


AXICON
LINEAR BARCODE VERIFIERS
Models: 6015, 6515, 7015
DOCUMENTATION BOOKLET
www.axicon.com


CONTENTS
AXICON VERIFIER CERTIFICATION
START UP GUIDE
Introduction
Important Information
What’s in the transit case
Software Installation for Windows (all versions)
Hardware installation for Windows
Software and Hardware Installation for Apple Macintosh
User Calibration
Page
3
5
5
7
8
9
13
14
Getting started with the Axicon verifier
Configuring the Axicon Verifier
AXICON SOFTWARE LICENCE AGREEMENT
Axicon Software Licence Terms – Licence Grant
Ownership of Software
Copies of Software
No Disassembly or Decryption of Software
Transfer of Software Licence
Termination of Software Licence
Export Requirements
Disclaimer
16
19
24
24
24
24
24
25
25
26
AXICON WARRANTY AND SERVICE CONTRACT
Warranty on all Products
Service Contract
- 1 -
27
28

VERIFIER SERVICING & FACTORY RECALIBRATION (VCAS)
Why CCD based verifiers require factory recalibration
Axicon Factory Recalibration Service (VCAS)
Other faults or damage
Equipment Rental Scheme
VCAS RECORD
CONTACT US
29
31
31
32
33
34
- 2 -

Church Road, Weston on the Green, Oxfordshire, OX25 3QP, UK
Tel: +44 (0) 1869 351155 / Fax: +44 (0) 1869 351205 /
Conformance Certification
We Axicon Auto ID Ltd
of Church Road, Weston on the Green, Oxfordshire, OX25 3QP, UK
Declare under our sole responsibility that the product has been designed and
manufactured at our address in the year 2014 to perform verification of barcode
quality in accordance with the following standards:
ANSI X3. 182 ISO/IEC 15416 ISO/IEC 15420 ISO/IEC 16388
ISO/IEC 16390 ISO/IEC 15417 ISO/IEC 24724
We further declare that the verifier has been designed and manufactured to ensure
conformance to Primary Reference Test Symbols available from N.I.S.T. and
Traceable Reflectance Standards available from N.P.L. in accordance with ISO/IEC
15426-1.
Tolerances: Decodability: ±8%
Rmin: ±3%
Rmax: ±5%
Defect: ±8%
Modulation: ±12%
We also certify that this equipment conforms to the following standards:Barcoding: ISO/IEC 15426-1 VERIFIER CONFORMANCE STANDARD
European Safety EN 60950
Electromagnetic Compatibility EN 55022 &
We also certify that the standards EN 60825 is not applicable to the product.
This equipment meets the requirements of the directives 89/336/EEC (Electromagnetic
Compatibility), 73/23/EEC (Low Voltage), based on our own relevant test reports.
Axicon Auto ID Ltd also certifies that this equipment, when used in conjunction with the
latest verifier software has all of the features required to meet the 21CFR Part 11 standard.
EN 55024
- 3 -


INTRODUCTION
Thank you for purchasing an Axicon Verifier. This short guide will enable
you to get started with your Axicon Verifier quickly and easily. A full
manual is available in electronic form on the software CD
The Axicon Verifier is designed to work with any PC running a version of
Microsoft Windows currently supported by Microsoft (some earlier
versions may also be supported – see notes) and with any Apple Macintosh
computer running Mac OS X version 10.4 or higher (up to but not including
Lion and Mountain Lion).
IMPORTANT INFORMATION
1. Your Axicon verifier is a piece of high precision quality control
equipment and should be handled with due care.
2. Please retain the plastic transit case. It will protect the equipment in
transit.
3. Only use power and data cables supplied by Axicon. Use of nonapproved accessories will invalidate the warranty.
4. If the verifier is dropped (or subjected to similar misuse) the accuracy
of the results may be affected. The unit should be returned to Axicon
immediately for servicing.
5. Axicon recommends that the verifier is factory recalibrated annually.
The unit should be returned to Axicon or to your approved Axicon
reseller for this check to be performed.
6. As the owner of an Axicon Verifier you are entitled to free software
updates for life. The latest copy of the software is always posted on
our website (www.axicon.com).
7. Subject to the terms of the license you are permitted to make
additional copies of the Axicon Verifier software.
- 5 -

8. For further, detailed information, including a trouble-shooting guide,
please read the manual which is available on the software CD.
- 6 -

WHAT’S IN THE TRANSIT CASE?
Please ensure that the following items are present upon receipt.
One of the following verifiers and the relevant cables:
• Axicon 6000 Series – CCD verifier with USB cable attached.
• Axicon 6500 Series – CCD verifier with USB cable attached.
• Axicon 7000 Series – CCD verifier with USB cable attached.
• Software CD.
• Wallet containing Documentation Booklet (includes Start Up Guide)
and Calibration Sheet
- 7 -

SOFTWARE INSTALLATION
WINDOWS (ALL CURRENT VERSIONS)
1. Insert the CD into the CD drive
2. The Install Program should now start automatically. (If not, open the
CD using Windows Explorer and double-click the Autorun Program.)
3. Click “Install Axicon Verifier”
4. Follow the on-screen installation instructions for the next four
windows (Select a language, Welcome, Software License Agreement
and choose destination location) until you get to the “Select
Components to install” window.
5. At the “Select Components to Install” screen ensure that the boxes
relating to “Drivers” and “Main Program” are both ticked.
6. (If you have purchased certain additional optional features which are
password-protected you may be asked to enter the password(s) at
this stage through a separate dialogue box).
7. Click “Next” again to pass the “Select folder in start menu” window
8. If you have selected any password-protected features you will be
prompted to enter your serial number and passwords now. The
description appears in bold for the features you have chosen to
install and the passwords are at the front of this booklet.
If you have more than one verifier with password protected features
(see point 6 above) you should enter the serial number and
passwords for the first unit, then click “Enter Another” to enter the
serial number and passwords for the additional verifiers.
Click on “Next”
9. The software will now be installed.
10. Leave the software CD in the PC in order to install the USB drivers.
- 8 -

HARDWARE INSTALLATION FOR WINDOWS
LOADING USB DRIVERS
1. Plug the verifier into any available USB port directly on the
computer.
2. When prompted to install the drivers, make sure the CD is inserted
into the CD driver and follow the instructions.
After installation is completed you will find the “Axicon Verifier”
directory in “Start Menu/Programs” and a shortcut to the program on
your desktop.
• Double clicking the Axicon Verifier shortcut icon will now start the
software.
• Two windows will open: the Command window and the Summary
window.
• The LED array of your CCD should now be lit and the text in the
bottom right hand corner of the Command window should read “Ready
to scan”. If not, refer to the troubleshooting section of the manual on
the CD.
- 9 -
INSTALLATION FOR EARLIER VERSIONS OF WINDOWS AND
WHEN MANUAL INSTALLATION OF DRIVERS IS REQUIRED.
LOADING USB DRIVERS.
Note: When using much older (and Microsoft-Unsupported) versions of
Windows you may need to install the older version of the USB drivers.
These are available from Axicon on request.
Manual installation/Updating of the USB drivers (if required)
This section provides some guidance to users of the Axicon Verifiers who
need to update the USB drivers.
Firstly install the Axicon Verifier software (version 2.0.25.1 or later – note
that it is always possible to download the latest software from our
website).
As part of the software installation, the USB driver files will have been
copied to the folder that was chosen for the installation.
Connect the verifier and wait for the Hardware Wizard to start, or
initiate the Hardware Wizard from the Device Manager.
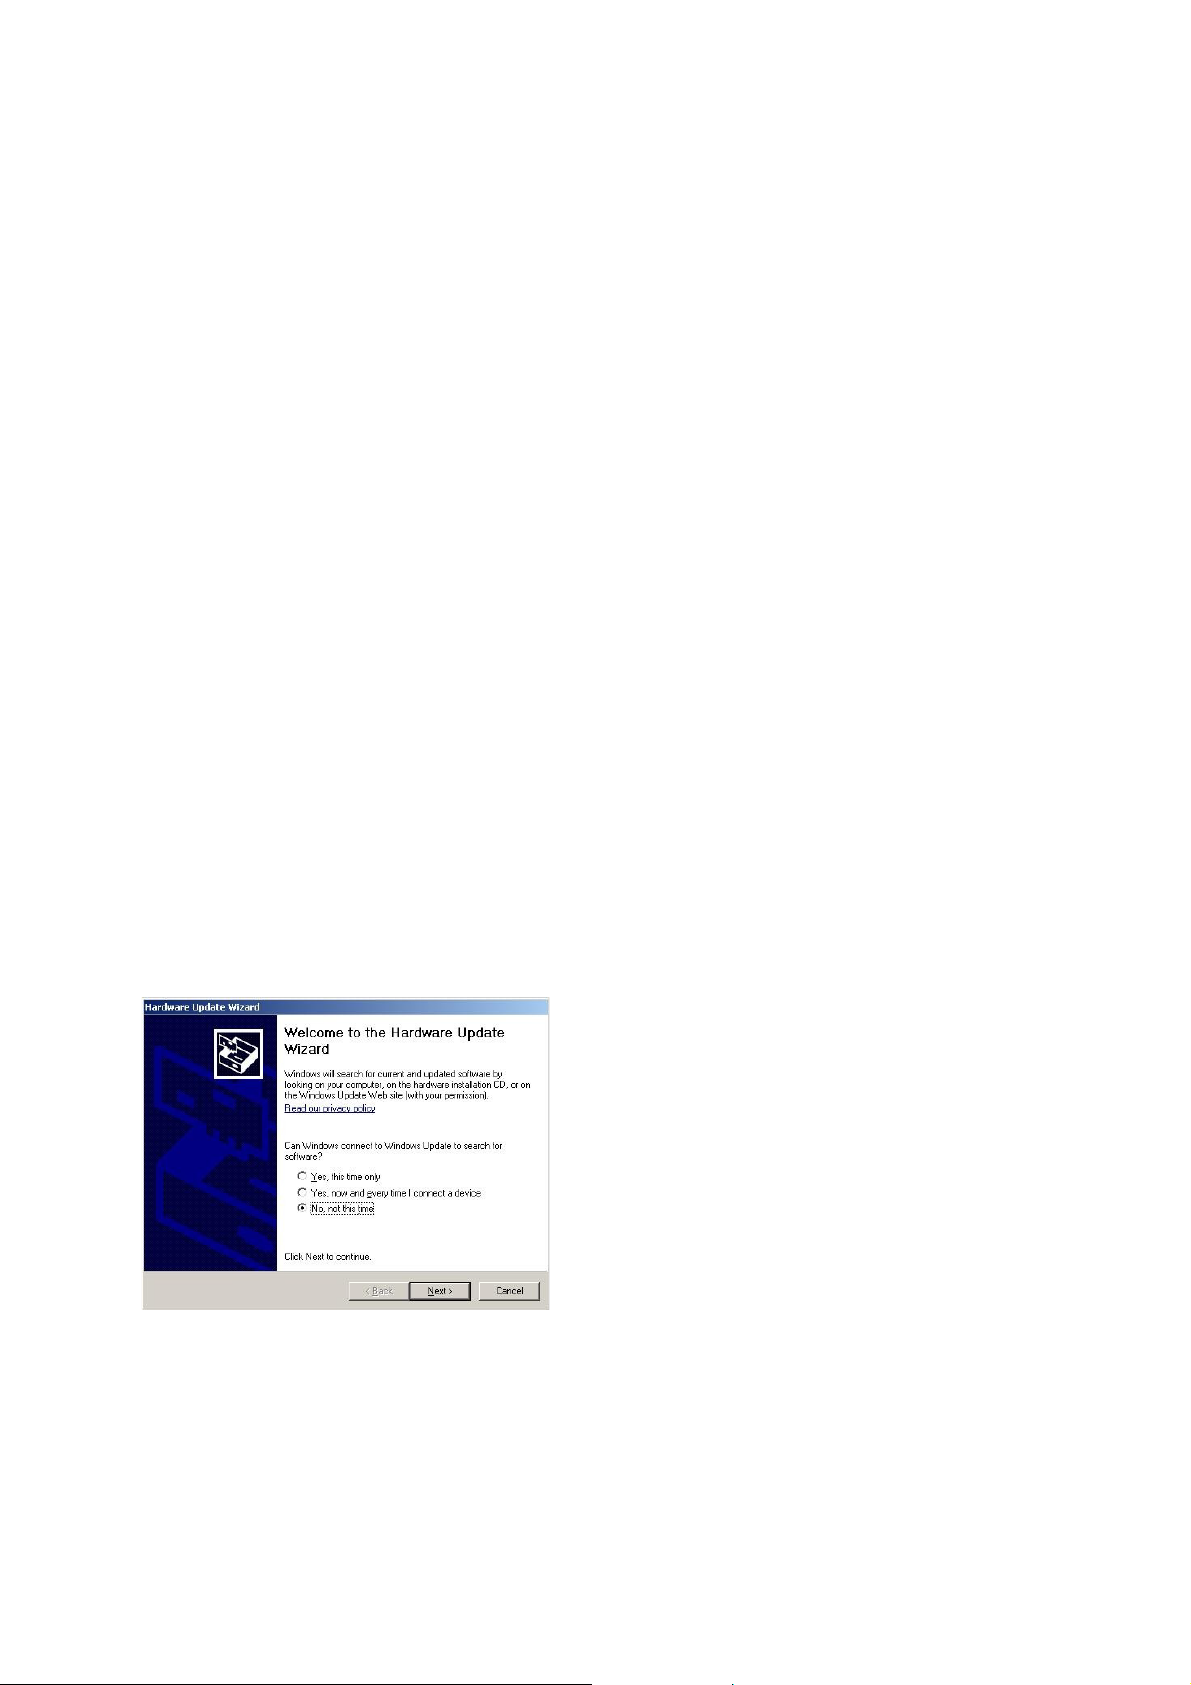
The following screen will appear for computers running Windows XP.
Select the option 'No' on this screen and then click the Next button.
- 10 -

Now choose the “Advanced” option to install from a list or specific
location and then click the “Next” button.
On this screen choose the 'Don't Search' option and again click on Next.
If any previous versions of the drivers have been installed, then you may
see them listed as shown above, however, at this point click on the Have
Disk button which will open the following dialogue.
If the default installation location was chosen when the Axicon Verifier
software was installed, then the appropriate driver files will have been
copied to the location shown in the dialogue above.
Browse to this location, or to the equivalent location if the default was
not chosen and then OK this dialogue.
- 11 -

The Hardware Wizard screen should now look like the one above and the
next step is to click the “Next” button to begin the driver installation.
A dialogue will pop up asking the user to confirm whether to continue the
installation or not.
Click on the 'Continue Anyway' button.
At this point, the driver files will be copied to the appropriate locations
and as soon as the installation finishes the verifier hardware will be heard
to beep as it powers up and becomes ready to use.
The Axicon Verifier software can now be launched and the software will
find and connect to the verifier hardware.
- 12 -

INSTALLATION FOR APPLE MACINTOSH
SOFTWARE
1. Insert the CD and double click on CD icon
2. Install USB Driver by double-clicking the USB Driver* icon. You will
need an administrator password. Installer will need to restart your
Mac after it has installed the driver.
3. To install the Verifier application, drag the icon to wherever you want
it.
4. To run the application double-click the Verifier icon.
* If you are using OS X 10.4 the text “You cannot install this software on
this disk (null)” may appear. If it does, click the “Go Back” button and
then the “Continue” button again and the driver should install.
HARDWARE
Plug the verifier into any available USB port.
- 13 -

USER CALIBRATION
Calibration with known reflectance values is essential to ensure the
accuracy of this equipment. It should be carried out after installation and
at regular intervals. (see below)
When the software detects an uncalibrated reader the following dialogue
box will appear “Reader XXX has not been calibrated”. You must click OK
to continue.
Please switch on your verifier at least five minutes before you start
to calibrate.
To calibrate you will need your calibration sheet, which you will find
in the wallet.
Take the calibration sheet out of the wallet and place it on a flat
surface.
For the Axicon 6000 Series use the EAN13 calibration code at the top
left of the sheet.
For the Axicon 6500 and 7000 Series use the large calibration code at
the bottom of the sheet.
Select the calibrate option.
For Windows versions: This is located in the “Options” menu
(or you can use the icon)
For Mac versions: This is located in the “Reader” menu
- 14 -

You will see a window with two edit boxes for minimum and
maximum reflectance values.
Ensure that the values shown in the window match the values printed
at the bottom of the calibration sheet.
(Modify the figures on the screen if necessary to ensure that they are
the same as the card
With the Calibration window open scan the calibration barcode 10
times. Then click the OK button.
The verifier is now calibrated and ready to use.
After calibration is completed, store the calibration sheet in its wallet,
away from light and physical damage. If your calibration sheet should
ever become damaged or discoloured in any way, please contact Axicon
or your supplier for a replacement.
NB: During the calibration process the software displays the
uncalibrated data and therefore reflectance values and grades
displayed behind the calibration window can be ignored.
Under normal operating conditions Axicon recommends calibrating the
verifier monthly (the verifier software is set up to remind you when it is
time to calibrate). In variable light and temperature conditions we
recommend more frequent calibration. The frequency can be changed if
required by using the “Options / Set-up /Calibration” path.
- 15 -

GETTING STARTED WITH YOUR AXICON VERIFIER
In countries where Axicon offer training courses we would strongly
recommend the use of these as the best way to get the most out of your
verifier and to understand all of it’s features.
For others, the following provides a general overview and start-point in
the verification process:- (This is not intended to be a comprehensive
instruction but will guide the user in the most frequently used features.)
When you first start the software you will see…
The “Command” Window :
This gives access to all of the main features of the verifier:Access can be by using pull down menus or by using icons
Icons are grouped according to function.
As you start using the verifier the main ones that you will use are the
display screens grouped at the centre of the top line of the command
window – From here to here:-
These cover the Command Screen (that we have seen already )…
A ”Summary Screen” that gives
the general quality of the
barcode
- 16 -

This Summary Screen shows the overall print quality of the barcode as
measured by the ISO/ANSI standards (the overall grade can be expressed
either as a number (ISO) – or as a letter (ANSI) – this can be altered as
required through the “Set-Up” icon (see below)
Information is also given on the bar-gain (ink spread), the overall
magnification of the barcode, validation of the check digit, structure,
and light margins (Quiet zones).
Ideally these will all show in green (pass) – any that have an amber or red
warning light beside them should be investigated.
NOTE: Be aware that just because a barcode receives a “pass” grade for
print quality does not necessarily mean that it is “fit for purpose” – after
all the wrong barcode number on a product may be printed perfectly but
that would not make it acceptable – Things like the size of the barcode
(magnification) and the location of the barcode are important if the
barcode is going to be “fit for purpose”.
The Details Screen…. Press
to get:-
This screen shows each of
the ISO/ANSI parameters
that are measured and
individually graded (as
both grades and
percentages).
Seven parameters are
graded and the lowest single grade becomes the overall grade for that
scan. (Ideally you should take a number of scans at different points in
the height of the same barcode – the verifier will automatically average
these for you to produce an overall print quality grade)
- 17 -

If the “Summary” Screen has shown poor print quality then the “Details”
screen is the ideal point to initially see what went wrong with the
barcode and hence focus the user on appropriate corrective action.
The Scan Profile Screen…. Press
The Scan profile screen shows the user exactly what the barcode will look
like to a scanner.
At the top of the graph are the higher levels of reflectance from the
background and at the bottom of the graph are the lower levels of
to get:-
reflectance from the darker bars.
Ideally the “sweep” (contrast) from top to bottom should be as great as
possible with smooth curves between the two, the “peaks” should ideally
be all around the same level and the “troughs” also at the same level.
If the cause of barcode problems is poor “modulation” or a high level of
defects then these can be shown overlaid on the graph by clicking the
appropriate box at the top of the Scan Profile Screen.
The Dimensional Measurements Screen…. Press
to get:-
If your “Details” screen has
- 18 -
shown a poor “Decodability”
grade then this is normally
because of bad dimensional

accuracy – this screen will show the accuracy of the bar/space dimensions
and highlight any problem areas.
The Pass/Fail Screen…. Press
FIXING THE SCREENS:- Most of the screens described above can be moved,
expanded or shrunk as required. When you have decided which screens
to get:This screen is ideal for users
who need a quick visual
indication of whether the
barcode meets the right print
quality standards.
you want displayed on your PC just use the “View” pull-down menu and
click on “Save positions”. Then whenever the software is started it will
always have those screens in those positions.
CONFIGURING THE VERIFIER
All of the primary configuration of the verifier is done through the “Setup” icon
Press this to enter the “Set-Up” dialogue.
There are a range of tabs to cover the different groups of parameters.
Here is shown the “General”
Standards: Click on “ISO” if you want
only the numeric ISO result to be shown –
- 19 -
group

or click on “ANSI” if you would prefer to be shown both results.
Units:- The “default” is to track the Windows settings for metric or
imperial measurements – alternatively you can set this as required.
Pass Grade:- If you are working on barcodes within the retail supply chain
then the “Apply GS1 General Specifications” should always remain ticked
on. The user can select the pass/fail grade for other barcode types as
specified either by an Industry Application Specification or by their
customer.
Magnification factor:- This remains for past support for Axicon customers
who have model 5000 verifiers. For all others the settings in this field
have no effect.
The next tab is “Check Characters”
This screen is to allow the user to select specifically for the barcode
types that have optional check digits. If these are being used then the
verifier can be set to validate them, if not then to ignore any checks.
The next tab is “Appearance” –
Most barcode symbologies (types) have
mandatory check digits and these will be
automatically validated as to their
correctness. A few barcode types have no
check digits at all.
This can be used to adjust any display
colours/shades for the pass, warning
and fail messages – and can also be
used to add Windows wave sounds to
give an audible indication of quality if
required.
- 20 -

The next tab is “Printing”
The user can pre-select any
particular reports that are required –
some users take the view that if the
barcode passes they will just save
the electronic report but that if the
barcode fails they want all of the
information possible – the required prints can be pre-selected.
This includes the option to have a personalised report generated through
the built-in Report Generator, although we do recommend that if you
have any particular non-standard requirements these should be discussed
with Axicon.
The verifier can also be set to “Auto-print” in order to avoid a user
forgetting to print a particular report.
“Print graph in Black and White” – essential to tick this is you are using a
monochrome (black and white) printer, otherwise a scan reflectance
profile will only show the outline and not the detail.
Also, the standard printed report can be personalised if required using
the “Report Header” feature.
The “Logging”
tab
The “logging” tab is used to
set the electronic saving of
records and to run preconfigured external programs
from the verifier.
We strongly advise all users to
click on “Enable” to the “Auto
Save Scan File” and to set a suitable location for the records to be
stored.
- 21 -

The files saved through this process can be regarded as “audit quality”
records of the verifications made and can also be used for remote
diagnostics purposes.
The files can be saved automatically with a filename comprising the
decoded number, date and time, sequentially numbered or by using a
dialogue box.
The centre part of this screen is used specifically to drive external
programs automatically from the verifier.
The bottom of this screen is saving data in a format suitable for legacy
purposes only.
The “Calibration
verifier has been calibrated on that PC.
Features are included to stop users inadvertently or incorrectly using a
wrong barcode for calibration purposes.
Axicon recommend that under normal circumstances user calibration is
” tab
The user can define the location
for the storage of the calibration
records – this should be in a
directory where the user has both
read/write access.
The verifier will store details of
each and every time that the
carried out on a monthly basis (more frequently where there are high
dust levels or significant changes in ambient temperature.
The “Plug-ins”
Plug-ins are an important
feature of the Axicon verifier
– allowing it to be tailored to
industry specific or user
- 22 -
Tab

specific features, such as running a Product lookup database, validation
of the structure of variable weight items, or identifying the formats of
European pharmaceutical codes – and a whole lot more.
The Plug-ins can be installed from the CD by using the “Install Optional
Plug-ins” – Please be careful to only install the plug-ins that you need
otherwise some confusing results may be displayed. . If you inadvertently
install Plug-ins you do not need, simply ensure the box alongside remains
unticked and it will be ignored.
Please contact Axicon or your local Axicon reseller for more information
about the range of available plug-ins and their applications.
The “E-Mail”
The “Advanced” Tab
For most users, the key part of this screen
is the ability to put password control on
all of the set-up parameters to eliminate
tab
To be used only if you want data to
be automatically e-mailed to a third
party.
the risk of unauthorised changes to the
saving or printing options.
Please do remember to keep a note of the password in a safe place.
Remember: There are many great features in the Axicon verifier – this
guide has been provided just to “Get you started”. We strongly advise all
users to take advantage of the Axicon Training Courses (where offered) so
that they can utilise all of the beneficial features of the verifier.
- 23 -

AXICON SOFTWARE LICENCE AGREEMENT
This software is Copyright © 1995-2014 Axicon Auto ID Limited
Use of the Software is subject to the Axicon Software Licence terms set
forth below. Using the Software indicates your acceptance of these
Licence terms. If you do not accept these Licence terms within 14 days,
you may return the entire unused product for a full refund.
AXICON SOFTWARE LICENCE TERMS -LICENCE GRANT
Axicon grants you a Licence to use any number of copies of the
Software, but only for Use in conjunction with the Axicon hardware
product that accompanied the Software.
"Use" means storing, loading, installing, executing or displaying the
Software.
You may not modify the Software or disable any licensing or control
features of the Software.
OWNERSHIP
The Software is owned and copyrighted by Axicon Auto ID Limited.
Your Licence confers no title or ownership in the Software and is not a
sale of rights in the Software.
COPIES
You may only make copies of the Software for archival purposes or
when copying is an essential step in the authorised use of the
Software.
You must reproduce all copyright notices in the original Software on
all copies.
You may not copy the Software onto a bulletin board or similar
publicly accessible system.
- 24 -

NO DISASSEMBLY OR DECRYPTION
You may not disassemble or decompile the software without prior
written consent from Axicon.
TRANSFER
Your Licence will automatically terminate upon any transfer of the
Software. Upon transfer, you must deliver the Software, including any
copies and related documentation, to the transferee.
The transferee must accept these Licence Terms as a condition of the
transfer.
TERMINATION
Axicon may terminate your Licence upon notice of failure to comply
with any of these Licence Terms.
Upon termination, you must immediately destroy the Software,
together with all copies, adaptations and merged portions in any
form.
EXPORT REQUIREMENTS
You may not export or re-export the Software in contravention of any
applicable laws or regulations.
This agreement should be construed in accordance with the laws of
England.
- 25 -

DISCLAIMER
In the following the expression "Verifier" means the verifier hardware and
the associated software.
We have taken care to ensure that this Verifier is free from defects.
However since we have no control over the circumstances in which you
might use the Verifier you must satisfy yourself that the performance of
the Verifier is suitable for your needs. Neither Axicon Auto ID Limited nor
the vendor of this Verifier can accept any liability for any loss or damage
(consequential or otherwise) which may be caused by use of this Verifier.
If the Verifier or any part of it is defective in any way, or in some other
way does not meet your expectations, the liability of Axicon Auto ID
Limited is limited to the cost of the product. You should bear this
limitation in mind if you use this Verifier in any situations where the
acceptance or rejection of shipments of goods or your reputation may
depend upon the quality of a bar code.
Under no circumstances is this Verifier licensed or authorised for use in
any situation whatsoever where the health or safety of humans or animals
might be put at risk
- 26 -

AXICON WARRANTY AND SERVICE CONTRACT
WARRANTY ON ALL PRODUCTS
All Axicon products covered by this documentation (Axicon 6015, 6515
and 7015 series verifiers) are sold with a two year parts and labour
warranty against manufacturing defects.
This is a Return to Bench warranty with shipping costs in one direction
being borne by the customer/distributor.
Should you need to return the unit to Axicon the original transit case
(plus appropriate packaging) must be used. If the equipment is
returned without the original transit case, Axicon will automatically
charge an additional sum for the replacement of this case.
Axicon’s standard repair turn-around is 7-10 working days from receipt
of the defective unit.
Our standard warranty does not include the provision of a loan unit.
Loan units can only be supplied if you have a Service Contract.
Axicon reserves the right to charge an inspection fee for any
equipment returned under warranty for which no fault is found.
Please contact Axicon to obtain an RMA number before returning any
equipment. This number must be quoted on all documentation. Axicon
cannot accept responsibility for equipment returned without a RMA
number.
- 27 -

SERVICE CONTRACT
A Service Contract may be purchased within 30 days from the date of
dispatch.
The service contract period will start from the date of dispatch of the
unit. You may select the number of years for which you want the Service
Contract to run (up to a maximum of 10 years). The appropriate payment
must be made in full prior to the unit(s) being accepted as being covered
by the Service Contract.
The Service Contract covers the following:
All parts and labour to repair the unit except where damage has been
caused by misuse of the equipment, in which case labour will be
included but not parts.
The availability of a swap-out unit to be used while the customer’s
unit is being repaired.
NOTE: Please see your Service Contract for full details including hire
charges.
For current cost of a Service Contract or equipment hire please contact
either Axicon or your approved Axicon reseller.
- 28 -

RECALIBRATION REQUIREMENT
WHY DO CCD BASED VERIFIERS REQUIRE A FACTORY RECALIBRATION?
Axicon 6000, 6500 and 7000 verifiers all use linear CCD sensors to capture
scan reflectance profiles of barcodes. These CCD sensors work very much
like digital cameras in the manner in which they capture an image, but
they only image a single line scan across a barcode, similar to the scan
line that you see with a hand held laser scanner.
The accurate measurement of reflectance across the full width of the
scan relies on the barcode symbol being imaged as if the illumination
were perfectly uniform and the sensor element equally sensitive at all
points along the scan line. In practice this is not necessarily the case,
however, the electronics within the head of these units applies a function
that enables the units to perform as if this were the case, so that when
the scan reflectance profile reaches the PC or Macintosh computer the
application can make this assumption and proceed with analysis. To
achieve this, the heads need to undergo a factory calibration process.
This calibration is not the same as the calibration that is performed by
the software application on the computer. The calibration that occurs
within the application assumes that a uniform profile is already achieved
by the scanning head and simply shifts the overall signal so that the
maximum and minimum reflectance reading with a scan taken of a known
calibration, or reference test sheet gives the correct reading for that
sheet. This process is the user calibration.
After many thousands of hours of use, the intensity of the LEDs that
illuminate the barcode symbol will gradually change.
- 29 -

If this gradual dimming is not completely uniform then a factory
recalibration would be required to re-establish the situation of creating
uniform scan reflectance profiles from the scanning heads.
If a uniform profile is not being achieved then a barcode symbol may start
to achieve lower grades, particularly for modulation, than it should be
getting. However, this may not always be obvious to the user when simply
trying to verify barcodes symbols.
- 30 -

VERIFIER SERVICING AND FACTORY RECALIBRATION
Axicon equipment is designed and manufactured to the highest
specifications and complies with all relevant international standards.
Barcode verifiers are precision measuring and testing devices. It is normal
practice for all inspection, measuring and test equipment to be regularly
checked and recalibrated and a precision quality control instrument such
as a barcode verifier is no exception.
To ensure that your equipment is working correctly, we recommend that
you return your verifier annually for servicing / factory recalibration
(please note that a factory recalibration is different to the user
calibration procedure explained on page 29 of this booklet). Axicon Auto
ID Ltd offers a high quality verifier factory recalibration service to ensure
that your Axicon verification equipment provides only the best results and
complies fully with GS1 standards. We recommend that this service is
carried out annually on verifiers aged 12 months or older. Please contact
us (or your reseller) for details of costs.
There is a silver sticker on your verifier which will tell you when it was
last factory recalibrated.
Should you decide not to take advantage of this service, we must remind
you that Axicon Auto ID Ltd is unable to accept any responsibility for noncompliance to the appropriate GS1 STANDARDS once your verifier has
exceeded the standard guarantee period provided on date of purchase.
- 31 -

To arrange for your verifier is to be factory calibrated.
1. Contact the Axicon Auto ID Ltd on
Telephone: +44 (0) 1869 351155
Fax +44 (0) 1869 352404
Email: vcas@axicon.com
2. We will provide you with a RMA number (Return to Manufacturer
Authority) for your authorisation.
3. Please fill in all details requested on the RMA form enclosed with this
letter, including the RMA number.
4. Return the verifier (including all cables) in its original case, the
completed RMA form, purchase order, your payment details and this
documentation booklet to our VCAS Bureau at Axicon Auto ID Ltd,
Church Road, Weston on the Green, Bicester, Oxfordshire OX25 3QP.
Axicon Auto ID Ltd cannot take responsibility for units returned in
alternative packaging.
5. Axicon Auto ID Ltd will normally complete the service and re-
calibration of your verifier within 7-10 days from the date received.
OTHER FAULTS OR DAMAGE
If, during the service /re-calibration of your equipment other faults or
damage are found additional costs may be applicable. We will
automatically send you details of the necessary repair and an estimate of
cost.
EQUIPMENT RENTAL SCHEME
Axicon Auto ID Ltd also offers an equipment rental scheme for customers
who require replacement equipment for the duration of the service
Please contact us for further details.
- 32 -

HOW TO CONTACT AXICON
Axicon Auto ID Ltd
Church Road, Weston on the Green, Oxfordshire OX25 3QP, UK
Tel.: +44 (0) 1869 35 11 55
Fax: +44 (0) 1869 35 1 205
Fax VCAS/Repairs: +44 (0) 1869 35 24 04
Email : info@axicon.com
Email VCAS/Repairs: vcas@axicon.com
Technical Support: support@axicon.com
Website: www.axicon.com
For service and support in the Americas please log on to
www.axicon.com
Due to Axicon’s continuing product improvement programs, specifications and
features herein are subject to change without notice.
All trademarks are acknowledged as belonging to their respective companies.
for contact details
YOUR AXICON DISTRIBUTOR
- 33 -

VCAS SERVICE RECORD
Verifier Model
Serial Number
Date Service
Undertaken
Serial no. of
calibration card
Name &
Signature
Axicon Auto ID Limited
Company Registration Number: 2003365
VAT Registration Number: GB 578651102
Verifier Documentation Booklet
Version 5 – Jan 2014
- 34 -
 Loading...