


THE BARCODE EXPERTS
Church Road, Weston on the Green, Oxfordshire, OX25 3QP, UK
Tel: +44 (0)1869 351155 | Email: sales@axicon.com
Web: www.axicon.com
user guide
Axicon 15000 series
2D-linear barcode verier
Industry
Partner

Page 2 of 28
Axicon Auto ID Limited | 15000 series verier user guide | June 2017
www.axicon.com

Contents
Introduction 5
How the verier works 6
Getting started 7
Calibration 10
Operating the verier 11
Settings 13
2D matrix codes 18
Several barcodes in eld of view 19
Saving and printing 20
Disclaimer 21
Software licence agreement 22
Warranty 24
Service contract 25
Annual service 26
Certicate of conformance 27
Contact us 28
Page 3 of 28
Axicon Auto ID Limited | 15000 series verier user guide | June 2017
www.axicon.com

Introduction
The Axicon 15000 series is designed to work with any PC running a currently
supported version of Windows (Windows 7, Windows 8, Windows 10 – both 32 bit and
64 bit versions).
Specication and application
This verier can be used to verify barcodes with a size of up to 51mm x 31mm for
15000 or 95 x 70mm for 15500. These will usually be barcodes used on retail point
of sale or healthcare items. ITF-14 and GS1-128 barcodes will typically be too large
to be read by this verier.
Linear barcodes: EAN-8, EAN-13, UPC-A, UPC-E, Code 39, Code 93, Code 128,
Codeabar, ITF, MSI Plessey.
2D barcodes: GS1 Data Matrix, GS1 QR codes
Other: OCR human readable characters for EAN/UPC barcodes can be matched to
the barcode number
Application standards: Data content checking can be performed for GS1 DataMatrix
or GS1 QR Codes that encode GS1 Application Identiers.
Multiple barcodes within the eld of view will be found and can be veried to the
appropriate standards.
www.axicon.com
Page 4 of 28
Axicon Auto ID Limited | 15000 series verier user guide | June 2017

What is in the case.
• Axicon 15000 Series verier
• Software CD
• Wallet containing this user guide and the calibration card.
System requirements
• Currently supported Windows Operating System (either 32 or 64 bit)
• 12 MB disc space
• 512 MB RAM minimum
• USB 2.0 port
Software Installation
Insert the CD into an appropriate drive and the Install program should start
automatically. If it does not, run Setup.exe. When the software has been
successfully installed, leave the CD in the drive, so that the USB driver will be
installed when the verier is connected to the computer.
Hardware installation
Connect the USB lead from the verier to a USB2 port on the computer. Please
install the software before connecting the 15000 series verier.
www.axicon.com
Page 5 of 28
Axicon Auto ID Limited | 15000 series verier user guide | June 2017

How the verier works
The verication begins with capturing an image which includes one or more
barcodes. Having captured this image, the verier is then asked to decode any
barcodes it can nd in the image. This is a two stage process, which is started by
clicking on the green arrow icon (or pressing one of the buttons on the verier) to
start the image capture, and then by clicking on the decode command icon (the two
turning arrows) or by pressing one of the buttons a second time.
The image that has been captured and decoded can be saved as a .png le, and
this can be re-veried at any later time. This is useful when the image contains
more than one barcode. The software allows the creation of verication reports for
each barcode that appears in the image, and the user simply clicks on the relevant
barcode for which a report is required.
More details about this process, saving image les, and saving verication reports
are explained later on in this user guide.
www.axicon.com
Page 6 of 28
Axicon Auto ID Limited | 15000 series verier user guide | June 2017

The le menu and the icons
The top left of the Axicon Camera Verier window includes the menu bar with ve
options, and the toolbar which includes seven command icons.
The File dropdown menu includes options for saving, load scan (open), appending
and printing verication reports.
The Edit dropdown menu provides options for cutting, copying and pasting.
Getting started
The home window for the software is shown below, and this will appear when the
software is launched. The window has four main areas, and these are explained
below.
Double-click on the Axicon Camera Verier icon. The rst window will open, and the
software will check if the verier is connected. If a verier is not connected, the
message Found Readers 0 will appear in the status bar. It will then be possible to
load (to open) previously saved verication reports. When a verier is connected,
the message here will provide the verier’s serial number.
www.axicon.com
Page 7 of 28
Axicon Auto ID Limited | 15000 series verier user guide | June 2017

Getting started
The View dropdown menu gives access to Settings (F5) and User data.
The Reader menu provides options for choosing which verier is operational, reader
information,Scanning, decoding, and calibrating the reader (the verier).
The Help menu provides access to the Axicon website, a check for software
updates, and information about the software.
The Command icons
Quit the application, or use Ctrl + Q
Load a saved barcode image, or use Ctrl +O
Save the current image and verication report, or use Ctrl + S
Start collecting barcode images in the eld of view, or press one of the two
buttons on the verier. (They both do the same thing, so use whichever one is
more convenient.)
Find and decode the barcodes seen in the eld of view.
Edit the settings for the application, or use F5
Display and edit user-dened data for this scan.
www.axicon.com
Page 8 of 28
Axicon Auto ID Limited | 15000 series verier user guide | June 2017

This panel has three tabs, where the rst set
of information about the barcode is shown.
The General tab will show you the decoded
data from the symbol, its x and y dimensions,
the print gain, and the aperture size.
The Reader tab simply gives you detailed
information about the verier such as its
serial number and build version.
The Scan tab provides details of when the image to be veried was scanned by the
verier.
The Details tab provides a summary of the results of the verication.
The ISO tab will include details of all the
separate parameters dened by ISO/IEC
for the particular barcode being veried.
The bottom left panel will include details
that relate to the analysis of a symbol
by one or more of the optional plugins.
Plugins are briey explained later on.
The status bar is at the very bottom of the
window, and provides details of what the
verier is doing.
www.axicon.com
Page 9 of 28
Axicon Auto ID Limited | 15000 series verier user guide | June 2017

Users must calibrate the verier on a regular basis to ensure that its measurements
are equivalent to reference values. The calibration card supplied with the verier
provides barcodes with known maximum and minimum reectance values. The
calibration card is certied for a minimum of one year (unless it has been physically
damaged).
When it is not being used please keep the card at in its plastic envelope, and away
from direct sunlight. If the card shows any sign of damage – for example, scratches
or any change in colour – please obtain a new card from us before proceeding.
Take the card from the plastic wallet, and place on a at surface. Place the verier
over the EAN-13 barcode at the top left hand side of card so that it appears in the
Axicon Camera verier window as shown below. Start the image capture process
by clicking on the green arrow icon. This will change to the pause button icon while
this is taking place.
Calibration
Then select Reader, and from the pull-down menu select Calibrate. The verier
will ask the user to conrm positioning and conrm that the RMax and RMin gures
shown on the window conform to those printed on the card. If they are dierent,
alter the numbers on the window as required and then press Start.
The verier software will then check the image before calibrating the instrument
and then rechecking. When this has been done a message Calibration Successful
will be shown and the verier is ready for use.
www.axicon.com
Page 10 of 28
Axicon Auto ID Limited | 15000 series verier user guide | June 2017

Activate the verier by pressing the green Start Scanning arrow, or press one of
the buttons on the verier (Both buttons perform the same functions). Then place
the verier over the barcode(s). The message Scanning will appear at the bottom
of the window. Press the Search/verify button to search for all barcodes within the
current eld of view or alternatively press one
of the buttons on the verier (both buttons
perform the same function).
The verier will draw a purple box around each
of barcodes it has found, and automatically
select the rst barcode to decode. It will
change the colour of the box around this one to
blue and display the verication results.
When only one symbol is present the box will
be blue, and if it is an EAN/UPC barcode a
purple box will appear around the numbers shown below it.
Operating the verier
www.axicon.com
Page 11 of 28
Axicon Auto ID Limited | 15000 series verier user guide | June 2017

Any linear barcode will be veried using ten dierent scan lines, as specied by
ISO/IEC 15416, and the verication grade will be based on the average of these ten
readings.
In this case the verier has responded with the message Found codes: 1 and
has found both the EAN-13 barcode and the numbers (the Human Readable
Interpretation) beneath the barcode.
The verier will automatically display the overall verication result based on the
average of ten scans made of the barcode.
To get more information about the grading of any of the particular parameters you
can click on the relevant parameter.
The verier will then indicate where the scan lines were taken and (if relevant)
which scans were a pass for that parameter (shown in green) and which scan lines
were a fail (shown in red).
To get a scan reectance prole of your linear barcode you can click on the Details
tab and select any of the Scan Info rows available. The reectance prole will now
show at the bottom of the scan info results. Click on the reectance prole to
enlarge it.
Operating the verier
www.axicon.com
Page 12 of 28
Axicon Auto ID Limited | 15000 series verier user guide | June 2017

Settings
The verier has a range of conguration settings. These can be set by clicking on
View and then selecting Settings.
Appearance: The Appearance tab allows you to change the colours used for Fail,
Warning and Pass, choose the language and switch between metric or imperial units
of measurement.
Plugins: The Plugins tab can be used to select data content checking to any of the
various standards shown.
www.axicon.com
Page 13 of 28
Axicon Auto ID Limited | 15000 series verier user guide | June 2017

Settings
Reports: In this window you can enable Auto Save, select the type of report le
to be created, and choose an output le where the data will be kept. There is an
option to add the records to an existing le rather than replacing the le, which is
mainly of benet with spreadsheet (.csv) les.
Saving: The Saving tab can be used to enable an Autosave of all of the barcodes
checked for audit purposes. The options are as follows:
Autosave – records will be automatically saved to provide a complete audit trail of
verications performed. The Autosave Directory name should be set by the user.
If Enable is ticked on and a directory specied but all other boxes remain unticked
then the verier software will create sequentially numbered les of the saved data.
This will ensure that records cannot be inserted, deleted or modied without it
being apparent (essential for compliance with 21 CFR Part 11 requirements).
www.axicon.com
Page 14 of 28
Axicon Auto ID Limited | 15000 series verier user guide | June 2017

If Use Decode box is ticked, the le name will automatically be created using the
rst digits of the decoded number.
If Use Date and Time box is ticked, the le name will automatically be created
using the date followed by the time as a le name.
If Use Decode and Use Date and Time boxes are both ticked, the le name will
automatically be created using the decoded number followed by the date and time.
If Save as box is ticked, a dialogue box will appear and you can enter a lename.
If Auto Save as box is ticked in addition to Use Decode or Use Date & Time (or
both), then the dialogue box will appear with the pre-selected data and allow the
operator to override this if required.
www.axicon.com
Page 15 of 28
Axicon Auto ID Limited | 15000 series verier user guide | June 2017

Settings
User data: User Data allows you to program the Axicon 15000 series software to
ask questions when a verication is being made, to collect the answers and to store
these with the verication report. This supplementary user date will then always be
displayed with the verication report.
Such data may typically be a job reference number or batch number, but equally
it could be information about the barcode such as the substrate or print process or
details about the operator, the department or the site. Multiple questions can be
entered if desired.
To set up the User-Data:
From the pull-down menu select View and then Settings. Click on the User Data
tab of the Settings window. To add a User Data item press the + symbol at the
bottom left of the window. The Create User Datum window will be shown. This can
now be completed as required.
www.axicon.com
Page 16 of 28
Axicon Auto ID Limited | 15000 series verier user guide | June 2017

An example of a Job Reference entry is shown
here. The title is entered and the Allow Blank is
un-ticked to force you to enter data into this eld.
This sample shows how you can be oered a
pull-down menu of options but with a default
option given. The default can be left blank. When
the list of selected questions has been completed
press the OK button.
Now when you verify a barcode and select save
scan the User Data dialogue window will appear
and allow you to enter the required information.
If you now save the scan le the User Data
information is automatically saved with it.
When loading a pre-saved scan le for which User
Data has been attached you simply need to load the
scan le, and re-verify the code using the Search
for all barcodes icon and then select View/UserData from the pull-down menu.
The Axicon software also includes a facility for
populating the User data settings screen from
an existing scan le (whether made from this
computer or not). Simply load an existing scan le,
go to the View/settings/User Data screen and then
press the populate icon.
There are also facilities to edit an existing User
Data entry (ideal for adding items to a pull-down
menu). You can also clear an existing User Data
population.
www.axicon.com
Page 17 of 28
Axicon Auto ID Limited | 15000 series verier user guide | June 2017

After you have activated the verier and set it to search/verify for any barcodes,
the result of verifying a GS1 DataMatrix symbol will appear like this window:
By clicking on the individual parameter the reason for any data content error is
displayed
If required the Data Content box can be stretched vertically to show more
information – just hover over the top edge of the box until the double horizontal
lines appear and then stretch the box.
2D matrix codes
www.axicon.com
Page 18 of 28
Axicon Auto ID Limited | 15000 series verier user guide | June 2017
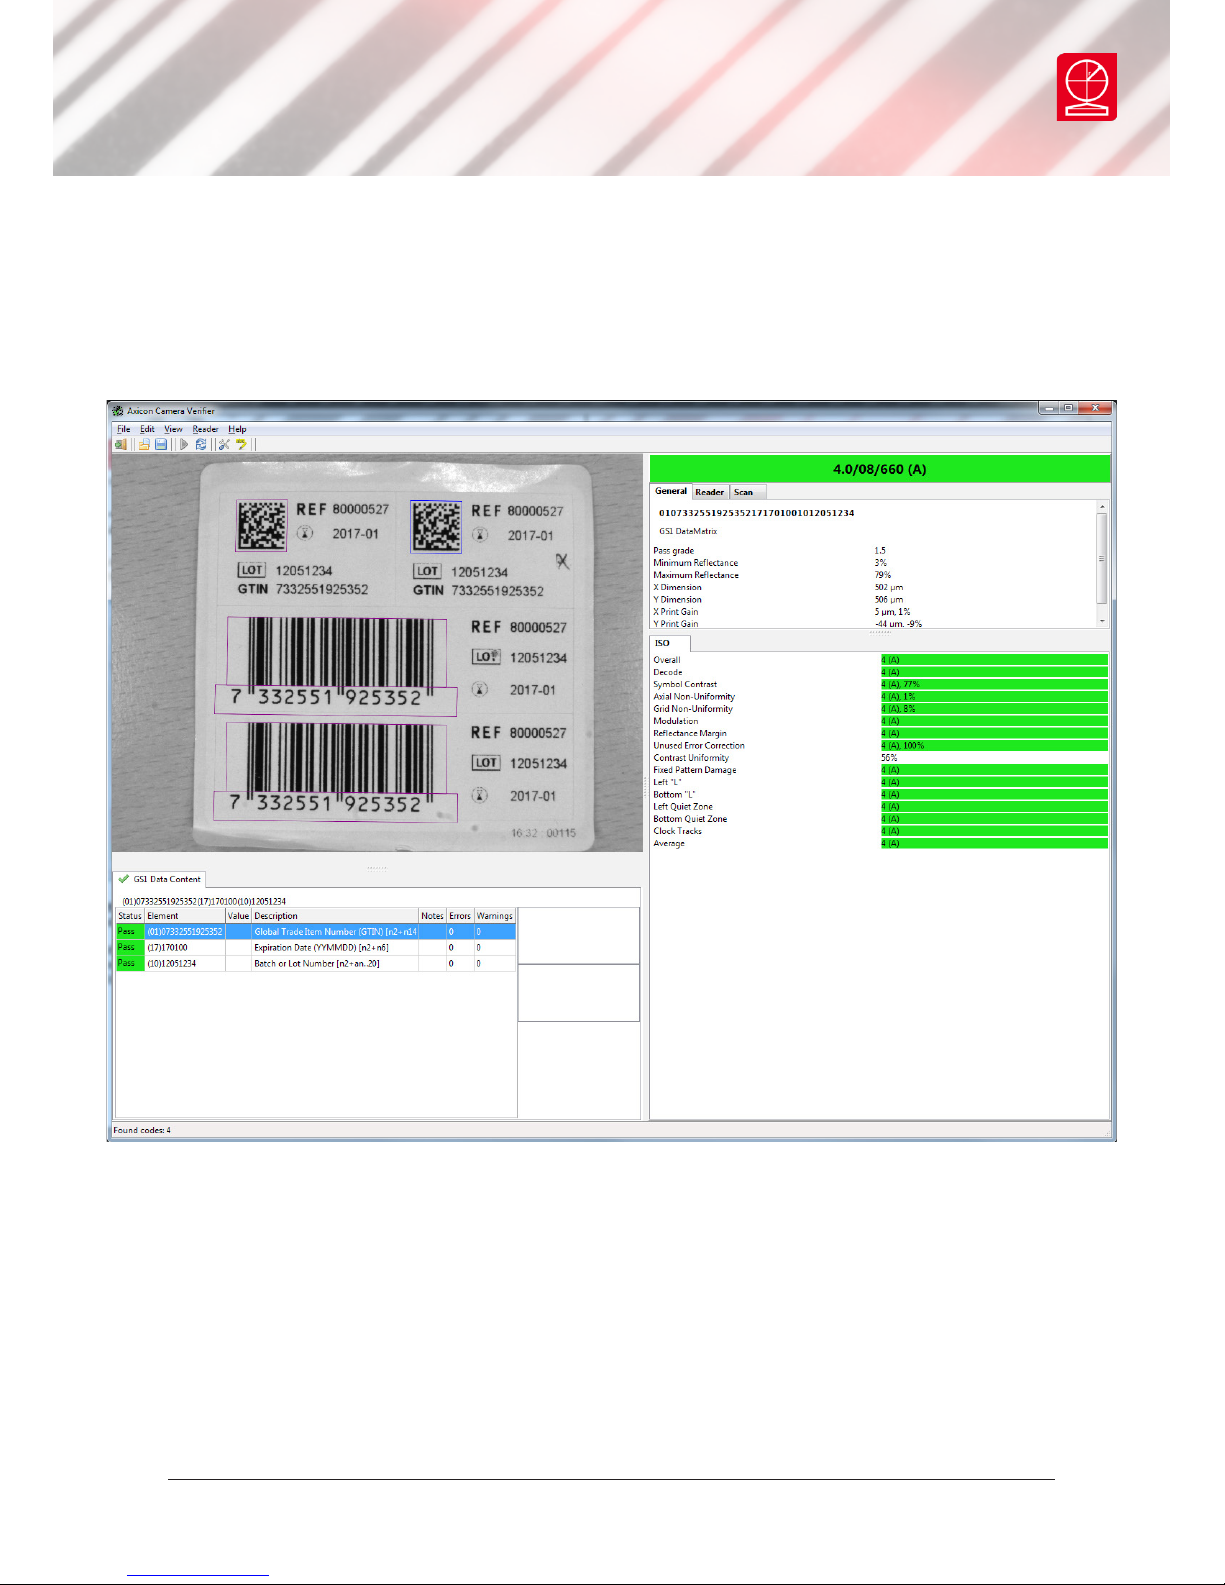
Several barcodes in eld of view
In cases where there are multiple barcodes within the eld of view the verier will
automatically recognise the codes present.
Each symbol that is recognised as a barcode will be surrounded by a purple or blue
box. The blue box indicates which symbol’s results are being shown on the right
hand side of the Axicon Camera Verier window. To change to the other barcode,
click on the purple box, which will now become blue.
The results for this barcode are now shown in the window.
www.axicon.com
Page 19 of 28
Axicon Auto ID Limited | 15000 series verier user guide | June 2017

A verication report may be saved in .csv, .pdf, .html or .txt formats. Additionally
reports can be manually saved for subsequent printing or else printed without
saving.
Use the File tab from the pull-down menu and then select Save Report.
Options will then be given for the various report saving options and you can then
select between these as required.
If you want the report to be automatically opened on creation (for example, if
there is a need to print the report) then tick the open report box.
For some le types you may wish to save data to a single le and append the data
rather than replacing the previous data – for example when saving data to a .csv
le.
In this case the Append Report box should be ticked. If this is left unticked and the
same le name as previous is specied then the data will be overwritten.
After a successful decode of a barcode, the results can be saved to a le in special
form of .png format). This is done by using the File/Save as function. These results
can be reviewed at some later stage and shared with others.
When a saved scan is opened by the application, the original data is available and
displayed. In addition, the original image can also be re-veried using the verify
button – this will then automatically use any plugins that are activated (such as CIP
or serialisation validation) regardless of whether the plugins were used at the time
of original verication.
To open a saved scan, use the File option from the pull-down menu and then
select Load Scan. Select the le to be viewed and re-veried. The .png le is then
displayed in the viewing area. The user should then press the Verify button.
The full verication information is then shown and can be viewed (and additionally
printed) as required.
Saving and printing
www.axicon.com
Page 20 of 28
Axicon Auto ID Limited | 15000 series verier user guide | June 2017

Disclaimer
In the following the expression verier means the verier hardware and the
associated software.
We have taken care to ensure that this Verier is free from defects. However since
we have no control over the circumstances in which you might use the Verier,
you must satisfy yourself that the performance of the Verier is suitable for your
needs. Neither Axicon Auto ID Limited nor the vendor of this Verier can accept any
liability for any loss or damage (consequential or otherwise) which may be caused
by use of this Verier.
If the Verier or any part of it is defective in any way, or in some other way does
not meet your expectations, the liability of Axicon Auto ID Limited is limited to the
cost of the product. You should bear this limitation in mind if you use this Verier
in any situations where the acceptance or rejection of shipments of goods or your
reputation may depend upon the quality of a barcode.
www.axicon.com
Page 21 of 28
Axicon Auto ID Limited | 15000 series verier user guide | June 2017

Software licence agreement
This software is Copyright © 2014 - 2017
Use of the software is subject to the Axicon software licence terms set out below.
Using the software indicates your acceptance of these licence terms. If you do not
accept these within 14 days, you may return the entire unused product for a full
refund.
Axicon grants you a licence to use any number of copies of the software, but only
for use with an Axicon verier. “Use” means storing, loading, installing, executing
or displaying the software. You may not modify the software or disable any of its
licensing or control features.
Ownership
The software is owned and copyrighted by Axicon Auto ID Limited. Your licence
confers no title or ownership in the software and is not a sale of rights in the
software.
Copies
You may only make copies of the software for archival purposes or when copying is
an essential step in its use. You must reproduce all copyright notices in the original
software on all copies. You may not copy the software onto a bulletin board or
similar publicly accessible system.
No disassembly or decryption
You may not disassemble or decompile the software without prior written consent
from Axicon.
Transfer
Your licence will automatically terminate upon any transfer of the software.
Upon transfer, you must deliver the software, including any copies and related
documentation, to the transferee. The transferee must accept these licence terms
as a condition of the transfer.
Termination
Axicon may terminate your licence upon notice of failure to comply with any
of these terms. Upon termination, you must immediately destroy the software,
together with all copies, adaptations and merged portions in any form.
www.axicon.com
Page 22 of 28
Axicon Auto ID Limited | 15000 series verier user guide | June 2017

Export requirements
You may not export or re-export the software in contravention of any applicable
laws or regulations.
This agreement should be construed in accordance with the laws of England.
DISCLAIMER
In the following the expression “verier” means the verier hardware and the
associated software.
We have taken care to ensure that this verier is free from defects. However since
we have no control over the circumstances in which you might use it you must
satisfy yourself that it is suitable for your needs. Neither Axicon Auto ID Limited
nor the vendor of this verier can accept any liability for any loss or damage
(consequential or otherwise) which may be caused by its use.
If the verier or any part of it is defective in any way, or in some other way does
not meet your expectations, the liability of Axicon Auto ID Limited is limited to the
cost of the product. You should bear this limitation in mind if you use this verier
in any situations where the acceptance or rejection of shipments of goods or your
reputation may depend upon the quality of a barcode.
www.axicon.com
Page 23 of 28
Axicon Auto ID Limited | 15000 series verier user guide | June 2017

Warranty
Axicon 15000 series verier is sold with a two year parts and labour warranty
against manufacturing defects. This is a return to bench warranty with shipping
costs in one direction being borne by the customer/distributor.
Should you need to return the unit to Axicon the original case (plus appropriate
packaging) must be used. If the equipment is returned without the original case, we
will automatically charge an additional sum for its replacement.
Axicon’s standard repair turnaround time is 7-10 working days. This standard
warranty does not include the provision of a loan unit. Loan units can be supplied
on request.
Axicon reserves the right to charge an inspection fee for any equipment returned
under warranty for which no fault is found. Please contact us to obtain an RMA
number before returning any equipment. This number must be quoted on all
documentation. We cannot accept responsibility for equipment returned without an
RMA number.
www.axicon.com
Page 24 of 28
Axicon Auto ID Limited | 15000 series verier user guide | June 2017

Maintenance agreement
A service contract may be purchased within 30 days from the date of despatch.
This allows you to return your verier back to us at no extra cost for its annual
VCAS (verier conformance and alignment service) so that you can be sure it still
measures barcode quality in accordance with the requirements of ISO/IEC 15426-1
and ISO/IEC 15426-2
The service contract will also extend the warranty beyond two years, so that if it
breaks down, all parts and labour will be provided free of any extra charges. The
only exception is when the verier has been misused, in which case labour costs
will be covered, but not those of the parts.
www.axicon.com
Page 25 of 28
Axicon Auto ID Limited | 15000 series verier user guide | June 2017

Annual service
All veriers need servicing every year to ensure that they measure barcode quality
in accordance with the relevant ISO/IEC standards. This verier conformance and
alignment service (VCAS) ensures that the verier is internally dust-free, checks
that it is focused correctly, and adjust the hardware to account for any change in
the brightness of the LEDs used to illuminate the barcodes.
This annual service is not the same as user calibration, as it looks at the output of
the LEDs and corrects for any variance in their evenness of illumination across the
whole eld of view. Over time the LEDs will fade but they will not fade uniformly.
User calibration ensures that the verier is measuring the darkest and brightest
reectances correctly but it cannot correct for any variance in the illumination.
After your verier has been serviced, we will return it you with the latest version
of the software on CD together with a new calibration sheet, and a new user guide
that will include the new certicate of ISO/IEC conformance. You will then need
to calibrate the verier before you use it again. The latest software can always be
downloaded free of charge from our website, www.axicon.com.
To arrange for your verier to be serviced:
1. Contact us on
Telephone: +44 (0) 1869 351155 | Fax +44 (0) 1869 352404
Email: vcas@axicon.com
2. We will provide you with an RMA number (Return to Manufacturer Authority)
and an RMA form.
3. Please ll in all details requested on the RMA form, including the RMA number.
4. Return the verier (including all cables) in its original case with the completed
RMA form, purchase order and your payment details to us at Axicon Auto ID
Ltd, Church Road, Weston on the Green, Oxfordshire OX25 3QP. We cannot take
responsibility for units returned in alternative packaging.
5. We will normally complete the service and re-calibration of your verier within
7-10 days.
www.axicon.com
Page 26 of 28
Axicon Auto ID Limited | 15000 series verier user guide | June 2017

Certicate of ISO/IEC
conformance
We, Axicon Auto ID Limited, of Church Road, Weston on the Green, Oxfordshire,
OX25 3QP, UK, hereby declare, that the following barcode verier(s):
Model number(s)
Serial number(s)
has been designed and manufactured at our address in the UK to verify barcode
quality and to conform to: ISO/IEC 15426-1 and ISO/IEC 15426-2 barcode verier
conformance specication.
The equipment has been tested and calibrated using primary reference test
symbols traceable to the USA’s National Institute of Standards and Technology’s
reectance standards. We also state that this equipment, when used with the
latest verier software, and congured appropriately has the features to meet
the requirements of the United States Food and Drug Administration regulation,
Title 21 CFR Part 11.
This verier has been quality assurance checked today, and conforms to this
ISO/IEC standard. This declaration of conformity is valid for a year.
Issue date
Expiry date
Authorised signatory
Signatory Name
At or before the expiry date the verier should be returned to Axicon for its
annual servicing. This VCAS (verier conformance and alignment service) will
ensure that the verier remains conformant to ISO/IEC 15426-1 and ISO/IEC
15426-2 for another year.
Church Road, Weston on the Green,
Oxfordshire, OX25 3QP, UK
Page 27 of 28
Axicon Auto ID Limited | 15000 series verier user guide | June 2017

Contact us
Axicon Auto ID Ltd
Church Road,
Weston on the Green,
Oxfordshire
OX25 3QP,
UK
Tel: +44 (0) 1869 351 155
Fax: +44 (0) 1869 351 205
Email: info@axicon.com
Website: www.axicon.com
As Axicon continually improves its products, their specications and features are
subject to change without notice. All trademarks are acknowledged as belonging to
their respective companies.
Your Axicon distributor
 Loading...