


THE BARCODE EXPERTS
Partner
Axicon 12600-12900 range
2D barcode veriers
user guide
Industry
Church Road, Weston on the Green, Oxfordshire, OX25 3QP, UK
Tel: +44 (0)1869 351155 | Email: sales@axicon.com
Web: www.axicon.com

www.axicon.com
Axicon Auto ID Limited | 12600 - 12900 user guide | June 2017
Page 2 of 24
Contents
Introduction 5
Installation 6
Software (1D) 8
Software (2D) 10
Using the verier 12
Calibration 13
Verication results 14
Using the 12800 - 12900 16
Software licence agreement 19
www.axicon.com
Annual servicing 20
Axicon Warranty 21
Certicate of conformance 23
Contact us 24
Axicon Auto ID Limited | 12600 - 12900 user guide | June 2017
Page 3 of 24

www.axicon.com
Introduction
An Axicon verier is a high-precision quality control device and should be handled
with due care.
Only use power and data cables supplied by Axicon. Use of non-approved
accessories will invalidate the warranty.
If the verier is dropped (or subjected to similar misuse) the accuracy of the results
may be aected. The unit should be returned to Axicon immediately for servicing.
Axicon recommends that the verier is factory re-calibrated annually. The unit
should be returned to Axicon or to your approved Axicon reseller for this servicing.
The following table shows the various models in the Axicon 12000 series which can
be used in conjunction with this software – and their typical applications:
Model Field of view Application
12000 24 x 18mm High resolution 2D codes
12500 40 x 24mm High to medium resolution 2D
codes
12600 51 x 38mm EAN/UPC and 2D codes
12700 70 x 51mm EAN/UPC and large 2D codes
12800 34 x 25.5mm Direct part marked (DPM) items
12900 34 x 25.5mm Direct part marked (DPM) items
Axicon Auto ID Limited | 12600 - 12900 user guide | June 2017
Page 4 of 24

www.axicon.com
What is in the case
• Axicon 12600, 12700, 12800 or 12900 2D verier.
• Power supply and y lead.
• Mains lead.
• Wallet containing this documentation booklet, software CD and the calibration
card.
Optional extras
Axicon also oer the following optional extras to be used in conjunction with the
system:
• Installation qualication and operational qualication procedural
documentation.
• Performance Qualication Test Kit – Comprising a set of test cards traceable to
international standards and full procedural instructions.
• Set of Reference Test Cards – traceable to international standards.
Axicon Auto ID Limited | 12600 - 12900 user guide | June 2017
Page 5 of 24

www.axicon.com
Installation
System requirements
A Microsoft-supported version of Windows (32 or 64 bit)
512 MB of RAM (Minimum)
A USB 2.0 port
Microsoft .NET Framework Version 3.5 SP1 or later
Please do not connect the verier to your PC before the software has been
installed. If the software has not been installed, Microsoft Windows will attempt
to nd the appropriate drivers for the verier online, and the wrong ones will be
installed.
The Webscan TruCheck software requires the .NET Framework version 3.5 to be
installed. The software installation process will check whether the .NET framework
is present, and install it if necessary.
Insert the software CD into an appropriate drive and the Install program should
start automatically. If not run Setup.exe. Set the location where you would like the
software installed, and specify whether the installation should be for a single user
or all users. You will be asked to conrm the installation before it takes place, and
it will then be conrmed. The software will then ask you if you want to install the
USB drivers.
After the software installation has been completed, please connect the verier to
install the USB drivers prior to running the software.
Axicon Auto ID Limited | 12600 - 12900 user guide | June 2017
Page 6 of 24

www.axicon.com
Hardware installation
Connect the metal connector on the end of the verier y-lead to the metal
connector on the power supply lead. Plug the mains lead into the power supply
module, and connect the mains lead to the power supply.
Plug the USB lead from the verier into a USB2 port on the computer. The USB2
drivers that are needed will be installed automatically.
Running the software for the rst time
When running the software for the rst time, you will be asked to specify certain
application options.
The application mode ‘UDI/HIBC’ relates to requirements of the Health Industry
Barcode Standard, so choose this if necessary. Most users choose the “Don’t print
report after each scan” option. You can always change these later if you need to.
Axicon Auto ID Limited | 12600 - 12900 user guide | June 2017
Page 7 of 24

www.axicon.com
Software (1D)
The Webscan TruCheck software will enable you to verify both 1D (linear) and
2D barcodes. The software can be congured to meet your requirements when
verifying both types of barcode.
Conguration of the 1D mode
Double click on the 1D icon to display the conguration screen.
Axicon Auto ID Limited | 12600 - 12900 user guide | June 2017
Page 8 of 24

www.axicon.com
If you are using the verier to check GS1 barcodes, make sure that the GS1 option
is selected in the top right of this window. This will automatically set the correct
pass grade for the symbols. In the Decode Options section you can choose how
many scans are to be used for each verication (ISO/IEC 15416 species 10), the
size of aperture to be used if you do not want this to be decided automatically, and
whether to use the general ITF (Standard I25) or GS1 ITF-14 decode algorithm.
The Report Options section allows you to decide how much information you would
like included in the verication report. You will need to have ISO 15416/5 selected.
If you choose Quality Parameters, more information about each parameter will be
provided. If you also choose Per Scan Details, information relating to each of the
scans will be provided individually. To include an image of the barcode that has
been veried, select Image of Symbol.
The Report and Print Options section allows you to choose in which format
the verication reports should be produced, and where they will be saved
automatically. Select Metric Units at the right of this section if you would like
measurements in µm or leave blank if you would like measurements in mils
(thousandths of an inch). It is not possible to save verication reports manually, so
it is important to choose a le directory where they can be easily accessed. The
reports will be named in the format decoded data in the symbol_DD_MM_YY HH_
MM_SS., for example 12345678_25_12_16 13_45_20.
Having saved the verication reports automatically, you will be able to rename
them manually using the normal Save as option.
Axicon Auto ID Limited | 12600 - 12900 user guide | June 2017
Page 9 of 24

www.axicon.com
Software (2D)
Conguration of the 2D mode
Double click on the 2D icon to display the conguration screen.
Axicon Auto ID Limited | 12600 - 12900 user guide | June 2017
Page 10 of 24

www.axicon.com
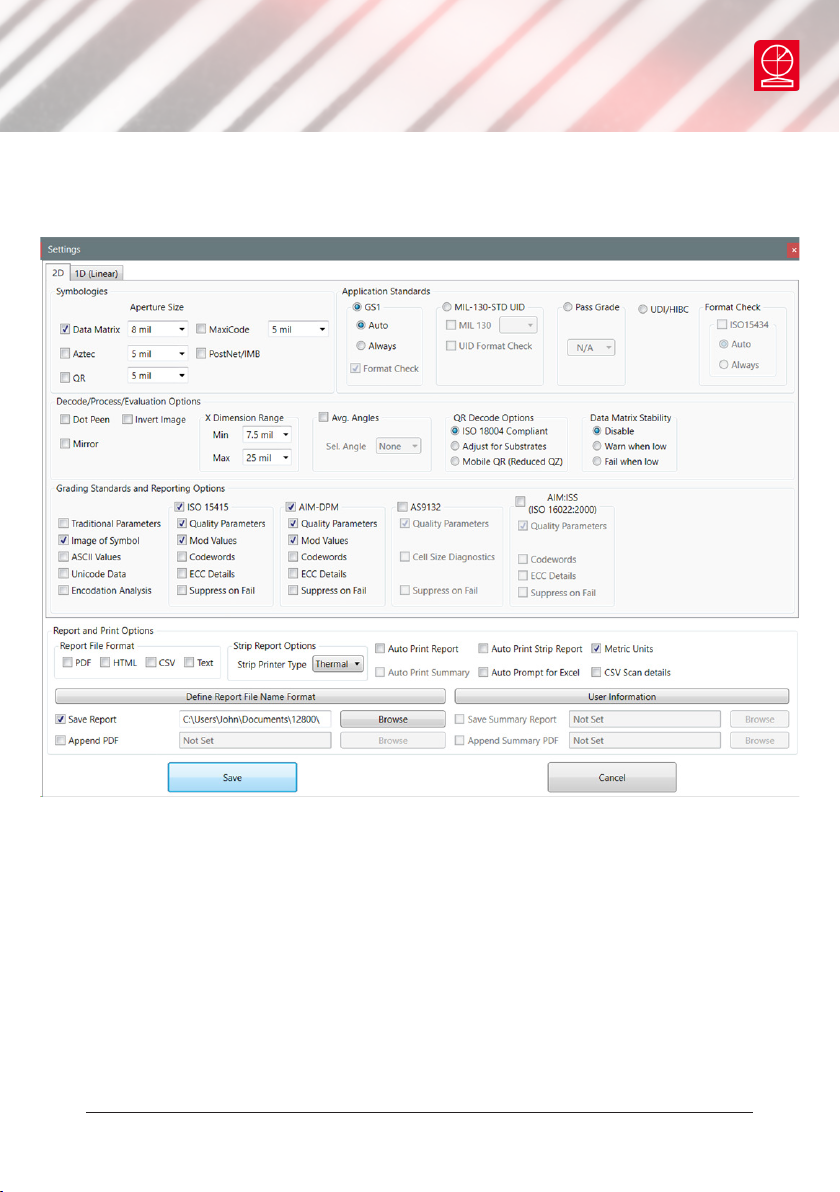
These settings are for the verication of Data Matrix, GS1 DataMatrix, QR Code,
GS1 QR Code and Aztec codes. Maxicode verication is an extra feature that may be
added if required.
Under the Application Standards section, select the GS1 option if this is relevant.
The MIL-130-STD setting relates to the USA’s Department of Defense standard for
unique identication. The UDI/HIBC setting relates to the Health Industry Barcode
standard for unique identication.
In the Grading Standards and Reporting Options section you can choose how much
information will be included in the verication report. GS1 users should ensure that
ISO 15415 option is selected. The other options to the right of this are only usable
with the Axicon 12800 and 12900 verier which is designed to verify direct part
marked symbols.
Saving and printing
The saving of reports takes place automatically, and you will have established
where they will be saved during the conguration process. They will be saved in
the format you have chosen (PDF, HTML, CSV or text) and you can print them as you
would any other document.
Axicon Auto ID Limited | 12600 - 12900 user guide | June 2017
Page 11 of 24

www.axicon.com
Using the verier
It will be easier to use the verier if you position it so that the cable is away from
you with the Start button on its right hand side.
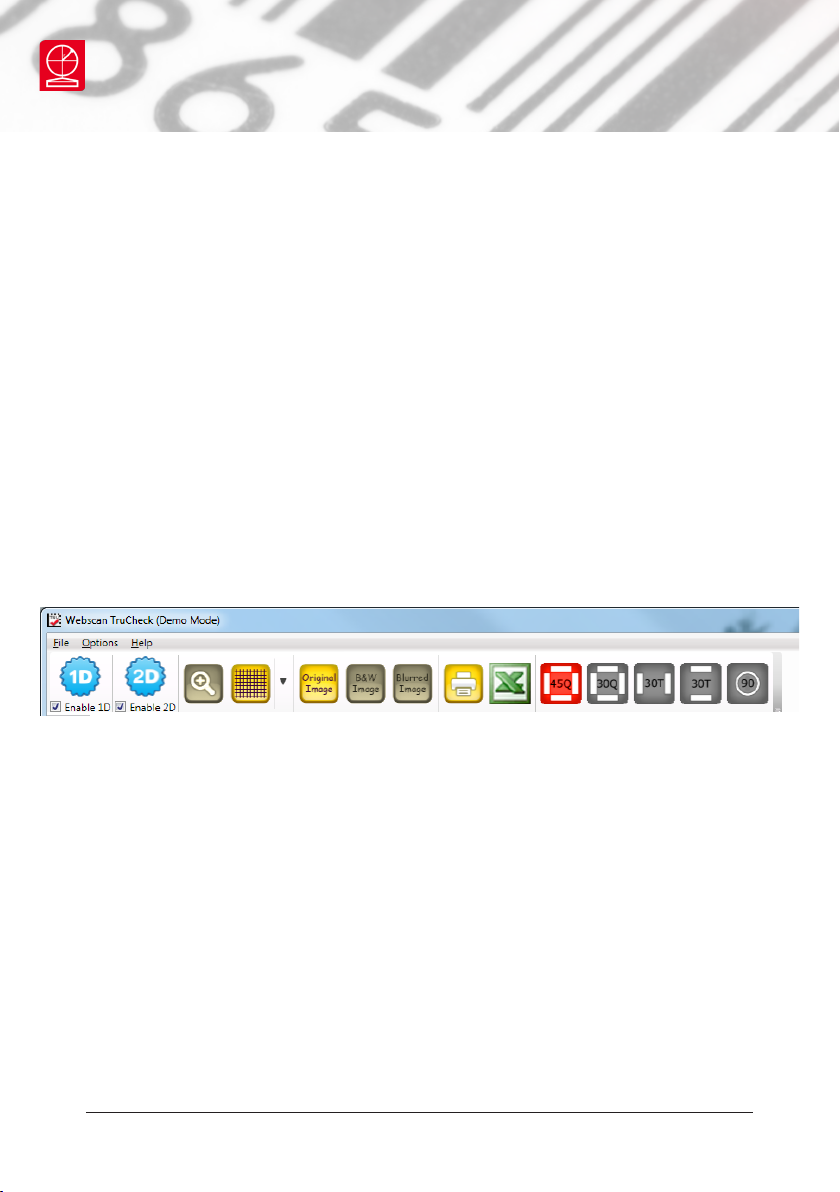
Notice the large Go Live button at the bottom of the main command window. When
you click this, or press the Start button on the verier, a live image will appear in
the window. Position the verier so that the barcode is in its centre.
The Go Live button will now say Verify code. Click on this, or press the Start
button again, and the verication will begin. After a few seconds the results will
appear in the window, with the ISO grade appearing in the centre.
Axicon Auto ID Limited | 12600 - 12900 user guide | June 2017
Page 12 of 24

Calibration
You must calibrate the verier on a regular
basis and we recommend that this is done at
least every 15 days. You can set a calibration
notication message with the software, and
this can be set to a maximum interval of 90
days.
Take the calibration card out of the plastic
wallet and check that it is not damaged or
marked. Place the verier over the card
so that the bars of the largest barcode are
vertical in the camera window.
Click on the Start button of the verier to
activate the camera.
Go to Options, then select Calibrate
Remote. The calibration dialogue box will be
displayed:
www.axicon.com
Select the linear barcode, and make sure
the Rmin and Rmax values match those on
your calibration card. Set the calibration
reminder to 15 days, and then click on the
calibrate button. The calibration will take
about 5 seconds and then the successful
window will appear. Press OK, and then
close the window.
Axicon Auto ID Limited | 12600 - 12900 user guide | June 2017
Page 13 of 24

www.axicon.com
Verication results
The Main tab provides an image of the barcode that has just been veried, together
with its overall grade to the right of the image, and at the far right, a detailed
summary of the results that includes the aperture reference number and the
wavelength of light being used.
When a linear barcode has been veried, the details for each of the ten scans the
verier has used to calculate the nal result are also provided.
The other tabs provide the results set out in slightly dierent ways.
The most interesting tab is called SRP (for Scan Reectance Prole) and this
provides a graph showing the brightness of the symbol measured across its width.
The high points represent the spaces, while the lowest points represent the bars.
The round green arrow buttons allow you to move through the ten dierent scans,
and as you do this, the SRP will change as will the results shown to their right. You
can also magnify the size of the barcode by using the icons on the far left of the
screen.
Axicon Auto ID Limited | 12600 - 12900 user guide | June 2017
Page 14 of 24

www.axicon.com
When you look above the SRP itself you will see three bands. The rst one, called
Original Scan, represents what the verier saw as it scanned that part of the
barcode. The Nominal Modules band represents the dierent module widths
(x-dimension widths) of a perfect barcode, and if you hover over these with
your cursor, the software will tell you how wide each element (bar or space) is.
The Threshold Edges band shows you the edges that have been detected by the
verication algorithm. If you move your cursor over this band, a small window will
appear that provides the reectance value for each element, and the letter grades
and percentage values for Modulation, Defects, and Decodability.
Verifying 2D symbols
You follow the same procedure as for linear symbols, after making sure that you
have selected Enable 2D below the blue 2D conguration icon at the top of the
command window. The results screen will now include an image of the code, with
additional details that are required by ISO/IEC 15415.
There is no SRP tab for 2D barcodes, so the one called Histogram provides details
of the dierent reectances of all the modules. The Advanced Detail tab provides
a diagram that shows the modulation values for each element. In this example, one
module is missing, so its value is 0.
Axicon Auto ID Limited | 12600 - 12900 user guide | June 2017
Page 15 of 24
www.axicon.com
Using the 12800 and 12900
Direct part marked symbols
The Axicon 12800 and Axicon 12900 are designed to read direct part marked (DPM)
2D symbols that are often etched or dot peened onto metallic surfaces. These
symbols can be veried in accordance with ISO/IEC 15415 or ISO/IEC TR 29158
(formerly known as the AIM Quality Guideline for Direct Park Marking). This second
approach allows for the angle of illumination to be changed, so the user can select
angles of 45º, 30º, or 90º, and also whether the 30º illumination should be on all
four sides or only two sides.
The Axicon 12800 is designed to read symbols on the same plane as its base, while
the Axicon 12900 has an adjustable height. This means that the Axicon 12900 can
be used to read DPM symbols marked on more unusually shaped objects or where
the marking is slightly recessed. The appropriate buttons to change the angle of
illumination appear at the top of the main command window, to the right of the
green x icon.
You should rst try to see if you can obtain an acceptable pass grade by using the
ISO/IEC 15415 standard, and then if not, by using the ISO/IEC TR 29158 (AIM-DPM)
approach. The 2D conguration settings will need to be changed to allow for the
AIM-DPM approach and for any other requirements such as those for the USA’s
Department of Defense’s MIL 130 standard.
If you are verifying 2D symbols produced on highly reective surfaces, you will have
to try out these options to see if you can obtain a suitable pass grade.
The tabs in the main window provide the same type of information as they do for
the Axicon 12600 and 12700.
Axicon Auto ID Limited | 12600 - 12900 user guide | June 2017
Page 16 of 24
www.axicon.com
If both the GS1 ISO/IEC 15415 and AIM-DPM approaches are selected, the
verication report will include both sets of results.
Axicon Auto ID Limited | 12600 - 12900 user guide | June 2017
Page 17 of 24

www.axicon.com
Using the 12900
You will use the aluminium handwheel at the top of the verier to adjust its height
above the base plate. The software for this verier is identical to that for the
Axicon 12800, except that it will check if the verier is the correct distance away
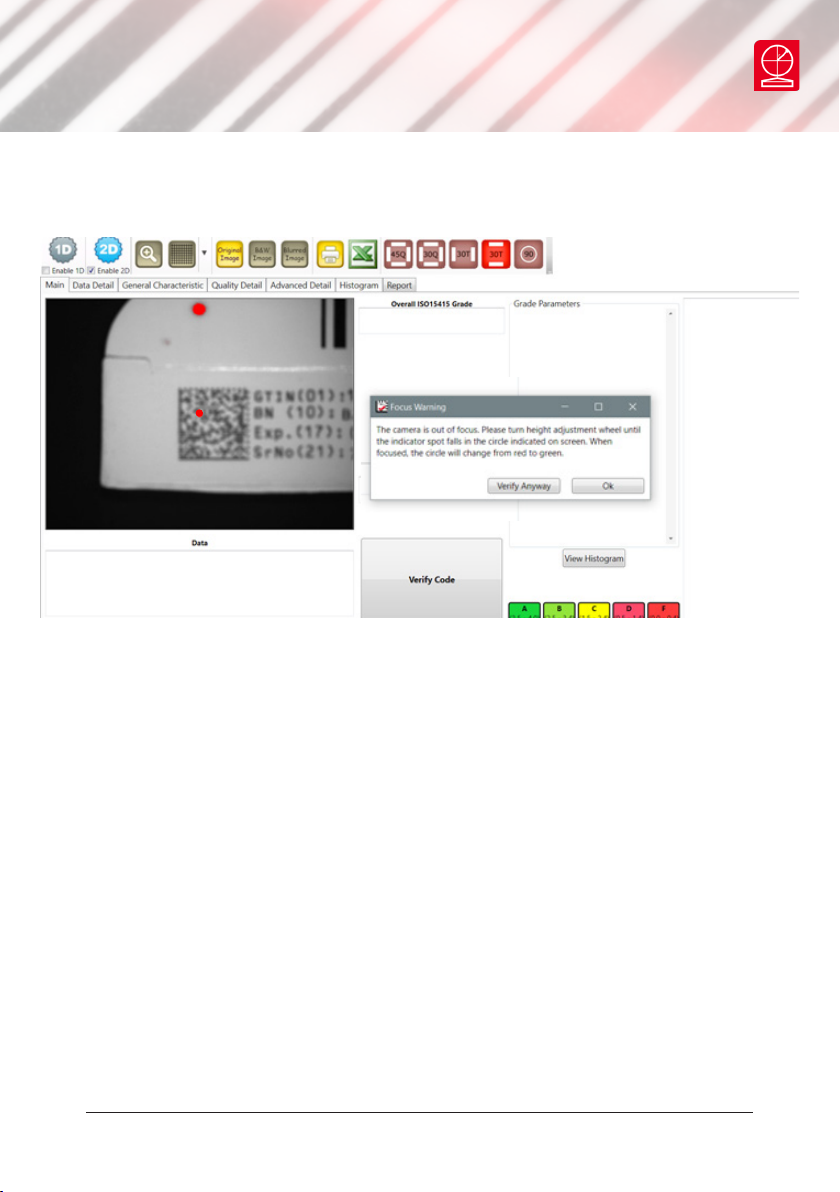
from the symbol to be veried after you have clicked on the Go Live button.
The screen will look like this, with a new ‘Focus warning’ window in the middle, if
the Verify Code button has been clicked before focussing the image.
Adjust the height using the handwheel, so that the two red dots overlap. The red
laser spot will move up or down the image as the handwheel is turned. Best focus
will be achieved when the red laser spot is aligned with the small red ring that is
shown in the middle of the image and when these two coincide, the red ring will
change to a green coloured ring and the Verify code button can then be clicked to
decode and verify the symbol.
Caution: Take care when adjusting the height of the verier above an awkwardlyshaped item to make sure that no part of it damages the unprotected components
inside the verier. The Axicon 12900 uses a Class 2 laser beam during its height
adjustment process.
Do not attempt to look directly at its source.
Axicon Auto ID Limited | 12600 - 12900 user guide | June 2017
Page 18 of 24
www.axicon.com
Axicon Auto ID Limited | 12600 - 12900 user guide | June 2017
Page 19 of 24

www.axicon.com
Annual service
All veriers need servicing every year to ensure that they measure barcode quality
in accordance with the relevant ISO/IEC standards. This verier conformance and
alignment service (VCAS) ensures that the verier is internally dust-free, checks
that it is focused correctly, and adjusts the hardware to account for any change in
the brightness of the LEDs used to illuminate the barcodes.
This annual service is not the same as user calibration, as it looks at the output of
the LEDs and corrects for any variance in their evenness of illumination across the
whole eld of view. Over time the LEDs will fade but they will not fade uniformly.
User calibration ensures that the verier is measuring the darkest and brightest
reectances correctly but it cannot correct for any variance in the illumination.
After your verier has been serviced, we will return it you with the latest version
of the software on CD together with a new calibration card, and a new user guide
that will include the new certicate of ISO/IEC conformance. You will then need
to calibrate the verier before you use it again. The latest software can always be
downloaded free of charge from our website, www.axicon.com.
To arrange for your verier to be serviced:
1. Contact us on
Telephone: +44 (0) 1869 351155 | Fax +44 (0) 1869 352404
Email: vcas@axicon.com
2. We will provide you with an RMA number (Return to Manufacturer Authority)
and an RMA form.
3. Please ll in all details requested on the RMA form, including the RMA number.
4. Return the verier (including all cables) in its original case with the completed
RMA form, purchase order and your payment details to us at Axicon Auto ID
Ltd, Church Road, Weston on the Green, Oxfordshire OX25 3QP. We cannot take
responsibility for units returned in alternative packaging.
5. We will normally complete the service and re-calibration of your verier within
7-10 days.
Axicon Auto ID Limited | 12600 - 12900 user guide | June 2017
Page 20 of 24

www.axicon.com
Axicon warranty
The Axicon 12600, 12700 or 12800 are sold with a one year parts and labour
warranty against manufacturing defects. This is a return to bench warranty with
shipping costs in one direction being borne by the customer/distributor.
Should you need to return the unit to us the original transit case (plus appropriate
packaging) must be used. If the equipment is returned without the original transit
case, we will automatically charge an additional sum for the replacement of this
packaging.
We reserve the right to charge an inspection fee for any equipment returned under
warranty for which no fault is found.
Please contact us to obtain an RMA (return to manufacturer authorisation)
number before returning any equipment. This number must be quoted on all
documentation. We cannot accept responsibility for equipment returned without an
RMA number.
Axicon Auto ID Limited | 12600 - 12900 user guide | June 2017
Page 21 of 24

www.axicon.com
Axicon Auto ID Limited | 12600 - 12900 user guide | June 2017
Page 22 of 24

Church Road, Weston on the Green,
Oxfordshire, OX25 3QP, UK
Certicate of ISO/IEC
conformance
We, Axicon Auto ID Limited, of Church Road, Weston on the Green, Oxfordshire,
OX25 3QP, UK, hereby declare, that the following barcode verier(s):
Model number(s)
Serial number(s)
has been designed and manufactured at our address in the UK to verify barcode
quality and to conform to: ISO/IEC 15426-1 and ISO/IEC 15426-2 barcode verier
conformance specication.
The equipment has been tested and calibrated using primary reference test
symbols traceable to the USA’s National Institute of Standards and Technology’s
reectance standards. We also state that this equipment, when used with the
latest verier software, and congured appropriately has the features to meet
the requirements of the United States Food and Drug Administration regulation,
Title 21 CFR Part 11.
This verier has been quality assurance checked today, and conforms to these
ISO/IEC standards. This declaration of conformity is valid for a year.
Issue date
Expiry date
Authorised signatory
Signatory Name
At or before the expiry date the verier should be returned to Axicon for its
annual servicing. This VCAS (verier conformance and alignment service) will
ensure that the verier remains conformant to ISO/IEC 15426-1 and ISO/IEC
15426-2 for another year.
Axicon Auto ID Limited | 12600 - 12900 user guide | June 2017
Page 23 of 24

Contact us
Axicon Auto ID Ltd
Church Road
Weston on the Green
Oxfordshire
OX25 3QP
UK
Tel: +44 (0) 1869 351 155
Fax: +44 (0) 1869 351 205
Email: info@axicon.com
Website: www.axicon.com
As Axicon continually improves its products, their specications and features are
subject to change without notice. All trademarks are acknowledged as belonging to
their respective companies.
Your Axicon distributor
 Loading...