


Axial Racing AX90033 User Manual

(2802751)AX90033使用說明書_完稿.indd 1 2013/9/13 上午 09:48:11

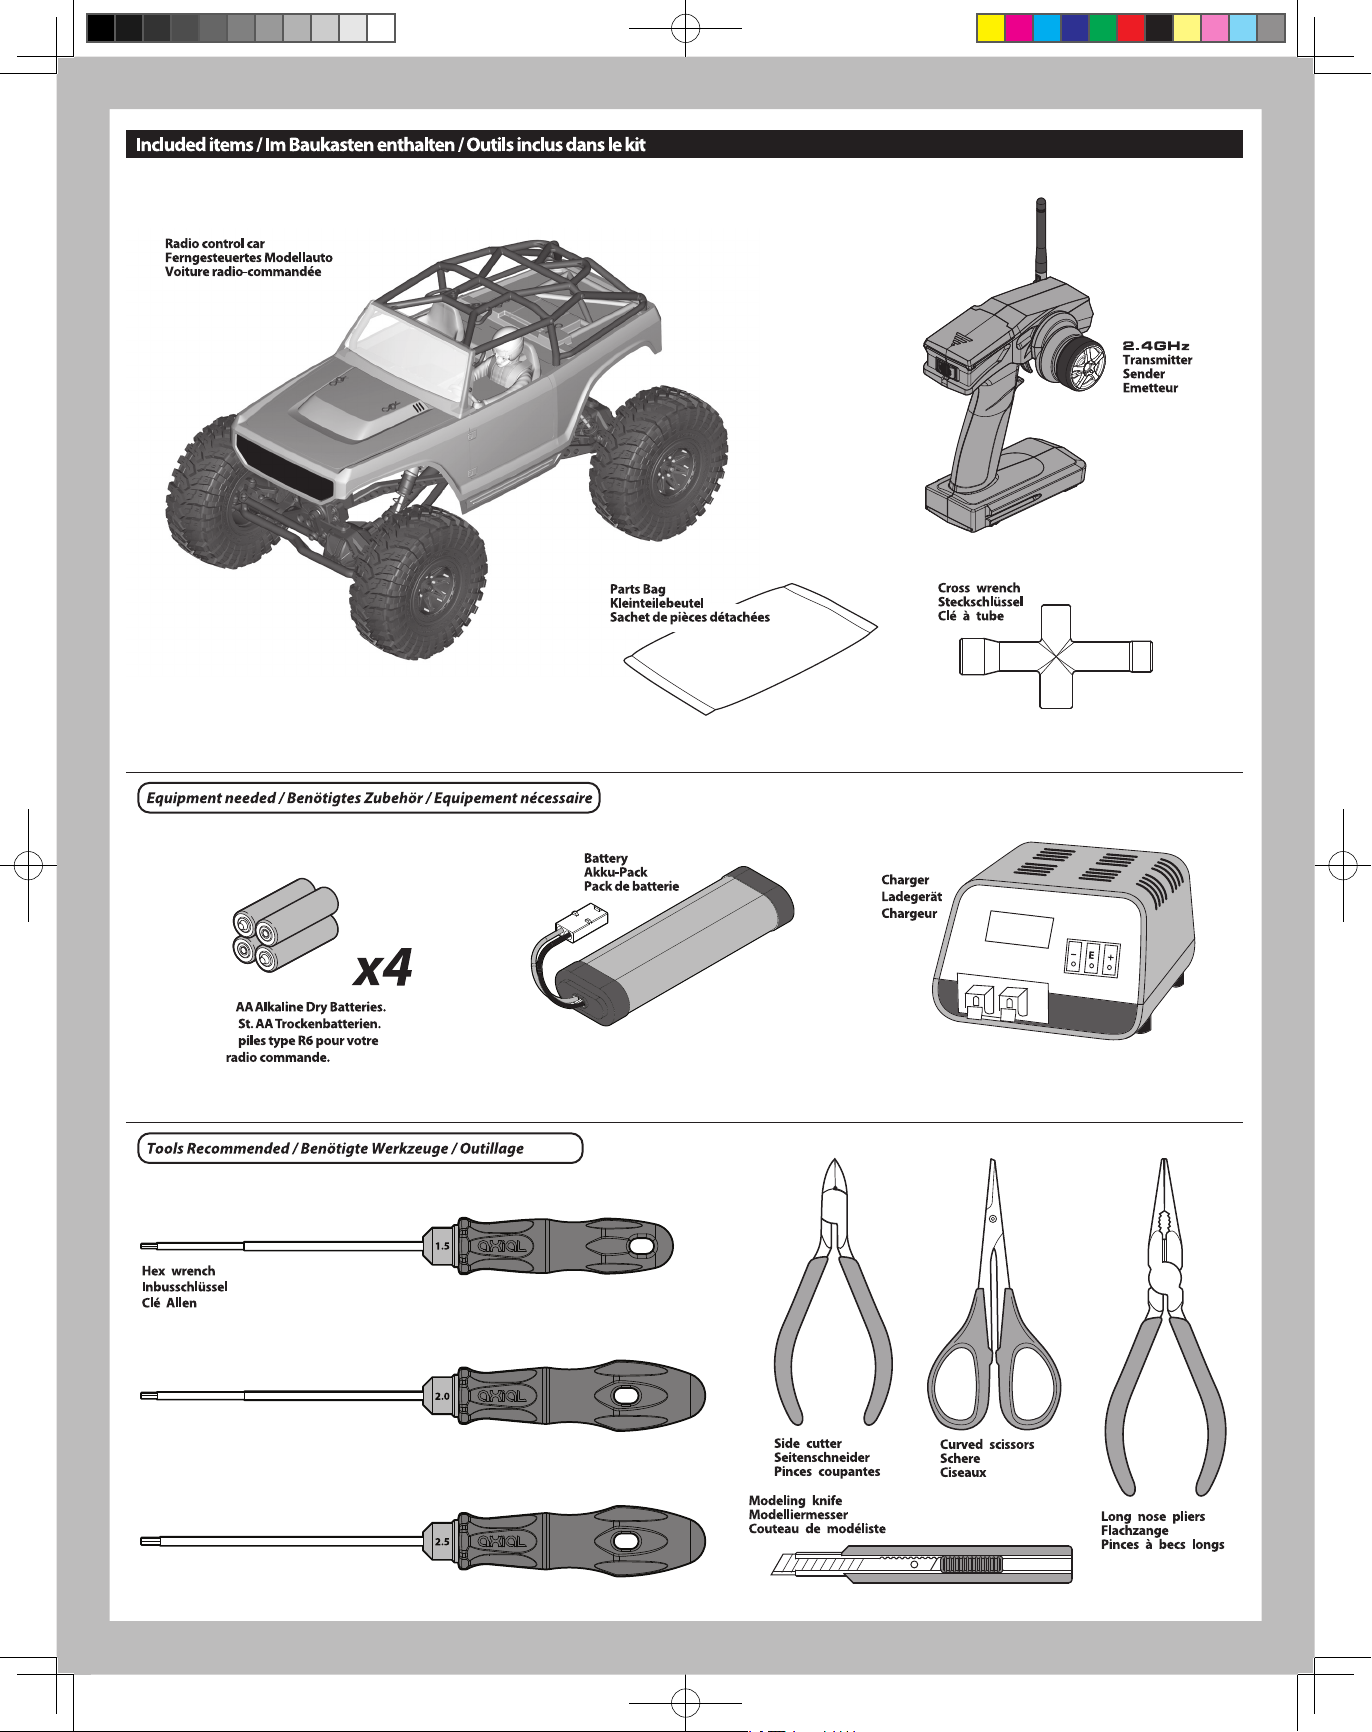
4
4
4
2
(2802751)AX90033使用說明書_完稿.indd 2 2013/9/13 上午 09:48:13
4
4
4
3
(2802751)AX90033使用說明書_完稿.indd 3 2013/9/13 上午 09:48:14

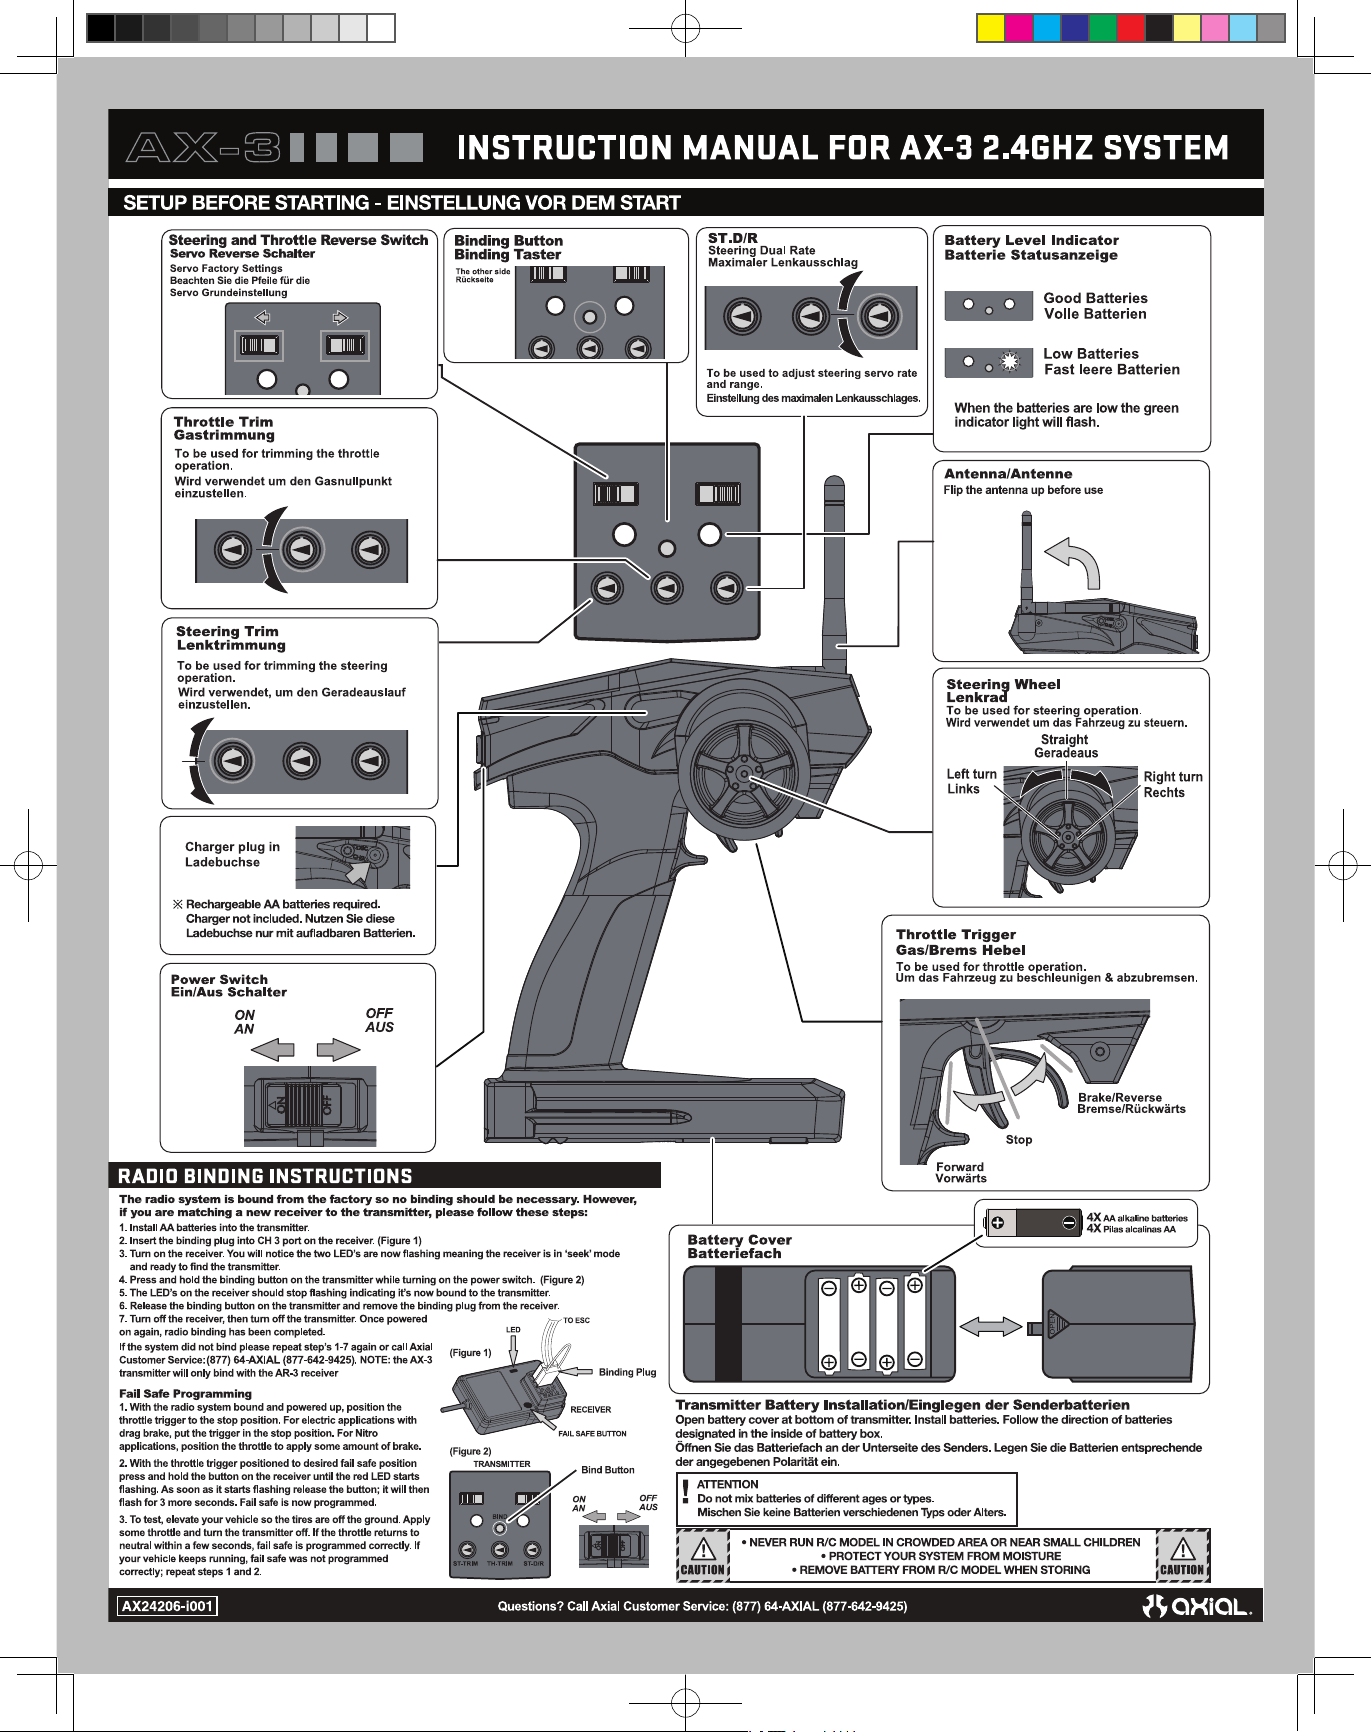
Steering Servo
C-Hub
Receiver Box
Front Body Mount
Steering Rack
Transmission
Lower 4-link Bar
ESC Plug
Shock Absorber
Rear Body Mount Battery Straps
Battery Tray
Spur/Pinion/Slipper
(Under Cover)
Motor
Electronic
Speed Control(ESC)
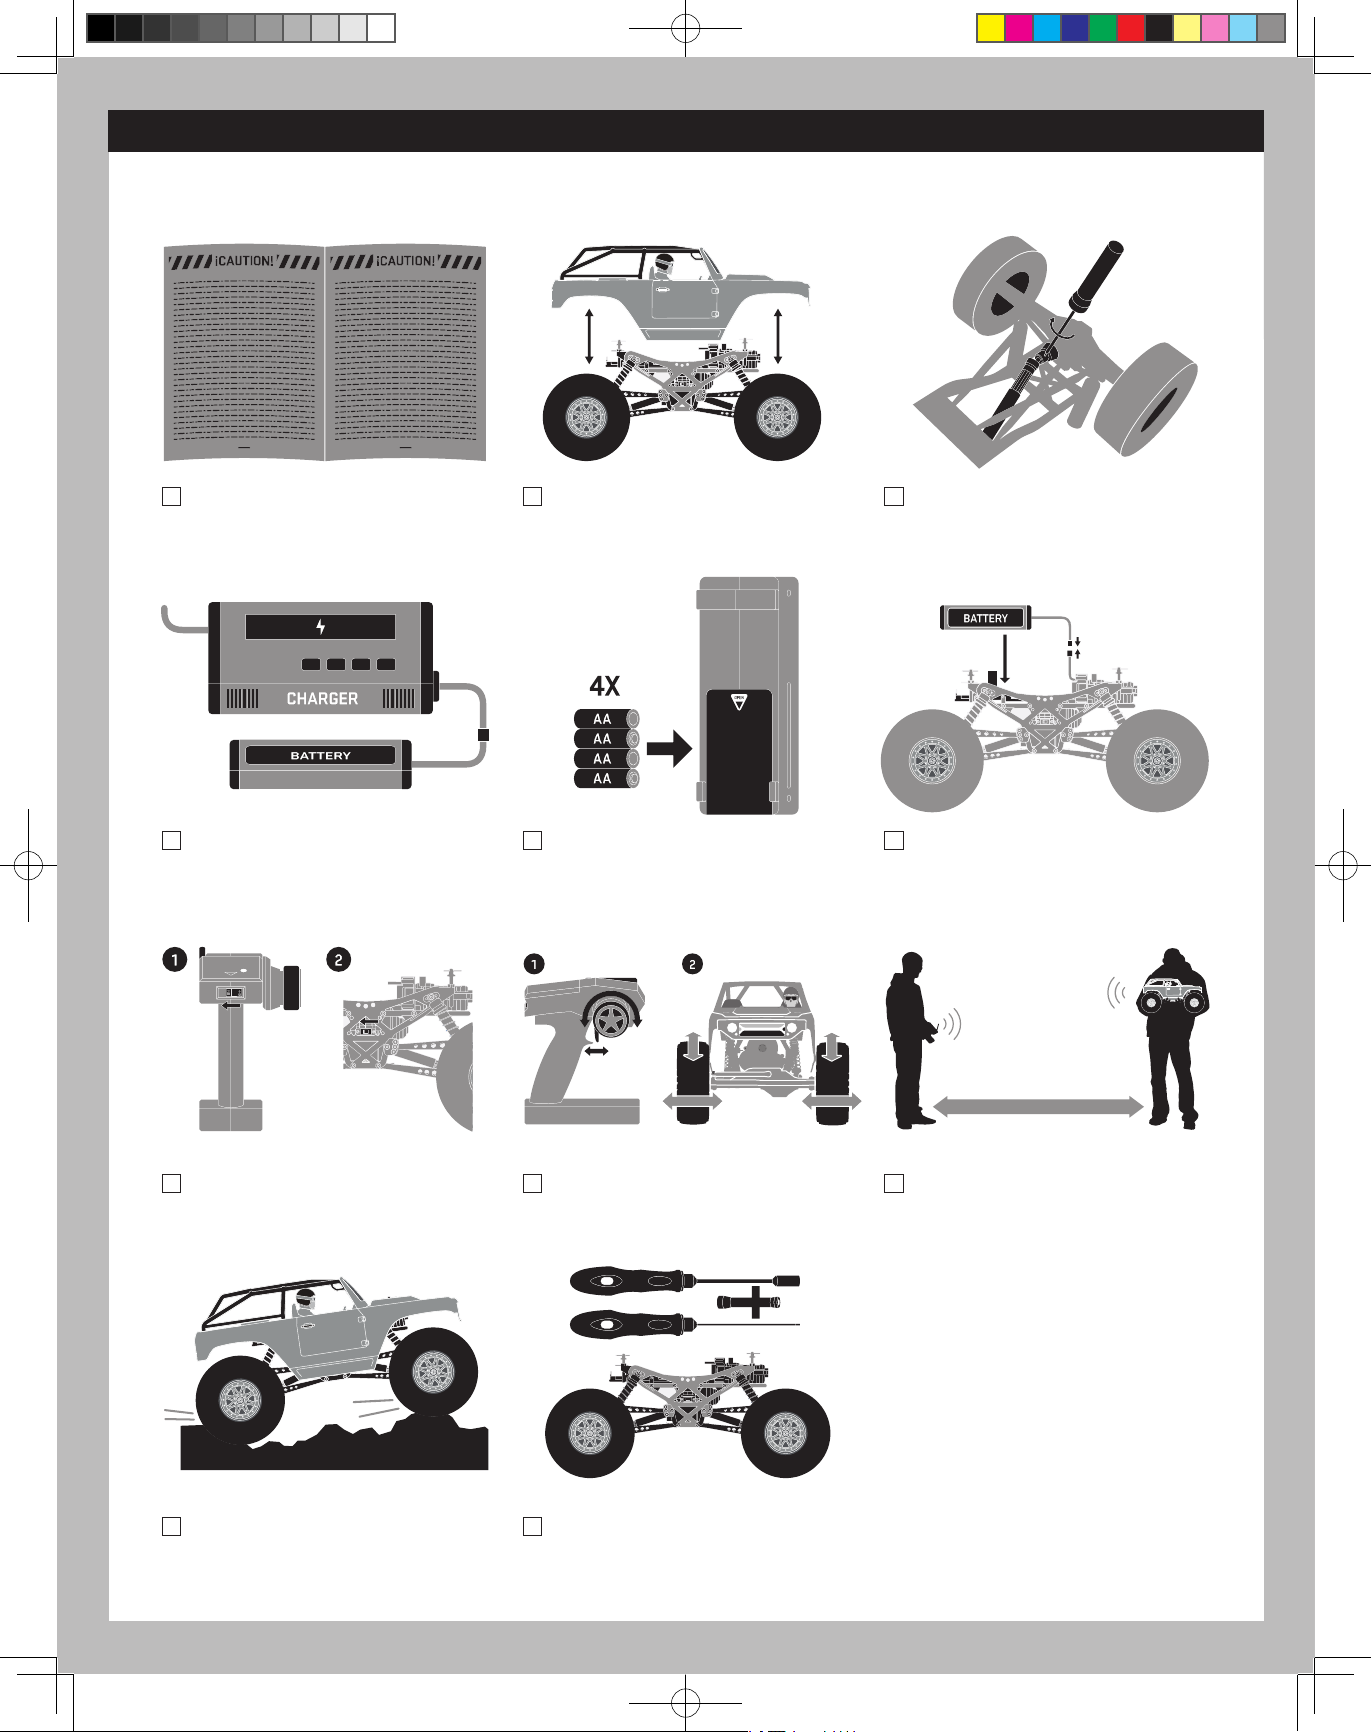
Put the battery in the car.
1.
Install the battery.
2.
Turn on the transmitter.
3.
Turn on the electronic speed controller.
4.
Connect rmly.
ON
OFF
4
(2802751)AX90033使用說明書_完稿.indd 4 2013/9/13 上午 09:48:17
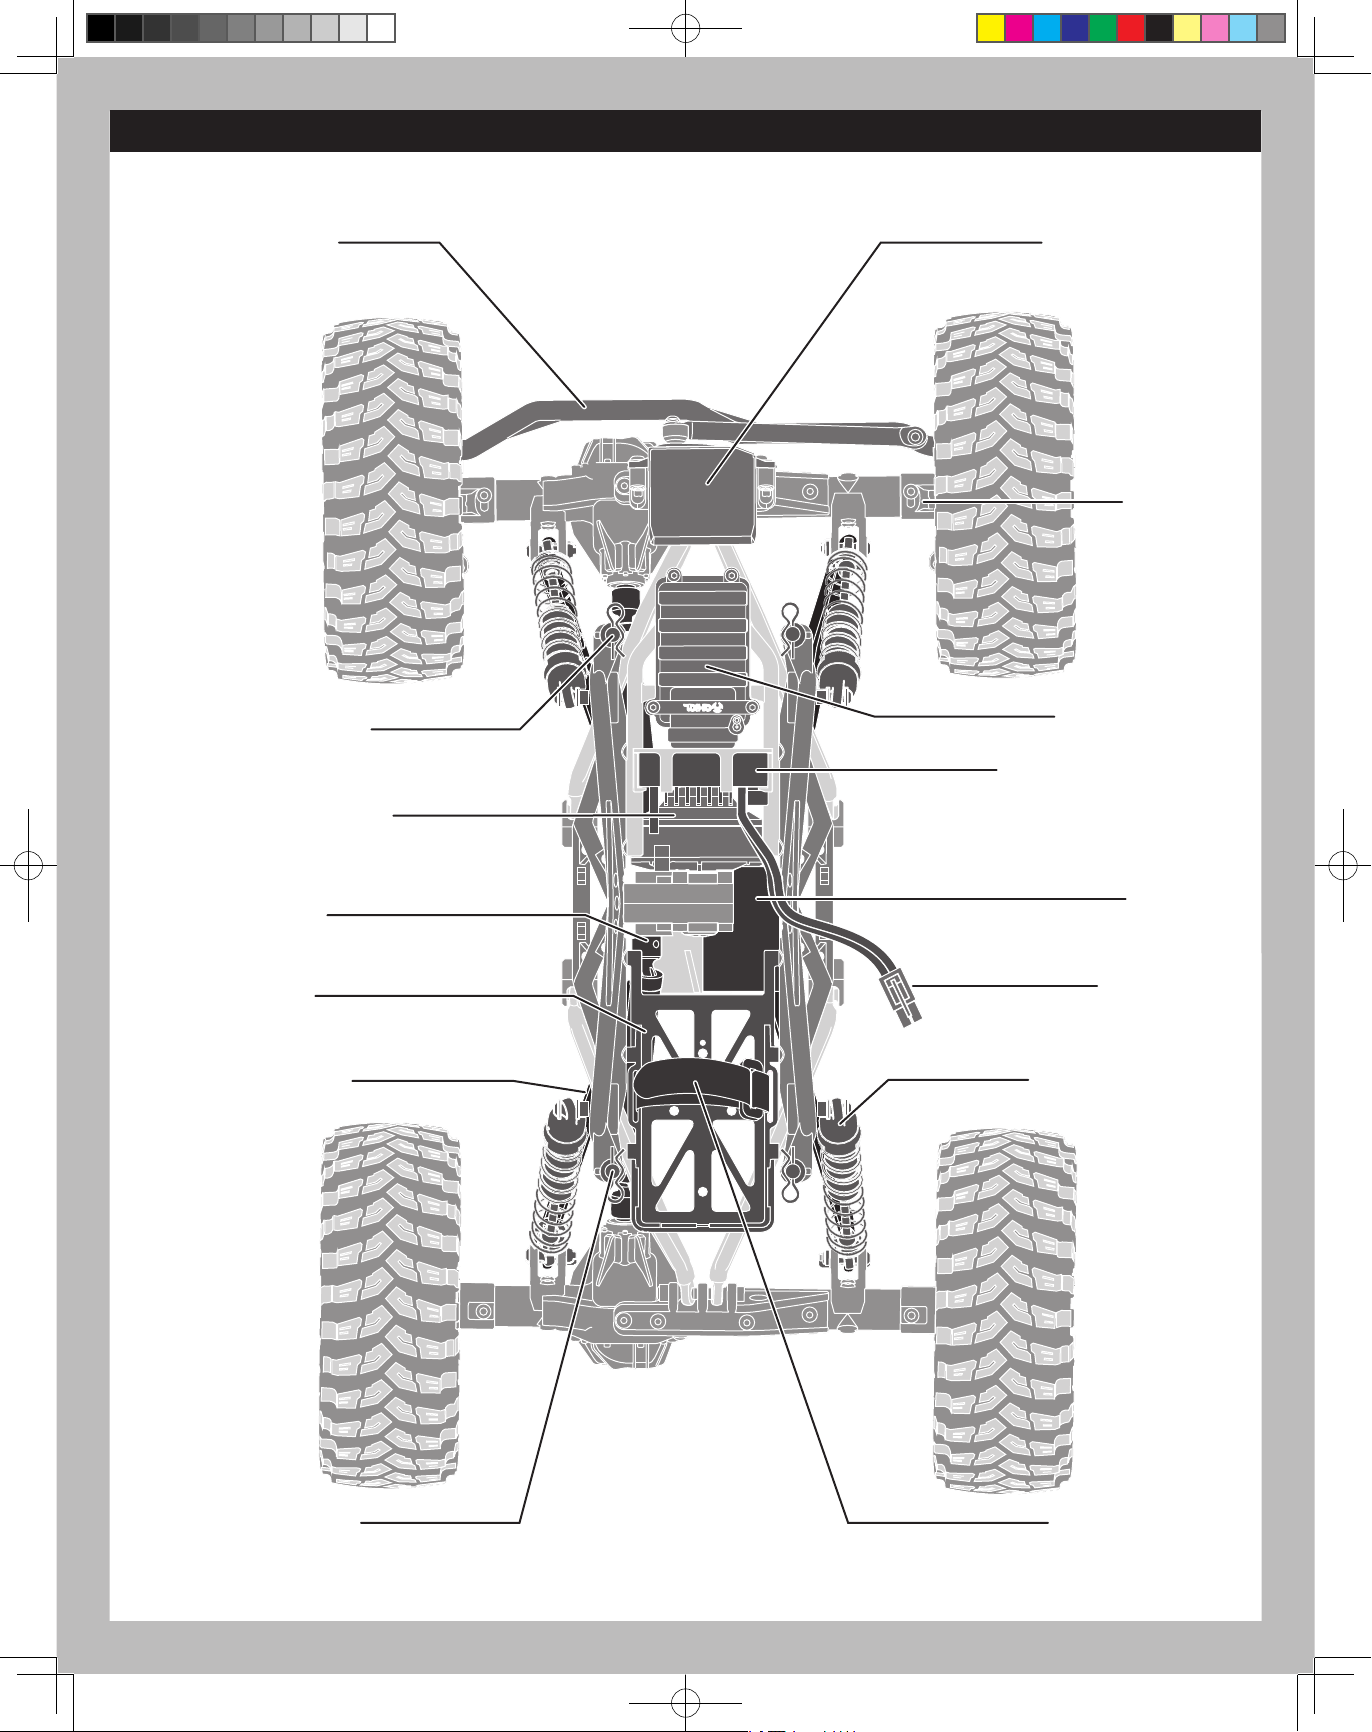
Top View Parts
Steering Rack
Front Body Mount
Spur/Pinion/Slipper
(Under Cover)
Steering Servo
C-Hub
Receiver Box
Electronic
Speed Control(ESC)
Transmission
Battery Tray
Lower 4-link Bar
Motor
ESC Plug
Shock Absorber
Rear Body Mount Battery Straps
5
5
(2802751)AX90033使用說明書_完稿.indd 5 2013/9/13 上午 09:48:18
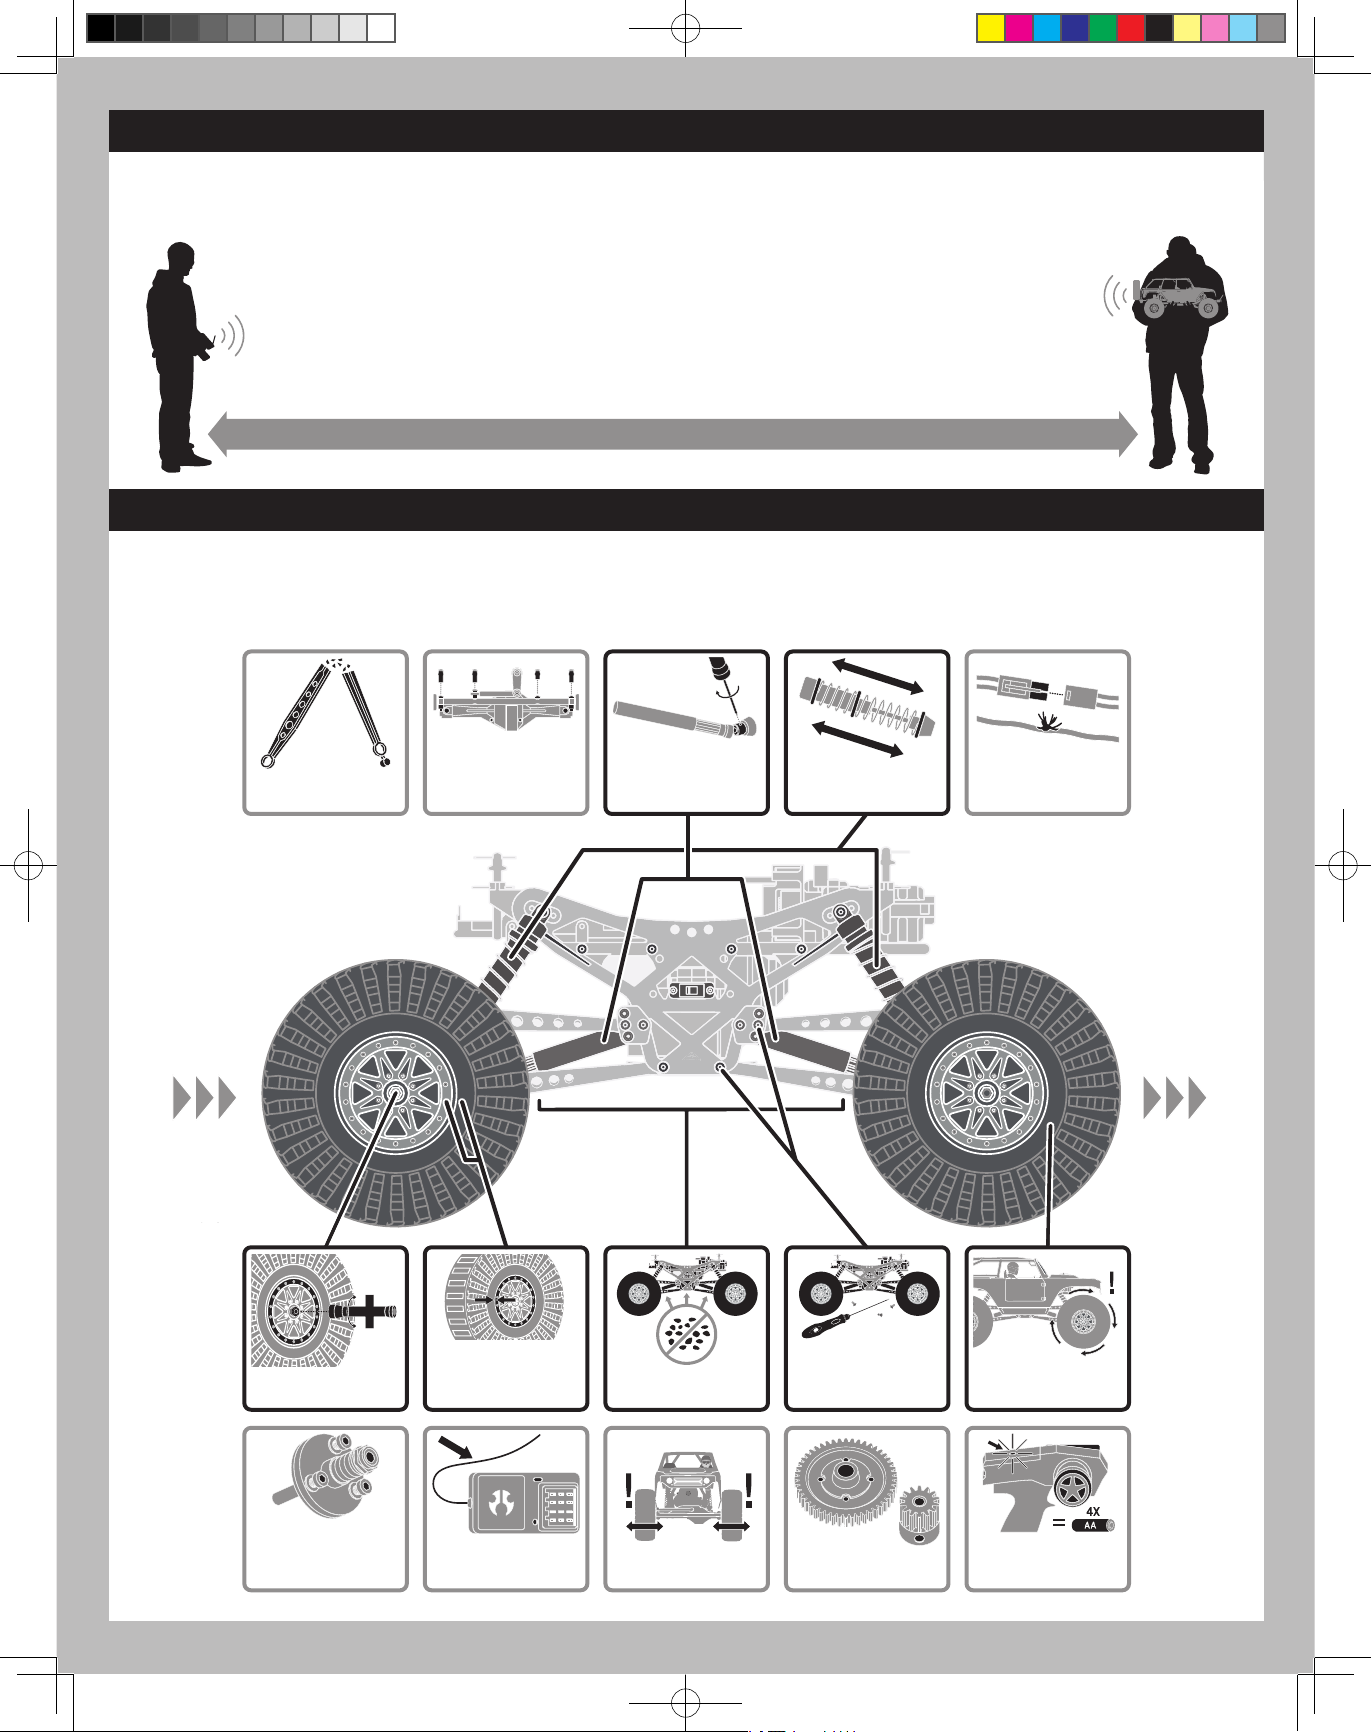
Getting-Started Checklist
KEEP CHASSIS FREE OF DIRT
OR DEBRIS
CHECK FOR LOOSE SCREWS
ON CHASSIS ESPECIALLY
THE KNUCKLE, C-HUB AND
AXLE LOCKOUT SCREWS
CHECK FOR WEAR ON
THE BALL JOINTS IN THE
STEERING AND SUSPENSION
LINKS
(REPLACE IF NECESSARY)
CHECK DRIVESHAFT SET
SCREWS ON BOTH ENDS
AND APPLY THREAD
LOCK IF NECESSARY
CHECK WHEEL NUTS MAKING
SURE THEY’RE SNUG
CHECK TIRES MAKING SURE
THE BEADS ARE STILL FIRMLY
BONDED TO THE ENTIRE
CIRCUMFERENCE OF THE RIM
REPLACE TRANSMITTER
AA’S IF THE GREEN LIGHT IS
BLINKING
INSPECT THE SPUR AND
PINION GEARS FOR DAMAGE
CHECK SLIPPER CLUTCH IF
APPLICABLE, FOR PROPER
OPERATION
(SEE PAGE 25 STEP
23 FOR SETUP INSTRUCTIONS)
CHECK DRIVELINE FOR
SMOOTH BIND-FREE
OPERATION
CHECK FOR ANY LOOSE
CONNECTIONS OR FRAYED
WIRING
INSPECT SHOCK
ABSORBERS FOR SMOOTH
DAMPENED OPERATION
CHECK RECEIVER ANTENNA
TO CONFIRM IT’S NOT
DAMAGED
REPLACE ANY NOTICEABLE
BENT OR BROKEN PARTS
Maintaining Your Vehicle
Just like a full size car or truck your RC vehicle must undergo periodic maintenance in order to ensure peak running performance. Preventative
maintenance will also help avoid needless breakages which could result in costly repairs. Below are some suggestions to properly maintain
your vehicle.
Range-Checking Your Radio System
The radio system should be checked before operating the vehicle to ensure it’s operating properly and has adequate range.
1. Turn on the transmitter first and then the vehicle.
2. Have a friend hold the vehicle while keeping hands and loose clothing away from moving parts.
3.
Walk away until you are at the farthest distance you plan to operate the vehicle.
4. Steer the vehicle back and forth and throttle both forward and reverse making sure there is no erratic behavior.
5. If any erratic behavior is exhibited do not operate the vehicle, call customer service for further assistance.
RANGE-CHECKING FOR DISTANCE
Check driveshaft setscrews on both ends and apply thread lock if necessary.
CHECK STEERING
OPERATION FOR ANY BINDS
The following checklist is a guide for getting you vehicle running for the first time.
Read ‘Cautions’ in Manual. (Page 2)
Familiarize yourself with vehicle and
its components.
Even though the vehicle is new check
driveshaft setscrews and other screws to
make sure they are tight from the factory.
Charge battery pack. (Page 4)
Turn on transmitter FIRST then ESC.
(Page 4)
Install 4X AA batteries into Transmitter.
(Page 7)
Check to make sure steering and throttle
operation work correctly. (Page 7)
Install battery pack in vehicle. (Page 4)
Range check radio system. (Next Page)
Drive vehicle, challenge yourself and
Maintain vehicle. (Next Page)
have fun!
(2802751)AX90033使用說明書_完稿.indd 6 2013/9/13 上午 09:48:22
6
6
Range-Checking Your Radio System
The radio system should be checked before operating the vehicle to ensure it’s operating properly and has adequate range.
1. Turn on the transmitter first and then the vehicle.
2. Have a friend hold the vehicle while keeping hands and loose clothing away from moving parts.
3. Walk away until you are at the farthest distance you plan to operate the vehicle.
4. Steer the vehicle back and forth and throttle both forward and reverse making sure there is no erratic behavior.
5. If any erratic behavior is exhibited do not operate the vehicle, call customer service for further assistance.
RANGE-CHECKING FOR DISTANCE
Maintaining Your Vehicle
Just like a full size car or truck your RC vehicle must undergo periodic maintenance in order to ensure peak running performance. Preventative
maintenance will also help avoid needless breakages which could result in costly repairs. Below are some suggestions to properly maintain
your vehicle.
Check driveshaft setscrews on both ends and apply thread lock if necessary.
REPLACE ANY NOTICEABLE
BENT OR BROKEN PARTS
CHECK FOR WEAR ON
THE BALL JOINTS IN THE
STEERING AND SUSPENSION
LINKS
(REPLACE IF NECESSARY)
CHECK DRIVESHAFT SET
SCREWS ON BOTH ENDS
AND APPLY THREAD
LOCK IF NECESSARY
INSPECT SHOCK
ABSORBERS FOR SMOOTH
DAMPENED OPERATION
CHECK FOR ANY LOOSE
CONNECTIONS OR FRAYED
WIRING
CHECK TIRES MAKING SURE
THE BEADS ARE STILL FIRMLY
CHECK WHEEL NUTS MAKING
SURE THEY’RE SNUG
CHECK SLIPPER CLUTCH IF
APPLICABLE, FOR PROPER
OPERATION
(2802751)AX90033使用說明書_完稿.indd 7 2013/9/13 上午 09:48:26
(SEE PAGE 25 STEP
23 FOR SETUP INSTRUCTIONS)
BONDED TO THE ENTIRE
CIRCUMFERENCE OF THE RIM
CHECK RECEIVER ANTENNA
TO CONFIRM IT’S NOT
DAMAGED
KEEP CHASSIS FREE OF DIRT
OR DEBRIS
CHECK STEERING
OPERATION FOR ANY BINDS
7
7
CHECK FOR LOOSE SCREWS
ON CHASSIS ESPECIALLY
THE KNUCKLE, C-HUB AND
AXLE LOCKOUT SCREWS
INSPECT THE SPUR AND
PINION GEARS FOR DAMAGE
CHECK DRIVELINE FOR
SMOOTH BIND-FREE
OPERATION
REPLACE TRANSMITTER
AA’S IF THE GREEN LIGHT IS
BLINKING
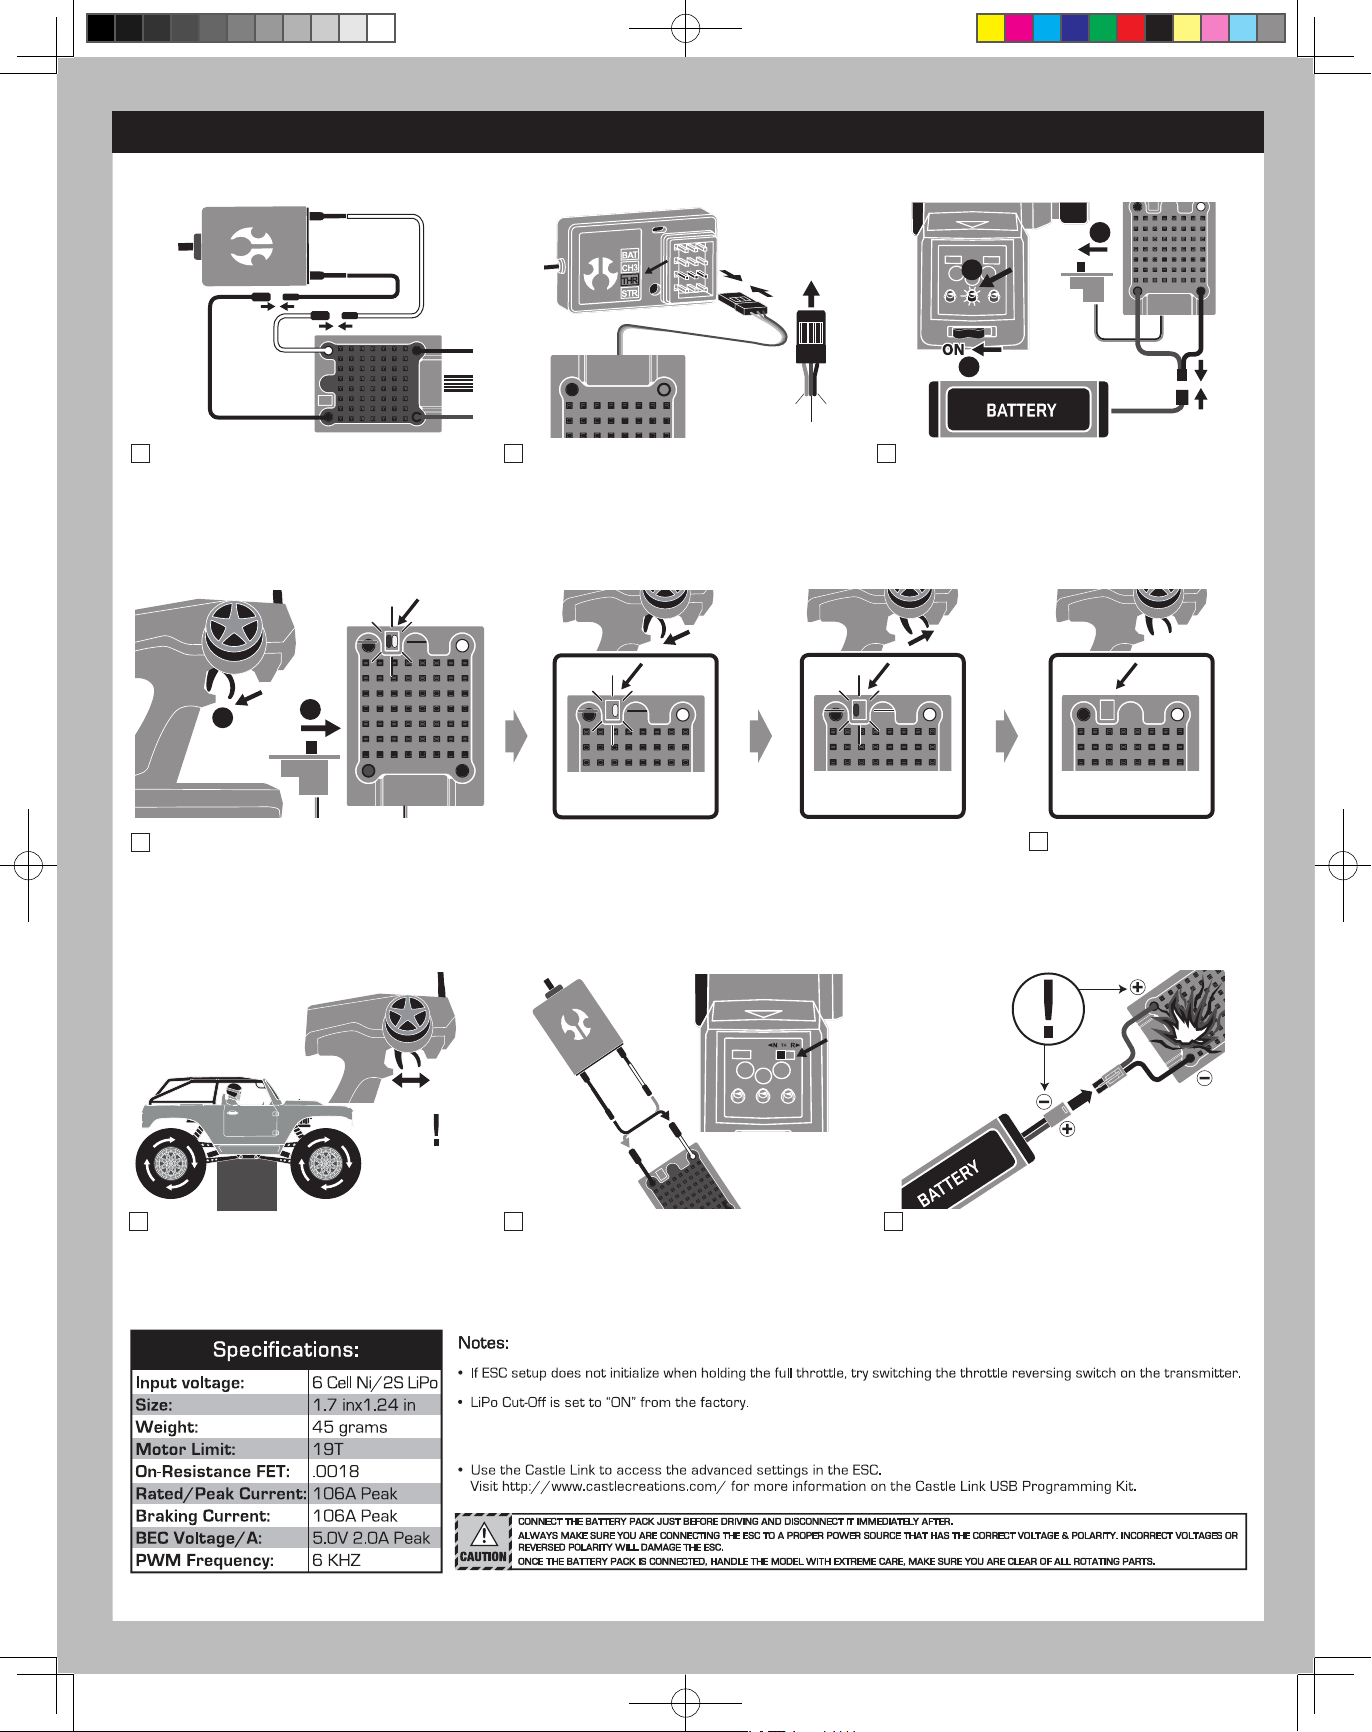
ESC Instructions
Red
Black
3
OFF
2
TH-TRIM
White
Black
Connect the ESC wires to the motor.
Green LED
Red LED
1
2
ON
De Le ...
Apply and hold full throttle on the transmitter.
Turn on the ESC and it will emit a series of tones,
De Le De Le De Le, the red and green LED will flash
then only the green LED will remain blinking.
Plug the ESC wire into the
throttle channel on the receiver.
Continue applying full throttle
Green LED
De Le De Le...
ESC blinks green and
emits De Le De Le De Le tone.
Orange Black
Red
Apply full brake Set to neutral point
Red LED
ESC blinks red and
emits De Le De Le De Le tone.
1
Before plugging the battery into the ESC.
make sure your transmitter is on
and the throttle trim is set at zero,
and the ESC switch in the OFF position.
No LED
De Le De Le ... De Le De Le ...
ESC shows no LED's and
emits De Le De Le De Le tone.
The ESC will emit a final
short series of tones,
De Le De Le, confirming it
has been calibrated.
Apply throttle to make sure the motor
is going the direction you wanted.
To reverse the direction of the motor,
switch the wires going to the motor.
Or reverse the transmitter throttle reverse switch.
Do NOT reverse the battery wire connections!
Reversing the battery polarity will permanently
damage the ESC.
If you're using NiMH or NiCd batteries turn " OFF " LiPo Cut- Off by visiting
the following link for Manually Programming the AE- 2 ESC : http: //www. axialracing. com/instructions .
8
8
(2802751)AX90033使用說明書_完稿.indd 8 2013/9/13 上午 09:48:28
BIND
ST-TRIM TH-TRIM ST-D/R
9
(2802751)AX90033使用說明書_完稿.indd 9 2013/9/13 上午 09:48:32