


1/10 ROCK CRAWLER RTR

CAUTIONS
To prevent serious personal injury and/or property damage, operate all remotely controlled models in a responsible manner as
outlined herein.
CHOOSE THE RIGHT PLACE TO OPERA TE YOUR R/C MODEL.
● Do not run on public streets or highways. This could cause serious accidents, personal
● injuries, and/or property damage.
● Never run R/C models near people or animals.
● To avoid injury, do not run in confined spaces.
● Do not run where loud noises can disturb others, such as hospitals and residential areas.
● Never run indoors. There is a high risk of fire and/or damage.
AFTER OPERATION OF YOUR R/C MODEL
● Turn off receiver first, then turn off transmitter, this will prevent runaways.
● Be careful when handling batteries, they will be hot after running.
● Replace any batteries that have been dented or have frayed wires, short circuits can
● cause fire .
● Be sure to keep your R/C model clean and free of excess dirt and grease, this will
● increase the life.
INSPECT YOUR MODEL BEFORE OPERATION.
● Make sure that all screws and nuts are properly tightened. It is also a good idea to use
● removable thread lock wherever metal screws go into metal, especially for engine mounts
● and the engine pilot shaft.
● Always use fresh batteries for your transmitter and for your receiver to avoid losing control
● of the model.
● Always test the brakes and throttle before starting your engine to avoid losing control of the
● model.
● Make sure no one else is using the same radio frequency as you are using.
VORSICHT!
Um Verletzungen an Personen und/oder Sachschäden zu vermeiden, sollten alle ferngesteuerten Modelle sorgfältig und
verantwortungsbewusst bedient werden,wie nachfolgend beschrieben.
Wählen Sie den richtigen Platz zum Fahren
● Fahren Sie niemals auf öffentlichen Straßen. Dies könnte Verkehrsunfälle, Personen
● schäden oder Sachschäden verursachen.
● Fahren Sie niemals in der Nähe von anderen Personen oder Tieren.
● Fahren Sie niemals auf belebten Straßen.
● Fahren Sie nie in der Nähe von Wohnhäusern oder Krankenhäusern. Der Lärm könnte
● andere Personen stören.
● Fahren Sie niemals in Innenräumen. Dort könnte etwas beschädigt werden.
Überprüfen Sie Ihr Modell, bevor Sie es in Betrieb nehmen.
● Gehen Sie sicher, dass alle Schrauben und Muttern festgezogen sind. Verwenden Sie
● überall dort Schrauben-Sicherungslack, wo Metallschrauben in ein Metallgewinde greifen,
● besonders bei den Motorhaltern.
● Um Störungen zu vermeiden, benutzen Sie immer voll geladene Akkus in Ihrem Sender
● und Empfänger .
● Bevor Sie den Motor starten, sollten Sie immer die Funktion der Bremse und des
● Gashebels testen.
● Gehen Sie sicher, dass niemand mit der gleichen Frequenz fährt wie Sie.
Nach Betrieb des RC Modells:
● Zuerst den Empfänger abdrehen, dann den Sender abdrehen um unkontrolliertes
Durchgehen zu vermeiden.
● Seien Sie vorsichtig mit gebrauchten Akkus, sie können nach dem Gebrauch heiß
sein.
● Ersetzten Sie Akkus/Batterien die beschädigt sind oder schadhafte Kabel aufweisen,
sie können Kurzschlüsse oder Feuer verursachen.
● Halten Sie Ihr Fahrzeug sauber und entfernen Sie Schmutz und Schmierfett,
damit erhöhen Sie die Lebensdauer Ihres Modells.
Afin d’éviter toutes blessures corporelles et/ou dommages environnants, veuillez procéder en toute responsabilité
comme indiqué ci-dessous
Choisir le lieu adéquat pour faire rouler votre modèle.
● Ne jamais rouler dans les rues ou sur les routes ouvertes au publique. Ceci peut
● provoquer de graves accidents.
● Ne jamais rouler près de personnes ou ďanimaux.
● Pour éviter les blessures, ne pas rouler dans des espaces confinés.
● Ne jamais rouler où le bruit peut déranger, comme aux abords des hôpitaux ou des
● quartiersrésidentiels.
● Ne jamais rouler à l’intérieur: les gaz d’échappement sont nocifs.
Controler votre modèle avant chaque utilisation.
● Vérifier que les vis et les écrour sont bien serrés. ll est trés fortement conseillé ďutiliser du
● frein filet pour bloquer les vis qui sont en contact avec du métal et tout particulierer ment
● les vis du moteur .
● Toujours utiliser des batteries bien chargées pour ľémission et la réception.
● Toujours vérifier les freins et la commande des gaz avant de démarrer.
● Vérifier qu’aucune autre personne n’utilise votre fréquence radio.
Après l'Opération De Votre Modèle de R/C
● Le virage du récepteur premier, alors virage de l'émetteur, ceci empêchera des
● fugitifs.
● Faire attention en contrôlant des piles, ils auront chaud après avoir couru.
● Remplacer n'importe quelles piles qui ont été cabossées ou a éraillé des fils, les
● court-circuits peuvent causer le feu.
● Etre sûr de garder votre modèle de R/C nettoie et libère de terre et la graisse
● supplémen taires, ceci augmentera la vie.

Included items / Im Baukasten enthalten / Outils inclus dans le kit
Radio control car
Ferngesteuertes Modellauto
Voiture radio-commandée
Antenna
Antenne
Antenna
Transmitter
Sender
Emetteur
Equipment needed / Benötigtes Zubehör / Equipement nécessaire
x8
8AA Alkaline Dry Batteries.
8 St. AA Trockenbatterien.
8 piles type R6 pour votre
radio commande.
Tools Recommended / Benötigte Werkzeuge / Outillage
Parts Bag
Kleinteilebeutel
Sachet de pièces détachées
Battery
Akku-Pack
Pack de batterie
Cross wrench
Steckschlüssel
Clé à tube
Charger
Ladegerät
Chargeur
visit www.maxamps.com for a complete
selection of batteries and chargers specifically
for the AX10 Scorpion.
* NiCd*
-
E +
1.5
2.0
2.5
Hex wrench
Inbusschlüssel
Clé Allen
Screwdriver (large)
Schraubenzieher (gross)
Tournevis (gros)
AX20015
AX20016
AX20017
AX20045
Side cutter
Seitenschneider
Pinces coupantes
Modeling knife
Modelliermesser
Couteau de modéliste
Curved scissors
Schere
Ciseaux
Long nose pliers
Flachzange
Pinces à becs longs

Getting Started / Angefangen Zu Werden / Commencer
Charge your battery / Laden des Fahrakkus / Chargement de la batterrie
Follow the manufacturer’s directions for the
* NiCd*
-
E +
charger you purchased to properly charge
your batteries.
Folgen Sie den Herstellernrichtungen für den
Auflader Ihres gekauft ordentlich, Ihre
Batterien zu laden.
Suivre les directions de fabricants pour le
chargeur votre a acheté convenablement
pour charger vos piles.
Charge your battery / Laden des Fahrakkus / Chargement de la batterrie
AX30031
AX30041
AX30041
Do not use Nickel Cadmium battery charger for Nickel Metal Hydride
batteries. If you do not use the special charger for Nickel Metal Hydride
batteries, the batteries will be damaged.
Verwenden Sie kein Ladegerät, dass für Nickel Cadmium Akkus gedacht ist, um Nickel
Metal Hydrid Akkus zu laden. Wenn Sie kein spezielles Ladegerät für Nickel Metal
Hydrid Akkus verwenden, können diese beschädigt werden.
N’utilisez pas de chargeur pour batteries Cadmium-Nickel pour charger des batteries
Nickel-Métal Hydride. Si vous n’utilisez pas un chargeur spécial pour des batteries
!
Nickel-Métal Hydride, celles-ci seront endommagées.
Transmitter Preparation / Vorbereitung des Senders / Préparation de L’émetteur
Antenna
Antenne
Antenna
AA Alkaline Batteries
8x
AA Trockenbatterien
Piles alcalines AA
Transmitter Preparation / Vorbereitung des Senders / Préparation de L’émetteur
Steering Dual Rate
Lenkeinschlagsbegrenzung
Double débit de direction
To be used to adjust steering servo throw.
Zum Einstellen des maximalen Lenkeinschlags.
À utiliser pour le réglage du taux et de l’angle du servo.
Reverse Switch
Servowegschalter
Commutateur d’inversion
You may have to reverse the steering
or throttle switch. Check to make
sure you have proper steering and
throttle before running your new kit
for the first time.
Sie dürfen die Steuerung oder den
Drosselklappenschalter umkehren müssen.
Kontrolle sich zu vergewissern, dass Sie
passende Steuerung und Drosselklappe vor
Laufen Ihres neuen Satzes zum erstem Mal
haben.
Vous pouvez avoir à renverser la direction ou
étranglez le commutateur. Le contrôle pour
s'assurer que vous avez la direction correcte
et étranglez avant de courir votre nouvelle
trousse pour la première fois.
Throttle Trim
Gas-Trimmung
TH. TRIMST. TRIM
If your vehicle is moving, adjust the throttle trim until it stops
Falls sich das Auto bewegt, bitte stellen Sie die Gas-Trimmung so ein, um das
Auto Zum Stillstand zu bringen.
Si la voiture, adjustez le trim de direction pour que la voiture arrête de bouger.
TH. TRIMST. TRIM
Turn steering trim to set tires completely in center position.
Stellen Sie die Trimmung so ein, dass die Räder geradeaus zeigen.
Tournez le trim de direction de façon à ce que les pneus soient dans une position
complètement centrée.
Front
Vorne
Avant
Trim d’accélération
Steering Trim
Lenkungstrimmung
Trim de direction

Trouble Shooting / Fehlerbehebung / Dépannage
Problem
Problem
Problème
Does not move
Das Auto fährt nicht
Le véhicule ne boughe pas
No Control.
Keine Kontrolle über das
Auto Pas de contrôle
Cause
Grund
Cause
Batteries are not installed properly in the transmitter.
Die Batterien sitzen nicht korrekt im Sender.
Les piles ne sont pas placées correctement dans l’émetteur.
Weak or no battery in model.
Leerer oder kein Akku im Auto.
Batterie faible ou non installée
Damaged motor.
Kaputter Motor.
Moteur endommagé
Frayed or broken wiring.
Beschädigte Verkabelung.
Câble dénudé ou coupe
ESC is shut down by heat protection circuit.
Notabschaltung des Reglers wegen Überhitzung.
Le système ESC est fermé par le circuit de protection
thermique.
Improper antenna on transmitter or model.
Zu kurze Antenne am Sender oder Auto.
Antenne inadéquate sur l’émetteur ou le véhicule
Remedy
Lösung
Remède
Make sure batteries are properly installed.
Legen Sie die Batterien korrekt ein.
Positionnez correctement les piles dans l’émetteur.
Install charged battery.
Einbauen eines geladenen Akkus.
Mettez en place une batterie chargée
Replace with new motor.
Austausch durch einen neuen Motor.
Remplacez par un nouveau moteur
Splice and insulate wiring completely.
Erneuern und isolieren Sie die kaputte Stelle.
Faites une épissure et isolez complètement le câble.
Stop driving immediately, do not drive the car until the
Speed Controller cools down.
Fahren Sie nicht weiter. Warten Sie bis der Fahrten regler
abgekühlt ist.
Arrêtez immédiatement de conduire, ne pilotez pas la
voiture tant que le contrôleur de vitesse n’a pas refroidi.
Install charged or fresh batteries.
Einbauen voller Batterien.
Mettez des batteries rechargées ou neuves.
Steering and Throttle
Function Reversed.
Lenkung und Gas funktionieren genau verkehrt
herum.
Direction et accélération
inverses.
Weak or no batteries in transmitter or model.
Leere oder keine Batterien im Sender oder Auto.
Batterie faible ou absente dans l’émetteur ou le véhicule.
Another radio control model using same frequency.
Ein anderes ferngesteuertes Modell verwendet die gleiche
Frequenz.
Un autre véhicule radio-commandé utilise la même
fréquence.
Neutral position or trim is incorrect.
Neutralposistion oder Trimmung sind verstellt.
La position neutre est incorrecte ou le trim n’est pas réglé.
Are the connectors and crystal inserted properly?
Sitzen alle Stecker und der Quarz richtig?
Est-ce que les connecteurs et le quartz sont correctement
mis en place ?
Servo reverse switch is in wrong position.
Servorichtungs-Schalter ist in der falschen Position.
L’interrupteur de marche arrière du servo est dans la
mauvaise position
Please check that the wires from ESC to motor are
connected properly.
Bitte überprüfen Sie, ob die Kabel vom Regler zum Motor
richtig sitzen.
Veuillez vérifier que les fils allant de l’ESC au moteur sont
correctement raccordés.
Fully extend antenna.
Ziehen Sie die Antenne vollständig aus.
Dépliez complètement l’antenne.
Try a different location or wait for the other person to
finish.
Fahren Sie auf einem anderen Platz oder warten Sie, bis das
andere Modell ausgeschaltet ist.
Allez ailleurs ou attendez que l’autre personne ait terminé.
Adjust the steering trim.
Stellen Sie die Lenkungstrimmung neu ein.
Réglez le trim de direction.
Reinstall connectors and crystal into the receiver.
Überprüfen Sie die Steckverbindungen und den Quarz.
Remettez en place les connecteurs et le quartz dans le
récepteur.
Set to correct position.
Satz, Position zu korrigieren
Vérifiez la position correcte
Check to make sure motor and ESC are properly connected.
Kontrolle sich zu vergewissern, dass Motor und ESC
ordentlich verbunden sind.
Le contrôle pour assurer que le moteur et ESC est convenablement connecté.

Upgrades / Steigungen / Montées
Rock Crawling / Schaukeln Sie Kriechen / Balancer Ramper
To upgrade your RTR to a more capable rock crawler we recommend replacing the front diff
gears with a heavy duty locker and changing the gearing to a 14T pinion.
Um Ihr RTR zu einem fähigeren Felsenkriecher wir zu verbessern, empfehlen wir, dass das
Ersetzen von den vorderen diff Gängen mit einem schweren Pflichtschließfach und Änderung
das Einstellen zu einem 14T Treibrad.
Pour améliorer votre RTR à une tortue de rocher plus capable que nous recommandons
remplaçant les engrenages de différence de devant avec un casier très résistant et changeant
l'adapte à un 14T pignon.
Lower Links / Lassen Sie Verbindungen herunter / Abaisser des Liens
AXA186
2
AX80005
AX30572
AX30500
See page 9 and page 24 for installation instructions.
Visit www.rccrawler.com for More Tips!
AXA1331
AXA186
Option Parts
AX30445
Threaded Aluminum Pipe
6x101mm - 30° Angle
AX80005
1
AXA1331
x2
AXA1331
Flanged Ball 3x5.8x7mm
AX30443
6x98mm
AXA1331
Flanged Ball 3x5.8x7mm
AXA1319
7x55mm Post
x4
Upper Links / Obere Verbindungen / Liens supérieurs
x8
AXA186
M3x16mm Set Screw
x4
AXA186
M3x16mm Set Screw
x4
AXA186
x8
x8
x2
AXA186
!
AX80005
Note Direction
Richtung beachten
6
AXA1319
AXA1331
AX80005 6
x2
Note Direction
Richtung beachten
!
AXA186
AX80005
AX80005
6
6
AXA186
1
AX80015
AXA1319
AXA1331

Upgrades / Steigungen / Montées
Steering Links / Steuerung Verknüpft / La direction Relie
AXA1331
Flanged Ball 3x5.8x7mm
AX30442
6x33mm
AXA186
M3x16mm Set Screw
x1
x4
x4
AXA1331
AX80005
2
AX80005
AXA186
1
AXA1331
AX30441
AXA186
AX30442
AXA1331
AXA186
AX80005
1
AX30441
6x106mm
AXA1053
M3 Nylon Locking Hex Nut
AXA1302
2x6mm Spacer
AXA667
M3x15mm
AXA670
M3x25mm
x1
x2
x1
x1
x3
AXA667
AXA1053
AXA667
AXA1053
AXA670
AXA1302
AXA186
AX80005
AXA1331
2
Option Parts
AX30395
Heavy Duty Bevel Gear Set
AX30122
Aluminum Shock Body 12x55mm
AX30445
Threaded Aluminum Pipe
6x101mm - 30° Angle
AX30482
AX10 Scorpion Motor Plate
AXA1053
AX30486
AX10 Scorpion Battery/Servo Plate
Springs
AX30213 Super Soft (Red)
AX30214 Soft (White)
AX30215 Medium (Green)
AX30216 Firm (Yellow)
AX30217 Super Firm (Blue)

Tuning and Setup
Réglage et mise au point
Batteries / Batterien / Piles
Optional Battery Mounting
The standard 7.2V stick pack can be mounted on the battery/radio tray as shown in the instructions. However this is not the most ideal mounting place for competitive rock crawling since it
places most of the weight higher in the chassis. You can also use smaller packs (LiPo, Lithium Ion, receiver packs, etc.) that offer a much lower weight. Ideally you want the bulk of the weight
to be over the front axle. If you plan on competing or simply want to improve the performance of your AX10 Scorpion it is recommended to relocate your batteries over the front axle. You can
mount the battery pack on top of the steering servo using Velcro, plastic zip ties, or strapping tape. You can also mount the battery pack using the optional AX10 Scorpion Battery/Servo Plate
(AX30486) as shown.
Optionale Akkubefestigung
Der normale 7,2V Stick Pack kann wie beschrieben auf die Elektronik Grundplatte montiert werden. Diese Position ist nicht der idealste Ort, da das Gewicht höher als das Chassis ist. Sie
können auch kleinere Packs verwenden (LiPo, Lithium Ion, Empfängerpacks...) die leichter sind. Im Idealfall kommt das Gewicht über die Vorderachse. Wenn Sie ein Rennen mitfahren, oder
die Leistung Ihres Wagens optimieren wollen wird empfohlen, die Akkus über die Vorderachse zu montieren. Sie können den Akkupack auf dem Lenkservo mit Klettverschluss, Kabelbinder
oder Klebeband montieren. Sie können auch den Akku mit dem Option Part AX30486 nach Bedarf montieren.
Monter facultatif de Pile
Le standard 7.2V tas de baton peut être monté sur le plateau de pile/radio selon les instructions. Cependant ceci n'est pas l'endroit montant le plus idéal pour ramper de rocher compétitif puisque
il place la plupart du poids plus haut dans le châssis. Vous pouvez utiliser aussi de plus petits tas (LiPo, l'Ion de Lithium, les tas de récepteur, etc.) cela offre un abaisse beaucoup le poids.
Idéalement vous voulez que la masse du poids pour ait été par-dessus l'essieu avant. Si vous planifiez sur concourir ou simplement le besoin pour améliorer l'exécution de votre AX10 Scorpion
qu'il est recommandé reloger vos piles par-dessus l'essieu avant. Vous pouvez monter le tas de pile sur la direction le Velcro d'utilisation servo, la fermeture éclair en plastique lie, ou sangler la
bande. Vous pouvez monter aussi le tas de pile utilisant le facultatif AX10 Scorpion Plaque Pile/Servo (AX30486) comme indiqué.
Visit www.rccrawler.com for More Tips!
visit www.maxamps.com for a complete selection of batteries and chargers
specifically for the AX10 Scorpion.
Wheels - Tires / Räder - Ermüdet / Les roues - Fatigue
The AX10 Scorpion is set up to be competitive right out of the box, however terrain, weather and driving style all affect the performance of the chassis. You can fine tune performance of your
AX10 Scorpion by adding weight, trimming the inner foam, and tuning your tires.
Der AX10 Skorpion ist konstruiert, um aus der Schachtel konkurenzfähig zu sein, jedoch beeinflussen Gelände, Wetter und Fahrstil die Leistung vom Chassis. Sie können die Leistung Ihres AX10 Skorpion durch hinzufügen
von Gewichten, Trimmen der Reifeneinlage und der Reifenabstimmung einstellen.
Le AX10 Scorpion s'est établi pour être la droite compétitif de la boîte, cependant le terrain, le temps et la conduite conçoivent tout affecte l'exécution du châssis. Vous pouvez condamner à une amende l'exécution d'air de
votre AX10 Scorpion en ajoutant le poids, taillant la mousse intérieure, et l'accordement de vos pneus.
Adding Weight / Addiergewicht / Poids ajoutant
You can add weight to the front axle to improve traction. Most users will use stick on
wheel weights that fit inside the tire and mount to the wheel, but you can also use Airsoft
pellets or BB’s. You will have to experiment to determine how much weight to add.
Sie können an der Vorderachse Gewicht hinzufügen um die Traktion zu verbessern. Die meisten
Fahrer verwenden Aufsteckbare Rädergewichte die innerhalb des Reifens montiert werden, Sie
können aber auch Airsoft Kugeln oder BB´s verwenden. Sie werden experimentieren müssen, um zu
bestimmen, wieviel Gewicht Sie hinzufügen müssen.
Vous pouvez ajouter le poids à l'essieu avant pour améliorer la traction. La plupart des utilisateurs
utiliseront le baton sur les poids de roue qui capable dans le pneu et le mont à la roue, mais vous
pouvez utiliser aussi les boulettes de Airsoft ou BB. Vous aurez à expérimenter pour déterminer
combien de peser pour ajouter.
Tire Flex / Reifen Flex / Le pneu Fléchit
You can adjust the amount of tire flex you get by trimming your inner foam. Visit
www.rccrawler.com to see all the choices you have before trimming your inner foams.
Sie können die Eigenschaften des Reifens durch trimmen der Reifeneinlage ändern. Besuchen Sie
www.rccrawler.com, um Möglichkeiten für diese Änderung zu sehen, bevor Sie die Einlage bearbeiten.
Vous pouvez ajuster la quantité de pneu fléchit vous obtient en taillant votre mousse intérieure.
Www.rccrawler.com de visite pour voir tous les choix que vous avez avant de tailler vos mousses
intérieures.
Standard Trimmed
7

Tuning and Setup
10 69.23 71.54 73.85
11 62.94 65.03 67.13
12 55.77 57.69 59.62 61.54
13 51.48 53.25 55.03 56.80
14 46.70 47.80 49.45 51.10 52.75
15 43.59 44.62 46.15 47.69 49.23
16 40.87 44.62 43.27 44.71 46.15
17 36.32 39.37 40.72 42.08 43.44
18 34.62 34.41 37.18 38.46 39.74 41.03
19 32.79 34.41 35.22 36.44 37.65 38.87
20 31.15 32.69 33.46 34.62 35.77 36.92
21 28.57 29.67 31.14 31.87 32.97 34.07 35.16
22 27.27 28.32 29.72 30.42 31.47 32.52 33.57
23 26.09 27.09 28.43 29.10 30.10 31.10 32.11
24 24.04 25.00 25.96 27.24 27.88 28.85 29.81 30.77
25 23.08 24.00 24.92 26.15 26.77 27.69 28.62 29.54
26 22.19 23.08 23.96 25.15 25.74 26.63 27.51 28.40
27 20.51 21.37 22.22 23.08 24.22 24.79 25.64 26.50 27.35
28 19.78 20.60 21.43 22.25 23.35 23.90 24.73 25.55 26.37
29 18.57 19.10 19.89 20.69 21.49 22.55 23.08 23.87 24.67 25.46
30 17.95 18.46 19.23 20.00 20.77 21.79 22.31 23.08 23.85 24.62
31 17.37 17.87 18.61 19.35 20.10 21.09 21.59 22.33 23.08 23.82
32 16.83 17.31 18.03 18.75 19.47 20.43 20.91 21.63 22.36 23.08
33 16.32 16.78 17.48 18.18 18.88 19.81 20.28 20.98 21.68 22.38
34 15.84 16.29 16.97 17.65 18.33 19.23 19.68 20.36 21.04 21.72
Spur
Pinion
48 Pitch
Réglage et mise au point
Shock Absorbers / Dämpfer / Amortisseurs
Proper building, maintenance, and tuning of your shocks will enhance the performance of your AX10 Scorpion. Be sure to inspect the shocks regulary for any sign of wear or damag and replace
parts as needed. Tune your shocks to enhance the performance of your AX10 Scorpion using the tips provided below.
Ordnungsgemäßer Zusammenbau, Wartung und Abstimmung der Dämpfer wird die Leistung Ihres AX10 Skorpion erhöhen. Prüfen Sie unbedingt regelmäßig die Dämpfer auf Verschleiß und ersetzen Sie die nötigen Teile.
Stimmen Sie Ihre Dämpfer ab wie untenstehend beschrieben, um die Leistung des Wagens zu erhöhen.
Le bâtiment correct, l'entretien, et accordant de vos chocs améliorera l'exécution de votre AX10 Scorpion. Etre sûr d'inspecter le regulary de chocs pour n'importe quel signe d'usure ou damag et remplace des parties comme
nécessaire. Accorder vos chocs pour améliorer l'exécution de votre AX10 Scorpion utilisant les pointes fournies au dessous.
Visit www.rccrawler.com for More Tips!
Shock Oil / Dämpferöl / Huile pour amortisseaur
Thinner / Dünner / Plus fluide
Softer damping
More traction
Quicker weight transfer
Weichere Dämpfung
Mehr Griff
Schnellere gewichtsverlagerung
Amortissement plus doux
Plus d’adhérence
Transfert de masses du châssis plus rapide
Thicker / Dicker / Plus visqueuse
Stiffer damping
Slower chassis weight transfer
Reacts slower to input
Härtere Dämpfung
Langsamere Gewichtsverlagerung
Auto reagiert langsamer auf Steuerbefehle
Amortissement plus rigide
Transfert de masses du châssis plus lente
La voiture répond plus lentement
aux commandes
Gear Ratio / Getriebeübersetzung / Rapports De Démultiplication
Use this equation to calculate the final drive ratio.
Final Drive Gear Ratio = 1 / ((pinion/Spur) X .13)
Mit dieser Gleichung können Sie die Gesamtübersetzung
berechnen.
Gesamtübersetzung = 1 / ((pinion/Spur) X .13)
Utlisez cette equationpour calculer le rapport de transmission final
Rapport de transmission final = 1 / ((pinion/Spur) X .13)
70 72 75 78 81 85 87 90 93 96
Shock Spring / Dämpferfeder / Ressort d’amortisseur
Softer / Weicher / Plus souple
More Chassis Roll
Mehr rollbewegung des chassis
Plus de roulis du châssis
Less Chassis Roll
Weniger rollbewegung des chassis
Moins de roulis du châssis
Thicker / Dicker / Plus visqueuse
AX30213 Super Soft (Red)
AX30214 Soft (White)
AX30215 Medium (Green)
AX30216 Firm (Yellow)
AX30217 Super Firm (Blue)
Slower - More Torque
Langsamer - Mehr Kraft
73.85:1
15.38:1
Faster - Less Torque
Schneller - Weniger Kraft
35 15.38 15.82 16.48 17.14 17.80 18.68 19.12 19.78 20.44 21.10
8

AX30405
Input Shaft 5x28mm
AX30163
Pin 2x10mm
AXA1393
E2.5 e-clip
AX30392
13T Bevel Gear
x1
x1
x1
x1
1
AXA1393
AX30163
AX30392
AX30405
Option Parts
AX30395
Heavy Duty Bevel Gear Set
AX30392
38T Bevel Gear
AX30170
Shaft 3 x 22
AX30390
10T Bevel Gear
AXA1162
O-Ring 5x1mm
x1
AXA015
M2x10mm
b
AX30390
13T Bevel Gear
x2
x4
x1
x2
a
x2
2
Tip
AX30500
AX80002
1
AXA1162
AX30390
AX30390
AX30390
AXA1230
a
AX30170
AX30390
b
AXA1162
b
a
AXA1221
Replace AX30390 gears with locker to
improve traction when rock crawling.
See page 12 for installation directions.
AX30385
AX30392
AX30420
Heavy Duty Locker
AXA015
AXA1230
Bearing 10x15x4mm
AXA1221
Bearing 5x11x4mm
AX30420
Solid Axle Dogbone 6x74mm
x2
x2
x2
AX30420
AXA1230
AXA1221
9
3
AXA1221
Bearing 5x11x4mm
AXA087
M3x16mm
x2
AXA1040
M3 Thin Hex Nut
x2
AXA085
M3x10mm
x2
x2
If Gear mesh is tight,
make sure input shaft
!
is seated correctly.
OK! NO!
AXA087
AXA085
AX80003
AXA1221
2
AXA1040
AX80003
AXA1040
AXA1221
1
AX80018
AX80019 1
1
10

AXA863
M3x6mm Tapping Binder Head
x4
4
AXA863
AX80012
2
AXA863
AX30366
Axle 5x35mm
AXA1221
Bearing 5x11x4mm
x2
x2
5
Note Direction
Richtung beachten
!
OK! NO!
AXA865
AX80004
Note Direction
Richtung beachten
!
AXA863
AXA863
AX80012
1
x2
1
AXA1230
AX30366
AXA1230
Bearing 10x15x4mm
AXA865
M3x10mm Tapping Binder Head
x2
x4
AXA865
AX80018
AX80018 3
!
3
Note Direction
Richtung beachten
AXA1221
AX80018
AX80018
3
3
AXA865
AXA865
11

AX30405
Input Shaft 5x28mm
AX30163
Pin 2x10mm
AXA1393
E2.5 e-clip
AX30392
13T Bevel Gear
x1
x1
x1
x1
6
AXA1393
Option Parts
AX30163
AX30392
AX30405
AX30395
Heavy Duty Bevel Gear Set
7
1
AX80002
AX30500
AX30385
AX30392
AX30500
Heavy Duty Locker
AX30392
38T Bevel Gear
AXA1230
Bearing 10x15x4mm
AXA1221
Bearing 5x11x4mm
x1
AXA015
M2x10mm
x1
x2
x2
x4
AXA1221
AX30421
AXA1230
THREAD
LOCK
THREAD
LOCK
AXA1230
AXA015
AX30421
AXA1221
AX30421
Solid Axle Dogbone 6x104.5mm
x2
12
8
AXA1221
Bearing 5x11x4mm
AXA087
M3x16mm
x2
AXA1040
M3 Thin Hex Nut
x2
AXA085
M3x10mm
x2
x2
If Gear mesh is tight,
make sure input shaft
!
is seated correctly.
OK! NO!
AX80003
AXA087
AXA1221
2
AXA085
AXA1040
AX80003
AXA1040
AXA1221
1
AX80018
1
13
AX80019
1

AXA863
M3x6mm Tapping Binder Head
x4
9
AXA863
AX80020
1
AXA863
AX30380
Metal Driveshaft Yoke
Option Parts
AX30493
Aluminum Drive Shaft Rings
x4
Option Parts
AX30494
Aluminum Straight Axle Adapter
10
AX30380
x2
AX80011
AXA863
1
AXA863
1
2
AX80011
AX80020
AX30380
11
x4
2
AXA1392
E2 e-clip
AXA1358
Shock Damper 3x7x8
AX30148
Shock Shaft 3x64
x8
AXA1201
O-Ring 3x2mm (P3)
x4
x4
x8
AX80014
AX80008
AX80013 1
AXA1201
3
AXA1358
6
AX80018 1
AX30148
AX80014
AXA1392
14


14
x4
AX80018 1
AX80016
2
1
AX80018
AXA180
M3x3mm Set Screw
AXA867
M3x15mm Tapping Binder Head
AXA180
M3x3mm Set Screw
x1
x1
x1
151615
1516
AX80016
AXA867
1
AXA180
THREAD
LOCK
AXA867
M3x15mm Tapping Binder Head
x1
AX80016
AXA867
1
AXA180
THREAD
LOCK

AXA089
M3x25mm
x2
171717
AXA089
AX80018
2
2
AX80018
AXA089
M3x25mm
x2
1518
AXA089
AX80018
AXA089
2
AX80018 2
AXA089

19
AXA1218
AX80009
2
AX30404
Outdrive Shaft
AXA013
x3
M2x6mm
AX30394
20T Drive Gear
AX30198
Drive gear Shaft 5x53.5
AXA1218
Bearing 5x10x4mm
AXA1225
Bearing 8x16x5mm
x1
AX30162
Pin 1.5x8mm
x2
x1
x1
x4
x2
AX30190
Shaft 5x18
x1
AXA1218
AX30198
AX30162
AX30190
AXA013
AXA1218
AX30394
AXA1218
AXA1225
AX30404
AX80010 2
AX80010
AXA1225
AX30404
1
5
AX80009
AXA088
M3x20mm
AXA1053
M3 Nylon Locking Hex Nut
x1
x1
20
AXA088
THREAD
LOCK
AX80009
Note Direction
Richtung beachten
!
AXA1053
3
AX80009
4
18


AXA1280
M3x10mm Flange Screw
x1
31
Install when servo
is in neutral position.
Bei Montage auf
Neutralstellung achten.
AX80006 7
23 Airtronics / JR / KO
AXA1280
M3x10mm Flange Screw
AXA1280
x4
32
AXA1280
AXA1280
AX80006 8
AX80006
4
AXA1280
AXA1280
AX80006
90°
5, 6, 7
AX80006 6
24 Hitec
AX80006 5
25 Futaba
33
2
AX80017
1
AX80018
AXA1280
M3x14mm Step Screw
AXA866
M3x12mm Tapping Binder Head
AXA868
M3x18mm Tapping Binder Head
x2
x1
x1
AX80018
1
AXA1290
AXA866
AX80017
23
AXA868
AXA1290
1

AXA180
M3x3mm Set Screw
x1
34
AX30578
Pinion 48DP 20T
x1
AXA1070
Washer 3x6x0.5
AXA083
M3x6mm
x2
Tip
AX30572
Pinion 48DP 14T
Replace with 14T pinion for better
rock crawling ratio.
AXA180
x2
AX30578
x1
AXA1070
AXA083
AXA1070
AXA083
AXA894
M3x8mm Tapping Flat Head
x1
35
Double Sided Tape
Doppelklebeband
AX30483
AXA894
3
AX80007
Double Sided Tape
Doppelklebeband
24

AXA894
M3x8mm Tapping Flat Head
x2
36
AXA894
AXA894
37
AX30041
AX30041
AX30031
AX30031
b
a
25

AXA015
M2x10mm
x48
38
AX12010
AX8098
Tighten all screws in
a star pattern as shown
Die Schrauben wie
gezeigt anziehen
!
AXA180
M3x3mm Set Screw
AX30429
12mm Aluminum Hub
AX30163
Pin 2x10mm
x4
x4
x4
AXA1045
M4 Nylon Lock Nut
x4
Make sure tire
bead seats properly
and beadlock ring
sits flush.
!
Auf richtigen Sitz achten
AXA015
39
AX8112
x4
AX8112
x4
Do Not Over Tighten
Nicht zu stark Anziehen
!
AXA015
AXA1090
Washer 4.8x14
x4
AX30429
AXA180
AX30163
AXA1090
AXA1045
26
AXA1059
AXA1059
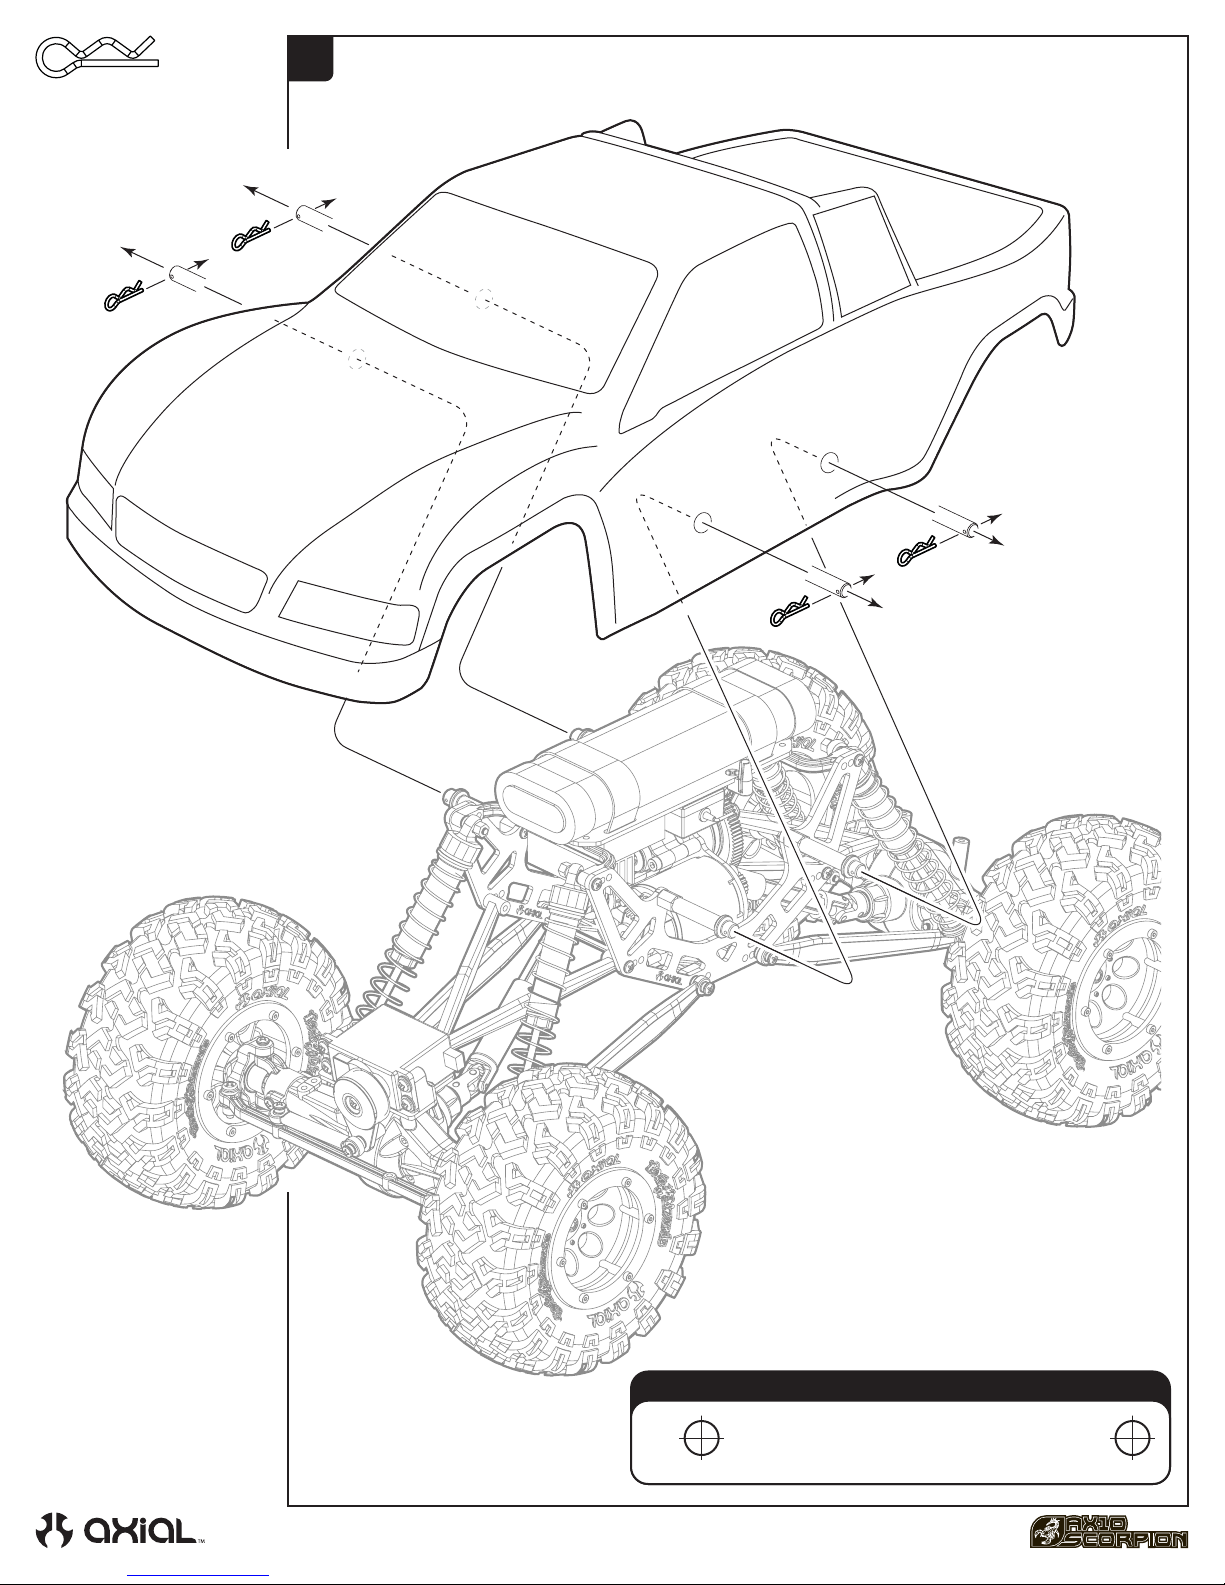
6mm Body Clip
40
x4
AXA1059
AXA1059
AXA1059
Body Post Template
27

Notes
Option Parts
AX30395
Heavy Duty Bevel Gear Set
AX30122
Aluminum Shock Body 12x55mm
AX30445
Threaded Aluminum Pipe
6x101mm - 30° Angle
AX30490
AX10 Scorpion Outrunner
Motor Plate
28
AX30486
AX10 Scorpion Battery/Servo Plate
Springs
AX30213 Super Soft (Red)
AX30214 Soft (White)
AX30215 Medium (Green)
AX30216 Firm (Yellow)
AX30217 Super Firm (Blue)


AX30572
Pinion 48DP 14T
x1
AXA1090
Washer 4.8x14
x4
AXA864
M3x8mm Tapping Binder Head
x2
AX30578
Pinion 48DP 20T
AXA013
M2x6mm
AXA083
M3x6mm
x1
AX30672
Spur 48DP 87T
x3
AXA015
M2x10mm
x5
AXA087
M3x16mm
x56
x1
x4
AXA1091
Washer 5x10x.5mm
AXA1162
O-Ring 5x1mm
AXA1186
O-Ring 9.5x1.5mm (S10)
AXA1201
O-Ring 3x2mm (P3)
AXA1218
Bearing 5x10x4mm
AXA1221
Bearing 5x11x4mm
AXA1225
Bearing 8x16x5mm
x2
x8
x1
x4
x10
x4
x2
AXA865
M3x10mm Tapping Binder Head
AXA866
M3x12mm Tapping Binder Head
AXA867
M3x15mm Tapping Binder Head
AXA868
M3x18mm Tapping Binder Head
AXA869
M3x20mm Tapping Binder Head
AXA894
M3x8mm Tapping Flat Head
AXA895
M3x10mm Tapping Flat Head
AXA896
M3x12mm Tapping Flat Head
x12
x1
x4
x1
x4
x6
x2
x2
AXA088
M3x20mm
AXA1040
M3 Thin Hex Nut
AXA1045
M4 Nylon Lock Nut
AXA1053
M3 Nylon Locking Hex Nut
AXA1059
6mm Body Clip
AXA1070
Washer 3x6x0.5
AX1071
Washer 4x8x1mm
x5
x1
AXA089
M3x25mm
x4
x1
x5
x4
x1
x7
AXA1230
Bearing 10x15x4mm
AXA1280
M3x10mm Flange Screw
AXA1280
M3x14mm Step Screw
AXA1358
Shock Damper 3x7x8
AXA1392
E2 e-clip
AXA1393
E2.5 e-clip
AXA180
M3x3mm Set Screw
AXA863
M3x6mm Tapping Binder Head
x8
x2
x5
x6
x5
x2
x4
x8
30

AX80003
AX80003
AX80004
11
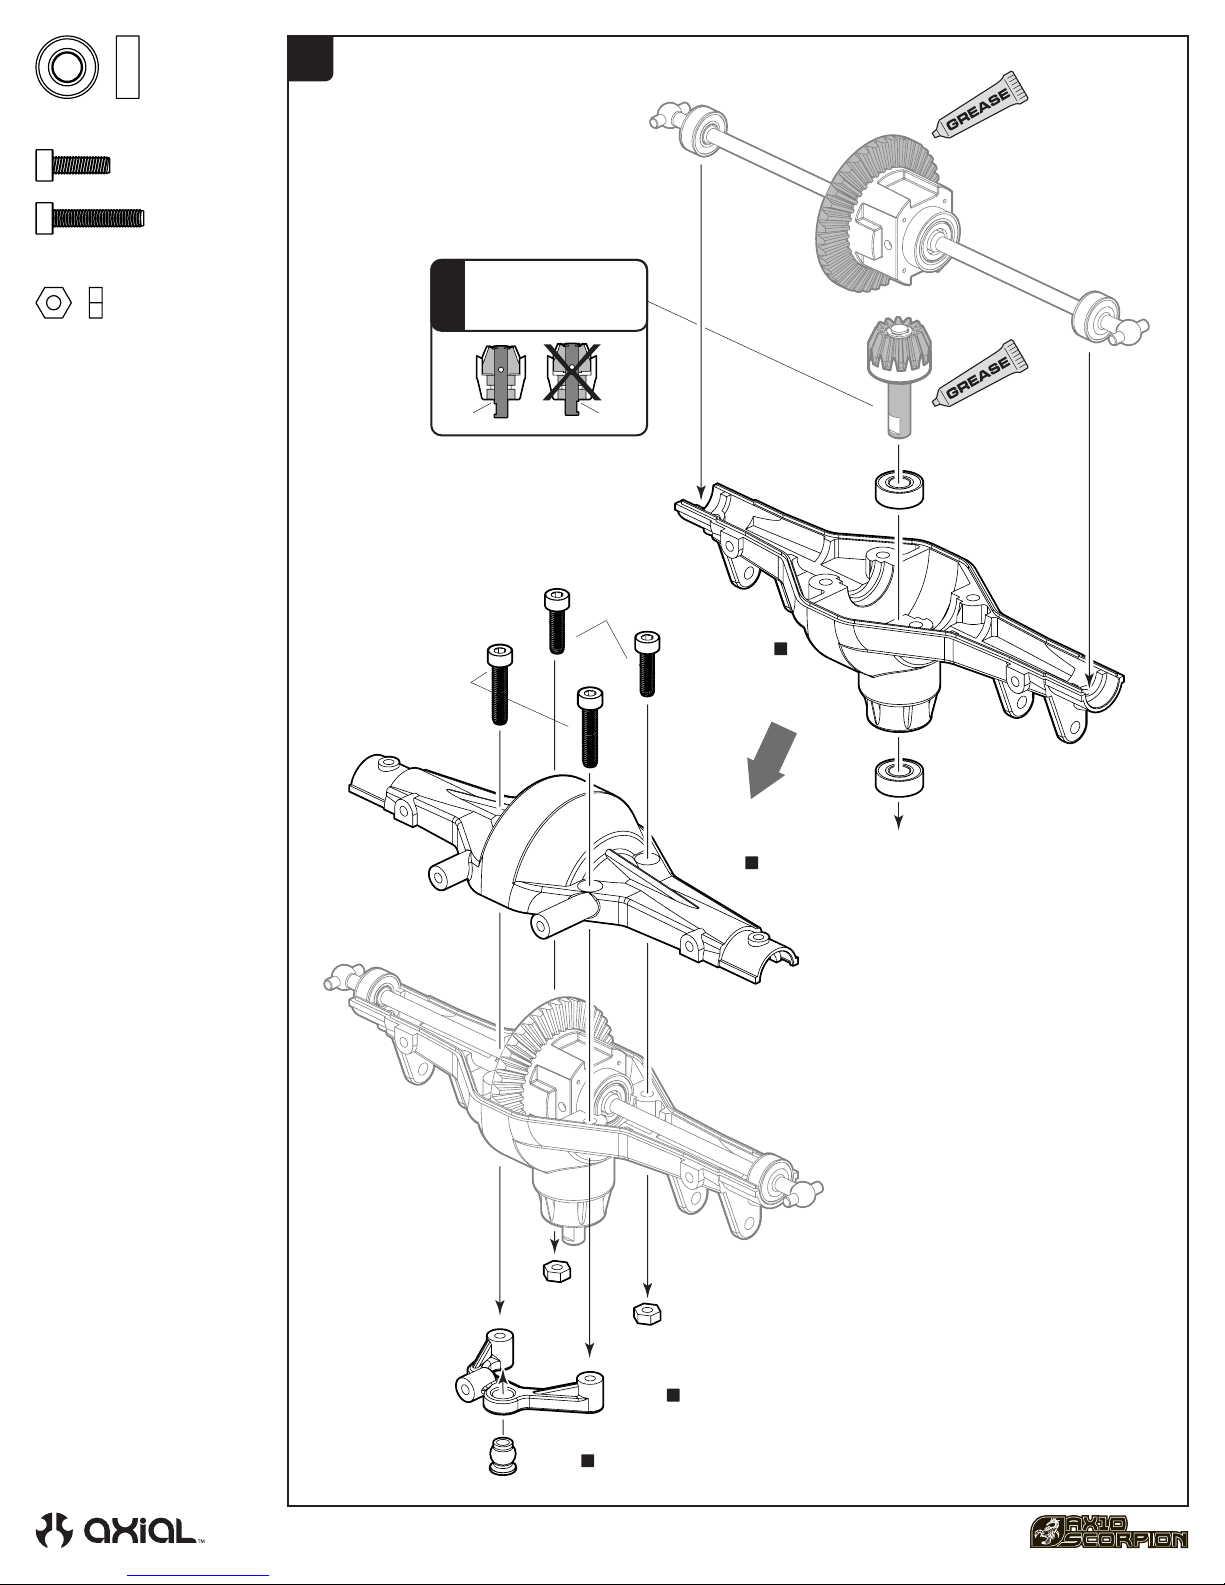
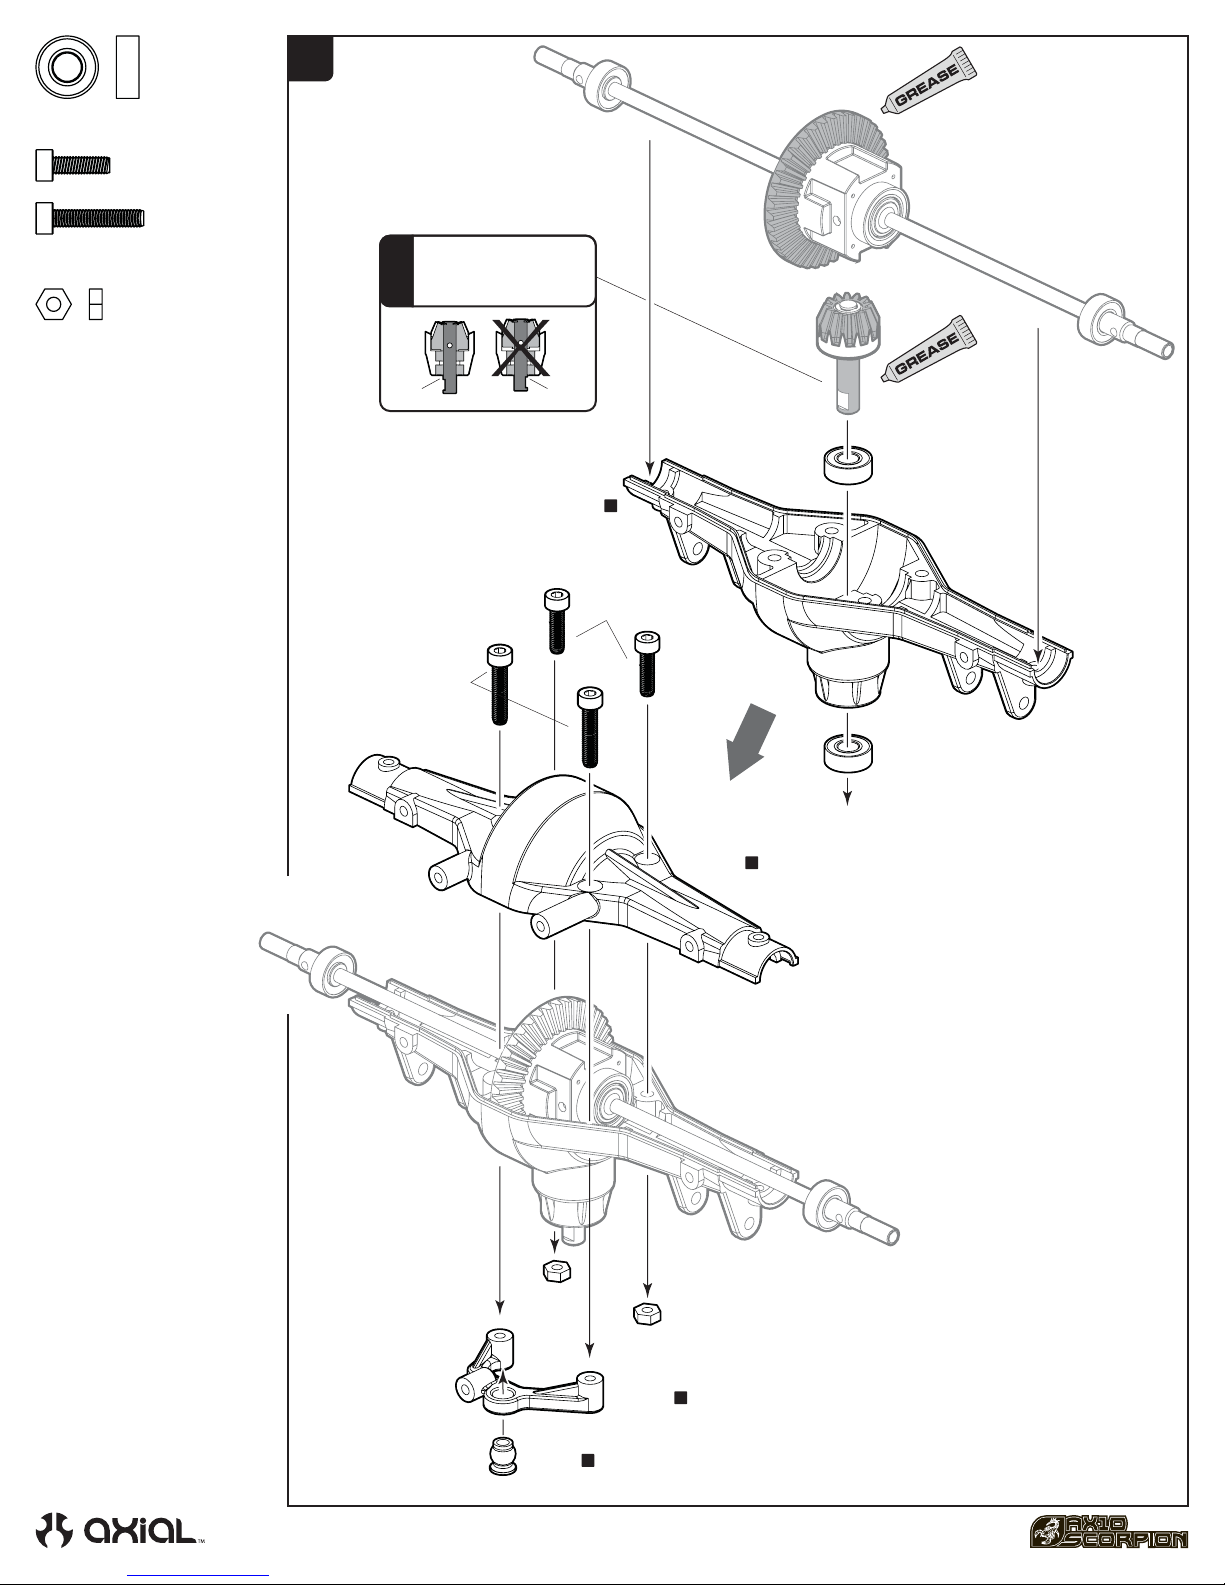
AX80002
Diff Case
23
AX80003
Solid Axle Set
x2
x2
1
2
AX80007
3
4
23
AX80009
1
2
45
1
1
1
234
567 8
1
3
6
2
AX80004
Hub Set
AX80006
Servo Set
x1
AX80006
x1
AX80007
Radio/Transmission Mounting Set
AX80009
x1
AX80008
6
8 10
7
5
4
1
9
AX80008
Shock Parts Set
Transmission Set
x1
x1
AX80010
Gear Set
2
3
AX80011
Drive Shaft Set
x1
AX80011
123
3
x2
31

AX80012
12
AX80012
C Hub Carrier Set
AX80013
1
x1
AX80014
Shock Cap Set
x2
1
1
2
2
3
3
AX80014
AX80014
4
4
AX80017
AX80013
80-125 Shock Body Set
AX80016
Linkage Parts Tree
x1
x2
11
223
1
1
AX80016
2
2
AX80017
Steering Link Parts Tree
x1
AX80018
11
1
22
33
AX80018
Hardware Parts Tree
1
x2
AX80020
Straight Axle Adapter Parts Tree
32
x1
AX80019
AX80019
3 Link Holder Parts Tree
AX80020
1
1
2
2
x1

Exploded View / Explosionsansicht / Vue éclatée
AX30031
AX30041
AX30041
AX24250
AX80007
AXA894
AX80018
AXA894
AXA869
AX80018
AX80007
AX30483
AXA867
AX30578
AXA894
AXA1059
AX80019
AXA180
AXA083
AX80018
AXA083
AX30031
AXA867
AXA1070
AXA1059
AXA1070
AX80018
AX30489
AX80019
AXA869
AX30480
AXA865
AXA865
AX24004
AX80009
AX80009
AX80009
AX30380
AXA180
AXA1071
AXA1045
AX80011
AXA1091
AX80011
AXA083
AX30413
33
AXA083
AXA1070
AXA1070
AX30380
AX30672
AXA180
AX30410
AX30412
AX30410
AX30491
AX80007
AXA1053
AXA894
AX80009
AXA895

AX80007
AX30394
AXA1218
AX80018
AX30162
AX30198
AXA1225
AX80018
AX30162
AX30404
AXA1218
AX80010
AX30190
AX80009
AXA1218
AX30404
AX80010
AXA013
AX30480
AX80009
AXA1218
AXA1225
AX80009
AX30380
AXA089
AXA089
AXA089
AXA180
AXA088
AX80011
AX80011
AX30380
AXA180
AX80014
AX80018
AXA1186
AXA1392
AX80014
AXA1392
AX30148
AXA1358
AX80013
AX80008
AXA1201
AX80014
AXA865
AXA869
AX80018
AXA865
AXA867
AX80019
AX80018
AXA869
AXA867
AXA1059
AX80019
AXA1059
34
AX30213 Super Soft (Red)
AX30214 Soft (White)
AX30215 Medium (Green)
AX30216 Firm (Yellow)
AX30217 Super Firm (Blue)
AX80008
AX80008
AX80018

Exploded View / Explosionsansicht / Vue éclatée
AXA089
AX80018
AX80018
AXA865
AX80016
AXA1045
AXA1090
AXA180
AX30429
AX30163
AXA1221
AX80004
AXA089
AXA865
AXA865
AXA1290
AX80018
AXA1230
AXA866
AX30366
AX80017
AXA868
AX80012
AXA864
AXA1280
AX80018
AX80018
AX80006
AX80018
AX80016
AX80018
AX80018
AXA1290
AXA864
AX80006
AX30420
AX80006
AXA1221
AXA1280
AXA1230
AX80007
AXA1280
AXA896
AX80002
AXA085
AXA896
AXA864
AXA1162
AX30390
AXA087
AX80007
AXA894
AXA864
AX30390
AX30170
AX30485
AX30385
AXA1162
AX30392
AX80003
AX80003
AX30392
AXA1221
AXA1393
AX30163
AXA015
AXA1230
AXA1040
AXA1221
AXA1221
AX80018
AXA867
AXA1040
AX30420
AXA864
AX80018
AX80012
AX30405
AXA865
AX80018
AX80016
AX80018
AX80018
AX80019
AXA864
AX30366
AXA1230
AXA089
AXA865
AX80004
AX80017
AXA865
35

AXA1045
AXA1090
AXA180
AX30163
AX30429
AX80020
AXA863
AX80018
AX80019
AXA865
AXA863
AX30405
AXA867
AX80003
AXA1221
AXA1221
AXA1040
AX80016
AX30421
AXA1230
AX30163
AXA1221
AXA865
AX30392
AXA015
AXA1393
AX80018
AX80016
AX80018
AX30392
AX30385
AX80003
AX30500
AX80002
AXA1230
AXA089
AX30421
AXA085
AXA087
AXA1221
AXA863
AXA863
AX80020
AXA180
AX30163
AX30429
AXA1045
AXA1090
AXA015
AX8112
AX30429
AXA1221
AX30163
AXA1090
AXA180
AXA1045
AX12010
36
AX12010
AX8098
AXA015
AX8112

Parts List
Part # Description Part # Description
AX12010
AX30041
AX30148
AX30162
AX30163
AX30170
AX30190
AX30198
AX30217
AX30366
AX30380
AX30385
AX30390
AX30392
AX30394
AX30404
AX30405
AX30410
AX30411
AX30412
AX30413
AX30420
AX30421
AX30429
AX30480
AX30483
AX30485
AX30489
AX30491
AX30500
AX30572
AX30578
AX30672
AX4017
AX80002
AX80003
AX80004
AX80006
AX80007
AX80008
AX80009
AX80010
AX80011
AX80012
AX80013
AX80014
AX80016
AX80017
AX80018
AX80019
AX80020
AX8098
Axial 2.2 Rock Lizards Tire
Velcro Strap 15x170mm
Shock Shaft 3x64
Pin 1.5x8mm (6pcs.)
Pin 2.0x10 (6pcs.)
Shaft 3 x 22 (2pcs.)
Shaft 5x18 (2pcs.)
Slipper Drive gear Shaft 5x53.5
Spring 14x90mm 3.01 lbs/in- Super Firm (Blue)
Axle 5x35mm
Metal Driveshaft Yoke
Diff Gasket 16x25x0.5mm
Differential Gear Set
Bevel Gear Set (38/13)
20T Drive Gear
Outdrive Shaft (2pcs)
Input Shaft 5x28mm (2pcs)
Inner Slipper Plate
Outer Slipper Plate
Slipper pad 27x8x1mm
Slipper spring 8.5x12 165 lbs/in - Black (2pcs)
Solid Axle Dogbone 6x74mm
Straight Axle 6x104.50mm
12mm Aluminum Hub (Black)
AX10 Scorpion Chassis Set
AX10 Scorpion Radio Plate
AX10 Scorpion Servo Plate
Transmission Spacer 5x6.9x4.8mm
AX10 RTR Motor Plate
Heavy Duty Locker
Pinion 48DP 14T
Pinion 48DP 20T
Spur 48DP 87T
Baja Buzzard Truck Body - .040" (Pre-printed) - Green
Diff Case -Small
Solid Axle Set
Hub Set
Servo Set
Radio/Transmission Mounting Set
Shock Parts Set
Transmission Set
Gear Set
Drive Shaft Set
C Hub Carrier Set
80-125 Shock Body Set
Shock Cap Set
Linkage Parts Tree
Steering Link Parts Tree
Hardware Parts Tree
3 Link Holder Parts Tree
Straight Axle Adapter Parts Tree
2.2 8 hole Beadlocks
AX8112
AXA013
AXA015
AXA083
AXA086
AXA087
AXA088
AXA089
AXA1040
AXA1045
AXA1053
AXA1059
AXA1070
AXA1071
AXA1090
AXA1091
AXA1162
AXA1186
AXA1201
AXA1218
AXA1221
AXA1225
AXA1230
AXA1280
AXA1290
AXA1358
AXA1392
AXA1393
AXA180
AXA863
AXA864
AXA865
AXA866
AXA867
AXA868
AXA869
AXA894
AXA895
AXA896
Electronics
AX24250
AX24004
Option parts/upgrades
AX12011
AX30122
AX30213
AX30214
AX30215
AX30216
AX30217
AX30395
AX30441
2.2 Beadlock Ring (Grey) (2pcs)
M2x6mm Cap Head (Black Oxide) (10pcs)
M2x10mm Cap Head (Black Oxide) (10pcs)
M3x6mm Cap Head (Black Oxide) (10pcs)
M3x12mm Cap Head (Black Oxide) (10pcs)
M3x16mm Cap Head (Black Oxide) (10pcs)
M3x20mm Cap Head (Black Oxide) (10pcs)
M3x25mm Cap Head (Black Oxide) (10pcs)
M3 Thin Hex Nut (BLACK) (10pcs)
M4 Nylon Lock Nut (Black) (10pcs)
M3 Nylon Locking Hex Nut (BLACK) (10pcs)
6mm Body clip (Black) (10pcs)
Washer 3x6x0.5 (10pcs)
Washer 4x8x0.5mm (10pcs)
Washer 4.8x14 (Black) (4pcs)
Washer 5x10x.5 (Black) (10pcs)
O-Ring 5x1mm (10pcs)
O-Ring 9.5x1.5mm (S10) (10pcs)
O-Ring 3x2mm (P3) (10pcs)
Bearing 5x10x4mm
Bearing 5x11x4mm
Bearing 8x16x5mm
Bearing 10x15x4mm
M3x10mm Servo Flange Screw
Step Screw M3x4x14mm (6pcs)
Shock Damper 3x7x8 (10pcs)
E2 e-clip (10pcs)
E2.5 e-clip (10pcs)
M3x3mm Set Screw (Black Oxide) (10pcs)
M3x6mm Tapping Binder Head (Black Oxide) (10pcs)
M3x8mm Tapping Binder Head (Black Oxide) (10pcs)
M3x10mm Tapping Binder Head (Black Oxide) (10pcs)
M3x12mm Tapping Binder Head (Black Oxide) (10pcs)
M3x15mm Tapping Binder Head (Black Oxide) (10pcs)
M3x18mm Tapping Binder Head (Black Oxide) (10pcs)
M3x20mm Tapping Binder Head (Black Oxide) (10pcs)
M3x8mm Tapping Flat Head (Black Oxide) (10pcs)
M3x10mm Tapping Flat Head (Black Oxide) (10pcs)
M3x12mm Tapping Flat Head (Black Oxide) (10pcs)
AE-1 Forward/Reverse ESC
AM27 540 Electric Motor (27T)
Axial 2.2 Rock Lizards Tires (Race Compound)
Aluminum Shock Body 12x55mm (2pcs.)
Spring 14x90mm 1.32 lbs/in - Super Soft (Red)
Spring 14x90mm 1.71 lbs/in - Soft (White)
Spring 14x90mm 2.25 lbs/in - Medium (Green)
Spring 14x90mm 2.78 lbs/in - Firm (Yellow)
Spring 14x90mm 3.01 lbs/in- Super Firm (Blue)
Heavy Duty Bevel Gear - 38T
Threaded Aluminum Pipe 6x106mm (2pcs.)
37

Part # Description Part # Description
AX30442
AX30443
AX30445
AX30482
AX30486
AX30492
AX30493
AX30494
AX4000
AX4001
AX4002
AX4004
AX4007
AX4008
AX4016
AX4018
AX4019
AX80005
AX80015
AX8090
AX8091
Threaded Aluminum Pipe 6x33mm (2pcs)
Threaded Aluminum Pipe 6x98mm (2pcs)
High Clearance Links - 6x101mm - 30 degree Angle (2pcs)
AX10 Scorpion Motor Plate
Optional AX10 Scorpion Battery/Servo Plate
AX10 Scorpion Rear Steer Kit
Driveshaft Ring - Grey (2pcs)
Aluminum Rear Axle Lockout (2pcs)
Axial War Wagon Truck Body .060 Pre-Cut Clear
Axial Baja Buzzard Truck Body .060 Pre-Cut Clear
Axial Diablo Truck Body .060 Pre-Cut Clear
B-17 Betty Truck Body (Clear)
B-17 Betty Truck Body .040"-uncut (Clear)
Axial Baja Buzzard Truck Body - .040" (Clear)
34 Rat Rod Truck - .060" (Clear)
Baja Buzzard Truck Body - .040" (Pre-printed) - Orange
Baja Buzzard Truck Body - .040" (Pre-printed) - Blue
Linkage Set
3 Link Connector
Axial 2.2 Rockster Beadlocks (White)
Axial 2.2 Rockster Beadlocks (Black)
AX8092
AX8093
AX8096
AX8097
AX8098
AX8099
AX8110
AX8111
AX8112
AX8113
AX8114
AX8115
AX8116
AX8117
AXA1319
AXA1331
AXA186
Axial 2.2 Rockster Beadlocks (Chrome)
Axial 2.2 Rockster Beadlocks (Black Chrome)
2.2 8 Hole Beadlocks (White)
2.2 8 Hole Beadlocks (Black)
2.2 8 Hole Beadlocks (Satin Chrome)
2.2 8 Hole Beadlocks (Black Chrome)
2.2 Beadlock Ring (Green)
2.2 Beadlock Ring (Purple)
2.2 Beadlock Ring (Blue)
2.2 Beadlock Ring (Red)
2.2 Beadlock Ring (Grey)
2.2 Rock Beadlock Ring (Green)
2.2 Rock Beadlock Ring (Purple)
2.2 Rock Beadlock Ring (Blue)
2.2 Rock Beadlock Ring (Red)
2.2 Rock Beadlock Ring (Grey)
M3x16mm Set Screw (Black Oxide) (10pcs)
Warranty Info
Axial Limited Warranty (USA)
Your Axial product is warranted to be free of defects in materials and workmanship when new. This warranty does not cover damages due to normal
wear and tear, user's failure to perform routine maintenance, user error of assembly or installation, user modifications, addition of aftermarket parts or
option parts. This warranty lasts as long as the original purchaser owns the product, and is not transferable (Verified by dated itemized sales receipt).
In the event of a defect under this warranty, Axial will, at our discretion, repair or replace the product, provided our inspection indicates that an
original defect exists. Axial reserves the right to replace any product which is no longer available with a product of comparable value and function. If
Axial determines the repair is not covered under warranty guidelines, there could be a charge applied for the repair and return shipping charges.
International Customers Warranty
Please return product to the dealer where the purchase was made. If your Axial product purchase was made through an on-line retailer, any warranty
issues must be taken care of by that retailer. Axial assumes no responsibility for Axial products sold internationally by on-line retailers.
Service
If you need service on your Axial product here are some simple steps to follow when sending in product in for Warranty/ Repair.
STEP 1:
Contact Axial Customer Service at 949-600-8642 Ext: 206 to receive a Return Merchandise Number (RMA#). Note: Axial requires the RMA# to be placed
on the return merchandise box when shipped to Axial.
STEP 2:
Please write a short note explaining the issue you experienced with the product.
STEP 3:
Include your return address with a daytime phone number and /or e-mail address.
STEP 4:
Please include a Money Order in the amount $10.00 made payable to Axial for return shipping costs although If product is found to be under Axial
Warranty coverage, the $10.00 will be refunded to you.
PLEASE NOTE: Tuning issues are not covered under the Axial Warranty and shipping fee's do apply.
Please allow 5-10 working days for product to be returned. Axial ships using United Postal Service Priority mail or UPS Ground. Any expedited shipping
must be arranged and prepaid by customer. Axial will not be responsible for lost or damaged packages.
38

AX90002-I001
21092 Bake Parkway, #114
Lake Forest, CA 92630
Tel: 949.600.8642
Fax: 949.600-8645
 Loading...