

Page 1

User Manual
<TX340G>
www.sprint.com
TX340G User Manual
Page 2

Consejo: Para encontrar esta manual para usuarios en
clic en Support > Devices.
To find this user manual in Spanish, please visit
www.sprint.com
Important Privacy Message – Sprint ’s policies often do not
apply to third-party applications. Third-party applications
may access your personal information or require Sprint to
disclose your customer information to the third-party
application provider. To find out how a third-party
application will collect, access, use, or disclose your personal
information, check the application provider’s policies, which
can usually be found on their website. If you aren’t
comfortable with the third-party application’s policies, don’t
use the application.
español,por favor visita a www.sprint.com y haz
and click Support > Devices.
TX340G User Manual
Page 3

Table Of Contents
Tip: Looking for something? If you don’t see it in the headings
listed here, try the index on page 34 .
Introduction ............................................................................................. 5
Overview ............................................................................................ 6
Features ............................................................................................. 6
Menu Option Table ............................................................................ 6
Section 1: Getting Started ....................................................................... 8
1A. Basic Installation............................................................................... 9
Package Contents ........................................................................... 10
Internal Battery Installation ............................................................ 11
Setting Up The Terminal.................................................................. 11
Wall Jack Tester............................................................................... 12
A-GPS for E911 ................................................................................ 13
Wall Mount Installation.................................................................... 13
LED Indicators ................................................................................. 14
Audible Indicators ........................................................................... 15
Section 2: TX340G FWT ....................................................................... 16
2A. Basic Operation/Activation.............................................................. 17
Power ON / OFF ............................................................................... 17
Activation ......................................................................................... 17
Setting Up Your Voicemail .............................................................. 18
Sprint Account Passwords ............................................................. 18
Getting Help ..................................................................................... 19
Making Calls.....................................................................................20
Receiving Calls ................................................................................ 20
Sound................................................................................................21
Adjusting Voice Volume..................................................................21
Adjusting Alert Tone Volume...........................................................21
Setting One Minute Alert ................................................................21
Setting Voice Privacy Alert .............................................................21
Setting Connection Alert.................................................................21
Setting Auto Send Time..................................................................22
Using # As Send Key......................................................................22
Setting DTMF Length ..................................................................... 22
Security.............................................................................................22
Changing Lock Code......................................................................22
Restricting Outgoing Calls..............................................................23
Activation/Re-Activation Reset .......................................................23
Factory Reset.................................................................................23
PRL Update....................................................................................23
TTY/TDD............................................................................................24
Mode Setting ..................................................................................24
Section 3: Sprint Service .......................................................................25
3A. Advanced Features .........................................................................26
Call ID................................................................................................26
Setting Caller ID Mode ...................................................................26
Call Waiting ID................................................................................26
Caller Name Display.......................................................................27
Call Waiting ...................................................................................... 27
Three-Way Calling............................................................................27
TX340G User Manual
Page 4

Voice Mail Service ........................................................................... 27
Troubleshooting .............................................................................. 29
Specifications .................................................................................. 30
Section 4: Safety and Warranty Information.......................................... 31
4A. Important Safety Information........................................................... 32
Safety Precautions .......................................................................... 32
4B. Manufacturer’s Warranty................................................................. 37
Manufacturer’s Warranty ................................................................ 37
Index ..................................................................................................... 40
TX340G User Manual
Page 5

This User Manual introduces you to Sprint service and all the features of
your new device. It’s divided into four sections:
♦ Section 1: Getting Started
♦ Section 2: TX340G FWT(Fixed Wireless Terminal)
♦ Section 3: Sprint Service
♦ Section 4: Safety and Warranty Information
Note: Because of updates in TX340G software, this printed manual may
not be the most current version for your TX340G. Visit
www.sprint.com
version of the user manual.
WARNING: Please refer to the Important Safety Information section on
Page 32 to learn about information that will help you safely
use your TX340G. Failure to read and follow the Important
Safety Information in this TX340G manual may result in
serious bodily injury, death, or property damage.
Introduction
and sign on to My Sprint to access the most recent
TX340G User Manual
Page 6

Overview
Features
The TX340G is a dual-band (800/1900Mhz) fixed wireless voice terminal
that is perfect for a seamless land-line like service. TX340G is designed
to provide a simple phone service at a home or business. Its Assisted
GPS feature provides E911 service to accurately determine the location
of the caller in case of an emergency. The TX340G allows the users to
migrate from landline to wireless without losing any functionality of their
regular home phone service.
- CDMA2000 1x voice services (backward compatible to IS-95 A/B)
- 800/1900 MHz Dual Band
- TTY/TDD Telephone Support
- 3 multi-colored LED Indicators (Signal, Mode and Power)
- 2 RJ-11 Bridged Ports (with max 4 REN)
- Dial-Tone and DTMF Generation
- Desktop and Wall-Mountable
- Call Waiting, Three-way Calling and Call Forwarding
- Call Restriction
- Type II Caller ID (or Call Waiting Caller ID)
- OTA (IS-683A)
Menu Option Table
Access the menu by first lifting the handset or pressing the TALK button
on your cordless phone and press ** followed by the appropriate number
sequence as shown below.
TX340G User Manual
Page 7

MENU
("**○○")
1.Sound
2.General
Sub Menu ITEM
1. Adjusting
Voice
Volume
2.AlertVolume *Louder
3.Setting 1
MinuteAlert
4.VoicePrivacy
Alert
5.Connection
Alert
1. Setting Caller
ID
2. Setting Auto
Send
time
3.#asSendkey *Off
4. Setting DTMF
Length
*Louder
#Lower
#Lower
*Off
#On
*Off
#On
*Off
#On
0 No Caller
ID
1 DTMF
Standard
2 FSK
(Bellcore):D
efault
3~9seconds
0OFF
#On
*Long
#Short
EXAMPLE
**11*(louder)
**11#(lower)
**12*(louder)
**12#(lower)
**13*(off)
**13#(on)
**14*(off)
**14#(on)
**15*(off)
**15#(on)
**210#(Nocallerid)
**211#(DTMF)
**212#(FSK)
**223#(3seconds)
**220#(off)
**23*(off)
**23#(on)
**24*(Long)
**24#(Short)
3.Security
4.TTY
1. Changing Lock
code
2.Restricting
OutgoingCalls
3. SprintOnly *Off
4. Activation/
Re‐Activation
5.FactoryReset Resets
6.UpdatePRL Lock code,
1.TTYModeSet 0TTYFULL
Old lock
code,(Tone)
,
New lock
code,#,
New lock
codeagain
Lockcode,
* Off or #
On
#On
MSL code,
<#>
module to
factory
default,<#>
<#>
1TTYTALK
2TTYHEAR
3 TTY OFF
(Default)
Tochangefrom0000to1234
**310000(confirmtone)
1234#1234#
Iflockcodeis0000,press
**320000*(off)
**320000#(on)
**33*(off)
**33#(on)
MSLcodeis000000:
**34000000
Iflockcodeis0000:
**350000
Iflockcodeis0000:
**360000
**410#:TTYFULL
**411#:TTYTALK
**412#:TTYHEAR
**413#:TTYOff
Three escalating beeps (bee-bee-beep) indicate a successful entry.
Three short beeps (beep-beep-beep) indicate an unsuccessful entry.
TX340G User Manual
Page 8

Getting Started
Section 1
TX340G User Manual
Page 9

1A. Basic Installation
♦ Package Contents(page10)
♦ Internal Battery Installation(page11)
♦ Setting Up The Terminal(page11)
♦ Wall Jack Tester(page12)
♦ GPS for E911(page13)
♦ Wall Mount Installation(page13)
♦ LED Indicators(page14)
♦ Audible Indicators(page15)
TX340G User Manual
Page 10

Package Contents
After opening the package, check to make sure that you have all the
parts shown below.
If any item is missing or broken, please call your service provider’s
support center.
① TX340G 1x Fixed Wireless Terminal
② CDMA Dual Band Dipole and AGPS Antenna
③ Power Adapter (Input: AC100-240V, 50/60Hz / Output:5V/2A)
④ Backup Battery
⑤ User Manual
⑥ Stand bracket
⑦ RJ-11 Phone Cord
⑧ Home Wiring Line Tester
CAUTION
Use the provided power adapter only. Using other power adapter may cause
permanent damage to the terminal.
TX340G User Manual
Page 11

Internal Battery Installation
Setting Up The Terminal
This TX340G operates by receiving electricity from an electrical outlet or
internal battery.
1. Open the battery cover on the bottom side of the terminal.
2. Connect the Battery power cable to the terminal.
3. Insert the battery pack in the right position between the hold bars.
4. Close the battery cover.
1. Connect the antenna by screwing it into the TNC connector on the
back of the terminal.
2. Connect a wired or cordless telephone to the terminal using the RJ-11
phone cord.
NOTE: Use wired or cordless telephones compatible to FCC part
68 only. Non-compliant telephones may not work properly.
3. Plug the AC adapter plug into the DC 5V jack of the Terminal.
4. Plug the AC adapter plug into an appropriate electrical outlet.
Connecting the Terminal to Home Phone Wall Outlet.
The TX340G can be connected to a home wall phone jack to generate a
dial tone service throughout the entire home and allow users to use
phones from any other home wall phone jack. Please verify that the
home wall phone jacks do not have existing active telephone service and
that they are not powered. Before connecting the terminal to home wall
jack, please test with the included “Wall Jack Tester”.
TX340G User Manual
Page 12
Wall Jack Tester (PSTN Line Tester)
The wall jack tester will verify if the wall phone jack is powered by existing
or previous landline phone service.
IMPORTANT NOTE
DO NOT CONNECT YOUR TERMINAL TO A WALL JACK IF PSTN
LINE IS STILL IN SERVICE.
Connecting the terminal to the live wall jack may interfere with the
existing phone service
1. Plug the tester into the wall jack.
2. If tester’s Green colored LED illuminates (ON), your PSTN line is still
active and powered. In this case, contact your existing or previous
landline phone service provider to disconnect the phone service and
power.
NOTE: Alternately, 2-line cross adapter may be used to
bypass the powered first phone line. Please see next
section, using 2-line cross adapter.
3. If Green colored LED does not illuminate, the wall phone jack is not
powered and you can safely connect your terminal to wall jack.
and damage the terminal.
[LED OFF – line is safe to use]
TX340G User Manual
Page 13

A-GPS for E911
Your terminal supports an A-GPS feature to meet a FCC 911 mandate,
which makes the location of the terminal available to 911 operators in the
case of emergency situations. During the emergency call, all the LEDs on
the terminal will blink and your location can then be determined by the
911 operator.
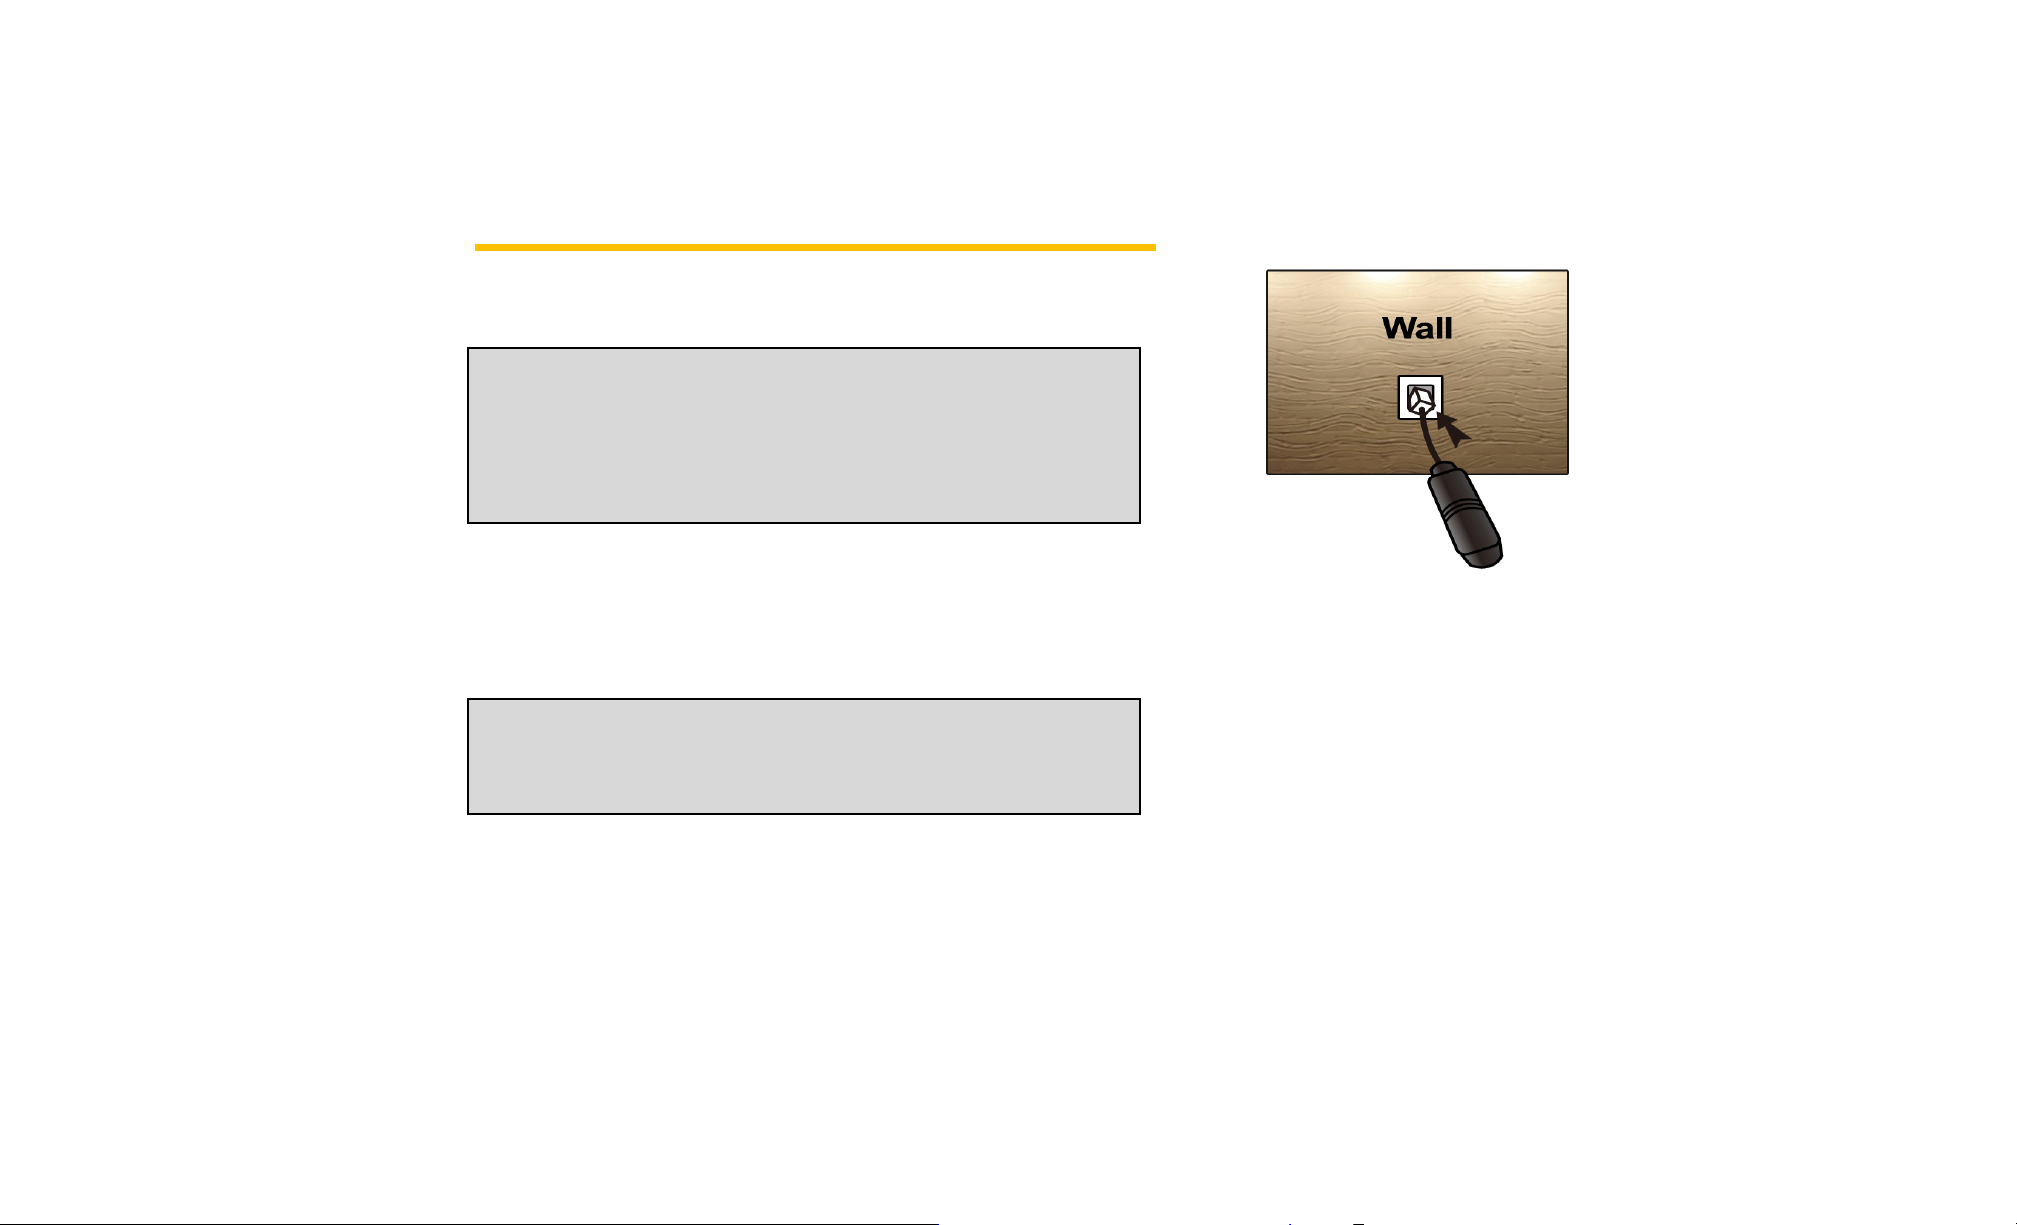
Wall Mount Installation
1. Mark two mounting holes locations on a wall to match the screw holes
on the back of the terminal.
2. Drill two holes and put screws at the marked locations.
3. Tighten the screws until the head is about 5mm from the wall.
4. Plug in the AC power connector and route the power cord in the
groove, if needed. Connect antenna.
5. Hang the terminal on the screws using the two holes on the back.
6. Push the terminal down until the unit is firmly locked into place.
TX340G User Manual
Page 14

GETTING TO KNOW THE TERMINAL
LED Indicators
MODE/
MSG
Blinking status,Signal<-90db
OFF - No service
Solid Off-Hook or In Use
Green
Blinking Incoming Call
Item Color Status Description
POWE
R
SIGNAL
Green
OFF - No Battery
Green Solid Signal>-75db
Green Slow
Orange Solid Good Signal
Orange
Red Solid Signal < -90db
Red Slow 3S off, 1S on, In Roam
Solid
Blinking Charging
Solid Mid Battery Level Orange
Blinking Battery Error
Solid Low Battery Red
Blinking Low Battery Warning
Blinking
Slow
Blinking
In Battery Mode: Fully Charged
In Adaptor mode: Connected
3S off, 1S on, In Roam status
3S off, 1S on, In Roam status,
Signal>-90db
Orange Blinking Voice Mail Waiting
E911
Call
All LEDs Blinking
All LEDs blink during emergency
call
TX340G User Manual
Page 15

Audible Indicators
Type Condition Meaning
The FWT is
in-service with
adequate receive
signal.
FWT is not capable
of making or
receiving calls.
FWT is not capable
of making calls but is
capable of receiving
calls.
The handset is not
properly laid down.
Checking the
handset.
Normal dial
tone
No Service tone
Outgoing call
restriction tone
Howler tone
Freq:350 + 440 Hz
Cadence: Continuous
Duration: 30s ±2s
Frequency:425Hz
Cadence:1.5s on / 0.8s
off,
0.33s on / 0.8s
off
Frequency: 425Hz
Cadence:0.8son/o.2soff
Frequency:1400+2060/
2450+2600Hz
Cadence:100ms on/
100ms off
TX340G User Manual
Page 16

TX340G FWT
(Fixed Wireless Terminal)
Section 2
TX340G User Manual
Page 17

2A. Basic Operation/Activation
Activation
♦ Power ON / OFF(page17)
♦ Activation(page17)
♦ Setting Up Your Voicemail(page18)
♦ Sprint Account Passwords(page18)
♦ Getting Help(page19)
♦ Making Calls(page20)
♦ Receiving Calls(page20)
♦ Sound(page21)
♦ Security(page22)
♦ TTY/TDD(page24)
Power ON / OFF
The power switch is located on the back side of the terminal
1. Turn on the unit by moving switch to ON position.
2. Turn off the unit by moving switch to OFF position.
NOTE: When you turn on the terminal, Power LED is Green then
turns to Green, Orange or Red depending on battery power .It
automatically searches for cellular service.
After successfully acquiring cellular service, the Signal LED turns
to Green, Orange or Red depending on signal strength.
1. Check if the terminal is turned on and setup properly.
2. Check signal LED to ensure the terminal is receiving a good signal.
3. With a house phone connected to the terminal, pick up the handset of
the phone.
4. When you hear dial tone, press the Activation sequence **34 000000#.
5. The terminal will begin the Activation process.
NOTE: If you purchased your phone at a Sprint Store, it is
probably activated and ready to use.
If you received your phone in the mail and it is for a new
Sprint account or a new line of service, it is designed to
activate automatically. To confirm your activation, make a phone
call.
If you received your phone in the mail and you are activating
a new phone for an existing number on your account, you
will need to go online to activate your new phone.
From your computer’s Web browser, go to
www.sprint.com/activate
instructions to activate your phone.
When you have finished, make a phone call to confirm your
activation. If your phone is still not activated or you do not have
access to the Internet, contact Sprint Customer Service at
1-888-211-4727 for assistance.
and complete the on screen
TX340G User Manual
Page 18

Setting Up Your Voicemail
Sprint Account Passwords
Your phone automatically transfers all unanswered calls to your
voicemail, even if your phone is in use or turned off. You should set up
your Sprint Voicemail and personal greeting as soon as your phone is
activated. Always use a password to protect against unauthorized
access.
1. Dial your Sprint voicemail number .
2. Follow the system prompts to:
¾ Create your password.
¾ Record your name announcement.
¾ Record your greeting.
NOTE: Voicemail Password
Sprint strongly recommends that you create a password when setting
up your voicemail to protect against unauthorized access. Without a
password, anyone who has access to your phone is able to access
your voicemail messages.
For more information about using your voicemail, see “Voicemail” on
page 27
As a Sprint customer, you enjoy unlimited access to your personal
account information, your voicemail account, and your data services
account. To ensure that no one else has access to your information, you
will need to create passwords to protect your privacy.
Account Username and Password
If you are the account owner, you will create an account username and
password when you sign on to www.sprint.com
click Sign up now! to get started).If you are not the account owner (if
someone else receives the bill for your Sprint service), you can get a
sub-account password at www.sprint.com
. (Click Sign in and then
.
Voicemail Password
You’ll create your voicemail password when you set up your voicemail.
See “Setting up Your Voicemail” on page 28 for more information on your
voicemail password.
TX340G User Manual
Page 19

Getting Help
Sprint 411
Managing Your Account
Online: www.sprint.com
¾ Access your account information.
¾ Check your minutes used (depending on your Sprint service
plan).
¾ View and pay your bill.
¾ Enroll in Sprint online billing and automatic payment.
¾ Purchase accessories.
¾ Shop for the latest Sprint phones.
¾ View available Sprint service plans and options.
¾ Learn more about data services and other products like Sprint
Picture Mail, games, ringers, screen savers, and more.
From Your Sprint Phone
¾ Press *4 to check minute usage and account balance.
¾ Press *3 to make a payment.
¾ Press *2 to access a summary of your Sprint service plan or get
answers to other questions
From Any Other Phone
¾ Sprint Customer Service: 1-888-211-4727.
¾ Business Customer Service: 1-800-927-2199.
Sprint 411 gives you access to a variety of services and information,
including residential, business, and government listings; movie listings or
showtimes; driving directions, restaurant reservations, and major local
event information. You can get up to three pieces of information per call,
and the operator can automatically connect your call at no additional
charge.
There is a
airtime.
¾ Press 411
per-call charge
to
use
Sprint
411, and you will
be billed for
Sprint Operator Services
Sprint Operator Services provides assistance
calls or when
party.
third
¾ Press 0
For more information or to see the la
us online
you place calls billed to a
.
at
www.sprint.com.
test in products and services,
when you place co
local telephone calling card or
llect
visit
TX340G User Manual
Page 20

Making Calls
y
Receiving Calls
1. Check if the terminal is turned on.
2. Pick up the handset of the phone.
3. If you hear a dial tone, dial the desired telephone number by using the
wired or cordless telephone’s keypad.
NOTE: You can dial a phone number with a maximum of 32 digits,
including * and #.
4. Wait for about 3 seconds until the call is automatically processed by
the terminal. (Auto Dial Time can be configured from 3 seconds to 9
seconds, or turned-off).
NOTE: If “# as Send Key” feature is enabled, press the # button to
process the call immediately after entering the dialed number.
Default setting is OFF. Please refer to the page 14 for “Using # as
Send Ke
5. When the other recipient answers, begin conversation.
NOTE: If Connection Alert is turned on, a beep is heard when the
call is connected. The default setting is OFF.
6. To hang up, put the phone receiver back on the phone hook or press
the TALK or OFF button on your phone.
”.
The wired or cordless telephone(s) connected to the terminal ring
when an incoming call comes in.
1. Pick up the phone receiver to answer the call.
2. To disconnect after the call is finished, place the handset on the phone
hook or press the TALK or OFF button on your phone.
NOTE 1: If using cordless phone, press TALK or OFF button to
answer the phone call. Refer to the cordless phone user manual for
instruction.
NOTE 2: Make sure that the attached telephone(s) ringers are
enabled.
TX340G User Manual
Page 21

Sound
Adjusting Voice Volume
You can control the volume level of the terminal.
1. Pick up the handset and listen to the dial-tone.
2. Press **11* to raise the voice volume.
3. Press **11# to lower the voice volume.
4. A confirmation beep will sound.
NOTE 1: Some phones may have their own volume control.
Use both the terminal and the phone volume controls to
optimize the sound level.
NOTE 2: Volume cannot be adjusted while a conversation is in
progress.
Adjusting Alert Tone Volume
1. Pick up the handset.
2. Press **12* to raise the alert tone volume.
3. Press **12# to lower the alert tone volume.
Setting One Minute Alert
incoming and outgoing calls. This tone is to help the user keep
track of the phone usage. To change the setting:
1. Pick up the handset.
2. Press **13# to enable the feature.
3. Press **13* to disable the feature.
Setting Voice Privacy Alert
If enabled, a beep is generated when Voice Privacy is on.
To change the setting:
1. Pick up the handset.
2. Press **14# to enable the feature.
3. Press **14* to disable the feature.
Setting Connection Alert
If enabled, a discrete tone is generated on the receiver when a call is
connected.
To change the setting:
1. Pick up the handset.
2. Press **15# to enable the feature.
3. Press **15* to disable the feature.
NOTE: The default setting may depend on the service provider.
When this feature is enabled, a discrete tone is generated at each
one minute interval on the receiver during a conversation for both
TX340G User Manual
Page 22

Setting Auto Send Time
Setting DTMF Length
Similar to a landline phone, the terminal automatically makes the
call shortly after the user finishes entering the phone number. To
change the setting:
1. Pick up the handset.
2. Press **22 Then press 3 ,9 or 0 and press # .
For example, to set the auto-send time to 5 seconds, press **225# .
NOTE 1: 0 value disables auto-send. If disabled, the user must
press # to make a call. # functions as a SEND key on the mobile
phone. If auto-send time is set to 0, then the # as SEND feature is
automatically enabled.
NOTE 2: The default auto send time is 3 seconds.
Using # As Send Key
Similar to mobile phones, pressing the # key after entering the
phone number can act as SEND key.
This feature can be enabled or disabled. To change the setting:
1. Pick up the handset.
2. Press **23# to enable the feature.
3. Press **23* to disable the feature.
NOTE: The default setting is OFF. If the Auto-Send Time is set as 0, then
“# as SEND key” feature is automatically enabled.
Some ARS (Automatic Response Service) require short or long
DTMF tones depending on the system. To change the setting:
1. Pick up the handset.
2. Press **24# to select Short DTMF tone.
3. Press **24* to select Long DTMF tone.
Security
Changing Lock Code
The lock code prevents the terminal from being used by an
unauthorized person without permission. The default lock code is
0000 .
To change the lock code:
1. Pick up the handset.
2. Press **31 .
3. Enter the old 4 digit lock code. For example 0000 , a long beep will
sound as confirmation. If not correct, an error tone will sound.
4. Enter the new 4 digit lock code followed by # . For example 1234# , a
long beep will sound as confirmation.
5. Re-enter the new 4 digit lock code followed by # . For example 1234# ,
a long beep will sound as confirmation. If not correct, an error tone will
sound.
TX340G User Manual
Page 23

For example, to change the lock code from 0000 to 1234 , press
**31 0000 1234#
1234# .
Restricting Outgoing Calls
NOTE 1: The default MSL code is 000000.
NOTE 2: Activation/Re-Activation reset includes Moto C24 default
settings and send activate command.
This feature can be used to block outgoing calls from being made.
But incoming call can still be received.
To change the setting:
1. Pick up the handset.
2. Press **32 .
3. Enter 4 digit lock code.
4. Press # to enable or * to disable.
NOTE 1: The default lock code is 0000 . To change, refer to
“Changing Lock Code” section.
NOTE 2: If someone tries to make a call when outgoing call
restriction is enabled, the terminal sounds a beep and howler
Activation/Re-Activation Reset
Reset the user configuration to default settings.
1. Pick up the handset.
2. Press **34 .
3. Enter the 6 digit MSL code.
4. Press # to reset. If not correct, an error tone will sound.
Factory Reset
Reset the user configuration to factory default settings.
1. Pick up the handset.
2. Press **35 .
3. Enter the 4 digit lock code.
4. Press # to reset. If not correct, an error tone will sound.
NOTE 1: The default lock code is 0000. To change, refer to
“Changing Lock Code” section.
NOTE 2: Factory reset includes auto send time, lock code, call
restrictions, caller ID type, voice privacy alert, connection alert and
1 minute alert.
PRL Update
This feature can be used to update PRL.
To change the setting:
1. Pick up the handset.
TX340G User Manual
Page 24

2. Press **36 .
3. Enter 4 digit lock code.
4. Press # to enable. If not correct, an error tone will sound.
NOTE 1: The default lock code is 0000 . To change, refer to
“Changing Lock Code” section.
NOTE 2: Need good signal can update PRL to succeed.
TTY/TDD
Mode Setting
To use the TTY/TDD feature, refer to following instruction. The default
setting is OFF.
1. Connect the TTY/TDD phone to the terminal through the RJ-11 jack.
2. Pick up the handset.
3. Press **410# for TTY Full Mode.
4. Press **411# for TTY Talk Mode.
5. Press **412# for TTY Hear Mode.
6. Press **413# for Off.
NOTE 1: For the detailed instructions, contact your service provider.
NOTE 2: Some TTY device may not generate the DTMF tone for *
and #, which is necessary to change the TTY/TDD mode. In such
case, please use regular analog phone to enter the mode change key
sequence.
TX340G User Manual
Page 25

Sprint Service
Section 3
TX340G User Manual
Page 26

3A. Advanced Features
♦ Call ID(page26)
♦ Call Waiting(page27)
♦ Three-Way Calling(page27)
♦ Voice Mail Service(page27)
♦ Troubleshooting(page29)
♦ Specifications(page29)
Call ID
Caller ID allows people to identify a caller before answering the phone by
displaying the number of the incoming call. If you do not want your
number displayed when you make a call, follow these steps.
1. Press *67.
2. Enter a phone number.
To permanently block your number, call Sprint Customer Service.
Setting Caller ID Mode
If your phone connected to the terminal is caller ID enabled, you can
set the terminal to display the caller identification number or name
on the LCD display of the wired or cordless phone.
To change the setting:
1. Pick up the handset.
2. Press **210# to disable the Caller ID feature.
3. Press **211# to enable DTMF Standard type.
4. Press **212# to enable FSK (Bellcore) type.
NOTE: The default setting of Caller ID is FSK.
Call Waiting ID
The Call Waiting ID feature allows the display of the second caller’s
number while already in a conversation (call waiting). This feature
works only with FSK Caller ID setting. In order to use this feature,
the corded/cordless phone must support caller ID and call waiting
ID, also known as type II caller identification.
TX340G User Manual
Page 27

Caller Name Display
Three-Way Calling
This feature allows the display of the caller’s name on the corded or
cordless phones that support alpha-numeric display for caller name
display. This is a network dependent feature and works only if your
service provider supports it. This feature may require an upgrade to
premium service or an additional fee.
Call Waiting
Call Waiting is a feature which enables you to be alerted to a second
incoming call when you are already on a phone call. Your service
provider may or may not provide this feature. Please contact with
your service provider to inquire. To use call waiting:
1. You will hear a beep from the earpiece when a second call is incoming.
2. Press the hook or press the FLASH key to answer to the second call.
3. Press the hook again or press the FLASH key to return to the first call.
Three-Way Calling is a feature that enables you to set up a
three-way conversation with two other callers. Your service provider
may or may not provide this feature. Please contact with your
service provider to inquire. To use three-way calling:
1. Place a call, after answering.
2. Place a second call: press the hook or FLASH key, input numbers then
press the hook or FLASH key again to dial-out the number.
3. When the second call is answered, press the hook or press the FLASH
key to start a three-way call.
Voice Mail Service
When you receive voice message(s), the MODE/MSG LED will blink
orange in color on the terminal. When you lift the receiver, a
stuttered voice message tone will be heard. Once your voice
messages are checked and deleted, the LED turns off and the
shuttered dial tone will return to a steady tone after few seconds.
The Voice mail feature may not be part of your service, so please
check with your service provider.
TX340G User Manual
Page 28

Setting Up Voice/Accessing your Voice Mail
service
Please check with your service provider for the voice mail access
number.
Yo u r
terminal automatically
if
voicemail, even
your Sprint
activated.
Always
1. Dial the voice mail access number as normal phone number.
2. Follow the system prompts to:
NOTE: Voicemail Password
Sprint strongly recommends that you create a password when setting
up your voicemail to protect against unauthorized access. Without a
password, anyone who has access to your phone is able to access
your voicemail messages.
Voicemail Notification
The MODE/MSG LED will blink orange in color.
When you lift the receiver, a stuttered voice message tone will be heard.
use a password to
¾ Create your
¾ Record your name anno
¾ Record your
your terminal is in use or turned off. You
V
oicemail and personal greeting as soon as your terminal is
passwor
gr
transfers all
protect against
d.
eeting.
uncement.
unanswered
unauthorized
calls
to
your
should set up
access.
You can review your messages directly by dialing your voicemail number.
Using Another Phone to Access Messages
1. Dial your voicemail number (your phone number)
2. When your voicemail answers, press * (the star key)
3. Enter your password.
Follow the voice instruction to listen and delete the messages.
NOTE: Initially, you may need to set-up voice mail. Follow the voice
instructions to set-up the voice mail service.
Retrieving Your Voicemail Messages
TX340G User Manual
Page 29

Troubleshooting
Problem: I Can’t Place a Call
1. Check the Terminal’s Power LED to make sure the Terminal is ON.
2. Check the antenna to make sure it is tightly connected to the Terminal.
3. Check the phone cord to make sure it is properly connected between
the Terminal’s RJ-11 port and the Telephone’s RJ-11 port.
4. In case that the telephone isn’t functioning properly, try connecting the
Terminal to a different telephone.
5. If you perform all of the above steps and still can’t make a call, contact
your service provider.
Problem: I Can’t Receive a Call
1. Check the handset to make sure it is placed properly on the cradle.
2. Check the Terminal’s Power LED to make sure the Terminal is ON.
3. Check the antenna to make sure it is tightly connected to the Terminal.
4. If you perform all of the above steps and still can’t receive a call,
contact your service provider.
Problem: No Power
1. Make sure the power adapter (or External Power Supply) is securely
connected between the electrical outlet and the Terminal.
2. Make sure a back-up battery is properly connected to the Terminal.
(Refer to Basic Installation section, Page 9)
3. When using in battery-only mode, make sure the back-up battery is
fully charged. To view the charge level, check the Terminal’s power LED.
(Refer to LED Indicators section, Page 14)
4. Make sure the power switch is in the ON position. The power switch is
located on the back side of the Terminal.
Problem: No Signal
If you don’t hear any dial tone through the handset and RSSI (Received
Signal Strength Indication) LED is OFF,
1. Check the Terminal’s Power LED to make sure it is ON.
2. Make sure your telephone is operational.
3. Make sure the antenna is tightly connected to the Terminal.
If the Terminal is powered on and the antenna is properly connected to
the Terminal but you still don’t hear a dial tone or see a light on the RSSI
LED, contact your service provider.
TX340G User Manual
Page 30

Specifications
Item Description Remark
Air Interface CDMA2000 1X
RF Module Motorola C24
RF Frequency 800MHz/1900Mhz Dual band
LED Indicator - 3 multi color
- POWER,SIGNAL and
MODE/MSG
Interface - 2 RJ-11 Ports (bridged), Max
4 REN
- DC power Jack
- Power ON/OFF Switch
- TNC Connector for CDMA
antenna with GPS antenna
Special
Feature
Tone Dial, No service, Howler, Alert,
Call feature Hook Flash
Battery - Li-ion rechargeable battery
AGPS for E911 Service
Automatic Sending
Caller ID(DTMF, Bellcore)
Stutter, Menu OK, Menu NOK
Call Waiting
Call Forwarding
Three-way Calling
- Capacity :1800mAh
Green,
Orange, Red,
Off
(Standard)
* Stand by time: >10 hrs, 24
preferred
* Talk time: >1.5 hrs, 3
preferred
Power Adapter - Input: AC100-240V, 50/60Hz
- Output:5V/ 2A
Dimension - Size: 165 X 158 X 26 (mm)
- Weight: 310g
Operating
Condition
1RWHWKHGHYLFHVWRSZRUNLQJDW&
- Temperature: -20 ℃ ~ 60℃
- Relative humidity : 10~95%
- Air pressure : 86~106kpa
With standard
battery
TX340G User Manual
Page 31

Safety and Warranty
Section 4
Information
TX340G User Manual
Page 32

4A. Important Safety Information
♦ General Precautions (page 32)
♦ Maintaining Safe Use of and Access to Your Device (page 32)
♦ Caring for the Battery (page 33)
♦ Radio Frequency (RF) Energy (page 34)
♦ Owner’s Record (page 36)
This booklet contains important operational and safety information
that will help you safely use your device. Failure to read and follow the
information provided in this phone guide may result in serious bodily
injury, death, or property damage.
General Precautions
There are several simple guidelines to operating your device properly
and maintaining safe, satisfactory service.
z Avoid exposing your device and accessories to rain or liquid spills. If
your device does get wet, immediately turn the power off and
remove the battery.
z Do not expose your device to direct sunlight for extended periods of
time.
z Although your device is quite sturdy, it is a complex piece of
equipment and can be broken. Avoid dropping, hitting, bending, or
sitting on it.
z Any changes or modifications to your device not expressly approved
in this document could void your warranty for this equipment and
void your authority to operate this equipment.
Note: For the best care of your device, only Sprint-authorized
personnel should service your device and accessories. Failure to do
so may be dangerous and void your warranty.
Maintaining Safe Use of and Access to Your
Device
TX340G User Manual
Page 33

Following Safety Guidelines
To operate your device safely and efficiently, always follow any special
regulations in a given area. Turn your device off in areas where use is
forbidden or when it may cause interference or danger.
Using Your Device Near Other Electronic Devices
Most modern electronic equipment is shielded from radio frequency (RF)
signals. However, RF signals from wireless device may affect
inadequately shielded electronic equipment.
RF signals may affect improperly installed or inadequately shielded
electronic operating systems or entertainment systems in motor vehicles.
Check with the manufacturer or their representative to determine if these
systems are adequately shielded from external RF signals. Also check
with the manufacturer regarding any equipment that has been added to
your vehicle.
Consult the manufacturer of any personal medical devices, such as
pacemakers and hearing aids, to determine if they are adequately
shielded from external RF signals.
Turning Off Your Device in Dangerous Areas
To avoid interfering with blasting operations, turn your device off when in
a blasting area or in other areas with signs indicating twoway radios
should be turned off. Construction crews often use remote-control RF
devices to set off explosives.
Turn your device off when you’re in any area that has a potentially
explosive atmosphere. Although it’s rare, your device and accessories
could generate sparks. Sparks can cause an explosion or fire, resulting in
bodily injury or even death. These areas are often, but not always, clearly
marked. They include:
z Fueling areas such as gas stations.
z Below deck on boats.
z Fuel or chemical transfer or storage facilities.
z Areas where the air contains chemicals or particles such as grain,
dust, or metal powders.
z Any other area where you would normally be advised to turn off your
vehicle’s engine.
Restricting Children’s Access to Your Device
Your device is not a toy. Do not allow children to play with it as they could
hurt themselves and others, damage the device or make calls that
increase your Sprint invoice.
Caring for the Battery
Protecting Your Battery
The guidelines listed below help you get the most out of your battery’s
performance.
TX340G User Manual
Page 34

z Recently there have been some public reports of wireless device
batteries overheating, catching fire, or exploding. It appears that
many, if not all, of these reports involve counterfeit or inexpensive,
aftermarket-brand batteries with unknown or questionable
manufacturing standards. Sprint is not aware of similar problems
with Sprint device resulting from the proper use of batteries and
accessories approved by Sprint or the manufacturer of your device.
Use only Sprint-approved or manufacturer-approved batteries and
accessories found at Sprint Stores or through your device’s
manufacturer, or call 1-866-866-7509 to order. They’re also available
at www.sprint.com/accessories. Buying the right batteries and
accessories is the best way to ensure they’re genuine and safe.
z In order to avoid damage, charge the battery only in temperatures
that range from 32° F to 113° F (0° C to 45° C).
z Don’t use the battery charger in direct sunlight or in high humidity
areas, such as the bathroom.
z Never dispose of the battery by incineration.
z Keep the metal contacts on top of the battery clean.
z Don’t attempt to disassemble or short-circuit the battery.
z The battery may need recharging if it has not been used for a long
period of time.
z It’s best to replace the battery when it no longer provides acceptable
performance. It can be recharged hundreds of times before it needs
replacing.
z Don’t store the battery in high temperature areas for long periods of
time. It’s best to follow these storage rules:
Less than one month:
-4° F to 140° F (-20° C to 60° C)
More than one month:
-4° F to 113° F (-20° C to 45° C)
Disposal of Lithium Ion (Li-Ion) Batteries
Do not handle a damaged or leaking Li-Ion battery as you can be
burned. For safe disposal options of your Li-Ion batteries, contact your
nearest Sprint authorized service center.
Special Note: Be sure to dispose of your battery properly. In some areas,
the disposal of batteries in household or business trash may be
prohibited.
Radio Frequency (RF) Energy
Understanding How Your Device Operates
Your device is basically a radio transmitter and receiver. When it’s turned
on, it receives and transmits radio frequency (RF) signals. When you use
your device, the system handling your call controls the power level. This
power can range from 0.006 watt to 0.2 watt in digital mode.
Knowing Radio Frequency Safety
The design of your device complies with updated NCRP standards
described below.
TX340G User Manual
Page 35

Page 36

Page 37

♦ Manufacturer’s Warranty(page37)
TX340G FWT has been designed to provide you with reliable, worry-free
service. If for any reason you have a problem with your equipment,
please refer to the manufacturer’s warranty in this section.
For information regarding the terms and conditions of service for your
TX340G FWT, please visit www.sprint.com or call Sprint Customer
Service at 1-888-211-4727.
Note: In addition to the warranty provided by your TX340G’s
manufacturer, which is detailed on the following pages, Sprint
offers a number of optional plans to cover your equipment for
non-warranty claims. Sprint Total Equipment Protection
provides the combined coverage of the Sprint Equipment
Replacement Program and the Sprint Equipment Service
and Repair Program, both of which are available separately.
Each of these programs may be signed up for within 30 days of
activating your phone. For more details, please visit your
nearest Sprint Store or call Sprint at 1-800-584-3666.
4B. Manufacturer’s Warranty
Manufacturer’s Warranty
Personal Communications Devices, LLC (the Company) warrants to the
original retail purchaser of this handheld portable cellular telephone that
should this product or any part thereof during normal consumer
usage and conditions, be proven defective in material or workmanship
that results in product failure within the first ninety (90) day period from
the date of purchase, such defect(s) will be repaired or replaced (with
new or rebuilt parts) at the Company’s option, without charge for parts or
labor directly related to the defect(s).The antenna, keypad, display,
rechargeable battery and battery charger, if included, are similarly
warranted for ninety (90) days from date of purchase.
This Warranty extends only to consumers who purchase the product in
the United States or Canada and it is not transferable or assignable. This
Warranty does not apply to:
(a) Product subjected to abnormal use or conditions, accident,
mishandling, neglect, unauthorized alteration, misuse, improper
installation or repair or improper storage;
(b) Product whose mechanical serial number or electronic serial number
has been removed, altered or defaced.
(c) Damage from exposure to moisture, humidity, excessive
temperatures or extreme environmental conditions;
(d) Damage resulting from connection to, or use of any accessory or
other product not approved or authorized by the Company;
(e) Defects in appearance, cosmetic, decorative or structural items such
TX340G User Manual
Page 38

as framing and non-operative parts;
(f) Product damaged from external causes such as fire, flooding, dirt,
sand, weather conditions, battery leakage, blown fuse, theft or improper
usage of any electrical source.
The Company disclaims liability for removal or reinstallation of the
product, for geographic coverage, for inadequate signal reception by the
antenna or for communications range or operation of the cellular system
as a whole. When sending your wireless device to Personal
Communications Devices, LLC for repair or service, please note that any
personal data or software stored on the device may be inadvertently
erased or altered. Therefore, we strongly recommend you make a back
up copy of all data and software contained on your device before
submitting it for repair or service. This includes all contact lists,
downloads (i.e., third-party software applications, ringtones, games and
graphics) and any other data added to your device. In addition, if your
wireless device uses a SIM or Multimedia card, please remove the card
before submitting the device and store for later use when your device is
returned, Personal Communications Devices, LLC is not responsible for
and does not guarantee restoration of any third-party software, personal
information or memory data contained in, stored on, or integrated with
any wireless device, whether under warranty or not, returned to Personal
Communications Devices, LLC for repair or service. To obtain repairs or
replacement within the terms of this Warranty, the product should be
delivered with proof of Warranty coverage (e.g., dated bill of sale), the
consumer’s return address, daytime phone number and/or fax number
and complete description of the problem, transportation prepaid, to the
Company at the address shown below or to the place of purchase for
repair or replacement processing. In addition, for reference to an
authorized Warranty station in your area, you may telephone in the
United States (800) 229-1235, and in Canada (800) 465-9672 (in Ontario
call 416-695-3060).
THE EXTENT OF THE COMPANY’S LIABILITY UNDER THIS
WARRANTY IS LIMITED TO THE REPAIR OR REPLACEMENT
PROVIDED ABOVE AND, IN NO EVENT, SHALL THE COMPANY’S
LIABILITY EXCEED THE PURCHASE PRICE PAID BY PURCHASER
FOR THE PRODUCT.ANY IMPLIED WARRANTIES, INCLUDING ANY
IMPLIED WARRANTY OF MERCHANTABILITY OR FITNESS FOR A
PARTICULAR PURPOSE, SHALL BE LIMITED TO THE DURATION OF
THIS WRITTEN WARRANTY. ANY ACTION FOR BREACH OF ANY
WARRANTY MUST BE BROUGHT WITHIN A PERIOD OF 18 MONTHS
FROM DATE OF ORIGINAL PURCHASE. IN NO CASE SHALL THE
COMPANY BE LIABLE FOR ANY SPECIAL CONSEQUENTIAL OR
INCIDENTAL DAMAGES FOR BREACH OF THIS OR ANY OTHER
WARRANTY, EXPRESS OR IMPLIED, WHATSOEVER. THE
COMPANY SHALL NOT BE LIABLE FOR THE DELAY IN RENDERING
SERVICE UNDER THIS WARRANTY OR LOSS OF USE DURING THE
TIME THE PRODUCT IS BEING REPAIRED OR REPLACED.
No person or representative is authorized to assume for the Company
any liability other than expressed herein in connection with the sale of
this product. Some states or provinces do not allow limitations on how
long an implied warranty lasts or the exclusion or limitation of incidental
TX340G User Manual
Page 39

or consequential damage so the above limitation or exclusions may not
apply to you. This Warranty gives you specific legal rights, and you may
also have other rights, which vary from state to state or province to
province.
IN USA: Personal Communications Devices, LLC
555 Wireless Blvd.
Hauppauge, NY 11788
(800) 229-1235
IN CANADA: PCD Communications Canada, LTD
5535 Eglinton Avenue West
Suite# 234
Toronto, ON M9C 5K5
(800) 465-9672
TX340G User Manual
Page 40

Numerics
3-Way Call 27
A
Audible Indicators 15
A-GPS for E911 13
Alert Tone Volume 21
Auto Send Time 22
Activation 17
B
Battery Installation 9
C
Connection Alert 21
Caller ID Mode 26
Call Waiting ID 26
Caller Name Display 27
Call Waiting 27
D
DTMF Length 22
F
Factory Reset 23
Index
Features 26
I
Installation 9
L
LED Indicators 14
Lock Code 22
M
Making Calls 20
Menu Option Table 6
Manufacturer’s Warranty 37
O
Overview 6
One Minute Alert 21
Outgoing Calls 23
P
Package Contents 10
Power ON/OFF 17
PRL Update 23
R
Receiving Calls 20
S
Setting Up The Terminal 11
Sound 21
Send Key 22
Security 22
Specifications 30
Safety Precautions 32
TX340G User Manual
Page 41

 Loading...