

Page 1
Axesstel Fixed Wireless Phone
CDMA PX340G
User Manual
Author Version Changes Date
Wangyun 1.0 initialization 2010-7-30
Page 2

错误!未找到引用源。
CDMA FWP
INDEX
GENERAL INTRODUCTION .......................................................................................................... 1
1
2 IMPORTANT INFORMATION ........................................................................................................ 2
3 PRODUCT OVERVIEW .................................................................................................................. 3
3.1 PACKING LIST ........................................................................................................................................ 3
3.2 PRODUCT INTRODUCTION ...................................................................................................................... 3
3.2.1 Appearance ....................................................................................................................................... 3
3.2.2 Key Definition ................................................................................................................................... 4
3.2.3 Setting up your Phone ....................................................................................................................... 4
3.2.4 Display Icon ...................................................................................................................................... 6
4 BASIC OPERATIONS .................................................................................................................... 6
4.1 POWER ON/OFF ..................................................................................................................................... 6
4.2 MAKE A CALL ........................................................................................................................................ 6
4.3 ANSWER A CALL .................................................................................................................................... 6
4.4 END A CALL ........................................................................................................................................... 6
5 MAIN MENU ................................................................................................................................... 7
6 MESSAGES .................................................................................................................................... 7
6.1 SEND A MESSAGE .................................................................................................................................. 7
6.2 RECEIVE A MESSAGE ............................................................................................................................. 8
6.3 VIEW OUTBOX ....................................................................................................................................... 8
6.4 DRAFTS .................................................................................................................................................. 9
6.5 VOICE MAIL ........................................................................................................................................... 9
6.6 TEMPLATE MESSAGES ........................................................................................................................... 9
6.7 DELETE MESSAGES .............................................................................................................................. 10
6.8 MEMORY STATUS ................................................................................................................................ 10
7 CALL LOG .................................................................................................................................... 10
7.1 MISSED CALLS ..................................................................................................................................... 10
7.2 RECEIVED CALLS ................................................................................................................................. 10
7.3 DIALED CALLS ..................................................................................................................................... 11
7.4 CALL TIME ........................................................................................................................................... 11
7.5 DELETE RECORD .................................................................................................................................. 11
8 CONTACTS .................................................................................................................................. 11
8.1 VIEW A CONTACT ................................................................................................................................ 12
8.2 ADD A NEW CONTACT ......................................................................................................................... 12
8.3 SEARCH FOR A CONTACT ..................................................................................................................... 13
8.4 GROUP ................................................................................................................................................. 13
8.4.1 Add a Contact to the Group ............................................................................................................ 13
8.4.2 Delete a Contact from the Group .................................................................................................... 13
8.4.3 Add a Group ................................................................................................................................... 13
8.4.4 Set a Ring tone to a Group .............................................................................................................. 14
8.5 DELETE A CONTACT ............................................................................................................................. 14
8.6 EDIT A CONTACT ................................................................................................................................. 14
8.7 SPEED DIAL ......................................................................................................................................... 14
8.8 MEMORY STATUS ................................................................................................................................ 14
9 TOOLS .......................................................................................................................................... 15
9.1 SCHEDULE ........................................................................................................................................... 15
9.2 ALARM CLOCK .................................................................................................................................... 15
9.3 CALCULATOR ....................................................................................................................................... 15
Page 3

错误!未找到引用源。
9.4 WORLD TIME ....................................................................................................................................... 15
10 SETTINGS .................................................................................................................................... 16
10.1 TONES .................................................................................................................................................. 16
10.1.1 Ring Tone ................................................................................................................................... 16
10.1.2 Volume ........................................................................................................................................ 16
10.1.3 Alert ............................................................................................................................................ 16
10.2 DISPLAY............................................................................................................................................... 16
10.2.1 Banner ........................................................................................................................................ 16
10.2.2 Backlight ..................................................................................................................................... 17
10.2.3 Contrast ...................................................................................................................................... 17
10.2.4 Language .................................................................................................................................... 17
10.2.5 Hyphen ....................................................................................................................................... 17
10.2.6 Time and Date ............................................................................................................................ 17
10.3 SECURITY ............................................................................................................................................. 18
10.3.1 Lock Phone ................................................................................................................................. 18
10.3.2 Change Pin ................................................................................................................................. 18
10.3.3 Incoming Call Setting ................................................................................................................. 18
10.3.4 Outgoing Call Setting ................................................................................................................. 19
10.3.5 Change Password ....................................................................................................................... 19
10.3.6 Load Default ............................................................................................................................... 19
10.4 CALL SETTINGS ................................................................................................................................... 20
10.4.1 Auto Answer ............................................................................................................................... 20
10.4.2 Voice Privacy ............................................................................................................................. 20
10.5 NETWORK SERVICE .............................................................................................................................. 20
10.6 PHONE INFO ......................................................................................................................................... 21
10.7 PORT SPEED ......................................................................................................................................... 21
11 DATA SERVICE ........................................................................................................................... 21
CDMA FWP
12 TECHNICAL PARAMETERS ....................................................................................................... 21
13 QUICK TROUBLESHOOTING GUIDE ........................................................................................ 21
Page 4

CDMA FWP
1 General Introduction
Thank you for choosing CDMA Fixed Wireless Phone of Axesstel. To use your phone well, please
read this user manual carefully before you use.
The phone has been designed to operate with the latest digital communication technology - Code
Division Multiple Access (CDMA). The phone provides the following advanced features:
Large LCD with backlight, easy to read
Status Indicators
Two-way SMS, voice mail and caller ID
Call Forwarding, Call Waiting, Three-Way Calling and Do not disturbing
High speed packet data dial-up Internet service (Only available for PX3x0N, not for PX1x0N)
Emergency call
Menu driven interface for easy operation and configuration
Store 200 contacts in phone
Save 200 SMS in phone
Last call redials
Choice of 13 ring tones
Adjustable ring and voice volume
AC power supply
Indoor antenna (and Outdoor antenna is optional)
Speaker phone for hands-free operation
Call privacy is also supported by CDMA technology
User friendly keypad
Long battery stand-by and talk time
USB data cable is provided
Easy to service and repair
1
Page 5

错误!未找到引用源。
CDMA FWP
2 Important Information
The product can only be installed indoors.
Do not place the phone near high temperature objects, under direct sunlight, near source of
water, near fire or near inflammable and explosive materials. Avoid using the phone in high
temperature or humidity.
The phone may interfere with heart pacemaker, hearing aid and other electronic medical devices.
Therefore please follow the instructions given by your equipment suppliers or consult your doctor.
Turn your phone OFF in health care centers if any regulations posted in the area instruct you to
do so. Hospitals or health care centers may be using equipment that may be sensitive to external
RF energy.
Place the phone away from other electronic devices like TV and Radio to avoid interference.
Keep the product away from magnetic field and static electricity.
Place the phone out of the reach of small children.
Do not attempt to reassemble the phone by yourself. Only authorized personnel could service the
phone and its accessories. Faulty installation or service can be dangerous and may invalidate the
warranty.
Do not clean the phone while in operation. Before attempting to clean the phone, turn the phone
off, disconnect the external power adapter and take out the battery. Use a dry, soft cloth for
cleaning. Do not use liquid or aerosol cleaners.
Do not drop, knock or shake the phone. Rough handling may break the phone body and internal
circuit boards.
Do not use the phone if the antenna is damaged. Replace the damaged antenna immediately by
using a qualified technician. Use only a manufacturer approved antenna. Non-approved
antennas, modifications or attachments may impair call quality and damage the phone.
Do not hold the antenna during operation. This may affect call quality and cause the phone to
operate at unintended power levels.
Keep the antenna free from obstructions and position the antenna straight up. This will ensure
best call quality.
Only use the battery and the power adapter approved by the manufacturer. If not, it may cause
an explosion or result in a short circuit.
It is highly recommended to fully charge the battery before initial use. The battery might have
been discharged during storage and delivery.
Do not throw battery. Batteries are not to be disposed off by putting them in fire. It may explode
or catch fire.
The power adapter must be used within the specified AC voltage range.
Take out the battery if you won’t use your phone for a long time and keep the battery well.
During lightning, do not touch the power plug. It may result in an electric shock or death.
Do not touch the plug with wet hands. Always grasp and pull the plug, not the cord. Do not put
heavy things on the power cord or bend it too much.
During daily use, do not pull out the power adapter. The battery is used for backup power, which
will not cause the increasing consumption of electricity.
Don’t use the power adapter if the power cable is damaged. Contact the maintenance center
immediately and replace the adapter.
2
Page 6
错误!未找到引用源。
CDMA FWP
3 Product Overview
3.1 Packing List
Once you open the product package, please check the packing list to make sure there is no part
missing. If any part is missing or broken, please contact the customer service. The packing list is as
follow:
No. Name Qty. Remark
1 Phone Body 1
2 Handset 1
3 Antenna 1
4 Handset Cable 1
5 Ni-MH Rechargeable Battery 1 Li-Ion Battery if specified
6 Charger 1
7 USB Cable 1
8 CD Disk 1
9 Prints 1 Including one User Manual, one Warranty Card
3.2 Product Introduction
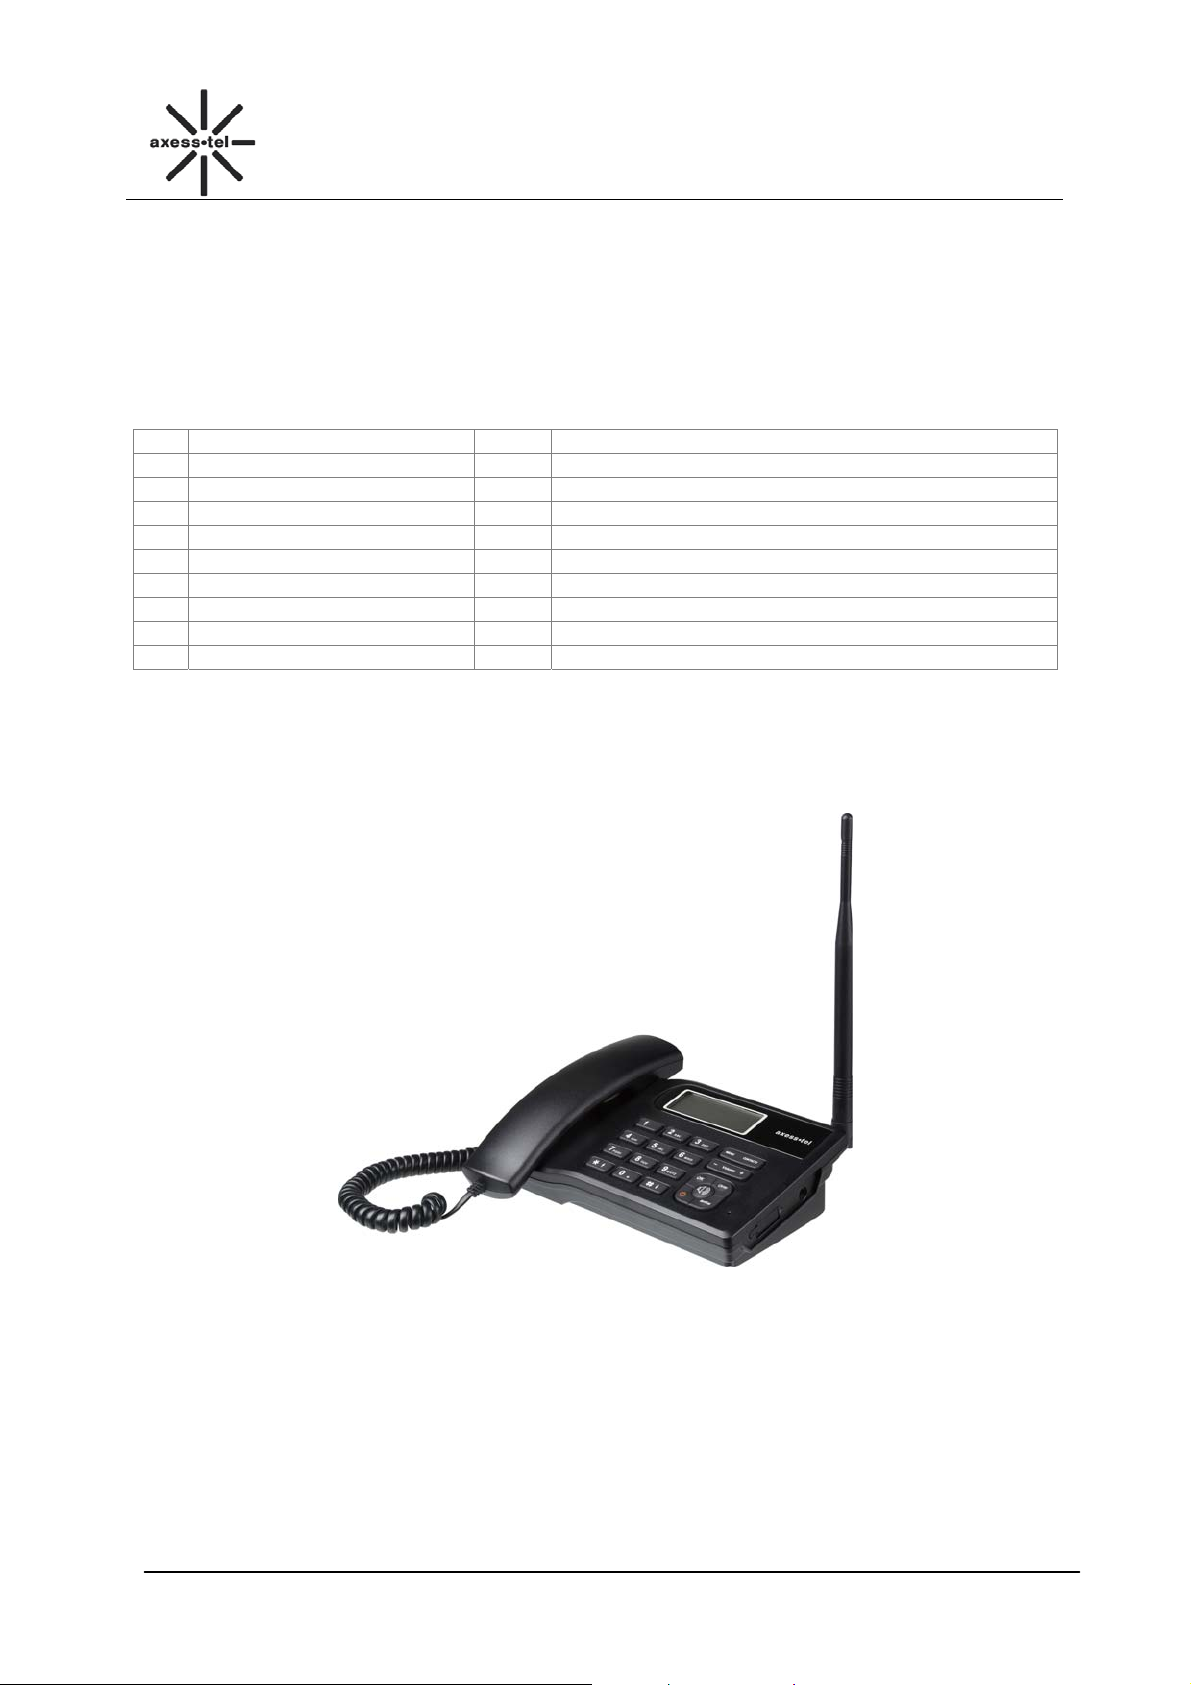
3.2.1 Appearance
Table 1 Packing List
Figure 1 PX3x0N Appearance
3
Page 7
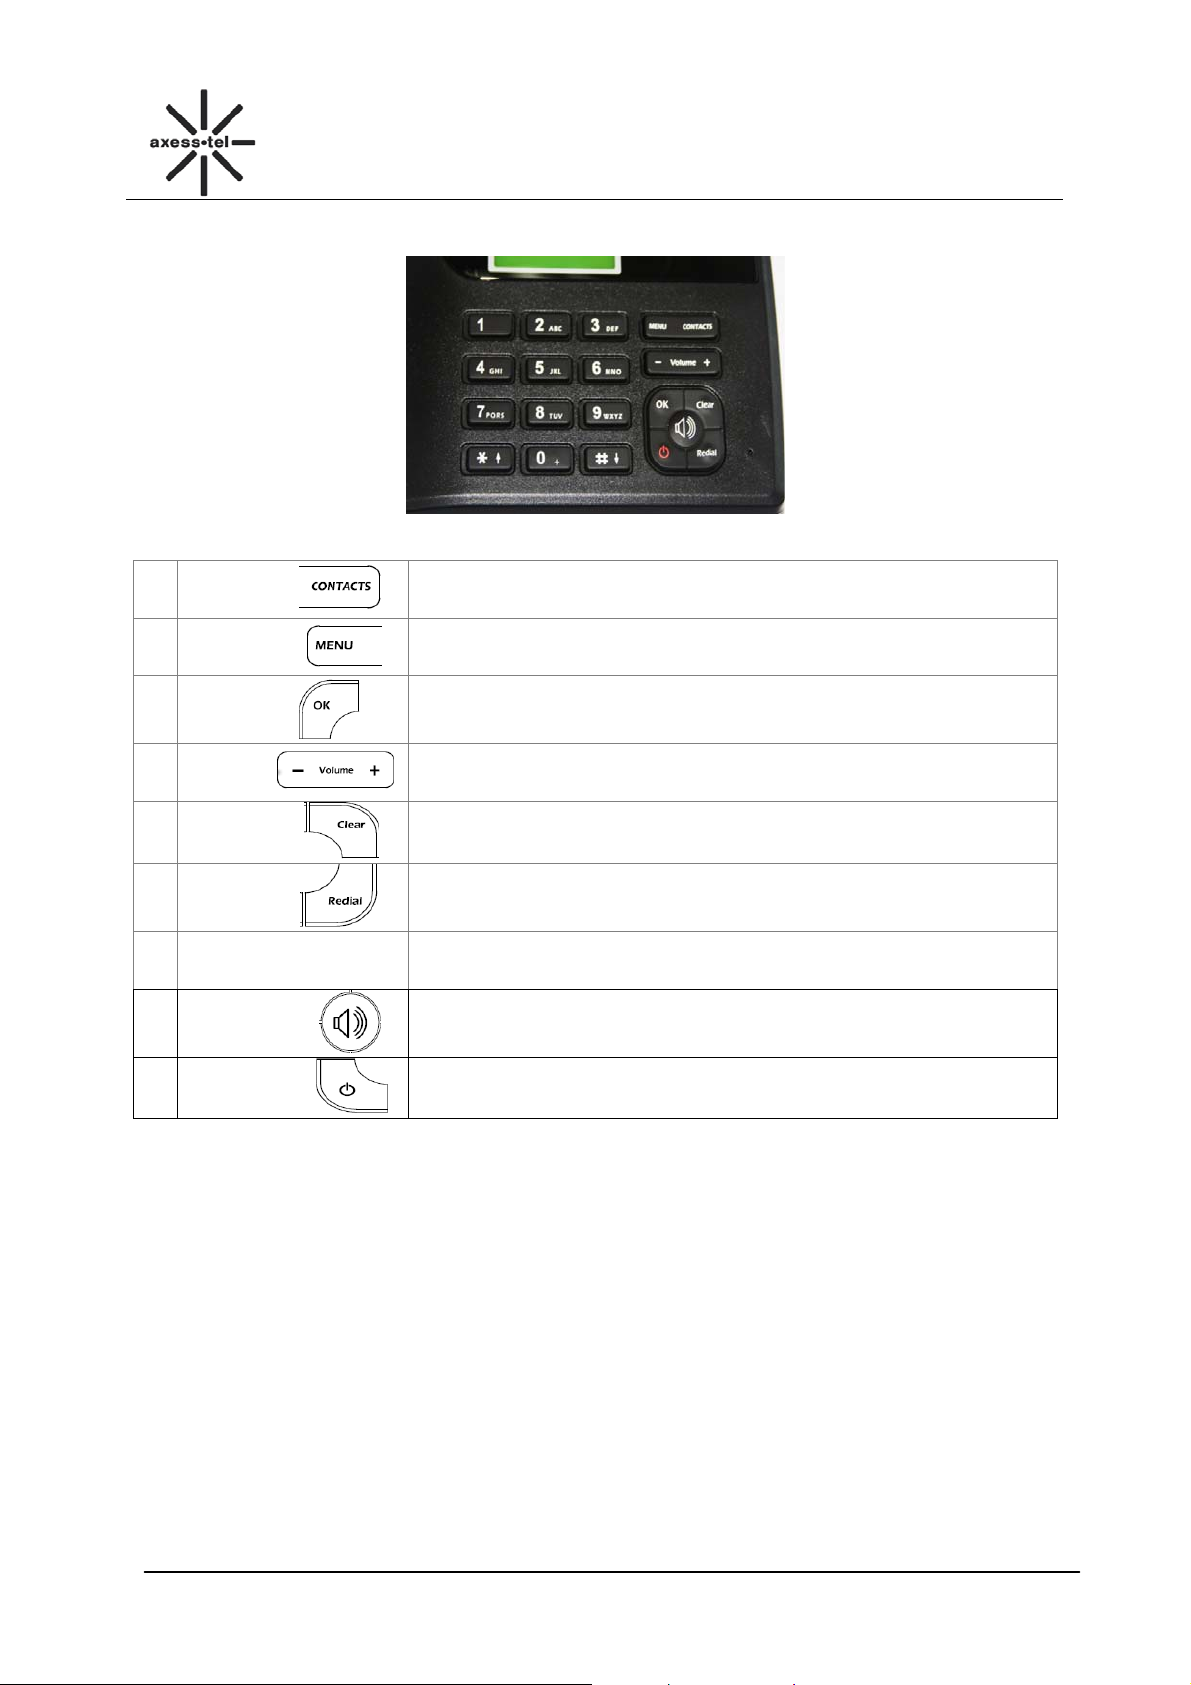
3.2.2 Key Definition
错误!未找到引用源。
CDMA FWP
Figure 2 Key Layout
1
Contacts
2
MENU Key
3
OK Key
4
Volume+-
5
Clear
6
Redial Key
0~9 Numeric Keys and
7
8
9
Power. key
* # Key
Speaker Key
In standby screen, press the Contacts Key go into the Contacts
function
Go into the main menu
Press OK Key to access the submenu
In Standby screen, press OK key go into main menu
Adjust the volume, or up and down key functions
Press it return to the last menu and delete characters,
In standby screen, press redial key go into the call log
To input numbers and characters
Make hand-free operation(speaker icon)
Press the power key can turn on and turn off the phone
3.2.3 Setting up your Phone
Installing the phone
This phone operates by receiving DC power from the AXESSTEL power adaptor, The phone is
equipped with a rechargeable battery as a backup in case of an AC power failure.
4
Page 8
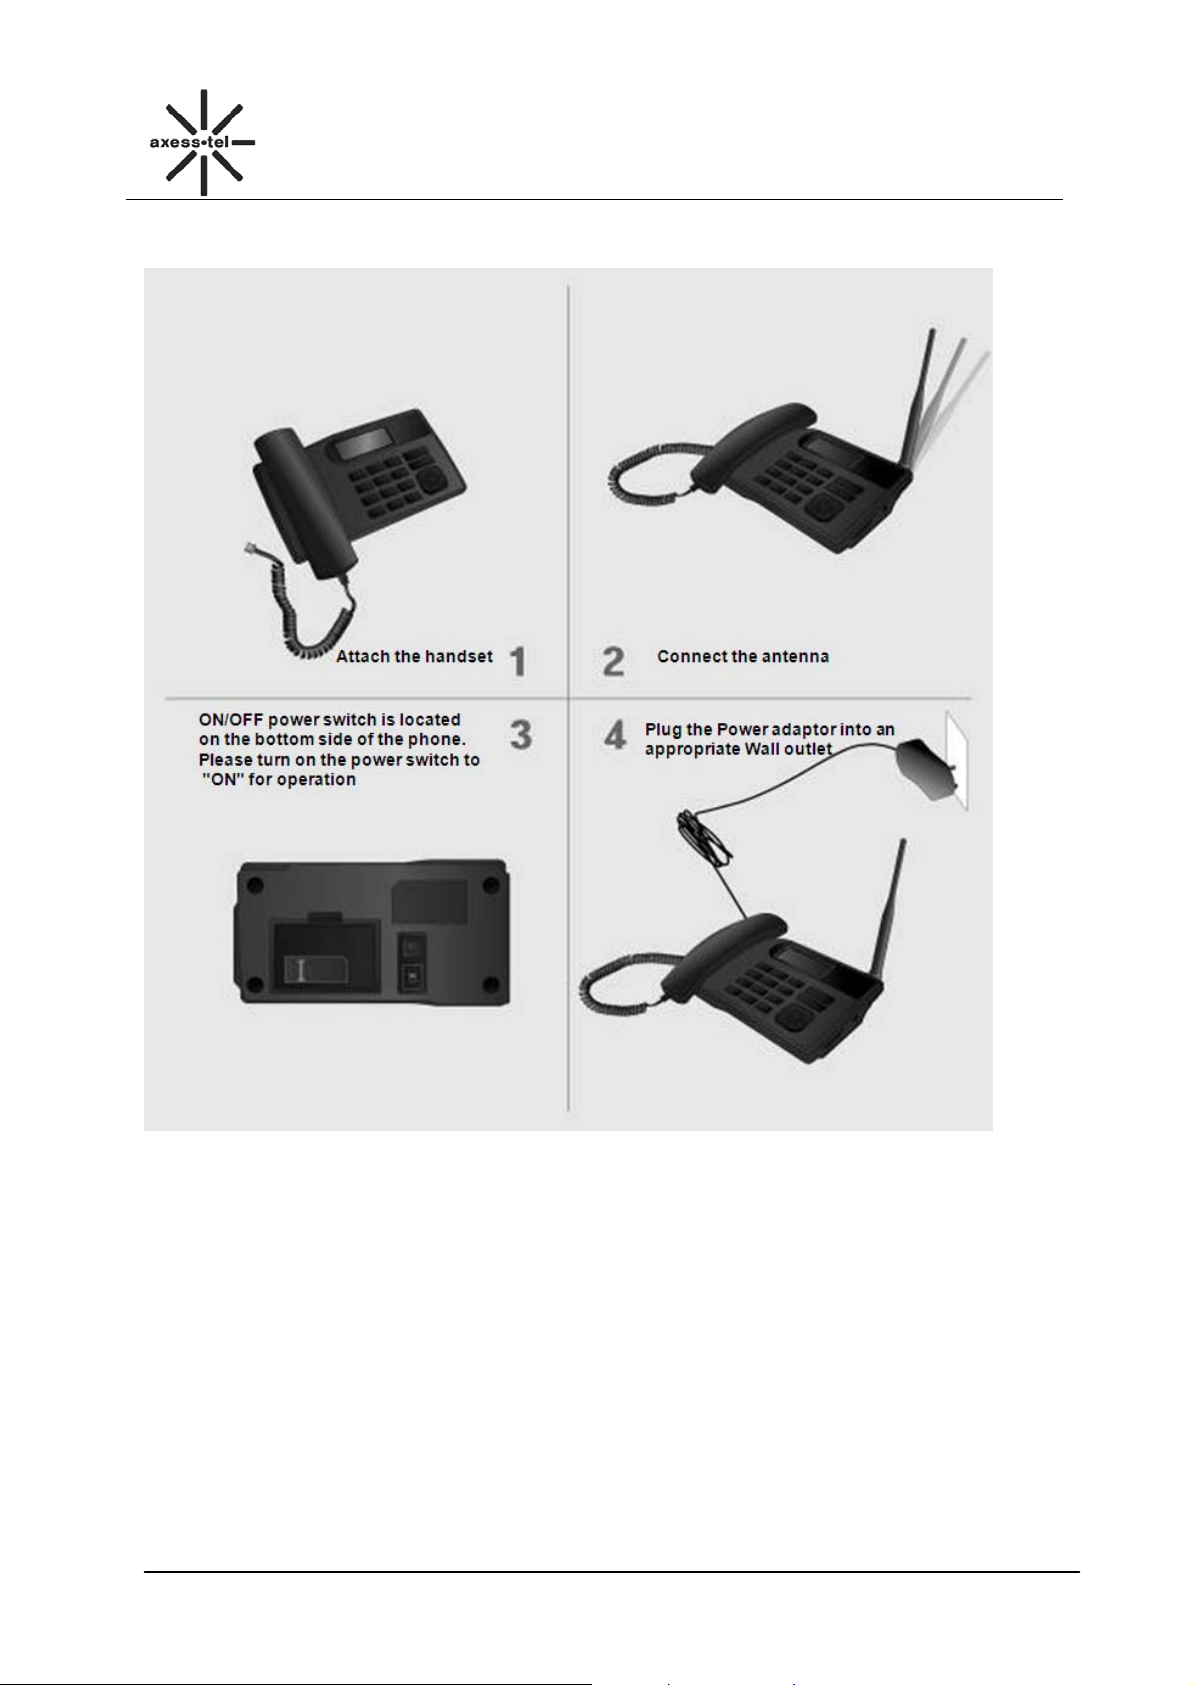
Desktop Installation
错误!未找到引用源。
CDMA FWP
5
Page 9

错误!未找到引用源。
3.2.4 Display Icon
The following icon may appear on the display of the phone:
No. Icon Description
1
2
3
4
5
6
8
9
10
Current signal strength. The more bars there are, the stronger the signal is.
No signal.
Battery capacity indicator. The more bars there are, the more capacity the
battery has.
Supplied by charger
Alarm on
Mute
No UIM card
Unread message
Roaming
Figure 3 Display Icon
CDMA FWP
4 Basic Operations
4.1 Power On/Off
Connect DC power supply to the “DC IN” port or insert the battery to the battery chamber. Switch the
“Power” switch (on the underside of the Phone) to ON, then press the Power On/Off Key on the panel
for 3 seconds to power on the phone—if the DC power is in and the phone will power automatically,
your phone should go to standby screen and is ready to use.
You can turn the phone off directly by switching the “Power ON/OFF” switch (on the underside of the
phone) to OFF position. If the phone will not be used for long time, please turn this switch to OFF. Or
you can press the Power On/Off Key for 3 seconds to power off the phone.
4.2 Make a Call
While your phone is power on and at standby screen, enter a destination number you wish to call and
then press <Redial >Key. (Note: To modify digits you enter, you can press<CLEAR> Key to delete
wrong digits first and then enter new digits).
The phone also has a speaker. To use the speaker to make a call, press <SPEAKER> Key, enter a
phone number, and press <Redial> Key.
Or you can press <Contacts> key to enter contacts menu, <1 View>,<OK> Key to the contacts list,
press <Volume + -> to scroll to the desired contact, press <Redial >Key .Once the call is connected,
the phone’s screen will display the number you have dialed, and the time duration the call has lasted.
4.3 Answer a Call
When there is an incoming call, the phone will ring and display the phone number of the incoming call
(if the number is available). You can pick up the handset or press <SPEAKER> Key to answer the
incoming call. The ring tone and ring-tone volume can be changed in the setting menu.
4.4 End a Call
You can end a call by pressing <POWER>Key. If you are using the handset for a phone call, hanging
up the handset will end the call automatically.
6
Page 10

错误!未找到引用源。
CDMA FWP
5 Main Menu
Press <MENU> Key to enter the main menu from the standby screen. The main menu includes:
Messages, Call Log, Contacts, Tools, and Settings. The menu tree is as follow.
Create
Inbox
Outbox
Messages
Call Log
Draft
Voice Mail
Template Messages
Delete Messages
Memory Status
Missed Calls
Received Calls
Dialed Calls
Call Time
Delete Record
View
Menu
Contacts
Tools
Settings
Figure 4 Menu Tree
Add New
Search Name
Groups
Delete All
Speed Dial
Memory Status
Schedule
Alarm
Calculator
World Time
Tones
Display
Security
Call Settings
Network Service
Phone Info
Port Speed
6 Messages
You could compose a new message, view the inbox and outbox, perform SMS setting, voice mail.
In standby screen, press <MENU> Key, <Messages> to the messages menu.
6.1 Send a Message
You can send a message to one recipient or multiple recipients.
1) Press <MENU> key, <Messages>, <1 Create> to compose a new
Message, you can input space by <0> key and input symbol by
<*> key, also you can switch input method by <#> key.
7
Messages
1 Create
2 Inbox(1)
3 Outbox(1)
Select Back
Page 11

错误!未找到引用源。
CDMA FWP
2) After finish inputting the text, press <OK > key to select the
Send, Send Messages, Insert Template, Insert Contacts, or
Save as Template function.
3) After finish inputting the text, press < MENU> Key, <1 Send>
or <2 Send Messages> to choose recipients from Contacts
or Group. You can also set the priority by selecting Priority.
If you want to edit the call back number which show in the
message, please select Callback to edit. Or you can save
the message to Draft by selecting Save.
1 Send
2 Send Message
3 Insert Template
Select Back
Tom
Helen
Select Back
1 Normal
2 Emergency
Select Back
Options
Contacts(4/1)
Priority
6.2 Receive a Message
1) If there is a new message, the phone will ring alert. In
standby screen, press <OK> key to read the message,
2) Or you could read the new message by press<MENU> key,
<Messages>, <2 Inbox>,to select the new message.
And press <MENU> Key to read the message.
3) Then press <MENU> Key, you can select
a) Reply: Reply the message
b) Forward: Forward the message
c) Save Number: Save the number(s) in the message.
d) Call: Call the number(s) in the message.
e) Delete: Erase the message
You have 1 new
message!
View
1 Create
2 Inbox(1)
3 Outbox(1)
Select Back
1 Reply
2 Forward
3 Save Number
Select Back
6.3 View Outbox
1) In standby screen, press<MENU> Key, <Messages>,
<3 Outbox>, <OK> Key to view the outbox SMS list.
2) Press<OK> Key to read the message, press<MENU> Key
to select Forward, Save Number, Call, Delete.
1 Create
2 Inbox(1)
3 Outbox(1)
Select Back
Tom
Messages
Options
Messages
Outbox(1/1)
8
Select Back
Page 12

错误!未找到引用源。
6.4 Drafts
1) In standby screen, press <Menu> Key, <Messages>, <4 Drafts>,
<OK> Key to view Drafts menu.
2) Scroll to the desired draft via <Volume+-> Key, press <Menu>
Key to read the draft, you can Edit or Delete it by press <Menu>
Key to enter the options.
CDMA FWP
Messages
4 Draft(6)
5 Voice mail
6 Template Messages
Select Back
6.5 Voice Mail
In standby screen, press <MENU> Key, <Messages>,
<5 Voice mail>, <OK> Key to view the Voice Mail menu.
1) If you have voice message, press <1 Voice Mail>,
<OK> Key to check your massage.
2) If you have voice message, press <2 Listen to Voice Mail> to
listen it.
3) In Voice Mail menu, press<3 Voice Mail Number>,
<OK> Key to set the voice mail number.
Note: Particular function and operation, please contact your local operator.
6.6 Template Messages
In standby screen, press <Menu> Key, <Messages>, <6 Template
Messages>, <OK> Key to view the Template Messages menu. You
can read 10 templates from the menu by pressing <Volume+-> Key:
1. I’m busy. Call me later.
2. Happy birthday!
3. Wait for a minute, please!
4. Where are you?
5. How was the day?
6. Good luck!
7. Please call my home number.
8. I will call you back soon!
9. I’m sorry!
10. Thank you!
You can Send or Add New template here. Scroll to the desired
template, press <Menu> Key, select Send to send a message by
using the template. Or select Add New to add a new template here.
Messages
4 Draft(6)
5 Voice mail
6 Template Messages
Select Back
Voice mail
1 Voice mail<0>
2 Listen to Voice Mail
3 Voice Mail Number
Select Back
Messages
4 Draft(6)
5 Voice mail
6 Template Messages
Select Back
Template Messages
1 I am busy.
2 Happy birthday!
3 Wait for a minute.
Select Back
Options
1 Send
2 Add New
Select Back
9
Page 13

错误!未找到引用源。
CDMA FWP
6.7 Delete Messages
In standby screen, press <MENU> Key, <Messages>,
<7 Delete Messages>, <OK> Key, select Inbox, press MENU key to
delete all messages in Inbox.
Note: You can delete all messages in Outbox, Draft, All messages by
selecting them.
7 Delete Messages
8 Memory status
9 Message settings
Select Back
1 Inbox
2 Outbox
3 Draft
Select Back
Messages
Delete Messages
6.8 Memory Status
In standby screen, press<MENU> Key, <Messages>,
<8 Memory Status>, <OK> Key.
In this menu, you can check the phone memory
status for messages.
Total Free
Phone 200 179
Back
7 Call Log
You can find Missed Calls, Received Calls, Dialed Calls, Call Time, and Delete Record in Call
Log menu.
In standby screen, press <MENU> Key, <Call Log><OK> Key to call log menu.
7.1 Missed Calls
1) In standby screen, press <MENU> Key,<Call Log>,
<OK> Key, <1 Missed Calls>, <OK> Key
2) The missed calls list will be displayed; you can
Press <Volume + -> to scroll to the desired number,
3) Press<MENU> Key to view the missed call information,
and press<MENU> Key, you can:
a) Send Message: Use this number to send a message,
b) Save: Save this number to contacts,
c) Delete: Erase this number in the list.
1 Missed Calls
2 Received Calls
3 Dialed Calls
Select Back
1 10000
2 Tom
3 10000
Select Back
Start:01/06,00:00:00
No answer.
Tom
Options Back
7.2 Received Calls
1) In standby screen, press <MENU> Key,<Call Log>,
<OK> Key, <2 Received Calls>, <OK> Key
2) The Received calls list will be displayed; you
can press <Volume +-> to scroll to the desired number,
3) Press<MENU> Key to view the incoming call
information, and press<MENU> Key, you can:
a) Send Message: Use this number to send a message,
b) Save: Save this number to contacts,
c) Delete: Erase this number in the list.
1 Missed Calls
2 Received Calls
3 Dialed Calls
Select Back
1 Send Message
2 Save
3 Delete
Select Back
Call log
Missed Calls
Call log
Call log
10
Page 14

错误!未找到引用源。
7.3 Dialed Calls
1) In standby screen, press <MENU> Key,<Call Log>,
<OK> Key, <3 Dialed Calls>, <OK> Key
2) The Dialed calls list will be displayed;
you can press <Volume +-> to scroll to the
desired number,
3) Press<MENU> Key to view the dialed call information,
and press<MENU> Key, you can:
a) Send Message: Use this number to send a message,
b) Save: Save this number to contacts,
c) Delete: Erase this number in the list.
7.4 Call Time
In standby screen, press <MENU> Key, <Call Log>,
<OK> Key, <4 Call Time>, <OK> Key,
You can press <Volume +-> to scroll
to Received Calls, Dialed Calls, All calls to view
total duration of the Received Calls, Dialed Calls,
All calls. Select the Reset Time, you can reset the call time.
7.5 Delete Record
In standby screen, press <MENU> key, <Call Log>, <OK> Key, <5
Delete Record>, <OK> Key
You can scroll the cursor to delete Missed Calls,
Received Calls, Dialed Calls, All Calls.
CDMA FWP
Call log
3 Dialed Calls
4 Call Time
5 Delete Record
Select Back
Dialed Calls
1 10000
2 Tom
3 10000
Select Back
Call log
3 Dialed Calls
4 Call Time
5 Delete Record
Select Back
Call Time
1 Received Calls
2 Dialed Calls
3 All Calls
Select Back
Call Time
2 Dialed Calls
3 All Calls
3 Reset Time
Select Back
Call log
3 Dialed Calls
4 Call Time
5 Delete Record
Select Back
Delete Record
1 Missed Calls
2 Received Calls
3 Dialed calls
Select Back
8 Contacts
Contacts can be used to store contact’s name and contact’s phone numbe rs, address, email, internet
address and note. You can store up to 200 entries to phone memory.
In standby screen, press <MENU> Key, < Contact>, <OK> Key to the contacts menu.
You also can press the <Contacts> key to the contacts menu.
11
Page 15

8.1 View a Contact
错误!未找到引用源。
CDMA FWP
There are 4 ways to view a contact.
1) In standby screen, press <MENU> Key ,<Contacts>,<1
View>,<OK> Key to the contacts list, press <Volume + -> to scroll
to the desired contact, then press <OK> Key to view the contact
information;
2) In standby screen, press <MENU> Key, <Contacts>, press
<Volume+-> to scroll to <3 Search Name>, <OK> Key, input the
name, press <MENU> Key to search the name. Press <Volume+->
to scroll to the desired contact, press <OK> Key to view the contact
information;
3) In standby screen, press <MENU>Key,<Contacts>, press
<Volume+-> to scroll to <4 Groups>,<OK> Key, select the group
that desired contact belongs, press <OK> Key to view the group
member list, then scroll to the desired contact, press <OK> Key to
view the contact information.
Contacts
1 View
2 Add New
3 Search Name
Select Back
Contacts
1 View
2 Add New
3 Search Name
Select Back
Contacts
4 Groups
5 Delete All
6 Speed Dial
Select Back
Groups
1 Family
2 Friends
Options Back
4) In standby screen, press <Contacts> key, <1 View>,<OK> Key to the
contacts list, press <Volume + -> to scroll to the desired contact,
then press <OK> Key to view the contact information.
8.2 Add a New Contact
1) In standby screen, press <MENU> Key ,<Contacts>,
press <Volume+-> to scroll to <2 Add New>,<OK> Key.
2) Input the number, then press<MENU> Key, input the
name, press <MENU> Key when finished.
Contacts
1 View
2 Add New
3 Search Name
Select Back
Number: 6/20
123456
Next Back
Name: 3/12 abc
Tom
Save Back
12
Page 16

错误!未找到引用源。
8.3 Search for a Contact
You can search a contact by name,
1) In standby screen, press <MENU> Key ,<Contacts>, press
<Volume+->
CDMA FWP
Contacts
1 View
2 Add New
3 Search Name
Select Back
to scroll to <3 Search Name>,<OK> Key
2) Input the name for inquiry,
3) Press<MENU> Key to search.
8.4 Group
8.4.1 Add a Contact to the Group
1) In standby screen, press <MENU>Key,<Contacts>,<4 Groups>,
<OK> Key to groups list (Family, Friends, Colleagues, Business,
Classmates), press<OK> Key to select one group, and check
the contacts list in the group.
2) If there is no contacts in the groups, press<OK> Key, to select
add new member from Contacts.
Search Name
Tom
Select Back
Contacts
4 Groups
5 Delete All
6 Speed Dial
Select Back
Groups
1 Family
2 Friends
Options Back
Options
1.Add new
2 Delete
3 Delete All
Select Back
8.4.2 Delete a Contact from the Group
1) In standby screen, press <MENU>Key ,<Contacts>,<4 Groups>,
<OK>Key, select desired group and press <OK> Key
2) Press <MENU> Key, <2 Delete> to delete a contact from the
group.
8.4.3 Add a Group
In standby screen, press <MENU>Key, <Contacts>, <4 Groups>,
<OK> Key, <MENU> Key, <1 Add Group>, <OK> Key, input the
name, Press <MENU> Key to save the new group.
Note: You can only add two groups at most.
13
Options
1.Add new
2 Delete
3 Delete All
Select Back
A
1 Add Group
2 Group Ringers
3 Edit
Select Back
Page 17

错误!未找到引用源。
8.4.4 Set a Ring tone to a Group
In standby screen, press <MENU>Key, <Contacts>,
<4 Groups>, <OK>Key, <MENU>Key, <2 Group Ri ngers>,
<OK> Key, select a proper tone via <Volume+-> key.
CDMA FWP
A
1 Add Group
2 Group Ringers
3 Edit
Select Back
8.5 Delete a Contact
In standby screen, press <MENU>Key, <Contacts>, <1 View>, <OK>
Key to the contacts list, press <Volume+-> to scroll to the desired
contact, then press <MENU> Key,<2 Delete>,<OK>Key to delete the
contact.
8.6 Edit a Contact
In standby screen, press <MENU>Key, <Contacts>, <1 View>,
<OK> Key to the contacts list, press <Volume+-> to scroll to the
desired contact, then press <OK> Key, and press <Volume + ->
key to select name, group or number, press<OK> Key to
edit, then press <OK> Key to save.
8.7 Speed Dial
1) In standby screen, press <MENU>Key, <Contacts>,
<6 Speed Dial>, <OK>Key to the speed dial number
list (Location 02~09), press<OK> Key to insert a number
from Contacts. Or you can press<MENU> Key to do
Add New, Delete or Delete All operation.
2) Operation method:
If there is a number in Location 02. The name
is ABC and number is 123456,
In standby screen, press <2>, <#>,<Redial> Key to dial
the number 123456 quickly.
1 View
Options
2 Delete
3 Send message
Select Back
Contacts
1 View
2 Add New
3 Search Name
Select Back
Edit Entry
Tom
[Friends]
Edit Back
Contacts
4 Groups
5 Delete All
6 Speed Dial
Select Back
Speed Dial
02:<empty>
03:<empty>
Options Back
Options
1.Add new
2 Delete
3 Delete All
Select Back
8.8 Memory Status
In standby screen, press <MENU>Key, <Contacts>, <7 Memory
Status>,<OK>Key, to check the memory status about the phone book.
14
Contacts
5 Delete All
6 Speed Dial
7 Memory Status
Select Back
Page 18

9 Tools
错误!未找到引用源。
CDMA FWP
9.1 Schedule
You can add your schedule in the phone. To add a schedule, please
1) In standby screen, press <MENU>Key, <Tools>, <1 Schedule>,
<OK> Key to the schedule menu.
2) Select < 1 Add new>, <OK> Key to add a new schedule, press
<Volume + -> to scroll to the date you want to add the schedule,
then press <OK> key, input the schedule, then press<MENU> Key
to set the schedule time. Press<MENU> Key to save.
To view the schedule that you have added, select List in Schedule
menu, then you can Delete, and View the schedule by press <Menu>
key. You can delete all schedules by selecting Delete All in Schedule menu.
9.2 Alarm Clock
In standby screen, press <MENU> Key, <Tools>, <2 Alarm>, <OK>
Key. Here you can set the alarm clock. Press <MENU> Key, <Set>,
<OK> Key to set the alarm time , press <MENU> Key to save and
enable the alarm. Or press <MENU> Key, <Disable>to disable the
alarm.
1 Schedule
2 Alarm
3 Calculator
Select Back
1 Add New
2 List
3 Delete All
Select Back
1 Schedule
2 Alarm
3 Calculator
Select Back
1 Set
2 Enable
Select Back
Tools
Schedule
Tools
Options
9.3 Calculator
In standby screen, press <MENU> Key, <Tools>, <3 Calculator>,
<OK> Key to the Calculator. Press <MENU> Key to refer the Help.
1 Schedule
2 Alarm
3 Calculator
Select Back
9.4 World Time
In standby screen, press <MENU> Key, <Tools>, <4 World Time>,
<OK> Key to the city list. Select a city, press<OK> Key to check the world time.
Tools
15
Page 19

错误!未找到引用源。
10 Settings
10.1 Tones
Here you can set the ring tone and volume. In standby screen, Press
< MENU > Key, <Settings>, <1 Tones>, <OK> Key.
10.1.1 Ring Tone
In Tones menu, select Ring Tone, press<OK> Key, you can set
the ringer for In Contacts, Not In Contacts, Messages and Alarm
Clock. Press <OK> Key to save your setting.
Press <Clear> Key to exit the menu.
10.1.2 Volume
In Tones menu, select Volume via <Volume+->, press<OK> Key,
you can set the volume for Ring Tone, Key Beep, Handset,
Handsfree. Press<OK>to save your setting.
Press <Clear> Key to exit the menu.
CDMA FWP
Settings
1 Tones
2 Display
3 Security
Select Back
Tones
1 Ring Tone
2 Volume
3 Alert
…
Ring Tone
1 In Contacts
2 Not In Contacts
3 Messages
Tone1
Tones
1 Ring Tone
2 Volume
3 Alert
…
Volume
1 Ring Tone
2 Key Beep
3 Handset
4 Handsfree
Med
10.1.3 Alert
In Tones menu, select Alert, press <OK> Key, you can turn on/off the
alert of Minute Beep, Call Connect, and Power On/Off.
Press<OK> Key to save your setting.
Press <Clear> Key to exit the menu.
10.2 Display
Here you can set the banner, backlight, contrast, language. Press
< MENU > Key, <Settings>, <2 Display>, <OK> Key.
10.2.1 Banner
In standby screen, Press< MENU > Key, <Settings>, <2 Display >,
<OK> Key to enter display menu.
Select <1 Banner>, press<OK> Key, you can change the banner
of the phone. Press<MENU> Key to save your setting. When you
turn on the phone, you can see the banner you set.
Note: You can press<#> Key to switch the input method. You can
input 20 digits at most.
Tones
1 Ring Tone
2 Volume
3 Alert
…
Alert
1 Minute Beep
2 Call Connect
3 Power On/Off
On
Settings
1 Tones
2 Display
3 Security
Select Back
Display
1 Banner
2 Backlight
3 Contrast
4 Language
Welcome
16
Page 20

错误!未找到引用源。
CDMA FWP
10.2.2 Backlight
In standby screen, press< MENU> Key, <Settings>, <2 Display >,
<OK> Key to enter display menu.
Select <2 Backlight>, press<OK> Key, you can change the timer
of turning off the backlight, and you also can turn off the backlight
by selecting Always Off. Press<MENU> Key to save your setting.
10.2.3 Contrast
In standby screen, Press< MENU> Key, <Settings>, < 2 Display>,
<OK> Key to enter display menu.
Select <3 Contrast>, press<OK> Key, you can change the contrast
of LCD. There are 8 levels, 0 is the highest contrast.
Press<MENU> Key to save your setting.
10.2.4 Language
In standby screen, Press< MENU> Key, <Settings>, <2 Display>,
<OK> Key to enter display menu.
Select <4 Language>, press<OK> Key, you can change the phone
language. Press<MENU> Key to save your setting.
10.2.5 Hyphen
In standby screen, Press< MENU> Key, <Settings>, <2 Display>,
press <OK> Key to enter Display menu, press <Volume +-> key to
scroll to select <5 Hypen>, press<OK> Key
If you Enable Hyphen,
EX. In standby screen, when you input 1234567, it will display 123-
4567.
10.2.6 Time and Date
In standby screen, Press< MENU> Key, <Settings>, <2 Display >,
press <OK> Key to enter Display menu, press <Volume +-> key
to scroll to select <6 Time and Date>, press<OK> Key, you can
set the Time format and Date format.
1) Select Time format , press<OK> Key, set the time format
to 24-hour or 12-hour via <Volume+->, press <OK> Key to
save the setting
2) Select Data format, press <OK> Key, set the data format
to MM/DD/YY or DD/MM/YY via <Volume+->, press <OK> Key
to save the setting.
17
1 Banner
Display
2 Backlight
3 Contrast
4 Language
15 Seconds
Backlight
o 7 Seconds
o 15 Seconds
o 30 Seconds
Select Back
Display
1 Banner
2 Backlight
3 Contrast
4 Language
2
Contrast
o 0
o 1
o 2
Select Back
Display
1 Banner
2 Backlight
3 Contrast
4 Language
English
Display
3 Contrast
4 Language
5 Hypen
6 Time and Date
Enable
Insert into Hypen
o Disable
o Enable
Select Back
Display
3 Contrast
4 Language
5 Hypen
6 Time and Date
…
Time format
1 24-Hour
2 12-Hour
Select Back
Date format
1 MM-DD
2 DD-MM
Select Back
Page 21

错误!未找到引用源。
10.3 Security
In standby screen, Press<MENU> Key, <Settings>,
<3 Security>,<OK> Key. Input the Lock Code: 0000,
Press <OK> Key to the security menu.
CDMA FWP
Settings
1 Tones
2 Display
3 Security
Select Back
10.3.1 Lock Phone
In Security menu, select <1 Lock Phone>, press <OK> Key
to select Unlock or lock the phone. Press <MENU> Key to
save your setting.
10.3.2 Change Pin
In Security menu, select <2 Change PIN>, press <OK> to enter it.
Input Old PIN1 (You have 3 chances, if you input wrong PIN for 3
times, the UIM card will be locked), press <MENU> Key to input
new PIN1, press <MENU> Key to input the new PIN1 again, then
press <MENU> Key to save your setting.
10.3.3 Incoming Call Setting
In Security menu, select <3 Incoming Call Setting>,
press <OK> Key to do the Incoming Call Limit or Incoming
Call Number List operation.
1) Select the Incoming Call Limit, press <OK> Key, select
Permit All, Forbid All, Permit List or Forbid List.
2) Select the Incoming Call Number List, press<OK> Key
to edit the Permit List or Forbid List.
Press <OK> Key to edit the number list, you can edit
10 numbers in every list. Press <OK> Key to input number.
Lock Phone
o Unlock
o Lock
Select Back
Security
1 Lock Phone
2 Change PIN
3 Incoming call Setting
4 Outgoing call Setting
Select Back
Security
1 Lock Phone
2 Incoming call Setting
3 Outgoing call Setting
4 Change Password
Select Back
Incoming Call Setting
o Incoming Call Limit
o Incoming Call Number List
Select Back
Incoming Call Limit
o Permit All
o Forbid All
o Permit List
Select Back
Incoming Call Number List
o Permit List
o Forbid List
Select Back
18
Page 22

错误!未找到引用源。
CDMA FWP
10.3.4 Outgoing Call Setting
In Security menu, select <4 Outgoing Call Setting>, press <OK> Key
to do the Outgoing Call Limit, Outgoing Call Number List or Dial
Delay Time operation.
2 incoming call Setting
3 Outgoing Call Setting
4 Change Password
5 Load Default
Select Back
Security
1) Select the Outgoing Call Limit, press <OK> Key, select Permit
All, Forbid All, Permit List or Forbid List screen.
2) Select the Outgoing Call Number List, press<OK> Key to edit
the Permit List or Forbid List.Press <OK> Key to edit the
Outgoing Call Setting
o Outgoing Call Limit
o Outgoing Call Number List
o Dial Delay Time
Select Back
Outgoing Call Limit
o Permit All
o Forbid All
o Permit List
Select Back
Outgoing Call Number List
o Permit List
o Forbid List
number list, you can edit 10 numbers in every list. Press <OK>
Key to input number.
Select Back
3) Select the Dial Delay Time, press<OK> Key. You can select the dial delay time: 1s~10s.Press
<OK> Key to select.
10.3.5 Change Password
In Security menu, select <5 Change Password>, press <OK> Key,
you will be prompted to enter a new password twice, press <OK> key
to confirm inputting, Press <Clear > key to clear a number.
10.3.6 Load Default
In Security menu, select <6 Load Default>, press<MENU>the phone
will restore all original phone settings.
List Default
In Contacts Tone 1
Tones
Display
Ring Tone
Volume
Alert
Banner welcome
Backlight 7 Seonds
Contrast 2
Language Espanol
Hyphen Disable
Not In Contacts Tone 2
Messages Tone 2
Ring Tone Med
Key Beep Low
Handset Med
Handsfree Med
Minute Beep Off
Call Connect Off
Power On/Off On
Security
2 incoming call Setting
3 Outgoing Call Setting
4 Change Password
5 Load Default
Select Back
Security
2 incoming call Setting
3 Outgoing Call Setting
4 Change Password
5 Load Default
Select Back
19
Page 23

错误!未找到引用源。
10.4 Call Settings
Here you can do the call settings operations. In standby screen,
Press <MENU> Key, <Settings>,<4 Call Settings>,<OK> Key.
10.4.1 Auto Answer
In Call Settings menu, select <1 Auto Answer>, press <OK> Key.
There are 2 options to choose, off and On. You can press<Volume+-
>, <OK> to select. If you choose On, the phone will auto answer the
incoming call after 3 seconds.
10.4.2 Voice Privacy
In Call Settings menu, select <2 Voice Privacy>, press <OK> Key.
There are 2 options to choose, Enhanced and Standard. You can
press<OK> Key to select.
The Enhanced mode is more secure than Standard mode.
The enhanced mode is using 128bits encryption algorithm, and the
standard mode is using 64bits encryption algorithm.
10.5 Network Service
In Call Settings menu, select <5 Network Service>, press <OK>
Key.
1. Press <OK> Key to select <1 call Forward>, press <OK> Key
to select <1 Activate> or <2 Cancel> to enable call forward if
busy or disable it.
Note: You can select <2 FWD If No Answer> and <3 FWD All
Calls> via <Volume +-> key, follow the steps above to enable or disable them.
2. Press <Volume+-> to select <2 Call Waiting>, press <OK> Key
to activate it or cancel it.
4 Call Settings
5 Network Service
6 Phone Info
Select Back
1 Auto Answer
2 Voice Privacy
o Off
o On
Select Back
1 Auto answer
2 Voice privacy
Select Back
o Enhanced
o Standard
Select Back
5 Network Service
6 Phone Info
7 Port Speed
Select Back
1 FWD if Busy
2 FWD if No Answer
3 FWD All Calls
Select Back
Network Service
1 Call Forward
2 Call Waiting
Select Back
1 Activate
2 Cancel
Select Back
CDMA FWP
Settings
Call Settings
Off
Auto Answer
Call Settings
Voice Privacy
Settings
Call Forward
Call Waiting
20
Page 24

错误!未找到引用源。
CDMA FWP
10.6 Phone Info
You could check the phone information in this menu. The phone information include s Phone Number
(need you to input the number first), SW Version (Software Version)。
10.7 Port Speed
Please consult your operator for details on this function.
.
11 Data Service
Model PX3x0N can provide circuit data service (14.4 kbps) and high speed data service (up to 153.6
kbps, the actual speed depends on your CDMA service provider and the service you have purchased).
You can use the phone as a modem for your computer.
The user manual of this function please refers to the user manual in the CD disk for data service.
12 Technical Parameters
Dimensions 190(L> x130(W> x63(H> mm
Weight <1.0kg
Air Interface IS-95A/B, IS-2000
Vocodec 13K QCELP & 8K EVRC
Charger AC Input 90 ~ 240 VAC, 50~60Hz
Charger DC Output 5.3VDC @800mA
Backup Battery 3.6V/1500mAh Li-ON Rechargeable Battery
Operation Temperature -10℃~ 50℃
Range of Humidity 5% ~ 95% RH
13 Quick Troubleshooting Guide
Unable to send/receive data/fax calls: Check the connections to computer and verify that
necessary software has been properly installed and configured.
Moisture or ventilation problems: Visually inspect the phone body, moisture can damage the
phone. Ventilation is also very important. Move the phone to improve the ventilation as necessary.
No power: Verify that AC power source and its corresponding circuit breaker are functioning
properly.
If Phone can’t make data connection:
9 Make sure to follow modem installation procedures
9 Make sure that you have purchased CDMA1x service from your CDMA service provider
9 Make sure that both PC’s modem driver and proper software are installed correctly
Unable to receive incoming calls:
9 Make sure that the incoming call is not restricted;
9 Make sure the FAX/DATA screen setting is OFF
9 Make sure that your Phone is having good signal reception
Unable to make outgoing calls:
9 Make sure that the numbers you dialed are not restricted;
9 Make sure that your Phone is having good signal reception
Unable to receive SMS: Make sure that your Phone’s memory is not full for storing SMS. If the
memory is full, please empty inbox.
While charging the battery, DON’T disconnect the charger before the battery is fully charged.
REMEMBER: You can always use Load Default sub-menu in Security menu to restore all original
phone settings.
21
Page 25

 Loading...