

Page 1

AXESSTEL Software User's Guide Contents
AX
ESSTEL
CDMA Technology
PST Software User's Guide
Restricted Distribution: This document
contains critical information about AXESSTEL
products and may not be distributed to anyone
that is not an employee of AXESSTEL without
the approval of Configuration Management.
AXESSTEL Proprietary
1
AXESSTEL Incorporated
San Diego, U.S.A.
Page 2

AXESSTEL Software User's Guide Contents
Axesstel, Inc.
6305 Lusk Blvd.
San Diego, CA 92121 U.S.A
1 (858) 625-2100 phone
1 (858) 625-2110 fax
Copyright © 2000 AXESSTEL Incorporated. All rights reserved.
Printed in the United States of America.
All data and information contained in or disclosed by this document is confidential and
proprietary information of AXESSTEL Incorporated, and all rights therein are expressly reserved.
By accepting this material the recipient agrees that this material and the information contained
therein is held in confidence and in trust and will not be used, copied, reproduced in whole or in
part, nor its contents revealed in any manner to others without the express written permission of
AXESSTEL Incorporated.
Export of this technology may be controlled by the United States Government. Diversion
contrary to U.S. law prohibited.
Restricted Distribution:
This document contains critical information about AXESSTEL products and may not be
distributed to anyone that is not an employee of AXESSTEL without the approval of
Configuration Management.
AXESSTEL is a registered trademark and registered service mark of AXESSTEL Incorporated.
Other product and brand names may be trademarks or registered trademarks of their respective
owners.
Information in this document is preliminary and subject to change and does not represent a
commitment on the part of AXESSTEL Incorporated.
AXESSTEL CDMA Technologies
PST Software User's Guide
July 14, 2003
2
AXESSTEL Proprietary
Page 3

AXESSTEL Software User's Guide Contents
Contents
1 Introduction........................................................................................ 1
1.1 Purpose ................................................................................................................1-1
1.2 Scope and intended audience...............................................................................1-2
1.3 Revision history.....................................................................................................1-3
1.4 Reference documents...........................................................................................1-4
1.5 Technical assistance.............................................................................................1-5
2 Installation.......................................................................................... 2
2.1 Required hardware and software .........................................................................2-1
2.2 Installing PST........................................................................................................2-2
2.3 Physical connectivity.............................................................................................2-3
3 Communication Parameters ............................................................ 3
4 Display and Function Overview.........................................................4
4.1 Status....................................................................................................................4-1
4.2 Download..............................................................................................................4-2
4.3 Nv edit ..................................................................................................................4-3
4.4 Nv Script................................................................................................................4-4
4.5 Lcd simulator.........................................................................................................4-5
4.6 Prl download…………………….............................................................................4-6
4.6.2 Prl Edit ……………………………………………………………………………….4-6-2
4.7 Dm logging …………….........................................................................................4-7
4.8 Cai msg..……………….........................................................................................4-8
4.9 Setup………………...............................................................................................4-9
4.10 Pst Frame Overview….......................................................................................4-10
5 Troubleshooting................................................................................. 5
Appendix
NV Scripts command.............................................................................A
SCAN_CONFIG Parameters..................................................................B
Sample Script Files................................................................................C
AXESSTEL Proprietary
3
Page 4

AXESSTEL Software User's Guide Contents
1 Introduction
1.1 Purpose
PST (AXESSTEL Extensible Diagnostic Monitor) provides a diagnostic client for DMSS
software. Its interface is based on the Mobile Diagnostic Monitor (MDM) and the CDMA
Air
Interface Tester (CAIT). It was developed to provide a rapid prototyping platform for
new diagnostic clients and diagnostic protocol packets
PST provides a graphical user interface that displays data retrieved from DMSS
Also It Can download data to DMSS.
1.2 Scope and intended audience
This user guide is intended for users of PST who need to know how to install, use, and
understand
information provided by PST.
Many features in PST are documented elsewhere.
The following is an overview of what
_ Installation
_ Physical connectivity
_ Communication parameters
_ Overview of PST screens
_ Description of using PST
is covered by this guide:
1.3 Revision history
The revision history for this document is provided in the below
Revision history
AxessPst Rev. – JULY 14 2003 Initial release Ver. 0.1
The following is an overview of what is covered by this guide
Phone status
Download
Nv item edit
Prl Download and Edit
Lcd simulator
Dm log
AXESSTEL Proprietary
4
Page 5

AXESSTEL Software User's Guide Contents
1.4 Reference documents
Reference documents are listed in the following table
Reference documents
1 CDMA DMSS Serial Data Interface Control Document 80-V1294-1 X5 Dec 2000
2. Qualcomm QXDM user guide
3. Qualcomm QPST user guide
4. Qualcomm CAIT user guide
1.5 Technical assistance
For assistance or clarification on information in this guide,
email AXESSTEL CDMA Technologies at
PST@AXESSTEL.COM
5
AXESSTEL Proprietary
Page 6
AXESSTEL Software User's Guide Contents
2 Installation
2.1 Required hardware and software
PST is designed to be installed and run on a workstation running at Windows 95 ,
Windows 98 , Windows 2000 series, Windows XP series
NOTE An OS higher than Microsoft Windows 95 is required to run Axesstel PST.
PST installer program required which enables PST to run for a specified period of time
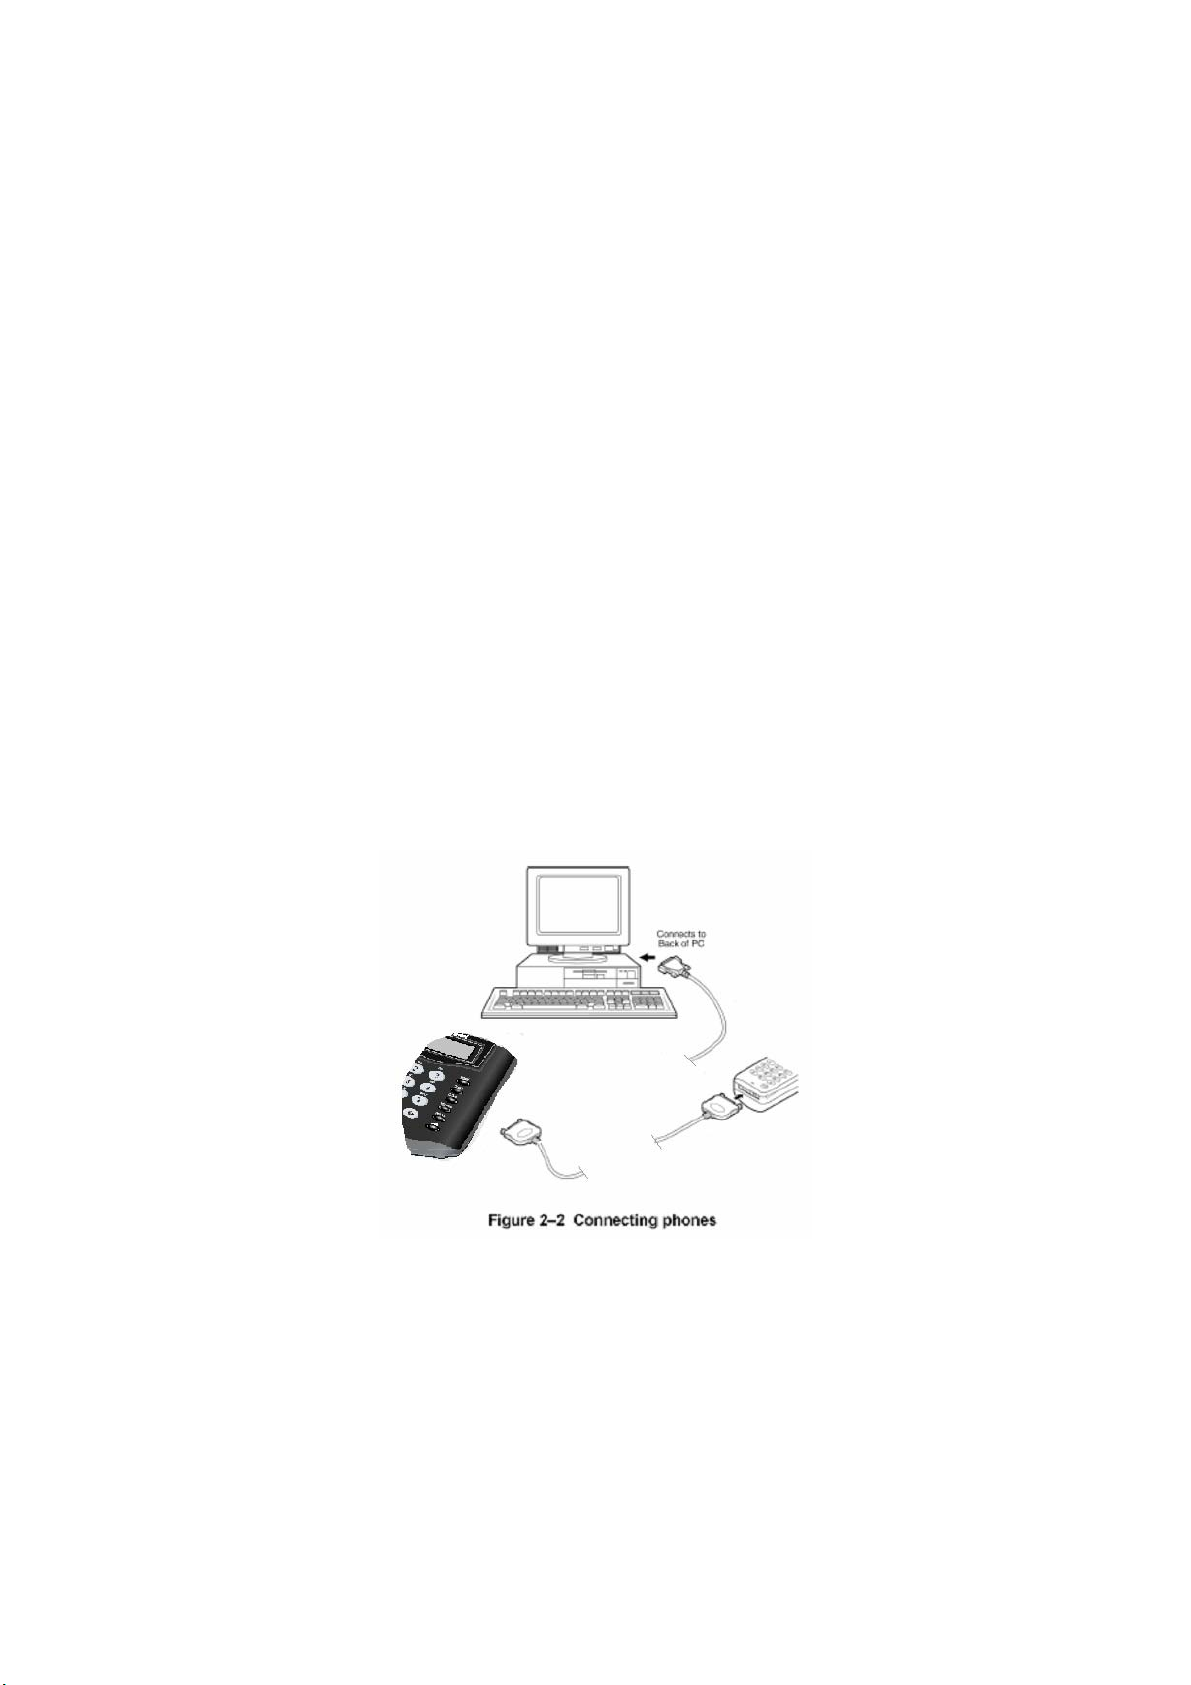
2.2 Physical connectivity
Connect a phone to a COM port on your PC using a serial cable as depicted in the
Figure 2-2.
You need following accessories:
- PC running PST
- Axesstel Wireless Phone
- UART COM Port
- COM Port
- RS-232 Cable provided by Axesstel.
AXESSTEL Proprietary
6
Page 7
AXESSTEL Software User's Guide Contents
2.3 Installing PST
The PST software is provided either over the network or on CD-ROM, setup files alone.
This installer installs the User Release of PST, which includes the PST client
components.
The following procedure explains the User Release Installer only.
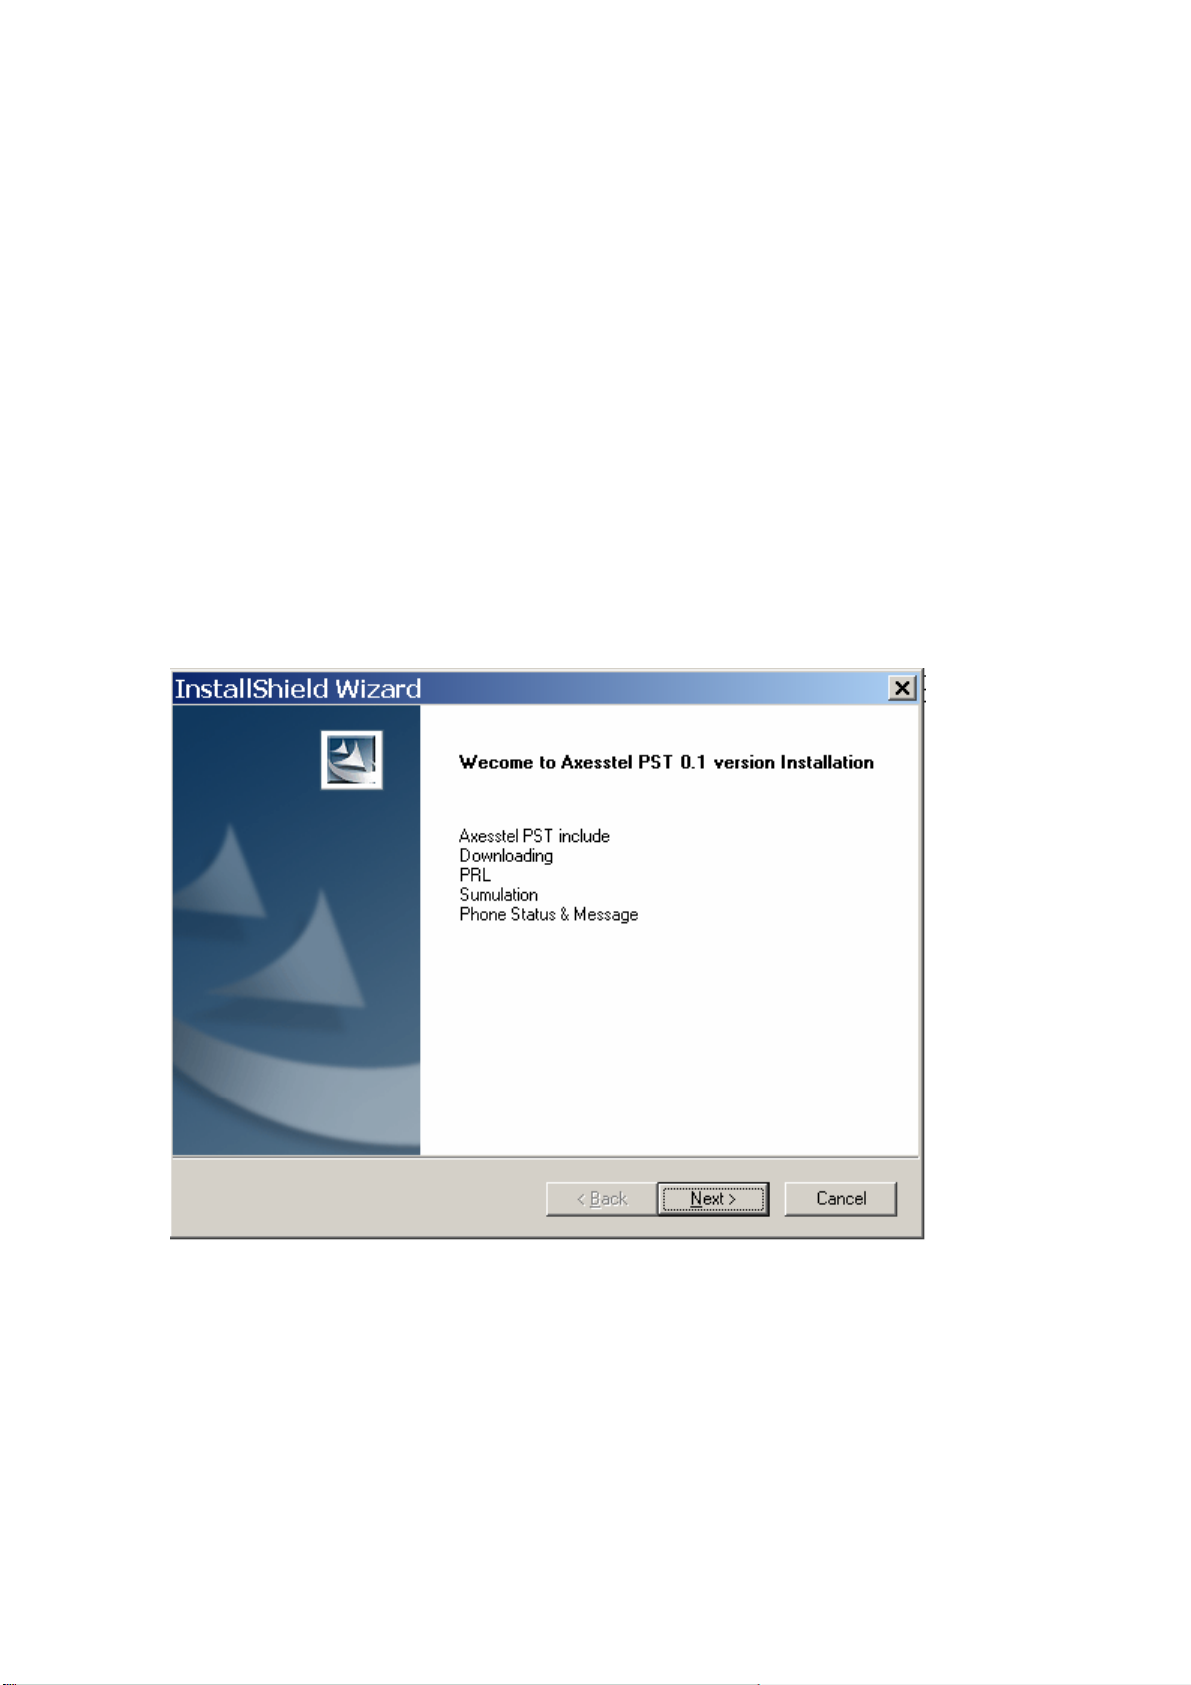
To install PST, run this file
1. From the Windows desktop, select START RUN Setup.exe
2. Click OK to confirm your choice and to run the executable file
3. By default, PST will be installed to this location on your machine:
Figure 2-3-1 Installer introduction
AXESSTEL Proprietary
7
Page 8
AXESSTEL Software User's Guide Contents
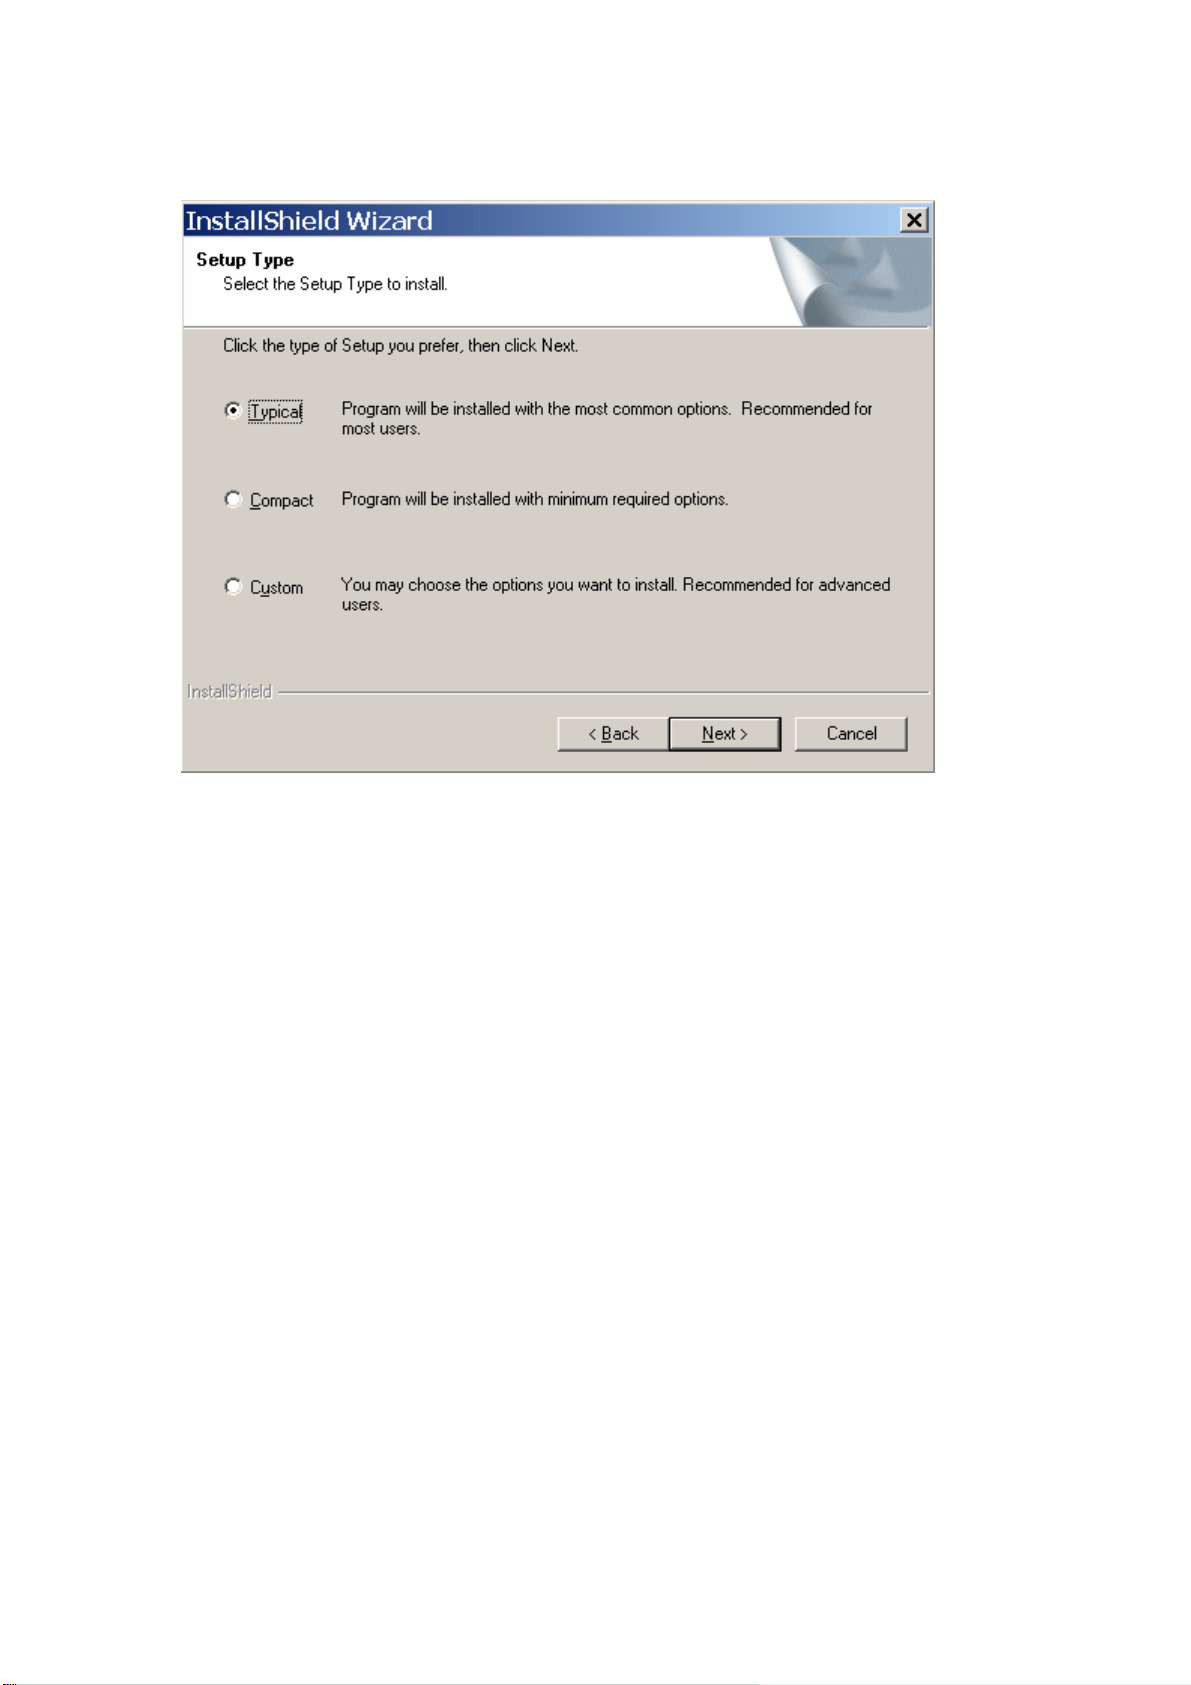
Figure 2-3-2 Choosing Setup Type
Choose Install Folder , By Default c:\Program Files\Axesstel\PST
The installer will allow you to change the installation directory to one of your choice.
The installer creates a PST folder in your START menu.
PST can be run from your START menu by selecting START ->Programs>AxesstelPST -> AxessPST.exe
8
AXESSTEL Proprietary
Page 9
AXESSTEL Software User's Guide Contents
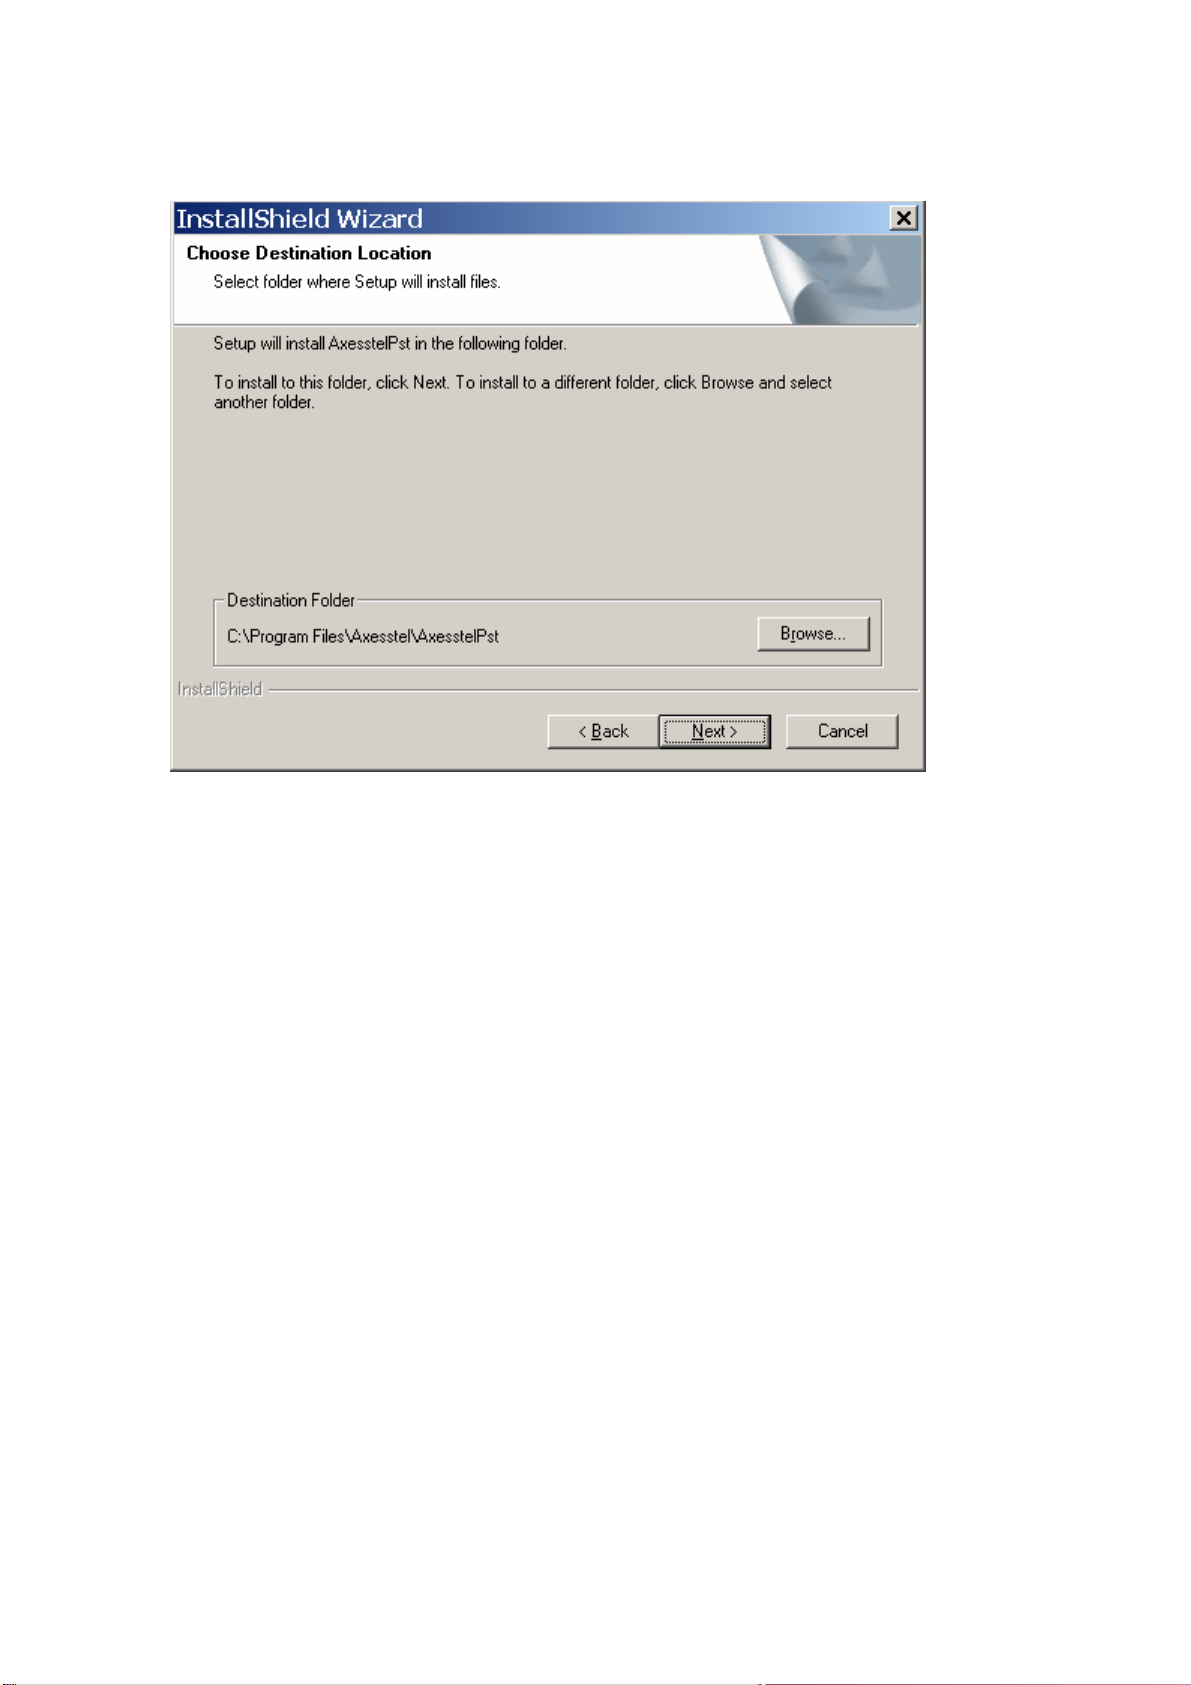
Figure 2-3-3 Selecting Destination Folder
9
AXESSTEL Proprietary
Page 10

AXESSTEL Software User's Guide Contents
3 Communication Setup
PST communication parameters should be configured for proper communication
between the phone and the PC.
The Communications dialog allows you to configure the COM port that will be used by
PST, as well as the Model of Phone.
Click Tool >> Setup
1. Select COM port number to be used.
2. Select Model Name
Axesstel Product Model Name
WLL products A2
Mobile phones E2
Hybrid products W2
Figure 3–1 Configure COM port & Product Model
AXESSTEL Proprietary
10
Page 11

AXESSTEL Software User's Guide Contents
4 Display and Function Overview
The AxesstelPST based on Multi document is composed of 7 components.
Click Tool to see the components.
Status
Download
Nv edit
Lcd simulator
Prl edit
Dm log
Setup
4.1 Status
Status window shows the current status of DMSS
Note: The modification of the status value is not allowed
You can only get current value of DMSS
(Below: Figure 4–1 PST status window)
11
AXESSTEL Proprietary
Page 12

AXESSTEL Software User's Guide Contents
Figure 4–1 PST status window
The fields and functions of the Status window are described in the following.
ESN
Electronic Serial Number (ESN) of the test phone.
Digital MIN
Digital phone Mobile Identification Number (MIN).
Analog MIN
Analog phone Mobile Identification Number (MIN).
Channel
Number of the CDMA channel.
SID
System Identification Number.
NID
Network Identification Number
12
AXESSTEL Proprietary
Page 13

AXESSTEL Software User's Guide Contents
Code channel
Number of the CDMA code channel, range from 1 to 63.
Pilot PN offset
The PN offset number
Protocol revision
The highest protocol revision which the base station is capable. This value appears at
the end of a call, and is one of the following:
_ J_STD008
_ IS-95 in Cellular Band
_ IS-95A + TSB74
_ IS-95B Partial
_ IS-95B Full
_ IS-2000 Release 0
_ IS-2000 Release A
Mobile P_REV
The highest protocol revision of which the DMSS software is capable, which is one of the
following:
_ J_STD008
_ IS-95 in Cellular Band
_ IS-95A + TSB74
_ IS-95B Partial
_ IS-95B Full
_ IS-2000 Release 0
_ IS-2000 Release A
P_REV in use
The protocol currently in use between the base and mobile stations, which is one of the
following:
_ J_STD008
_ IS-95 in Cellular Band
_ IS-95A + TSB74
_ IS-95B Partial
13
AXESSTEL Proprietary
Page 14

AXESSTEL Software User's Guide Contents
_ IS-95B Full
_ IS-2000 Release 0
_ IS-2000 Release A
SO in use
Slot cycle index
Frequency that the test phone checks the paging channel for data.
SCM
Station class mark (SCM) specifies the test phone hardware transmit (Tx) and receive
(Rx) capabilities.
Compiled date
Date the test phone firmware was compiled, displayed in month, day, and year format.
Compiled time
Time of day the test phone firmware was compiled, indicated in hours, minutes, and
seconds.
Released date
Date the test phone firmware was approved for release, indicated in the month, day,
and year format.
Released time
Time of day the test phone firmware was approved for release, displayed in hours,
minutes, and seconds.
Phone time
Current time of the test phone
RF Mode
Operating mode of phone under test. Mode types:
CDMA, Analog, or PCS.
AXESSTEL Proprietary
14
Page 15

AXESSTEL Software User's Guide Contents
Phone State
CDMA state of phone under test, such as CDMA Idle, CDMA Conversation, etc.
CDMA rx state
RX State of the test phone.
Aquire or Not available
Entry reason
CDMA frame crc
RSSI
Current analog RSSI measurement
Output power
The signal’s Ec/Io power level (from 0 to –25 dB)
Locaid
Analog location area identification number.
Analog word sync
Analog good frames
Analog bad frames
MSM Demod ID
MSM Chip ID
HW major version
HW minor version
Firmware version
15
AXESSTEL Proprietary
Page 16

AXESSTEL Software User's Guide Contents
Version directory
Model code
Model number of the test phone
For example, A2, W2, E2
COM port
Serial port in use
COM port state
State of Serial Port that used by PST
If serial port is active, this field displays data speed.
If not, this field displays “Port not opened”
4.2 Download
Software Download is used to:
_ Download software to a phone from a Axesstel Phone Image (.HEX) file
_ Download software to a phone from a Axesstel Phone Image (.BIN) file
_ Backup and Recover User Data
To start Download, Select menu -> window-> Download.
The first window, as shown in Figure 4–2, appears.
AXESSTEL Proprietary
16
Page 17
AXESSTEL Software User's Guide Contents
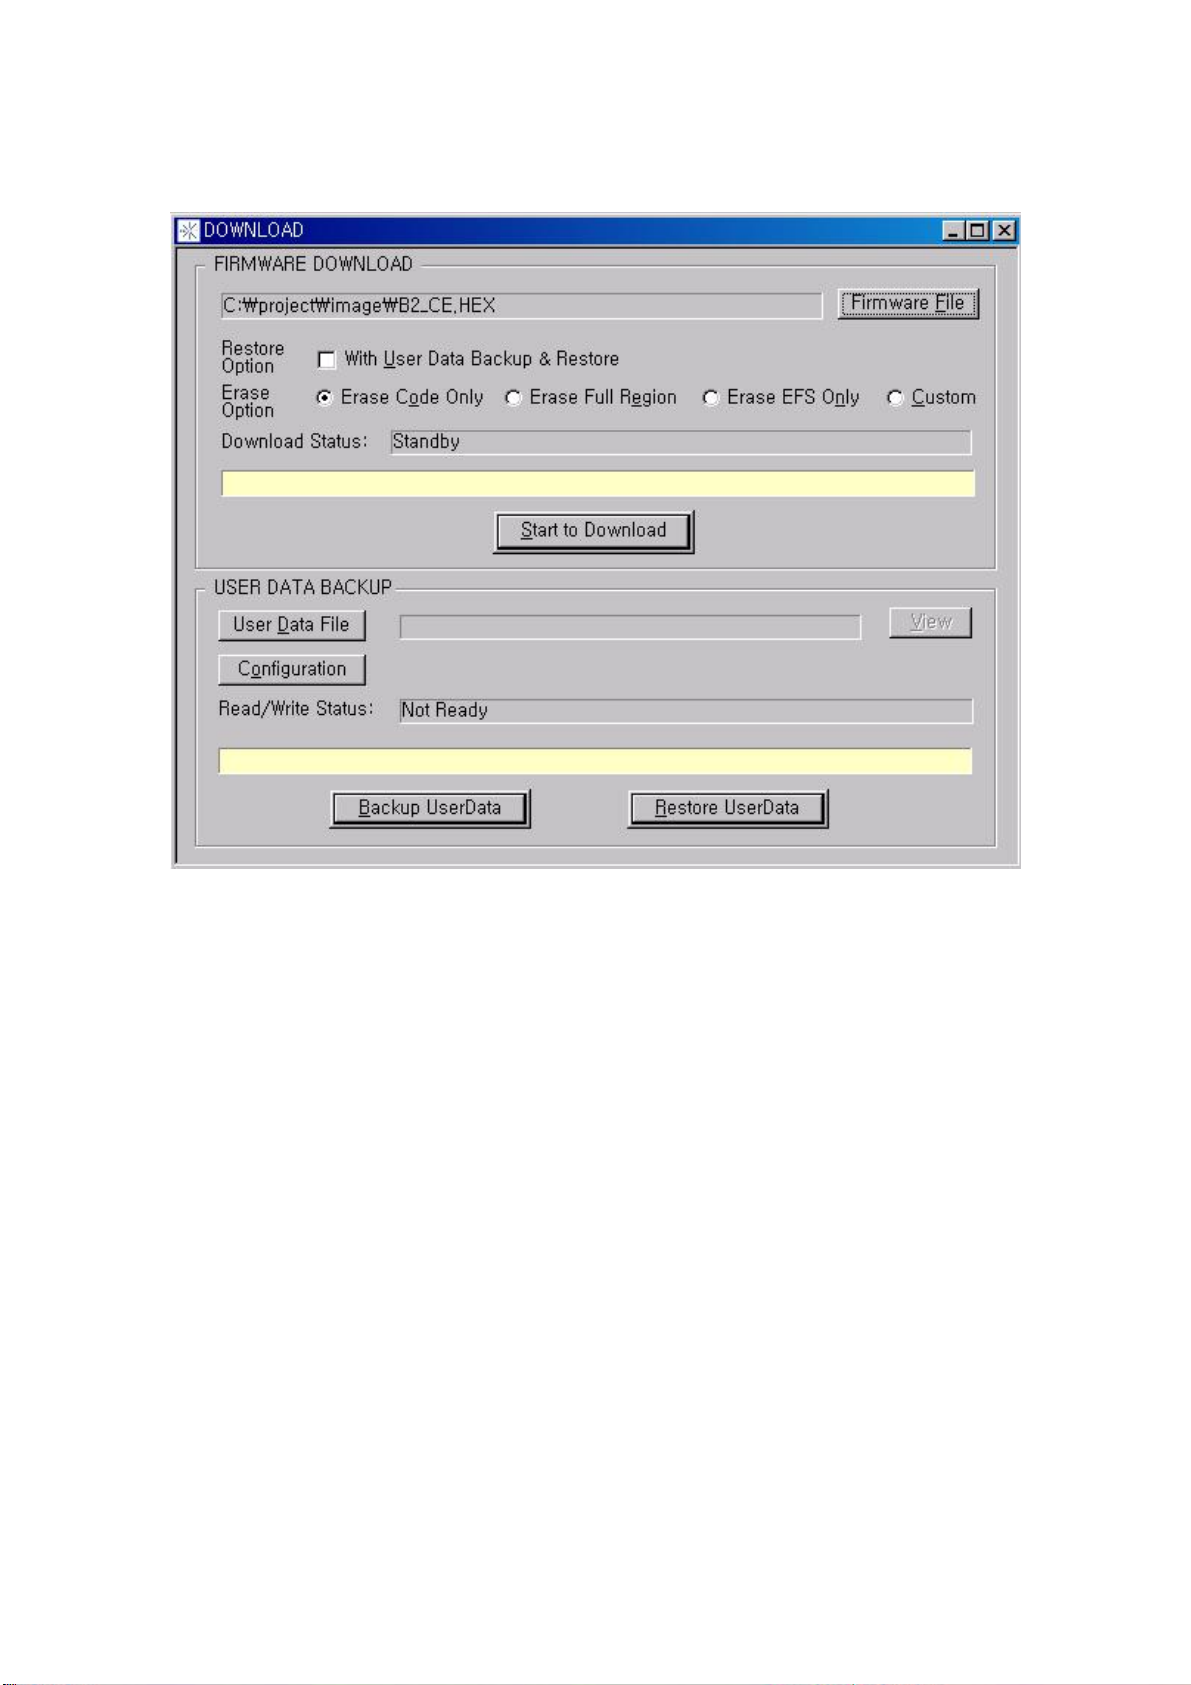
Figure 4–2 PST Download window
4.2.1 Downloading a file
The Software Download application let you select a phone connected to your PC,
select a file to download into the phone,
and monitor the status of your download session in the lower portion of the window
The application can download new code to any Axesstel phone
4.2.2 Selecting a file to download
Click Find button located in Download windows
next , choose the Phone Image in the Phone Image dialog
Use this dialog to locate the file to download
4.2.3 Starting the download
To start the download:
1. Click Start. You will see the progress of the download in the lower portion of the PST
AXESSTEL Proprietary
17
Page 18
AXESSTEL Software User's Guide Contents
Software, Download window
2. Download is stating
3. when download is end, download window display “
download is end successfully”
4. Total time to end nomally is 3’ 45
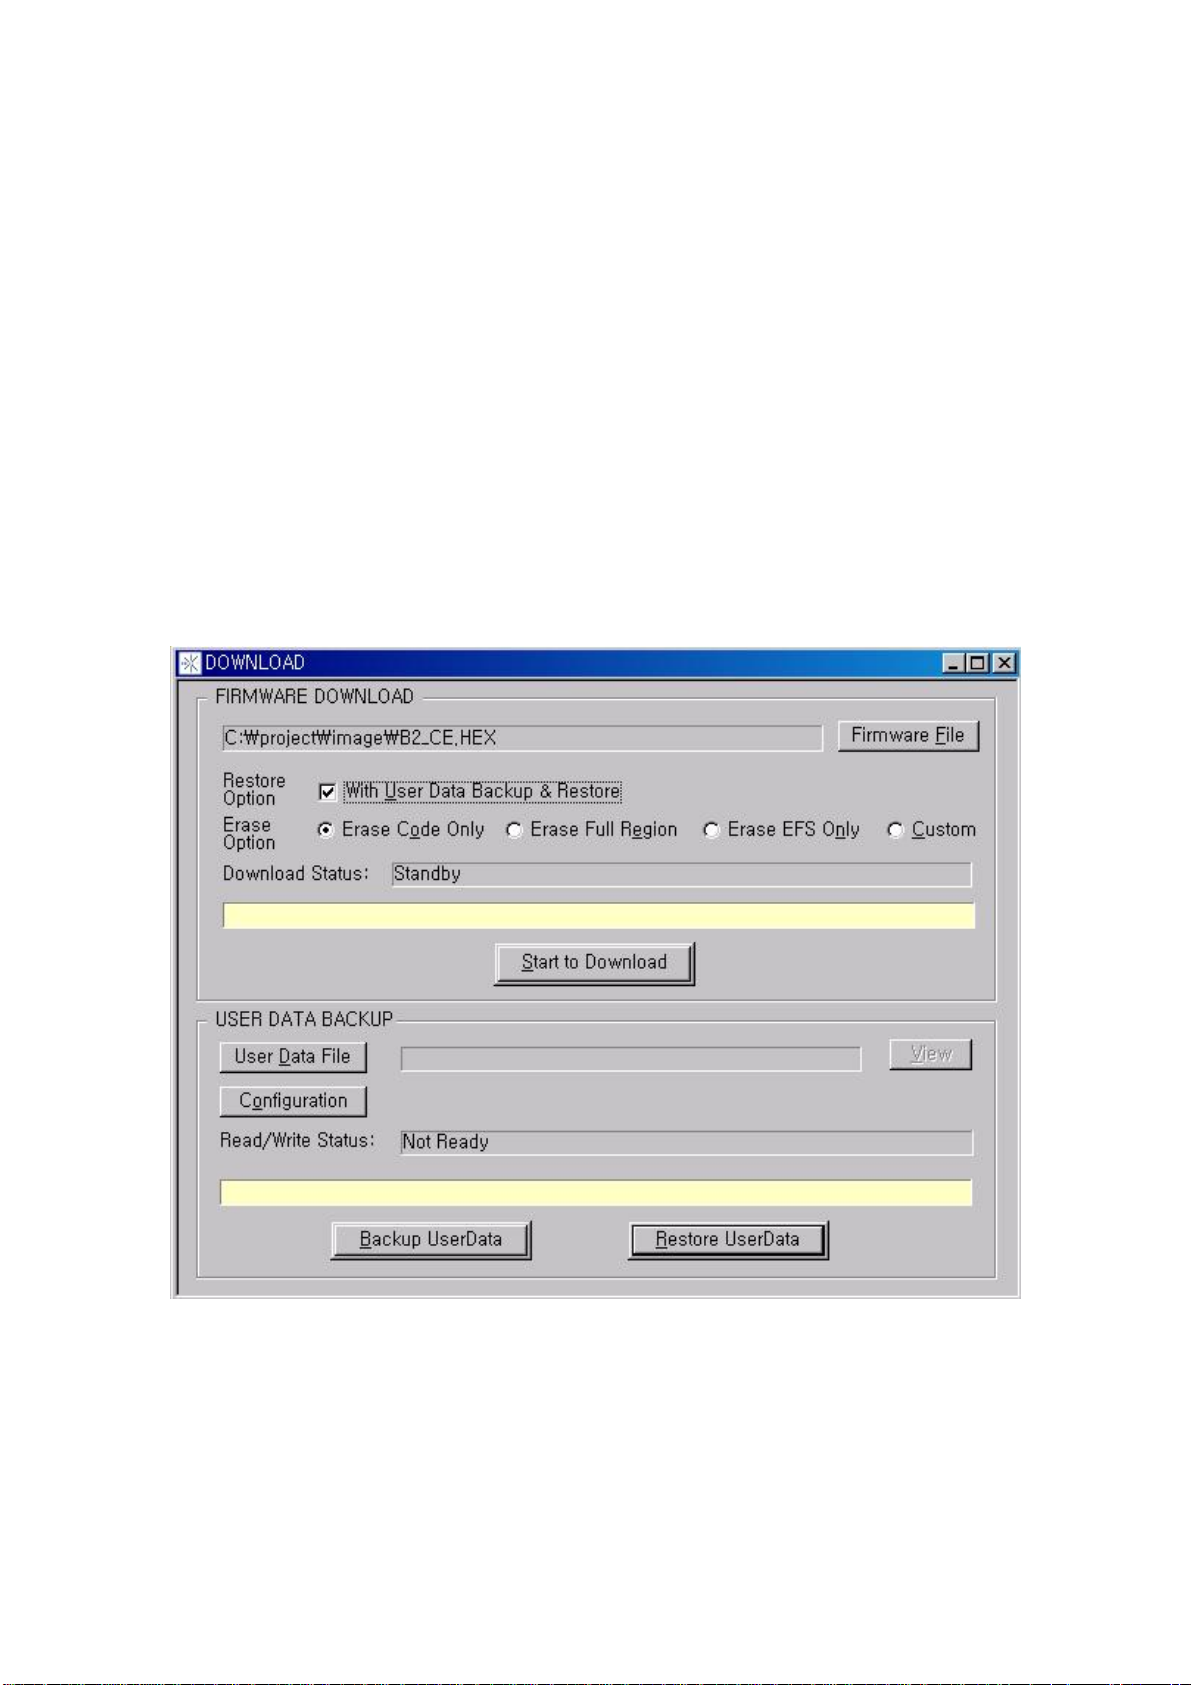
4.2.4 Saving and restoring NV memory
Items in a phone’s NV memory are backuped automatically during the download
process
If the User Data
You can also save and restore them manually.
The USER DATA tabs let you select files for backing up or restoring phone settings.
Backup/Restore check box is checked.
Figure 4–1-4 Backup & Restore
4.2.5 Backing up NV items
18
AXESSTEL Proprietary
Page 19
AXESSTEL Software User's Guide Contents
To back up a phone’s NV memory:
1. Click the Read from phone Button in the USER DATA tab
2. select the target file to save nvitems from the resulting
You will see the progress of the bakup process in the lower portion of the dialog.
4.2.6 Restoring NV items
To restore a phone’s NV memory from a backup (usr) file:
1. Click User Data File Button to access the restored file
2. select the target file restored nvitems
3. Click
Start.
You will see the progress of the restore process in the lower portion of the dialog.
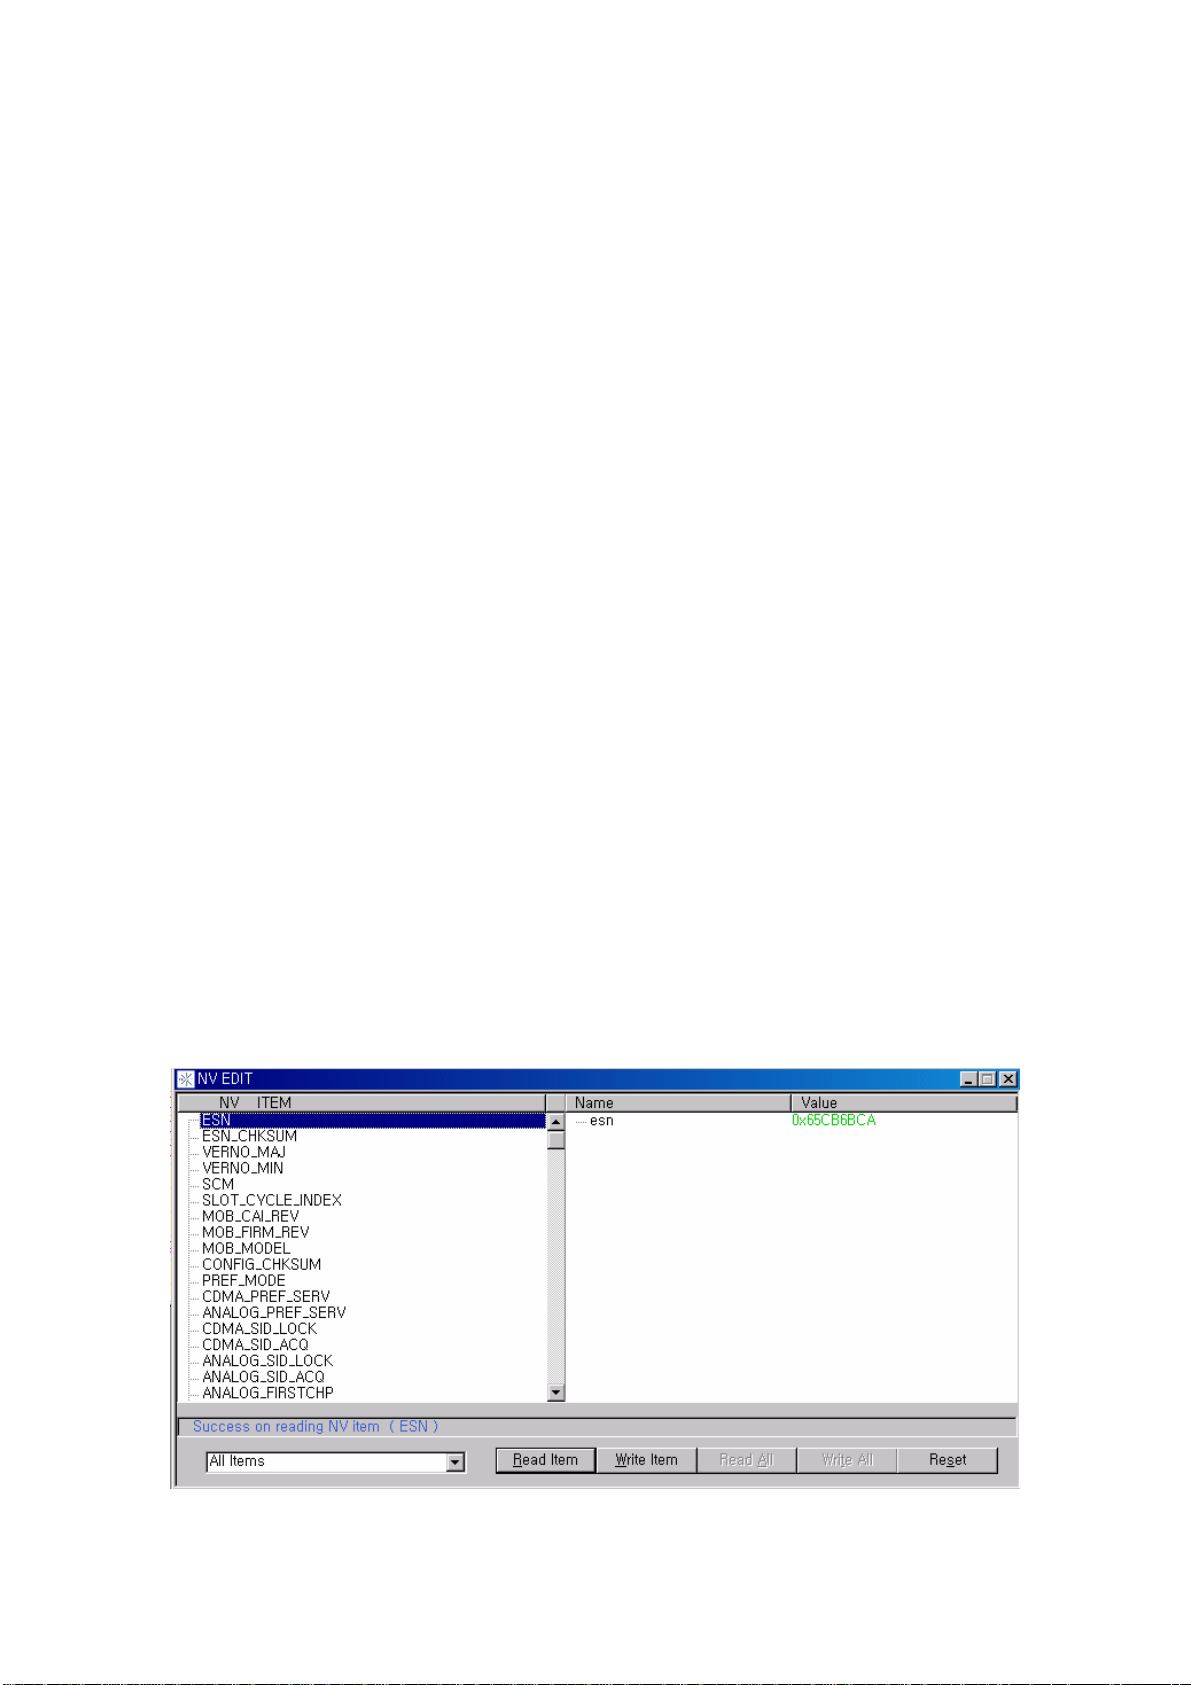
4.3 Nv Edit
This screen allows you to read and write NV items.
When you click on an NV item,
it will display the names within the item in right window
And Click the Read button to read the current value of the selected NV item int right
window
After modifying the values,
click the Write button to write the updated values back to the phone.
AXESSTEL Proprietary
19
Page 20

AXESSTEL Software User's Guide Contents
Figure 4–3 Nv edit window
The NV Edit can read and write nv item in the DMSS
The NV Edit Support to next items
* Electronic Serial Number.
ESN Electronic Serial Number
ESN_CHKSUM Electronic Serial Number checksum
VERNO_MAJ NV Major version number
VERNO_MIN NV Minor version number
* Permanent physical station configuration parameters.
SCM SCMp
SLOT_CYCLE_INDEX Slot cycle index
MOB_CAI_REV Mobile CAI revision number
MOB_FIRM_REV Mobile firmware revision number
MOB_MODEL Mobile model
CONFIG_CHKSUM Checksum of physical configuration parameters
* Permanent general NAM items. Each of these is associated with a
* particular NAM (there are up to four NAMs per unit). The NAM id is
* specified in the request. Certain analog parameters are truly
* associated with the MIN, but since there is only one MIN per NAM
* in analog mode they are defined as a NAM item.
PREF_MODE DigitalAnalog mode preference
CDMA_PREF_SERV CDMA preferred serving system (AB)
ANALOG_PREF_SERV Analog preferred serving system (AB)
CDMA_SID_LOCK CDMA SID(s) to lockout
CDMA_SID_ACQ CDMA SID to acquire
ANALOG_SID_LOCK ANALOG SID(s) to lockout
ANALOG_SID_ACQ ANALOG SID to acquire
ANALOG_FIRSTCHP Analog FIRSTCHPp
ANALOG_HOME_SID Analog HOME_SIDp
AXESSTEL Proprietary
20
Page 21

AXESSTEL Software User's Guide Contents
ANALOG_REG Analog registration setting
PCDMACH Primary CDMA channel
SCDMACH Secondary CDMA channel
PPCNCH Primary PCN channel
SPCNCH Secondary PCN channel
NAM_CHKSUM NAM checksum
* Authentication NAM items. Each of these is associated with a NAM
* authentication (there are up to four NAMs per unit). The NAM id is
* specified in the request.
A_KEY Authentication A key
A_KEY_CHKSUM Authentication A key checksum
SSD_A SSD_Asp
SSD_A_CHKSUM SSD_Asp checksum
SSD_B SSD_Bsp
SSD_B_CHKSUM SSD_Bsp checksum
COUNT COUNTsp
* MIN items. Each of these is associated with a particular MIN within
* the NAM (there are up to 2 MINs per NAM). The MIN id itself is
* specified in the request. When operating in analog mode the first MIN
* is the one and only meaningfull one.
MIN1 MIN1p
MIN2 MIN2p
MOB_TERM_HOME CDMA MOB_TERM_HOMEp registration flag
MOB_TERM_FOR_SID CDMA MOB_TERM_FOR_SIDp registration flag
MOB_TERM_FOR_NID CDMA MOB_TERM_FOR_NIDp registration flag
ACCOLC ACCOLCp
SID_NID CDMA SIDNID pairs
MIN_CHKSUM MIN checksum
* Operational NAM settings.
AXESSTEL Proprietary
21
Page 22

AXESSTEL Software User's Guide Contents
CURR_NAM Current NAM
ORIG_MIN Call origination MIN within NAM
AUTO_NAM Select NAM automatically on roaming
NAME_NAM A user selectable name for each NAM
* Semi-permanent analog registration parameters.
NXTREG Holds the registration count per CAI section 2.3.4.1.
LSTSID SIDsp (last SID registered)
LOCAID LOCAIDsp
PUREG PUREGsp
* Semi-permanent CDMA registration and channel parameters.
ZONE_LIST ZONE_LISTsp
SID_NID_LIST SID_NID_LISTsp
DIST_REG Distance registration variables
LAST_CDMACH Last CDMA channel acquired
* Timers, each associated with a specific NAM.
CALL_TIMER Last call time
AIR_TIMER Air time (resettable cummulative call timer)
ROAM_TIMER Roam time (resettable cummulative roam timer)
LIFE_TIMER Life time (non-resettable cumm. call timer)
* Run timer, independent of NAM.
RUN_TIMER Run timer (time hardware has been running)
* Memory (speed) dial numbers.
DIAL Speed dial number
STACK Call stack number
STACK_IDX Call stack last number index
AXESSTEL Proprietary
22
Page 23

AXESSTEL Software User's Guide Contents
REDIAL
* Telephone pages (obsolete).
PAGE_SET OBSOLETE Page setting
PAGE_MSG OBSOLETE Page message and time
* Volumes.
EAR_LEVEL Handset ear piece volume level
SPEAKER_LEVEL Handsfree speaker volume level
RINGER_LEVEL Ringer volume level
BEEP_LEVEL Key beep volume level
* Tones.
CALL_BEEP One minute call beeper select
CONT_KEY_DTMF Continuous keypad DTMF tones select
CONT_STR_DTMF Continuous string (memory) DTMF tones select
SVC_AREA_ALERT Service area enterexit alert select
CALL_FADE_ALERT Call fade alert select
* Various phone settings.
BANNER Idle banner to display
LCD Display brightness setting
AUTO_POWER Auto power settings (power savings)
AUTO_ANSWER Auto answer setting
AUTO_REDIAL Auto redial setting
AUTO_HYPHEN Auto hyphen setting
BACK_LIGHT Backlighting manualauto mode
AUTO_MUTE Auto radio mute setting
* Locks and restrictions values.
MAINTRSN Base station maintance required reason
AXESSTEL Proprietary
23
Page 24

AXESSTEL Software User's Guide Contents
LCKRSN_P Base station lock reason, until power cycled
LOCK Indicator of whether user locked the phone
LOCK_CODE Lock code string
AUTO_LOCK Auto lock setting
CALL_RSTRC Call restrictions
SEC_CODE Security code
HORN_ALERT Horn alert setting
* Error log.
ERR_LOG Error log
* Miscellaneous items.
UNIT_ID Unit hardware id (obsolete)
FREQ_ADJ Frequency adjust values (obsolete)
* V Battery MinMax. (Portable Only Item)
VBATT V battery regulator array for minmax
* Audio Adjustment values
VOC_GAIN
* Spare items (2) for developer
SPARE_1
SPARE_2
* Data Services items
DATA_IO_MODE External port (IO) mode for Data svc
DATA_MODE_ENABLED Data Service(Task) EnabledDisabled
DATA_MODE_ENABLED
IDLE_DATA_TIMEOUT Data service idle time in seconds
AXESSTEL Proprietary
24
Page 25

AXESSTEL Software User's Guide Contents
* Initial Muting Modes
INI_MUTE
* Factory free format test buffer
FACTORY_INFO
* DM address item (for multi-drop HDLC)
DM_ADDR
CDMA_PN_MASK
SEND_TIMEOUT
-----------------------------------------------------------------------------
POWER_CYCLES
ALERTS_LVL
ALERTS_LVL_SHADOW
RINGER_LVL_SHADOW
BEEP_LVL_SHADOW
EAR_LVL_SHADOW
TIME_SHOW
MESSAGE_ALERT message alert type
AIR_CNT
ROAM_CNT
LIFE_CNT
DWNR_UP_CNT
SEND_PIN
AUTO_ANSWER_SHADOW
AUTO_REDIAL_SHADOW
SMS
IMSI_11_12
IMSI_T_11_12
25
AXESSTEL Proprietary
Page 26

AXESSTEL Software User's Guide Contents
IMSI_MCC
IMSI_T_MCC
DIR_NUMBER
DIR_NUMBER_PCS
VOICE_PRIV
FSC
-----------------------------------------------------------------------------
* MSM2P and beyond NV items. (continued)
N1M
ALARMS
STANDING_ALARM
DIALING_PLAN
ISD_STD_PASSWD
ISD_STD_RESTRICT
FSC2
FSC2_CHKSUM
WDC
HW_CONFIG
* TMSI NAM parameters and extensions.
IMSI OBSOLETE InternationaMobileStationID
IMSI_ADDR_NUM Length of IMSI
IMSI_T_ADDR_NUM TMSI_ZONE_LENs-p
ASSIGNING_TMSI_ZONE_LEN TMSI_ZONEs-p
ASSIGNING_TMSI_ZONE TMSI_CODEs-p
TMSI_CODE TMSI expiration time
TMSI_EXP Subscriber's home block
HOME_PCS_FREQ_BLOCK Directory number, PCS format
* Roaming List and MRU Table.
ROAMING_LIST The roaming list
AXESSTEL Proprietary
26
Page 27

AXESSTEL Software User's Guide Contents
MRU_TABLE Most recently used channels
MRU2_TABLE NOTE: This item is obsolete
LIFE_TIMER_G
CALL_TIMER_G
OTKSL One-time keypad subsidy lock
TIMED_PREF_MODE To allow analog-only operation
RINGER_TYPE Ringer type setting
ANY_KEY_ANSWER Answer call with any key
BACK_LIGHT_HFK Hands Free Kit backlight setting
RESTRICT_GLOBAL Global phone book restriction
KEY_SOUND Type of keypress sound emitted
DIALS_SORTING_METHOD Phone book sorting method
LANGUAGE_SELECTION Language for user interface
MENU_FORMAT Type of user interface menus
RINGER_SPKR_LVL External speaker ringer volume
BEEP_SPKR_LVL External speaker key beep volume
VIBRATOR Use vibrator instead of ringer
FLIP_ANSWERS Opening clamshell answers call
DIAL_RESTRICT_LVLS ISS2 dialing restriction levels
DIAL_STATE_TABLE_LEN Number elements in state table
DIAL_STATE_TABLE ISS2 dialing plan state table
VOICE_PRIV_ALERT Voice privacy alert for TGP
DATA_QNC_ENABLED QNC enabled flag
DATA_SO_SET Which Service Option set is in effect
UP_LINK_INFO IP addresses and key data
UP_KEY
UP_PARMS Current gateway, alert state, etc.
UP_CACHE The Unwired Planet cache
ELAPSED_TIME Timer for formal test use
PDM2 For RF Cal use
VBATT_AUX Auxillary VBATT min-max
DTACO_CONTROL DTACO enableddisabled control
DTACO_INTERDIGIT_TIMEOUT DTACO interdigit timeout
PDM1 For RF Cal use
BELL_MODEM Flag for ISS2
SID_NID_LOCK CDMA SID(s) and NID(s) to lockout
AXESSTEL Proprietary
27
Page 28

AXESSTEL Software User's Guide Contents
PRL_ENABLED If the roaming list is enabled or not
SYSTEM_PREF System Preference, per NAM
HOME_SID_NID "Home" SIDNID list
OTAPA_ENABLED Whether OTAPA is enabled, per NAM
NAM_LOCK SPASM protection per NAM
IMSI_T_S1 True IMSI - MIN1
IMSI_T_S2 True IMSI - MIN2
UP_ALERTS Unwired Planet alert records
UP_IDLE_TIMER Idle time timer
SMS_UTC Specifies format of SMS time display
ROAM_RINGER Specifies roam ringer on or off
RENTAL_TIMER The rental timer item
RENTAL_TIMER_INC The rental timer increment value
RENTAL_CNT The rental counter
RENTAL_TIMER_ENABLED Enablesdisables the rental timer
FULL_SYSTEM_PREF Controls system pref display options
BORSCHT_RINGER_FREQ Ringer freq used for BORSCHT port (RJ-11)
PAYPHONE_ENABLE Enabledisable payphone support
DSP_ANSWER_DET_ENABLE Enabledisable dsp answer detection
EVRC_PRI EVRC13K priority: EVRC first, 13K first
AFAX_CLASS_20 Obsolete item
V52_CONTROL V52 control option
CARRIER_INFO Bitmap and ASCII name info for carrier
AFAX Analog FAX type: end to end or class 2.0
SIO_PWRDWN Distinguishes oldnew UART hardware
PREF_VOICE_SO EVRC voice service options
SMS_AUTO_DELETE SMS auto-deletion enabled status
SRDA_ENABLED Silent redial enabled status
OUTPUT_UI_KEYS Enable-disable sending UI keystrokes
POL_REV_TIMEOUT Timeout for polarity reversal
SI_TEST_DATA_1 First stack-checker diagnostic buffer
SI_TEST_DATA_2 Second stack-checker diagnostic buffer
SPC_CHANGE_ENABLED Enable-disable OTASP SPC change
DATA_MDR_MODE
DATA_PKT_ORIG_STR Dial string for originating packet calls
DATA_AUTO_PACKET_DETECTION Packet data configuration item
AXESSTEL Proprietary
28
Page 29

AXESSTEL Software User's Guide Contents
ROAM_MSG Downloadable roaming messages
SMS_REMINDER_TONE Reminder tone is on or off
PAP_USER_ID User_ID for Password Auth. Protocol
PAP_PASSWORD Actual password for PAP
SMS_BC_SERVICE_TABLE_SIZE
SMS_BC_SERVICE_TABLE
SMS_BC_CONFIG
SMS_BC_USER_PREF
PREF_FOR_RC IS2000 CAI radio configuration RC preference
DS_DEFAULT_BAUD DATA SERVICES default SIO baud rate
PRIMARY_DNS Contains the IP Address of the DNS Server
SECONDARY_DNS Contains the IP Address of the Secondary
DNS Server
DATA_SCRM_ENABLED Enablesdisables the mobile's ability to SCRM
DATA_TRTL_ENABLED In IS2000, if mobile should self-throttle R-SCH
--------------------------------------------------------------------------------------------------------------------
----------
*Axesstel Item for Only W2 Model
SHORTCUT_ONE
SHORTCUT_TWO
SHORTCUT_THR
SHORTCUT_FOR
SHORTCUT_FIV
SHORTCUT_SIX
SHORTCUT_SEV
SHORTCUT_EIG
SHORTCUT_NIN
SHORTCUT_TEN
VOICEMAIL_NUMBER
GPS1_LOCK
TOLL_FREE_LIST
LONG_DISTANCE
INTERNATIONAL
AXESSTEL Proprietary
29
Page 30
AXESSTEL Software User's Guide Contents
PAY_PER_USE
4.4 Nv Scripting
4.4.1 Overview
PST contains a scripting language that allows you to extend its
functions for special-purpose testing. Script commands allow you to
send single or multiple commands to a test phone from PST. You
can either enter and send commands manually or have them sent
from a prepared script file.
Some script commands direct packets to the test phone, while others
affect only PST operations. When data packets are sent to the test
phone, response packets are returned to PST containing data or
acknowledgment (ACK) messages. These responses are displayed
on the Scripting window and can be logged to a file.
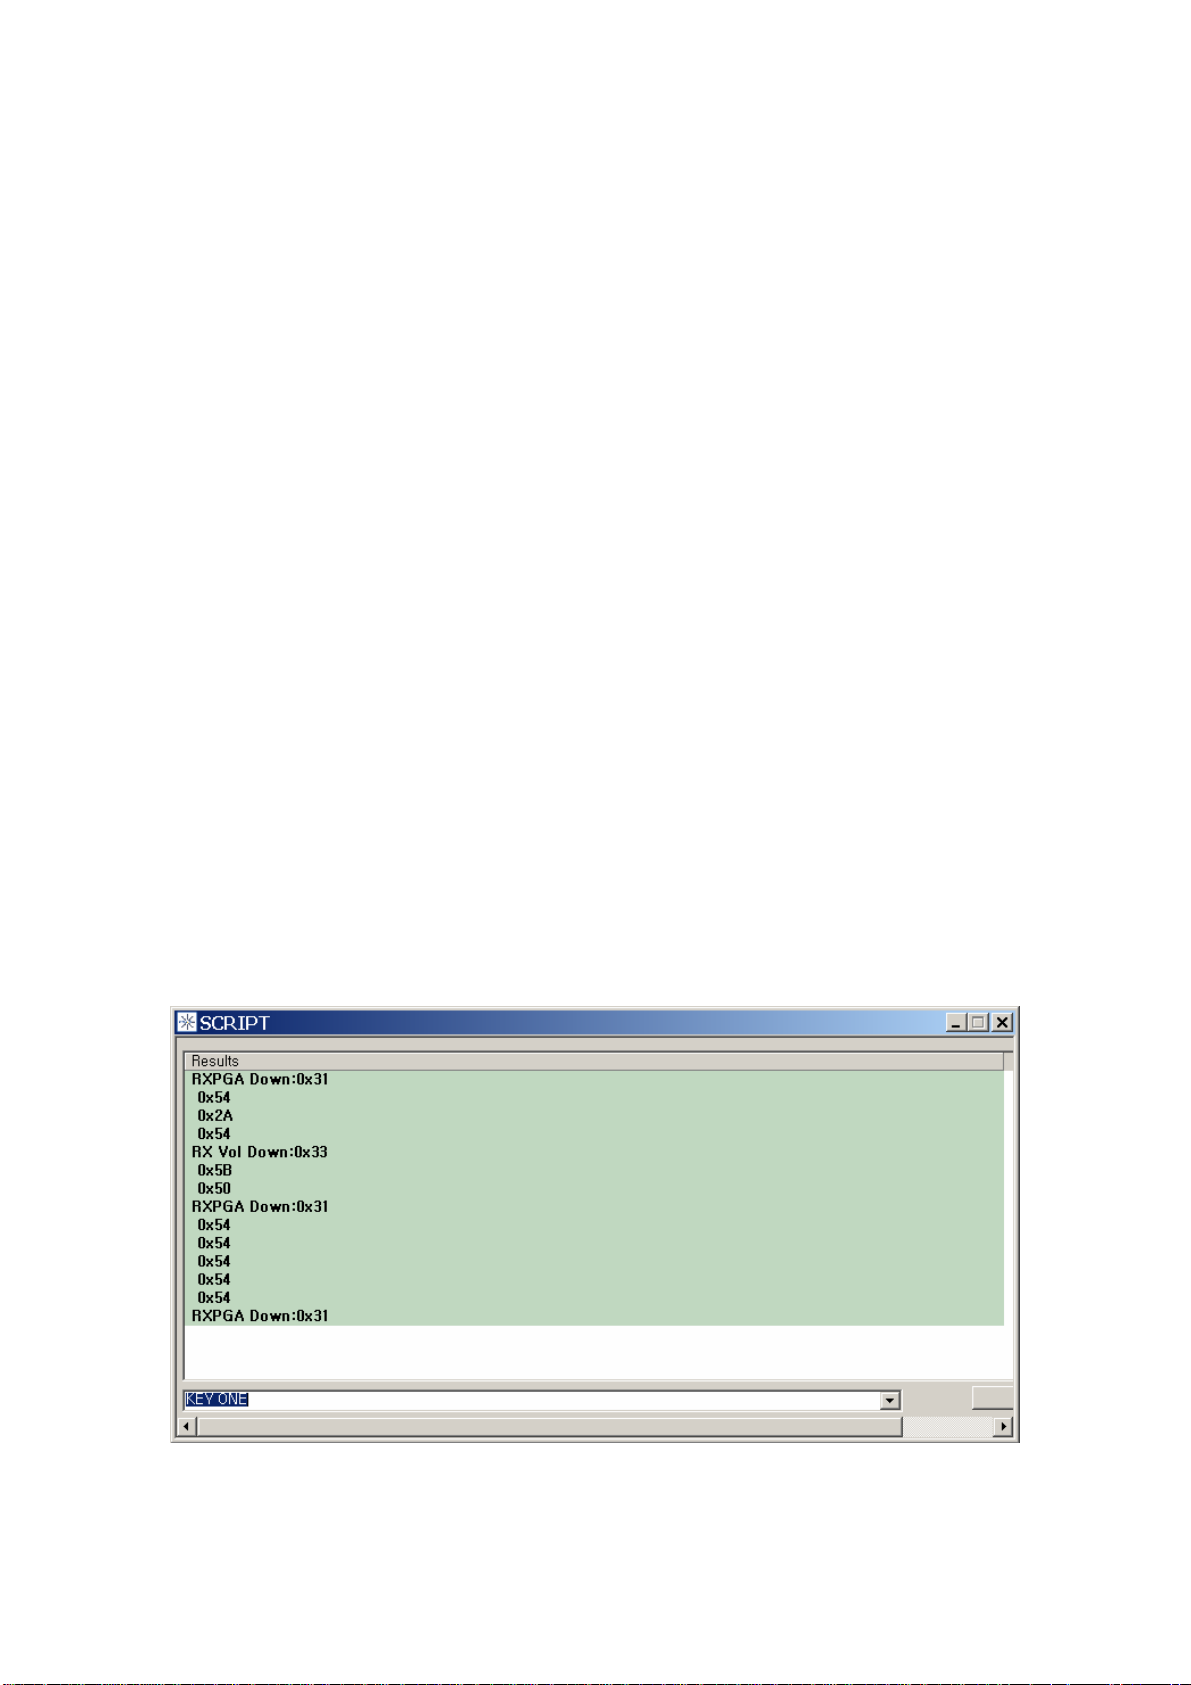
4.4.2 Scripting window
You can view or run scripts displayed on the Scripting window. This
window contains two areas where you can enter commands, control script execution,
and view output after running ascript.
Figure 4-4-2-1 Script window
30
AXESSTEL Proprietary
Page 31

AXESSTEL Software User's Guide Contents
Figure 4–6-2-2 Changed LCD simulator after executing command
In the View menu, click Script to open the window.
The fields and functions available in the Scripting window are
defined in the following table.
Run
Run On: If you click Run Button , The the entire script you picked automatically
execute without stopping (no user control)
Scripting
The Script Command line can execute or run a single command, a
group of commands, or an entire script file. Commands from a script
file appear in the edit section of the window under Script File Info.
The output of an executed script command or file appears in the
Command Results section.
Color codes help you distinguish between different types of output.
Green represents executed commands typed in the Script Command
line. Blue represents variables and messages produced by the script.
AXESSTEL Proprietary
31
Page 32

AXESSTEL Software User's Guide Contents
Red indicates an error condition or warning. To resize the edit and
output sections of the window, grab and pull on the frame edges
with the cursor.
4.3.3 Using scripts
Script commands and files are processed and executed by a built-in
interpreter. This utility does not support basic features such as
looping, decision-making, or array processes or functions. Scripts
are executed line-by-line, in strict sequence without any pointers,
jumps, or branches.
All script commands must be in the standard format described in
Appendix A Script command list . You should be familiar
with the script commands
Single Step Selects automatic execution of entire script without
stopping (no direct user control)
Item Description
There are three different ways to run scripts using the procedures in
this section
Run a single script command from the window like Figure 4–6-2-1
1. In the Script Command line, type the script command.
2. Press Enter to run the command.
3. Check the Command Results section to view any output.
32
AXESSTEL Proprietary
Page 33

AXESSTEL Software User's Guide Contents
Figure 4–6-2-1 Typing of the single command
Figure 4–6-2-2 Changed LCD simulator after executing command
Run a script file from the window:
1. Click Run Button
2 If the Dialog box search script file, select a script file(*.scr)
When you select a right file, The Scrips window execute script file automatically
The result from scripts file are flowing in Figure
33
AXESSTEL Proprietary
Page 34

AXESSTEL Software User's Guide Contents
Figure 4–6-2-3 Message after scripts was executed
4.4.4 Script command conventions
To run properly, every script command described in Appendix A
must be typed in the exact format described there. Where commands
appear in upper case, they are keywords and must be typed as
shown (although lowercase is allowed).
Numeric values used in scripting are always integers, never float
types. Hexadecimal representation of integers is allowed, and
normally indicated by the 0x prefix. There is one exception to the
rule regarding hexadecimal integers requiring the 0x prefix: when
Scripting
an address is specified in seg:off format. The segment (seg) and offset
(off) values are in hexadecimal form, for example, 1234:ABCD.
Strings are enclosed in double quotes, for example, “string”.
There is no way to include a double-quote character inside of a
string, for example, “string “another” string”.
Where a command allows a variable number of arguments, such as
the nv_write command, the variable part is enclosed in {var} braces.
In script files, the semicolon ( ; ) introduces a comment line. All text
on a line after the semicolon is ignored. A line that starts with a
semicolon is ignored completely.
Lines in script files can be up to 512 characters long, but lines entered
directly on the Script Command line may be only 71 characters long.
AXESSTEL Proprietary
34
Page 35

AXESSTEL Software User's Guide Contents
There are no looping commands in the PST script language. To
execute a command repeatedly, you must insert the command into
the script the desired number of times.
A script file cannot run (execute) itself, and run commands are only
allowed to be nested 5 deep.
Script commands list
Appendix A, “Script Command List” on page 56 provides a
complete list of the script commands for scripting read or write
operations. For each command, there is a definition of its function,
syntax form, and, in many cases, an example of its usage in a script.
35
AXESSTEL Proprietary
Page 36

AXESSTEL Software User's Guide Contents
Figure 4–4-1 a example of nv script file
]
AXESSTEL Proprietary
36
Page 37

AXESSTEL Software User's Guide Contents
4.5 Lcd simulator
4.5.1 Overview
The lcd simulator Retrieves the current handset display screen from the phone.
Returns the backlight and annunciator information as well as the
current appearance of the screen. (The phone display alternates
showing the screen size)
Figure 4–5 Lcd simulator window
4.5.1 LCD MODE
The fields of the Combo box describe Lcd Size displayed int LCD window
Choose the right lcd size
4.5.2 KEY
AXESSTEL Proprietary
37
Page 38

AXESSTEL Software User's Guide Contents
Sends a specified key press to the phone.
The keys value is describe in the next
Name Definition/Value
PF1 Soft-key #1 (left-most)
PF2 Soft-key #2 (right-most)
MSG Message waiting
# key POUND
* key STAR
0 key ZERO
1 key ONE
2 key TWO
3 key THREE
4 key FOUR
5 key FIVE
6 key SIX
7 key SEVEN
8 key EIGHT
9 key NINE
Send key SEND
End key END
CLR Clear key
STO Store key
UP Up-arrow key
DOWN Down-arrow key
MUTE Mute key
RCL Recall key
MENU Menu key
SELECT Select key
ALPHA Alpha key
PWR_ON Power key was actuated
PWR_OFF Power key was actuated
PWR Power key
INFO Info key
AXESSTEL Proprietary
38
Page 39

AXESSTEL Software User's Guide Contents
FREE Phone placed in hands-free cradle
PHONE Phone lifted from hands-free cradle
REDIAL Redial key
PUSH_TO_TALK Push to Talk button
RELEASE Key to note that all keys are up
ON_HOOK Phone has gone on-hook
OFF_HOOK Phone has gone off-hook
RING_VOL_0 Ringer volume 0
RING_VOL_1 Ringer volume 1
RING_VOL_2 Ringer volume 2
EAR_UP Ear-piece up
EAR_UP_END Ear-piece up + end pressed
EAR_DOWN Ear-piece down
4.6 Prl
Overview
The Prl is displays and Edit a phone’s roaming protocol information
Also You may use this tool to Download an existing roaming list file to the phone
If you have a existing prl file, you may go to the 4.5.2 prl download
39
AXESSTEL Proprietary
Page 40

AXESSTEL Software User's Guide Contents
Figure 4–6-1 Prl window
4.6.1 Prl edit
The Roaming List Editor displays a phone’s roaming protocol information.
You can use this tool to edit an existing roaming list file, create a new roaming list
To start Roaming List Editor, from the Start menu, Click the Edit PRL Button
4.6.1.1 Edit PRL
Roaming List Editor opens in Edit mode. You can then view specific files using the Edit
mode.
The Edit mode screen is divided into three areas
All entries and changes to a roaming list file must be made in Edit mode
To Edit an existing roaming list file, Click the
Open Button
On the Constrast , To Create new file, Click the
New Button
After You did Edit all Information , you can save the data
For saving the data, Click “
40
Save” & “Save As” Button
AXESSTEL Proprietary
Page 41

AXESSTEL Software User's Guide Contents
Figure 4–6-1 PRL Editor
4.6.1.2 System settings (roaming list type)
Each of the two roaming list types has default settings, that can be edited in the system
settings
region. Roaming List Editor accepts only permissible entries. Thus, a value of 1 can be
entered in the
field for Default Roaming Indicator while a value of ONE cannot.
These settings apply to the entire file. However, the system record table lets you assign
different
default roaming indicators to individual records
4.6.2 Acquisition record table (acquisition types)
The middle region of the Edit mode screen defines acquisition types.
Use the acquisition record table to establish the priority the phone will follow in finding a
channel when roaming.
41
AXESSTEL Proprietary
Page 42

AXESSTEL Software User's Guide Contents
Create new rows in the table as needed to define settings for different acquisition types.
The acquisition record table must contain at least one completely filled-in row of data
for an acquisition type.
Select the acquisition type for each row from the drop-down list in that field.
Roaming List Editor defines options for the other fields depending on the acquisition
type. For example, when Analog Cellular acquisition is selected, only one channel in
that row is available to accept input.
Figure 4–6-2-1 Add a row to Aquistion table
AXESSTEL Proprietary
42
Page 43

AXESSTEL Software User's Guide Contents
Figure 4–6-2-2 Selecting Acquisition Record Type
43
AXESSTEL Proprietary
Page 44

AXESSTEL Software User's Guide Contents
Figure 4–6-2-3 Selecting a Number of Channnel
4.6.2.1 Acquisition Permissible entries
Roaming List Editor ensures that the entries and selections in each field of the
acquisition record table
conform to predefined parameters.
Table 4-6-2-1 describes the permissible values in acquisition records.
Roaming List Editor ensures that the entries and selections in each field of the
acquisition record table and system record table conform to predefined parameters.
Acquisition records
ACQ type Permissible values
Analog Cellular Select A, B, or Both under Ch 1.
CDMA Cellular (standard) Select A, B, or Both under Ch 1.
44
AXESSTEL Proprietary
Page 45

AXESSTEL Software User's Guide Contents
Select Pri, Sec, or Both under Ch 2.
CDMA Cellular (custom) IS-683A:
Enter at least one (up to 31) channel to
search within the ranges 1013 to 1023, 1
to 311, 356 to 644, 689 to 694, or 739 to
777, inclusive.
Note: This acquisition type does not apply
to nonstandard.
Generic Cellular Select A, B, or Both under Ch 1.
PCS (using blocks) Select at least one (up to six) block to
search, A, B, C, D, E, F, or Any to search
any block.
Do not mix channels and blocks in the
same record.
PCS (using channels) IS-683A:
Enter at least one (up to 31) channel to
search within the range of 25 to 1175,
inclusive.
Nonstandard:
Enter at least one (up to 25) channel to
search within the range of 25 to 1175,
inclusive.
Table 4-6-2-1 Permissible values in acquisition records
4.6.2.2 Record entry and edit
New Roaming List Editor files open with the first row, or record, of the acquisition
record table,
Index 0, ready to be defined.
Select the acquisition type from the drop-down list.
Then specify the
available channel(s) for that type as needed.
As indicated in the list of permissible entries, some channels may be left blank for
some acquisition
45
types.
AXESSTEL Proprietary
Page 46

AXESSTEL Software User's Guide Contents
However, Roaming List Editor does not permit you to skip columns in this table.
If you skip a channel, or if you fail to select an acquisition type for a row, a warning is
displayed when you attempt to save the file.
To add another acquisition record, Double -click in the firt colunm area in aquistion
table and input value of row
Select an acquisition type for that record as before and continue specifying the
in num_acq_rec.
channels
Editing records
To delete a record, double-click the first column in the selecting row
and click
Delete Record(s) from pop-up
To insert a record, double-click in the first row
and click
Insert Record from pop-up
NOTE The Cut, Copy, and Delete commands apply to the record level, not to fields within
a record, even if only one field appears to be selected.
For deleting all record, click
Clear Other fields in the records are not affected
4.6.3 System record table (system types)
The lower region of the Edit mode screen defines system types
Use the system record table to provide settings that will enable specified acquisition
types to find a
system.
The system record table must include at least one completely filled-in row of data
corresponding to a
record entry in the acquisition record table.
Every system record must refer, by acquisition index number, to a record in the
acquisition record table.
However, not all acquisition records need corresponding system records.
Roaming List Editor defines permissible values for these data depending on the
acquisition type. If you input an incorrect entry, a warning displays, giving the allowed
range for that field. You cannot
leave the field until you have corrected it.
You can use acquisition records more than once. You can also create a roaming list
with as little as one acquisition record entry and one system record entry. You can also
create a roaming list as large
as the phone permits.
46
AXESSTEL Proprietary
Page 47

AXESSTEL Software User's Guide Contents
4.6.3.1 System Permissible entries
Roaming List Editor ensures that the entries and selections in each field of the system
record table
conform to predefined parameters.
Table 4-5-3-1 describes the permissible values in system records.
System records
Field Permissible values
SID (System ID) Enter 1 to 32767, or 0 for any (wildcard)
System ID.
NID (Network ID) Enter 0 to 65534, or 65535 for any
(wildcard) Network ID.
Neg/Pref Select Neg for Negative, Pref for
Preferred.
Geography Select New for the first record in a
geographical region.
Select Same if the record is for the same
region as the preceding record.
Note: This field is automatically set to New
in the first record and, like all gray fields,
cannot be changed.
Priority Select Same or More priority than the next
record.
Acq Index Enter the index number (left column) of
the corresponding acquisition record
entry.
Note: The entered index number will be
automatically updated if acquisition
records are inserted or removed.
However, Roaming List Editor does not
check entered values until you save the
file.
Roam Indicator IS-683A:
Enter 0 to 255.
47
AXESSTEL Proprietary
Page 48

AXESSTEL Software User's Guide Contents
Nonstandard:
Select Off, On, or Flashing
Note: This individual record setting
enables you to override the Default
Roaming Indicator setting shown for the
roaming list type in the system settings
region of the Edit mode screen.
Table 4-6-3-1 Permissible values in system records
Figure 4–6-3-1 Prl edit window
4.6.3.2 Record entry and edit
Editing records
To delete a record, double-click the first column in the selecting row
and click
48
Delete Record(s) from pop-up
AXESSTEL Proprietary
Page 49

AXESSTEL Software User's Guide Contents
To insert a record, double-click in the first row
and click
Insert Record from pop-up
NOTE The Cut, Copy, and Delete commands apply to the record level, not to fields within
a record, even if only one field appears to be selected.
For deleting all record, click
Clear Other fields in the records are not affected
Figure 4–6-3-2 Insert record into system table
4.6.4 prl download
A prl file that is made out from prl edit is required to download prl.
Click Download button below to download prl.
If a prl file is not selected, click File button to open a prl file.
Clicking Download button, prl is started to download with a message pop-up as
AXESSTEL Proprietary
49
Page 50

AXESSTEL Software User's Guide Contents
shown in the following picture.
Click ‘Yes(Y)’ to erase existing MRU information, ‘No(N)’ not to erase.
If the download successfully completed, ‘prl download success’ would be shown in a
pop-up message.
Figure 4–6-4 Prl Download
Check the performance of RF mode and channel searching value in the status window
to confirm the completion of prl.
50
AXESSTEL Proprietary
Page 51

AXESSTEL Software User's Guide Contents
4.7 Dm logging
Overview
AxesstelPst provides important features that let you log various types of data and
messages.
You can configure and access logging operations, level selections, and max logging
line.
This section covers the following features:
_ Logging status
_ Viewing log files
_ Logging mask configuration
_ Mobile message display and configuration
Figure 4–7 Dm logging window
4.7.1 Logging Status window
The Logging Status window displays a summary of logging activities .
The Logging Status window displays the event status, signaling, and diagnostic
messages generated during operation of the mobile phone. These messages offer a
valuable source of information about
the performance and diagnostics of any axesstel ‘phone. Messages can be tracked in
real-time or logged to a file for later analysis. The information contained in the log files
can be analyzed to measure test phone performance or high-level traffic patterns in the
AXESSTEL Proprietary
51
Page 52

AXESSTEL Software User's Guide Contents
network.
DM log windows is composed the following
Level:
The Level is Message Level from the DMSS
There is 5 kind of Message type
H : High level message
M; Medium level message
L: Low level Message
F: Fatal level Message
E : Error level Message
Time:
The time that messages were generated, formatted as a 9-digit number in hours,
minutes, seconds, and milliseconds, with hours displayed in 24-hour form.
File:
Name of the source code file where the message was generated.
Line:
Line number in source code file where the message was generated.
Message:
Plain text description of message.
4.7.2 Logging Mask dialog box
You can control mobile message file format and logging functions with the Mobile
Messages Configuration dialog box, including message logging operation, priority
threshold
To open this dialog box, press Config Button from the DM log window
You can use the Logging Mask dialog box to specify which messages
from the test phone are to be logged. These log mask settings allow
more efficient use of the limited serial interface bandwidth used for
AXESSTEL Proprietary
52
Page 53

AXESSTEL Software User's Guide Contents
logging. The log mask bits specify what data will accumulate in the
logging queue of the test phone. The queued data is sent over the
serial interface link to the computer, where it accumulates in a file in
memory. Logging messages are written from memory to the hard
disk every five seconds.
Figure 4–7-2 Configuration Dialog for Dm log
Logging and Messages
By altering the log mask, you can limit the amount of data logged
and the time required to log it. At times, high volumes of data can
cause the logging queue of the test phone to overflow. This overflow
can result in lost data packets, and missing information in the log
file. The dialog box is typically used to configure the logging mask
at the start of logging operations.
4.7.3 Control Logging flow
“Start” & “stop” Button can control Logging flowing flow
when button is displayed “Start”, It provide starting message flow
In contrast, if button is displayed “Stop”, Dm log is writing the logging message in the
window
“Stop” button provide stoping message flow
4.7.4 Saving the message log
AXESSTEL Proprietary
53
Page 54

AXESSTEL Software User's Guide Contents
The Messages can be tracked in real-time or logged to a file
Clicking the Add to Log button, the DM log save the log in real-time to “msgsaved.log
file” in the subdirectory named “LOG” The picture in Figure 4–6-3 Dm log file
If you installed AxesstelPst in the c:\program\AxesstelPst, LOG directory is located in
c:\program\AxesstelPst\LOG
And Clicking the Save button, the DM log Save the all log and message displayed in
the message window to the date-time file
Ex) 06080306.txt
Figure 4–7-4 Dm log file
4.8 CAI MSG
Logging and Messages
Overview
CAI MSG provides more features than DM log Msg window
You can configure and access logging
operations, data selections, and file formats.
This section covers the following features
AXESSTEL Proprietary
54
Page 55

AXESSTEL Software User's Guide Contents
_ Logging status
_ Annotating log files
_ Viewing log files
_ Logging mask configuration
_ Mobile message display and configuration
_ Layer III message display and configuration
_ Conversion utilities (separate from CAIT) for parsing
_ The Friendly Viewer utility provided for parsing and viewing
log files.
Logging Status window
The Logging Status window displays a summary of logging
activities, including a summary of the current log file and those log
files already closed. This information is useful for managing the
format and size of the file, and types of data collected.
In the View menu, click CAI MSG to open the window.
The following table describes this window’s fields and functions.
Figure 4–9 CAI MSG Window
Item Description
Current Log File
File Name Name of the log file being written
AXESSTEL Proprietary
55
Page 56

AXESSTEL Software User's Guide Contents
File Size Total number of data bytes stored in the file
Duration Total time spent logging data into the file, indicated in
seconds
Log Files Summary
Directory The directory where log files are currently being written. To
change this directory, click the button at the right of this field
and select a new directory from the resulting Select Directory
dialog box.
Log file filter This field lets you invoke one of CAI’s conversion utilities to
be applied to each log file as it is closed. To add or change a command,
click the button at the right of this field and,
in the resulting Custom Trigger dialog box, type a new command,
or select a previous one from the drop down list, then click OK.
A Delete button is also provided in the Custom Trigger dialog
box so you can delete commands from the list.
Logging and Messages
The status values appearing in the Logging Status window cannot
be controlled from within the window.
Log files can be named using CAI MSG’s default naming format or that
of the Mobile Diagnostic Monitor program. You can change the type
of file name format used in the Configure CAI MSG dialog box
To remove a command from this field, click the button at the
right of it, then drag to select the text in the Custom Trigger
dialog box and press the Delete key. This way, your
command will still be available in the drop down list on the
Custom Trigger dialog box.
# of Files Total number of files logged during current operating session
Overall Size Total number of bytes for all files logged during the current
operating session
(Table Headings)
File # Identification number assigned to the file by CAI MSG
File Name Name of the log file(s) written and closed. Right-clicking on
this filename presents a pop-up menu with the option of
opening the file for viewing.
AXESSTEL Proprietary
56
Page 57

AXESSTEL Software User's Guide Contents
Start Time Time the file was created and data logging started
End Time Time data logging stopped and the file was closed
Duration(sec) Total number of seconds spent logging data to the file
Size Total number of data bytes stored in the file
Description In this column, you can type a description of any log file listed
in the table. This description is stored in the header of the log
file, and can be up to 79 characters in length.
Close Log Control button that closes the current log file and begins
writing a new file
Export Control button that lets you save the current table of log file
data to a comma-separated text file
Clear Click this button to clear the list of files. Doing so does not
delete the files from the logging directory.
Item Description
CAI MSG ’s default filename format consists of 11 alphanumeric
characters arranged as follows:
For example, m0214212.156 is a log file created on day 2 of the
month at 2 PM, 21 minutes, 21 seconds for a test phone with a MIN
ending in 56.
After a log file is created and closed, it is listed in the Logging Status
display. Each log file is saved in binary format, and must be viewed
using CAI MSG ’s Open Log File feature.
Logging Status menu
When the Logging Status window is displayed, the Logging Status
menu provides you with options for handling the log files and the log file table
in the Logging Status window.
In the CAI MSG main window, click Logging Status to open the menu.
The following table describes the functions of the Logging Status menu.
m Letter ‘m’ indicates this is a log file.
dd Day of the month, range 01 to 31.
hh Hour of the day, range 00 to 23.
mm Minutes in the hour, range 00 to 59.
ss Seconds in the hour, range 00 to 59.
ii Last two digits in the test phone’s mobile identification
number (MIN).
AXESSTEL Proprietary
57
Page 58

AXESSTEL Software User's Guide Contents
Item Description
Close Log File Closes the current log file and begins logging to a new file.
Export Log
File Names
Displays a directory dialog box that lets you save the current
table of log file data to a comma-separated text file.
Clear Log File
Names
Empties the contents of the log file table in the Logging Status
window.
Annotating log files
CAI MSG provides an annotation feature that lets you insert simple text
markers in the current log file. By selecting Annotate Log File,
you can access a menu of preset annotations to
insert at the current point in the log file.
Selecting one of these annotations from the menu inserts it at the
current line in the log file. Or, if you want to use an annotation that
is not in the list, choose Custom Annotation. The Custom
Annotation dialog box appears, in which you can specify a new
annotation.
Item Description
All annotations that you add in this dialog box are available in the
drop-down list that appears when you click the arrow at the right of
the text box. Then, click OK to choose the selected annotation, or
click Delete to remove a custom annotation from the list.
Viewing log files
To view log files you have recorded with CAI MSG ,
choose Open Log File. A directory dialog box appears in which you
can locate the log file to open.
When you select a file and click OK, a log file viewing window appears.
This window consists of two panes. The upper pane contains a
scrollable list of messages that are in the log file. When you select a
message, its details appear in the lower pane. You can drag to select
AXESSTEL Proprietary
58
Page 59

AXESSTEL Software User's Guide Contents
these details and copy them for pasting to another program.
Logging Mask dialog box
You can use the Logging Mask dialog box to specify which messages
from the test phone are to be logged. These log mask settings allow
more efficient use of the limited serial interface bandwidth used for
logging. The log mask bits specify what data will accumulate in the
logging queue of the test phone. The queued data is sent over the
serial interface link to the computer, where it accumulates in a file in
memory. Logging messages are written from memory to the hard
disk every five seconds.
Logging and Messages
By altering the log mask, you can limit the amount of data logged
and the time required to log it. At times, high volumes of data can
cause the logging queue of the test phone to overflow. This overflow
can result in lost data packets, and missing information in the log
file. The dialog box is typically used to configure the logging mask
at the start of logging operations.
To to open this dialog box, click Logging Mask
The dialog box presents the available settings in an expandable tree,
organized into categories by their function. Clicking on a plus sign
(+) next to a category displays the subcategories or settings it
contains.
Click the check box for each configuration item you want to select. A
check mark indicates the item is selected, whereas no check mark
indicates the item is not selected.
The Logging Mask dialog box also lets you set priorities for each
message to be logged. To the right of each message type in the list
there is a symbol specifying its priority: a green arrow for high
priority, a yellow tilde (~) for medium priority, and a red arrow for
low priority.
The phone software employs a complex algorithm to apply logging
priorities. The test phone has a 2048 byte output buffer, into which
all log records are placed prior to being transmitted to the mobile
station (MS). Normally, when a task is ready to queue a log record
AXESSTEL Proprietary
59
Page 60

AXESSTEL Software User's Guide Contents
for output to the MS, it issues an allocation request that reserves
exactly enough space for the type of log record to be transmitted.
It then fills in the space that has been allocated, and eventually the log
record is transmitted. If there was not enough space in the output
buffer to satisfy the allocation request, the log record is “dropped”
and never gets transmitted to the MS.
The priority mechanism modifies this process by assigning each log
code with a priority value, ranging from 0 to 2048. When a task is
ready to queue a log record, it issues an allocation request for the
size of the log record, plus (2048 – priority) bytes. This means that a
log code with a priority of 2048 requests exactly enough bytes to
hold the associated record, while an log code with a priority of 0 gets
an allocation request for 2048 bytes plus the actual record size. The
lower the priority value, the more space must be free in the output
queue in order to allocate the log record. This should squelch the
logging of records with low priority values when the output queue
is fairly full.
It is important to note that since the output buffer in most phones is
2048 bytes, priority codes of less than the size of the log packet will
always cause the packet to be dropped.
CAI MSG allows you to assign numeric values to represent Low,
Medium, and High priorities, and then to set the priority of any log
code to one of the three symbolic values in the log mask dialog. It
also maps log priorities read from the phone to one of the three
user-defined priorities.
The mask bit values available in this dialog box are defined in the
following table.
Item Description
Logging Mask Displays the hexadecimal value of the logging mask
code.
Signaling Messages
Common IS95/IS2000 Channels
Sync Channel When selected, logs all sync channel messages
received.
Paging Channel When selected, logs all paging channel signaling
messages received.
AXESSTEL Proprietary
60
Page 61

AXESSTEL Software User's Guide Contents
Access Channel When selected, records all access channel signaling
messages sent.
Logging and Messages
Forward Traffic
Channel
When selected, records all forward traffic channel
signaling messages received in the traffic channel.
Reverse Traffic
Channel
When selected, logs all reverse traffic channel signaling
messages sent in the traffic channel.
IS2000 Channels
Quick Paging
Channel
When selected, logs all quick paging channel signaling
messages.
Forward Channel/Multipath Info
Temporal Analyzer
Finger Info
When selected, records all Temporal Analyzer finger
PN offset and power level data.
Note: This option is mutually exclusive with the General
TA and General TA with Supplemental Channels
options.
Searcher Path log When selected, logs searcher results in a dense Fast
Log Data packet. This packet is supported only by
special test phones, such as the Retriever pilot scanner
test phone.
New Temporal
Analyzer
When selected, records Temporal Analyzer data
(window size and position, pilot offset, signal power,
etc.).
Note: This option is mutually exclusive with the General
TA and General TA with Supplemental Channels
options.
AXESSTEL Proprietary
61
Page 62

AXESSTEL Software User's Guide Contents
General TA When selected and if using a 5GP-series phone, logs
Temporal Analyzer finger PN offset and power level
data as well as searcher data (window size and
position, pilot offset, signal power, etc.).
Note: This option is mutually exclusive with the
Temporal Analyzer Finger Info, TA Searcher, and MDR
Gen TA Data options.
General TA with
Supplemental
Channels
When selected and if using a 5GP-series phone, logs
Temporal Analyzer finger PN offset data, power level
data, searcher data (window size and position, pilot
offset, signal power, etc.), and a count of MDR
supplemental channel data.
Note: This option is mutually exclusive with the TA and
Finger Data, TA Searcher, and Gen TA Data options.
Searcher and Finger
Info
When selected, records all logs searcher results data
as well as Temporal Analyzer finger PN offset and
power level data.
Item Description
Receive/Transmit Power, Power Control
Sparse AGC/TX/RX
Power
When selected, records all sparse AGC and closed loop
power control messages.
IS2000 Fast
Forward Power
Control
When selected, records all IS2000 fast forward power
control messages.
IS2000 Reverse
Power Control
When selected, records all IS2000 reverse power
AXESSTEL Proprietary
62
Page 63

AXESSTEL Software User's Guide Contents
control messages.
Frame Type Logging
Forward Link
Markov Statistics When selected, records Markov rate and error data for
all frames.
IS2000 Dedicated
Channels Frame
Types
When selected, records frame type information for
dedicated IS2000 forward link frames.
Reverse Link
Access Probe When selected, logs all access probe data.
IS2000 Dedicated
Channels Frame
Type
When selected, records frame type information for
dedicated IS2000 reverse link frames.
Frame Content Logging
Forward Link
IS95 Forward Link
Frames
When selected, records frame content information for
IS95 forward link frames.
IS2000 RLP
Forward Frames
When selected, records frame content information for
IS2000 RLP forward frames.
Reverse Link
IS95 Reverse Link
Frames
When selected, records frame content information for
IS95 reverse link frames.
IS2000 RLP
Transmit Frames
When selected, records frame content information for
IS2000 RLP transmit frames.
AXESSTEL Proprietary
63
Page 64

AXESSTEL Software User's Guide Contents
IS2000 Logging
Service
Configuration
When selected, records service configuration
information for IS2000-capable targets.
Active Set
Configuration
When selected, records active set configuration
information for IS2000-capable targets.
Item Description
Logging and Messages
RLP Statistics When selected, records RLP statistics information for
IS2000-capable targets.
Test Data Service
Option
When selected, records test data service option
information for IS2000-capable targets.
Data Link Logging
Async TCP/IP
Segments
When selected, records information on asynchronous
TCP/IP segments.
IP Data Packets When selected, records information on IP data packets.
IS95 RLP Data
Packets
When selected, records information on IS95 RLP data
packets.
Vocoder Packets
Vocoder Bit Rate
Mask
When selected, records vocoder bit rate mask
information.
Forward Link
Vocoder Packets
When selected, logs all vocoder rate and message data
in forward channel of transmission link.
AXESSTEL Proprietary
64
Page 65

AXESSTEL Software User's Guide Contents
Reverse Link
Vocoder Packets
When selected, logs all vocoder rate and message data
in reverse channel of transmission link.
AMPS Logging
Forward Channel When selected, logs all forward channel signaling
messages received for AMPS calls.
Reverse Channel When selected, logs all reverse channel signaling
messages received for AMPS calls.
Analog Handoff When selected, logs all handoff messages received for
AMPS calls.
Slot Statistics When selected, logs all slot statistics received for
AMPS calls.
Word Sync Count When selected, logs all word sync messages received
for AMPS calls.
Voice Channel
Information
When selected, logs all voice channel information
received for AMPS calls.
Miscellaneous
Debug Messages When selected, records all debugging messages
generated by the test phone software.
GPS Location When selected, records GPS position information, if
available.
Diagnostic
Commands
When selected, records diagnostic commands issued
to the test phone during logging.
Mobile Messages window
The Mobile Messages window displays the event status, signaling,
and diagnostic messages generated during operation of the mobile
phone. These messages offer a valuable source of information about
the performance and diagnostics of the test phone. Messages can be
tracked in real-time or logged to a file for later analysis. The
information contained in the log files can be analyzed to measure
AXESSTEL Proprietary
65
Page 66

AXESSTEL Software User's Guide Contents
test phone performance or high-level traffic patterns in the network.
In the View menu, click Mobile Messages or press F3 to open the
window.
Logmask Change When selected, records changes to the logmask made
during logging.
Band Class Change When selected, records changes in channel or band
class for multi-band test phones.
Test Mobile
Commands
When selected, records test mobile commands.
Embedded File
System Information
When selected, records changes to the test phone’s
embedded file system.
Event Reports When selected, records event reports from CAI MSG .
Factory Test Mode When selected, records Factory Test Mode log packets.
Data Statistics When selected, records statistics collected by the Data
Statistics window.
Obsolete
Fujitsu Handset
Information
When selected, records Fujitsu handset information.
AGC Values When selected, records AGC values.
ETAK Position and
Speed Information
When selected, records GPS position and speed
information in ETAK format.
OK Saves the new log mask configuration and sends it to
the test phone.
Cancel Closes the dialog box without changing the log mask,
discarding any changes that have been made.
Item Description
Logging and Messages
The fields and functions of the message window are defined in the
following table.
Item Description
AXESSTEL Proprietary
66
Page 67

AXESSTEL Software User's Guide Contents
(Message Headings)
Time Stamp The time that messages were generated, formatted as
a 9-digit number in hours, minutes, seconds, and
milliseconds, with hours displayed in 24-hour form.
File Name Name of the source code file where the message was
generated.
Line # Line number in source code file where the message
was generated.
Msg Lvl Priority level assigned to message, color coded for easy
identification. Priority types: Red=HIGH,
Green=MEDIUM, and Blue=LOW.
Message Text Plain text description of message.
(Status Bar—Window Bottom)
Message Level Minimum priority assigned for display of messages. Any
messages below this priority will not be displayed.
Current Message Number of messages in the buffer being logged in the
current (open) log file.
The messages appearing in this window cannot be modified.
You can also view these messages by saving a log file, then
extracting the mobile messages you want to see using the conversion
utilities
Mobile Messages menu
The Mobile Messages menu allows you to select functions for
controlling and configuring mobile message display and logging.
You can use the cursor, control key, or hot key to select any
command in the menu without actually opening the menu. This
menu is accessible only when the Mobile Messages window is
active.
In the CAI MSG main window, click Mobile Messages to open the
menu.
The following table describes the items available from the Mobile
Messages menu.
Free Messages Number of free entries in a message buffer. These are
used to store new messages when you have paused
the display.
Dropped Messages Number of messages dropped by the phone due to
AXESSTEL Proprietary
67
Page 68

AXESSTEL Software User's Guide Contents
buffer overflow.
Mobile Messages Configuration dialog box
You can control mobile message file format and logging functions
with the Mobile Messages Configuration dialog box, including
message logging operation, priority threshold, and data fields
displayed.
To open this dialog box, press C or choose Configuration from the
Mobile Messages menu.
The following table describes the fields and functions of the
configuration dialog box.
Item Description
Paused On: Temporarily suspends logging of mobile messages.
Off: Normal message logging.
Message Level Selection control that assigns the minimum priority for
display of messages. Any messages below this priority
will not be displayed.
View All On: Displays all mobile message fields in the window.
Off: Displays set of currently selected mobile message
fields.
Select Fields to View
Time Stamp On: Displays time stamp information for messages.
Off: Does not display time stamp information for
messages.
File Name On: Displays file name information for messages.
Off: Does not display file name information for
messages.
Logging and Messages
Select the check box for each configuration item you want to
activate. A check mark indicates the item is selected, whereas no
check mark indicates that the item is not selected.
Layer III messages
CAI MSG displays IS-95-A, IS-95-B, and IS-2000 Layer III messages in
three separate windows:
AXESSTEL Proprietary
68
Page 69

AXESSTEL Software User's Guide Contents
_ Log Message Summaries
_ Log Message Inspector
_ Log Message Monitor
As listed here, these windows each display an increasing amount of
Layer III message information, allowing you to monitor behavior of
the test phone at a variable level of focus—as broad or narrow as
your needs require.
The Log Message Summaries window displays a
continually-refreshing view of the most recent Layer III messages.
The newest message is highlighted by a yellow bar to indicate the
progress of the message list’s refreshing.
This window has a resizable configuration pane on the left. In this
pane, you select the type of messages you want to see by selecting
check boxes in an expandable list of messages. As CAI MSG receives
messages of the types selected, it populates the panel on the right
To open the window, in the View menu, click Log Message
Summaries.
Line Number On: Displays line number for messages.
Off: Does not display line number or messages.
Message Level On: Enables message filtering according to minimum
priority level. Priority types: Red=HIGH,
Green=MEDIUM, and Blue=LOW.
Off: No priority filtering.
OK Control button that saves the mobile message
configuration settings and closes the configuration
dialog box.
Item Description
By double-clicking a message in the Log Message Summaries
window, you can view the details of that message in the Log
Message Inspector window.
This window consists of two panes. The upper pane contains a
scrollable list of messages that were in the message buffer when the
window opened. The list may no longer be current, but it allows you
to view the details of each message for further information, as well
as copy message details to paste into another program. When you
select a message, its details appear in the lower pane. Initially, this
AXESSTEL Proprietary
69
Page 70

AXESSTEL Software User's Guide Contents
lower pane displays the details of the message you double-clicked in
the Log Message Summaries window.
This window can only be accessed by double-clicking a message in
the Log Message Summaries window or the Log Message Monitor
window.
You can save all the messages listed in this window to a log file.
From the Log Message Inspector menu, select either Save as Binary
or Save as Text. A directory dialog box appears, so that you can
name the file. By default, binary log files are saved with the
extension “log,” while text log files are saved with the extension
“txt.”
Logging and Messages
Note that the Log Message Inspector window is basically the same
window as the one used to view log files
To view Layer III message details in real time, use the Log Message
Monitor window. This configurable window lets you select which
Layer III messages you want to view in real time, and displays a
single, detailed panel for each selected message type that is updated
by every occurrence of that type of message.
In the View menu, click Log Message Monitor to open the window.
94 Chapter 5: Logging and Messages AXESSTEL Proprietary
Like the Log Message Summaries window, this window has a
resizable configuration pane on the left. In this pane, you select the
type of messages you want to monitor by selecting check boxes in an
expandable list of messages. As CAI MSG receives messages of the types
selected, it populates the panel on the right with individual panes
that each show the most recent message of a given type. The scroll
bar in the right panel lets you view all selected messages. Also, up
and down arrows in the lower right of an individual pane indicate
that there is additional message detail that you can view by clicking
the arrows to scroll within the pane or by dragging the lower border
of the pane downward. Double-clicking a message causes it to be
displayed in the Log Message Inspector window, unless it displays
the words “Out of cache” instead of an age value, which indicates
that it’s no longer available to be displayed in the Log Message
Inspector window.
AXESSTEL Proprietary
70
Page 71

AXESSTEL Software User's Guide Contents
Two modes of parsing are available within the message text
displayed in this window. The default is verbose mode, which
shows all message information. For long messages, you may choose
to view a condensed version of the message by disabling the Parse
in Verbose option on the Log Message Monitor menu.
To make monitoring individual message types easier, you can open
multiple instances of the Log Message Monitor window and
configure them to each show a unique set of messages.
4.9 Setup
Click Window->setup
4.9.1 Selecting comport
select a comport using possible
If you do not select a comport, pst chose enable comport automatically
4.9.2 selecting a phone
To select a phone
select the phone to which you want to download software
By default, A2 is set
71
AXESSTEL Proprietary
Page 72

AXESSTEL Software User's Guide Contents
Figure 4–9-1 Select Port dialog
4.10 Pst Environment Overview
The composition of AxesstelPst is shown in the Figure 4-8-1
The AesstelPst basically supports multi document to perform various works at the
same time. But, only ‘download‘ does not support Multi Working with other windows
72
AXESSTEL Proprietary
Page 73

AXESSTEL Software User's Guide Contents
Figure 4–10 AxesstelPst
4.10.1 Pst Environment file
The Environment of Axesstel pst is based on configuring file named “Defualt.cfg”
This file have a lot of information about Pst and frame
You can find Nv parameter in the middle of file
If Nv parameter value is 1 , you can see the nv item in the Nv Edit
If Nv parameter value is 0, this field is disappeared
4.10.2 selecting a window
For window display, you can select window in the View tab
AXESSTEL Proprietary
73
Page 74

AXESSTEL Software User's Guide Contents
Figure 4–10-2 View
5 Troubleshooting
This chapter shows several situations you might encounter while using AxesstelPST
and solutions to try.
AXESSTEL Proprietary
74
Page 75

AXESSTEL Software User's Guide Contents
1. When an error occurs while downloading,
try once more If it does not help, contact to
2. When the power is not automatically switched on after downloading or prl editing
please check the wire is alive and push the ‘power’ button.
3. When the screen does not work properly
please adjust the LCD size.
4. When an error message -COMPORT connection failed- shows up after executing
PST
please exit the program and re-execute PST.
For problems not covered here, please send email to
pst@axesstel.com.
pst@axesstel.com
Appendix A
Script Command List
Overview
This appendix contains a complete list of the script commands for
75
AXESSTEL Proprietary
Page 76

AXESSTEL Software User's Guide Contents
read and write operations. Over 60 commands, functions, and
processes are described in alphabetical order. For each command
there is a definition of its function and syntax format, and in many
cases an example of its usage in a script. Some commands do not
have examples, since their usage is clear from their definitions.
Script commands
AKEY
Allows you to enter an authorization key number. This command is
for Module targets only.
Syntax akey “number”
Example akey “15423”
Response Enters the A-key number 15423.
APPEND_LOG
Opens a script log in append mode so the new data is added to the
file rather than a new file created.
Syntax append_log filename.ext
Example append_log mylogfile.txt
Response New messages are added to the file without overwriting the existing
content.
APR_LIST_WR
Writes an abbreviated Preferred Roaming List (PRL) to any Axesstel phone
using a shortcut write command. This allows specifying only channel numbers
for the PRL list. All other entries
default to wild cards.
Syntax apr_lst_wr {nam, ch1, ch2...ch32}
Example apr_lst_wr {0, 500, 250}
Response The list containing the channel numbers is sent to the mobile phone.
APR_LIST_WR_683
Loads a standard-format abbreviated IS-683-A preferred roaming
list.
Syntax apr_list_wr_683 {nam, [cell], [pcs], channel_1, [channel_2,
channel_3,...] [AMPS_A | AMPS_B]}
The “cell” argument specifies cellular channels; “pcs” specifies PCS
channels. Up to 32 channels can be specified per NAM.
Example apr_list_wr_683 {0, cell, 777, pcs, 500, AMPS_B}
AXESSTEL Proprietary
76
Page 77

AXESSTEL Software User's Guide Contents
Response Writes a PRL instructing NAM 1 to look for CDMA cellular service
on channel 777, CDMA PCS service on channel 500, or B-side AMPS
service.
Script Command List
AUDIO_CONTROL
Allows control of various audio characteristics of the module. This
command is for Module targets only.
Syntax audio_control {audio_command_code, [arg_1,...arg_8]}
The following table lists the possible values for audio_command_code
and the arguments required or available for each code.
Code Definition/Arguments
0 Set audio path and muting
arg_1=audio path: 0=no path, 1=handset path, 2=external path
arg_2=mute output path: 0=no, 1=yes
arg_3=mute input path: 0=no, 1=yes
1 Set voice volume
arg_1=volume level for handset: 0–7
arg_2=volume level for hands-free kit (HFK) speaker: 0–7
2 Set ringer volume
arg_1=volume level for handset: 0–7
arg_2=volume level for hands-free kit (HFK) speaker: 0–7
3 DTMF start
arg_1=tone
possible values
4 DTMF stop (no arguments)
5 Tone start
arg_1=tone definition
possible values
arg_2=duration (in milliseconds)
arg_3=audio path: 0=no path, 1=handset path, 2=external path
arg_4=sound class: 1=beep, 2=voice beep, 3=voice
arg_5=volume for handset: 0–3 for beep or voice beep, 0–7 for voice
arg_6=volume level for hands-free kit (HFK) speaker: 0–7 for beep or
voice beep, 0–3 for voice
arg_7=DTMF path: 0=play locally, 1=transmit, 2=play locally and
transmit, 3=mute
AXESSTEL Proprietary
77
Page 78

AXESSTEL Software User's Guide Contents
6 Tone stop (no arguments)
Example audio_control {2, 5, 7}
Response Sets the ringer volume at 5 for the handset and 7 for the hands-free
kit speaker.
BEEP
Makes an audio noise to alert the user.
Syntax beep
CAIT_VERSION
Returns the full version number for PST as listed in the About
PST dialog box.
Syntax cait_version
CALL_INFO
Requests information about the call including caller ID string,
service option, etc. This command is for Module targets only.
Syntax call_info
7 Sound start
arg_1=sound code
possible values
arg_2=audio path: 0=no path, 1=handset path, 2=external path
arg_3=sound class: 1=beep, 2=voice beep, 3=voice
arg_4=volume: 0–3 for beep or voice beep, 0–7 for voice
arg_5=DTMF path: 0=play locally, 1=transmit, 2=play locally and
transmit, 3=mute
8 Sound stop (no arguments)
9 Set key sound class
arg_1=sound class: 1=beep, 2=voice beep, 3=voice
Code Definition/Arguments
Script Command List
CARRIER (analog test command)
Turns mobile phone carrier on or off.
Syntax carrier on | off
Example carrier on
Response Mobile phone carrier turns on.
CDATA (analog test command)
Specifies six bytes of data to transmit on the reverse control channel
message.
AXESSTEL Proprietary
78
Page 79

AXESSTEL Software User's Guide Contents
Syntax cdata byte1, byte2, byte3... (where byte is 1 byte)
Example cdata 1 2 3 4 5 6
Response Data is transmitted in message on the reverse control channel.
CDMA_RSSI
Requests the current CDMA RSSI value. This command is for
Module targets only.
Syntax cdma_rssi
CLOSELOG
Closes the currently open transcript file. If no transcript file is open,
a message informing the user of that fact is displayed.
Syntax closelog
See also openlog
append_log
CLS
Clears the CAIT display screen.
Syntax cls
COMP (analog test command)
Turns the compander (compressor/ expander) on or off.
Syntax comp on | off
Example comp on
Response Turns the compander on.
CWAIT
Halts scripting for a specified duration.
Syntax cwait centiseconds
Example cwait 300
Response Halts scripting for three seconds.
DATA_PARM_GET
Requests statistics regarding a specific data protocol from CST
phones like the QSec™-800. Available protocols are Radio Link
Protocol (RLP), Point to Point Protocol (PPP), Internet Protocol (IP),
Transport Control Protocol (TCP), User Datagram Protocol (UDP),
Real Time Protocol (RTP), Compressed Real Time Protocol (CRTP).
Specify ALL to return statistics for all supported protocols.
Syntax data_parm_get RLP | PPP | IP | TCP | UDP | RTP | CRTP | ALL
Example data_parm_get IP
Response The command returns the following Internet Protocol statistics:
AXESSTEL Proprietary
79
Page 80

AXESSTEL Software User's Guide Contents
Internet Protocol Statistics 5/20/99 16:26:47
*Datagrams received 14392
*Datagrams discarded due to errors 132
*Datagrams discarded due to protocol 59
*Datagrams delivered to IP user proto. 3443
*Datagrams requesting transmission 4337
Script Command List
DIAL_CST
Originates a call to the given number on CST phones like the
QSec™-800.
Syntax dial_cst V | A | P | M | L | C | S | N| CN | SN
“dial_string_or_packet_url”
V=voice, A=Async, P=packet, M=Markov, L=Loopback, C=Clear,
S=Secure, N=No dial string, CN=clear number, SN=secure number
Example dial_cst V S CN “5035550523”
Response A secure voice call will be made to 503-555-0523. Because the dial
string is a clear number, the CST will make a clear voice call and then
do the necessary signalling to perform secure dialed number
discovery.
DIAL
Originates a call to the given number with the given service option.
For the Axesstel phone, this is accomplished by simulating the key
presses needed to originate the specified call type through the
handset. Therefore, activity on the actual keypad, if not locked out,
may interfere with this operation.
Syntax dial “number_string” service_option
The following table lists the possible values for service_option.
Option Definition
V Voice call (IS96A)
V96 Voice call (IS96)
V13 13K voice call
V733 IS733 13 kbits/sec voice call
LB 8 kbits/sec loopback call
LB13 13 kbits/sec loopback call
M Old style 8 kbits/sec Markov call
M8 New style 8 kbits/sec Markov call
AXESSTEL Proprietary
80
Page 81

AXESSTEL Software User's Guide Contents
M13 New style 13 kbits/sec Markov call
EVRC EVRC call
Example 1 dial “555-1212” V
Response Originates voice call to 555-1212 (V=IS96A, V96=IS96). For the
AXESSTEL phone, any of the “V” options will only originate a call in
the default voice service option. The other phone targets will use the
specified service option.
Example 2 dial “ ” M
Response Originates an old 8K Markov call. Notice that the string is empty, as
a Markov call does not originate to any particular number, but the
string must be there. The same syntax is used for loopback calls as
well. If a number is given for the axesstel phone, that number is
used in the “dialed-digits” field of the Markov origination.
See also hs_lock
DIAL_END
Ends the current phone call. For a axesstel phone, this is
accomplished by simulating a press of the end key. Therefore,
activity on the actual keypad, if not locked out, may interfere with
this operation.
Syntax dial_end
Example dial_end
Response Sends the command to end the call.
See also hs_lock
MDR1 MDR Fwd RS1 Rev RS1 call (IS-707A service option number 22)
MDR2 MDR Fwd RS1 Rev RS2 call (IS-707A service option number 23)
MDR3 MDR Fwd RS2 Rev RS1 call (IS-707A service option number 24)
MDR4 MDR Fwd RS2 Rev RS2 call (IS-707A service option number 25)
MDR5 MDR Data Pattern Test 1 call (proprietary service option)
MDR6 MDR Data Pattern Test 2 call (proprietary service option)
TDSO Full Test Data Service Option
STDSO Simple Test Data Service Option (proprietary service option)
Option Definition
Script Command List
DIPSW
Sets the specified DIP switches to on (1) or off (0), where the value is
16 bit hexadecimal
AXESSTEL Proprietary
81
Page 82

AXESSTEL Software User's Guide Contents
Syntax dipsw [value]
Example dipsw 0xFFFF
Response This turns on all of the DIP switches.
DP_READ
Creates a dialing plan file for WLL phones by reading from the
specified NAM.
Syntax dp_read nam file_string
Example dp_read 1 dialplan.bin
Response The dialing plan for NAM 2 is written to a file named dialplan.bin.
DP_WRITE
For WLL phones, loads a dialing plan, created by a dialing plan tool,
to the specified NAM.
Syntax dp_write nam file_string
Example dp_write 1 dialplan.bin
Response The dialing plan in a file named dialplan.bin is written to NAM 2.
DTMF (analog test command)
Activates the DTMF generator with a digit, where digit is 1–9, 0,*,#,
or off.
Syntax dtmf [digit]
Example dtmf 0
ERR_CLR
Clears one or all of the errors in the NV memory. If item is 0xFF, it
clears all errors, otherwise it clears that one entry.
Syntax err_clr [item]
Example err_clr 0xFF
Response All errors in non-volatile (NV) memory are cleared.
Note The only time this command might be used is at the beginning of a test run. It is
suggested that at the end of the test run, the ERR_GET command may be used
to retrieve any errors that occurred during the test run.
ERR_GET
Reads all the errors in the NV memory and displays them.
Syntax err_get
Example err_get
Response The total logged messages: 0002
The total ignored messages: 0041
FEATURE_QUERY
AXESSTEL Proprietary
82
Page 83

AXESSTEL Software User's Guide Contents
Lists features supported by a mobile phone.
Syntax feature_query
Also supported as the following:
_ feature_query_page
_ fq_page
Storage addr The err Filecode Line #
0 7A mc 1442 NF
1 FF rxc 3001 NF
Script Command List
GET_EXT_STATE
Requests the module status from the extended state packet. This
command is for Module targets only.
Syntax get_ext_state
GET_SCREEN
Retrieves the current handset display screen from the phone.
Returns the backlight and annunciator information as well as the
current appearance of the screen. (The phone display alternates
showing the screen and blink screen. It alternates between
annunciator and blink annunciator, so if something is on one and
not the other it will blink.)
Syntax get_screen
Example get_screen
Response Backlight ON
Screen:
Axesstel
Feb 13, Thu
6:16pm
(special characters here)
Annunciator: 0001
Blink Screen:
Axesstel
Feb 13, Thu
6:16pm
(special characters here)
Blink Annunciator: 0001
RSSI: 05
83
AXESSTEL Proprietary
Page 84

AXESSTEL Software User's Guide Contents
Blink Rate: 0500
The special characters are mapped characters on the mobile phones.
At this time, PST does not interpret them into anything readable.
GET_SMS
Requests the most recent SMS message and provides options for
deleting SMS messages. This command is for Module targets only.
Syntax get_sms erase_code
erase_code can be any of the following:
Example get_sms 0
Response Retrieves the latest SMS message and does not delete any messages.
GPS_LAST_PKT
As part of the GPS receiver configuration, this command is used to
set the last packet in the burst from the GPS receiver. The packet
name is given in quotation marks. This setting is only good while
PST is running. The information is lost when you exit PST.
Syntax gps_last_pkt “packet_name”
Example gps_last_pkt “vtg”
Response The vtg message is set as the last one in a burst.
Code Definition/Value
0 Do not delete any SMS messages
1 Delete all SMS text messages
2 Delete the most recently accessed SMS text message
3 Delete the oldest accessed SMS text message
4 Delete all SMS voice messages
5 Delete the most recent SMS voice message
6 Delete the oldest SMS voice message
7 Delete all SMS messages
Script Command List
HELP
Displays a brief description of the command syntax. If entered with
no argument, all commands are listed with help text. If the topic
option is used, an explanation of only that topic is displayed.
Syntax help [topic]
Example 1 help
Response All commands with topic options are displayed.
Example 2 help NV
AXESSTEL Proprietary
84
Page 85

AXESSTEL Software User's Guide Contents
Response A complete list of NV items are displayed by name. For more
specific help with NV items, type help nv_read or help nv_write in
the Scripting window.
HL_PR_LIST_RD
Allows the user to read the Preferred Roaming List (PRL) into a file.
The NAM parameter indicates which NAM the PRL should be read
from. The filename parameter must be given in quotation marks and
names the file that the PR list will be read into. If the file already
exists, it will be overwritten. If it does not exist, it will be created in
the format readable by the offline AXESSTEL Preferred Roaming
List Print Tool (Print PRL). This is the same format to be written to
the phone using the hl_pr_list_wr command or the Product Support
Tool (PST) for phones supporting PCS mode. This command differs
from pr_list_rd in that the file it writes lacks the 3- or 5-byte header
used in the older implementation.
Syntax pr_list_rd nam “filename”
Example pr_list_rd 0 “nam1prl.hin”
Response The list is printed to a file named nam1prl.hin.
HL_PR_LIST_WR
Allows the user to write a Preferred Roaming List (PRL) file to the
phone. The NAM parameter specifies which NAM the PRL should
be written to. The filename must be given in quotation marks and
must be a file that was previously read from a phone using the
hl_pr_list_rd command, read from a phone using the PST, or created
using the AXESSTEL Roaming List Generator (RLG) for phones
supporting PCS mode. Use this command only with headerless PRL
files. For PRL files which have the 3- or 5-byte header, use
pr_list_wr.
Syntax pr_list_wr nam “filename”
Example pr_list_wr 0 “nam1prl.hin”
Response The list in the file nam1prl.hin is sent to the mobile phone.
See also pr_list_wr
HS_LOCK
Locks or unlocks manual key operation for handset emulation. It is
recommended that if the handset emulation commands are used
(key, get_screen), the manual operation be locked out for
AXESSTEL Proprietary
85
Page 86

AXESSTEL Software User's Guide Contents
consistency.
Syntax hs_lock l | u
Example hs_lock l
Response Normal manual keypad operation is locked out.
See also key
get_screen
INP
Requests a port input operation where port is accessed either as a
byte (8 bits) or word (16 bits) port, depending on the syntax of the
command.
Syntax inp byte | word
Example inp byte 0x01
Response Requested byte is input from port address 0x01.
KEY
Sends a specified key press to the phone. The keys include keys
other than just handset keys.
Syntax key [key_name]
Script Command List
Values for key names can be any of the following:
Name Definition/Value
NONE No more keys available
ON_HOOK Phone has gone on-hook
OFF_HOOK Phone has gone off-hook
RING_VOL_0 Ringer volume 0
RING_VOL_1 Ringer volume 1
RING_VOL_2 Ringer volume 2
EAR_UP Ear-piece up
EAR_UP_END Ear-piece up + end pressed
EAR_DOWN Ear-piece down
PF1 Soft-key #1 (left-most)
PF2 Soft-key #2 (right-most)
MSG Message waiting
POUND # key
STAR * key
ZERO 0 key
ONE 1 key
86
AXESSTEL Proprietary
Page 87

AXESSTEL Software User's Guide Contents
TWO 2 key
THREE 3 key
FOUR 4 key
FIVE 5 key
SIX 6 key
SEVEN 7 key
EIGHT 8 key
NINE 9 key
SEND Send key
END End key
CLR Clear key
STO Store key
UP Up-arrow key
DOWN Down-arrow key
MUTE Mute key
RCL Recall key
SD1 Speed dial #1
SD2 Speed dial #2
SD3 Speed dial #3
MENU Menu key
SELECT Select key
ALPHA Alpha key
DEC_POUND Decoded # DTMF
DEC_STAR Decoded * DTMF
DEC_0 Decoded 0 DTMF
DEC_1 Decoded 1 DTMF
DEC_2 Decoded 2 DTMF
DEC_3 Decoded 3 DTMF
DEC_4 Decoded 4 DTMF
DEC_5 Decoded 5 DTMF
DEC_6 Decoded 6 DTMF
DEC_7 Decoded 7 DTMF
DEC_8 Decoded 8 DTMF
DEC_9 Decoded 9 DTMF
DEC_A Decoded A DTMF
DEC_B Decoded B DTMF
87
AXESSTEL Proprietary
Page 88

AXESSTEL Software User's Guide Contents
DEC_D Decoded C DTMF
DEC_D Decoded D DTMF
PWR_ON Power key was actuated
PWR_OFF Power key was actuated
PWR Power key
INFO Info key
FREE Phone placed in hands-free cradle
PHONE Phone lifted from hands-free cradle
IGN_OFF Ignition was turned off
IGN_ON Ignition was turned on
Name Definition/Value
Script Command List
Example key rcl
Response The rcl key press is sent to the subscriber station.
Note The PWR_ON keystroke cannot actually power on the test phone or subscriber
station.
TMR_ON Power-up timer ’on’ pseudo-key
TMR_OFF Power-up timer ’off’ pseudo-key
BAD_BATT The car battery is failing
EXT_PWR_ON External power was turned on
EXT_PWR_OFF External power was turned off
REDIAL Redial key
RSSI_KEY RSSI key
HFK_CORD Coil cord car-kit
HFK_NOCORD Non-coil-corded car-kit
HEADSET Headset
DEV_UNKNOWN Unknown device ID
EXT_DEV ONES detector finds external device
LOUDSPEAKER Loudspeaker
LSPKR Loudspeaker
HDS Home docking station attached
HEADSET_ON Analog Headset on
HEADSET_OFF Analog Headset off
PUSH_TO_TALK Push to Talk button
PTT Push to Talk button
HAT_UP HAT Up press
88
AXESSTEL Proprietary
Page 89

AXESSTEL Software User's Guide Contents
HAT_DOWN HAT Down press
HAT_LEFT HAT Left press
HAT_RIGHT HAT Right press
RELEASE Key to note that all keys are up
Name Definition/Value
KEY_HOLD
Sends a key press to the phone without release as if you were
holding the key down.
Syntax key_hold [key]
Example key_hold pwr
Response The end key is sent to the test phone; and if it is a axesstel phone,
it will actually power off.
LOAD_SYNTH (analog test command)
Tunes the synthesizer to a given channel (analog only).
Syntax load_synth [channel]
LOGGING
Turns data logging on and off from the scripting screen command
line or in a script file. This command is equivalent to typing Alt+L
from anywhere in PST. If using this command to turn logging on,
you can optionally specify a file name to which the log will be
written.
Syntax logging on [“filename”]| off
Example logging on
Response PST starts polling the test phone for logging messages.
LOGMASK
Used to change the current log mask from the scripting screen or in
a script file. If logging is on when this command is executed, the new
log mask is sent to the phone. If not, the log mask is set in PST
Syntax logmask [mask_value].
Where mask_value is the new log mask to change.
Script Command List
Example logmask 0XFFFFFFFF
Response This turns on all possible logging fields in the current log mask in
PST.
MODE
Requests a mode change of the subscriber station. Many test
AXESSTEL Proprietary
89
Page 90

AXESSTEL Software User's Guide Contents
commands are only accepted by the subscriber station when it is in
offline mode. In the offline options below, the A and D stand for
analog and digital, respectively.
Syntax mode offline-a | offline-d | reset
Example 1 mode offline-a
Response Directs the subscriber station to enter the offline analog mode. After
this command is sent, it may take several seconds to complete the
transition into the offline mode. Monitor the phone_state
Example 2 mode reset
Response Directs the subscriber station to perform a software restart, and the
test phone will cycle power. This command is not valid unless the
phone is already in an offline state first.
NV_READ
Requests an NV (non-volatile memory) item by name from the
phone. There are hundreds of NV items. For a complete listing of the
NV items which can be read, type
help nv_read. Some of the items
need modifiers to specify which element you want to read.
Syntax nv_read item [modifiers]
Example nv_read esn
Response The test phone ESN (electronic serial number of test phone) is
requested.
NV_READ_HEX
Requests an NV (non-volatile memory) item by name from the
phone, in hexadecimal format. There are hundreds of NV items. For
a complete listing of the NV items which can be read, type
nv_read_hex. Some of the items need modifiers to specify which
help
element you want to read.
Syntax nv_read_hex item [modifiers]
NV_WRITE
Provides a value to be written to the named NV item.
Syntax nv_write item {parameters}
Example nv_write slot_cycle_index{1}
Response The value 1 is written to the slot cycle index NV item. Note that
because different NV items require different types of data, the
argument list varies from item to item. Type
help nv_write for an
argument list. The dot operator ( ) is required, but the content can be
AXESSTEL Proprietary
90
Page 91

AXESSTEL Software User's Guide Contents
a string, address, or numeric. The list may have up to 40 arguments.
A comma must separate each item.
NV_WRITE_ONLINE
Writes an NV item as does nv_write, but does so without going
offline.
Syntax nv_write_online item {parameters}
Example nv_write_online ringer_level {2}
Response The value 2 is written to the ringer level NV item while the phone
remains online.
See Also nv_write
OPENLOG
Open a transcript file and writes every line echoed to the screen in
the script scrolling area. An optional ECHO switch enables
recording of scripting commands within the log file opened.
Script Command List
Syntax openlog “log_file_name” [echo]
Example openlog “foo.dat” echo
Response The file foo.dat is opened for transcript output. The quotation marks
are not required but are recommended for correct interpretation. For
example, if the file is named
PST would warn of a syntax error. This is because the
first character would be interpreted as a number not a string.
Additionally, the presence of the ECHO switch results in
subsequent scripting commands being recorded in the file foo.dat.
“2test.dat” without using quotations,
“2” as the
Note The openlog command cannot be nested (only one file can be open at a time).
OUTP
Requests a port output operation.
Syntax outp byte | word
Example outp byte 0x01 12
Response Decimal 12 is output to the byte port 0x01.
PARM_GET
Requests the specified parameters as follows:
_ MUX1 = Rate Set 1 Traffic Channel Parameters
_ MUX2 = Rate Set 2 Traffic Channel Parameters
_ PAGE = Paging Channel
_ ACCESS = Access Channel
AXESSTEL Proprietary
91
Page 92

AXESSTEL Software User's Guide Contents
_ LAYER2 = Layer 2 Statistics
_ ALL = All of the above
Syntax parm_get MUX1 | MUX2 | PAGE | ACCESS | LAYER2 | ALL
Example parm_get access
Response The PST displays the access channel statistics as follows:
Access Channel Statistics 5/20/93 16:26:47
*Acc Chn req msgs 740
*Acc Chn rsp msgs 0
*Probe Tx > 1 17
*Probe Tx > 2 8
*Probe Tx > 3 4
*Probe Tx > 4 3
*Probe Tx > 5 1
*Num of failed attempts 0
PARM_SET
Sets the specified parameters. A -1 value clears all parameters.
Syntax parm_set parm_id [value]
Example parm_set -1 0
Response All parameters are cleared (reset to zero).
PASSWORD
Allows the user to send the phone’s security password. This is the
password associated with the DMSS Security Plan, not to be
confused with the Service Programming Code. If a phone has this
password set, sending this command with the correct password will
unlock secure features (memory peek/poke, port I/O). If the wrong
password is sent, the phone powers off. The password argument is
a 16-character string of hexadecimal digits (0–9, A–F), representing
the 8-byte password of the phone.
Syntax password “password”
Example password “0123456789abcdef”
Response The security password of 0x0123456789abcdef is sent to the
phone to unlock the secure features of the phone.
Script Command List
PAUSE
Stops reading commands from the script file until a keystroke is
entered.
AXESSTEL Proprietary
92
Page 93

AXESSTEL Software User's Guide Contents
Syntax
Example pause
Response A dialog box with the text “Paused ! Press Enter or click
pause
the OK Button” opens. The execution of the script is suspended
till the user closes this dialog box.
PCM_LB
Turns the Vocoder PCM Loop Back on or off. This mode feeds
samples from the address codec back to the codec effectively looping
microphone audio to the handset (or other) speaker.
Syntax pcm_lb on | off
Example pcm_lb off
Response The Vocoder PCM Loop Back turns off.
PEEK
This command causes PST to ask the subscriber station for the
contents of a specified region of its memory up to 16 bytes at a time.
Syntax peek byte | word | dword | nv_byte | nv_word | nv_dword | voc
addr length
Example peek byte 0040:0000 4
Response Peeks at the 4 bytes starting at memory address 0040:0000.
PHONE_STATE
Requests the current phone state (analog, CDMA), displays state
and event count, which is a count of the number of handoffs, and
other state-significant events. Possible phone states are:
_ No Service
_ Analog States: Initialization, Idle, Voice Channel Initialization,
Waiting for Order, Waiting for Answer, Conversation, Release,
System Access
_ CDMA States: Initialization, Idle, Voice Channel Initialization,
Waiting for Order, Waiting for Answer, Conversation, Release,
Update Overhead Information, Mobile Station Origination
Attempt, Page Response, Order/Message Response,
Registration Access, Message Transmission
Syntax phone_state
PILOT_SETS
Requests current pilot sets information (members of active,
candidate, neighbor sets, PN offset, strength)
AXESSTEL Proprietary
93
Page 94

AXESSTEL Software User's Guide Contents
Syntax
pilot_sets
Example Active Set Candidate Set Neighbor Set
PN Strength PN Strength PN Strength PN Strength
* 396 12 76 63 152 63
* 236 63 288 63
* 328 63 296 63
* 24 35 316 63
* 488 29
* 44 63
* 364 26
* 204 63
* 344 63
* 368 63
*Remaining Set Pilot Inc: 4
PKT_LB
Turns the Vocoder Packet Loop Back on or off. This mode returns
voice packets received on the forward traffic channel back over the
reverse traffic channel. For this command to take effect, the phone
must be in a call. The command must be repeated for each call.
Syntax pkt_lb on | off
Example pkt_lb on
Response Turns the Packet Loop Back on.
POKE
Directs the subscriber station to set a given memory location to a
specified value. Note that using this command, without any
knowledge of a particular memory location, has the potential to
disable the subscriber station.
Syntax poke byte | word | dword | nv_byte | nv_word | nv_dword |
voc addr value
Script Command List
Example poke word 0040:0000 0xFFFF
Response Pokes (inserts) 0xFFFF into the word at memory address 0040:0000.
PR_ LIST_RD
Allows the user to read the Preferred Roaming List (PRL) into a file.
The NAM parameter indicates which NAM the PRL should be read
from. The filename parameter must be given in quotation marks and
AXESSTEL Proprietary
94
Page 95

AXESSTEL Software User's Guide Contents
names the file that the PR list will be read into. If the file already
exists, it will be overwritten. If it does not exist, it will be created in
the format readable by the offline Axesstel Preferred Roaming
List Print Tool (print PRL). It is the same format to be written to the
phone using the pr_list_wr command or the Product Support Tool
(PST) for phones supporting PCS mode.
Syntax pr_list_rd nam “filename”
Example pr_list_rd 0 “nam1prl.bin”
Response The list is printed to a file named nam1prl.bin.
PR_LIST_WR
Allows the user to write a Preferred Roaming List (PRL) file to the
phone. The NAM parameter specifies which NAM the PRL should
be written to. The filename must be given in quotation marks and
must be a file that was previously read from a phone using the
pr_list_rd command, read from a phone using the PST, or created
using the AXESSTEL Roaming List Generator (RLG) for phones
supporting PCS mode.
Syntax pr_list_wr nam “filename”
Example pr_list_wr 0 “nam1prl.bin”
Response The nam1prl.bin list is sent to the mobile phone.
PRINT
Prints a line on the display window.
Syntax print “text”
Example print “Next we will test the symbol error rate”
Response The string “Next we will test the symbol error rate” is printed
on the display screen. The quotation marks delimit the string.
RCVERSUS1 (analog test command)
Returns the message count on the analog control channel.
Syntax rcversus1
RCVS1 (analog test command)
Returns the message count on the analog control channel. Shorthand
for rcversus1.
Syntax rcvs1
RSSI (analog test command)
Returns the current analog RSSI measurement.
Syntax RSSI
AXESSTEL Proprietary
95
Page 96

AXESSTEL Software User's Guide Contents
RUN
Starts executing commands from a script file. This also allows one
script file to execute another.
Syntax run [script_file_name]
Example run test0001.scr
Response PST starts running the test0001.scr script file. This command is
entered on the command line or contained in a script file. When
entered on the command line, the file is opened and commands are
parsed and executed from the beginning of the file to the end. When
this command is contained in a script file, the position in the current
file is remembered, the new file is run, then processing is resumed in
the original file. Nesting of files up to five deep is supported.
Script Command List
RXMUTE (analog test command)
Mutes or unmutes the receiver audio signal.
Syntax rxmute on | off
Example rxmute off
Response Unmutes the receiver audio signal.
SATOFF (analog test command)
Disables the SAT (supervisory audio tone) transmission.
Syntax satoff
SATON (analog test command)
Transmits a SAT (supervisory audio tone). Value may be 5970, 6000,
or 6030 Hz.
Syntax saton [value]
Example saton 6000
Response Transmits a SAT at 6000 Hz.
SCAN_CONFIG
Lets you alter the Pilot Scanner’s PN search parameters and
algorithms.
The scan_config command requires you to you specify the values of
all parameters even if you want to change only one of them.
For a detailed description of each scan_config parameter, see
Syntax scan_config scan_mode incr win_siz integ ho_typ log_fmt log_thr
The following table lists the possible values for each parameter:
Parameter Value
AXESSTEL Proprietary
96
Page 97

AXESSTEL Software User's Guide Contents
scan_mode 0=A R R R (all PNs), 1=A N N N (list).
incr 0=Use pilot_inc, 1,2...=User specified.
win_siz 0=Use (PN 64*Incr), 1= WinN, 2... 512=User specified.
Example scan_config 0 3 1 2 0 0 0
Response Resets PN scanning to scan all PN space using an increment of 3.
SCAN_NLIST
This command lets you load the Retriever Pilot Scanner with
Neighbor list information to either augment or override the OTA
Neighbor List, or to provide a pilot list for scanning PN offsets in List
mode.
Syntax scan_nlist replace_all active_pn nlist_siz {P1, P2,... P20}
replace_all controls how Retriever uses this list. Use replace_all=1 to
completely replace the Neighbor list. Use replace_all=0 to append
the new list to the end of the existing Neighbor list. Retriever
supports up to 20 total pilots in Idle/Scan List mode.
active_pn is the Active serving system’s PN to associate this list with
nlist_siz is the length of the list being entered
P1, P2, etc., is the list of pilot PNs to include in the Neighbor list.
Example 1 scan_nlist 0 160 2 {24,48}
Response Pilots PN=24 and PN=48 are added to Active pilot PN=160’s
Neighbor List.
Example 2 scan_nlist 1 160 5 {4,16,32,96,104}
Response Replaces any existing pilot list with PN offsets 4,16,32,96, and 104 for
scanning in List mode.
SCAN_ON
Starts PN scanning using either the default parameters or
parameters that have been entered using the scan_config command.
Syntax scan_on
integ 0=256, 1=360, 2=512, 3=720, 4=1020.
ho_typ 0=Within Nlist only, 1=All, 2=None.
log_fmt 0=Dense Scanner format, 1=STD AXESSTEL DM format.
log_thr 0=All, 1=T_DROP, 2=T_ADD (STD log_fmt only).
Parameter Value
Script Command List
Example scan_on
Response PN scanning begins.
AXESSTEL Proprietary
97
Page 98

AXESSTEL Software User's Guide Contents
SCAN_OFF
Turns the PN scanner OFF and returns the scanner to normal phone
operation.
Syntax scan_off
Example scan_off
Response PN scanning ends.
SCAN_PARSE
Reads in a binary log file containing Dense-Pack searcher packets
and writes out an ASCII file listing the Dense-Pack search scans
only.
The Dense-Pack scanner log packet contains the time stamp of the
search, Rx power at the end of the search, LNA state during the
search, instantaneous E
c/Io of each of the four largest energy peaks
in the search window of each PN, and each peak’s position (time
delay).
Individual E
Rx + E
c values can be computed from this by adding
c/Io, where Rx represents an estimate of the total power Io.
Note The scan_parse command only parses out Dense-Pack searcher packets from
the binary data.
The following is an example of output from the scan_parse
command:
Time PN S Win L Rx E1 E2 E3 E4 P1 P2 P3 P4 WPos
00:37:26.087 192 A 256 1 -85.9 -10.5 -19.3 -19.5 -20.0 0102 0071 0119 00e4 f838
00:37:26.100 400 R 256 1 -84.9 -18.3 -19.6 -19.7 -20.4 00e0 003d 011d 01b0 f838
00:37:26.120 404 R 256 1 -84.9 -18.8 -19.5 -19.8 -20.0 0039 014a 009e 00ac f838
00:37:26.135 408 R 256 1 -84.9 -18.2 -19.2 -19.2 -19.6 01da 0042 0100 01c3 f838
The columns of scan_parse output contain the following data:
Syntax scan_parse log_file_name output_file_name
Example scan_parse M2817330.007 search_scans.txt
Response The Dense-Pack log file M2817330.007 is parsed and the Dense-Pack
search scans it contains are written to the file search_scans.txt.
SCAN_PN_ID
In user interface screen mode, the Retriever Pilot Scanner supports
the ability to display 4-letter cell sector names rather than PN offset
numbers. The scan_pn_id command lets you enter these cell sector
names into the phone’s programmable memory.
AXESSTEL Proprietary
98
Page 99

AXESSTEL Software User's Guide Contents
Be aware that at this time, no ability to resolve PN reuse ambiguities
within a network is supported. It is assumed that the main
usefulness of the PN name mapping feature will either be in
networks having no PN reuse (small to mid-size networks), or in
situations where the user wants to enter a cluster of
uniquely-assigned PNs confined to an area within a larger network.
Column Data
Time CDMA system time at the end of the search period.
PN PN offset of the search.
S Set membership of the search (Active, Neighbor, Remaining)
deduced by Retriever by comparing the searched PN to the
contents of the latest Extended neighbor list message. “N”
indicates that Retriever cannot deduce the membership.
L LNA (low noise amplifier) state during the search (1=on, 0=off).
Rx Estimate of the total receive power in the 1.25 MHz CDMA
channel (can be considered the open loop total signal +
interface + noise term I
E1–E4 Four largest energy peaks’s Ec/Io found in the search window.
P1–P4 Position of each peak in half chip windows. A peak position of
0100 half chop hex units refers to a peak exactly centered in the
search window.
Wpos Lower 16 bits of the absolute position of the search window.
Script Command List
o).
Syntax scan_pn_id pilot_pn name
pilot_pn is the PN offset number to map to the cell sector name.
name is a 4-letter cell sector name string.
Example scan_pn_id 4 MIRX
scan_pn_id 8 MIRY
scan_pn_id 12 MIRZ
scan_pn_id 16 SORX
scan_pn_id 20 SORY
Response The PN offsets 4, 8, 12, 16, and 20 are assigned the names MIRX,
MIRY, MIRZ, SORX, and SORY, respectively.
SCAN_RF_CNTL
The Retriever Pilot Scanner can be service programmed with CDMA
channels like a normal commercial phone. However, the
AXESSTEL Proprietary
99
Page 100

AXESSTEL Software User's Guide Contents
scan_rf_cntl command is provided to ensure Pilot Scanner will lock
onto a particular RF channel and suppress registrations on that
channel.
Syntax scan_rf_cntl cdma_channel reg
cdma_channel is the CDMA channel you want to lock onto. When
cdma_channel is nonzero, the Retriever Pilot Scanner will always
tune and lock onto this channel, ignoring any service-programmed
system selection parameters, OTA Channel List hashing, or Global
Service Redirection commands. When cdma_channel is set to zero (0),
system selection returns to automatic; that is, it is controlled by the
contents of Retriever’s service-programmed system selection and
OTA system commands.
reg is a boolean value (0=yes, 1=no) that indicates whether or not
Retriever should register on this CDMA channel according to the
Active serving sector’s registration parameters (contained in the
latest received Extended System Parameters Message.)
Example scan_rf_cntl 2 1
Response The Retriever phone locks onto RF channel 2 and suppresses
registration on that channel.
SCAN_TRANS
Reads in a binary log file containing Dense-Pack searcher packets
and writes out another binary log file in which the Dense-Pack
packets have been converted to Standard DM Temporal Analyzer
packets.
Syntax scan_trans input_file output_file
Example scan_trans M2817330.007 M2817330.out
Response The Dense-Pack log file M2817330.007 is translated and output as a
log file in standard DM format file, M2817330.out.
SEND_DATA
This command sends the contents of a hexadecimal string to the
phone. The hexadecimal data string is translated into a binary byte
stream before being transmitted. Any response returned by the
phone is displayed in the scripting window in HEX and ASCII.
Syntax send_data “hex_string”
SEND_DATA_FILE
This command sends the contents of the specified data file to the
AXESSTEL Proprietary
100
 Loading...