

Page 1

版本
REV.
设计
DESIGN
日期
DATE
变更内容
CONTENTS
标记
MARK
处数
QTY.
01 林泽斌 20170703
210mm
142.5mm
技术要求
1. 印刷字体需清晰、均匀、平整、无重影;
2. 尺寸为 142.5×210mm,公差 ±1mm;
3. 装订方式:骑马钉;
4. 黑白印刷;
5. 所有材料满足欧盟包材指令要求和 REACH 要求。
设计
DESIGN
林泽斌 20170703
材料
MATERIAL
封面 200g 铜版纸(覆哑膜)
内页 128g 铜版纸
名称
TITLE
用户手册
审核
CHECK
编号
PART NO.
224000009300
工艺
PROCESS
图幅
SIZE
A4
比例
SCALE
1:2
厦门优胜卫厨科技有限公司
标准化
STANDARDIZE
单位
UNIT
mm
批准
APPROVE
共
SHEET
1 张 第OF1 张
机型编号
TYPE
E312-01
USER MANUAL
Intelligent toilet
AXENT.ONE C
XIAMEN AXENT CORPORATION LIMITED
Page 2

USER MANUAL
Intelligent toilet
AXENT.ONE C
Page 3

Page 4

Thank you for your trust.
We really appreciate your choice of AXENT products. Before using the products, please
read this user manual to ensure safe and proper use.
Please follow the instructions written in this manual.
After reading this manual, please preserve it for future use.
The content of the manual might change as a result of the constant upgrade of AXENT
products while the update information will NOT be informed.
Illustrations in this manual are only for reference. They are NOT pictures of real items.
We sincerely hope that you could understand how to use the product by reading this user
manual.
In order to guarantee the best performance of the product and your safty, we sincerely
advice that:
Please read this manual carefully before using the product for the first time.
Page 5

Page 6

CONTENT
1 SAFETY
1.1 NORMAL USE ..........................................................
1.2 IMPORTANT SAFEGUARDS ............................................
1.3 SAFETY INSTRUCTIONS ...............................................
1.4 GROUNDING INSTRUCTIONS ..........................................
1.5 FCC INSTRUCTIONS ...................................................
2 PRODUCTS ....................................................... 9
3 FUNCTIONS ..................................................... 10
4 INTRODUCTION ..................................................11
5 MULTIFUNCTION KNOB INSTRUCTION4
5.1 QUICK START ........................................................
5.2 REGULAR USE .......................................................
5.3 ADDITIONAL FEATURES ..............................................
5.4 STAND-BY-MODE ...................................................
5.5 PAIRING ............................................................
6 REMOTE CONTROL INSTRUCTION1
6.1 REGULAR USE
6.1.1 OPENING AND CLOSING THE SEAT AND LID .................................
6.1.2 FLUSH ...................................................................
6.1.3 REAR WASH AND POWER WASH ...........................................
6.1.4 FRONT WASH ............................................................
6.1.5 OSCILLATING AND PULSATING SHOWER ..................................
6.1.6 WATER VOLUME ..........................................................
6.1.7 DRY ......................................................................
6.1.8 SPRAY ARM POSITION ....................................................
6.1.9 TEMPERATURE ADJUSTMENT ............................................
6.2 ADDITIONAL FEATURES
6.2.1 NIGHT LIGHT SETTING ....................................................
6.2.2 MUTE SETTING ..........................................................
6.2.3 ECO SETTING ............................................................
6.2.4 AUTO OPEN SETTING ....................................................
14
15
16
20
20
21
21
22
22
22
23
23
23
23
24
24
25
25
3
3
4
6
7
Page 7

CONTENT
6.2.5 SENSE AREA SETTING ...................................................
6.2.6 AUTO CLOSE SETTING ...................................................
6.2.7 AUTO FLUSH SETTING....................................................
6.2.8 DEODORIZE .............................................................
6.2.9 SELF CLEANING .........................................................
6.2.10 USER PROFILE ..........................................................
6.2.11 RESET ..................................................................
6.2.12 PAIRING ................................................................
6.2.13 APP ....................................................................
25
25
26
26
27
27
27
27
27
7 MAINTENANCE
7.1 SPRAY ARM CLEANING ..............................................
7.2 SYSTEM PURGE.....................................................
7.3 FILTER CLEANING ..................................................
7.4 SURFACE CLEANING ................................................
7.5 REMOVING THE TOILET SEAT AND LID ...............................
7.6 LEAKAGE PROTECTIVE MAINTENANCE ...............................
7.7 WINTER MAINTENANCE .............................................
7.8 LONG-TERM NONUSE MAINTENANCE ................................
28
29
29
30
30
31
32
32
8 MALFUNCTIONS DURING OPERATION ............................ 33
9 DIMENSION .....................................................36
10 TECHNICAL DATA ............................................... 37
Page 8

SAFETY
■
The following warning signs warn you of dangerous situations and their
severity:
ფ
ფ
ქ
ტ
DANGER!
WARNING!
CAUTION!
NOTE!
High risk, lethal hazards, severe injuries
Medium risk, severe injuries
Low risk, minor injuries
Damage to property
1.1 NORMAL USE
The AXENT shower toilet is a shower toilet with spray attachment for rear wash and front wash
cleaning functions. It can also be used as a normal WC seat at any time. Its use is limited exclusively
to enclosed spaces.
Any other usage will be deemed as not corresponding with normal usage. AXENT undertakes no
liability for abnormal usage.
1.2 IMPORTANT SAFEGUARDS
When using electrical products, especially when children are present, basic safety precautions
should always be followed, including the following:
READ ALL INSTRUCTIONS BEFORE USING
DANGER!
ფ
To reduce the risk of electrocution
●
Always unplug this product immediately after using.
●
Do not use while bathing.
●
Do not place or store product where it can fall or be pulled into a tub or sink.
●
Do not place in or drop into water or other liquid.
●
Do not reach for a product that has fallen into water. Unplug immediately.
3
Page 9

SAFETY
WARNING!
ფ
To reduce the risk of burns, electrocution, fire, or injury to persons
●
Close supervision is necessary when this product is used by, on, or near children or invalids.
●
Use this product only for its intended use as described in this manual. Do not use
attachments not recommended by the manufacturer.
●
Never operate this product if it has a damaged cord or plug, if it is not working properly, if
it has been dropped or damaged, or dropped into water. Return the product to a service
center for examination and repair.
●
Keep the cord away from heated surfaces.
●
Never block the air openings of the product or place it on a soft surface, such as a bed or
couch, where the air openings may be blocked. Keep the air openings free of lint, hair, and
the like.
●
Never use while sleeping or drowsy.
●
Never drop or insert any object into any opening or hose.
●
Do not use outdoors or operate where aerosol (spray) products are being used or where
oxygen is being administered.
●
Connect this product to a properly grounded outlet only. See Chapter 1.4.
●
Unplug this product before filling. Fill (reservoir) with water only unless otherwise specified
by manufacturer. Do not overfill (or specify filling instructions).
SAVE THESE INSTRUCTIONS
1.3 SAFETY INSTRUCTIONS
Carefully read and observe the following safety instructions!
Information for the user
●
Children and persons with insufficient knowledge or experience in handling the device, or who
have limited physical, sensory or mental capabilities, may only use the device following proper
instruction or when supervised.
●
Make sure that children cannot play with AXENT shower toilet.
Avoid malfunctions and damage to the product as a result of improper use.
●
If AXENT shower toilet is moved from a cold location to a warm loc ation, condensation may form.
Leave the unit switched off for a few hours.
●
Do not install AXENT shower toilet in rooms where there is a danger of frost. The room
temperature must not be less than 39 °F (4°C).
●
Do not place open fire sources, candles, cigarettes, or similar, on AXENT shower toilet.
●
Do not reuse the old hose-set. Please use the new one only.
4
Page 10

SAFETY
●
Do not expose the AXENT shower toilet directly to water.
●
Do not climb on or stand on the product.
●
Do not place any heavy objects on the lid.
●
Only open the seat and cover via the remote control.
●
Do not push the lid down with excessive force.
●
Do not deliberately soil, spray or block the spray arm.
Repairs must only be carried out by a person with the necessary expertise
●
Do not carry out modifications, tamper with, install additional equipment or attempt to repair the
AXENT shower toilet.
●
Improperly performed repairs can lead to accidents, damage and malfunctions.
Only use the device when it is fully functional
●
Make sure that the power cable or mains plug is not damaged.
●
The power cable must not become jammed or pinched.
●
Keep the power cable away from hot surfaces and sharp edges.
●
Never touch the mains plug with wet hands.
●
Do not use the product if it is not working properly.
Disconnect it from the mains immediately. Close the water cut-off valve to interrupt the water
supply. Contact your installer.
Information on the use of batteries
●
Keep batteries out of the reach of small children. Batteries can be life-threatening if swallowed. If
a battery has been swallowed, call for medical assistance immediately.
●
Batteries may not be recharged, reactivated by other means, dismantled, exposed to fire or
short-circuited.
●
Always remove empty batteries from the remote control immediately. They may leak and cause
damage.
●
Do not insert new and old batteries together in the remote control.
●
Clean the battery and contacts before inserting the battery. Note the proper polarity.
●
Remove the batteries if you do not use the remote control for an extended period.
●
Do not expose the batteries to extreme conditions: avoid contact with hot surfaces or direct
sunlight. Otherwise there is a risk of leakage.
●
If battery acid has leaked, avoid contact with skin, eyes and mucous membranes. In case of
contact with the acid, flush the affected areas with large amounts of clean water and consult a
doctor immediately.
5
Page 11
SAFETY
Grounding pin
Grounded outlet
Grounded outlet box
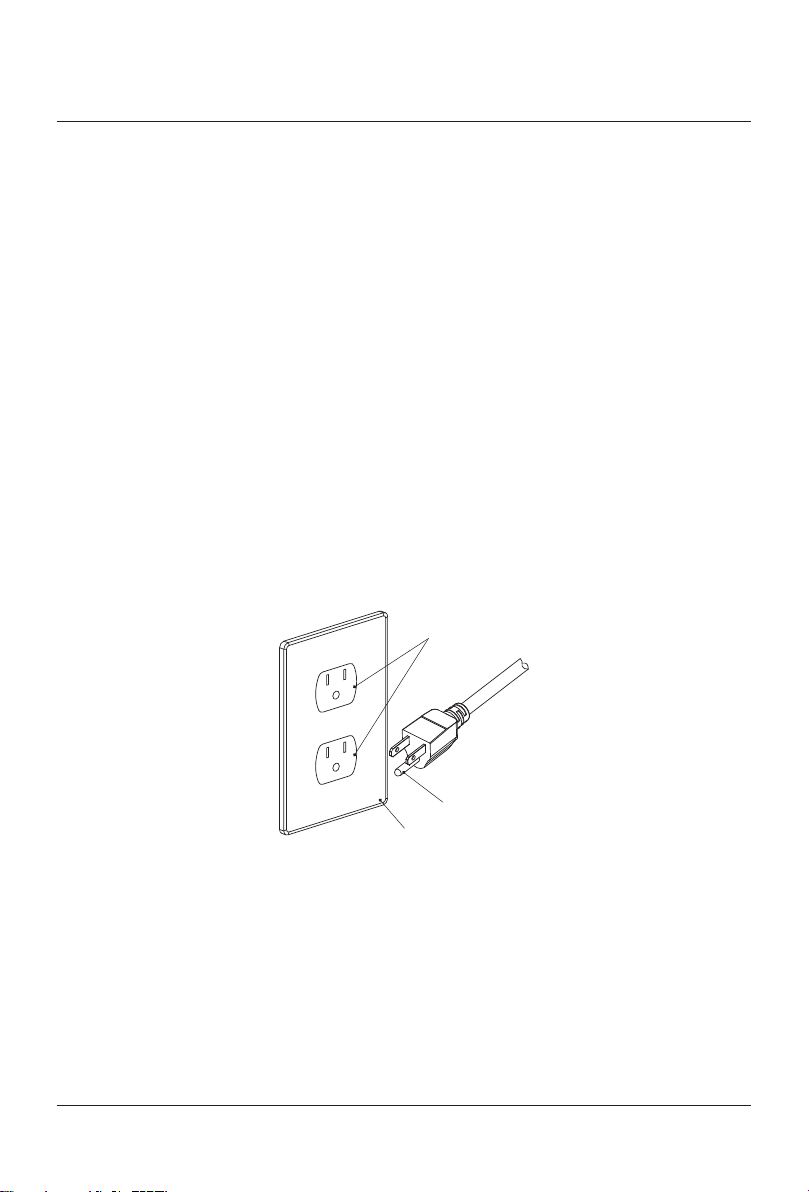
1.4 GROUNDING INSTRUCTIONS
This product should be grounded. In the event of an electrical short circuit, grounding reduces the
risk of electric shock by providing an escape wire for the electric current.
This product is equipped with a cord having a grounding wire with a grounding plug.
The plug must be plugged into an outlet that is properly installed and grounded.
DANGER!
ფ
Improper use of grounding plug can result in a risk of electric shock
●
If repair or replacement of the cord or plug is necessary, do not connect the grounding wire
to either flat blade terminal. The wire with insulation having an outer surface that is green
with or without yellow stripes is the grounding wire.
●
This product is factory equipped with a specific electric cord and plug to permit connection
to a proper electric circuit. Make sure that the product is connected to an outlet having the
same configuration as the plug. No adapter should be used with this product. Do not modify
the plug provided — if it will not fit the outlet, have the proper outlet installed by a qualified
electrician. If the product must be reconnected for use on a different type of electric circuit,
the reconnection should be made by qualified service personnel.
●
If it is necessary to use an extension cord, use only a three wire extension cord that has
a three-blade grounding plug, and a three-slot receptacle that will accept the plug on the
product. Replace or repair a damaged cord.
Wiring Diagram (NOT FOR INSPECTOR’S U SE)
NOTE!
ტ
●
Actual field installation maybe be slightly different from diagram. Provided fittings will be
connected at the bottom of unit instead on the sides.
6
Page 12

SAFETY
1.5 FCC INSTRUCTIONS
Please note that changes or modifications not expressly approved by the party responsible for
compliance could void the user’s authority to operate the equipment.
Note: This equipment has been tested and found to comply with the limits for a Class B digital
device, pursuant to part 15 of the FCC Rules. These limits are designed to provide reasonable
protection against harmful interference in a residential installation. This equipment generates,
uses and can radiate radio frequency energy and, if not installed and used in accordance with
the instructions, may cause harmful interference to radio communications. However, there is no
guarantee that interference will not occur in a particular installation. If this equipment does cause
harmful interference to radio or television reception, which can be determined by turning the
equipment off and on, the user is encouraged to try to correct the interference by one or more of
the following measures:
–
Reorient or relocate the receiving antenna.
–
Increase the separation between the equipment and receiver.
–
Connect the equipment into an outlet on a circuit different from that to which the receiver is
connected.
–
Consult the dealer or an experienced radio/TV technician for help.
7
Page 13

Page 14
■
This manual is applicable for the following products:
ს
[E322-02]
PRODUCTS
PRODUCTS
9
Page 15

FUNCTIONS
FUNCTIONS
FUNCTION E322-02
1 Rear Wash
2 Power Wash
3 Front Wash
4 Instantly Water Heatin g
5 Water Temperature Adj ustment
6 Water Volume Adjustment
7 Spray Arm Po sition Adjustment
8 Oscillate
9 Pulsa te
10 Puls ate / Oscill ate
11 Dry
12 Air Temperature Adj ustment
13 Auto Fl ush
14 Auto Open
15 Remote Control Open
16 Seat He ating
17 S eat Temp erature Adjustment
18 Protection from low te mperature burn
19 Anti-microbial Seat
20 Anti-microbial Ceramic
21 Self Cleaning
22 Descale
23 Side button
24 Remote Control
25 User Profile
26 Auto Li ght
27 Eco
28 Inlet Filtering
29 Deodorize
30 Soft Close
10
Page 16

■
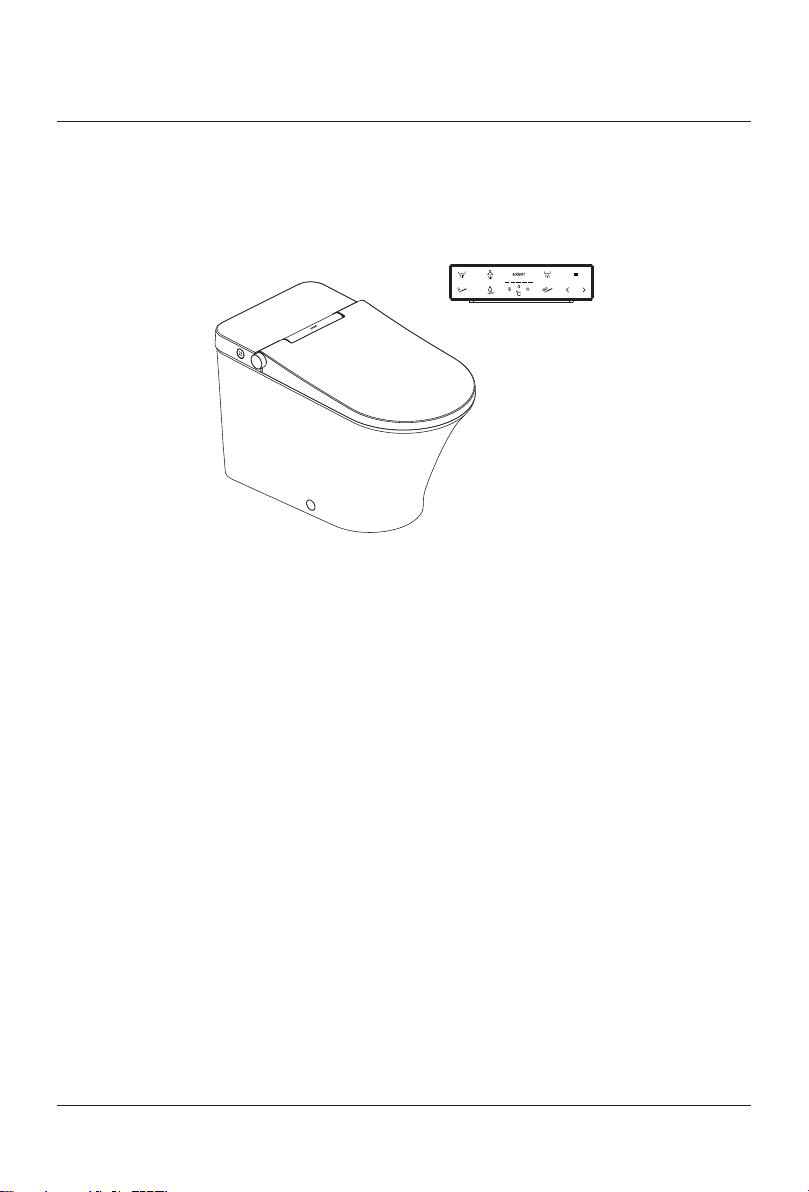
Multifunction Knob
Water Retaining Lid
MAIN
Ambient Light
■
SIDE BUTTONS
INTRODUCTION
Lid
Dry
Cover
Flush
Spray Arm
Rear Wash
Front Wash
Deodorize
Seat
Ceramic
Cap
Flush
B
A
Drain
11
Page 17

INTRODUCTION
3 4 521
12 13 14 15
16 17
18
19 20
6 7
8
10 11
9
21
4
22
25
23
26
27 28
■
REMOTE CONTROL
REMOTE CONTROL HOLDER
TOP
FRONT
BACK
BOTTOM
12
2
Page 18

ს
INTERFACE
INTRODUCTION
Lid
Seat
Close
Flush
User
Rear Wash
Front Wash
Logo Indicator
Level Indicator
Dry
Stop
Massage
Water Volume
Seat Temp
ს
COMBINATION
Auto Open Setting
→
+
for 2 sec.
+
Auto Close Setting
→
+
Auto Flush Setting
→
+
Sensing Distance Setting
→
Temp
Air Temp
Water Temp
Position
Minus
Plus
System Purge
Descale
Setting
Light
Mute
Eco
Power Off
Charging
for 2 sec.
+
→
+
→
+
for 2 sec.
+
Turn Off
→
Deodorize Setting
Self Cleaning Setting
Self Cleaning Setting
→
ს
ON/OFF/CHARGING
ON
The remote control is powered off. Press Setting for 2 sec. to turn on the remote control.
OFF
Press Setting and at the same time User for 2 sec. to turn off the remote control.
CHARGING
When power is below 15%, the Logo Indicator will blink on and off, indicating the battery needs to
be charged.
Please connect the standard charge cable to Charging on the remote control.
The Level Indicator indicates the battery powe. All 5 lights on means the remote control is fully
charged.
13
Page 19

MULTIFUNCTION KNOB INSTRUCTION
5.1 QUICK START
AXENT.ONE C offers a Quick Start function. Sit down on the toilet seat and push the button.
The shower starts and will stop after another push on the button.
ტ
The spray arm is automatically cleaned with water before and after each shower procedure.
Rear Wash
Stop
14
Page 20

5.2 REGULAR USE
Adjusting nozzle position
Stop
MULTIFUNCTION KNOB INSTRUCTION
Rear Wash Front Wash
Adjusting water volume Adjusting water temperature
15
Page 21

MULTIFUNCTION KNOB INSTRUCTION
5.3 ADDITIONAL FEATURES
With the multifunction knob, beside the primary functions, additional settings can be changed or
service functions made on two main levels.
LEVEL 1
–
Signal ton ON / OFF
–
Seat heating ON / OFF
–
Self-cleaning function ON / OFF
–
System purge
–
Emptying the water tank
LEVEL 2
–
Night light ON / AUTO / OFF
–
Deodorizer ON / OFF
–
Decalcification for water-bearing parts
–
Spray arm cleaning
–
System reset
ACTIVATE FUNCTIONS AT LEVEL 1
By pressing the multifunction knob for 5 seconds until the «Ambient light» flashes slowly, the mode
level 1 is activated.
The «Ambient light» keeps on flashing slowly.
DEACTIVATE FUNCTIONS AT LEVEL 1
You are in the mode level 1: Push the multifunction knob.
The «Ambient light» stops flashing and you hear one time «beep».
The mode level 1 is deactivated.
NOTE!
ტ
●
If no operations are done within 3 minutes, the mode level 1 will be deactivated automatically.
LEVEL 1 SIGNAL TON ON / OFF
You are in the mode level 1: «Ambient light» flashes slowly,
–
Turn the multifunction knob counter clockwise.
One time «beep»: Signal ton is ON
Two times «beep»: Signal ton is OFF
Factory setting: Signal ton is ON
16
Page 22

MULTIFUNCTION KNOB INSTRUCTION
LEVEL 1 SEAT HEATING ON / AUTO / OFF
You are in the mode level 1: «Ambient light» flashes slowly
–
Press and hold the multifunction knob.
–
Turn it clockwise.
One time «beep»: Seat heating is ON
Two times «beep»: Seat heating is AUTO
Three times «beep»: Seat heating is OFF
Factory setting: Seat heating is ON
LEVEL 1 SELF-CLEANING FUNCTION ON / OFF
As soon as you sit down on the toilet seat, the spray arm will be cleaned with fresh water.
This function can be turned ON or OFF.
You are in the mode level 1: «Ambient light» flashes slowly
–
Press and hold the multifunction knob.
–
Turn it counter clockwise.
One time «beep»: Self-cleaning function is ON
Two times «beep»: Self-cleaning function is OFF
Factory setting: Self-cleaning function is ON
LEVEL 1 SYSTEM PURGE
After a long time of not using the shower toilet, all water bearing parts can be exchanged with fresh
wa ter.
You are in the mode level 1: «Ambient light» flashes slowly.
–
Turn multifunction knob clockwise.
–
You will hear one «beep«. The system purge has started.
The system purge process stops after 90s automatically.
NOTE!
ტ
●
Turn multifunction knob clockwise again to stop the system purge procedure immediately.
17
Page 23

MULTIFUNCTION KNOB INSTRUCTION
LEVEL 1 EMPTYING THE WATER TANK
In case of a service intervention, you might be obliged to empty the water tank.
You are in the mode level 1: «Ambient light» flashes slowly.
–
Pull the multifunction knob.
–
Turn it counter clockwise.
The pump empties the water tank. You will hear a «beep» if the process is finished.
ACTIVATE FUNCTIONS AT LEVEL 2
By pressing the multifunction knob for 5 seconds until the «Ambient light » flashes slowly, the mode
level 1 is activated.
By pressing the multifunction knob again for 5 seconds until the «Ambient light » flashes quickly, the
mode level 2 is activated. The «Ambient light » keeps on flashing quickly.
DEACTIVATE FUNCTIONS AT LEVEL 2
You are in the mode level 2.
Push the multifunction knob.
The «Ambient light» stops flashing and you hear one time «beep».
The mode level 2 is deactivated.
NOTE!
ტ
●
If no operations are done within 3 minutes, the mode level 2 will be deactivated automatically.
LEVEL 2 NIGHT LIGHT ON / AUTO / OFF
You are in the mode level 2: «Ambient light» flashes quickly.
–
Turn multifunction knob counter clockwise.
One time «beep»: Night light function is ON
Two times «beep»: Night light function is AUTO
Three times «beep»: Night light function is OFF
Factory setting: AUTO mode – the brightness will be adapted according
to the ambience.
18
Page 24

MULTIFUNCTION KNOB INSTRUCTION
LEVEL 2 DEODORIZER ON / OFF
The deodorizer function is activated when a user is seated.
You are in the mode level 2: «Ambient light» flashes quickly
–
Press and hold the multifunction knob.
–
Turn it clockwise.
One time «beep»: Deodorizer is ON
Two times «beep»: Deodorizer is OFF
Factory setting: Deodorizer is ON
LEVEL 2 AUTO DRY ON / OFF
The dry function is started when a user press the multifunction knob during Rear or Front Wash.
You are in the mode level 2: «Ambient light» flashes quickly
–
Press and hold the multifunction knob.
–
Turn it counter clockwise.
One time «beep»: Auto Dry is ON
Two times «beep»: Auto Dry is OFF
Factory setting: Auto Dry is OFF
LEVEL 2 DECALCIFICATION FOR THE WATER-BEARING PARTS
The entire water system can easily be decalcified like a coffee machine. Fill a cup with 200ml
decalcification liquid (Durgol preferred).
You are in the mode level 2: «Ambient light» flashes quickly
–
Pull the multifunction knob.
–
Turn it clockwise.
The water system will be drained completely and the spray arm is moving out without any water
spray function.
–
Hold the cup close the spray arm.
–
Dip the spray arm into the cup with the decalcification liquid.
The liquid will be absorbed. The spray arm moves back into its position.
The decalcification liquid will circulate in the water-bearing parts in order to diss olve the limestone.
The decalcification liquid will be ejected automatically.
The whole water-bearing system will be rinsed 3 times with fresh water. This process will take
approxemately 3 minutes
19
Page 25

MULTIFUNCTION KNOB INSTRUCTION
LEVEL 2 SPRAY ARM CLEANING
You are in the mode level 2: «Ambient light» flashes quickly
–
Turn the multifunction knob clockwise.
The spray arm will move out.
–
Clean the spray arm with a fabric.
–
Turn the multifunction knob clockwise again.
The spray arm will move back to its position.
NOTE!
ტ
●
If no operations are done within 3 minutes, the spray arm will move back automatically.
LEVEL 2 SYSTEM RESET
You are in the mode level 2: «Ambient light» flashes quickly
–
Pull the multifunction knob.
–
Turn it counter clockwise.
One time «beep»: All values are reset to factory settings
If you turn the multifunction knob again, a 3 seconds «beep» will inform you that the system will be
re-started.
5.4 STAND-BY-MODE
ACTIVATE
Press and hold the multifunction knob until «Ambient light» off.
DEACTIVATE
Slightly knock the toilet lid.
5.5 PAIRING
Cut off the power of the shower toilet and then apply power to it. After three times «beep», start
pairing by pressing multifunction knob 5 times within 20 seconds.
Three times «beep» from the shower toilet confirms successful pairing.
Pairing has originally been done in the factory. It is necessary only after you changed your
multifunction knob.
20
Page 26

REMOTE CONTROL INSTRUCTION
3 4 521
REMOTE CONTROL INSTRUCTION
6.1 REGULAR USE
TOP
6.1 .1 OPENING AND CLOSING THE SEAT AND LID
OPEN
Press Lid after leaving the seat; open the lid or close the seat.
Press Seat after leaving the seat; open the lid and seat.
Auto Open: According to the Auto Open Setting, lid or lid and seat will be opened automatically
when you are around.
CLOSE
Press Close after leaving the seat; close the seat and lid.
Auto Close: Lid and seat will be closed automatically 2 minutes after leaving.
Note!
ტ
●
Auto Open only works when the lid is closed and 10 sec. after last Auto Open.
●
Please do not put things on the lid or seat.
6.1.2 FLUSH
Press Flush; starts the function.
Auto Flush: Leave the seat after you are seated over 5 sec. and the function will be started after a
peroid of time defined by the Auto Flush Setting. Factory setting of Auto Flush Setting is 15 seconds.
21
Page 27

REMOTE CONTROL INSTRUCTION
6 7
12 13 14 15
8
9
16 17
10 11
18
19 20
FRONT
6.1.3 REAR WASH AND POWER WASH
STA RT
Press Rear Wash after you are seated; the Rear Wash icon starts to light and starts the
function.
STOP
Press Stop to stop the Rear Wash.
The Rear Wash will stop automatically after continuous usage of 3 minutes.
6.1.4 FRONT WASH
STA RT
Press Front Wash after you are seated; the Front Wash icon starts to light and starts the
function.
STOP
Press Stop to stop the Front Wash.
The Front Wash will stop automatically after continuous usage of 3 minutes.
6.1.5 OSCILLATING AND PULSATING SHOWER
Press Massage to activate oscillating, pulsating, or oscillating and pulsating wash during the
Rear and Front Wash.
–
Oscillating: Press Massage
–
Pulsating: Press Massage twice
–
Pulsating and Oscillating: Press Massage three times
After pressing three times the Massage function, the regular Rear or Front wash is in place again.
22
Page 28

REMOTE CONTROL INSTRUCTION
6.1.6 WATER VOLUME
Press Water Volume during Rear or Front Wash, the Water Volume icon starts to light and the
water volume can be regulated.
–
Press Minus to reduce the water volume.
–
Press Plus to increase the water volume.
The Level Indicator indicates the selected water volume.
6.1.7 DRY
STA RT
Press Dry after you are seated; the Dry icon starts to light and starts the function.
–
Oscillating Air: Press Massage during dry; the Massage icon starts to blink and starts
oscillating air. Press Dry again will stop oscillating air.
STOP
Press Stop to stop the Dry.
The Dry will stop automatically after continuous usage of 3 minutes.
6.1.8 SPRAY ARM POSITION
Press Position during Rear Wash, Front Wash, or Dry; the Position icon starts to light and the
position can be regulated.
–
Press Minus to move the Spray Arm backward.
–
Press Plus to move the Spray Arm forward.
The Level Indicator indicates the selected Spray Arm position.
6.1.9 TEMPERATURE ADJUSTMENT
Press Temp repeatedly during Rear or Front Wash to switch among Seat Temp, Water
Temp or Air Temp.
When indicator lights , or on, corresponding temperature can be adjusted.
–
Press Minus to lower the temperature.
–
Press Plus to increase the temperature.
The Level Indicator indicates the selected level. If all lights are off, the corresponding heating
function is turned off.
23
Page 29

REMOTE CONTROL INSTRUCTION
3 4 521
21
4
22
25
23
26
6.2 ADDITIONAL FEATURES
TOP
BACK
6.2.1 NIGHT LIGHT SETTING
Press Light to enter into the setting. Press Light to switch among ON, OFF and AUTO.
–
Night Light is ON: The indicator on.
–
Night Light is AUTO: The indicator blinks 3 times and turns on.
–
Night Light is OFF: The indicator blinks for one second and turns off.
Factory setting: Night Light function is AUTO mode - the brightness will be adapted according to
the ambience.
2
6.2.2 MUTE SETTING
Press Mute to set the mute mode ON or OFF.
–
Mute is ON: The indicator on.
–
Mute is OFF: The indicator blinks for one second and turns off.
Factory setting: Mute function is OFF.
24
Page 30

REMOTE CONTROL INSTRUCTION
6.2.3 ECO SETTING
Press Eco to turn on or off the function.
–
Eco is ON: The indicator on.
–
Eco is OFF: The indicator blinks for one second and turns off.
Factory setting: Eco function is OFF.
6.2.4 AUTO OPEN SETTING
Press Set and at the same time Lid to enter the setting. Press Lid repeatedly to switch
among OFF, Seat and Lid.
–
Auto Open is OFF: One indicator in Level Indicator on.
–
Auto Open is Seat: Three indicators in Level Indicator on.
–
Auto Open is Lid: Five indicators in Level Indicator on.
Factory setting: Auto Open function is Seat.
6.2.5 SENSE AREA SETTING
Press Set and at the same time Seat for 2 sec. to light the Seat Temp, Water Temp and
Air Temp and enter the setting. The Level Indicator indicates is reduction or increase and the
selected level of Sense Area. Every one indicator of the Level Indicator count 4 levels.
–
Press Minus to reduce the levels of Sense Area.
–
Press Plus to increase the levels of Sense Area.
Entering Stand-by Mode will exit the Sense Area Setting.
6.2.6 AUTO CLOSE SETTING
Press Set and at the same time Close to enter the setting. Press Close to turn on or off the
function.
–
Auto Close is OFF: One indicator in Level Indicator on.
–
Auto Close is ON: Five indicators in Level Indicator on.
Factory setting: Auto Close function is ON.
25
Page 31

REMOTE CONTROL INSTRUCTION
3 4 521
21
4
22
25
23
26
TOP
BACK
6.2.7 AUTO FLUSH SETTING
Press Set and at the same time Flush to enter the setting. Press Flush repeatedly to switch
among OFF, 5 seconds, 10 seconds, 15second, 20 seconds and 25 secnds.
–
Auto Flush is OFF: No indicator in Level Indicator on.
–
Auto Flush is 5 seconds: One indicator in Level Indicator on.
–
Auto Flush is 10 seconds: Two indicators in Level Indicator on.
–
Auto Flush is 15 seconds: Three indicators in Level Indicator on.
–
Auto Flush is 20 seconds: Four indicators in Level Indicator on.
–
Auto Flush is 25 seconds: Five indicators in Level Indicator on.
Factory setting: Auto Flush function is 15 seconds.
2
6.2.8 DEODORIZE
Press Set and at the same time Mute to turn on or off the function.
–
Deodorize is ON: The indicator on.
–
Deodorize is OFF: The indicator blinks for one second and turns off.
Factory setting: Deodorize function is ON.
26
Page 32

REMOTE CONTROL INSTRUCTION
6.2.9 SELF CLEANING
Press Set and at the same time Eco to turn on or off the function.
–
Self Cleaning is ON: The indicator on.
–
Self Cleaning is OFF: The indicator blinks for one second and turns off.
Factory setting: Deodorize function is ON.
6.2.10 USER PROFILE
Press User to switch among different user profiles. There are 5 user profiles in total which
correspond with five indicators in Level Indicator respectively.
Functions will conform with the settings defined by the user profile selected.
The change of user's setting will be saved automatically when profile setting mode is on.
You will exit user profile mode after activating the stand-by mode of the remote control for a moment.
6.2.11 RESET
The remote control and shower toilet can be reset to the factory settings.
Turn off the remote control. Press Eco and at the same time turn on the remote control by
pressing Set for 2 seconds to restore factory settings.
6.2.12 PAIRING
Pairing has originally been done in the factory. So it is necessary only after you changed your
remote control.
Please make sure there is sufficient power supply for the remote control before pairing.
Cut off the power of the shower toilet and then apply power to it.
After a «beep», start pairing by pressing Stop 5 times within 20 seconds.
Three times «beep» from the shower toilet confirms successful pairing.
6.2.13 APP
Users of Android and IOS could scan the following QR code to download and install the app named
“AXENT Intelligent Control” so that your device (such as smart phones and tablets etc. ) are capable
of controlling this product remotely.
NOTE!
ტ
–
Requires bluetooth 3.0 or later.
–
Requires IOS8.0 or later.
27
Page 33

MAINTENANCE
21
4
22
25
23
26
7.1 SPRAY ARM CLEANING
BACK
ს
MULTIFUNCTION KNOB
You are in the mode level 2: «Ambient light» flashes quickly
–
Turn the multifunction knob clockwise.
The spray arm will move out.
–
Clean the spray arm with a fabric.
–
Turn the multifunction knob clockwise again.
The spray arm will move back to its position.
If no operations are done within 3 minutes or you are
seated, the spray arm will move back automatically.
2
ს
REMOTE CONTROL
Leave the seat and press Descale
–
The washing spray arm extends.
–
Clean the spray arm with a fabric.
.
Press Descale again.
The spray arm will move back to its position.
If no operations are done within 3 minutes or you are
seated, the spray arm will move back automatically.
28
Page 34

MAINTENANCE
7.2 SYSTEM PURGE
After a long time not using the shower toilet, all water bearing parts can be exchanged with fresh
wa ter.
ს
MULTIFUNCTION KNOB
You are in the mode level 1: «Ambient light» flashes slowly.
–
Turn multifunction knob clockwise.
–
You will hear one «beep«. The system purge has started.
The system purge process stops after 90s automatically.
Turn multifunction knob clockwise again to stop the system purge procedure immediately.
ს
REMOTE CONTROL
Press System Purge to turn on function.
The system purge process stops after 90s automatically.
Press System Purge again or press Stop to stop the system purge procedure immediately.
7.3 FILTER CLEANING
The filter net could be detached as shown in the picture on the left.
2
Wash the filter with clean water.
NOTE!
ტ
–
When the water flow is lower than normal, please clean the
filter.
–
During the whole cleaning process, please detach the inlet
hose from the product.
–
Please make sure that the angle valve is shut off.
–
Please put the filter back in reversed sequence after
cleaning it.
29
Page 35

MAINTENANCE
7.4 SURFACE CLEANING
CAUTION!
ქ
●
Cut off the power of the shower toilet before clean it.
This product has been designed and manufactured with great care and attention to detail. If you
follow a few simple cleaning instructions you will be able to enjoy its comfort, quality and beauty
every day.
ს
CLEANING INSTRUCTIONS SEAT, LID AND BACK COVER
Use a mild soap solution to clean the seat and please take care that the seat and hinges are not left
damp. Dry off any residual water or cleaning agent with a soft cloth. Avoid contact of the seat and
hinges with abrasive, corrosive or chlorine-based cleaners, as these may cause damage or lead
to flash rust. Therefore, when cleaning the bowl, make sure that the seat and cover are kept in an
upright position until all cleaning agent has been flushed away.
ს
CLEANING INSTRUCTIONS CERAMIC
Under no circumstances should you use harsh or abrasive cleaning substances such as abrasive
cream cleansers, scouring powder or drain cleaner on your ceramic surfaces. Also avoid using
steam cleaners and hard, abrasive sponges. Please bear in mind that hair colouring products can
reduce the effectiveness of AXENT Easy Clean.
If you follow this guidance then you should remain satisfied with the performance of AXENT Easy
Clean for many years. Recommended cleaners for sanitary ceramic surfaces with AXENT Easy
Clean finish. The use of acidic cleaners with a pH value between 1 and 4 is highly recommended.
Cleaners with a pH value in the neutral range (5 to 8) are not always suitable. We strongly advise
against using either weak or strong alkaline cleaners, i.e. substances with pH values from 9 to 12.
7.5 REMOVING THE TOILET SEAT AND LID
NOTE!
ტ
●
The toilet seat and lid can be removed, cleaned and remounted quickly and easily when
heavily soiled.
1. Lift up the toilet seat and toilet lid.
2. Remove the toilet seat and toilet lid by vertical lifting them out of the bracket.
3. Clean the toilet seat and toilet lid.
4. Insert the toilet seat and toilet lid vertically from the top into the bracket in the same way as
removed.
5. Let the toilet seat and toilet lid glide down.
30
Page 36

UNINSTALLING AND INSTALLING THE LID AND SEAT
ს
MAINTENANCE
7.6 LEAKAGE PROTECTIVE MAINTENANCE
Please check the leakage current protector regularly, at least monthly.
Checking Methods:
–
Press the Reset button of the leakage protector. Indicator light turns on, showing that it has been
connected to power.
–
Press the Test of the leakage protector. Indicator light turns off, showing that it is disconnected
from the power.
In case of wrong notification information after operating, please stop using this product and contact
the local supplier or the service hot line to replace the leakage protector.
Please assure that the indicator light of the leakage protector is on continuously on when this
product is working.
In case that the leakage protector has been installed in the existing circuit, please check the
protector following the above method.
31
Page 37

MAINTENANCE
Indicator
LEAKAGE PROTECTIVE GRAPH
ს
Tes t
BBEEFFOORREE UUSSEE
Reset
7.7 WINTER MAINTENANCE
Please make sure water in the system is of proper temperature, so as to guarantee that the water in
the shower toilet and the hose could not be frozen.
When the environment temperature is lower than 0 , please stop using this product.
–
Cut off the power of the shower toilet or press the Test of the leakage protector.
–
Shut off the angle valve.
–
Press Empty for 5 sec. to empty water inside heating pipe.
–
Discharge the hose-set and empty water inside.
–
Press Flush.
7.8 LONG-TERM NONUSE MAINTENANCE
When this product is not used for a long time, please cut off the power of the shower toilet and
empty the water in it.
–
Cut off the power of the shower toilet or press the Test button of the leakage protector.
–
Shut off the angle valve.
–
Press Empty for 5 sec. to empty water inside heating pipe.
–
Discharge the hose-set and empty water inside.
–
Press Flush.
–
Please check according to the manual before use it again.
32
Page 38

MALFUNCTIONS DURING OPERATION
■
MALFUNCIONS AND SOLUTIONS
When you think the product is malfunction, please follow the methods below. If those methods
could not make the product work normally, please return the product to a service center for
examination and repair.
NOTE!
ტ
●
In case of water leakage, please shut off the angle valve and cut off the power at the same
time.
Please first check the following things when you think the product is malfunction.
Check the Power Supply: check whether the power resource works normally and whether the
leakage current protector trips.
Check Water Supply: check whether the water supply is normal and the angle valve shut off.
In case of the following phenomena, please cut off the power immediately:
The buzzer making the «beep» sound continuously or the leakage current protector trips frequently.
■
No Function
MALFUNCTION CAUSE FAULT CLEARANCE
No Function
Product i n Stand-by- Mode Open li d to deactivate the Stan d-by Mode
Leakage p rotective trips Pre ss Reset button of t he leakage prote ctive
■
Remote Control
MALFUNCTION CAUSE FAULT CLEARANCE
Not working Remote co ntrol turned off Press Setting for 2 s ec. to turn it on
Logo Indicator blinks on
and off
Not sensi tive Beyond the i nductive dista nce
■
Rear and Front Wash
MALFUNCTION CAUSE FAULT CLEARANCE
Spray arm move o ut too slowly Self-cleaning Please wait for a moment
Low Water Volume Water Volum e set too low Increase Water Volu me
Low Water Temperature Water Temperature set to o low Increa se Water Temperatu re
Water stop suddenly Leaving th e seat during was hing Seated and restar t the washing
Spray arm exte nding without
water spraying out
The storage b attery is low
Seat fails to sense seated
33
Conne ct the standard ch arge cable to the
Chargin g on the remote control
Please u se the remote control wi thin the
inducti ve distance
Move or rese ated to cover the sensi ng
area and res tart the functio n
Page 39

MALFUNCTIONS DURING OPERATION
■
Dry
MALFUNCTION CAUSE FAULT CLEARANCE
Low Air Temperature Air Temperature set too low I ncrease Air Temperatu re
Not working Seat fails to sense seated
■
Massage
MALFUNCTION CAUSE FAULT CLEARANCE
Not working Started not during washing Restart Massage during washing
■
Heating of the Seat
MALFUNCTION CAUSE FAULT CLEARANCE
Low Seat Temperature Seat Temperature set to o low Increa se Seat Temperature
High Se at Tem perature Seat Temperature set to o high Reduc e Seat Temperature
Low Seat Temperature w hen
seated and g o normal then
■
Opening and Closing the lid and seat
MALFUNCTION CAUSE FAULT CLEARANCE
Auto Open not working
Auto Close n ot working
Seat not op ened by Auto
Open
Eco mode on Turn off Eco mode
Auto Open of f Set Auto Ope n as Lid or Seat
Lid not closed Close lid
Less than 10 sec. after last Auto
Close
The user st ill moving withi n the
inducti ve distance
Auto Open is of f or set as Lid Set Auto Ope n as Seat
Lid not closed Close lid
Less than 10 sec. after last Auto
Close
Move or rese ated to cover the sensi ng
area and res tart the functio n
Wait for 10 seconds after last Auto Clos e
Leave the ind uctive distanc e or be static
for 2 min utes
Wait for 10 seconds after last Auto Clos e
34
Page 40

MALFUNCTIONS DURING OPERATION
■
Deodorize
MALFUNCTION CAUSE FAULT CLEARANCE
Deodo rize off Turn on Deodorize
Not working
Still work ing after leaving s eat
■
Night Light
MALFUNCTION CAUSE FAULT CLEARANCE
Night light not working N ight light in OF F mode S witch night lig ht to ON or AUTO mode
Night lig ht always on N ight light in ON m ode Switch ni ght light to AUTO or OFF m ode
■
Descale
MALFUNCTION CAUSE FAULT CLEARANCE
Spray arm mov ing back
automatically
Water is sprayin g out when
turning on Descale
Seat fails to sense seated
During washing
Deodorize continues for 60
seconds after leaving seat for
better effect
No operat ions are done with in
3 minutes af ter it moves out
Sensin g area covered by
conducting medium
Move or rese ated to cover the sensi ng
area and res tart the functio n
Wait for washi ng to finish and De odorize
will start automatically
Normal.
Please re start the spray ar m cleaning
Please re move the conduct ing medium
■
Alarm Function
MALFUNCTION CAUSE FAULT CLEARANCE
Continuous «beep»
Leakage p rotector trips
frequently
Water temperatu re topover
regular
Current le akage exceeds the
normal value
35
Disconnect the main plug and contact
customer service
Disconnect the main plug and contact
customer service
Page 41

DIMENSION
403
>12
DIMENSION
■
[E322-02]
958
460
725
Unit: mm
36
Page 42

TECHNICAL DATA
TECHNICAL DATA
ITEM DESCRIPTION
Article No E322-02
Nominal voltage 120V ~ , 60Hz
Power consumption (max.) 1860W
Nominal power consumption 1050W
Power cord ≥ 70.8 inc h ( 1.8 m )
Flow pressu re range 14.5 - 1 08.8 psi ( 0.1 - 0.75 MP a )
Water outlet temperature range 39 - 9 5 °F (4 - 35 °C)
Adaptable room temperature range 39 - 104 ° F (4 - 40 °C)
Net weig ht 97 lbs ( 44 kg )
Package size 32.6 × 19 .6 × 23.3 inch ( 8 27 × 497 × 592 mm )
Protection degree IPX4
Water volume 350 - 600 mL /min 5 levels
Water temperature 88 - 102 °F (3 1 - 39°C) 5 levels
Heater power 160 0W
Wash
Dry
Seat
heating
Lid and
seat
Operation control Remote control
Blue tooth Bluetooth control and music
Side button Rear wash , Front wash, D ry and Stop
Seat induction Yes
Protection from low tem perature burn Yes
Abnormality notification Beeping sound
Washing Period 3 min
Spray arm pos ition 5 levels
Anti-backflow device Anti -backflow val ve
Security device Temperature sensor an d relay
Wind speed ≥3.5m/s
Air temperatu re 86 - 115 ° F (30 - 46°C) 5 levels
Heater power 200W
Spray arm pos ition 3 levels
Security device Thermal fuse and thoermostat
Surface tem perature 8 4 - 98 °F (29 - 37°C)
Heater power 24W
Security device Temp erature sensor
Remote control Open and c lose
Automatic Yes
Descent control Yes
37
Page 43

Page 44

Page 45

AXENT Corporation Ltd.
info@axentbath.com
www.axentbath.com
P\N:224000009300 2017/07/03
 Loading...