

Axdia ODYS User Manual

Safety Precautions
z Do not subject the device to severe impact or drop it from heights.
z Do not use the device in extreme hot or cold, dusty or damp conditions. Do not
expose it to direct sunlight.
z Avoid using the device near strong magnetic fields.
z Keep the device away from water and other liquids. In the event that water or
other liquids enter the device, power off the product immediately and clean the
device.
z Do not use chemicals to clean the device in order to avoid corrosion. Clean it
with a dry cloth.
z We are not responsible for damage or lost data caused by malfunction, misuse,
modification of the device or battery replacement.
z Do not attempt to disassemble, repair or modify the product. This will invalidate
the warranty.
z If the device will not be used for an extended period of time, please charge the
battery at least once per month to maintain battery life.
z Charge the battery if:
a) The battery level icon displays
b) The device powers off automa tic al l y when restarted.
c) There is no response when pressing keys with keys unlocked and battery
full.
z When the device is being formatted or transferring a file, do not interrupt the
connection. Otherwise, data may be corrupted of lost.
z When the device is used as a portable HD, please use only per the instructions.
Otherwise, permanent data loss could occur.
z Please use and install data using the attachments/accessories provided and
only according to the manufacturer’s instruction.
z Please refer to the inform ation on the bottom of the device for electrical and
safety information before installing data or operating the device.
z To reduce the risk of fire or electric shock, do not expose this device to rain or
moisture. The device should not be exposed to dripping or splashing. Never
place objects filled with liquids, such as vases, on the device.
z There is danger of explosion if the battery is replaced incorrectly. Replace only
with the same or equivalent type.
z The battery (battery or batteries or battery pack) should not be exposed to
excessive heat such as sunlight, fire or the like.
z Please follow responsible procedures for battery disposal.
z If the power adaptor is disconnected from the device, the device will remain
operable as long as the battery has sufficient charge.
(An empty battery)
EN
1
V2.2
EN
z The power adaptor is a CLASS II apparatus with double insulation, and no
external ground is provided.
z Safety symbol explanation:
- The lightning flash with arrowhead symbol within an equilateral triangle is
intended to alert the user to the presence of non-insulated “dangerous
voltage” within the product’s enclosure that may be of sufficient magnitude
to constitute a risk of electric shock.
- To reduce the risk of electric shock, do not remove the cover (or back) as
there are no user-serviceable parts inside. Refer servicing to qualified
personnel.
- The exclamation point within an equilateral triangle is intended to alert the
user to the presence of important ope rating and maintenance instruct ions
in the literature accompanying the device.
z Do not leave the device on in a confined space such as a book case or similar.
The ventilation should not be impeded by covering the ventilation openings with
items such as newspaper, table-cloths, curtains, etc.
z No open flames, such as lighted candles, should be placed on the device.
z Use the device in moderate climates.
z Never disconnect the USB cable from your e-book reader to the PC during a
data transfer or formatting. Correctly disconnect the device from the operating
system. Information loss and malfunctions can occur.
Disposal
Correct Disposal of this product. This marking indicates that this product should not be
disposed of with other household waste in the EU. To prevent possible harm to the
environment or human health from uncontrolled waste disposal, recycle it responsibly to
promote the sustainable reuse of material resources. To dispose of your used device,
please use the return and collection systems available in your area or contact the retailer
where the product was purchased. They can take this product for safe environmental
recycling.
The rechargable battery in this device may not be replaced by the user. Please contact
our service support center should the battery require replacing.

Listening Cautions
Hearing Safety
Listen at a moderate volume: Using headphones at a high volume can impair your
hearing. This product can produce sounds in decibel ranges t hat may cause hearing
loss for a normal person, even for exposure less than a mi nute. The higher decibel
ranges are offered for those that may have already experie nced some hearing loss.
Sound can be deceiving. over time your hearing ‘comfort level’ adapts to higher
volumes of sound. So after prolonged listening, what sounds ‘normal’ can actually be
loud and harmful to your hearing. To guard against this, set your volume to a safe level
before your hearing adapts and leave it there. To establish a safe volume level: Set
your volume control at a low setting. Slowly increase the sound until you can hear it
comfortably and clearly, without distortion. Listen for reasonable periods of time:
prolonged exposure to sound, even at normally ‘safe’ levels, can also cause hearing
loss. Be sure to use your equipment reasonably and take appropriate breaks. Be s ure
to observe the following guidelines when using your headphones. Listen at reasonable
volumes for reasonable periods of time. Be careful not to adjust the volume as your
hearing adapts. Do not turn up the volume so high that you can’t hear what’s around
you. You should use caution or temporarily discontinue use in potentially hazardous
situations. Do not use headphones while operating a motorized vehicle, cycling,
skateboarding, etc.; it may create a traffic hazard and is illegal in many areas.
SUPPORT
http://www.odys.de support@odys.de
On our website you will find the latest information about this product, other products of our
enterprise, our company itself and valid warranty terms. The latter you will find under Service Downloads. Firmware upgrades for this device are also offered on our website. For questions or
problems read our FAQs on our website or contact our after sales service.
EN
Appropriate use
Device is designed for playing music and video files in commonly used formats, showing photos and
access internet functions using the build in wifi function. It is exclusively meant for this purpose and must
only be used for the same.
This also includes paying attention to all information contained in this operating manual, especially in the
safety instructions. Any other usage is considered to be improper and may lead to material damages and
even personal injuries. Moreover, it will result in the immediate loss of guarantee. The manufacturer does
not bear any liability for damages caused due to improper use.
This manual may not reflect your actual device’s operation. All information is
subject to change without prior notification. Please follow your actual
device’s operational procedures.
3

Table of Content
Safety Precautions ..............................................................................................1
Listening Cautions...............................................................................................3
EN
Appropriate use...................................................................................................3
Feature Summary................................................................................................5
Accessories.........................................................................................................5
Buttons & Ports....................................................................................................6
Charging Battery..................................................................................................7
Installing Memory Card........................................................................................7
Transferring Files.................................................................................................8
Turning On/Off.....................................................................................................8
Screen Lock.........................................................................................................8
Home Screen.......................................................................................................9
Using the Touch Screen ....................................................................................11
Access Internet..................................................................................................12
Internet Access - UMTS ....................................................................................14
Virtual Keyboard................................................................................................17
Using the Web Browser.....................................................................................18
Sending/Receiving E-Mails ...............................................................................20
Reading E-Books ..............................................................................................23
Playing Music ....................................................................................................28
Video / Photo Playback .....................................................................................30
ES File Explorer.................................................................................................33
Manage Third-party Applications.......................................................................36
HDMI Output......................................................................................................37
System Settings.................................................................................................38
Troubleshooting.................................................................................................41
Troubleshooting.................................................................................................43
Specifications ....................................................................................................44
Warranty Conditions..........................................................................................46

Feature Summary
Wi-Fi Connectivity
With the latest Wi-Fi technology, this device can connect you to the Internet wherever
you are.
8” Touch Screen
Touch or slide your finger on the screen, the screen responds instantly.
Third-party Application Support
With the built-in Android
applications in this device. Please note, that you need to insert an SD-Card for it.
Built-in G-sensor
The screen changes to landscape or portrait automatically when the device rotates.
Entertainment
You can enjoy music, movies, pictures and e-books with the Mobile Tablet.
TM
OS, you can install a large number of third-party
Accessories
z USB Cable
z Power Adaptor
z Quickstart
EN
5

EN
Buttons & Ports
1.
Volume
- / Menu
2. Volume +/key
3. Power Button Press and hold the power switch to turn on or off the device;
4. USB 2.0
Hi-speed
/ USB Host
Power jack (DC in)
5. Headphone jack Audio output connection for head-phones
6.Mini HDMI Connect to a TV or other display.
7. Reset pin
hole
8. Status LED Red while charging. Turns green when battery is fully charged.
9. Micro SD
Card Slot
10. Camera Front-facing camera for taking avatar pictures
11. Microphone
Shortly press to decrease the volume level.
Shortly press to increase the volume level.
Briefly press the switch to turn the screen on or off
Connect to a computer to transfer data
(e.g., music, videos, photos, files).
Support USB stick, Surf stick, KeyBoard and Mouse.
Charge and power the tablet with the included power adapter.
Note: Speaker output is automatically disabled when
headphones are connected to the player.
Note: Sound over HDMI must be enabled separately using the
system settings.
Press to reset the tablet if it freezes or otherwise behaves
abnormal. (Use a paperclip or other small object to gently
press this key .)
Accommodates any standard SD/SDHC memory card.
Charging Battery
The device has a built-in rechargeable battery. No extra battery installation is
required. Just charge the device when it indicates low battery.
To charge the battery, connect the device to any standard wall outlet via the USB
port using the power adaptor. It takes about 5 hours to fully charge the battery.
Note:
a. You can operate the device even when it is being charged. But for extended battery life,
it is suggested NOT to use the device when it is charging.
b. It is recommended to charge the battery before you use the device for the first time.
c. For maximum performance, lithium-ion batteries need to be used often. If you don’t use
the device often, be sure to recharge the battery at least once per month.
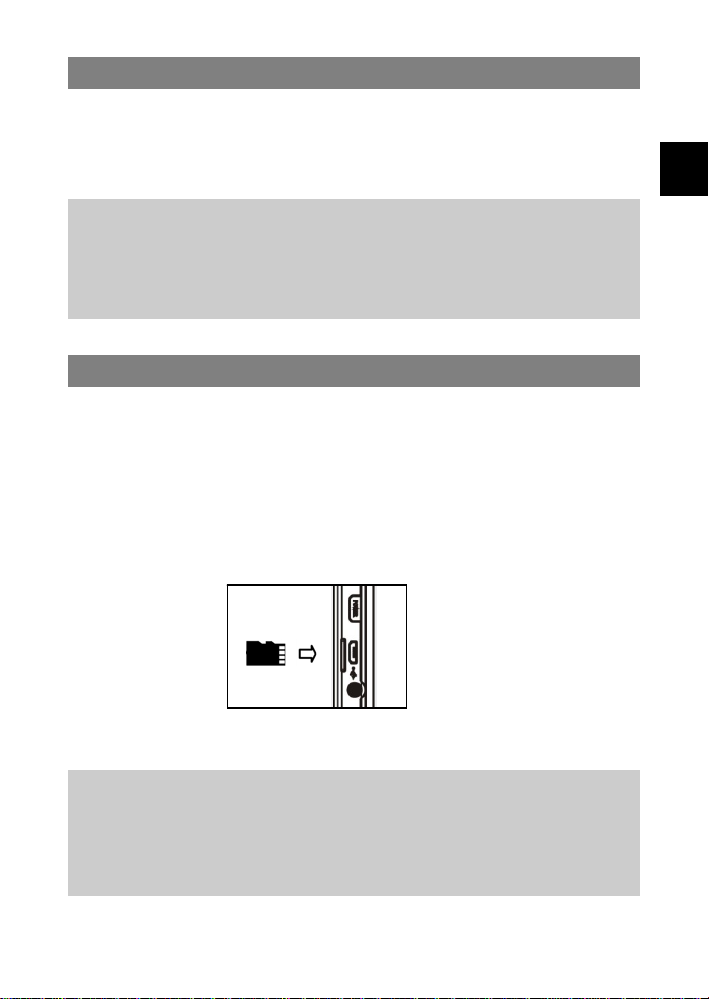
Installing Memory Card
This device can read files directly from memory card.
To use a memory card, find the card slot at the bottom of the device and then insert
the memory card into the slot in the correct orientation. To access the files stored in
the memory card, enter the Explorer mode by tapping the Explorer icon and select
the “SD Card” directory.
• Check that the SD card is in the correct position with the contact pin facing
upwards as illustrated. You may damage the card and the reader if SD card is not
inserted in correct position.
EN
• Push the SD card into the card slot until it clicks.
• To remove SD card, push the SD card once again until it clicks.
Note: We recommend using only SD or SDHC cards up to 32GB capacity.
• When a SD card is inserted in or ejected from the device, it may take few seconds for the
device to update the content.
• Please avoid inserting or ejecting SD card when other operation is running as this may
cause the system hang.
• Do Not remove the card if the content inside the card is being played. This will halt the
operation of the device and might cause a system hang.
7
Transferring Files
Before reading or playing files, you need to transfer media files from a computer to
the device.
(1) Connect the device to a computer with the supplied USB cable.
EN
(2) Once connected, two removable disk drives will show on your computer. One
represents the internal memory of the device, and the other represents the
memory card inserted into the device. Now you can copy files from or to these
disk drives just as you would on your hard drive.
(3) Choose “Turn off USB Storage” and then tap “Turn Off” to disconnect the device
from computer.
(4) Disconnect the device from the PC safely.
a) Left-click the
b) Click the pop-up mini-window message of “Stop the USB Mass Storage
Device – Drive (X).”
c) Disconnect the device from the computer.
Note: The pre-installed applications and Android OS occupy a considerable part of
capacity – nearly more than 1GB, it is normal that you see huge difference between
available memory space and total capacity.
icon at the right bottom corner of the computer desktop.
Turning On/Off
To turn on the device, press and hold the Power button on the unit until you
see the boot-up screen then release. It may take a few minutes to start up the
system, please wait before you proceed.
To turn off the device, press and hold the Power button until you see the
option “Power Off”, tap on “Power Off” and then tap on “OK”.
Tip: This device will sleep with the screen off if it stays inactive for a few seconds. You can
briefly press the Power button to turn on the screen and wake it up.
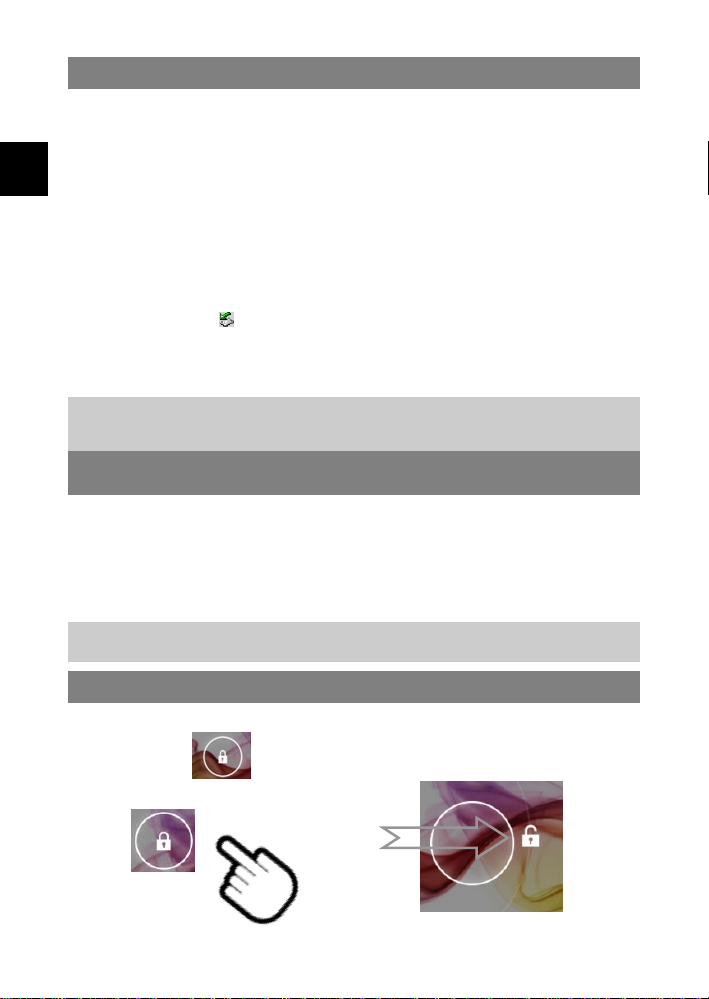
Screen Lock
The screen automatically turns off and locks itself after a set period of time.
When the screen turned off, press the Power button to light up the screen.
Push the lock icon
and drag it to the surrounding edge to unlock.
j
r
a b c
Vision
d e f g h i
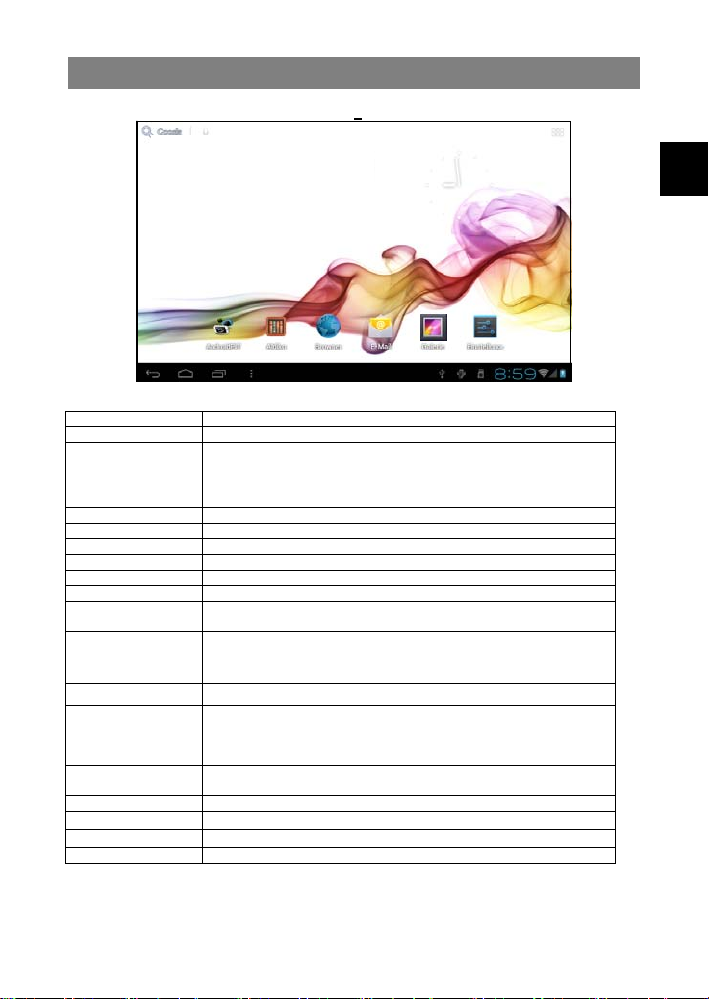
Home Screen
k l m n o p q
a. GoogleSearchBar
b. GoogleVoice Search
c. Applicationsicon TaponthisicontorevealallapplicationsinstalledonyourTablet
d. AppCenter Selectandinstallnewapplications
e. Aldiko Toreadandmanagee‐booksinePuborPDfformat
f. Browser TaptolaunchtheBrowsertovisityourfavoritewebsite s.
g. E‐Mail Toopenthemailclient
h. Galerie Pictureview
i. Systemsettings
j. Backsoftkey Taptoreturntothepreviousscreen.Ifthekeyboardisonthescreen,taptoclose
k. Homesoftkey Taptoreturntothehomescreen.
l. Runningapps
m. MenusoftKey Taptoviewtheoptionmenu
n. SystemHints Informstheuserifattachedmemoryorupdatesareavailableandothersystem
o. CurrentTime Indicatethetimelocation
p. Wifi Appearswhenawirelessconnectionwasestablished
- YoucancopytheapplicationsontotheHomescreenbypressing
andholdingontheiricons.
- You can delete the application from the Hom e Screen by dragging
their icons to the Cross that appears at the top of the screen .
thekeyboard.
Tapandholdtoviewalistofrecentlyusedapplications;touchanapplicationin
thelisttolaunchit.
Showappswhicharecurrentlyrunninginbackground.
Note:WhenyouTaptheMenukeyfromwithinanapplication,youwillseethe
optionsforthatapplication.ToviewtheAndroidsystemoptions,taptheMenu
keyfromthehomescreen.
statusinformation’s
q. GSM ShowstheGSMsignalqualitywhileusinganUMTSUSBstick
r. BatteryCharge Showsthestatusofthebattery
EN
9

Display all Applications
The device supports most of popular third-party applications. It has many useful
applications pre-installed, such as music player, video player, photo viewer, alarm
clock, calculator, etc. Furthermore, you can add more applications to the device by
EN
installing them manually.
To display all applications installed on your device, tap the Application Tab.
Refer to the figure below.
Vision
Using the Touch Screen
This device is equipped with a touch-screen. Following are a few tips on how to use
the touch screen.
Tip: For a proper usage please use your fingernails or a soft-plastic stylus (not provided) to
tap on the screen.
Main Touch Screen Actions
In many applications, you can go back one level in the interface by tappi ng on the
Back icon
Wherever you are in the interface, you can go back directly to the Home Screen by
tapping on the Home icon
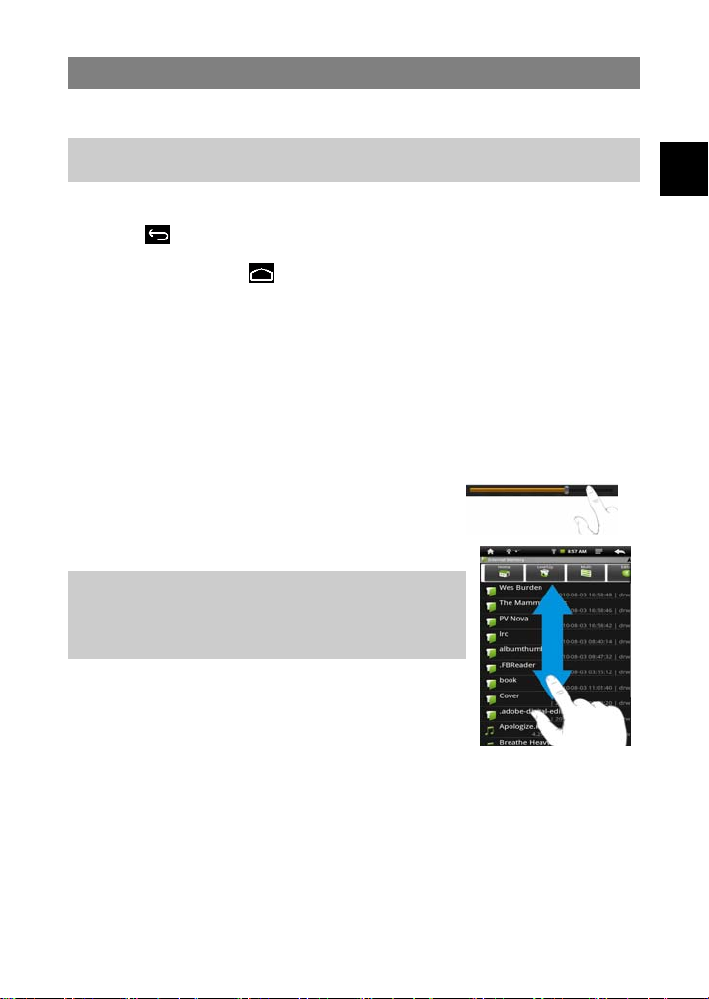
Other Touch Screen Actions
y When watching a video or listening to music, you can tap the progression bar to
go directly to a different location in the video or so ng . Y ou can also use your
finger to drag the cursor in the progression bar to another location in the video or
song.
In the file browsers (File, Music, Video, Photo, etc.), you
y
can drag your finger up and down to scroll the file list up
and down.
y In the Web browser, you can scroll up and down by
tapping on the page and dragging it up or down (be
careful not to tap a link until you are ready!).
y Tap the link to open the page.
Note: DON’T use a pen or pencil or other sharp items to tap on
the screen! This may damage the screen. DON’T place heavy
or sharp edged items on the screen. Clean it carefully with a
soft cloth. DON’T use cleaner.
(at the lower left corner of the screen).
(in the lower left corner of the screen).
EN
11
Access Internet
Your Tablet features built-in Wi-Fi technology so that you can access the
internet via Wi-Fi network.
First of all, you need to configure a Wi-Fi network. For the Wi-Fi configuration
EN
procedure to work, you need to be in a Wi-Fi zone that will allow you to connect
to it. Every time Your Tablet is in range of a network that you have already
configured once, it will attempt to make a connection.
Note: In order to establish a Wi-Fi connection it is required to know the encryption
password of the desired Wi-Fi network.
Be sure that you are allowed to use this network and that no other settings of this network
like MAC address filter will deny the connection.
The MAC Address of your device can be found at: “Settings” – “About device” – “ Status”.
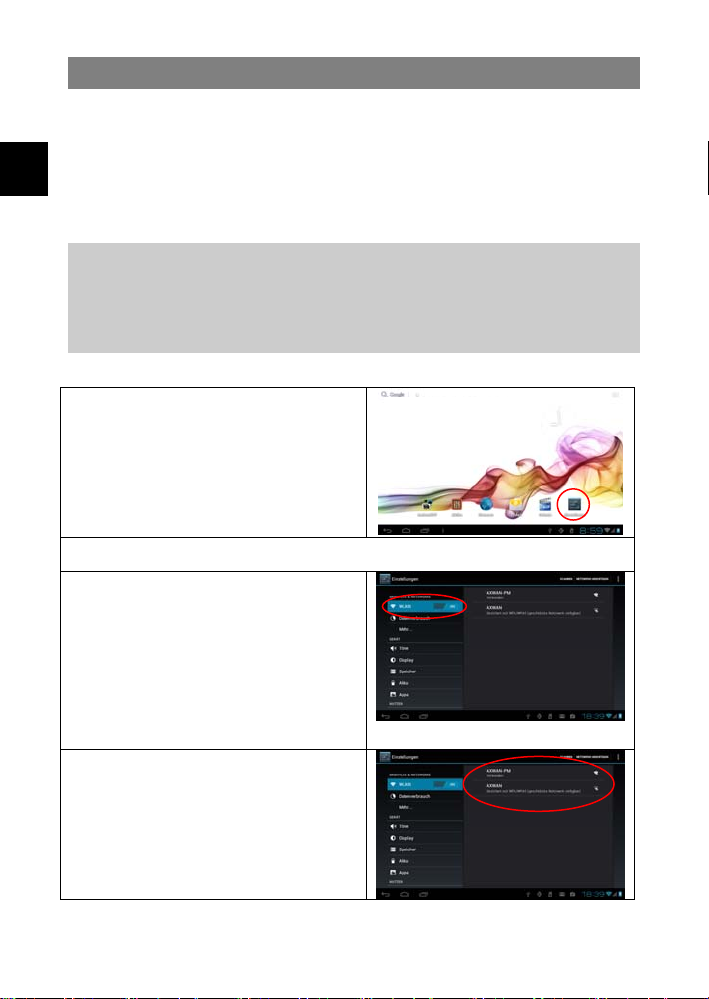
Configuring WIFI Connection
(1) In the Home screen, tap on the
Settings icon.
(2) Tap on the “Wireless and Network” setting to open.
(2) Tap on the “Wi-Fi” setting to turn on
the Wi-Fi. your Tablet will scan
automatically for available WiFi
networks and display them. The list of
available networks shows all the
wireless networks in range of your
device.
Vision
(3) The list of available networks will be
shown at the right side
Note:
The available network list is constantly refreshed automatically.
When the Wi-Fi is enabled, Your Tablet will connect automatically to your configured
networks when they are in range.
If Your Tablet finds a network that has never been configured, it will display a notification
icon.
(4)Tap on the network you want to connect to, enter the required network
information (password) and then tap on “Connect”. Your Tablet will now
attempt to establish a connection to that WiFi hot spot with the network
parameters you entered. If the connection is successful, the message
Connected to XXX will appear under the WIFI setting.
Advanced Connection
To manually scan for available Wi-Fi networks,
In the “WRELESS&NETWORKS” screen, tap the
,If the Wi-Fi network you want to connect to does not appear in the list, s, then tap
“ADD NETWORK.” Enter the required settings, then tap “Save.”
SCAN icon (at top right corner)
Launching the Web browser
Tap the Applications icon to display all applications, and then tap the Browser icon
to launch the Web browser.
If you are already connected to a network, the Web browser will simply open and you
can start browsing the Web. To access a new website, tap the Menu icon
to display the menu, and input another address.
Note: Not all wireless networks offer access to the Internet. Some Wi-Fi networks only link
several computers together, without any Internet connection.
EN
13

Internet Access - UMTS
For mobile Internet access you can use common UMTS Internet sticks with
your tablet.
EN
Please note:
- Unfortunately, not all UMTS (3G) dongles can be used with this device. You find a list
of all supported dongles in the menu: Settings – Wireless & Network – More… - 3G
Support Information.
Please only use one of the listed dongles! Currently these are:
Huawei E220, E261, E153, E272, EC122, EC150, EC189, EC167,
EC1261, E173u, E1820, E1750, E1782, E160E, EC156, EC1270, E182E,
E353, ZTE MF637U, AC2766, AC2736, AC2746, MF633BP-1 and AC580.
- This function is a special feature, which can only be used with additional
accessories, which are not supplied with the device.
- For Internet connection you need a SIM card plus the respective Internet
connection tariff.
Caution!
If your SIM card is PIN-protected it must be disabled before use. You can use
any common mobile phone. Find the respective menu item in the security
settings of your mobile phone.
Configure 3G Internet Connection
1. Use the USB adaptor cable to connect the dongle to the device.
2. Turn the device on.
After the device is turned on, press the On/Off button until the menu is
displayed and press the OK button to confirm.
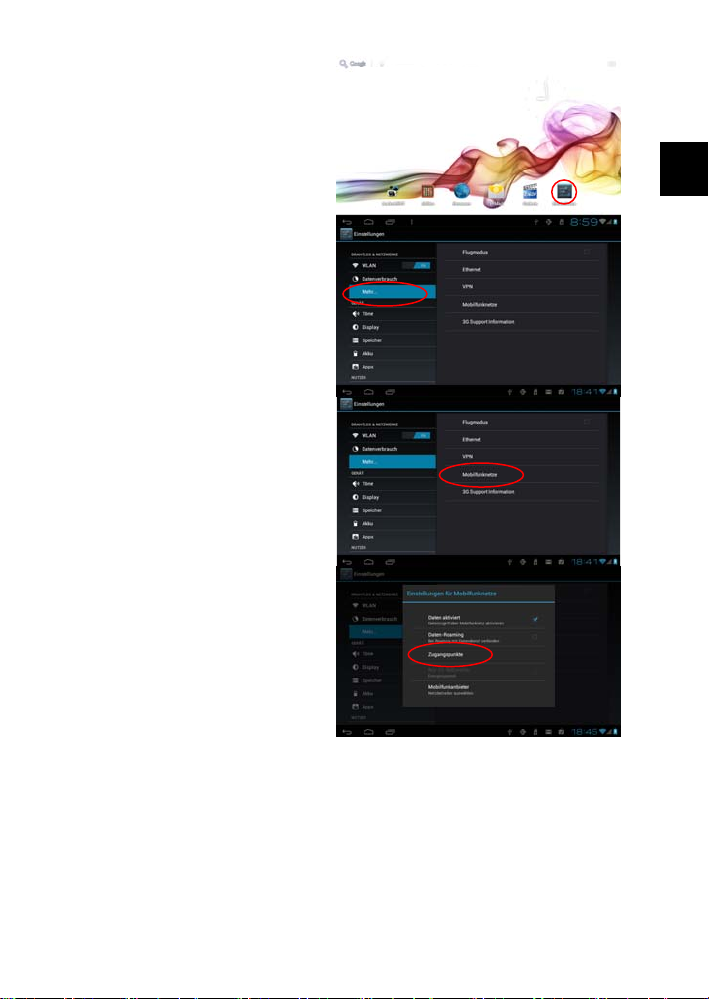
3. In the Home screen tap on the
settings icon.
Vision
EN
4. Open the page with installed
apps
Settings –
Wireless & Network –
More…–
Mobile Networks.
5. Enable the item “Data Enabled”
if it is not yet ticked.
6. Select item “Access Points” to
add an Internet access point.
15
 Loading...