

Page 1
F
Security
&
Home Automation System
USER MANUAL
(VERSION 1.0)
AX1 ICON
Page 2

Page 3

AX1 ICON User Manual
iii
Version 1.0
Content
Preface 1
Features 2
ICON Keypad Indicators 3
Summary of Operations 4
Telephony Control Flow(Voice) 5
Telephony Control Flow (Beeper) 6
User Programming Summary 7
Chapter 1: System Control
Auto Home Arming 8
Day Arming
Night Arming 9
Force Arming
Remote Control Arming 10
Timer Arming
Telephone Remote Arming
Disarming 11
Remote Control Disarming
Timer Disarming
Telephone Remote Disarming 12
Automation Control (Individual Control)
Automation Control (ON ALL)
Automation Control (OFF ALL) 13
Timer Automation Control
Clear Alarm Memory 14
Zone Chime
View Trouble
Bypass /Un- Bypass Zone 15
Emergency Situation 16
System Test Mode 17
Keypad Setting Mode 18
View Timer Mode 19
Chapter 2: User Programming Mode
Enter User Programming Mode 20
Edit Master PIN
Add New or Edit User PIN 21
Delete User or Guest PIN
Add New or Edit Guest PIN 22
Edit DURESS PIN
Program Auto ON Timer 23
Program Auto OFF Timer
Program System Clock 24
Program ARM Timer 25
Program DISARM Timer
Others Setting 26
Glossary 27
System Information 28
Page 4

1
Version 1.0
PREFACE
Thank you for choosing the AX1 Security and Home Automation system. High quality, large
number of funcitons and yet simple operation are main advantages of the system. Hoping that
you will be fully satisfied with this choice, we ensure you with our professional assistance
and information on our proudcts.
This manual will explain to you on how to operate your AX1 security and home automation
system. This system is made up of a control panel, keypads, IO expander module (optional),
telephone voice module (optional), various sensors and detectors. An enclosure will contain
the control panel, which includes the system electronics and stanby battery.
TESTING
It is advisable to perform periodical test of the alarm system – check every single detector’s
ability to detect zone violation by opening the protected windows, doors etc. It is also
advisable to check sirens and telephone voice messaging system. Please refer to testing
procedures section in this manual. If your system does not function properly, please contact
your system installer for services.
LIMITATIONS
Even though AX1 is an advanced security system, it does not 100% guarantee protections
against burglary, fire or other losses. Any alarm system whether commercial or residential is
subject to compromise or failure-to-warn for a variety of reasons. These include:
Intruders may gain access through unprotected openings or have the technical
sophistication to bypass an alarm sensor or disconnect an alarm warning device.
Intrusion detectors, smoke detectors and many sensing devices will not operate
without power. Devices powered by AC will not work if there is no AC power supply
for any reason and their back up batteries are missing, dead or improperly installed.
Alarm warning devices such as sirens or bells may not alert people or wake up sleeper
if they are located on the other side of closed or partly closed door.
Telephone lines needed to transmit alarm from the premise to a central monitoring
station may be out or temporarily out of service. Telephone station lines are subjected
to compromise by sophisticated method of attack.
Smoke detector used in conjunction with the alarm system may not sense fires that
start where smoke cannot reach the detector such as wall, roof or the other side of the
door. Smoke detector also may not sense a fire on another level of residence or
carelessness and safety hazards like smoking in the bed, violent explosions, escaping
gas, improper storage of flammable material, overloaded electrical circuits, and
children playing with matches.
The most common cause of an alarm system not functioning properly when an
intrusion or fire occurs is inadequate maintenance. Therefore, your system should be
tested weekly to ensure all sensors are working properly.
Installing an alarm system may make you eligible for lower insurance rates but an
alarm system is not substitute for insurance. Homeowners, property owners and
renters should continue to insure their lives and properties.
Note: Specifications subject to change without prior notice.
Page 5

AX1 ICON User Manual
2
Version 1.0
FEATURES
AX1 ICON
1. 8 fully programmable zones
2. Expandable up to 8 output controls (with feedback capability)
3. Supports up to 4 ICON keypads
4. 1 Real time ARM/DISARM timer on Daily Basis only.
5. 4 Real time ON/OFF timer on daily basis
6. 7 user codes & 1 guest code
7. 8 Event Trigger Outputs
1. 3 Soft Zones (Emergency/Fire/Panic)
2. 2 Programming Mode- Installer Programming and User Programming
3. 4 User Arming type (Auto home arming/ Day arming/ Night arming / Force arming)
4. Real time clock function
5. Programmable Entry/Exit Delay Time
6. 4 bell types (Steady/ Pulse/ Chirp/ Silent)
7. 3 zone types [End-of-line (EOL) / Normally Open (NO) / Normally Close (NC)]
8. Adjustable loop response sensitivity
9. Key Switch function (Latch/ Momentary)
10. Dedicated Tamper zone
11. AC power supply monitoring
12. Low battery indication
13. Bell Loss indication
14. Bell Test function
15. Telephone line loss detection
16. Telephone Voice Module
17. RS485 ready (to support longer distance communication)
18. Report events to 4 phone numbers with 4 account numbers
19. Ademco® Contact ID CMS reporting format
20. Voice reporting format (direct to user) or tone reporting format
21. Interactive Voice menu or tone beepers during user call in
22. Support Remote programming via touch tone telephone
23. Programmable event trigger
24. Fast Key on Keypad for Easy menu access
25. Duress code
26. Walk test function
27. Double Call-in Feature for Fax Machine telephone line sharing
Page 6
AX1 ICON User Manual
3
Version 1.0
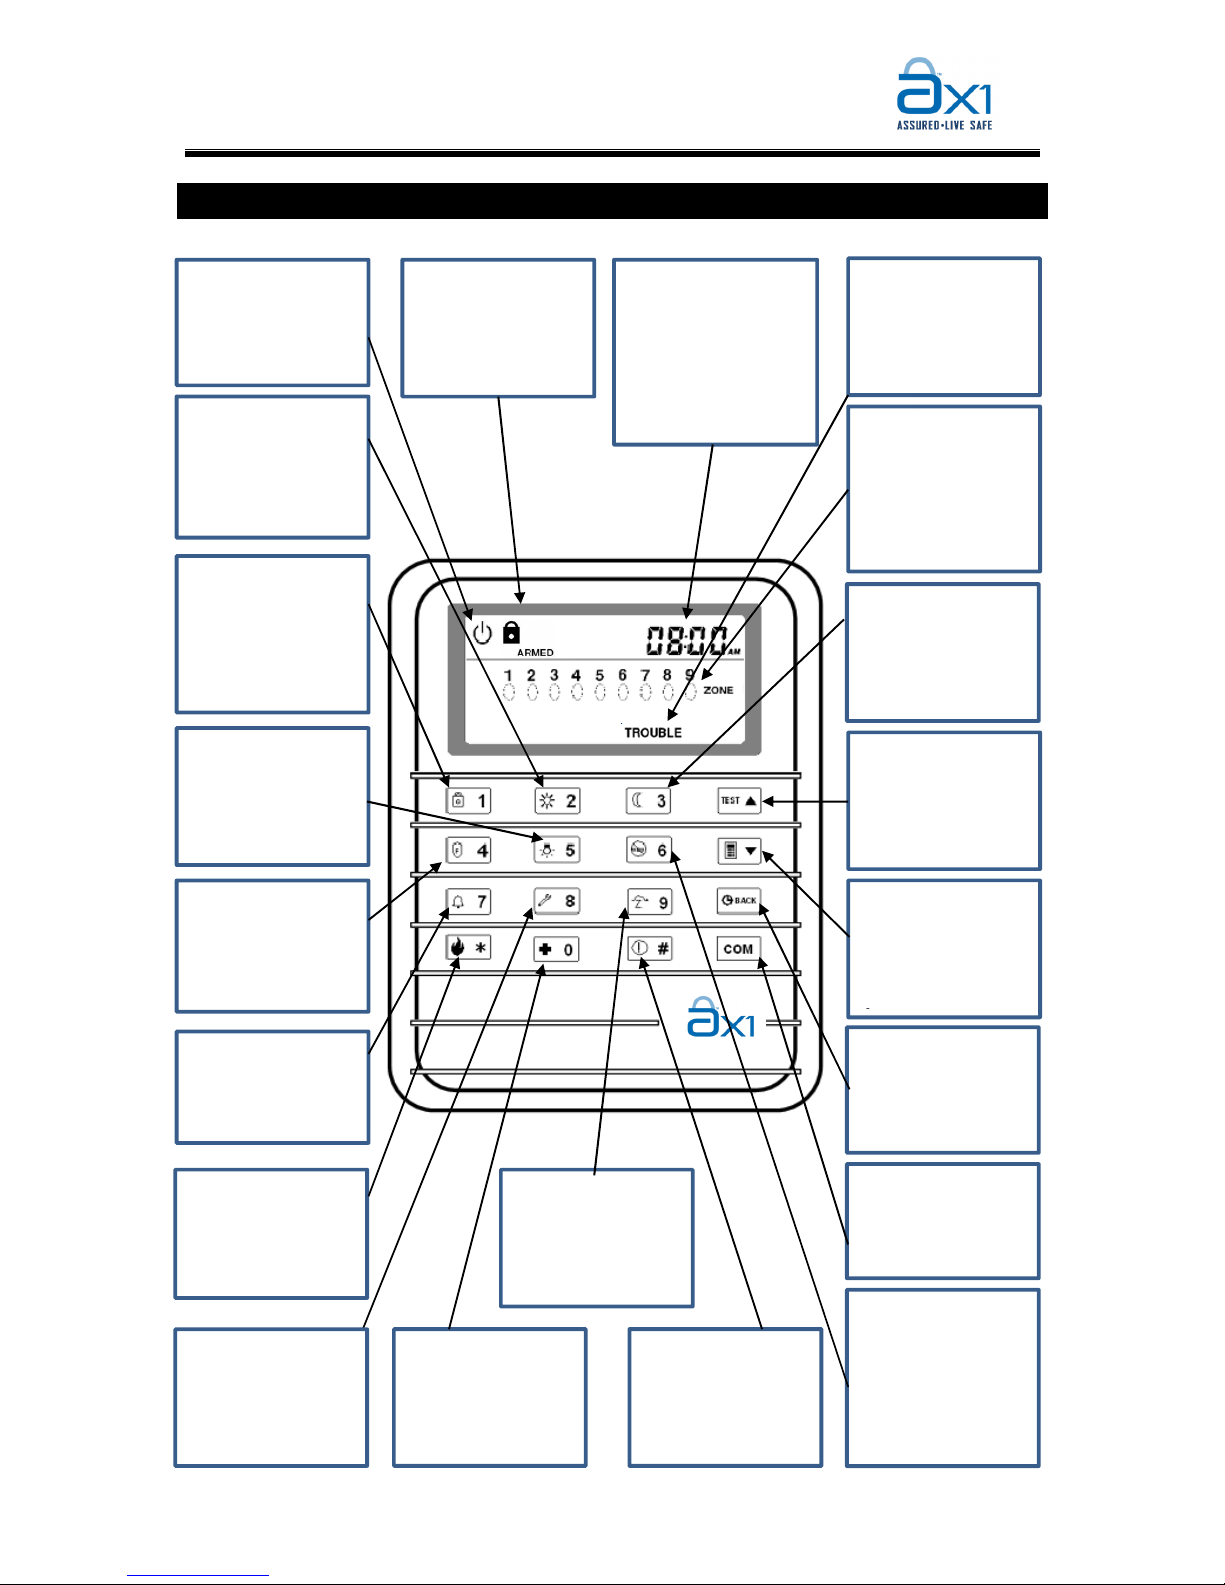
ICON KEYPAD INDICATORS
POWER INDICATOR
The Indicator is
illuminated when AC
power is present
ARM INDICATOR
The respective ARM
indicator will
illuminate base on
arming type.
CHARACTER DISPLAY
These 6 characters
display area will show
system CLOCK, Menu
Title, Function name
and EXIT/ENTRY
Count down time.
ZONE INDICATORS
These Indicators are
illuminated zone
status either OPEN,
CLOSE, BYPASS or
ALARM
[3] Night Arm
This key will activate
the NIGHT ARM
mode when press
and hold for 2s.
[2] DAY ARM
This key will
activated DAY ARM
mode when press
and hold for 2s.
[1] AUTO HOME
ARM
This key will
activated AUTO
HOME ARM mode
when press and hold
[TEST]
The key will start the
test mode menu
when press and hold
for 2s.
[5] AUTOMATION
This key will activate
AUTOMATION menu
when press and hold
for 2s.
[4] FORCE ARM
This key will activate
FORCE ARM when
press and hold for
2s.
[7] ZONE CHIME
This indicator will
toggle DOOR CHIME
to enable/disable.
[*] FIRE
This key will activate
FIRE ALARM when
press and hold for
2s.
[0] EMERGENCY
This key will activate
EMERGENCY ALARM
when press and hold
for 2s.
[#] PANIC
This key will activate
PANIC ALARM when
press and hold for
2s.
[6] CLEAR ALARM
MEMORY
This key will clear
the alarm memory
and stop the Strobe
light when press and
hold for 2s.
KEYPAD SETTING
This key will start
the KEYPAD
OPTIONS menu
when press and hold
[BACK]
This key will guide
user back to
previous menu.
[9] BYPASS
This key will activate
the BYPASS mode
when press and hold
for 2s.
[COM]
This key will guide
user to enter
programming mode.
TROUBLE
The Indicator is
illuminated when
the system is in
trouble condition
[8] TROUBLE
This key will activate
TROUBLE MODE
when press and hold
for 2s
Page 7
AX1 ICON User Manual
4
Version 1.0
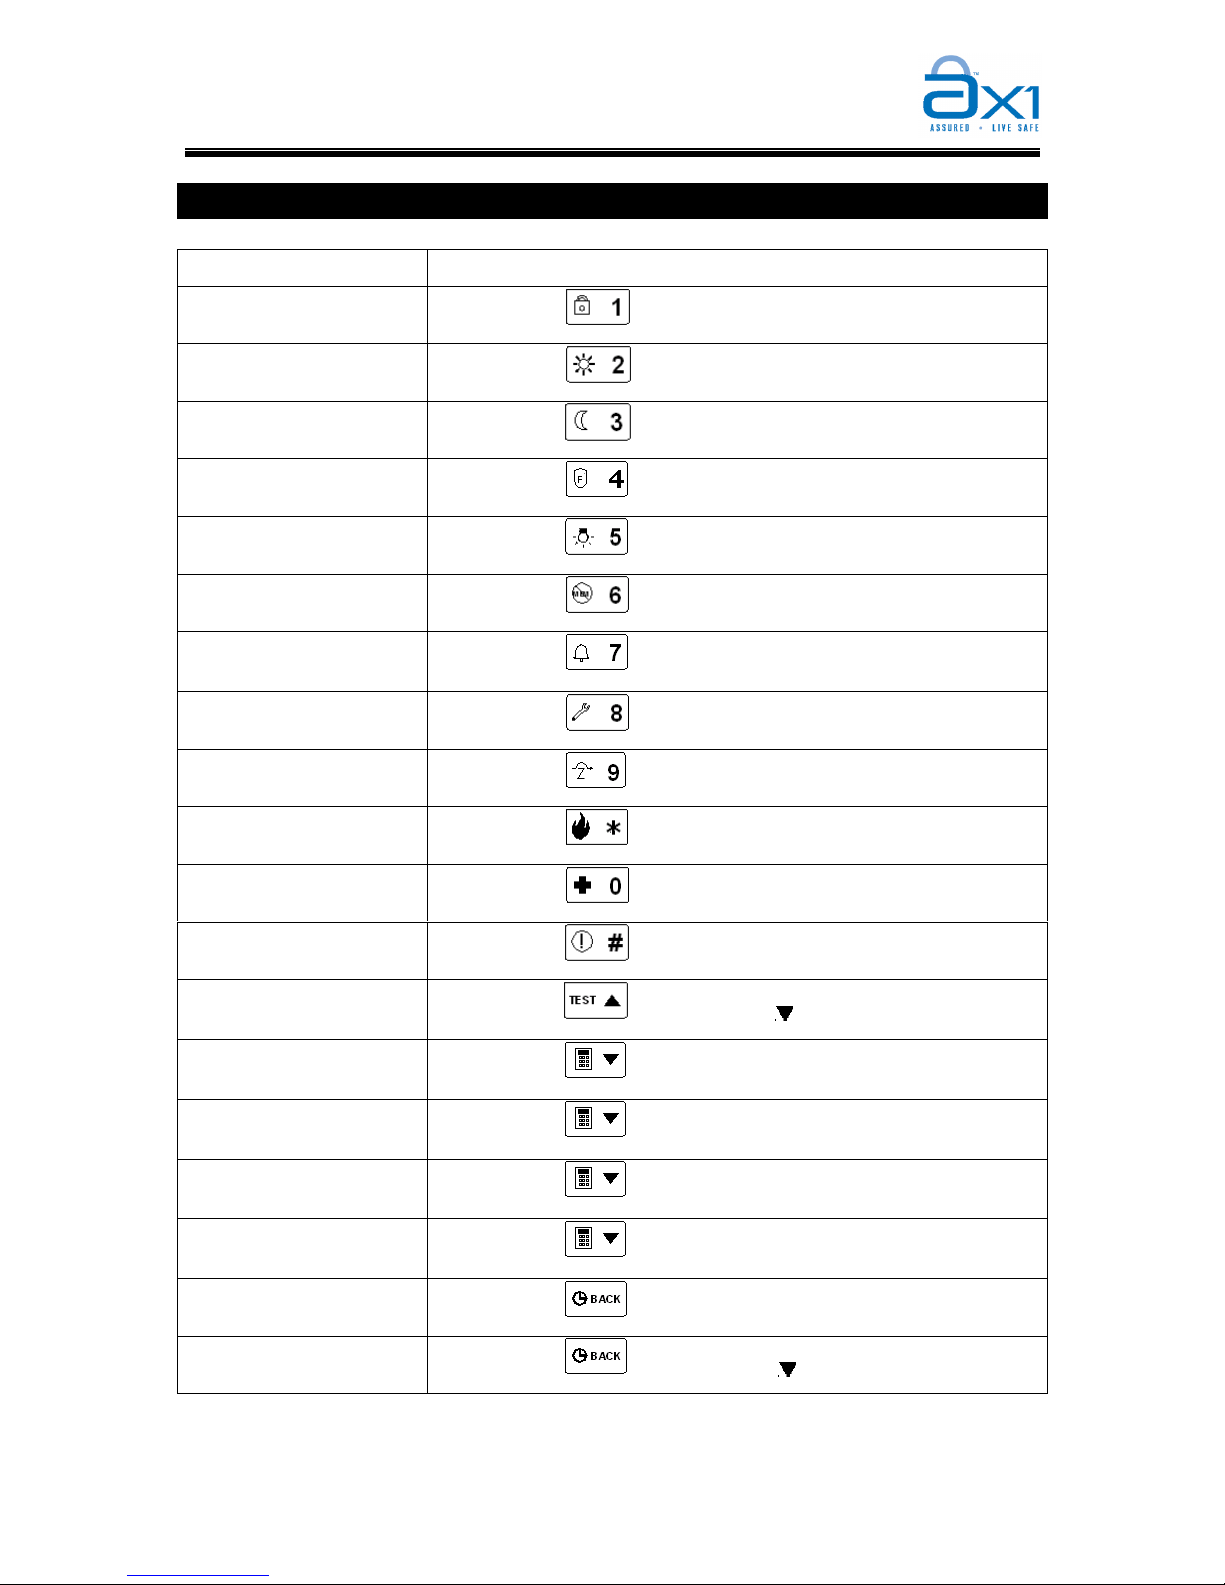
SUMMARY OF OPERATION
Automatic Arm/Disarm
[User PIN]
+
[#]
Auto Home Arm
Press and hold
for 2 seconds
Day Arm
Press and hold
for 2 seconds
Night Arm
Press and hold
for 2 seconds
Force Arm
Press and hold
for 2 seconds
Automation
Press and hold
for 2 seconds + [Output Numbers] +[BACK]
Clear Alarm Memory
Press and hold
for 2 seconds
Turn ON/OFF Zone
Chime
Press and hold
for 2 seconds
View Trouble
Press and hold
for 2 seconds
Bypass Zone
Press and hold for 2 seconds + [Zone numbers] + [BACK]
Fire Alarm
Press and hold
for 2 seconds
Emergency Alarm
Press and hold
for 2 seconds
Panic Alarm
Press and hold
for 2 seconds
Walk Test / Bell Test/
Battery Test
Press and hold
for 2 seconds + [
] + [#]
Turn On/Off Keypad
Backlight
Press and hold
for 2 seconds + [1] + [#]
Turn On/Off Arm buzzer
Tone
Press and hold
for 2 seconds + [2] + [#]
Turn On/Off Exit Entry
Delay Buzzer Tone
Press and hold
for 2 seconds + [3] + [#]
Turn On/Off Keypress
Buzzer Tone
Press and hold
for 2 seconds + [4] + [#]
View Arm Timer Setting
Press and hold
for 2 seconds + [#]
View IO Timer Setting
Press and hold
for 2 seconds + [ ] + [Timer Number]+[#]
Page 8
AX1 ICON User Manual
5
Version 1.0
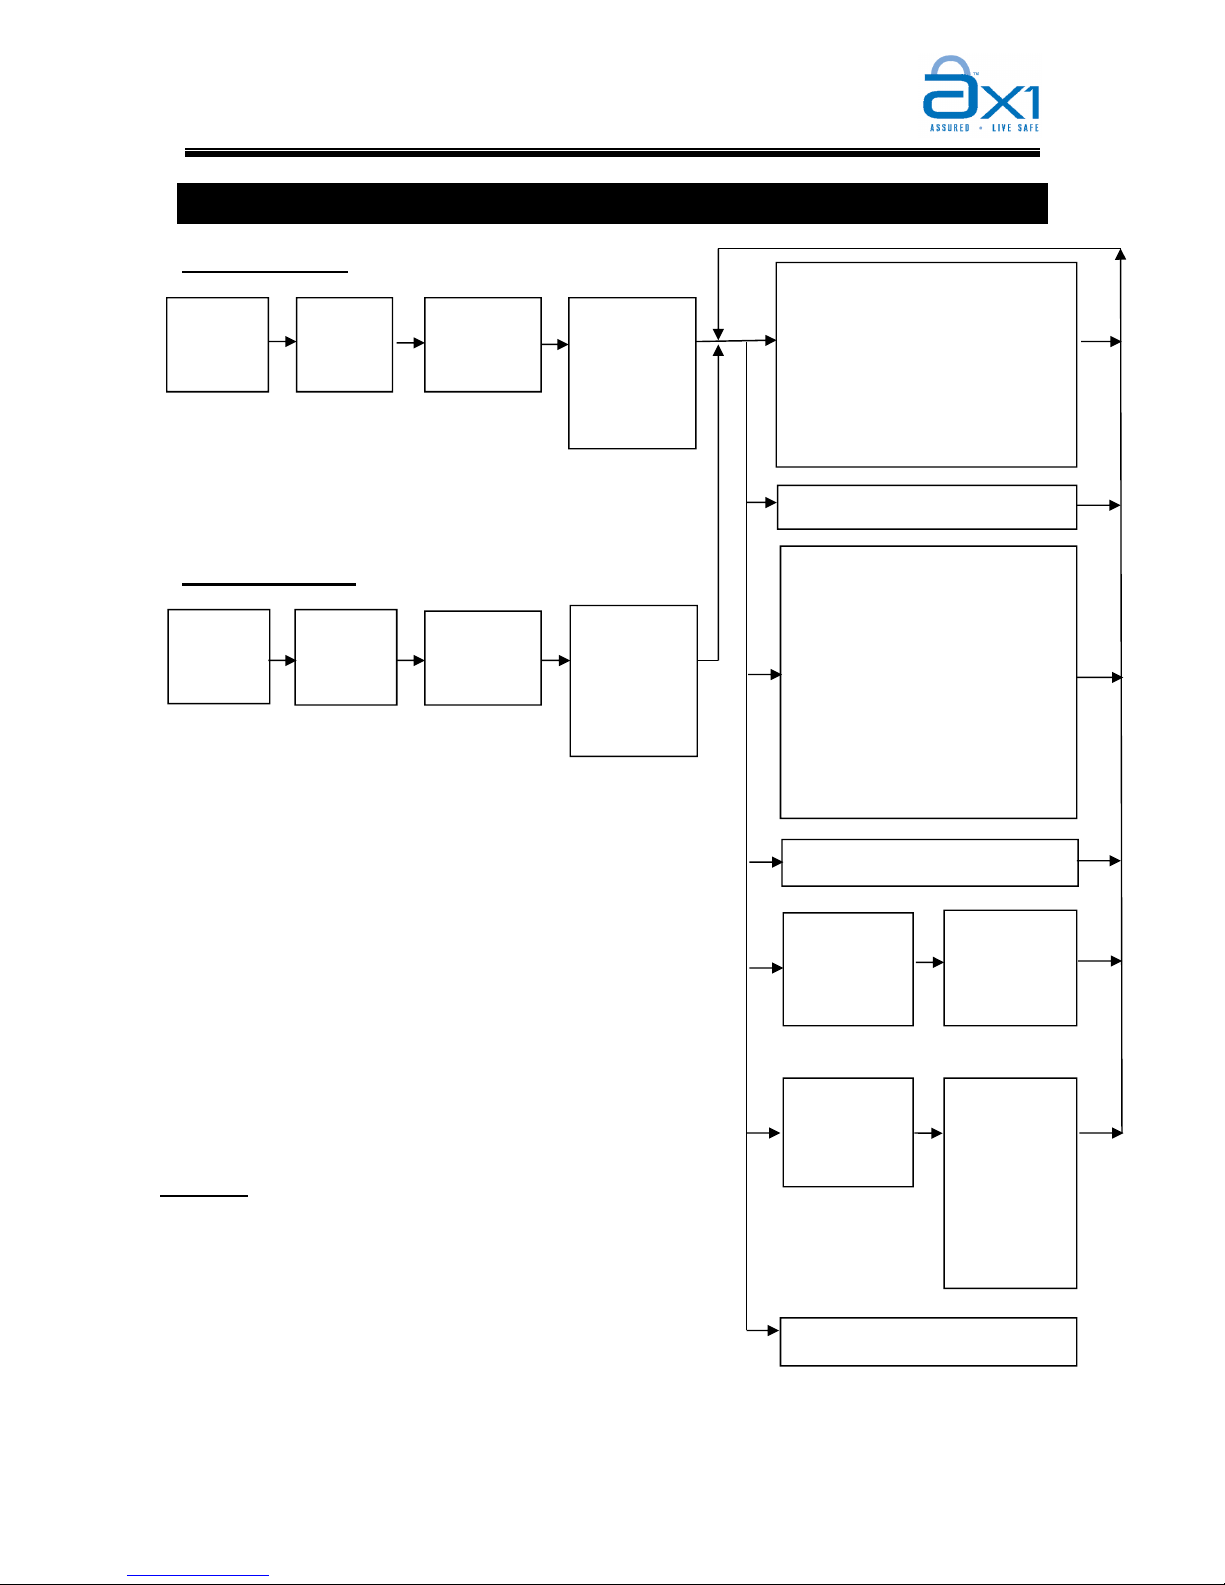
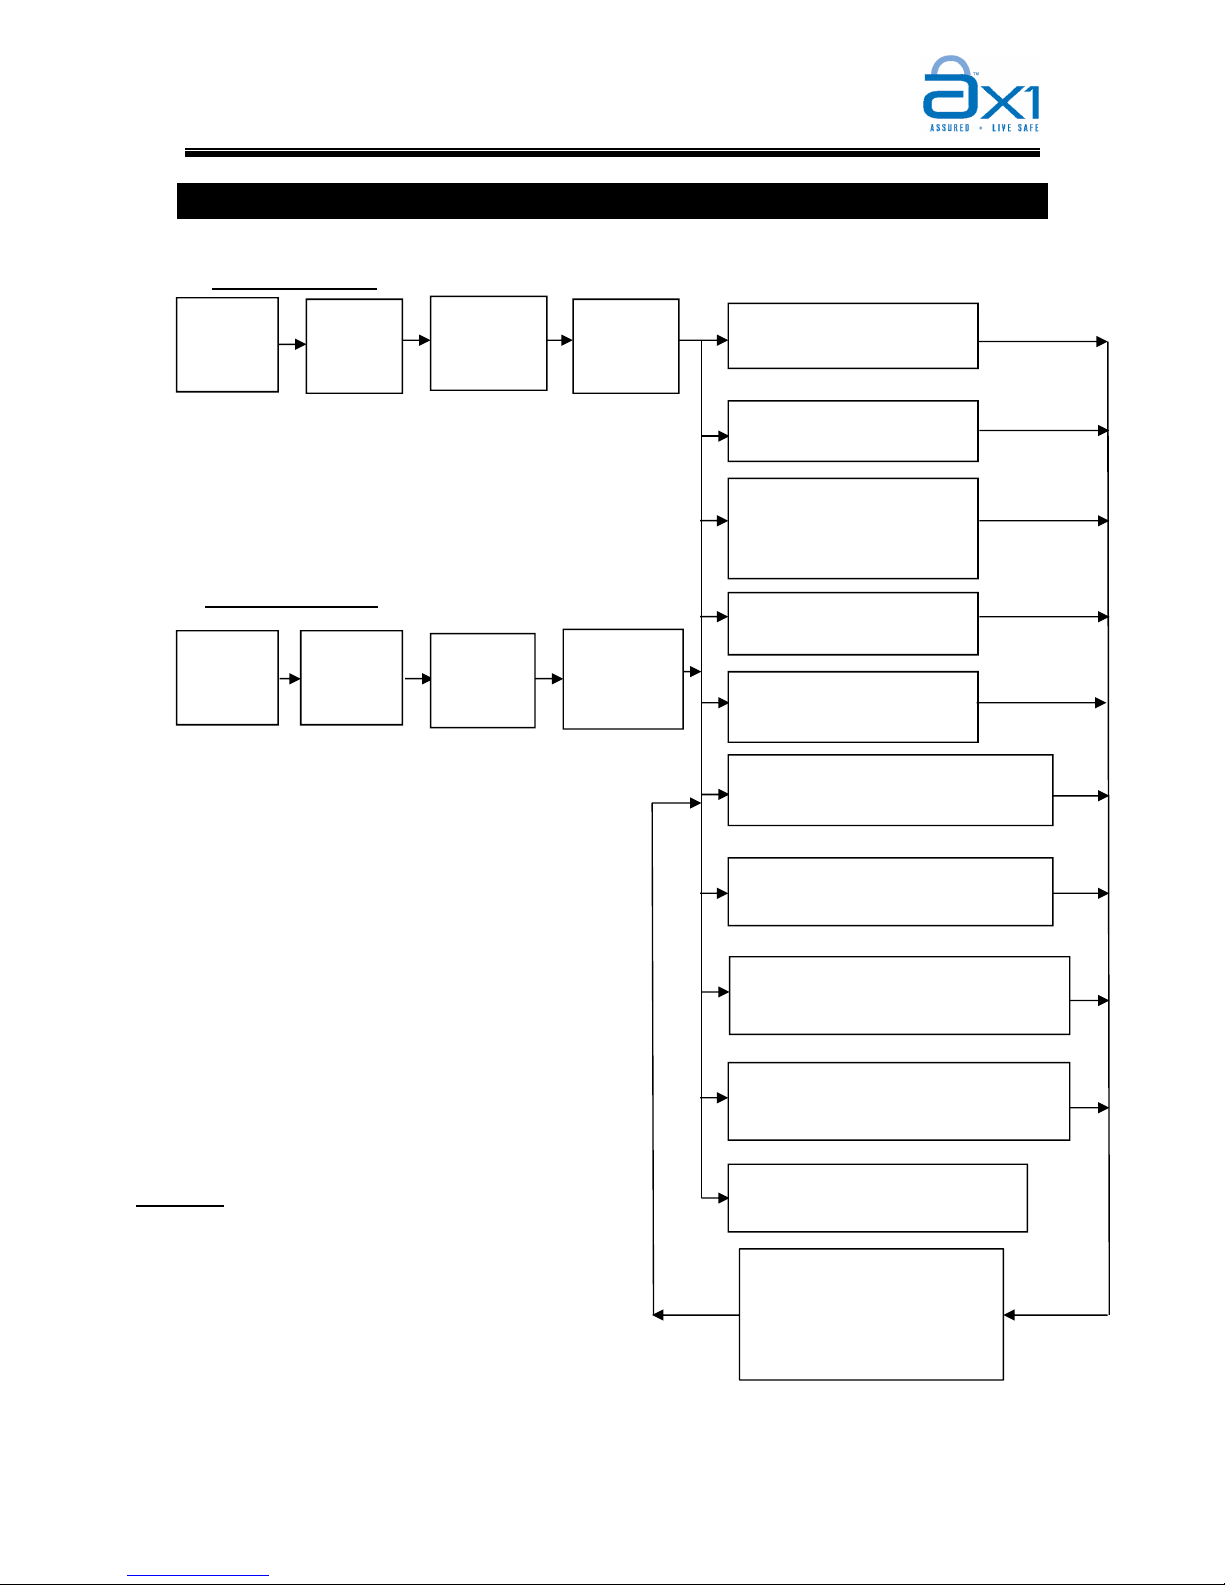
TELEPHONY CONTROL FLOW (With Voice)
[1]
Force Arm/ Disarm System
Remarks:
(i) For Automation Menu, if key ‘00’ is pressed,
system will OFF ALL outputs if any of the IO is
ON; else system will process as ON ALL.
(ii) The system will automatically cut off telephone
line if user does not key in any number for more
than 60 seconds or key in wrong master pin more
than 3 times
Slow
beeps
[#] Voice Menu:
“Press
1 for Security Menu;
2 for System Status;
3 for Siren Control;
4 for Zone Bypass & Restore Menu;
5 for Automation Menu;
Press 0 for Exit; “
[3]
ON/ OFF Siren
[4]
Zone
Bypass
/Bypass
Restore
[
01] to [08]
(Zone
Number)
[*] to exit
[2]
System Status Report On:
- System Arm/Disarm
- Alarm Triggered Zone
- Zone Open / Bypassed
- Siren ON / OFF
- Output ON / OFF
- DC / Siren/ AC Status(if
system status enabled)
- Fire / Emergency/ Panic
alarmed
[5]
On /
Off
Automation
Output
[01] to [08]
(Output
Number)
[00] to
ON/OFF
All
[*] to exit
Answer
Call
System
Voice
Report and
Voice
Guidance
Press any
key
[0] to [9]
[0]
End telephony control
Dial
Phone
Number
Wait for
system
answer
System
Welcome
Note and
Voice
Guidance
[Master
PIN] +
[#]
System Call Out:
Call In to System:
[*]
[*]
Page 9
AX1 ICON User Manual
6
Version 1.0
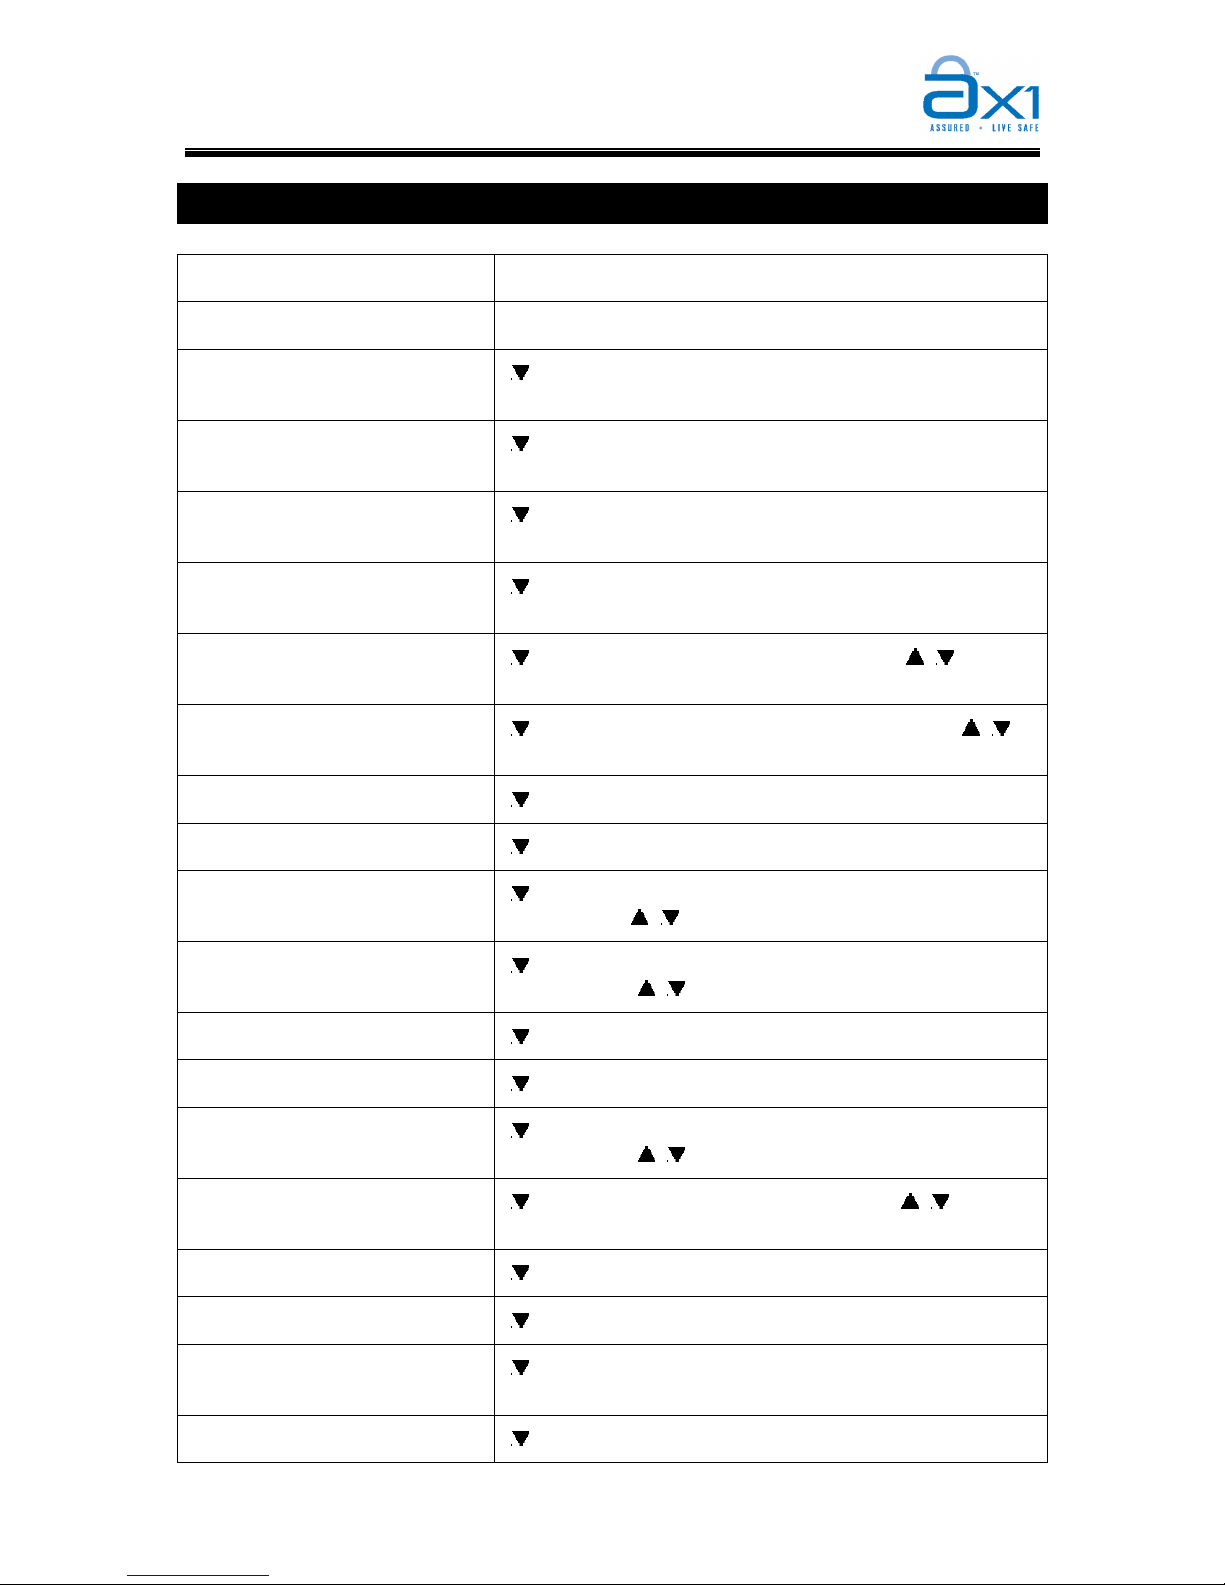
TELEPHONY CONTROL FLOW (BEEPER)
Accceptance Tone
(Short Beep)
OR
Error/ Reject Tone
(Long Beep)
(Continuous tone for Alarm;
OR
5 beep tone for Arm/
Disarm/ Zone Restore/
Trouble)
System Call Out:
Answer
Call
Slow
beeps
Press any
key
[0] – [9]
Alarm/
Event
Tone
To Force Arm System
[1] + [0] + [#]
To Disarm System
[2] + [0] + [#]
To CheckAlarm report
[3] + [#]
*For next alarm, press [#]
again
To ON Siren
[4] + [#]
To OFF Siren
[5] + [#]
To Bypass Zone
[6] + [Zone Number 01 - 08] + [#]
To Restore Bypass Zone
[7] + [Zone Number 01 - 08] + [#]
To ON Automation output:
[8] + [Output Number 00 - 08] + [#]
To OFF Automation output:
[9] + [Output Number 00 - 08] + [#]
Dial
Phone
Number
Wait for
system
answer
Accepatnce
Beeper
Tone
[Master
PIN] +
[#]
To End Telephony control:
[0] + [#]
Remarks:
(i) For Alarm Report, system will beep base
on the alarmed zone number, eg,
Zone 2 alarm - “Beep…Beep”
Zone 3 alarm-“Beep….Beep…..Beep”
(ii) If Fire/Emergency/Panic or Tamper
alarm, system will play continuos 6
beeps.
Call In to System:
Page 10
AX1 ICON User Manual
7
Version 1.0
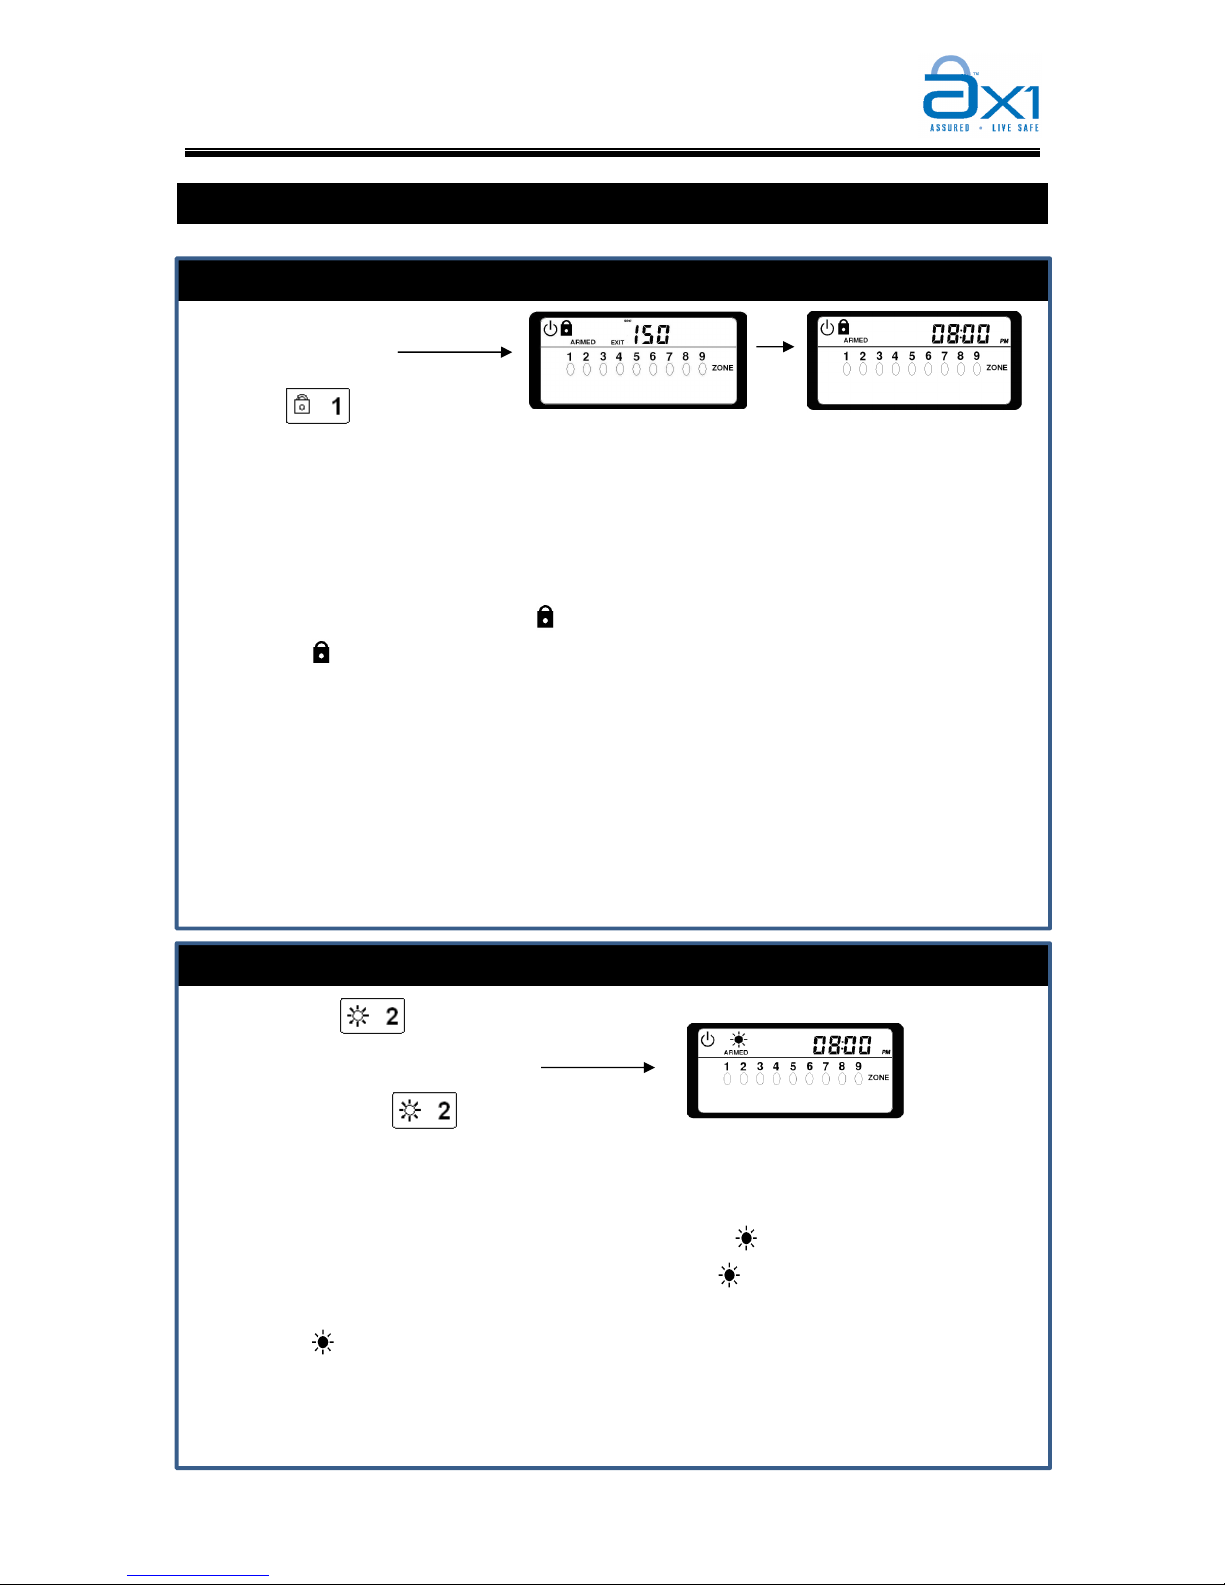
USER PROGRAMMING SUMMARY
Enter User Programming Mode [Master Pin] + [COM] + [#]
Exit User Programming Mode [BACK]
Edit Maste Pin [ ] for “PIN” + [#] + [1] + [#] + [New PIN] + [#] + [Re-enter
NEW PIN] + [#]
Add/ Edit User 2 - 7 Pin [ ] for “PIN” + [#] + [User Number] + [#] + [New PIN] + [#]
+ [Re-enter NEW PIN] + [#] + [Access Level] + [#]
Add/ Edit Guest Pin [ ] for “PIN” + [#] + [8] + [#] + [New PIN] + [#] + [Re-enter
NEW PIN] + [#] + [Access Level] + [#] + [valid days]
Edit Duress Pin [ ] for “DURESS” + [#] + [4 digti New PIN] + [#] + [Re-
enter NEW PIN] + [#]
Edit ARM Timer [ ] for “ARM” + [#]+ [Set Arm Time] + [#] + [
/
] to set
AM/PM + [#]
Edit DISARM Timer [ ] for “DISARM” + [#]+ [Set Disarm Time] + [#] + [
/
]
to set AM/PM + [#]
Delete ARM Timer [ ] for “ARM” + [#]+ [0] + [#]
Delete DISARM Timer [ ] for “DISARM” + [#]+[0] + [#]
Edit ON IO Timer [ ] for “IO ON” + [#] + [Timer Number] + [#] + [Set On
Time] + [#] + [
/
] to set AM/PM + [#]
Edit OFF IO Timer [ ] for “IO OFF” + [#] + [Timer Number] + [#] + [SET OFF
TIME] + [#] + [
/
] to set AM/PM + [#]
Delete ON IO Timer [ ] for “IO ON” + [#] + [Timer Number] + [#] + [0] + [#]
Delete OFF IO Timer [ ] for “IO OFF” + [#] + [Timer Number] + [#] + [0] + [#]
Edit ON IO Timer [ ] for “IO ON” + [#] + [Timer Number] + [#] + [SET ON
TIME] + [#] + [
/
] to set AM/PM + [#]
Edit System Clock [ ] for “CLOCK” + [#] + [Set Time] + [#] + [
/
] to set
AM/PM + [#]
Enable/Disable Installer Access [ ] for “INS AC” + [1] + [#]
Enable/Disable Fast Key Access [ ] for “FAST” + [1] + [#]
Enable/Disable Phone Line
Detection
[ ] for “PH DeT” + [1] + [#]
Enable/Disable PC COMM [ ] for “PC COM” + [1] + [#]
Page 11
AX1 ICON User Manual
8
Version 1.0
Chapter 1: System Operation
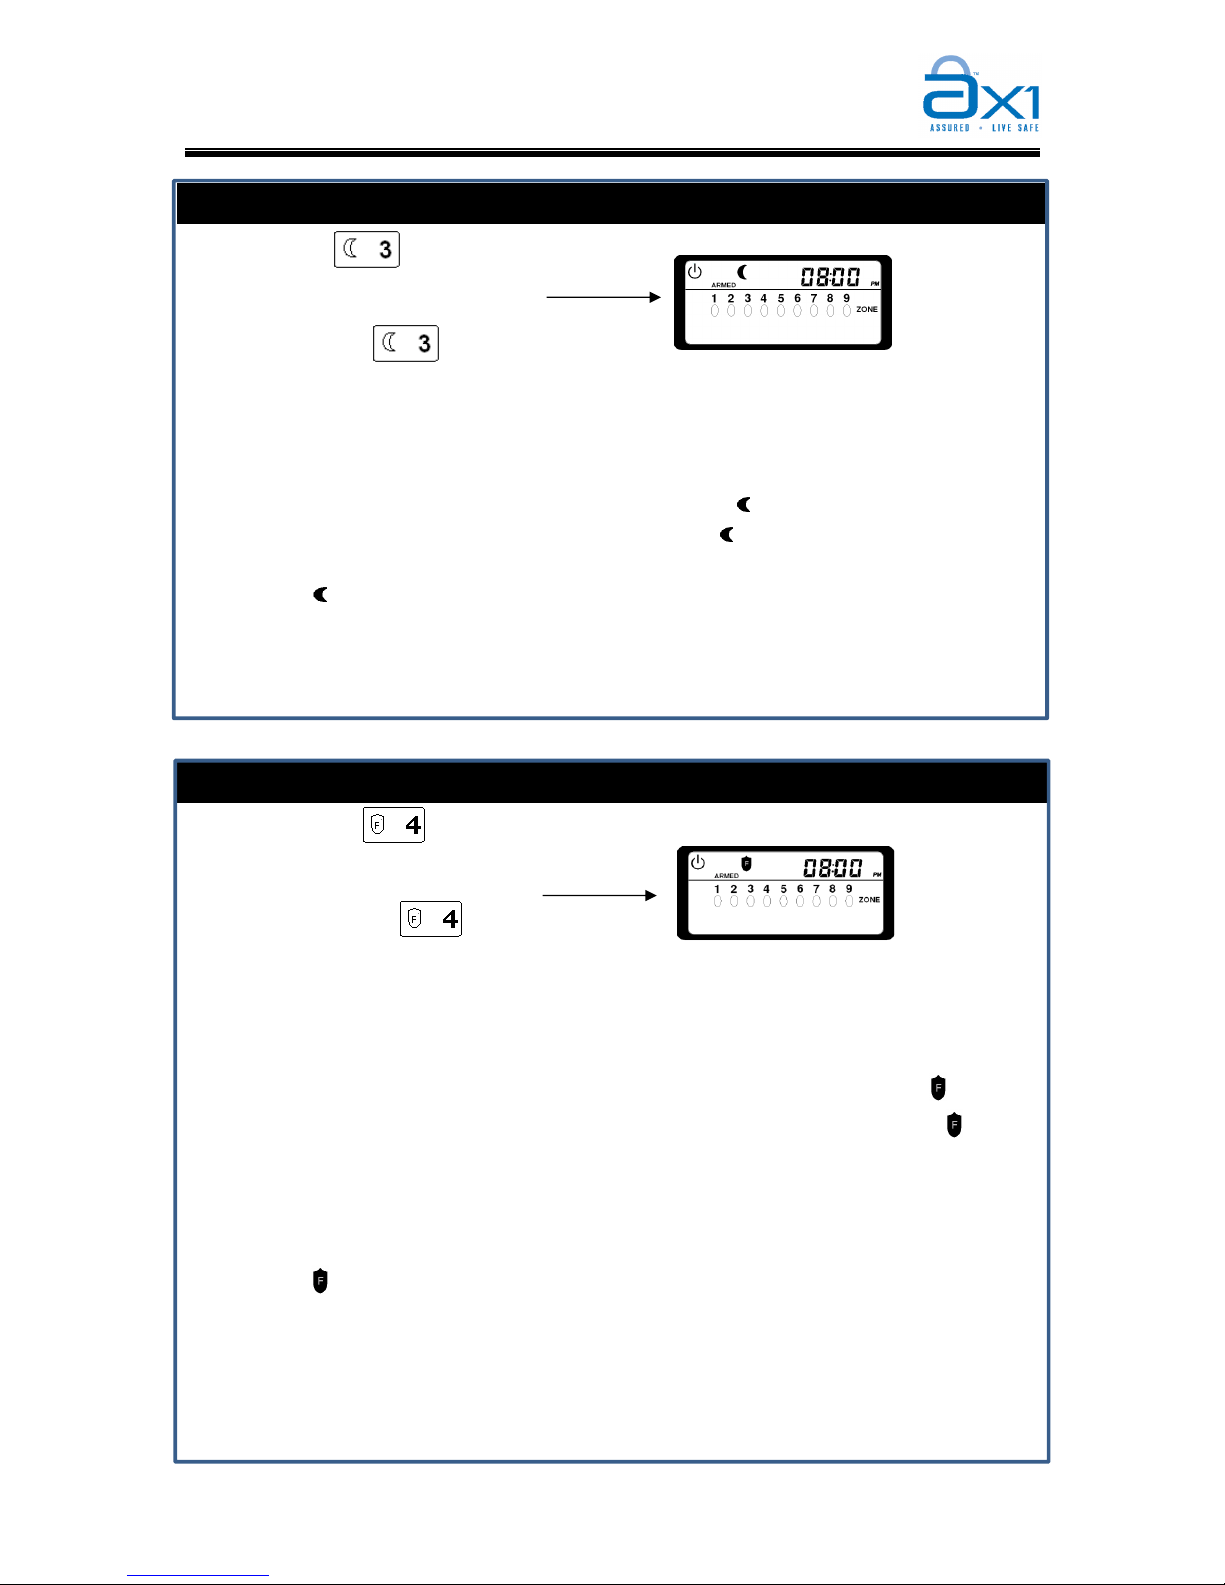
Auto Home Arming
Recommend to Use: When going to leave the premises.
1. Ensure all the protected premises are closed prior to activate auto home arming before
leaving.
2. Enter a valid [USER PIN] and follow by [#]. If fast key is enabled, user can activate
this arming mode by pressing [ ] and hold for 2s.
3. The “ ” indicator will flash with exit delay count down number showing on the
keypad display screen. Buzzer will beep on and off indicating the EXIT delay count
down in progress.
4. Leave the premises only via the DELAY zone.
5. If the DELAY Zone is remained intact after the EXIT delay [where the user is
presume still at home], system will automatically swap the Auto Home Arming to
Day Arming, with interior zone bypass.
6. User will be given an ENTRY delay time to disarm the system when enter the
premises via DELAY zone.
Day Arming
Recommend to Use: When user is at the premises.
1. Ensure all the protected premises are closed prior to activate Day arming mode.
2. User can activate this arming mode by just pressing [ ] and hold for 2s. If fast key is
disabled, enter a valid [USER PIN] and follow by [ ] and hold for 2s.
3. System will be armed instantly with Interior zone bypassed.
4. The “ ” indicator will be shown on the keypad display screen once system is
armed in Day Arming mode.
5. User will be given an ENTRY delay time to disarm the system when enter the
premises via DELAY zone.
Exit delay count down
with buzzer sound.
[User PIN] + [#]
Or
(Press and hold for 2s)
[User PIN] +
(
Press and
hold for 2s)
Or
(Press and hold for 2s)
Page 12
AX1 ICON User Manual
9
Version 1.0
Night Arming
Recommend to Use: When all family members back to home and ready to sleep.
1. Ensure all the protected premises are closed prior to activate Night arming mode.
2. User can activate this arming mode by just pressing [ ] and hold for 2s. If fast key is
disabled, enter a valid [USER PIN] and follow by [ ] and hold for 2s.
3. System will be armed instantly with Interior zone bypassed.
4. The “ ” indicator will be shown on the keypad display screen once system is armed
in Night Arming mode.
5. There is NO ENTRY delay in Night arming mode. Any violation on Delay Zone will
trigger the alarm instantly.
Force Arming
Recommend to Use: When going to leave the premises for short while with some of the
zone openned
1. If fast key is enabled, user can activate this arming mode by just pressing [ ] and
hold for 2s. If fast key is disabled, enter a valid [USER PIN] and follow by [ ] and
hold for 2s.
2. System will be armed instantly with certain violated zones to by bypassed
automatically. The violated zone will be under protection again once the zone resume
normal.
3. The “ ” indicator will be shown on the keypad display screen once system is armed
in Night Arming mode.
4. User will be given an ENTRY delay time to disarm the system when enter the
premises via DELAY zone.
[User PIN] +
(
Press and
hold for 2s)
Or
(Press and hold for 2s)
[User PIN] +
(
Press and
hold for 2s)
Or
(Press and hold for 2s)
Page 13

AX1 ICON User Manual
10
Version 1.0
Remote Control Arming
1. This arming mode can be activated via remote control unit or keyswitch arming.
(provided remote control/ key switch is installed to the system)
2. Press the remote control button or twist and release the key switch.
3. The system will be armed in Auto Home Arming mode. (Please refer to Auto Home
Arming description at page 8). Leave the permises via Delay Zone.
4. The “ARMED” indicator will be shown on the keypad display screen once system is
armed via remote control or keyswitch.
5. The Siren or Bell indicator will ON once to confirm the arming. (User may choose for
Siren indicator or Bell indicator. Please refer to Installer programming sheet.)
Timer Arming
1. The system can be programmed to automatically ARM by itself at the specific time.
2. The system will be armed in FORCE arming mode when the system timer reaches the
preset ARM TIMER time.
3. The “ARMED” indicator will be shown on the keypad display screen once system is
armed by timer.
4. Please refer to User Programming section – ARM TIMER at page 25.
Telehphone Remote Arming
1. AX1 system can be remotely ARM from outside the house through any telephone or
handphone.
2. The system will be armed in FORCE arming mode when the user enter the instruction
through telephone or handphone.
3. The “ARMED” indicator will be shown on the keypad display screen once system is
armed via telephone or handphone.
4. For details, please refer to Telephone Control Flow at page 5 or 6.
Page 14
AX1 ICON User Manual
11
Version 1.0
Disarming
When to use: To disarm the system when enter the ARMED premises through Delay
zone with ENTRY delay or to stop the alarm.
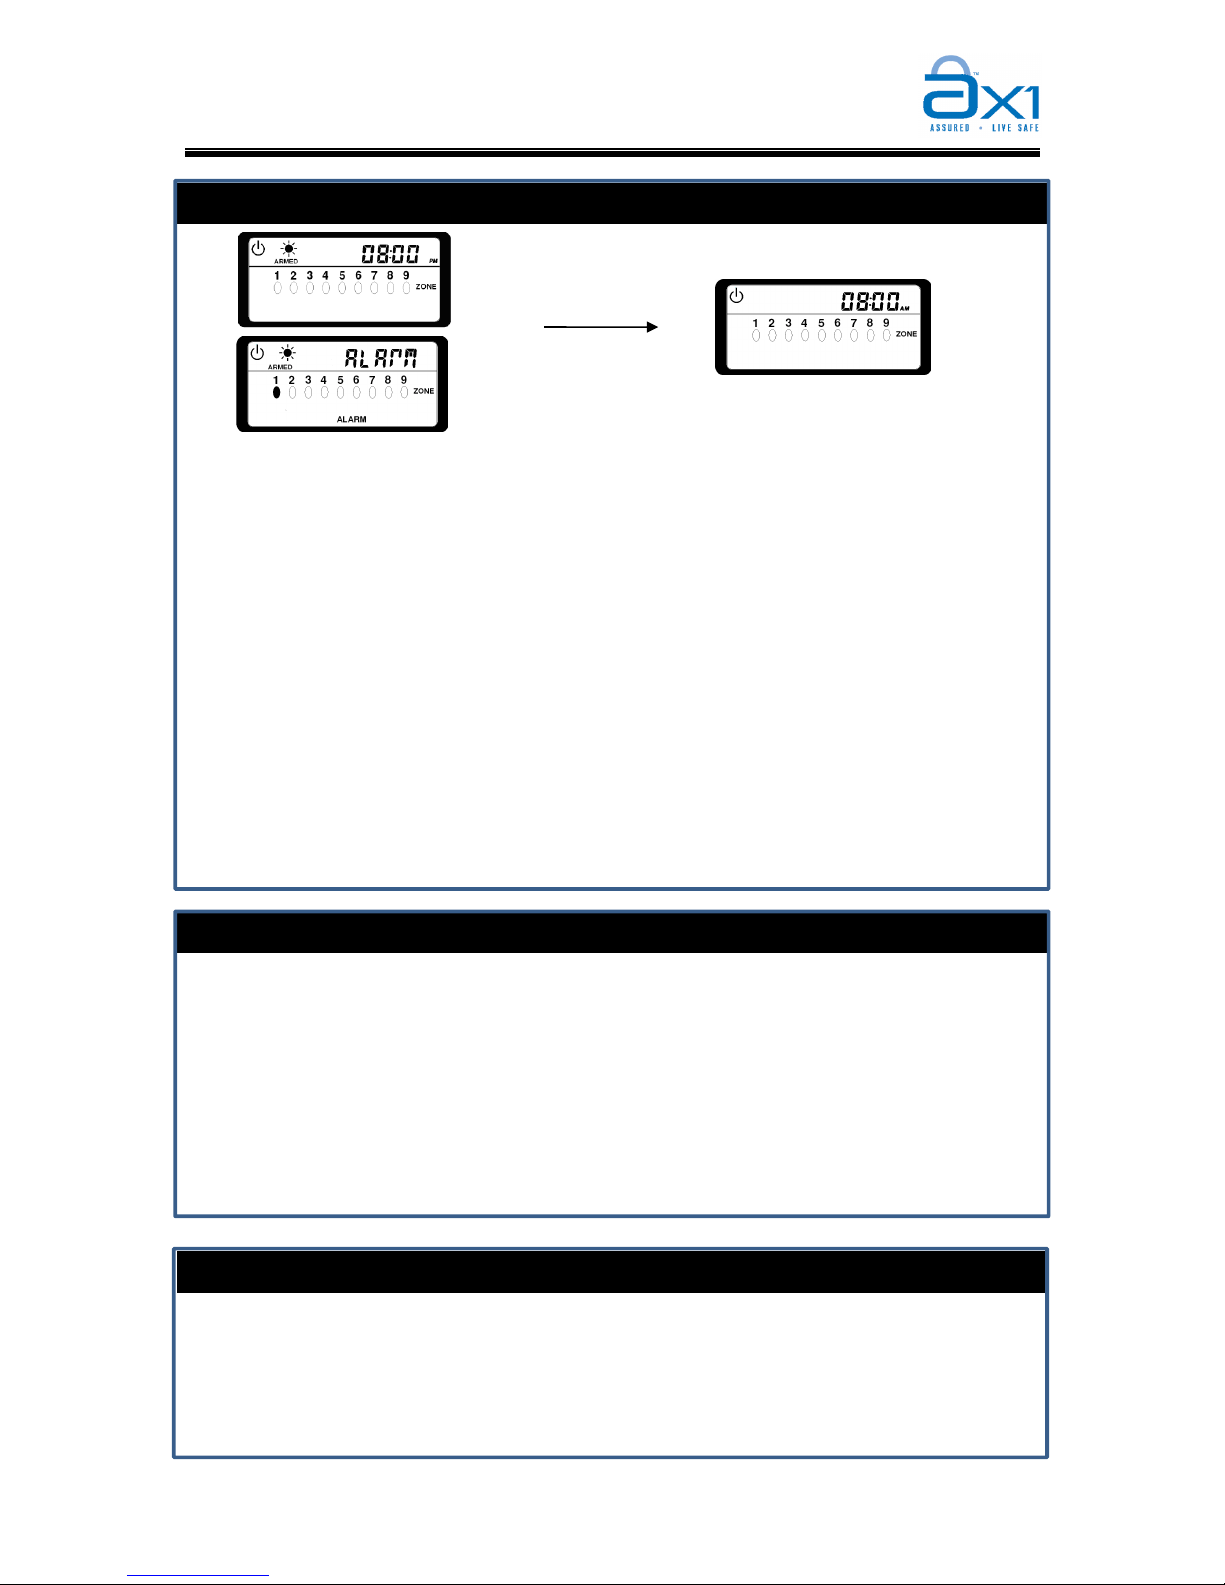
1. To disarm the system, enter a valid [User PIN] followed by [#] before ENTRY delay
expired.
2. If no valid user code has been entered by the end of the ENTRY delay count down,
ALARM will be triggered.
3. Buzzer acceptance tone will be played if the system is successfully disarmed and the
“ARMED” indicator will extinguish.
4. If the ALARM is triggered, user can stop the BELL and SIREN by disarming the
system.
5. The violated ZONE indictor will continue flashing after system disarms till user has
cleared the alarm memory. [refer to page 14]
Remote Control Disarming
1. This system can be disarmed by pressing the remote control unit or twist and release
the keyswitch. (provided Remote control/ key switch is installed to the system)
2. The “ARMED” indicator will extinguish and the Siren or Bell indicator will ON twice
to confirm the arming. (User may choose for Siren indicator or Bell indicator. Please
refer to Installer programming sheet.)
3. If the “ARMED” indicator remains illuminated, press the remote control button or
twist and release the key switch again.
Timer Disarming
1. The system can be programmed to automatically DISARM by itself at the specific
time.
2. The “ARMED” indicator will extinguish once system is disarmed by timer.
3. Please refer to User Programming section – DISARM TIMER at page 25
[User PIN] + [#]
Page 15
AX1 ICON User Manual
12
Version 1.0
Telepone Remote Disarmimg
1. AX1 system can be remotely DISARM from outside the house through any telephone
or handphone.
2. The “ARMED” indicator will extinguish once system is disarmed by telephone or
handphone.
3. For detail, please refer to Telephone Control Flow at page 5 or 6.
Automation Control (Individual Control)
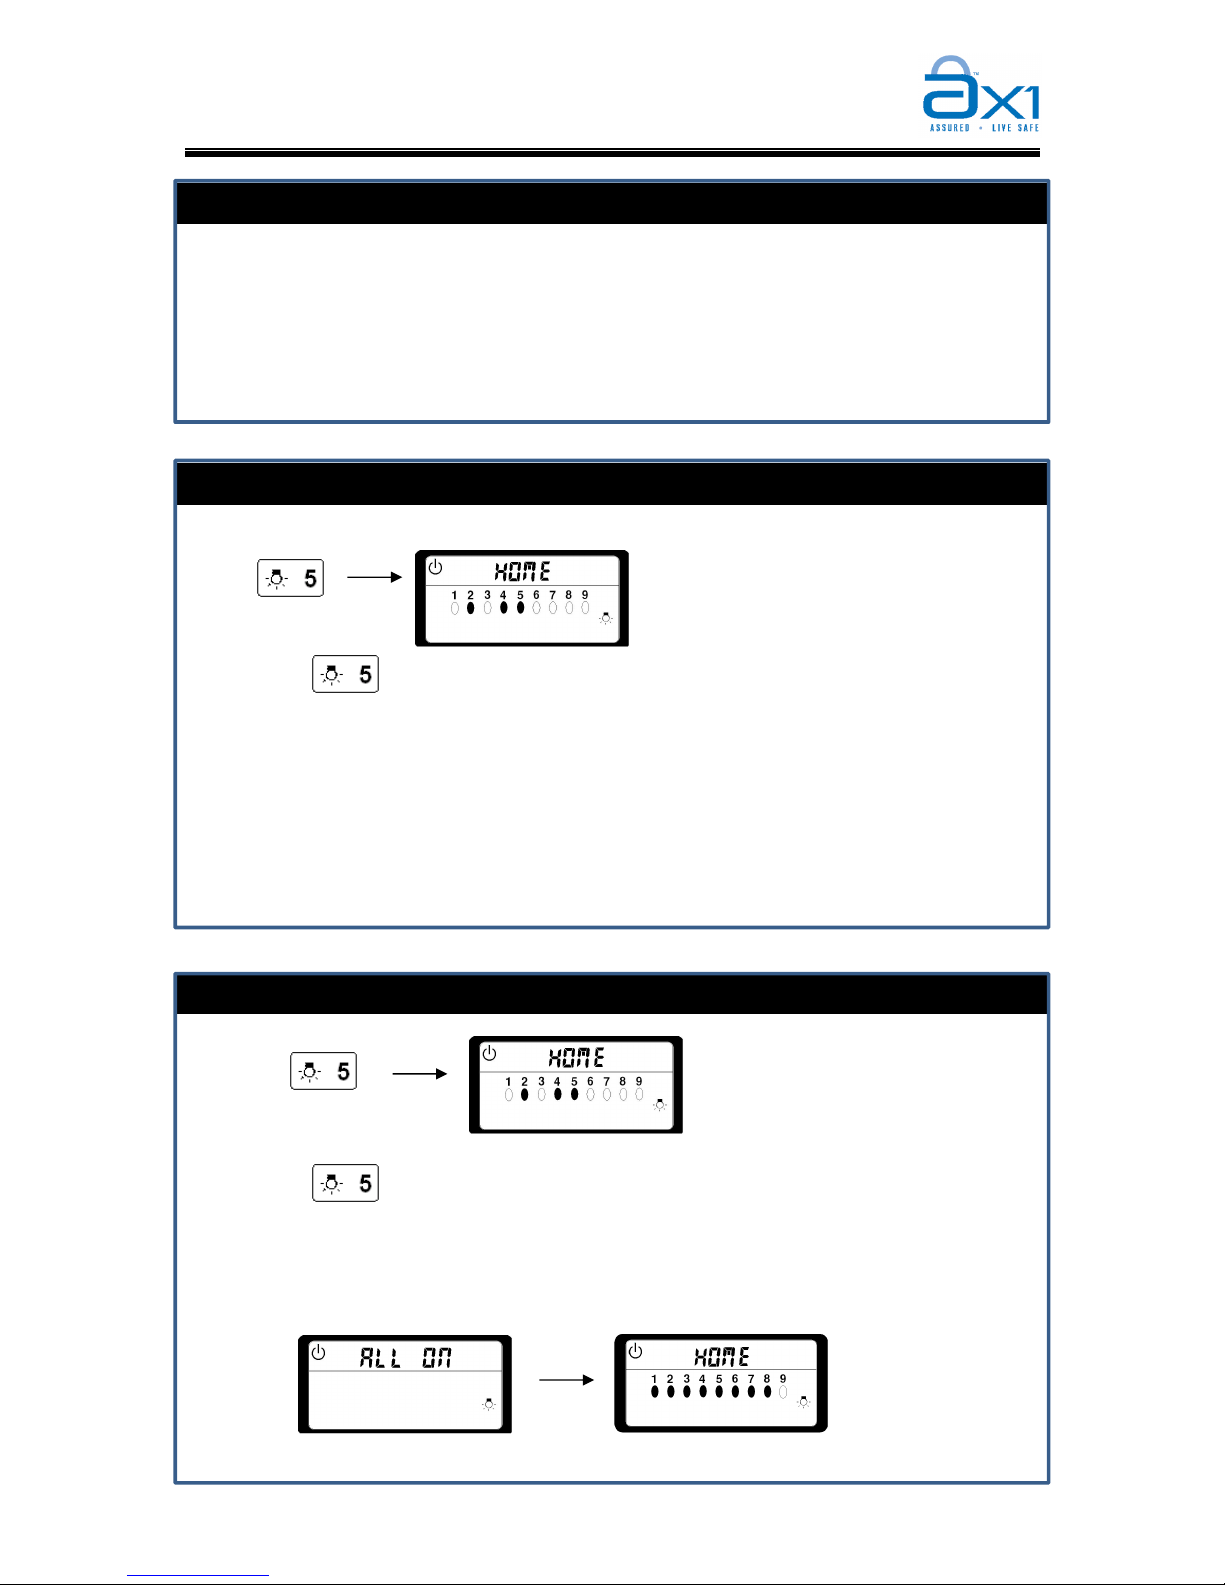
1. Press
and hold for 2 seconds.
2. The keypad display screen show HOME with status of output 1-8.
3. Zone indicators 1 to 8 will turn ON if the respective outputs are ON.
4. Zone indicators 1 to 8 will turn OFF if the respective outputs are OFF.
5. Enter the desired output number to ON/OFF that particular atuotmation. Keypad
buzzer will beep twice once the instruction is accepted. The respective output will
turn ON/OFF and the latest output status will show on keypad screen.
6. Press [BACK] key to exit.
Automation Control (ON All)
1. Press
and hold for 2 seconds.
2. The keypad display screen show HOME with output 1-8 status.
3. Enter [0] and follow by [#] to confirm the instruction. Output 1 to 8 will turn ON one
by one and and keypad display screen will show the latest output status.
4. Press [BACK] key to exit.
(Press and hold for 2s)
(
1 to 8
)
+ [Output Numbers]
(Press and hold for 2s)
+ [0] + [#]
(When [0] is entered)
(When [#] is entered)
Page 16
AX1 ICON User Manual
13
Version 1.0
Automation Control (Off All)
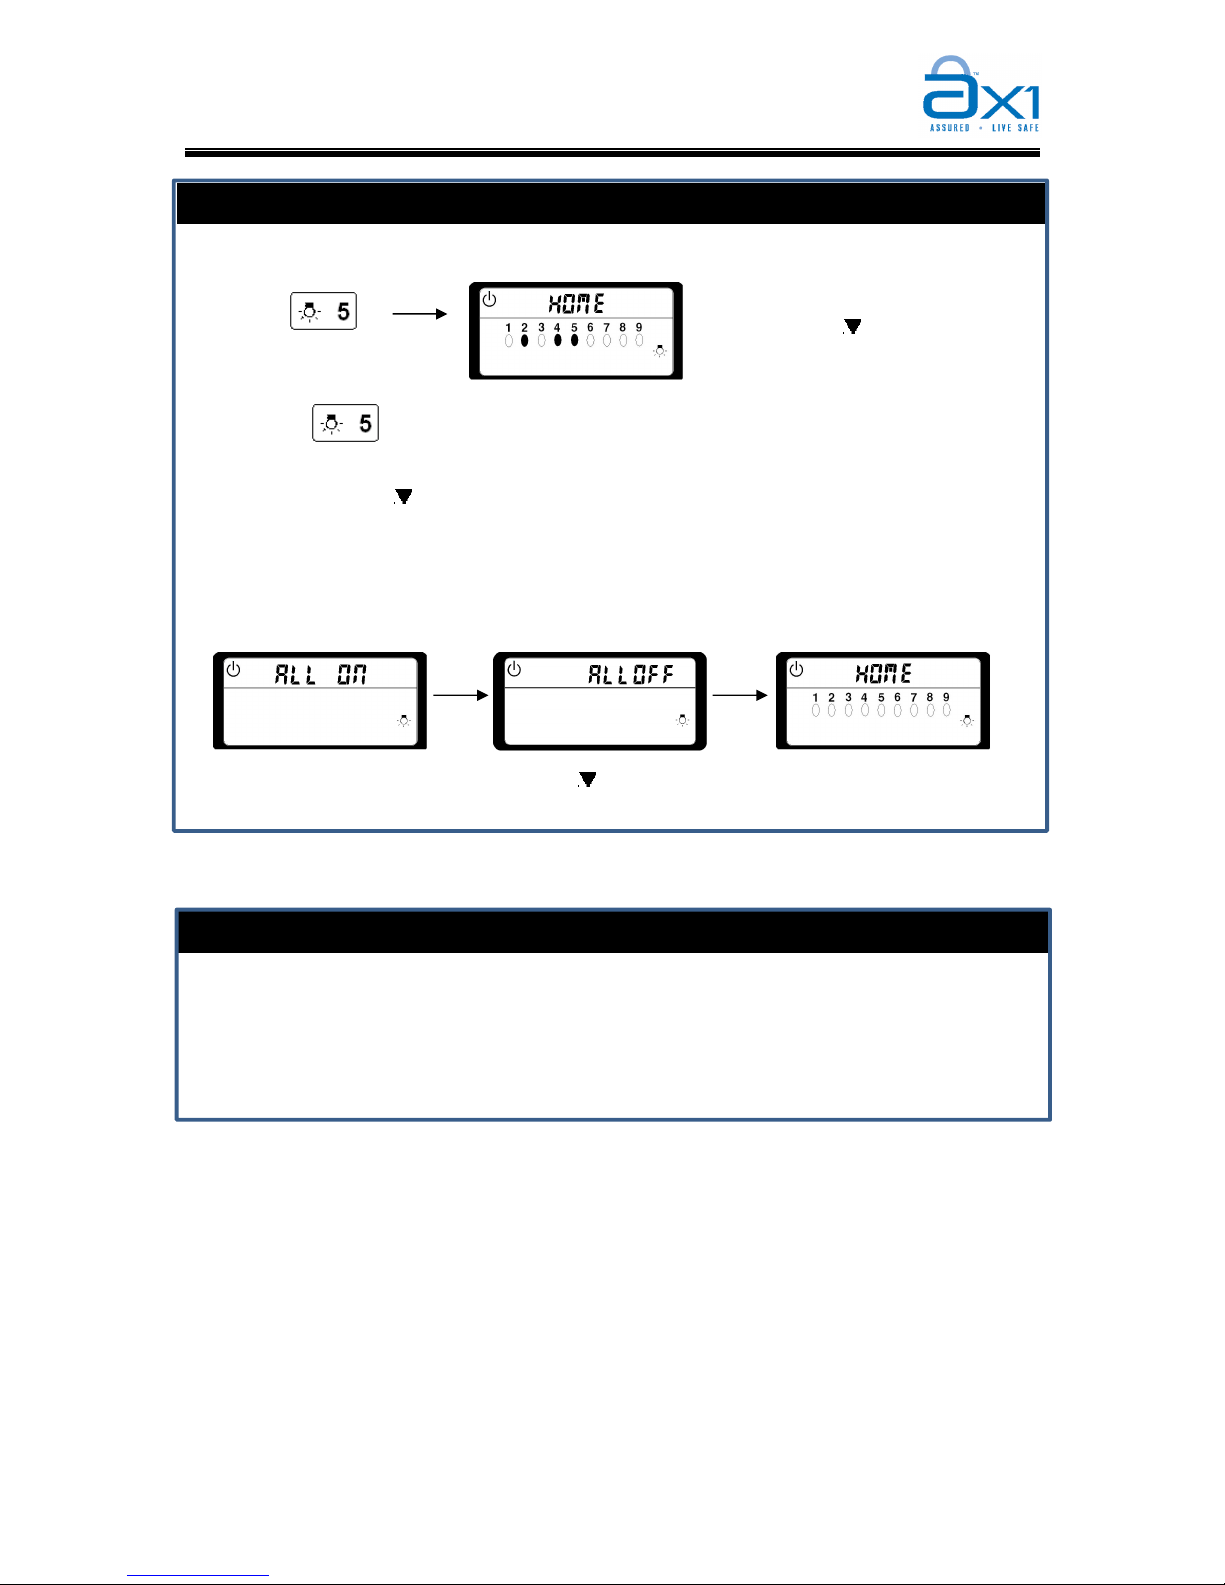
1. Press
and hold for 2 seconds.
2. The keypad display screen show HOME with status of output 1-8.
3. Enter [0] then [
] to scroll to page ALL OFF, followed by
[#] to confirm the instruction.
Output 1 to 8 will turn OFF and keypad display screen will show the latest output
status.
4. Press [BACK] key to exit.
Timer Automation Control
1. The system can be programmed to ON or OFF automation point by itself at the
specific time.
2. Please refer to User Programming section – PROGRAM AUTO ON and PROGRAM
AUTO OFF at page 23.
(Press and hold for 2s)
+ [0] + [ ] + [#]
(When [0] is entered)
(When [#] is entered)
(When [ ] is entered)
Page 17
AX1 ICON User Manual
14
Version 1.0
Clear Alarm Memory
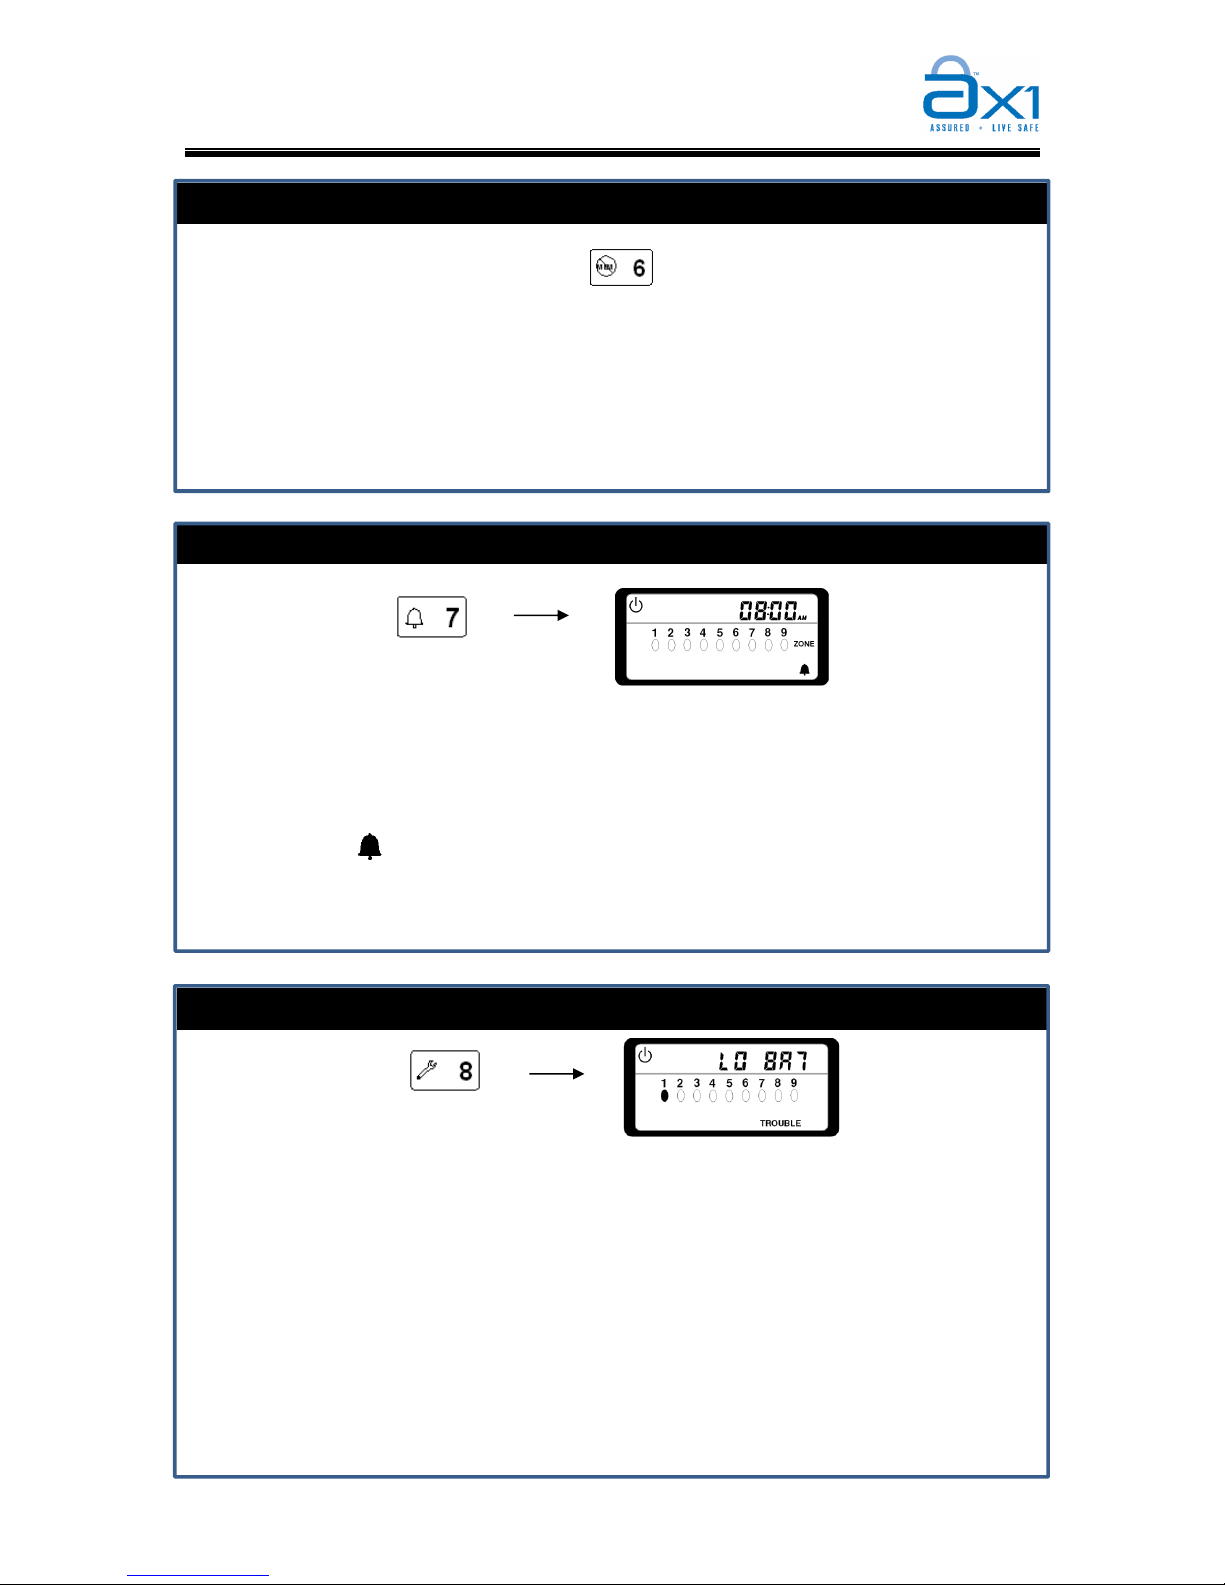
1. The keypad display screen will show the most recent alarm that triggered with one or
more ZONE indicators slow flash.
2. The Strobe lights will turn OFF when the user enter CLEAR ALARM MEMORY
mode.
Zone Chime
1. Zone chime allows user to monitor the zones while the system is disarmed. The
keypad buzzer indicator will beep once when there is zone violation, where the
SIREN will not turn ON.
2. Keypad buzzer acceptance tone will sound when user press [7] and hold for 2s.
3. Indicator “ ” will illuminate if the zone chime is enabled, or the indicator will
extinguish if zone chime is disabled.
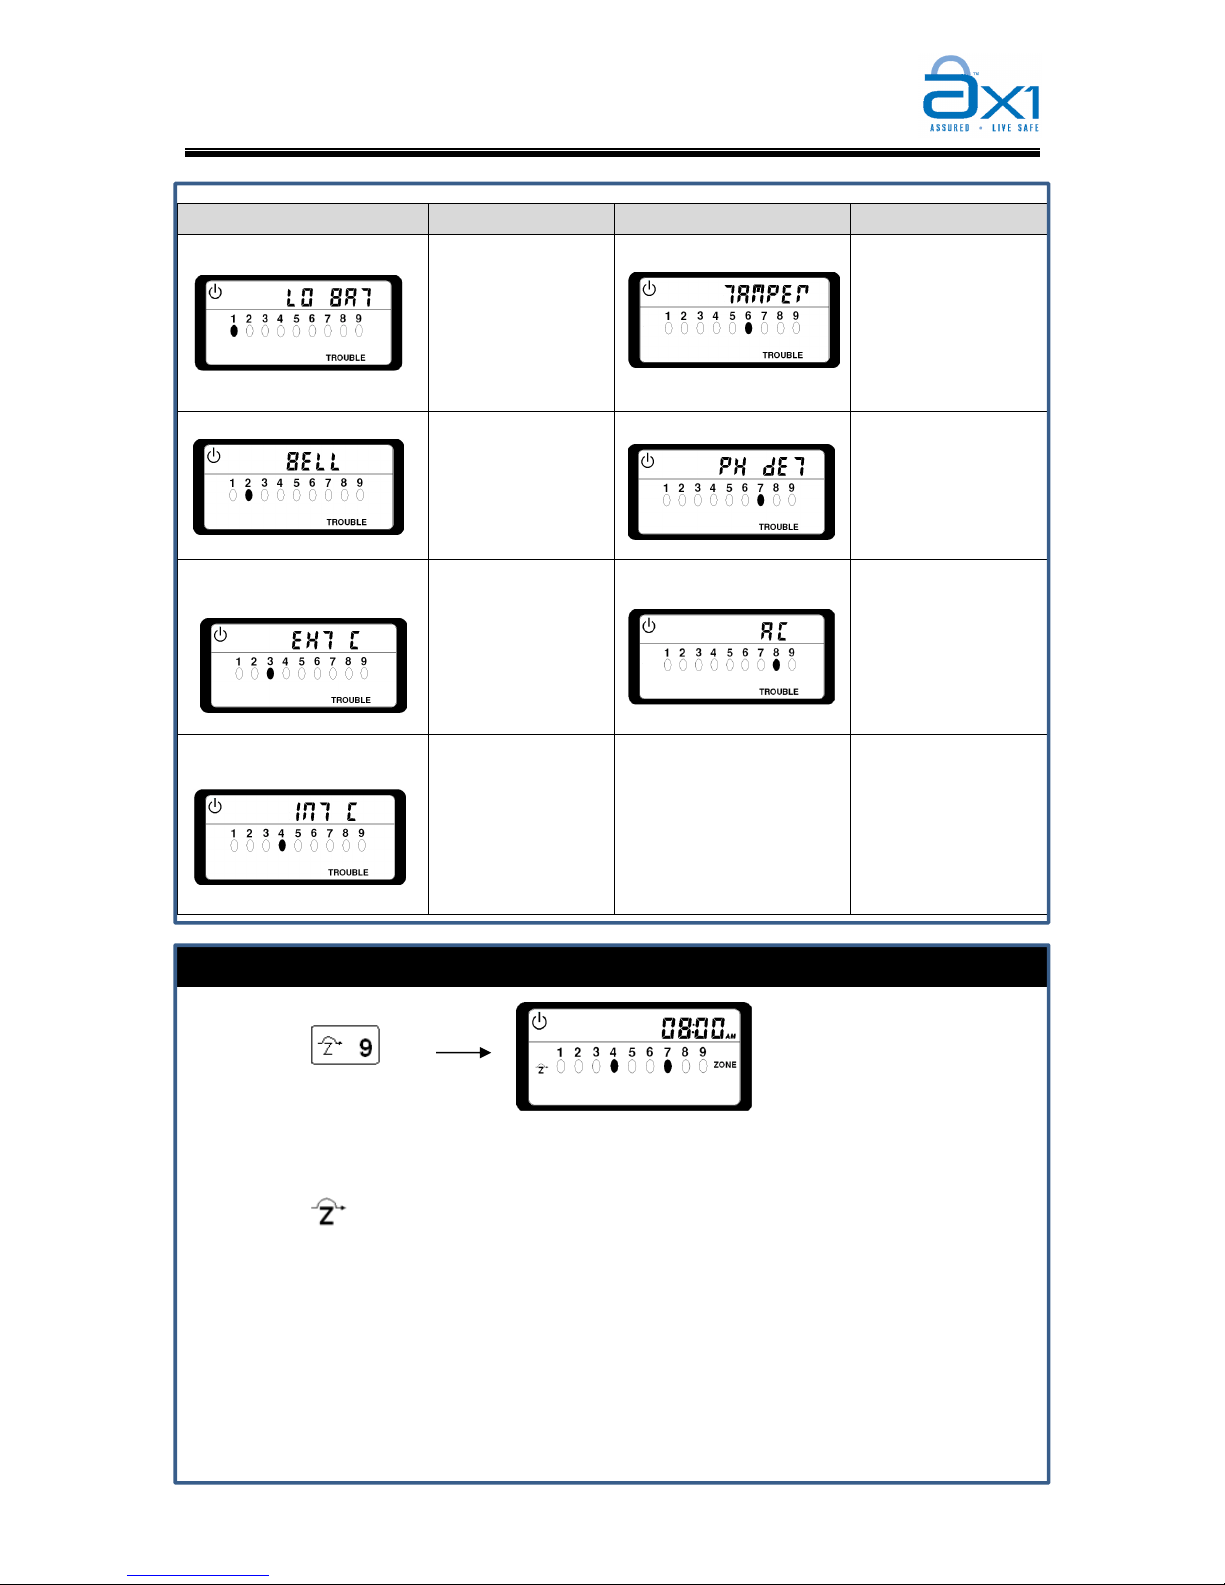
View Trouble
1. The system will monitor a number of possible trouble conditions. If any of the
conditions occur, the “TROUBLE” indicator will appear on keypad display.
2. The “TROUBLE” indicator will be illuminated until the trouble has been resolved.
3. Press and hold key [8] for 2s to view the trouble list.
4. The “TROUBLE” indicator will slow flash and keypad buzzer will sound 2 beeps.
5. One or more ZONE indicators will turn ON to indicate which trouble has occurred.
6. To view the trouble description, just press the key number corresponding to the zone
with indicators ON. The trouble description will illuminate on keypad display screen.
[Refer to table in next page]
7. Press [BACK] key to exit.
(Press and hold for 2s)
(Press and hold for 2s)
(Press and hold for 2s)
Page 18
AX1 ICON User Manual
15
Version 1.0
Bypass / Un -bypass Zone
1. To bypass zone, the system must in normal mode.
2. Press and hold key [9] for 2 seconds.
3. The “ ” indicator will illuminate at left bottom and keypad buzzer will beep twice.
ZONE indicators 1 to 8 will turn ON if the respective zone is already bypassed.
ZONE indicators 1 to 8 will turn OFF if the respective zone is un-bypass.
4. Press the zone number that needs to be bypassed/un-bypass. Keypad buzzer will
beeps twice upon acceptance. Repeat this step to bypass/un-bypass other zones.
5. Press [BACK] key to exit.
6. The bypassed zone slow slow flash to indicate that the zone is bypassed now.
7. All bypassed zone will automatically resume normal (unbypassed) when the system is
disarmed. User must re-excute the bypass process before next arming.
Trouble Causes Trouble Causes
[1] DC Loss
Backup battery
weak or backup
battery not
available
[6] Tamper
Tamper occurred
and has not been
cleared by alarm
memory clear
[2] Bell Strobe Siren Loss
Bell, strobe or
siren is loss.
[7] Phone Line Loss
No phone line
connected to the
system
[3] External
Communication Error
Unable to call out
either due to no
reply by user
during reporting.
[8] AC Loss
No power supply
detected
[4] Internal
Communication Error
ICON keypad
cannot
communicate
with main panel.
Please check
wiring.
(Press and hold for 2s)
+ [Zone Numbers]
(
1 to 8
)
Page 19
AX1 ICON User Manual
16
Version 1.0
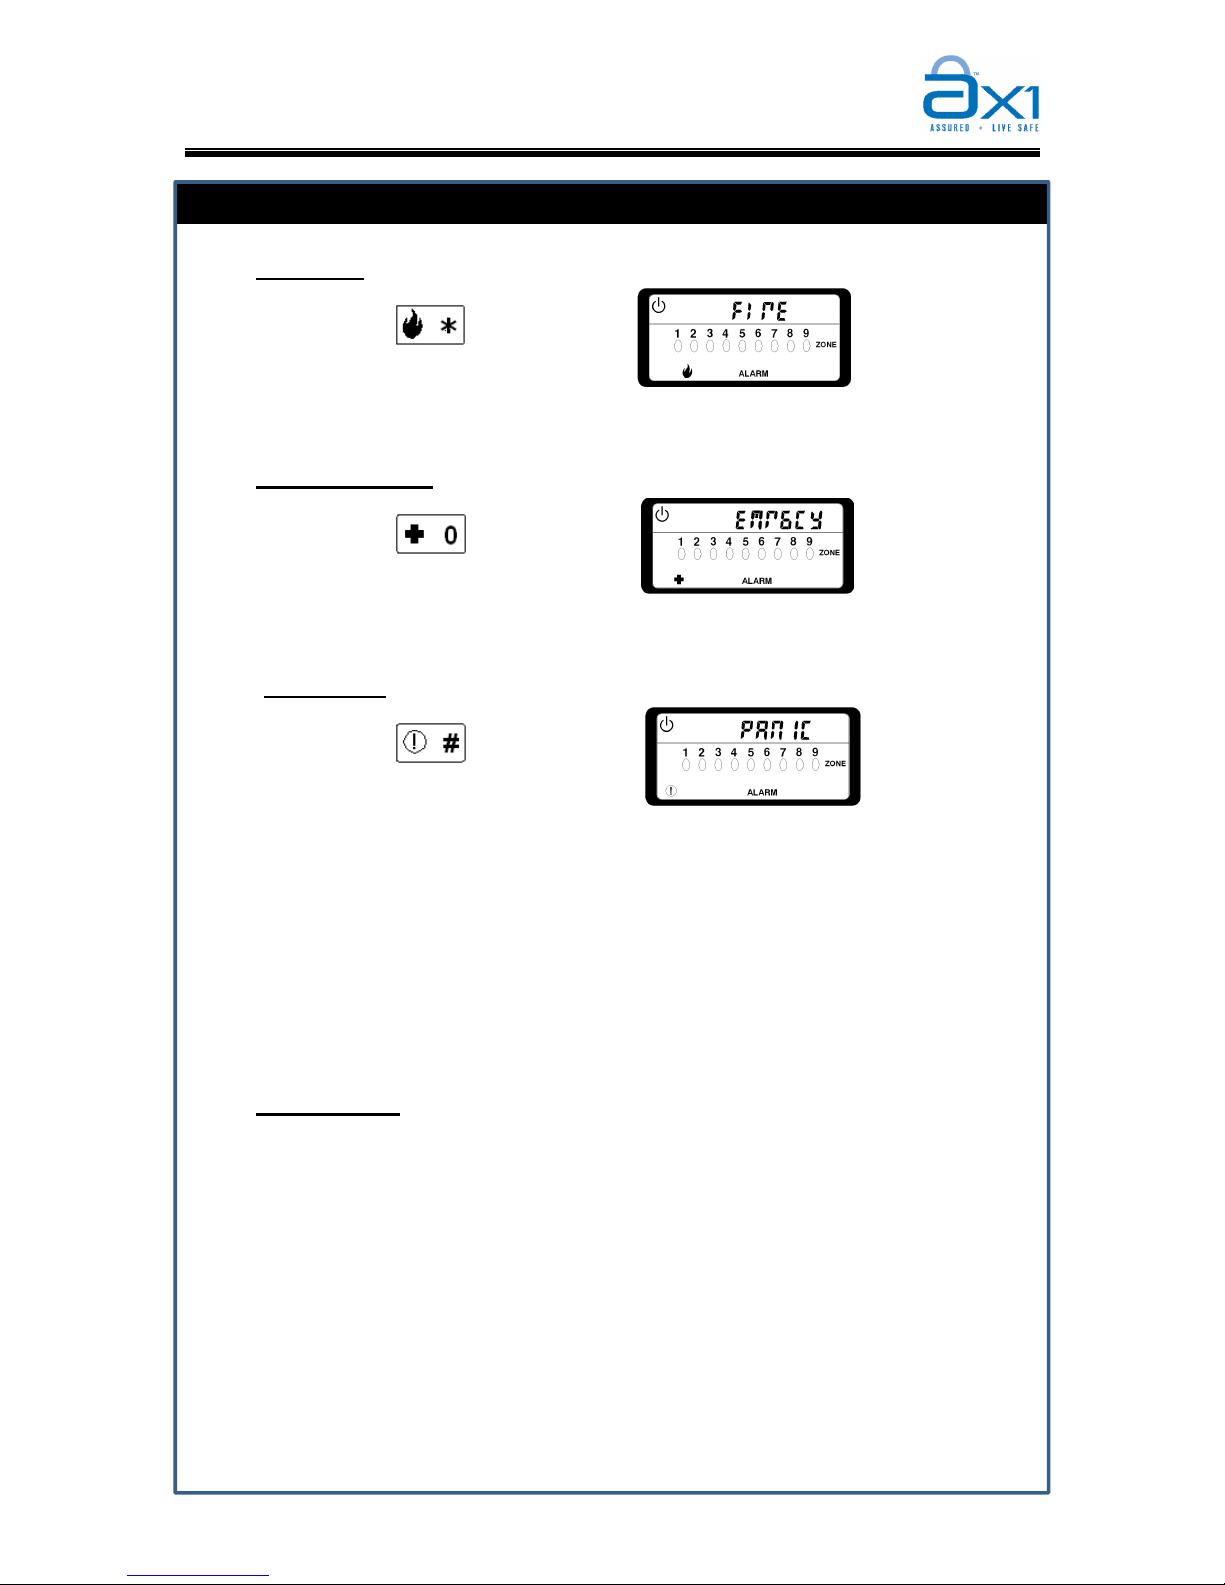
Emergency Situation
(A) Fire Alarm
(B) Emergency Alarm
(C) Panic Alarm
1. These softzone keys will trigger the Fire, Emergency or Panic alarm respectively.
2. The Siren will sound and the reporting will be sent to user or central monitoring
station.
3. Enter a valid User PIN and followed by [#] key to stop the siren.
4. The softzone key can be deactivated to prevent mis-used. [Refer to installer
programming sheet]
(D) DURESS Code
1. In the event of where the user is forced by the intruder or robber to disarm the alarm
system, user can disarm the alarm system by using 4 digits Duress Code.
2. By pressing Duress Code, system will be disarmed. However, a silent signal will be
sent to any designated telephone number or central monitoring station (CMS) to call
for help. (* Provided the system is connected to CMS).
3. The siren and strobe will not be activated.
4. It is advisable to choose a code that can be easily remembered. To edit the duress
code, please refer to page 22.
(Press and hold for 2s)
(Press and hold for 2s)
(Press and hold for 2s)
Page 20
AX1 ICON User Manual
17
Version 1.0
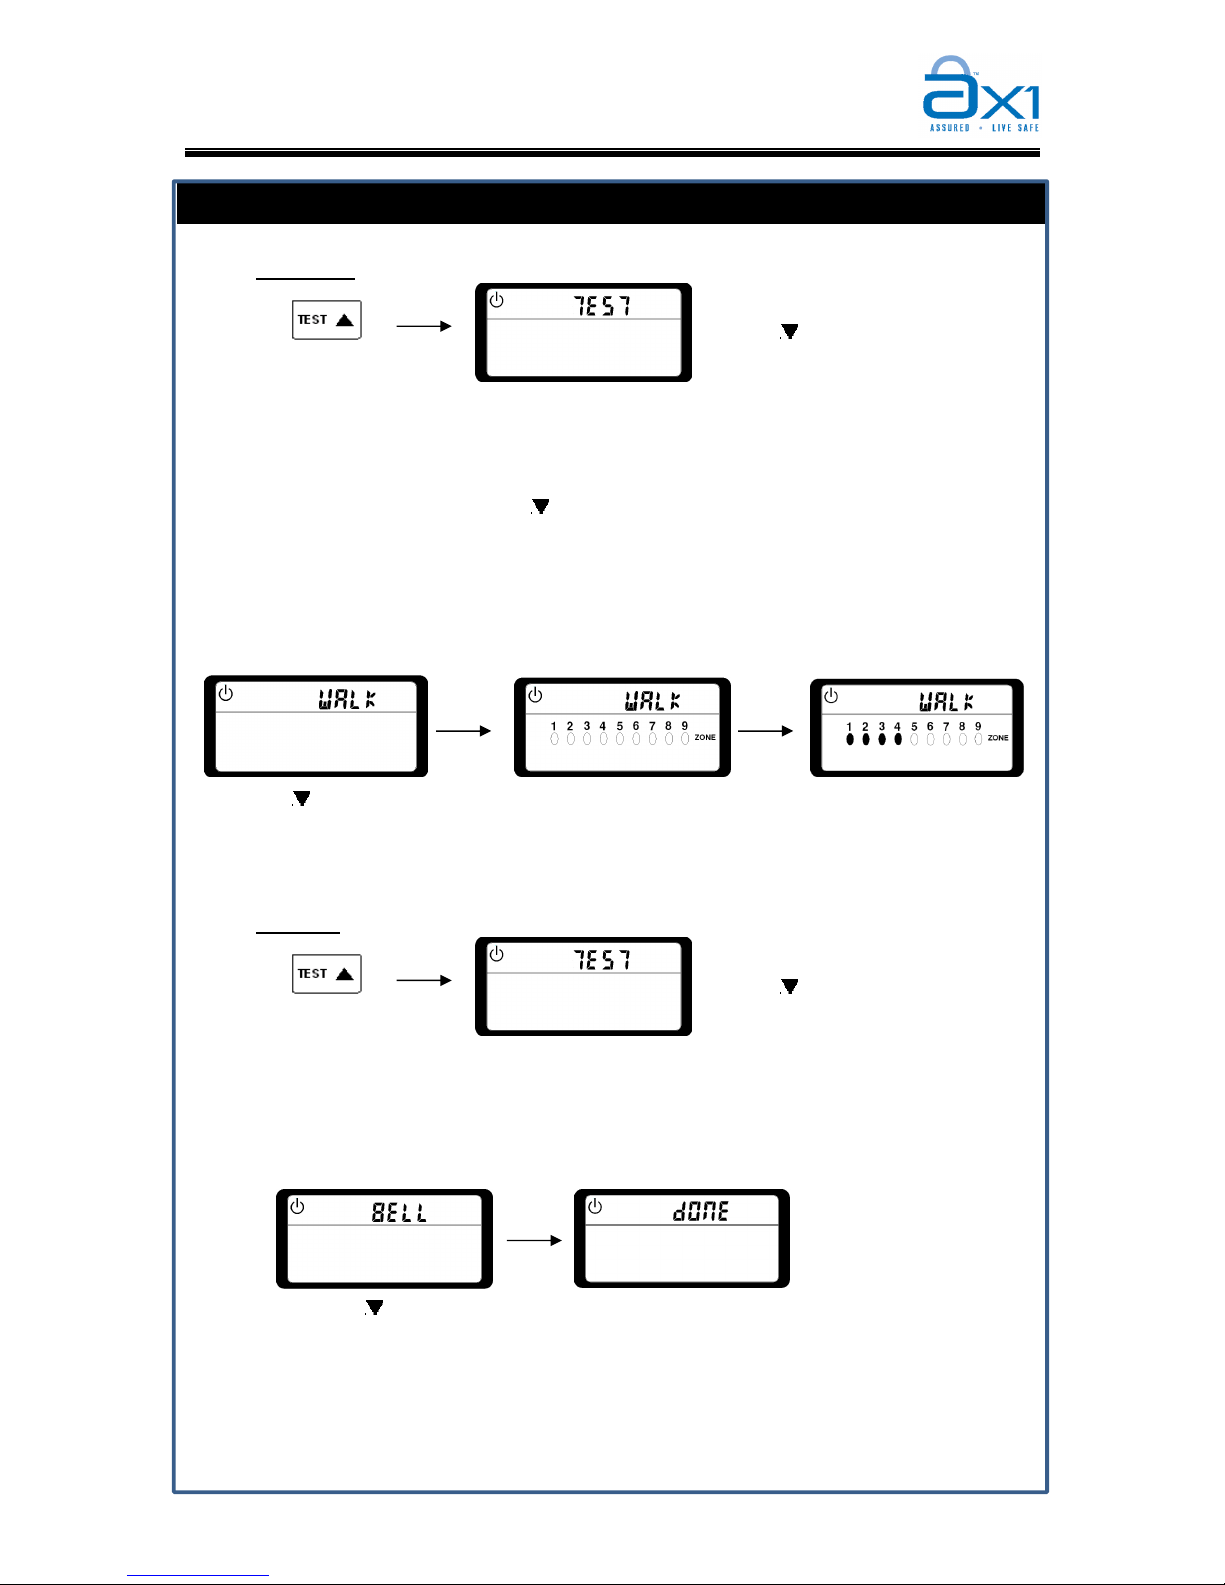
System Test Mode
(A) Walk Test
2. Press [TEST] key, then press [ ]
to scroll to WALK Test and followed by [#] key to enter
the mode.
3. Each time zone faulted, siren will sound for 2s and the corresponding zone light will
fast flash with keypad buzzer beeping.
4. To exit walk test, press [BACK] key.
(B) Bell Test
1. Bell test allow on-site testing for siren & bell functionality.
2. Siren and bell will sound for 3 seconds.
3. If siren or bell does not sound, consult your system installer.
1. Walk test allow on-site testing for each zone of the system.
(Press and hold for 2s)
+ [ ] + [#]
(When [] is entered)
(When [#] is entered)
(Walk Test in progress)
(Press and hold for 2s)
+ [ ] + [#]
(2 times)
(When [] is entered)
(When [#] is entered)
Page 21
AX1 ICON User Manual
18
Version 1.0
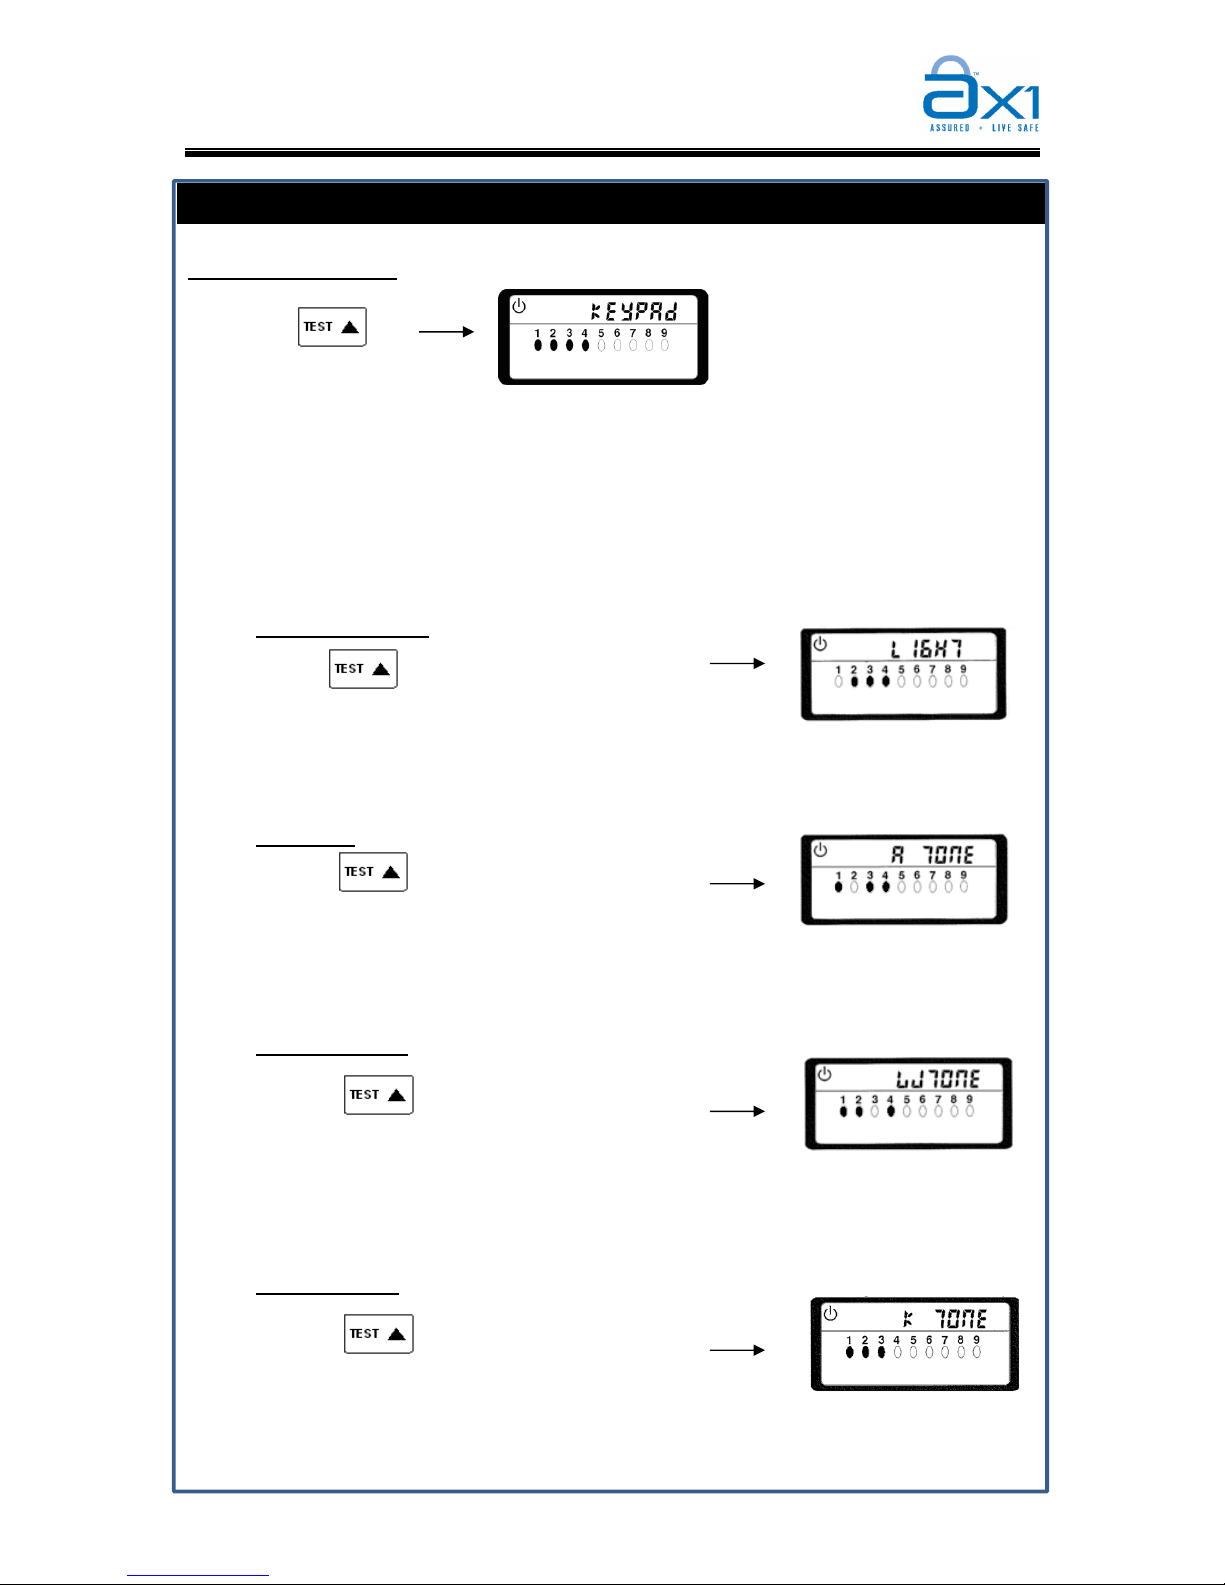
Keypad Setting Mode
Keypad Setting Mode
1. There are total 4 allowable setting for user to turn ON/OFF.
2. By default all these 4 options (Keypad Backlight, Arm Tone, Pre-warn Tone and
Keypress Tone) are turn ON.
3. Indicator ZONE will illuminate if the respective setting is ON.
4. Indicator ZONE will extinguish if the respective setting is OFF.
5. To turn ON/OFF all at once, enter [0] and followed by [#]
(A) Keypad Bakclight
1. To turn ON/OFF the keypad backlight, press [TEST] and hold for 2s, followed by [1]
and [#] to confirm the command.
(B) Arm Tone
1. To turn ON/OFF the Arm Tone, press [TEST] and hold for 2s, followed by [2] and [#]
to confirm the command.
(C) Pre-Warn Tone
1. To turn ON/OFF the pre-warn tone (Exit/Entry delay buzzer sound), press [TEST]
and hold for 2s, followed by [3] and [#] to confirm the command.
(D) Keypress Tone
1. To turn ON/OFF the keypress tone, press [TEST] and hold for 2s, followed by [4] and
[#] to confirm the command.
(Press and hold for 2s)
+ [1] + [#]
(Press and hold for 2s)
+ [2] + [#]
(Press and hold for 2s)
+ [3] + [#]
(Press and hold for 2s)
(Press and hold for 2s)
+ [4] + [#]
Page 22
AX1 ICON User Manual
19
Version 1.0
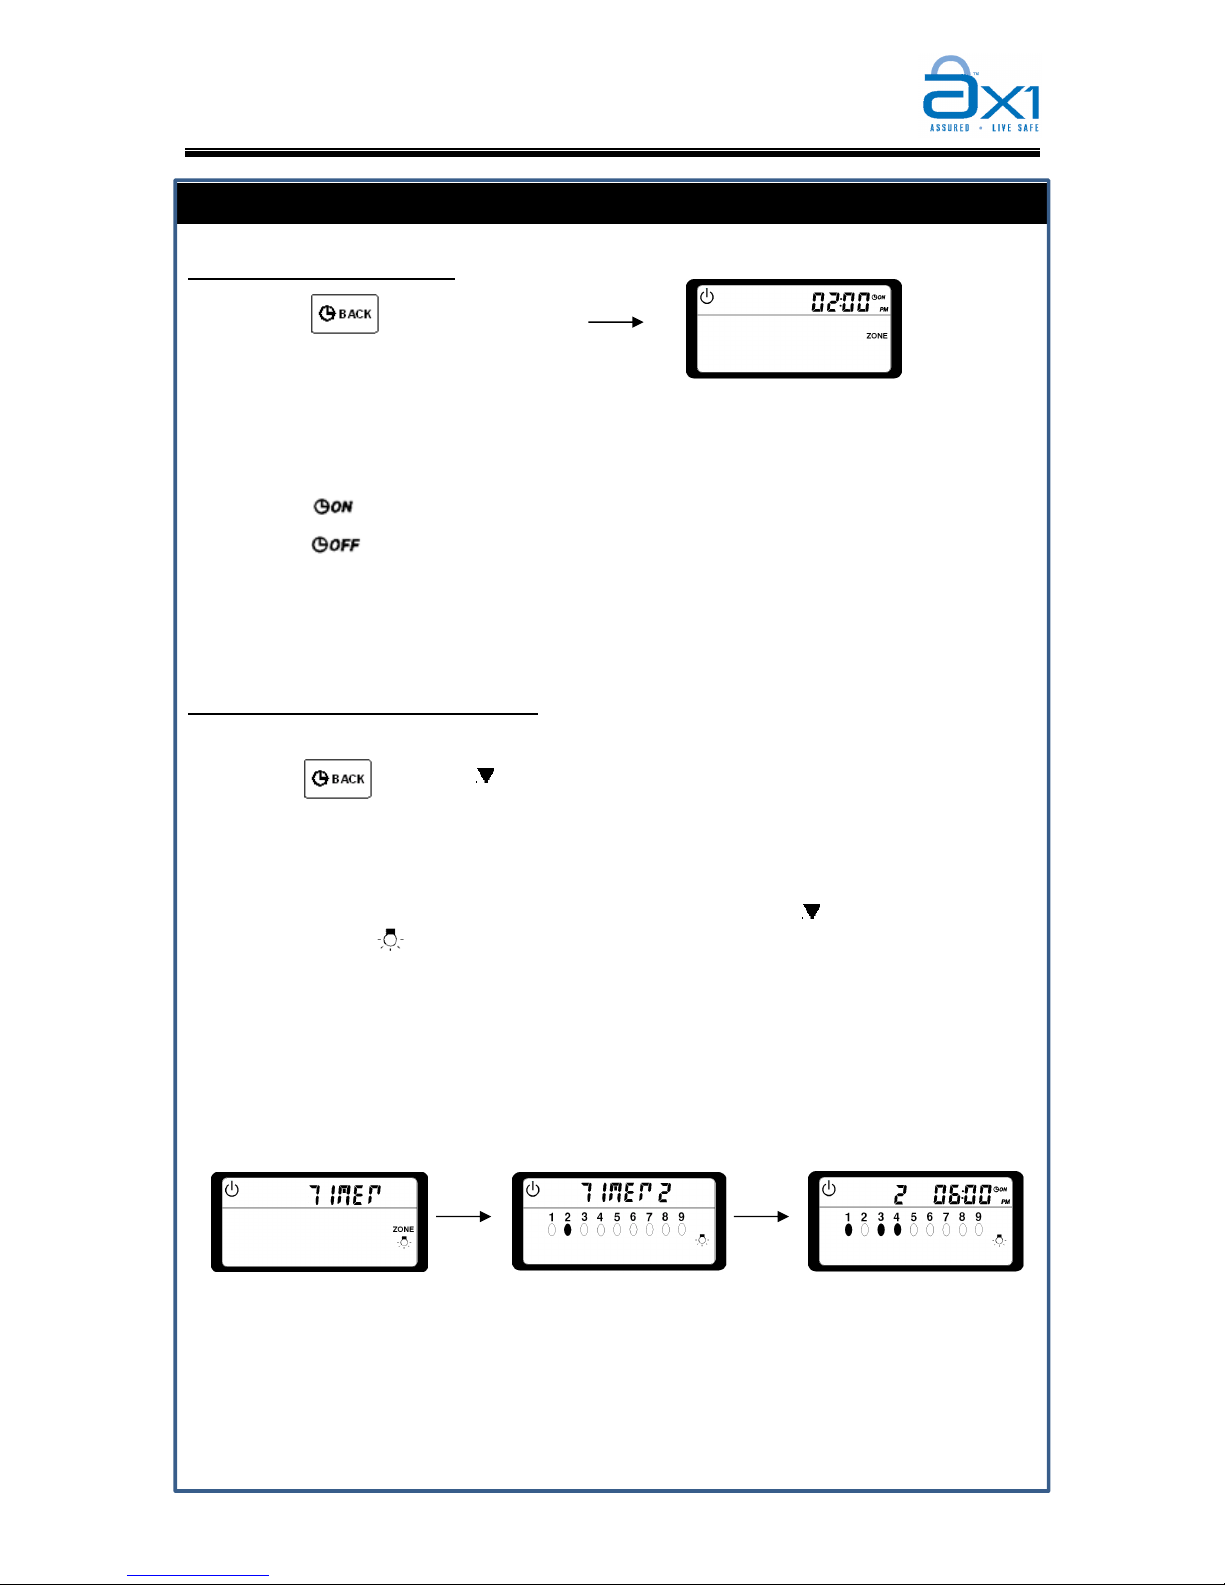
View Timer Mode
View Arm & Disarm Timer
1. User can view the preprogrammed ARM and DISARM timer setting.
2. Press [BACK] and hold for 2s, followed by [#].
3. Keypad display screen will show the ARM and DISARM timer setting.
4. The “ ” indicator represent ARM timer
5. The “ ” indicator represent DISARM timer.
6. If the timer was deactivated, keypad will show 12:00am.
7. Press [BACK] key to exit
View ON & OFF Automation Timer
1. User can view the preprogrammed ON and OFF automation timer setting.
2. Press [BACK] and hold for 2s, followed by [#]. Then press [ ] to choose ON OFF
Timer. The “ ” indicator will flash now.
3. Enter timer number 1 to 4 that you wish to view, followed by [#].
4. Keypad display screen will now show the ON timer setting follow by OFF timer
setting. Outputs that activate by the respective timer will be illuminated at ZONE
indicators.
5. If the timer was deactivated, keypad will show 12:00am.
6. Press [BACK] key to exit.
(Press and hold for 2s)
+ [#]
(Press and hold for 2s)
+ [ ] + [Timer Number] + [#]
(1 to 4)
(When press [BACK] and
hold for 2s)
(When enter Timer number [2])
(When enter [#])
Page 23
AX1 ICON User Manual
20
Version 1.0
CHPTER 2: USER PROGRAMMING
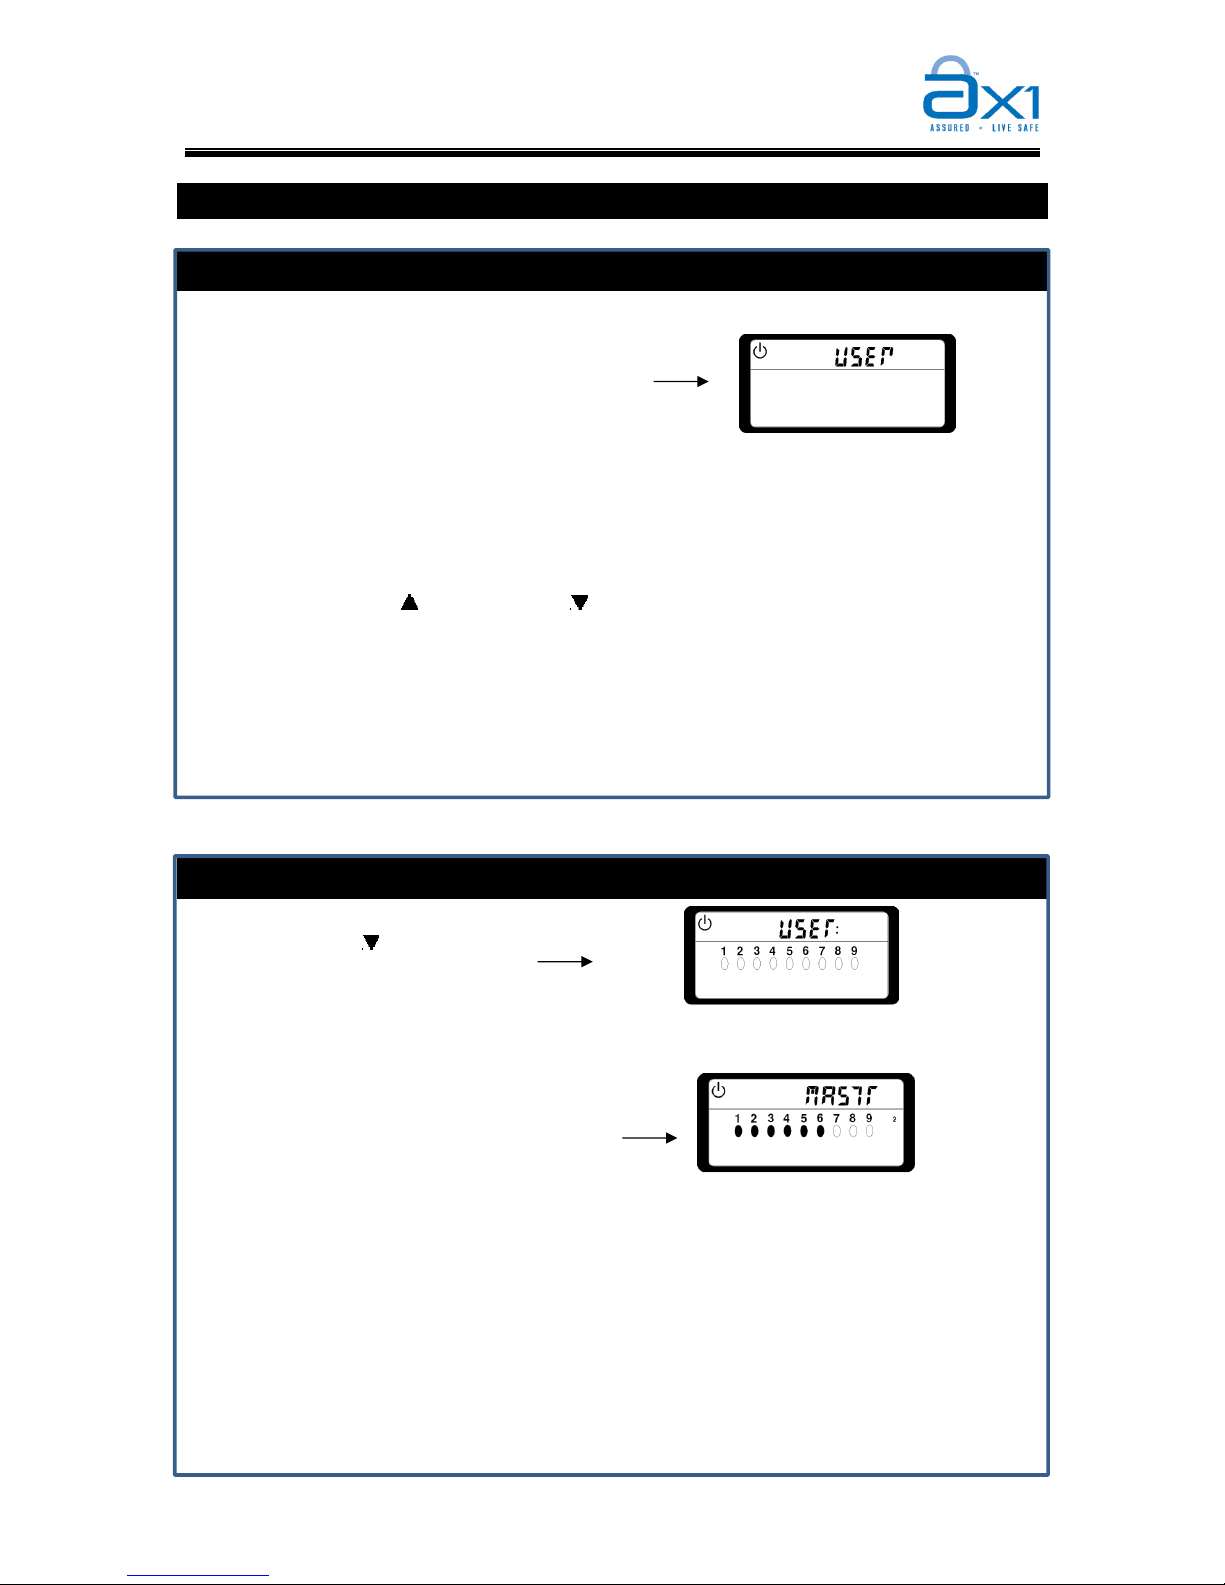
Enter User Programming Mode
1. Only Master PIN can access to user programming mode.
2. The user programming mode can only be accessible when system is not armed.
3. Enter a valid [Master Pin]. If you enter any mistakes, press the [*] key to cancel.
4. If a wrong Master PIN is entered, a long beep will be sound. Repeat step [3].
5. User can press [ ] to scroll up or [ ] to scroll down to view the menu.
6. To enter submenu, scroll until desired menu and press [#].
7. There are 11 menus in user programming: PIN, DURESS, IO ON (Timer), IO OFF
(Timer), CLOCK, ARM (Timer), DISARM (Timer), INSTALLER ACCESS, FAST
KEY, PHONE LINE DETECTION, PC COM
Edit Master PIN
1. Ensure the system is in USER PROGRAMMING MODE. Scroll to search for PIN
menu, followed by
2. Enter [1] follow by new Master PIN in 4 to 6 digit. Press [#] to confirm. (PIN 000000
is not applicable for password).
3. Re-enter NEW PIN and followed by [#].
4. Press [BACK] key to exit.
[Master PIN] + [COM] + [#]
Step 1:
[ ] for “PIN” + [#]
Step 2: [1] + [#] + [New PIN ] + [#]
Step 3: [Re-enter NEW PIN] + [#]
(4 to 6 digits)
(4 to 6 digits)
Page 24
AX1 ICON User Manual
21
Version 1.0
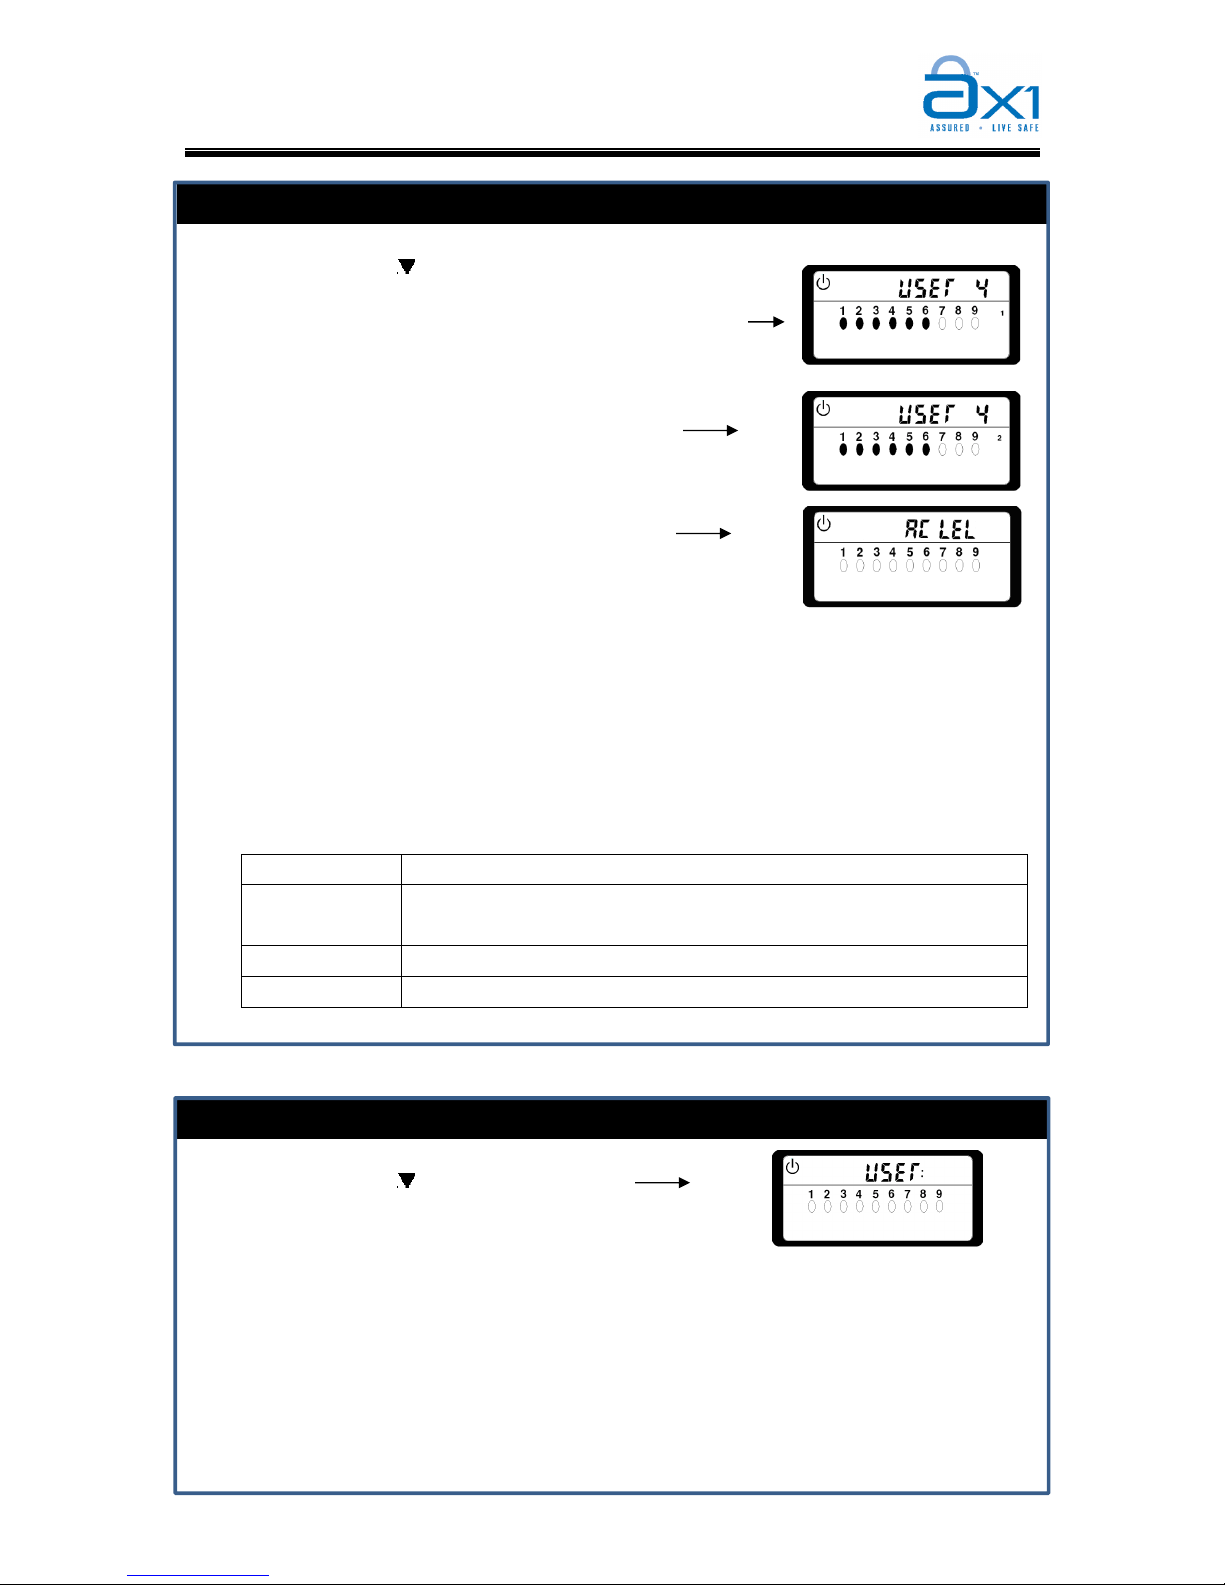
Add New or Edit User PIN
Step 1: [ ] for “PIN” + [#]
Step 2: [User Number] + [#] + [NEW PIN] + [#]
Step 3: [Re-enter NEW PIN] + [#]
Step 4: [Access Level] + [#]
1. Ensure system is in user programming mode.
2. Enter User number that you wish to add/ edit [2 to 7] in step 2 and [#], follow by
Enter the new user PIN in 4 to 6 digit. Press [#] to confirm. (PIN 000000 is not
applicable for password)
3. Re-ennter new user PIN and followed by [#].
4. The access level of the respective user PIN can be programmed by enter key [1] to
[4]. The respective ZONE indicator will illuminated or extinguish upon the key is
entered
ZONE 1 ON means enable the user PIN to ARM & DISARM
ZONE 2 ON means enable the user PIN to ARM only, else DISARM only
[Remarks: this setting is only applicable if ZONE 1 is disabled]
ZONE 3 ON means enable the user PIN to BYPASS ZONE
ZONE 4 ON means enable the user PIN for OPEN/CLOSE REPORT
5. Press [BACK] key to exit.
Delete User or Guest PIN
Step 1: [ ] for “PIN” + [#]
Step 2: [User or Guest Number] + [#] + [0] + [#]
1. Ensure system is in user programming mode.
2. Enter the user number that you wish to erase followed by [#], then press [0] and
followed by [#] key to delete.
3. Master PIN and Duress Code cannot be deleted.
4. Press [BACK] key to exit.
(2 to 7) (4 to 6 digits)
(1 to 4)
(2 to 8)
Page 25
AX1 ICON User Manual
22
Version 1.0
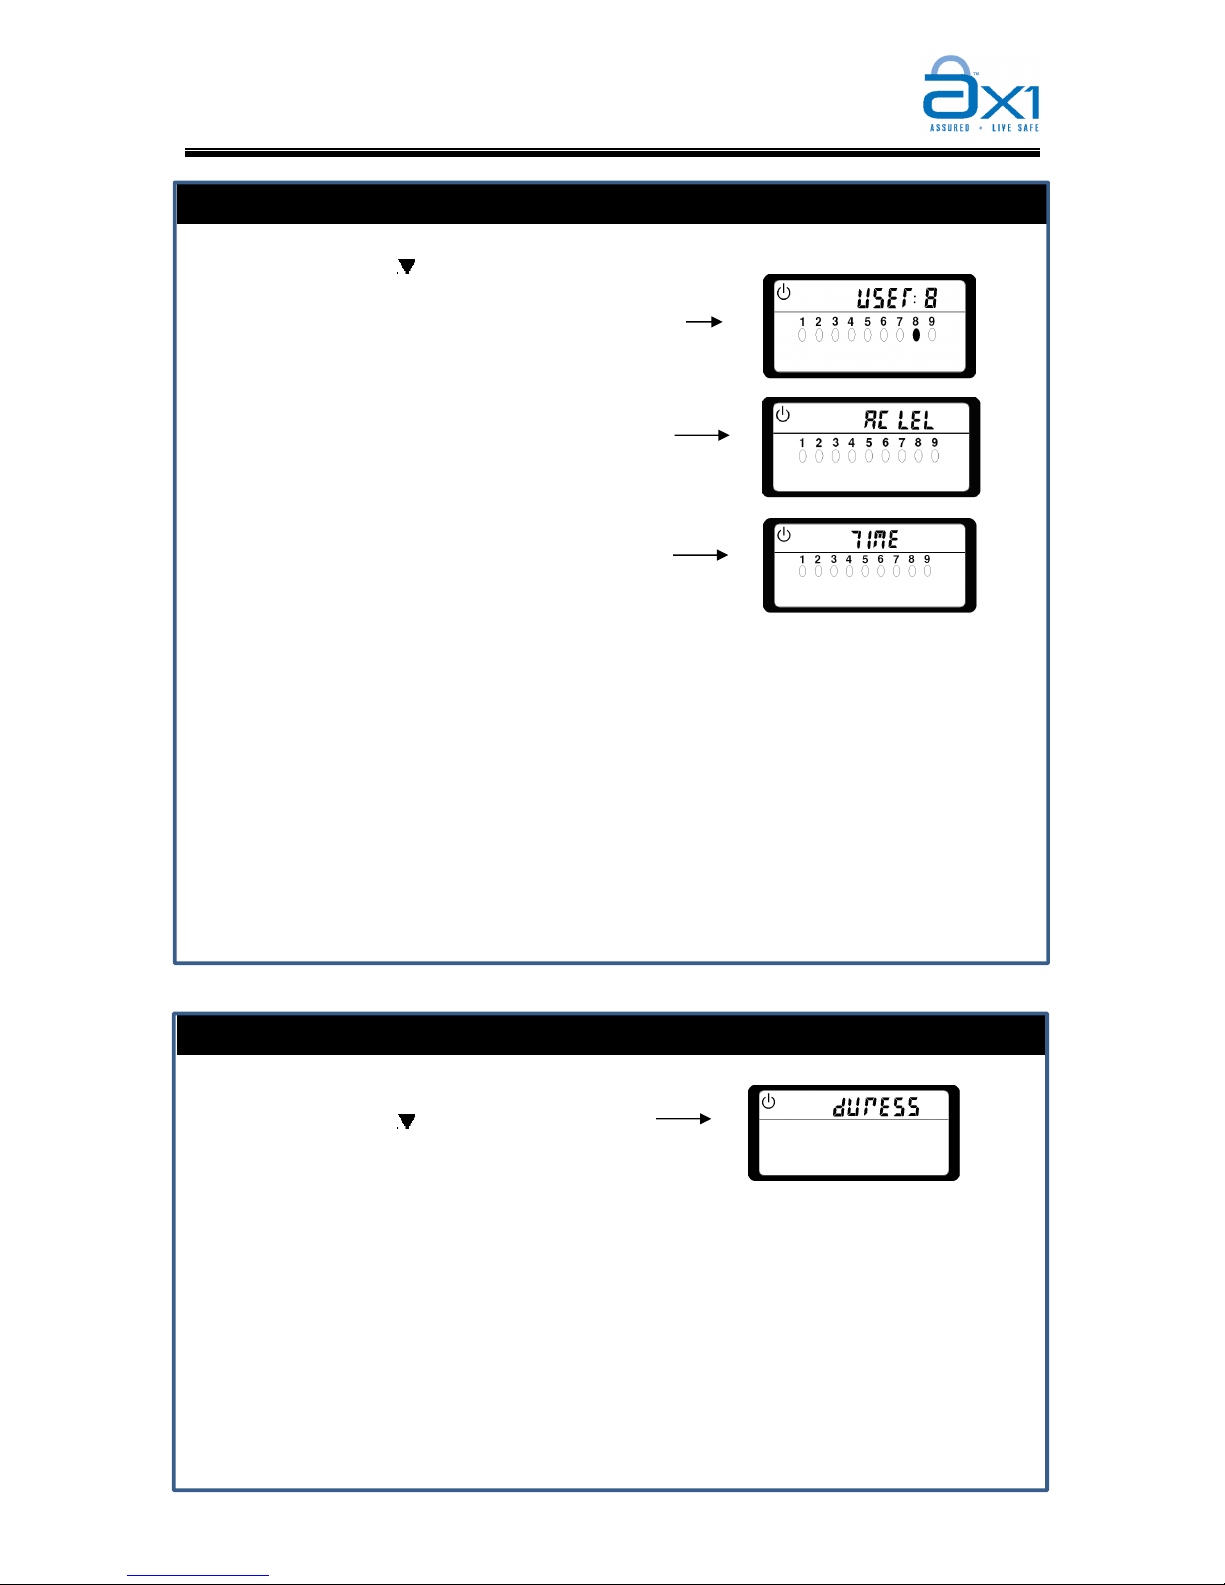
Add New or Edit Guest PIN
Step 1: [ ] for “PIN” + [#]
Step 2: [8] + [#] + [NEW PIN] + [#]
Step 3: [Re-enter NEW PIN] + [#]
Step 4: [Access Level] + [#]
Step 5: [Guest Time] + [#]
1. This option allows user to program a new pin with validity duration from 1 to 15
days.
2. Ensure system is in user programming mode.
3. Enter the new Guest PIN in 4 to 6 digit. Press [#] to confirm. (PIN 000000 is not
applicable for password).
4. Follow step 1 to step 4. [refer to table in section ADD NEW or EDIT USER CODE
for Acees level detail, page 21]
5. In step 5, enter the validity duration (1 to 15). The guest PIN will be automatically
deleted by the system once the duration has expired.
6. Press [BACK] key to exit.
Edit Duress PIN
Step 1: [ ] for “DURESS” + [#]
Step 2: [NEW PIN] + [#]
Step 3: [Re-enter New PIN] + [#]
1. Ensure system is in user programming mode.
2. Enter the new 4 digit Duress PIN and followed by [#].
3. Re-enter the DURESS PIN and press [#] to confirm. The default Duress PIN is “2222
4. Press [BACK] key to exit.
(4 to 6 digits)
(1 to 4)
(1 to 15)
(4 digits)
(4 digits)
Page 26
AX1 ICON User Manual
23
Version 1.0
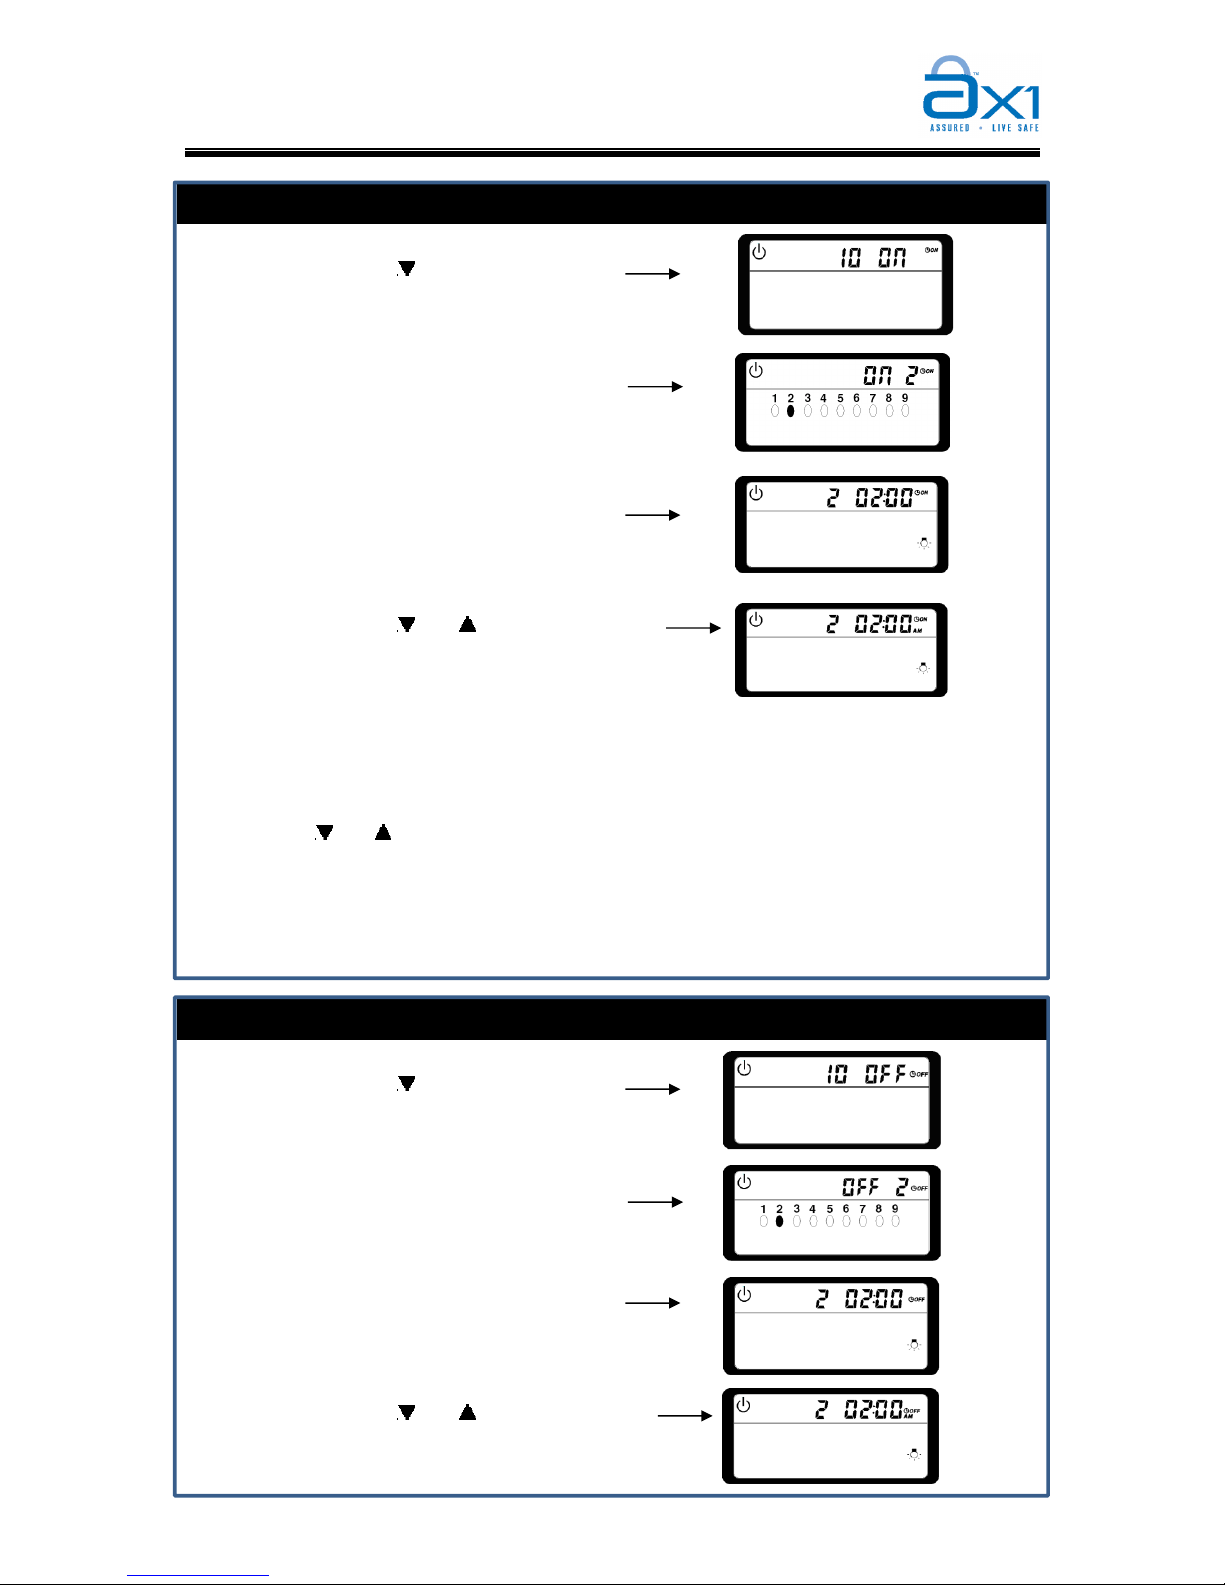
Program Automation ON Timer
Step 1:
[ ] for “IO ON” + [#]
Step 2: [Timer Number] + [#]
Step 3: [ON Time] + [#]
Step 4: [ ] or [] to set AM/PM + [#]
1. Ensure system is in user programming mode.
2. Under IO ON mode, enter the automaton ON timer number that user wish to
programmed [1 to 4].
3. Enter ON Timer in 12 hour format, eg: 2:00pm is 0200. If any mistake had been
entered, press [*] key to erase and repeat step 3.
4. Press
[ ] or [ ] to set AM/PM, followed by [#] key to confirm.
5. Press [BACK] to exit.
6. To delete the respective timer, enter [0] instead of ON TIME, followed by [#] key.
The respective timer will be deleted.
7. The timer setting can be view in View Timer Mode [refer to page 19].
Program Automation OFF Timer
Step 1:
[ ] for “IO OFF” + [#]
Step 2: [Timer Number] + [#]
Step 3: [OFF Time] + [#]
Step 4: [
] or [] to set AM/PM + [#]
(1 to 4)
(12 hour format)
(1 to 4)
(12 hour format)
Page 27
AX1 ICON User Manual
24
Version 1.0
1. Ensure system is in user programming mode.
2. Under IO OFF mode, enter the OFF timer number that user wish to programmed [1 to
4].
3. Enter OFF Timer in 12 hour format, eg: 2:00pm is 0200. If any mistake had been
entered, press [*] key to erase and repeat step 3.
4. Press
[ ] or [ ] to set AM/PM, followed by [#] key to confirm
5. Press [BACK] to exit.
6. To delete the respective timer, enter [0] instead of enter OFF TIME in step 3,
followed by [#] key. The respective timer will be deleted.
7. The timer setting can be view in View Timer Mode [refer to page 19].
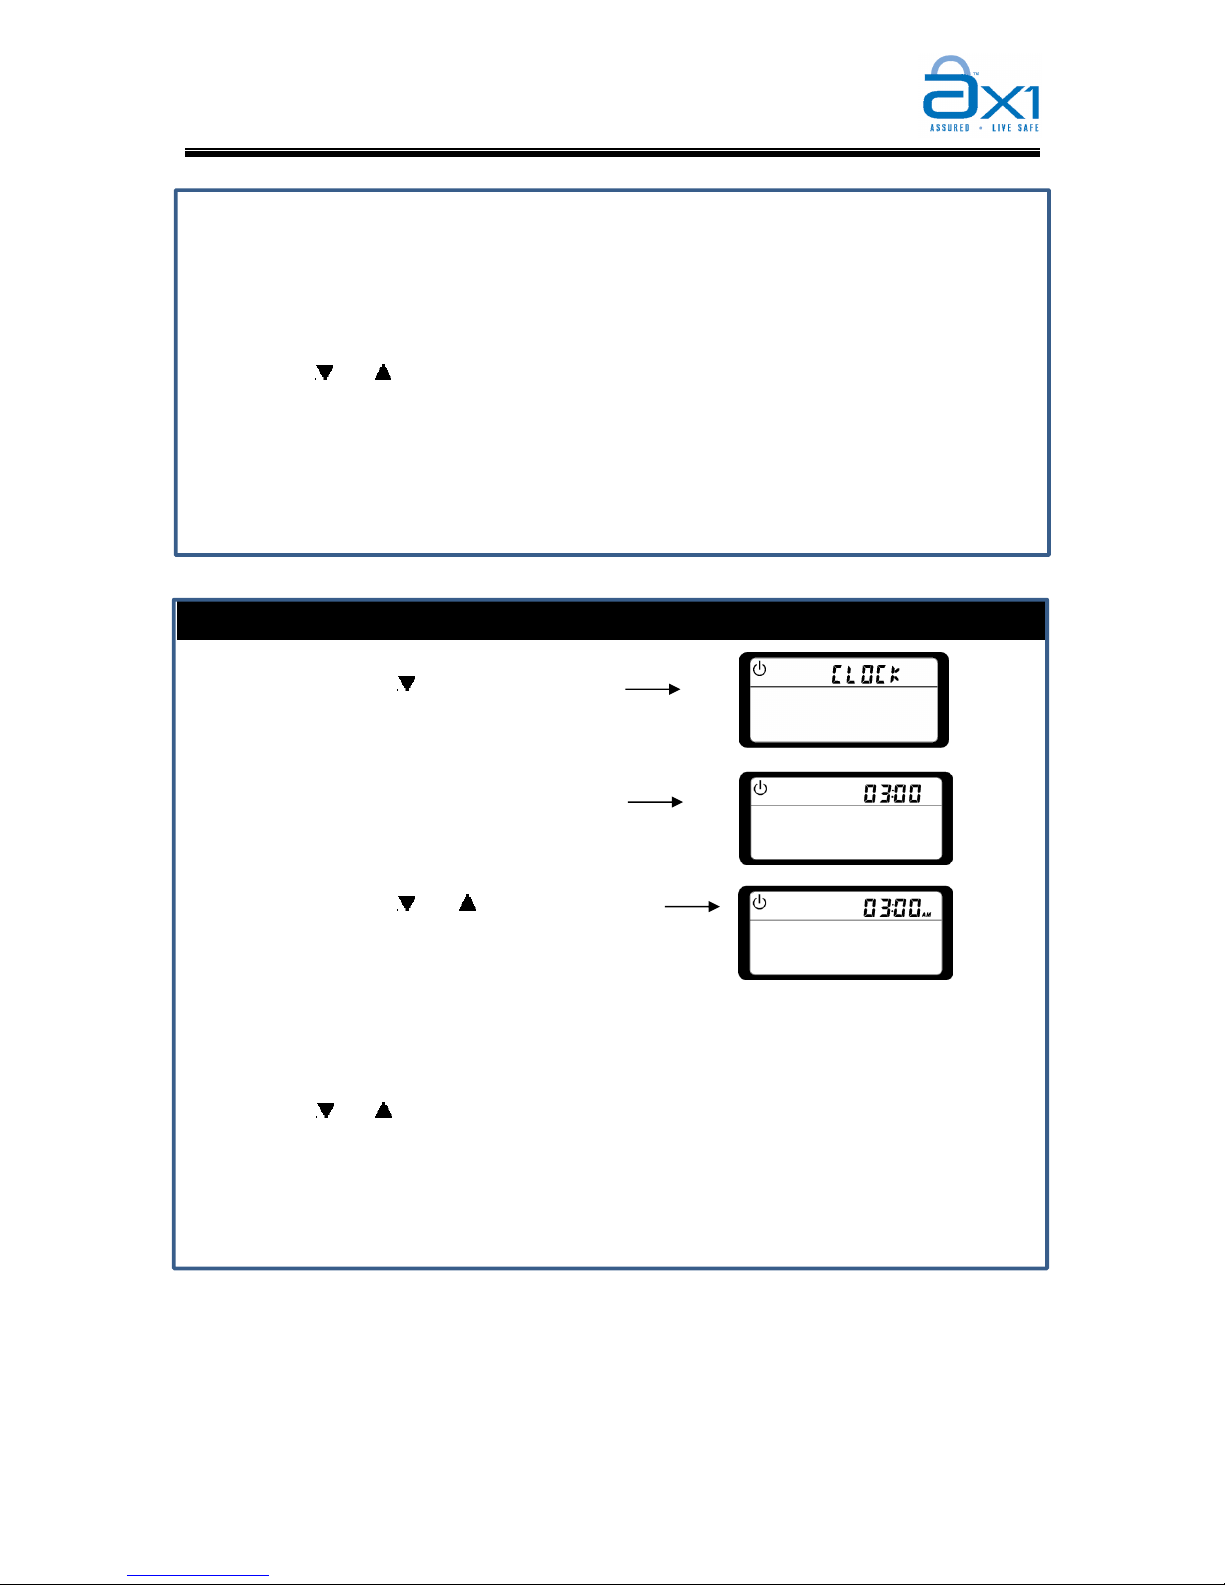
Program System Clock
Step 1:
[ ] for “CLOCK” + [#]
Step 2: [Clock] + [#]
Step 3: [ ] or [] to set AM/PM + [#]
1. Ensure system is in user programming mode.
2. Scroll down to search for CLOCK menu and press [#] key to enter.
3. Enter clock in 12 hour format, eg: 3:00pm is 0300.
4. If any mistake had been entered, press [*] key to erase and repeat step 3.
5. Press [
] or [ ] to set AM/PM, followed by [#] key. Keypad buzzer will beeps twice upon
acceptance.
6.
Press [BACK] key to exit
7. You will see the updated clock shows in the keypad display screen now.
(12 hour format)
Page 28
AX1 ICON User Manual
25
Version 1.0
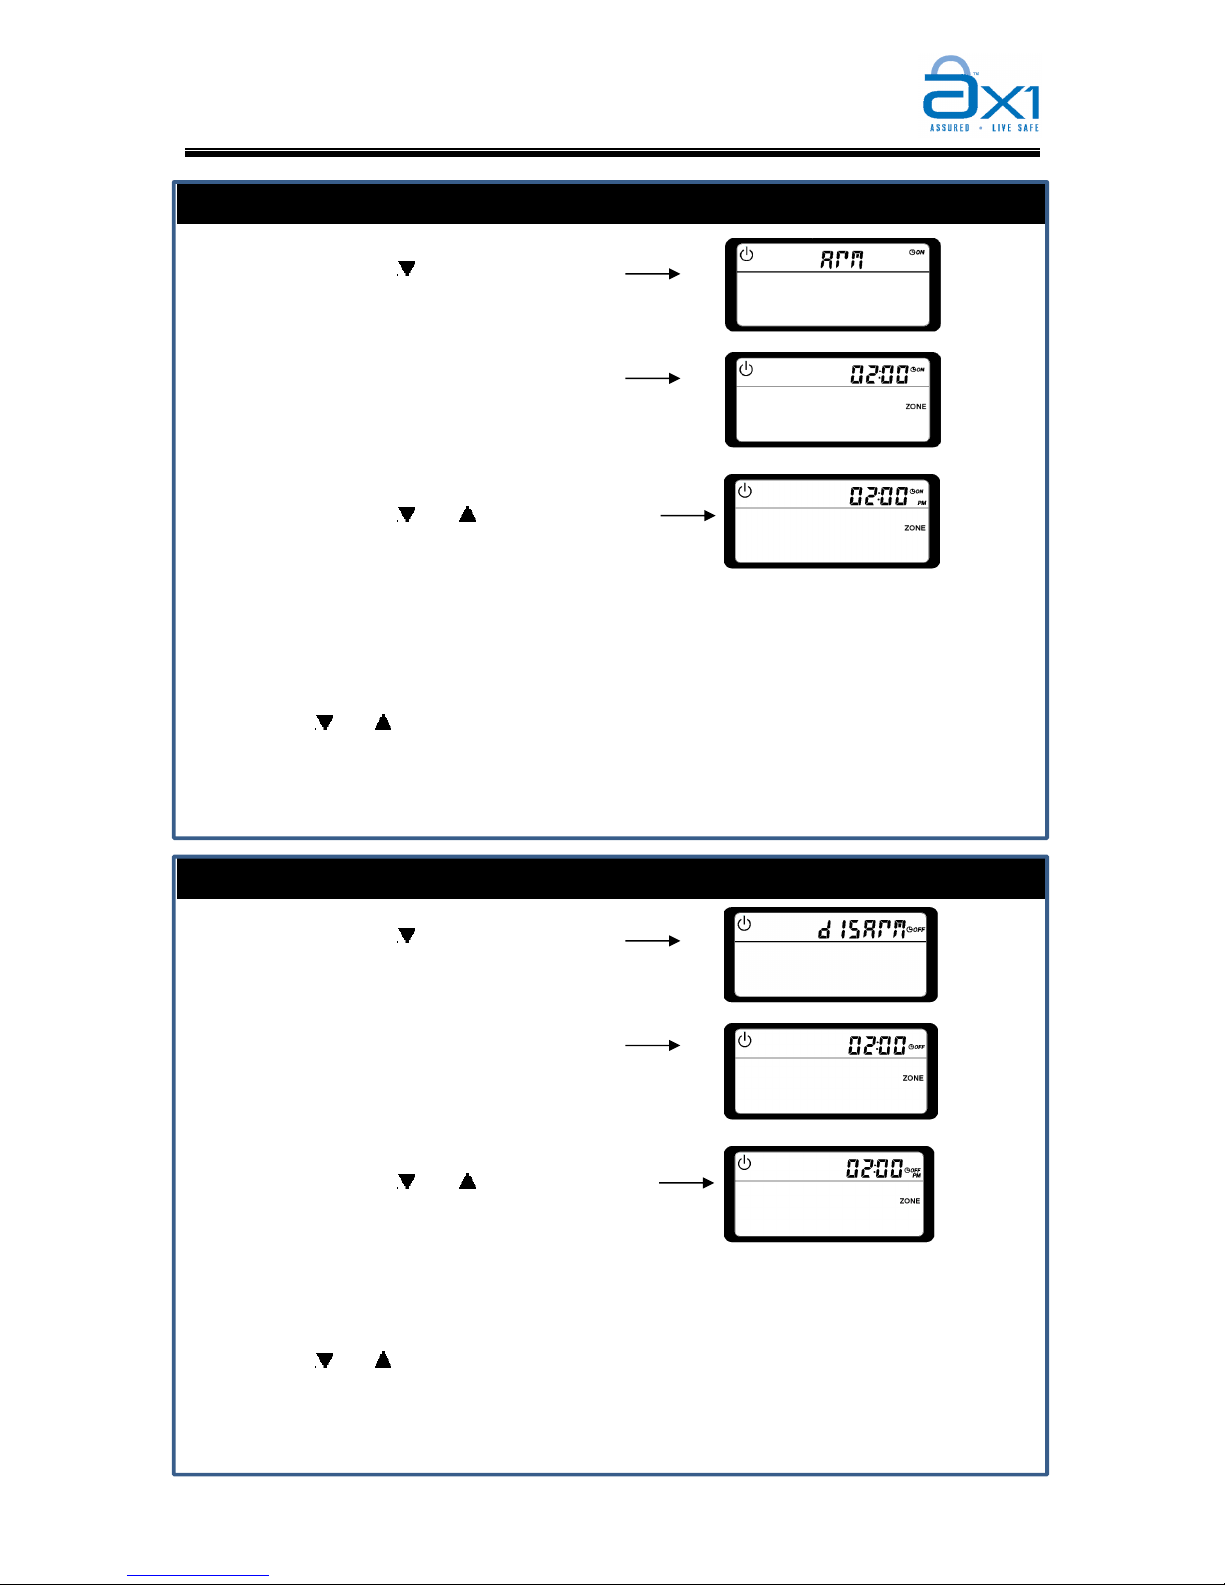
Program ARM Timer
Step 1:
[ ] for “ARM” + [#]
Step 2: [ARM Time] + [#]
Step 3: [ ] or [ ] to set AM/PM + [#]
1. Ensure system is in user programming mode.
2. Scroll down to search for ARM menu and press [#] key to enter.
3. Enter the [ARM TIME] in 12-hour format, e.g: 2:00pm is 02:00.
4. If any mistake had been entered, press [*] key to erase and repeat step 3.
5. Enter [#] key to confirm the time.
6. Press
[ ] or [ ] to set AM/PM, followed by [#] key to confirm.
7.
Press [BACK] key to exit.
8.
To delete ARM timer, enter [0] instead of enter ARM TIME in step 3, followed by [#] key.
9. The timer setting can be view in View Timer Mode [refer to page 19].
Program DISARM Timer
Step 1:
[ ] for “dISARM” + [#]
Step 2: [DISARM Time] + [#]
Step 3: [ ] or [ ] to set AM/PM + [#]
1. Ensure system is in user programming mode.
2. Scroll down to search for dISARM menu and press [#] key to enter.
3. Enter the [DISAR TIME] in 12-hour format, e.g: 2:00pm is 02:00.
4. Enter [#] key to confirm the time.
5. Press
[ ] or [ ] to set AM/PM, followed by [#] key to confirm.
6.
Press [BACK] key to exit.
7.
To delete DISARM timer, enter [0] instead of DISARM TIME in step 3, followed by [#] key.
8. The timer setting can be view in View Timer Mode [refer to page 19].
(12 hour format)
(12 hour format)
Page 29
AX1 ICON User Manual
26
Version 1.0
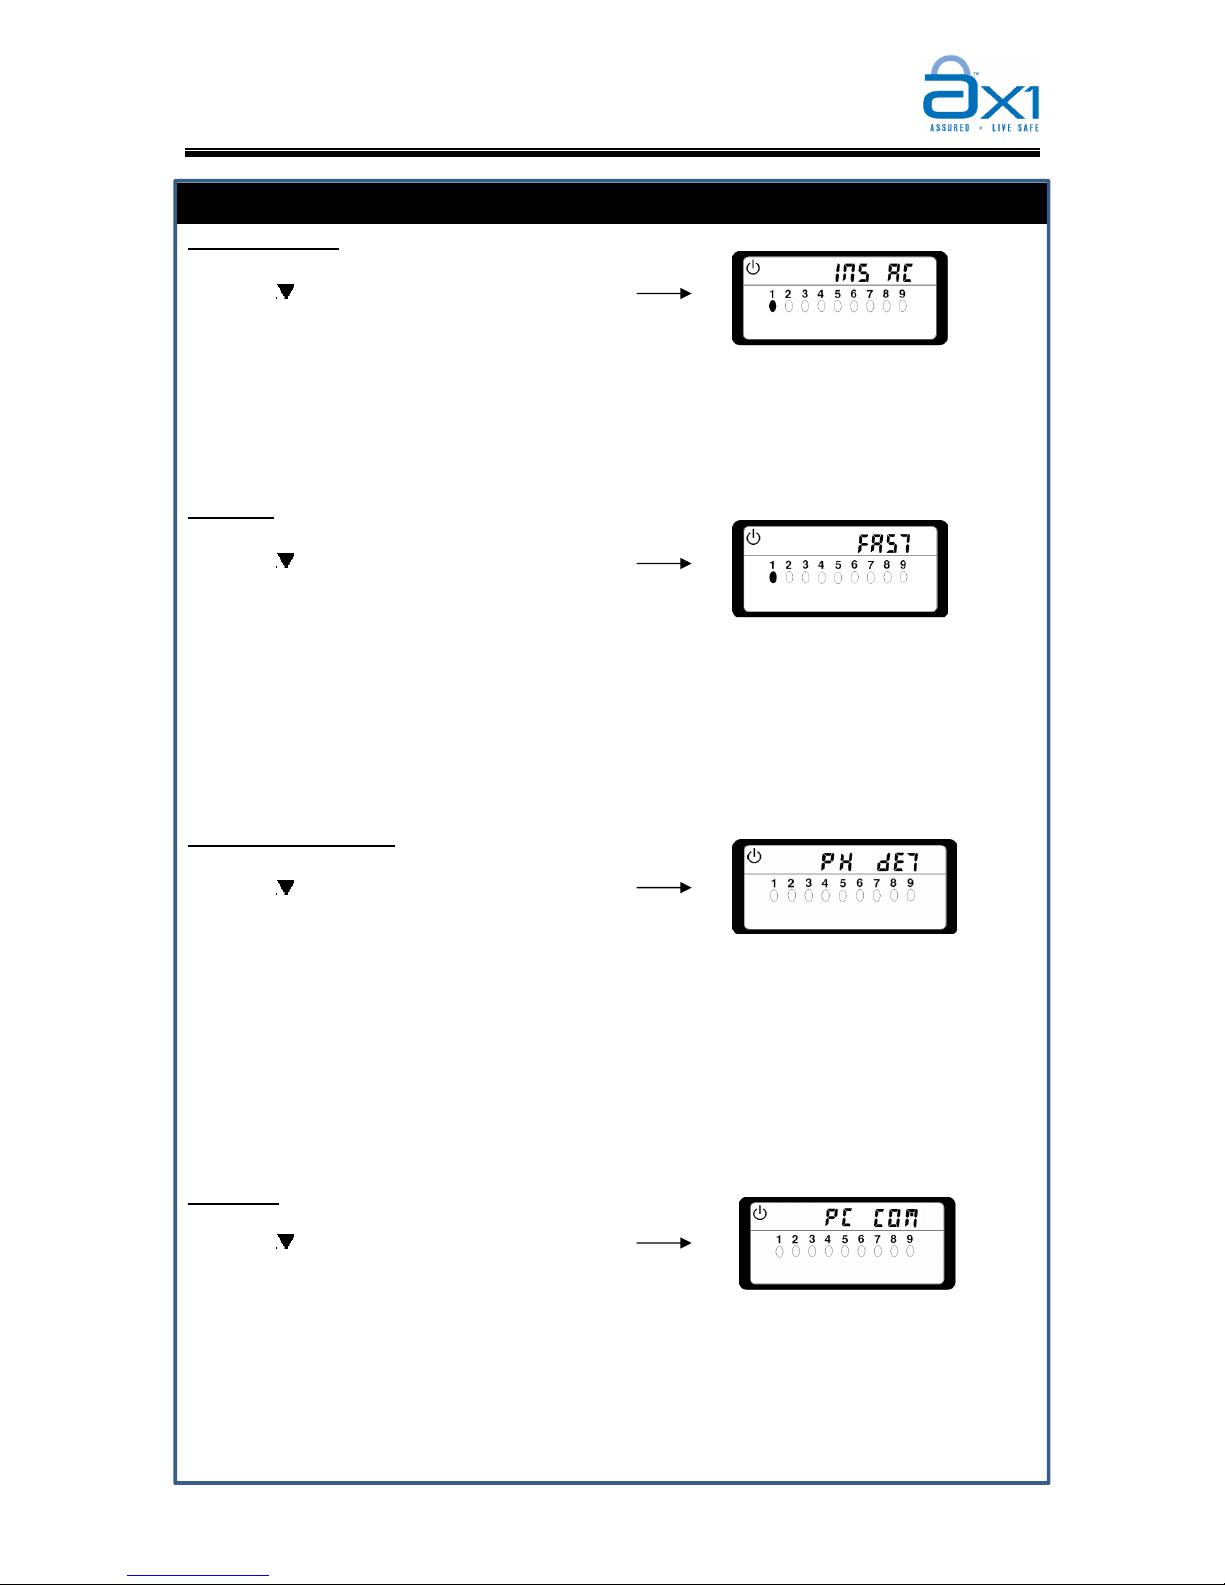
Others Setting
Installer Access
1. Ensure system is in user programming mode.
2. The ZONE 1 indicator illuminate if Installer Access is enabled. [Default is enabled]
3. Press [1] to enable/disable installer access, followed by [#] key to confirm.
4. Press [BACK] key to exit.
Fast Key
1. Ensure system is in user programming mode.
2. The ZONE 1 indicator illuminate if Fast Key is enabled. [Default is enabled]
3. Press [1] to enable/disable Fast Key, followed by [#] key to confirm.
4. Press [BACK] key to exit.
5. PIN number is required in order to perform all controlling if Fast Key is disabled.
Phone Line Detection
1. Ensure system is in user programming mode.
2. The ZONE 1 indicator illuminate if Phone Line Detection is enabled. [Default is
disabled]
3. Press [1] to enable/disable Phone Line Detection, followed by [#] key to confirm.
4. Press [BACK] key to exit
5. Upon enabled, system will monitor phone line status. Alarm will trigger if the phone
line signal is loss.
PC COM
1. Ensure system is in user programming mode.
2. The ZONE 1 indicator illuminate if PC COM is enabled. [Default is disabled]
3. Press [1] to enable/disable PC COM, followed by [#] key to confirm.
4. Press [BACK] key to exit
5. This option shall be enabled by installer if communication bus 2 [A2, B2] is
connected to devices, eg AX1 GSM and AIM.
[
] for “INS AC
” + [1] + [#]
[
] for “FAST
” + [1] + [#]
[
] for “PH dET
” + [1] + [#]
[
] for “PC COM
” + [1] + [#]
Page 30

AX1 ICON User Manual
27
Version 1.0
GLOSSARY
Arm
To activate the system into ARMED mode. Any zone violation will activate the alarm.
Bypass
Removal of one or more protection zones from the system. When the panel is ARMED,
violation of a bypassed zone will be ignored.
Chime
A beeping tone from the keypad to indicate sensor is activated
Day Arm
Instant arming that bypassed INTERIOR zones while the system is armed. An ENTRY delay
time will be given to the user to disarm the system after entering the armed premises.
Disarm
To deactivate the system. FIRE, PANIC, EMERGENCY and 24 HOUR zone remain active
while the system is disarmed.
Duress Code
An ambush code which will disarm the system and simultaneously send a silent distress
signal to the central monitoring station (CMS) and report to prepragrammed receiver number.
Default Duress code is 2222.
Entry Delay
The delay countdown time that allow user to enter the premises to disarm the system.
Exit Delay
The delay countdown time that allow user to leave the premises through DELAY zone when
the system is armed.
Force Arm
Instant arming that allows for certain violated zones to be bypassed temporary. When the
violated zones resume, these zones will be protected. There is an ENTRY delay time in this
arming mode.
Master PIN
A 4 – 6 digits code which use to Arm, Disarm and enter user programming mode. The Master
PIN is also equivalent to user 1 PIN. Default Master PIN is 111111.
Night Arm
Instant arming that bypassed INTERIOR zones while the system is armed. In this mode, there
is no ENTRY delay time for the user.
User PIN
A 4 to 6 digits code which is used to arm and disarm the system from the keypad
Zone
A specific area of your premises guarded by sensors, which detect violations of that areas..
Page 31
AX1 ICON User Manual
28
Version 1.0
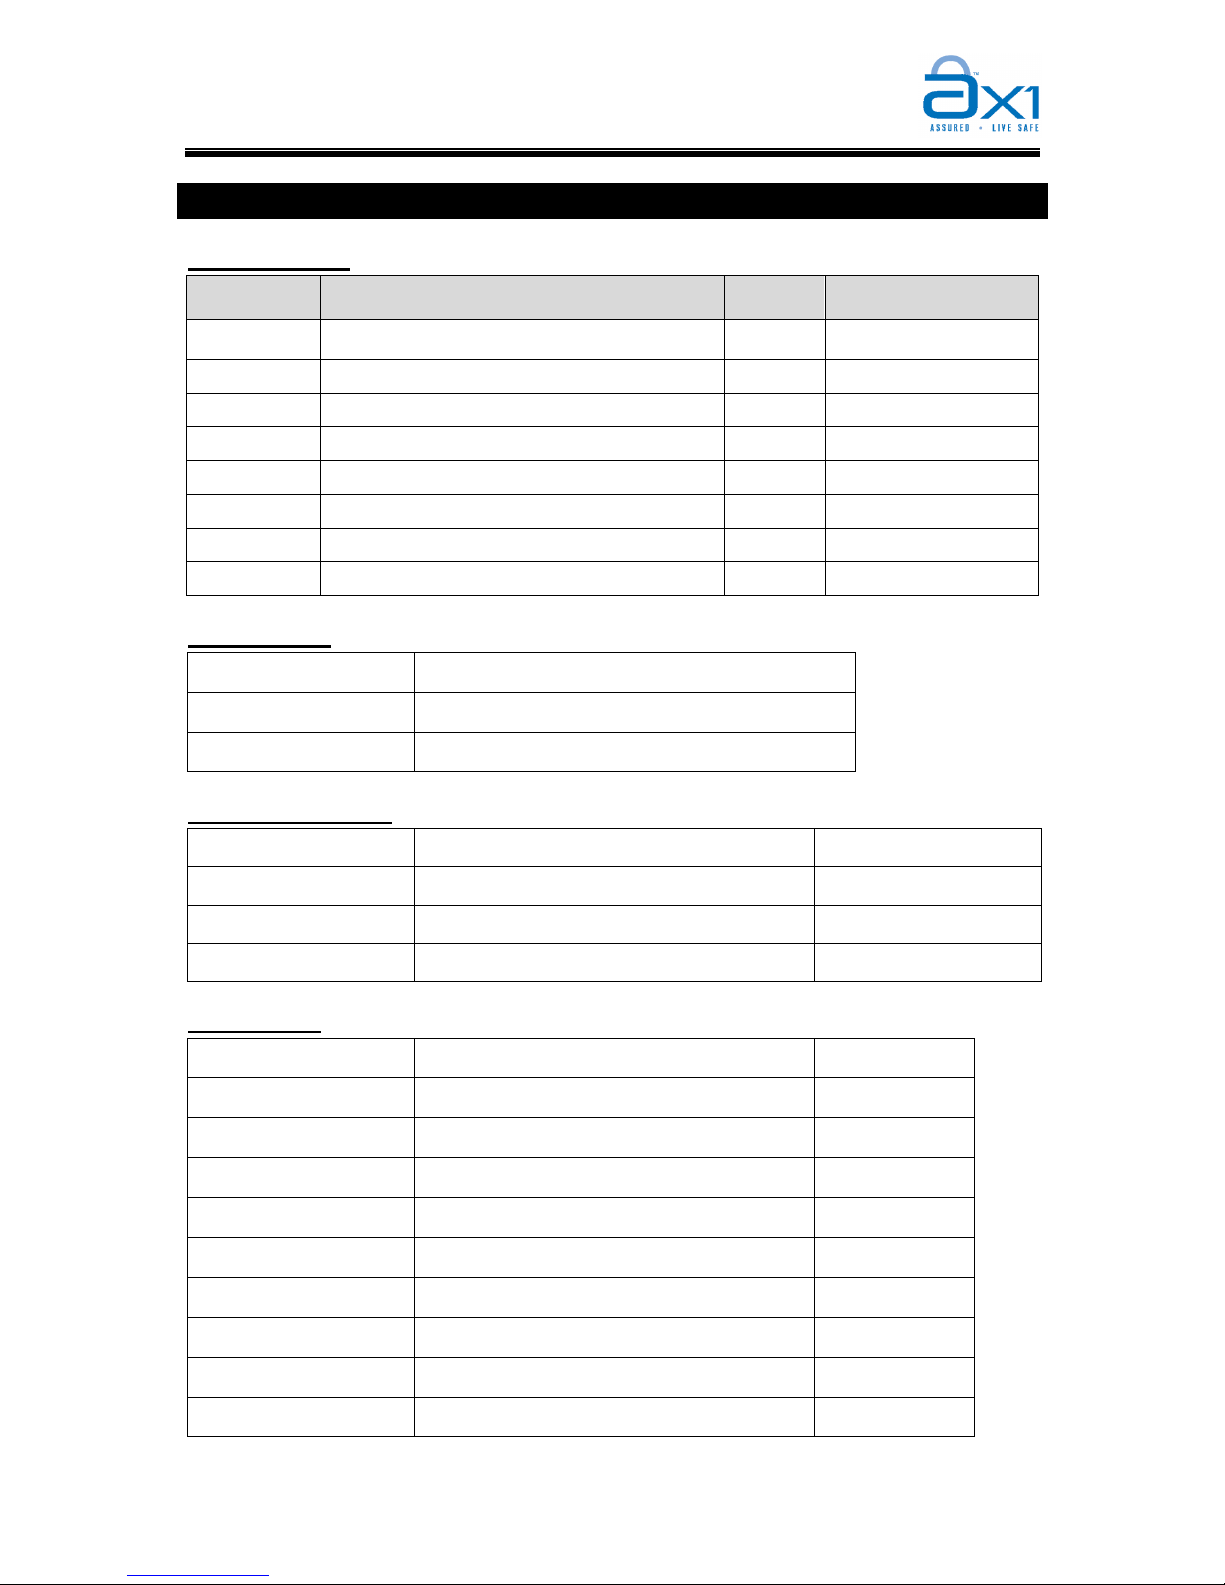
SYSTEM INFORMATION
Zone Infomation
Zone Zone Type
Zone
Chime
Location
(e.g: Main door)
1 Light/Interior/Instant/Delay/24 Hours Yes/No
2 Light/Interior/Instant/Delay/24 Hours Yes/No
3 Light/Interior/Instant/Delay/24 Hours Yes/No
4 Light/Interior/Instant/Delay/24 Hours Yes/No
5 Light/Interior/Instant/Delay/24 Hours Yes/No
6 Light/Interior/Instant/Delay/24 Hours Yes/No
7 Light/Interior/Instant/Delay/24 Hours Yes/No
8 Light/Interior/Instant/Delay/24 Hours Yes/No
System Timers
Entry Delay Time
Seconds
Exit Delay Time
Seconds
Siren ON Time
Minutes
Telephone Reporting
Receiver Number 1
Permanent / Backup
Receiver Number 2
Permanent / Backup
Receiver Number 3
Permanent / Backup
Receiver Number 4
Permanent / Backup
Timer Setting
Arm Timer
a.m / p.m.
Disarm Timer
a.m / p.m.
ON Timer 1
a.m / p.m.
OFF Timer 1
a.m / p.m.
ON Timer 2
a.m / p.m.
OFF Timer 2
a.m / p.m.
ON Timer 3
a.m / p.m.
OFF Timer 3
a.m / p.m.
ON Timer 4
a.m / p.m.
OFF Timer 4
a.m / p.m.
 Loading...