

Page 1

AWS Snowball
User Guide
AWS Snowball: User Guide
Copyright © 2018 Amazon Web Services, Inc. and/or its affiliates. All rights reserved.
Page 2

AWS Snowball User Guide
Amazon's trademarks and trade dress may not be used in connection with any product or service that is not Amazon's, in any manner
that is likely to cause confusion among customers, or in any manner that disparages or discredits Amazon. All other trademarks not
owned by Amazon are the property of their respective owners, who may or may not be affiliated with, connected to, or sponsored by
Amazon.
Page 3

AWS Snowball User Guide
Table of Contents
....................................................................................................................................................... vi
What Is a Snowball? . . . . . . . . . . . . . . . . . . . . . . . . . . . . . . . . . . . . . . . . . . . . . . . . . . . . . . . . . . . . . . . . . . . . . . . . . . . . . . . . . . . . . . . . . . . . . . . . . . . . . . . . . . . . . . . . . . . . . . . . . . . 1
Snowball Features . . . . . . . . . . . . . . . . . . . . . . . . . . . . . . . . . . . . . . . . . . . . . . . . . . . . . . . . . . . . . . . . . . . . . . . . . . . . . . . . . . . . . . . . . . . . . . . . . . . . . . . . . . . . . . . . . . . . . . 1
Prerequisites for Using AWS Snowball .......................................................................................... 2
Tools and Interfaces . . . . . . . . . . . . . . . . . . . . . . . . . . . . . . . . . . . . . . . . . . . . . . . . . . . . . . . . . . . . . . . . . . . . . . . . . . . . . . . . . . . . . . . . . . . . . . . . . . . . . . . . . . . . . . . . . . . 2
Related Services ......................................................................................................................... 2
Are You a First-Time User of AWS Snowball? ................................................................................. 2
Pricing . . . . . . . . . . . . . . . . . . . . . . . . . . . . . . . . . . . . . . . . . . . . . . . . . . . . . . . . . . . . . . . . . . . . . . . . . . . . . . . . . . . . . . . . . . . . . . . . . . . . . . . . . . . . . . . . . . . . . . . . . . . . . . . . . . . . . . 3
Device Differences . . . . . . . . . . . . . . . . . . . . . . . . . . . . . . . . . . . . . . . . . . . . . . . . . . . . . . . . . . . . . . . . . . . . . . . . . . . . . . . . . . . . . . . . . . . . . . . . . . . . . . . . . . . . . . . . . . . . . . 3
Use Case Differences .......................................................................................................... 3
Hardware Differences . . . . . . . . . . . . . . . . . . . . . . . . . . . . . . . . . . . . . . . . . . . . . . . . . . . . . . . . . . . . . . . . . . . . . . . . . . . . . . . . . . . . . . . . . . . . . . . . . . . . . . . . . . 3
Tool Differences ................................................................................................................. 5
Other Differences . . . . . . . . . . . . . . . . . . . . . . . . . . . . . . . . . . . . . . . . . . . . . . . . . . . . . . . . . . . . . . . . . . . . . . . . . . . . . . . . . . . . . . . . . . . . . . . . . . . . . . . . . . . . . . . 6
How It Works ............................................................................................................................ 6
How It Works: Concepts ...................................................................................................... 7
How It Works: Implementation . . . . . . . . . . . . . . . . . . . . . . . . . . . . . . . . . . . . . . . . . . . . . . . . . . . . . . . . . . . . . . . . . . . . . . . . . . . . . . . . . . . . . . . . . . . . 9
Jobs . . . . . . . . . . . . . . . . . . . . . . . . . . . . . . . . . . . . . . . . . . . . . . . . . . . . . . . . . . . . . . . . . . . . . . . . . . . . . . . . . . . . . . . . . . . . . . . . . . . . . . . . . . . . . . . . . . . . . . . . . . . . . . . . . . . . . . . . 11
Job Types . . . . . . . . . . . . . . . . . . . . . . . . . . . . . . . . . . . . . . . . . . . . . . . . . . . . . . . . . . . . . . . . . . . . . . . . . . . . . . . . . . . . . . . . . . . . . . . . . . . . . . . . . . . . . . . . . . . . . . . . 11
Job Details ...................................................................................................................... 12
Job Statuses .................................................................................................................... 13
Setting Up ............................................................................................................................... 14
Sign Up for AWS .............................................................................................................. 14
Create an IAM User . . . . . . . . . . . . . . . . . . . . . . . . . . . . . . . . . . . . . . . . . . . . . . . . . . . . . . . . . . . . . . . . . . . . . . . . . . . . . . . . . . . . . . . . . . . . . . . . . . . . . . . . . . 14
Next Step ........................................................................................................................ 15
Getting Started . . . . . . . . . . . . . . . . . . . . . . . . . . . . . . . . . . . . . . . . . . . . . . . . . . . . . . . . . . . . . . . . . . . . . . . . . . . . . . . . . . . . . . . . . . . . . . . . . . . . . . . . . . . . . . . . . . . . . . . . . . . . . . . . 16
Sign Up for AWS ...................................................................................................................... 16
Create an Administrator IAM User .............................................................................................. 16
Importing Data into Amazon S3 ................................................................................................. 16
Create an Import Job . . . . . . . . . . . . . . . . . . . . . . . . . . . . . . . . . . . . . . . . . . . . . . . . . . . . . . . . . . . . . . . . . . . . . . . . . . . . . . . . . . . . . . . . . . . . . . . . . . . . . . . . 17
Receive the Snowball . . . . . . . . . . . . . . . . . . . . . . . . . . . . . . . . . . . . . . . . . . . . . . . . . . . . . . . . . . . . . . . . . . . . . . . . . . . . . . . . . . . . . . . . . . . . . . . . . . . . . . . . 18
Connect the Snowball to Your Local Network . . . . . . . . . . . . . . . . . . . . . . . . . . . . . . . . . . . . . . . . . . . . . . . . . . . . . . . . . . . . . . . . . . . . . . 20
Transfer Data . . . . . . . . . . . . . . . . . . . . . . . . . . . . . . . . . . . . . . . . . . . . . . . . . . . . . . . . . . . . . . . . . . . . . . . . . . . . . . . . . . . . . . . . . . . . . . . . . . . . . . . . . . . . . . . . . . . 21
Return the Appliance ........................................................................................................ 24
Monitor the Import Status . . . . . . . . . . . . . . . . . . . . . . . . . . . . . . . . . . . . . . . . . . . . . . . . . . . . . . . . . . . . . . . . . . . . . . . . . . . . . . . . . . . . . . . . . . . . . . . . . 24
Exporting Data from Amazon S3 . . . . . . . . . . . . . . . . . . . . . . . . . . . . . . . . . . . . . . . . . . . . . . . . . . . . . . . . . . . . . . . . . . . . . . . . . . . . . . . . . . . . . . . . . . . . . . . . 24
Create an Export Job ........................................................................................................ 25
Receive the Snowball . . . . . . . . . . . . . . . . . . . . . . . . . . . . . . . . . . . . . . . . . . . . . . . . . . . . . . . . . . . . . . . . . . . . . . . . . . . . . . . . . . . . . . . . . . . . . . . . . . . . . . . . 26
Connect the Snowball to Your Local Network . . . . . . . . . . . . . . . . . . . . . . . . . . . . . . . . . . . . . . . . . . . . . . . . . . . . . . . . . . . . . . . . . . . . . . 28
Transfer Data . . . . . . . . . . . . . . . . . . . . . . . . . . . . . . . . . . . . . . . . . . . . . . . . . . . . . . . . . . . . . . . . . . . . . . . . . . . . . . . . . . . . . . . . . . . . . . . . . . . . . . . . . . . . . . . . . . . 29
Return the Appliance ........................................................................................................ 32
Repeat the Process ........................................................................................................... 32
Where Do I Go from Here? ........................................................................................................ 32
Best Practices .................................................................................................................................. 33
Security Best Practices . . . . . . . . . . . . . . . . . . . . . . . . . . . . . . . . . . . . . . . . . . . . . . . . . . . . . . . . . . . . . . . . . . . . . . . . . . . . . . . . . . . . . . . . . . . . . . . . . . . . . . . . . . . . . . 33
Network Best Practices ............................................................................................................. 33
Resource Best Practices . . . . . . . . . . . . . . . . . . . . . . . . . . . . . . . . . . . . . . . . . . . . . . . . . . . . . . . . . . . . . . . . . . . . . . . . . . . . . . . . . . . . . . . . . . . . . . . . . . . . . . . . . . . . . 33
Performance . . . . . . . . . . . . . . . . . . . . . . . . . . . . . . . . . . . . . . . . . . . . . . . . . . . . . . . . . . . . . . . . . . . . . . . . . . . . . . . . . . . . . . . . . . . . . . . . . . . . . . . . . . . . . . . . . . . . . . . . . . . . 34
Speeding Up Data Transfer . . . . . . . . . . . . . . . . . . . . . . . . . . . . . . . . . . . . . . . . . . . . . . . . . . . . . . . . . . . . . . . . . . . . . . . . . . . . . . . . . . . . . . . . . . . . . . . . 34
How to Transfer Petabytes of Data Efficiently . . . . . . . . . . . . . . . . . . . . . . . . . . . . . . . . . . . . . . . . . . . . . . . . . . . . . . . . . . . . . . . . . . . . . . . . . . . . . . 36
Planning Your Large Transfer . . . . . . . . . . . . . . . . . . . . . . . . . . . . . . . . . . . . . . . . . . . . . . . . . . . . . . . . . . . . . . . . . . . . . . . . . . . . . . . . . . . . . . . . . . . . . 36
Calibrating a Large Transfer . . . . . . . . . . . . . . . . . . . . . . . . . . . . . . . . . . . . . . . . . . . . . . . . . . . . . . . . . . . . . . . . . . . . . . . . . . . . . . . . . . . . . . . . . . . . . . . 38
Transferring Data in Parallel . . . . . . . . . . . . . . . . . . . . . . . . . . . . . . . . . . . . . . . . . . . . . . . . . . . . . . . . . . . . . . . . . . . . . . . . . . . . . . . . . . . . . . . . . . . . . . 39
Using the Snowball Console .............................................................................................................. 40
Cloning an Import Job .............................................................................................................. 40
iii
Page 4

AWS Snowball User Guide
Using Export Ranges . . . . . . . . . . . . . . . . . . . . . . . . . . . . . . . . . . . . . . . . . . . . . . . . . . . . . . . . . . . . . . . . . . . . . . . . . . . . . . . . . . . . . . . . . . . . . . . . . . . . . . . . . . . . . . . . . 40
Export Range Examples . . . . . . . . . . . . . . . . . . . . . . . . . . . . . . . . . . . . . . . . . . . . . . . . . . . . . . . . . . . . . . . . . . . . . . . . . . . . . . . . . . . . . . . . . . . . . . . . . . . . . 41
Getting Your Job Completion Report and Logs ............................................................................. 42
Canceling Jobs ......................................................................................................................... 43
Using a Snowball . . . . . . . . . . . . . . . . . . . . . . . . . . . . . . . . . . . . . . . . . . . . . . . . . . . . . . . . . . . . . . . . . . . . . . . . . . . . . . . . . . . . . . . . . . . . . . . . . . . . . . . . . . . . . . . . . . . . . . . . . . . . . 45
Changing Your IP Address ......................................................................................................... 49
Transferring Data ..................................................................................................................... 51
Transferring Data with the Snowball Client . . . . . . . . . . . . . . . . . . . . . . . . . . . . . . . . . . . . . . . . . . . . . . . . . . . . . . . . . . . . . . . . . . . . . . . . . . . . . . . . . . 52
Using the Snowball Client ................................................................................................. 52
Transferring Data with the Amazon S3 Adapter for Snowball ......................................................... 65
Downloading and Installing the Amazon S3 Adapter for Snowball . . . . . . . . . . . . . . . . . . . . . . . . . . . . . . . . . . . . . . . . . . 65
Using the Amazon S3 Adapter for Snowball ........................................................................ 66
Shipping Considerations .................................................................................................................... 73
Preparing a Snowball for Shipping ............................................................................................. 73
Region-Based Shipping Restrictions . . . . . . . . . . . . . . . . . . . . . . . . . . . . . . . . . . . . . . . . . . . . . . . . . . . . . . . . . . . . . . . . . . . . . . . . . . . . . . . . . . . . . . . . . . . . 74
Shipping a Snowball ................................................................................................................. 74
Shipping Carriers .............................................................................................................. 74
Security ........................................................................................................................................... 77
Encryption in AWS Snowball ...................................................................................................... 77
Server-Side Encryption . . . . . . . . . . . . . . . . . . . . . . . . . . . . . . . . . . . . . . . . . . . . . . . . . . . . . . . . . . . . . . . . . . . . . . . . . . . . . . . . . . . . . . . . . . . . . . . . . . . . . . 77
Authorization and Access Control . . . . . . . . . . . . . . . . . . . . . . . . . . . . . . . . . . . . . . . . . . . . . . . . . . . . . . . . . . . . . . . . . . . . . . . . . . . . . . . . . . . . . . . . . . . . . . . 79
Authentication . . . . . . . . . . . . . . . . . . . . . . . . . . . . . . . . . . . . . . . . . . . . . . . . . . . . . . . . . . . . . . . . . . . . . . . . . . . . . . . . . . . . . . . . . . . . . . . . . . . . . . . . . . . . . . . . . 79
Access Control . . . . . . . . . . . . . . . . . . . . . . . . . . . . . . . . . . . . . . . . . . . . . . . . . . . . . . . . . . . . . . . . . . . . . . . . . . . . . . . . . . . . . . . . . . . . . . . . . . . . . . . . . . . . . . . . . 82
AWS Key Management Service in Snowball .................................................................................. 84
Using the AWS-Managed Customer Master Key for Snowball .................................................. 85
Creating a Custom KMS Envelope Encryption Key ................................................................. 85
Authorization with the Amazon S3 API Adapter for Snowball . . . . . . . . . . . . . . . . . . . . . . . . . . . . . . . . . . . . . . . . . . . . . . . . . . . . . . . . . 85
Other Security Considerations for Snowball . . . . . . . . . . . . . . . . . . . . . . . . . . . . . . . . . . . . . . . . . . . . . . . . . . . . . . . . . . . . . . . . . . . . . . . . . . . . . . . . . 86
Data Validation . . . . . . . . . . . . . . . . . . . . . . . . . . . . . . . . . . . . . . . . . . . . . . . . . . . . . . . . . . . . . . . . . . . . . . . . . . . . . . . . . . . . . . . . . . . . . . . . . . . . . . . . . . . . . . . . . . . . . . . . . . . . . . . . 87
Checksum Validation of Transferred Data . . . . . . . . . . . . . . . . . . . . . . . . . . . . . . . . . . . . . . . . . . . . . . . . . . . . . . . . . . . . . . . . . . . . . . . . . . . . . . . . . . . . 87
Common Validation Errors . . . . . . . . . . . . . . . . . . . . . . . . . . . . . . . . . . . . . . . . . . . . . . . . . . . . . . . . . . . . . . . . . . . . . . . . . . . . . . . . . . . . . . . . . . . . . . . . . . . . . . . . . 87
Manual Data Validation for Snowball During Transfer ................................................................... 88
Manual Data Validation for Snowball After Import into Amazon S3 . . . . . . . . . . . . . . . . . . . . . . . . . . . . . . . . . . . . . . . . . . . . . . . . . 89
Notifications . . . . . . . . . . . . . . . . . . . . . . . . . . . . . . . . . . . . . . . . . . . . . . . . . . . . . . . . . . . . . . . . . . . . . . . . . . . . . . . . . . . . . . . . . . . . . . . . . . . . . . . . . . . . . . . . . . . . . . . . . . . . . . . . . . . . 90
Specifications . . . . . . . . . . . . . . . . . . . . . . . . . . . . . . . . . . . . . . . . . . . . . . . . . . . . . . . . . . . . . . . . . . . . . . . . . . . . . . . . . . . . . . . . . . . . . . . . . . . . . . . . . . . . . . . . . . . . . . . . . . . . . . . . . . . 91
Supported Network Hardware .................................................................................................... 91
Workstation Specifications . . . . . . . . . . . . . . . . . . . . . . . . . . . . . . . . . . . . . . . . . . . . . . . . . . . . . . . . . . . . . . . . . . . . . . . . . . . . . . . . . . . . . . . . . . . . . . . . . . . . . . . . . 93
Limits . . . . . . . . . . . . . . . . . . . . . . . . . . . . . . . . . . . . . . . . . . . . . . . . . . . . . . . . . . . . . . . . . . . . . . . . . . . . . . . . . . . . . . . . . . . . . . . . . . . . . . . . . . . . . . . . . . . . . . . . . . . . . . . . . . . . . . . . . . . . . 95
Regional Limitations for AWS Snowball ....................................................................................... 95
Limitations on Jobs in AWS Snowball ......................................................................................... 95
Limitations on Transferring On-Premises Data with a Snowball ...................................................... 96
Limitations on Shipping a Snowball ............................................................................................ 96
Limitations on Processing Your Returned Snowball for Import . . . . . . . . . . . . . . . . . . . . . . . . . . . . . . . . . . . . . . . . . . . . . . . . . . . . . . . . 96
Troubleshooting ............................................................................................................................... 98
Troubleshooting Connection Problems ........................................................................................ 98
Troubleshooting Data Transfer Problems ..................................................................................... 98
Troubleshooting Client Problems ................................................................................................ 99
Troubleshooting Snowball Client Validation Problems ........................................................... 99
HDFS Troubleshooting ..................................................................................................... 100
Troubleshooting Adapter Problems . . . . . . . . . . . . . . . . . . . . . . . . . . . . . . . . . . . . . . . . . . . . . . . . . . . . . . . . . . . . . . . . . . . . . . . . . . . . . . . . . . . . . . . . . . . 100
Troubleshooting Import Job Problems ....................................................................................... 101
Troubleshooting Export Job Problems ....................................................................................... 101
Job Management API ...................................................................................................................... 102
API Endpoint .......................................................................................................................... 102
API Version . . . . . . . . . . . . . . . . . . . . . . . . . . . . . . . . . . . . . . . . . . . . . . . . . . . . . . . . . . . . . . . . . . . . . . . . . . . . . . . . . . . . . . . . . . . . . . . . . . . . . . . . . . . . . . . . . . . . . . . . . . . . 103
API Permission Policy Reference . . . . . . . . . . . . . . . . . . . . . . . . . . . . . . . . . . . . . . . . . . . . . . . . . . . . . . . . . . . . . . . . . . . . . . . . . . . . . . . . . . . . . . . . . . . . . . . 103
Related Topics ........................................................................................................................ 105
iv
Page 5

AWS Snowball User Guide
Document History . . . . . . . . . . . . . . . . . . . . . . . . . . . . . . . . . . . . . . . . . . . . . . . . . . . . . . . . . . . . . . . . . . . . . . . . . . . . . . . . . . . . . . . . . . . . . . . . . . . . . . . . . . . . . . . . . . . . . . . . . . 106
AWS Glossary ................................................................................................................................. 108
v
Page 6

AWS Snowball User Guide
This guide is for the Snowball (50 TB or 80 TB of storage space). If you are looking for documentation for
the Snowball Edge, see the AWS Snowball Edge Developer Guide.
vi
Page 7

AWS Snowball User Guide
Snowball Features
What Is an AWS Snowball Appliance?
AWS Snowball is a service that accelerates transferring large amounts of data into and out of AWS using
physical storage appliances, bypassing the Internet. Each AWS Snowball appliance type can transport
data at faster-than internet speeds. This transport is done by shipping the data in the appliances through
a regional carrier. The appliances are rugged shipping containers, complete with E Ink shipping labels.
With a Snowball, you can transfer hundreds of terabytes or petabytes of data between your on-premises
data centers and Amazon Simple Storage Service (Amazon S3). AWS Snowball uses Snowball appliances
and provides powerful interfaces that you can use to create jobs, transfer data, and track the status of
your jobs through to completion. By shipping your data in Snowballs, you can transfer large amounts
of data at a significantly faster rate than if you were transferring that data over the Internet, saving you
time and money.
Note
There are many options for transferring your data into AWS. Snowball is intended for
transferring large amounts of data. If you want to transfer less than 10 terabytes of data
between your on-premises data centers and Amazon S3, Snowball might not be your most
economical choice.
Snowball uses Snowball appliances shipped through your region's carrier. Each Snowball is protected
by AWS Key Management Service (AWS KMS) and made physically rugged to secure and protect your
data while the Snowball is in transit. In the US regions, Snowballs come in two sizes: 50 TB and 80 TB. All
other regions have 80 TB Snowballs only.
Snowball Features
Snowball with the Snowball appliance has the following features:
• You can import and export data between your on-premises data storage locations and Amazon S3.
• Snowball has an 80 TB model available in all regions, and a 50 TB model only available in the US
regions.
• Encryption is enforced, protecting your data at rest and in physical transit.
• You don't have to buy or maintain your own hardware devices.
• You can manage your jobs through the AWS Snowball Management Console, or programmatically with
the job management API.
• You can perform local data transfers between your on-premises data center and a Snowball.
These transfers can be done through the Snowball client, a standalone downloadable client, or
programmatically using Amazon S3 REST API calls with the downloadable Amazon S3 Adapter for
Snowball. For more information, see Transferring Data with a Snowball (p. 51).
• The Snowball is its own shipping container, and its E Ink display changes to show your shipping label
when the Snowball is ready to ship. For more information, see Shipping Considerations for AWS
Snowball (p. 73).
• For a list of regions where the Snowball appliance is available, see AWS Snowball in the AWS General
Reference.
Note
Snowball doesn't support international shipping or shipping between regions outside of the US.
For more information on shipping restrictions, see Region-Based Shipping Restrictions (p. 74).
1
Page 8

AWS Snowball User Guide
Prerequisites for Using AWS Snowball
Prerequisites for Using AWS Snowball
Before transferring data into Amazon S3 using Snowball, you should do the following:
• Create an AWS account and an administrator user in AWS Identity and Access Management (IAM). For
more information, see Creating an IAM User for Snowball (p. 79).
• If you are importing data, do the following:
• Confirm that the files and folders to transfer are named according to the Object Key Naming
Guidelines for Amazon S3. Any files or folders with names that don't meet these guidelines won't be
imported into Amazon S3.
• Plan what data you want to import into Amazon S3. For more information, see How to Transfer
Petabytes of Data Efficiently (p. 36).
• If you are exporting data, do the following:
• Understand what data will be exported when you create your job. For more information, see Using
Export Ranges (p. 40).
• For any files with a colon (:) in the file name, change the file names in Amazon S3 before you create
the export job to get these files. Files with a colon in the file name fail export to Microsoft Windows
Server.
Tools and Interfaces
Snowball uses the AWS Snowball Management Console and the job management API for creating and
managing jobs. To perform data transfers on the Snowball appliance locally, use the Snowball client or
the Amazon S3 Adapter for Snowball. To learn more about using these in detail, see the following topics:
• Using the AWS Snowball Management Console (p. 40)
• Using an AWS Snowball Appliance (p. 45)
• Transferring Data with a Snowball (p. 51)
We also recommend that you check out the job management API for AWS Snowball. For more
information, see AWS Snowball API Reference.
Services Related to AWS Snowball
This guide assumes that you are an Amazon S3 user.
Are You a First-Time User of AWS Snowball?
If you are a first-time user of the Snowball service with the Snowball appliance, we recommend that you
read the following sections in order:
1. To learn more about the different types of jobs, see Jobs for Standard Snowball Appliances (p. 11).
2. For an end-to-end overview of how Snowball works with the Snowball appliance, see How AWS
Snowball Works with the Standard Snowball Appliance (p. 6).
3. When you're ready to get started, see Getting Started with AWS Snowball (p. 16).
2
Page 9

AWS Snowball User Guide
Pricing
Pricing
For information about the pricing and fees associated with the AWS Snowball, see AWS Snowball Pricing.
AWS Snowball Device Differences
The Snowball and the Snowball Edge are two different devices. This guide is for the Snowball. If you are
looking for documentation for the Snowball Edge, see the AWS Snowball Edge Developer Guide. Both
devices allow you to move huge amounts of data into and out of Amazon S3, they both have the same
job management API, and they both use the same console. However, the two devices differ in hardware
specifications, some features, what transfer tools are used, and price.
AWS Snowball Use Case Differences
Following is a table that shows the different use cases for the different AWS Snowball devices:
Use case Snowball Snowball Edge
Import data into Amazon S3
Copy data directly from HDFS
Export from Amazon S3
Durable local storage
Use in a cluster of devices
Use with AWS Greengrass (IoT)
Transfer files through NFS with a
GUI
✓ ✓
✓
✓ ✓
✓
✓
✓
✓
AWS Snowball Hardware Differences
Following is a table that shows how the devices differ from each other, physically. For information
on specifications for the Snowball, see AWS Snowball Specifications (p. 91). For information on
specifications for the Snowball Edge, see AWS Snowball Edge Specifications.
3
Page 10

AWS Snowball User Guide
Hardware Differences
Snowball Snowball Edge
Each device has different storage capacities, as follows:
Storage capacity (usable
Snowball Snowball Edge
capacity)
50 TB (42 TB) - US regions only
80 TB (72 TB)
100 TB (83 TB)
100 TB Clustered (45 TB per
✓
✓
✓
✓
node)
Each device has the following physical interfaces for management purposes:
Physical interface Snowball Snowball Edge
E Ink display – used to track
✓ ✓
shipping information and
configure your IP address.
LCD display – used to manage
✓
connections and provide some
administrative functions.
4
Page 11

AWS Snowball User Guide
Tool Differences
AWS Snowball Tool Differences
The following outlines the different tools used with the AWS Snowball devices, and how they are used:
Snowball Tools
Snowball client with Snowball
• Must be downloaded from the AWS Snowball Tools Download page and installed on a powerful
workstation that you own.
• Can transfer data to or from the Snowball. For more information, see Using the Snowball
Client (p. 52).
• Encrypts data on your powerful workstation before the data is transferred to the Snowball.
Amazon S3 Adapter for Snowball with Snowball
• Must be downloaded from the AWS Snowball Tools Download page and installed on a powerful
workstation that you own.
• Can transfer data to or from the Snowball. For more information, see Transferring Data with the
Amazon S3 Adapter for Snowball (p. 65).
• Encrypts data on your powerful workstation before the data is transferred to the Snowball.
Snowball Edge Tools
Snowball client with Snowball Edge
• Must be downloaded from the AWS Snowball Tools Download page and installed on a computer that
you own.
• Must be used to unlock the Snowball Edge or the cluster of Snowball Edge devices. For more
information, see Using the Snowball Client.
• Can't be used to transfer data.
Amazon S3 Adapter for Snowball with Snowball Edge
• Is already installed on the Snowball Edge by default. It does not need to be downloaded or installed.
• Can transfer data to or from the Snowball Edge. For more information, see Using the Amazon S3
Adapter.
• Encrypts data on the Snowball Edge while the data is transferred to the device.
File interface with Snowball Edge
• Is already installed on the Snowball Edge by default. It does not need to be downloaded or installed.
• Can transfer data by dragging and dropping files up to 150 GB in size from your computer to the
buckets on the Snowball Edge through an easy-to-configure NFS mount point. For more information,
see Using the File Interface for the AWS Snowball Edge.
• Encrypts data on the Snowball Edge while the data is transferred to the device.
AWS Greengrass console with Snowball Edge
• With a Snowball Edge, you can use the AWS Greengrass console to update your AWS Greengrass group
and the core running on the Snowball Edge.
5
Page 12

AWS Snowball User Guide
Other Differences
Differences Between Items Provided for the Snowball and
Snowball Edge
The following outlines the differences between the network adapters, cables used, and cables provided
for the Snowball and Snowball Edge.
Network Interface Snowball Support Snowball Edge
Support
RJ45
SFP+
SFP+ (with optic
connector)
QSFP
For more information on the network interfaces, cables, and connectors that work with the different
device types, see the following topics:
• Supported Network Hardware (p. 91) for Snowballs in this guide.
• Supported Network Hardware in the AWS Snowball Edge Developer Guide.
✓ ✓
✓ ✓
✓ ✓
✓
Cables Provided with
Device
Only provided with
Snowball
Only provided with
Snowball
No cables provided for
either device. No optic
connector provided for
Snowball Edge devices.
An optic connector is
provided with each
Snowball
No cables or optics
provided
AWS Snowball Other Differences
For other differences, including FAQs and pricing information, see:
• https://aws.amazon.com/snowball
• https://aws.amazon.com/snowball-edge
How AWS Snowball Works with the Standard Snowball Appliance
Following, you can find information on how AWS Snowball works, including concepts and its end-to-end
implementation.
Topics
• How It Works: Concepts (p. 7)
• How It Works: Implementation (p. 9)
6
Page 13

AWS Snowball User Guide
How It Works: Concepts
How It Works: Concepts
How Import Works
Each import job uses a single Snowball appliance. After you create a job in the AWS Snowball
Management Console or the job management API, we ship you a Snowball. When it arrives in a few days,
you’ll connect the Snowball to your network and transfer the data that you want imported into Amazon
S3 onto that Snowball using the Snowball client or the Amazon S3 Adapter for Snowball.
When you’re done transferring data, ship the Snowball back to AWS, and we’ll import your data into
Amazon S3.
7
Page 14

How Export Works
AWS Snowball User Guide
How It Works: Concepts
Each export job can use any number of Snowball appliances. After you create a job in the AWS Snowball
Management Console or the job management API, a listing operation starts in Amazon S3. This listing
operation splits your job into parts. Each job part can be up to about 80 TB in size, and each job part has
exactly one Snowball associated with it. After your job parts are created, your first job part enters the
Preparing Snowball status.
Soon after that, we start exporting your data onto a Snowball. Typically, exporting data takes one
business day. However, this process can take longer. Once the export is done, AWS gets the Snowball
ready for pickup by your region's carrier. When the Snowball arrives at your data center or office in a few
days, you’ll connect the Snowball to your network and transfer the data that you want exported to your
servers by using the Snowball client or the Amazon S3 Adapter for Snowball.
When you’re done transferring data, ship the Snowball back to AWS. Once we receive a returned
Snowball for your export job part, we perform a complete erasure of the Snowball. This erasure follows
the National Institute of Standards and Technology (NIST) 800-88 standards. This step marks the
completion of that particular job part. If there are more job parts, the next job part now is prepared for
shipping.
Note
The listing operation is a function of Amazon S3. You are billed for it as you are for any Amazon
S3 operation, even if you cancel your export job.
8
Page 15

AWS Snowball User Guide
How It Works: Implementation
How It Works: Implementation
The following are overviews of how the Snowball is implemented for importing and exporting data. Both
overviews assume that you'll use the AWS Snowball Management Console to create your job and the
Snowball client to locally transfer your data. If you'd rather work programmatically, to create jobs you
can use the job management API for Snowball. For more information, see AWS Snowball API Reference.
To transfer your data programmatically, you can use the Amazon S3 Adapter for Snowball. For more
information, see Transferring Data with the Amazon S3 API Adapter for Snowball (p. 65).
End-to-End Import Implementation
1. Create an import job – Sign in to the AWS Snowball Management Console and create a job. The
status of your job is now Job created, and we have queued your job request for processing. If there’s a
problem with your request, you can cancel your job at this point.
2. A Snowball is prepared for your job – We prepare a Snowball for your job, and the status of your job
is now Preparing Snowball. For security purposes, data transfers must be completed within 90 days
of the Snowball being prepared.
3. A Snowball is shipped to you by your region's carrier – The carrier takes over from here, and the
status of your job is now In transit to you. You can find your tracking number and a link to the
tracking website on the AWS Snowball Management Console. For information on who your region's
carrier is, see Shipping Carriers (p. 74).
4. Receive the Snowball – A few days later, your region's carrier delivers the Snowball to the address
that you provided when you created the job, and the status of your job changes to Delivered to you.
When the Snowball arrives, you’ll notice that it didn’t arrive in a box, because the Snowball is its own
shipping container.
5. Get your credentials and download the Snowball client – Get ready to start transferring data by
getting your credentials, your job manifest, and the manifest's unlock code, and then downloading the
Snowball client.
• The Snowball client is the tool that you’ll use to manage the flow of data from your on-premises
data source to the Snowball. You can download the Snowball client from the AWS Snowball Tools
Download page.
• The manifest is used to authenticate your access to the Snowball, and it is encrypted so that only
the unlock code can decrypt it. You can get the manifest from the AWS Snowball Management
Console when the Snowball is on-premises at your location.
• The unlock code is a 29-character code that also appears when you get your manifest. We
recommend that you write it down and keep it separate from the manifest to prevent unauthorized
access to the Snowball while it’s at your facility. The unlock code is visible when you get your
manifest.
6. Install and set up the Snowball client – Install the Snowball client on the computer workstation that
has your data source mounted on it.
7. Position the hardware – Move the Snowball into your data center and open it following the
instructions on the case. Connect the Snowball to power and your local network.
8. Power on the Snowball – Next, power on the Snowball by pressing the power button above the E Ink
display. Wait a few minutes, and the Ready screen appears.
9. Start the Snowball client – When you start the Snowball client on your workstation, type the IP
address of the Snowball, the path to your manifest, and the unlock code. The Snowball client decrypts
the manifest and uses it to authenticate your access to the Snowball.
10.Transfer data – Use the Snowball client to transfer the data that you want to import into Amazon S3
from your data source into the Snowball.
11.Prepare the Snowball for its return trip – After your data transfer is complete, power off the
Snowball and unplug its cables. Secure the Snowball’s cables into the cable caddie on the inside of the
Snowball’s back panel and seal the Snowball. Now the Snowball is ready to be returned.
9
Page 16

AWS Snowball User Guide
How It Works: Implementation
12.Your region's carrier returns the Snowball to AWS – While the carrier has the Snowball for shipping,
the status for the job becomes In transit to AWS.
13.AWS gets the Snowball – The Snowball arrives at AWS, and the status for your job becomes At AWS.
On average, it takes about a day for AWS to begin importing your data into Amazon S3.
14.AWS imports your data into Amazon S3 – When import starts, your job’s status changes to
Importing. The import can take a few days. At this point, if there are any complications or issues, we
contact you through email.
Once the import is complete, your job status becomes Completed, and a PDF file of your job
completion report becomes available for download from the AWS Snowball Management Console.
15.Your imported data now resides in Amazon S3 – With the import complete, the data that you
transferred is now in Amazon S3.
Now that you know how an import job works, you're ready to create your first job. For more information,
see Importing Data into Amazon S3 with AWS Snowball (p. 16).
For more information about the job management API for Snowball, see AWS Snowball API Reference.
End-to-End Export Implementation
1. Create an export job – Sign in to the AWS Snowball Management Console and create a job. This
process begins a listing operation in Amazon S3 to determine the amount of data to be transferred,
and also any optional ranges for objects within your buckets that your job will transfer. Once the
listing is complete, the AWS Snowball Management Console creates all the job parts that you'll need
for your export job. At this point, you can cancel your job if you need to.
Note
The listing operation is a function of Amazon S3. You are billed for it as you are for any
Amazon S3 operation, even if you cancel your export job.
2. A Snowball is prepared for your job part – Soon after your job parts are created, your first job part
enters the Preparing Snowball status. For security purposes, data transfers must be completed
within 90 days of the Snowball being prepared. When the Snowball is prepared, the status changes
to Exporting. Typically, exporting takes one business day; however, this process can take longer. Once
the export is done, the job status becomes Preparing shipment, and AWS gets the Snowball ready for
pickup.
3. A Snowball is shipped to you by your region's carrier – The carrier takes over from here, and the
status of your job is now In transit to you. You can find your tracking number and a link to the
tracking website on the AWS Snowball Management Console. For information on who your region's
carrier is, see Shipping Carriers (p. 74).
4. Receive the Snowball – A few days later, the carrier delivers the Snowball to the address you provided
when you created the job, and the status of your first job part changes to Delivered to you. When the
Snowball arrives, you’ll notice that it didn’t arrive in a box, because the Snowball is its own shipping
container.
5. Get your credentials and download the Snowball client – Get ready to start transferring data by
getting your credentials, your job manifest, and the manifest's unlock code, and then downloading the
Snowball client.
• The Snowball client is the tool that you’ll use to manage the flow of data from the Snowball to your
on-premises data destination. You can download the Snowball client from the AWS Snowball Tools
Download page.
• The manifest is used to authenticate your access to the Snowball, and it is encrypted so that only
the unlock code can decrypt it. You can get the manifest from the AWS Snowball Management
Console when the Snowball is on-premises at your location.
• The unlock code is a 29-character code that also appears when you get your manifest. We
recommend that you write it down and keep it separate from the manifest to prevent unauthorized
10
Page 17

AWS Snowball User Guide
Jobs
access to the Snowball while it’s at your facility. The unlock code is visible when you get your
manifest.
6. Install and set up the Snowball client – Install the Snowball client on the computer workstation that
has your data source mounted on it.
7. Position the hardware – Move the Snowball into your data center and open it following the
instructions on the case. Connect the Snowball to power and your local network.
8. Power on the Snowball – Next, power on the Snowball by pressing the power button above the E Ink
display. Wait a few minutes, and the Ready screen appears.
9. Start the Snowball client – When you start the Snowball client on your workstation, type the IP
address of the Snowball, the path to your manifest, and the unlock code. The Snowball client decrypts
the manifest and uses it to authenticate your access to the Snowball.
10.Transfer data – Use the Snowball client to transfer the data that you want to export from the
Snowball appliance into your on-premises data destination.
11.Prepare the Snowball for its return trip – After your data transfer is complete, power off the
Snowball and unplug its cables. Secure the Snowball’s cables into the cable caddie on the inside of the
Snowball’s back panel and seal the Snowball. The Snowball is now ready to be returned.
12.Your region's carrier returns the Snowball to AWS – When the carrier has the Snowball, the status
for the job becomes In transit to AWS. At this point, if your export job has more job parts, the next job
part enters the Preparing Snowball status.
13.We erase the Snowball – Once we receive a returned Snowball we perform a complete erasure of the
Snowball. This erasure follows the NIST 800-88 standards.
Now that you know how an export job works, you're ready to create your first job. For more information,
see Exporting Data from Amazon S3 with Snowball (p. 24).
Jobs for Standard Snowball Appliances
A job in AWS Snowball (Snowball) is a discrete unit of work, defined when you create it in the console
or the job management API. Jobs have types, details, and statuses. Each of those elements is covered in
greater detail in the sections that follow.
Topics
• Job Types (p. 11)
• Job Details (p. 12)
• Job Statuses (p. 13)
Job Types
There are two different job types: import jobs and export jobs. Both of the Snowball job types are
summarized following, including the source of the data, how much data can be moved, and the result
you can expect at successful job completion. Although these two types of jobs have fundamental
differences, they share some common details The source can be local to your data center or office, or it
can be an Amazon S3 bucket.
Import into Amazon S3
An import job is the transfer of 80 TB or less of your data (located in an on-premises data source), copied
onto a single Snowball, and then moved into Amazon S3. For import jobs, Snowballs and jobs have a
one-to-one relationship, meaning that each job has exactly one Snowball associated with it. If you need
additional Snowballs, you can create new import jobs or clone existing ones.
11
Page 18

AWS Snowball User Guide
Job Details
Your data source for an import job should be on-premises. In other words, the storage devices that
hold the data to be transferred should be physically located at the address that you provided when you
created the job.
You can import any number of directories, files, and objects for each import job, provided the amount of
data you're importing fits within a single Snowball. In the US regions, Snowballs come in two sizes: 50 TB
and 80 TB. All other regions have 80 TB Snowballs only.
When you import files, each file becomes an object in Amazon S3 and each directory becomes a prefix.
If you import data into an existing bucket, any existing objects with the same names as newly imported
objects will be overwritten.
When the import has been processed and verified, AWS performs a complete erasure of the Snowball.
This erasure follows the National Institute of Standards and Technology (NIST) 800-88 standards.
After your import is complete, you can download a job report. This report alerts you to any objects that
failed the import process. You can find additional information in the success and failure logs.
Important
Don't delete your local copies of the transferred data until you can verify the results of the job
completion report and review your import logs.
Export from Amazon S3
An export job is the transfer of any amount of data (located in Amazon S3), copied onto any number of
Snowballs, and then moved one Snowball at a time into your on-premises data destination. When you
create an export job, it's split into job parts. Each job part is no more than 80 TB in size, and each job
part has exactly one Snowball associated with it.
Your data source for an export job is one or more Amazon S3 buckets. Once the data for a job part is
moved from Amazon S3 to a Snowball, you can download a job report. This report will alert you to any
objects that failed the transfer to the Snowball. You can find more information in your job's success and
failure logs.
You can export any number of objects for each export job, using as many Snowballs as it takes to
complete the transfer. Snowballs for an export job's job parts are delivered one after another, with
subsequent Snowballs shipping out to you once the previous job part has entered the In transit to AWS
status.
When you copy objects into your on-premises data destination from a Snowball, those objects are saved
as files. If you copy objects into a location that already holds files, any existing files with the same names
will be overwritten.
When AWS receives a returned Snowball, we perform a complete erasure of the Snowball. This erasure
follows the NIST 800-88 standards.
Important
Don't change, update, or delete the exported Amazon S3 objects until you can verify that all of
your contents for the entire job have been copied to your on-premises data destination.
When you create an export job, you can choose to export an entire Amazon S3 bucket or a specific range
of objects keys. For more information, see Using Export Ranges (p. 40).
Job Details
Each import or export job for Snowball is defined by the details that you specify when it's created. The
following list describes all the details of a job.
• Job name – A name for the job, containing alphanumeric characters, spaces, and any Unicode special
characters.
12
Page 19

AWS Snowball User Guide
Job Statuses
• Job type – The type of job, either import or export.
• Job ID – A unique 39-character label that identifies your job. The job ID appears at the bottom of the
shipping label that appears on the E Ink display, and in the name of a job's manifest file.
• Created date – The date that you created this job.
• Shipping speed – Speed options are based on region. For more information, see Shipping
Speeds (p. 76).
• IAM role ARN – This Amazon Resource Name (ARN) is the AWS Identity and Access Management
(IAM) role that is created during job creation with write permissions for your Amazon S3 buckets. The
creation process is automatic, and the IAM role that you allow Snowball to assume is only used to copy
your data between your Amazon S3 buckets and the Snowball. For more information, see Creating an
IAM Role for Snowball (p. 81).
• AWS KMS key – In Snowball, AWS Key Management Service (AWS KMS) encrypts the keys on each
Snowball. When you create your job, you also choose or create an ARN for an AWS KMS encryption key
that you own. For more information, see AWS Key Management Service in Snowball (p. 84).
• Snowball capacity – In the US regions, Snowballs come in two sizes: 50 TB and 80 TB. All other
regions have the 80 TB Snowballs only.
• Storage service – The AWS storage service associated with this job, in this case Amazon S3.
• Resources – The AWS storage service resources associated with your job. In this case, these are the
Amazon S3 buckets that your data is transferred to or from.
Job Statuses
Each job has a status, which changes to denote the current state of the job.
Job Status Description Job Type That Status
Applies To
Job created Your job has just been created. This status is the
only one during which you can cancel a job or its
job parts, if the job is an export job.
Preparing Snowball AWS is preparing a Snowball for your job. Both
Exporting AWS is exporting your data from Amazon S3 onto
a Snowball.
Preparing shipment AWS is preparing to ship a Snowball to you. Both
In transit to you The Snowball has been shipped to the address
you provided during job creation.
Delivered to you The Snowball has arrived at the address you
provided during job creation.
In transit to AWS You have shipped the Snowball back to AWS. Both
At AWS Your shipment has arrived at AWS. If you're
importing data, your import typically begins
within a day of its arrival.
Both
Export
Both
Both
Both
Importing AWS is importing your data into Amazon Simple
Storage Service (Amazon S3).
Completed Your import job or export job part has completed
successfully.
13
Import
Both
Page 20

AWS Snowball User Guide
Setting Up
Job Status Description Job Type That Status
Applies To
Canceled Your job has been canceled. You can only cancel
Snowball import jobs during the Job created
status.
Setting Up Your AWS Access
Before you use AWS Snowball (Snowball) for the first time, you need to complete the following tasks:
1. Sign Up for AWS (p. 14).
2. Create an IAM User (p. 14).
Sign Up for AWS
When you sign up for Amazon Web Services (AWS), your AWS account is automatically signed up for all
services in AWS, including AWS Import/Export. You are charged only for the services that you use. For
more information about pricing and fees for Snowball, see AWS Snowball Pricing. Snowball is not free to
use; for more information on what AWS services are free, see AWS Free Usage Tier.
If you have an AWS account already, skip to the next task. If you don't have an AWS account, use the
following procedure to create one.
To create an AWS account
1. Open https://aws.amazon.com/, and then choose Create an AWS Account.
Note
This might be unavailable in your browser if you previously signed into the AWS
Management Console. In that case, choose Sign in to a different account, and then choose
Create a new AWS account.
2. Follow the online instructions.
Both
Part of the sign-up procedure involves receiving a phone call and entering a PIN using the phone
keypad.
Note your AWS account number, because you'll need it for the next task.
Create an IAM User
Services in AWS, such as AWS Import/Export, require that you provide credentials when you access
them, so that the service can determine whether you have permission to access its resources. AWS
recommends not using the root credentials of your AWS account to make requests. Instead, create an
AWS Identity and Access Management (IAM) user, and grant that user full access. We refer to these users
as administrator users.
You can use the administrator user credentials, instead of root credentials of your account, to interact
with AWS and perform tasks, such as to create an Amazon S3 bucket, create users, and grant them
permissions. For more information, see Root Account Credentials vs. IAM User Credentials in the AWS
General Reference and IAM Best Practices in IAM User Guide.
If you signed up for AWS but have not created an IAM user for yourself, you can create one using the IAM
console.
14
Page 21

AWS Snowball User Guide
Next Step
To create an IAM user for yourself and add the user to an Administrators group
1. Use your AWS account email address and password to sign in as the AWS account root user to the
IAM console at https://console.aws.amazon.com/iam/.
Note
We strongly recommend that you adhere to the best practice of using the Administrator
IAM user below and securely lock away the root user credentials. Sign in as the root user
only to perform a few account and service management tasks.
2. In the navigation pane of the console, choose Users, and then choose Add user.
3. For User name, type Administrator.
4. Select the check box next to AWS Management Console access, select Custom password, and then
type the new user's password in the text box. You can optionally select Require password reset to
force the user to create a new password the next time the user signs in.
5. Choose Next: Permissions.
6. On the Set permissions for user page, choose Add user to group.
7. Choose Create group.
8. In the Create group dialog box, type Administrators.
9. For Filter, choose Job function.
10. In the policy list, select the check box for AdministratorAccess. Then choose Create group.
11. Back in the list of groups, select the check box for your new group. Choose Refresh if necessary to
see the group in the list.
12. Choose Next: Review to see the list of group memberships to be added to the new user. When you
are ready to proceed, choose Create user.
You can use this same process to create more groups and users, and to give your users access to your
AWS account resources. To learn about using policies to restrict users' permissions to specific AWS
resources, go to Access Management and Example Policies.
To sign in as this new IAM user, sign out of the AWS Management Console, then use the following URL,
where your_aws_account_id is your AWS account number without the hyphens (for example, if your
AWS account number is 1234-5678-9012, your AWS account ID is 123456789012):
https://your_aws_account_id.signin.aws.amazon.com/console/
Type the IAM user name and password that you just created. When you're signed in, the navigation bar
displays "your_user_name @ your_aws_account_id".
If you don't want the URL for your sign-in page to contain your AWS account ID, you can create an
account alias. From the IAM dashboard, choose Create Account Alias and type an alias, such as your
company name. To sign in after you create an account alias, use the following URL:
https://your_account_alias.signin.aws.amazon.com/console/
To verify the sign-in link for IAM users for your account, open the IAM console and check under AWS
Account Alias on the dashboard.
If you're going to create Snowball jobs through an IAM user that is not an administrator user, that
user needs certain permissions to use the AWS Snowball Management Console effectively. For more
information on those permissions, see Creating an IAM User for Snowball (p. 79).
Next Step
Getting Started with AWS Snowball (p. 16)
15
Page 22

AWS Snowball User Guide
Sign Up for AWS
Getting Started with AWS Snowball
With AWS Snowball (Snowball), you can transfer hundreds of terabytes or petabytes of data between
your on-premises data centers and Amazon Simple Storage Service (Amazon S3). Following, you can
find general instructions for creating and completing your first data transfer job. You can find more
information on specific components of Snowball later in this documentation. For an overview of the
service as a whole, see How AWS Snowball Works with the Standard Snowball Appliance (p. 6).
Both sets of instructions assume that you'll use the AWS Snowball Management Console to create your
job and the Snowball client to locally transfer your data. If you'd rather work programmatically, to create
jobs you can use the job management API for Snowball. For more information, see AWS Snowball API
Reference. To transfer your data programmatically, you can use the Amazon S3 Adapter for Snowball. For
more information, see Transferring Data with the Amazon S3 Adapter for Snowball (p. 65).
Sign Up for AWS
If you already have an AWS account, go ahead and skip to the next section: Create an Administrator IAM
User (p. 16). Otherwise, see Sign Up for AWS (p. 14).
Create an Administrator IAM User
If you already have an administrator AWS Identity and Access Management (IAM) user account, go
ahead and skip to one of the sections listed following. If you don't have an administrator IAM user, we
recommend that you create one and not use the root credentials of your AWS account to make requests.
To do so, see Create an IAM User (p. 14).
Important
There is no free tier for Snowball. To avoid unwanted charges and delays, read through the
relevant import or export section following before you start creating your jobs.
Next:
• Importing Data into Amazon S3 with AWS Snowball (p. 16)
• Exporting Data from Amazon S3 with Snowball (p. 24)
Importing Data into Amazon S3 with AWS Snowball
The process for importing data into Amazon S3 with Snowball has the following steps.
Topics
• Create an Import Job (p. 17)
• Receive the AWS Snowball Appliance (p. 18)
• Connect the AWS Snowball Appliance to Your Local Network (p. 20)
• Transfer Data (p. 21)
• Return the Appliance (p. 24)
• Monitor the Import Status (p. 24)
16
Page 23

AWS Snowball User Guide
Create an Import Job
Create an Import Job
To create an import job from the console
1. Sign in to the AWS Management Console and open the AWS Snowball Management Console.
2. Choose Create Job.
3. Plan your job.
In this optional step, you determine the number of jobs you need to create to finish transferring all
the data you want to import into Amazon S3. The answer you provide helps you better plan for your
data transfer.
Once you've finished this page, choose Next.
Note
If you're performing a petabyte scale data transfer, we recommend that you read How to
Transfer Petabytes of Data Efficiently (p. 36) before you create your first job.
4. Give shipping details.
On this page, you provide the shipping address that you want the Snowball for this job delivered
to. In some regions you choose your shipping speed as well. For more information, see Shipping
Speeds (p. 76).
Once you've finished this page, choose Next.
5. Give job details.
On this page, specify the details of your job. These details include the name of your import job,
the region for your destination Amazon S3 bucket, the specific Amazon S3 bucket to receive your
imported data, and the storage size of the Snowball. If you don't already have an Amazon S3 bucket,
you can create one on this page. If you create a new Amazon S3 bucket for your destination, note
that the Amazon S3 namespace for buckets is shared universally by all AWS users as a feature of the
service. Use a bucket name that is specific and clear for your usage.
Once you've finished this page, choose Next.
6. Set security.
On this page, you specify the following:
• The Amazon Resource Name (ARN) for the IAM role that Snowball assumes to import your data to
your destination S3 bucket when you return the Snowball.
• The ARN for the AWS Key Management Service (AWS KMS) master key to be used to protect your
data within the Snowball. For more information, see Security in AWS Snowball (p. 77).
Once you've finished this page, choose Next.
7. Set notifications.
On this page, specify the Amazon Simple Notification Service (Amazon SNS) notification options
for your job and provide a list of comma-separated email addresses to receive email notifications
for this job. You can also choose which job status values trigger these notifications. For more
information, see Snowball Notifications (p. 90).
Once you've finished this page, choose Next.
8. Review.
On the next page, review the information you've provided. To make changes, choose the Edit button
next to the step to change in the navigation pane, or choose Back.
17
Page 24

AWS Snowball User Guide
Receive the Snowball
Important
Review this information carefully, because incorrect information can result in unwanted
delays.
Once your job is created, you're taken to the job dashboard, where you can view and manage your jobs.
The last job you created is selected by default, with its Job status pane open.
Note
The Job created status is the only status during which you can cancel a job.
For more information on managing jobs from the AWS Snowball Management Console and tracking
job status, see Using the AWS Snowball Management Console (p. 40). Jobs can also be created and
managed with the job management API. For more information, see the AWS Snowball API Reference.
After you created your first import job, AWS processes the information you provided and prepares a
Snowball specifically for your import job into Amazon S3. During the processing stage, if there's an
issue with your job, we contact you by email. Otherwise, we ship a Snowball to the address you provided
when you created the job. Shipping can take a few days, but you can track the shipping status of the
Snowball we prepared for your job. In your job's details, you'll see a link to the tracking webpage with
your tracking number provided.
Next: Receive the AWS Snowball Appliance (p. 18)
Receive the AWS Snowball Appliance
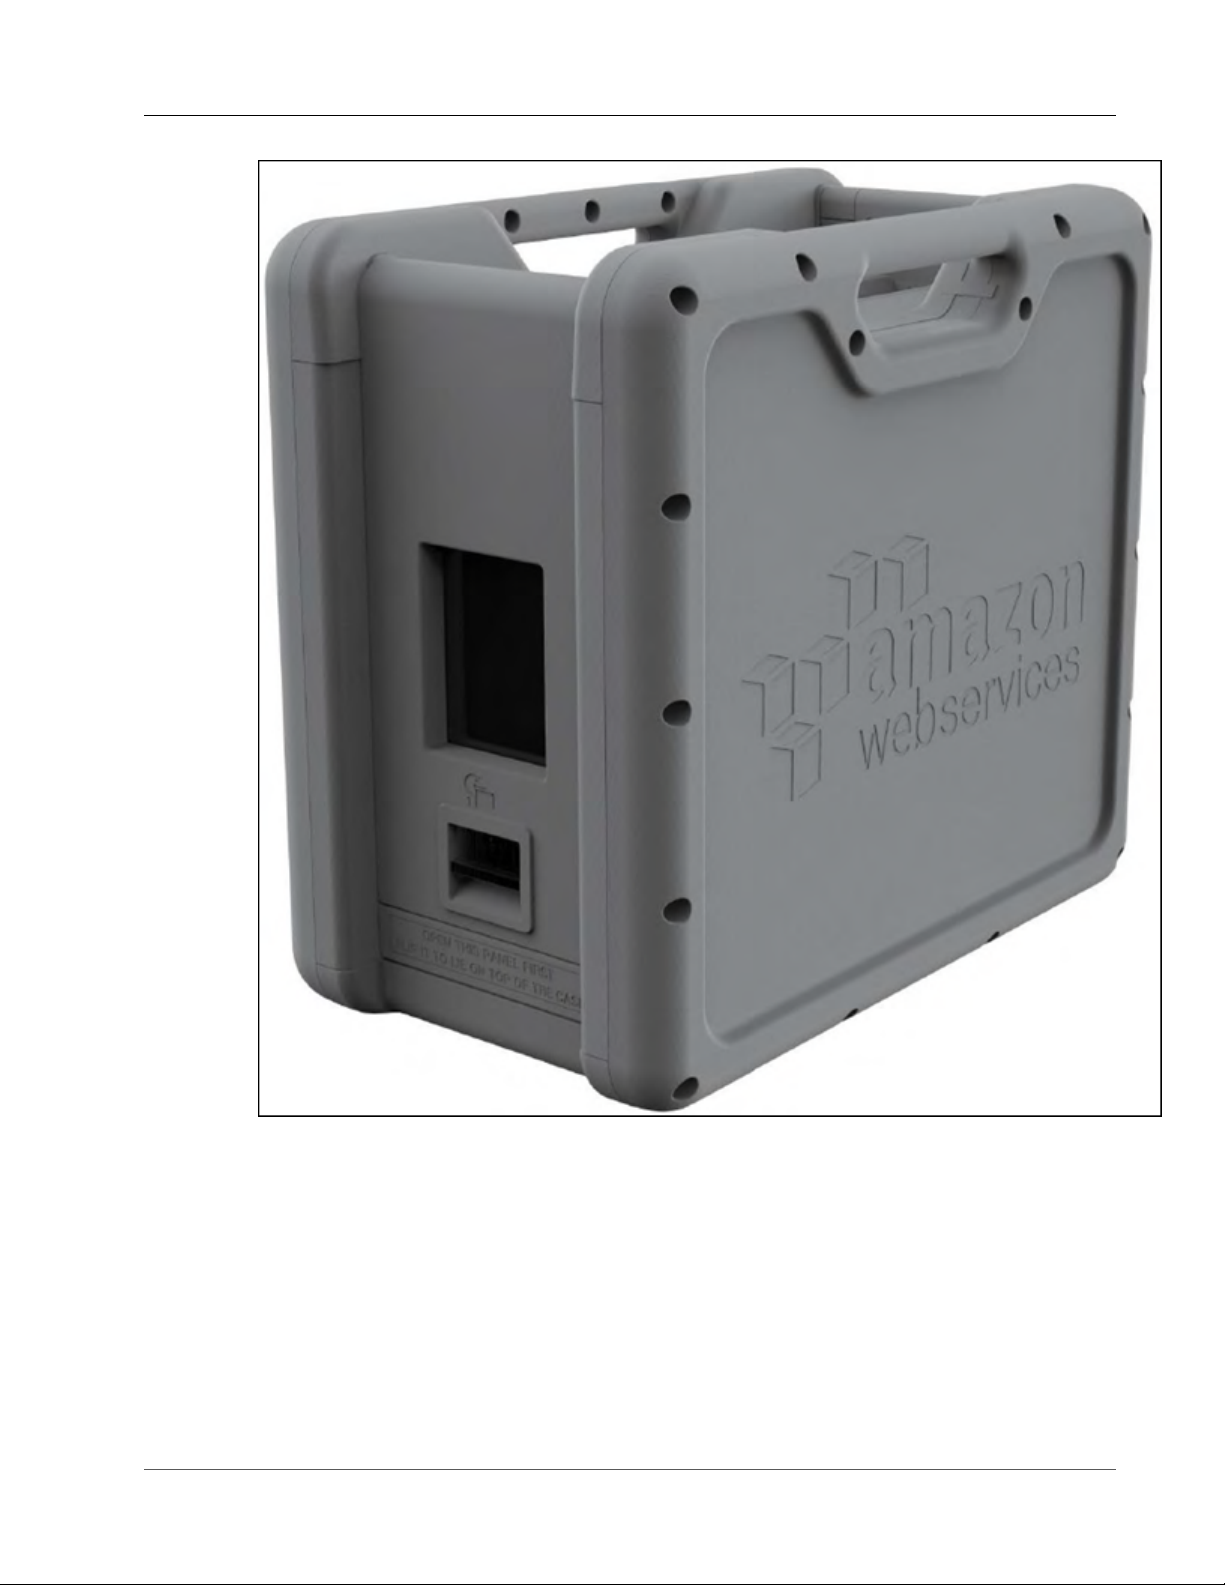
When you receive the Snowball appliance, you'll notice that it doesn't come in a box. The Snowball is
its own physically rugged shipping container. When the Snowball first arrives, inspect it for damage
or obvious tampering. If you notice anything that looks suspicious about the Snowball, don't connect
it to your internal network. Instead, contact AWS Support and inform them of the issue so that a new
Snowball can be shipped to you.
Important
The Snowball is the property of AWS. Tampering with a Snowball is a violation of the AWS
Acceptable Use Policy. For more information, see http://aws.amazon.com/aup/.
Before you connect the Snowball to your network and begin transferring data, it's important to cover a
few basic elements of your data transfer.
• The Snowball – The following is what the Snowball will look like.
18
Page 25
AWS Snowball User Guide
Receive the Snowball
• Data source – This device holds the data that you want to transfer from your on-premises data center
into Amazon S3. It can be a single device, such as a hard drive or USB stick, or it can be separate
sources of data within your data center. The data source or sources must be mounted onto your
workstation in order to transfer data from them.
• Workstation – This computer hosts your mounted data source. You'll use this workstation to transfer
data to the Snowball. We highly recommend that your workstation be a powerful computer, able
to meet high demands in terms of processing, memory, and networking. For more information, see
Workstation Specifications (p. 93).
Next: Connect the AWS Snowball Appliance to Your Local Network (p. 20)
19
Page 26

AWS Snowball User Guide
Connect the Snowball to Your Local Network
Connect the AWS Snowball Appliance to Your Local Network
In this step, you'll connect the Snowball to your network. The Snowball appliance has two panels, a front
and a back, which are opened by latches and flipped up to rest on the top of the Snowball. Open the
front panel first, flip it on top of the Snowball, and then open the back panel, flipping it up to rest on the
first. Doing this gives you access to the touch screen on the E Ink display embedded in the front side of
the Snowball, and the power and network ports in the back.
Remove the cables from the cable catch, and plug the Snowball into power. Each Snowball has been
engineered to support data transfer over RJ45, SFP+ copper, or SFP+ optical 10 gigabit Ethernet. For SFP
+ optical, you'll have to use your own cable, connected to the SFP+ optical adapter in one of the SFP+
ports. For more information on cables and ports, see Supported Network Hardware (p. 91). Choose
a networking option, and plug the Snowball into your network. Power on the Snowball by pressing the
power button above the E Ink display.
1. Connect the powered-off Snowball to your network.
Note
We recommend that you set up your network connections so that there are as few hops as
possible between the data source, the workstation, and the Snowball.
2. Attach the power cable to the back of the Snowball, and then plug it in to a reliable source of power.
Then press the power button, located above the E Ink display, and wait for the E Ink display to read
Ready.
3. When the Snowball is ready, the E Ink display shows the following screen.
20
Page 27

AWS Snowball User Guide
Transfer Data
At this point, you can change the default network settings through the E Ink display by choosing
Network. To learn more about specifying network settings for the Snowball, see Changing Your IP
Address (p. 49).
Make a note of the IP address shown, because you'll need it to configure the Snowball client.
Important
To prevent corrupting your data, do not disconnect the Snowball or change its network
settings while transferring data.
The Snowball is now connected to your network.
Next: Transfer Data (p. 21)
Transfer Data
The following section discuss the steps involved in transferring data. These steps involve getting your
credentials, downloading and installing the Snowball client tool, and then transferring data from your
data source into the Snowball using the Snowball client.
Note
You can also transfer data programmatically with the Amazon S3 Adapter for Snowball. For
more information, see Transferring Data with the Amazon S3 Adapter for Snowball (p. 65).
Topics
21
Page 28

AWS Snowball User Guide
Transfer Data
• Get Your Credentials (p. 22)
• Install the AWS Snowball Client (p. 22)
• Use the AWS Snowball Client (p. 22)
• Stop the AWS Snowball Client, and Power Off the Snowball (p. 23)
• Disconnect the Appliance (p. 23)
Get Your Credentials
Each AWS Snowball job has a set of credentials that you must get from the AWS Snowball Management
Console or the job management API to authenticate your access to the Snowball. These credentials are
an encrypted manifest file and an unlock code. The manifest file contains important information about
the job and permissions associated with it. Without it, you won't be able to transfer data. The unlock
code is used to decrypt the manifest. Without it, you won't be able to communicate with the Snowball.
Note
You can only get your credentials after the Snowball appliance has been delivered to you. After
the appliance has been returned to AWS, the credentials for your job are no longer available.
To get your credentials by using the console
1. Sign in to the AWS Management Console and open the AWS Snowball Management Console at AWS
Snowball Management Console.
2. In the AWS Snowball Management Console, search the table for the specific job to download the job
manifest for, and then choose that job.
3. Expand that job's Job status pane, and select View job details
4. In the details pane that appears, expand Credentials. Make a note of the unlock code (including
the hyphens), because you'll need to provide all 29 characters to transfer data. Choose Download
manifest in the dialog box and follow the instructions to download the job manifest file to your
computer. The name of your manifest file includes your Job ID.
Note
As a best practice, we recommend that you don't save a copy of the unlock code in the same
location in the workstation as the manifest for that job. For more information, see Best
Practices for AWS Snowball (p. 33).
Now that you have your credentials, you're ready to transfer data.
Install the AWS Snowball Client
The Snowball client is one of the tools that you can use transfer from your on-premises data source to
the Snowball. You can download the Snowball client for your operating system from AWS Snowball
Tools Download page.
Use the AWS Snowball Client
In this step, you'll run the Snowball client from the workstation first to authenticate your access to the
Snowball for this job, and then to transfer data.
To authenticate your access to the Snowball, open a terminal or command prompt window on your
workstation and type the following command:
snowball start -i [Snowball IP Address] -m [Path/to/manifest/file] -u [29
character unlock code]
Following is an example of the command to configure the Snowball client.
22
Page 29

AWS Snowball User Guide
Transfer Data
snowball start -i 192.0.2.0 -m /Downloads/JID2EXAMPLE-0c40-49a7-9f53-916aEXAMPLE81manifest.bin -u 12345-abcde-12345-ABCDE-12345
In this example, the IP address for the Snowball is 192.0.2.0, the job manifest file that you downloaded is
JID2EXAMPLE-0c40-49a7-9f53-916aEXAMPLE81-manifest.bin, and the 29 character unlock code
is 12345-abcde-12345-ABCDE-12345.
When you've entered the preceding command with the right variables for your job, you get a
confirmation message. This message means that you're authorized to access the Snowball for this job.
Now you can begin transferring data onto the Snowball. Similarly to how Linux allows you to copy files
and folders with the copy (or cp) command, the Snowball client also uses a cp command. As in Linux,
when you use the copy command you'll provide the values of two paths in your command. One path
represents the source location of the data to be copied, and the second path represents the destination
where the data will be pasted. When you're transferring data, destination paths to the Snowball must
start with the s3:// root directory identifier.
During data transfer, you'll notice that there is at least one folder at the root level of the Snowball. This
folder and any others at this level have the same names as the destination buckets that were chosen
when this job was created. Data cannot be transferred directly into the root directory; it must instead go
into one of the bucket folders or into their subfolders.
To transfer data using the Snowball client, open a terminal or command prompt window on your
workstation and type the following command:
snowball cp [options] [path/to/data/source] s3://[path/to/data/destination]
Following is an example of the command to copy data using the client to the Snowball.
snowball cp --recursive /Logs/April s3://MyBucket/Logs
For more information on using the Snowball client tool, see Using the Snowball Client (p. 52). Use the
Snowball client commands to finish transferring your data into the Snowball. When you finish, it's time
to prepare the Snowball for its return trip.
Stop the AWS Snowball Client, and Power Off the Snowball
When you've finished transferring data on to the Snowball, prepare it for its return trip to AWS. To
prepare it, run the snowball stop command in the terminal of your workstation. Running this
command stops all communication to the Snowball from your workstation and performs local cleanup
operations in the background. When that command has finished, power off the Snowball by pressing the
power button above the E Ink display.
Disconnect the Appliance
Disconnect the Snowball cables. Secure the Snowball's cables into the cable caddie on the inside of the
Snowball back panel and seal the Snowball. When the return shipping label appears on the Snowball's E
Ink display, you're ready to drop it off with your region's carrier to be shipped back to AWS. To see who
your region's carrier is, see Shipping Carriers (p. 74).
Important
Don't delete your local copies of the transferred data until the import into Amazon S3 is
successful at the end of the process and you can verify the results of the data transfer.
Next:
Return the Appliance (p. 24)
23
Page 30

AWS Snowball User Guide
Return the Appliance
Return the Appliance
The prepaid shipping label on the E Ink display contains the correct address to return the Snowball.
For information on how to return your Snowball, see Shipping Carriers (p. 74). The Snowball will be
delivered to an AWS sorting facility and forwarded to the AWS data center. The carrier will automatically
report back a tracking number for your job to the AWS Snowball Management Console. You can access
that tracking number, and also a link to the tracking website, by viewing the job's status details in the
console, or by making calls to the job management API.
Important
Unless personally instructed otherwise by AWS, never affix a separate shipping label to the
Snowball. Always use the shipping label that is displayed on the Snowball's E Ink display.
Additionally, you can track the status changes of your job through the AWS Snowball Management
Console, by Amazon SNS notifications if you selected that option during job creation, or by making calls
to the job management API. For more information on this API, see AWS Snowball API Reference. The
final status values include when the Snowball has been received by AWS, when data import begins, and
when the import job is completed.
Next: Monitor the Import Status (p. 24)
Monitor the Import Status
You can track the status of your job at any time through the AWS Snowball Management Console or
by making calls to the job management API. For more information this API, see AWS Snowball API
Reference. Whenever the Snowball is in transit, you can get detailed shipping status information from
the tracking website using the tracking number you obtained when your region's carrier received the
Snowball.
To monitor the status of your import job in the console, sign in to the AWS Snowball Management
Console. Choose the job you want to track from the table, or search for it by your chosen parameters in
the search bar above the table. Once you select the job, detailed information appears for that job within
the table, including a bar that shows real-time status of your job.
Once your package arrives at AWS and the Snowball is delivered to processing, your job status changes
from In transit to AWS to At AWS. On average, it takes a day for your data import into Amazon S3 to
begin. When it does, the status of your job changes to Importing. From this point on, it takes an average
of two business days for your import to reach Completed status.
Now your first data import job into Amazon S3 using Snowball is complete. You can get a report about
the data transfer from the console. To access this report from the console, select the job from the
table, and expand it to reveal the job's detailed information. Choose Get report to download your job
completion report as a PDF file. For more information, see Getting Your Job Completion Report and Logs
in the Console (p. 42).
Next: Where Do I Go from Here? (p. 32)
Exporting Data from Amazon S3 with Snowball
The AWS Snowball Management Console is where you'll create and manage jobs to export data from
Amazon S3. The process for export data from Amazon S3 with Snowball has the following steps.
Topics
• Create an Export Job (p. 25)
• Receive the AWS Snowball Appliance (p. 26)
24
Page 31

AWS Snowball User Guide
Create an Export Job
• Connect the AWS Snowball Appliance to Your Local Network (p. 28)
• Transfer Data (p. 29)
• Return the Appliance (p. 32)
• Repeat the Process (p. 32)
Create an Export Job
To create an export job from the console
1. Sign in to the AWS Management Console and open the AWS Snowball Management Console at AWS
Snowball Management Console.
2. Choose Create Job.
3. Plan your job.
In this step, you'll choose your job type. For an export job, choose Export.
Once you've finished this page, choose Next.
Note
If you're performing a petabyte scale data transfer, we recommend that you read How to
Transfer Petabytes of Data Efficiently (p. 36) before you create your first job.
4. Give shipping details.
On the next page, you'll provide the shipping address that you want the Snowball for this job
delivered to. In some regions you choose your shipping speed as well. For more information, see
Shipping Speeds (p. 76).
Once you've finished this page, choose Next.
5. Give job details.
On the next page, specify the details of your job. These details include the name of your export job,
the region that your source Amazon S3 buckets reside in, the buckets that you want to export data
from, and the storage size for the Snowballs that will be used with this job. We recommend that you
let AWS decide on the Snowball sizes for each job part, as we will optimize for cost efficiency and
speed for each job part. When you create an export job in the AWS Snowball Management Console,
you can choose to export an entire Amazon S3 bucket or a specific range of objects and prefixes. For
more information, see Using Export Ranges (p. 40).
Important
When selecting what data to export, keep in mind that objects with trailing slashes in their
names (/ or \) will not be transferred. Before exporting any objects with trailing slashes,
update their names to remove the slash.
Once you've finished this page, choose Next.
6. Set security.
On the next page, you'll specify the Amazon Resource Name (ARN) for the AWS Identity and Access
Management role that Snowball assumes to export your data from your source Amazon S3 buckets,
and also the AWS Key Management Service (AWS KMS) master key ARN to be used to protect your
data within the Snowball. For more information, see Security in AWS Snowball (p. 77).
Once you've finished this page, choose Next.
7. Set notifications.
On the next page, specify the Amazon Simple Notification Service (Amazon SNS) notification
options for your job and provide a list of comma-separated email addresses to receive email
25
Page 32

AWS Snowball User Guide
Receive the Snowball
notifications for this job. You can also choose which job status values trigger these notifications. For
more information, see Snowball Notifications (p. 90).
Once you've finished this page, choose Next.
8. Review.
On the next page, review the information you've provided. To make changes, choose the Edit button
next to the step to change in the navigation pane, or choose Back.
Important
Review this information carefully, because incorrect information can result in unwanted
delays.
Once your job is created, you're taken to the job dashboard, where you can view and manage your jobs.
The newest job you created is selected by default, though this a temporary placeholder. When the
Amazon S3 listing operation completes in the background, this newest job will be replaced with the
number of job parts necessary to complete your job.
Note
At this point, until the job enters the Preparing Snowball status, you have the option of
canceling the job and its job parts. If you think that you might want to cancel a job, we suggest
that you use Amazon SNS notifications to track when the job is created.
For more information on managing jobs from the AWS Snowball Management Console and tracking job
status, see Using the AWS Snowball Management Console (p. 40).
Once the Snowball is prepared, the status for your first job part will become Exporting. Exporting
typically takes one business day; however, this can take longer on occasion.
Once Exporting has completed, the Snowball for your job part enters the Preparing shipment status,
followed quickly by the In transit to you status. Shipping can take a few days, and you can track the
shipping status of the Snowball we prepared for your job. In your job's details, you'll see a link to the
tracking webpage with your tracking number provided.
Now that your export job is on its way, you can get from the console a report of the data transfer from
Amazon S3 to the Snowball, and also success and failure logs. To access the report or the logs, select
the job from the table, and expand it to reveal the job's detailed information. Choose Get report to
download your job report. For more information, see Getting Your Job Completion Report and Logs in
the Console (p. 42).
Next: Receive the AWS Snowball Appliance (p. 26)
Receive the AWS Snowball Appliance
When you receive the Snowball appliance, you'll notice that it doesn't come in a box. The Snowball is
its own physically rugged shipping container. When the Snowball first arrives, inspect it for damage or
obvious tampering. If you notice anything that looks suspicious about the Snowball, don't connect it to
your internal network. Instead, contact AWS Support and inform us of the issue so that a new Snowball
can be shipped to you.
Important
The Snowball is the property of AWS. Tampering with a Snowball is a violation of the AWS
Acceptable Use Policy. For more information, see http://aws.amazon.com/aup/.
Before you connect the Snowball to your network and begin transferring data, it's important to cover a
few basic components of Snowball data transfer.
• The Snowball – The following is what the Snowball will look like.
26
Page 33

AWS Snowball User Guide
Receive the Snowball
• Data destination – This on-premises device will hold the data that you want to transfer from the
Snowball. It can be a single device, such as a hard drive or USB stick, or it can be separate destinations
of data within your data center. The data destination must be mounted onto your workstation in order
to transfer data to it.
• Workstation – This computer hosts your mounted data destination. You'll use this workstation to
receive data from the Snowball. We highly recommend that your workstation be a powerful computer,
able to meet high demands in terms of processing, memory, and networking. For more information,
see Workstation Specifications (p. 93).
Next: Connect the AWS Snowball Appliance to Your Local Network (p. 28)
27
Page 34

AWS Snowball User Guide
Connect the Snowball to Your Local Network
Connect the AWS Snowball Appliance to Your Local Network
In this step, you'll connect the Snowball to your network. The Snowball appliance has two panels, a front
and a back, which are opened by latches and flipped up to rest on the top of the Snowball. Open the
front panel first, flip it on top of the Snowball, and then open the back panel, flipping it up to rest on the
first. Doing this gives you access to the touch screen on the E Ink display embedded in the front side of
the Snowball, and the power and network ports in the back.
Remove the cables from the cable catch, and plug the Snowball into power. Each Snowball has been
engineered to support data transfer over RJ45, SFP+ copper, or SFP+ optical 10 gigabit Ethernet. For SFP
+ optical, you'll have to use your own cable, connected to the SFP+ optical adapter in one of the SFP+
ports. For more information on cables and ports, see Supported Network Hardware (p. 91). Choose
a networking option, and plug the Snowball into your network. Power on the Snowball by pressing the
power button above the E Ink display.
1. Connect the powered-off Snowball to your network.
Note
We recommend that you set up your network connections so that there are as few hops as
possible between the data source, the workstation, and the Snowball.
2. Attach the power cable to the back of the Snowball, and then plug it in to a reliable source of power.
Then press the power button, located above the E Ink display, and wait for the E Ink display to read
Ready.
3. When the Snowball is ready, the E Ink display shows the following screen.
28
Page 35

AWS Snowball User Guide
Transfer Data
At this point, you can change the default network settings through the E Ink display by choosing
Network. To learn more about specifying network settings for the Snowball, see Changing Your IP
Address (p. 49).
Make a note of the IP address shown, because you'll need it to configure the Snowball client.
Important
To prevent corrupting your data, do not disconnect the Snowball or change its network
settings while transferring data.
The Snowball is now connected to your network.
Next: Transfer Data (p. 29)
Transfer Data
Following, you can find information about getting your credentials, downloading and installing the
Snowball client tool, and then transferring data from the Snowball to your on-premises data destination
using the Snowball client.
Topics
• Get Your Credentials (p. 30)
• Install the AWS Snowball Client (p. 31)
29
Page 36
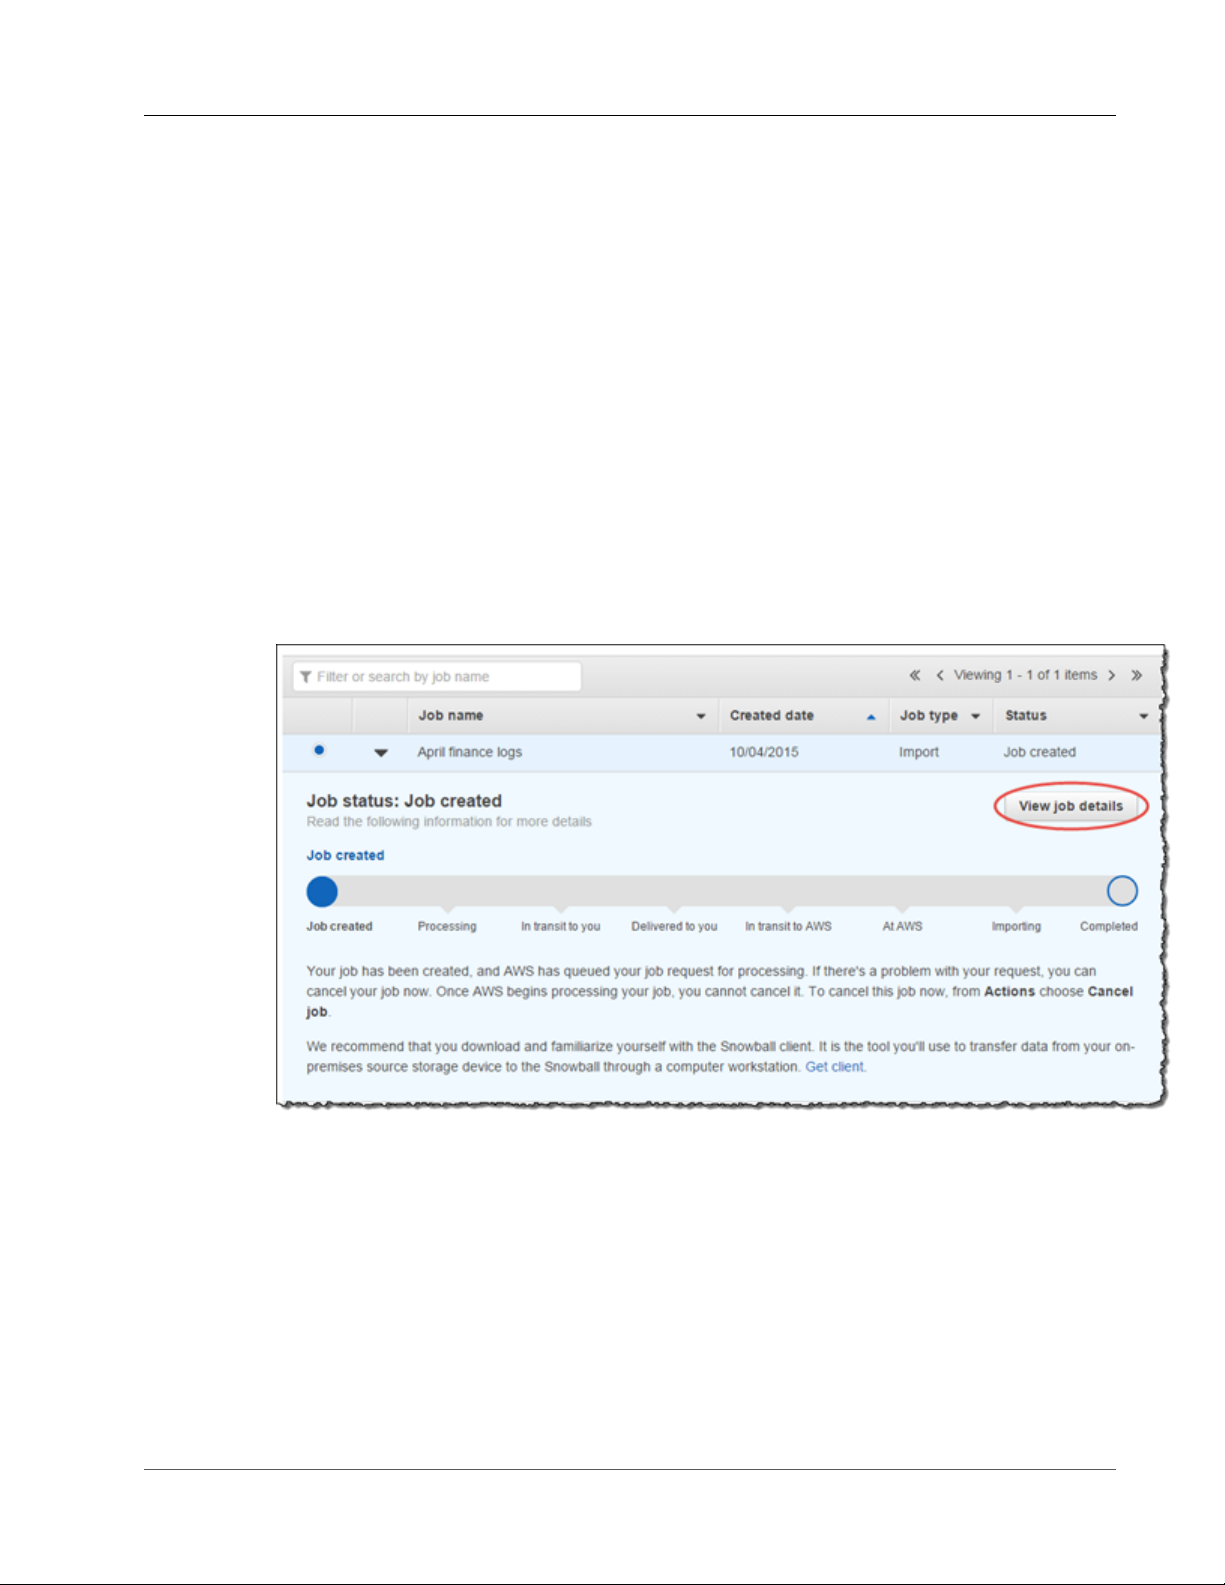
AWS Snowball User Guide
Transfer Data
• Use the AWS Snowball Client (p. 31)
• Disconnect the AWS Snowball Appliance (p. 31)
Get Your Credentials
Each AWS Snowball job has a set of credentials that you must get to authenticate your access to the
Snowball. These credentials are an encrypted manifest file and an unlock code. The manifest file
contains important information about the job and permissions associated with it. Without it, you won't
be able to transfer data. The unlock code is used to decrypt the manifest. Without it, the you won't be
able to communicate with the Snowball.
Note
You can only get your credentials after the Snowball appliance has been delivered to you.
To get your credentials from the console
1. Sign in to the AWS Management Console and open the AWS Snowball Management Console.
2. In the AWS Snowball Management Console, search the table for the specific job part to download
the job manifest for, and then choose that job.
3. Expand that job part's Job status pane, and select View job details.
Note
Each job part has its own unique set of credentials. You won't be able to unlock a Snowball
for one job part with the credentials of a different job part, even if both job parts belong to
the same export job.
4. In the details pane that appears, expand Credentials. Make a note of the unlock code (including the
hyphens), because you'll need to provide all 29 characters to run the Snowball client.
5. Choose Download manifest in the dialog box, and then follow the instructions to download the job
manifest file to your computer. The name of your manifest file includes your job part ID.
Note
As a best practice, we recommend that you don't save a copy of the unlock code in the same
location in the workstation as the manifest for that job. For more information, see Best
Practices for AWS Snowball (p. 33).
30
Page 37

AWS Snowball User Guide
Transfer Data
Now that you have your credentials, you're ready to use the Snowball client to transfer data.
Install the AWS Snowball Client
The Snowball client is one of the tools that you can use to manage the flow of data from your onpremises data source to the Snowball. You can download the Snowball client for your operating system
from AWS Snowball Tools Download page.
Use the AWS Snowball Client
In this step, you'll run the Snowball client from the workstation first to authenticate your access to the
Snowball for this job, and then to transfer data.
To authenticate your access to the Snowball, open a terminal or command prompt window on your
workstation and type the following command:
snowball start -i [Snowball IP Address] -m [Path/to/manifest/file] -u [29
character unlock code]
Following is an example of the command to configure the Snowball client.
snowball start -i 192.0.2.0 -m /Downloads/JID2EXAMPLE-0c40-49a7-9f53-916aEXAMPLE81manifest.bin -u 12345-abcde-12345-ABCDE-12345
In this example, the IP address for the Snowball is 192.0.2.0, the job manifest file that you downloaded is
JID2EXAMPLE-0c40-49a7-9f53-916aEXAMPLE81-manifest.bin, and the 29-character unlock code
is 12345-abcde-12345-ABCDE-12345.
When you've entered the preceding command with the right variables for your job part, you get a
confirmation message. This message means that you're authorized to access the Snowball for this job. If
you perform the snowball ls command, you'll notice that there is at least one folder at the root level
of the Snowball. This folder and any others at this level have the same names as the source S3 buckets
that were chosen when this job was created.
Now you can begin transferring data from the Snowball. Similarly to how Linux allows you to copy files
and folders with the copy (or cp) command, the Snowball client also uses a cp command. As in Linux,
when you use the copy command you'll provide the values of two paths in your command. One path
represents the source location of the data to be copied, and the second path represents the destination
where the data will be pasted. When you're transferring data, source paths from the Snowball must start
with the s3:// root directory identifier.
Following is an example of the command to copy data using the client from the Snowball
snowball cp --recursive s3://MyBucket/Logs /Logs/April
Use the Snowball client commands to finish transferring your data from the Snowball. For more
information on using the Snowball client, see Using the Snowball Client (p. 52).
Disconnect the AWS Snowball Appliance
When you've finished transferring data from the Snowball, prepare it for its return trip to AWS. First,
disconnect the Snowball cables. Secure the Snowball's cables into the cable caddie on the inside of the
Snowball back panel, and then seal the Snowball.
When the return shipping label appears on the Snowball's E Ink display, it's ready to be returned.
Next:
31
Page 38

AWS Snowball User Guide
Return the Appliance
Return the Appliance (p. 32)
Return the Appliance
The prepaid shipping label on the E Ink display contains the correct address to return the Snowball.
For information on how to return your Snowball, see Shipping Carriers (p. 74). The Snowball will be
delivered to an AWS sorting facility and forwarded to the AWS data center. Your region's carrier will
automatically report back a tracking number for your job to the AWS Snowball Management Console.
You can access that tracking number, and also a link to the tracking website, by viewing the job's status
details in the console.
Important
Unless personally instructed otherwise by AWS, never affix a separate shipping label to the
Snowball. Always use the shipping label that is displayed on the Snowball's E Ink display.
When your region's carrier gets the Snowball, the status for the job becomes In transit to AWS. At this
point, if your export job has more job parts, the next job part enters the Preparing Snowball status.
Next: Repeat the Process (p. 32)
Repeat the Process
Once we receive a returned Snowball for your export job part, we perform a complete erasure of the
Snowball. This erasure follows the National Institute of Standards and Technology (NIST) 800-88
standards. This step marks the completion of that particular job part. If there are more job parts, the
next job part is being prepared to be shipped out.
You can monitor the status of all your jobs and job parts from the AWS Snowball Management Console.
Next: Where Do I Go from Here? (p. 32)
Where Do I Go from Here?
Now that you've read through the getting started section and begun your first data transfer job, you can
learn more about using the Snowball tools and interfaces detail from the following topics:
• Using the AWS Snowball Management Console (p. 40)
• Using an AWS Snowball Appliance (p. 45)
• Transferring Data with a Snowball (p. 51)
We also recommend that you checkout the job management API for AWS Snowball. For more
information, see AWS Snowball API Reference
If you're importing data into Amazon S3 for the first time, you might want to learn more about what you
can do with your data once it's there. For more information, see the Amazon S3 Getting Started Guide.
32
Page 39

AWS Snowball User Guide
Security Best Practices
Best Practices for AWS Snowball
Following, you can find information to help you get the maximum benefit from and satisfaction with
AWS Snowball (Snowball).
Security Best Practices for AWS Snowball
Following are approaches that we recommend to promote security when using Snowball:
• If you notice anything that looks suspicious about the Snowball, don't connect it to your internal
network. Instead, contact AWS Support, and a new Snowball will be shipped to you.
• We recommend that you don't save a copy of the unlock code in the same location in the workstation
as the manifest for that job. Saving the unlock code and manifest separately helps prevent
unauthorized parties from gaining access to the Snowball. For example, you might take this approach:
First, save a copy of the manifest to the workstation. Then, email the unlock code to the AWS Identity
and Access Management (IAM) user to perform the data transfer from the workstation. This approach
limits access to the Snowball to individuals who have access to files saved on the workstation and also
that IAM user's email address.
• Whenever you transfer data between your on-premises data centers and a Snowball, logs are
automatically generated and saved to your workstation. These logs are saved in plaintext format
and can contain file name and path information for the files that you transfer. To protect this
potentially sensitive information, we strongly suggest that you delete these logs after the job that
the logs are associated with enters Completed status. For more information about logs, see Snowball
Logs (p. 64).
Network Best Practices for AWS Snowball
Following are approaches that we recommend for using Snowball with a network:
• Your workstation should be the local host for your data. For performance reasons, we don't
recommend reading files across a network when using Snowball to transfer data. If you must transfer
data across a network, batch the local cache before copying to the Snowball so the copy operation can
go as fast as possible.
• Because the workstation is considered to be the bottleneck for transferring data, we highly
recommend that your workstation be a powerful computer, able to meet high demands in terms of
processing, memory, and networking. For more information, see Workstation Specifications (p. 93).
• You can run simultaneous instances of the Snowball client in multiple terminals, each using the copy
operation to speed up your data transfer. For more information about using the Snowball client see
Commands for the Snowball Client (p. 56).
• To prevent corrupting your data, don't disconnect the Snowball or change its network settings while
transferring data.
• Files must be in a static state while being copied. Files that are modified while they are being
transferred are not imported into Amazon S3.
Resource Best Practices for AWS Snowball
Following are approaches that we recommend for working with Snowball and your data resources, along
with a few additional important points:
33
Page 40

AWS Snowball User Guide
Performance
• The 10 free days for performing your on-premises data transfer start the day after the Snowball
arrives at your data center, and stop when you ship the appliance back out.
• The Job created status is the only status in which you can cancel a job. When a job changes to a
different status, it can’t be canceled.
• For import jobs, don't delete your local copies of the transferred data until the import into Amazon S3
is successful at the end of the process. As part of your process, be sure to verify the results of the data
transfer.
• We recommend that you have no more than 500,000 files or directories within each directory.
Performance for AWS Snowball
Following, you can find information about AWS Snowball performance. Here, we discuss performance in
general terms, because on-premises environments each have a different way of doing things—different
network technologies, different hardware, different operating systems, different procedures, and so on.
The following table outlines how your network's transfer rate impacts how long it takes to fill a Snowball
with data. Transferring smaller files without batching them into larger files reduces your transfer speed
due to increased overhead.
Rate (MB/s) 42-TB Transfer Time 72-TB Transfer Time
800 14 hours 1 day
450 1.09 days 1.8 days
400 1.16 days 2.03 days
300 1.54 days 2.7 days
277 1.67 days 2.92 days
200 2.31 days 4 days
100 4.63 days 8.10 days
60 8 days 13 days
30 15 days 27 days
10 46 days 81 days
The following describes how to determine when to use Snowball instead of data transfer over the
internet, and how to speed up transfer from your data source to the Snowball.
Speeding Up Data Transfer
In general, you can improve the transfer speed from your data source to the Snowball in the following
ways, ordered from largest to smallest positive impact on performance:
1. Use the latest Mac or Linux Snowball client – The latest Snowball clients for Mac and Linux both
support the Advanced Encryption Standard New Instructions (AES-NI) extension to the x86 instruction
set architecture. This extension offers improved speeds for encrypting or decrypting data during
transfers between the Snowball and your Mac or Linux workstations. For more information on AES-NI,
including supported hardware, see AES instruction set on Wikipedia.
34
Page 41

AWS Snowball User Guide
Speeding Up Data Transfer
2. Batch small files together – Each copy operation has some overhead because of encryption.
Therefore, performing many transfers on individual files has slower overall performance than
transferring the same data in larger files. You can significantly improve your transfer speed for small
files by batching them in a single snowball cp command. Batching of small files is enabled by
default. During the import process into Amazon S3, these batched files are automatically extracted to
their original state. For more information, see Options for the snowball cp Command (p. 60).
3. Perform multiple copy operations at one time – If your workstation is powerful enough, you can
perform multiple snowball cp commands at one time. You can do this by running each command
from a separate terminal window, in separate instances of the Snowball client, all connected to the
same Snowball.
4. Copy from multiple workstations – You can connect a single Snowball to multiple workstations. Each
workstation can host a separate instance of the Snowball client.
5. Transfer directories, not files – Because there is overhead for each snowball cp command, we don't
recommend that you queue a large number of individual copy commands. Queuing many commands
has a significant negative impact on your transfer performance.
For example, say that you have a directory called C:\\MyFiles that only contains three files, file1.txt,
file2.txt, and file3.txt. Suppose that you issue the following three commands.
snowball cp C:\\MyFiles\file1.txt s3://mybucket
snowball cp C:\\MyFiles\file2.txt s3://mybucket
snowball cp C:\\MyFiles\file3.txt s3://mybucket
In this scenario, you have three times as much overhead as if you transferred the entire directory with
the following copy command.
Snowball cp –r C:\\MyFiles\* s3://mybucket
6. Don't perform other operations on files during transfer – Renaming files during transfer, changing
their metadata, or writing data to the files during a copy operation has a significant negative impact
on transfer performance. We recommend that your files remain in a static state while you transfer
them.
7. Reduce local network use – Your Snowball communicates across your local network. Because of
this, reducing other local network traffic between the Snowball, the switch it's connected to, and the
workstation that hosts your data source can improve data transfer speeds.
8. Eliminate unnecessary hops – We recommend that you set up your Snowball, your data source, and
your workstation so that they're the only machines communicating across a single switch. Doing so
can result in a significant improvement of data transfer speeds.
Experimenting to Get Better Performance
Your performance results will vary based on your hardware, your network, how many and how large
your files are, and how they're stored. Therefore, we suggest that you experiment with your performance
metrics if you're not getting the performance that you want.
First, attempt multiple copy operations until you see a reduction in overall transfer performance.
Performing multiple copy operations at once can have a significantly positive impact on your overall
transfer performance. For example, suppose that you have a single snowball cp command running in
a terminal window, and you note that it's transferring data at 30 MB/second. You open a second terminal
window, and run a second snowball cp command on another set of files that you want to transfer. You
see that both commands are performing at 30 MB/second. In this case, your total transfer performance
is 60 MB/second.
Now, suppose that you connect to the Snowball from a separate workstation. You run the Snowball
client from that workstation to execute a third snowball cp command on another set of files that
35
Page 42

AWS Snowball User Guide
How to Transfer Petabytes of Data Efficiently
you want to transfer. Now when you check the performance, you note that all three instances of the
snowball cp command are operating at a performance of 25 MB/second, with a total performance of
75 MB/second. Even though the individual performance of each instance has decreased in this example,
the overall performance has increased.
Experimenting in this way, using the techniques listed in Speeding Up Data Transfer (p. 34), can help
you optimize your data transfer performance.
Performance Considerations for HDFS Data Transfers
When getting ready to transfer data from a Hadoop Distributed File System (HDFS) cluster (version
2.x) into a Snowball, we recommend that you follow the guidance in the previous section, and also the
following tips:
• Don't copy the entire cluster over in a single command – Transferring an entire cluster in a single
command can cause performance issues, including slow transfers, "flipped" bits, and missing or
corrupted data on the Snowball. We recommend that in this case you separate the data transfer into
multiple parts.
• Don't transfer a large number of small files – Suppose that you have a large number of files, say over
1000, and those files are small, say under 1 MB each in size. In this case, transferring them all at once
has a negative impact on your performance. This performance degradation is due to per-file overhead
when you transfer data from HDFS clusters.
If you must transfer a large number of small files, we recommend that you find a method of collecting
them into larger archive files, and then transferring those. However, these archives are what is
imported into Amazon S3. If you want the files in their original state, take them out of the archives
after importing the archives.
Important
The --batch option for the Snowball client's copy command is not supported for HDFS data
transfers.
How to Transfer Petabytes of Data Efficiently
When transferring petabytes of data, we recommend that you plan and calibrate your data transfer
between the Snowball you have on-site and your workstation according to the following guidelines.
Small delays or errors can significantly slow your transfers when you work with large amounts of data.
Topics
• Planning Your Large Transfer (p. 36)
• Calibrating a Large Transfer (p. 38)
• Transferring Data in Parallel (p. 39)
Planning Your Large Transfer
To plan your petabyte-scale data transfer, we recommend the following steps:
• Step 1: Understand What You're Moving to the Cloud (p. 37)
• Step 2: Prepare Your Workstations (p. 37)
• Step 3: Calculate Your Target Transfer Rate (p. 37)
• Step 4: Determine How Many Snowballs You Need (p. 37)
• Step 5: Create Your Jobs Using the AWS Snowball Management Console (p. 38)
36
Page 43

AWS Snowball User Guide
Planning Your Large Transfer
• Step 6: Separate Your Data into Transfer Segments (p. 38)
Step 1: Understand What You're Moving to the Cloud
Before you create your first job for Snowball, you should make sure that you know what data you want
to transfer, where it is currently stored, and the destination you want to transfer it to. For data transfers
that are a petabyte in scale or larger, doing this administrative housekeeping makes your life much easier
when your Snowballs start to arrive.
You can keep this data in a spreadsheet or on a whiteboard—however it works best for you to organize
the large amount of content you plan to move to the cloud. If you're migrating data into the cloud for
the first time, we recommend that you design a cloud migration model. For more information, see the
whitepaper A Practical Guide to Cloud Migration on the AWS Whitepapers website.
When you're done with this step, you know the total amount of data that you're going to move into the
cloud.
Step 2: Prepare Your Workstations
When you transfer data to a Snowball, you do so through the Snowball client, which is installed on a
physical workstation that hosts the data that you want to transfer. Because the workstation is considered
to be the bottleneck for transferring data, we highly recommend that your workstation be a powerful
computer, able to meet high demands in terms of processing, memory, and networking.
For large jobs, you might want to use multiple workstations. Make sure that your workstations all meet
the suggested specifications to reduce your total transfer time. For more information, see Workstation
Specifications (p. 93).
Step 3: Calculate Your Target Transfer Rate
It's important to estimate how quickly you can transfer data to the Snowballs connected to each of your
workstations. This estimated speed equals your target transfer rate. This rate is the rate at which you can
expect data to move into a Snowball given the realities of your local network architecture.
By reducing the hops between your workstation running the Snowball client and the Snowball, you
reduce the time it takes for each transfer. We recommend hosting the data that you want transferred
onto the Snowball on the workstation that you transfer the data through.
To calculate your target transfer rate, download the Snowball client and run the snowball test
command from the workstation that you transfer the data through. If you plan on using more than one
Snowball at a time, run this test from each workstation. For more information on running the test, see
Testing Your Data Transfer with the Snowball Client (p. 53).
While determining your target transfer speed, keep in mind that it is affected by a number of factors
including local network speed, file size, and the speed at which data can be read from your local servers.
The Snowball client copies data to the Snowball as fast as conditions allow. It can take as little as a
day to fill a 50 TB Snowball depending on your local environment. You can copy twice as much data in
the same amount of time by using two 50 TB Snowballs in parallel. Alternatively, you can fill an 80 TB
Snowball in two and a half days.
Step 4: Determine How Many Snowballs You Need
Using the total amount of data you're going to move into the cloud, found in step 1, determine how
many Snowballs you need to finish your large-scale data migration. Remember that Snowballs come in
50 TB (42 usable) and 80 TB (72 usable) sizes so that you can determine this number effectively. You can
move a petabyte of data in as little as 14 Snowballs.
37
Page 44

AWS Snowball User Guide
Calibrating a Large Transfer
Step 5: Create Your Jobs Using the AWS Snowball Management Console
Now that you know how many Snowballs you need, you can create an import job for each appliance.
Because each Snowball import job involves a single Snowball, you create multiple import jobs. For more
information, see Create an Import Job (p. 17).
Step 6: Separate Your Data into Transfer Segments
As a best practice for large data transfers involving multiple jobs, we recommend that you separate
your data into a number of smaller, manageable data transfer segments. If you separate the data this
way, you can transfer each segment one at a time, or multiple segments in parallel. When planning your
segments, make sure that all the sizes of the data for each segment combined fit on the Snowball for
this job. When segmenting your data transfer, take care not to copy the same files or directories multiple
times. Some examples of separating your transfer into segments are as follows:
• You can make 10 segments of 4 TB each in size for a 50 TB Snowball.
• For large files, each file can be an individual segment.
• Each segment can be a different size, and each individual segment can be made of the same kind of
data—for example, batched small files in one segment, large files in another segment, and so on. This
approach helps you determine your average transfer rate for different types of files.
Note
Metadata operations are performed for each file transferred. Regardless of a file's size, this
overhead remains the same. Therefore, you get faster performance out of batching small files
together. For implementation information on batching small files, see Options for the snowball
cp Command (p. 60).
Creating these data transfer segments makes it easier for you to quickly resolve any transfer issues,
because trying to troubleshoot a large transfer after the transfer has run for a day or more can be
complex.
When you've finished planning your petabyte-scale data transfer, we recommend that you transfer a few
segments onto the Snowball from your workstation to calibrate your speed and total transfer time.
Calibrating a Large Transfer
You can calibrate a large transfer by running the snowball cp command with a representative set of
your data transfer segments. In other words, choose a number of the data segments that you defined
following last section's guidelines and transfer them to a Snowball. At the same time, make a record of
the transfer speed and total transfer time for each operation.
Note
You can also use the snowball test command to perform calibration before receiving a
Snowball. For more information about using that command, see Testing Your Data Transfer with
the Snowball Client (p. 53).
While the calibration is being performed, monitor the workstation's CPU and memory utilization. If the
calibration's results are less than the target transfer rate, you might be able to copy multiple parts of
your data transfer in parallel on the same workstation. In this case, repeat the calibration with additional
data transfer segments, using two or more instances of the Snowball client connected to the same
Snowball. Each running instance of the Snowball client should be transferring a different segment to the
Snowball.
Continue adding additional instances of the Snowball client during calibration until you see diminishing
returns in the sum of the transfer speed of all Snowball client instances currently transferring data. At
38
Page 45

AWS Snowball User Guide
Transferring Data in Parallel
this point, you can end the last active instance of Snowball client and make a note of your new target
transfer rate.
Important
Your workstation should be the local host for your data. For performance reasons, we don't
recommend reading files across a network when using Snowball to transfer data.
If a workstation's resources are at their limit and you aren’t getting your target rate for data transfer
onto the Snowball, there’s likely another bottleneck within the workstation, such as the CPU or disk
bandwidth.
When you complete these steps, you should know how quickly you can transfer data by using one
Snowball at a time. If you need to transfer your data faster, see Transferring Data in Parallel (p. 39).
Transferring Data in Parallel
Sometimes the fastest way to transfer data with Snowball is to transfer data in parallel. Parallelization
involves one or more of the following scenarios:
• Using multiple instances of the Snowball client on a single workstation with a single Snowball
• Using multiple instances of the Snowball client on multiple workstations with a single Snowball
• Using multiple instances of the Snowball client on multiple workstations with multiple Snowballs
If you use multiple Snowball clients with one workstation and one Snowball, you only need to run the
snowball start command once, because you run each instance of the Snowball client from the same
user account and home directory. The same is true for the second scenario, if you transfer data using
a networked file system with the same user across multiple workstations. In any scenario, follow the
guidance provided in Planning Your Large Transfer (p. 36).
39
Page 46

AWS Snowball User Guide
Cloning an Import Job
Using the AWS Snowball Management Console
All jobs for AWS Snowball are created and managed from either the AWS Snowball Management Console
or the job management API for AWS Snowball. The following provides an overview of how to use the
AWS Snowball Management Console.
Topics
• Cloning an Import Job in the Console (p. 40)
• Using Export Ranges (p. 40)
• Getting Your Job Completion Report and Logs in the Console (p. 42)
• Canceling Jobs in the Console (p. 43)
Note
For information on creating your first job in the console, see Create an Import Job (p. 17) or
Create an Export Job (p. 25) in the Getting Started chapter.
Cloning an Import Job in the Console
When you first create an import job, you might discover that you need more than one Snowball. Because
each Snowball is associated with a single import job, requiring more than one Snowball means that you
need to create more than one job. When creating additional jobs, you can go through the job creation
wizard again, or you can clone an existing job.
Cloning a job means recreating it exactly, except for an automatically modified name. Cloning is a simple
process.
To clone a job
1. In the AWS Snowball Management Console, choose your job from the table.
2. For Actions, choose Clone job.
3. The Create job wizard opens to the last page, Step 6: Review.
4. Review the information and make any changes you want by choosing the appropriate Edit button.
5. To create your cloned job, choose Create job.
Cloned jobs are named in the format Job Name-clone-number. The number is automatically appended
to the job name and represents the number of times you've cloned this job after the first time you clone
it. For example, AprilFinanceReports-clone represents the first cloned job of AprilFinanceReports job,
and DataCenterMigration-clone-42 represents the forty-second clone of the DataCenterMigration job.
Using Export Ranges
When you create an export job in the AWS Snowball Management Console, you can choose to export an
entire Amazon S3 bucket or a specific range of objects keys. Object key names uniquely identify objects
in a bucket. If you choose to export a range, you define the length of the range by providing either an
inclusive range beginning, an inclusive range ending, or both.
Ranges are UTF-8 binary sorted. UTF-8 binary data is sorted in the following way:
40
Page 47

AWS Snowball User Guide
Export Range Examples
• The numbers 0-9 come before both uppercase and lowercase English characters.
• Uppercase English characters come before all lowercase English characters.
• Lowercase English characters come last when sorted against uppercase English characters and
numbers.
• Special characters are sorted among the other character sets.
For more information on the specifics of UTF-8 sort order, see https://en.wikipedia.org/wiki/UTF-8.
Export Range Examples
Assume you have a bucket containing the following objects, sorted in UTF-8 binary order.
• 01
• Aardvark
• Aardwolf
• Aasvogel/apple
• Aasvogel/banana
• Aasvogel/cherry
• Banana
• Car
Specified Range
Beginning
(none) (none) All of the objects
(none) Aasvogel 01
(none) Aasvogel/banana 01
Specified Range Ending Objects in the
Range That Will
Be Exported
in your bucket
Aardvark
Aardwolf
Aasvogel/apple
Aasvogel/banana
Aasvogel/cherry
Aardvark
Aardwolf
Aasvogel/apple
Aasvogel/banana
Aasvogel (none) Aasvogel/apple
Aasvogel/banana
Aasvogel/cherry
41
Page 48

AWS Snowball User Guide
Getting Your Job Completion Report and Logs
Specified Range
Beginning
Aardwolf (none) Aardwolf
Aar (none) Aardvark
Specified Range Ending Objects in the
Range That Will
Be Exported
Banana
Car
Aasvogel/apple
Aasvogel/banana
Aasvogel/cherry
Banana
Car
Aardwolf
Aasvogel/apple
Aasvogel/banana
Aasvogel/cherry
Banana
Car
car (none) No objects will
be exported, and
you’ll get an error
message when you
try to create the
job. Note that car
is sorted below
Car according
to UTF-8 binary
values.
Aar Aarrr Aardvark
Aardwolf
Getting Your Job Completion Report and Logs in the Console
Whenever data is imported into or exported out of Amazon S3, you'll get a downloadable PDF job
report. For import jobs, this report becomes available at the very end of the import process. For export
jobs, your job report typically becomes available for you while the Snowball for your job part is being
delivered to you.
42
Page 49
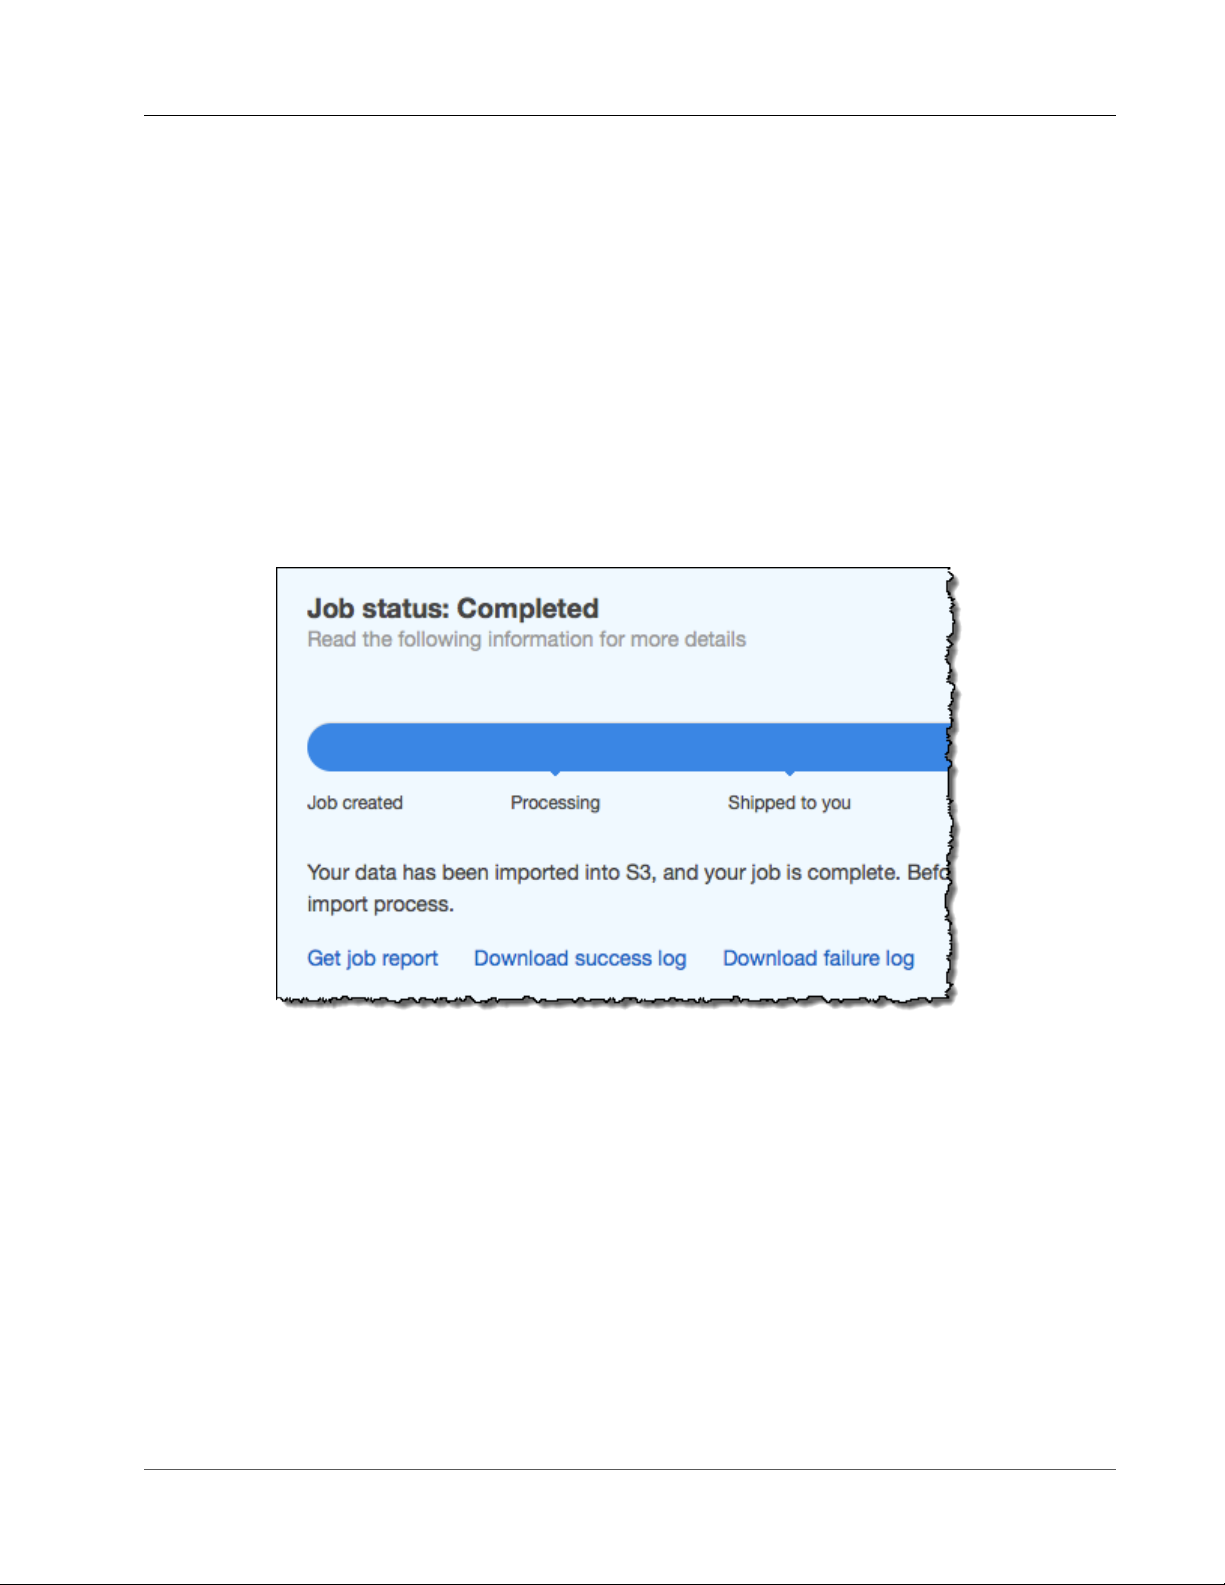
AWS Snowball User Guide
Canceling Jobs
The job report provides you insight into the state of your Amazon S3 data transfer. The report includes
details about your job or job part for your records. The job report also includes a table that provides a
high-level overview of the total number of objects and bytes transferred between the Snowball and
Amazon S3.
For deeper visibility into the status of your transferred objects, you can look at the two associated logs: a
success log and a failure log. The logs are saved in comma-separated value (CSV) format, and the name
of each log includes the ID of the job or job part that the log describes.
You can download the report and the logs from the AWS Snowball Management Console.
To get your job report and logs
1. Sign in to the AWS Management Console and open the AWS Snowball Management Console.
2. Select your job or job part from the table and expand the status pane.
Three options appear for getting your job report and logs: Get job report, Download success log,
and Download failure log.
3. Choose your download.
The following list describes the possible values for the report.
• Completed – The transfer was completed successfully. You can find more detailed information in the
success log.
• Completed with errors – Some or all of your data was not transferred. You can find more detailed
information in the failure log.
Canceling Jobs in the Console
If you need to cancel a job for any reason, you can do so before it enters the Preparing Snowball status.
You can only cancel jobs can when they have Job created status. Once a job begins processing, you can
no longer cancel it.
43
Page 50

AWS Snowball User Guide
Canceling Jobs
To cancel a job
1. Sign in to the AWS Management Console and open the AWS Snowball Management Console.
2. Search for and choose your job from the table.
3. From Actions, choose Cancel job.
You have now canceled your job.
44
Page 51

AWS Snowball User Guide
Using an AWS Snowball Appliance
Following, you can find an overview of the Snowball appliance, the physically rugged appliance
protected by AWS Key Management Service (AWS KMS) that you use to transfer data between your onpremises data centers and Amazon Simple Storage Service (Amazon S3). This overview includes images
of the Snowball, instructions for preparing the appliance for data transfer, and networking best practices
to help optimize your data transfer.
For information on transferring data to or from a Snowball, see Transferring Data with a
Snowball (p. 51).
When the Snowball first arrives, inspect it for damage or obvious tampering.
Warning
If you notice anything that looks suspicious about the Snowball, don't connect it to your internal
network. Instead, contact AWS Support, and a new Snowball will be shipped to you.
The following is what the Snowball looks like.
45
Page 52

AWS Snowball User Guide
It has two panels, a front and a back, which are opened by latches and flipped up to rest on the top of
the Snowball.
46
Page 53
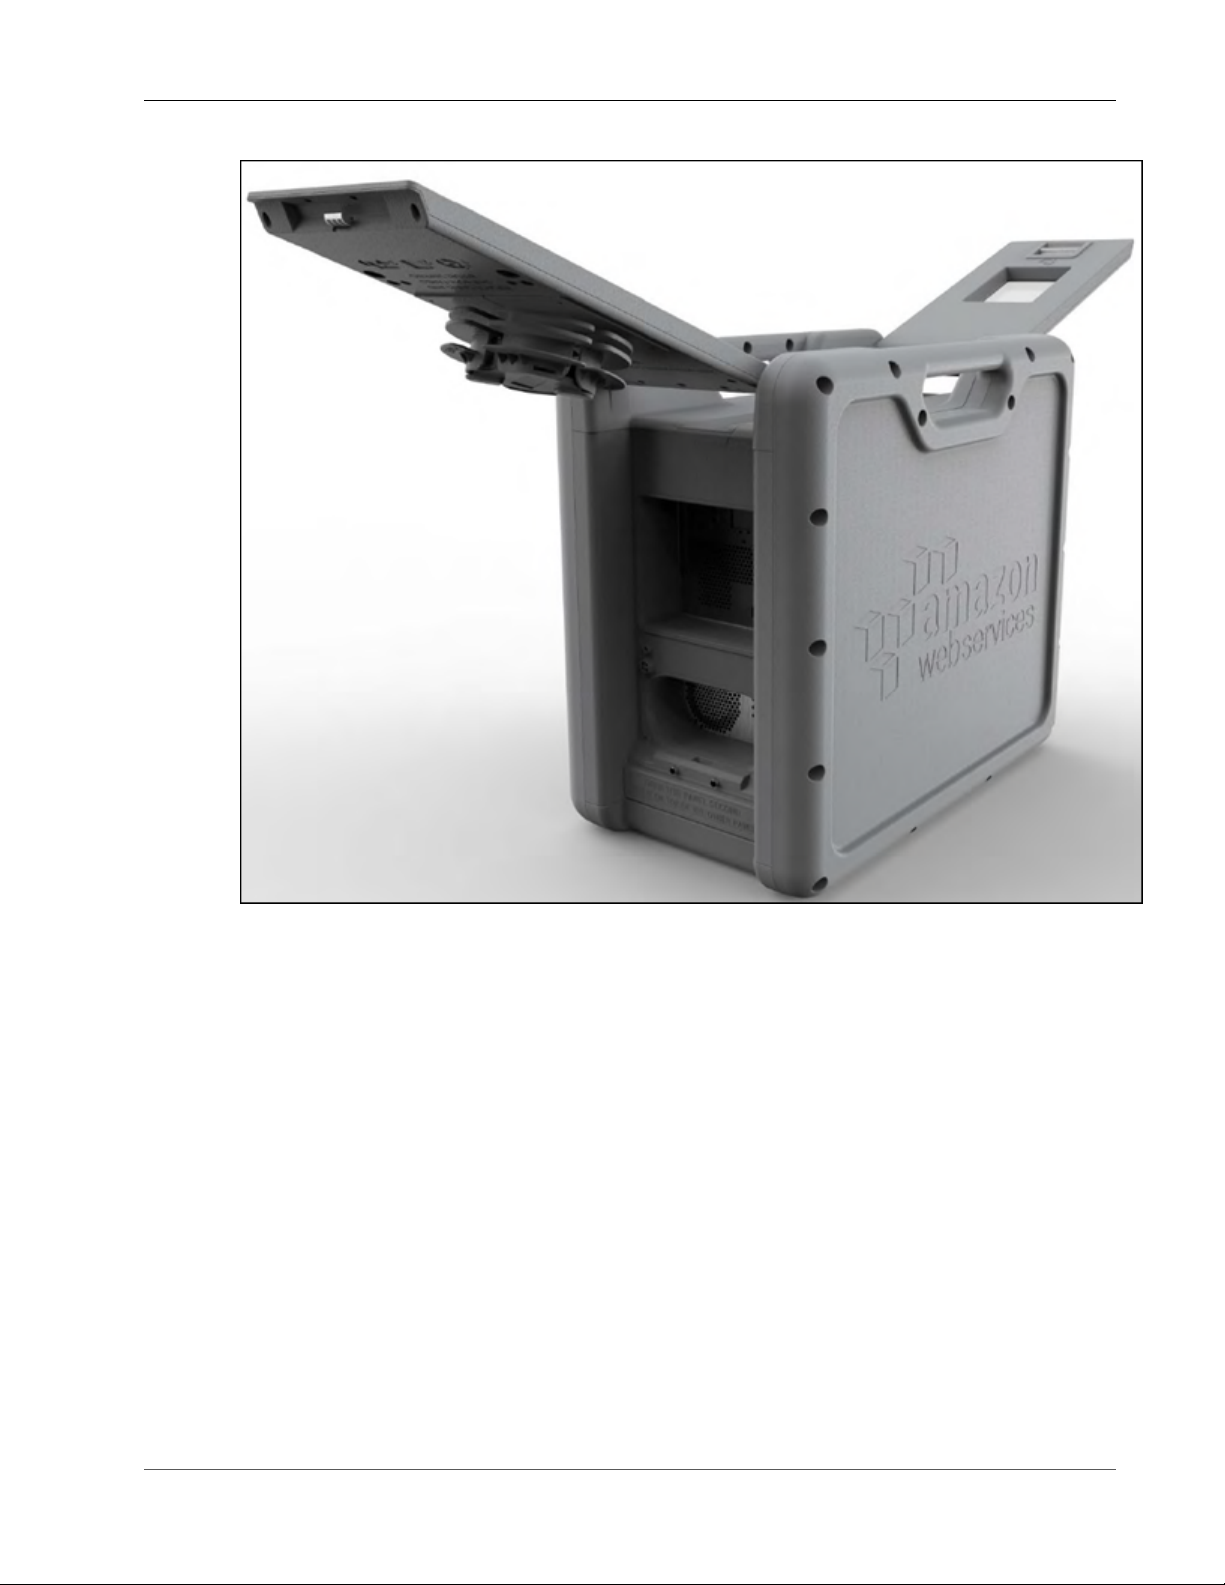
AWS Snowball User Guide
Open the front panel first, flip it on top of the Snowball, and then open the back panel second, flipping it
up to rest on the first.
47
Page 54
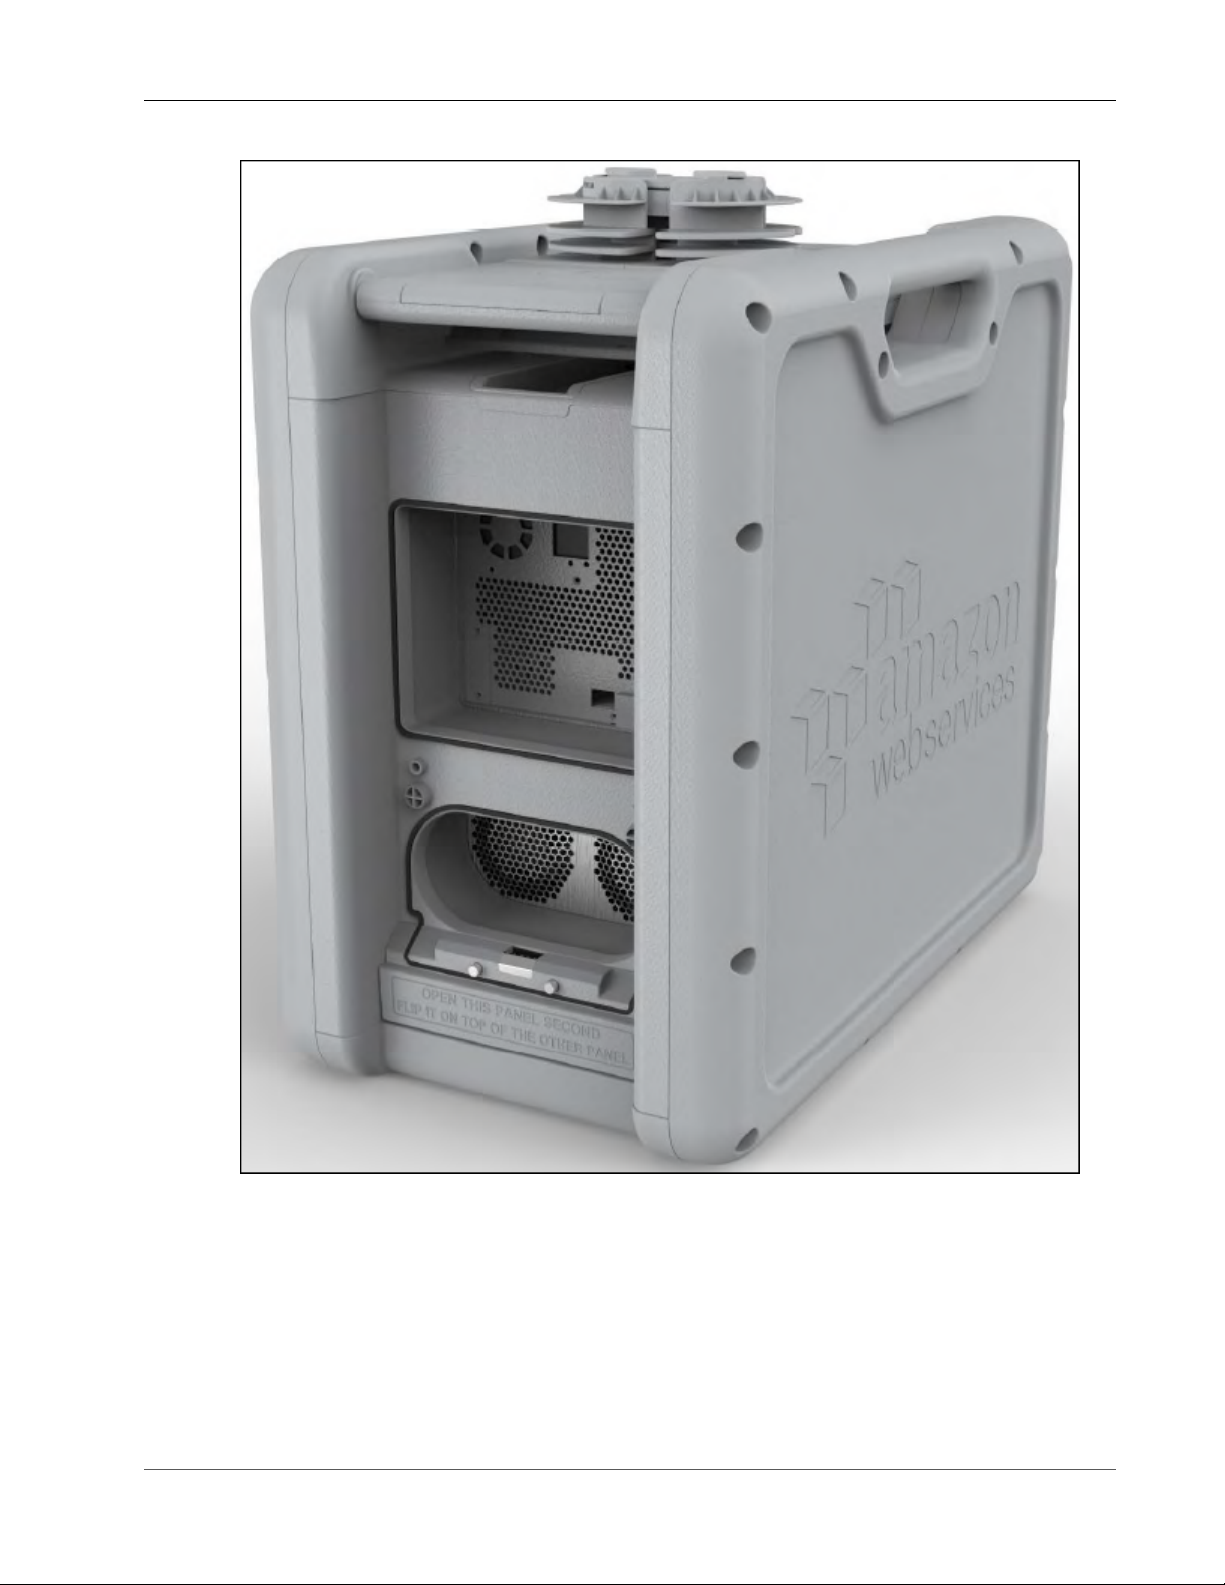
AWS Snowball User Guide
Doing this gives you access to the touch screen on the E Ink display embedded in the front side of the
Snowball, and the power and network ports in the back.
Remove the cables from the cable catch, and plug the Snowball into power. Each Snowball has been
engineered to support data transfer over RJ45, SFP+ copper, or SFP+ optical 10 gigabit Ethernet. Choose
a networking option, and plug the Snowball into your network. Power on the Snowball by pressing the
power button above the E Ink display.
You’ll hear the Snowball internal fans start up, and the display changes from your shipping label to say
Preparing. Wait a few minutes, and the Ready screen appears. When that happens, the Snowball is ready
to communicate with the Snowball client data transfer tool and accept your incoming traffic.
48
Page 55

AWS Snowball User Guide
Changing Your IP Address
The E Ink display is used to provide you with shipping labels and with the ability to manage the IP
address that the Snowball uses to communicate across your local network.
Changing Your IP Address
You can change your IP address to a different static address, which you provide by following this
procedure.
To change the IP address of a Snowball
1. On the E Ink display, tap Network. The following screen appears, which shows you the current
network settings for the Snowball.
49
Page 56
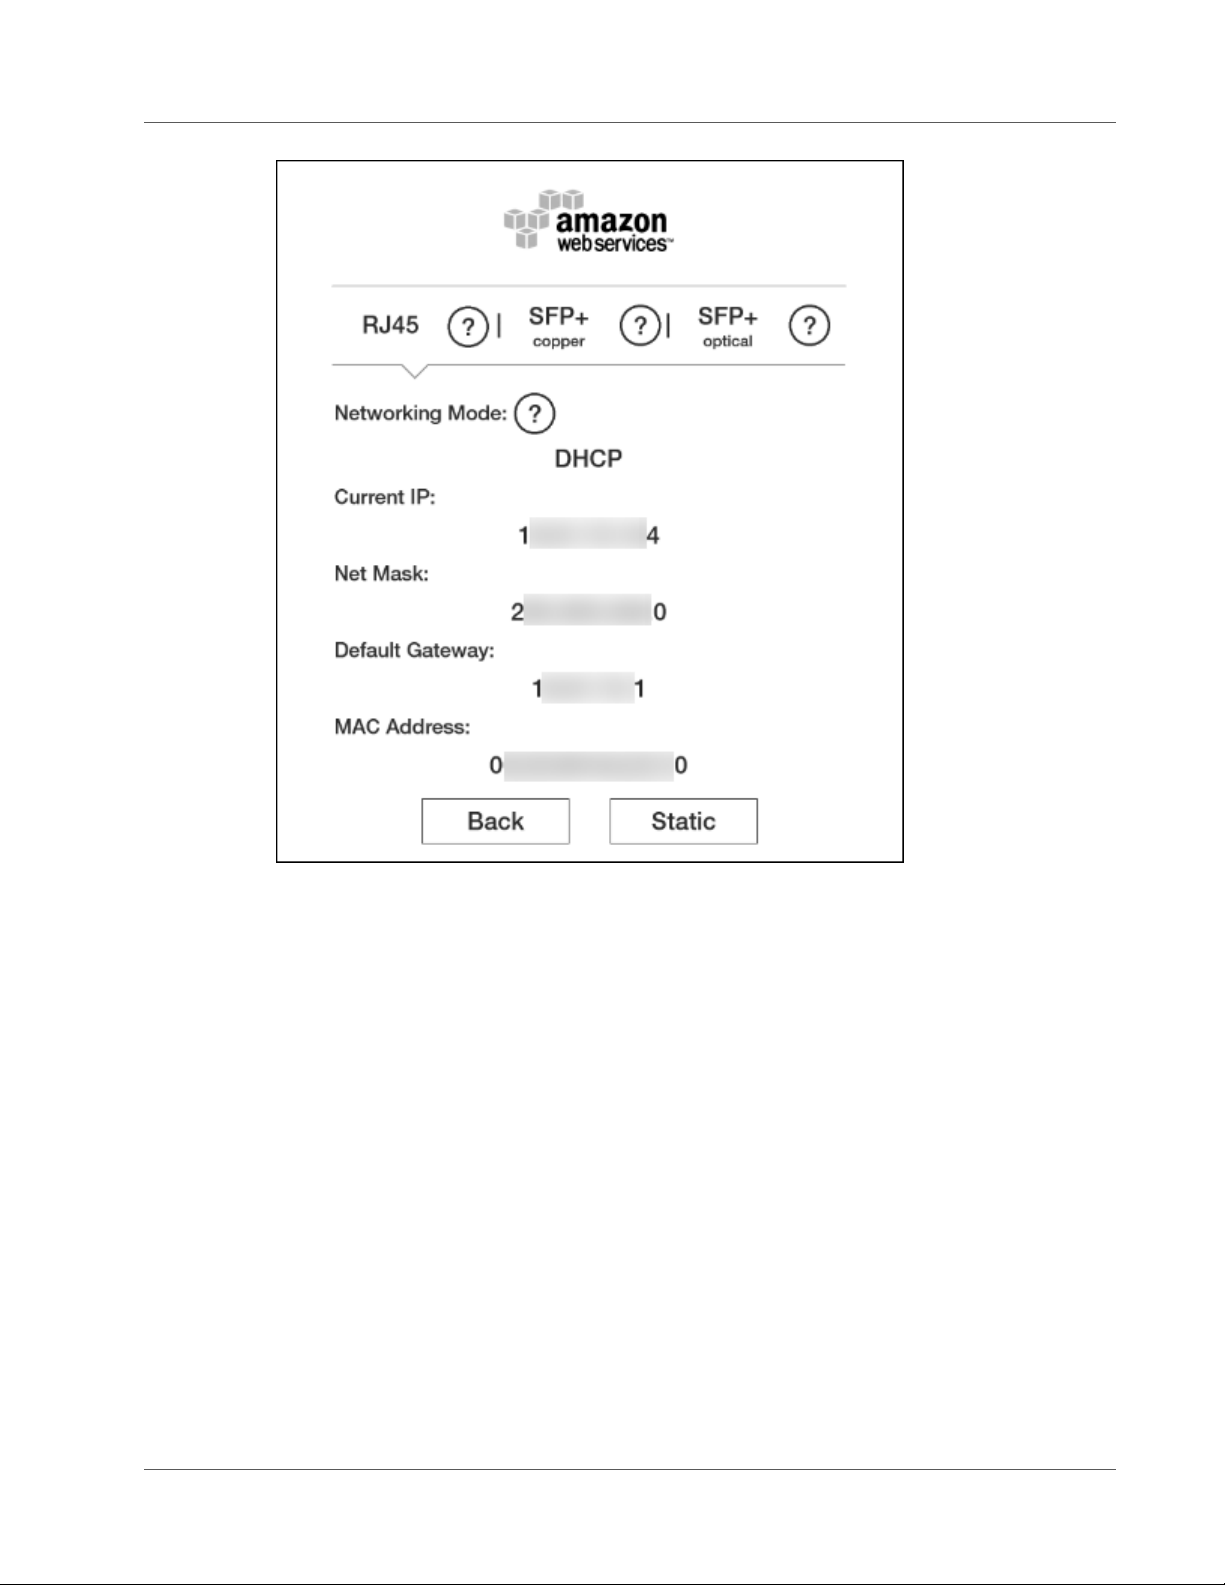
AWS Snowball User Guide
Changing Your IP Address
2. At the top of the page, either RJ45, SFP+ Copper, or SFP+ Optical has been highlighted. This value
represents the type of connection that Snowball is currently using to communicate on your local
network. Here, on the active DHCP tap, you see your current network settings. To change to a static
IP address, tap Static.
50
Page 57

AWS Snowball User Guide
Transferring Data
On this page, you can change the IP address and network mask to your preferred values.
Transferring Data with a Snowball
When locally transferring data between a Snowball and your on-premises data center, you can use the
Amazon S3 Adapter for Snowball or the Snowball client:
• Snowball client (p. 52) – A standalone terminal application that you run on your local workstation
to do your data transfer. You don't need any coding knowledge to use the Snowball client. It provides
all the functionality you need to transfer data, including handling errors and writing logs to your local
workstation for troubleshooting and auditing.
• Amazon S3 Adapter for Snowball (p. 65) – A tool that transfers data programmatically using a
subset of the Amazon Simple Storage Service (Amazon S3) REST API, including support for AWS
Command Line Interface (AWS CLI) commands and the Amazon S3 SDKs.
Note
If you're performing a petabyte-scale data transfer, we recommend that you read How to
Transfer Petabytes of Data Efficiently (p. 36) before you create your first job.
51
Page 58

AWS Snowball User Guide
Transferring Data with the Snowball Client
Transferring Data with the Snowball Client
The Snowball client is a standalone terminal application that you run on your local workstation to do
your data transfer. You don't need any coding knowledge to use the Snowball client. It provides all
the functionality you need to transfer data, including handling errors and writing logs to your local
workstation for troubleshooting and auditing. For information on best practices to improve your data
transfer speeds, see Best Practices for AWS Snowball (p. 33).
You can download and install the Snowball client from the AWS Snowball Tools Download page. Once
there, find the installation package for your operating system, and follow the instructions to install the
Snowball client. Running the Snowball client from a terminal in your workstation might require using a
specific path, depending on your operating system:
• Linux – The Snowball must be run from the ~/snowball-client-linux-build_number/bin/ directory.
• Mac – The install.sh script creates symbolic links (symlinks) in addition to copying folders from the
Snowball client .tar file to the /usr/local/bin/snowball directory. If you run this script, you can then run
the Snowball client from any directory, as long as the /usr/local/bin is a path in your bash_profile. You
can verify your path with the echo $PATH command.
• Windows – Once the client has been installed, you can run it from any directory without any additional
preparation.
Note
We recommend that you use the latest version of the Linux or Mac Snowball client, as they
both support the Advanced Encryption Standard New Instructions (AES-NI) extension to the
x86 instruction set architecture. This offers improved speeds for encrypting or decrypting
data during transfers between the Snowball and your Mac or Linux workstations. For more
information on AES-NI, including supported hardware, see AES instruction set on Wikipedia.
Topics
• Using the Snowball Client (p. 52)
Using the Snowball Client
Following, you can find an overview of the Snowball client, one of the tools that you can use to transfer
data between your on-premises data center and the Snowball. The Snowball client supports transferring
the following types of data to and from a Snowball.
Sources of data that can be imported with the Snowball client are as follows:
• Files or objects hosted in locally mounted file systems.
• Files or objects from a Hadoop Distributed File System (HDFS) cluster. Currently, only HDFS 2.x clusters
are supported.
Note
Each file or object that is imported must be less than or equal to 5 TB in size.
Because the computer workstation from which or to which you make the data transfer is considered
to be the bottleneck for transferring data, we highly recommend that your workstation be a powerful
computer. It should be able to meet high demands in terms of processing, memory, and networking. For
more information, see Workstation Specifications (p. 93).
Topics
• Testing Your Data Transfer with the Snowball Client (p. 53)
52
Page 59

AWS Snowball User Guide
Using the Snowball Client
• Authenticating the Snowball Client to Transfer Data (p. 53)
• Schemas for Snowball Client (p. 54)
• Importing Data from HDFS (p. 54)
• Commands for the Snowball Client (p. 56)
• Options for the snowball cp Command (p. 60)
• Syntax for the snowball cp Command (p. 62)
• Snowball Logs (p. 64)
Testing Your Data Transfer with the Snowball Client
You can use the Snowball client to test your data transfer before it begins. Testing is useful because
it can help you identify the most efficient method of transferring your data. The first 10 days that the
Snowball is on-site at your facility are free, and you'll want to test your data transfer ahead of time to
prevent fees starting on the eleventh day.
You can download the Snowball client from the tools page at any time, even before you first log in to
the AWS Snowball Management Console. You can also use the Snowball client to test your data transfer
job before you create the job, or any time thereafter. You can test the Snowball client without having a
manifest, an unlock code, or a Snowball.
To test data transfer using the Snowball client
1. Download and install the Snowball client from the AWS Snowball Tools Download page.
2. Ensure that your workstation can communicate with your data source across the local network. We
recommend that you have as few hops as possible between the two.
3. Run the Snowball client's test command and include the path to the mounted data source in your
command as follows.
snowball test [OPTION...] [path/to/data/source]
Example
snowball test --recursive --time 5 /Logs/2015/August
Example
snowball test -r -t 5 /Logs/2015/August
In the preceding example, the first command tells the Snowball client to run the test recursively through
all the folders and files found under /Logs/2015/August on the data source for 5 minutes. The second
command tells the Snowball client to report real-time transfer speed data for the duration of the test.
Note
The longer the test command runs, the more accurate the test data you get back.
Authenticating the Snowball Client to Transfer Data
Before you can transfer data with your downloaded and installed Snowball client, you must first run the
snowball start command. This command authenticates your access to the Snowball. For you to run
this command, the Snowball you use for your job must be on-site, plugged into power and network, and
turned on. In addition, the E Ink display on the Snowball's front must say Ready.
53
Page 60

AWS Snowball User Guide
Using the Snowball Client
To authenticate the Snowball client's access to a Snowball
1. Obtain your manifest and unlock code.
a. Get the manifest from the AWS Snowball Management Console or the job management API.
Your manifest is encrypted so that only the unlock code can decrypt it. The Snowball client
compares the decrypted manifest against the information that was put in the Snowball when
it was being prepared. This comparison verifies that you have the right Snowball for the data
transfer job you’re about to begin.
b. Get the unlock code, a 29-character code that also appears when you download your manifest.
We recommend that you write it down and keep it in a separate location from the manifest that
you downloaded, to prevent unauthorized access to the Snowball while it’s at your facility.
2. Locate the IP address for the Snowball on the Snowball's E Ink display. When the Snowball is
connected to your network for the first time, it automatically creates a DHCP IP address. If you want
to use a different IP address, you can change it from the E Ink display. For more information, see
Using an AWS Snowball Appliance (p. 45).
3. Execute the snowball start command to authenticate your access to the Snowball with the
Snowball's IP address and your credentials, as follows:
snowball start -i [IP Address] -m [Path/to/manifest/file] -u [29 character unlock
code]
Example
snowball start -i 192.0.2.0 -m /user/tmp/manifest -u 01234-abcde-01234-ABCDE-01234
Schemas for Snowball Client
The Snowball client uses schemas to define what kind of data is transferred between your on-premises
data center and a Snowball. You declare the schemas whenever you issue a command.
Sources for the Snowball Client Commands
Transferring file data from a local mounted file system requires that you specify the source path, in
the format that works for your OS type. For example, in the command snowball ls C:\\User\Dan
\CatPhotos s3://MyBucket/Photos/Cats, the source schema specifies that the source data is
standard file data.
For importing data directly from a Hadoop Distributed File System (HDFS) to a Snowball, you specify the
Namenode URI as the source schema, which has the hdfs://IP Address:port format. For example:
snowball cp -n hdfs://192.0.2.0:9000/ImportantPhotos/Cats
s3://MyBucket/Photos/Cats
Destinations for the Snowball Client
In addition to source schemas, there are also destination schemas. Currently, the only supported
destination schema is s3://. For example, in the command snowball cp -r /Logs/April s3://
MyBucket/Logs, the content in /Logs/April is copied recursively to the MyBucket/Logs location on
the Snowball using the s3:// schema.
Importing Data from HDFS
You can import data into Amazon S3 from your on-premises Hadoop Distributed File System (HDFS)
through a Snowball. You perform this import process by using the Snowball client. Importing from HDFS
54
Page 61

AWS Snowball User Guide
Using the Snowball Client
is not supported with the Amazon S3 Adapter for Snowball. Following, you can find information about
how to prepare for and perform HDFS data transfer.
Although you can write HDFS data to a Snowball, you can't write Hadoop data from a Snowball to your
local HDFS. As a result, export jobs are not supported for HDFS.
If you have a large number of small files, say under a megabyte each in size, then transferring them all
at once has a negative impact on your performance. This performance degradation is due to per-file
overhead when you transfer data from HDFS clusters.
Important
The batch option for the Snowball client's copy command is not supported for HDFS
data transfers. If you must transfer a large number of small files from an HDFS cluster, we
recommend that you find a method of collecting them into larger archive files, and then
transferring those. However, these archives are what is imported into Amazon S3. If you want
the files in their original state, take them out of the archives after importing the archives.
Preparing for Transferring Your HDFS Data with the Snowball Client
Before you transfer your HDFS (version 2.x) data, do the following:
• Confirm the Kerberos authentication settings for your HDFS cluster – The Snowball client supports
Kerberos authentication for communicating with your HDFS in two ways: with the Kerberos login
already on the host system and with authentication through specifying a principal and keytab in the
snowball cp command. The following HDFS/Kerberos encryption types are known to work with
Snowball:
• des3-cbc-sha1-kd
• aes-128-cts-hmac-sha1-96
• 256-cts-hmac-sha1-96
• rc4-hmac (arcfour-hmac)
Alternatively, you can copy from an unsecured HDFS cluster.
• Confirm that your workstation has the Hadoop client 2.x version installed on it – To use the
Snowball client, your workstation needs to have the Hadoop client 2.x installed, running, and able to
communicate with your HDFS 2.x cluster.
• Confirm the location of your site-specific configuration files – If you are using site-specific
configuration files, you need to use the --hdfsconfig parameter to pass the location of each XML
file.
• Confirm your Namenode URI – Each HDFS 2.x cluster has a Namenode.core-site.xml file. This file
includes a property element with the name of fs.defaultFS and a value of IP Address:port,
for example hdfs://192.0.2.0:9000. You use this value, the Namenode URI, as a part of the source
schema when you run Snowball client commands to perform operations on your HDFS cluster. For
more information, see Sources for the Snowball Client Commands (p. 54).
Note
Currently, only HDFS 2.X clusters are supported with Snowball. You can still transfer data from
an HDFS 1.x cluster by staging the data that you want to transfer on a workstation, and then
copying that data to the Snowball with the standard snowball cp commands and options.
When you have confirmed the information listed previously, identify the Amazon S3 bucket that you
want your HDFS data imported into.
After your preparations for the HDFS import are complete, you can begin. If you haven't created your
job yet, see Importing Data into Amazon S3 with AWS Snowball (p. 16) until you reach Use the AWS
Snowball Client (p. 22). At that point, return to this topic.
55
Page 62

AWS Snowball User Guide
Using the Snowball Client
Before Transferring Data from HDFS
Before using the Snowball client to copy HDFS (version 2.x) data, take the following steps:
1. To transfer data from an HDFS cluster, get the latest version of the Snowball client. You can download
and install the Snowball client from the AWS Snowball Tools Download page. There you can find the
installation package for your operating system. Follow the instructions to install the Snowball client.
2. Ensure that your HDFS cluster is running, and accessible from the workstation that you've installed the
Snowball client on.
Transferring Data from HDFS
Now you're ready to transfer data from your HDFS (version 2.x) cluster. For more information on all the
Snowball client copy command options, including those specific to HDFS, see Options for the snowball
cp Command (p. 60).
If you encounter performance issues while transferring data from your HDFS 2.x cluster to a Snowball,
see Performance Considerations for HDFS Data Transfers (p. 36).
After Transferring Data from HDFS
Once you've finished transferring data from your HDFS (version 2.x) cluster, you can validate the data on
the Snowball with the following steps:
1. Use the snowball validate command to verify the number of uploaded files and confirm that they
were uploaded correctly.
2. List all the files at the destination path or paths to confirm that the HDFS file or files were copied. For
example, you can use the following command:
snowball ls s3://bucket-name/destination-path
Commands for the Snowball Client
Following, you can find information on Snowball client commands that help you manage your data
transfer into Amazon Simple Storage Service (Amazon S3). You can have multiple instances of the
Snowball client in different terminal windows connected to a single Snowball.
Topics
• Copy Command for the Snowball Client (p. 57)
• List Command for the Snowball Client (p. 57)
• Make Directory Command for the Snowball Client (p. 58)
• Retry Command for the Snowball Client (p. 58)
• Remove Command for the Snowball Client (p. 58)
• Start Command for the Snowball Client (p. 59)
• Status Command for the Snowball Client (p. 59)
• Stop Command for the Snowball Client (p. 59)
• Test Command for the Snowball Client (p. 59)
• Validate Command for the Snowball Client (p. 59)
• Version Command for the Snowball Client (p. 60)
• Using the Verbose Option (p. 60)
56
Page 63

AWS Snowball User Guide
Using the Snowball Client
During data transfer, at least one folder appears at the root level of the Snowball. This folder and any
others at this level have the same names as the Amazon S3 buckets that you chose when this job was
created. You can't write data to the root level of the Snowball. All data must be written into one of the
bucket folders or into their subfolders.
You can work with files or folders with spaces in their names, like my photo.jpg or My Documents.
However, make sure that you handle the spaces properly in the client commands. For more information,
see the following examples:
• Linux and Mac version of the client – snowball ls s3://mybucket/My\ Folder/my\
photo.jpg
• Windows version of the client – snowball ls "s3://mybucket/My Documents/my
photo.jpg"
Note
Before transferring data into Amazon S3 using Snowball, you should make sure that the files
and folders that you're going to transfer are named according to the Object Key Naming
Guidelines for Amazon S3.
If you're having trouble using the Snowball client, see Troubleshooting for a Standard
Snowball (p. 98).
Copy Command for the Snowball Client
The snowball cp command copies files and folders between the Snowball and your data source. For
details on options for the Snowball copy command (snowball cp), see Options for the snowball cp
Command (p. 60). In addition to supporting command options, transferring data with the Snowball
client supports schemas to define what type of data is being transferred. For more information on
schemas, see Schemas for Snowball Client (p. 54).
Usage
snowball cp [OPTION...] SRC... s3://DEST
Import examples
snowball cp --recursive /Logs/April s3://MyBucket/Logs
snowball cp -r /Logs/April s3://MyBucket/Logs
Export examples
snowball cp --recursive s3://MyBucket/Logs/ /Logs/April
snowball cp -r s3://MyBucket/Logs/ /Logs/April
For details on options for the Snowball copy command (snowball cp), see Options for the snowball cp
Command (p. 60).
List Command for the Snowball Client
The snowball ls command lists the Snowball contents in the specified path. You can't use this
command to list the contents on your workstation, your data source, or other network locations outside
of the Snowball.
57
Page 64

AWS Snowball User Guide
Using the Snowball Client
Usage
snowball ls [OPTION...] s3://DEST
Example
snowball ls s3://MyBucket/Logs/April
Make Directory Command for the Snowball Client
The snowball mkdir command creates a new subfolder on the Snowball. You can't create a new folder
at the root level. The root level is reserved for bucket folders.
Usage
snowball mkdir [OPTION...] s3://DEST
Example
snowball mkdir s3://MyBucket/Logs/April/ExpenseReports
Retry Command for the Snowball Client
The snowball retry command retries the snowball cp command for all the files that didn't copy
the last time snowball cp was executed. The list of files that weren't copied is saved in a plaintext log
in your workstation's temporary directory. The exact path to that log is printed to the terminal if the
snowball cp command fails to copy a file.
Example Usage
snowball retry
Remove Command for the Snowball Client
The snowball rm command deletes files and folders on the Snowball. This operation can take some
time to complete if it removes a large number of files or directories, such as with snowball rm -r,
which deletes everything on the device. If you run the snowball ls command afterwards, it shows you
the state of the device when the deletion is completed.
However, the amount of storage reported by the snowball status command may show you the
amount of storage remaining before the snowball rm command was issued. If this happens, try the
snowball status command in an hour or so to see the new remaining storage value.
Usage
snowball rm [OPTION...] s3://DEST
Examples
snowball rm --recursive s3://MyBucket/Logs/April
snowball rm -r s3://MyBucket/Logs/April
58
Page 65

AWS Snowball User Guide
Using the Snowball Client
Start Command for the Snowball Client
The snowball start command authenticates your access to the Snowball with the Snowball's IP
address and your credentials. After you run a snowball start command, you can execute any number
of snowball cp commands.
Usage
snowball start -i IP Address -m Path/to/manifest/file -u 29 character unlock code
Example
snowball start -i 192.0.2.0 -m /user/tmp/manifest -u 01234-abcde-01234-ABCDE-01234
Status Command for the Snowball Client
The snowball status command returns the status of the Snowball.
Example Usage
snowball status
Example Output
Snowball Status: SUCCESS
S3 Endpoint running at: http://192.0.2.0:8080
Total Size: 72 TB
Free Space: 64 TB
Stop Command for the Snowball Client
The snowball stop command stops communication from the current instance of the Snowball client
to the Snowball.
You can use this command to make sure that all other commands are stopped between the data source
server and the Snowball. If you have multiple instances of the client connected to a single Snowball,
you use this command for each instance when you’re ready to stop transferring data. You can run this
command to stop one instance of the client while still copying data with another instance.
Example Usage
snowball stop
Test Command for the Snowball Client
The snowball test command tests your data transfer before it begins. For more information, see
Testing Your Data Transfer with the Snowball Client (p. 53).
Example Usage
snowball test
Validate Command for the Snowball Client
Unless you specify a path, the snowball validate command validates all the metadata and transfer
statuses for the objects on the Snowball. If you specify a path, then this command validates the content
59
Page 66

AWS Snowball User Guide
Using the Snowball Client
pointed to by that path and its subdirectories. This command lists files that are currently in the process
of being transferred as incomplete for their transfer status.
Doing this for import jobs helps ensure that your content can be imported into AWS without issue.
This command might take some time to complete, and might appear to be stuck from time to time.
This effect is common when there are lots of files, and even more so when files are nested within many
subfolders. We recommend that you run this command with the verbose option.
Example Usage
snowball -v validate
Version Command for the Snowball Client
The snowball version command displays the Snowball client version on the terminal.
Example Usage
snowball version
Using the Verbose Option
Whenever you execute a Snowball client command, you can use the verbose option for additional
information. This additional information is printed to the terminal while the command is running.
Using the verbose option helps you to better understand what each command is doing. It also helps
you troubleshoot issues you might encounter with the Snowball client.
The verbose option is off by default. You can turn it on by specifying the option while running a
command, as in the following examples.
snowball -v cp /Logs/April/logs1.csv s3://MyBucket/Logs/April/logs1.csv
snowball --verbose ls s3://MyBucket/Logs/April/
Options for the snowball cp Command
Following, you can find information about snowball cp command options and also syntax guidelines
for using this command. You use this command to transfer data from your workstation to a Snowball.
Command Option Description
-b, --batch String.
Significantly improves the transfer performance for small files by batching
them into larger .snowballarchives files. Batching is on by default. You
can change the following defaults to specify when a file is included in a
batch:
• By default, files that are 1 MB or smaller are included in batches. You can
change this setting by specifying the --batchFileSizeInKBLimit
option with a new maximum file size, in kilobytes. Maximum file sizes
range from 100 KB to 1 MB. Files that are larger than the specified
maximum file size are transferred to the Snowball as individual files and
not included in any batches.
60
Page 67

AWS Snowball User Guide
Using the Snowball Client
Command Option Description
• By default, batches hold up to 10,000 files. This limit can be changed by
setting the --batchNumOfFiles option. The number of files in a batch
can range from 5,000 to 100,000 files.
During import into Amazon S3, batches are extracted and the original
files are imported into Amazon S3. Only .snowballarchives files that
were created during the copy command with this option are extracted
automatically during import.
--checksum On and set to false by default.
Calculates a checksum for any source and destination files with the same
name, and then compares the checksums. This command option is used
when a copy operation is resumed. Using this option adds computational
overhead during your copy operation.
Note
When this option isn't used, a faster comparison of just file names
and dates occurs when you resume as copy operation.
-f, --force On and set to false by default. This command option has two uses:
• When used with a copy command, -f overwrites any existing content on
the destination that matches the path and name of the content being
transferred.
• When used after a copy command is run, -f overrides the --resume
command option. Instead, your copy operation is performed from the
beginning again, overwriting any existing content on the destination with
the same path and name.
Note
The preceding use cases are not mutually exclusive. We recommend
that you use -f with care to prevent delays in data transfer.
-h, --help On and set to false by default.
Displays the usage information for the snowball cp command in the
terminal.
--noBatch String.
Disables automatic batching of small files. If you're copying a directory,
and you use this option, you must also use the --recursive option. This
option is hidden. For performance reasons, we don't recommend that you
use it unless your use case requires it.
-r, --recursive On and set to false by default.
Recursively traverses directories during the snowball cp command's
operation.
-s, --stopOnError On and set to false by default.
Stops the snowball cp command's operation if it encounters an error.
61
Page 68

AWS Snowball User Guide
Using the Snowball Client
In addition to the previously defined Snowball client copy command options, there are some options
specific to transferring data from an HDFS cluster. The following table describes those options. For more
information on transferring from an HDFS cluster, see Importing Data from HDFS (p. 54).
Important
The --batch option for the Snowball client's copy command is not supported for HDFS
data transfers. If you must transfer a large number of small files from an HDFS cluster, we
recommend that you find a method of collecting them into larger archive files, and then
transferring those. However, these archives are what is imported into Amazon S3. If you want
the files in their original state, take them out of the archives after importing the archives.
HDFS-Specific
Command Option
--hdfsconfig Used with the hdfs:// import schema, this option sets the path to a
-k On and set to false by default.
Description
custom XML configuration file on the server running your HDFS cluster.
This option must be repeated if you have multiple configuration files. For
example, the following specifies two configuration files.
--hdfsconfig src/core/Namenode-site.xml --hdfsconfig /
hdfs/corp/conf/hdfs-site.xml
Used with the hdfs:// import schema and the -p option, this option
sets the path to the keytab file used to authenticate the Snowball client's
connection to the HDFS cluster before copying data to a Snowball.
Note
You must have both the principal and the keytab registered with
the Kerberos authentication server used to authenticate the HDFS
cluster. If you recently ran the kinit command on your terminal,
then you don't need to specify this option.
-n On and set to false by default.
Used with the hdfs:// import schema, this option copies data from a
nonsecure HDFS cluster.
-p On and set to false by default.
Used with the hdfs:// import schema and the -k option, this option sets
the principal used to authenticate the Snowball client's connection to the
HDFS cluster before then copying data to a Snowball.
Note
You must have both the principal and the keytab registered with
the Kerberos authentication server used to authenticate the HDFS
cluster. If you recently ran the kinit command on your terminal,
then you don't need to specify this option.
Syntax for the snowball cp Command
Copying data with the Snowball client's snowball cp command uses a syntax that is similar to Linux
cp command syntax. However, there are some notable differences. In the following topics, you can find
a reference for the syntax used by the snowball cp command. Failure to follow this syntax can lead to
unexpected results when copying data to or from a Snowball.
When copying data, define a source path and a destination path, as in the following example.
62
Page 69

AWS Snowball User Guide
Using the Snowball Client
snowball cp [source path] [destination path]
When copying a directory, if you also want to copy the contents of the source directory, you use the -r
option to recursively copy the contents.
Syntax for Copying a File
• Copying a file to a nonexistent destination with no trailing slash – Copies the source file to a new
file at the destination.
snowball cp /tmp/file1 s3://bucket-name/dir1/file2
In the preceding example, the source file file1 is copied to the Snowball with the new file name of
file2.
• Copying a file to a nonexistent destination with a trailing slash – Creates a new directory at the
destination, and copies the file into that new directory.
snowball cp /tmp/file3 s3://bucket-name/dir2/
In the preceding example, the dir2 directory does not exist until this command is executed. Because
dir2/ has a trailing slash in this example, dir2 is created as a directory, and the path to file3 on the
Snowball is s3://bucket-name/dir2/file3.
• Copying a file to an existing destination file – Fails unless you specify the -f option to overwrite the
existing destination file.
snowball cp -f /tmp/file4 s3://bucket-name/dir3/file5
In the preceding example, the destination file file5 already exists before the command was executed.
By executing this command with the -f option, file5 is overwritten by the contents of file4, with a
destination path of s3://bucket-name/dir3/file5.
• Copying a file to an existing destination directory – Copies the file into the existing destination
directory.
snowball cp /tmp/file6 s3://bucket-name/dir4/
The preceding example copies file6 into s3://bucket-name/dir4/.
Note
If file6 already exists in s3://bucket-name/dir4/ when this command is executed, the
command fails. You can force the destination file6 to be overwritten by the source file6 by
using the snowball cp command with the -f option.
• Copying a file to a bucket on Snowball with or without a trailing slash – Copies the file into the root
level directory on the Snowball that shares the name of an Amazon S3 bucket.
snowball cp /tmp/file7 s3://bucket-name
The preceding example copies file7 into s3://bucket-name/file7.
Note
If file7 already exists in s3://bucket-name when this command is executed, the command
fails. You can force the destination file7 to be overwritten by the source file7 by using the
snowball cp command with the -f option.
63
Page 70

AWS Snowball User Guide
Using the Snowball Client
Syntax for Copying a Directory
• Copying a directory to a new destination with or without a trailing slash – Specify the source path
and the destination path.
snowball cp -r /tmp/dir1 s3://bucket-name/dir2/
snowball cp -r /tmp/dir1 s3://bucket-name/dir2
The preceding examples both do the same thing. They both create the new directory dir2 and
recursively copy the contents of dir1 to it.
• Copying a directory to a destination directory that already exists – Only the unique contents from
the source directory make it into the destination directory, unless the snowball cp command is used
with the -f option to force the entire destination directory to be overwritten.
snowball cp -r /tmp/dir3 s3://bucket-name/dir4/
In the preceding example, only the unique contents from the source directory make it into the
destination directory, dir4.
snowball cp -r -f /tmp/dir3 s3://bucket-name/dir4/
In the preceding example, the destination directory dir4 is overwritten with the contents in the source
dir3 directory.
• Copying a directory to a destination file that already exists – This operation fails, unless you use
the snowball cp command with the -f option. In this case, the operation succeeds, because the
destination file is overwritten with a copy of the source directory of the same name.
snowball cp -r -f /tmp/dir5 s3://bucket-name/dir6
In the preceding example, dir6 on the Snowball is actually a file. Usually this command fails in this
case, because the source dir5 is a directory. However, because the -f is used, the file dir6 is forcibly
overwritten as a directory with the contents from the source dir5.
• Copying a directory to a bucket on a Snowball – Specify the bucket name in the destination path.
snowball cp -r /tmp/dir7 s3://bucket-name/
Note
If dir7 already exists in s3://bucket-name when this command is executed, the command
copies over the unique content from the source directory into the destination directory. You
can force the destination dir7 to be overwritten by the source dir7 by using the snowball cp
command with the -f option.
Snowball Logs
When you transfer data between your on-premises data centers and a Snowball, the Snowball client
automatically generates a plaintext log and saves it to your workstation. If you encounter unexpected
errors during data transfer to the Snowball, make a copy of the associated log files. Include them along
with a brief description of the issues that you encountered in a message to AWS Support.
Logs are saved in the following locations, based on your workstation's operating system:
64
Page 71

AWS Snowball User Guide
Transferring Data with the
Amazon S3 Adapter for Snowball
• Windows – C:/Users/<username>/.aws/snowball/logs/
• Mac – /Users/<username>/.aws/snowball/logs/
• Linux – /home/<username>/.aws/snowball/logs/
Logs are saved with the file name snowball_<year>_<month>_<date>_<hour>. The hour is based on
local system time for the workstation and uses a 24-hour clock.
Example Log Name
snowball_2016_03_28_10.log
Each log has a maximum file size of 5 MB. When a log reaches that size, a new file is generated, and the
log is continued in the new file. If additional logs start within the same hour as the old log, then the
name of the first log is appended with .1 and the second log is appended with .2, and so on.
Important
Logs are saved in plaintext format and contain file name and path information for the files that
you transfer. To protect this potentially sensitive information, we strongly suggest that you
delete these logs once the job that the logs are associated with enters the completed status.
Transferring Data with the Amazon S3 Adapter for Snowball
The Amazon S3 Adapter for Snowball is a programmatic tool that you can use to transfer data between
your on-premises data center and a Snowball. It replaces the functionality of the Snowball client. As
with the Snowball client, you need to download the adapter's executable file from the AWS Snowball
Tools Download page, install it, and run it from your computer workstation. When programmatically
transferring data to a Snowball, all data goes through the Amazon S3 Adapter for Snowball, without
exception.
We highly recommend that your workstation be a powerful computer. It should be able to meet high
demands in terms of processing, memory, and networking. For more information, see Workstation
Specifications (p. 93).
Downloading and Installing the Amazon S3 Adapter for Snowball
You can download and install the Amazon S3 Adapter for Snowball from the AWS Snowball Tools
Download page. Once there, find the installation package for your operating system, and follow the
instructions to install the Amazon S3 Adapter for Snowball. Running the adapter from a terminal in your
workstation might require using a specific path, depending on your operating system.
To install the adapter, first download the snowball-adapter-operating_system.zip file from the AWS
Snowball Tools Download page. Unzip the file, and navigate the extracted folder. For the Mac and Linux
versions of the adapter, to make the snowball-adapter file executable, change the permissions on this
file within the bin directory with the following commands.
chmod +x snowball-adapter
To confirm the adapter was installed successfully
1. Open a terminal window on the workstation with the installed adapter.
2. Navigate to the directory where you installed the snowball-adapter-operating_system
subdirectory.
65
Page 72

AWS Snowball User Guide
Using the Amazon S3 Adapter for Snowball
3. Navigate to snowball-adapter-operating_system/bin.
4. Type the following command to confirm that the adapter was installed correctly: ./snowball-
adapter --help.
If the adapter was successfully installed, its usage information appears in the terminal.
Installing the adapter also adds the snowball subdirectory to your .aws directory. Within this snowball
directory, you can find the logs and config subdirectories. Their contents are as follows:
• The logs directory is where you find the log files for your data transfers to the Snowball through the
Amazon S3 Adapter for Snowball.
• The config directory contains two files:
• The snowball-adapter-logging.config file contains the configuration settings for the log files written
to the ~/.aws/snowball/logs directory.
• The snowball-adapter.config file contains the configuration settings for the adapter itself.
Note
The .aws directory is located at ~/.aws in Linux, OS X, or Unix, or at C:\User\USERNAME\.aws on
Windows.
Using the Amazon S3 Adapter for Snowball
Following, you can find an overview of the Amazon S3 Adapter for Snowball, which allows you to
programmatically transfer data between your on-premises data center and the Snowball using Amazon
S3 REST API actions. This Amazon S3 REST API support is limited to a subset of actions, meaning that
you can use the subset of supported Amazon S3 AWS CLI commands or one of the AWS SDKs to transfer
data.
If your solution uses the AWS SDK for Java version 1.11.0 or newer, you must use the following
S3ClientOptions:
• disableChunkedEncoding() – Indicates that chunked encoding is not supported with the adapter.
• setPathStyleAccess(true) – Configures the adapter to use path-style access for all requests.
For more information, see Class S3ClientOptions.Builder in the Amazon AppStream SDK for Java.
Topics
• Starting the Amazon S3 Adapter for Snowball (p. 66)
• Getting the Status of a Snowball Using the Adapter (p. 67)
• Unsupported Amazon S3 Features for Snowball (p. 68)
• Options for the Amazon S3 Adapter for Snowball (p. 68)
• Using the Adapter with Amazon S3 Commands for the AWS CLI (p. 70)
• Supported REST API Actions (p. 71)
Starting the Amazon S3 Adapter for Snowball
To use the Amazon S3 Adapter for Snowball, start it in a terminal on your workstation and leave it
running while transferring data.
Note
Because the computer workstation from which or to which you make the data transfer
is considered to be the bottleneck for transferring data, we highly recommend that
66
Page 73

AWS Snowball User Guide
Using the Amazon S3 Adapter for Snowball
your workstation be a powerful computer. It should be able to meet high demands in
terms of processing, memory, and networking. For more information, see Workstation
Specifications (p. 93).
Before you start the adapter, you need the following information:
• The Snowball's IP address – Providing the IP address of the Snowball when you start the adapter tells
the adapter where to send your transferred data. You can get this IP address from the E Ink display on
the Snowball itself.
• The job's manifest file – The manifest file contains important information about the job and
permissions associated with it. Without it, you won't be able to access the Snowball. It's an encrypted
file that you can download after your job enters the WithCustomer status. The manifest is decrypted
by the unlock code. You can get the manifest file from the console, or programmatically from calling a
job management API action.
• The job's unlock code – The unlock code a string of 29 characters, including 4 dashes. It's used
to decrypt the manifest. You can get the unlock code from the AWS Snowball Management
Console (p. 22), or programmatically from the job management API.
• Your AWS credentials – Every interaction with the Snowball is signed with the AWS Signature Version
4 algorithm. For more information, see Signature Version 4 Signing Process. When you start the
Amazon S3 Adapter for Snowball, you specify the AWS credentials that you want to use to sign this
communication. By default, the adapter uses the credentials specified in the home directory/.aws/
credentials file, under the [default] profile. For more information on how this Signature Version 4
algorithm works locally with the Amazon S3 Adapter for Snowball, see Authorization with the Amazon
S3 API Adapter for Snowball (p. 85).
Once you have the preceding information, you're ready to start the adapter on your workstation. The
following procedure outlines this process.
To start the adapter
1. Open a terminal window on the workstation with the installed adapter.
2. Navigate to the directory where you installed the snowball-adapter-operating_system directory.
3. Navigate to the bin subdirectory.
4. Type the following command to start the adapter: ./snowball-adapter -i Snowball IP
address -m path to manifest file -u 29 character unlock code.
Note
If you don't specify any AWS credentials when starting the adapter, the default profile in the
home directory/.aws/credentials file is used.
The Amazon S3 Adapter for Snowball is now started on your workstation. Leave this terminal window
open while the adapter runs. If you're going to use the AWS CLI to transfer your data to the Snowball,
open another terminal window and run your AWS CLI commands from there.
Getting the Status of a Snowball Using the Adapter
You can get a Snowball’s status by initiating a HEAD request to the Amazon S3 Adapter for Snowball.
You receive the status response in the form of an XML document. The XML document includes storage
information, latency information, version numbers, and more.
You can't use the AWS CLI or any of the AWS SDKs to retrieve status in this. However, you can easily test
a HEAD request over the wire by running a curl command on the adapter, as in the following example.
curl -H "Authorization Header" -X HEAD http://192.0.2.0:8080
67
Page 74

AWS Snowball User Guide
Using the Amazon S3 Adapter for Snowball
Note
When requesting the status of a Snowball, you must add the authorization header. For more
information, see Signing AWS Requests with Signature Version 4.
An example of the XML document that this request returns follows.
<?xml version="1.0" encoding="UTF-8" standalone="yes"?>
<Status xsi:schemaLocation="http://s3.amazonaws.com/doc/2006-03-01/" xmlns:xsi="http://
www.w3.org/2001/XMLSchema-instance">
<snowballIp>192.0.2.0</snowballIp>
<snowballPort>8080</snowballPort>
<snowballId>012EXAMPLE01</snowballId>
<totalSpaceInBytes>77223428091904</totalSpaceInBytes>
<freeSpaceInBytes>77223428091904</freeSpaceInBytes>
<jobId>JID850f06EXAMPLE-4EXA-MPLE-2EXAMPLEab00</jobId>
<snowballServerVersion>1.0.1</snowballServerVersion>
<snowballServerBuild>2016-08-22.5729552357</snowballServerBuild>
<snowballAdapterVersion>Version 1.0</snowballAdapterVersion>
<snowballRoundTripLatencyInMillis>1</snowballRoundTripLatencyInMillis>
</Status>
Unsupported Amazon S3 Features for Snowball
Using the Amazon S3 Adapter for Snowball, you can programmatically transfer data to and from a
Snowball with Amazon S3 API actions. However, not all Amazon S3 transfer features and API actions
are supported for use with a Snowball device. For more information on the supported features, see the
following:
• Using the Adapter with Amazon S3 Commands for the AWS CLI (p. 70)
• Supported REST API Actions (p. 71)
Any features or actions not explicitly listed in these topics are not supported. For example, the following
features and actions are not supported for use with Snowball:
• TransferManager – This utility transfers files from a local environment to Amazon S3 with the SDK for
Java. Consider using the supported API actions or AWS CLI commands with the adapter instead.
• GET Bucket (List Objects) Version 2 – This implementation of the GET action returns some or all (up to
1,000) of the objects in a bucket. Consider using the GET Bucket (List Objects) Version 1 action or the ls
AWS CLI command.
Options for the Amazon S3 Adapter for Snowball
Following, you can find information on Amazon S3 Adapter for Snowball options that help you configure
how the adapter communicates with a Snowball.
Note
Before transferring data into Amazon S3 using Snowball, make sure that the files and directories
that you're going to transfer are named according to the Object Key Naming Guidelines.
Option Description Usage and Example
-a
The AWS profile name that you want to use to
snowball-adapter -a
sign requests to the Snowball. By default, the
--awsprofile-name
adapter uses the credentials specified in the home
directory/.aws/credentials file, under the
68
snowball-adapter -a
Lauren
Page 75

AWS Snowball User Guide
Using the Amazon S3 Adapter for Snowball
Option Description Usage and Example
[default] profile. To specify a different profile, use
this option followed by the profile name.
-s
--aws-secretkey
-h
--help
-i
--ip
-m
--manifest
-u
--unlockcode
The AWS secret key that you want to use to sign
snowball-adapter -s
requests to the Snowball. By default, the adapter
uses the key present in the default profile specified
in the home directory/.aws/credentials file,
under the [default] profile. To specify a different
snowball-adapter -s
wJalrXUtnFEMI/K7MDENG/
bPxRfiCYEXAMPLEKEY
profile, use this option, followed by a secret
key. The --aws-profile-name option takes
precedence if both options are specified.
Usage information for the adapter. snowball-adapter -h
The Snowball's IP address, which can be found on
snowball-adapter -i
the Snowball's E Ink display.
snowball-adapter -i
192.0.2.0
The path to the manifest file for this job. You
snowball-adapter -m
can get the manifest file from the AWS Snowball
Management Console (p. 22), or programmatically
from the job management API.
The unlock code for this job. You can get the
snowball-adapter -m ~/
Downloads/manifest.bin
snowball-adapter -u
unlock code from the AWS Snowball Management
Console (p. 22), or programmatically from the job
management API.
snowball-adapter -u
01234-abcde-01234ABCDE-01234
-ssl
--ssl-enabled
-c
--sslcertificatepath
-k
--sslprivate-keypath
A value that specifies whether or not the
Secure Socket Layer (SSL) protocol is used for
communicating with the adapter. If no additional
certification path or private key is provided, then a
self-signed certificate and key are generated in the
home directory/.aws/snowball/config directory.
The path to the certificate to use for the SSL
protocol when communicating with the adapter.
The path to the private key to use for the SSL
protocol when communicating with the adapter.
69
snowball-adapter -ssl
snowball-adapter -ssl
snowball-adapter -c
~/.aws/snowball/myssl/
certs
snowball-adapter -k
~/.aws/snowball/myssl/
keys
Page 76

AWS Snowball User Guide
Using the Amazon S3 Adapter for Snowball
Using the Adapter with Amazon S3 Commands for the AWS CLI
In the following, you can find how to specify the Amazon S3 Adapter for Snowball as the endpoint for
applicable AWS CLI commands. You can also find what Amazon S3 AWS CLI commands are supported for
transferring data to the Snowball with the adapter.
Note
For information on installing and setting up the AWS CLI, including specifying what regions you
want to make AWS CLI calls against, see the AWS Command Line Interface User Guide.
Specifying the Adapter as the AWS CLI Endpoint
When you use the AWS CLI to issue a command to the Snowball, specify that the endpoint is the Amazon
S3 Adapter for Snowball, as shown following.
aws s3 ls --endpoint http://<IP address for the S3 Adapter>:8080
By default, the adapter runs on port 8080. You can specify a different port by changing the contents in
the snowball-adapter.config file described in Downloading and Installing the Amazon S3 Adapter for
Snowball (p. 65).
Supported AWS CLI Amazon S3 Commands
Following, you can find a description of the subset of AWS CLI commands and options for Amazon S3
that the AWS Snowball Edge appliance supports. If a command or option isn't listed following, it's not
supported. You can declare some unsupported options, like --sse or --storage-class, along with a
command. However, these are ignored and have no impact on how data is imported.
• cp Copies a file or object to or from the Snowball.
• --dryrun (boolean) The operations that would be performed using the specified command are
displayed without being run.
• --quiet (boolean) Operations performed by the specified command are not displayed.
• --include (string) Don't exclude files or objects in the command that match the specified pattern.
See Use of Exclude and Include Filters in the AWS CLI Command Reference for details.
• --exclude (string) Exclude all files or objects from the command that matches the specified
pattern.
• --follow-symlinks | --no-follow-symlinks (boolean) Symbolic links (symlinks) are
followed only when uploading to S3 from the local file system. Amazon S3 doesn't support symbolic
links, so the contents of the link target are uploaded under the name of the link. When neither
option is specified, the default is to follow symlinks.
• --only-show-errors (boolean) Only errors and warnings are displayed. All other output is
suppressed.
• --recursive (boolean) The command is performed on all files or objects under the specified
directory or prefix. Currently, this option is only supported for uploading data to a Snowball.
• --storage-class (string) The type of storage to use for the object. Valid choices are: STANDARD |
REDUCED_REDUNDANCY | STANDARD_IA. Defaults to STANDARD.
• --metadata (map) A map of metadata to store with the objects in Amazon S3. This map is applied
to every object that is part of this request. In a sync, this functionality means that files that aren't
changed don't receive the new metadata. When copying between two Amazon S3 locations, the
metadata-directive argument defaults to REPLACE unless otherwise specified.
Important
Syncing from one directory on a Snowball to another directory on the same Snowball is not
supported. Syncing from one Snowball to another Snowball is not supported.
• ls Lists objects on the Snowball.
70
Page 77

AWS Snowball User Guide
Using the Amazon S3 Adapter for Snowball
• --human-readable (boolean) File sizes are displayed in human-readable format.
• --summarize (boolean) Summary information is displayed (number of objects, total size).
• rm Deletes an object on the Snowball.
• --dryrun (boolean) The operations that would be performed using the specified command are
displayed without being run.
• --include (string) Don't exclude files or objects in the command that match the specified pattern.
For details, see Use of Exclude and Include Filters in the AWS CLI Command Reference.
• --exclude (string) Exclude all files or objects from the command that matches the specified
pattern.
• --only-show-errors (boolean) Only errors and warnings are displayed. All other output is
suppressed.
• --quiet (boolean) Operations performed by the specified command are not displayed.
Supported REST API Actions
Following, you can find REST API actions that you can use with the Snowball.
Topics
• Supported REST API Actions for Snowball (p. 71)
• Supported REST API Actions for Amazon S3 (p. 72)
Supported REST API Actions for Snowball
HEAD Snowball
Description
Currently, there's only one Snowball REST API operation, which can be used to return status information
for a specific device. This operation returns the status of a Snowball. This status includes information
that can be used by AWS Support for troubleshooting purposes.
You can't use this operation with the AWS SDKs or the AWS CLI. We recommend that you use curl or an
HTTP client. The request doesn't need to be signed for this operation.
Request
In the below example, the IP address for the Snowball is 192.0.2.0. Replace this value with the IP address
of your actual device.
curl -X HEAD http://192.0.2.0:8080
Response
<Status xsi:schemaLocation="http://s3.amazonaws.com/doc/2006-03-01/" xmlns:xsi="http://
www.w3.org/2001/XMLSchema-instance">
<snowballIp>127.0.0.1</snowballIp>
<snowballPort>8080</snowballPort>
<snowballId>device-id</snowballId>
<totalSpaceInBytes>499055067136</totalSpaceInBytes>
<freeSpaceInBytes>108367699968</freeSpaceInBytes>
<jobId>job-id</jobId>
<snowballServerVersion>1.0.1</snowballServerVersion>
<snowballServerBuild>DevBuild</snowballServerBuild>
<snowballClientVersion>Version 1.0</snowballClientVersion>
71
Page 78

AWS Snowball User Guide
Using the Amazon S3 Adapter for Snowball
<snowballRoundTripLatencyInMillis>33</snowballRoundTripLatencyInMillis>
</Status>
Supported REST API Actions for Amazon S3
Following, you can find the list of Amazon S3 REST API actions that are supported for using the Amazon
S3 Adapter for Snowball. The list includes links to information about how the API actions work with
Amazon S3. The list also covers any differences in behavior between the Amazon S3 API action and the
Snowball counterpart. All responses coming back from a Snowball declare Server as AWSSnowball, as
in the following example.
HTTP/1.1 200 OK
x-amz-id-2: JuKZqmXuiwFeDQxhD7M8KtsKobSzWA1QEjLbTMTagkKdBX2z7Il/jGhDeJ3j6s80
x-amz-request-id: 32FE2CEB32F5EE25
Date: Fri, 08 2016 21:34:56 GMT
Server: AWSSnowball
• GET Bucket (List Objects) version 1 – In this implementation of the GET operation, the following is
true:
• Pagination is not supported.
• Markers are not supported.
• Delimiters are not supported.
• When the list is returned, the list is not sorted.
• Only version 1 is supported. GET Bucket (List Objects) Version 2 is not supported.
• The Snowball adapter is not optimized for large list operations. For example, you might have a case
with over a million objects per folder where you want to list the objects after you transfer them to
the device. In this type of case, we recommend that you order a Snowball Edge for your job instead.
• GET Service
• HEAD Bucket
• HEAD Object
• GET Object – When an object is uploaded to a Snowball using GET Object, an entity tag (ETag) is not
generated unless the object was uploaded using multipart upload. The ETag is a hash of the object.
The ETag reflects changes only to the contents of an object, not its metadata. The ETag might or
might not be an MD5 digest of the object data. For more information on ETags, see Common Response
Headers in the Amazon Simple Storage Service API Reference.
• PUT Object – When an object is uploaded to a Snowball using PUT Object, an ETag is not generated
unless the object was uploaded using multipart upload.
• DELETE Object
• Initiate Multipart Upload – In this implementation, initiating a multipart upload request for an object
already on the Snowball first deletes that object and then copies it in parts to the Snowball.
• List Multipart Uploads
• Upload Part
• Complete Multipart Upload
• Abort Multipart Upload
Note
Any Amazon S3 REST API actions not listed here are not supported. Using any unsupported
REST API actions with your Snowball Edge returns an error message saying that the action is not
supported.
72
Page 79

AWS Snowball User Guide
Preparing a Snowball for Shipping
Shipping Considerations for AWS Snowball
Following, you can find information about how shipping is handled for AWS Snowball, and a list that
shows each AWS Region that is supported. The shipping rate you choose for a job applies to both
sending and receiving the Snowball or Snowballs used for that job. For information on shipping charges,
see AWS Snowball Pricing.
Topics
• Preparing a Snowball for Shipping (p. 73)
• Region-Based Shipping Restrictions (p. 74)
• Shipping an AWS Snowball Appliance (p. 74)
When you create a job, you specify a shipping address and shipping speed. This shipping speed doesn’t
indicate how soon you can expect to receive the Snowball from the day you created the job. It only
shows the time that the appliance is in transit between AWS and your shipping address. That time
doesn’t include any time for processing. Processing time depends on factors including job type (exports
take longer than imports, typically) and job size (80-TB models take longer than 50-TB models,
typically). Also, carriers generally only pick up outgoing Snowballs once a day. Thus, processing before
shipping can take a day or more.
Note
Snowball devices can only be used to import or export data within the AWS Region where the
devices were ordered.
Preparing a Snowball for Shipping
The following explains how to prepare a Snowball appliance and ship it back to AWS.
To prepare a Snowball for shipping
1. Make sure that you've finished transferring all the data for this job to or from the Snowball.
2. Power off the Snowball by pressing the power button above the digital display.
Note
If you've powered off and unplugged the Snowball, and your shipping label doesn't appear
after about a minute, contact AWS Support.
3. Disconnect and stow the cables the Snowball was sent with. The back panel of the Snowball has a
cable caddie that holds the cables safely during the return trip.
4. Close the two panels on the back and front of the Snowball, pressing in until you hear and feel them
click.
You don't need to pack the Snowball in a container, because it is its own physically rugged shipping
container. The E Ink display on the front of the Snowball changes to your return shipping label when the
Snowball is turned off.
73
Page 80

AWS Snowball User Guide
Region-Based Shipping Restrictions
Region-Based Shipping Restrictions
Before you create a job, you should sign in to the console from the AWS Region that your Amazon S3
data is housed in. A few shipping restrictions apply, as follows:
• For data transfers in US regions, we don't ship Snowballs outside of the United States.
• We don't ship Snowballs between non-US regions—for example, from EU (Ireland) to EU (Frankfurt), or
from Asia Pacific (Mumbai) to Asia Pacific (Sydney).
• For data transfers in Asia Pacific (Sydney), we only ship Snowballs within Australia.
• For data transfers in Asia Pacific (Mumbai), we only ship Snowballs within India.
• For data transfers in Japan, we only ship Snowballs within Japan.
• For data transfers in the EU regions, we only ship Snowballs to EU member countries listed following:
Austria, Belgium, Bulgaria, Croatia, Republic of Cyprus, Czech Republic, Denmark, Estonia, Finland,
France, Germany, Greece, Hungary, Ireland, Latvia, Lithuania, Luxembourg, Malta, Netherlands, Poland,
Portugal, Romania, Slovakia, Slovenia, Spain, Sweden, and the UK.
• For data transfers in the Asia Pacific (Singapore) region, we only ship Snowballs to Singapore.
Note
AWS doesn't ship Snowballs to post office boxes.
Shipping an AWS Snowball Appliance
The prepaid shipping label contains the correct address to return the Snowball. For information on how
to return your Snowball, see Shipping Carriers (p. 74). The Snowball is delivered to an AWS sorting
facility and forwarded to the AWS data center. Package tracking is available through your region's carrier.
You can track status changes for your job by using the AWS Snowball Management Console.
Important
Unless personally instructed otherwise by AWS, don't affix a separate shipping label to the
Snowball. Always use the shipping label that is displayed on the Snowball digital display.
Shipping Carriers
When you create a job, you provide the address that you want the Snowball shipped to. The carrier that
supports your region handles the shipping of Snowballs from AWS to you, and from you back to AWS.
Whenever a Snowball is shipped, you get a tracking number. You can find each job's tracking number and
a link to the tracking website from the AWS Snowball Management Console's job dashboard, or by using
API calls to the job management API. Following is the list of supported carriers for Snowball by region:
• For India, Blue Dart is the carrier.
• For Japan, Schenker-Seino Co., Ltd., is the carrier.
• For all other regions, UPS is the carrier.
AWS Snowball Pickups in the EU, US, Canada, and Singapore
In the EU, US, Canada, and Singapore, keep the following information in mind for UPS to pick up a
Snowball:
• You arrange for UPS to pick up the Snowball by scheduling a pickup with UPS directly, or take the
Snowball to a UPS package drop-off facility to be shipped to AWS. To schedule a pickup with UPS, you
need a UPS account.
74
Page 81

AWS Snowball User Guide
Shipping Carriers
• The prepaid UPS shipping label on the E Ink display contains the correct address to return the
Snowball.
• The Snowball is delivered to an AWS sorting facility and forwarded to the AWS data center. UPS
automatically reports back a tracking number for your job.
Important
Unless personally instructed otherwise by AWS, never affix a separate shipping label to the
Snowball. Always use the shipping label that is displayed on the Snowball's E Ink display.
AWS Snowball Pickups in Brazil
In Brazil, keep the following information in mind for UPS to pick up a Snowball:
• When you're ready to return a Snowball, call 0800-770-9035 to schedule a pickup with UPS.
• Snowball is available domestically within Brazil, which includes 26 states and the Distrito Federal.
• If you have a Cadastro Nacional de Pessoa Juridica (CNPJ) tax ID, be sure that you know this ID before
you create your job.
• You should issue the appropriate document to return the Snowball device. Confirm with your tax
department which of the documents following is required in your state, according to your ICMS
registration:
• Within São Paulo – A non-ICMS declaration and an Electronic Tax Invoice (NF-e) are usually required.
• Outside São Paulo – The following are usually required:
• A non-ICMS declaration
• A nota fiscal avulsa
• An Electronic Tax Invoice (NF-e)
Note
For non-ICMS taxpayer declaration, we recommend that you generate four copies of your
declaration: one for your records, the other three for transport.
AWS Snowball Pickups in Australia
In Australia, if you're shipping a Snowball back to AWS, send an email to snowball-pickup@amazon.com
with Snowball Pickup Request in the subject line so we can schedule the pickup for you. In the body of
the email, include the following information:
• Job ID – The job ID associated with the Snowball that you want returned to AWS.
• AWS Account ID – The ID for the AWS account that created the job.
• Postcode – The postcode for the address where we originally shipped the Snowball to you.
• Earliest Pickup Time (your local time) – The earliest time of day that you want the Snowball picked up.
• Latest Pickup Time (your local time) – The latest time of day that you want the Snowball picked up.
• Email Address – The email address that you want the pickup request confirmation sent to.
• Special Instructions (optional) – Any special instructions for picking up the Snowball.
Soon, you get a follow-up email from UPS to the email address you specified with more information
about your pending pickup, scheduled for the soonest available date.
AWS Snowball Pickups in India
In India, Blue Dart picks up the Snowball device. When you are ready to schedule the return for your job,
follow the instructions on the Snowball's E Ink display.
75
Page 82

AWS Snowball User Guide
Shipping Carriers
Important
When using a Snowball in India, remember to file all relevant tax paperwork with your state.
AWS Snowball Pickups in Japan
In Japan, Schenker-Seino handles your pickups. When you are ready to return your device,
you can schedule a pickup on the Schenker-Seino booking website: https://track.seino.co.jp/
CallCenterPlusOpen/PickupOpen.do. Keep the following in mind when returning a device:
• You arrange for Schenker-Seino to pick up the Snowball by scheduling a pickup with them directly.
• Find the self-adhesive paper return-shipping label in the pouch attached to the device and apply it
over the existing paper shipping label on the side of the device. Don't apply the paper label on the
doors, inside the doors, on the bottom of the device, or on the E Ink display.
• The Snowball is delivered to an AWS sorting facility and forwarded to the AWS data center. SchenkerSeino automatically reports back a tracking number for your job.
Shipping Speeds
Each country has different shipping speeds available. These shipping speeds are based on the country in
which you're shipping a Snowball. Shipping speeds are as follows:
• Australia – When shipping within Australia, you have access to express shipping. Typically, Snowballs
shipped express are delivered in about a day.
• Brazil – When shipping within Brazil, you have access to UPS Domestic Express Saver shipping, which
delivers within two business days during commercial hours. Shipping speeds might be affected by
interstate border delays.
• European Union (EU) – When shipping to any of the countries within the EU, you have access to
express shipping. Typically, Snowballs shipped express are delivered in about a day. In addition, most
countries in the EU have access to standard shipping, which typically takes less than a week, one way.
• India – When shipping within India, Snowballs are sent out within 7 working days of AWS receiving all
related tax documents.
• Japan – When shipping within Japan, you have access to the standard shipping speed.
• United States of America (US) and Canada – When shipping within the US or Canada, you have access
to one-day shipping and two-day shipping.
• Singapore – When shipping within Singapore, you have access to Domestic Express Saver shipping.
76
Page 83

AWS Snowball User Guide
Encryption in AWS Snowball
Security in AWS Snowball
Following, you can find information on security considerations for working with AWS Snowball. Security
is a significant concern when transporting information of any level of classification, and Snowball has
been designed with this concern in mind.
Topics
• Encryption in AWS Snowball (p. 77)
• Authorization and Access Control in AWS Snowball (p. 79)
• AWS Key Management Service in Snowball (p. 84)
• Authorization with the Amazon S3 API Adapter for Snowball (p. 85)
• Other Security Considerations for Snowball (p. 86)
Encryption in AWS Snowball
When you're using a standard Snowball to import data into S3, all data transferred to a Snowball has
two layers of encryption:
1. A layer of encryption is applied in the memory of your local workstation. This layer is applied whether
you're using the Amazon S3 Adapter for Snowball or the Snowball client. This encryption uses AES
GCM 256-bit keys, and the keys are cycled for every 60 GB of data transferred.
2. SSL encryption is a second layer of encryption for all data going onto or off of a standard Snowball.
AWS Snowball uses server side-encryption (SSE) to protect data at rest.
Server-Side Encryption in AWS Snowball
AWS Snowball supports server-side encryption with Amazon S3–managed encryption keys (SSE-S3).
Server-side encryption is about protecting data at rest, and SSE-S3 has strong, multifactor encryption
to protect your data at rest in Amazon S3. For more information on SSE-S3, see Protecting Data Using
Server-Side Encryption with Amazon S3-Managed Encryption Keys (SSE-S3) in the Amazon Simple
Storage Service Developer Guide.
Currently, Snowball doesn't support server-side encryption with AWS KMS–managed keys (SSE-KMS) or
server-side encryption with customer-provided keys (SSE-C). However, you might want to use either of
these SSE types to protect data that has been imported. Or you might already use one of those two SSE
types and want to export. In these cases, keep the following in mind:
• Import – If you want to use SSE-KMS or SSE-C to encrypt the objects that you've imported into S3,
copy those objects into another bucket that has SSE-KMS encryption established as a part of that
bucket's bucket policy.
• Export – If you want to export objects that are encrypted with SSE-KMS or SSE-C, first copy those
objects to another bucket that either has no server-side encryption, or has SSE-S3 specified in that
bucket's bucket policy.
77
Page 84

AWS Snowball User Guide
Server-Side Encryption
Enabling SSE-S3 for Data Imported into Amazon S3 from a Snowball
Use the following procedure in the Amazon S3 Management Console to enable SSE-S3 for data being
imported into Amazon S3. No configuration is necessary in the AWS Snowball Management Console or
on the Snowball device itself.
To enable SSE-S3 encryption for the data that you're importing into Amazon S3, simply update the
bucket policies for all the buckets that you're importing data into. You update the policies to deny
upload object (s3:PutObject) permission if the upload request doesn't include the x-amz-server-
side-encryption header.
To enable SSE-S3 for data imported into Amazon S3
1. Sign in to the AWS Management Console and open the Amazon S3 console at https://
console.aws.amazon.com/s3/.
2. Choose the bucket that you're importing data into from the list of buckets.
3. Choose Permissions.
4. Choose Bucket Policy.
5. In Bucket policy editor, enter the following policy. Replace all the instances of YourBucket in this
policy with the actual name of your bucket.
{
"Version": "2012-10-17",
"Id": "PutObjPolicy",
"Statement": [
{
"Sid": "DenyIncorrectEncryptionHeader",
"Effect": "Deny",
"Principal": "*",
"Action": "s3:PutObject",
"Resource": "arn:aws:s3:::YourBucket/*",
"Condition": {
"StringNotEquals": {
"s3:x-amz-server-side-encryption": "AES256"
}
}
},
{
"Sid": "DenyUnEncryptedObjectUploads",
"Effect": "Deny",
"Principal": "*",
"Action": "s3:PutObject",
"Resource": "arn:aws:s3:::YourBucket/*",
"Condition": {
"Null": {
"s3:x-amz-server-side-encryption": "true"
}
}
}
]
}
6. Choose Save.
You've finished configuring your Amazon S3 bucket. When your data is imported into this bucket, it is
protected by SSE-S3. Repeat this procedure for any other buckets, as necessary.
78
Page 85

AWS Snowball User Guide
Authorization and Access Control
Authorization and Access Control in AWS Snowball
You must have valid credentials to create Snowball jobs. You use these credentials to authenticate your
access. A requester with valid credentials must also have permissions from the resource owner to access
resources from the resource owner. For example, you can use the AWS Identity and Access Management
(IAM) service to create users in your account. IAM users have valid credentials to make requests, but by
default they don't have permissions to access any resources. Following, you can find information on how
to authenticate requests and manage permissions to access Snowball resources.
Note
The following contains information specific to the AWS Snowball Management Console and
Snowball client. If you're planning on programmatically creating jobs and transferring data, see
AWS Snowball API Reference.
Authentication
Every Snowball job must be authenticated. You do this by creating and managing the IAM users in your
account. Using IAM, you can create and manage users and permissions in AWS.
Snowball users must have certain IAM-related permissions to access the AWS Snowball Management
Console to create jobs. An IAM user that creates an import or export job must also have access to the
right Amazon Simple Storage Service (Amazon S3) resources, such as the Amazon S3 buckets to be used
for the job.
To use AWS Snowball Management Console, the IAM user must meet the following conditions:
• The IAM account must be able to do the following:
• List all of your Amazon S3 buckets and create new ones as needed.
• Create Amazon Simple Notification Service (Amazon SNS) topics.
• Select AWS Key Management Service (AWS KMS) keys.
• Create IAM role Amazon Resource Names (ARNs).
For more information on granting a user access to an Amazon S3 bucket, see Creating an IAM User for
Snowball (p. 79).
• An IAM role must be created with write permissions for your Amazon S3 buckets. The role must also
have a trust relationship with Snowball, so AWS can write the data in the Snowball to your designated
Amazon S3 buckets. The job creation wizard for each job does this step automatically; you can also do
it manually. For more information, see Creating an IAM Role for Snowball (p. 81).
Creating an IAM User for Snowball
If the account doing the work in the Snowball console is not the root account or administrator, you must
use the IAM Management Console to grant the user the permissions necessary to create and manage
jobs. The following procedure shows how to create a new IAM user for this purpose and give that user
the necessary permissions through an inline policy.
If you are updating an existing IAM user, start with step 6.
To create a new IAM user for Snowball
1. Sign in to the AWS Management Console and open the IAM Management Console at https://
console.aws.amazon.com/iam.
2. From the navigation pane, choose Users.
3. Choose Create New Users.
79
Page 86

AWS Snowball User Guide
Authentication
4. Type a name for the user, and choose Create.
5. On the screen that appears, you can download security credentials for the IAM user that you just
created. Creating an IAM user generates an access key consisting of an access key ID and a secret
access key, which are used to sign programmatic requests that you make to AWS. If you want to
download these security credentials, choose Download. Otherwise, choose close to return to your
list of users.
Note
After this access step, your secret key is no longer available through the AWS Management
Console; you have the only copy. To protect your account, keep this information confidential
and never email it. Do not share it outside your organization, even if an inquiry appears to
come from AWS or Amazon.com. No one who legitimately represents Amazon will ever ask
you for your secret key.
6. To view the user details page, choose your user from the table.
7. Choose the Permissions tab, and then expand Inline Policy.
8. Choose the click here link to create a new inline policy.
9. Choose Custom Policy, and then choose Select to provide your own policy document.
10. Create a name you'll remember for your custom policy, like JobCreation.
11. Paste the following text into your custom Policy Document.
Note
If you're updating an existing user, review the following text carefully before you change
their permissions, as you might inadvertently grant or disable permissions that you didn't
intend to change.
{
"Version": "2012-10-17",
"Statement": [
{
"Effect": "Allow",
"Action": [
"s3:ListBucket",
"s3:GetBucketPolicy",
"s3:GetBucketLocation",
"s3:ListBucketMultipartUploads",
"s3:ListAllMyBuckets",
"s3:CreateBucket"
],
"Resource": [
"*"
]
},
{
"Effect": "Allow",
"Action": [
"kms:DescribeKey",
"kms:ListAliases",
"kms:ListKeys",
"kms:CreateGrant"
],
"Resource": [
"*"
]
},
{
"Effect": "Allow",
"Action": [
"iam:AttachRolePolicy",
"iam:CreatePolicy",
"iam:CreateRole",
"iam:ListRoles",
80
Page 87

AWS Snowball User Guide
Authentication
"iam:ListRolePolicies",
"iam:PutRolePolicy",
"iam:PassRole"
],
"Resource": [
"*"
]
},
{
"Effect": "Allow",
"Action": [
"sns:CreateTopic",
"sns:GetTopicAttributes",
"sns:ListSubscriptionsByTopic",
"sns:ListTopics",
"sns:Subscribe",
"sns:SetTopicAttributes"
],
"Resource": [
"*"
]
},
{
"Effect": "Allow",
"Action": [
"snowball:*",
"importexport:*"
],
"Resource": "*"
}
]
}
12. Choose Apply Policy to finalize your new inline policy and return to the IAM Users page in the
console.
The preceding procedure creates a user that can create and manage jobs in the Snowball console.
Creating an IAM Role for Snowball
An IAM role must be created with read and write permissions for your Amazon S3 buckets. The role must
also have a trust relationship with Snowball, so AWS can write the data in the Snowball and in your
Amazon S3 buckets, depending on whether you're importing or exporting data. Creating this role is done
as a step in the job creation wizard for each job.
When creating a job in the AWS Snowball Management Console, creating the necessary IAM role occurs
in step 4 in the Permission section. This process is automatic, and the IAM role that you allow Snowball
to assume is only used to write your data to your bucket when the Snowball with your transferred data
arrives at AWS. However, if you want to create an IAM role specifically for this purpose, the following
procedure outlines that process.
To create the IAM role for your import job
1. On the AWS Snowball Management Console, choose Create job.
2. In the first step, fill out the details for your import job into Amazon S3, and then choose Next.
3. In the second step, under Permission, choose Create/Select IAM Role.
4. The IAM Management Console opens, showing the IAM role that AWS uses to copy objects into your
specified Amazon S3 buckets.
Once you've reviewed the details on this page, choose Allow.
81
Page 88

AWS Snowball User Guide
Access Control
5. You return to the AWS Snowball Management Console, where Selected IAM role ARN contains the
Amazon Resource Name (ARN) for the IAM role that you just created.
6. Choose Next to finish creating your IAM role.
The preceding procedure creates an IAM role that has write permissions for the Amazon S3 buckets
that you plan to import your data into The IAM role that is created has one of the following structures,
depending on whether it's for an import or export job.
IAM Role ARN for an Import Job
{
"Version": "2012-10-17",
"Statement": [
{
"Effect": "Allow",
"Action": [
"s3:GetBucketLocation",
"s3:ListBucketMultipartUploads"
],
"Resource": "arn:aws:s3:::*"
},
{
"Effect": "Allow",
"Action": [
"s3:GetBucketPolicy",
"s3:PutObject",
"s3:AbortMultipartUpload",
"s3:ListMultipartUploadParts",
"s3:PutObjectAcl"
],
"Resource": "arn:aws:s3:::*"
}
]
}
IAM Role ARN for an Export Job
{
"Version": "2012-10-17",
"Statement": [
{
"Effect": "Allow",
"Action": [
"s3:GetBucketLocation",
"s3:GetBucketPolicy",
"s3:GetObject",
"s3:ListBucket"
],
"Resource": "arn:aws:s3:::*"
}
]
}
Access Control
As IAM resource owner, you have responsibility for access control and security for the Snowball console,
Snowball, and other assets associated with using Snowball. These assets include such things as Amazon
S3 buckets, the workstation that the data transfer goes through, and your on-premises data itself.
82
Page 89

AWS Snowball User Guide
Access Control
In some cases, we can help you grant and manage access control to the resources used in transferring
your data with Snowball. In other cases, we suggest that you follow industry-wide best practices for
access control.
Resource Description How to Control Access
AWS Snowball
Management
Console
The AWS Snowball Management Console is
where you create and manage your data transfers
between your on-premises data centers and
Amazon S3 using discrete units of work called
jobs. To access the console, see AWS Snowball
Management Console.
Amazon S3
buckets
All data in Amazon S3 is stored in units called
objects. Objects are stored in containers called
buckets. Any data that goes into Amazon S3 must
be stored in a bucket.
Snowball A Snowball is a storage appliance that is
physically rugged, protected by AWS Key
Management Service (AWS KMS), and owned
by Amazon. In the AWS Snowball service, all
data transfers between Amazon S3 and your onpremises data center is done through a Snowball.
You can only access a Snowball through the
Snowball client, the data transfer tool. For you
to access a Snowball, it must be connected to
a physical workstation that has the Snowball
client installed on it in your on-premises data
center. With the Snowball client, you can access
the Snowball by providing the job manifest and
unlock code in the command that the Snowball
client uses to start communication with the
Snowball.
You can control access to
this resource by creating or
managing your IAM users.
For more information, see
Creating an IAM User for
Snowball (p. 79).
To import data into an Amazon
S3 bucket, the IAM user that
created the import job must
have read and write access to
your Amazon S3 buckets. For
more information on granting
a user access to an Amazon
S3 bucket, see How Amazon
S3 Authorizes a Request for a
Bucket Operation and Example
1: Bucket Owner Granting Its
Users Bucket Permissions in the
Amazon Simple Storage Service
Developer Guide.
You can control access to the
Snowball by careful distribution
of a job's manifest and unlock
code.
Manifest The manifest is an encrypted file that you can
download from the AWS Snowball Management
Console after your job enters the Processing
status. The manifest is decrypted by the unlock
code, when you pass both values to the Snowball
through the Snowball client when the client is
started for the first time.
83
As a best practice, we
recommend that you don't
save a copy of the unlock code
in the same location as the
manifest for that job. Saving
these separately helps prevent
unauthorized parties from
gaining access to the Snowball
associated with that job. For
example, you might save a
copy of the manifest to the
workstation, and email the code
Page 90

AWS Snowball User Guide
AWS Key Management Service in Snowball
Resource Description How to Control Access
to the IAM user to perform
the data transfer from the
workstation. This approach
limits those who can access the
Snowball to individuals who
have access to files saved on the
workstation and also that IAM
user's email address.
Unlock code The unlock code is a 29-character code with 25
alphanumeric characters and 4 hyphens. This
code decrypts the manifest when it is passed
along with the manifest to the Snowball through
the Snowball client when the client is started for
the first time. You can see the unlock code in the
AWS Snowball Management Console after your
job enters the Preparing Snowball status. The
code also appears in the dialog box when you
download the manifest for a job. The unlock code
appears on-screen only and is not downloaded.
Again, as a best practice we
recommend that you don't
save a copy of the unlock code
in the same location as the
manifest for that job. Saving
these separately helps prevent
unauthorized parties from
gaining access to the Snowball
associated with that job. For
example, you might save a
copy of the manifest to the
workstation, and email the code
to the IAM user to perform
the data transfer from the
workstation. This approach
limits those who can access the
Snowball to individuals who
have access to files saved on the
workstation and also that IAM
user's email address.
AWS Key Management Service in Snowball
AWS Key Management Service (AWS KMS) is a managed service that makes it easy for you to create and
control the encryption keys used to encrypt your data. AWS KMS uses hardware security modules (HSMs)
to protect the security of your keys. Specifically, the Amazon Resource Name (ARN) for the AWS KMS key
that you choose for a job in AWS Snowball is associated with a KMS key. That KMS key is used to encrypt
the unlock code for your job. The unlock code is used to decrypt the top layer of encryption on your
manifest file. The encryption keys stored within the manifest file are used to encrypt and de-encrypt the
data on the device.
In Snowball, you can choose an existing KMS key. Specifying the ARN for an AWS KMS key tells Snowball
which AWS KMS master key to use to encrypt the unique keys on the Snowball.
Your data is encrypted in the local memory of your workstation before it is transferred to the Snowball.
The Snowball never contains any discoverable keys.
In Amazon S3, there is a server-side-encryption option that uses AWS KMS–managed keys (SSE-KMS).
SSE-KMS is not supported with AWS Snowball. For more information on supported SSE in AWS Snowball,
see Server-Side Encryption in AWS Snowball (p. 77).
84
Page 91

AWS Snowball User Guide
Using the AWS-Managed
Customer Master Key for Snowball
Using the AWS-Managed Customer Master Key for Snowball
If you'd like to use the AWS-managed customer master key (CMK) for Snowball created for your account,
use the following procedure.
To select the AWS KMS CMK for your job
1. On the AWS Snowball Management Console, choose Create job.
2. Choose your job type, and then choose Next.
3. Provide your shipping details, and then choose Next.
4. Fill in your job's details, and then choose Next.
5. Set your security options. Under Encryption, for KMS key either choose the AWS-managed CMK or
a custom CMK that was previously created in AWS KMS, or choose Enter a key ARN if you need to
enter a key that is owned by a separate account.
Note
The AWS KMS key ARN is a globally unique identifier for the AWS KMS CMK.
6. Choose Next to finish selecting your AWS KMS CMK.
Creating a Custom KMS Envelope Encryption Key
You have the option of using your own custom AWS KMS envelope encryption key with AWS Snowball.
If you choose to create your own key, that key must be created in the same region that your job was
created in.
To create your own AWS KMS key for a job, see Creating Keys in the AWS Key Management Service
Developer Guide.
Authorization with the Amazon S3 API Adapter for Snowball
When you use the Amazon S3 Adapter for Snowball, every interaction is signed with the AWS Signature
Version 4 algorithm by default. This authorization is used only to verify the data traveling from its source
to the adapter. All encryption and decryption happens in your workstation's memory. Unencrypted data
is never stored on the workstation or the Snowball.
When using the adapter, keep the following in mind:
• You can disable signing – After you've installed the adapter on your workstation, you can disable
signing by modifying the snowball-adapter.config file. This file, saved to /.aws/snowball/config, has
a value named auth.enabled set to true by default. If you change this value to false, you disable
signing through the Signature Version 4 algorithm. You might not want to disable signing, because
signing is used to prevent modifications or changes to data traveling between the adapter and your
data storage. You can also enable HTTPS and provide your own certificate when communicating with
the adapter. To do so, you start the adapter with additional options. For more information, see Options
for the Amazon S3 Adapter for Snowball (p. 68).
Note
Data traveling to or from a Snowball is always encrypted, regardless of your signing solution.
85
Page 92

AWS Snowball User Guide
Other Security Considerations for Snowball
• The encryption key is not changed by what AWS credentials you use – Because signing with the
Signature Version 4 algorithm is only used to verify the data traveling from its source to the adapter, it
never factors into the encryption keys used to encrypt your data on the Snowball.
• You can use any AWS profile – The Amazon S3 Adapter for Snowball never connects back to AWS to
verify your AWS credentials, so you can use any AWS profile with the adapter to sign the data traveling
between the workstation and the adapter.
• The Snowball doesn't contain any AWS credentials – You manage access control and authorization
to a Snowball on-premises. No software on the Snowball or adapter differentiates access between one
user and another. When someone has access to a Snowball, the manifest, and the unlock code, that
person has complete and total access to the appliance and all data on it. We recommend that you plan
physical and network access for the Snowball accordingly.
Other Security Considerations for Snowball
Following are some security points that we recommend you consider when using Snowball, and also
some high-level information on other security precautions that we take when a Snowball arrives at AWS
for processing.
We recommend the following security approaches:
• When the Snowball first arrives, inspect it for damage or obvious tampering. If you notice anything
that looks suspicious about the Snowball, don't connect it to your internal network. Instead, contact
AWS Support, and a new Snowball will be shipped to you.
• You should make an effort to protect your job credentials from disclosure. Any individual who has
access to a job's manifest and unlock code can access the contents of the Snowball appliance sent for
that job.
• Don't leave the Snowball sitting on a loading dock. Left on a loading dock, it can be exposed to the
elements. Although the Snowball is rugged, weather can damage the sturdiest of hardware. Report
stolen, missing, or broken Snowballs as soon as possible. The sooner such a Snowball issue is reported,
the sooner another one can be sent to complete your job.
Note
The Snowball is the property of AWS. Tampering with a Snowball is a violation of the AWS
Acceptable Use Policy. For more information, see http://aws.amazon.com/aup/.
We perform the following security steps:
• All objects transferred to the Snowball have their metadata changed. The only metadata that remains
the same is filename and filesize. All other metadata is set as in the following example: -rw-rw-
r-- 1 root root [filesize] Dec 31 1969 [path/filename]
• When a Snowball arrives at AWS, we inspect every appliance for any signs of tampering and to verify
that no changes were detected by the Trusted Platform Module (TPM). AWS Snowball uses multiple
layers of security designed to protect your data, including tamper-resistant enclosures, 256-bit
encryption, and an industry-standard TPM designed to provide both security and full chain of custody
for your data.
• Once the data transfer job has been processed and verified, AWS performs a software erasure of the
Snowball appliance that follows the National Institute of Standards and Technology (NIST) guidelines
for media sanitization.
86
Page 93

AWS Snowball User Guide
Checksum Validation of Transferred Data
Data Validation in AWS Snowball
Following, you'll find information on how Snowball validates data transfers, and the manual steps you
can take to ensure data integrity during and after a job.
Topics
• Checksum Validation of Transferred Data (p. 87)
• Common Validation Errors (p. 87)
• Manual Data Validation for Snowball During Transfer (p. 88)
• Manual Data Validation for Snowball After Import into Amazon S3 (p. 89)
Checksum Validation of Transferred Data
When you copy a file from a local data source using the Snowball client or the Amazon S3 Adapter
for Snowball, to the Snowball, a number of checksums are created. These checksums are used to
automatically validate data as it's transferred.
At a high level, these checksums are created for each file (or for parts of large files). These checksums
are never visible to you, nor are they available for download. The checksums are used to validate the
integrity of your data throughout the transfer, and will ensure that your data is copied correctly.
When these checksums don't match, we won't import the associated data into Amazon S3.
Common Validation Errors
Validations errors can occur. Whenever there's a validation error, the corresponding data (a file or a part
of a large file) is not written to the destination. The common causes for validation errors are as follows:
• Attempting to copy symbolic links.
• Attempting to copy files that are actively being modified. This will not result in a validation error, but it
will cause the checksums to not match at the end of the transfer.
• Attempting to copy whole files larger than 5 TB in size.
• Attempting to copy part sizes larger than 5 GB in size.
• Attempting to copy files to a Snowball that is already at full data storage capacity.
• Attempting to copy files to a Snowball that doesn't follow the Object Key Naming Guidelines for
Amazon S3.
Whenever any one of these validation errors occurs, it is logged. You can take steps to manually identify
what files failed validation and why as described in the following sections:
• Manual Data Validation for Snowball During Transfer (p. 88) – Outlines how to check for failed files
while you still have the Snowball on-premises.
87
Page 94

AWS Snowball User Guide
Manual Data Validation for Snowball During Transfer
• Manual Data Validation for Snowball After Import into Amazon S3 (p. 89) – Outlines how to check
for failed files after your import job into Amazon S3 has ended.
Manual Data Validation for Snowball During
Transfer
You can use manual validation to check that your data was successfully transferred to a Snowball Edge.
You can also use manual validation if you receive an error after attempting to transfer data. Use the
following section to find how to manually validate data on a Snowball Edge.
Check the failed-files log – Snowball client
When you run the Snowball client copy command, a log showing any files that couldn't be transferred
to the Snowball is generated. If you encounter an error during data transfer, the path for the failed-files
log will be printed to the terminal. This log is saved as a comma-separated values (.csv) file. Depending
on your operating system, you find this log in one of the following locations:
• Windows – C:/Users/<username>/AppData/Local/Temp/snowball-<random-character-
string>/failed-files
• Linux – /tmp/snowball-<random-character-string>/failed-files
• Mac – /var/folders/gf/<random-character-string>/<random-character-
string>/snowball-7464536051505188504/failed-files
Use the --verbose option for the Snowball client copy command
When you run the Snowball client copy command, you can use the --verbose option to list all the files
that are transferred to the Snowball. You can use this list to validate the content that was transferred to
the Snowball.
Check the logs – Amazon S3 Adapter for Snowball
When you run the Amazon S3 Adapter for Snowball to copy data with the AWS CLI, logs are generated.
These logs are saved in the following locations, depending on your file system:
• Windows – C:/Users/<username>/.aws/snowball/logs/
snowball_adapter_<year_month_date_hour>
• Linux – /home/.aws/snowball/logs/snowball_adapter_<year_month_date_hour>
• Mac – /Users/<username>/.aws/snowball/logs/
snowball_adapter_<year_month_date_hour>
Use the --stopOnError copy option
If you're transferring with the Snowball client, you can use this option to stop the transfer process in
the event a file fails. This option stops the copy on any failure so you can address that failure before
continuing the copy operation. For more information, see Options for the snowball cp Command (p. 60).
Run the Snowball client's validate command
The Snowball client's snowball validate command can validate that the files on the Snowball were
all completely copied over to the Snowball. If you specify a path, then this command validates the
content pointed to by that path and its subdirectories. This command lists files that are currently in the
process of being transferred as incomplete for their transfer status. For more information on the validate
command, see Validate Command for the Snowball Client (p. 59).
88
Page 95

AWS Snowball User Guide
Manual Data Validation for Snowball
After Import into Amazon S3
Manual Data Validation for Snowball After Import into Amazon S3
After an import job has completed, you have several options to manually validate the data in Amazon
S3, as described following.
Check job completion report and associated logs
Whenever data is imported into or exported out of Amazon S3, you get a downloadable PDF job report.
For import jobs, this report becomes available at the end of the import process. For more information,
see Getting Your Job Completion Report and Logs in the Console (p. 42).
S3 inventory
If you transferred a huge amount of data into Amazon S3 in multiple jobs, going through each job
completion report might not be an efficient use of time. Instead, you can get an inventory of all the
objects in one or more Amazon S3 buckets. Amazon S3 inventory provides a .csv file showing your
objects and their corresponding metadata on a daily or weekly basis. This file covers objects for an
Amazon S3 bucket or a shared prefix (that is, objects that have names that begin with a common string).
Once you have the inventory of the Amazon S3 buckets that you've imported data into, you can easily
compare it against the files that you transferred on your source data location. In this way, you can quickly
identify what files where not transferred.
Use the Amazon S3 sync command
If your workstation can connect to the internet, you can do a final validation of all your transferred files
by running the AWS CLI command aws s3 sync. This command syncs directories and S3 prefixes. This
command recursively copies new and updated files from the source directory to the destination. For
more information, see http://docs.aws.amazon.com/cli/latest/reference/s3/sync.html.
Important
If you specify your local storage as the destination for this command, make sure that you have a
backup of the files you sync against. These files are overwritten by the contents in the specified
Amazon S3 source.
89
Page 96

AWS Snowball User Guide
Snowball Notifications
Snowball is designed to take advantage of the robust notifications delivered by Amazon Simple
Notification Service (Amazon SNS). While creating a job, you can provide a list of comma-separated email
addresses to receive email notifications for your job.
You can also choose from the status list which job status values trigger these notifications. For more
information about the different job status values, see Job Statuses (p. 13).
You can configure Amazon SNS to send text messages for these status notifications from the Amazon
SNS console. For more information, see Sending and Receiving SMS Notifications Using Amazon SNS.
Note
These notifications are optional, and are free if you're within your first million Amazon
SNS requests for the month. For more information about Amazon SNS pricing, see https://
aws.amazon.com/sns/pricing.
After you create your job, every email address that you specified to get Amazon SNS notifications
receives an email from AWS Notifications asking for confirmation to the topic subscription. For each
email address to receive additional notifications, a user of the account must confirm the subscription by
choosing Confirm subscription.
The Amazon SNS notification emails are tailored for each triggering state, and include a link to the AWS
Snowball Management Console.
90
Page 97

AWS Snowball User Guide
Supported Network Hardware
AWS Snowball Specifications
The following table outlines hardware specifications for the Snowball appliance.
Item Specification
Storage capacity 50 TB Snowballs have 42 TB of usable space. 80 TB Snowballs have 72 TB of
usable space.
On-board I/O 10-gigabit
interfaces
Cables Each Snowball ships with RJ45 and copper SFP+ cables. For SFP+ optical,
Thermal requirements Snowballs are designed for office operations, and are ideal for data center
Decibel output On average, a Snowball produces 68 decibels of sound, typically quieter
Weight 47 pounds (21.3 Kg)
Height 19.75 inches (501 mm)
Width 12.66 inches (320 mm)
Length 21.52 inches (548 mm)
Power In the US regions: NEMA 5–15p 100–220 volts. In all regions, a power cable
Power consumption 200 watts.
Voltage 100 – 240V AC
Frequency 47/63 Hz
Each Snowball supports RJ45 (Cat6), SFP+ Copper, and SFP+ Optical.
you need to use your own cable, connected to the SFP+ optical adapter in
one of the SFP+ ports.
operations.
than a vacuum cleaner or living-room music.
is included.
Power conversion
efficiency
Temperature range 0 – 40°C (operational)
Non-operational
Altitude
Operational Altitude 0 to 3,000m (0 to 10,000’)
80 – 84% at 25C, 230Vac
Not specified
Supported Network Hardware
After you open the back panel of the Snowball, you see the network ports shown in the following
photograph.
91
Page 98
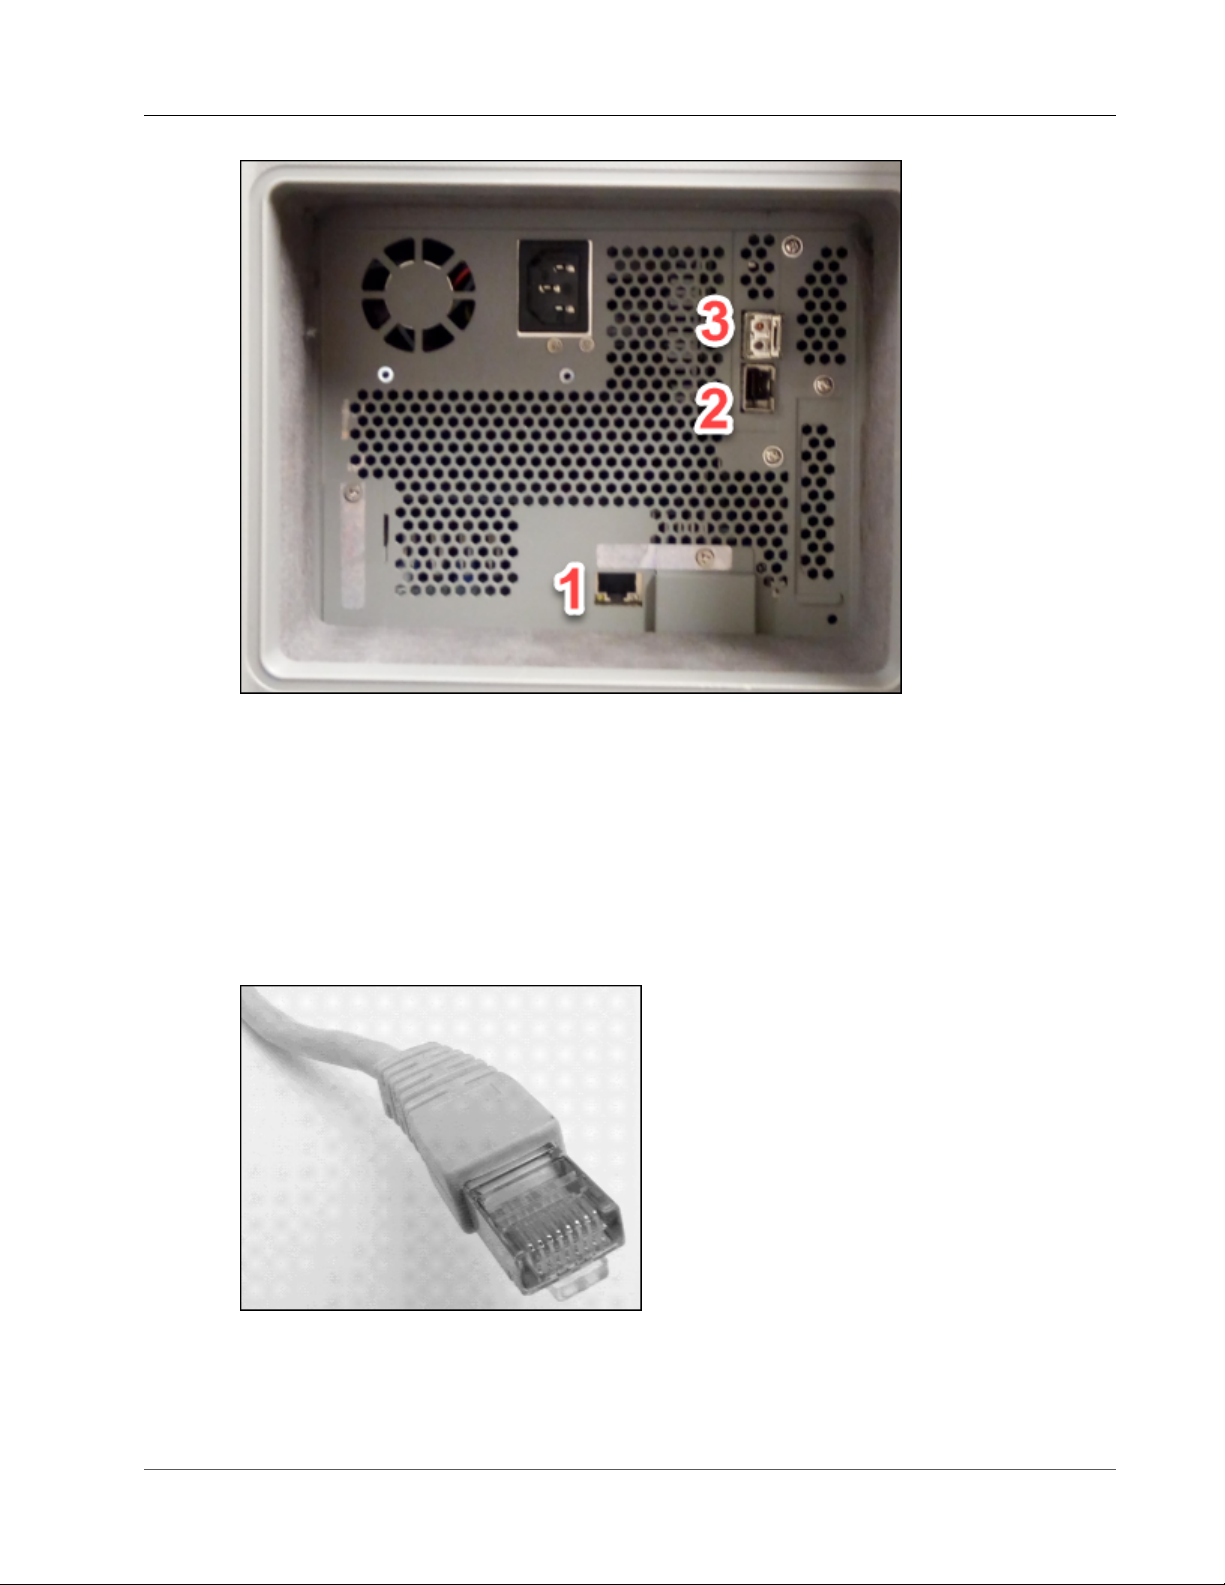
AWS Snowball User Guide
Supported Network Hardware
These ports support the following network hardware.
1. RJ45
This port provides 1Gbase-TX/10Gbase-TX operation. It is connected via UTP cable terminated with a
RJ45 connector.
1G operation is indicated by a blinking amber light. 1G operation is not recommended for large-scale
data transfers to the Snowball device, as it will dramatically increase the time it takes to transfer data.
10G operation is indicated by a blinking green light. It requires a Cat6A UTP cable with a maximum
operating distance of 180 feet(55 meters).
2. SFP+
This port provides an SFP+ interface compatible with both SFP+ transceiver modules and direct-attach
copper (DAC) cables. You need to provide your own transceivers or DAC cables. Examples include:
92
Page 99
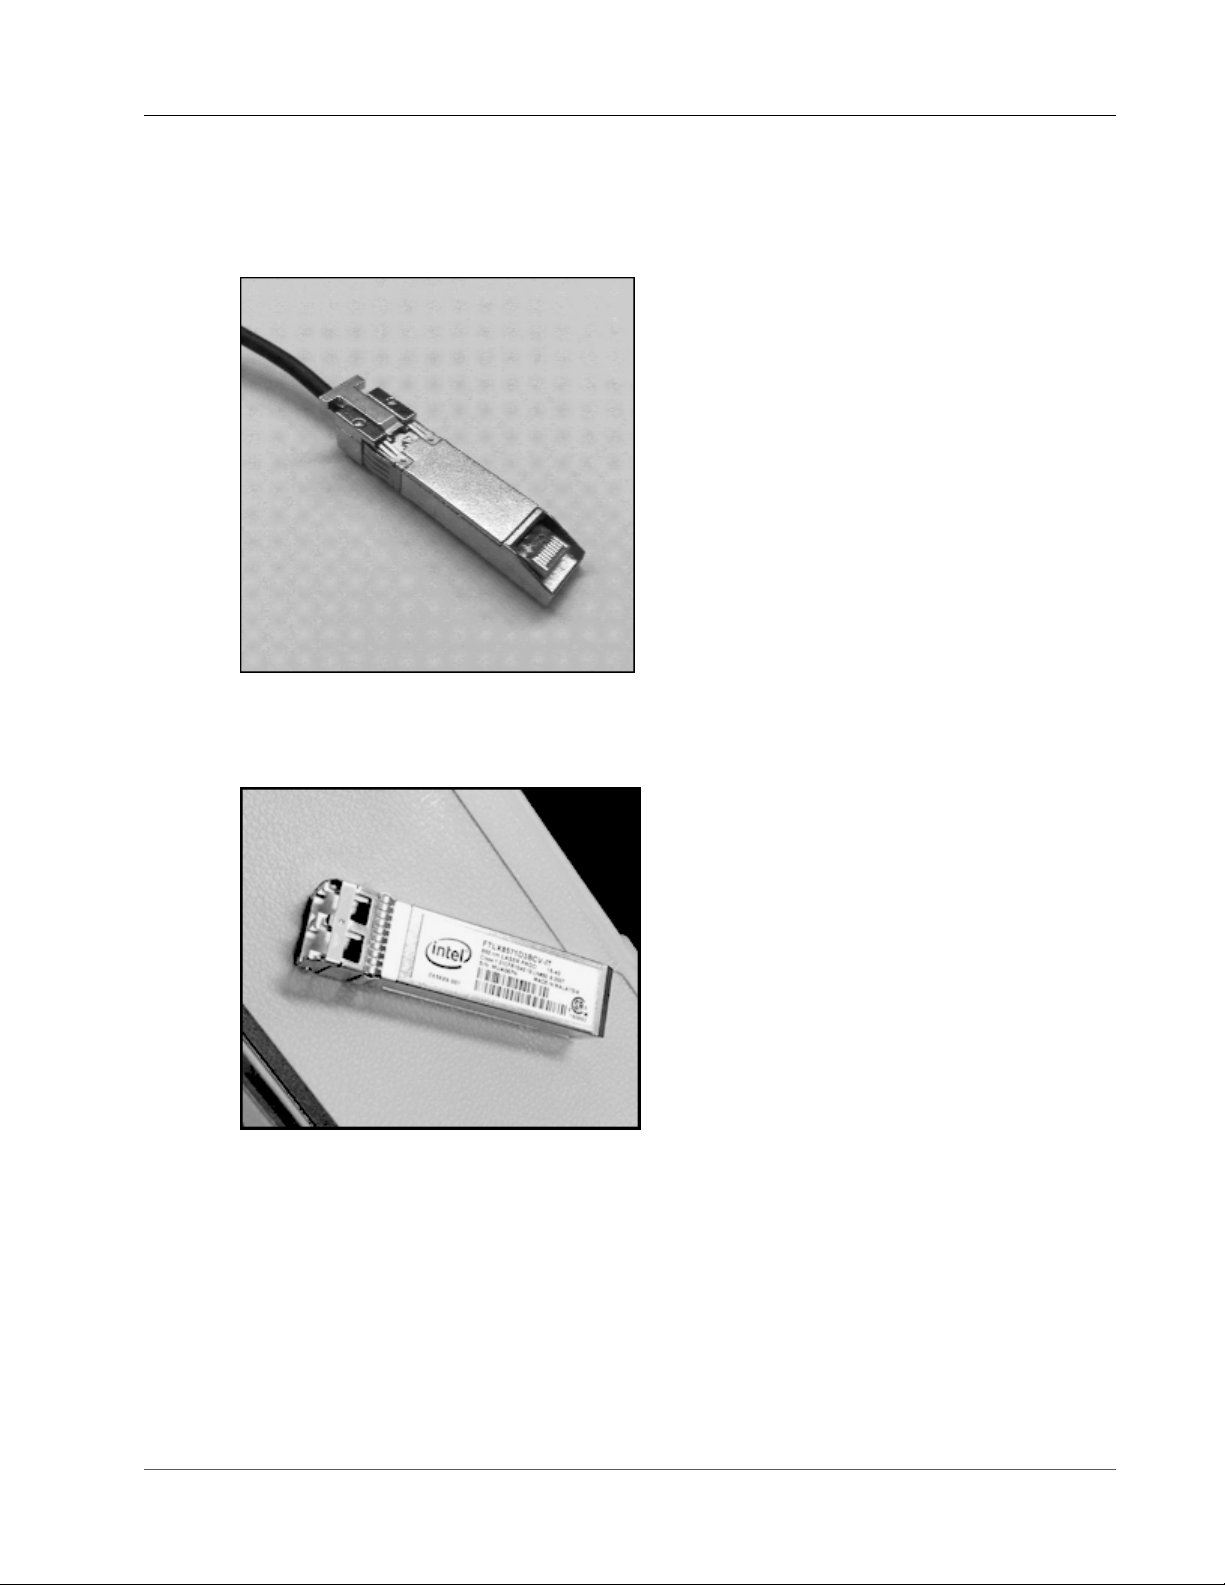
AWS Snowball User Guide
Workstation Specifications
• 10Gbase-LR (single mode fiber) transceiver
• 10Gbase-SR (multi-mode fiber) transceiver
• SFP+ DAC cable
3. SFP+
This port provides an SFP+ interface and a 10Gbase-SR transceiver that uses multi-mode fiber optic
media with an LC connector.
Workstation Specifications
The workstation is the computer, server, or virtual machine that hosts your mounted data source. You
connect the Snowball to this workstation to transfer your data. Because the workstation is considered
the bottleneck for transferring data between the Snowball and the data source, we highly recommend
that your workstation be a powerful computer, able to meet high demands for processing, memory, and
networking.
We recommend that your workstation be a computer dedicated to the task of running the Snowball
client or the Amazon S3 Adapter for Snowball while you're transferring data. Each instance of the client
93
Page 100

AWS Snowball User Guide
Workstation Specifications
or the adapter requires up to 7 GB of dedicated RAM for memory-intensive tasks, such as performing
encryption.
Note
The hardware specifications for the workstations that are used to transfer data to and from
a Snowball are for a powerful computer. These hardware specifications are mainly based on
security requirements for the service. When data is transferred to a Snowball, a file is loaded
into the workstation's memory. While in memory, that file is fully encrypted by either the
Snowball client or the Amazon S3 Adapter for Snowball. Once the file is encrypted, chunks
of the encrypted file are sent to the Snowball. At no point is any data stored to disk. All data
is kept in memory, and only encrypted data is sent to the Snowball. These steps of loading
into memory, encrypting, chunking, and sending to the Snowball are both CPU- and memoryintensive.
The following table outlines the suggested specifications for your workstation.
Item Suggested Specification
Processing power 16 core CPU
Memory 16 gigabytes of RAM
Important
Each running instance of the client and/or adapter requires up
to 7 GB of dedicated RAM for memory-intensive tasks, such as
performing the snowball cp command.
Microsoft Windows
support (64-bit only)
Mac support Mac OS X version 10.10 or higher
Linux support (64-bit
only)
User interface support • Keyboard
Network I/O support • RJ45
• Windows 7
• Windows 8
• Windows 10
• Ubuntu version 12 or higher
• Red Hat Enterprise Linux (RHEL) version 6 or higher
• Mouse
• Monitor
• SFP+ Copper
• SFP+ Optical
94
 Loading...