

Page 1

PREFACE
Thank you for purchasing and using our good
quality product. To enjoy the perfect performance
brought by this TV receiver, please spare some time
to read this instruction manual thoroughly before
operating the TV. Also, keep it handy for reference at
any time.
*CONTENTS *
1. Features 5. Safety Instruction & Maintenance
2. Points To Notice 6. Trouble Shooting
3. Locations Of Controls 7. Specificatio
4. Operations
ns
1
Page 2

1. FEATURES
* I2C Bus Control * NTSC 3.58/4.43 Playback
* 100 TV Program Presets * NTSC Comb Filter
* Full Function Remote Contr ol * Dynamic Black Stretch Circuitry
* On Screen Display * Blue Back (no input of TV signal)
* Stereo /Mono(AV mode) * Auto Power-Off (15 mins - no TV signal)
* S -Video Input * Sleep Timer (maximum 120 minutes)
* BG System * Side / Rear AV Inputs
* Rear AV Output
2. POINTS TO NOTICE
2.1 Connect the TV unit to AC mains supply but never to DC supply. (Refer the specified power
rating to the back plate of the TV unit.)
2.2 To avoid fire or electricity leakage, never place the TV unit near kitchen or any place where water
easily splashes over or drips on the TV unit.
2.3 Never locate the TV unit in places of high humidity. Be sure the condensed moisture has
evaporated completely before power is turned on.
2.4 Never place any naked flame sources such as lighted candles on or too close to the TV unit.
2.5 Make sure that a clearance of 10cm minimum is kept between the top, sides and back of the TV
unit and the nearest wall or furniture enclosure to ensure proper ventilation. Also, do not place the
TV unit in an excessively hot location.
2.6 Never impede the ventilation openings of the TV unit with items such as newspapers, table clothes,
curtains, etc.
2.7 Never place the TV unit near any magnetic objects such as external speakers without shielding
cover because their strong magnetic field could interfere the picture’s purity.
2.8 Locate the TV unit in a place where strong light does not strike directly on its screen because light
reflection could cause eyestrain. Complete darkness is also not suitable for watching TV. Soft and
indirect lighting is recommended.
2.9 Automatic Degaussing: Each time the TV unit is turned on with the Power On/Off Knob; the
automatic degaussing circuitry would function shortly to purge out the residual magnetism on the
CRT’s metal parts that ensures the picture more clear and alive. If the TV unit has been moved or
changed to other positions or in other directions, first turn the main switch off for at least one hour
and then turn it on again.
2
Page 3
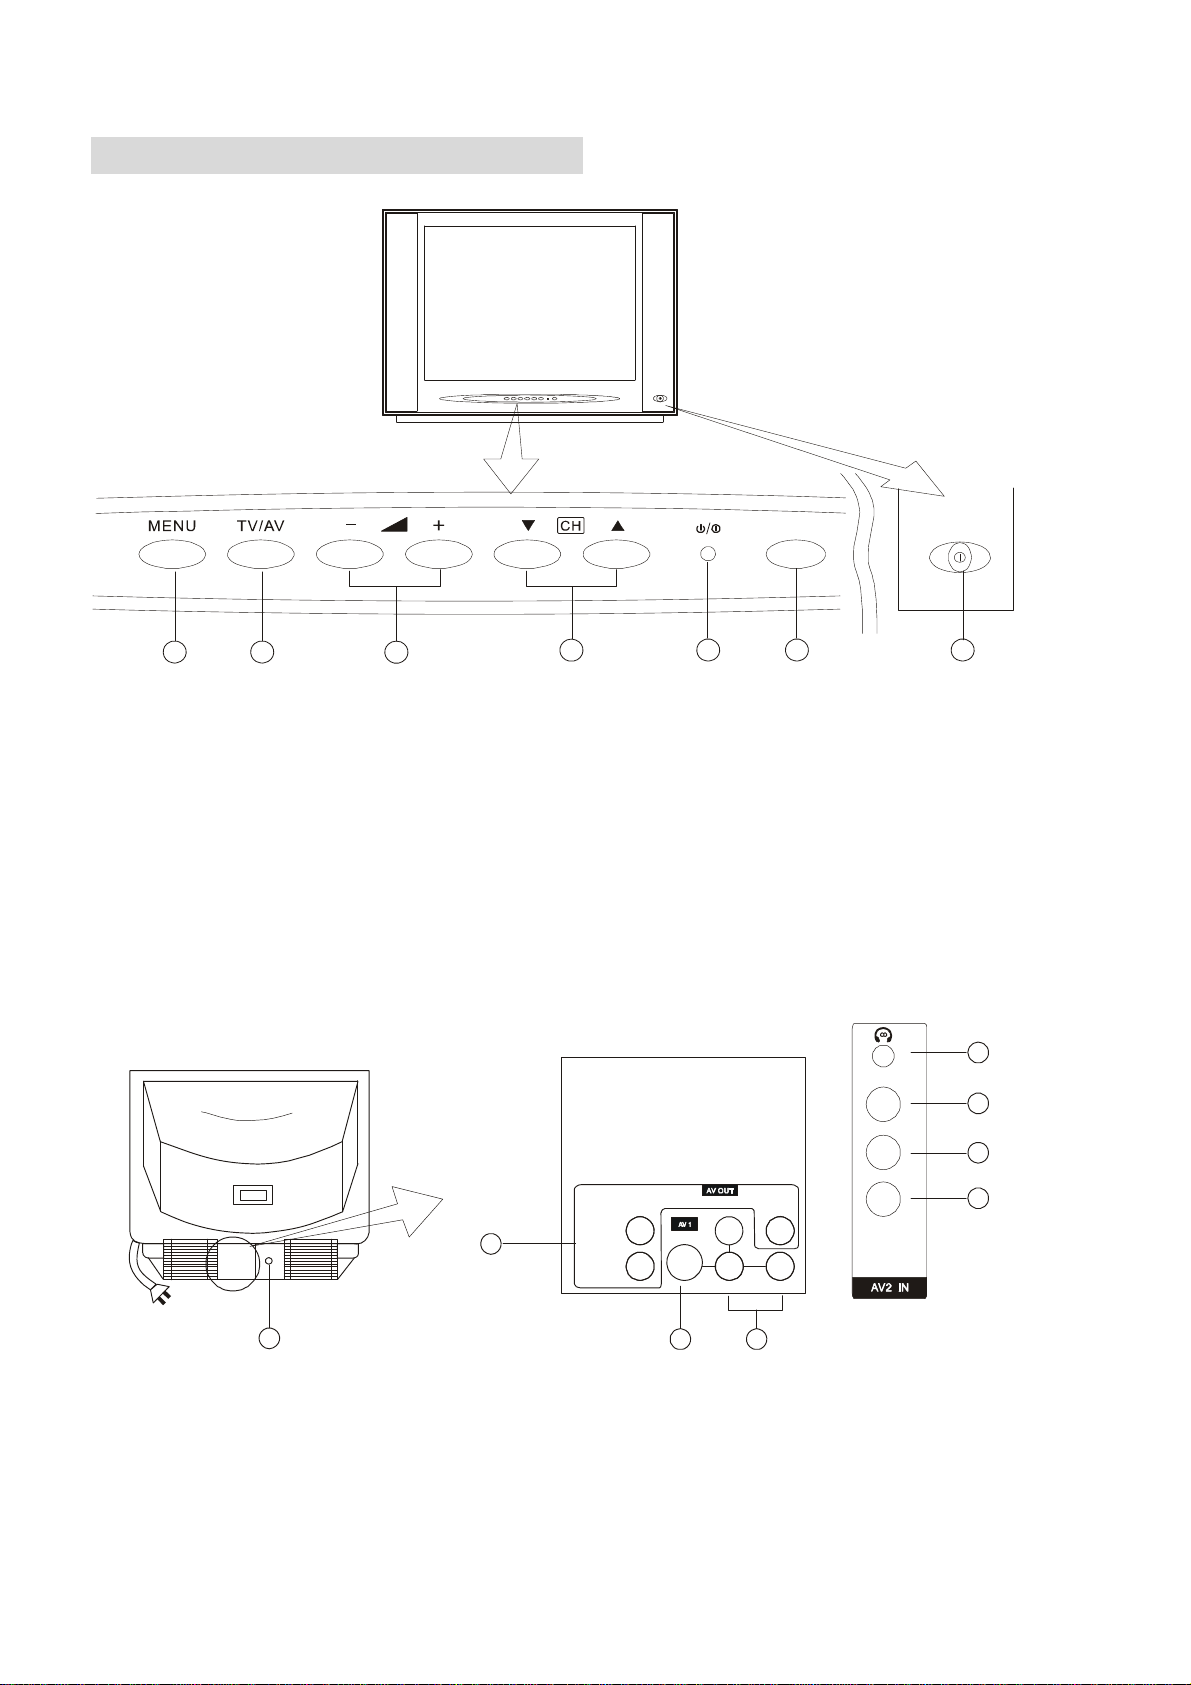
3. LOCATIONS OF CONTROLS
67
5
4
32
1
3.1 Front View Of Main Unit
1. Main Power On/Off Button
2. Infrared Sensor
3. Power / Standby Indicator
4. Program Number Up“+” / Down“-”Buttons
5. Volume Control Up“+” / Down“-”Buttons
7. Menu Button
8. Headphone (Optional)
9. Video Input Terminals (AV2)
10. Audio Left\Mono Input Terminal (AV2)
11 . Audio Right Input Terminal (AV2)
6. TV / AV Select Button
3.2 Back View of Main Unit
8
VIDEO
9
L\MONO
10
R
AUDIO
L
13
15
BACK AV IN/O UT SIDE AV IN
S-VIDEO
R
14
L/MONO
VIDEO
VIDEO
R
12
11
12. Video/Audio (AV1) Input Terminals
13. Video/Audio Output Terminals
14. S-Video Input Terminal (AV1 Priority)
3
15. 75 Ohm Antenna Terminal
Page 4
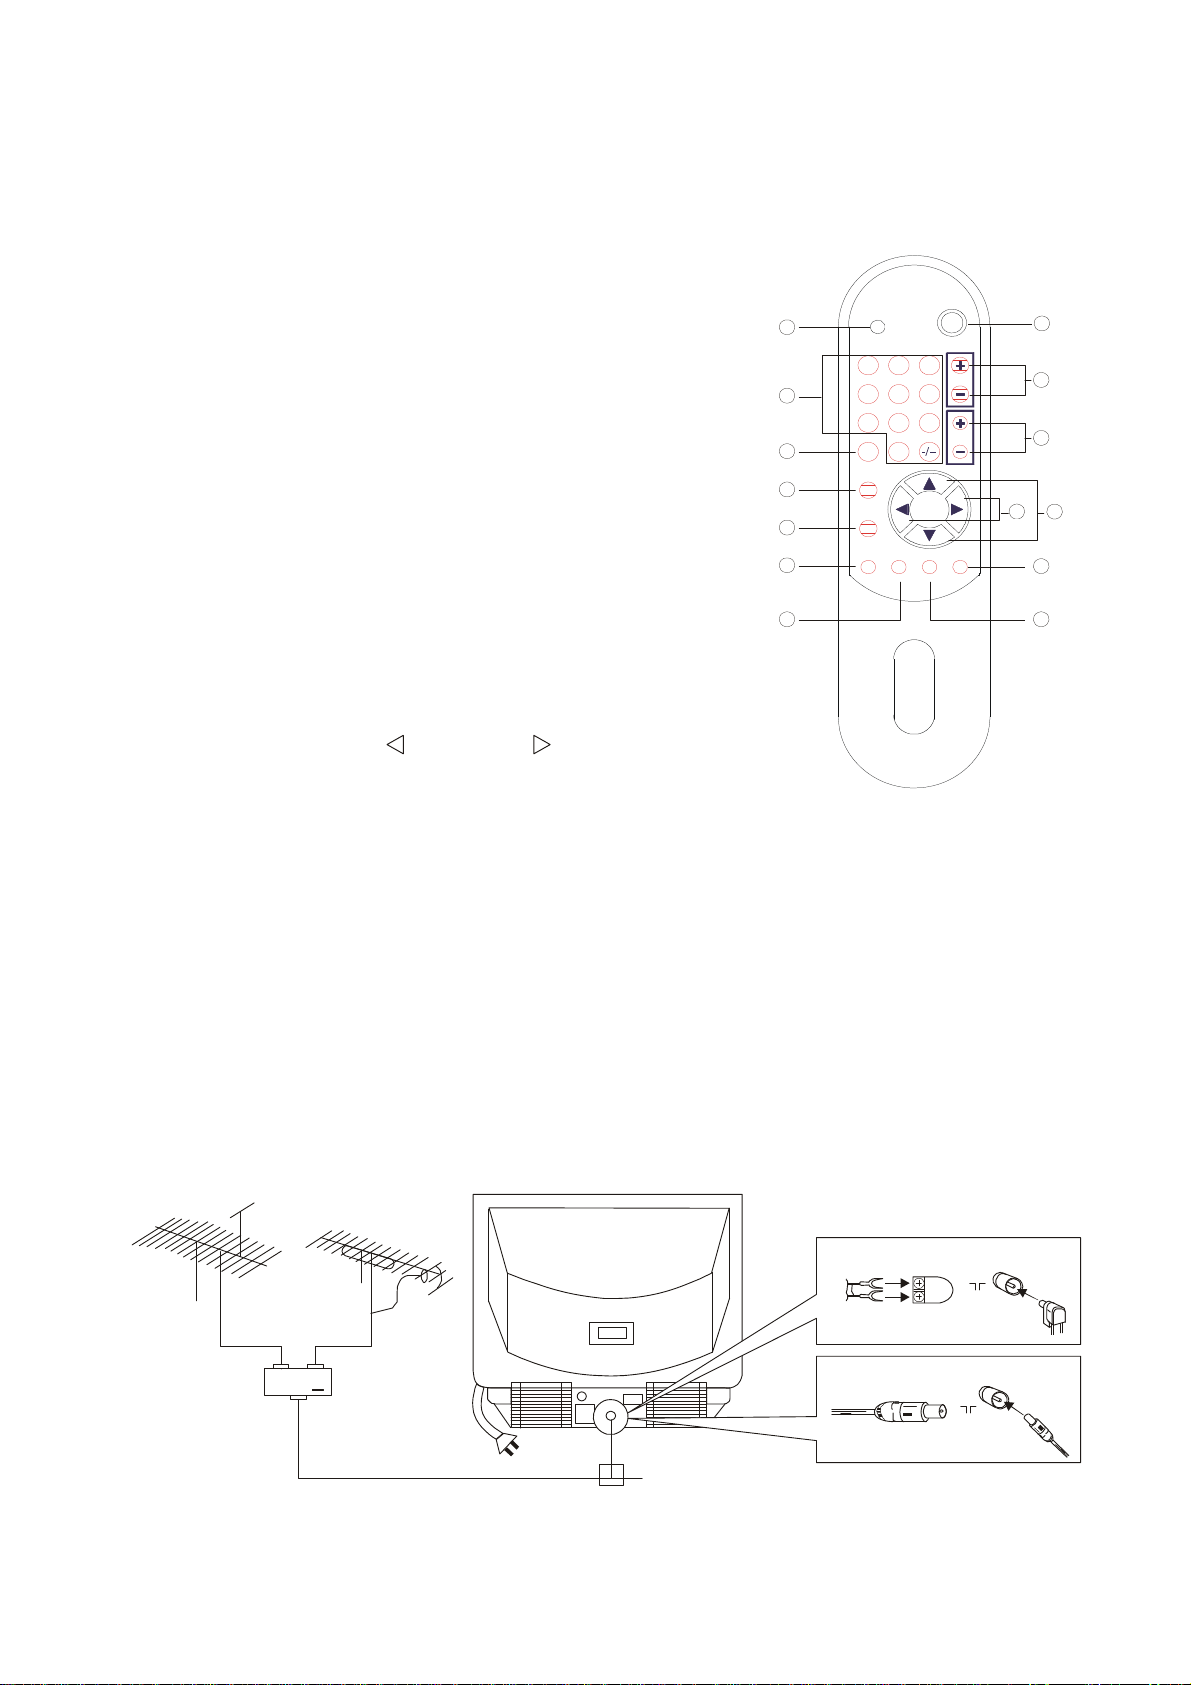
3.3 Remote Control Handset Operation
A. POWER ON/OFF BUTTON
B. DIRECT SELECT CHANNEL NUMBER BUTTONS
(0-9, -/--)
C. CHANNEL NUMBER (Up “+”/ Down “-”) BUTTONS
D. VOLUME CONTROL (Up “+”/ Down “-”) BUTTONS
E. TV/AV SELECT BUTTON
F. PICTURE BUTTON
G. MENU BUTTON
H. SYSTEM BUTTON
I. SLEEP BUTTON
J. DISPLAY BUTTON
K. ANA.MEM. BUTTON
L. FUNCTION (Up “△”/ Down “▽”) BUTTONS
M. FUNCTION (LEFT “ ”/ RIGHT “ ”) BUTTONS
N. MUTE BUTTON
N
B
E
F
G
H
IJ
MUTE
4
PICTURE
MENU
SYSTEM SLEEP DISPLAYANA.MEM.
POWER
A
251
3
VOL
6
87
9
CHAV/TV
0
D
C
M
L
K
Note : Most of the functions of the TV unit can be operated and controlled with the remote control
handset; therefore, the buttons stated below refer to those on the remote control handset unless
specified.
3.4 Method Of Connecting Outdoor Antenna
For obtaining excellent performance from the unit, it is absolutely necessary to install an appropriate
and high quality outdoor antenna. During installation, adjust its length, angle as well as direction in
order to achieve the best reception.
VHF Antenna
Matching
Antenna Input (75 ohm Coaxial Cable)
Ant enna Cor d Pl ug
300 ohm tw o-lead parallel cord
Antenna connector
75 ohm Coa x i al Ca bl e
pl ug
Pl ug
ON
ON
4
Page 5

4. OPERATION
Initial Operation
Note : The TV unit will turn into standby mode after no TV program has been received for 15 minutes;
at this moment, the red standby indicator lights up.
4.1 Take out the remote control handset; remove the battery cover; place 2 pcs. of 1.5V AA/ UM-3
dry. Batteries in the correct polarity into the battery compartment and then replace the battery
cover.
4.2 Plug TV antenna cable into the antenna socket at the back of the unit.
4.3 Plug the AC line cord plug of the unit into your AC socket and then push down the MAIN
POWER ON/OFF button on the TV unit, and the red power indicator lights up.
4.4 Press the POWER ON/OFF button of the remote control handset to turn on the TV and then start
the following operations.
4.5 Press the MENU button successively; the screen shows the following menus in turn.
PICTURE SOUND POS. MEMORY LANGUAGE
When the [POS. MEMORY] menu shows on the screen, stay there. If it does not appear (maybe in
AV mode), press the AV/TV button to turn into TV mode.
4.6 Press the “△” or “▽” button to select [AUTO MEMORY]; at this moment, the selected item
color turns red.
4.6.1 Press the “ ” or “ ” button to start the [AUTO MEMORY] process. Once it has found a TV
channel in your area; it would be stored in a channel position number starting from 0. If no TV
programs are found, check whether the antenna is correctly connected or works properly.
4.6.2 Press the CHANNEL “▲ ” or “ ▼ ” button to search other TV programs you have searched and
stored.
4.6.3 Language Select
Enter the [LANGUAGE] menu, and press either the “△” or “▽” button or the CHANNEL “▲
“or “▼” button of the TV unit to select the display language between Chinese and English.
5
Page 6

Basic Operation
4.7 Selecting TV programs
Method 1 – Using the CHANNEL “ ▲ ” or “ ▼ ” button:
Press the CHANNEL “ ▲ ” or “ ▼ ” button or that on the TV unit to select your desired TV
programs.
Method 2 – Using the “-/--” and NUMBER (0 – 9) buttons:
For the channel position numbers 0 – 9, press 0 – 9 on the remote handset.
For the channel position numbers 10 – 99, first press the “-/--“ button twice and then the NUMBER
buttons.
4.8 Adjusting Volume
Press the VOLUME “ + ” or “ - ” button or that on the TV unit to adjust the volume to your desired
level.
4.8.1 Muting
Press the MUTE button to make the TV unit silent instantly; at this moment, a red word, “MUTE”,
appears on the screen. To restore the sound, simply press the button again.
4.9 User’s Picture Memory
This TV unit has four picture memories; each contains four picture effects including Color, Contrast,
Brightness and Sharpness. It helps to get the picture you desire easily. Press the ANA. MEM. button
to select your favorite picture from the four picture memories as follows:
MEMORY 1 MEMORY 2 MEMORY 3 MEMORY4
( DYNAMIC) (STANDARD) (MILD) (MEMORY)
Note : Memories 1 to 3 have been pre-set at the factory and cannot be altered at all. Only
“MEMORY” allows the user to adjust to their desire freely.
4.10 Position Memory Menu
You could use the functions in this menu to search and store TV channels or skip those repeated or
not desired.
Note : This menu can only be entered in TV mode.
Press the MENU button or that of the TV unit successively to enter the [POS. MEMORY] menu.
6
Page 7

Channel Position Number Select
Press either the “△” or “▽” button or the CHANNEL “ ▲ ” or “ ▼ ” button of the TV unit to
select [POSITION] and the “ ” or “ ” button or the VOLUME “ + ” or “ - ” button of the TV unit
to select the channel position number you want. (Attn.: Select an unused channel position number
for a new TV channel. If you want to skip a repeated TV channel, simply select the respective
channel position number.
Skip Control
This function can skip the channel position number you don’t want to appear. First select the number
you want to skip (use the above process), press the “△” or “▽” button to select [SKIP] and then the
“ ” or “ ” button to toggle “ON” or “OFF”. The “ON” status indicates that the selected channel
position number is hidden, whereas the “OFF” status shows that this function is disabled.
Band Select
This function allows you select the band you need among VHF-L; VHF-H and UHF when using
manual search. After entering the [POS. MEMORY] menu, press the “△” or “▽” button to select
[BAND] and then the “ ” or “ ” button to select or change the band. They change as below.
VHFH UHF VHFL
Search Control
This function is for manual search operation. Press the “
” button or the VOLUME “ + ” button
of the TV unit to search upward. “UP” stops blinking when a TV channel has been found. If you
want to continue searching upward, simply press the button again. To search downward, press the
“ ” button or the VOLUME “ - ” button of the TV unit. When “UP” or “DOWN” is blinking, you
may press the button opposite to the searching direction to stop the searching process.
Fine Tune Adjustment
If a TV channel is not satisfactorily received, use this function to acquire the best effect. After
entering the [POS. MEMORY] menu, press the “△” or “▽” button to select [MFT] and then keep
pressing the “
” or “ ” button to adjust it. Over-adjustment may result in losing that channel
after changing to other TV channels.
Auto Search
Press the “△” or “▽” button to select [AUTO MEMORY]; then follow the procedures of 4.6.1.
7
Page 8

4.11 Picture Menu
To adjust the picture effect, first press the PICTURE button to enter the [PICTURE] menu.
Alternatively, use the MENU button or that of the TV unit to enter the [PICTURE] menu.
Color Control
Press either the “△” or “▽” button or the CHANNEL “ ▲ ” or “ ▼ ” button of the TV unit to
select [COLOR] and then either the “ ” or “ ” button or the VOLUME “ + ” or “ - ” button
of the TV unit to adjust the effect of color.
Brightness Control
Select [BRIGHT] in the [PICTURE] menu and then follow the process of color control to adjust
the effect of brightness.
Contrast Control
Select [CONT] in the [PICTURE] menu and then follow the process of color control to adjust the
effect of contrast.
Sharpness Control
Select [SHARP] in the [PICTURE] menu and then follow the process of color control to adjust the
effect of sharpness.
Tint Control
Select [TINT] in the [PICTURE] menu and then follow the process of color control to adjust the
effect of tint.
(Note : This function is only available with NTSC signal input.)
Blue Back Control
Press either the “△” or “▽” button or the CHANNEL “▲” or “▼” button of the TV unit to
select [B.B] and then the”
” or “ ” button to turn the blue black function “ON” or “OFF”.
(Note : Please don’t turn on the “BLUE BACK” function, When you use “AUDIO IN” only at AV
mode.)
4.12 System Select
If Color is abnormal, press the SYSTEM button to invoke the “SYSTEM” menu on the screen. Use
the FUNCTION “
” or “ ” button to select its proper color system. The color systems which
include AUTO, PAL, SECAM, NTSC 3.58 and NTSC 4.43 appear in turn on the screen.
SYSTEM
COLOUR AUTO
4.13 Display Control
Press the DISPLAY button to display on the screen the channel position number of the TV program
you are watching. Press it again to make the number disappear.
8
Page 9

4.14 Sleep Timer Control
The sleep timer turns the TV unit into standby mode automatically when the pre-set sleep time is
reached. Press the “ ” button ,the sleep time can be set in 10-minute steps up to 120 minutes.
And then press the “ ” button ,the sleep time can be set in 10-minute steps down to “OFF”.
Each time the SLEEP button is pressed; the set time changes as below:
OFF 120 110 …20 10
minutes minutes minutes minutes
Note.: If you turn the TV unit into standby mode while the sleep timer is running, the sleep time
setting will be cancelled.
4.15 Standby Mode
Press the POWER ON/OFF button to turn the TV unit into standby mode. Press it again to return
to operation mode.
4.16 AV/TV Modes Select
Press the AV/TV SELECT button or that of the TV unit to toggle between AV and TV modes.
When the screen shows “VIDEO”, it indicates the TV unit is in AV mode. ”VIDEO 1” is for Rear
AV Input Terminal, while “VIDEO 2” is for Side AV Input.
4.17 Local Buttons
The TV unit itself is also built with the AV/TV button, the MENU button, the CHANNEL “ ▲ ”
and “ ▼ ” buttons and the VOLUME “ + ” and “ - ” buttons.
4.18 S-Video Input Terminal
Connection Method
If your AV equipment such as VCD player, DVD player, VCR, Video Camera, etc. is built with
S-Video output terminal, you may connect it to the S-Video Input Terminal of this unit with an
appropriate cord (not included) . When connected, at this moment, “S-Video” displays on the
screen. Since the S-Video Input Terminal has priority over the rear RCA type Video Terminal, the
latter will be disabled.
Note : When the S-Video Input Terminal is connected, the AV Output Video signal provides Black
/White picture only.
9
Page 10

Methods of Connecting with AV Equipment
Y
You could enjoy high quality picture on the screen from playback from VCR or video camera.
If your video equipment is built with S-Video output terminal, you could connect it to the TV
unit’s S-Video Input Terminal with an appropriate cable. If it is not available, connect it to Video
Input Terminal.
VIDEO
FR ONT AV I N
VCR w/o S-VIDEO
Ter min al
Y
W
Vid eo IN
L\MONO
R
L
R
Video Camera
Y
W
R
Flowing Direction of Signal
Yellow (Video)
Y
W
White (Left/Mono)
AUDIO
L
S-VIDEO
R
S-VIDEO
IN
R
Audio IN
L/MONO
VIDEO
VIDEO
R
R
Red (Right)
DVD Player/LD Player
Y
S-VIDEO
OUT
R
W
Audio Output
4.19 Sound Control
(a)Balance Control
Press the MENU button to select the [SOUND] menu. Press the PROGRAM NUMBER “▲” or
“▼” button to select [BALANCE]; then hold down the VOLUME CONTROL “
” or “ ” button
to adjust the effect of balance.
(b)Super woofer
Press the MENU Button to select the [SOUND] menu ,Press either the “△” or “▽” button or the
CHANNEL “▲” or “▼” button of the TV unit to select [SUPERWOOFER] and then the” ”
or “ ” button or the VOLUME “ + ” or “ - ” button of the TV unit to turn the superwoofer
function “ON” or “OFF”.
(Note: Only applicable to the unit built with Super woofer)
10
Page 11

5. SAFETY INSTRUCTIONS AND MAINTENANCE
5.1 Prevent TV unit from being splashed or being dripped by water, any liquids or rain to avoid fire
or electricity leakage.
5.2 Do not drop any objects inside TV unit.
5.3 Do not locate TV unit in a place where little children could reach.
5.4 High voltage exists inside TV unit so do not remove back cover. In case of failure, do not attempt
to fix it by yourself and call qualified service personnel.
5.5 Use appropriate power source and do not overload AC outlet socket to avoid fire or electricity
leakage.
5.6 Do not block TV unit’s ventilation slots when in use.
5.7 Unplug TV unit if not used for a long period .
5.8 Clean TV unit with a cloth moistened with water or mild detergent but never use any other
solvents or chemicals. Remember to turn the TV off before cleaning.
5.9 Check outdoor antenna periodically to see whether it is damaged or becomes loose.
5.10 During lightning, unplug outdoor antenna to prevent the TV unit from damage.
5.11 Never try to remove any components inside or adjust those not mentioned in this manual.
5.12 Do not attempt to disassemble or fix the TV unit ; otherwise, you may be electrically shocked or it
would easily catch fire.
11
Page 12

6. TROUBLE SHOOTING
6.1 The TV unit could not be turned on when the MAINS POWER SWITCH knob is pressed
down.
z Check whether the red power indicator lights up. If so, press any of the buttons of the remote
control handset to turn the TV unit into operation mode.
z If the red power indicator does not light up, check whether the AC line cord is connected to the
appropriate AC outlet socket.
6.2 TV channel is not received.
z Change to other TV channels to see whether they work normally. If normal, the channel not
received is mostly because of no broadcast. You may follow the procedures of 4.10 to search it
again.
6.3 No sound
z Check whether the sound system matches with that of the TV channel broadcast.
z Check whether the mute function is “ON”.
z Check whether the volume is turned to the minimum level.
6.4 No color
z Press the ANA. MEM. button to select DYNAMIC to see whether it is normal.
z Change to other channels to see whether they are normal.
z Check whether the color system matches with that of the channel broadcast.
6.5 Dark picture
z Press the ANA. MEM. button to select MEMORY, DYNAMIC, STANDARD or MILD to see
whether the picture is normal.
z Change to other channels to see whether they are normal.
6.6 Snowy picture
z Check whether the antenna is properly connected or fails to work.
12
Page 13

7. SPECIFICATIONS
TELEVISION SYSTEM: PAL B/G
COLOR SYSTEM: PAL, NTSC3.58/4.43
CHANNEL MEMORY: 0-99
ANTENNA INPUT: 75 Ω (unbalanced)
VIDEO INPUT: 1 Vp-p
AUDIO INPUT: 0.4 Vrms
MAX. AUDIO OUTPUT: 3W + 3W
WORKING VOLTAGE: 230V-240V
POWER CONSUMPTION : 140W
CRT DIMENSION : 69 cm
NET WEIGHT: XX KG
Attn: All designs and specifications are subject to change without any prior notice.
Dimensions and net weight are of approximate values .
ATTENTION!
Main Australian TV channels have been pre-tuned at the factory. Sometimes channel frequencies could change regionally. If
it is necessary please fine tune channel settings of your TELEVISION to ensure better picture quality. For more about “ Fine
tuning” procedure please see Instruction Manual ( Ref. page 7 for AUTO Search and Fine Tune Adjustment ).
Pre-set: Channel table:
Channel#2 ABC
Channel#7 Channel 7
Channel#9 Channel 9
Channel#10 Channel 10
Channel#28 SBS
NOTE- pre-tuned channels will be erased if auto tuning is attempted. Should you wish to add additional channels and
keep the pre-tuned channels, please follow the instruction book for manual tuning procedure.
USE 10-40290-01 P11,12
13 COPY 10-20762-02 CHANGE P9.11,12,13
 Loading...