

Page 1
USB/SD/MP3/CD/Radio
UCE1168PR
Antiq
ue Turntable
I N S T R U C T I O N M A N U A L
Page 2
WARNING
TO PREVENT FIRE OR SHOCK HAZARD DO NOT EXPOSE THIS APPLIANCE TO RAIN OR MOISTURE.
CAUTION
RISK OF ELECTRIC SHOCK
DO NOT OPEN
WARNING : SHOCK HAZARD-DO NOT OPEN
LIGHTNING FLASH WITH ARROWHEAD SYMBOL -
within an equilateral triangle, is intended to alert the
us er t o th e presenc e of u ni ns ul at ed danger ou s
voltage within the products enclosure that may be of
sufficie nt magnit ude to co nstitude a risk of electric
shock to persons.
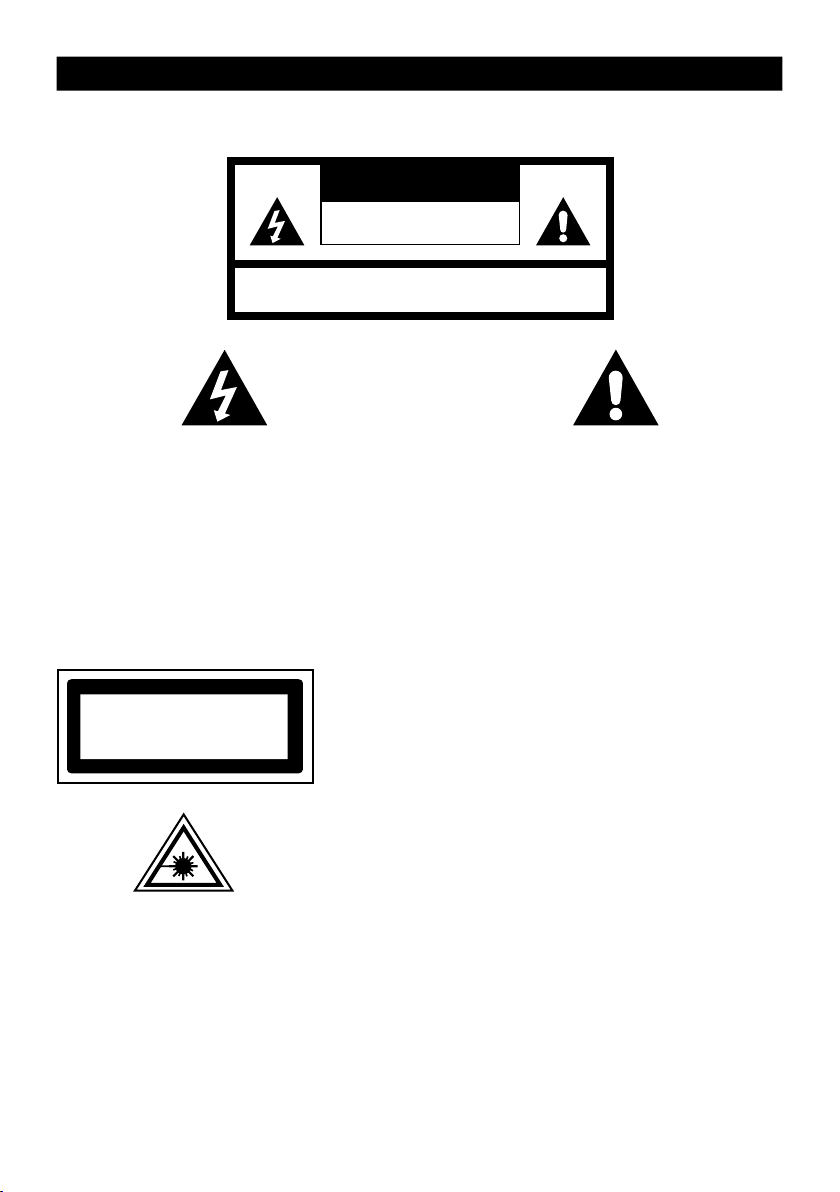
The following label has been affixed to the unit, listing the proper procedure for working with the laser beam:
CLASS 1 LASER PRODUCT LABEL -
CLA SS 1 LA SER PRODUCT
KLA SS 1 LA SER APPARAT
LUO KEN 1 L AISE RLAITE
KLA SSE 1 L ASER PRODUK T
This label is attached to the place as illustrated to inform that the
apparatus contains a laser component.
WARNING LABEL INFORMING OF RADIATION -
This label is placed inside the unit. As shown in the illustration. To
warn against further measures on the unit. The equipment contains
a laser radiating laser rays according to the limit of laser product of
class 1.
EXCLAMATION POINT -
is used to indicate that a specific component shall be
replaced only by the compon ent sp eci fie d i n t hat
documentation for safety reason.
within an equilateral triangle,
E-1
Page 3

SAFETY INSTRUCTIONS
1. READ INSTRUCTIONS - All the safety and operating instructions should be read before the appliance is operated.
2. RETAIN INSTRUCTIONS - The safety and operating instruction should be retained for future reference.
3. HEED WARNINGS - All warnings on the appliance and in the operating instructions should be adhered to.
4. FOLLOW INSTRUCTIONS - All operating instructions should be followed.
5. WATER AND MOISTURE - The appliance should not be used near water, for example, near a bathtub, washbowl,
kitchen sink, laundrytub, swimming pool or in a wet basement.
6. VENTILATION - The appliance should be situated so that its location or position does not interfere with its proper
ventilation. Do not place on bed, sofa, rug or similar surface that may block the ventilation openings, in a built-in
installation, such as a bookcase or cabinet that may impede the flow of air through the ventilation openings.
7. HEAT - The appliance should be situated away from heat sources such as radiators, stoves, or other appliances
(including amplifiers) that produce heat.
8. POWER SOURCE - The applian ce shou ld be c onnecte d to po wer sup ply onl y o f the t ype des cribed in the
operating instructions or as marked on the appliance.
9. GROUNDING - Precautions should be taken to ensure that the grounding means of an appliance is not defeated.
10. POWER CORD PROTECTION - Power supply cords should be routed so that they are not likely to be walked
on or pinched by items placed upon or against them.
11. POWER LINES - An outdoor antenna should be located away from power lines.
12. OBJECT and LIQUID ENTRY - Care should be taken so that objects do not fall and liquids are not spilled into
the enclosure through openings.
13. ESD WARNING - The display does not function properly or no reaction to operation of any the control may due
14. DAMAGE REQUIRING SERVICE - The appliance should be serviced by qualified service personnel when:
a. The power-supply cord or plug has been damaged.
b. Objects have fallen into, or liquid has been spilled into the appliance enclosure.
c. The appliance has been exposed to rain.
d. The appliance has been dropped, or the enclosure damaged.
e. The appliance does not appear to operate normally.
15. SERVICING - The user should not attempt to service the appliance beyond that described in the user operating
instructions. All other servicing should be referred to qualified service personnel.
Notes:
a. Dirty or scratched CD may cause a skipping problem. Clean or replace the CD.
b. If an error display or malfunction occurs, disconncet the AC cord and remove all the batteries. Then turn the power
back on.
to the electrostatic discharge. Switch off and unplug the set. Reconnect after a few seconds.
BEFORE OPERATION
Notes: CONCERNING COMPACT DISCS.
Since dirty, damaged or warped discs may damage the appliance, care should be taken of the followings items:
a. Usable compact discs. Use only compact disc with the mark shown below.
b. CD compact disc only with digital audio signals.
E-2
Page 4
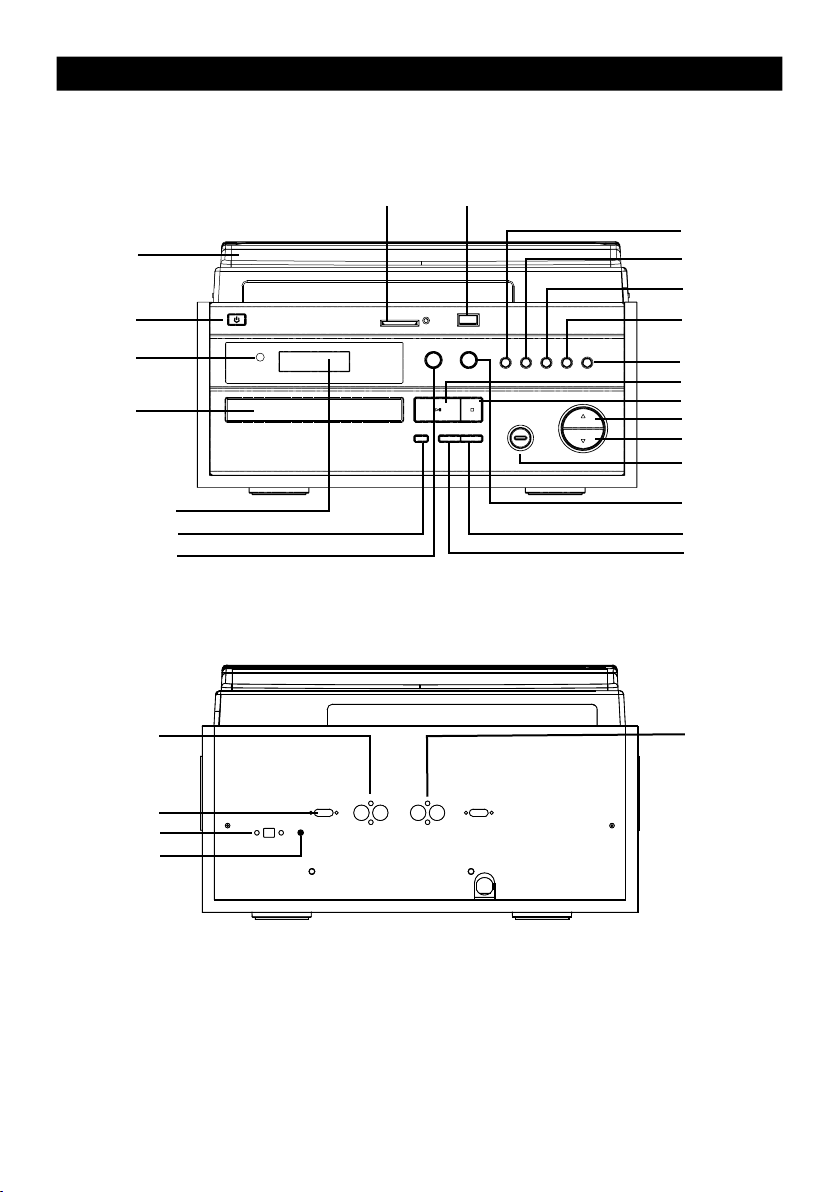
LOCATION OF CONTROL
PHONO
COVER
POWER
REMOTE
SENSOR
CD DOOR
LCD DISPLAY
OPEN / CLOSE
FUNCTION
AUX - IN JACK
(L/R)
SD CARD SLOT
USB SLOT
MODE
PROGRAM
BIT RATE
PRE-DN
PRE-UP
PLAY/PAUSE
STOP/BAND
VOL +
VOL -
STANDBY
RECORD
SKIP +
SKIP -
EXTERNAL
SPEAKER
JACK (L/R)
AUTO STOP
AM ANTENNA
FM ANTENNA
E-3
Page 5
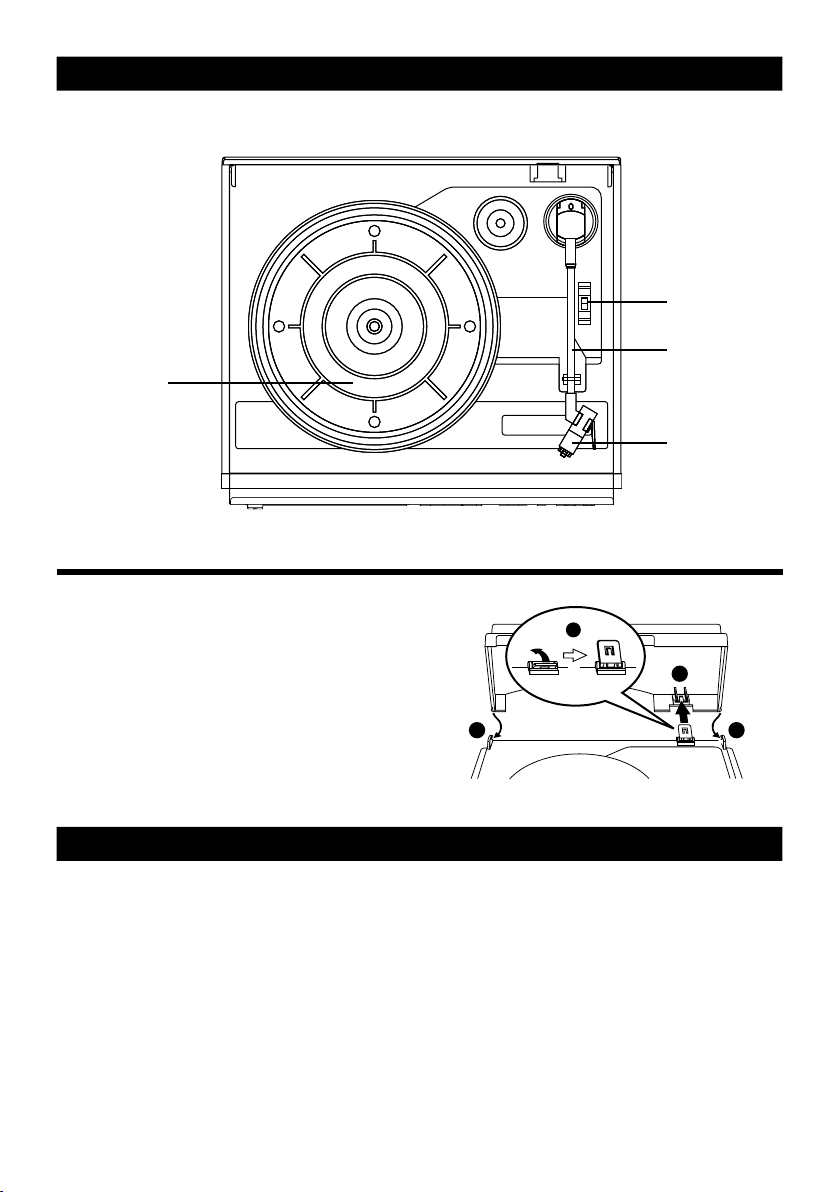
LOCATION OF CONTROL
PLATTER
PHONO COVER ASSEMBLY
SPEED SELECTOR
TONE ARM
TURNTABLE HEAD
1. Push the metal bracket to rear side.
2. Connect the metal bracket to the phono cover.
3. Connect the hinge of the phono cover to the
appliance.
1
2
33
POWER SOURCE
AC POWER
You can power your appliance by plugging the detachable AC power cord into the AC inlet at the
back of the appliance and into a wall AC power outlet. Check that the rated voltage of your appliance
matches your local voltage.
E-4
Page 6

1. STANDBY
2. TIMER
3. CLOCK
4. 0 - 9
5. PROGRAM
6. INFO MONO / ST.
7. SKIP +
8. STOP / BAND
9. SKIP -
10. X-BASS
11. SLEEP
12. VOL +
13. VOL -
14. P - DOWN
15. P - UP
16. FIND
17. PLAY / PAUSE
18. MODE
19. EQ
20. REC
21. FUNCTION
22. MUTE
BATTERY INSTALLATION
REMOTE CONTROL
1
2
3
5
6
7
8
9
10
11 20
12
13
4
14
15
16
17
18
19
21
22
Insert 2 x “AAA” size batteries into the battery compartment. Be sure that the batteries are inserted
correctly to avoid damage to the remote control. Always remove the bat teries when the remote
control will n ot be used for a long period of time, as this w ill cause leakage to the batt eries and
subsequently damage to your set.
Notes:
- Use batteries of the same type. Never use different types of batteries together.
- If the distance required between the remote control and the appliance decreases, the batteries
are exhausted. In this case replace the batteries with new one.
SENSOR WINDOW OF THE RECEIVER
- Even if the remote control is operated within the effective range, its operation may be impossible if
there are any obstacies between the appliance and the remote control.
- If the remote control is operated near other appliances which generate infrared rays, or if other
remote control devices using infrared rays are used near the appliance, it may operate incorrectly.
E-5
Page 7

RADIO OPERATION
AUTOMATIC TUNI
1. Press the “FUNCTION” button to select “TUNER” mo
2. Press the “STOP / BAND” button to select AM or FM.
3. Press the “SKIP +” or “SKIP -” button to start automatic tuning process.
4. When a station is tuned in the tuning process, it will stop automatically and you can listen to your
desired station.
NG
de.
MANUAL TUNING
It is for selecting stations, which cannot be tuned automatically. (manual selection)
To tune a channel manually.
- Skip step 4 in the above procedures.
- In step 3, each time the “SKIP +” or “SKIP -” button is pressed momentarily (0.5 second or less),
the frequency changes by a fixed step:
FM: 0.05 MHz steps
AM: 9 kHz steps
MEMORY PRESET
1. Repeat step 1 to 4 in the AUTOMATIC TUNING procedures.
2. Press the “PROGRAM” button to start the preset process.
3. Display will show the memory sequence number and a flashing “1”.
4. Press the “P - UP” or “P - DOWN” button or the “PROGRAM” button of front panel to determine
the preset station number.
5. Press again the “PROGRAM” button to preset your desired station.
6. Once all t he stations were prese t, press th e “P - UP” or “P-DOWN” button to listen to y our
desired station.
MONO / STEREO
Press the “BIT RATE” button to achieve the best frequency.
E-6
Page 8

CD / MP3 OPERATION
GENERAL OPERATI
PLAY / PAUSE Press to start playing CD / MP3 disc.
Press again to stop playing CD / MP3 operation temporarily.
Press again to resume playback.
SKIP + & Press to go to the next track or back to the previous track.
SKIP - Press and hold while playing until you find the point of the sound.
STOP Press to stop all CD / MP3 operation.
ON
PLAYBACK
1. Open the CD door and place a CD / MP3 disc with the label up in the CD compartment.
2. Close the CD door.
3. Press the “FUNCTION” button to select “READING”.
4. Focus search is performed if disc is inside. Playback will start automatically from the first track.
5. Adjust the “VOLUME” control to the desired level.
6. Press the “PLAY / PAUSE” button again when you want to stop playback temporaril
7. Press the “STOP” button when finished.
y.
FOLDER SELECT
Press the “P - UP” or “P - DOWN” button on remote control to select folder. ( Folder select function
can only operate if disc store with at least 2 directories / files. )
E-7
Page 9

CD / MP3 OPERATION
PROGR
AM
Up to 20 tracks can be programmed for disc play in any order.
Be sure to press the “STOP” button before use.
1. Press the “PROGRAM” button, the display will show “P00 000” and “PROGRAM”.
2. Press the “P - UP” or “P - DOWN” button on remote control to select folder. ( For MP3 only, folder
select function can only operate if disc store with at least 2 directories / files. )
3. Select desired track by using the “SKIP +” or “SKIP -” button.
4. Press the “PROGRAM” button again to confirm desired track into the program memory.
5. Repeat step 2 to 4 to enter additional tracks into the program memory.
6. When all the desired tracks have programmed. Press the “PLAY / PAUSE” button to play the disc
in the order you have programmed.
7. Press the “STOP” button to terminate programmed playback.
MODE
Press the “MODE” button before or during playing CD / MP3 disc,
each press switches the repeat function as follows:
1 - REPEAT
1
2 - REPEAT ALL
3 - REPEAT ALBUM ( For MP3 only )
4 - INTRO
5- RANDOM
6- NORMAL PLAYBACK
REPEAT 1
REPEAT 1
NORMAL
PLAYBA
CK
REPEAT
ALL
REPE
ALL
RANDOM
RAMD
OM
AT
REPEAT
ALBUM
REPE
UM
ALB
INTRO
INT
RO
AT
E-8
Page 10

USB / SD OPERATION
GENERAL OPERATIO
PLAY / PAUSE Press to start playing tracks from the USB / SD card.
Press again to stop playing USB / SD operation temporarily.
Press again to resume playback.
SKIP + & Press to go to the next track or back to the previous track.
SKIP - Press and hold while playing until you find the point of the sound.
STOP Press to stop all USB / SD operation.
N
PLAYBACK
1. Plug or slot in USB / SD card device to port. (Make sure no disc on disc tray)
2. Press the “FUNCTION” button to select “READING”.
3. Play will start automatically from the first track.
4. Press the “STOP” button when finished.
5. Press the “PLAY / PAUSE” button again, playback will start from the first track.
Notes
:
You can press the “STOP / BAND / USB / SD” button twice during CD playing change to “USB / SD”
mode.
FOLDER SELECT, PROGRAM, REPEAT, RANDOM
The operation of FOLDER SELECT, PROGRAM, REPEAT and RANDOM mode are as the same as
that of CD / MP3. Please refer to CD / MP3 OPERATION.
E-9
Page 11

PHONO OPERATION
GENERAL OPERATION
Notes:
Remove the stylus protector. Be sure that the tone arm is detached from the tone arm rest before
operation and resecured again afterward.
1. Set the “FUNCTION” selector to “PHONO” mode.
2. Set the “SPEED” selector to the proper speed depending on the record to be played.
3. Place the record on the platter.
4. Lift the tone arm from the rest and slowly move it to the record side. The platter will begin to rotate.
5. Place the tone arm on the desired position.
6. Adjust the “VOLUME” control to the desired level.
7. At the end of the record, the platter will automatically stop rotation. Lift the tone arm from the record
and return it to the rest.
8. To stop manually, lift the tone arm from the record, and return it to the rest.
Notes:
As some kind of record the auto - stop area was out of the unit setting, so it will stop before the last
track finish. In the case, set the “AUTO - STOP” selector to “OFF” mode, then it will run to the end of
the record but will not stop automatically. ( Set the “FUNCTION” selector to “OFF” mode or set the
“AUTO - STOP” selector to “ON” mode to stop the playback. ) Put back the tone arm to the rest.
STYLUS REPLACEMENT
Replacement of a worn stylus can be easily accomplished as follows:
1. To remove the old sty lus, pull o ut the styl us
assembly in direction shown, holding the head
shell with your other hand.
2. Then install the new stylus by pushing it gently
into the cartridge ( hold by the edge to prevent
damage to stylus. ) until it clicks into place.
1
2
E-10
Page 12

RECORD OPERATION
ENCORDING FROM AUX IN / PHONO TURNTABLE/ RADIO
* Plug in either a blank SD/MMC or a flash USB device, than select and play on the desired input.
1. Press the “RECORD” button on UNIT/REMOTE until “REC” flashing on display. Appliance will
start record
2. Press the “RECORD” button to complete single track recor
ENCORDING FROM CD/MP3/USB/SD
1. Insert a blank SD/MMC or a flash USB device, select and press the “PLAY” button to play
desired track.
2. Press the “RECORD” button on unit/remote to start encording from ether above direc
transmition.
3. Press the “RECORD” button to terminate record of single track.
4. Repeat the above operation for recording a new track.
SINGLE TRACK DELETE OF USB/MEMORY CARD
Be sure a USB/MEMORY CARD is in the slot.
1. Press and hold the “RECORD” button until display will show: DEL--001.
2. Use the “SKIP + or -” button to choose the track desired to delete..
3. Press the “RECORD” button again, display show “YES NO”, Use the “SKIP + or -” button to
con
4. Press the “RECORD” button to co
ing.
ding.
tion
tinue.
nfirm.
FORMAT OF ST
1. Press twice “RECORD” button until dispaly show “FORMAT”.
2. Y/N will flash on display( Y=YES, N=NO).
3. Press the “SKIP + or -” button to continue.
4. Press the “RECORD” button to confirm.
ORAGE
E-11
Page 13

OTHER FEATURES
EQ
Press the “EQ” button on remote control, each press switch the EQ function as follows:
1 - CLASSIC
2 - ROCK
3 - POP
4 - JAZZ
5 - FLAT (NORMAL)
Notes:
- The player not responsible for playability of MP3 in any case. Due to recording condition such as PC
performance, writing software, media ability or etc.
- For CD-RW, CD-R, it may not be played according to the type of this disc.
EXTRA BASS
1. Press the “BASS” button on remote control to enjoy extra bass sound effect.
2. Display will show “BBS - ON”.
3. Press the “BASS” button again to switch off extra bass sound effect, display will show “BBS-OFF”.
ID-3 TAG ( FOR MP3 ONLY )
1. Press the “INFO / MONO / ST.” button on remote control.
2. ID3 information will show on display.
3. Press the “INFO / MONO / ST.” button again to terminate.
MUTE
1. Press the “MUTE” button to remove the sound during playing disc.
2. Press the “MUTE” button again to resume the sound.
E-12
Page 14

OTHER FEATURES
SLEEP
1. Press the “SLEEP” button on remote control, display will show “90”. That means, after 90
minutes, appliance will automatically turn to standby mode.
2. Press the “SLEEP” button again to select the automatically turn off time, from 90, 80, 70, 60, 50,
40, 30, 20, 10 minutes.
3. Press the “SLEEP” button to “OFF” to canel sleep function.
CLOCK SETTING
1. Press the “STANDBY” button to switch unit at standby mode.
2. Press the “MEMORY” button twice to entry clock set mode.
3. Adjust hour by pressing the “SKIP +” or “SKIP -” button, press the “MEMORY” button to confirm.
4. Adjust minute by pressing the “SKIP +” or “SKIP -” button, press the “MEMORY” button to confirm.
Notes:
Because clock setting is at standby mode, the display is dim.
E-13
Page 15

OTHER FEATURES
TIMER S
Timer setting must be after completed clock setting.
1. Press the “STANDBY” button to turn the unit at standby mode.
2. Press the “TIMER/ALARM” button on remote control or unit to timer on mode.
Display:
ETTING
TIMER
3. Press the “CLOCK” button once.
Dispaly:
ON TIME
4. Press the “MEMORY” button once, then press “SKIP+” or “SKIP-” button to adjust hour(1-24).
5. Press the “MEMORY” button again, then press “SKIP+” or “SKIP-” button to adjust minutes.
6. Press the “MEMORY” button once, to save time.
7. Unit will automatically turn on at the preset time.
8. Press the “CLOCK” button twice.
Display:
OFF TIME
9. Repeat step 4-6 to set the timer.
10. Unit will automatically turn off at the preset time.
11. To cancel timer setting, turn on the unit and pressthe ”TIMER/ALARM” on remote control to timer
off mode.
E-14
Page 16

OTHER FEATURESOTHER FEATURES
OTHER FEATURES
FIND
1. Press the “FIND” button on remote control once, the unit will start searching for song’s title which
starting from “A - Z” then “0 - 9” by pressing the “SKIP+ or -” button on remote control.
2. If there is no songs starting with “A”, the display will show:
A NOFILE
3. If there are songs starting with “L”, the display wi
ll show:
L LONELY
4. Since there are more than 1 song with “L”, press the “STOP” and “SKIP + or -” button to s
different songs starting with “L”. Press “STOP” button again to go back to the main menu and
continue to select “I, J, K...”.
5. Press the “PLAY” button to play the desire song.
6. Press the “FIND” button twice and LCD will display the name of album. Press the “SKIP + or - ”
button to select the desire album and press play to comfirm the
7. Press the “FIND” button again to exit FIND function.
track.
elect
E-15
 Loading...