

Page 1
7” (17cm) Portable TV
Instruction Manual
T270B
For information and support, www.bigw.com.au
Page 2

CONTENT
QUICK GUIDE 3
Plug in your T270B 3
Preparing the Remote Control 3
1. PANELS 4
1.1 Front panel and side panels 4
1.2 Rear panel 4
2. INTRODUCTION 5
2.1 Check list 5
2.2 About transmission 5
2.3 About the portable receiving antenna and accessorial antenna 5
2.4 Connecting the T270B to the TV 5
3. REMOTE CONTROL 5
3.1 Definition 5
3.2 Preparing the remote control 6
4. NAVIGATING WITH MENUS 6
4.1 Analog TV 6
4.1.1 Menu definition 6
4.2 Digital TV 8
4.2.1 Program information 8
4.2.2 Channel 9
4.2.3 Channel setting 10
4.2.4 System Setting 11
4.2.5 Option 13
4.2.6 Games 13
4.2.7 Shortcut menu 14
5. MAINTENANCE 15
5.1 Handling your T270B 15
5.2 Considerations about the screen 16
5.3 Cleaning recommendations 16
5.4 Care the power source 16
5.5 Care battery 16
5.6 About the headphone using 17
6. TROUBLESHOOTING 17
7. TECHNICAL SPECIFICATIONS 18
7.1 Transmission Standards 18
7.2 RF Input Modulator Output 18
7.3 External power supply 18
2
Page 3

GENERAL INFORMATION ABOUT THE T270B
T270B is a portable digital TV set; it can be used in a car or outdoor. Throughout this manual you will notice that
everyday operation of your T270B is based on a series of user friendly on-screen displays and menus. These
menus will help you get the most from your T270B; guiding you through installation, channel selection, viewing and
many other functions.
Using the buttons on the remote control can perform all functions, and using the buttons on the front panel can also
perform some of the functions.
Please be aware that new software may change the functionality of the T270B.
Should you experience any difficulties with the operation of your T270B, please consult the relevant section of this
manual, including the Troubleshooting, or alternatively call your dealer or customer service adviser.
IMPORTANT! Read this before using the T270B!
z Do not cover the T270B’s ventilation openings with items such as newspapers, tablecloths, curtains etc.
z Do not place the T270B on top of a unit that emits heat.
z Do not place naked flame sources, such as lighted candles, on the T270B.
z Use a soft cloth and a mild solution of washing-up liquid to clean the casing.
z Do not expose the T270B to dropping or splashing liquids.
z Do not place any objects filled with liquids, such as vases, by the T270B.
z To give your T270B an extra protection, e.g. at a thunderstorm, we recommend that connect it via an external
surge protection device.
z Do not remove the cover.
z Do not allow the unit to be exposed to hot, cold or humid conditions.
QUICK GUIDE
Plug in your T270B
You can use either an AC adapter or a rechargeable Li-ion battery as a power source for your T270B.
! Use the T270B only with the supplied AC adapter.
To use the AC adapter:
1. Plug one end of the power cord into the AC outlet.
2. Plug the cable attached to the AC adapter into the DC in port on the T270B
Preparing the Remote Control
Before using the remote controller, you need to insert the supplied battery in order to enable communication
between the T270B and remote controller.
z To insert battery:
z Turn the remote controller over.
z Press in the tab and lift the battery cover up.
z Insert the supplied battery into the remote controller.
z Align the battery cover to the remote controller.
z Press down until the cover clicks into place.
! If the remote controller does not operate properly, you may need to replace the battery. When the remote controller is not be ing
used for extended periods of time, remove the batteries to avoid possible damage from battery leakage.
3
Page 4
1. PANELS
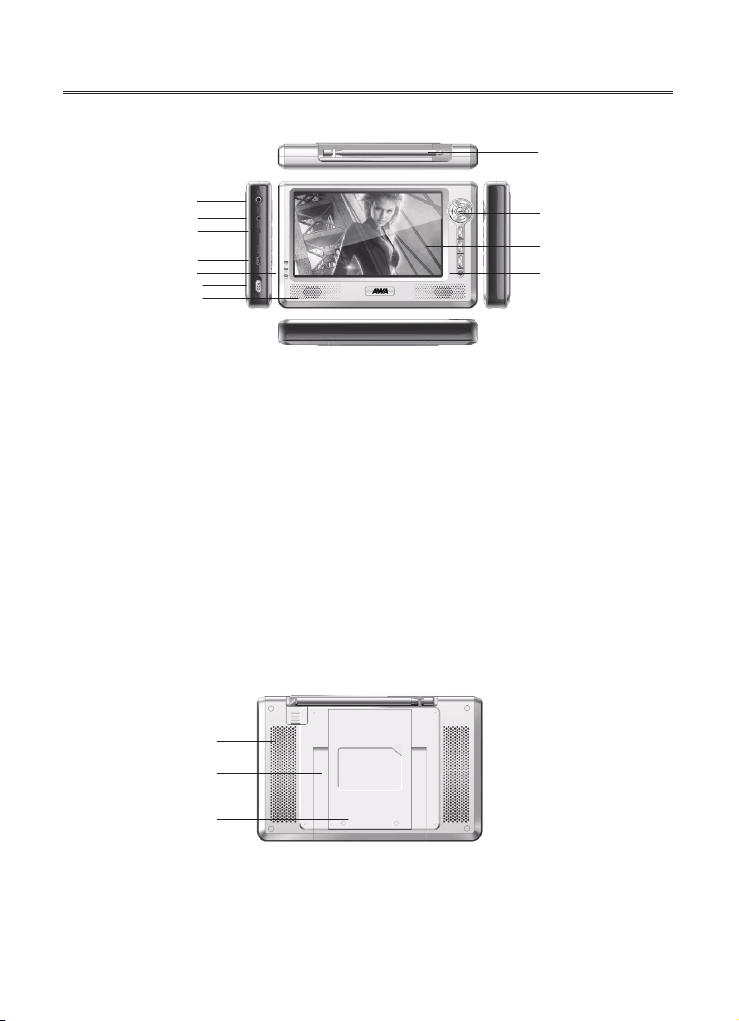
1.1 Front panel and side panels
1
5
6
7
8
9
10
11
1. Portable receiving antenna (the antenna jack can plug the accessorial antenna)
2. Front panel buttons (include Ok, Cursor up, Cursor down, Cursor left, Cursor right, Menu, Mode, 16:9/4:3)
3. Screen
4. Infrared remote receiver
5. Headphone jack
6. Video output jack (CVBS)
7. Power supply jack
8. Upgrade jack
9. Indicators (Red, Green, Blue)
The states are shown as:
10. Power key
11. Speaker
Red, green, blue – Machine turn on and charge battery
Green – Machine turn on, no charge
Red, blue – Machine turn off and charge battery
Null – Machine turn off
2
3
4
1.2 Rear panel
12
13
12. Cool holes
13. Stand
14. Li-ion battery cover
14
4
Page 5
2. INTRODUCTION
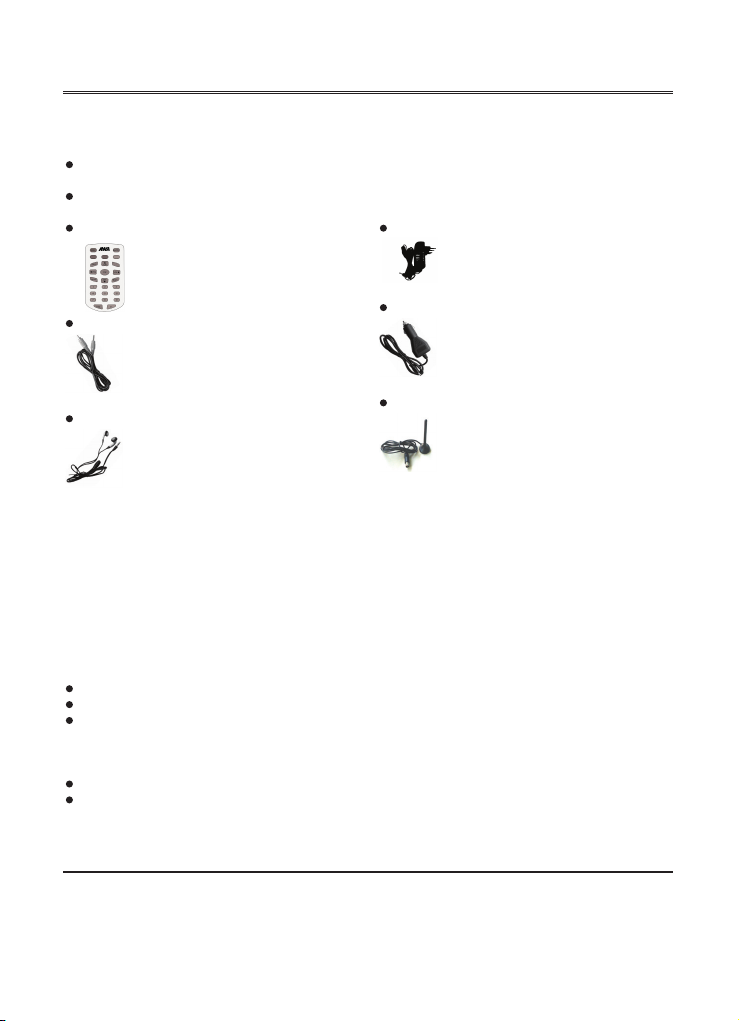
2.1 Check list
The box for your T270B should contain the following items:
The T270B
Owner’s manual
Remote control
Power supply adapter (AC adapter)
Video output cable
Headphone
Car Power Adapter
Accessorial Antenna
2.2 About transmission
Buildings, mountains and the surrounding terrain can block Radio and TV signals. Depending on whether the
receiver is located in a valley, behind a mountain or in a concrete building, the quality of reception may vary
considerably. As with most other transmissions, bad weather affects reception quality. We recommend use the
accessorial long antenna instead of short antenna when the signal isn’t good, but not allow using other model
antennas.
2.3 About the portable receiving antenna and accessorial antenna
Use the antenna for UHF channels 21-69 for DVB-T, such as a directional antenna.
If possible, place the antenna by the window and directed towards the TV transmitter.
The strength of TV signal varies according to reflections from buildings or mountains. The signal penetrates
thick stone or concrete walls poorly. However, a wooden building is not a big barrier to digital TV signals.
2.4 Connecting the T270B to the TV
Connect the T270B CVBS jack to the TV CVBS input socket for video.
Connect the T270B Headphone jack to the TV audio input socket for sound.
3. REMOTE CONTROL
3.1 Definition
This section describes how to operate the T270B using the buttons on the remote control. Using the buttons on the
front panel can also perform some of the functions.
5
Page 6
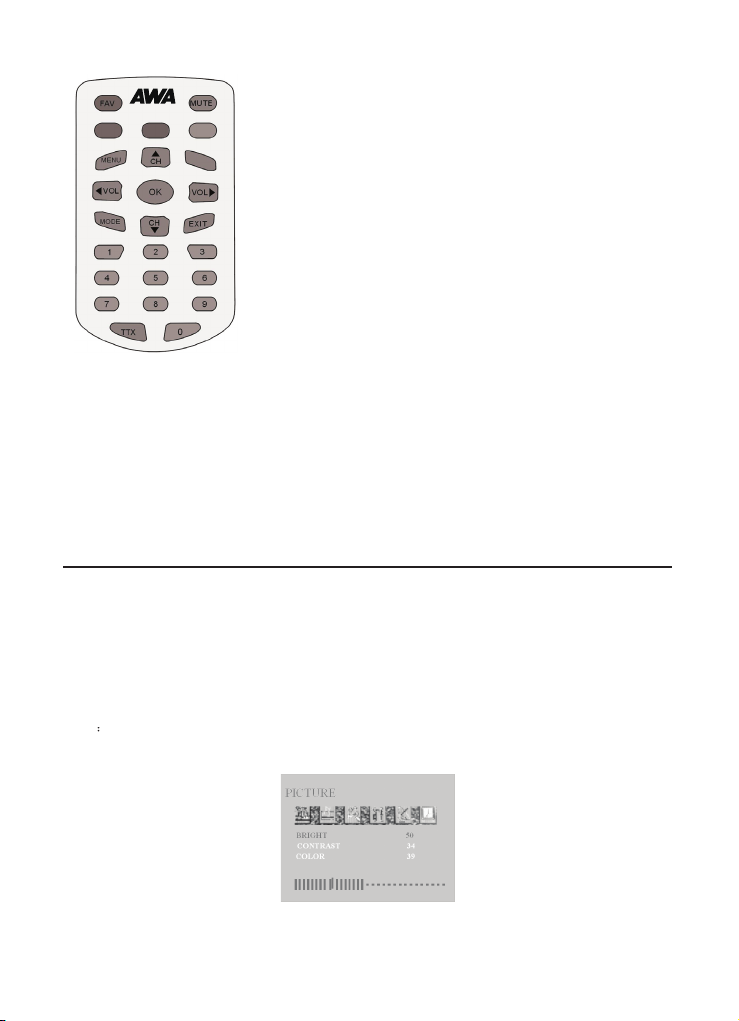
FAV To open the favorite menus
Mute Press once to turn the sound off/on (mute/unmute).
Mode Toggle between DTV, RADIO and Analog TV mode. Or call
Ok To confirm a selection or to open Menu.
Exit To exit a selection or to close Menu
Cursor up Move up in the menus and change to
the next channel in viewing mode.
Cursor down Move down in the menus and change to the previous c
Cursor left Move left/change settings in menus. Decrease the volume
Cursor right Move right/change settings in menus. Increase the volume
Menu To go back one level at a time within menus. To open/close
0~9 To change the channel and to select individual menu options.
TT
Red, Green, Yellow, Blue To fast turn pages at Teletext. Blue for screen conversion switching. Green for audio
language switching (DTV), Yellow for audio channel switching, Red, no used.
Act as +10 key to switch 1 or 2 digits channels. (At Analog TV mode)
X Press to enter Teletext (if available) (At Digital TV Mode)
out the soft keyboard at some menus
in viewing mode.
level in viewing mode.
level in viewing mode.
the menus.
hannel
3.2 Preparing the remote control
Remove the cover from the battery compartment at the bottom of the remote control.
Insert the battery, taking care to observe the + and – markings indicated inside.
Replace the cover.
! Attention: This remote controller’s figure maybe different to the remote controller what you obtained. But the
symbols and functions on the remote controller are the same as this figure
4. NAVIGATING WITH MENUS
The following describes the functions of your T270B while watching Analog TV and terrestrial digital TV. Some of
the functions described here are dependent on the Service Provider and can only be used if they are included in
the transmitted program information.
4.1 Analog TV
4.1.1 Menu definition
ATV menu includes (PICTURE), (AUDIO), (OPTION), (SYSTEM), (PRESET), (VERSION) six windows.
Each window’s introduction is shown as following:
PICTURE
Left/right cursor buttons adjust the brightness of the screen.
Bright
Contrast: adjust the contrast of the screen.
Color: adjust the color of the screen.
Figure 4.1.1
6
Page 7

AUDIO
VOLUME: adjust the volume of sound.
Figure 4.1.2
OPTION
ENGLISH: Choose OSD languages; include English, German, French, Spanish, Portuguese, Italian, and Dutch.
MODE: Select 16˖9/4˖3 display formats.
BATTERYICON: Select display or no display the battery iron in the up-right corner of screen.
RESET: Reset the picture parameters of screen.
Figure 4.1.3
SYSTEM
C.SYS: Adjust the color mode of TV-Auto, PALˈSECAM.
S.SYS:Adjust the sound mode of TV-I, L, BG, DK. The default S-SYSTEM is PAL-BG.
SWAP: Let the current channel can exchange to another
COPY: Let the current channel can copy from another
channel.
channel.
Figure 4.1.4
PRESET
AUTO SEARCH: Auto search the TV channels. Right cursor button search TV channels.
SEARCH: Manual search the last/next TV channel, Left cursor button search the last TV channel, right cursor
button search the next TV channel.
FINE TUNER: Micro-adjust the current TV signal.
PROGRAM: Display the current channel number.
7
Page 8

Skip: If selected, skip the selected channel number when use CH+/CH- select channel. Select ON means skip;
select OFF means no skip.
Figure 4.1.5
VERSION
Show the version information of system. (Using adapter)
Show the version and battery information of system. (Using battery)
Figure 4.1.6
4.2 Digital TV
4.2.1 Program information
The T270B can display information about TV and radio programs that are currently being broadcast as well as
those that will be broadcast next.
Some of the advanced functions described here can only be used if they are included in the program information
transmitted by the broadcasters.
When you change channels, a program information banner is displayed for a few seconds.
z The program information may include:
z The current time
z The channel name and number.
z The names of the current and next programs
z The start and stop times of the current program.
z The start and stop times of the next program
You can open the main menu by pressing Menu key at the remote control or front panel. You can perform different
settings enter menus.
1. Display menu by pressing the Menu button; to hide them, press the menu button again.
2. When menus are displayed, you can move the folders in horizontal directions with left/right cursor buttons.
z The horizontal row contains folders; there are Channel, Channel Setting, System Setting, Option and
Game folders.
z To move a folder into focus, use the left/right cursor buttons.
z When a folder is in focus the bookmarks will be shown in the title bar.
z To confirm the selection, press the OK button, then it will appear submenu lists.
8
Page 9

z When you try to open some of the submenu lists contained in the folders you will be asked to enter a pin
code. This code is pre-set to 888888 in the factory.
z Press Menu to open the Menu.
z Press OK to open the Channel list menu.
z You can always leave a menu at any time you want, without affecting any settings, by pressing the Menu
button.
Figure 4.2.1
4.2.2 Channel
The Channel folder includes following menu list: Channel List, Favorite List and EPG.
To move the menu list into focus, use the up/down cursor buttons
You can enter the submenu list by pressing OK.
Exit the menu list by pressing Menu.
Channel List
Figure 4.2.2
It shows all the channels with information including number, name, bandwidth, quality, frequency, and strength.
To move the channel list into focus, use the up/down cursor buttons.
Use OK to confirm the selection.
Go back to the previous menu by pressing Menu
Use Mode button to switch TV/Radio channel list.
Favorite List
The TV list may contain a lot of channels. To sort your own lists you can make it easier to handle channels. You
can edit favorite channel lists in this menu.
If you have several lists and want to make changes in them (News, Movie, MTV, Finance and Other), select
which list by using the Mode button.
Use right cursor button to add the channel to favorite list.
Electronic Programme Guide (EPG)
In the EPG you will find information about the programs for the current day and for the following seven days.
(Provided that this information is included in the channel transmission from the distributor.)
You may also select the type of program you want information about, like Movie, Sports or Music.
Booking: You can select the program, which want to book at the EPG menu.
Choose program by using up/down, left/right cursor buttons.
Use OK to book the selected program.
Go back to the previous menu by pressing Menu.
9
Page 10

4.2.3 Channel setting
The Channel Setting folder includes following menu list: Channel Search and Sort Channel.
To move the menu list into focus, use the up/down cursor buttons
You can enter the submenu list by pressing OK.
Exit the menu list by pressing Menu.
Figure 4.2.3
Channel search
When you want to search for channels, a channel search procedure can be performed in different ways at Search
Type combo box: Auto Scan, Manual Scan
.
Figure 4.2.4
Auto Scan: you can change the items of region (Europe, Australia), whether the update mode (Append or
Replace) before you decide start search.
Focus to Start Search and Press OK to start searching for channels.
! The region item (Europe, Australia) is decided by the signal of different country’s broadcasting companies.
Manual Scan: Select the channel number you want to search for by using the number buttons on the remote
control or using Mode buttons to open soft digital keyboard.
You can also change the items of region and update mode before you decide start search.
Scan By NIT: Select NIT if you want to search on all of the transmitters connected to a specific network, focuses to
During the channel search procedure, the T270B may download a large number of channels. This may include
channels from various Service Providers, also those to which you do not have access unless you have a smart
card from one of those Service Providers. If you select a program to which you do not have access, you will get a
message on the screen.
Start Search and Press OK to start searching for channels.
Figure 4.2.5
After search, press OK to save the new channel or press Menu if you don’t want to save it.
10
Page 11

Sort Channel
You can select how the channels shall be sorted in the TV and Radio lists. There are two sort mode (Name Up or
Name Down
Note: Sorting does not apply for Favorite Lists.
or LCN) are used here.
4.2.4 System Setting
Figure 4.2.6
The system setting folder includes following menu list: Time Setting, Language Setting, Parental Setting, A/V
Setting, Factory Setting and Booking List.
To move the menu list into focus, use the up/down cursor buttons
You can enter the submenu list by pressing OK.
Exit the menu list by pressing Menu.
Figure 4.2.7
Time Setting
It includes following submenu list: TimeZone Setting and Banner Time Setting.
TimeZone Setting: you can set the time zone here in order to correct current time zone where you are.
Banner Time Setting: When you switch channels, an information banner will be shown for a few seconds. You
can select the duration for which the banner will be shown. (1, 3, 5, 7, 9seconds)
Figure 4.2.8
Language Setting
In order to fit the person of different countries, the menu language can be set to different languages (English,
Dutch, French, German, Italian, Portuguese, Spanish
Here, you can set audio language too. If more than one audio language is transmitted, you may select one
language. When available, you can select from the different languages (same as menu languages) being
broadcast.
,Russian). The default language is English.
Figure 4.2.9
Parental Setting
To open this menu you will be asked to enter your access code. From the factory the access code is set to 888888.
After set, the access code has to be entered before you can watch locked channels. You need to enter the access
code every time you start the T270B from standby.
11
Page 12

When input the right access code, the Parental Setting Menu will be opened.
Figure 4.2.10
Figure 4.2.11
Change Pin Code: You can change the access code for entering parental setting and locked channel.
A/V Setting
It includes following submenu list: Video Setting and Audio Setting.
Video Setting:
Set your video options. It includes TV Shape, Conversion, Standard, Bright, Contrast and Saturation.
Figure 4.2.12
Figure 4.2.13
TV shape: Select your TV screen format. The 4:3 format is standard for most TV screens. Select 16:9 for
widescreen TV.
Conversion: you can select different display formats (
TV program.
PillarBox will give a complete picture, but leaves black areas at the left and right. No distortion.
Verticalcut will fill up the screen horizontally but cut some information from the up and down sides of the picture.
No distortion.
FullFrame will fill up the screen size with distortion.
Auto will fit the screen size automatically.
Standard: When the T270B is connected to the TV channels, you may need to select the correct TV standard
system. (Auto, PAL)
Bright: left/right cursor buttons adjust the brightness of the screen.
Contrast: left/right cursor buttons adjust the contrast of the screen.
Saturation: left/right cursor buttons adjust the saturation of the screen.
Audio Setting:
Set your audio option.
FullFrame,PillarBox, Verticalcut,and Auto) to show the
Figure 4.2.14
Audio Channel: you can choose different audio channel modes here. (Stereo, Left, Right, Mono)
12
Page 13

Factory Setting
It includes following submenu list: Restore Default and Clear Channels.
Figure 4.2.15
Restore Default: If you continue from here, all your previous settings, access code and favourite channels, etc. will
If you do not want to reinstall, you can leave this menu when the warning is displayed by pressing “Menu”.
be erased.
Clear Channels: If you continue this, all your previous channels will be erased.
Book List
You can check the booking programs you set at here.
4.2.5 Option
The option folder includes following menu list: System Information and Save mode.
System Information
Figure 4.2.16
When you enter the System Information folder, you will find general information about which hardware and
software version your T270B is running on, you can also find the signal information and battery information
about T270B.
Figure 4.2.17
At the battery information option, you can also select display or close the battery indicated icon at top-right corner
on the screen.
Save mode
In order to save power when the T270B at portable state, the screen’s backlight can be turn on or turn off. The save
mode folder includes: Backlight Level and Close Screen at radio mode.
Figure 4.2.18
Backlight Level: adjust the screen’s backlight status, yes for save power, off for no save power.
Close Screen at radio mode: set screen whether on or off when system at the radio mode.
4.2.6 Games
The Game folder includes following menu list: Calendar, Tetris and PushBox.
13
Page 14

Figure 4.2.19
Calendar: you can check the date, which you would like to know.
Figure 4.2.20
Tetris, PushBox: available games.
Figure 4.2.21
Figure 4.2.22
4.2.7 Shortcut menu
In order to operate the menu conveniently, there are some often used functions be set at the shortcut menu. The
Shortcut Menu folder includes following menu list: Channel List, Favorite List, EPG, TELETEXT and Channel
Info. There are some soft buttons on this menu too. (Subtitle, Mute, Ch+, Ch-, Fav+, Fav-)
Figure 4.2.23
To Channel List, Favorite List and EPG items, please refer to 4.2.2 section.
14
Page 15

TELETEXT
Pressing
ttx will open a teletext page, if teletext is transmitted for that channel. Select teletext pages using the
number buttons on the remote control.
You can also quickly move to the different page options shown on any page by pressing cursor left/right.
Press OK on a highlighted page number to go to that page.
Sometimes a teletext page may contain subpages. When subpages are available, they are numbered on the lower
part of the screen. To view a subpage, press OK when no page numbers have been highlighted. Move to the
different subpages with cursor left/right.
Note: it may take some time before all of the subpages are available for selection.
Press ttx/back to return to TV/Radio mode.
Cursor up/down will show the next or previous teletext page.
Channel Info
There is a program information banner is displayed under the screen.
The program information may include:
z The current time
z The channel name and number.
z The names of the current and next programs
z The start and stop times of the current program
z The start and stop times of the next program
z Audio channel mode
z Language mode
z Signal strength
All these banners disappear automatically after a few seconds.
Go back to the previous menu by pressing Menu.
Soft buttons
Subtitle: When available, you can select from different subtitle languages.
Ch++, Ch--: To jump 3 channels forward (Ch++) and back (Ch--) from the current channel.
Fav+, Fav-: To move one favorite channel of the current group favorite list.
Mute: if you want to lower the volume in ones, you can set mute.
5. MAINTENANCE
5.1 Handling your T270B
1. Do not drop the T270B or heavy objects on top of the T270B.
2. Do not place the T270B in a location subject to: Heat sources, such as radiators or air ducts,
3. Direct sunlight, Excessive dust, Moisture or rain, Mechanical vibration or shock, Strong magnets or speakers
that are not magnetically shielded, Ambient temperature of more than 35
humidity.
4. Do not place electronic equipment near the T270B. The electromagnetic field of the T270B may cause a
malfunction.
5. Provide adequate air circulation to prevent internal heat from building up. Do not place the T270B on porous
surfaces such as rugs or blankets, or near material such as curtains or draperies that may block its ventilation
slots.
6. The T270B uses high-frequency radio signals and may cause interference to radio or TV reception. If this
occurs, relocate the T270B a suitable distance away from the set.
7. Use only specified peripheral equipment and interface cables; otherwise, problems may occur.
8. Do not use cut or damaged connection cables.
9. If the T270B is brought directly from a cold location to a warm one, moisture may condense inside the T270B, In
this case, allow at least one hour before turning on the T270B, If any problems occur, unplug the T270B and
contact an authorized Service Centre. To find the nearest centre or agent, visit the online support Web site.
10. Make sure you disconnect the power cord before cleaning the T270B.
15
o
C or less than 5 oC and High
Page 16

5.2 Considerations about the screen
1. Please read the details of this guidebook before using, and store safely in case use another day.
2. You may see tiny black points and/or bright points (red, blue, or green) that continuously appear on the LCD.
LCD has a very few (0.01%) unlit pixels and always lit pixels. You may also see distortion in colours or
brightness depending on your perspective. This is a normal result of the manufacturing process and does not
indicate a malfunction.
3. The LCD is manufactured using high-precision technology, do not apply a strong shock or drop it. Do not
disassemble or refit yourself.
4. Do not exert pressure on LCD screen. The LCD that is made from glass may be broken by pressure.
5. Do not place your LCD in a location subject to direct sunlight or excessively high temperature. This may cause
a malfunction.
6. Do not place your LCD in a location subject to mechanical vibrations or in an unstable location.
7. Do not place use a moist cloth to wipe the LCD. Liquid may cause a malfunction if it leaks into your LCD.
8. Do not place or drop any object onto the LCD. Also, do not apply any force to the LCD. If the liquid leaves out,
please use soap and clean water to clean.
9. If you bring your LCD from a cold location to a warm one, moisture may condense on the LCD. In such a case,
wipe off the moisture before using your LCD. It is recommended to use tissue papers to wipe off the moisture. If
the LCD surface is still not warm enough, moisture may condense again. Leave LCD until its surface is
warmed up to the ambient temperature. Do not use alcohol, gas or chemistry reagent to wipe.
10. Close LCD after use or during in malfunction. Please switch off power in case safe.
11. If you have any questions, please contact our company.
5.3 Cleaning recommendations
1. To clean the cover, take care the T270B is disconnected.
2. Do not use scented hydrocarbons or chloride solvents. Such products may attack the plastics used in the
construction of the cover. The cover should be cleaned by means of a light solution of detergent and water
applied with a soft cloth. Dry thoroughly before using the system again.
3. Do not use for the cleaning of the front panel, alcohol or its derivatives, these products can attack the
mechanical properties of the materials and diminish their useful time of life.
5.4 Care the power source
1. Refer the online specifications to check the power operation of your T270B.
2. Do not share the AC outlet with other power-consuming equipment, such as a photocopier or shredder.
3. You can purchase a power strip with a surge protector. This device pr events damage to the T270B caused by
sudden power surges, in an electrical storm.
4. Do not place heavy objects on the power cord.
5. To disconnect the cord, pull it out by the plug.
6. Unplug the T270B from the AC outlet if you are planning to not use the T270B for a long time.
7. Make sure that AC outlet is easily accessible.
8. When the AC adapter is not used, unplug it from the AC outlet.
9. Use the AC adapter supplied with the T270B or authorized products. Do not use any other AC adapter as it may
cause a malfunction.
5.5 Care battery
1. Battery life is shorter in a cold environment. This is due to decreased battery efficiency at low temperatures.
2. Charge the batteries at temperatures between 10
3. This T270B is designed to operate only with special batteries. The battery design for only professional or
Service Provider can open. Do not open or try to disassemble the battery cover on the back yourself.
4. While the battery is in use or being charged, the battery pack heats up. This normal and is not cause concern.
5. When the battery indicated iron on the screen flashes or when you have not used the battery for a long time,
you need to recharge the battery.
6. If the battery power is still low after charging it, the battery may be reaching the end of its life and should be
replaced. Please contact your dealer or Service Provider.
o
C to 30 oC. Low temperatures require a long charging time.
16
Page 17

5.6 About the headphone using
1. Do not use headphones while driving, cycling, or operating any motorized vehicle. It may create a traffic hazard
and is illegal in some areas. It can also be potentially dangerous to play loud music while walking, especially at
pedestrian crossings.
2. Avoid using headphones at high volume. Hearing experts advise against continuous, loud and extended play. If
you experience a ringing in your ears, reduce the volume or discontinue use.
6. TROUBLESHOOTING
Problem Possible causes What to do
The LED on the front
panel does not light up/is
not lit.
The screen is close and
power LED is on.
The remote control is not
working.
You have forgotten your
PIN code
When the T270B tries to
find and store channels
you get the message
“No services”.
When only very few of
the expected number of
channels are found.
During the channel
searching process, the
buttons or remote
controller’s keys are
insensitive.
Mains cable is not connected.
The battery isn’t installed
or need to recharge.
Condensed fluid may
cause the T270B to
malfunction.
The T270B is in close
screen modes
Battery exhausted.
Remote control is incorr-
ectly Aimed.
The aerial is not properly
connected to the T270B.
The aerial is not correctly
directed towards the transmitter.
The aerial is not suitable
for digital channels.
The signal is too weak for
the connected aerial.
There are no terrestrial
digital transmissions in the
area.
Since the channel
searching process use a
lot of system resource, the
system scan keys or
buttons will become very
slow.
Check that the mains cable is plugged into the
power socket
Make sure the battery is installed properly and
charged.
Disconnect the AC adapter and remove the
battery. Wait three to five minutes. Reattach the
AC adapter and reinstall the battery, and press the
power button to turn on the T270B.
Do not use the T270B for at least one hour if there
are some condensed fluids in it.
Press the any buttons to bring the T270B out of
close screen mode
Change battery.
Aim the remote control at box.
Check that nothing blocks the front panel.
Please use factory default mode.
Check the aerial ins- tallation including its
connections.
Check that the aerial is directed towards the transmitter.
Check that digital trans- missions are available in
the area.
If things does not work out as they should, let the
local TV dealer check whether the aerial is
intended for receiving digital trans- missions or
not. If not you have to exchange the aerial.
Try press buttons or remote controller’s keys
several times.
Note: If you have tried all of the actions suggested above, without solving the problem, please contact your
dealer or Service Provider.
17
Page 18

7. TECHNICAL SPECIFICATIONS
7.1 Transmission Standards
Analogue TV, DVB-T (SD), MPEG 2
7.2 RF Input Modulator Output
RF input frequency 177.5-226.5MHz & 474-862MHz
RF input power level -20 dBm to -78dBm
RF impedance 75ȍ
Frequency range Loop through 47-862MHz
Supported TV systems PAL SECAM
Output signal PAL(DTV)
Demodulation OFDM 2K and 8K, QPSK, 16QAM, 64QAM
Front panel Three LED indicators, eight Keys.
7.3 External power supply
Input 230V±10%, 50~60Hz
Power consumption max 8W
Power consumption min 6W
DC power to the T270B 12V
Battery content 2000mA/h, 7.4V
Operating temperature 0°C to +40°C
Storage temperature -20°C to +65°C
Humidity 25% to 75% rel. humidity
Dimensions (w×d×h) 211.8mm×134.8mm×28mm
(DTV),VHFL, VHFH, UHF (ATV)
N294
Imported by BIG W
18
Page 19

Product Warranty
Product Warranty
Subject to the warranty repair conditions below, this product is warranted for 12 months from the
Subject to the warranty repair conditions below, this product is warranted for 12 months from the
The benefits conferred by this warranty are in addition to and not in derogation of all rights and remedies in respect of this product
The benefits conferred by this warranty are in addition to and not in derogation of all rights and remedies in respect of this product
which the consumer has under the Trade Practices Act and other State and Territory laws.
which the consumer has under the Trade Practices Act and other State and Territory laws.
Warranty Repair Conditions
Warranty Repair Conditions
A. This warranty only applies provided the product:-
A. This warranty only applies provided the product:-
Has been purchased in Australia and sold by Authorised Distributors or Dealers and only where the products are used
Has been purchased in Australia and sold by Authorised Distributors or Dealers and only where the products are used
and serviced within Australia
and serviced within Australia
Is taken for service when required to an Authorised Service Agent, together with written instructions indicating specific
Is taken for service when required to an Authorised Service Agent, together with written instructions indicating specific
problem or function requiring investigation.
problem or function requiring investigation.
Has valid proof of purchase and presented when warranty service is requested.
Has valid proof of purchase and presented when warranty service is requested.
Has only been used in a domestic application.
Has only been used in a domestic application.
Has been installed and operated in accordance as noted in the operating instructions under normal use and reasonable
Has been installed and operated in accordance as noted in the operating instructions under normal use and reasonable
care (in the opinion of the Service Centre).
care (in the opinion of the Service Centre).
Has not been damaged by the use of accessories which in the opinion of the Service Centre are defective or incompatible
Has not been damaged by the use of accessories which in the opinion of the Service Centre are defective or incompatible
with the product.
with the product.
Has not been tampered with or repaired (including unauthorised alterations) by anyone other than the Telefix or an
Has not been tampered with or repaired (including unauthorised alterations) by anyone other than the Telefix or an
Authorised Service Centre.
Authorised Service Centre.
B. The warranty does not cover:-
B. The warranty does not cover:-
Damage, malfunction or failure resulting from use of incorrect voltages, incorrect installation, accidental damage, misuse,
Damage, malfunction or failure resulting from use of incorrect voltages, incorrect installation, accidental damage, misuse,
neglect, build-up of dirt or dust abuse, wear and tear, maladjustment of customer controls, mains supply problems,
neglect, build-up of dirt or dust abuse, wear and tear, maladjustment of customer controls, mains supply problems,
thunderstorm activity or Acts of God, pixel error, infestation by insects or vermin, exposure to abnormally corrosive
thunderstorm activity or Acts of God, pixel error, infestation by insects or vermin, exposure to abnormally corrosive
conditions or any foreign object or matter having entered the product.
conditions or any foreign object or matter having entered the product.
Mileage or travelling time in respect of service outside the authorised Telefix Service Centre nor pick up and delivery cost
Mileage or travelling time in respect of service outside the authorised Telefix Service Centre nor pick up and delivery cost
incurred.
incurred.
Service calls arising from failure to correctly operate the product or to observe noted instructions, or repair which reveals
Service calls arising from failure to correctly operate the product or to observe noted instructions, or repair which reveals
the product is in normal working order.
the product is in normal working order.
Cabinet parts, user replacement batteries or leads unless the defective items are reported at the time of purchase.
Cabinet parts, user replacement batteries or leads unless the defective items are reported at the time of purchase.
C.
C.
Service calls only apply to Television display devices (CRT, LCD, Plasma) with screen sizes greater than 59cm in the major
Service calls only apply to Television display devices (CRT, LCD, Plasma) with screen sizes greater than 59cm in the major
metropolitan areas of Australia or the normal operating areas of the nearest Authorised Service Centers.
metropolitan areas of Australia or the normal operating areas of the nearest Authorised Service Centers.
D.
D.
Requested service visits to the customer premises will be made during normal working hours of the customary working week
Requested service visits to the customer premises will be made during normal working hours of the customary working week
upon request by the customer. Where such a visit is made on a day arranged by the customer and the service technician is
upon request by the customer. Where such a visit is made on a day arranged by the customer and the service technician is
unable to obtain access to the product, the Service Centre will be entitled to make a separate charge for service call fee, time
unable to obtain access to the product, the Service Centre will be entitled to make a separate charge for service call fee, time
and distance travelled.
and distance travelled.
E. Telefix and its Authorised Service Centres may charge for work done where the product is found to be in good working order.
E. Telefix and its Authorised Service Centres may charge for work done where the product is found to be in good working order.
Example, charges may be made where the problem is found to be due to incorrect setting of customer controls, use of poor
Example, charges may be made where the problem is found to be due to incorrect setting of customer controls, use of poor
associated equipment (e.g. poor antenna systems) or the inability of the product to operate with faulty or incompatible
associated equipment (e.g. poor antenna systems) or the inability of the product to operate with faulty or incompatible
equipment.
equipment.
F.
F.
If the product is sent to an Authorised Service Centre, the owner is responsible for the cost of transport to and from the Service
If the product is sent to an Authorised Service Centre, the owner is responsible for the cost of transport to and from the Service
Centre. In addition, the product is at the owners risk while in transit to and from the authorised Service Centre.
Centre. In addition, the product is at the owners risk while in transit to and from the authorised Service Centre.
G.
G.
No person is authorised to make or give any assertions, statements or undertakings, whether expressed or implied about the
No person is authorised to make or give any assertions, statements or undertakings, whether expressed or implied about the
product other than or additional to the terms of this warranty.
product other than or additional to the terms of this warranty.
original date of purchase covering both parts and labour.
original date of purchase covering both parts and labour.
PLEASE READ INSTRUCTION MANUAL CAREFULLY
PLEASE READ INSTRUCTION MANUAL CAREFULLY
Should you encounter any problems?
DO NOT RETURN THIS PRODUCT TO THE STORE OF PURCHASE
DO NOT RETURN THIS PRODUCT TO THE STORE OF PURCHASE
Please contact Telefix for Warranty Support
Please contact Telefix for Warranty Support
The original proof of purchase must be kept and produced for service requirements.
The original proof of purchase must be kept and produced for service requirements.
Should you encounter any problems?
1300 366 144
1300 366 144
Email: warrantyhelp@awa.com.au
Email: warrantyhelp@awa.com.au
Page 20

 Loading...