

Page 1
Page 2
1
GB
Precautions
To avoid injuries and damage to property, please read the following precautions carefully and use
the product accordingly.
Precautions are classified into Warning, Caution and Note according to their priorities.
The company shall not be held liable for any injury or damage caused by failure to follow the precautions.
If the user fails to follow instructions marked with this symbol, personal injury,
possibly fatal, may result.
If the user fails to follow instructions marked with this symbol, personal injury
may result.
If the user fails to follow instructions marked with this symbol, minor personal
injury, or damage to the product or property may result.
Page 3
2
WARNING
If the user fails to follow the instructions below, personal injury, possibly fatal, may result.
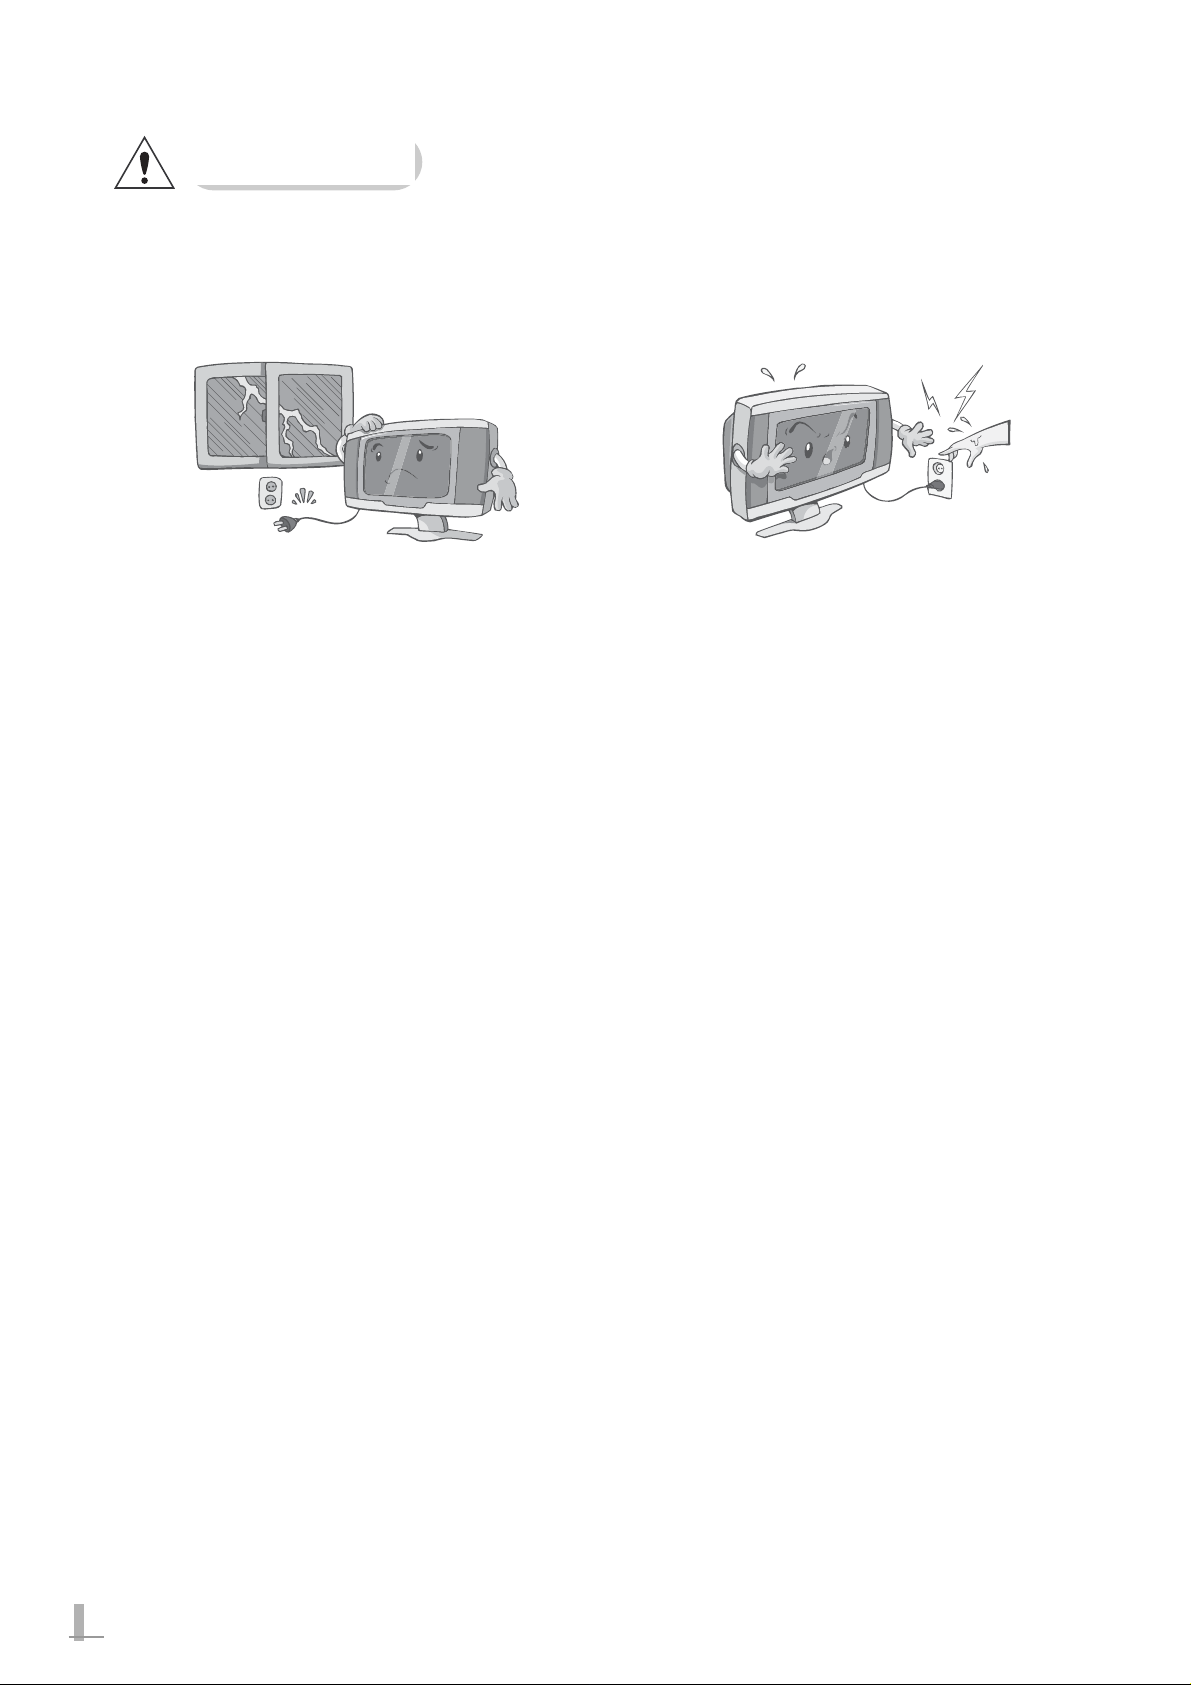
Lightning
In case of lightning, immediately turn the system
off and disconnect the power cord from the wall
outlet. Never touch the antenna cable when
there is lightning. There is danger of electric
shock or damage to the product.
Power Plug
Never touch the power plug with wet hands.
There is a danger of electric shock.
Power Cord
Do not place heavy objects on the power cord.
Avoid cutting, bending, pulling, heating or twisting the power cord. There is a danger of electric
shock or fire.
Power Specification
Supply power according to the power specification of the product.
Incorrect power supply may cause a fire or
damage to the product.
Abnormal States
If the product emits smoke, unusual noises, or
smells of burning, or if liquid gets into the
product, turn the system off immediately,
disconnect the power plug from the wall outlet,
and contact your service center.
There is a danger of fire or damage to the product.
Page 4
3
GB
CAUTION
If the user fails to follow the instructions below, personal injury may result.
Product Installation
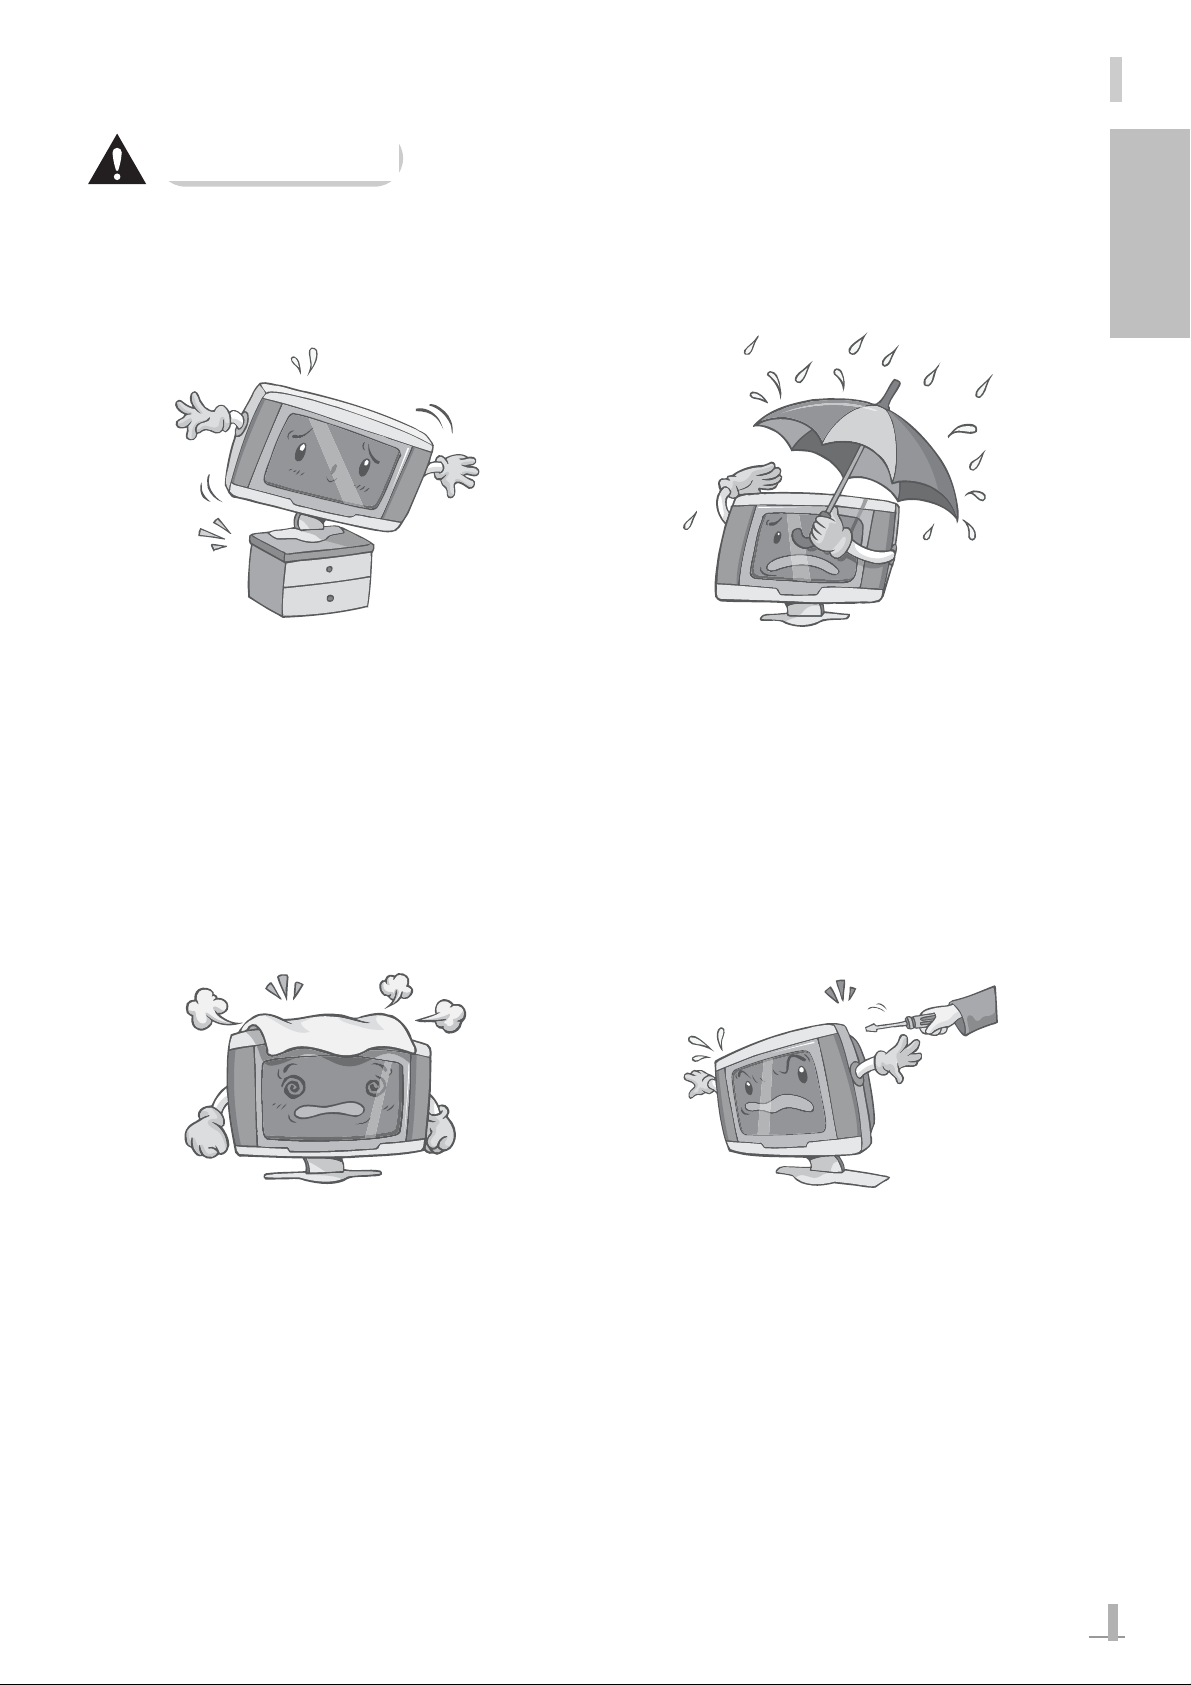
Do not install in unstable places, for example on
a stand that is smaller than the product. If the
product falls it may injure the user or be damaged.
Do not install the product in places without ventilation. It may cause a fire or damage to the
product.
Ventilation
Make sure the product's vents are not blocked
by a tablecloth or curtain. It may cause a fire or
damage to the product.
Cable Installation
Do not install the cables where people normally
walk. Users may trip on the cables or damage
the product.
Avoid Liquid or Moisture
Avoid dripping or splashing water onto the product. In particular do not use the product outdoors when it is raining or snowing, or near
water. There is a danger of electric shock or
damage to the product.
Do Not Modify
Do not disassemble, or attempt to fix or modify
the product. There is a danger of electric shock
or damage to the product.
Do Not Heat the Product
Do not heat the product. It may cause a fire or
damage to the product.
Page 5
4
NOTE
If the user fails to follow the instructions below, minor personal injury or damage to the product or
property may result.
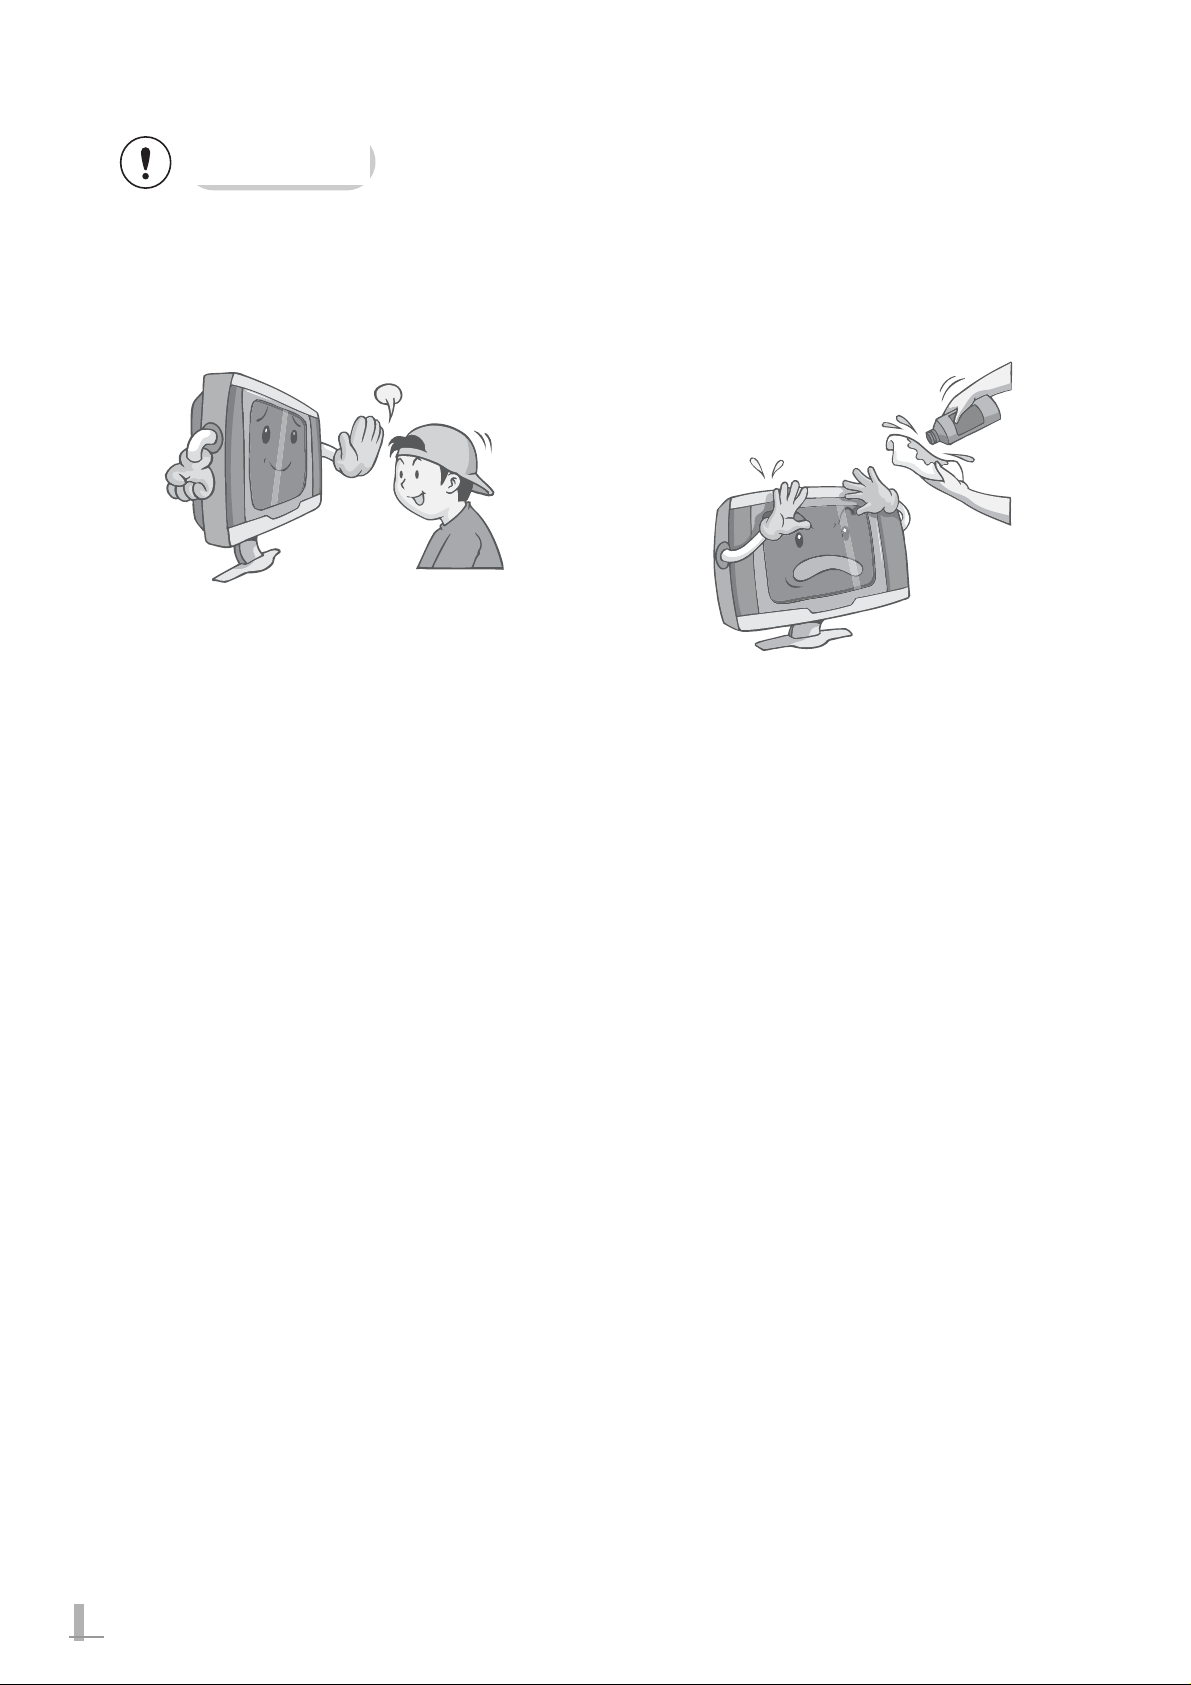
Using the Product
Keep a reasonable distance from the product
when watching it.
Continuous viewing from too close distance
may harm your eyesight.
Cleaning the Product
Do not spray water or cleansing solutions onto
the surface of the product. Never wipe with
chemical solutions such as benzene, paint thinner and acetone. These may cause discoloration or harm the surface coating.
Clean the product lightly with a soft dry cloth or
towel.
Page 6

5
GB
Caring for the Product
Disconnect the power cord from the wall outlet if you do not intend to use it for a long period of time.
There is a danger of leakage of electricity or fire.
Unsuitable Places for Product Operation
Do not use this product in the following places, or the product may malfunction or be damaged.
• Where the temperature is lower than 5°C or higher than 35°C.
• Where relative humidity is lower than 30% or higher than 80%.
• In dusty places.
• In places exposed to rain.
• In places where there is magnetism, or metal, or where there are other electrical appliances.
• Where there is an electric motor or engine that may produce electrical interference.
• Where there is strong electromagnetism, such as near a cell phone repeater.
• Where there is anything flammable.
Installation and Operation
• Make sure to connect any external devices to this product before connecting power to the
product and any external devices. Otherwise the product may malfunction or be damaged.
• Avoid subjecting the product to strong impact. It may damage the product or cause it to
malfunction.
• Uneven power supply due to natural disaster or power failure may cause the product to
malfunction.
• Do not clean the product when it is turned on. It may damage the product or cause it to
malfunction.
• If this product suffers severe damage or comes to the end of its life, dispose of it in
accordance with your local authority regulations.
Page 7

6
Table of Contents
Precautions.......................................................1
WARNING.............................................2
CAUTION..............................................3
NOTE....................................................4
Table of Contents .............................................6
Features............................................................7
Contents ...........................................................8
Parts and Their Functions................................9
Front Panel...........................................9
Rear Panel...........................................10
Remote Control....................................11
Replacing the Batteries........................13
Connections.....................................................14
Connecting an External Aerial.............14
Connecting a Cable
Television Network ...............................14
Connecting External Input
Devices ................................................15
Connecting a DVD Player ................16
Connecting a Computer
(D-SUB)............................................16
Connecting a Power Cord...................17
Basic Operations .............................................18
Switching Your TV On and Off.............18
Selecting Input Source.........................19
Selecting Channel................................20
Adjusting the Volume ...........................21
Teletext.................................................22
Settings............................................................24
PICTURE.............................................24
Video Adjust......................................24
Video NR (Noise Reduction)............25
Screen Raito .....................................26
SOUND................................................27
Balance.............................................27
Effect.................................................28
AVL (Auto Volume Level)..................29
Surround...........................................29
TV ........................................................30
Auto Tuning.......................................30
Manual Tuning..................................31
Fine Tuning.......................................32
Edit ...................................................33
SETUP.................................................34
Language..........................................34
Time..................................................35
OSD Off Time...................................36
OSD Half Tone..................................37
Reset ................................................37
ANALOG..............................................38
PC Adjust..........................................38
Brightness/Contrast..........................39
Temperature......................................39
Auto Balance ....................................40
Troubleshooting...............................................41
Specifications...................................................42
Page 8

7
GB
Features
Modern Design
The graceful modern style will enhance your prestige.
Analog Interface
Analog interface is supported so that you can connect up any input or output devices.
Vivid Color on TV with SCART Interfaces
Enjoy sharp color images via SCART interfaces.
Page 9
8
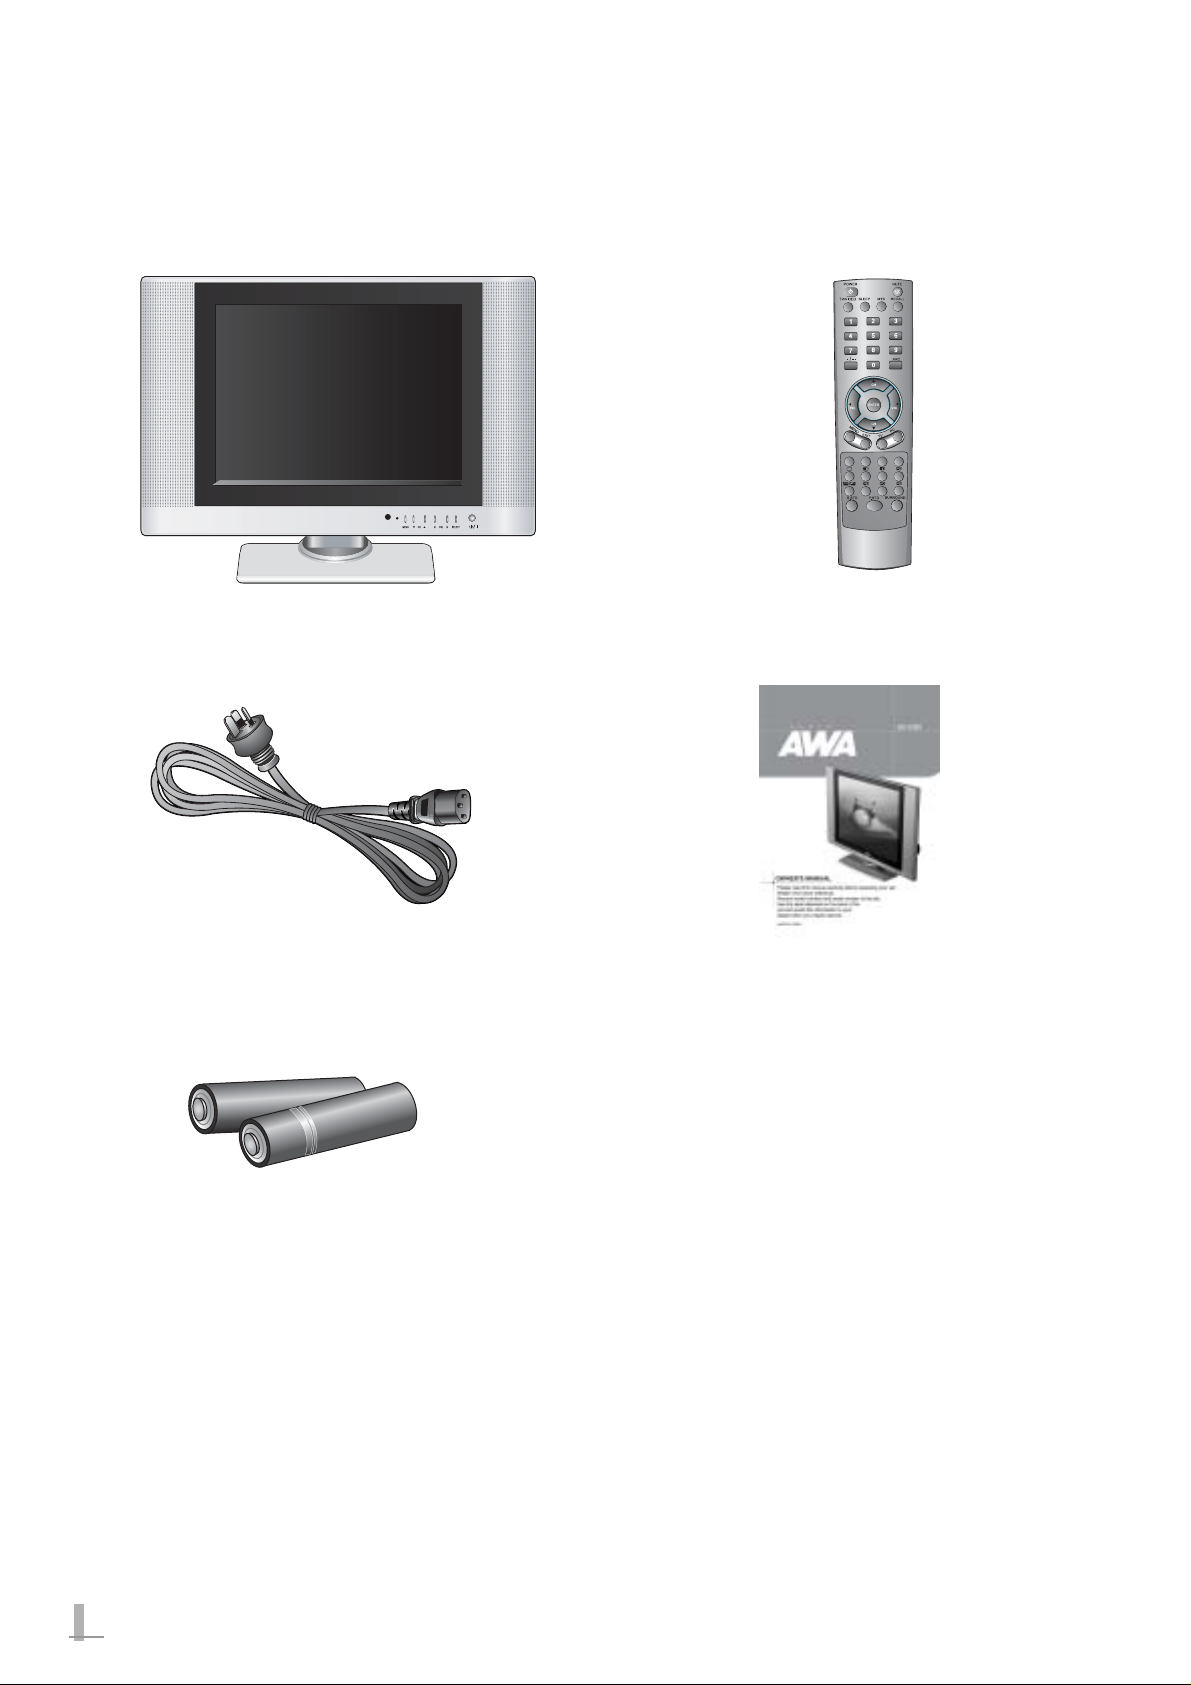
Contents
TV
Remote Control
Power Cord
Remote Control Battery (AAA) 2EA
User's Manual
Page 10
9
GB
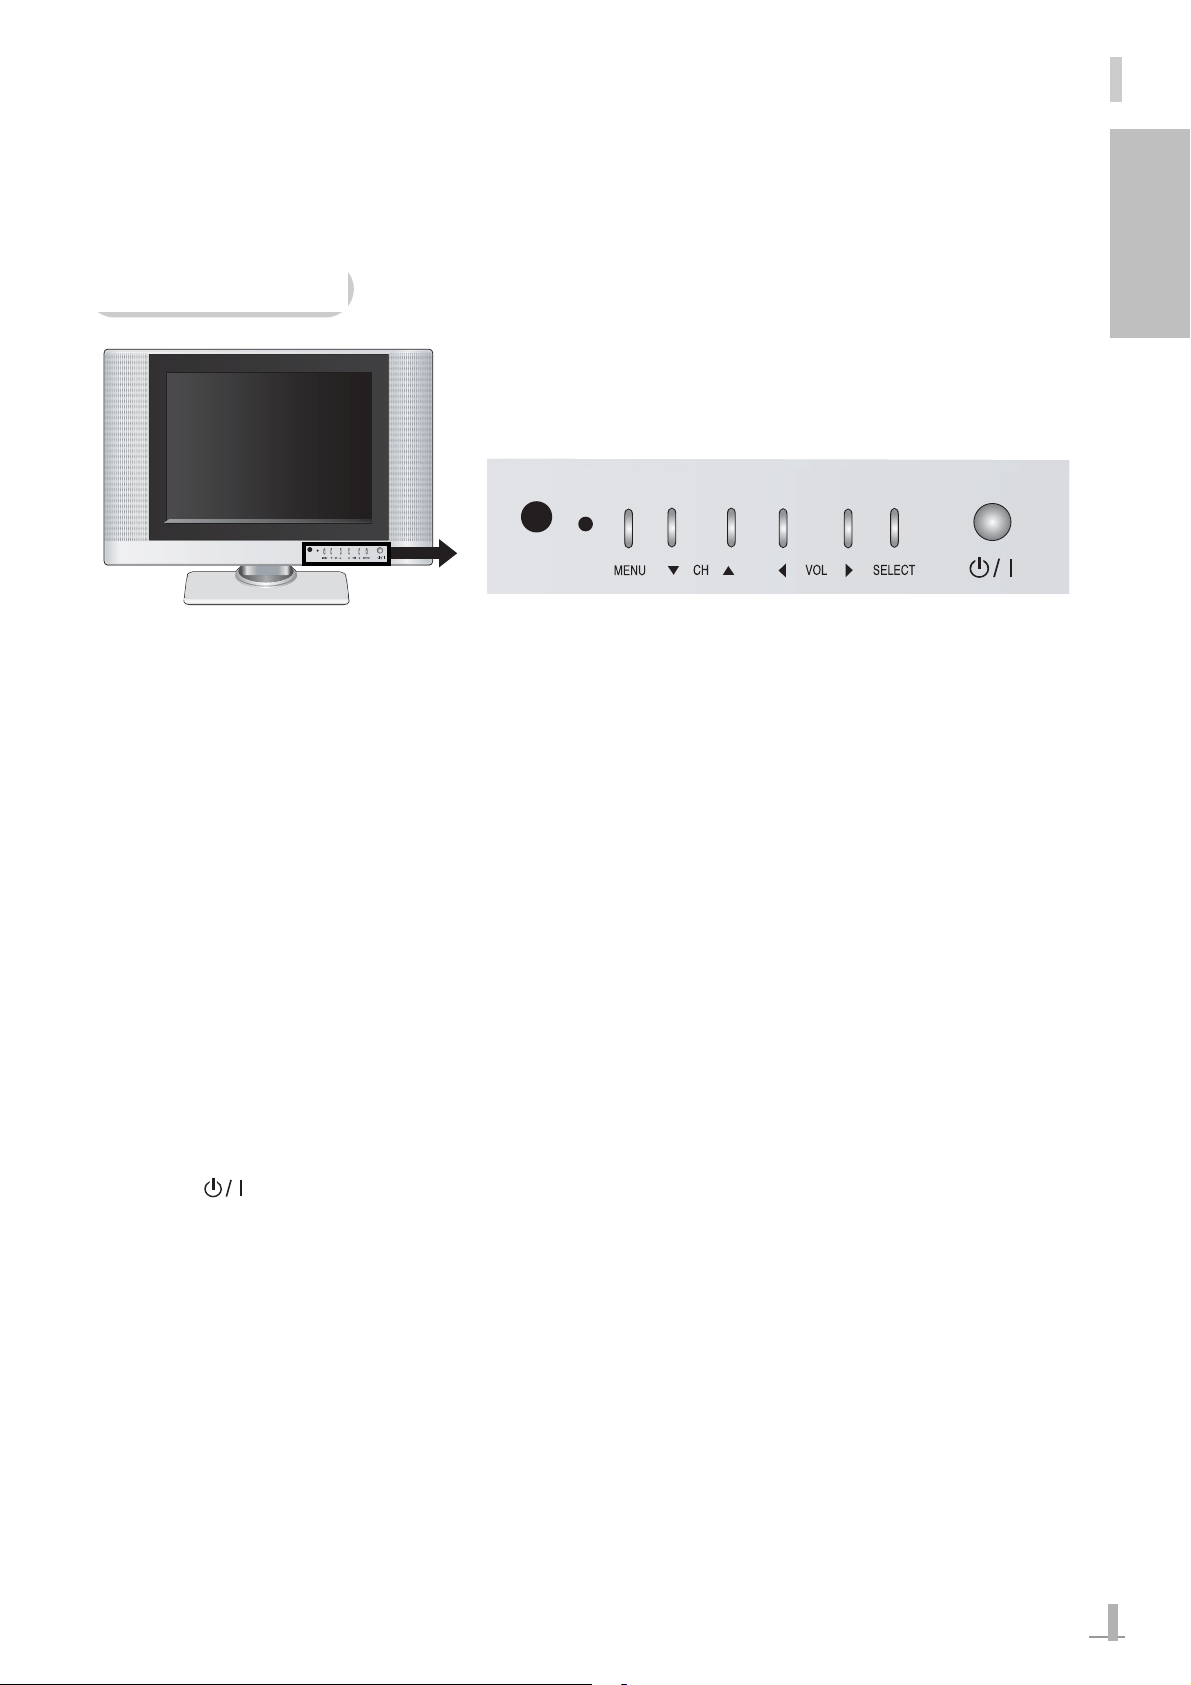
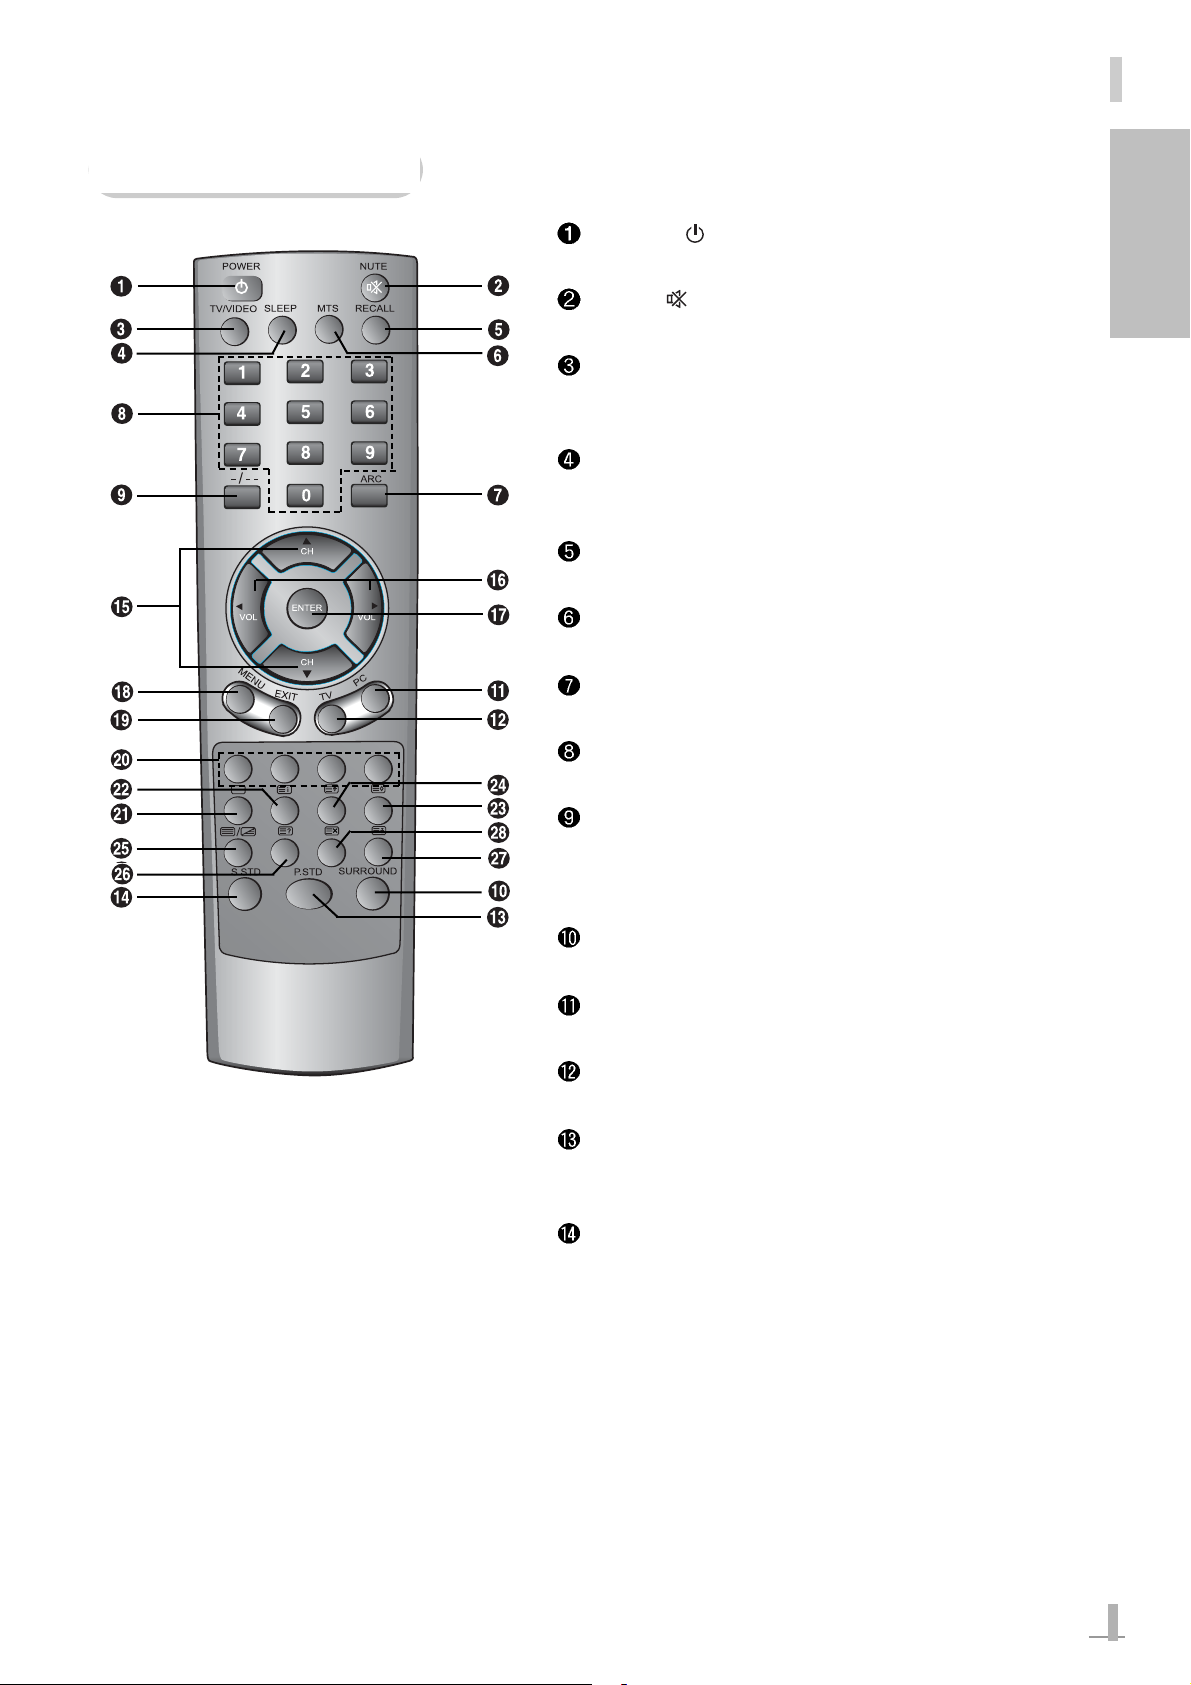
Parts and Their Functions
Front Panel
(1) (2) (3) (4) (5) (6) (7)
(1) Remote Control Sensor
(2) Power LED
The Power LED shows the current power status.
The Power LED lights yellow when you connect the power cord (standby mode) and turns to
green when you turn the power on.
(3) MENU Button
Press this button to display the main OSD menu or to exit from a sub menu.
(4)
CH
Press these buttons to select a TV channel or an OSD menu. In addition, you can adjust
con figuration values using these buttons.
(5) VOL
Press these buttons to adjust the volume or to select an OSD menu. In addition, you
can adjust configuration values using these buttons.
(6) SELECT Button
Press this button to select an input source or an OSD sub menu.
(7) Power ( ) Button
Press this button to turn the TV on or off (standby mode).
Page 11
10
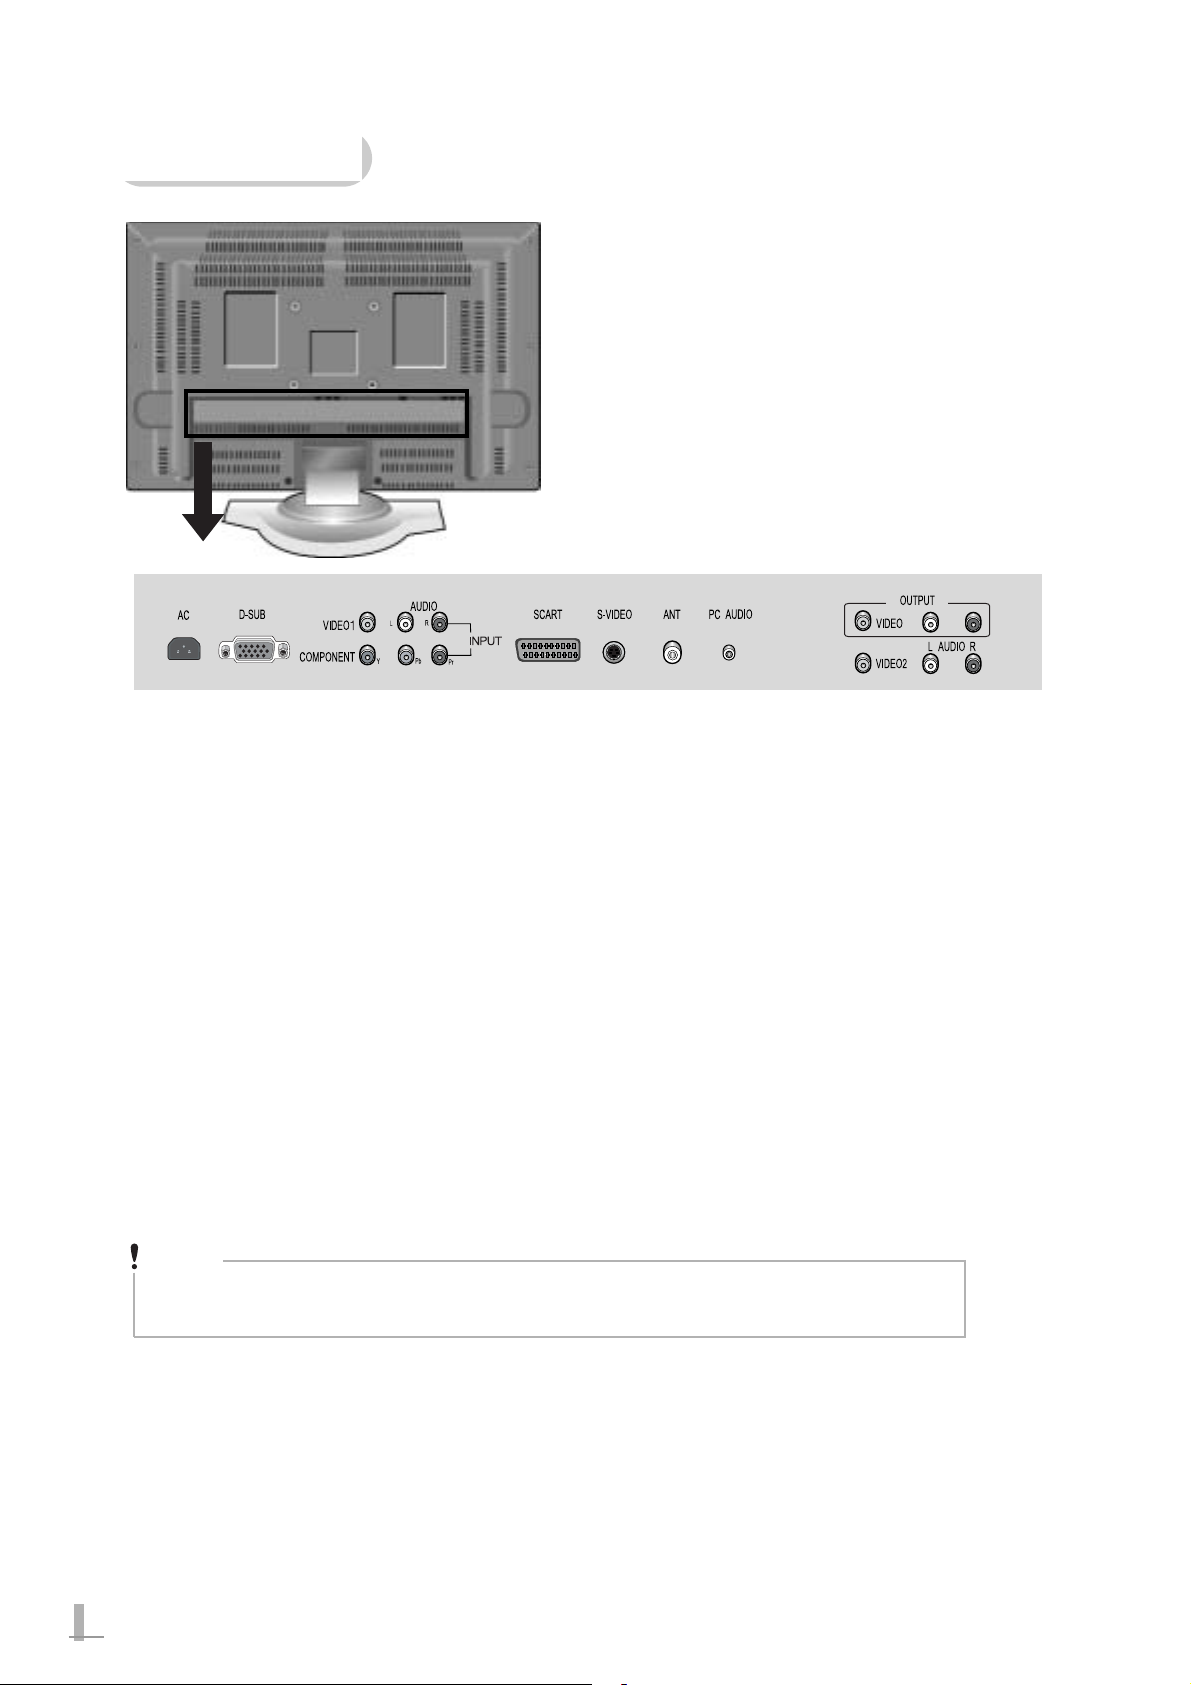
Rear Panel
(1) AC inlet
(2) D-SUB port (15-pin Analog RGB)
(3) COMPOSITE VIDEO 1 INPUT
(4) COMPONENT (Y/Pb/Pr)
(5) SCART
(6) S-VIDEO
(7) ANT.(RF)
(8) PC AUDIO
(9) VIDEO OUTPUT
(10) COMPOSITE VIDEO 2 INPUT
(1)
(2) (4)
(5)
(6)
(7)
(8)
(3)
(10)
Note
SOUND L/R port of VIDEO1 input is used for both of the S-VIDEO and
COMPONENT.
(9)
Page 12
11
POWER ( ): Press this button to turn the TV
on or off.
MUTE ( ): Press this button to mute the sound
temporarily.
TV/VIDEO: Press this button to view all available
input sources (e.g. SCART, VIDEO, S-VIDEO,
COMPONENT, RGB-PC, and Aerial).
SLEEP: Press this button to setup the Sleep
timer to turn the TV off automatically when the
set time has passed.
RECALL: Press this button to view the current
channel as well as the audio/video settings.
MTS: Press this button to set the TV audio to
stereo or mono.
ARC: Press this button to select the screen
aspect ratio (NORMAL/16:9/ZOOM1/ZOOM2).
Numeric Buttons: Use these buttons to directly
select a channel.
-/-- Button: Press to directly move to a channel
number saved in the channel list.
-: channel 0~9
--: channel 10~99
SURROUND: Press this button to select a
surround mode.
PC: Press this button to select a PC as the input
source.
TV: Press this button to select TV as the input
source.
P.STD: Press this button to set video settings
(STANDARD/DYNAMIC/MOVIE/MILD/GAME/
USER).
S.STD: Press this button to set audio settings
(FLAT/MUSIC/MOVIE/SPEECH/USER).
GB
Remote Control
Page 13
12
CH : Press these buttons to select a TV channel or a channel that provides Teletext service.
In addition, you can select a menu item or a configuration value using these buttons.
VOL: Press these buttons to adjust the volume.
In addition, you can select a menu item or a configuration value using these buttons.
ENTER: Press this button to select an OSD menu sub.
MENU: Press this button to view the OSD menu.
EXIT: Press this button to exit the current menu.
Color Buttons: Use these buttons to select a menu corresponding to the color.
: Press this button to activate or cancel the Teletext function.
: Press this button to view the Teletext index page.
: Press this button to view a Teletext sub page.
: Press this button to adjust the Teletext screen size.
: Press this button to view the TV program and the Teletext page at the same time.
: Press this button to show the hidden text of the Teletext screen.
: Press this button to pause the Teletext page.
: Press this button to cancel the Teletext related settings.
Page 14
13
GB
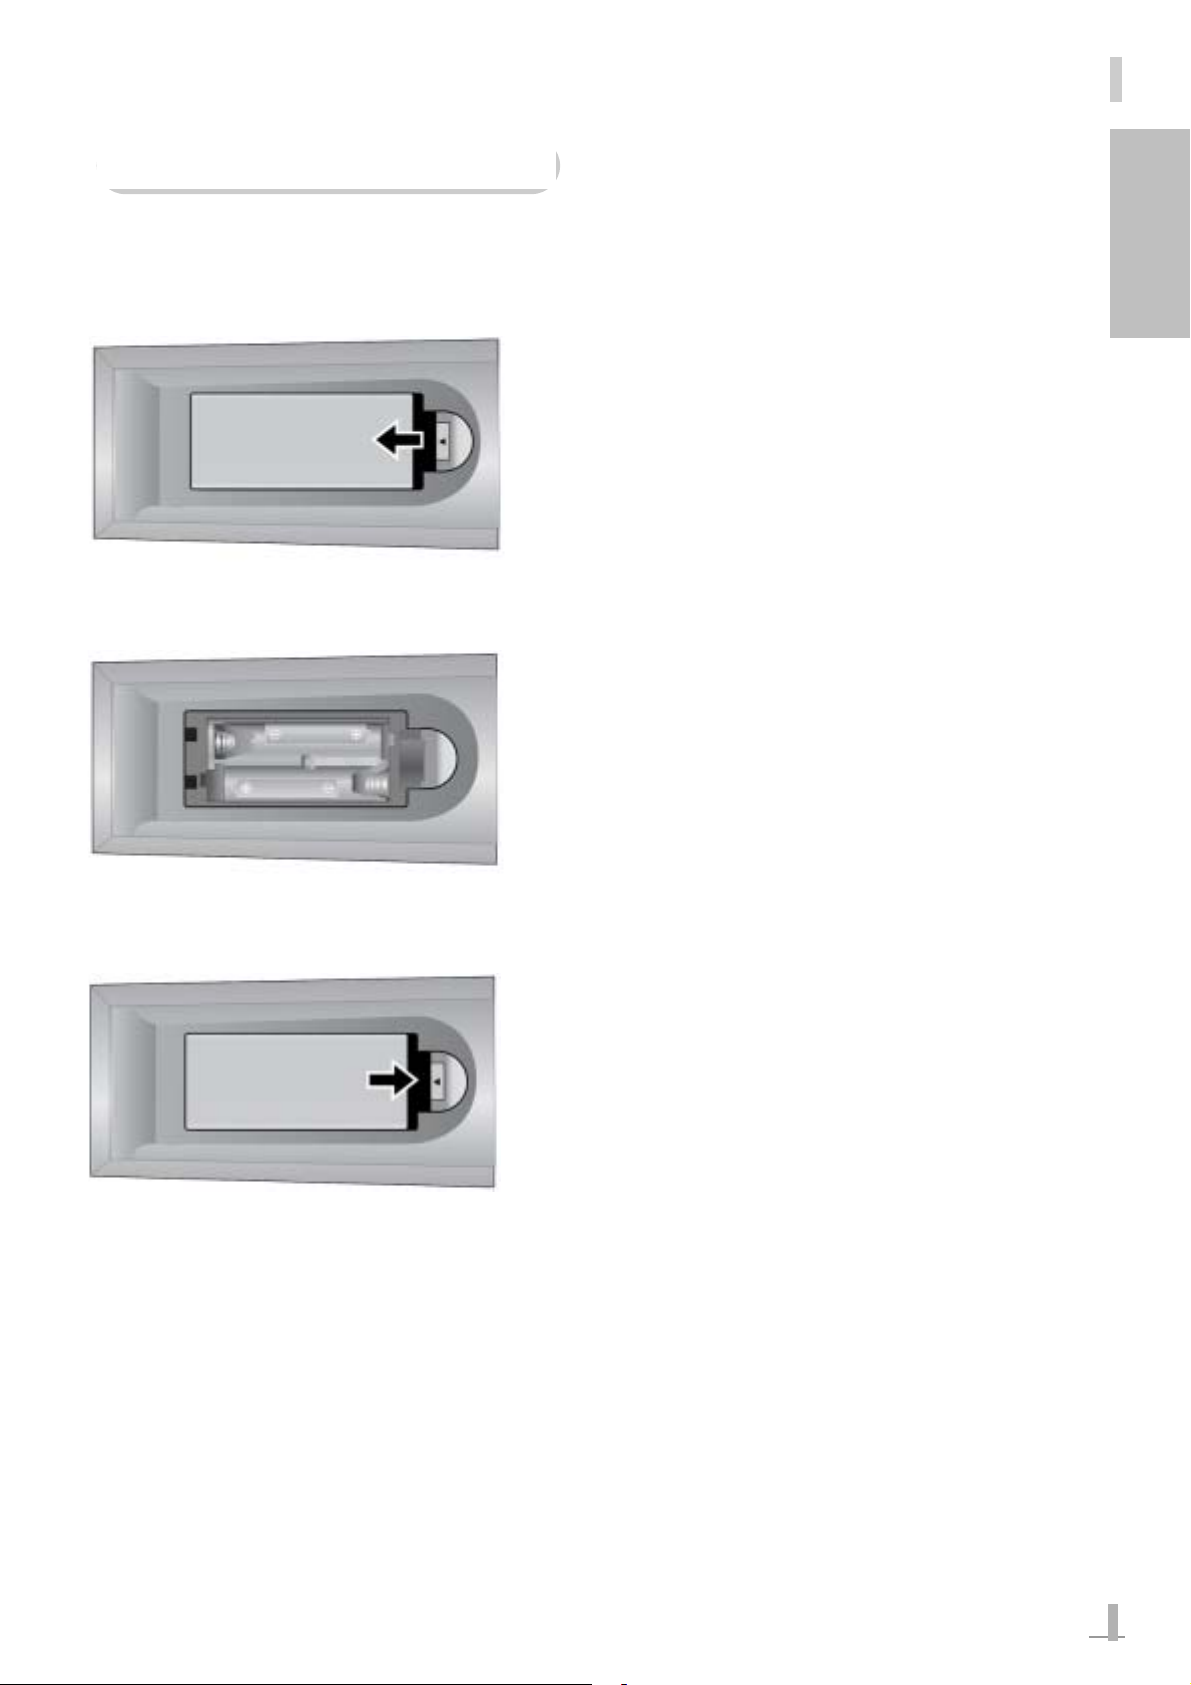
Replacing the Batteries
If the remote control malfunctions, replace the batteries referring to the following descriptions.
1. Remove the cover of the remote control.
2. Insert 2 batteries (AAA size), taking care to respect the polarities.
3. Close the cover.
Page 15

14
Connections
Connecting an External Aerial
To use an outdoor aerial, connect the aerial and the ANT. port at the rear of the TV with coaxial
cable. If your apartment provides an internal aerial port, connect it to the ANT. port at the rear of the
TV with coaxial cable.
Caution
Before connecting other devices to the product, make sure that the power cord is not connected
to a wall outlet. Connecting external devices to the product when its power cord is already connected to a wall outlet may cause electric shock or damage to the product.
Note
Coaxial cable is not supplied with the product.
Connecting a Cable Television Network
Note
Coaxial cable is not supplied with the product.
Connect the coaxial cable for the cable television network to the ANT. port at the rear of the TV.
Page 16

15
GB
Connecting External Input Devices
1.Connect the Composite VIDEO OUTPUT jack of the external device and the Composite VIDEO
INPUT 1 or 2 jack of the TV with the RCA cable. (Yellow - Video, White - Audio L, Red - Audio R)
2.Connect the SCART port of the external device and the SCART port of the TV with a SCART
cable.
3.If the external device provides an S-VIDEO interface, connect the S-VIDEO jack of the
external device and the S-VIDEO jack of the TV with an S-VIDEO jack.
Note
The SCART cable is not supplied with the product.
Page 17

16
1.Connect the Component jacks (Y/Cb/Cr or Y/Pb/Pr) of the DVD player and the Component jacks
(Y/Pb/Pr) of the TV with the RCA cable.
2.Connect the Composite AUDIO OUTPUT jack of the DVD player and the Composite VIDEO
INPUT 2 jack of the TV with the RCA cable. (Audio Only, White - Audio L, Red - Audio R)
1.Connect the D-SUB port of the computer and the D-SUB port of the TV with the D-SUB cable.
2.Connect the AUDIO OUT port of the computer and the PC AUDIO jack of the TV with the
audio cable.
Note
The audio cable is not supplied with the product.
Connecting a DVD Player
Connecting a Computer (D-SUB)
Page 18

17
GB
Connecting a Power Cord
Connect the power cord to the AC inlet of the TV and then connect the power cord to the wall outlet
to supply power to the unit.
Notice
Connect the power cord to the wall outlet only after connecting the antenna,
external input devices, DVD player, computer, etc. There is a danger of electric
shock or damage to the product.
Note
The shape of plug may vary depending on your country.
Page 19

18
Basic Operations
Switching Your TV On and Off
The procedures to switch the TV on and off are described below.
1.Make sure that the power cord has been connected to the wall outlet.
When the power cord is connected, the Power LED on the TV light in red.
2.To switch the TV on, press the Power ( ) button on the front panel of the TV or the remote
control.
When the TV is turned on, the Power LED changes to green.
3.To switch your TV off, press the Power ( ) button on the front panel of the TV or the remote
control once again.
When the TV is turned off, the Power LED changes to red.
Note
After switching the TV on, select your desired language (English, German,
French, Spanish, Italian, Portuguese). For more detailed information about procedures to configure language, refer to “Language” on page 34. The default
language is English.
Page 20

19
GB
Selecting Input Source
The procedures to select input source are described
below.
1.Press the TV/VIDEO button.
2.The TV/VIDEO list is displayed on the screen.
3.Select a desired source by using the and
buttons and then press the ENTER button.
4.The selected input source will be displayed on
the screen.
Note
You can easily select TV or PC as an input
source by pressing the corresponding shortcut
key on the remote control.
Page 21

20
Selecting Channel
The procedures to change channels are described
below.
1.Turn the TV on and configure the input source to
TV.
2.If you already know the configured channel
number, select the desired channel by pressing
the numeric buttons on the remote control.
The program broadcast on the selected
channel will be displayed on the screen.
3.To view configured channels in sequence,
select a channel by using the
and buttons
on the front panel of the TV or the remote
control.
4.The program broadcast on the selected
channel will be displayed on the screen.
Note
If channels have not been configured, configure
them by referring to “TV” on page 30.
Page 22

21
GB
Adjusting the Volume
The procedures to adjust the volume are described
below.
1.Adjust the volume by using the and
buttons on the main body or the remote control.
The current volume level will then be displayed
on the screen.
2.Press the MUTE button to mute the sound
temporarily.
To cancel the mute function, press the MUTE
button once again.
52
Page 23

22
Teletext
Most channels carry Teletext, pages of text messages of real-time news, weather forecasts, and
sports results, etc.
The Teletext pages are organized into the following parts.
A: Selected Page Number
B: Broadcasting Station Name
C: Current Page Number or Search Status.
D: Date and Time
E: Text
F: Option Menus
To view Teletext information
1.Turn the TV on and change the source to TV.
2.Select a channel providing the Teletext service.
(See “Selecting Channel” on page 20.)
3.Press the button once. The Teletext page will
then appear.
Press the button once again. The actual
broadcast is simultaneously displayed with the
Teletext page.
4.Press the button to exit Teletext.
The actual broadcast will then be displayed on
the screen.
Page 24

23
GB
The following 4 color buttons are used for Teletext.
The functions of the buttons are determined subject
to the corresponding page.
• RED Button
• GREEN Button
• YELLOW Button
• BLUE Button
• : Shows or hides the Teletext page.
• : Moves to the index page.
• : Doubles the screen font size.
• : You can move to a sub-page by entering a
4-digit number.
• : Shows Teletext information and
normal broadcast channel simultaneously.
• : Shows hidden text (e.g. an answer in a Quiz
program).
• : This function enables watching the TV while
searching for the TTX page.
• : Pauses the Teletext page.
Page 25

24
PICTURE
Using this menu, you can setup basic screen functions. The supported sub menus include Video
Adjust, Video NR and Screen Ratio.
Note
You can only configure activated OSD menus according to the type of source.
1.Press the MENU button.
The OSD menu will be displayed.
2.Select PICTURE by using the and
buttons.
3.Select Video Adjust, Video NR or Screen Ratio
by using the
and buttons and then press
the
button.
Procedures to configure each of the functions are described below.
Video Adjust
1.Select Video Adjust by using the and
buttons and then press the button.
2.Select a desired Video Setting by using the
and buttons.
You can select a video setting from STANDARD,
DYNAMIC, MOVIE, MILD, GAME and USER.
3.Press the MENU button to return to the high-level
menu.
4.To finish the configuration, press the EXIT button.
Using this sub menu, you can select an appropriate video mode according to the video genre -e.g.
TV, movie, video game, etc.
Note
For all video modes except USER mode, the
Brightness, Contrast, Color, Sharpness and Tint
settings are pre-determined, and you cannot
change them.
Settings
Note
No input of buttons for more than 10 seconds when the OSD is displayed hides
the OSD menu.
Page 26

25
GB
If you select USER mode
1.Select Brightness, Contrast, Color, Sharpness or Tint
using the
and buttons and then press the
button.
2.Adjust the configuration value by using the and
buttons.
3.Press the MENU button to return to the high-level
menu.
4.To finish the configuration, press the EXIT button.
Note
To return to the high-level menu, press the MENU button.
Note
The Tint item will only be displayed in NTSC mode.
Note
To change the Video Setting more easily, press
the P.STD on the remote control once. When
you press the P.STD button, the Video Setting
changes to STANDARD, DYNAMIC, MOVIE,
MILD, GAME and USER in sequence.
Video NR (Noise Reduction)
1.Select Video NR by using the and buttons
and then press the
button.
2.Select either ON or OFF by using the and
buttons.
3.Press the MENU button to return to the high-level
menu.
4.To finish the configuration, press the EXIT button.
This function reduces noise on the screen.
Note
To return to the high-level menu, press the MENU button.
Page 27

26
Screen Ratio
1.Select Screen Ratio by using the and
buttons and then press the button.
2.Select a desired screen ratio by using the and
buttons.
You can select NORMAL, 16:9, ZOOM1, or ZOOM2.
3.Press the MENU button to return to the high-level
menu.
4.To finish the configuration, press the EXIT button.
Using this sub menu, you can change the aspect ratio.
Note
To return to the high-level menu, press the MENU button.
Note
To change the screen ratio more easily, press
the ARC button on the remote control once.
When you press the ARC button, the screen
ratio changes to NORMAL, 16:9, ZOOM1, and
ZOOM2 in sequence.
Page 28

27
GB
SOUND
Using this menu, you can configure the audio settings. Supported sub menus include Balance,
Effect, AVL and Surround. You can select a sub menu according to the procedures below.
1.Press the MENU button. The OSD menu will be
displayed.
2.Select SOUND by using the and buttons.
3.Select Balance, Effect, AVL or Surround by
using the
and buttons and then press the
button to configure the selected sub menu.
Procedures to configure each of the functions are described below.
Balance
1.Select Balance by using the and but
tons and then press the
button.
2.Configure the balance setting to your desired
value by using the
and buttons.
3.Press the MENU button to return to the high-level
menu.
4.To finish the configuration, press the EXIT button.
Note
To return to the high-level menu, press the MENU button.
Using this sub menu, you can configure the balance of the volume of the TV.
Page 29

28
Note
To return to the high-level menu, press the MENU button.
Effect
1.Select Effect by using the and buttons
and then press the
button.
2.Select a desired Effect Setting by using the
and buttons.
You can select FLAT, MUSIC, MOVIE, SPEECH
or USER.
For all modes except USER, the Bass
and Treble settings are preset and they are not
configurable.
If you select the USER Effect Setting, you can
configure the Bass and Treble settings by using
the
and buttons. To configure the setting,
select a desired setting to configure and then
press the
button. Configure the setting to a
desired value by using the
and buttons.
3.Press the MENU button to return to the high-level
menu.
4.To finish the configuration, press the EXIT button.
Using this sub menu, you can configure the sound mode for each genre, - e.g. TV, Movie, Music,
etc.
Note
To change the Effect Setting more conveniently,
press the S.STD button on the remote control
once. When you press the S.STD button, the
Effect Setting is changed to FLAT, MUSIC,
MOVIE, SPEECH and USER in sequence.
Page 30

29
GB
AVL (Auto Volume Level)
1.Select AVL by using the and buttons
and then press the
button.
2.Select either ON or OFF by using the and
buttons.
3.Press the MENU button to return to the high-level
menu.
4.To finish the configuration, press the EXIT button.
The AVL function automatically suppresses sound that is louder than that of a normal broadcast program. This function is useful especially when an advertisement is broadcast.
Note
To return to the high-level menu, press the MENU button.
Surround
1.Select Surround by using the and
buttons and then press the button.
2.Select either ON or OFF by using the and
buttons.
3.Press the MENU button to return to the high-level
menu.
4.To finish the configuration, press the EXIT button.
Note
To return to the high-level menu, press the MENU button.
Page 31

30
TV
Using this menu, you can configure the TV function. Supported sub menus include Auto Tuning,
Manual Tuning, Fine Tuning, Edit and Sound.
1.Press the MENU button. The OSD menu will be
displayed.
2.Select TV by using the and buttons.
3.Select Auto Tuning, Manual Tuning, Fine Tuning,
Edit or Sound System by using the
and
buttons and then press the button.
Procedures to configure each of the functions are described below.
Auto Tuning
This function automatically searches for channels and allocates empty program numbers to the
channels found.
1.Select Auto Tuning by using the and
buttons and then press the button.
2.Select a desired option by using the and
buttons and press the ENTER button to start
Auto Tuning function that searches for the
channels and allocates empty program numbers
to the channels found.
You can select an option from SECAM L and
PAL/SECAM.
The number of the channels found while running
Auto Tuning will be displayed on the left side
of the progress bar. The progress status of the
search operation is displayed by the percentage
figure on the right side of the progress bar
(00~99). To cancel Auto Tuning while it is
running, press the MENU or ENTER button.
When the configuration is completed, the
channel list will be displayed. The Program
Number, Station Name, and Whether to Skip
when you select a program will be displayed.
3.To finish the configuration, press the EXIT button.
Page 32

31
GB
Manual Tuning
1.Select Manual Tuning by using the and
buttons and then press the button.
2.Select a program number that will be used as the
standard for channel search by using the
and buttons.
You can select a program number between P00
and P99.
3.Select Color by using the and buttons
and then press the
button to configure the
color of the channel(COLOR SYSTEM).
4.Configure the setting by using the and
buttons.
You can select, SECAM L or PAL/SECAM.
5.Press the MENU button to return to the
high-level menu.
6.Select Sound by using the and
buttons and press the button to configure the
sound for the channel(SOUND SYSTEM).
7. Select a desired configuration value by using the
and buttons.
You can select BG, I, DK or L.
8.Press the MENU button to return to the
high-level menu.
9.Select Search by using the and
buttons and then press the button. Select a
new channel by using the
and buttons.
10.Select Storage by using the and
buttons and then press the button. Select a
program number to allocate to the channel by
using the
and buttons.
Using this sub menu, you can manually select a channel and allocate an empty program number to
the channel.
P A L / S E C A M
Page 33

32
11. Press the OK button to save the channel and
return to the high-level menu.
12. Select a Station Name by using the and
buttons and press the button to rename the
selected station.
Enter letters (A~Z), number (0~9) and special
characters (-, blank) by using the
and
buttons moving the cursor position by using
the
and buttons.
13. Press the OK button to save the channel and
return to the high-level menu.
14. To finish the configuration, press the EXIT
button.
Note
To return to the high-level menu, press the MENU button.
Fine Tuning
1.Select Fine Tuning by using the and
buttons and then press the button.
2.Configure a desired value by using the and
buttons.
You can select a value between -32 and +32.
3.Press the MENU button to return to the high-level
menu.
4.To finish the configuration, press the EXIT button.
When a channel is not clearly displayed, you can tune the channel using the Fine Tuning menu.
Note
To return to the high-level menu, press the MENU button.
Page 34

33
GB
Edit
1.Select Edit by using the and buttons
and then press the
button.
The edit screen will then be displayed.
2.Select a program to change by using the , ,
and buttons.
3. Press the color button (R, G, Y, B) on the remote
control to select the ERASE (R), SKIP (G),
INSERT (Y) or REPLACE (B) options.
• ERASE: This option erases the selected
program.
• SKIP: This option determines whether to skip
the selected channel.
(N : Do not skip, Y : Skip)
• INSERT: The option copies the selected
channel and inserts the channel in front of
the following channel.
• REPLACE: This option replaces the selected
channel with a channel you want.
4. Press the MENU button to return to the high-level
menu.
5. To finish the configuration, press the EXIT button.
Using this sub menu, you can change a program number, rename a station or determine whether to
SKIP when a program is selected.
Note
To return to the high-level menu, press the MENU button.
Page 35

34
SETUP
Using this menu, you can configure basic settings. Supported sub menus include Language, Time,
OSD Off Time, OSD Half Tone and Reset.
1.Press the MENU button. The OSD menu will be
displayed.
2.Select SETUP by using the and buttons.
3.Select from the Language, Time, OSD Off
Time, OSD Half Tone and Reset sub menus by
using the
and buttons and then press the
button.
Language
1.Select Language by using the and
buttons and then press the button.
2.Select a desired language by using the and
buttons.
3. Press the MENU button to return to the
high-level menu.
4.To finish the configuration, press the EXIT button.
Using this sub menu, you can select an OSD language. Supported languages include English,
German, French, Spanish, Italian and Portuguese.
Procedures to configure each of the functions are described below.
Note
To return to the high-level menu, press the MENU button.
Page 36

35
GB
Time
To configure the current time
1.Select Time by using the and buttons and then press the button.
2. Select Time Set by using the and buttons and then press the button.
3. Configure the current time by using the , , and buttons.
4.Press the MENU button to return to the high-level menu.
5.To finish the configuration, press the EXIT button.
To configure the automatic On timer
1.Select On Time by using the and buttons and then press the button.
2.Configure the automatic On timer by using the , , and buttons and select ON to
activate the On timer.
3. Press the MENU button to return to the high-level menu.
4.To finish the configuration, press the EXIT button.
To configure the automatic Off timer
1.Select Off Time by using the and buttons and then press the button.
2.Configure the automatic Off timer by using the , , and buttons and select ON to
activate the Off timer.
3. Press the MENU button to return to the high-level menu.
4.To finish the configuration, press the EXIT button.
Using this sub menu, you can configure the current time, the automatic On/Off timers and the Sleep
timer.
Note
If On Time is configured to OFF, the TV will not be turned on at the configured On Time.
Note
If Off Time is configured to OFF, the TV will not be turned off at the configured Off Time.
Page 37

36
To configure the Sleep timer
1.Select Sleep by using the and buttons and then press the button.
2.Select a desired time by using the and buttons.
You can select 10, 20, 30, 60, 120 or 180 MIN.
3. Press the MENU button to return to the high-level menu.
4.To finish the configuration, press the EXIT button.
Note
If Sleep is configured to OFF, the TV will not be turned off even after the configured time period
has passed.
Note
To return to the high-level menu, press the MENU button.
OSD Off Time
1.Select OSD Off Time by using the and
buttons and then press the button.
2.Select a desired time duration by using the
and buttons.
You can select 10, 20, 30, 60 sec or OFF.
3. Press the MENU button to return to the
high-level menu.
4.To finish the configuration, press the EXIT button.
Using this sub menu, you can configure time to hide the OSD screen.
Note
To return to the high-level menu, press the MENU button.
Page 38

37
GB
OSD Half Tone
1.Select OSD Half Tone by using the and
buttons and then press the button.
2.If you select ON by using the and
buttons, the OSD menu will be translucent.
3. Press the MENU button to return to the
high-level menu.
4.To finish the configuration, press the EXIT button.
Using this sub menu, you can select the transparency of the OSD menu.
Note
To return to the high-level menu, press the MENU button.
Reset
1.Select Reset by using the and buttons
and then press the
button.
2.Press the or button to reset all
configurations.
When all configurations are initialized, the initial
screen will be displayed.
Using this sub menu, you can reset all configurations to the factory settings.
Note
Take care when you use this function, because the Reset function resets all configurations to the factory settings.
Note
If you configure OSD Half Tone to off, the OSD
menu will be opaque.
Page 39

38
ANALOG
Using this menu, you can configure analog input related functions. The supported sub menus
include PC Adjust, Brightness/Contrast, Temperature and Auto Balance.
1.Press the MENU button. The OSD menu will be
displayed.
2.Select ANALOG by using the and buttons.
3.Select PC Adjust, Brightness/Contrast,
Temperature or Auto Balance by using the
and buttons and then press the button.
PC Adjust
Using this sub menu, you can configure the screen settings required to use the TV as a PC monitor.
You can adjust H Position, V Position, Clock and Phase. You can configure all items automatically or
manually.
Procedures to configure each of the functions are described below.
To configure the screen automatically
1.Select PC Adjust by using the and buttons
and then press the
button.
2.Select Auto Adjust by using the and
buttons.
The Auto Adjust function configures the screen
settings to optimal values according to the PC
specifications.
3. Press the MENU button to return to the
high-level menu.
4.To finish the configuration, press the EXIT button.
To configure the screen manually
You can select and manually configure a desired
item from H Position, V Position, Clock and Phase
by using the
and buttons.
1.Select a desired item and then press the
button.
2.Adjust the selected configuration value by using
the
and buttons.
Page 40

39
GB
1.Select Temperature by using the and
buttons and then press the button.
2.Select a desired color temperature by using the
and buttons.
You can select 6500K, 7500K, 9300K or USER.
3. Press the MENU button to return to the
high-level menu.
4.To finish the configuration, press the EXIT button.
3. Press the MENU button to return to the
high-level menu.
4.To finish the configuration, press the EXIT button.
Temperature
Using this sub menu, you can configure the color temperature of the screen.
Note
All the color temperature settings except for
USER, R Gain, G Gain and B Gain values are
pre-defined and you cannot change them.
Note
To return to the high-level menu, press the
MENU button.
Brightness/Contrast
1.Select Brightness/Contrast by using the and
buttons and then press the button.
2.Select the Brightness or Contrast function by
using the
and buttons and then press the
button.
3. Adjust the selected configuration value by using
the
and buttons.
4.Press the MENU button to return to the high-level
menu.
5.To finish the configuration, press the EXIT button.
Using this sub menu, you can configure the brightness and contrast of the screen.
Note
To return to the high-level menu, press the MENU button.
Page 41

40
1.Select Auto Balance by using the and
button and then press or button.
2.Press the MENU button to return to the
high-level menu.
3. To finish the configuration, press
the EXIT button.
Auto Balance
You can automatically adjust the white balance of the input color.
If you have selected USER from Temperature
settings
You can configure the R Gain, G Gain and B Gain.
1.Select R Gain, G Gain, or B Gain by using the
and buttons and then press the
button.
2.Adjust the selected configuration value by using
the
and buttons.
3. Press the MENU button to return to the
high-level menu.
4.To finish the configuration, press the EXIT button.
Note
To return to the high-level menu, press the MENU button.
Page 42

41
GB
Troubleshooting
Symptom
No picture displayed on
the screen and the Power
LED is not lit.
No picture displayed on
the screen and the Power
LED is lit.
After-image remains on
the screen.
Picture displayed on the
screen but I cannot hear
the sound.
Picture displays ghosting
(the ghost effect).
“NO SIGNAL” appears on
the screen.
The remote control
malfunctions.
Check List
The power cord is not properly connected.
The Brightness or Contrast is
too low.
The LCD panel is out of
order.
This may happen when you
have had a still picture on the
screen for a long time.
The current volume level is
too low.
The Mute function is activated.
The audio cable is not properly connected.
The antenna is not properly
installed.
The antenna cable is not
connected to the TV.
The computer is turned off.
The monitor cable is not
properly connected.
The LCD TV cannot display
the signal from the current
input source.
The battery is not properly
installed.
The battery of the remote
control is discharged.
Solutions
Check that the power cord is
properly connected to the
wall outlet.
Adjust the Brightness or
Contrast.
Contact an authorized service center.
Do not keep still pictures on
the screen for a long time.
Turn the TV off when you are
not watching it.
Adjust the volume.
Cancel the Mute function.
Connect the audio cable
properly.
Adjust the position and direc-
tion of the antenna.
Connect the antenna cable
to the TV properly.
Turn the computer on.
Connect the monitor cable
properly.
Change the input source.
Reinstall the battery,
observing the correct
polarity.
Replace the battery with a
new one.
Page 43

42
Display Panel
Display Panel
• Active Screen Size: 20.1 inch
• Aspect Ratio: 4:3
• Color Quality: 16.7Million colors
Feature
Feature
• Mode: TV/VIDEO1/VIDEO2/S-VIDEO1/DVD/PC
• On/Off TIME, Sleep Timer
• AUTO Channel Program
• Fine Tuning
• Channel EDIT Function
• TELETEXT (10 page/250 page Option)
• Multi Language
• Aspect Ratio Control: NORMAL/16:9/ZOOM1/ZOOM2
Picture
Picture
• Scan System: Progressive Scan (VIDEO1, VIDEO2)
• Color System: PAL/SECAM-B/G, D/K, I, L/L’
• Picture Mode: Standard/Dynamic/Movie/Mild/Game/Custom
• Dual 3D Motion Adaptive Deinterlacer
• Luma and Chroma Transient Improvement (LTI/CTI)
• 3D Video Noise Reduction
• High-Quality Deinterlacing
Input/Output
Input/Output
• AC Inlet
• D-Sub
• COMPOSITE VIDEO INPUT 1, 2
• COMPOSITE AUDIO INPUT 1, 2
• COMPONENT VIDEO INPUT 1
• SCART
• S-VIDEO
• ANT.(RF)
• PC AUDIO
Sound
Sound
• Stereo: NICAM /A2
• Sound Mode: Standard/Flat/Music/Movie/Speech/User
• Speaker: 5W x 2EA
General
General
• Voltage: AC 100~ 240 V
• Power Consumption: 65 W
• Weight: 8.9 kg (19.6 lbs)
• Size: 593 (W) X 200 (D) X 388 (H) mm
Specifications
Page 44

Panel Pixel Polic
y
[A Grade]
Dots Defect Type
Bright Dots
Dark Dots
SD2020 REMARK
1 Single 3
2 Adjacent 0
3 Adjacent 0
S-TTL 3
1 Single 5
2 Adjacent 2
3 Adjacent 0
S-TTL 7
Total Bright and Dark Dots
7
Page 45

 Loading...