

Page 1
DAB+ Clock Radio
Radius II
USER’S MANUAL
Thank you for purchasing this product. Please read this manual thoroughly before operating
the unit, and keep it for future reference.
Page 2
2
LIGHTNING FLASH WITH ARROWHEAD SYMBOL -
within an equilateral triangle, is intended to alter the
user to the presence of uninsulated dangerous voltage
within the products enclosure that may be of sufficient
magnitude to constitute a risk of electric shock to
persons.
EXCLAMATION POINT- within an equilateral triangle,
is used to indicate that a specific component shall be
replaced only by the component specified in that
documentation for safety reason.
To achieve the utmost in enjoyment and performance, and in order to become familiar with its features,
please read this manual carefully before attempting to operate this product, this will assure you years of
trouble free performance and listening pleasure.
Important Notes
• This safety and operating instruction should be retained for future reference.
• The apparatus should not be exposed to dripping or splashing or placed in a humid atmosphere
such as a bathroom.
• Do not install the product in the following areas:
o Places exposed to direct sunlight or close to radiators
o On top of other stereo equipment that radiate too much heat
o Blocking ventilation or in a dusty area
o Areas where there is constant vibration
o Humid or moist places.
• Do not place near candles or other naked flames
• Operate the product only as instructed in this manual
• Before turning on the power for the first time, make sure the power adaptor is properly connected.
For safety reasons, do not remove any covers or attempt to gain access to the inside of the product. Refer
any servicing to qualified personnel.
Do not attempt to remove any screws, or open the casing of the unit; there are no user serviceable parts
inside, refer all servicing to qualified service personnel.
WARNING
Page 3

3
1. READ INSTRUCTIONS – All the safety and operating instructions should be read before appliance s operated.
2. RETAIN INSTRUCTIONS - The safety and operating instructions should be retained for future reference.
3. HEED WARNINGS – All warnings on the appliance and in the operating instructions should be adhered to.
4. FOLLOW INSTRUCTIONS – All operating instructions should be followed.
5. WATER AND MOISTURE – The appliance should not be used near water, for example, near a bathtub, washbowl,
kitchen sink, laundry tub, swimming pool or in web basement.
6. VENTILATION – The appliance should be situated so that its location or position does not interfere with its proper
ventilation. Do not place on bed, sofa, rug or similar surface that may block the ventilation openings, in a built-in
installation, such as a bookcase or cabinet that may impede the flow of air through the ventilation openings.
7. HEAT – The appliance should be situated away from heat sources such as radiators, stoves, or other appliances
(including amplifiers) that produce heat.
8. POWER SOURCE – the appliance should be connected to power supply only of the type described in the
operating instructions or as marked on the appliance.
9. POWER CORD PROTECTION – power supply cords should be routed so that they are not likely to be walked on
or pinched by items placed upon or against them.
10. POWER LINES – an outdoor antenna should be located away from power lines.
11. OBJECT AND LIQUID ENTRY – care should be taken so that objects do not fall and liquids are not spilled into the
enclosure through openings.
12. ESD WARNING – the display does not function properly or not reaction to operation of any the control may due to
the electrostatic discharge. Switch off and unplug the set. Reconnect after a few seconds.
13. DAMAGE REQUIRING SERVICE – the appliance should be serviced by qualified service personal when:
14. The power-supply cord or plug has been damaged.
15. Objects have fallen into, or liquid has been spilled into the appliance enclosure.
16. The appliance has been exposed to rain.
17. The appliance has been dropped, or the enclosure damaged.
18. The appliance does not appear to operate normally.
19. SERVICING – the user should not attempt to service the appliance beyond that described in the user operation
instructions. All other servicing should be referred to qualified service personnel.
20. DO ensure that all electrical connections (including the mains plug, extension leads and inter-connections between
the pieces of equipment) are properly made and in accordance with the manufacturer’s instructions. Switch off and
unplug the power before making or changing connections.
21. DON’T remove any fixed cover as this may expose dangerous voltages.
22. DON’T use equipment such as personal stereos or radios so that you are distracted from the requirements of
traffic safety.
23. DON’T leave equipment switched on when it is unattended unless it is specifically stated that it is designed for
unattended operation. Switch off using the switch on the equipment and make sure that your family knows how to
do this. Special arrangements may need to be made for infirm or handicapped people.
24.
DON’T continue to operate the equipment if you are in any doubt about if it’s working normally or if it’s damaged in
any way. Switch it off, unplug the mains power and consult your deale
r.
SAFETY INSTRUCTIONS
Page 4
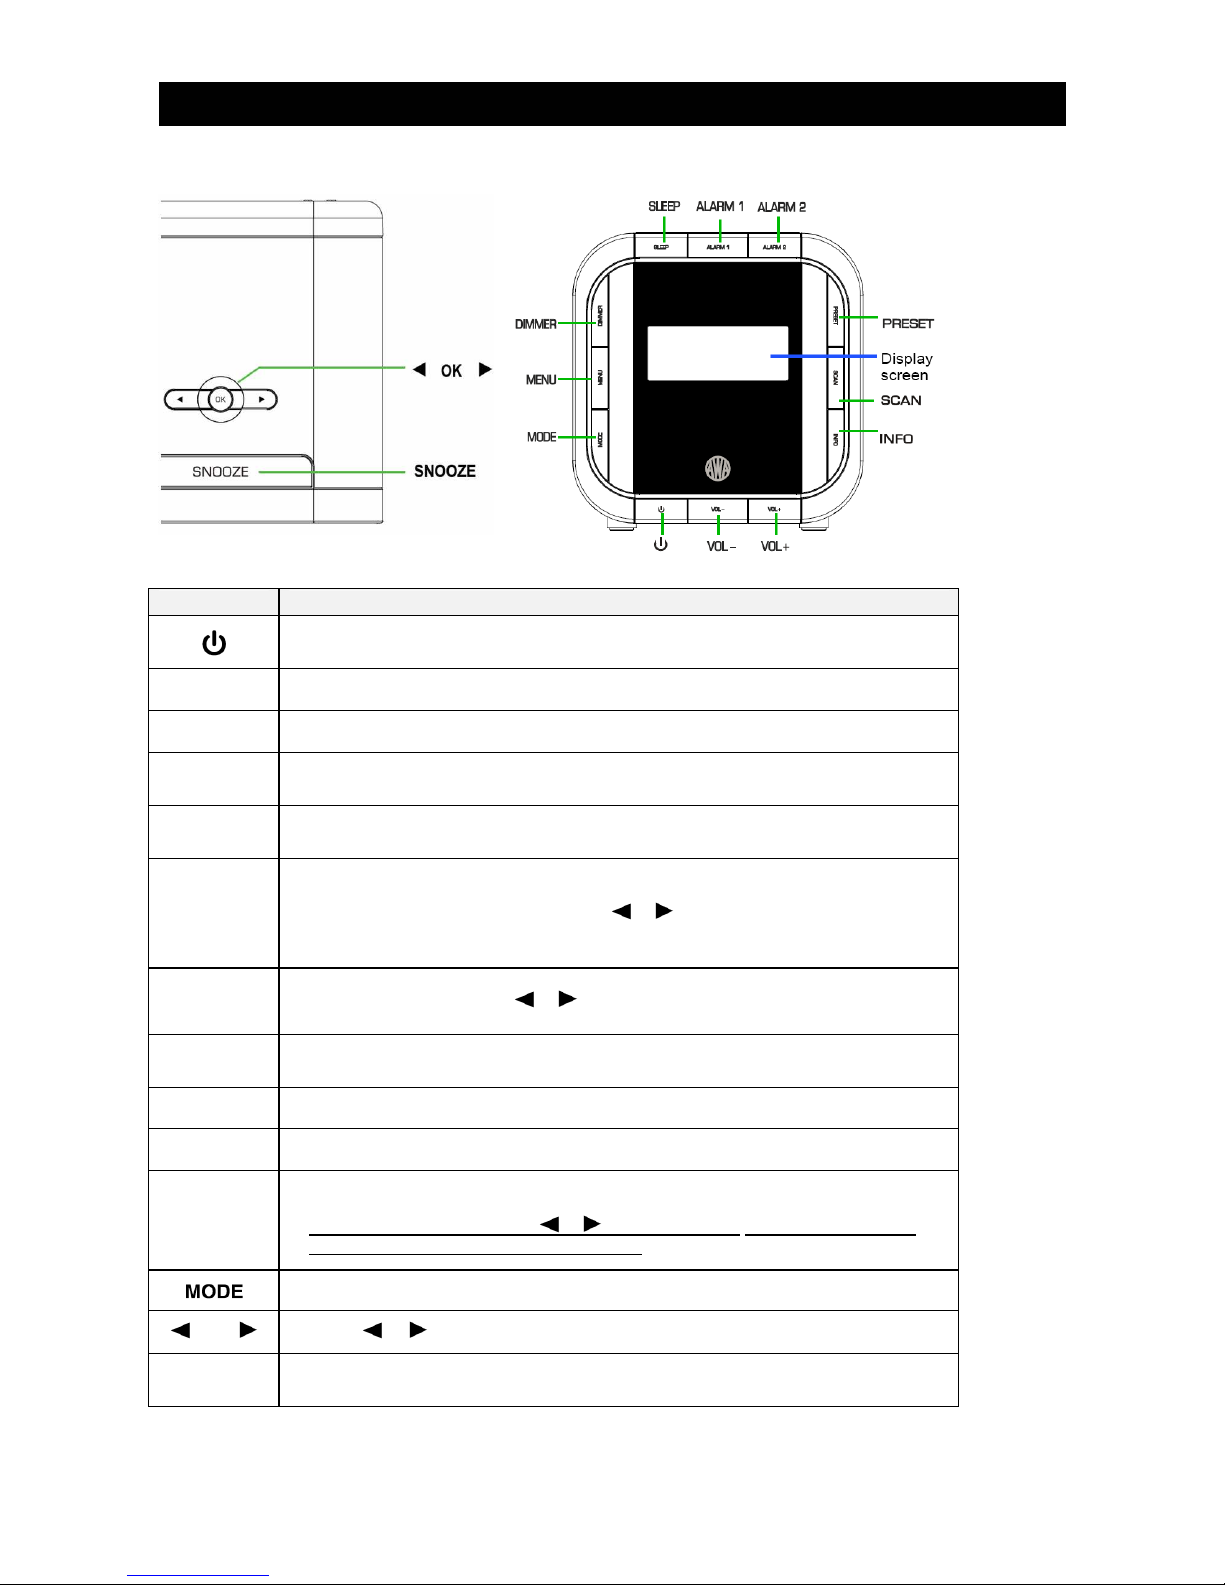
UNIT TOP VIEW UNIT FRONT VIEW
Control All modes
a. Press to turn unit on/off
b. When alarm is coming, press to turn it off
VOL -
Press to decrease volume level
VOL +
Press to increase volume level
INFO
DAB, FM mode:
Press to display queue information
SCAN
DAB and FM mode:
Press to scan stations
PRESET
DAB and FM mode:
Press and hold PRESET until “Preset Store” show on display, then select
desire channel number by pressing
or ,
then press PRESET again to
store preset.
Press “Preset” briefly then select desire channel number to recall preset 1-10
ALARM2
a. Press ALARM 2, then set time, duration, source, cycle period and
volume by pressing
or
, confirm by pressing OK
b. When alarm is coming, press to turn it off
ALARM1
a. Press to set alarm1
b. When alarm is coming, press to turn it off
SLEEP
Press to set sleep for 15, 30, 45, 60 or 90 minutes period.
DIMMER
Press to adjust dimmer
MENU
Press to enter system setting.
(Press MENU, and then press or to browse options: Time/Audio/Language/
Snooze time/Factory Reset/SW version. etc)
Press repeatedly to convert among DAB/FM/Auxiliary Input mode
OK
Press or to backward or forward press OK to confirm
SNOOZER When alarm activates, press to active snooze function and postpone alarm
LOCATION OF CONTROL
Page 5

5
UNIT BACK VIEW
Power Supply
socket:
Unique designed for connect power
cord
AUX IN socket:
Connects to the external audio
device
SWITCH ON
Note: Position the cable antenna, so that it cannot be walked on or pinched by items placed on or against with.
• Extend the cable antenna found on the rear of radio, press to switch it on, the display will show
‘Welcome to Digital Radio’.
FOR INITIAL USE
•
For initial use, your radio will make an auto ‘Scanning…’ to scan all stations available, and store them.
• Please wait whilst the scan is in progressing, as soon as the scan is completed, the DAB stations will be
displayed in alphanumeric order. The first station in the list will be selected.
Note: a. if no DAB signal is found in your area, it may be necessary to relocate your radio.
Or to check that DAB coverage is available in your area.
SHIFT TO ANOTHER PROGRAM
1. While playing a DAB program, you can shift to another
program by pressing or to browse.
2. While your expecting station shows up, press OK to
confirm, and it is done!
LOCATION OF CONTROL
POWER SOURCE
DAB OPERATION
Page 6

6
PRUNE INACTIVE STATIONS
Note: this function only activated in DAB mode, doing this, to let only active stations [ones that are currently
broadcasting] available.
1. The path is: Press MENU, and then press or to ‘‘Prune’, press OK to confirm, your radio will ask
you ‘Prune? <No> Yes’.
2. Press or ‘Yes’, press OK to confirm.
UPDATE STATIONS LIST
Note: Put your radio in a place where with strong DAB signal.
1. Press SCAN directly, the unit will scan all the DAB channels and add any new stations available to the
station list. Or
You also can complete this order by press MENU, and then press or to ‘Full scan’, press OK to
confirm.
TUNE TO FM MODE
1. Press MODE to turn your radio from DAB Mode to ‘FM
Mode’.
Note: If your radio currently in AUX mode, you can shift to
FM Mode by repeatedly pressing MODE.
SEARCH PROGRAMS
1. For first time use, it will start at the beginning of the FM frequency range (87.50MHz). Otherwise, the last
listened FM station should be selected.
2. To manually scan FM frequency, while frequency is showing up, gently and quickly press or to
change it 0.05MHz per step.
3. How to perform auto ‘Scanning…’? three ways:
a. To forward auto ‘Scanning…’ the next active station, press and then press OK.
b. To backward auto ‘Scanning…’ the next active station, make sure frequency shows up, press
and then press OK.
c. Or, w simply press OK or SCAN to conduct auto ‘Scanning…’
4. To auto ‘Scanning…’ the next active station, repeat one way of step3.
5. The unit will display the frequency changing until it stops at the next station.
6. After it reached one end of the frequency range, it will search again from the beginning of frequency
range.
DAB OPERATION
FM OPERATION
Page 7

7
SCAN SETTING
By default, FM scans stop at any available station. This may result in a poor signal-to-noise ratio (hiss)
from weak stations.
To change the scan settings to stop only at stations with good signal strength, press MENU < Scan
setting > ‘Strong stations only?’ press OK to confirm.
AUDIO SETTING
By default, all stereo stations are reproduced in stereo. For weak stations, this may result in a poor
signal-to-noise ratio (hiss).
To play weak stations in mono, press MENU < Audio setting > Forced mono, press OK to
confirm.
VIEW STATION INFORMATION
Note: only available for DAB and FM mode.
It is possible to browse the information that is displayed on the second line of the display when listening to a
DAB, FM program by pressing INFO repeatedly.
STATION PRESETS
Your radio can store 10 DAB and 10 FM station presets, please note that this function only available at DAB
or FM mode. To store the current station:
1. Press and hold PRESET button, until it says: ‘Preset Store #’.
2. Press or to cycle through preset stations 1-10.
3. When your expected preset station number shows up, press OK, it will say: ‘Preset # stored’, the
relative preset number will be showing up.
SELECT PRESET STATION
Please note that this function only available at DAB or FM mode. To select a stored station:
1. Press MODE repeatedly to convert to relevant mode (DAB/FM mode).
2. Press PRESET button, it will say: ‘Preset Recall #’.
3. Press or to your selecting one, press OK to confirm.
FM OPERATION
OTHER FEATURES
Page 8

8
AUX IN MODE
Note: a. make sure your radio is powered on.
b. using the connection lead, your radio will be transformed into a high quality digital audio speaker system.
1. Connect one end of the audio lead to the headphone (or auxiliary out) socket of your secondary device,
connect the other end to the AUX IN socket on the rear of your radio.
2. Press MODE repeatedly until ‘Auxiliary Input Mode’ is displayed.
3. To gain optimal volume levels, adjust the output volume level on both of the source device and on radio
itself is recommended.
Note: AUX IN allows for quick and easy connection to an MP3 player or other external sound sources
SET TIME
1. The path is: press MENU < Time >, press OK to confirm, and then turn SELECT to view options as
below:
<Set 12/24 hour format>: ‘Set 24 hour’ and ‘Set 12 hour’
<Set Time/date>: Manually set-up both Time and Date
<Auto update>: ‘Update from DAB’ and ‘No update’
<Set date format>: ‘MM-DD-YYYY’ and ‘DD-MM-YYYY’
2. Then setting time according to your personal preference.
SET SNOOZE
Note: this function is unique designed for postpone your alarm.
1. The path is: Press MENU ‘Snooze Time’, press OK to confirm.
2. Press or to view options: 5/10/15/20/25/30 minutes, the default setting is 5 minutes.
3. Press OK to confirm your favor option, it is done!
SET AUDIO
1. The path is: Press MENU‘Audio’, press OK to confirm.
2. Press or to cycle through options: ‘Treble’ and ‘Bass’.
3. Press OK to confirm your preferred option, and then follow your radio’s demonstration to set the value
which you prefer for ‘Treble’ or ‘Bass’ level, Press OK to confirm, it is done!
OTHER FEATURES
Page 9

9
SET ALARM
Note: ensure that clock is set already.
1. Press ALARM1, it will say ‘Alarm 1 Setup’,
meanwhile icon will be twinkling.
2. To set alarm 2, press ALARM2, and icon will be sparkling, now let’s take set alarm 1 as example.
3. While your radio says ‘Alarm 1 Setup’, press OK to confirm, your radio will now running into ‘Alarm 1
Wizard’, and then follow your radio’s instruction, configure the following parameters:
∗ Alarm states: Off/ On, press or to ‘On’, press OK to confirm.
∗ On time: 06: 00 (alarm sounding time)
∗ Duration time: 15/30/45/60/90minutes (alarm sounding lasting time)
∗ Source: Buzzer/DAB/FM
∗ Alarm sounds frequency: Daily, Once, Weekends or weekdays
∗ Alarm volume: press or to your favor alarm volume, and then press OK to confirm, your radio
will say ’Alarm saved’.
To Operate SNOOZE
When Alarm is sound, press SNOOZE to postpone it.
• While in SNOOZE function, the relative alarm should be twinkling, and shows how long it will be elapsed,
during this time, you also can press to stop snooze, and press again to have your radio play.
• When radio reached SNOOZE time, it should be sound again.
To Turn Off Alarm
Note: a. To turn alarm off temporary, while alarm is coming, press is OK; To turn it off permanently, please
follow below option b.
b. you can simply do a ‘Factory Reset’ to cancel Alarm you have set, or follow below steps.
Refer above step 1-3 enter relative alarm setting, while Alarm states: On is twinkling, press or to ‘Off’,
press OK to confirm, and then follow your radio’s illustration, until it indicates you ‘Alarm saved’, it is done!
SET LANGUAGE
1. The path is: Press MENU‘‘Language’, press OK to confirm.
2. Press or to cycle through, for which you will find ‘English’, ‘Frangais’, ‘Deutsch’ and ‘Italiano’
available.
3. While your expected one is showing up, press OK to confirm, it is done!
OTHER FEATURES
Page 10

10
SET DIMMER
Note: sometimes, you may want to adjust the backlight level of your radio to suit your personal preference.
1. Repeatedly press DIMMER to adjust backlight level.
SET SLEEP
Note: sometimes, you may want your radio after a settled time turns it off automatically, below shows you how to do
it.
1. Press SLEEP to directly set sleep, it will say: ‘Set sleep time ------- sleep off’.
2. Press SLEEP repeatedly to define the snooze period, on which you can find off/15/30/45/60/90 minutes
available.
3. While your preferred option shows up, just stop press SLEEP, and it is done!
4. To check how long the sleep time will be reached, press SLEEP again.
5. Radio will automatically put itself into standby mode after the setting time has elapsed.
6.
To continue enjoying your program, press to power it on..
FACTORY RESET
Note: doing this order, you can delete all of the preset stations and return the radio to its original factory settings.
1.
The path is: Press
MENU(‘‘Factory Reset’,( ‘Factory Reset? <No> Yes’.
2. Press or to ‘Yes’, and then press OK to confirm, it is done!
The preset radio stations are erased and the radio is returned to its original factory settings.
SW VERSION
1. Press MENU, and then press ‘SW version’.
2. Press OK to confirm, and you get it.
VOLUME CONTROL
Adjust the radio volume by pressing VOL- or VOL+.
OTHER FEATURES
Page 11

11
Specifications: DAB+ Clock Radio
Audio Output: 2Wrms X 2
Frequency Ranges:
(FM) 87.5-108MHz
(DAB) 174 – 240MHz
Unit Power input:
5Vdc, 1200mA
Power Supply:
AC Power Input: 100-240V~, 50-60Hz, 0.2A
Output: 5Vdc, 1200mA
Dimension: 140mm x 140mm x 143mm
SPECIFICATION
Page 12

12
Product Warranty
Subject to the warranty repair conditions below, in addition to all rights and remedies to which you may be entitled under the
Competition and Consumer Act 2010 (Commonwealth) and any other relevant legislation, the manufacturer warrants this
product to be free from defects in materials or workmanship for a period of 12 Months from the original date of purchase.
Warranty Repair Conditions
A.
This Product Warranty only applies provided the product:-
Has been purchased in Australia and sold by Authorised Distributors or Dealers and only where the products are used and
serviced within Australia
Is taken for service when required to an Authorised Service Agent, together with written instructions indicating specific
problem or function requiring investigation.
Has valid proof of purchase and presented when warranty service is requested.
Has only been used in a domestic application.
Has been installed and operated in accordance as noted in the operating instructions under normal use and reasonable care
(in the opinion of the Service Centre).
Has not been damaged by the use of accessories which in the opinion of the Service Centre are defective or incompatible
with the product.
Has not been tampered with or repaired (including unauthorised alterations) by anyone other than the AWA Service Centre or
an Authorised Service Centre.
B.
This Product Warranty does not cover:-
Damage, malfunction or failure resulting from use of incorrect voltages, incorrect installation, accidental damage, misuse,
neglect, build-up of dirt or dust abuse, wear and tear, maladjustment of customer controls, mains supply problems,
thunderstorm activity or Acts of God, pixel error, infestation by insects or vermin, exposure to abnormally corrosive conditions
or any foreign object or matter having entered the product.
Mileage or travelling time in respect of service outside the authorised AWA Service Centre nor pick up and delivery cost
incurred.
Service calls arising from failure to correctly operate the product or to observe noted instructions, or repair which reveals the
product is in normal working order.
Cabinet parts, user replacement batteries or leads unless the defective items are reported at the time of purchase.
C.
Service calls only apply to Television display devices (CRT, LCD, Plasma) with screen sizes greater than 68cm in the major
metropolitan areas of Australia or the normal operating areas of the nearest Authorised Service Centers.
D.
Requested service visits to the customer premises will be made during normal working hours of the customary working week
upon request by the customer. Where such a visit is made on a day arranged by the customer and the service technician is
unable to obtain access to the product, the Service Centre will be entitled to make a separate charge for service call fee, time
and distance travelled.
E.
The AWA Service Centre and its Authorised Service Centres may charge for work done where the product is found to be in good
working order. Example, charges may be made where the problem is found to be due to incorrect setting of customer controls,
use of poor associated equipment (e.g. poor antenna systems) or the inability of the product to operate with faulty or
incompatible equipment.
F.
If the product is sent to an Authorised Service Centre, the owner is responsible for the cost of transport to and from the Service
Centre. In addition, the product is at the owners risk while in transit to and from the authorised Service Centre.
G.
No person is authorised to make or give any assertions, statements or undertakings, whether expressed or implied about the
product other than or additional to the terms of this warranty.
This product comes with guarantees that cannot be excluded under the Australian Consumer Law. You are entitled to a replacement
or refund for a major failure and for compensation for any other reasonably foreseeable loss or damage. You are also entitled to have
the goods repaired or replaced if the goods fail to be of acceptable quality and the failure does not amount to a major failure. Where a
failure does not amount to a major failure Big W is entitled to choose between providing you with a repair, replacement or refund. To
obtain compensation, you would need to provide documentary evidence of the loss or damage suffered, and documentary evidence
that such loss or damage was a reasonably foreseeable consequence of a failure by Big W to comply with a consumer guarantee
under the Australian Consumer Law. Such evidence may include photographs, statutory declarations, receipts or reports (eg from
your doctor), depending on the loss or damage.
This warranty is provided by Woolworths Limited of 1 Woolworths Way, Bella Vista NSW 2153.
Please read instruction manual carefully
Should you encounter any problems
Please contact Telefix for Warranty Support
1300 366 144
Email: warrantyhelp@awa.com.au
The original proof of purchase must be kept and produced for service requirements under this Product Warranty.
 Loading...