

Page 1

Pocket Projector
PJ200
User's manual
The style and parts of the product shown in this manual may be
different from the actual unit due to various models.
OK
Page 2
2
Safety Information
• Keep away from water or moisture and dusty areas.
• Never store in hot and very cold areas.
• Only use attachments/accessories specied by the manufacturer.
• No objects lled with liquids, such as vases, shall be placed on
apparatus.
• Avoid dust contamination when the projector is not in use.
• Avoid environments where the projector would be exposed to direct
sunlight (or any other source of excessive heat) for long periods of
time.
• Protect the projector from potential liquid spills such as soda, coffee,
tea, etc.
• Be carefully to keep it without dropping it or strong impact.
• Operate the projector on a level, well-grounded work surface, free of
excessive vibration.
• Do not open the projector case alone without technical support
because there is danger of electrical shock.
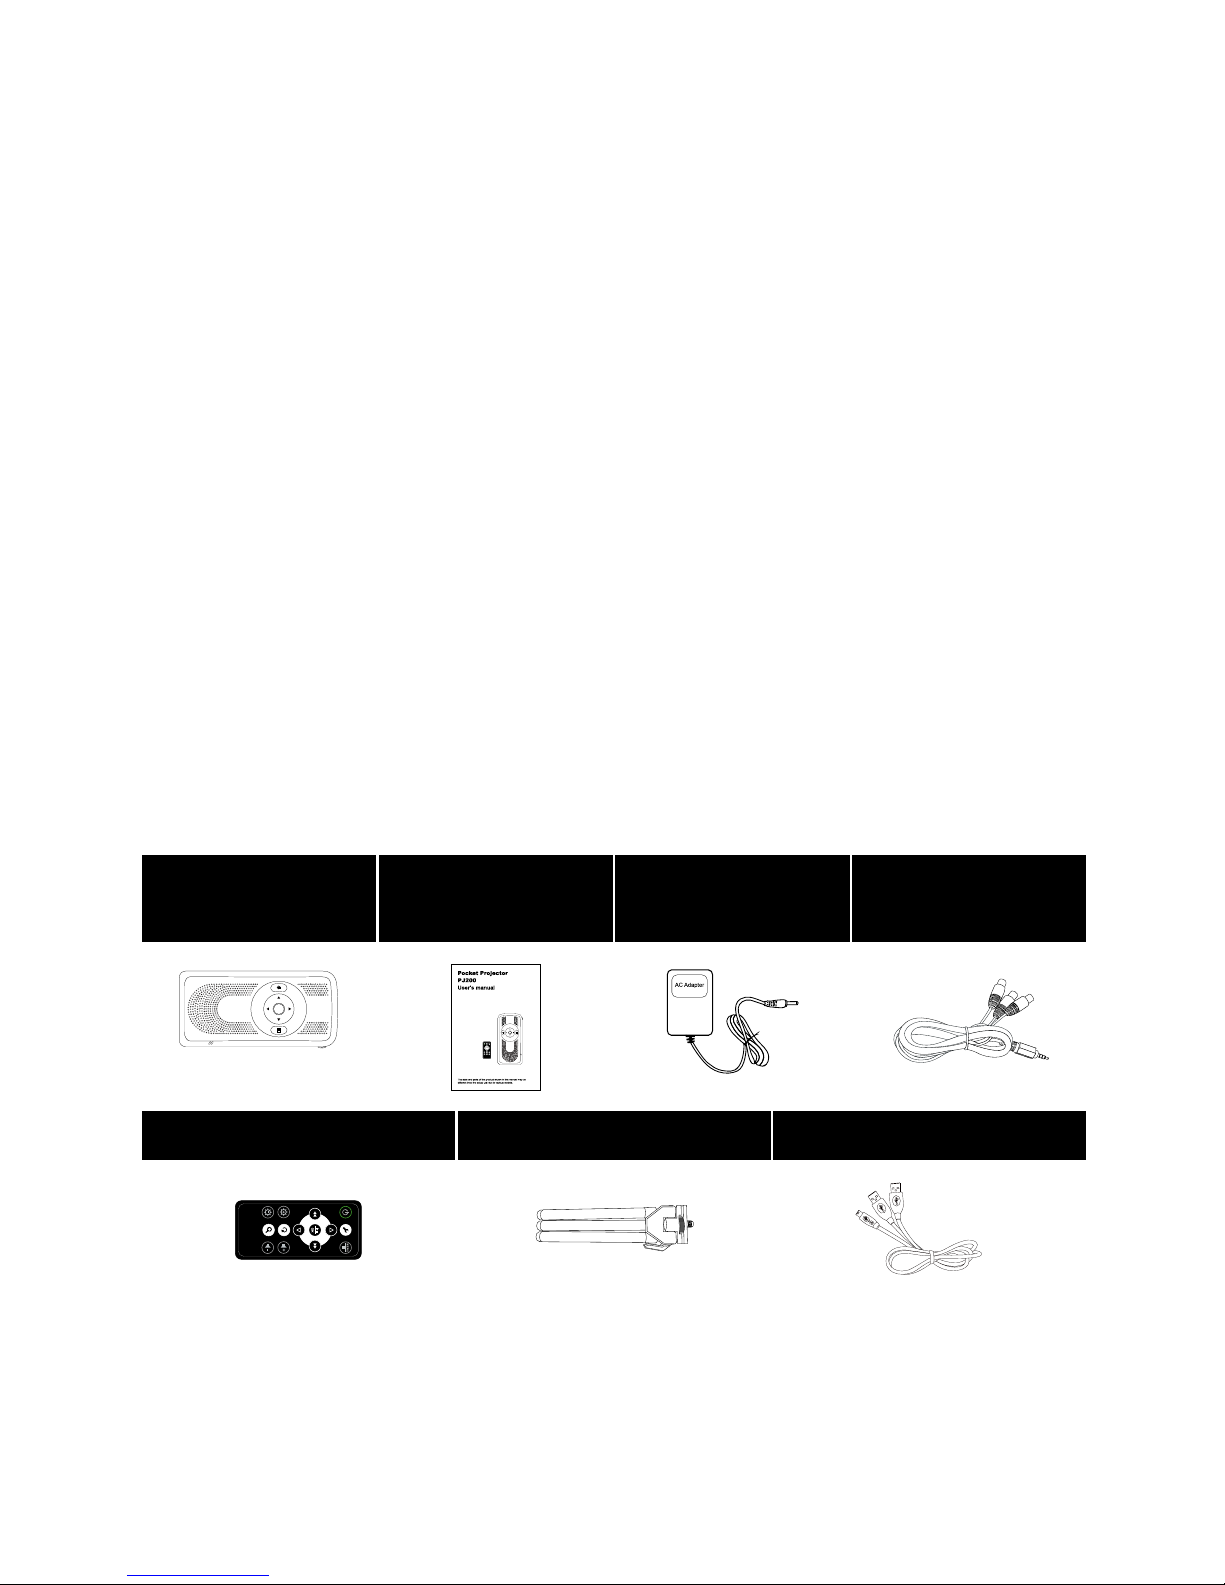
Package contents
Projector User manual Power adapter
(5V/2A)
AV cable
OK
OK
Remote control Tripod Mini USB cable
Page 3

3
Safety Information .............................................................................2
Package contents ..............................................................................2
Contents .............................................................................................3
Product overview...............................................................................4
Remote control ..................................................................................7
- Remote control operation range .............................................................. 9
- Using the remote control for the rst time ............................................... 9
- Battery replacement of the remote control .............................................. 9
- Cautions of the remote control ...............................................................10
- Charging the battery ...............................................................................11
- Charging the battery using the power adapter. ......................................11
- Charging the battery using a computer. .................................................11
- The battery icons indicate battery level as following: ............................12
Connection ........................................................................................13
- Insert a memory card .............................................................................13
- Connect with AV device (AV in) ..............................................................13
- Connect to external stereo speakers......................................................13
Getting started ..................................................................................14
- Turn the power on/off .............................................................................14
- Distance and projective image size ........................................................15
- Adjust the focus ......................................................................................15
Basic operation.................................................................................16
- Select a mode ........................................................................................16
Photo mode .......................................................................................17
- Photo Slideshows ...................................................................................17
- Background music ..................................................................................17
Movie mode .......................................................................................18
Music mode .......................................................................................19
Edit .....................................................................................................20
- Copy .......................................................................................................20
- Delete .....................................................................................................22
- Create a new folder ................................................................................22
Copy les from and to a PC .............................................................24
- Copy les from a computer to this unit ...................................................24
- Disconnect the projector from a PC .......................................................24
Setup .................................................................................................25
Helpful Tips .......................................................................................27
Specications ...................................................................................28
Contents
Page 4
4
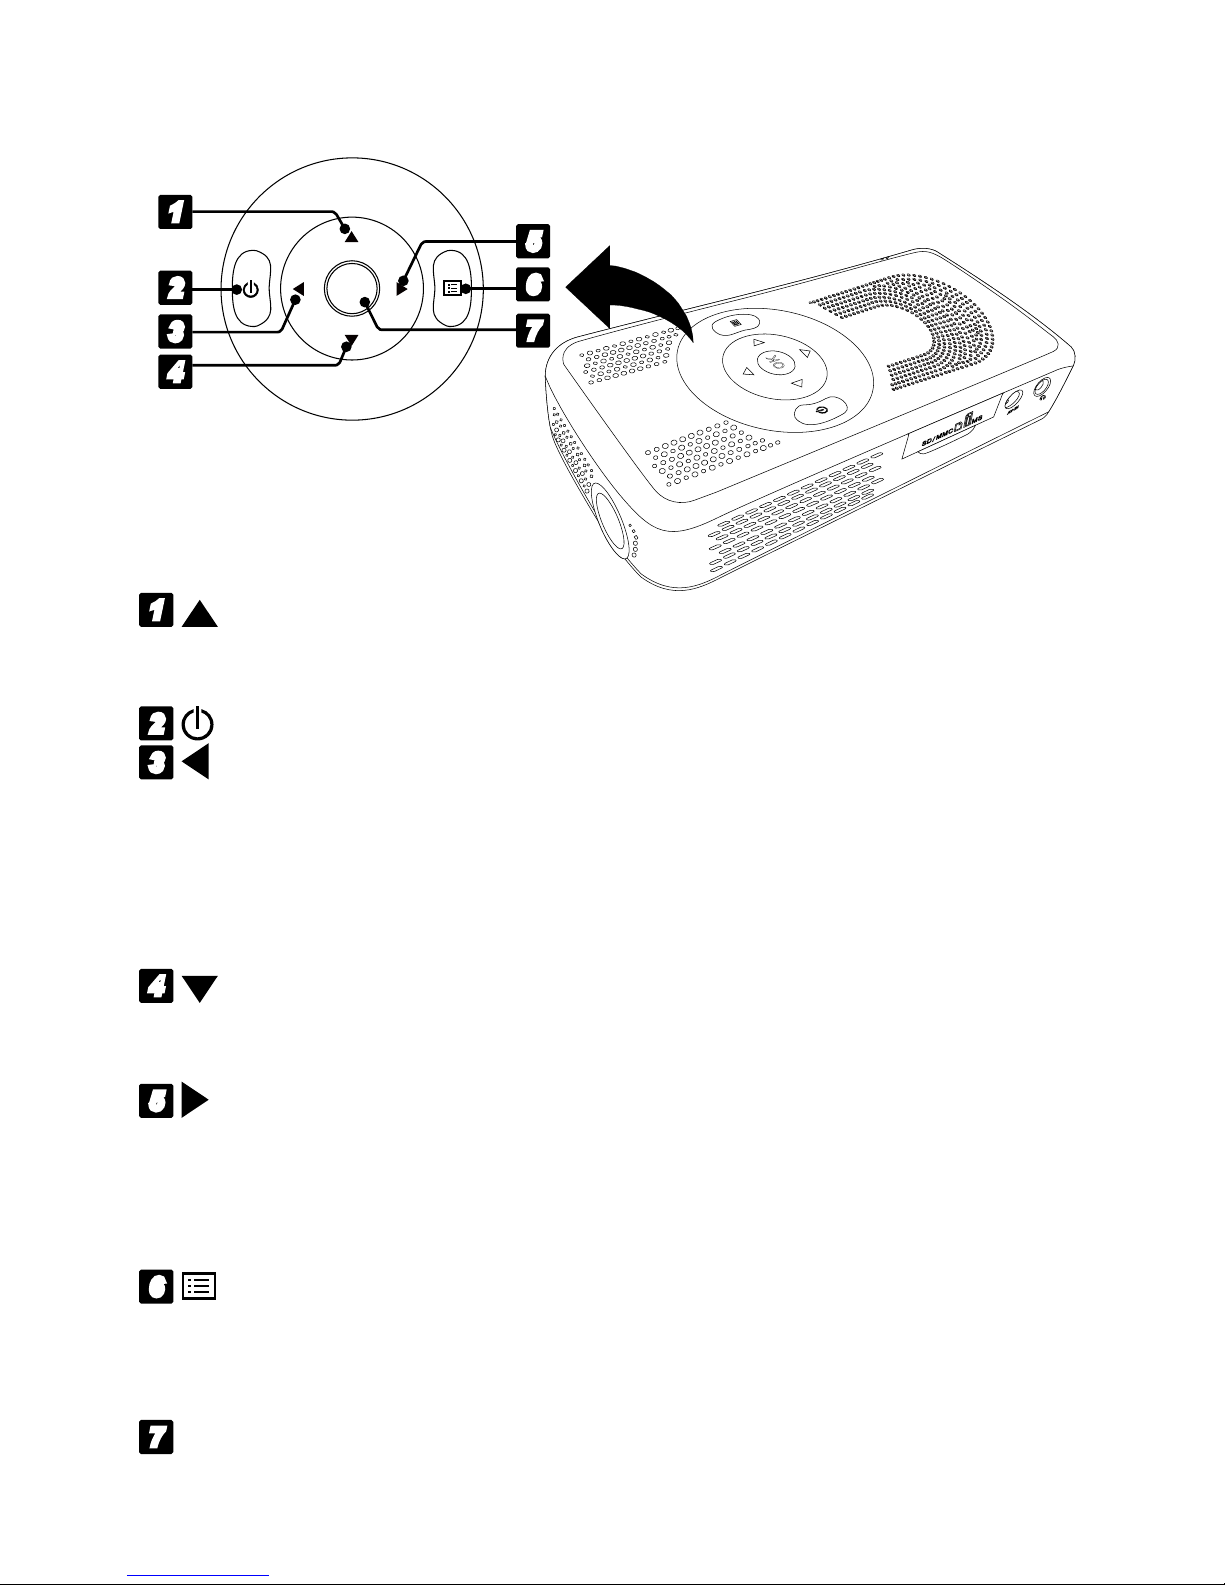
Product overview
1
Up:
• Press to move up in the menus.
• Press to increase the volume.
2
Standby / On:
Press to enter standby mode or wake up the projector.
3
Left / Previous:
• Press to move left in the menus.
• Press to rewind the current playabck le under Video and Music mode.
• Press to return to the previous le when the music or video playback is
been paused.
• Press to return to the previous le in the Photo mode.
4
Down:
• Press to move down in the menus.
• Press to decrease the volume.
5
Right / Next:
• Press to move right in the menus.
•
Press to fast forward the current playback le under Video and Music mode
.
•
Press to skip to the next le when the music or video packback is been paused.
• Press to skip to the next le under the Photo mode.
6
Menu / Stop / Thumbnail:
• Press to return to the main menu.
• Press to stop the current playback le under Video and Music mode.
• Press to bring up the thumbnail in the Photo mode.
7
OK:
Press to conrm the selection.
OK
1
2
3
4
5
6
7
Page 5
5
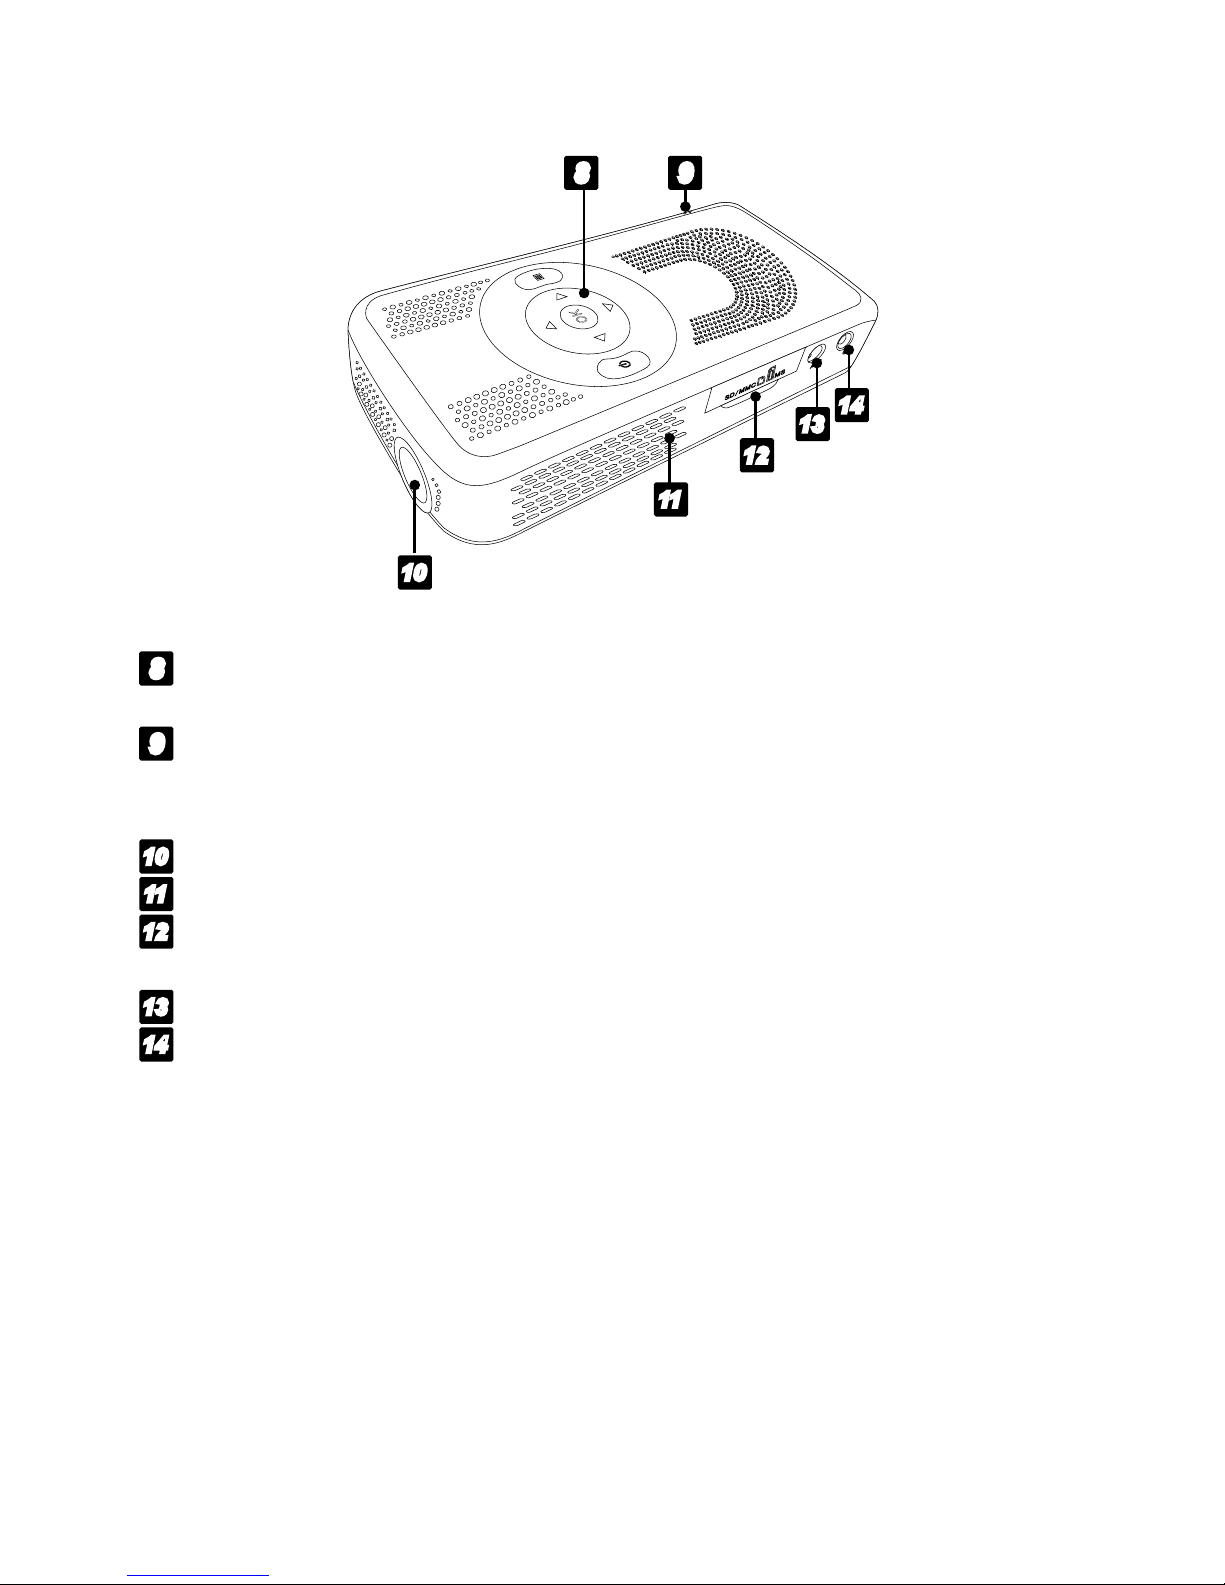
8
Power indicator: Lights yellow-green when the power is on, lights
red when the power is in standby mode.
9
Charging indicator: Lights orange when charging the battery, lights
yellow-green when the charging procedure is
complete.
10
Lens
11
Speakers
12
SD/MMC/MS card slot:
Accommodates SD, SDHC, MMC, MS or MS
Pro card.
13
AV-IN jack:
Connects to other audio and video output jacks.
14
Earphone jack:
Inserts a earphone/headphone or the external stereo
speakers. It can disable the built-in speakers.
12
13
14
9
11
8
10
Page 6
6
17
18
19
20
16
15
11
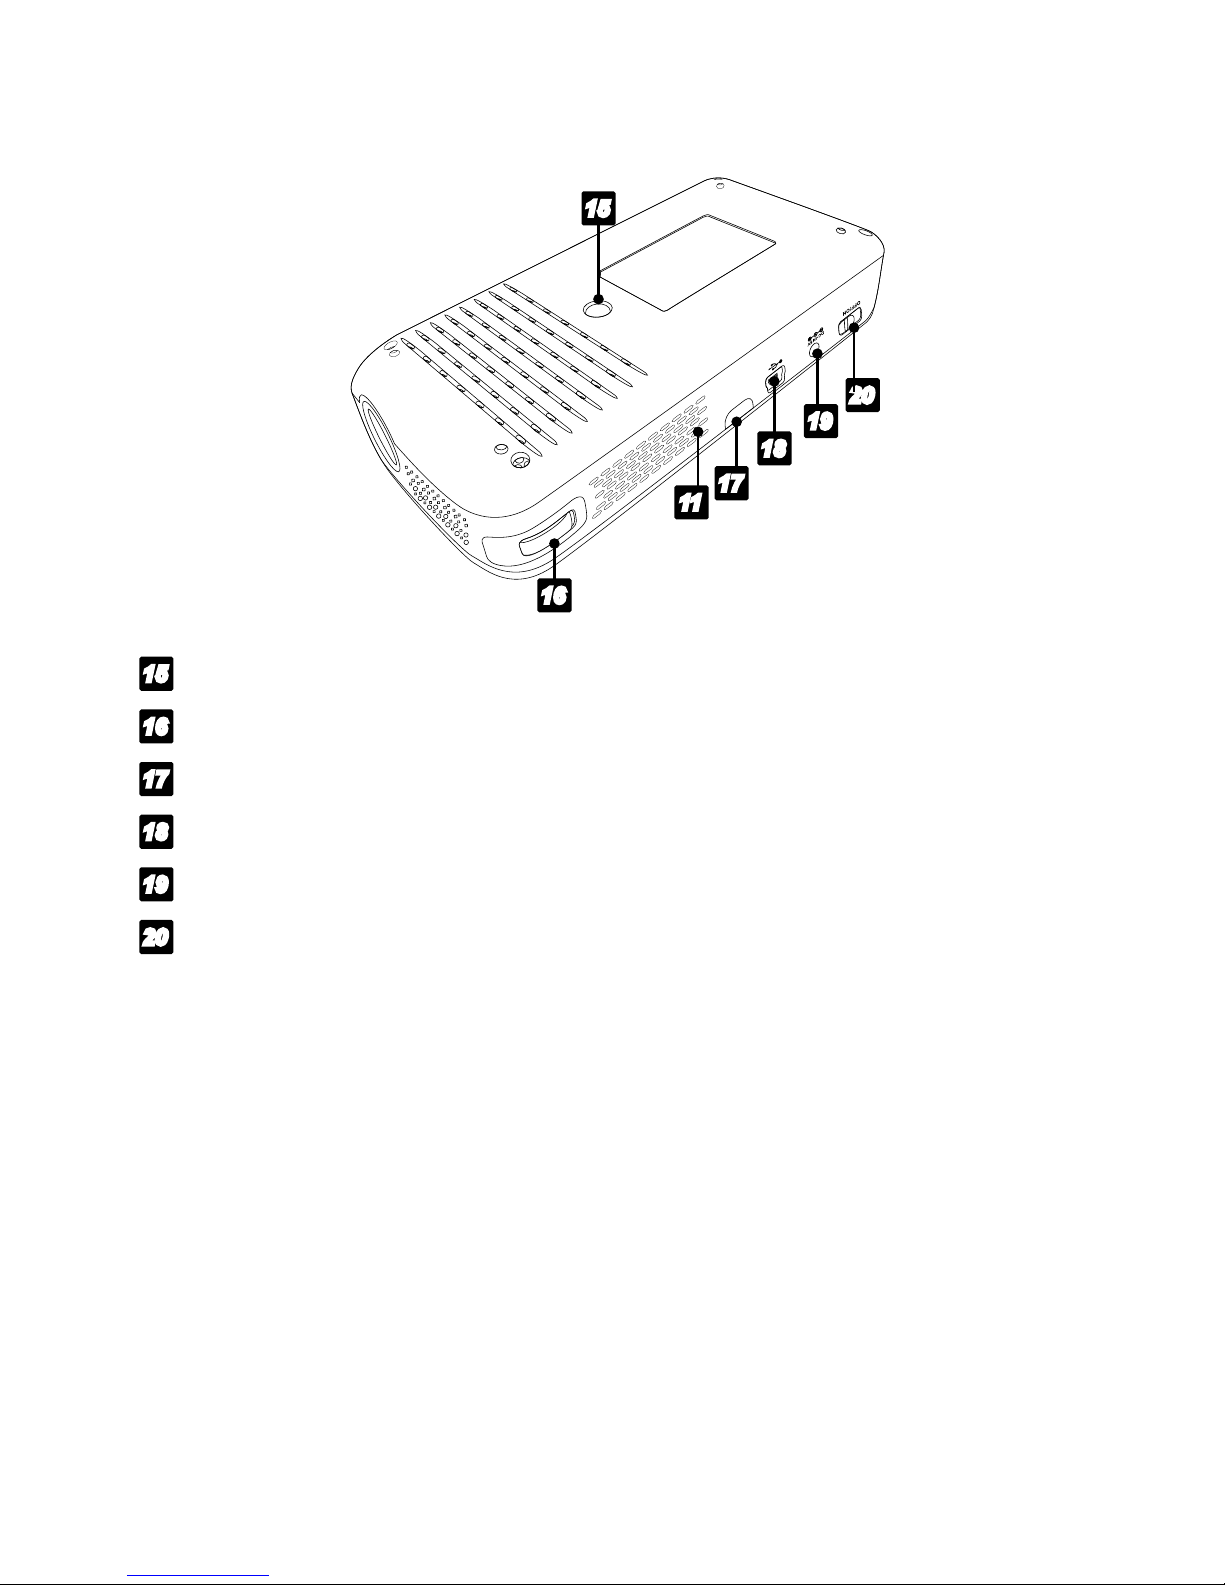
15
Tripod stand hole:
Attaches to a standard tripod with ¼" - 20 thread.
16
Focus wheel:
Adjust the focus distance.
17
Remote control sensor
18
Mini USB port
19
DC-IN 5V jack:
Connect to supplied AC power adapter.
20
Power switch:
Puts the porjector's power to on or off.
Caution: Before switching off the projector's power, please enter the
standby mode by pressing Standby/On button.
Page 7
7
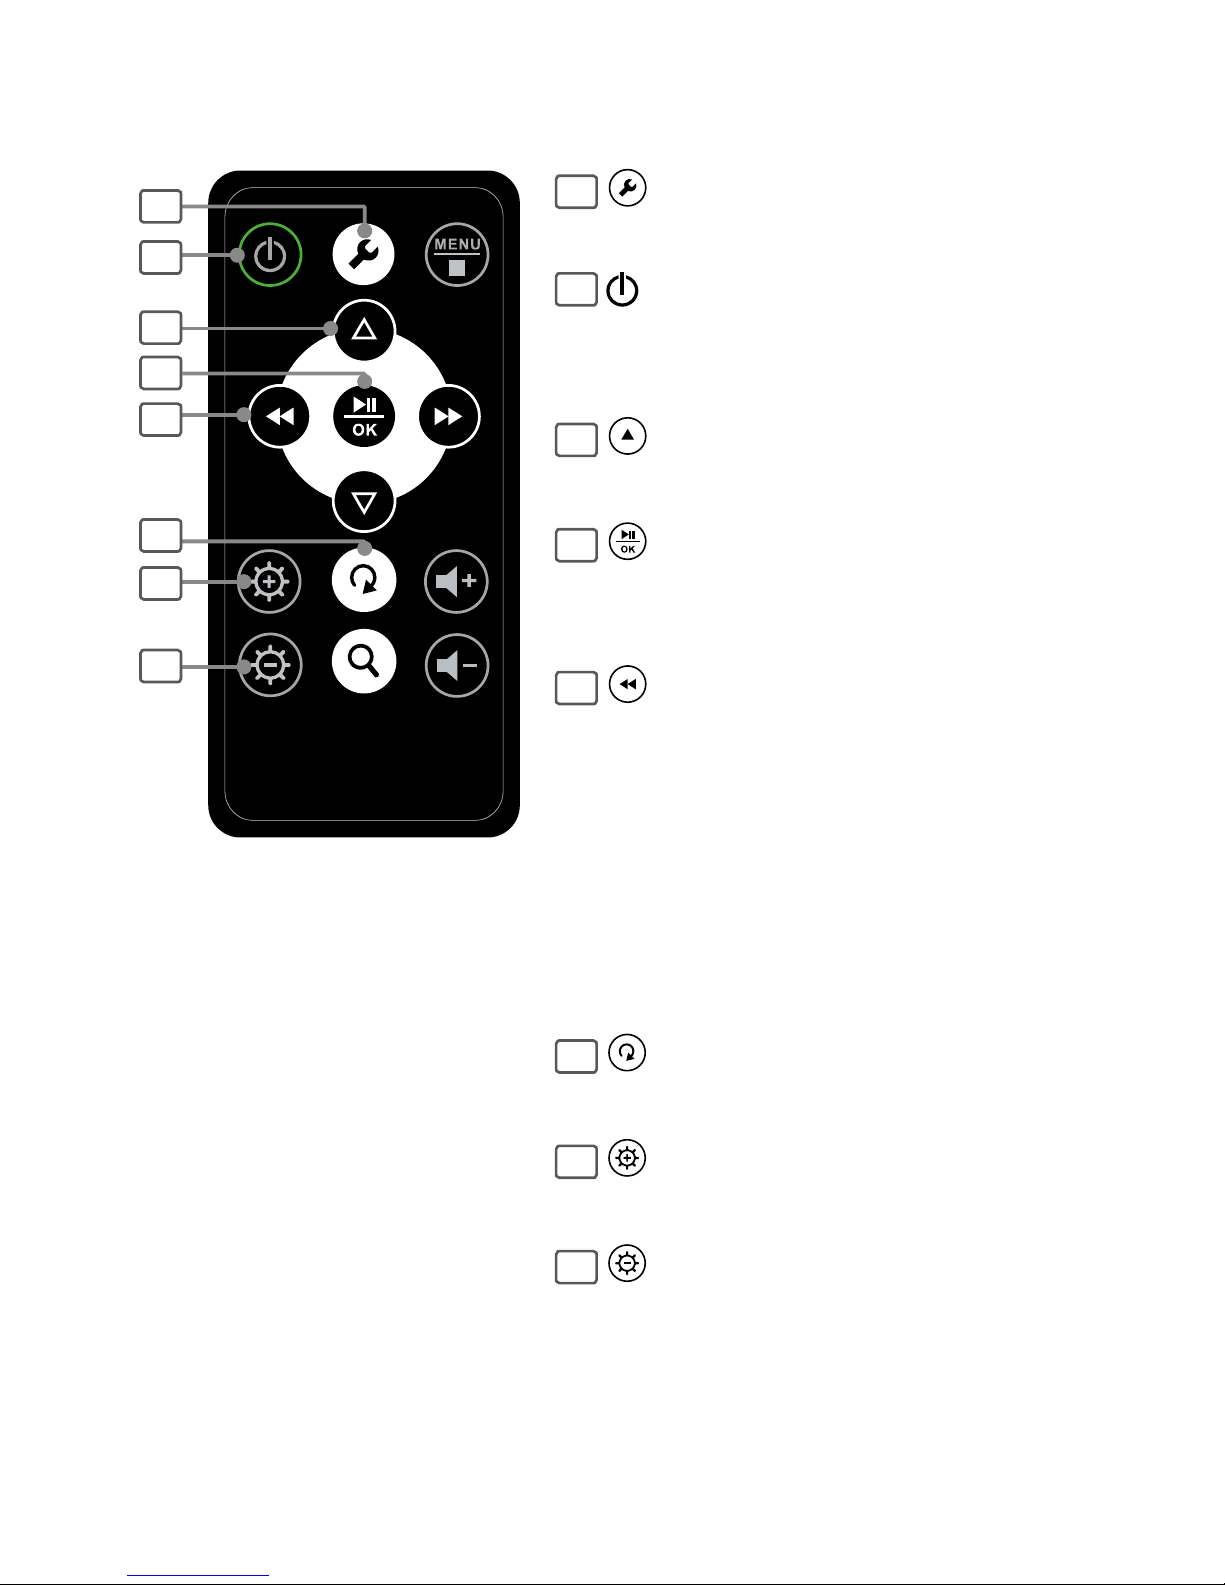
Remote control
1
2
3
4
5
6
7
8
1
Setup:
Press to enter Setup mode.
2
Standby / On:
Turn on the projector or go to standby
mode.
3
Up:
Press to move up in the menus.
4
Play / Pause / OK:
• Press to play or pause the playback.
• Press to conrm the selection.
5
Left / REV / Previous
• Press to move left in the menus.
• Press to rewind the current playback le
under Video and Music mode.
• Press to return to the previous le when
the music or video playback is been
paused.
• Press to return to the previous le in the
Photo mode.
6
Rotate:
Press to rotate the photo.
7
Brightness +:
Press to increase the brightness.
8
Brightness -:
Press to decrease the brightness.
Page 8
8
14
9
10
11
12
13
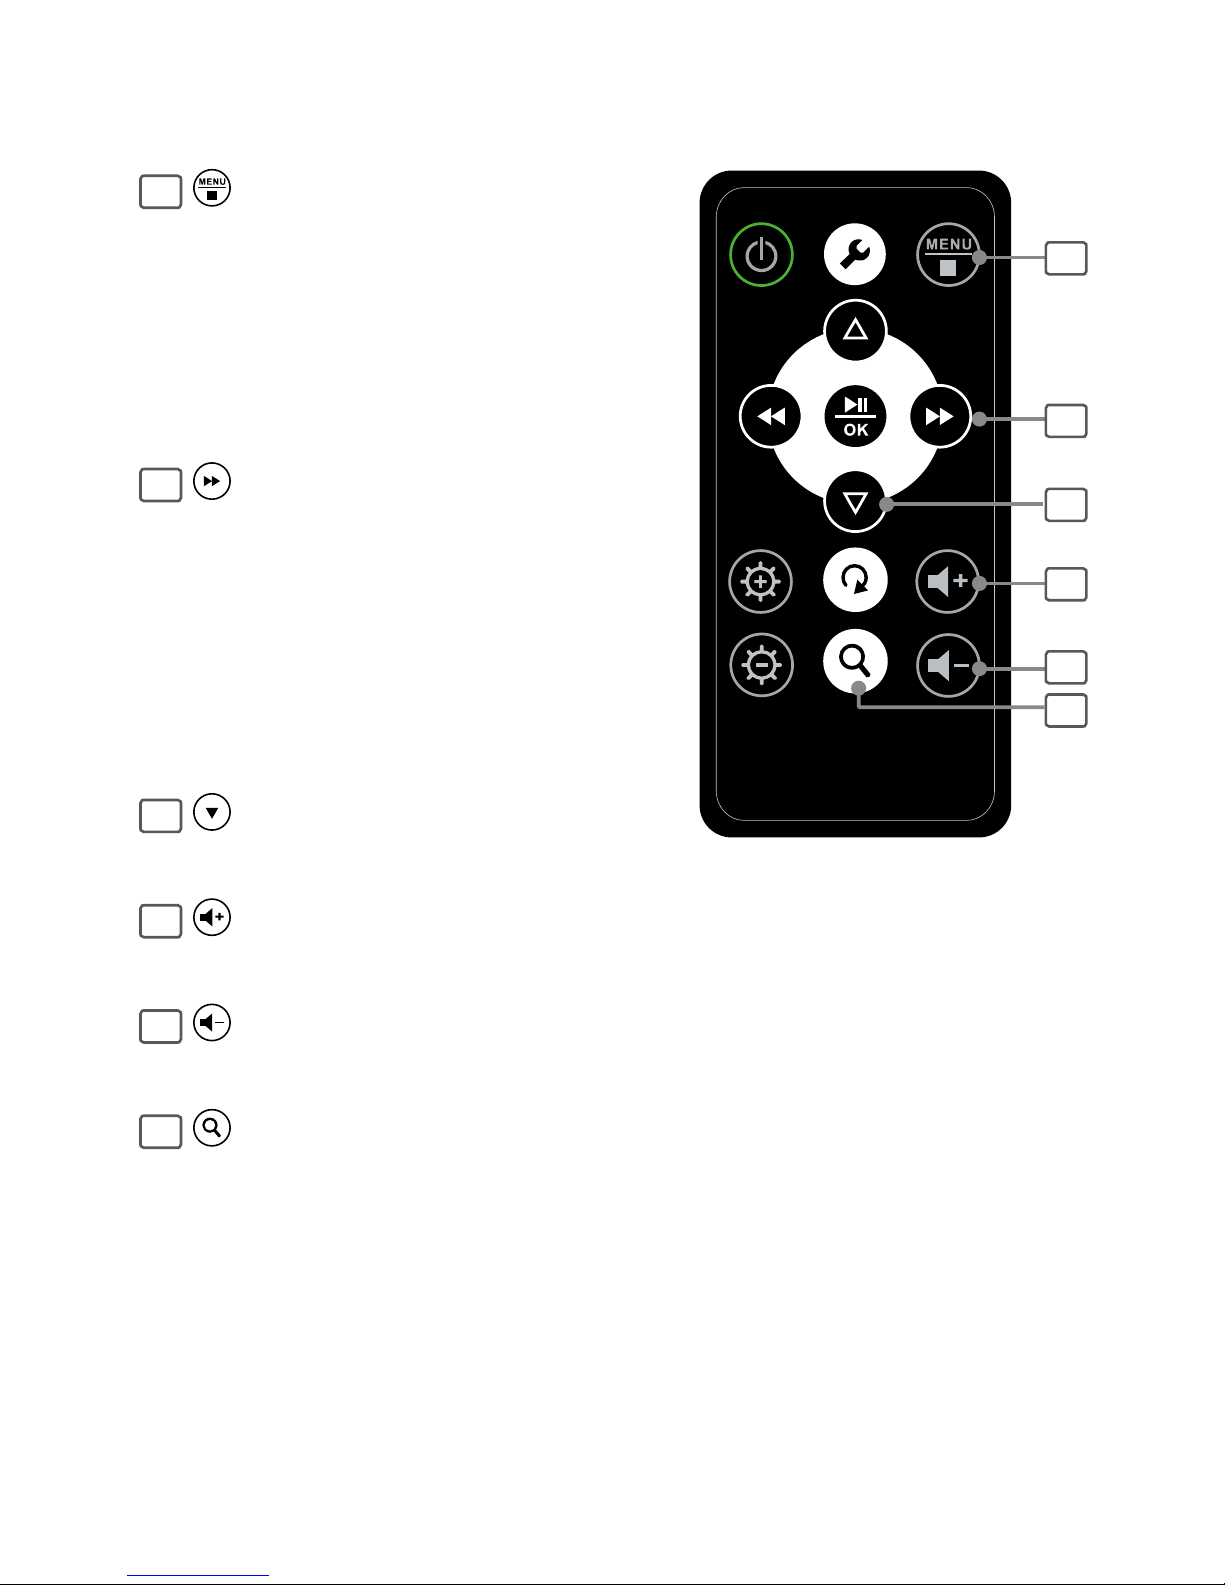
9
Menu / Stop / Back
• Press to return to the upper menu or
main menu.
• Press to stop the current playback le
under Video and Music mode.
• Press to bring up the thumbnail in the
Photo mode.
10
Right / F.FWD / Next:
• Press to move right in the menus.
• Press to fast forward the current playback
le under Video and Music mode.
• Press to skip to the next le when the
music or video playback is been paused.
• Press to skip to the next le in the Photo
mode.
11
Down:
Press to move down in the menus
12
Vol +:
Press to increase the volume.
13
Vol -:
Press to decrease the volume.
14
Zoom:
Press to zoom the photo from 25% to
200%, video from 2x to 4x.
Page 9
9
Remote control
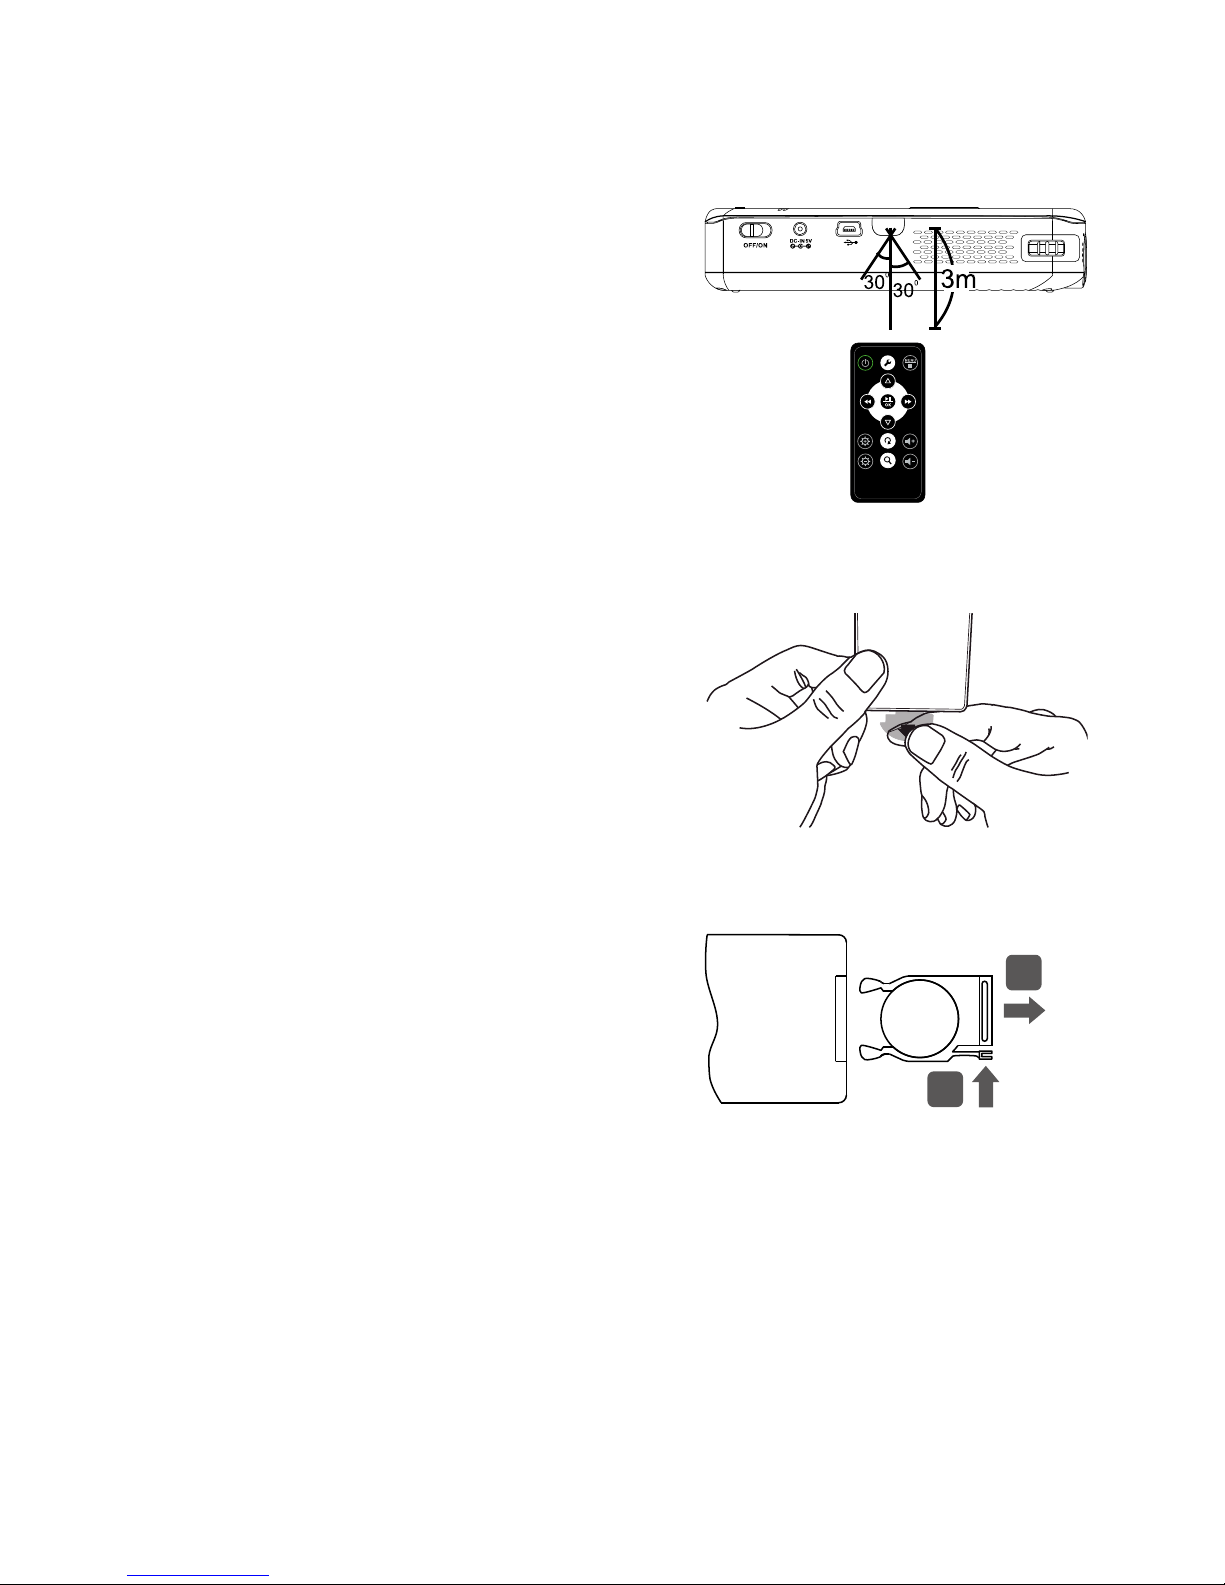
Remote control operation range
• Point the remote control unit no more
than 3 meters from the remote control
sensor and within 60° of the right of
the unit. The operating distance may
vary according to the brightness of the
room.
Using the remote control for the rst time
• Remember to remove the insulating
mylar strip from the battery if the
remote control is being used for the
rst time.
Battery replacement of the remote control
1. Press and hold the battery release
tab in the direction of arrow.
Note: Take care of your nger nails
when you press and hold the battery
released tab.
2. Pull out the battery holder completely in the direction of arrow.
3. Remove the old battery.
4. Place a new battery in the holder.
Note: Use a 3V lithium battery (No. CR2025 or equivalent).
+
CR2025
1
2
Page 10

10
Cautions of the remote control
• Small button cell batteries such as used in the remote handset for
this projector are easily swallowed by young children and this is
dangerous. Keep loose button cells away from young children and
make sure that the battery holder tray is secure in the remote control.
Seek medical advice if you believe a cell has been swallowed.
• Improper or incorrect use of batteries may cause corrosion or battery
leakage, which could cause re, personal injury or damage to
property.
• Install the batteries correctly by following the polarity (+ and -)
indications in the battery compartment.
• When the batteries are exhausted, the remote control will not function.
• Use only the types of the batteries which are indicated in this manual.
• Do not dispose of the used batteries as domestic waste. Dispose of
them in accordance with the local regulations.
Page 11

11
Charging the battery
• Charges the battery when the (low battery indicator) appears
on the screen. The LED indicator lights orange when charging the
battery. Lights yellow-green when the battery is fully charged.
Note:
• Please switch the power to off before charging the battery.
•
The projector may not response if the power adapter/USB cable removes
from DC-IN jack/Mini USB port when the battery is fully charged. To
activate the projector again, please re-connect the power adapter/USB
cable into DC-IN jack/Mini USB port, and then turn the power switch to on
and off in order.
Charging the battery using the power adapter
• Connect one end of the supplied
power adapter to the projector and
the other end to the wall socket.
Charging the battery using a computer.
1. Use the supplied USB cable to
connect the mini-USB connector
to the projector, and the regular
USB connectors to two available
USB ports on a computer.
2. It may take few seconds for
Windows™ to recognize the
projector. When the projector
has been recognized, the
charging process will be started.
Power adaptor
Example: Laptop
(not supplied)
Mini USB cable
Page 12

12
The battery icons indicate battery level as following:
Full: The battery icon disappears in few seconds.
Medium: The battery icon disappears in few seconds.
Low: The battery icon remain on for a longer time.
Nearly empty: The battery icon ashes for a few seconds to
alert.
Note:
•
The battery is partially charged at shipment. Please charge to Full
( )
for use at the rst time, and it take about 4.5 hours at fully
charged. For normal use, the playback time is approximately 2.5
hours.
• To prolong the battery life, it is recommended to empty (completely
drain) the battery before the battery’s rst recharge.
• The lifespan of the battery is limited, and it will age every time it is fully
charged or discharged. The battery capacity will slowly be drained as
it ages. Therefore, aged batteries will provide a short lifespan.
• T
he battery power is running down slightly when the projector is in standby
mode.
CAUTION
• May explode if the battery is incorrectly replaced or disposed of in
re. Replace only with the same or equivalent type by a qualied
technician.
• Do not short circuit.
• Do not place the battery in direct sunlight or in excessively hot places
(over 140°F (60°C) such as the dashboard of cars.
• Use only with the specied power adapter (5VDC, 2A).
Page 13

13
Connection
Insert a memory card
1. Lift open the plastic cover.
2. Insert your memory card into the
appropriate slot according to the orientation
marked on the card slot, then close the
cover.
3. To remove the memory card, ip out the
plastic cover, and then push the memory
card to eject it from the card slot.
Connect with AV device (AV in)
• Connect AV-In jack with other AV device's
Audio/Video out jack using supplied 3.5mm AV
cable.
Note: Be sure to match up the correct color
(Yellow, White, Red) with the cable connectors.
Connect to external stereo speakers
• connect the earphone output to an earphone/
headphone or speakers which built-in internal
amplier using the 3.5mm audio cable.
Note: This projector supports only to output
the audio to dynamic speakers (active
speakers). Connect to a wall socket if the
speaker you connected need higher power
comsumption. For more speaker's deatails,
refer to its instruction manual.
3.5mm
AV cable
(supplied)
Example: DVD player
Memory cards
(not supplied)
• •
• •
• •
K
Example:
stereo speakers
O
K
O
K
Page 14

14
Getting started
Turn the power on/off
• Slide the power switch to ON. The
projector begins to project an image
and the charging indicator turns
yellow-green.
Note: The video output on some
video devices is defaulted to OFF.
Please refer to the device’s manual
to enable the video output.
• Press STANDBY button to put the projector in standby mode. Press
STANDBY button again to wake it up.
Note: If no signal is inputted for a while, the projector may turn off the
power automatically depending on the Auto Power Off setting under
SETUP ( ) menu.
• Turn the power off, press STANDBY button, and then slide the power
switch to OFF.
Page 15

15
Distance and projective image size
• The distance between the screen and projector is 0.2m at least. It
recommends to project the image onto a white and at surface.
• The projector can be projected from 7 to 65 inches (178~1650 mm)
diagonal image. Refer to the table below for more projective image
size.
Diagonal SIze Image width Image height
Distance between
screen and projector
7 in (17.88cm) 5.6 in (14.2 cm) 4.2 in (10.6 cm) 8.3 in (21 cm)
14.3 in (36.2 cm) 11.3 in (28.7 cm) 8.5 in (21.7 cm) 16.8 in (42.7 cm)
21.5 in (54.6 cm) 17 in (43.1 cm) 12.8 in (32.6 cm) 25.6 in (65 cm)
28.7 in (73 cm) 22.9 in (58.2 cm)
17.4 in (44.1 cm) 34.4 in (87.5 cm)
36 in (91.4 cm) 28.6 in (72.7 cm) 21.7 in (55 cm) 43.2 in (109.7 cm)
43.2 in (109.8 cm) 34.5 in (87.6 cm) 26 in (66.1 cm) 52 in (132.5 cm)
50.5 in (128.2 cm) 40.4 in (102.6 cm) 30.6 in (77.7 cm) 61.3 in (155.8 cm)
57.7 in (146.6 cm) 46.1 in (117 cm) 34.7 in (88.2 cm) 70 in (178 cm)
65 in (165cm) 52 in (132 cm) 39.4 in (100 cm) 79 in (201 cm)
Adjust the focus
• Rotates the Focus wheel to bring the
object into focus.
Page 16

16
Basic operation
Select a mode
Battery
status
Inputted
source
Movie
Photo
Edit
Music
Setup
1. Once the power is turned on, the main menu will appear on the
screen as illustrated above.
2. Press / / / to select the desired mode, then press
to enter.
Note: When an external source is been inputted, the inputted source icon
will appear on the screen automatically. The AV-IN has a higher priority if
both AV-IN and card slot have been connected. To playback the media from
the memory card, please remove the AV-IN cable.
Page 17

17
Photo mode
Photo Slideshows
1. Press / / / to select Photo ( ) in the main menu,
then press to enter. By default, the photo slideshow will playback
automatically. To enter thumbnail mode, press .
2. Press / / / to select a desired photo, then press to
display the photo by slideshow.
3. Press to return to the previous photo or press to skip to the
next photo.
4. To pause the slideshow playback, press .
5. To enter to the thumbnial, press
.
6. If the thumbnail mode has more
then one page, press /
repeatedly to turn to the next
page. Press / repeatedly
to return to the upper page.
7. To return to the main menu, press .
Background music
1. Press to enter the Setup menu.
2. Press / to select Slideshow Setup, then press .
3. Press / to select Background Music, then press .
4. Press / to On, then press to conrm.
1024x768 2010/01/01
Page 18

18
1. Press / / / to
select Movie ( ) in the main
menu, then press to enter.
2. Press / to select a
desired video, then press to
playback.
3. To pause the video playback, press .
4. Press or during playback. The speed of advance (x2, x4, x8,
x16 and x32) or reverse (x2, x4, x8, x16 and x32) changes for each
press of or .
5. Press and / in order to select the folder from left side
window if more folders are available, then press or to enter
ie list on the right side window.
6. To return to the main menu, press .
Movie mode
Total File: 5
/dev/card1/1
Video
Music
Photo
Video 01 1
Video 02 2
Video 03 3
Video 04 4
Video 05 5
Page 19

19
1. Press / / / to
select Music ( ) in the main
menu, then press to enter.
2. Press / to select a
desired music, then press to
playback.
3. To pause the music playback, press .
4. Press or during playback. The speed of advance (x2, x4, x8,
x16 and x32) or reverse (x2, x4, x8, x16 and x32) changes for each
press of or .
5. Press and / in order to select the folder from left side
window if more folders are available, then press or to enter
ie list on the right side window.
6. To return to the main menu, press .
Music mode
Total File: 5
/dev/card1/1
Video
Music
Photo
Song 01 1
Song 02 2
Song 03 3
Song 04 4
Song 05 5
Page 20

20
Edit
1. Press / / / to
select Edit ( ) in the main
menu, then press to enter.
2. Press and / in order
to select the folder from left
side window if more folders are
available, then press or
to enter ie list on the right side
window.
Copy
1. Press or to select the
le you wish to copy.
2. Press to highlight the le.
3. Repeat the step 1 and 2 to
highlight more les, then press
to highlight Edit button.
Note: The maximum number of les
that can be selected at one time is
20. If you want to copy more than 20
les, please repeat steps 1-3.
4. Press to bring up the Edit
dialogue window.
5. Press or to select Copy,
then press .
Page 21

21
6. Press to enter to left side
window, then press or
to select an destination drive or
folder to be saved.
7. Press to return right side
window, press again to
highlight Edit.
8. Press to bring up the Edit
dialogue window.
9. Press or to select
Paste, then press .
Page 22

22
Delete
1. Follow the steps 1-4 of Copy
to bring up the Edit dialogue
window.
2. Press or to select
Delete, then press .
3. A delete window will pop-up on
the screen. Press / to
highlight Yes, then press to
delete the selected le(s).
Create a new folder
1. Press to enter the left side
window, then press or
to select the drive you wish to
create a new folder.
2. Press to conrm the
selected drive and enter the
right side window automatically.
Page 23

23
3. Press to highlight Edit, then
press .
4. An Edit dialogue window
appears on the screen. Press
or to highlight New
Folder, then press .
5. A virtual keyboard appears on
the screen, press / /
/ to text the folder name and
then press Enter to conrm.
Page 24

24
Copy les from and to a PC
Copy les from a computer to this unit
1. Connect the mini-USB
connector to the projector, and
the regular USB connectors to
two available USB ports on your
PC.
2. Turn on the power of this
projector.
3. It may take a few seconds to
recognize this projector. When
the projector is being recognized, the AutoPlay will pop-up on the
screen automatically.
Note: Pop-up windows may not be operated depending on your Windows
setting.
4. Click on Open folder to view les to access
the folders in the projector.
5. Use standard Windows Explorer le copy
and paste procedures to move content onto
the projector’s internal memory or inserted
memory card.
Disconnect the projector from a PC
• Double click the Safely Remove Hardware
icon on the task bar on Windows operation
system to remove the projector.
Note: For more supported Windows OS details, please refer to the
specications.
Example:
Laptop
(not supplied)
Mini USB cable
Page 25

25
Setup
1. Press / / / to
select Setup ( ) in the main
menu, then press to enter.
2. Press / / / buttons
to select or cycle through
available options.
3. Press to conrm.
Option Sub-options Description
Lamp mode General
Mode
Adjust the color balance according to the
ambient light of the projector’s location.
Options: Normal, Bright
Other Mode Adjust the environmental illumination.
Options: Boost, Eco, Off
Image
Setup
Brightness Adjust the screen’s brightness
Options: -4 ~ +4
TFT
Contrast
Adjust the screen’s contrast.
Options: -4 ~ +4
TFT
Saturation
Adjust the screen’s saturation.
Options: -4 ~ +4
Slideshow
Setup
Interval
Time
Select the interval time for photo slide show.
Options: 5Sec., 10Sec., 15Sec., 30Sec., 1Min.,
3Mins., Off
Transition
Effect
Select the style of transition.
Options: No Effect., Blind Vertical, Blind
Horizontal, Color Fill Ver., Color Fill Hor.,
Fade In/Out, Random
Background
music
Enable or disable the slideshow background
music.
Options: On, Off
Page 26

26
Option Sub-options Description
Slideshow
Setup
Power ON
Music
Enable or disable the sound when opening the
projector.
Options: On, Off
Custom
Setup
OSD
Language
Select the preference language to display on
the screen.
Options: English, French, German, Italian
Spanish, Portuguese, Dutch, Polish
Auto Power
Off
Set the timer for standby mode if the projector
is inactive status. Please note that the timer
duration will automatically reduce to half when
playing music.
Options: Off, 3mins, 5mins, 15mins
Audio
Source
Due to the different electrics voltage of external
audio source, please select an appropriate audio
option depending on the source you connected.
Options: DVD, Iphone & Others
Reset Restore the factory default settings. WARNING!
Select this function will erase all previously
stored settings.
Options: Confirm
Exit
Page 27

27
Helpful Tips
No image projects
• Check if the power adapter is plugged securely into the power outlet.
• Check if the Power switch on the projector is set to on.
• Check if no power in the power outlet.
• Charge the battery when the low battery reminder appears on the
screen.
No sound.
• Ensure the audio output is connected properly.
• Press the Volume + buttons.
The image is blur or invisible.
• Adjust the Focus wheel.
• Project the image onto a at and white surface.
• The distance between the screen and projector is 0.2m at least.
• Shorten the size of projective image. The imge size of projection is
between 7 to 65 inches (178~1650mm).
• Reduce or darkened the ambient light.
Image is too small or too large.
• Move the projector closer to or away from where the image is being
projected.
Unable to play the multi-media les(photo, video and music).
• The format of the les may not be compatible with the projector.
Please convert these media les to the readable formats. For more
supported formats, please refer to specications.
• Check if using compatible memory cards.
Page 28

Specications
Display Technology LCoS
Light source LED
Resolution 640 x 480 pixels
Aspect ratio 4 : 3
Focusing Manual
Projection Image
Size
178~1650 mm (7"~65")
Contrast ratio 200 : 1
Brightness 12 lumens
Supported ies Video: MPEG-1, MPEG-4 SP
Music: MP3
Photo: JPEG
Card Reader slot SD/SDHC/MMC/MS-pro
Built-in memory 128MB (option)
Inputs DC-In, Earphone out, AV IN
Speaker 0.5W x 2
Tripod Socket 1/4" - 20
Dimension 126mm x 60mm x 27mm (L x W x H)
Weight Approx. 200g
Operating
temperature,
humidity
10˚–35˚C, 10–80% RH
Power Source AC 100-240V 50 / 60 Hz; DC 5V/2A
Battery x 1 (Built-in Li-polymer)
Supported operation
system for mass
storage
Window XP/Vista/7
 Loading...