

Page 1
USER'S MANUAL
PDVD-13609LC
9" (22cm) portable DVD Player
with USB and Card Slot
Before connecting, operating or adjusting this product,
please read this user's manual carefully and completely.
Page 2

Table of Contents
Contents
Table of Contents
Safety Precautions
Identification of Controls
Main Unit
R emote control unit
T ypes of Playable Discs
P1
P2
P3-P5
P3
P4-P5
P5
SETUP Menu Setting
General Setup Page
Audio Setup Page
Video Setup Page
Preference Page
Password Setup Page
Battery Parameters
Parameters and specifications
P6-P8
P6
P6-P7
P7
P7-P8
P8
P9
P9
1
Page 3
Safety Precautions
WARNING
RISK OF ELECTRIC SHOCK
DO NOT OPEN
Warning:To reduce the risk of electric shock,do not remove
the cover or back of this product.There are no user-serviceable
parts inside. Refer servicing to qualified service personnel.
Warning: To reduce the risk of fire or electric shock, do not
expose this product to dripping or splashing water,rain, or
moisture. Do not place objects filled with water such as vases,
on the Product.
Warning: This digital video disc player employs a laser system.
Use of controls,adjustments, or the performance of procedures
other than those specified herein may result in hazardous
radiation Exposure.
Warning: To prevent direct exposure to laser beam,do not open
the enclosure.Visible laser radiation when open.
Warning: Never stare directly into the laser beam.
Caution: Do not install this product in a confined space such
as a book case or similar unit.
Warning: when the unit using by child, parents must make sure
to let the child understand all contents in Instruction book how
battery using to guarantee using battery correctly all the time.
Warning: when find battery overheat, swell or dour, please
stop using battery and contact service centre for getting
replacement.
Warning: do not charging battery on the place of insufficient
ventilation such as: mattress, sofa, cushion , soft mat......
Warning: we will not take any responsibility if user incorrectly
use battery, not following our warning instruction label on the
battery case.
N
N
Notes on Copyrights:
It is forbidden by law to copy, broadcast, show,broadcast via
cable, play in public, or rent copyrighted material without
permission.
This i te m in corpo ra te s copy prot ec ti on tech no lo gy that i s
prot ec te d by U.S. pa te nt s and oth er i nt ellec tu al p roper ty r ig hts
of Rov i Co rp orati on .R everse en gi ne ering a nd d is assem bl y
are pr oh ib ited.
SERIAL NUMBER:
You can find the serial number on the back of the unit.This number
is unique to this unit and not available to others.You should record
requested information here and retain this guide as a permanent
record of your purchase.
Model No. ______________________________
Serial No. ______________________________
Date of Purchase_________________________
charge
strong
impact
over
heat
40 C
2
Page 4
Identification of Controls
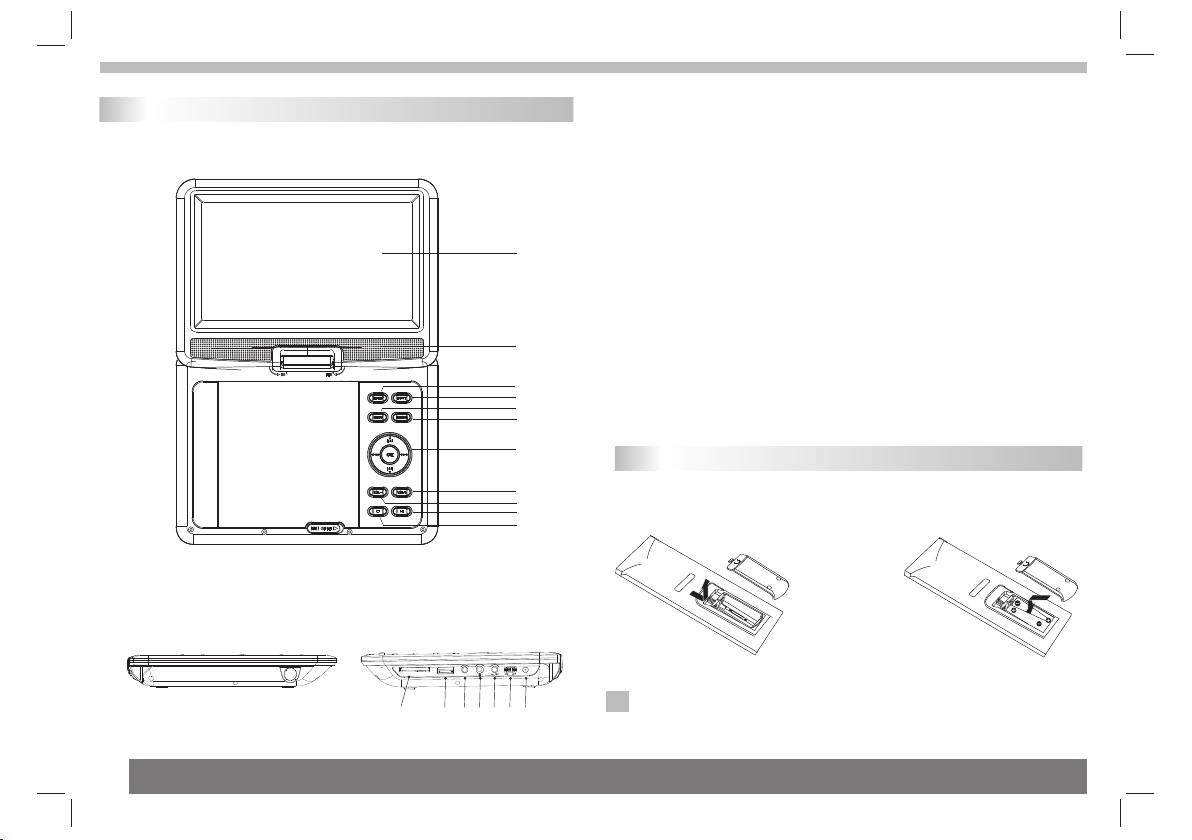
Main Unit
1.TFT screen
2.Speakers
3.SETUP
4.MODE
5.MENU
1
6.DVD/SD/USB
Select input source,DVD/Card/USB
7.UP/DOWN/LEFT/RIGHT
select an item in the menu.
2
3
4
5
6
7
8
9
10
11
when playing CD,VCD,DVD,If available
UP:previous track
Down:Next track
Left:Fast reverse
Right:Fast forward
Insert the battery
1.Open the battery door.
8.VOL+
9.VOL-
10. PLAY/PAUSE
11. STOP
12.SD/MMC/MS
13.USB
14.COAXIAL
15.Headphone out jacks
16.AV OUT
17.Power ON/OFF switch
18.DC IN 9-12V
2.Insert two AAA size batteries.
3
V
2
1
-
9
N
I
S
M
/
C
M
M
/
D
S
B
S
U
12
14
13
DC
L
A
I
X
A
O
C
1516
18
17
1 2
NOTES:
N
Remove battery during storage or when you are not using the DVD
player for a long time.
Page 5

Identification of Controls
Remote control unit
DVD
OSD
11
GOTO
26
17
18
10
VOL- VOL+
13
19
5
6
7
8
15
1.PLAY/PAUSE
Press PLAY/PAUSE once to pause playback, pressing PLAY/
PAUSE second time will resume the playback.
2.STOP
When this buttom is pressed once, the unit records the stopped
point,from where playback will resume if ENTER is pressed after
wards. But if STOP button is pressd again instead of ENTER
button, there will be no resume function.
3.Reverse Skip
Go to previous chapter/ track to the beginning.
SD/USB
MUTE
SLOW
MENU
25
23
27
4
22
20
16
14
12
21
2
9
24
4.Forward Skip
Go to next chapter/ track.
5.ZOOM
: Use ZOOM to enlarge or shrink the video image.
DVD VCD
1.Press ZOOM during playback or still playback to activate the
Zoom function. The square frame appears briefly in the right bottom
of the picture.
2. Each press of the ZOOM button changes the TV screen in the
following sequence:
JPEG
: Use ZOOM to enlarge or shrink the picture.
1
3
1.Press 'ZOOM' .
2,Used " " to enlarge,or " " to shorten the picture.
Use the button to move through the zoomed picture.
6.REPEAT
Press REPEAT during playback to select a desired repeat mode.
: you can play a chapter/title/all on a disc.
DVD
VCD CD
Mp3 WMA
Repeat folder/ folder play mode on a disc.
7.A B
To repeat a segment: press AB once to set the starting point for
repeat segment, press it again to set an end point, and the player
will repeat the segment from the start to the end point.
8.PROGRAM
:The program function enables you to store your
DVD VCD CD
favourite tracks from the disc. Press PROGRAM button ,then
PROGRAM MENU will appear on screen, now you can use the
number key to direct input the titles,chapters or tracks number and
select START option. TO resume normal playback, press PROGRAM
and select STOP option on the program menu.
: you can play a track/all on a disc.
: you can select shuffle/ random/ single/ Repeat one/
4
Page 6

Identification of Controls
Remote control unit
:You can press PROGRAM repeatly to select the slide show
JPEG
mode, the are 16 types slide show.
9. MUTE
Disable Audio output.
10.TITLE
Return to DVD title menu.
11.OSD
Switches the OSD language.
12.0-9 NUMBER BUTTON
Selects numbered items in a menu.
13.ENTER
Confirms menu selection.
14. MENU
Accesses menu on a DVD disc.
15.DISPLAY
To display the playtime and status information.
16.AUDIO
Press AUDIO repeatedly during playback to hear a different
DVD
audio language or audio track, if avilable.
Press AUDIO repeatedly during playback to hear a different
VCDCD
audio channel (Stereo, Left, or Right).
17.SUBTITLE
Press SUBTITLE repeatedly during playback to hear a different
subtitle languages.
18.ANGLE
Press ANGLE will change the view angle, on DVDs that support this
feature.
19.SETUP
Accesses or removes setup menu.
20.10+ BUTTON
In order to select a track 10 or greater, first press 10+, For example;
select track 12, first press 10+, and then press number 2 button.
21.STEP
Press STEP once to pause playback, Form this station, press STEP
to advance one video frame.
22. BUTTON
Press BUTTON allow skipping back at 5-level speed(X2->X4->
X8->X16->X32), press ENTER button return to normal playback.
23. BUTTON
Press BUTTON allow skipping ahead at 5-level speed(X2->X4->
X8->X16->X32), press ENTER button return to normal playback.
24. PBC
PBC on/off switch. Only for VCD, For other discs, the function
is invaild.
25.SLOW
Press Slow button repeatedly to enter slow playback, and cycle
between different speeds. The speeds are 1/2,1/4,1/8,1/16,and
normal.
26.GOTO
Goto time point , title or chapter you want in DVD Mode.
27.DVD/SD/USB
DVD/CARD/USB.
Types of Playable Discs
_________________________________________
_________________________________________
_________________________________________
_________________________________________
In addition, this unit plays , DVD -R, DVD +R,DVD -RW,DVD +RW,
Kodak Picture CDs, SVCD, and CD-R / CD-RW that contains audio
titles,MP3, WMA,JPEG and DivX files.
_________________________________________
DVD
(8 cm / 12 cm disc)
Video CD (VCD)
(8 cm / 12 cm disc)
Audio CD
(8 cm / 12 cm disc)
5
Turn off the power and keep AC cord pulled out from the outlet when connecting the systerm.
Page 7

SETUP Menu Setting
General Setup Page
Press SETUP button to get the setup menu. Use direction buttons
to select the preferred item. After finishing settings, press
SETUP again to normal display.
The following menu items can be changed:
GENERAL: selects the GENERAL PAGE menu.
AUDIO: selects the AUDIO PAGE menu.
VIDEO: selects the VIDEO PAGE menu.
PREFERENCE : selects the PREFERENCE PAGE menu.
PASSWORD: selects the PASSWORD PAGE menu.
General Setup Page
Angle Mark
Displays current angle setting information on the right hand corner
of the TFT screen if available on the disc.
OSD Language
You can select your own preferred language seetings.
Closed Captions
Closed captions are data that are hidden in the video signal of some
discs.Before you select this function,please ensure that the disc
contains closed captions information and your TV set also has this
function.
Screen Saver
This function is used to turn the screen saver On or Off.
- - GENERALSETUP PAGE - -
TV DISPLAY WIDE
ANGLE MARK ON
OSD LANGUAGE ENG
CLOSED CAPTIONS ON
SCREEN SAVER ON
GOTO GENERAL SETUP PAGE
TV DISPLAY: selects the aspect ratio of the playback picture.
4:3 PANSCAN: if you have a normal TV and want both sides of the
picture to be trimmed or formatted to fit your TV screen.
4:3 LETTERBOX: if you have a normal TV. In this case, a wide picture
with black bands on the upper and lower portions of the TV screen will
be displayed.
16:9:wide screen display.
Wide Squeeze:
Set screen mode to 4:3.
ON
OFF
ON
OFF
ENGLISH
FRENCH
GERMAN
ITALIAN
SPANISH
PORTUGUESE
ON
OFF
4:3 PANSCAN
4:3 LETTERBOX
16:9
WIDE SQUEEZE
Audio Setup Page
Audio Setup Page
-- --
- - - -AUDIO SETUP PAGE
DOWNMINX
DIGITAL OUTPUT
DOLBY DIGITAL
GO TO AUDIO SETUP PAGE
STR
RAW
DUAL MONO
DYNAMIC
-
-
-
-
-
-
-
-
-
-
STR
SPDIF/OFF
STR
L-MONO
R-MONO
FULL
MIX-MONO
-
-
-
-
-
-
-
-
OFF
-
SPDIF/RAW
SPDIF/PCM
LT/RT
STEREO
6
Page 8

SETUP Menu Setting
Audio Setup Page
Downmix
This options allows you to set the stereo analog output of your
DVD Player.
LT/RT :Select this option if your DVD Player is connected to a
Dolby Pro Logic decoder.
Stereo :Select this option when output delivers sound from only
the two front speakers.
Digital Output
The function is used to select the SPDIF Output:SPDIF Off,SPDIF
/RAW,SPDIF/PCM.
SPDIF Off: Turns off the SPDIF output.
SPDIF/RAW: If you have connected your DIGITAL AUDIO OUT
to a multi-channel decoder/receiver.
SPDIF/PCM: Only if your receiver is not capable of decoding
multi-channel audio.
Dolby digital
The options included in Dolby Digital Setup are: and
'Dynamic '.
Dual Mono
Stereo:Left mono sound will send output signals to Left speaker
and Right mono sound will send output signals to Right speaker.
L-Mono:Left mono sound will send output signals to Left speaker
and Right speaker.
R-Mono:Right mono sound will send output signals to Left speaker
and Right speaker.
Mix-Mono:Left and Right mixed mono sound will send output
signals to Left and Right speakers.
Dynamic
Dynamic range compression.
'Dual Mono '
Video Setup Page
Video Setup Page
- - VIDEO SETUP PAGE - -
SHARPNESS MID
BRIGHTNESS 00
CONTRAST 00
HUE 00
SATURATION 00
VIDEO INVERSE
GOTO VIDEO SETUP PAGE
Sharpness,Brightness,Contrast,Hue,Saturation:setting the video
quality.
OFF
HIGH
MEDIUM
LOW
Video Inverse:setting TFT screen display inverse on or off.
Preference Page
Preference Page
- - PREFERENCE SETUP PAGE - -
TV TYPE PAL
AUDIO ENG
SUBTITLE ENG
DISC MENU ENG
PARENTAL
DEFAULT
GOTO PREFERENCE PAGE
RESET
1 KID SAF
2 G
3 PG
4 PG13
5 PGR
6 R
7 NC17
8 ADULT
ENGLISH
FRENCH
GERMAN
ITALIAN
SPANISH
PORTUGUESE
OTHERS
ENGLISH
FRENCH
GERMAN
ITALIAN
SPANISH
PORTUGUESE
OTHERS
TV Type
Selecting the colour system that corresponds to your TV when AV
outputs.This DVD Player is compatible with both NTSC and PAL.
ENGLISH
FRENCH
GERMAN
ITALIAN
SPANISH
PORTUGUESE
OTHERS
PAL
AUTO
NTSC
7
Page 9

SETUP Menu Setting
Preference Page
PAL - Select this if the connected TV is PAL system.It will change the
video signal of a NTSC disc and output in PAL format.
NTSC-Select this if the connected TV is NTSC system.It will change
the video signal of a PAL disc and output in NTSC format.
Auto:Chang the video signal output automatic according to the
playing disk format.
Audio:Selects a language for audio (if available).
Subtitle:Selects a language for subtitle (if available).
Disc Menu:Selects a language for disc menu (if available).
Parental
Some DVDs may have a parental level assigned to the complete disc
or to certain scenes on the disc.This feature lets you set a playback
limitation level.The rating levels are from 1 to 8 and are country
dependent. You can prohibit the playing of certain discs that are not
suitable for your children or have certain discs played with alternative
scenes.
Default:Back to the factory setting.
Password Setup Page
Password Setup Page
- - PASSWORD SETUP PAGE - -
PASSWORD MODE ON
PASSWORD
GOTO PASSWORD SETUP PAGE
Password mode: Set password mode on/off. If set to off, change
parental level will not check password.
ON
OFF
Password Setup Page
Password: select the menu password change page.
OLD PASSWORD
NEW PASSWORD
CONFIRM PWD
OK
OLD PASSWORD: Enter the OLD password, (Factory setting is
1369), and the cursor will jump automatically to
NEW PASSWORD
.
NEW PASSWORD: Enter the NEW password. Enter 4 digits from
the remote control unit numeric buttons, and the
cursor will automatically jump to CONFIRM PASSWORD.
CONFIRM PASSWORD: Confirm the NEW password by entering
it again. If the confirmation is incorrect, the cursor
will stay in this column. After entering, the correct new password
again, the cursor will jump automatically to OK.
OK: When cursor is on this button, press ENTER key to confirm
setting.
Note: If the password has been changed, the parentaland disc
N
lock code will also be changed.
The default password(1369)is always active even the password
has been changed.
8
Page 10

Parameters and specifications
Battery Parameters
Electronical parameters
Item
Power requirements
Dimensions (Approx.)
Power consumption
Weight (Approx.)
Operating humidity
VIDEO OUT
AUDIO OUT
Output
Audio
: 9-1 2V 1 .5 A
: 260(L)X182(W)X37.5(H)MM
: <10W
: 0.9KG
: 5 % to 90 %
:1.4 Vrms (1 KHz, 0 dB)
:Speaker:1WX2, output, Coaxial outputHeadphones
Standard requirement
System
Laser
Signal system
Frequency
response
Signal-to-noise ratio
Dynamic range
Accessories
:Semiconductor laser, wavelength 650 nm
: NTSC / PAL
: 20Hz to 20 kHz(1dB)
:More than 80 dB (ANALOG OUT connectors only)
:More than 85 dB (DVD/CD)
:Video/Audio cable,Remote control,
Stereo headphone,Rechargeable battery,
Car cigarette Adapter,car Bag
Battery Parameters
Battery Specifications:
Output:DC 7.4V
Charge / Discharge Time:
Standard charge time:3h ~ 4h
Storage and work circumstances:
1. Storage circumstances Temperature Humidity
6 months
1 week
2.Work circumstances Temperature Humidity
Standard charge
Standard discharge
-20 C +45 C~
-20 C +65 C~
0 C +45 C~
-20 C +65 C~
65+20%
65+20%
65+20%
65+20%
Note: Design and specifications are subject to change prior notice.
N
9
Page 11

Page 12

 Loading...