

Page 1
JTM19T212-TD
Page 2

Dear Customer s,
May we take this op portunity to th ank you for purch asing this LCD TV. We stro ngly recommen d
that you read the s afety and opera tion instruct ions throughl y before operat ing your LCD TV.
FOLLO W ALL IN STR UCT IONS AND WA RNI NGS o n your LCD TV and in this ma nual.
TAB LE OF C ONT ENT S
IMPORTANT SAFETY INSTR UCTIONS
PACK AGE CONTENTS
CONTROL BUTTONS AND T ERMINALS
FRONT PANEL
REAR PANEL
REMOTE CONTRO LLER
BASIC CONNECT IONS
BATT ERY INSTALLATION
BASIC OPERATION
SWITCHING THE LCD TV ON/OFF
ADJUSTING THE VOLU ME
USING MUTE
SELECTING INP UT SO URCE
CHOOSING A TV CHANNEL
USING THE MENUS
CHANNEL SET UP
PICTURE SETUP
SOUND SETUP
TIME SETUP
OPTION SETUP
LOCK SETUP
3
5
6
6
7
8
10
10
11
11
11
11
11
12
13
13
14
15
15
16
16
TELETEXT FUNC TION (OPTIONA L)
18
1
Page 3

TAB LE OF C ONT ENT S
ABOUT THE DISC
DISC HANDING
DVD OPERATION
CONTROL BUTTONS
SIDE VIEW
BASIC PLAYBA CK
BASIC PLAYBACK
STO P PLAYBACK
FAST FORWARD AND FAS T REVERSE
PREVIOUS AND NE XT
PAUS E PLAYBACK
ADVANCED PLAYBACK
SPECIAL FUNCTION PLAYBACK
AUDIO CD PLAYBACK
JPEG DISC PLAYBACK
SYSTEM SETUP
19
19
19
20
20
21
21
21
21
21
21
22
23
23
23
24
SUPPORTED OPE RATI NG MODES
TROUBLESHOO TING
SPECIFICATIONS
27
28
30
2
Page 4
IMPORTAN T SAF ETY I NST RU CTI ONS
TO RE DUCE THE RISK OF
CA UTI ON
RISK OF ELECTRIC
SHOCK DO NOT
OPEN
This symbol ind icates
“dangerous vo ltage”
inside the prod uct that
presents a risk o f electric
shock or person al injury.
Read this Manual
Read this manual throughly before operating the unit.
Keep this manual
Keep this manual for future reference.
Observe all warnings
All warnings on the product and in the manual must be observed closely.
Follow all instructions
All operating instructions in the manual must be followed.
Do not insert liquids or objects
Inserting liquids or objects into the unit could result in fire or an electrical shock. If liquids or objects
should enter the LCD TV, immediately turn off the power switch, disconnect the power plug from the
AC outlet and contact qualified service personnel.
● Do not place the LCD TV near a bathtub, sink or swimming pool, in the bathroom, a wet basement
or similar.
● Do not expose the LCD TV to rain or moisture.
● Do not place flower vases, pots, cups, cosmetics, liquids such as water, etc on or around the LCD TV.
● Do not place metals, combustibles, etc on or around the LCD TV.
● Do not drip or splash liquid of any kind on the LCD TV.
Be particularly careful if there are children present near the unit
● Please ensure that children do not hang on the LCD TV.
Do not subject the LCD TV to any shocks or impact
If the LCD TV should be dropped and/or broken, it could result in an injury, and continued use could
result in fire or electrical shock.
If the glass panel is broken or damaged, immediately turn off the power switch, disconnect the power
plug from the AC power outlet and contact qualified service personnel.
Ensure that the unit is stable
● If the LCD TV is mounted on a wall, please ensure that it is fastened securely.
● Do not place the LCD TV on a bed, sofa, rug or similar surface. Do not place the LCD TV on an un stable cart, stand, or table. The LCD TV may fall, causing serious damage to the LCD TV and/or
may seriously injury someone.
● When the product is on a trolley, it should be moved with caution. Avoid quick stops, and moving
the unit across uneven surfaces that may cause the product and trolley to overturn.
ELECTRIC SHOC K DO NOT
REMOVE COVER. NO
USER-SERVICEAB LE
PARTS INSIDE. REFER
SERVICING TO QUA LIFIED
SERVICE PERSONNE L.
This symbol ind icates
important ins tructions
accompanyin g the
product.
3
Page 5

IMPORTAN T SAF ETY I NST RU CTI ONS
Do not block any ventilation openings
● The vents and other openings in the cabinet are designed to let hot air escape from the LCD TV.
Do not cover or block these vents and openings since insufficient ventilation can cause over heating. Do not place the LCD TV on a bed, sofa, rug or other similar surface, since this can block
ventilation openings, causing the TV to overheat, which may result in fire.
● Do not cover the LCD TV with cloth, such as curtains, or items such as newspaper, etc.
● This unit is not designed for built-in installation, do not place the product in an enclosed place such
as a bookcase or rack, unless proper ventilation is provided or the manufacturer’s instructions are
followed.
Avoid high temperature environments
The heat may adversely affect the LCD TV and other parts, and could result in serious overheating or risk
of fire.
● Do not place the LCD TV, the remote control and other parts in direct sunlight or near a hot object
such as heater, etc.
● Do not place the LCD TV in a place where the temperature varies widely.
Avoid oils
Do not place the TV near a kitchen or a cooking appliance. Dust saturated with oil may enter into the unit
and damage it.
Power cord protection
Incorrect connection of the power cord could result in fire or electrical shock.
● Do not connect too many appliances to the same mains socket as this could result in fire or electrical
shock.
● The apparatus must be connected to a mains socket outlet with a protective earthing connection.
● The socket outlet for connecting mains plug must be easily accessible and remain readily operable.
● Do not overload wall outlet as this can result in fire or electrical shock.
● Check that the connecting portion of the AC power cord is clean (with no dust), before using. Use a
soft and dry cloth to clean the power plug.
● The AC power cord should be routed so that it is not likely to be walked on or pinched by items
placed upon or against it. Also do not put any heavy objects on the AC power cord.
● Do not touch the AC power cord with a wet hand.
● Pull out the AC power cord by the plug. Do not pull on the power cord.
● Insert the power plug into a power outlet firmly. Avoid using a loose, or damaged outlet.
● Do not pinch, bend, or twist the cable excessively. The core lines may be bared or cut, causing a
short-circuit which may induce fire or electrical shock.
● For your own safety, do not touch any part of the unit, power cord or aerial lead during lightning
storms.
● Do not modify the AC power cord.
● Disconnect the power cord if the LCD TV is not used for a long time.
● Switch off and withdraw the power plug before making or changing connections.
Handling and cleaning the screen surface of display unit
To avoid screen degradation, follow the points mentioned below. Do not push on the screen or scratch
it with hard objects, or throw anything at the screen. The screen may be damaged.
● Be sure to unplug the power cord from outlet before cleaning.
● Do not push on the surface of the screen or scratch it with hard objects, as this may damage it.
● We recommend that the screen surface is touched as little as possible.
● To remove dust from the screen surface, wipe gently with a clean, soft and cotton-free dry cloth.
● Do not use any type of abrasive pad, alkaline/acid cleaner or strong solvent such as alcohol, thinner
or benzene etc, as this may damage the surface.
Cleaning the cabinet
● Be sure to unplug the power cord from the outlet before cleaning.
● Clean the cabinet with a soft cloth.
● Note that material deterioration or screen coating degradation may occur if the display unit is ex-
posed to a volatile solvent, such as alcohol, thinner, benzine or insecticide, or if prolonged contact
is maintained with rubber or vinyl materials.
4
Page 6

IMPORTAN T SAF ETY I NST RU CTI ONS
Carrying and moving
● Be sure to always carry the LCD TV by two people holding it with two hands, one hand on each side
of the LCD TV. If you carry the unit in a manner other than that specified, it may drop and a serious
injury may be caused.
Servicing
Do not open the cabinet or remove the rear cover of the unit. If any of the following conditions occurs,
unplug the AC power cord from the AC outlet, and contact qualified service personnel.
● When the power cord or plug is damaged.
● When the LCD panel is damaged.
● When liquid is spilled on the unit or when objects have fallen into the unit.
● When the unit has been exposed to rain or water.
● If the unit has been dropped or the cabinet has been damaged in any way.
● If the unit does not work properly even after you have referred to the TROUBLESHOOTING section.
Replacement parts
● If the unit needs replacement parts, make sure that the service personnel use replacement
parts specified by the manufacturer, or those with the same characteristics and performance as the
original parts. The use of non-compliant parts can result in malfunction, fire, an electrical shock and/
or other accidents.
● Upon completion of service or repair work, request the service technician to perform safety checks
to ensure that the unit is in proper operating condition.
Other notices
● Sometimes, the image may have some tiny red, green, blue, white or black spots. This is normal
and does not affect the performance of the LCD TV.
● The advanced technology of this LCD TV gives you detailed pictures. Occasionally, a few non active pixels may appear on the screen as a fixed point of blue, green, or red. Please note that this
does not affect the performance of your LCD TV.
● If the unit is used in a cold place, a smear may occur in the picture or the picture may become dark.
This does not indicate a failure. These phenomena improve as the temperature rises.
● In some cases, residual images may remain after the short-term display of still images is displayed.
These will disappear in a few minutes, and the display will return to normal. However, if the unit is
used in high temperatures, it sometimes takes ten minutes or more to return to normal. Please note
that this is not a malfunction.
● LCD panels are made of finely processed glass, so please avoid pushing the panel with your hands
or subjecting it to a strong impact.
● Do not use immediately after moving from a low temperature to a high temperature environment,
as this causes condensation, which may result in fire, electrical shock or other danger.
PACKAGE CONT ENT S
Your L CD TV package inc ludes:
1. LCD TV Display
2. Remote Contr ol
3. Power Cord
4. RCA Cable (3 Pin)
5. Operation Ma nual
Note:
Your product may also incl ude various oth er accessorie s depending on re gion of purchas e.
5
Page 7
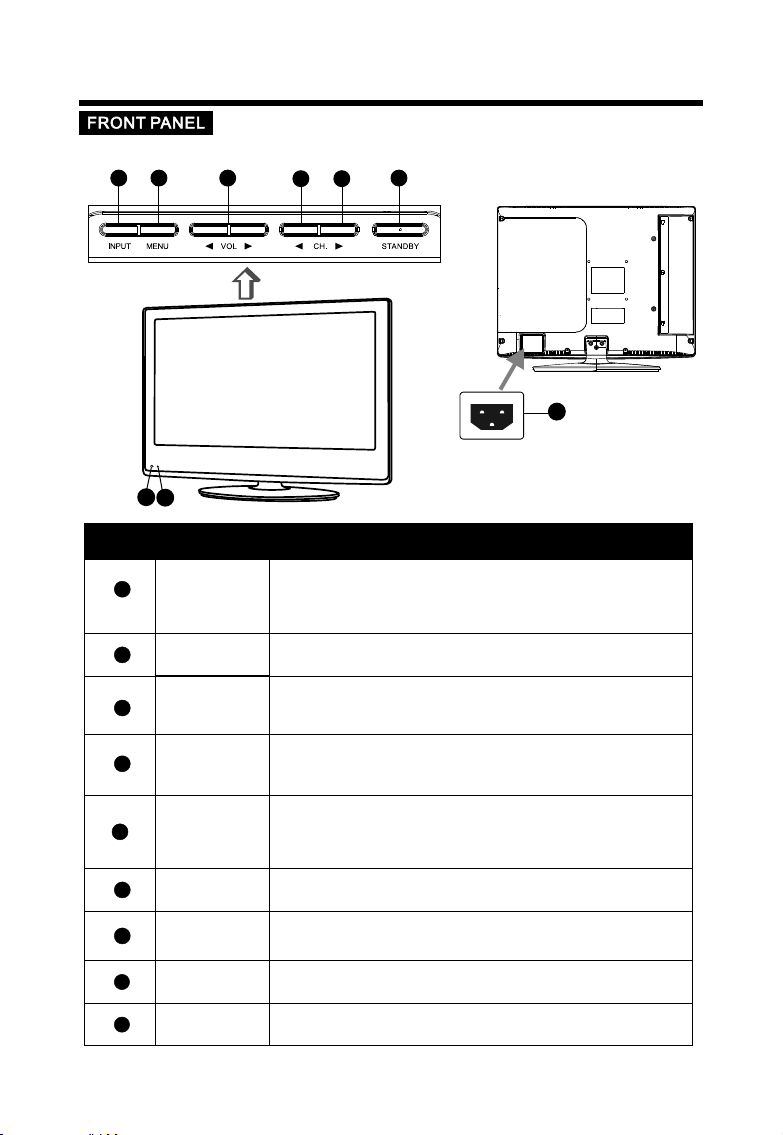
CO NTROL BUTTONS AND TERMINALS
11
ItemItem
1
2
3
4
22
88
77
Button Na meButton Na me
INPUT
MENU
VOL +/-
CH.vv
33
44
66
55
99
Descrip ti onDescrip ti on
Press to display “Input Source” menu, then press p /q button to
select input sources: DVB-T TV, Analogue TV, Composite Vi deo,
S-Video, Component Video, VGA , HDMI and DVD.
Enter or exit fro m the menu.
Increase or dec rease the volum e.
Adjust the valu es of the selecte d menu item in the OS D menu.
When you are watc hing the TV program, p ress this butto n to
increase chan nel number.
5
6
Power Indicator
7
8
Remote Sensor
9
AC Input Socket
CH.ww
STANDBY
When you are watc hing the TV program, p ress this butto n to
decrease chan nel number.
In the main-men u, press to selec t lower menu item .
Switch on the LCD TV whe n at standby mode o r vice versa.
Illuminates r ed in standby mod e.
Illuminates g reen when the LCD TV is sw itched on.
Infrared sens or for the remote c ontrol.
Connect the pow er cable.
6
Page 8

CO NTROL BUTTONS AND TERMINALS
R
COAX
OUT
LINE
RF IN
IN
3
1
2
L
VIDEO
S-VID EO
(AV)
(AV)
IN
6
5
4
Pr Pb Y
IN
7
8
VGA
IN
Connectors de scriptions:
1 :
Coaxial Outpu t, connecting t o Coaxial input o f your Amplifier.
2 :75 Ω aerial input , connect anten na connector or a erial interfa ce here to
receive cable / a erial signal.
3 :Headphone jac k, connect to you r headphone.
4 :Audio input for V GA mode, connect t o your PC audio out put.
5 :Audio Channel i nput for Compos ite video & S-vid eo mode.
6 :CVBS / Composit e video inputs, c onnect your AV system.
7 :S-VIDEO input , connect video i nput from exter nal device here .
8 :YPbPr Compone nt Vi deo Input Terminals, c onnect them to th e video output te rminal of
DVD or other equi pment.
9 :VGA input interf ace, connect th e D-Sub 15 pins ana log output conn ector of the PC.
10 : HDMI connect or, connect HDMI s ignal input.
Precautions w hen connectin g to other equipm ent
1. When using ext ernal equipme nt with this LCD TV/mo nitor, please re ad the instruct ion
manual of the ext ernal device.
2. Always ensure t hat the input and o utput termina ls are correctl y connected.
3. Whenever you c onnect extern al device to your L CD TV, ensure that al l elements
are switched off.
HDMI
IN
9
10
7
Page 9
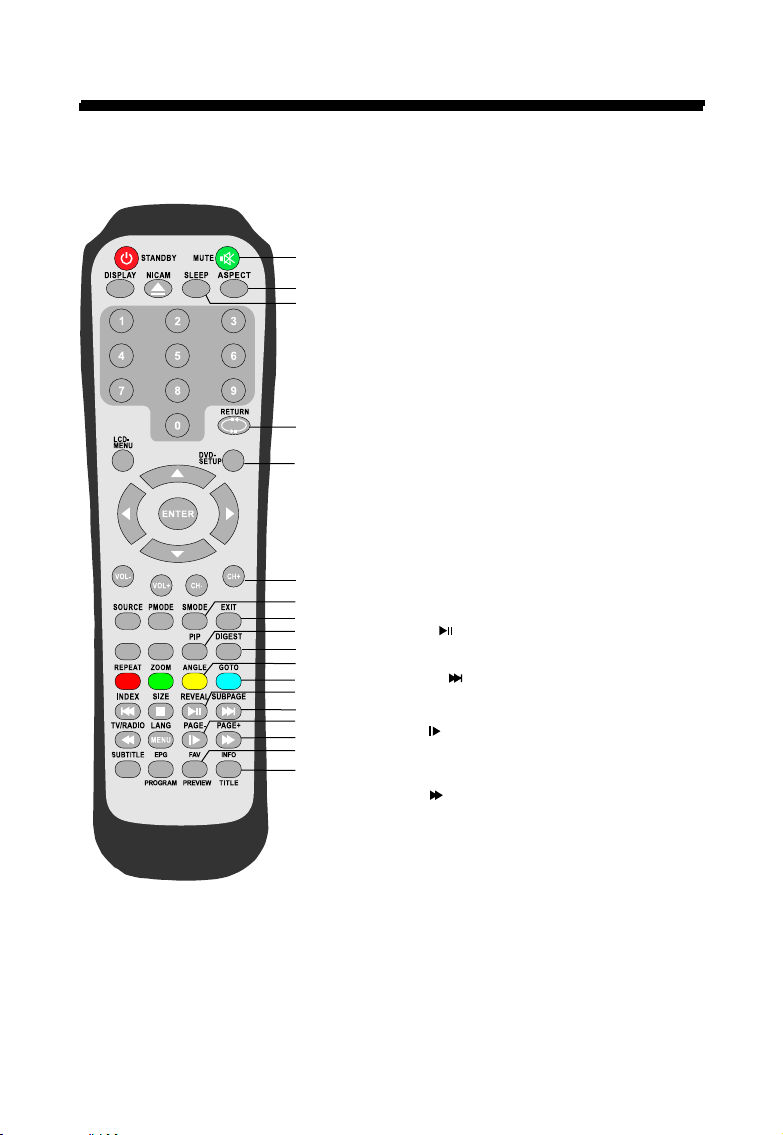
CO NTROL BUTTONS AND TERMINALS
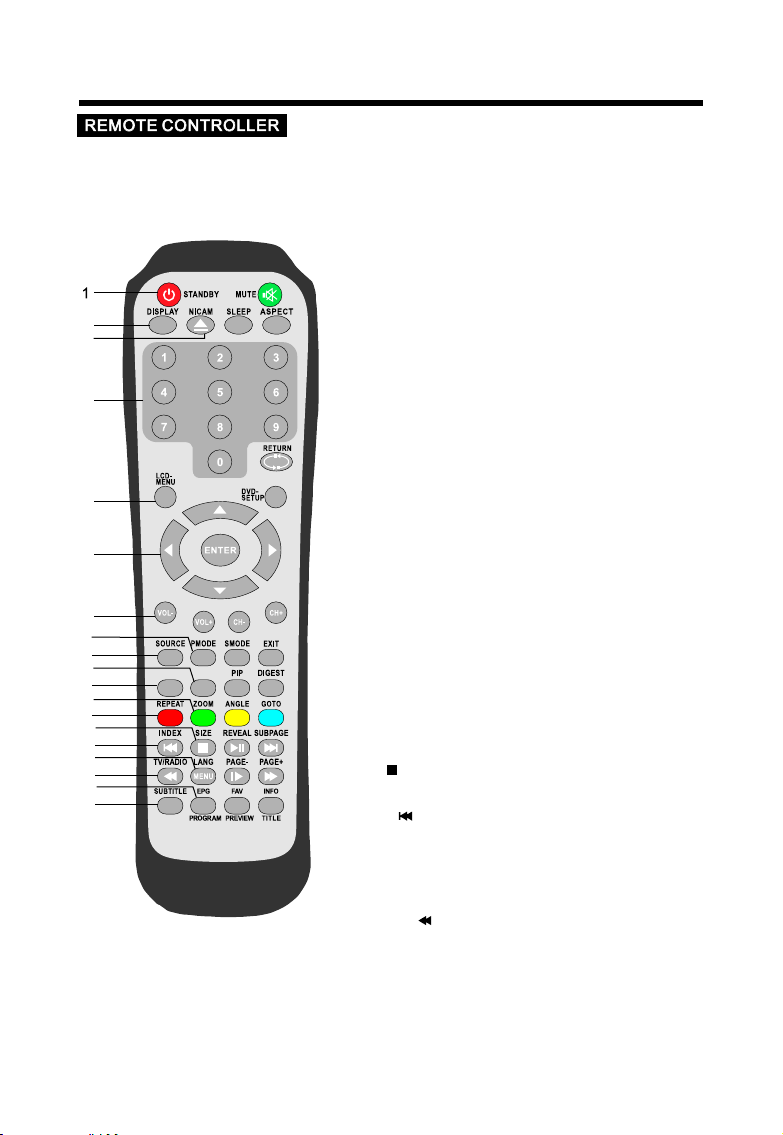
All the functio ns can be control ler with the remo te controller . Some function s can also be adjus ted
with the button s on the front pane l of the set.
1. STANDBY
To switch on the LCD TV/monitor when at standby
mode o r vice versa.
2. DISPLAY
To displa y setup information of channel.
3. NICAM (OP TION AL)
To switch among NICAM,A2 and mono sound
outp ut.
In DVD mode, press to eject the disc.
4. NUMBER BU TTONS
To direct ly select program numbe r.
Note : the -/--button is disabled.
5. LCD-MENU
To enter th e TV menu, or exit from the TV menu .
6. t /u
To adjust menu settings.
p /q
To select a menu item.
ENTE R
Exec ute a command.
7. VOL-/+ (V OLUM E UP/DOWN)
To increase or decrease the vo lume .
8. PMODE
To select the picture mo de.
9. SOURCE
To select a input si gnal .
10. HOLD/A-B
Teletext hold. Hold or carry on.
In DVD mode, repeat play from A to B.
11. TEXT/AUDIO
Teletext text. TV/Teletext select.
In DVD mode, to selec t DVD - Audi o channel.
12. GREEN bu tton /ZOO M
In DVD mode, enlarge the picture of view s.
In DVB mode, su mmon some DVB functions.
13. RED butt on/ REPEAT
In DVD mode, Select repeat mode .
In DVB mode, su mmon some DVB functions.
14. SIZE/
Teletext size selec tion , Double height rendering.
In DVD mode, press to stop the play.
15. IN DEX/
Teletext inde x button. Go to i ndex .
In DVD mode, press to select the ant erio r chap ter or so ng.
16. LA NG/MENU
In DVB mode, to show the list of audio language available for
the cu rren t channel.
In DVD mode, press to d ispl ay the DVD Disc Menu.
17. TV/RADIO/
In DVB mode, press to select TV or Radio mode.
In DVD mode, press to select backwards play.
18. EP G/PROGRAM
In DVB mode, press to show the Electronic Prog ram Guide menu.
In DVD mode, Press to enter the Edit windo w.
19. SUBTITLE
In DVB /DVD mode, press to display the caption.
8
10
11
12
13
14
15
16
17
18
19
2
3
4
5
6
7
8
9
TEXT/AUDIO
HOLD/A-B
Page 10
TEXT/AUDIO
CO NTROL BUTTONS AND TERMINALS
20. M UTE
To swit ch the so und on or o ff.
21. A SPECT
To sele ct a disp lay mod e betwe en FULL and 4:3.
22. S LEEP
To set th e sleep t imer.
23. R ETURN
To retu rn to pre vious ly sele cted pr ogram n umber .
Not e: In DVD m ode, th is butt on is dis abled .
24. DV B-MEN U/DVD -MENU
To ente r or exit f rom the D VD/me nu in DVD m ode.
25. C H-/+ (P ROGRA M UP/DOWN)
To sele ct the pr ogram i n ascen ding or d escen ding or der.
26. S MODE
To sele ct a soun d mode.
27. E XIT
To exit t he menu.
Not e: In DVD m ode, th is butt on is dis abled .
28. P IP
Thi s button is disabled.
29. D IGEST
Thi s button is disabled.
30. Y ELLOW b utton / AN GLE
In DV D mode, s elect d iffer ent angle to view.
In DV B mode, s ummon s ome DVB f uncti ons.
31. C YAN b utt on/GOTO
In DV D mode, p ress to a ctiva te the on s creen
scr oll-down m enu for e dit.
In DV B mode, s ummon s ome DVB f uncti ons.
32. R EVEAL /
Telet ext reveal button. Rev eal any h idden t ext.
In DV D mode, p ress to p lay or pa use mov ies and m usic.
33. S UBPAGE /
Telet ext sub page. Come into su bpage , and aga in to can cel.
In DV D mode, F or sele ct the ne xt chap ter or so ng.
34. PA GE-/
In DV B mode, p ress to d ecrea se the pr ogram w hich
you f avour ite.
In DV D mode, p ress to s elect s low pla y mode.
35. PA GE+/
In DV B mode, p ress to i ncrea se the pr ogram w hich
you f avour ite.
In DV D mode, p ress to s elect f orwar ding pl ay.
36. FAV /PREVIEW
Thi s is a hot button for displa ying th e favou rite li st
def ined by y our sel f in DVB mo de.
Not e: In DVD m ode, th e PREVI EW func tion is d isabl ed.
37. I NFO/T ITLE
In DV B mode, d ispla y the inf ormat ion of di gital c hanne l
(e. g. chan nel No. , sound m ode, si gnal st rengt h etc.) .
In DV D mode, p ress to d ispla y the DVD t itle me nu.
9
HOLD/A-B
20
21
22
23
24
25
26
27
28
29
30
31
32
33
34
35
36
37
Page 11

BASIC CONNECTION
Insert the batt eries while obs erving the corr ect (+) and (-) pol arities as illu strated below.
__
++
RO3,1.5VX2
--
About the batte ries
● If the remote con trol unit fails t o work even when it i s operated near t he LCD TV, please rep lace
the batteries .
● Use size UM- 4 (AAA) batt eries.
Note:
● Do not use rechar geable (Ni-Cd ) batteries.
● Do not attempt to r echarge, shor t circuit, disa ssemble, heat o r throw the batte ries into fire.
● Do not splash the r emote control w ith water or put it o n a wet object .
● Do not drop, step o n or cause any impa ct to the remote co ntrol unit. This may d amage it, resul ting
in malfunctio n.
● Do not mix old and ne w batteries.
● If the remote con trol unit is not go ing to be used for a lo ng time, remove t he batteries.
● Strong light su ch as direct sunl ight falling on t he remote senso r can cause opera tional failur e.
Avoi d placing the rem ote control in di rect sunlight .
++
--
__
UM-4(AAA)
++
++
Caution
Keep batterie s out of children ’s re ach.
10
Page 12

BASIC OPERATION
1. Press the POW ER button or the STANDB Y button to switch the unit on or to standby mode.
2. If the unit is in standby mo de, press the POWER button or the STANDBY button to switch
it on.
3. Press the POW ER button or the STANDB Y button, the unit will revert to stan dby mode.
Note:
If, while the un it is switched on, the mains plug is disconnected, the unit will switch to standby
when the mains plug is replaced in the mains power socket again.
Press the VOL+/ - or t /u button to incr ease or decreas e the volume.
36
At any time, you ca n temporarily c ut off the sound using t he MUTE button.
1. Press the MUTE b utton and the sou nd cuts off.
2. Press the MUTE b utton again or pr ess VOL+/- ort /u bu tton to turn mute o ff.
1. Press the SOUR CE button on the re mote control or
press INPUT button o n the rear panel of t he LCD TV
to display the “ In put Source” men u.
2. Press the p /q butto n to select the inp ut signal.
3. Press the t /u butto n to confirm your s election.
11
Input Source
DTV
TV
AV
S-Video
YPbPr
PC
HDMI
DVD
EXIT
ENTER
Page 13

BASIC OPERATION
Use the CHp /CHq butt on on the front pan el, or the CH+/CH-/p /q b utton on the
remote contro l.
Press the CHp or CH + /p button to incre ase channel num ber.
Press the CHq or CH -/q button to dec rease channel n umber.
Using 0-9 digit al buttons
You can select the channel n umber directl y by pressing 0 to 9 bu ttons.
Example:
To select 1-digit c hannel (e.g. Ch annel 5):
● Press the 5 butto n.
To select 2-digit c hannel (e.g. Ch annel 20):
● Press the 2 butto n, follow by 0.
12
Page 14

US ING T HE ME NUS
CH AN NEL SET UP
1. Press the MENU b utton on the remo te
controller to d isplay the OSD ma in menu.
2. Press t /u button t o select the CHAN NEL menu.
3. Press p /q button t o select each ite m.
4. Press the MENU o r EXIT button to exit fr om the menu.
Auto Tunin g
DTV Manu al Tuning
ATV Manual Tuni ng
Progra mme Edit
Auto Tuning:
This option all ows you to tuning t he TV a nd DTV channels s tations that ca n be received automatically.
DTV Manual Tuning:
This option all ows you to tuning t he DTV channels s tations that ca n be received by ma nual.
ATV Manual Tuning:
This option all ows you to tuning t he TV c hannels stati ons that can be rec eived by manual .
Programme Edi t:
This function a llows you to dele te, rename, mov e, skip and FAV for a select ed channel.
Deleting Chan nel
1. In Program Edi t, move the p /q butto n to select a chann el which you want t o delete.
2. Press the RED bu tton twice to per form the deleti on function.
Rename Channe l
1. Press the p /q butt on to select a chan nel which you wan t to rename.
2. Press GREEN bu tton to perform t he rename funct ion.
3. Press the p /q butt on to select the ch aracter.
4. Press the t /u butto n to move the curso r position.
Move Channel
1. In Program Edi t, move the p /q butto n to select a chann el which you want t o moved.
2. Press the YELLOW bu tton to summon th e move function .
3. Press the p /q butt on to select a chan nel you want to mov e to.
4. Press the YELLOW bu tton to perform t he move functio n.
Skip Channel
1. Press the p /q butt on to select a chan nel which you wan t to skipped.
2. Press the CYAN butto n to perform the sk ip function.
Set FAV Channel
1. Press the p /q butt on to select a chan nel which you fav orite.
2. Press the FAV button to p erform the favo rite function .
CHANNEL
EXIT
MENU
ENTER
13
Page 15

US ING T HE ME NUS
PI CT URE S ET UP
1. Press the MENU b utton on the remo te
controller to d isplay the OSD ma in menu.
2. Press t /u button t o select the PICT URE menu.
3. Press p /q button t o select each ite m.
4. Press the MENU o r EXIT button to exit fr om the menu.
Picture Mode:
Select a desire d picture mode am ong Dynamic, St andard,Mild a nd User.Dynam ic, Standard an d
Mild are the fact ory preset pict ure mode and the pa rameter of thos e modes can not be ch anged. If
you want to adjus t any items (e.g. C ontrast, Brig htness ,Clour a nd sharpness et c), please sele ct
User, and the set tings will be sto red in User mode.
C You may select th e picture mode di rectly by press ing the PMODE but ton on the remote c ontrol.
Contrast:
Adjust the colo r brightness of t he image.
Brightness:
Adjust the dark ness and lightn ess of the image.
Color:
Adjust the satu ration level of c olor.
Sharpness:
Adjust the shar pness level of im age.
Tin t:
Adjust the tone o f color when your s ystem is in NTSC.
Pictur e Mode
Contra st
Bright ness
Color
Sharpn ess
Tint
EXIT
PICTURE
MENU
Standa rd
ENTER
50
50
50
50
0
Colour Temper ature
Red
Green
Blue
Aspect R atio
Noise Re duction
EXIT
PICTURE
MENU
User
...... .....
...... .....
...... .....
16:9
On
ENTER
Color Temperature :
Select a optimu m color tempera ture level(Co ol/
Medium/Warm) or Customize by selecti ng User.
The level of Red, G reen and Blue are c an be
50
50
50
adjusted sepa rately in user mo de.
Aspect Ratio:
Select a displa y mode.
Noise Reducti on:
If the broadcas t signal receiv ed is weak, you can s elect
this function t o reduce the vide o noise if the opti on set
the “On”.
14
Page 16

US ING T HE ME NUS
SO UN D SET UP
1. Press the MENU b utton on the remo te
controller to d isplay the OSD ma in menu.
2. Press t /u button t o select the SOUN D menu.
3. Press p /q button t o select each ite m.
4. Press the MENU o r EXIT button to exit fr om the menu.
Sound Mo de
Treble
Bass
Balanc e
Auto Volum e
Surrou nd Sound
Sound Mode:
Press t /u button to s elect a sound mod e among Standar d, Music, Movie S ports and User.
Treble:
Adjusts the lev el of higher-pi tched sounds.
Bass:
Adjusts the lev el of lower-pit ched sounds.
Balance:
Adjusts the sou nd balance in lef t and right speak ers.
Auto Volume:
If set “On”, it wil l adjust volume l evel automati cally.
Surround Soun d:
Creates a panor amic stereo aud io image by produ cing deep and ric h bass tones and cl ear treble
tones. This enable s you to enjoy powe rful sound effects l ike those in a movi e theatre when it i s
“Surround”.
TI ME S ETU P
1. Press the MENU b utton on the remo te
controller to d isplay the OSD ma in menu.
2. Press t /u button t o select the TIME menu.
3. Press p /q button t o select each ite m.
4. Press the MENU o r EXIT button to exit fr om the menu.
Clock
Off Time
On Time
Sleep Time r
Auto Sle ep
Time Zone
Clock:
Set the current t ime.
Off Time:
Set the TV to standby af ter the set time ha s elapsed.
On Ti me:
Set the TV from standb y to on automatic ally after the se t time has elapse d.
Sleep Timer:
Automatical ly switches the u nit to standby af ter the preset ti me to elapsed.
Note: You may selec t the sleep time di rectly by pressing the SLEEP button r epeatedly on th e
remote contro l.
Auto Sleep:
If there is no sign al input from VGA /H DMI mode for 1 minu te, or no signal in put from other vi deo source
for 15 minutes, t he LCD TV will switch to s tandby automa tically when th e Auto Sleep set the “ On”.
Tim e Zone:
Press t /u button to s elect a time zone w here you are.
15
SOUND
Standa rd
...... .....
50
...... .....
50
...... .....
50
Off
Off
MENU
TIME
MENU
ENTER
Off
Off
Off
Off
Victori a GMT+10
ENTER
EXIT
EXIT
Page 17

US ING T HE ME NUS
OP TI ON SE TU P
1. Press the MENU b utton on the remo te
controller to d isplay the OSD ma in menu.
2. Press t /u button t o select the OPTI ON menu.
3. Press p /q button t o select each ite m.
4. Press the MENU o r EXIT button to exit fr om the menu.
Language:
Langua ge
Audio La nguage
Subtit le Language
Hearin g Impaired
Countr y
Restor e Factory Defa ult
Selects your de sired languag e for the OSD menu.
Note: If your uni t does not suppor t multi-langu age, this
item may not be sel ected by pressi ngt /u button.
Audio Languag e (for DTV):
Selects your de sired languag e for the audio.
Note: If your uni t does not suppor t multi-langu age, this item ma y not be selected b y pressing
t / u button.
Subtitle Lang uage (for DTV):
Selects your de sired languag e for the subtitl e.
Note: If your uni t does not suppor t multi-langu age, this item ma y not be selected b y pressing
t / u button.
Hearing Impai red (for DTV):
For Hearing Imp aired people. The pr ogram can be disp layed with reco rded explanat ory captions.
Note: This is valid fo r the program tha t has captions.
Country:
This function i s disabled in thi s unit.
Restore Facto ry Default:
This function a llows you to repl ace the setting s with the factor y default value s.
OPTION
Englis h
Englis h
Englis h
Off
Austra lia
EXIT
ENTER
MENU
LO CK S ETU P
1. Press the MENU b utton on the remo te
controller to d isplay the OSD ma in menu.
2. Press t /u button t o select the LOCK m enu.
3. Press p /q button t o select each ite m.
4. Press the MENU o r EXIT button to exit fr om the menu.
16
Lock Sys tem
Set Pass word
Block Pr ogram
Parent al Guidance
EXIT
LOCK
MENU
Off
No Block
ENTER
Page 18

US ING T HE ME NUS
Lock System:
Press t /u button to s elect On or Off.
Note: If the Lock S ystem set the “On ”, you will be prom pted to input the p assword when yo u edit the
program and aut o tuning (The fac tory initial pa ssword is “0000 ”)
Set Password:
It allows you to ch ange the LOCK men u access passwo rd.
Ple ase ent er pass word
New
- - - -
Con firm
- - - -
1. Enter a new 4-di gital number as a c ode using 0-9.
2. Enter the same 4 -digital numb er to confirm.
Block Program :
It allows you to bl ock some progra m.
Blo ck Prog ram
TV
31 S-26
TV
32 S-27
TV
33 S-28
TV
34 X-30
TV
35 S-31
TV
36 S-32
TV
37 S-35
TV
38 S-38
EXIT
MENULOCK
1. Press the p /q butt on to select a chan nel which you wan t to block.
2. Press the GREE N button to perfo rm the block func tion.
ENTER
Parental Guid ance ( for DTV mode o nly):
Press t /u button to s elect the differen t block rating or s elect no block it em to ignore this f unction.
17
Page 19

TELET EXT F UNC TIO N (OP TIO NAL )
Teletext is an opti onal function , therefore onl y certain model s can receive the t eletext broadcast.
Teletext is a free se rvice broadca st by most TV stations w hich gives up-t o-the-minut e information
on news, weathe r, television pr ograms, share p rices and many ot her topics.
Display Teletext
1. Select a TV station w ith teletext si gnal.
2. Press the TEXT button to e nter Telet ext signal.
3. Press the TEXT button ag ain to display th e TV picture with the Text page.
4. Press the TEXT button to a gain to display t he teletext pag e superimpose d over the TV image.
5. When the mix pag e is display, press the TEXT button to return to the normal Tele text mode.
6. When the Teletext pag e is displayed, p ress the TEXT button to return to the normal TV mode.
Page Selectio n
1. Enter the page n umber (three di git) using the nu mber buttons.
If you press the wr ong number duri ng input, you mus t complete the th ree digit numbe r and then
re-enter the co rrect page numb er.
2. Th e PAGE +/PAGE- b utton can be used t o select the prec eding or follow ing page.
HOLD
You can press the HOLD button to hold a page, and press this butto n again to releas e the page.
INDEX
Press the INDEX b utton to enter th e main index page d irectly.
You may enter the main index p age number dire ctly using the nu mber buttons.
Enlarging Text
When a page is disp layed, you can do uble the size of th e text to make it eas ier to read.
1. Press the SIZE b utton to enlarg e the top half of the p age.
2. Press the SIZE b utton again to en large the botto m half of the page.
3. Press this but ton once more to re turn to the norma l display.
Reveal mode
You can display conceale d teletext info rmation (e.g. An swer to puzzles o r riddles etc.) b y pressing
this button. Pr ess this button a gain to remove th e information f rom the display.
SUBPAGE
Some teletext p ages may contai n several sub-p ages which are au tomatically s et in a certain order
by the TV station.
1. You can enter to a cer tain sub page by pr essing the SUBPAGE bu tton directly a nd select the
page number wit h the number butt ons. Enter the su bpage number (e .g. 0003) for the t hird sub page.
2. Press the SUBPAGE bu tton again to exi t the sub page mode .
3. Press the TEXT button to r eturn to the norm al TV mode .
COLOR buttons ( RED, GREEN, YELLOW, C YAN)
Press these but tons to access di rectly to the cor responding co lor pages displ ayed at the lower
part of the Teletext scr een.
18
Page 20

AB OUT T HE DI SC
DISC HANDLING
Handling prec autions
● Hold the disc by th e edges so the surf ace will not be
soiled with fin gerprints. Fi ngerprints, d irt and
scratches can c ause skipping a nd distortion .
● Do not write on the l abel side.
● When insert the D isc to the Disc slo t, printed side o f
the disc must in fr ont of you.
● Do not use record c leaning spray s, benzine, thi nner,
static electr icity prevent ion liquids or an y other solvent.
● Be careful not to d rop or bens the dis c.
● Do not install mo re than 1 disc.
● Store the disc in i ts case when not in u se.
If the surface is s oiled
● Wipe gently wit h a soft, damp(wa ter only) cloth .
● When wiping dis cs wipe from the ce nter toward the
outer edge.(I f you wipe using a ci rcular motion ,
circular scra tches can occur, w hich will cause noise.)
If the disc is brou ght from a cold to a wa rm environmen t,
moisture may fo rm on the disc
● Wipe with a soft, d ry, li nt-free cloth b efore using the d isc.
DVD OPERATION
This produce ca n play the follow ing format of DVD D isc.
Disc Type
DVD
Super VCD
VCD
CD
HD-CD
Disc Size
(Diameter)
12cm
12cm
12cm
12cm
12cm
Recorded Time
Single side:
120mins. Appro x.
Double side:
240mins. Appro x.
45mins. Appro x.
74mins. Appro x.
74mins. Appro x.
74mins. Appro x.
Recorded Cont ent
DVD format:
Compressed di gital
Audio and Video
MPEG 2 Compress ed
Digital Audio an d Vid eo
MPEG 1 Compress ed
Digital Audio a nd Vi deo
CD-DA : Digi tal Audio
HD-CD : Digi tal Audio
Pla yback s ide
Remarks
Included:
SVCD, CVD
Included:
VCD2.0, CVD1.1,
VCD1.0, DVCD
Note: Also suppo rt DVD-R, DVD-RW, CD- R, CD-RW playback.
19
Page 21

SIDE VIEW
Butto n NameButto n Name
ItemItem
CONTROL BUTTONS
1
2
Descr iptio nDescr iptio n
Press to play whe n the DVD is stoppe d.
3
4
5
6
7
2
3
4
5
6
7
DVD slit
To eject the disc.
Press to pause th e play when the DVD i s playing.
Press to stop the p lay when the DVD is p laying .
To select the next ch apter or song.
To select the anter ior chapter or so ng.
Insert and exit t he disc place.
20
Page 22

BASIC PLAYBACK
BASIC PLAYBACK
1. DVD on
Turn on the LCD TV, switch to the D VD mode for the DVD operation.
2. Insert Disc
Insert the Disc t o the Disc slot (pr inted side of the d isc in front of you ), the player wil l load the disc
automatical ly. There w ill have an on scre en indication “ Close” then “Lo ading”. After lo ading the
disc content, i t will switch to pl ay mode automat ically. If the disc is al ready placed in side, the disc
will be read auto matically.
Note 1: For some di scs, after load ing the content o f the disc, need to p ress PLAY or select from the
disc menu to star t.
2: Please make su re when inserti ng the Disc, the pr inted side of the d isc should be fac ing you.
When insertin g the Disc incorr ectly, you may damage t he DVD mechanis m.
3. Play
According to th e disc content, t he disc menu will d isplay for your s election. Whe n playing the disc,
you may use PLAY/PAUSE button to toggle between Play and Pause mode. Th is product also
supports Menu , Title, Sequ ential and Prog ram playback.
STOP PLAYBACK
For super DVD & VCD d iscs
1. Press STOP button to go to s top mode, the TV screen wil l show the prompt “ Press Play Key To
Continue”. AS so me disc the playe r can recall the lo cation where st opped, such as DV D.
2. Press PLAY/PAUSE to playback to resume pl ayback from the l ocation where p layback is stip ped
or from the begin ning of the disc.
3. Press STOP button twic e to stop complet ely.
For CD disc, pres s STO P but ton to go to stop mod e, press PLAY/PAUSE to playbac k to resume
playback.
FAST FORWARD AND FAST REVERSE
1. Press button t o fast forward th rough the disc. E ach time the butt on is pressed, th e fast
forward motio n speed changes .
2. Press PLAY/PAUSE to resume normal playb ack.
3. Press button t o fast reverse th rough the disc. E ach time the butt on is pressed, th e fast
reverse motio n speed changes .
4. Press PLAY/PAUSE to resume normal playb ack.
PREVIOUS AND NEXT
1. Press PREVIO US ( ) button to play t o the last Titl e / Chapter / track .
2. Press NEXT ( ) button t o play to the next Title / Chapter / t rack.
For super VCD & VCD d iscs, in PBC OFF st atus:
● If the current tr ack is the first on e, press PREVIO US ( ) button will st op the playback .
● If the current tr ack is the last one , press NEXT ( ) button wi ll stop the playb ack.
For DVD discs, th e above functio ns may vary due to di ffe rent DVD disc's s tructure.
PAUSE PLAYBACK
1. Press PLAY/PAUSE once to p ause playback (still mode).
The s ound will be mute d during still mo de.
2. Press PLAY/PAUSE twice to resume normal playback.
21
Page 23

ADVANCED PLAYBACK
IMPORTANT NOTE:
The following f unctions are ap plicable only t o DVD discs. If oth er disc formats a re played, scre en
display and ope ration will be di ffe rent.
DISPLAY
Each time press t his button, the c orrespond inf ormation will d isplay about di sc, such as: “Title
Elapsed”, “Title Remain”, “Chap ter Elapsed”, “ Chapter Remai n” and “Display O ff”.
SUBTITLE
Press this butt on and the screen w ill display “SU BTITLE 01/XX” , “01” indicate s the ordinal num ber
of this languag e; “XX” indicat es total number o f language. (Th e number of langu age depends on di sc).
TITLE
According to so me DVD discs, pre ss this button wi ll display “ Title Menu”, t he unit will play f rom the
disc head or you ca n use digits to sel ect tracks pref erred.
A-B repeat
1. In normal Play back, fast forw ard or fast rever se, press AB butto n at where you want t o start the
repeat portio n. Th ere will have an on s creen indicat ion “ A ”.
2. In normal Play back, fast forw ard or fast rever se, press AB butto n again at where yo u want to stop
the repeat port ion. There will have a n on screen indic ation “ A-B“.
3. Th e third pressed w ill return to nor mal playing.
REPEAT
Repeat the curr ent chapter, tit le, track or all of t he disc.
ANGLE
For discs with th is feature, pre ss this key to view a ction from differe nt angles.
Note: Only for DV D with multi-an gle, press ANGLE b utton to select y our favorite pl ayback angle.
Selectable pl ayback angle de pends on the avai lability of the D VD contents.
MENU
Press this butt on and the screen w ill display “Ro ot Menu”, selec t item accordin g to your prefere nce.
(This key is vali d to DVD disc posse ssing multi-l ayer menu.)
ZOOM
Each time press ed, the picture e nlarges.
In this mode, you c an move the pictu re with ▲ / ▼/ ◄ / ►butto n.
PROGRAM
Press this butt on and the screen w ill display inf o window, press di gits button to in put the program
number what you w ant, when finis hed, move the cur sor to select the “ Start”, at this t ime the unit
will start prog ram playback an d the screen will d isplay “Progr am”.
If you want to canc el this functio n, press “STOP” twic e and the press “PL AY/PAUSE”.
Note: This functio n is available fo r DVD and VCD discs .
VOLUME and MUTE
Press “+” at the ri ght of VOLUME to in crease volume , “-” to decrease t o volume. The first pr ess of
MUTE will displ ay MUTE(no voic e), the second pr ess will return t o normal playba ck.
Audio option se lection
Press this butt on on remote cont rol to change the m ode of audio.
For example: Aud io 1/2
Audio 2/2
22
Page 24

SPECIAL FUNCTION PLAYBACK
AUDIO CD PLAYBACK
When playing Aud io CD disc, a navig ation menu will b e
displayed aut omatically if t he disc is loaded i n succession.
In the menu, use ▲ / ▼b utton in the curs ors to select the
file, then pres s ENTER button to p lay this file. In t his page,
press PREVIOU S( ) or NEXT ( ), you can sele ct the
previous or nex t file when playi ng and you also can s elect
the previous or n ext page when sto p.
JP EG D ISC P LAYBAC K
When playing JP EG disc, a naviga tion menu will be d isplayed auto matically if th e disc is loaded
in succession . In the menu, use ▲ / ▼b utton in the curs ors to select a fil e, then press ENT ER,
the file will be pl ay with a slide-s how. press PREVI OUS( ) or NEXT( ) to se lect the previo us
or the next pictu re. Press PLAY/PAUSE to pause the current pi cture for enjoy ing, when press
ENTER, it will re turn to normal pl aying.
23
Page 25

SYSTEM SETUP
When you press DV D SETUP key on the re mote control, t he setup menu wil l be displayed.
1. Within the set up menu, you can us e ▲ / ▼/ ◄ / ►buttons on th e remote contro l to move the
cursor, and the n press the ENTER b utton to make you r selection. Pr ess ◄ button can re turn
the previous me nu.
2. To exit setup menu , you can press DVD S ETUP menu.
Tv Display PS
Osd Lang ENG
Spdif Output
Screen Saver On
HDCD
Last Memory Off
Tv Display:
The TV Display wh ich select the di ffe rent ratio of dis play format and t he screen of TV, There are
various types o f display on scre en for different mat ches between Di sc and TV.
Note:
● No matter which d isplay format i s selected, a pic ture recorded i n standard 4:3 fo rmat always
displays in the 4 :3 aspect ratio .
● The display for mat of DVD titles m ay vary; please r efer to the infor mation that acc ompanies your
specific DVD ti tle.
● If the DVD title is r ecorded in 16:9 w ide display for mat while the TV is a stan dard 4:3 screen ,
horizontal co mpression of th e image will resu lt.
● Some DVD titles m ay be recorded in s pecial format s. In such cases, t he DVD titles wil l always
appear on the scr een in their orig inal format, re gardless of whi ch TV d isplay format y ou select.
Off
Osd Lang(Osd La nguage):
Users can selec t the whole setup m enu and on-scre en display lang uage.
Spdif Output:
There are 3 modes ( Spdif Off Spdif / Raw Sp dif / Pcm) for your s election; use n avigation but tons
to select differen t modes, press EN TER button to con firm.
Spdif Off: Coaxial o utput off.
Spdif / Raw: When c onnected the co axial output to y our audio ampli fier, playing ba ck the discs
with Dolby, MPEG cont ents, the coaxi al output the ori ginal signal to y our amplifier.
Your Amplifier mus t have the corres ponding decoding function.
Spdif / Pcm: When c onnected with 2 c hannels digit al stereo ampli fier, playing ba ck the discs
with Dolby, MPEG cont ents, the coaxi al output with 2 ch annel to your amp lifier.
24
Page 26

SYSTEM SETUP
Screen Saver:
If the screen sav er is on, then ther e will be an animat ed picture on the s creen wheneve r the DVD
player is idle fo r a certain time.
HDCD:
Please choose t he sampling fre quencies of the d igital filter , the higher the sa mpling freque ncies
are, the cleare r the audio quali ty is. When defau lt setting is off, it wi ll display " CD" by reading
HDCD, for HDCD pl ayback, pleas e choose44.1K o r 88.2K.
Last Memory:
This function i s convenient wh en you want to cont inue viewing a di sc from the point w here you were
watching befo re. Unlike the re sume function , the last Memory f unction is effecti ve even the DVD is
removed from th e player.
Last Memory may n ot work reliabl y with some VCD tha t feature PBC.
PR EF ERE NC E SE TU P PAGE
The preferenc e setting is only a ctive with no dis c, and these sett ing is effective on ea ch time power
on till exchang ing the saved set ting.
Tv Typ e:
This player sup ports different TV outp ut, including Au to, NTSC and PAL syst ems.
1. If your TV support on ly NTSC or PAL and you ha ve inadverten tly selected th e wrong TV type, the
TV im age will flicke r and become blac k-and-white . In this case, you s hould press the D VD SETUP
button to set as fo llowing Note.
Note: How to set th e TV type?
1. You may switch the N TSC/PAL setting o f the DVD player to m atch the video signal of your TV.
2. Th e table below sho ws what kinds of di sc are compatib le with each sett ing (AUTO, PAL and NTSC)
25
Page 27

SYSTEM SETUP
Audio:
Sets the prefer red audio langu age as the defaul t when playing DV D. (If the DVD supp orts the
languages)
Subtitle:
Sets the prefer red subtitle la nguage as the def ault when playi ng DVD. (If the DVD s upports the
languages)
Disc Menu:
Sets the prefer red menu langua ge as the default w hen playing DVD . (If the DVD suppo rts the
languages)
Parental:
The parental co ntrol functio n works in conjun ction with the di ffe rent censorsh ip classes assi gned
to DVDs. These class es help tp contro l the types of DVDs t hat the family wa tches, there ar e up to
8 censorship cl asses for DVDs.
Note: If you chan ge this set, you mu st input passwo rd. (Initial pa ssword: 13690 0)
Password Chan ge:
You can change the password, please type 6 nu merals as new pas sword.
Note: Initial p assword: 1369 00
Be sure remembe r new password. W hen set parenta l control funct ion you must inpu t new password.
Default:
Resets to all the m anufacturer ’s original se ttings for this D VD player press E NTER to perform t he
reset.
26
Page 28

SUPPO RTED OPERATING MODES
COMPONENT VID EO (YPbPr) INPU T
Mode Resolution
576i 576
480i 480
576p
480p
1080i/50
1080i/60
720p/60
1080p/50
1080p/60
576
480
1080
1080
720 44.96
1080
1080
RGB INPUT
Mode
VGA
VGA
VGA
SVGA
SVGA
SVGA
XGA
XGA
XGA
Resolution
640X480
640X480
640X480
800X600
800X600
800X600
1024X768
1024X768
1024X768
SXGA
SXGA
1360X768
HDMI INPUT
Mode Resolution
576p
1080i/50
1080i/60
720p/60
1080p/50
1080p/60
720X576
1920X1080
1920X1080
1280X720
1920X1080
1920X1080
● It is possible th at modes which ar e not listed in the a bove table abov e may not be suppor ted.
For an optimal pi cture, it is reco mmended to choo se a mode listed in t he table.
● The incoming di splay modes tha t are compatibl e with WINDOWS ar e shown in the tabl e above.
● Sometimes, th e image may be disr upted due to the fr equency stand ard from the VGA car d.
However, this is n ot an error. You may improve this situation by acti vating the auto matic
adjustment or b y manually chan ging the phase an d the clock setti ngs in the menu.
● To extend the servi ce life of the prod uct, we recomme nd that you use you r computer ’s power
management fu nction.
Horizontal Frequenc y (K Hz ) Vertical Frequency (Hz )
15.63
15.73
31.26
31.47
28.13
33.75
50.00
60.00
50.00
60.00
50.00
60.00
60.00
56.25
67.50
Horizontal Frequenc y (K Hz )
37.5
37.9
31.5
46.9
47.2
37.9
60.0
56.5
48.4
50.00
60.00
Vertical Frequency (Hz )
75
72
60
75
72
60
75
70
60
47.8 601280X768
47.7
Horizontal Frequenc y (K Hz ) Vertical Frequency (Hz )
31.25
28.13
33.75
45.00
56.25
67.50
60
50.00
50.00
60.00
60.00
50.00
60.00
27
Page 29

TROUBLESHOOT ING
Before contac ting a service te chnician, per form the follow ing simple chec ks. If any problem still
persists, unp lug the LCD TV and call fo r serving.
Problem
No sound
Normal picture but no sound
Sound is too low
No picture or black and white
picture
“No signal” message
Sound and pictu re
interferenc e
Blurred or snow y picture,
distorted sou nd
Remote control does not
work
The LCD TV does not turn on
The image is too light or too
dark
On PC mode, horizontal bars
appear to flicker, jitter or
shimmer on the image
On PC mode, vertical bars
appear to flicker, jitter or
shimmer on the image
On PC mode, image is not
stable and may appear to
vibrate
On PC mode, image is not
centred on the screen.
● Check that the main plug has been connected to a wal l inl et.
● Check that you have pressed the button on the fron t of th e TV.
● Check the volume.
● Check the volume.
● Check whether then MUTE button has been pressed on the remote
control.
● Check the volume.
● If the volume is still too low after setting th e vol ume l eve l to
maximum, check the volume control on comp ute r sou nd ca rd or
software program, but also check the volume of t he DV D.
● Adjust the color settings.
● Check that the broadcasting system selecte d is co rre ct.
● Check the contrast and brightness of the image .
● Check the video source connected to the TV.
● Make sure that the signal cable is firmly con nec ted t o the P C or th e
video sources.
● Make sure that the PC or video sources are switche d on.
● Try to identify the ele ctr ica l app lia nce that is aff ect ing t he set and
move it further away.
● Check the direction, location and connecti ons o f you r aer ial.
● The battery in the remote control may be exhaust ed.
● The battery may be improperly installed .
● Check that there is no obstruction between the r emo te co ntr ol an d
the remote (infrared) sensor.
● Ensure that there is no strong light shining on th e rem ote c ont rol ’s
infrared sensor.
● Be sure the power cord is plugged in.
● Adjust the brightness and Contrast.
● Adjust the Phase.
● Adjust the Manu al Clock .
● Check that the display resolution and freque ncy f rom y our P C or
video board is a valid mode for your LCD TV.
Control Panelg Di spl ayg Settings.
● If the setting is not correct, use your compu ter u til ity p rog ram to
change the display settings.
Your monitor supports multiscan display f unc tio n wit hin t he follow ing frequency domain:
Horizontal frequency:30KHz~75KHz
Vertical frequency: 56Hz~75Hz
Maximum refresh rate:1360X768@60Hz
● Adjust the horizontal and vertical posi tio n.
Possible Solu tion
28
Page 30

DVD Mode:
Problem
When the playback button is
pressed, playback does not
begin, or it stops quickly
No sound, or sound is strange
Buttons cannot be operated
The picture is disturbed
during search
Playback does not start even
when a title is selected
The disc is hot whe n it is
removed
Subtitles do no t appear
The audio or subtitle language
cannot be selected
The angle cannot be changed
TROUBLESHOOT ING
● Have you inserted a disc other than a DVD, video CD or m usi c CD.
● If the disc is dirty, wipe it clean.
● Insert correctly, wi th the label surface on the near side.
● When connected to an external amp, set DVD output to ‘‘YES’’.
● Check connections and audio settings.
● There is no sound during pause, still picture, jog or slow playback.
● Check the audio mode is correct.
● Operation may be forbidden, depending on the disc.
● If buttons do not operate at all, try turning the power supply button on
the remote control of the main unit ‘‘Off’’ and ‘‘On’’. The system may fail
to operate correctly due to the effects of lightning or static electricity, etc.
● Some disturbance is normal. This is not a malfunction.
● Some titles cannot be played back if viewin g res tri cti ons h ave
been set.
● Thi s is no t a pro ble m for quality or performance.
● Subtitles appear only with discs, which c ont ain t hem .
● The DVD does not have multiple language.
● Even with a DVD, switching cannot be done at point s whe re mu lti -
angle is not stored.
Possible Solu tion
29
Page 31

SPECI FIC ATI ONS
LCD P anel
Siz e
Dis play si ze
Pix el Pitc h
Vie w Angle
Fre quenc y
Hor izont al
Vert ical
Dis play co lor
Dis play Re solut ion
Max imum Mo de
Opt imum Mo de
Inp ut Sour ce
Syn c.
Vid eo Signal
RGB S ignal
TV
Col or Syst em
Sou nd Syst em
Vid eo
Col or Syst em
Vid eo Format
Pow er Supp ly
Inp ut
Pow er Cons umpti on
Wor king
Sta ndby
Env ironm ental C onsid erati ons
Ope ratin g Tempera ture
Ope ratin g Humid ity
Aud io Char acter istic s
Aud io Inpu t
Aud io Inpu t (PC)
Fre quenc y
Res ponse
Dim ensio n (WXDXH) mm
Wit hout St and
Wit h Stand
Wei ght (Kg)
Net W eight
Gro ss Weig ht
Not e:
● Des ign and s pecif icati ons are s ubjec t to chan ge with out not ice.
● Wei ght and dimensions sho wn are ap proxi mate va lues on ly.
19” D iagon al
408 .24(H ) X 255.1 5 (V) mm
0.2 835(H ) X 0.283 5 (V) mm
140 °/140 °(H/V )
30~ 75KHz
56~ 75Hz
16. 7M colo rs
136 0 X 768 @ 60H z
128 0 X 768 @ 60H z
H/V s epara te, TTL , P. or N.
1Vp -p @ 75 ohm
0.7 V p-p @ 75 oh m
PAL
BG, D K, I
PAL/ SECAM/NTSC
CVB S, S-VH S, RGB
AC 10 0~240 V, 50 /60 Hz
60W
≤ 3W
10℃ ~ 40 ℃( 50°F ~ 10 4°F)
10% ~ 8 0%
RCA Ja ck (L, R) , 0.5Vrms (-9dB)
Ø3. 5 Stere o, 0.5Vrms (-9dB )
RF: 1 00Hz~ 12KHz ( at ± 3dB)
A/V: 100Hz~1 3KHz (a t ± 3dB)
462 X76X3 52
462 X169X 382
5.5
7
30
 Loading...