

Page 1
JTM 1 9F2 2 -D
M6601-19F21100 2R
EN GLIS H
Page 2

Dear Customers,
May we take this opportunity to thank you for purchasing this LCD TV. We st ro ng ly r ec om me nd
that you read the safety and operation instructions throughly before operating your LCD TV.
FOLLOW ALL INS TR UC TI ON S AND WARN IN GS o n yo ur L CD TV and in this manual.
TAB LE OF CONTENTS
IMPORTAN T SA FE TY INSTRUCTIONS
PACK AG E CO NT EN TS
CONTROL BUT TONS AN D TE RM IN AL S
FRONT PANEL CON TR OL S
REAR PAN EL TE RM IN AL S
REMOTE CONTROL
BASIC CONNECTION
BATTERY INSTALLATION
BASIC OPERATIO N
SWITCHING THE L CD TV ON/OFF
CHOOSING A TV CHA NN EL
ADJUSTING THE V OL UM E
SELECTING INPUT SOU RC E
MENU OPERATI ON S
INPUT PC MO DE
INPUT TV MODE
INPUT AV/SCART/S-VIDEO MODE
TELETEXT FUNCTIONS(OPTION)
3
5
6
6
6
7
8
8
9
9
9
9
9
10
10
11
12
13
ABOUT THE DISC
DISC HANDING
DVD OPERATIO N
14
14
14
1
Page 3

TAB LE OF CONTENTS
BASIC OPERATIN G IN ST RU CT IO NS
PLAY THE D IS C
MENU PLAYB AC K
TITLE PLAYBA CK
SEQUENTIAL PLAYBACK
PROGRAM PLAYBA CK
SIDE VIEW
LOCATI ON O F CO NT RO LS F OR D VD O PE RATION
FUNCTIONS OPERATIN G IN ST RU CT IO NS
MP3/JPEG PLAYB AC K
DISC MENU
SYSTEM SETUP
LANGUAGE SETUP
AUDIO SETUP
DIGITAL SETUP
SUPPORTED OPERATIN G MO DE S
TROUBLESHOOTING
15
15
15
16
16
16
17
18
19
23
24
24
25
26
26
27
28
SPECIFICATIO NS
30
2
Page 4
IMPORTANT SAFETY INSTRUCTIONS
TO RE DU CE THE RISK OF
CA UT IO N
RISK OF ELECTRIC
SHOCK DO NOT
OPEN
This symbol indicates
“dangerous voltage”
inside the product that
presents a risk of electric
shock or personal injury.
Read this Manual
Read this manual throughly before operating the unit.
Keep this manual
Keep this manual for future reference.
Observe all warnings
All warnings on the product and in the manual must be observed closely.
Follow all instructions
All operating instructions in the manual must be followed.
Do not insert liquids or objects
Liquids or objects could result in fire or electrical shock. Use special caution in households where
children are present. If liquids or objects should enter the LCD TV, immediately turn off the power
switch, disconnect the power plug from the AC outlet and contact the qualified service personnel.
● Do not place the LCD TV near the bathtub, bathroom, kitchen sink, wet basement or swimming
pool , and the like.
● Do not expose the LCD TV to rain or moisture.
● Do not place flower vases, pots, cups, cosmetics, liquids as water, etc on or around the LCD TV.
● Do not place metals, combustibles, etc on or around the LCD TV.
● Do not drip or splash liquid of any kind on the LCD TV.
Do not give the LCD TV any shock or impact
If the LCD TV should be dropped and/or broken, it could result in an injury, and continued use could
result in fire or electrical shock.
If the glass panel is broken or damaged, immediately turn off the power switch, disconnect the power
plug from the AC power outlet and contact the qualified service personnel.
Prevent the unit from falling
● Do not allow children to climb on the LCD TV.
● Do not place the LCD TV on a bed, sofa, rug, similar surface. Do not place the LCD TV on an un stable cart, stand or table. The LCD TV may fall, causing serious damage to the LCD TV and/or
serious personal injury, death.
● When the product is used on a trolley, care should be taken to avoid quick stops, excessive force,
and uneven surfaces that may cause the product and trolley to overturn.
ELECTRIC SHOCK.
DO NOT RE MO VE C OV ER .
NO USER-SERVI CE AB LE
PARTS INSIDE. REFER
SERVI CI NG TO QUALIFIED
SERVI CE P ER SO NN EL .
This symbol indicates
important instructions
accompanying the
product.
3
Page 5

IMP O RTANT S A F ETY INSTRUCTIONS
Do not block any ventilation openings
● The vents and other openings in the cabinet are designed to let hot air escape from the LCD TV.
Do not cover or block these vents and openings since insufficient ventilation can cause over heating. Do not place the LCD TV on a bed, sofa, rug or other similar surface, since they can block
ventilation openings, it may overheating and result in fire.
● Do not cover the LCD TV with cloth, such as curtains, or items such as news paper, etc.
● This unit is not designed for built-in installation, do not place the product in an enclosed place such
as a bookcase or rack, unless proper ventilation is provided or the manufacturer ’s instructions are
followed.
Avoid high temperature environment
The heat could adversely affect the LCD TV and other parts, and could result in serious overheating or
risk of fire.
● Do not place the LCD TV, the remote control and other parts in direct sunlight or near a hot object
such as heater, etc.
● Do not put the LCD TV in a place where the temperature is widely changing.
Avoid oils
Do not install the LCD TV in a place that uses oil. Dust absorbing oil may enter into the unit and damage
the unit.
Power cord protection
Incorrect connection of the power cord could result in fire or electrical shock.
● Do not connect too many appliances to the same mains socket as this could result in fire or electrical
shock.
● The apparatus shall be connected to a mains socket outlet with a protective earthing connection.
● The socket outlet for connecting mains plug shall be easily accessible and remain readily operable.
● Do not overload wall outlet as this can result in fire or electrical shock.
● Check that the connecting portion of the AC power cord is clean (with no dust), before using. Use a
soft and dry cloth to clean the power plug.
● AC power cord should be routed so that they are not likely to be walked on or pinched by items
placed upon or against it. Also do not put any heavy objects on the AC power cord.
● Do not touch the AC power cord with a wet hand.
● Pull out the AC power cord by the plug. Do not pull on the power cord.
● Insert the power plug into a power outlet firmly. Avoid using a loose or damaged outlet.
● Do not pinch, bend, or twist the cable excessively. The core lines may be bared or cut, causing a
short-circuit which may induce fire or electrical shock.
● For your own safety, do not touch any part of the unit, power cord or aerial lead during lightning
storms.
● Do not modify the AC power cord.
● Disconnect the power cord if the LCD TV is not used for a long time.
● Switch off and withdraw the power plug before making or changing connections.
Handing and cleaning the screen surface of display unit
To avoid screen degradation, follow points mentioned below. Do not push on or scratch with
hard objects, or throw anything at the screen. The screen may be damaged.
● Be sure to unplug the power cord from outlet before cleaning.
● Do not touch the display panel after operating continuously for a long period as the display panel
becomes hot.
● We recommend that the screen surface is touched as little as possible.
● To remove dust from the screen surface, wipe gently with a clean, soft and cotton-free dry cloth.
● Do not use any type of abrasive pad, alkaline/acid cleaner or strong solvent such as alcohol, thinner
or benzene etc, as the surface may be impaired.
Cleaning the cabinet
● Be sure to unplug the power cord from the outlet before cleaning.
● Clean the cabinet with a soft cloth.
● Note that material deterioration or screen coating degradation may occur if the display unit is ex-
posed to a volatile solvent, such as alcohol, thinner, benzine or insecticide, or if prolonged contact
is maintained with rubber or vinyl materials.
4
Page 6

IMP O RTANT S A F ETY INSTRUCTIONS
Carrying and moving
● Be sure to always carry the LCD TV carefully holding it with two hands, one hand on each side of the
LCD TV. If you carry the unit in a manner other than that specified, it may drop and a serious injury
may be caused.
Servicing
Do not open the cabinet or remove the rear cover of the unit. If any of the following conditions occurs,
unplug the AC power cord from the AC outlet, and contact qualified service personnel.
● When the power cord or plug is damaged.
● When the LCD panel is damaged.
● When the liquid is spilled on the unit or when objects have fallen into the unit.
● When the unit has been exposed to rain or water.
● If the unit has been dropped or the cabinet has been damaged in any way.
● If the unit does not work properly even after you have referred to the TROUBLESHOOTING section.
Replacement parts
● In case the unit needs replacement parts, make sure that the service personnel uses replacement
parts specified by the manufacturer, or those with the same characteristics and performance as the
original parts. Use of unauthorized parts can result in fire, electrical shock and/or other danger.
● Upon completion of service or repair work, request the service technician to perform safety checks
to ensure that the unit is in proper operating condition.
Other notices
● Sometimes, the image may have some tiny red, green, blue, white or black spots. This is normal
and does not affect the performance of the LCD TV.
● Due to advanced technology of the LCD TV, giving you fine picture details. Occasionally, a few non active pixels may appear on the screen as a fixed point of blue, green, or red. Please note that this
is does not affect the performance of your LCD TV.
● If the unit is used in a cold place, a smear may occur in the picture or the picture may become dark.
This does not indicate a failure. These phenomena improve as the temperature rises.
● In some case, residual images may remain after the short-term display of still images is displayed.
These will disappear in a few minutes, and the display will return to normal. However, if used in high
temperatures, it sometimes spends some tens of minutes to return to normal. Please note that this
is not a malfunction.
● LCD panel are made of finely processed glass, Avoid pushing or hands or a strong impact on the
panel. It may cause damage to the LC cells, and/or there is danger of glass breakage.
● Do not use immediately after moving from a low temperature to a high temperature environment,
as this causes condensation, which may result in fire, electrical shock or other danger.
PACKAGE CONTEN T S
Your L CD T V pa ck ag e in cl ud es :
1. LCD TV
2. Remote Control
3. RCA Cable (3 Pin)
4. Operation Manual
5. Power Cord
Note:
Your product may also include various other accessories depending on region of purchase.
5
Page 7
CO N T ROL BUTTON S A ND TERMINAL S
FRONT PANEL CONTROLS
This TFT-LCD TV/monitor allows you to easily adjust the characteristics of the ima ge b ei ng displayed.
While you use t hese buttons to adjust the controls, th e OS D (on-screen-display) will show you their
numeric values as t he y change.
Butt on N am eButt on N am e
MENU
CH-
CH+
POWER
VOL-
VOL+
SOURC E
POWER I ND IC ATOR
Enter o r ex it f ro m the menu.
When yo u wa tc h th e TV program, pus h th is b utton to
decre as e ch an nel number. In the main-me nu , pu sh t his
butto n to s el ec t the downward menu item.
When yo u wa tc h th e TV program, pus h th is b utton to
incre as e ch an nel number. In the main-me nu , pu sh t his
butto n to s el ec t the upward menu item.
Switc h on t he L CD TV/monitor whe n at s ta ndby mode
or vice ver sa .
Decre as e/ ad just the values of the sele ct ed m enu item,
or decr ea se t he l evel of audio volume.
Incre as e/ ad just the values of the sele ct ed m enu item,
or incr ea se t he l evel of audio volume.
Selec t TV, SC ART, AV, S-V ID EO, PC-RGB or DVD mode.
Illum in at es r ed in standby mode.
Illum in at es g reen when the LCD TV is s wi tched on.
REMOT E SE NS OR Infra re d se ns or for the remote control le r.
Note:
If no sig na l in pu ts for 15 minutes, the unit w il l sw itch to standby mode automa ti ca lly.
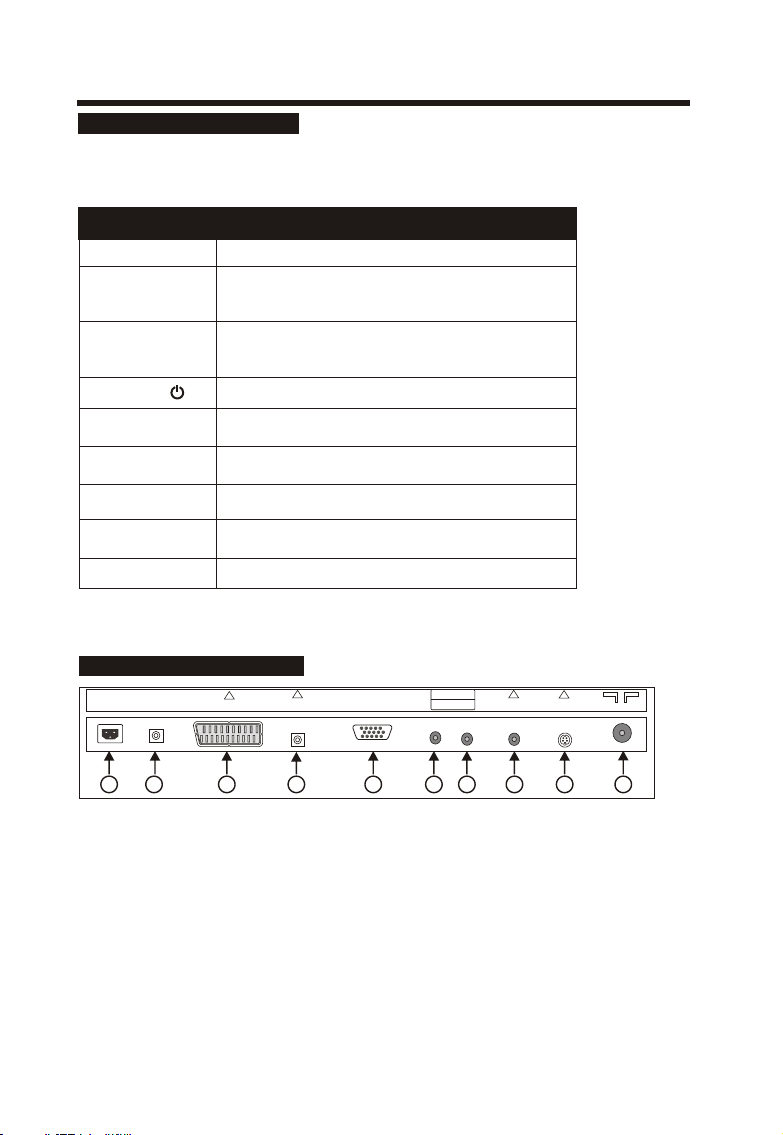
RE AR PANE L TER MIN AL S
AC IN
COAXIAL
SCAR T
LINE I N
Desc ri pt ionDesc ri pt ion
VGA IN
(D-S UB 15PI N)
R L
AUDI O IN
VIDE O IN
S-VI DEO
ANT. 75Ω
1
2
3
4
5
6 7
8
Connectors descriptions:
① :AC power input for the LCD TV.
② :DVD Coaxial Output, connecting to Coaxial input of your Amplifier.
③ :Scart input interface, connect your AV syst em w it h SC ART output.
④ :Audio input for VGA mode, connect to your PC audio output.
⑤ :DB15 VGA interface, connect power supply adaptor here.
⑥ :Right Audio Channel input for Composite video & S-video mode.
⑦ :Left Audio Channel input for Composite video & S-video mode.
⑧ :CVBS / Composite video inputs, connect your AV syst em .
⑨ :S-VIDEO input, connect video input from external device here.
⑩ : 75 Ω aerial input, connect antenna connector or aerial interface here to
receive cable / aerial signal.
6
10
9
Page 8
CO N T ROL BUTTON S A ND TERMINAL S
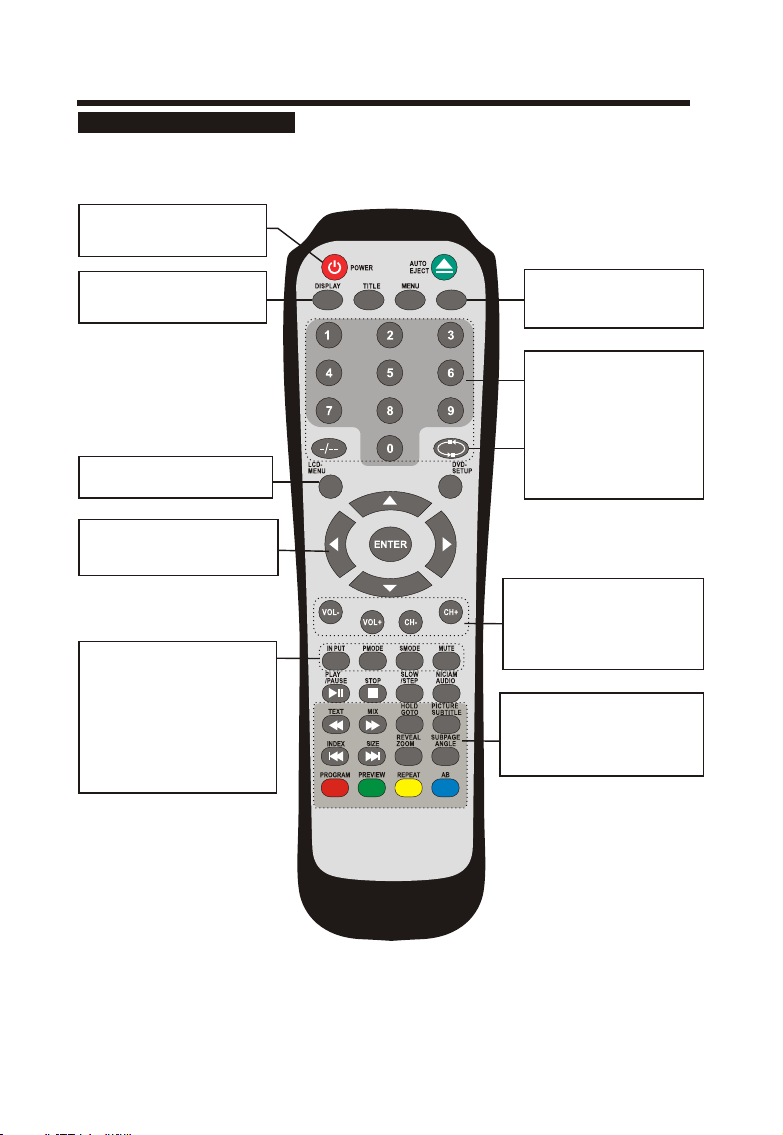
RE MO TE CO NT ROL LE R
All the functions can be control with the remote control. Some functions can also be adjusted with the
buttons on the front panel of the set.
POWER
To switch on the LCD TV/monitor
when in standby mode or vice versa.
DIS PLAY
Dis play cu rrent TV cha nnel
informat ion
LCD M ENU
To ente r or exit f rom the T V menu.
◄►▲▼and EN TER
To select on the screen menu items
and ch ang e the item values.
PMO DE
To sele ct the pi cture m ode.
INP UT
To sele ct TV, SCAR T, AV, S-V IDEO
PC- RGB or DV D monit or mode .
SMO DE
To sele ct the so und mod e.
MUT E
To swit ch the so und on or o ff.
SLEEP BUTTON
SLEEP
To select the sleep time to
automatically to standby.
NUMBER BUTTONS
To directly select program
number.
RETURN
To return the last view TV
channel.
-/--
To select one or two digital TV
channel.
CH+ /CH-
To sele ct the pr ogram i n
asc endin g or desc endin g.
VOL +/VOL-
To incr ease or d ecrea se the vo lume.
TEL ETEXT B UTTON S (OPTI ONAL)
The se butt ons are u sed for c ertain
mod els wit h Telet ext fun ctions on ly.
For f urther de tails, refer to the
TEL ETEXT FUNCTI ON.
Note:
Some buttons are supply for DVD operation use. For further details, refer to the "Location of
controls for DVD operation".
7
Page 9
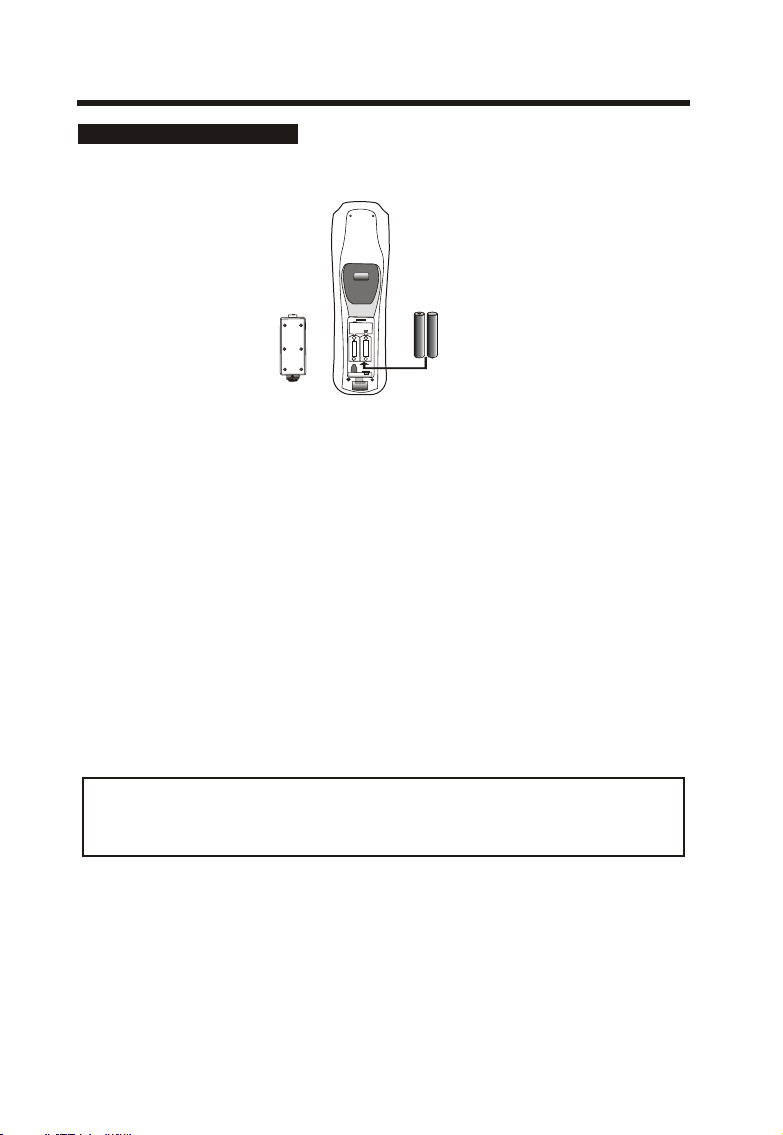
BASIC CONNEC T ION
BATTE RY IN STALLATIO N
Insert the batteries while observing the correct (+) and (-) polarities as illustrated below.
__
++
RO3,1.5VX2
--
About the batteries
● If the remote control unit fails to work even when it is operated near the LCD TV, please
replace the batteries.
● Use size UM- 4 ( AAA) batteries.
Note:
● Do not use rechargeable (Ni-Cd) batteries.
● Do not attempt to recharge, short circuit, disassemble, heat or throw the batteries into the fire.
● Do not splash the remote control with water or put it on a wet object .
● Do not drop, step on or cause any impact to the remote control unit. This may damage it,
resulting in malfunction.
● Do not mix old and new batteries.
● If the remote control unit is not going to be used for a long time, remove the batteries.
● Str ong light such as direct sunli ght falling on the remote sens or can cause operational
fai lure. Place the remote contr ol to avoid direct contact wit h sunlight.
Bat teries should never be throw n away or incinerated but disp osed of in accordance with you r
loc al regulations concernin g chemical wastes.
++
--
__
UM-4(AAA)
++
++
Ca ut ion
Keep batteries out of children’s re ac h. I f ba tt er ie s ar e sw al lo we d, c on ta ct a p hy si ci an
immediately.
8
Page 10

BASIC OPERATION
SW IT CHI NG T HE LC D TV O N /O FF
1. Press th e button on the front panel or th e STANDBY bu tt on on the remote controller to
switch it on or to standby mode.
2. If the unit is in standby mode, press the STANDBY but to n on the remote controller to switch
it on .
3. Press th e STANDBY bu tt on o n the remote controller, the unit wi ll r ev er t to standby mode.
Note:
If, while the unit is switched on, the mains plu g is disconnected, the unit will switch to standby
when the ma in s plug is replaced in the mains pow er socket again.
CH OO SIN G A TV CH AN NEL
Using the CH+/CH-button on the front panel, or the p /q button on the remote control.
Press the CH+ or p button to increase channel number.
Press the CH- or q button to decrease channel number.
Using 0-9 digital buttons
You can select the channel number directly by pressing 0 to 9 buttons .
Example:
To select 1-digit channel (e.g. Channel 5):
● Press the -/-- button repeatedly to display “-” then press 5 button.
To select 2-digit channel (e.g. Channel 20):
● Press the -/-- button repeatedly to display “--” then press 2, follow by 0.
AD JU STI NG T HE VO LU M E
Press the VOL+/- button to increase or decrease the volume
The volume indicator appears and the volume changes as you press the VOLUME +/- buttons.
Using Mute
At any time, you can temporarily cut off th e so un d us in g th e MU TE b ut to n.
1. Press the MUTE button and the sound cuts off . The icon will appear in the low-left corner of
the screen.
2. To tur n mu te o ff, press the MUTE button again or simply press either the VOL+ button .
SE LE CTI NG I NPU T SO U RC E
Repeatedly press the SOURCE button on your front panel or on the remote control, the source
sequence is as follows:
TVZ SCART Z AVZ S -V ID EO Z PC-RGBZ DVD
9
Page 11

ME N U O PERATI O NS
You can modify certain parameters of the LCD-TV in the menu system. Please read the following
descriptions to get an understanding of each adjustable parameter.
IN PU T PC MO DE
1. Press LCD-MENU button to either display the “PC” or “GENERAL” or “AUDIO” menu.
2. Press ▲ / ▼ buttons to scroll through the parameters
3. Press ◄ / ► buttons to make changes to the parameters
4. Press the LCD-MENU button to exit the menu .
Nam e of menu Pic ture of m enu
PC M EN U
BRI GHTNE SS 50
CON TRAST 50
COL OR SE TTING U SER
PC ME NU
AUT O CONF IG "
H-P OSITI ON 50
V-PO SITIO N 5 0
PHA SE 50
CLO CK 50
640X480 60 Hz
AUDIO MENU
50
VOL UME
50
AUD IO MENU
BAL ANCE
AUD IO PRES ET PER SONAL
TRE BLE
BAS S
50
50
GENERAL MEN U
GEN ERAL
MEN U
LAN GUAGE E NGLIS H
BLU E SCRE EN ON
NOI SE RED UCE O N
INP UT SOUR CE PC -RGB
ZOO M 4:3
RES ET "
Ins truct ions
BRI GHTNE SS: Adjust the bright ness of th e pic ture, the
image becom es brighter as the number increa se.
CON TRAST : Adju st the contrast of the pi cture, the image
bec omes highe r as the number incr ease.
COL OUR SETTIN G: Select betwe en 9300k/650 0k/user
def ine.
AUT O CON FIG: Adjust the H-POSIT ION,V-POSIT ION,
PHA SE and CLOCK autom atica lly. Adjus t the
H-POS ITION , V-P OSITION , PHA SE an d CLOCK
aut omati cally .
H-P OSITI ON: Pictur e hor izont al positio n adj ust.
V-PO SITIO N: Picture vert ical positio n adj ust.
PHA SE: Remove s any hori zonta l dis torti on and clears
or sharp ness the displaye d cha racters .
CLO CK: Adjust the TFT-LCD to match the video input
sou rce.
VOL UME: Adj ust the v olume .
BAL ANCE: Ad just th e balan ce of the a udio ou tput fr om
lef t to righ t.
AUD IO PRES ET: Fou r diffe rent se tting s: Pers onal,
Voic e, Musi c and The ater.
TRE BLE: Adj ust the t reble o f the sou nd, can o nly be
adj ust und er Pers onal mo de
BAS S: Adjus t the bas s of the so und, ca n only be a djust
und er Pers onal mo de
LAN GUAGE : Chang e the lan guage o f the men u, choo se
bet ween EN GLISH a nd FREN CH.
BLU E SCREE N: Disp lay the b lue scr een whe n no sign al.
NOI SE REDU CE: Red uce the n oise of t he pict ure,
pro vide cl earer p ictur e.
INP UT SOUR CE: Dis play th e curre nt mode .
ZOO M: To selec t a displ ay mode b etwee n Full an d 4:3.
RES ET: Res ets pic ture se tting s to the fa ctory d efaul t .
10
Page 12

ME N U O PERATI O NS
IN PU T TV MO DE
1. Press LCD-MENU button to either display the “VIDEO” or “TV” or “GENERAL” or “AUDIO” menu.
2. Press KEY ▲ / ▼ to s cr ol l th ro ug h th e pa ra me te rs .
3. Press ◄ / ► buttons to make changes to the parameters.
4. Press the LCD-MENU button to exit the menu .
Nam e of menu Pic ture of m enu
VIDEO MENU
VID EO MENU
BRI GHTNE SS 50
CON TRAST 5 0
COL OR 50
SHA RPNES S 50
BRIGHT NESS : Adjust the br ightness o f the p ictur e, th e
image be comes brig hter as the numbe r increase .
CONTRA ST: Adjust th e con trast of the pict ure, the image
become s higher as th e num ber increa se.
COLOR: Adjus t the colo ur.
SHARPN ESS: Adjust the am ount of deta il en hancemen t,
the imag e sha rpness rises as t he nu mber incre ase.
Ins truct ions
AUD IO MENU
GEN ERAL
MEN U
TV ME NU
AUDIO MENU
50
VOL UME
50
BAL ANCE
AUD IO PRES ET PER SONAL
TRE BLE
BAS S
50
50
GENERAL MEN U
LAN GUAGE E NGLIS H
BLU E SCRE EN ON
NOI SE RED UCE O N
INP UT SOURC E T V
ZOO M 4:3
RES ET "
TV MENU
CHA NNEL 10
SYS TEM BG
SKI P ON
AFC ON
FIN E TU NE 184 .25 MHz
DEL ETE °
SWAP °
MAN UAL SEA RCH °
AUT O SEARC H °
VOL UME: Adj ust the v olume .
BAL ANCE: Ad just th e balan ce of the a udio ou tput fr om
lef t to righ t.
AUD IO PRES ET: Fou r diffe rent se tting s: Pers onal,
Voic e, Musi c and The ater.
TRE BLE: Adj ust the t reble o f the sou nd, can o nly be
adj ust und er Pers onal mo de.
BAS S: Adjus t the bas s of the so und, ca n only be a djust
und er Pers onal mo de.
LAN GUAGE : Chang e the lan guage o f the men u, choo se
bet ween EN GLISH a nd FREN CH.
BLU E SCREE N: Disp lay the b lue scr een whe n no sign al.
NOI SE REDU CE: Red uce the n oise of t he pict ure,
pro vide cl earer p ictur e.
INP UT SOUR CE: Dis play th e curre nt mode .
ZOO M: To selec t a displ ay mode
bet ween Fu ll and 4: 3.
RES ET: Res ets pic ture se tting s to the fa ctory d efaul t .
CHANNE L: Ch ange the TV channe l.
SYSTEM : Select the TV s tandard.
SKIP: If you wa nt sk ip a ch annel, you can turn it on and
this cha nnel will be skip in the next time .
AFC: Auto freq uen ce contr ol. Pres s the button impr ove
the imag e qua lity
FINE TUN E: If t he im age received is not ve ry go od, you
can pres s p / q to se lect Fine Tuning item in men u.
Then pre ss t /u butto n to ad just and improv e the
image qu ality.
DELETE : Del ete the cu rrent program .
SWAP: SWAP functio n allows you to arrang e the c hannel
number s by ex changing b etw een 2 pres et ch annels. In the
sub-me nu of SWAP, the foll owi ng items c an be s elected:
FRO M: To select the chann el nu mber tha t you want to
exchan ge fr om by using t /u but ton.
TO: To select the chann el nu mber that you want to
exchan ge to b y usi ng t /u butto n.
SWAP: Confirm to swap th e cha nnels by using t /u
button .
MANUAL SEAR CH: M anual search th e cha nnel.
AUTO SEARCH : Auto sear ch an d save the channe l.
11
Page 13

ME N U O PERATI O NS
IN PU T AV / SCAR T / S- VID EO M O DE
1. Press LCD-MENU button to either display the “VIDEO” or “GENERAL” or “AUDIO” menu.
2. Press ▲ / ▼ buttons to scroll through the parameters.
3. Press ◄ / ► buttons to make changes to the parameters.
4. Press the LCD-MENU button to exit the menu .
Nam e of menu Pic ture of m enu
VIDEO MENU
BRI GHTNE SS 50
CON TRAST 5 0
COL OR 50
SHA RPNES S 50
VID EO MENU
AUDIO MENU
50
VOL UME
50
AUD IO MENU
BAL ANCE
AUD IO PRES ET PER SONAL
TRE BLE
BAS S
50
50
GENERAL MEN U
GEN ERAL
MEN U
LAN GUAGE E NGLIS H
BLU E SCRE EN ON
NOI SE RED UCE O N
INP UT SOURC E AV
ZOO M 4:3
RES ET "
Ins truct ions
BRIGHT NESS : Adjust the br ightness o f the p ictur e, th e
image be comes brig hter as the numbe r increase .
CONTRA ST: Adjust th e con trast of the pict ure, the image
become s higher as th e num ber increa se.
COLOR: Adjus t the colour.
SHARPN ESS: Adjust the am ount of deta il en hancemen t,
the imag e sha rpness rises as t he nu mber incre ase.
VOL UME: Adj ust the v olume .
BAL ANCE: Ad just th e balan ce of the a udio ou tput fr om
lef t to righ t.
AUD IO PRES ET: Fou r diffe rent se tting s: Pers onal,
Voic e, Musi c and The ater.
TRE BLE: Adj ust the t reble o f the sou nd, can o nly be
adj ust und er Pers onal mo de
BAS S: Adjus t the bas s of the so und, ca n only be a djust
und er Pers onal mo de
LAN GUAGE : Chang e the lan guage o f the men u, choo se
bet ween EN GLISH a nd FREN CH.
BLU E SCREE N: Disp lay the b lue scr een whe n no sign al.
NOI SE REDU CE: Red uce the n oise of t he pict ure,
pro vide cl earer p ictur e.
INP UT SOUR CE: Dis play th e curre nt mode .
ZOO M: To selec t a displ ay mode
bet ween Fu ll and 4: 3.
RES ET: Res ets pic ture se tting s to the fa ctory d efaul t .
12
Page 14

TEL E TEXT FUNCTIO N ( OPTION)
Teletext is an optional function, therefore only certain models can receive the teletext broadcast.
Teletext is a free broadcast service by most TV s ta ti on s wh ic h gi ve u p- to -t he -m in ut e in fo rm at io n
on news, weather, television program, share prices and many other topics.
Display Tele te xt
1. Select a TV st at io n wi th t el et ex t si gn al .
2. Press the TE XT button to enter Teletext signal.
3. Press the TE XT button again to return to the normal TV mode.
Page Selection
1. Enter the desired page number (three digit) using the number buttons.
If you press a wrong number during input, you must complete the three digit number and then
re-enter the correct page number.
2. Th e p /q button can be used to s el ec t th e pr ec ed in g or f ol lo wi ng p ag e.
MIX(optional)
This function enables you to superimpose the Tele te xt p ag e ov er t he TV program.
1.When a page is displayed, press the MIX button. The TV picture will appear with the TEXT pag e.
2.Press the MIX button again to return to the normal Text m od e.
HOLD
You can press the HOLD button to hold a page, and press this button again to release the page.
INDEX
Press the INDEX button to enter the main index page directly.
You may enter the main index page number directly using the number buttons.
CANCEL
If you want to watch TV, but not cancel the TEL ET EX T mode completely, press the CANCEL
button. When the last selected page is updated, the page number is shown at the top of the TV
screen. Press the TEX T or CANCEL but to n to r ev ea l th e pa ge .
Enlarging Text
When a page is displayed, you can double the size of the text to make it easier to read.
1. Press the SIZE button to enlarge the top half of the page.
2. Press the SIZE button again to enlarge the bottom half of the page.
3. Press this button once more to return to the normal display.
Reveal mode
You can display concealed teletext information (e.g. Answer to puzzles or riddles etc.) by pressing
this button. Press this button again to remove the information from the display.
SUBPAG E
Some teletext pages may contain several sub-pages which are automatically paged in a certain
cycle by the TV s ta ti on .
1. You can enter to a certain sub page by pressing the SUBPAGE b ut to n di re ct ly a nd s el ec t th e
page number with the number buttons. Enter the subpage number (e.g. 0003) for the third sub page.
2. Press the SUBPAGE b ut to n ag ai n to e xi t th e su b pa ge m od e.
3. Press the TE XT button to return to the normal TV mode.
COLOR buttons (RED, GREEN, YE LL OW, C YAN)
Press these buttons to access directly to the corresponding color pages displayed at the lower part
of the Tele te xt s cr ee n.
13
Page 15

AB O U T THE DISC
This Product Can Play the following format of DVD Disc.
Disc type Disc Size
(Diameter)
Recorded Time Recorded Content Remarks
Single side:
120mins. Approx.
DVD 12cm
Double side :
240mins. Approx.
DVD format :
Compressed digital Audio and
Video
Super VCD 12cm 45mins. Approx. MPEG 2 Compressed Digital
Audio and Video
Included :
SVCD, CVD
VCD 12cm 74mins. Approx. MPEG 1 Compressed Digital
Audio and Video
Included :
VCD2.0, VCD1.1,
VCD1.0, DVCD
CD 12cm 74mins. Approx. CD-DA : Digital Audio
HD-CD 12cm 74mins. Approx. HD-CD : Digital Audio
MP3 / JPEG 12cm 600mins. Approx. Compressed digital Audio
DISC HANDLING
Handling precautions
● Hold the disc by the edges so the surface will not be
soiled with fingerprints. Fingerprints, dirt and
scratches can cause skipping and distortion.
● Do not write on the label side.
● When insert the Disc to the Disc slot, printed side of
the disc must in front of you.
● Do not use record cleaning sprays, benzine, thinner,
static electricity prevention liquids or any other solvent.
● Be careful not to drop or bens the disc.
● Do not install more than 1 disc.
● Store the disc in its case when not in use.
If the surface is soiled
● Wipe gently with a soft, damp(water only) cloth.
● When wiping discs wipe from the center toward the
outer edge.(If you wipe using a circular motion,
circular scratches can occur, which will cause noise.)
If the disc is brought from a cold to a warm environment,
moisture may form on the disc
● Wipe with a soft, dry, lin t- fr ee c lo th b ef or e us in g th e di sc .
DVD OPERATION
Dis c
'
(
Note: Also support DVD-R, CD-R, CD-RW pl ay ba ck .
14
Page 16

BASIC OPERATING INSTRUCTIONS
PLAY THE DISC
1.DVD on
Turn on the LCD TV, switch to the DVD mode for the DVD operation.
2.Insert Disc
Insert the Disc to the Disc slot (printed side of the disc in front of you), the player will load the disc
automatically. There will have an on screen indication “CLOSE” then “READ”. After loading the
disc content, it will switch to play mode automatically. If th e di sc i s al re ad y pl ac ed i ns id e, t he d is c
will be read automatically.
Note 1: For some discs, after loading the content of the disc, need to press PLAY or select from the
disc menu to start.
2: Please make sure when inserting the Disc, the printed side of the disc should be facing you.
When inserting the Disc incorrectly, you m ay d am ag e th e DV D me ch an is m.
3.Play
According to the disc content, the disc menu will display for your selection. When playing the disc,
you may use PAUS E bu tt on t o to gg le b et we en P la y an d Pa us e mo de . This product also supports
Menu, Title, Sequential and Program playback.
MENU PLAYBACK
1.Menu Playback (For DVD, Super VCD and VCD2.0 discs)
<1> Press MENU button
● For DVD discs, the screen will display the DVD Disc Menu (Root Menu)
● For Super VCD & VCD2.0 discs, the screen will display the Super VCD, VCD2.0 Disc Menu
(PBC: [OFF]) (Press the MENU button to display the PBC status.)
● Playback the Super VCD & VCD2.0 discs, the default PBC status is ON.
<2> For DVD discs, use the navigation buttons to select and Play the highlighted contents;
For Super VCD & VCD2.0 discs, use the numeric buttons to play your favorite content directly.
(note: PBC should be OFF.)
<3> Press ENTER or PLAY button to start from the highlighted content.
<4> Return to the Root Menu when playing the disc
● For DVD discs, press MENU to display the Disc Menu.
● For Super VCD & VCD2.0 discs, when PBC is ON, press MENU to display the Disc Menu.
<5> STO P
● Press STO P button once to stop. Press PLAY bu tt on t o re su me f ro m wh er e yo u st op pe d.
● Press STO P button Twice to stop. Press PLAY button to start from beginning.
In order to protect the disc, press STO P button then press EJECT button to take the disc out. When
the disc is ejected, hold the disc edge slightly and take it from the eject direction to prevent scratches.
When not using the DVD function (in stand-by mode or using others modes for a long time), please
take out the disc to protect the DVD loader and the disc.
15
Page 17

BASIC OPERATING INSTRUCTIONS
TITLE PLAYBACK
Title Playback For DVD Disc only.
● Press TIT LE b ut to n , th er e wi ll h av e an o n sc re en i nd ic at io n “T IT LE ”.
● Press the direction or numeric buttons to select your favorite title.
● The n wi ll p la y fr om t he f ir st c ha pt er o f th e se le ct ed t it le .
SEQUENTIAL PLAYBACK
Sequential Playback for DVD, Super VCD, VCD, CD, CD-G, HD-CD, MP3/JPEG discs.
For Super VCD & VCD discs, if PBC is “ON” status, press PLAY button will enter the disc menu.
Press MENU button to turn PBC OFF. Press PLAY button to start in sequent.
For Others, while it stopped, press PLAY button to start in sequent.
PROGRAM PLAYBACK
Program Playback for DVD, Super VCD, VCD, CD, CD-G, HD-CD, MP3/JPEG discs.
Using Program playback, you can select max. 16 tracks from the disc to playback in programmed
order.
OSD for Program playback:
PRO G
T C
1 ─ ─ : ─ ─
2 ─ ─ : ─ ─
3 ─ ─ : ─ ─
4 ─ ─ : ─ ─
T C
5 ─ ─ : ─ ─
6 ─ ─ : ─ ─
7 ─ ─ : ─ ─
8 ─ ─ : ─ ─
PLAY C LEA R
T C
9 ─ ─ : ─ ─
10 ─ ─ : ─ ─
11 ─ ─ : ─ ─
12 ─ ─ : ─ ─
DVD , MP3/J PEG dis cs
T C
13 ─ ─ : ─ ─
14 ─ ─ : ─ ─
15 ─ ─ : ─ ─
16 ─ ─ : ─ ─
PRO G
1 ─ ─ ─ ─
2 ─ ─ ─ ─
3 ─ ─ ─ ─
4 ─ ─ ─ ─
5 ─ ─ ─ ─
6 ─ ─ ─ ─
7 ─ ─ ─ ─
8 ─ ─ ─ ─
PLAY C LEA R
9 ─ ─ ─ ─
10 ─ ─ ─ ─
11 ─ ─ ─ ─
12 ─ ─ ─ ─
Sup er VCD, V CD, CD, C D-G, D- CD disc s
13 ─ ─ ─ ─
14 ─ ─ ─ ─
15 ─ ─ ─ ─
16 ─ ─ ─ ─
If it is in PBC ON status, using program playback will turn to PBC OFF automatically.
According to the highlight area input the title and chapter number by numeric buttons, press PLAY
button to start; or move to the <PLAY> b y na vi ga ti on b ut to ns , pr es s EN TE R button to start.
(Program up to 16 tracks)
While playing the program, you may press PROGRAM button to display the program menu for edit.
To clear the program by moving to <CLEAR> and press ENTER button. Or press STOP button to
end the program. When press PLAY button again, the disc will play by sequent.
While playing the program, there will have an on screen indication “PRG PLAY” an d th e cu rr en t ti tl e
and chapter number.
16
Page 18

SIDE VIEW
Butt on N am eButt on N am e
ItemItem
BASIC OPERATING INSTRUCTIONS
1
2
3
4
5
6
Desc ri pt io nDesc ri pt io n
To eject the disc.
2
3
4
5
6
DVD slit
Switch the DVD purch and play.
Press to stop the play when the DVD is playing .
To select the anterior chapter or song.
To select the next chapter or song.
Insert and exit the disc place.
17
Page 19

BASIC OPERATING INSTRUCTIONS
LOCATION OF CONTROLS FOR DVD OPERATION
TIT LE
Pre ss to dis play th e DVD tit le menu .
STO P
To stop t he play .
PLAY/PAU SE
Pla y or Paus e movie s and mus ic or
for wards f rames .
For s elect f orwar ding or b ackwa rds
or sl ow play .
For s elect t he ante rior or n ext
cha pter or s ong.
PRO GRAM
Pre ss to ent er the Ed it wind ow.
PRE VIEW
Pre ss to int ro or sca n 9 pictu re
dis play of C D or VCD.
SLEEP
MENU
Press to display the DVD Disc Menu.
EJE CT
Use d to ejec t DVD or CD .
DVD -SETU P
Pre ss to dis play th e DVD OSD
men u.
SLO W
To sele ct slow m otion f uncti on.
GOT O
Pre ss to act ivate t he on scr een
scr oll-dow n menu fo r edit.
NIC AM/AU DIO
To sele ct NICA M / DVD - Audi o
cha nnel.
SUB TITLE
Sel ect dif ferent su btitle mo de.
ANG LE
Sel ect dif ferent an gle to view .
ZOO M
Enl arge th e pictu re of vie ws.
AB
Rep eat pla y from A to B .
REP EAT
Sel ect repea t mode.
Note:
The prompt message ‘‘ IN VALID KEY’’ will appears on the screen when a button is pressed, that is
the operation is prohibited by the player or disc.
18
Page 20

FU N C TIONS OPERATING INSTRUCTION S
Play (For DVD, Super VCD, VCD, CD, CD-G, HD-CD, MP3/JPEG discs.)
● For DVD disc, press PLAY button from root or title menu; while playing the DVD, you may play
your favorite title directly with title selection by pressing the TIT LE b ut to n.
● For Super VCD & VCD discs, while playing the disc, you may play your favorite tracks by numeric
buttons. (Note: When using the Program playback or when it is PCB ON status, you can only use
PREV or NEXT bu tt on s to c ha ng e th e tr ac k)
● For CD, CD-G & HD-CD discs, while playing the disc, you may play your favorite tracks by
numeric buttons.
● For MP3 / JPEG disc, you may play your favorite tracks by numeric buttons from the content menu.
Note: From track 1-10, use numeric buttons directly; For tracks over 10, press - / -- button first.
(e.g. Track 15, press - / -- then 5)
If input track number is not valid, it will not function.
Previous( )/ Next ( ) (For DVD, Super VCD, VCD, CD, CD-G, HD-CD, MP3/JPEG discs.)
While playing the disc:
● Press PREVIOUS ( ) button to play to the last Title / Chapter / track.
● Press NEXT ( ) bu tt on t o pl ay t o th e ne xt Title / Chapter / track.
For super VCD & VCD discs, in PBC OFF status:
● If the current track is the first one, press PREVIOUS ( ) button will stop the playback.
● If the current track is the last one, press NEXT ( ) bu tt on w il l st op t he p la yb ac k.
For DVD discs, the above functions may vary due to diff er en t DV D di sc 's s tr uc tu re .
Forward( ) / Backward( ) (For DVD, Super VCD, VCD, CD, CD-G, HD-CD, MP3/JPEG
discs.)
While playing the disc, you may use forward or backward function.
● The re a re 4 s pe ed s fo r fo rw ar d. P re ss f or wa rd b ut to n to t og gl e be tw ee n di fferent speeds in
sequent. (FORWARDx2j FORWARDx4j FORWARDx8j FORWARDx20j Play)
1. While in forward, you may press PLAY to resume normal speed.
2. For CD, HD-CD, MP3, forward also have audio output.
For DVD discs, if forward to last title / chapter, it will start from the beginning.
For Super VCD & VCD discs, in PBC ON status, if forward to the last track, it will start from the
beginning.
● The re a re 4 s pe ed s fo r ba ck wa rd . Pr es s ba ck wa rd b ut to n to t og gl e be tw ee n di fferent speeds in
sequent. (BACKWARDx2j BACKWA RD x4 j BA CKWARDx8j BACKWARDx20j Play)
1. While in backward, you may press PLAY to resume normal speed.
2. For CD, HD-CD, MP3, backward also have audio output.
For DVD discs, if backward to first title / chapter, it will start from the beginning.
For Super VCD & VCD discs, in PBC ON status, if backward to the first track, it will start from the
beginning.
Note: During Forward or Backward, the sound will be off .
19
Page 21

FU N C TIONS OPERATING INSTRUCTION S
Slow motion (For DVD, Super VCD & VCD discs)
While playing the disc, you may use slow motion function.
● The re a re 6 s pe ed s fo r sl ow m ot io n. P re ss S LO W bu tt on t o to gg le b et we en d ifferent speeds in
sequent. (SF1/2j SF1/3j SF1/4j SF1/5j SF1/6j SF1/7j Play)
● While in slow motion, you may press PLAY to resume normal speed.
Note: During Slow motion, the sound will be off .
Pause (For DVD, Super VCD, VCD, CD, CD-G, HD-CD, MP3/JPEG discs.)
FOR CD, CD-G, HD-CD & MP3/JPEG discs, press PAUS E bu tt on t o pa us e; p re ss P LAY button to
resume.
FOR DVD, Super VCD, VCD discs, press PAU SE b ut to n to p au se ; pr es s ST EP button to playback
frame by frame; press PLAY button to resume.
Repeat (For DVD, Super VCD, VCD, CD, CD-G, HD-CD, MP3/JPEG discs.)
Press REPEAT button once to display the current repeat mode.
● For Super VCD, VCD, CD, CD-G, HD-CD, discs, while playing in sequent, you may use the repeat
playback.
There are 2 repeat modes, press REPEAT to toggle between different modes in sequent:
REPEAT (OFF)j REPEAT (1) j RE PE AT (ALL)
● For DVD discs, you may setup the repeat playback mode.
There are 2 repeat modes, press REPEAT to toggle between different modes in sequent:
REP: (OFF)j REP: (CHAPTER)j REP: (TITLE)j REP: (REP ALL)
● For MP3 / JPEG discs, while playing the disc, you may use the repeat playback.
There are 3 repeat modes, press REPEAT to toggle between different modes in sequent:
REPEAT (OFF)j REPEAT (1)j REPEAT (DIR)j REPEAT (ALL)
Display (For DVD, Super VCD, VCD, CD, CD-G, HD-CD, MP3/JPEG discs.)
Press DISPLAY button to activate the on screen roll-down menu for the current Tit le , Chapter, ti me
and other information.
● For DVD discs (2 pages):
Press DISPLAY button once to display first page:
Disc type, Title -/- (Current / Full), Chapter-/-(Current/Full), Full disc time.
Press DISPLAY button again to display second page:
Audio-/--(Current/Full) or OFF, Language, Audio type, Subtitle-/-(Current/Full) or OFF.
Press DISPLAY button again to turn off the on screen display.
● For Super VCD discs (2 pages):
Press DISPLAY button once to display first page:
Disc type, Track -/- (Current / Full), Mute status, PBC status, Repeat mode status, Current track time.
Press DISPLAY button again to display second page:
Audio-/--(Current/Full) or OFF, Audio type, Language, Subtitle-/-(Current/Full) or OFF.
Press DISPLAY button again to turn off the on screen display.
20
Page 22

FU N C TIONS OPERATING INSTRUCTION S
● For CD, CD-G, HD-CD, MP3 / JPEG discs:
Press DISPLAY button once to display first page:
Disc type , Track -/- (Current / Full), Mute status, Repeat mode status, Current track time.
Press DISPLAY button again to turn off the on screen display.
Goto (For DVD, Super VCD, VCD, CD, CD-G, HD-CD, MP3/JPEG discs.)
This function allow you to play your favorite Title / Chapter / track. Press GOTO button to activate
the on screen scroll-down menu for edit. According to the highlighted area, input your favorite Title /
chapter / Track number by numeric buttons or input the playback time. After editing, press ENTER
to start. If the input is invalid, it will not function.
Note: While editing, the GOTO b ut to n is n ot f un ct io n.
If it is in PBC ON status, this function will switch the it to OFF.
Audio (For Super VCD, VCD, CD, CD-G, HD-CD, MP3/JPEG discs.)
● Press AUDIO button once to display current audio mode.
● Press again to toggle between diffe re nt a ud io m od es i n se qu en t.
1. For Super VCD & VCD discs: (Stereo L R Auto L Aut o R)
2. For CD, CD-G, HD-CD, MP3 discs: (Stereo L R)
Note: Switching to Auto L / R audio channel may be vary due to different discs contents.
Bilingual VCD discs can use AUDIO button to switch between diffe re nt l an gu ag es .
Language (For DVD, Super VCD discs)
● Press AUDIO button once to display current language.
● Press again to toggle between diffe re nt l an gu ag es m od e in s eq ue nt .
Note: For Multi-languages DVD & Super VCD discs, press AUDIO button to select your favorite
language.
PREVIEW (For Super VCD, VCD, CD, CD-G, HD-CD, MP3/JPEG discs.)
● For Super VCD & VCD discs, while the disc had stopped, press PREVIEW button.
1. Th e sc re en w il l sp li t to 9 s ma ll d is pl ay t o pl ay e ac h tr ac k by 3 s ec . ac co rd in g to t he t ra ck s or de r.
2. If it is in PCB ON status, this function will switch it to OFF. (Note: If started the disc menu, preview
will not function)
3. Press PREV / NEXT bu tt on t o na vi ga te t he 9 s ma ll s cr ee ns .
4. Press PLAY button to playback the current selection.
5. Press 1- 9 button to activate corresponding small screen directly.
● For CD, CD-G, DTC-CD, HD-CD discs, while the disc had stopped, press INTRO button. It will
start to play each track by 15 sec. according to the tracks order.
1. Press numeric buttons directly to select the tracks for preview
2. Press PLAY button to playback the current track
While playing the discs, you may also press PREVIEW button to activate this function. (Note: if the
current track started over 15 sec. this function will start from next track.)
21
Page 23

FU N C TIONS OPERATING INSTRUCTION S
Subtitle (For DVD, Super VCD discs)
● Press SUBTITLE button once to display current sub-title.
● Press again to toggle between diffe re nt s ub ti tl e mo de s in s eq ue nt .
Note: For Multi-languages subtitle DVD & Super VCD discs, press SUBTITLE button to select your
favorite subtitle language.
Angle (For DVD discs.)
● Press ANGLE button once to display current playback angle.
● Press again to toggle between diffe re nt p la yb ac k an gl e co de i n se qu en t.
e.g. Angle -/- (Current/Full) or OFF.
Note: Only for DVD with multi-angle, press SUBTITLE button to select your favorite playback angle.
Selectable playback angle depends on the availability of the DVD contents.
Mute (For DVD, Super VCD, VCD, CD, CD-G, HD-CD, MP3/JPEG discs.)
● Press MUTE button to mute the audio output. The re w il l ha ve a n on s cr ee n sy mb ol i nd ic at e “M UT E” .
● Press again to cancel, or Press VOL + to cancel and adjust the volume.
In case there is no audio output, try to press MUTE button to cancel mute.
Zoom (For DVD, Super VCD, VCD, MP3/JPEG discs.)
● Press ZOOM button to zoom in the picture.
● There are 6 zoom modes, press ZOOM button to toggle between diffe re nt z oo m mo de s in s eq ue nt :
Zoom2j Zoom3j Zoom4j Zoom1/2j Zoom1/3j Zoom1/4j Zoom OFF
In Zoom2-4, You may use the navigation buttons to pan the picture for your favorite portion.
Repeat A- B (For DVD, Super VCD, VCD, CD, CD-G, HD-CD, MP3/JPEG discs.)
● In normal Playback, fast forward or fast reverse, press A-B button at where you want to start the
repeat portion. The re w il l ha ve a n on s cr ee n in di ca ti on “ RE PE AT A- “.
● In normal Playback, fast forward or fast reverse, press A-B button again at where you want to stop
the repeat portion. The re w il l ha ve a n on s cr ee n in di ca ti on “ RE PE AT A-B“.
● The repeat function started to playback the portion from A to B automatically.
● Press A-B button again to cancel. Th er e wi ll h av e an o n sc re en i nd ic at io n “A -B C AN CE L” .
1. For Super VCD, VCD & CD discs, repeat A-B is only function within the same track. When playing
the others, repeat A-B will cancel automatically.
2. For Super DVD discs, repeat A-B is only function within the same Title /Chapter. When playing
the others, repeat A-B will cancel automatically.
Volu me ( Fo r DV D, S up er V CD , VC D, CD, CD-G, HD-CD, MP3/JPEG discs.)
Press VOL - / VOL + bu tt on s to a dj us t th e ou tp ut v ol um e.
Note: Playback DVD discs in original code, is not adjustable.
22
Page 24

FU N C TIONS OPERATING INSTRUCTION S
MP3/JPEG PLAYBACK
After loading the MP3/JPEG disc, it will start to scan for the stored MP3 /JPEG folders. Th en w il l
firstly display the MP3 contents automatically and start to play the first file (highlighted file).
Screen as follow.
Display current MP3
playback function
Display current MP3
playback function
[MP3] --.MP 3
01. Mp3
[PICT URE] --.JPG
01. PIC TURE
01. _ _ _ _
02. _ _ _ _
03. _ _ _ _
04. _ _ _ _
05. _ _ _ _
06. _ _ _ _
07. _ _ _ _
08. _ _ _ _
09. _ _ _ _
10. _ _ _ _
01. _ _ _ _
02. _ _ _ _
03. _ _ _ _
04. _ _ _ _
05. _ _ _ _
06. _ _ _ _
07. _ _ _ _
08. _ _ _ _
09. _ _ _ _
10. _ _ _ _
Highlight file for current
playback.
Highlight file for current
playback.
Using the navigation buttons to check you favorite folder and playback the first file or move to the
your favorite file.
Note:
● Press ◄ ► buttons to move the highlight to folders, documents or mode selection.
● Press numeric buttons to select the contents directly. For n um be r ov er 1 0,
press -/-- button first. (e.g. File number 15, press -/-- then 5.)
● When playback MP3 files, there is no picture display, on ly a ud io o ut pu t.
● Playing the JPEG discs, press PROGRAM button to select slide effe ct s. There are 17 slide modes,
press PROGRAM button to toggle between diff er en t mo de s in s eq ue nt :
Start from topZ Start from bottomZ Start from leftZ Start from rightZ Start from upper left corner
Z Start from upper right cornerZ Merge from left / rightZ Horizontal bladesZ Vertical bladesZ
Merge form 4 cornersZ Random PlaybackZ Slide effect OFF
● When play or pause with picture playback, you may use navigation buttons to flip / rotate the picture.
1. ▲ button to flip horizontally
2. ▼ button to flip vertically
3. ◄ button to rotate left 90˚
4. ► button to rotate right 90˚
● When play or pause with picture playback, you may use MENU button to enter preview mode to
display 12 pictures. Press NEXT / PRE V bu tt on t o se le ct n ex t / pr ev io us p ag e or p re ss n um er ic
buttons to view the corresponding pictures.
Note 1: The a bo ve f un ct io ns m ay v ar y ac co rd in g to D MP contents.
2: Th e ma xi mu m JP EG i ma ge s iz e th at c an b e di sp la ye d is 1 28 0 x 10 24 .
23
Page 25

DVD FUNCTION SET T I NGS
SYSTEM SETUP
SYSTEM SETUP
TV SY STEM
TV TY PE
PASS WORD
RATI NG
DEFA ULT
EXI T SETUP
TV SYSTEM:
Select according to your TV c ol or s ys te m: ( NT SC , PAL, Auto for Multi-system)
Default setting is NTSC.
TV TYPE:
Select a according display mode among 4:3PS, 4:3LB and 16:9.
4:3PS : suitable for normal TV, when playback wide screen movie, the left and right of the screen
will be cropped.
4:3LB : suitable for normal TV, when playback wide screen movie, the top and bottom will have a
black border.
16:9 : suitable for connecting a wide screen TV / D is pl ay.
Note:
1. Playback screen size may vary according to the discs contents.
2. For discs with 4:3 contents, using any mode would only display a 4:3 screen
3. Screen ratio selection should be according to the connected TV / D is pl ay a sp ec t ra ti o.
PASS WO RD :
1. Th e de fa ul t se tt in g is l oc ke d. N o Ra ti ng s el ec ti on o r ch an ge p as sw or d co ul d be d on e. To edit
the Rating setting, please enter default password “0000” by numeric buttons, then press ENTER
button to confirm.
2. To cha ng e pa ss wo rd , in pu t an y 4 di gi t nu mb er w he n th e lo ck i s un lo ck ed . On ce t he 4 d ig it
number in entered, that will be your new password.
RATI NG :
Playback for some discs with rating, you can select the rating setting according to your preference.
Rating restriction divided in eight diffe re nt c at eg or y fr om K ID S AF E to AD ULT.
Note: Only editable when password is unlocked. And only can function when password is locked.
DEFAULT :
Press ENTER button to restore factory default.
1. Press the SETUP bu tt on o n th e re mo te c on tr ol t o to
activate the DVD player OSD menu;
2. Press p /q button to move and highlight between
diffe re nt s ub -m en u. P re ss t /u or ENTER button to
enter the highlighted sub-menu.
3. Press SETUP bu tt on t o ex it t he O SD m en u, o r mo ve t he
highlight to EXIT SET UP then press ENTER button to exit.
Note: In Setup mode, the following functions will be
cancel or pause : TIT LE , SU B- TI TL E, D IS PL AY,
PLAY, SETUP, STOP, SLOW / STEP, NICAM /
AUDIO, FF, FR, PREV, NEXT, GOTO, ZOOM,
ANGLE, PROGRAM, PREVIEW, REPEAT,
REPEAT A-B.
24
Page 26

DVD FUNCTION SET T I NGS
LANGUAGE SETUP
LANGUAGE SETUP
OSD L ANGUA GE
AUD IO LANG
SUB TITLE L ANG
MEN U LANG
EXI T SETUP
OSD LANGUAGE:
Use navigation buttons to select the OSD LANGUAGE setup icon, press ENTER button to confirm.
There are 6 languages for your selection, press p /q buttons to toggle between diff er en t
languages. (ENGLISH GERMAN SPANI SH FRENCH PORTUGUESE ITALIAN) Press ENTER
button to confirm.
Note: If the selected language is not included in you DVD disc content, it will select the default
language of the disc automatically. The default language setting is French.
AUDIO LANG(Audio language):
Use navigation buttons to select the AUDIO LANG setup icon, press ENTER button to confirm.
There are 8 languages for you selection, press p /q buttons to toggle between diffe re nt
languages. (ENGLISH GERMAN SPANI SH FRENCH PORTUGUESE ITALIAN).
Press ENTER button to confirm.
Note: If the selected language is not included in you DVD disc content, it will select the default
language of the disc automatically. The default language setting is French.
SUBTITLE LANG (Subtitle language):
Use navigation buttons to select the SUBTITLE LANG setup icon, press ENTER button to confirm.
There are 7 languages for you selection, press p /q buttons to toggle between diffe re nt
languages (ENGLISH GERMAN SPAN IS H FRENCH PORTUGUESE ITALIAN OFF).
Press ENTER button to confirm.
Note: If the selected language is not included in you DVD disc content, it will select the default
language of the disc automatically. The default language setting is French.
MENU LANG (Menu Language):
Use navigation buttons to select the MENU LANG setup icon, press ENTER button to confirm.
There are 8 languages for you selection, press p /q buttons to toggle between diffe re nt
languages (ENGLISH GERMAN SPAN IS H FRENCH PORTUGUESE ITALIAN).
Press ENTER button to confirm.
Note: If the selected language is not included in you DVD disc content, it will select the default
language of the disc automatically. The default language setting is FRENCH.
1. Press the SETUP bu tt on o n th e re mo te c on tr ol t o to
activate the DVD player OSD menu;
2. Press p /q button to move and highlight between
diffe re nt s ub -m en u. P re ss t /u or ENTER button to
enter the highlighted sub-menu.
3. Press SETUP bu tt on t o ex it t he O SD m en u, o r mo ve t he
highlight to EXIT SET UP then press ENTER button to exit.
25
Page 27

DVD FUNCTION SET T I NGS
AU DI O SET UP
AUDIO SETUP
AUD IO OUT
TON E
EXI T SETUP
AUDIO OUT:
There are 3 modes (SPDIF / OFF SPDIF / original code SPDIF / PCM) for your selection; use
navigation buttons to select diff er en t mo de s, p re ss E NT ER b ut to n to c on fi rm .
SPDIF / OFF: Coaxial output off .
SPDIF / RAW: When connected the coaxial output to your audio amplifier, playing back
the discs with Dolby, MP EG c on te nt s, t he c oa xi al o ut pu t th e or ig in al s ig na l to y ou r am pl if ie r.
Your Amplifier must have the corresponding decoding function.
SPDIF / PCM: When connected with 2 channels digital stereo amplifier, playing back the discs
with Dolby, MP EG c on te nt s, t he c oa xi al o ut pu t wi th 2 c ha nn el t o yo ur a mp li fi er.
TON E:
Use p /q buttons to adjust the Tone setti ng .
DIGITAL SETUP
DIGITAL SETUP
DYN AMIC RA NGE
DUA L MONO
EXI T SETUP
1. Press the SETUP bu tt on o n th e re mo te c on tr ol t o to
activate the DVD player OSD menu;
2. Press p /q button to move and highlight between
diffe re nt s ub -m en u. P re ss t /u or ENTER button to
enter the highlighted sub-menu.
3. Press SETUP bu tt on t o ex it t he O SD m en u, o r mo ve t he
highlight to EXIT SET UP then press ENTER button to exit.
DYNAMIC RANGE:
When switch the compress mode to “Audio output”, adjust the compress ratio for diff er en t effect.
When selected FULL, the peak signal value is smallest. When selected OFF, the peak signal
value is biggest.
DUAL MO NO :
You can select four different audio output: STEREO, MONO L, MONO R, MIX MONO.
26
Page 28

SUP P ORTED OP E RATING M O DES
Resolution
720x400
Horizontal
Frequency (KHz)
31.50
Vertical
Frequency (Hz)
70.00
Comment
DOS
640x480
640x480
640x480
800x600
800x600
800x600
1024x768
1024x768
1024x768
1280x1024
1280x1024
37.50
37.90
31.50
46.90
47.20
37.90
60.00
56.50
48.40 60.00
80.00
63.50 60.00
75.00
72.00
60.00
75.00
72.00
60.00
75.00
70.00
75.00
VGA
VGA
VGA
SVGA
SVGA
SVGA
XGA
XGA
XGA
SXGA
SXGA
● Modes, which are not l isted in the above tabl e, may not be supported. Fo r an optimal picture
is recommended to ch oose a mode listed in the t able.
● The incoming displ ay modes are compatib le with WINDOWS as shown in t he table above.
● Sometimes, the ima ge may be disrupted due t o the frequency standar d from the VGA card.
However, this is not an e rror. You may improve this s ituation by activat ing the automatic
adjustment or by man ually changing the ph ase and the clock setting s in the menu.
● To extend the service li fe of the product, we rec ommend that you use your co mputer’s powe r
management funct ion.
27
Page 29

TROUBLESHOOTING
Before contactin g the service technic ian, perform the follow ing simple checks. If any p roblem
still persists, un plug the LCD TV and call for servic e.
TV Mode:
No sound or picture
Norma l pi cture but no sound
Sound i s to o low
No pict ur e or black and white
pictu re
“NO INP UT ” message
Sound and picture
interference
Blurred or snowy picture,
distorted sound
Remot e co ntrol does not
work
The LCD TV does not turn on
The ima ge i s too light or too
dark
On PC mod e, h orizontal bars
appea r to f licker, jitter or
shimm er o n the image
On PC mod e, v ertical bars
appea r to f licker, jitter or
shimm er o n the image
In PC mod e, i mage is not
stabl e an d may appear to
vibra te
In PC mod e, i mage is not
centr ed o n the screen.
Problem
● Check t ha t the mains plug has be en c on nected to a wall ou tl et .
● Check t ha t you have pressed th e bu tt on on the front of th e TV.
● Check t he p icture contrast a nd b ri ghtness setti ng s.
● Check t he v olume.
● Check the volume.
● Check whether the MUTE button has been pressed on the remote
control.
● Check t he v olume.
● If the vo lu me is still too low aft er s et ting the volume lev el t o its
maxim um , check the volume co nt ro l on any external dev ic e
conne ct ed.
● Adjus t th e colour settings .
● Check t ha t the broadcast sys te m se lected is correct .
● Make su re t hat the signal cabl e is f ir mly connected to th e PC o r the
video s ou rces.
● Make su re t hat the PC or video sou rc es a re switched on.
● Try to identif y th e el ectrical applia nc e that is affec ti ng the set and
move it f ur ther away.
● Check t he d irection, locat io n an d connections of yo ur a erial.
● The bat te ry in the remote cont ro l ma y be exhausted.
● The bat te ry may be improperl y in st alled.
● Check t ha t there is no obstruc ti on b etween the remo te c on trol and
the rem ot e (infrared) sens or.
● Ensur e th at there is no strong l ig ht s hining on the rem ot e co ntrol’s
infra re d sensor.
● Be sure t he p ower cord is plugge d on .
● Adjus t th e brightness and Co nt ra st.
● Adjus t th e Phase.
● Adjust the Clock.
Possible Solution
● Check t ha t the display resol ut io n and frequency fro m yo ur PC or
video b oa rd is a valid mode for yo ur L CD TV.
Contr ol P anelg Display g Se ttings.
● If the se tt ing is not correct, u se y ou r computer utilit y pr ogram to
chang e th e display setting s.
Your moni to r su pports multis ca n di splay function wi th in the follow ing fre qu ency domain:
Horiz on tal frequency:3 0~ 75 KHz
Vertic al f requency: 56~75 Hz
Maxim um r efresh rate:128 0X 10 24@75Hz
● Adjus t th e horizontal and ve rt ic al position.
28
Page 30

DVD Mode:
Problem
When th e pl ayback button is
press ed , playback does not
begin , or i t stops quickly
No soun d, o r sound is strange
Butto ns c annot be operated
The pic tu re is disturbed
durin g se arch
Playb ac k does not start even
when a ti tl e is selected
The disc is hot when it is
removed
Subtitles do not appear
The aud io o r subtitle langua ge
canno t be s elected
The ang le c annot be changed
TROUBLESHOOTING
● Have yo u in serted a disc other t ha n a DV D, video CD or musi c CD .
● If the di sc i s dirty, wipe it c le an.
● Inser t co rrectly, wit h th e label surface on th e ne ar s ide.
● When connected to an external amp, set DVD output to ‘‘YES’’.
● Check connections and audio settings.
● There is no sound during pause, still picture, jog or slow playback.
● Check the audio mode is correct.
● Operation may be forbidden, depending on the disc.
● If buttons do not operate at all, try turning the power supply button on
the remote control of the main unit ‘‘Off’’ and ‘‘On’’. The system may fail
to operate correctly due to the effects of lightning or static electricity, etc.
● Some di st urbance is normal . This is not a malfu nc ti on.
● Some ti tl es cannot be played b ac k if v iewing restrict io ns have
been se t.
● Thi s is not a problem for qu al ity or performanc e.
● Subti tl es appear only with d is cs , which contain the m.
● The DVD d oe s not have multiple l an gu age.
● Even wi th a D VD, switching can no t be done at points whe re m ul ti-
angle i s no t stored.
Possible Solution
29
Page 31

SPE C IFICATI ONS
LCD P anel
Siz e
Dis play si ze
Pix el Pitc h
Vie w Angle
Fre quenc y
Hor izont al
Vert ical
Dis play co lor
Dis play Re solut ion
Opt imum Mo de
Max imum Mo de
Inp ut Sour ce
Syn c.
Vid eo Signal
RGB S ignal
TV
Col or Syst em
Sou nd Syst em
Vid eo
Col or Syst em
Vid eo Format
Pow er Supp ly
Inp ut
Pow er Cons umpti on
Wor king
Sta ndby
Env ironm ental C onsid erati ons
Ope ratin g Tempera ture
Ope ratin g Humid ity
Aud io Char acter istic s
Aud io Inpu t
Aud io Inpu t (PC)
Fre quenc y
Res ponse
Dim ensio n (WXDXH ) mm
Wit hout St and
Wit h Stand
Wei ght (Kg)
Net W eight
Gro ss Weig ht
Not e:
● Des ign and s pecif icati ons are s ubjec t to chan ge with out not ice.
● Wei ght and dim ensions s hown ar e appro ximat e value s only.
19" D iagon al
408 .24(H ) X 255.1 5(V) mm
0.2 835(H ) X 0.283 5 (V) mm
150 ° /140° (H/V)
30~ 75KHz
56~ 75Hz
16. 2M colo rs
128 0 X 1024 @ 60 Hz
128 0 X 1024 @ 75 Hz
H/V s epara te, TTL , P. or N.
1Vp -p @ 75 ohm
0.7 V p-p @ 75 oh m
PAL/ SECAM
BG, D K, I, L, L’
PAL/ SECAM /NTSC
CVB S, S-VH S, RGB
AC 10 0~240 V, 50/ 60Hz
60W
< 3W
10℃ ~ 40 ℃( 50°F ~ 10 4°F)
10% ~ 8 0%
RCA Ja ck (L, R) , 0.5Vrms (- 9dB)
i 3.5 S tereo Jac k, 0.5Vrms ( -9dB)
RF: 1 00Hz~ 12KHz ( at ± 3dB)
A/V: 100 Hz~13 KHz (at ± 3 dB)
484 X101X 372.5
484 X210X 420
6.5
8
30
 Loading...