

Page 1
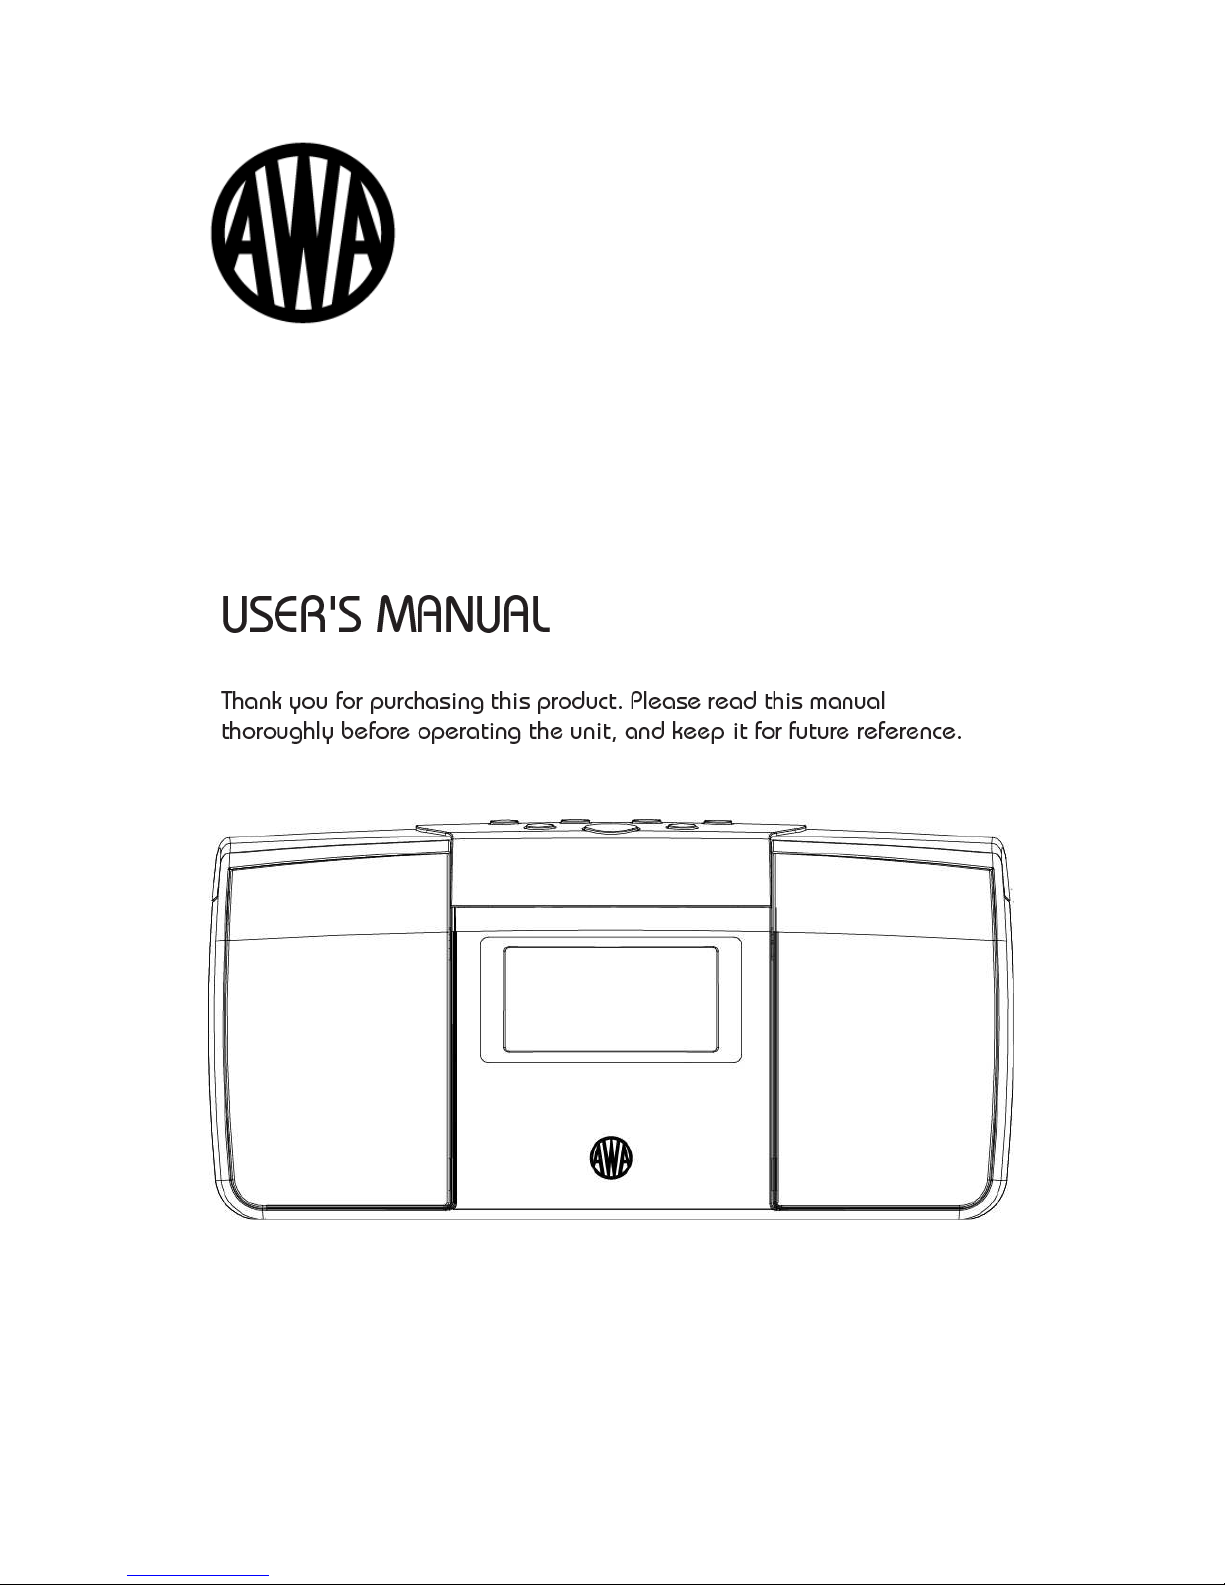
DAB+ Internet Clock Radio
IR706
Page 2
Safety Information
WARNING: TO REDUCE THE RISK OF FIRE OR
ELECTRIC SHOCK, DO NOT EXPOSE THIS
APPLIANCE TO RAIN OR MOISTURE.
IMPORTANT SAFETY INSTRUCTIONS
To reduce the risk of electrical shock, fire, etc.:
1. Read these instructions.
2. Keep these Instructions.
3. Heed all Warnings.
4. Follow all instructions.
5. Do not use this apparatus near water.
6. Clean only with dry cloth. For stubborn stains,
use a soft cloth dampened with a weak solution of
mild detergent and water. Dry the apparatus
immediately afterwards with a clean cloth. Do not
use abrasive clothes, thinners, alcohol, or other
chemical solvents, because they may damage the
finish or remove the panel lettering.
7.Do not block any ventilation openings. The
ventilation shall not be impeded by covering the
ventilation openings with items, such as
newspapers, table clothes, curtains, etc.
8.Do not install near any heat source such as
radiators, heat registers, stoves, or other
apparatus (including amplifiers) that produce heat.
The lightning flash with arrowhead symbol
within an equilateral triangle is intended to
alert the user to the presence of uninsulated
"dangerous voltage" within the product's
enclosure that may be of sufficient
magnitude to constitute a risk of electric
shock to persons.
The exclamation point within an equilateral
triangle is intended to alert the user to the
presence of important operating and
maintenance (servicing) instructions in the
literature accompanying the appliance.
9. Do not defeat the safety purpose of the polarized
or grounding - type plug. a polarized plug has two
blades with one wider than the other. A grounding
type plug has two blades and a third grounding
prong. The wide blade or the third prong are
provided for your safety. If the provided plug does
not fit into your outlet, consult an electrician for
replacement of the obsolete outlet.
Not match with submitted samples
10. Protect the power cord from being walked on or
pinched particularly at plugs, convenience
receptacles, and the point where they exit from
the apparatus. If the power cord is damaged, it
must be repaired by a qualified repairer.
11. Only use attachments/accessories specified by
the manufacturer.
12. Use only with the cart, stand, tripod, bracket or
table specified by the manufacturer, or sold with
the apparatus. When a cart is used, use caution
when moving the cart/apparatus combination to
avoid injury from tip-over.
13. Unplug this apparatus during lightning storms or
when unused for long periods of time.
14. Refer all servicing to qualified service personnel.
Servicing is required when the apparatus has
been damaged in any way, such as power-supply
cord or plug is damaged, liquid has been spilled
or objects have fallen into the apparatus, the
apparatus has been exposed to rain or moisture,
does not operate normally, or has been dropped.
15. The apparatus shall not be exposed to dripping or
splashing and no objects filled with liquids, such
as vases, shall be placed on the apparatus.
16. The mains plug or an appliance coupler is used
as the disconnect device, the disconnect device
shall remain readily operable.
17. Please read Rating Labels at the bottom of unit
for power input and other safety information.
Page 3

Contents
Safety Information 2
Package Content 2
Unit Top Overview..............................................................................................................3
Unit Front and Back Overview............................................................................................4
Internet Radio Quick start Guide 5
What you need before you can use your Internet Radio ......................................................5
Chapter 1 Internet Mode 6
1.1 Setup Wizard .................................................................................................................6
1.2 Access Wireless Network..............................................................................................7
1.3 Local Stations ................................................................................................................8
1.4 Choose a Station ............................................................................................................8
1.5 Select a Station through Podcasts ..................................................................................9
1.6 Get Access Code and FAQ Solutions ............................................................................9
1.7 Station Updates..............................................................................................................9
1.8 Add Station to ‘My Favourites’...................................................................................10
1.9 Add Station to ‘My Added Stations’ ...........................................................................11
Chapter 2 Music Player Mode 12
2.1 Setting up a Music Server............................................................................................12
2.2 Sharing Media with Windows Media Player ...............................................................12
2.3 Play Shared Media.......................................................................................................13
Chapter 3 DAB Mode 15
3.1 Shift to DAB mode ......................................................................................................15
3.2 Shift to Another DAB/DAB+ Station..........................................................................15
3.3 Dynamic Label Segment (DLS)...................................................................................15
3.4 Prune Invalid................................................................................................................15
3.5 DRC (Dynamic Range Control)...................................................................................16
3.6 To Change Station Order .............................................................................................16
Chapter 4 FM Mode 17
4.1 General operation.........................................................................................................17
4.2 Scan Setting .................................................................................................................17
4.3 How to Scan.................................................................................................................17
4.4 Audio Setting...............................................................................................................17
Chapter 5 General Operation 18
5.1 Setting Station Presets .................................................................................................18
5.2 Selecting a Preset Station.............................................................................................18
5.3 Sleep Function .............................................................................................................18
5.4 Setting Clock ...............................................................................................................19
5.5 Setting Alarm...............................................................................................................19
Chapter 6 System settings 21
6.1 Network setup..............................................................................................................21
6.2 Language .....................................................................................................................21
Page 4

6.3 Factory Reset ...............................................................................................................21
6.4 Software Update ..........................................................................................................22
6.5 Setup Wizard ...............................................................................................................22
6.6 The way to get SW Version and Radio ID...................................................................22
6.7 Backlight......................................................................................................................23
Chapter 7 Troubleshooting 24
Chapter 8 Specification 25
Page 5
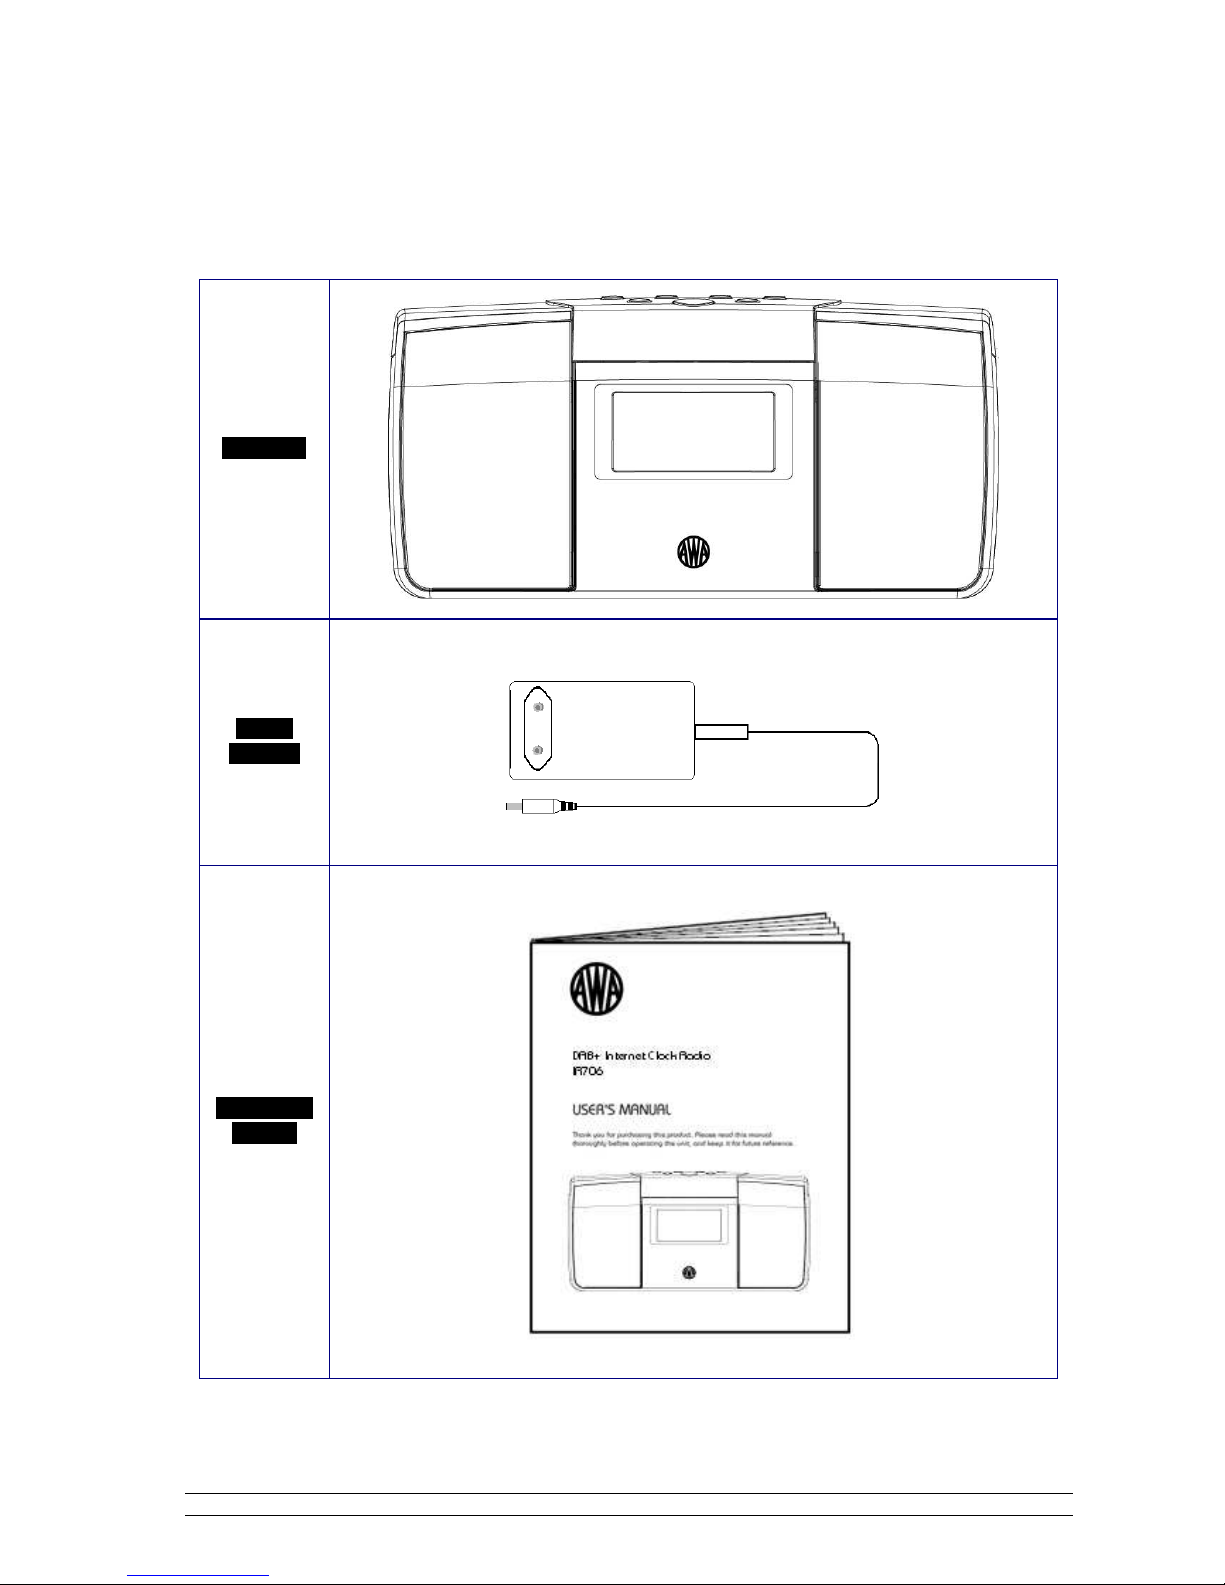
Package Content
Main Unit
Power
Adapter
Instruction
Manual
The configuration not match with submitted sample
2
Page 6
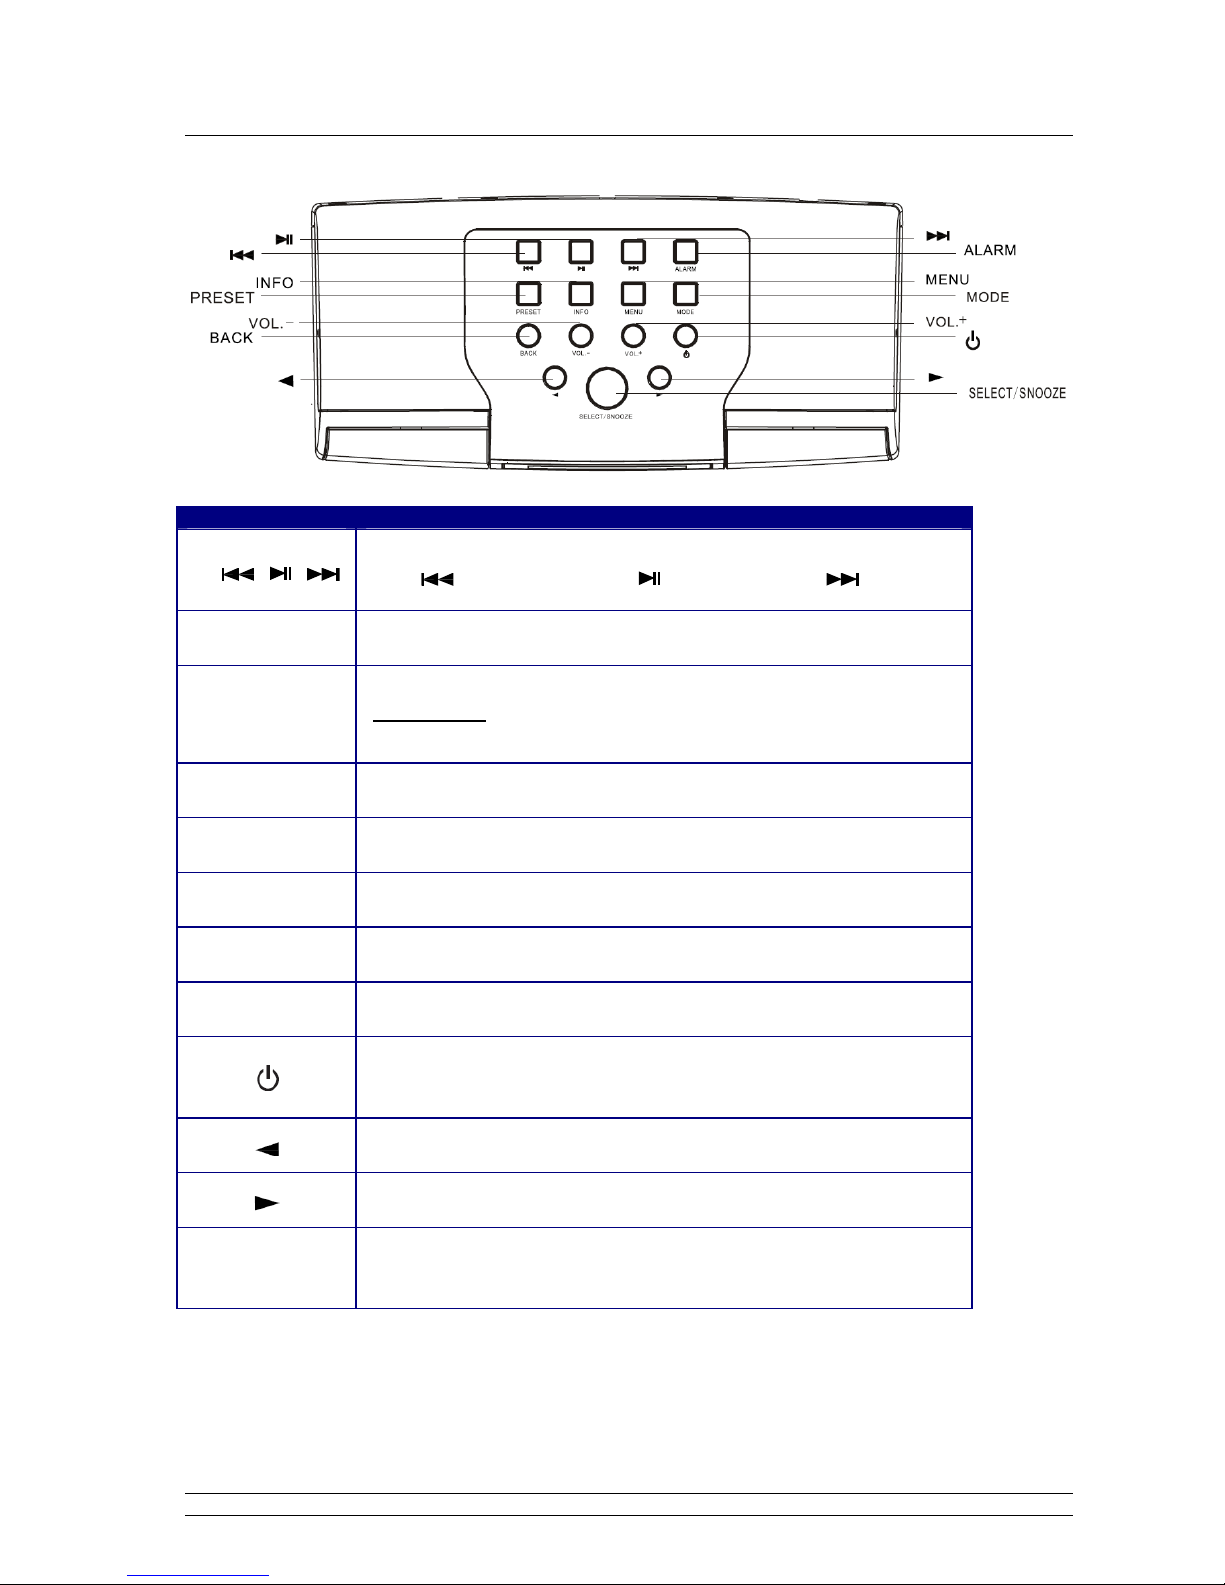
Unit Top Overview
Control All mode
ALARM
PRESET
INFO
MENU
MODE
BACK
Vol- Vol+
Music player mode use only:
Press to previous track, press to Play/Pause, Press to next Track
Press to set Alarms
Internet, DAB and FM mode:
Press and hold to store current playing program as preset station;
Short press to load preset stations.
While a program is playing, press to browse station information
Press to main menu and other options
Press to convert among Internet, Music player, DAB and FM mode in turn.
Press to go back to previous menu page
Press to adjust volume level
Press to turn on/off the Radio;
When alarm is coming, press to turn alarm off
Press to upward browse options
SELECT/SNOOZE
Press to downward browse options
Press to confirm;
When alarm is coming, press to postpone alarm
3
Page 7
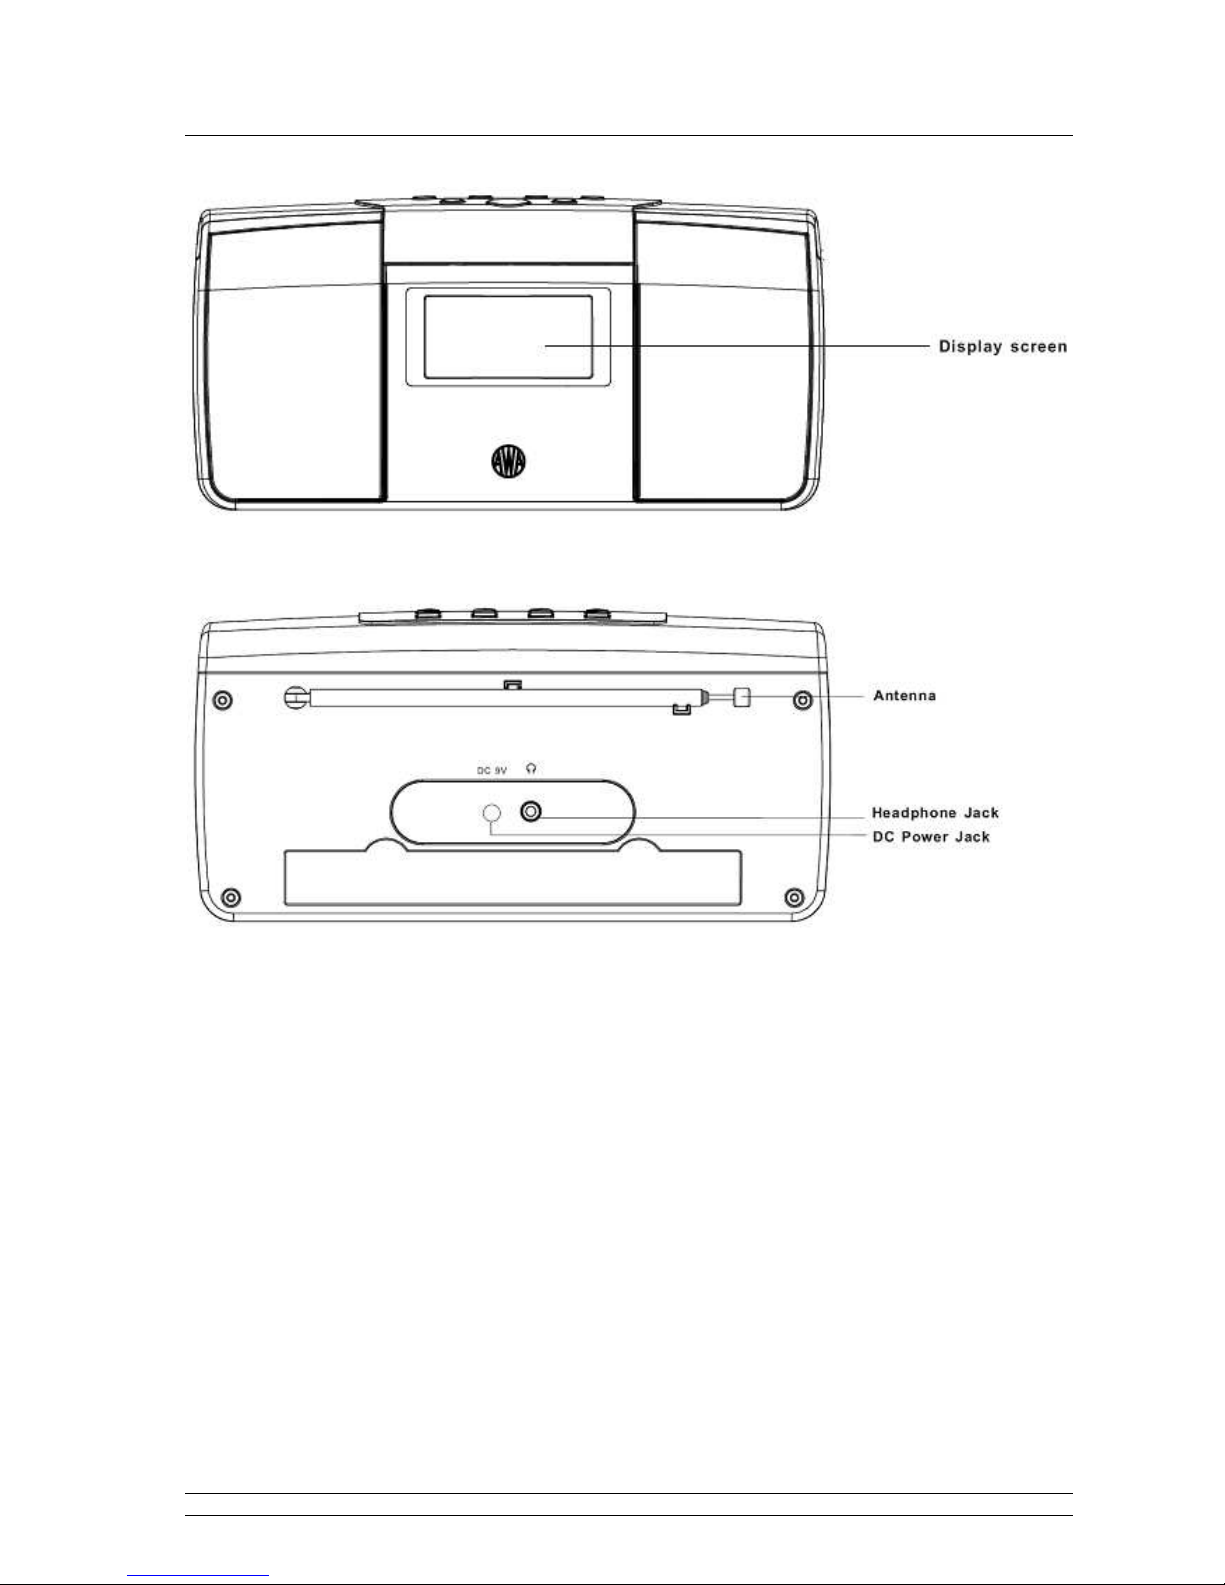
Unit Front and Back Overview
4
Page 8

Internet Radio Quick Start Guide
What you need before you can use your Internet Radio
☺
Thanks for your buying! Before use it, you need to know followings:
Wireless LAN Setting:
• A broadband Internet connection.
• A wireless access point (Wi-Fi) connected to your broadband Internet, preferably via a router.
• If your wireless network is configured to use Wired Equivalent Privacy (WEP) or Wi-Fi Protected
Access (WPA) data encryption, you need to know the WEP or WPA code so you can get the
Internet Radio to communicate with the network.
• If your wireless network is configured for trusted stations, you will need to enter the Radio’s MAC
address into your wireless access point. To find the Radio’s MAC address, use menu items as
follows:
Main menu System settings Network View settings MAC address
To enter the MAC address into your wireless access point, you must read the instructions
supplied with the wireless access point.
Before you continue, make sure that your wireless access point is powered up and
connected to your broadband Internet. To get this part of the system working, read the
instructions supplied with the wireless access point is highly recommended!
5
Page 9
Chapter 1 Internet Mode
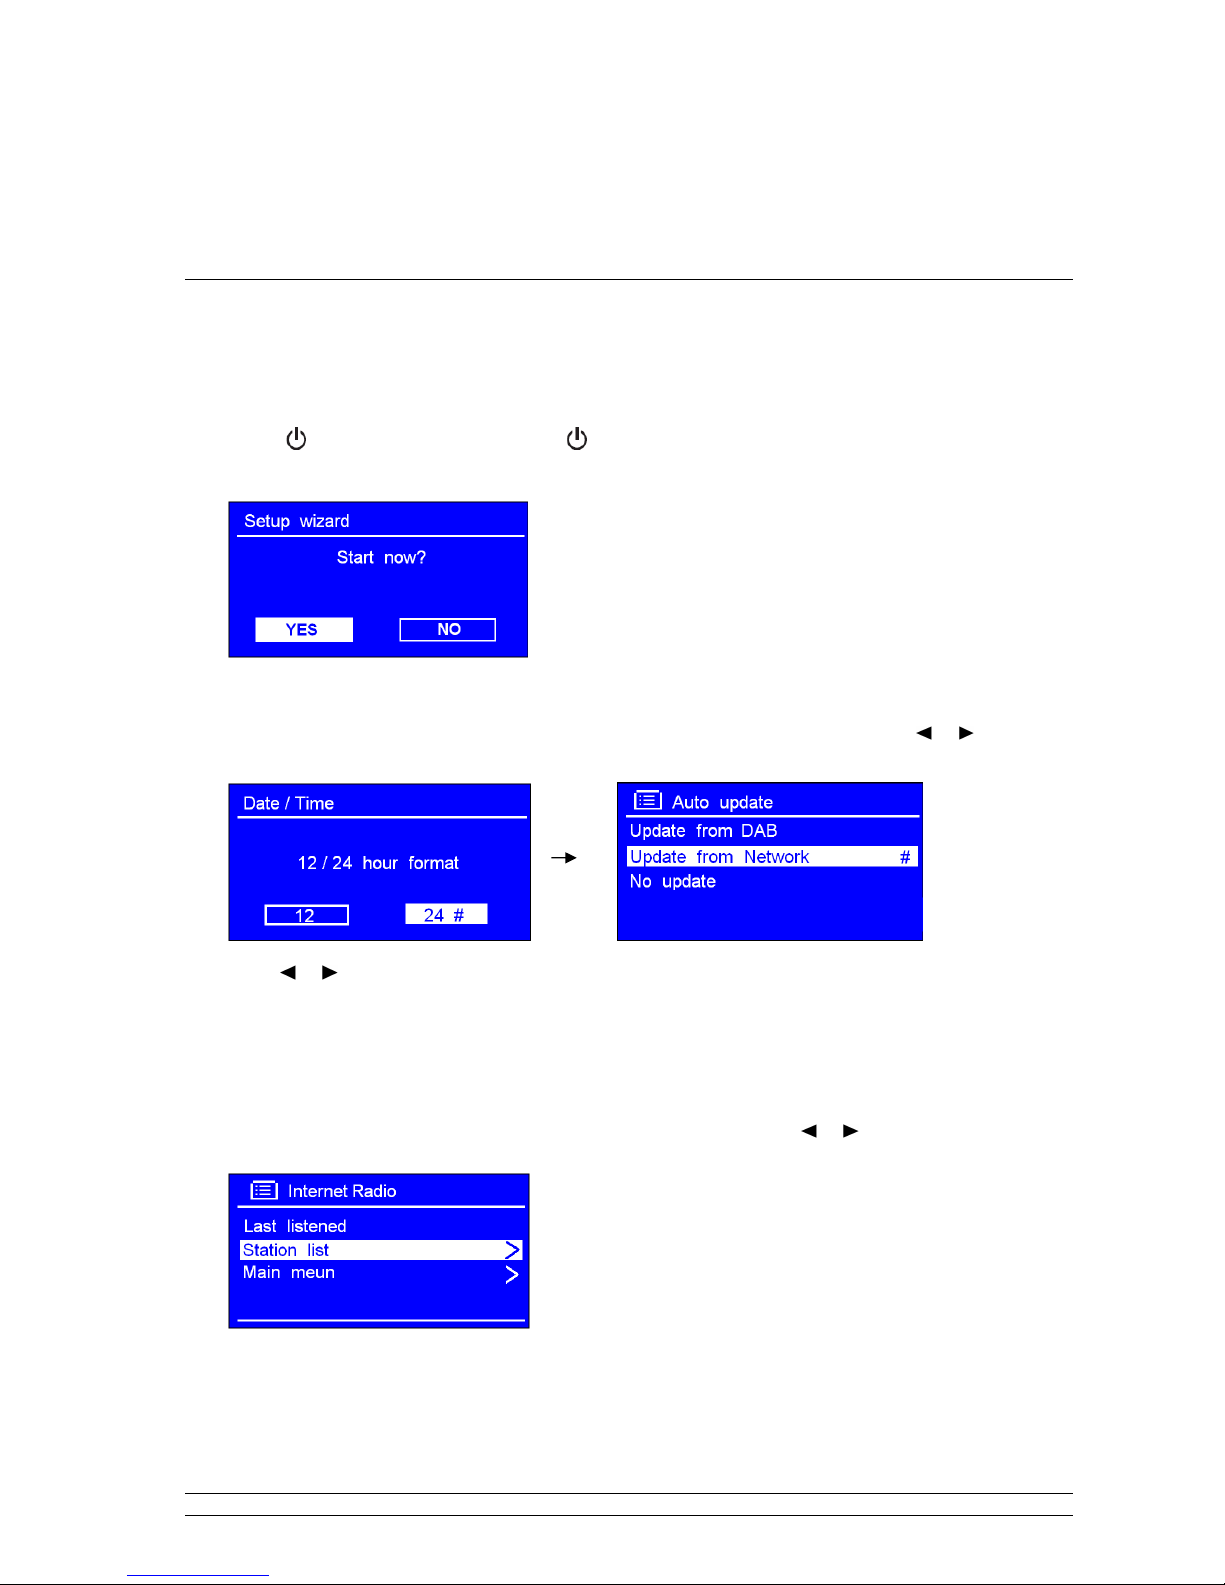
1.1 Setup Wizard
Step 1 - Power up
1. Connect DC adapter to your Internet Radio.
2. Press to switch your radio on (press again can switch your radio off).
3. For initial use, a ‘Setup wizard’ dialog appears on the display.
Step 2 – Setup wizard
1. Continue the above step, press SELECT/SNOOZE to confirm ‘YES’ and then press or to your
preferred ‘hour format’, press SELECT/SNOOZE to confirm.
2. Press or to ‘Update from Network’, and then press SELECT/SNOOZE to confirm. Now, follow
your radio’s instruction, configure the following parameters:
• Timezone:
• Daylight saving:
• Wlan region:
• SSID:
SELECT/SNOOZE to confirm.
select your local timezone.
On or Off
Most of Europe
In some cases radio may find more than one network. Press
or
to your favorite one, press
Note: If your network is not configured to request a
password (WEP/WPA), radio will connect to the
network and display as left picture show:
3. If a WEP/WPA key (password) is required, radio will ask you to input the WEP/WPA code and display
the password entry screen as follows:
6
Page 10

Press or to cycle through the alphanumeric character list, press SELECT/SNOOZE to select an
appointed character.
Note: WEP/WPA pass codes are case-sensitive.
If a wrong character is being input while entering your password, select ‘ ’ to
delete that character.
Note: a.> = Backspace.
b.> the method of select , or : while cursor point to ‘ ’, press , and you
can select , then press you can select or in turn.
c.> Select will be returned to previous track.
d.> Radio will automatically save the WEP/WPA you’ve input, so no bother to re-enter these codes.
e.> After selecting the final character of your password, press or to , and then press
SELECT/SNOOZE
to confirm.
4. Press SELECT/SNOOZE to exit. The setting is OK now.
1.2 Access Wireless Network
1. After successfully ‘setup wizard’, it will show you as above, press SELECT/SNOOZE to enter ‘Internet
radio’ mode.
2. While cursor point to < Station list >, press SELECT/SNOOZE to confirm.
7
Page 11

3. Then refer following section to choice stations. Or if failed to connect to network, please follow:
a. Check your Router, see it working normally or not;
Relocate your radio to a stronger signal position is necessary!
b.
Make sure your password is correct input.
c.
1.3 Local Stations
•
Make sure your radio connected to network.
•
‘Local China’ is, which can be changeable according to your current location, for instance, it can be local
Germany, US, or local UK, etc. In a word, it’s a very easy way for you to find your local programs.
1. To enter Local stations, press MENU < Station list > < Local China >, press SELECT/SNOOZE
to confirm.
2. Press or to your favourite item, press SELECT/SNOOZE to confirm, and then step by step to the
program you desired.
1.4 Choose a Station
Note: make sure your radio has already connected to network, if you considered any step is not consistent
with this instruction menu, press BACK to move backward.
1. To assess to this order, press MENU < Station list > < Stations >, press SELECT/SNOOZE to
confirm.
2. There are five options are available for you to choose a station as above photo show.
•
‘LOCATION’ enables you to choose from the radio stations provided by any country which you choose from a
list.
8
Page 12

a. While cursor point to < Location >, press SELECT/SNOOZE to confirm.
b. Press or to the region you wanted, press SELECT/SNOOZE to confirm.
c. Using the same method to choose country, station in turn, radio will now loading.
•
‘GENRE’ enables you to choose stations according to their content, for example Classic Rock, Sport, News, etc.
Note: a. Some radio stations do not broadcast 24 hours per day, and some stations are not always on-line.
b. If this station has on-demand content, that is, it gives an option of listening the old programs which
have already been broadcast.
1.5 Select a Station through Podcasts
1. To assess to this order, press MENU < Station list > < Podcasts >, press SELECT/SNOOZE
to confirm, and then press or to your favorite option.
2. Press SELECT/SNOOZE to confirm, and then step by step to your purpose program.
1.6 Get Access Code and FAQ Solutions
1. Press MENU < Station list > < Help >, press SELECT/SNOOZE to confirm.
Note: at this step, you can also listening radio FAQ solutions.
2. While cursor point to < Get access code >, press SELECT/SNOOZE to confirm, then you get it.
1.7 Station Updates
Occasionally, radio will tell you that it is receiving an updated station list. It does this automatically and
periodically, ensuring your radio always has the latest station directory on-board.
9
Page 13

1.8 Add Station to ‘My Favourites’
1. Visit website: http://www.wifiradio-frontier.com
2. Click on the register link.
3. Create account login, you need an Access code to complete it, for how to get this code,
please refer previous page.
Note: want to member login? Therefore save your registered ‘Email address’ and ‘Password’.
4. You will able to take advatage of the various additional features and services offered by the
Frontier internet Radio Portal.
5. After above setting is well done, in order to have your radio access your new settings, get your
radio power off for several minutes is necessary.
6. How to play ‘My favourites’? Your need two steps:
a. Press MENU < Station list > < My favourites >, press SELECT/SNOOZE to confirm.
b. Press or to your favorite option, and then press SELECT/SNOOZE to loading…
Note: You added ‘my favourites’ stations will shows up at ‘my favourites’ subdirectory. Doing a ‘factory
reset’ cannot erase them.
10
Page 14

1.9 Add Station to ‘My Added Stations’
Even though the Internet radio portal contains thousands of stations, you may want to listen to stations
not listed. You can add your own stations via the portal.
1. Visit website: http://www.wifiradio-frontier.com
2. Login as a member(at previous page, you registered).
3. You will able to take advatage of the various additional features and services offered by the
Frontier internet Radio Portal.
4. After above setting is well done, in order to have your radio access your new settings, get your
radio power off for several minutes is necessary.
5. How to play ‘’? Your need two steps:
a. Press MENU < Station list > < My added stations >, press SELECT/SNOOZE to
confirm.
b. Press or to your favorite option, and then press SELECT/SNOOZE to loading…
Note: Your added stations will show up at ‘my added stations’’ subdirectory. Doing a ‘factory reset’ cannot
erase them.
11
Page 15

Chapter 2 Music Player Mode
2.1 Setting up a Music Server
• In order for your radio play music files from a computer, the computer must be set up to share files or
media.
• UPnP media sharing allows devices like this radio to play music from a shared media library,
navigating through tag menus such as Artist, Album or Genre.
• If you are running a suitable server system such as a PC with Windows Media Player10 or later
(WMP), and your music library is well-tagged, then it is recommended to use media sharing.
• Only the UPnP server needs to be set up.
2.2 Sharing Media with Windows Media Player
The most common UPnP server is Windows Media Player (10 or later). Alternatively, other UPnP
platforms and servers may be used. To set up WMP for media sharing, perform the following steps:
1. Ensure that the PC is connected to the network.
2. Ensure that the radio is powered on and connected to the same network.
3. In WMP, add to the media library the audio files and folders you want to share with your radio (Library
> Add to Library…).
4. In WMP, enable media sharing (Library > Media sharing…).
5. Make sure that the radio has access to the shared media by selecting it and clicking Allow. You can
also set a name for the shared media in Settings… Click OK to close the dialogue boxes.
6. The PC is now ready to stream the music to the radio. The WMP UPnP service runs in the
background; there is no need to start WMP explicitly.
12
Page 16

2.3 Play Shared Media
1. Press MODE repeatedly until < Music player > is showing up.
Note: Or, enter < Main menu >, and then press
confirm.
or
to < Music player >, press
SELECT/SNOOZE
to
2. While cursor point to < Shared media >, press SELECT/SNOOZE to confirm, and then step by step
to your selecting Music. Press to previous track, press to Play/Pause, Press to Next Track
3. Adjust the volume by pressing VOL+ or VOL-.
•
My Playlist
‘My playlist’ is a collection of songs added by the user from UPnP, it can be reached by pressing
MENU, and then press or to < My playlist >, press SELECT/SNOOZE to confirm.
•
Repeat Play Mode
Press MENU, and then press or to < Repeat play: Off >, press SELECT/SNOOZE to shift ‘Off’
to ‘On’.
•
Shuffle Play Mode
Press MENU, and then press or to < Shuffle play: Off >, press SELECT/SNOOZE to shift ‘Off’
to ‘On’.
•
Clear My playlist
Note: sometimes, you might be considered to fresh your media station list, follow below steps, it’s pretty
easy.
‘Clear My Playlist’ can be reached by pressing MENU, and then press or to < Clear My
playlist >, press SELECT/SNOOZE to confirm.
•
Prune servers
1. Press MENU, and then press or to < Prune servers >, press SELECT/SNOOZE to confirm.
2. Press or ‘Yes’ while your radio asks you ‘Prune shared media wake on LAN servers?’, press
SELECT/SNOOZE to confirm.
•
Now Playing Information
1. While a track is playing, the screen shows its track, artist and album if provided. There is also a
progress bar with figures for elapsed and total track time.
2. To view further information, press INFO repeatedly, screen will appear displaying information such as
bit rate, codec and sampling rate.
13
Page 17

14
Page 18

Chapter 3 DAB Mode
3.1 Shift to DAB mode
1. Press MODE repeatedly until < DAB radio > is shows up. For initial use, it will carry up a full scan
and store stations list in memory.
Note: a. or press MENU to enter < Main menu >, and then press or to < DAB >, press
2. Once the scanning is completed, the DAB/DAB+ stations will be displayed in alphanumeric order. The
first station in the list would be selected.
Note: if no DAB/DAB+ signal is found in your area, it may be necessary for you to relocate your radio.
SELECT/SNOOZE to confirm.
b. in use, you can redo a full scan to update stations list through:
Press MENU, and then press
or
to ‘Scan’, press
SELECT/SNOOZE
to confirm.
3.2 Shift to Another DAB/DAB+ Station
Note: if a wrong operation is being conducted, you can move back at any time by pressing BACK.
1. Press MENU, and then press SELECT/SNOOZE to enter < Station list >.
2. Press or to cycle through stations list, and then press SELECT/SNOOZE to confirm.
3.3 Dynamic Label Segment (DLS)
This is scrolling text information supplied by the DAB/DAB+ station. It may comprise
information on music title or detail of the program and is provided by the broadcaster.
3.4 Prune Invalid
1. Press MENU, and then press or to < Prune invalid >, press SELECT/SNOOZE to confirm.
2. Press or to ‘YES’, and press SELECT/SNOOZE to confirm.
15
Page 19

3.5 DRC (Dynamic Range Control)
You can set the level of the compression of stations to eliminate the differences in dynamic range or
sound level between radio stations.
Note: a. Set DRC to off indicates no compression.
b. set DRC to low indicates little compression.
c. set DRC to high shows maximum compression.
1. Press MENU, and then press or to < DRC >, press SELECT/SNOOZE to confirm.
2. Press or to your preferred option, press SELECT/SNOOZE to confirm.
3.6 To Change Station Order
1. Press MENU, and then press or to < Station order >, press SELECT/SNOOZE to confirm.
Note: There are 3 options: Alphanumeric, Ensemble and
Valid. #shows before the default of your setting option to
indicate current station order.
STATION ORDER DESCRIPTION
Alphanumeric Display all stations in alphanumeric order.
Ensemble List active stations [ones that are currently broadcasting] before inactive ones.
Valid Remove inactive stations from the station list.
2. Press or to your ideal option, press SELECT/SNOOZE to confirm.
16
Page 20

Chapter 4 FM Mode
4.1 General operation
1. Press MODE repeatedly until < FM Radio > is showing up.
For initial use, it will start at the beginning of the FM frequency range (87.50MHz).
Otherwise, the last listened FM station will be selected.
Note: or enter < Main menu >, and then press or to < FM >, press
SELECT/SNOOZE
to confirm.
4.2 Scan Setting
By default, FM scans stop at any available station. This may result in a poor signal-to-noise ratio (hiss)
from weak stations.
To change the scan settings to stop only at stations with good signal strength, press MENU < Scan
setting > Strong stations only? Yes, press SELECT/SNOOZE to confirm.
4.3 How to Scan
1. To manually adjust frequency, while frequency shows up, press or to adjust it by 0.05MHz per
step.
2. To auto-searching, while frequency shows up, simply press SELECT/SNOOZE.
4.4 Audio Setting
By default, all stereo stations are reproduced in stereo. For weak stations, this may result in a poor signalto-noise ratio (hiss).
To play weak stations in mono, press MENU < Audio setting > Listen in mono only? Yes,
press SELECT/SNOOZE to confirm.
17
Page 21

Chapter 5 General Operation
5.1 Setting Station Presets
Your radio can store 10 Internet, 10 DAB and 10 FM stations preset.
To store the current station:
1. Press and hold PRESET until it shows ‘Save Preset’, and then press or to your purpose one.
2. Press SELECT/SNOOZE to confirm. And then it will return to its normal working condition, and preset
icon appeared on display.
5.2 Selecting a Preset Station
To select a stored Interne station:
1. Press MODE to goes into relative mode, only limited to Internet, DAB and FM mode.
2. Press PRESET, and your radio will show ‘Recall Preset’, press or to your purpose one.
3. Press SELECT/SNOOZE to confirm.
5.3 Sleep Function
1. It can be activated from press MENU < Main menu > < Sleep >, press SELECT/SNOOZE to
confirm.
2. Press or to define the sleep period: off/15/30/45/60minutes.
3. When your purpose period is appeared, press SELECT/SNOOZE to confirm.
18
Page 22

Note: At this step, and sleep icon shows up, as well as shows how long it will be expired.
4. Radio will now automatically put itself into standby mode after sleep time has elapsed.
5. To continue enjoying your program by pressing
.
5.4 Setting Clock
1. It can be activated from press MENU < Main menu > < System settings > < Time/Date >,
press SELECT/SNOOZE to confirm.
Note: here, Press
or
to a range of time settings are available, which include the functionality to set:
•
<Set Time/date>: Manually set-up both Time and Date
•
<Auto update>: ‘Update from DAB’, ‘Update from Network’ and ‘No update’
•
<Set format>: ‘Set 24 hour’ and ‘Set 12 hour’
•
<Set timezone>: Press
or
to your location timezone, press
SELECT/SNOOZE
to confirm
•
<Daylight savings>: Press or to ‘ON’, and then press
SELECT/SNOOZE
to confirm, it is done!
1.
5.5 Setting Alarm
Note: Setting Alarm, make sure setting time at first.
1. Setting alarm can be simply press ALARM, or from pressing MENU < Main menu > < Alarms
>, press SELECT/SNOOZE to confirm.
2. Press or to your purpose one, press SELECT/SNOOZE to confirm.
3. Configure the following parameters:
• Enable: Off, Daily, Once, Weekends or weekdays
• Time: 00:00
• Mode: Buzzer, Internet radio, DAB or FM
19
Page 23

• Preset: this option depends on which alarm mode you have setting, this option won’t be available
unless you choice Internet radio, DAB, FM as alarm sound mode
• Volume: Press or to your like volume level, press SELECT/SNOOZE to confirm
Note: remember don’t set your radio volume level to zero (Mute), otherwise, when alarm is
coming, the alarm sound cannot be heard.
• Save: finally, press or to this option, and press SELECT/SNOOZE to confirm to make sure
alarm saved
The screen shows active alarms with an icon at the bottom left.
To check alarms status, press to enter standby mode.
•
Turn Alarm off
•
Play Snooze Function
----------- When alarm is coming, you can press to turn it off.
----------- Press SELECT/SNOOZE to postpone it, repeatedly press
SELECT/SNOOZE, the SNOOZE can be 5/10/15/30 minutes in
turn.
Note: a. While in SNOOZE function, the relative alarm should
be blinkling, and shows how long it will be elapsed,
during this time, you also can press to stop
snooze, and . press again to have your radio play.
b. After reached SNOOZE time, it should be sound again.
•
To cancel Alarm
Refer above steps 1-3 set ‘Alarm Enable status’ to ‘Off’, and then follow your radio’s instructions, until it
shows ‘Alarm saved’.
20
Page 24

Chapter 6 System settings
6.1 Network setup
Note: Users experienced with networking may find these options useful for diagnosing and fixing network
problems.
1. There are some options for viewing and manually altering network settings from pressing MENU <
Main menu > < System settings > < Network >, press SELECT/SNOOZE to confirm.
2. Press or to your purpose network setting option:
•
Want to access to another Router? --------- Network wizard
•
Want to set up a WPS encrypted network? ---------WPS setup
•
Want to get MAC address, Wlan region, IP address etc? ---------- View settings.
•
Want to set it to another region? ---------- Wlan region
•
Want to set DHCP enable or disable? ----------- Manual settings
•
Want to see the list of registered networks or delete some of unwanted networks? ---------- Network profile
3. Press SELECT/SNOOZE to confirm to enter corresponding setting.
6.2 Language
1. It can be activate by pressing MENU < Main menu > < System settings > < Language >,
press SELECT/SNOOZE to confirm.
2. Press or to your language, press SELECT/SNOOZE to confirm, it is done.
6.3 Factory Reset
• A factory reset resets all user settings to default values, so time/date, network configuration and
presets are lost.
• However, the radio’s current software version is maintained, as is registration with the Internet radio
portal.
21
Page 25

• Internet radio favourites therefore remain unless you re-register your radio with another account on
the portal website.
1. It can be reached by pressing MENU < Main menu > < System settings > < Factory
Reset > Proceed? YES or NO.
2. Press SELECT/SNOOZE to confirm ‘YES’.
6.4 Software Update
• From time to time, your radio may make software upgrades available with bug fixes and/or additional
features.
• If your radio detects that newer software is available, it asks if you want to go ahead with an update. If
you agree, the new software is then downloaded and installed.
• After a software upgrade, all user settings are maintained.
Before starting a software upgrade, ensure that your radio is plugged into a stable mains power
connection. Disconnecting power during a software update may permanently damage the unit.
It can be activated from < Main menu > < System settings > < Software update >, press
SELECT/SNOOZE to confirm, your radio will automatically 'Checking for new versions...' and update.
C A U T I O N
6.5 Setup Wizard
• When this unit is started for the first time, it runs through a setup wizard to configure settings for
date/time and network.
• Once this has finished, the system is ready to use in most modes.
1. To run the setup wizard again, press < MENU > < Main menu > < System settings > <
Setup wizard > Yes.
2. Press SELECT/SNOOZE to confirm ‘Yes’, then step by step to set it.
6.6 The way to get SW Version and Radio ID
1. It can be activated from pressing MENU < Main menu > < System settings > < Info >.
22
Page 26

2. Press SELECT/SNOOZE to confirm, this information may be requested when dealing with technical
support issues.
6.7 Backlight
Note: Here, High brightness level can get you pretty easy to view the station information. Set to Low can let you
feel comfortable while you do not want to light bother you.
· For Power on condition:
It can be activated from < Main menu > < System settings > < Backlight > Power-On Level
low/Medium/High. (Setting to high level is recommended!)
· For Standby condition:
It can be activated from < Main menu > < System settings > < Backlight > Standby Level
low/Medium/High. (Setting to low level is recommended!)
23
Page 27

Chapter 7 Troubleshooting
If you experience any trouble with your wireless Internet Radio, then you may find it useful to visit the help
section on our webpage: http://www.wifiRadio-frontier.com
If you have trouble connecting the Radio to your wireless network, these steps may help to resolve the
problem:
1. Confirm that a Wi-Fi connected PC can access the Internet (i.e. can browse the web) using the same
network.
2. Check that a DHCP server is available, or that you have configured a static IP address on the Radio.
You can configure a static IP address on the Radio using the menu item ‘System settings Network
Manual settings Wireless’, and then select ‘DHCP disable’.
3. Check your access point does not restrict connections to particular MAC addresses. You can view the
Radio’s MAC address using the menu item ‘System settings Network View settings MAC
address’.
4. If you have an encrypted network, check that you have entered the correct key or password into the
Radio. Remember that text-format keys are case sensitive. If, when attempting to connect to an
encrypted network, your Radio displays: ‘Wireless error’ followed by a 5-digit number, then please ensure
that you enter the correct passphrase for the network. If the problem persists, then you may need to
consult your network configuration.
5. If your Radio can connect to the network successfully, but is unable to play particular stations, it may be
due to one of the following causes:
a. The station is not broadcasting at this time of the day (remember it may be located in a different time
zone).
b. The station has reached the maximum allowed number of simultaneous listeners.
c. The station is not broadcasting anymore.
d. The link on the Radio is out of date.
e. The Internet connection between the server (often located in a different country) and you is slow.
Try using a PC to play back the stream via the broadcaster’s web site.
6. If you can play back the station with a PC, use the form at http://www.wifiRadio-frontier.com to notify us
so that we can change the station data that is used by the Radio.
24
Page 28

Chapter 8 Specification
ITEMS DESCRIPTION
Specifications: DAB+ Internet Radio
Power Requirements:
Output Power: 2Wrms x 2
Speaker: 8 ohm
Dimension: 226 x 111 x 105mm
DC Adapter: Input: 100-240 Vac, 50-60 HZ
Output: 9Vdc/1000mA
This symbol on the product or in the instructions means that your electrical and electronic equipment should be
disposed at the end of its life separately from your household waste. There are separate collection systems for
recycling in the EU.
For more information, please contact the local authority or your retailer where you purchased the product.
25
 Loading...