

Page 1
DVD/MPEG4/CD/MP3/ PLAYER /DVB-T tunerATV
USER MANUAL
Please read this User Manual carefully to ensure proper use of this product and keep this manual
for future reference.
DP7560
Page 2

DVD Use Manual Content
INT RODUC TIO N
Safety Precautions
Panel Illustration
Connecting to a TV set
Remote Control
Remote Control Operation
DVD PA RT
The Setup Menu System
MPEG4/MP3 PLAYBACK
KODAK Picture CD playback
DVB PA RT
The Setup Menu System
ATV PAR T
The Setup Menu System
SCR EEN SET PA RT
The Setup Menu System
OTH ERS
Troubleshooting
Specifications
Accessories Includes
1
2
2
3
3
4
1. The appara tus shall not be expose d to drippin g or Splashing and
that no objec ts filled with liquid s, such as Vases, shall be place d
the apparatus.
2. The mains pl ug is used as the disconnec t device, the disconnec t
device shal l remain readily operable.
3. To be completely disco nnect the power input, the mains plu g of
apparat us shall be dis connected from the mai ns.
4. The mains pl ug of apparatus should not be obstructed or should
be easily access ed during intende d use.
6
6
7
10
10
11
12
12
Page 3
Saf ety Instru ction s
CAU TION
RISK OF EL ECTRI C SHOCK
Safe ty is Import ant
To ensure your safe ty and th e safety o f others, please en sure you
read t he Safety Instructi ons before you operate thi s product.
Keep this information in a safe place for future reference.
Please read all the safety information before using the product.
Safety Considerations.
Position the cables so that they cannot be walked on or pinched by items
placed on or against them.
Do not use the por table DVD Player in humid or damp conditi ons.
Do not allow the porta ble DVD Player to get wet.
Do not expose the po rtable DVD Player to dripping or splash ing.
Do not place water fi lled objects such as vases on top of th e portable
DVD Player.
Do not place naked flame sources, such as candles, o n the top of the
portable DVD Player.
Caution:D anger of ex plosion if battery is incorrectly replaced .Replace only
with th e same or equiva lent type.
Warnin g:The ba ttery (b attery or batteries o r batter y pack) shall n ot be
expos ed to excessive he at such as sunsh ine,fire or th e like.
Warnin g:To reduce the r isk of fire or ele ctric shoc k, do not expo se this
apparatus to rain or m oisture.T he app apatus shall not be exposed to
dripping or sp lashing and that no obj ects filled wi th l iquids,s uch as
vases ,shall not be p laced on appar atus.
Warni ng:Only use atta chments/acc essorie s speci fied provided by t he
manufacture r,the Porta ble DVD Player is suppl ied by AC adapt er,the AC
adapter is used as disconn ect device, the disconn ect device sha ll remain
readily operab le.
When th e apparatus wa s in electrosta tic circumstance, it m ay be
malfuncti on and need to reset by u ser.
Warn ing:The U SB memo ry stic k shoul d be plug i n the uni t direct ly. USB
extension ca ble sho uld not b e used to avoid f ailin g of data t ransfe rring
and i nterferen ce cause d.
DO NOT OPE N
Clea ning
ALWAY S unplu g the Por table DV D Playe r before y ou clean i t.
Do no t use liq uid or ae rosol cl eaner s.
Clean the Port able DVD P layer w ith a sof t, damp ( not wet ) cloth .
Vent ilati on
The slo ts and open ings on th e Portable DV D Player are for ventilat ion.
Do not cover or blo ck them as it may caus e overheatin g.
NEVER let children push anythi ng into the holes or slo ts on the case.
Ser vicin g
There a re no user serv iceable pa rts in this Po rtable DVD Pl ayer.
When s ervicin g, refer to qua lified se rvice pers onnel.
Cons ult your dea ler if you are eve r in doubt abo ut the insta llatio n,
oper ation or safe ty of this un it.
Bat tery Di sposa l
Please ensure b atteries are di spose d of safel y.
Nev er disp ose of ba tterie s in a fire o r with ot her hou sehol d waste.
Che ck with y our loca l autho rity fo r dispo sal regu latio ns.
This sy mbol indi cates that th is product in corporates double
insu lation bet ween hazard ous mains vo ltage and use r accessible
parts. When se rvicing us e only identical repl acement pa rts.
WARNING: To reduce the risk o f fire or electri c shock, do
not exp ose this app aratus to rai n or cords.
Corre ct D isposal of this produ ct. This making indi cates that this
produ ct should not be dispo sed wi th ot her ho usehold was tes
throu ghout the EU . To prevent p ossible har m to the enviro nment or
hum an heal th from unco ntrolle d waste dis posal, recy cle it
res pons ibly to pro mote th e sus tain able reu se of materi al
resou rces. To return your used device, please use the return and
col lectio n syst ems or contact the ret ailer w here t he prod uct wa s
purch ased. They ca n take this product for environm ental safe rec ycling.
Special notice
A few highlights or dark spots may occur on the LCD screen. It is a very common
phenomenon of the activematrix display technology, and does not mean any defects
or faults. Never try to repair this machine by yourself. In case of any faults. Please
turn off the unit at once, and notify our Company or the corresponding dealer. The
display is made up of many precision electronic components. Any disassembly or
modification may lead to further damage.
11
Page 4
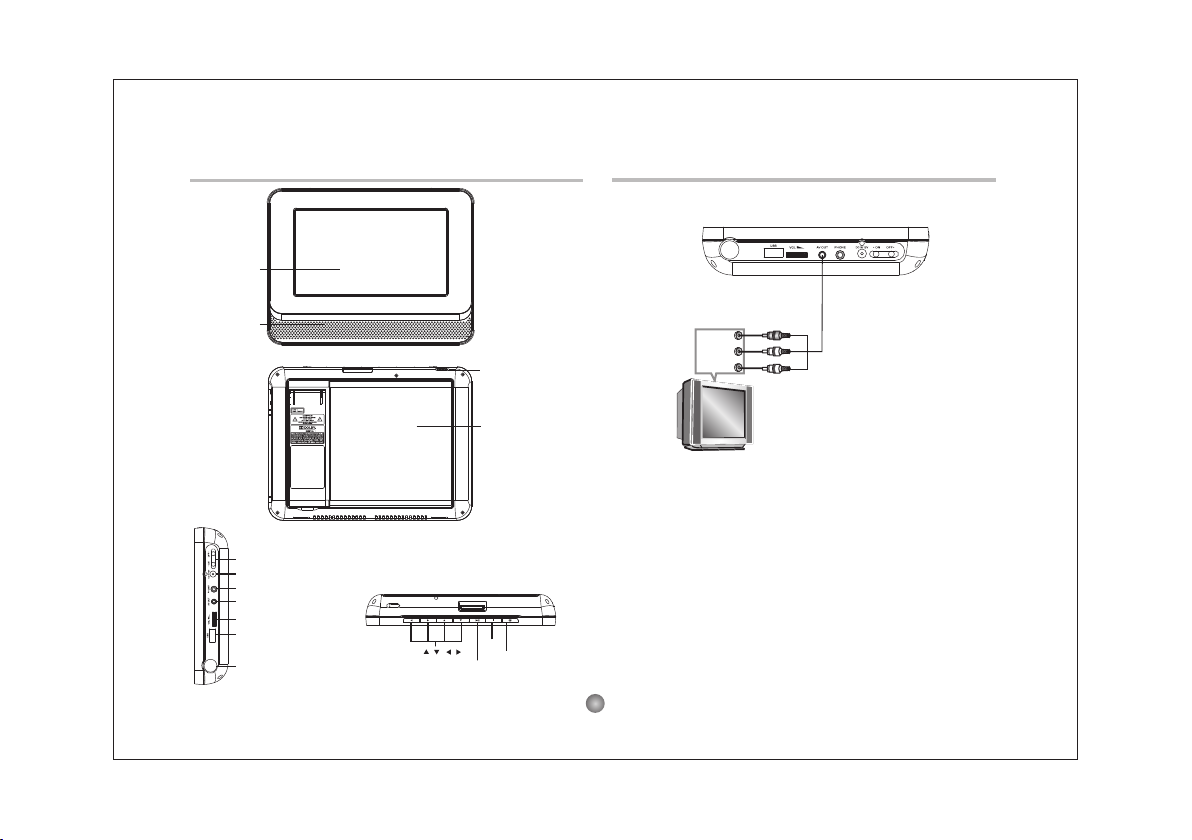
Panel Illustration
LCD DISPLAY
Con necti ng to a TV Se t
Connections
SPEAKER
POWER ( ON/OF)
DC 12V INPUT JACK(power supply)
HEADPHONE
AV OUTPUT
VOLUME
USB IN
ANT IN 75 ohm
MOVE( , , , )
OPEN DISC TOP
DISC TOP
STOP
PLAY/PAUSE
SOURCE
Yellow
VIDE O IN
AUDI O IN
Red
White
CVBS
R
L
2
Page 5

Remote Control
Remote Control
REV
MUTE DIS PLAY SP EAKER
MENU
SUBTI TLE
AUDIO
REPEAT /FAV
SETUP PLAY/PA USE
SOURC E
REV PREV
RANDO M P ROG ANGLE
MUTE
DISPLAY
MENU
SUBTITLE
AUDIO
REPEAT/FAVORITE
SETUP
MOVE( )
ENTER
SOURCE
FWD
RANDOM
PROG
Note:
1. In this ma nual, wi ll be used t o represent dif ferent
NAVI GATIO N ARROWS o n the rem ote respecti vely.
2. In order to o perate any of th e remote fu nctions, yo u must first press
the Po wer butt on on the DVD play er.
3. Some of th e keys is mul tiple key. They can be use d in DVD mode or
in DVB m ode.
CR2025
2
HOW TO REPLACE THE BATTERY
STEP 1: PUSH THE BUTTON TOWARD LEFT;
1
STEP 2: PULL THE BATTERY LOADER OUT.
FUNCT ION
FUNCTION
SPEAKER
NUMBER
KEY SELECT
GOTO
10+
EXIT
S P/TE XT TO
TV/RA DIO
ZOOM/E PG
NEXT
TITLE
GOTO
STOP/TEXT
PLAY/PAUSE
TV/RADIO
ZOOM/EPG
EXIT
NEXT
PREV
TITLE
ANGLE
Introduction
BATTERIES
INCORRECT USE OF BATTERIES MAY CAUSE THEM TO LEAK,
CORRODE OR EXPLODE.
Be sure to place the batteries in the correct direction.
It is dangerous to charge/heat/open or short-circuit the batteries.
Do not leave dead or expired batteries or mix old/new batteries.
When not using the remote control for a long duration of time, remove
the batteries. When operating range becomes reduced, replace all
batteries with new, fresh ones.
If leakage from the battery occurs, wipe the battery liquid from the
battery compartment, then replace.
About Bui lt-in Re chargea ble Batte ry
Precauti ons relat ed to batte ry recharg e
1. Once the ba ttery is f ully disch arged, im mediat ely recharge it
(reg ardle ss of wheth er you pla n to use the bat tery or not) in ord er to
maximiz e the battery li fe. When th e power is lo w, the battery i con will
be shown on the upp er left corner of t he TFT for wa rning.
2. To charge the b attery, please connect t his player to AC ma ins via
the AC a dapter and the c harge ind icator wi ll turn on i n red, and the
indicat or wil l turn into green w hen the batter y is fully ch arged. Th is
will take ab out 2-2. 5 hours if th e player i s in off m ode or 4 .5-6 hou rs if
the playe r is in workin g mode.
Using and m aintain ing yo ur recharg eable batter ies
1. Ple ase make su re you alway s use only th e AC adapter inc luded wi th
the playe r to rech arge your batte ries.
2. Recharg e effici ency wil l degrade when t he env ironmental
tempera ture dro ps below 50 F (1 0 C) or exce ed 95 F (3 5 C) .
3. The lasting ti me of the fully cha rged battery when a he adph one is
conn ected to the pla yer is approximately 2 hours
o o o o
3
Page 6

The setup menu system---DVD PART
General Step s of setup menu
In the DVD mode, Press the <STO P> butt on, The n press <setup>
button, the DVD main set up menu appea rs.
1. DVD MENU
A. DVD Setup-L anguage Setup
Press the Up and Down button move on the
DVD set up and to enter. The DVD Setu planuage Setup opti on appe ar the screen.
1) MENU
Highlight the MENU option , and press th e
Arrow bu ttons to choose the menu langua ge
you prefe r. Press <ENTER> to confi rm. If
the dis c you are playing ha s that Languag e
availabel . It will di splay the menu in the
language.
Notes:
If your preferred langua ge is not availabel, the disc s default
language will be played.
2) AU DIO
Hig hligh t the AUD IO opti on, and p ress the A rrow but tons to c hoose
the a udio la nguag e you pref er. Press <EN TER > to confirm . If th e
dis c you are pl aying h as that l angua ge avai lable, it wi ll ou tput th e
lan guage .
3) SUBTITLE
Hig hlight the SUB TITLE option, an d press the A rrow buttons to
cho ose the subtit le langu age you pre fer. Press <EN TER> to co nfi rm.
If th e disc you are p laying has th at language avai lab le, it w ill display
sub titles in t hat language.
4) E XT ER NAL S UB TITL E
Hi ghlight th e EXT ERNAL S UBTI TLE o ptio n, an d pre ss th e Arrow
bu tto ns to ch oos e the support ed subti tle language wh en pla ying
MPEG4 format di scs.
Main M enu
DVD Set up
DVB Men u
Syste m Setti ng
Game
Exit
:Selec t :Confi rm
Advanced Features
B. DVD Se tup- Audi o Setup
Press <D OWN> arrow bu tton to highlight th e Audio Setup opti on
on the sc reen.
2) DOWN MIX
There are two modes, one is Lo/Ro, one is Lt/Rt.
C. DVD Se tup- Custom Setu p
Press th e <Down> arro w button to highlight the Custom Setup opt ion
on the sc reen.
1) PAR ENTAL CTRL
Parent al Ctrl: 1,2:G ,3:G,4: PG13,5, 6:R,7 :NC1 7,8 the eig ht level s.
The firs t level discs are open to people of ever age and eight level
only sui table for the adult. If you want to chang e the parent al ctrl
setting , enter the us er’s a ge c ontrol i tem a nd t hen e nter f our d igital
pass word. T he default passwo rd is 6 666 (i f you are usin g this player
for the first ti me, just inp ut this code).I f the inp ut code has been
conf irmed, the level se tting up me nu will app ear. Move t he curs or to
choose the expected level and press <ENTER> butto n to confi rm
and memor y it. Move the curso r to the "ENTE R" and press <ENTER >
button t o con firm an d withdr aw to the “use r setup” menu or press
<ENTER> b utto n to directly withdraw from th e oper ation.
DVD Set up-Au dio Set up
Downmix
Ae
:Selec t :Con firm
DVD Setup-Cu stom Setup
Parental Ctrl
Ae
Angle Mark
:Selec t :Confi rm
4
Page 7

The setup menu system---DVD PART
2) ANGLE MARK
There are On and Off the two choices for t his item. If in the ON m ode,
when play a disc which the content is multi-angle shot, you may press
the <ANGLE> button on the remote control to enjoy the scene in
different ang les.
D. DVD Setup-Exit
Press the <DOWN> arrow button to highlight the <EXIT> option on
the screen In the DVD Set up-Exit ,Choose the E xit option to return
the DVD main Setup.
2.System Setting
Press the <SETUP> button , the DVD main setup me nu appears t he
screen, then press the <DOWN> button to highlig ht the syste m
setting option.
A. System Setting Menu -language Setup
Press the <UP> and <DOWN> button moveon the System setting an d
to enter but ton. the System setting Menu-l anuage Setup optio n appear
the screen. In the System setting Menu-language Set up, you can setup
the OSD option.
1) O SD LAN GUAGE
Highlight the OSD LANGUAGE option, and
press the Arrow buttons to choose the OSD
language you prefer. Press <ENTER> to
confirm, and it will display OSD in that
language.
DVD Set up Menu -Lang uage Se tup
OSD
Ae
: Select : Confir m
Advanced Features
B. Sy stem s etting Menu-Display Se tup
Press the <D OWN> arrow button to
high light the Setup opti on on the screen
In th e System Se tting Menu-Display
Setu p.
1) TV Standard
Accord ing to the Color Syste m of the TV, you can choose t he TV
Standard.
2) Di splay
TYP E
Accord ing to the Displ ay type, you can choose 4:3PS, 4:3LB or 16:9.
C. Sy stem s etting Menu-Preference
Press the Do wn ar row button t o highlight
the P referen ce option on the screen.
1) UI Style
According to UI Style , you can choose Style 1, Style2, St yle3, Sty le4.
2) C hange PIN -T he def aul t password is 666 6.
3) Default Type
In the De faul t Type opti ons, you can choo se the DVD MO DE, D VB
MODE, US B MOD E, ATV MOD E user S elect MOD E, Last operatio n
Type M ODE.
NOTE : In the Default Type, If you choose t he DV B MODE. T hat n ext
powe r on the PLAYE R will d irect enter DVB MOD E, no again d isplay
the SOUR CE li st.
4) Default Th e Default setup optio ns are RE STORE factory setu p,
Let your PLAYE R work on the defa ult s tate.
5) System Info The system in fo inclu des mod el, H W, SW an d Dat e.
5
DVD Set up-Di splay S etup
TV Standard
Ae
Display Type
:Selec t :Confi rm
Page 8

The setup menu system---DVD PART
Advanced Features
Kodak picture CD Playback
3. Game options
Press the <SETUP> button, the DV D main setup menu appears the
screen, then press t he <DOWN> button to highlight the Game opt ion.
Press the <UP> and <DOWN> button move on the DVD setup and
press <ENTER> button to confirm the Main Menu- Game option,
appear the screen.
In the Main Menu-Game Setup, you can
setup the Mine, Tetris, Rush Hour,
Calendar four kinds of games. For
example:If you want to play the Mine
Game, you can p ress the <DOWN>
button to high light the Mine options.
Then press the <ENTER> button to
Enter. As below:Other Game options operation same to t he Mine Game.
Main M enu
Mine
Tetris
Rush Ho ur
Calen dar
Exit
:Selec t :Confi rm
MP3 P layba ck
Whe n a Mp3 dis c is loaded, t he scree n will di splay a s follow s:
Press to select the file when the cursor
appears in the file wi ndow. Press select
to play the current file select by the cursor.
Press to switch between the directory
window and the file window.
Note:
Curre nt
direc tory
name
The player will not function correctly under
the following condition:
1. The disc is bad ly scratched, damaged or dirty.
2. The disc is not finalized.
Curre nt MP3/ JPEG fi le
name . If a JPEG f ile is
play ing, th e name sh ould
have a JP EG exte nsion .
3. The recording format is not supported by the player.
The In troduct ion of KODA K Pict ure CD
A Koda k pict ure CD ha s the size and shape of a regular CD. You
can order a K ODAK Picture CD simply by c hecking the box on the
photo finish ing envelope whe n you drop o ff a roll of fi lm(35mm or
Adva nced Pho to System(AP S) color print film ) at the ti me of
proce ssing in Kodak Expre ss store di splaying “ Ko dak Pictu re
Cd” sign. When your order is retur ned, you re ceive your prints ,
negativ es, a nd your full rol l of pi ctures safely stored on you r
KODA K Pict ure CD. Each KODAK Picture CD bri ngs yo u the tools
to enhance, share and manag e you r picture s on your comp uter.
You also can reco rd the JPEG p ictu re into CD- R or CD- RW with the
CD-Rewr iter yours elf.
Note:
1. The Max. Siz e of JPEG Picture can be supported: 3840X3840
pels
2. JPE G stands for Join t Pict ure Experts Grou p. It is the fi rst
nternat ional Sta ndard on Still P icture Compre ssing: I SO 10918 -1,
cons tituted by the Committee o n St ill Picture com press ing
Standard of ISO . Th e pi ctures on KODAK P icture CD a re stored in
this format(JP EG). This pl ayer can deco de the JPEG pict ure in
KODA K Picture CD a nd play back th e pi ctures in dif feren t mode s.
Now, you can playb ack KODAK Pi cture CD o n this playe r and view
your wond erful pictures on yo ur TV in the comfort of your living
room. W hen a Kodak Pictu re CD is inserted on a playe r an
automat ic slide show is la unched . Each pi cture in the Koda k
Picture CD w ill be display ed con secuti vely in a slid e-show fas hion
and wi ll be scaled to fit in t he who le TV screen .
6
Page 9

The setup menu system---DVB PART
Advanced Features
1. First Time Installation
After all the connections have been made
properly, switch on your TV. Make sure the
receiver is connected to the home antenna
and press <POWER> to switch the receiver
on. If you are using the receiver for the first
time, a First Time Installation menu will be
displayed to guide you through the initial
setup. Use the remote controller to finish the
setup.
A. At the First time installation menu, select
YES and press <ENTER> button on the remote
controller to proceed.
B. Enter your regional settings, include your
Country, Language, Time Zone . Then select
<NEXT> to proceed.
C. Select Yes to start the automatic channel
search.
D. Wait to completethe scanning.In case you
want to stopthe scanning, press the
<RETURN> button. The channels already
found will stillbe stored.
E. Wh en fini shed, a ll acti ve chan nels found
wil l be store d autom atically. Th e last found
cha nnel wi ll be pla yed.
Firs t Time Ins talla tion
Do you w ant to st art fir st time
Inst allat ion Wiz ard?
Yes No
Firs t Time Ins talla tion( 1)
England
Country
Germany
Language
Spain
Time Zone
France
Italy
Back Next
Firs t Time Ins talla tion( 2)
Do you w ant to st art Auto S earch ?
Prev ious ch annel l ist wil l be repl aced.
Yes NoBack
DVB Men u-Pro gram Se arh-A utoma tic
Progress
Channel No
Frequency
TV List Music List
Exit Sa ve & Exit
2. DV B Mode of M ain Men u
Press the < SETUP > butto n, the DV B main se tup men u appea rs the
scre en, then pre ss the <DOWN> but ton to hig hligh t the DVB Menu
opt ion.
A. DV B MENU- Progra m list
Press the < UP> and < DOWN> b utton
mov e on th e DVB Menu and to enter
but ton to en ter t he DVB Men u-P rogram
lis t optio n, appe ar the sc reen.
1) TV Program
Press the <RIGHT> button to highlight the
TV Program, Then press the <ENTER>
button to enter the TV program options,
appear the screen. All active channels are
listed in the Program List, allowing you to
make your own Favorite channel group,
DVB Me nu-Pr ogram L ist
TV Program
Music Program
Sort
:Selec t :Conf irm
DVB Men u-Pro gram Li st-Pr ogram E dit Table
Program Name
No..
1 Ideal World
2 UKTV Brtldeas
3 TMF
4 The HITS
Favor Move Del
:Selec t :Confirm Exit: S ave & Exi t
move, delete channels.
Creating Favorite Channel Groups
This feature allows you to group your favorite channels. To create your
favorite groups:
a. Select the channel which you would like to add to the group and go to
the Favor column.
b. When the Favor column of the desired channel ishighlighted, one red
heart symbol will appear after press the <ENTER> button.Pressing the
<ENTER> button again will un-select the channel of the favorite group.
c. Once your favorite group is created, you can press the <FAVORITE>
keys to quickly access your favorite channels.
Moving a Channel
a. Select the channel which you like to move and go to the Move column.
b. Press <ENTER> button and a symbol will be displayed.
c. Use the <UP / DOWN> key to move the channel to a desired position.
d. Press <ENTER> button again will be exit the moving channel mode.
7
Page 10

The setup menu system---DVB PART
Deleti ng a Channel
a. Select the channel which you like to delete and go to the Del colum n.
b. Press <ENTER> button and an X symbol will be displayed. Repeat
this step in th e channe l to be deleted.
c. Press <SETUP> or <RETURN> button and the marked channel will
be deleted .
d. Press <ENTER> button again will exit the de leting ch annel mo de.
2) Music Program
Press the <DOWN> button to highlight the Music Progra m, Then press
the <ENT ER> button to enter the Music program opti ons, app ear the
screen.
NOTE: This Music program opti ons operation same the TV Progra m.
3) So rt
Press the < DOWN> b utton t o hig hligh t the Sor t optio ns, yon can
cho ose the c hanne ls Sort s tyle. As: By Name , By Se rvice I D, By
Cha nnel nu mber, B y LCN.
B. DVB Menu-Program Search
Press the Up and Down button moveon the DVB
Menu-Program Search option appear the screen.
In the DVB Menu-Program Search, you can setup
the Automatic Search, Manual Search options.
1) Automatic Search.
Choose the Automatic Search options, This
operation same the First Time Installation. Refer
to First time Installation.
2) Manual Search.
If any channel is missing after auto search,
or you want to add newly launched channels,
you can use Manual Search to scan the
desired channels. To manually search the
target channel, you must know its parameters,
e.g., the channel number. After the channel is
found, it is appended to the current channel list
Advanced Features
a. Enter the Manu al Sea rch menu via Main M enu > Pro gram
Search > Man ual Se arch.
b. Specif y the ap propria te channel num ber in t he Cha nnel No field
by press <DOW N> and <UP> button. En ter your se lection , the
frequenc y and bandwidt h values are chan ged ac cordi ngly.
c. Select <E NTER> button to start manu al sea rch
d. If no s ignal is fou nd, a messa ge indicatin g no sig nal will appea r.
Otherwi se scanned cha nnel will be saved and append ed to the
current ch annel list.
C. DVB M enu - Parenta l Control
This feature allows you to preve nt chi ldren or un authori zed pe ople
from watch ing ch annels .
1) Enter Main Men u > Paren tal Co ntrol. First, you will need to
enter PIN as promp ted to use the p arental con trol menu . (The
defa ult PIN is 66 66.)
2) After cor rect PIN input, t he following op tions are provide d:
Channel L ock: Allow s you to acti vate o r de-a ctivate the ove rall
parental co ntrol. Wh en set to YES , all the channe ls wit h locking
setting s will be loc ked.
Pare ntal Se tting : In the ch annel l ist,
select t he ch annel y ou wa nt to lock and
the n press <E NTER> . A padlo ck sy mbol
wil l be disp layed . To remo ve th e lock,
press <EN TER> ag ain.
D. DV B Menu- System Set tin g
1) Co untry
In th e Count ry opti ons, yo u can
cho ose a kin ds of the C ountr ies. As :
Eng land Ge rmany , Italy, Fran ce,
Spa in etc.
Pare ntal Se tting
No.
Prog ram Nam e
DIMO
1
FTV
2
FMTV
3
FTVN
4
TTV-1
5
TTV-2
6
HAKK A
7
CTS
8
CTS- IQ
9
CTS- EQ
10
DVB Me nu-Pr ogram L ist
Country
Language
GMT Usage
Time Zone
System Schedu le
:Selec t :Co nfirm
8
Lock
Page 11

The setup menu system---DVB PART
Advanced Features
2) La nguag e
Press the < DOWN> b utton t o hig hligh t the Lan guage o ption s, then
Press the < ENTER > butto n to into t he La nguag e setup .
1 st /2 nd Audi o : This op tion al lows you t o select your first and
sec ond c hoice fo r the aud io lang uage. I f neith er of you r selected
lan guage i s avail able on the pro gram trans mit ted, th e mai n
lan guage o f the program will be us ed.
Sub title : Allow s you to se lect the subtit le langu age . If your s elected
lan guage i s not ava ilable on the prog ram tra nsm itted , the m ain
lan guage o f the program will be us ed.
Exi t: you can cho ose t he Exit o ption s to retur n the Sys tem set tin g.
3) GM T usage :
All ows you to enab le/dis able Gree nwich M ean Tim e (GMT) u sage. I f
you k now the G MT ti me zone o f your location, set G MT us age to ON
and s elect an app ropr iate ti me zone . If you pre fer to se t the t ime
man ually, select OFF in G MT us age ite m and t hen man ually selec t
the d ate and t ime.
4) Ti me Zone
Select a n app ropria te time z one to di splay t he local time correct ly.
Bot h EPG and s ystem s che dule need a correc t tim e zone se tting .
) Sys tem Sch edu le
5
Press the < DOWN> b utton t o hig hligh t the Sys tem S che dule
opt ions, t hen Press the < ENTER > butto n to into t he Sy stem
sch edule setu p.
swi tch on an d tune to a p re-s pecif ied cha nnel fo r a pre-se t lengt h of
tim e. Up to1 0 tasks can be s che duled.
Thi s featu re all ows t he recei ver to automati cal ly
a. In the Schedu le pane, u se the <UP / DO WN> ke y to sel ect a ta sk
and use <RIGHT / L EFT > key to sw itch bet ween Inacti ve and
Act ive.
b. Pre ss <ENTE R> to en ter the de tail page.c . Enter th e following
set tings as required. Use the < UP / DOWN> key to move bet ween
set ting item s, the <RIGHT / L EFT> key to s witch be tween avail able
sele ctions and nu meric ke ys to en ter numeric v alu e. Mode: You ca n
repe at the tas k by setti ng the frequency as O nce, Dai ly or Weekly. Or
you ca n select S top to d isable t he
task. Sta rt and End Time : Enter
the start a nd end tim e that
automatica lly turn s on and off th e
receiver.
Cha nnel Type: S elect TV or radi o
cha nnel as required. Channe l No:
Sele ct the channe l to be play ed at
sch eduled ti me.
d. Wh en the set ting is do ne, press
<SE TUP> or <R ETURN> to save
the c hanges .
9
Page 12

ATV PART
Advanced Features
1.P ress SOU RCE but ton to se lect ATV MODE.
2.P ress SET UP to dis play op tions a s follow s.
A. Pre ss DOWN b utton to sele ct AUTO
SEA RCH, Pre ss Righ t butto n to start auto
sea rch.
B. Pres s UP and DOWN button to s elect
MANUAL SEARCH , Press Right or Left
button to start manual search .
NOT E:
1.A uto Sea rch alwa ys st art f rom program numb er 0.
2.I f the ind icati on fre quency sto pped fo r a whi le during se arch ing,
it me ans
a new c hanne l found and it w ill b e saved , If we ak sign al recei ved,
the c hanne l may be sk ipped a nd it wil l not sav e.
3.W hen Aut o Search o r Manua l Search, you can press S ETU P
but ton to stop Auto Search o r Manua l Search.
C. Pre ss UP and D OWN but ton to select F INE tun e, Press
TV MEN U
AUTO S EARCH
MANUA L SEARC H
FINE
POSI TION 4
SWAP 0
S-S YS L
SKIP O FF
UHF 58 5.25M Hz
SELECT ADJUST
Lef t and Rig ht butt on to fin e Tune t he frequ ency .
NOT E: Pre ss Left o r Right b utton o nce, the cent ral f requ ency
of th e selected chan nel w ill dec rease or increas e 50kHz .
D. Pre ss UP and D OWN but ton to select
cur rent channel nu mbe r and cha nnel fre quenc y will be d ispla yed at
the b ottom o f the men u. Press L eft or Ri ght but ton to view the
prev ious or n ext cha nnel.
POS ITION , the
E. Pre ss UP and D OWN but ton to select S WAP, yo u can
cha nge the c hanne l posit ion here .Set the chann el nu mber wi th
Lef t/Rig ht butt ons, pre ss DOWN b utt on an d confirm wi th Righ t.
F. Press U P and DOW N butto n to se lect S-SY S, you ca n
cha nge the a udio sy stem I, D K, BG .
NOT E:
1.O n audio s ystem carr ier : I stands for 6.0MHz, D K stands for 6.5
MHz a nd BG sta nds for 5. 5MH z,pleaselect the audi o sys tem
accordi ng to loca l broadcast er.
2.C olor sy stem(i t wil l auto se tup a ccordi ng to a udi o system):
A.W hile audio s ystem is I , color system is PAL-I.
B.W hile audio s ystem is D K, co lor system is PAL-D K .
C.W hile audio s ystem is B G, co lor system is PAL-B G .
3.I n case of p ict ure or sound have nois e, pleas e che ck the au dio
sys tem first.
G. Press UP and DOWN button to select SKIP to skip the channel.
SCR EEN SET PA RT
Press t he FUNCTI ON but ton to disp lay PI CTURE set ting a s bellow:
Press DOW N butto n to high lig ht the de sired it em.
Press LEF T and RIG HT to adj ust the s creen br ightn ess,
con tra st, color , HUE(f or NTSC o nly), aspect ratio , color sy stem,
OSD l angua ge, or se t to default valu es.
PICT URE
BRIG HT 50
CONT RAST 50
COLO R 50
HUE 50
ZOOM 1 6:9
S-C OLOR AU TO
LANG E NGLIS H
DEFAU LT
SELECT ADJUST
10
Page 13

Troubleshooting
If you have any questions, please consult the troubleshooting guide below.
NO PICTURE OR SOUND
Ensure the power button is on.
Ensure the power outlet is operational.
Ensure the power cord is not damaged.
Ensure the power plug is connected
firmly to the outlet.
PICTURE BUT NO SOUND
Ensure the audio jacks are securely connected.
Ensure the audio connector is not damaged.
Ensure the volume is turned up in VOL/CH
setup.
Ensure you have set the player's AUDIO
settings correctly.
Ensure you have ENTERed the correct AV
input for your TV.
Ensure the audio is not set to mute.
SOUND BUT NO PICTURE
Ensure the video jacks are securely connected.
Ensure you have ENTERed the correct AV input
for your TV.
Ensure the video connector is not damaged.
Ensure you have set the player's VIDEO
settings correctly.
POOR PICTURE OR SOUND
Ensure you have set the player's AUDIO
settings correctly.
Ensure the disc is not scratched or stained.
Ensure the AV connector or the output terminal
is not damaged.
"BAD DISC" DISPLAYED
Ensure the disc is not warped,
damaged or deformed.
Ensure the disc is not badly stained
or damaged.
Ensure the disc format is
compatible with the player.
Please check whether you have
REMOTE NOT WORKING
Ensure the remote batteries are working.
Point the remote control directly at the
player's IR sensor.
Remove any obstacles between the
remote and the IR sensor.
UNIT NOT WORKING
Turn off the power, and then turn it on
again.
"NO DISC" DISPLAYED
Ensure you have put the disc on the tray.
Ensure the disc is not upside down.
Ensure the disc is not distorted, stained
or scratched.
Before you request for repair
Phenomena below does not necessarily mean failure with TV set.
Please check following before you request for repair.
Phenomena
No picture, no sound
No image
No sound
Diamonds in picture
No signal
Dark picture
Diamonds in picture
orinferior sound
during driving.
Improper connection with AC adapter orCar
adapter. Use of unauthorized power
supply. Power Switch is on OFF position.
Whether antenna adjusted correctly;
Whether the correct Channel or Countryselected.
May need to reset or search.
Whether the sound is turned to the end.
Whether earphone plugged in.
Whether press speaker button? Whether press
mute button? Sound system correct set in ATV
mode?
Whether antenna adjusted correctly; Maybe too
weak signal at the receiving place.
Whether the correct Country selected;
Maybe signal too weak.
Adjust Brightness, Contrast correctly
The signal too weak at that place
Possible causes
11
Other
Page 14

Specifications
Play mode
Disc mode
Function
Video S/N ratio
Resolution
Frequency response
Audio S/N ratio
Dynamic range
Distortion
D/A Converter
Specifications are subject to change without notice.
600 Memorized TV Channels (DVB-T) /RADIO channels
64 (DVB-T) Number of MUX supported
The u nit can not p lay DTS a udi o on DVD vi deo d isc
Accessories Includes:
NTSC/PAL
DVD ,VCD, C D, MP 3, CD-R , CD- RW, JPE G,
DVD + -R/W, W MA, AVI
DVD, DVBT, ATV, USB
≥65dB.
≥500 lines.
fs 96KHz: 20Hz-20KHz:+/-1dBI
≥90dB
≥80dB
< 0.01%
96KHz/24bit
Input Frequency
Display Device
Receiving Channel
Sound System
Screen Size
Video output
Audio output
Power Voltage
Power consumption
Size
Weight
Thi s produc t incor porat es copyright prot ectio n technolog y that is
prot ected b y U.S. pa tents a nd othe r intel lect ual property ri ght s.
Use o f this co pyrig ht prote ction t echno logy mus t be auth orize d by
Rov i Corpo ration, an d is in tended for ho me and ot her lim ited vi ewing
use s only unless o therw ise aut horiz ed by Rovi Corporation.
Rev erse engineeri ng or d isasse mbly is p rohibi ted.
VHF 48.25MHz~412.5MHz
UHF 412.5MHz~863.25MHz
Color LCD
ATV: DI 48.25MHz~863.25MHz
BG 48.25MHz~863.25MHz
DTV: VHF 177.5MHz~226.5MHz
UHF 474 MHz~858 Mhz
(DK / I / BG)
7 inches
1Vp-p(75 W)
2CH
DC IN 12V
≤15W
206x160x40mm
0.7kg
M
U
T
E
M
D
I
E
S
N
P
L
U
A
Y
S
U
B
S
T
P
I
E
T
L
A
E
K
E
A
R
U
D
F
U
I
O
N
R
C
E
T
P
I
O
E
A
N
T
/
F
A
V
S
E
T
U
P
S
1
O
P
0
L
U
A
+
R
Y
C
/
G
P
E
A
O
U
T
S
O
R
E
E
V
S
T
O
R
P
/
A
T
N
E
X
D
T
T
O
V
E
/
X
M
R
I
T
A
D
I
P
O
R
Z
P
O
O
R
O
G
E
M
V
/
E
P
G
A
N
N
G
E
L
X
E
T
T
I
T
L
E
DVD/MPEG4/CD/MP3/ PL AYER /DVB-T tunerATV
USER MANUAL
Please read this User Manual carefully to ensure proper use of thi s product and k eep this manu al
for future reference.
DP7560
12
Other
Page 15

Product Warranty
Sub je ct to t he w arr an ty re pa ir co nd iti on s bel ow, t hi s pro du ct is
war ra nte d fo r 1 yea r fr om th e or igi na l dat e of p urc ha se co ve rin g
bot h pa rts a nd l abo ur.
The b en efi ts c onf er red b y th is wa rr ant y ar e in ad di tio n to a nd no t in
derog ation o f all rig hts a nd r eme di es in r es pec t of t his p ro duc t wh ich
the con sum er h as un de r the Tr ad e Pra ct ice s Act a nd ot he r Sta te a nd
Territo ry la ws .
War ran ty R epa ir C ond it ion s
A. Th is w arr an ty on ly a ppl ie s pro vi ded t he p rod uc t:-
· Has bee n purch ase d in Au str al ia an d so ld by Auth ori se d Dis tr ibu to rs
or Deal ers and o nly whe re th e pr odu ct s are u se d and s er vic ed w ith in
Austr ali a
· Is ta ke n for s er vic e wh en re qu ire d to a n Auth or ise d Se rvi ce Ag ent ,
toget her w it h wri tt en in st ruc ti ons i nd ica ti ng sp ec ifi c pr obl em o r fun ct ion
requi ring in vesti gat io n.
· Has val id pr oo f of pu rc has e an d pre se nte d wh en wa rr ant y se rvi ce i s
reque ste d.
· Has onl y bee n us ed in a d om est ic a ppl ic ati on .
· Has bee n insta lle d an d ope ra ted i n ac cor da nce a s no ted i n th e
opera ting in str uc tio ns u nde r no rma l us e and r ea son ab lec ar e (in t he
opini on of the S erv ic e Cen tr e).
· Has not b een d am age d by t he us e of a cce ss ori es w hic h in t he op in ion
of th e Se rvi ce C ent re a re de fe cti ve o r inc om pat ib le wi th t he pr od uct .
· Has not b een t am per ed w ith o r re pai re d (in cl udi ng u nau th ori se d
alter ati on s) by a ny one o th er th an t he Tele fi x or an Au th ori se d Ser vi ce
Centr e.
B. Th e wa rra nt y doe s no t cov er :-
· Damag e, ma lf unc ti on or f ai lur e re sul ti ng fr om u se of i nc orr ec t
volta ges , in cor re ct in st all at ion , ac cid en tal d am age , mi sus e, neg le ct,
build -up of di rt or d us t abu se , wea r an d tea r, ma lad ju stm en t of cu st ome r
contr ols , ma ins s up ply p ro ble ms ,th un der st orm a ct ivi ty o r Acts o f Go d,
pixel e rro r, in fes ta tio n by i nse ct s or ve rm in, e xp osu re t o abn or mal ly
corro siv ec ond it ion s or a ny fo re ign o bj ect o r ma tte r ha vin g en ter ed t he
produ ct.
· Milea ge or tra vel li ng ti me i n res pe ct of s er vic e ou tsi de t he au th ori se d
Telefix S erv ic e Cen tr e nor p ic k up an d de liv er y cos t in cur re d.
· Ser vi ce ca ll s ari si ng fr om f ail ur e to co rr ect ly o per at e the p ro duc t or
to ob se rve n ot ed in st ruc ti ons , or r epa ir w hic h re vea ls t he pr od uct i s in
norma l worki ng or de r.
· Cabin et pa rt s, us er r epl ac eme nt b att er ies o r le ads u nl ess t he
defec tiv e it ems a re r epo rt ed at t he t ime o f pu rch as e.
C. Se rv ice c al ls on ly a ppl y to Tel evi si on di sp lay d ev ice s (C RT, LCD ,
Plasm a) wi th s cre en s ize s gr eat er t han 5 9c m in th e ma jor m et rop ol ita n
areas o f Aust ra lia o r th e nor ma l ope ra tin g ar eas o f th e nea re st
Autho ris ed S erv ic e Cen te rs.
D. Re qu est ed s erv ic e vis it s to th e cu sto me r pre mi ses w il l be ma de
durin g norma l worki ng hour s of th e cu sto ma ry wo rk ing w ee k upo n
reque st by t he c ust om er. Wh er e suc h a vi sit i s ma de on a d ay a rra ng ed
by th e cu sto me r and t he s erv ic e tec hn ici an i s una bl e to ob ta in ac ce ss
to th e pr odu ct , the S er vic e Ce ntr e wi ll be e nt itl ed t o mak e a se par at e
charg e for s er vic e ca ll fe e, t ime a nd d ist an ce tr av ell ed .
E. Tele fi x and i ts Au tho ri sed S er vic e Ce ntr es m ay ch ar ge fo r wo rk do ne
where t he pr od uct i s fo und t o be i n goo d wo rki ng o rde r.
Exa mp le, c ha rge s ma y be ma de w her e th e pro bl em is f ou nd to b e du e to
incor rec t se tti ng o f cus to mer c on tro ls , use o f po or as so cia te d equ ip men t
(e.g. p oor a nt enn a sy ste ms ) or th e in abi li ty of t he p rod uc t to op er ate w it h
fau lt y or in co mpa ti ble e qu ipm en t.
F. If t he p rod uc t is se nt t o an Aut ho ris ed S erv ic e Cen tr e, th e ow ner i s
respo nsi bl e for t he c ost o f tr ans po rt to a nd f rom t he S erv ic e Cen tr e.
In ad di tio n, t he pr od uct i s at t he ow ne rs ri sk w hil e in t ran si t to an d fr om
the a ut hor is ed Se rv ice C en tre .
G. No p er son i s au tho ri sed t o ma ke or g iv e any a ss ert io ns, s ta tem en ts or
under tak in gs, w he the r ex pre ss ed or i mp lie d ab out t he p rod uc t oth er t han
or addi tiona l to th e te rms o f th is wa rr ant y.
PLE ASE REA D INSTR UCTIO N MANUA L CAREF ULLY
DO NO T RETUR N THIS PRO DUCT TO TH E STORE O F PURCH ASE
The o rigin al proo f of purc hase mu st be kep t and pro duced f or serv ice req uirem ents.
Sho uld you e ncoun ter any p roble ms?
Ple ase con tact Tel efix fo r Warran ty Supp ort
130 0 366 144
Ema il: war ranty help@ awa.c om.au
Page 16

 Loading...