

Page 1

DVD 5.1 HOME THEATRE SYSTEM
DA641-COVER.CDR
DA641
Page 2

Contents
Features.......................................................................................2
For Your Attention...........................................................................3
Accessories...................................................................................4
Panel............................................................................................5
Connection.................................................................................6-7
System Setup...........................................................................8-12
Play........................................................................................13-17
Troubleshooting...........................................................................18
Specification...............................................................................19
-1-
M1389E21B-P1.CDR
Page 3

Features
Thank you for purchasing our product. Please read this manual
carefully before connection and operation. Please keep this manual
for future reference.
This DVD player is a new generation home player which can produce
high quality video and audio for your continued enjoyment.
Built in Dolby Digital, LPCM, MPEG etc. digital audio decoder
HiFi, 96kHz/24bit audio digital processor
COAXIAL digital audio output
Compatible with DVD/VCD/CD/MP3/JPEG/ PICTURE
CD/MPEG4 etc.
AM/FM stereo tuning system
High quality amplifier
-2-
DA641-P2.CDR
Page 4
For Your Attention
IMPORTANT NOTES
Please read through the manual carefully before connection and
operation.
Do not open the cover or touch any internal components.
Turnoff the power when the unit is not being used. (Unplug the
power cord if the unit is not used for a long time)
Plug,as the disconnected device entirely with power source ,should
keep in easy-to-operation in daily life.
Don't expose this unit to direct sunlight. Keep away from any
heating sources.
Don't expose this unit to rain or moisture.
Place the unit on a horizontal level. Keep the unit ventilated. Don't
block the heat hole. Overheating may cause malfunction.
Clean the cabinet with soft cloth. Detergent or alcohol is not
recommended as it may damage the unit.
This book is only a guide for user’s operation.
The apparatus shall not be exposed to dripping or splashing and
that no object filled with liquids, such as vases, shall be placed on
the apparatus.
The lightning flash is intended to alert the user to the presence
of dangerous voltage within the product's enclosure, and
touching the internal components may result in a risk of electric
shock to persons.
CAUTIONCAUTION
CAUTION
RISK OF ELECTRIC SHOCK
DO NOT OPEN
CLASS 1
LASER PRODUCT
The exclamatory mark is intended to alert the user to the
presence of important operating instructions.
To reduce the risk of electric shock or fire, do not open the
cover. Refer service to qualified service personnel.
This mark indicates this unit belongs to class 1 laser product.
The laser beam may produce radiation harm to the directly
touching human body.
-3-
M1389E21B-P3.CDR
Page 5

Accessories
Accessories
User Manual
l
ua
n
a
m
er
Us
AM Antenna
Remote Controller
Remote control
FM Antenna
A/V Cable
Speaker Connect Cable
Remote Controller Operation
Insert the batteries into the cell box. Points the remote controller at
the remote sensor within 8 meters and with 30-degree of its left or
right side.
Take the batteries out of the controller when it is not being used for
a long time.
This unit can play the following types of discs
Disc types
DVD
Symbol Contents
Audio + Video
MP3
Video-CD
VCD
CD-DA
Picture CD
MPEG-4
COMPACT
DIGITAL VIDEO
V I D E O
-4-
VIDEO CD
Audio
Audio + Video
Audio
JPEG Photo CD
Audio + Video
M1389E21B-P4.CDR
Page 6
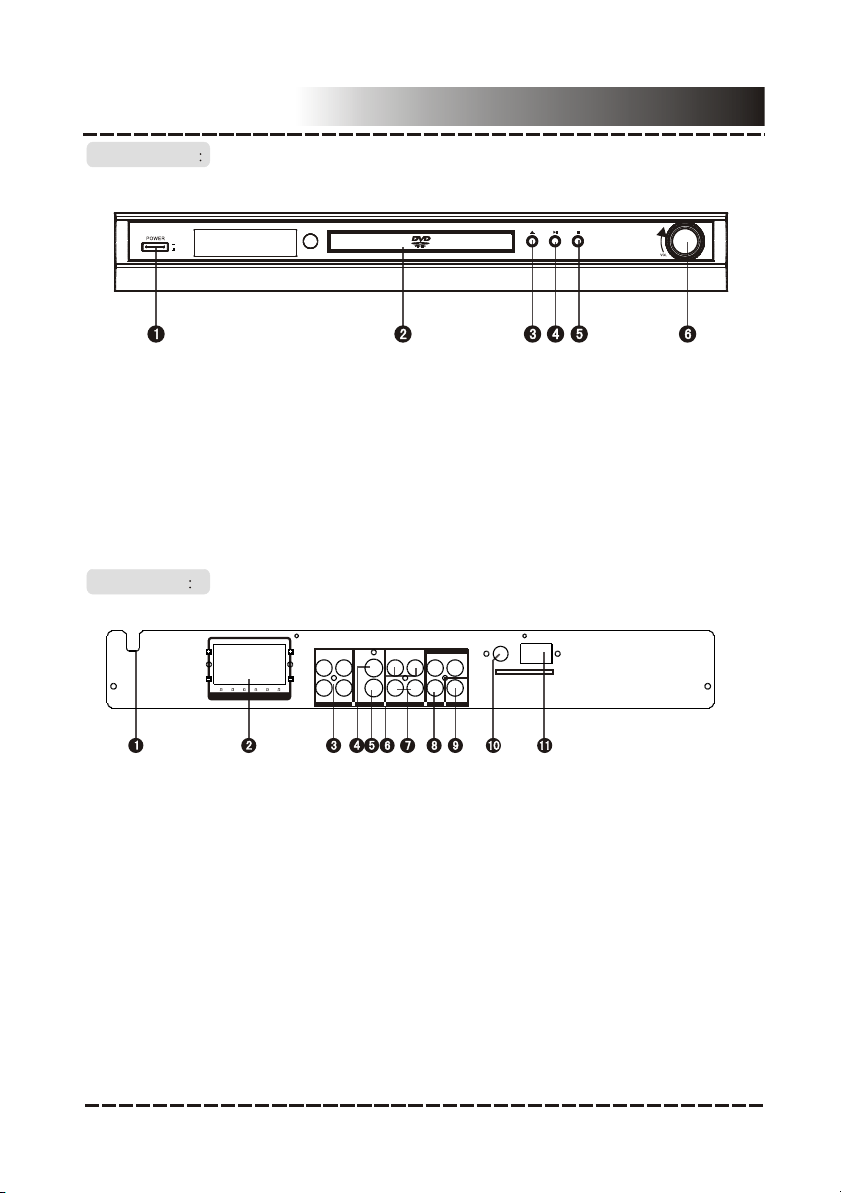
FRONT PANEL
ON
OFF
Panel
1. POWER
2. DVD DOOR
3. OPEN/CLOSE BUTTON
4. PLAY/PAUSE BUTTON
REAR PANEL
SWSW CENCEN SRSR SLSL
FRFR FLFL
L1 L2
4
8 4 4 4 4
SPEAKERS OUT
1. POWER CORD
2. SPEAKER OUTPUT TERMINALS
3. 2CH AUDIO INPUT
4. VIDEO OUTPUT
R1 R2
2CH AUDIO IN 2CH AUDIO OUTVIDEO
5. STOP BUTTON
6. VOLUME KNOB
L1 L2
R1 R2
COMPONENT VIDEO OUT
COAXIAL
Cr/Pr
DIGITAL AUDIO
YCb/Pb
FM 75ohm -ANTENNA- AM LOOP
VIDEO
S-VIDEO
5. S-VIDEO OUTPUT 9 . COAXIAL
6. L AUDIO OUTPUT
7. R AUDIO OUTPUT
10 . FM ANTENNA
11. AM ANTENNA
8. COMPONENT Y,Cb/Pb,Cr/Pr
-5-
DA641-P5.CDR
Page 7

Connection
R
L
Stereo Audio
audioUse a pair of cable (red for right /white for left) to connect the stereo
audio output terminal of this unit to the other stereo audio input terminal.
Coaxial Digital Audio
specifiedUse the coaxial cable to connect the coaxial output terminal of this
unit to the coaxial input terminal of power amplifier.
Speaker Output
Use the speaker cable (white+,black-)to connect the speaker output
of this unit to the s . terminals peakers' corresponding terminals
Note:
The physical connection should come with audio output setup of this unit.
Please refer to Audio Setup in System Setup.
Other Audio Input
L
R
R
L
Analog Audio Output
Digital Audio Input
COAXIAL
COAXIAL
DIGITAL AUDIO
Digital Audio Output
CENTER SPEAKER
SR SPEAKER
SWSW CENCEN SRSR SLSL
4 4 4 4 4
8
SPEAKERS OUT
Speaker Output
SL SPEAKER
FR SPEAKER
FRFR FLFL
SUBWOOFER
FLSPEAKER
-6-
DA641-P6.CDR
Page 8

Connection
Component Input
Y
Cr/PrCb/Pb
Component Input
Y
Cr/PrCb/Pb
VIDEO
Y
Cb/Pb
Component Input
Y
Cr/PrCb/Pb
The following available video output for this unit .
Composite Video
Use the AVc able (yellow terminal)to connect composite video output terminal
of this unit to the TV/monitor video input terminal.
S-Video
Use the S-video cable to connect the s-video output terminal of this unit to the
TV/monitor S-video input terminal.
Component Video (YUV)
Use -core AV cable to connect the component output terminals of this unit to
3
the corresponding TV/monitor input terminals.
Note:
Real connection depends on the TV/monitor input terminal.
Don't use the all connections at the same time, otherwise the picture will be
affected.
Only the physical connection conforms to the video setting can it produce
the normal picture (please refer to the Video Setup in System Setup).
Component Input
S-VIDEO
VIDEO
Y
Cr/PrCb/Pb
Y
VIDEO
S-VIDEO
Video and
S-Video Output
Cb/Pb
Cr/Pr
Component Video
Output
-7-
DA641-P7.CDR
Page 9

System Setup
MENU OPERATION:
Press [SETUP] key for the screen to show the setup page. In setup mode,
press [SETUP] key again to quit the setup page. Press direction key to the
desired item, and press [ENTER] to confirm.
(1) Some setup items are concerning the present modes. The items in gray
can't be set up.
(2) The setup is memorized and will be kept after the power has been turned off.
GENERAL SETUP PAGE
TV Display:
4:3 PANSCAN: When the unit connects to the normal TV set, the wide-
screen image shows on the full screen, but some part is cut off.
4:3 LETTERBOX: When the unit connects to the normal TV set, the widescreen image shows and black bars appear on the top and bottom of screen.
16:9: Use this item when the unit is connected with the wide screen TV set.
Wide-Squeeze: Use this item when the unit is connected to the wide-screen
TV set.
ANGLE MARK:
It will show the ANGLE mark when playing DVD disc with multi-angle view if
selection is ON.
OSD LANG:
Select on-screen display language.
CLOSED CAPTIONS:
This function doesn't work when the disc is without captions. If the caption is
OFF, press [SUBTITLE] key on the remote controller to turn the captions on.
SCREEN SAVER:
If the SCREEN SAVER is set ON and the unit is switched on without a disc
playing for several minutes, a moving picture appears on the screen and the
unit will go to standby mode after 20 minutes. You can press the [STANDBY]
key on the remote controller to activate.
LAST MEMORY:
When this function is ON, the unit can memorize the time elapsed from the
last time you played the disc. When playing next time, it will resume playing
from the memorized time.
AUDIO SETUP PAGE
ANALOG AUDIO SETUP:
DOWNMIX:
LT/RT: The audio out is Left and Right channel formatting even if the original
sound is 5.1CH format.
-8-
M1389E21B-P8.CDR
Page 10

System Setup
STEREO: The audio out format is stereo even if the original sound is 5.1CH
format.
3D SURROUND: The audio out is virtual surround sounds (only for 5.1CH
player)
5.1CH: Turn off DOWNMIX function. If playing 5.1CH discs or the unit is
connected with 5.1 channel amplifier, this item should be selected.(only for
5.1CH player)
FRONT, CENTER, REAR and SUB-WOOFER SPEAKER: (No this item in
2CH player)
If your speaker system includes the above speakers, you can set these
items according the real speaker status.
DIALOG: The DIALOG mode is available, and you can press up and down
direction key to adjust it. (In the DOWNMIX mode, LT/RT or STEREO is
selected.)
D.R.C: The D.R.C can control data record. You can chose AUTO, ON and
OFF in this mode.
DIGITAL AUDIO SETUP PAGE
DIGITAL OUTPUT:
SPDIF OFF: No digital output(coaxial off), only analog audio output.
ALL: If this item is selected, you can set up RAW.
PCM ONLY: In SPDIF/PCM mode, setup PCM channel according to your
preference.
LPCM OUT :
Select PCM frequency at 48kHz or 96kHz.
Note: Some amplifiers don't support 96kHz sampling which will effect the
coaxial output.
DOLBY DIGITAL SETUP
DUAL MONO:
Stereo: Set audio output to the stereo output.
L-mono: Set audio output to the mono-left channel.
R-mono: Set audio output to the mono-right channel.
Mix-mono: Set audio output to the mix-mono channel.
DYNAMIC:
Select this to reduce the overall volume and still keep defined audio sound.
You can press up and down direction key to adjust it.
-9-
DA641-P9.CDR
Page 11

System Setup
CHANNEL DELAY PAGE:
If the above setup dissatisfy you, you can set the speaker distances in the
real conditions. Press up/down direction key to select the speaker, and
press left/right direction key to adjust the distance.
EQUALIZER:
In this item you can set sound mode, bass boost, super bass and treble
boost. You can select one according to your preference and the disc
content.
3D PROCESSING:
In PROLOGIC ON mode, the reverb mode setup is available.
HDCD SETUP:
You can select the digital filter at off,1x and 2x.
-10-
DA641-P10.CDR
Page 12

System Setup
VIDEO SETUP PAGE
COMPONENT V IDEO:
OFF: Set video output to the composite.
YUV: Set video output in analog component video format when connecting
to Y/U/V terminals.
P-YUV: Set progressive YUV signals. Connection same as YUV.
Note::
If the video setting differs with the physical connection, the TV set may not
have picture. In this case, you can RESET the machine, then keep pressing
key [V_MODE] until the picture returns again.
COLOR SETTING SETUP:
COLOR SETTING includes: SHARPNESS, BRIGHTNESS, CONTRAST,
GAMMA, HUE, SATURATION and LUMA DELAY .
Adjust each item in the Color Setting to get the suitable color output of the
TV screen.
SHARPNESS: There are three optional output modes:
HIGH\MEDIUM\LOW.
BRIGHTNESS: Use the left/right direction key to move the scroll and adjust
the brightness.
CONTRAST: Use the left/right direction key to move the scroll and adjust
the contrast.
GAMMA: There are four optional output modes:
HIGH\MEDIUM\LOW\NONE.
HUE: Use the left/right direction key to move the scroll and adjust the hue.
SATURATION : Use the left/right direction key to move the scroll and adjust
the saturation.
LUMA DELAY: In this item you can choose 0T or 1T .
-11-
DA641-P11.CDR
Page 13

System Setup
PREFERENCE PAGE
TV system:
This unit is suitable for all kinds of TV systems. You can select one of the
PAL, MULTI or NTSC.
PAL : Set the output at PAL system.
MULTI: The TV system is auto switched according to the disc system.
NTSC: Set the output at NTSC system.
PBC: There are 2 optional output modes: ON/OFF. If the PBC is set on,
when playing VCD, return to the main menu. If the PBC is set off, when
playing VCD, return to the main sequence.
AUDIO, SUBTITLE and DISC MENU LANGUAGE PAGE:
These are the initial settings by your preference. If a setting is supported by
disc content, it will work. Otherwise the disc default value works. These
settings can be changed respectively by pressing key [AUDIO] and
[SUBTITLE] when playing.
PARENTAL:
The control level is for parents to control the content and protect children
from violence and erotism. The level of the disc is higher than the setting
level and can not be played .
DEFAULT:
Reset to the initial factory setups.
PASSWORD PAGE:
Change the password. The initial factory password is 136900. You can set
your own password. If you forget your own password, you can use 136900
as general password to decode.
-12-
M1389E21B-P12.CDR
Page 14

Play
STANDBY
OPEN/CLOSE
11
22
55
44
77
88
0/100/10
GOTO
VOLUME
Stand by/working mode switch
Eject or load the disc tray
33
When playing VCD1.1, CD disc, after loading the disc, use the
66
digital key to select the desired track or chapter directly. Press [10+]
99
10+ 10+
key and then another digital key to select the track whose number is
more than 10.
You can press digit keys at PROGRAM and MENU selection.
Press [GOTO] to select title time, chapter time or track time to play.
You can use digital key input the GOTO time.
When playing the disc, press[ ]button once to pause. Press[ ]button
again to return to normal play.
Press[ ]button, no sound will give out. Press[ ]again, MUTE OFF
will display and the sound will resume.
Press this button for quick forward search.
Press this button for quick rewind search.
Press [VOLUME+] to adjust volume up.
Press [VOLUME-] to adjust volume down.
TITLE
SUBTITLE
AUDIO
When playing DVD disc, press it to the previous chapter.
When playing VCD or CD disc, press it to the previous track.
When playing DVD disc, press it to the next chapter.
When playing VCD and CD disc, press it to the next track.
Note: When playing Mp3 disc, you must select the song by up or
down direction key, then press[ ENTER] to play. If you press left
direction key, the system will return to superior root directory.
Return to the top menu when playing DVD disc.
When playing the disc with multi-subtitle, press [SUBTITLE]
continually to select the desired sub-title.
Select the desired audio channel when playing DVD disc.
-13-
M1389E21B-P13.CDR
Page 15

Play
MENU
A-MODE
ANGLE
V-MODE
PROGRAM
OSD
SOURCE
SELECT
S.EFFECT
CH-LEVEL
TONE
Return to the previous menu when playing DVD disc.
W hen playing VCD2.0 disc, it works as PBC. Press [MENU] button
to switch PBC ON and PBC OFF. under PBC ON mode, the disc
menu will show. You can select a program in the menu. Under PBC
OFF mode, the menu will not appear, press digital key to select the
track directly. VCD1.1, CD-DA and Mp3 have no PBC menu.
Audio output switch (not available for 2 channel mode).
When playing the disc with multi-angle, it's convenient to change the
view angle.
Video output mode switch (if losing pictures or picture is abnormal,
keep switching until you reach a clear picture.)
If the disc is with 2 or more tracks, chapters or titles, set up the
playing order as your preference. Press this button to enter program
menu.
Press digital key to input the number of the track, title or chapter. If
the programmed tracks are over ten, press [NEXT] to go on
programming. (Maximum 20 programable items)
Use the direction key to move the cursor to the START. Press
[ENTER] to start PROGRAM play.
When playing MP3 disc, NO program function! Press [PROGRAM]
button once to enter directory-play mode, you can select program to
play in the current directory, and press [PROGRAM] again to enter
file-list mode, you can select program to play in the file list of whole
disc .
Press the [OSD] button, the relative information of the disc will
display on the TV screen.
Source switch among DVD/TUNER(AM/FM)/LINE1/LINE2
Press [S.EFFECT] button to obtain different sound effect. CD
playing is more proper to obtain better sound effect. You had better
close S.EFFECT when playing disc with Dolby 5.1 channel in order
to obtain real 5.1 effect.
Press this key to select a channel then press [VOLUME+/-] to adjust
its level.
Press [TONE], then press [VOLUME+/-] to control bass, mediant
and treble.
-14-
M1389E21B-P14.CDR
Page 16

Play
L/R/ST
STEP
ZOOM
REPEAT
A-B
When playing VCD or CD disc with multi-channel, press [L/R/ST]
button to select left channel/right channel/stereo/mix audio output.
When playing DVD, VCD or SVCD disc, press [STEP] once, the
picture changes to next frame. Press [ ] to resume normal play.
When playing DVD, VCD disc, press [ZOOM] to zoom in or zoom out
the picture.
In zoom in mode, press direction key to move the picture for viewing.
The picture can not be moved in zoom out mode.
Press [REPEAT] button to repeat a title, chapter, track or the whole
disc.
When playing DVD disc, press [REPEAT] button continually, the turn
is chapter repeat, title repeat and all repeat.
When playing VCD or CD disc, the turn is track repeat and all repeat.
When playing MP3 disc, the turn is single repeat, repeat one, repeat
folder and folder.
When playing DVD, VCD, CD disc, press [A-B] button to repeat a
certain contents.
Press [A-B] key on the start point (A) and the ending point (B) to
select the repeat part.
Press [A-B] the third time, cancel A-B repeat and return to normal
play.
When playing DVD, VCD or CD disc, press [ ]button once, the unit
will memorize the previous ending point. Press[ ]button to go on
the play. Press[ ]button for the second time to stop the play and
end memory.
-15-
M1389E21B-P15.CDR
Page 17

Play
PLAY PICTURE CD DISC
Press [ ], 12 small pictures will show on the TV screen.
Press direction key to select the desired picture.
Use direction key to select SLIDE SHOW, then press [ENTER] to start random
play.
Use direction key to select MENU, then press [ENTER] to enter instruction menu.
Instruction menu as follows:
[PROGRAM]: to change picture transform mode, [ ]: entering picture preview
mode, [ ]: previous picture, [ ]: next picture, [ ]: to play picture, [UP]:
mirror image in vertical, [DOWN]: mirror image in horizon, [LEFT]: rotate 90
degrees anticlockwise, [RIGHT]: rotate 90 degrees clockwise, [ZOOM]: change
zoom mode, [ ]: zoom in the picture, [ ]: zoom out the picture (Before zoom-
in /out a picture, please first press [ZOOM] button),
[UP/DOWN/LEFT/RIGHT]: move zoom center. Select CONTINUE to exit.
LINE INPUT OPERATION:
This unit has two group extra line input terminals. You can input the
analogue stereo audio signals from extra device such as DVD, CD, TAPE
PLAYER, and process the input signal to meet your preference.
Under LINE INPUT mode, you can press [A_MODE] to change the stereo
input to 5.1CH output. At the same time, [VOLUME+/-], [CH_LEVEL],
[MUTE],[TONE] and [S.EFFECT] buttons are available.For details, please
refer to the PLAY chapter.
-16-
M1389E21B-P16.CDR
Page 18

Tuner Operation:
AM/FM
MO/ST
MEMORY
AUTO
11
22
5 5
44
77
88
0/10 0/10
SEARCH+
SEARCH-
RADIO+
10+10+
AM/FM switch.
Mono/Stereo switch in FM mode.
After having selected a station and tuned a new frequency, press
[MEMORY] to save the frequency.
Automatic searching and presetting in FM/AM tuner mode.
33
Press the digital button to choose a preset station, you must input
66
99
two digital key to select a station. For example, if you select 02
station, you must press[0] and [2] .
if you select the 15 station, you must press [1] and[ 5].
Searching with frequency up.
Searching with frequency down.
Skip forward a station.
Play
RADIO-
Skip backward a station.
Under Tuner mode, you can press [A_MODE] to change the stereo
input to 5.1CH output. At the same time, [VOLUME+/-], [CH_LEVEL],
[MUTE],[TONE] and [S.EFFECT] buttons are available, please refer
to the PLAY chapter for details.
-17-
M1389E21B-P17.CDR
Page 19

Trouble shooting
Before resorting to maintenance service, please kindly check by yourself with
the following chart.
Symptom
No power
No picture
No sound
Distorted picture
Luminance unsteady
or picture with noise
Unable to play
Key malfunction
Remote control
Doesn't work
Can't locate any channels
in tuner mode
The power cord isn't connected
Cause(s)
Fuse melting
TV video setup isn't corrected
Player video setup isn't corrected
Video cable isn't connected well
Audio cable isn't connected well
Source select incorrect
Audio setup isn't corrected
Dirty disc
In fast forward or fast rewind mode
Anti-copy circuit influence
Without disc
Disc is bad
Disc is put upside down
Dirty disc
There are menu on TV screen
Parental control is working
Power wave or other static interference
Doesn't work
Remote control is too far from DVD unit
Batteries are weak
Antenna is not connected
Source mode is not in tuner mode
Connect the power cord properly
Solution
Replace a same specification fuse!
Select the suitable setup
Select the suitable setup
Connect the cable properly
Connect the cable properly
Switch to the proper source
Select the suitable audio setup
Clean the disc
Sometimes, tiny distortion appears normally
Connect the DVD unit to TV directly
Load the disc
Clean or replace the disc
Load the disc properly
Clean the disc
Use SETUP to turn off menu
Set up parental off or change the setup
Turn on/off the power and try again.
Point the remote control at the sensor
Operate remote controller within 8m
Replace the batteries
Connect antenna
Switch to tuner mode
-18-
M1389E21B-P18.CDR
Page 20

DVD RECEIVER
Specification
Power supply
Power consumption
Working
environment
Disc output
Tuner
Temperature -10~+40
Relative humidity
TV System
Frequency Response
S/N(A weight)
Frequency Range
THD+NOISE
WOW FLUTTER
AM frequency Range
FM band Range
Power output (Max)
Frequency response
AC ~240V/50Hz
150W
5%~90%
PAL/NTSC
20Hz~20KHz
80dB( )1KHz
70dB( )1KHz
60dB(1KHz)
Below the limit of apparatus measure
522KHz~1620KHz
87.5MHz~108MHz
15WX5+30W
1.5dB(20Hz~20KHz)
-19-
DA641-P19.CDR
 Loading...