

Avue AV830SDIR Instruction Manual
AV830SDIR
ado pt s adv an ced ima ge
pro ce ssi ng t echno logy
.Re so lut io n is as high a s 00T VL7
rea li ze cl ea r and sha rp imag e.
480 T V Lin e
700 TV Line
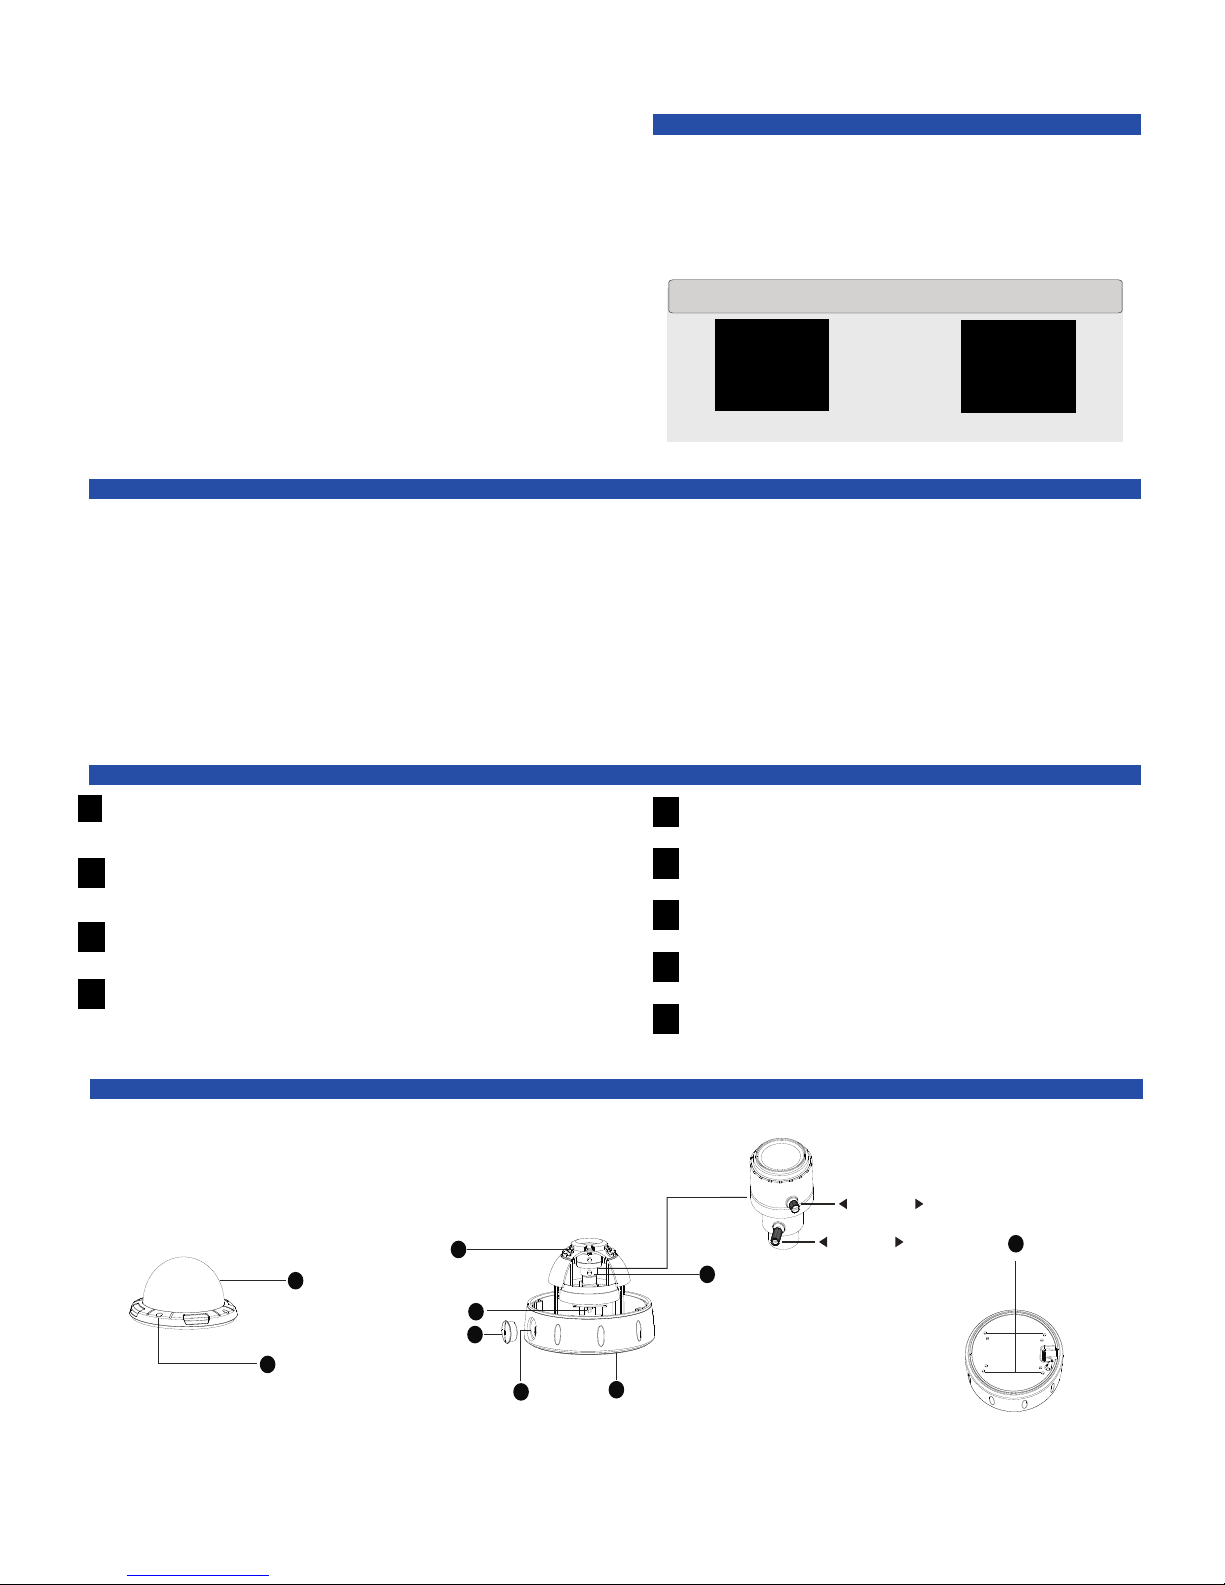
1. Dome Enclosure: to protect camera lens and body.
2. Glass cover screw hole
3. Base
4. Wire out hole
5.Stages of a screw the lid
6. OSD
7.IR LED
8.LENS
9. Four install screws holes
1
2
3
4
5
6
7
8
9
DESCRIPTION
Tha nk y ou fo r your p urc ha sin g th is
pro du ct. B ef ore a ttemp tin g
to co nn ect o r oper ate t hi s pro duct,
ple as e
rea d th ese i ns truct ions car ef ull y an d sav e thi s man ua l for f ut ure use .
PRECAUTIONS
FEATURES
PARTS INSTRUCTION
(at bottom of the base)
FAR NEAR
TELE WIDE
AV83 0S DI R ha s advan ce d im ag e pr ocess in g te ch no lo gy with r es ol ut io ns as hig h as
700TV L and adv an ce d di gi tal wid e dy na mi c ra ng e, HS -B LC e tc . To ensure a c le ar
and bri gh t pi ct ur e the AV830 SD IR c omes wi th a p ow er fu l OSD men u th at i nc lu de s
brigh tn es s co nt rast an d co lo r sa tu ratio n ad ju st me nts, mu lt i- ar ea B LC whit e ba la nc e,
AGC and o th er f un ct ions. M ir ro r mo ti on dete ct io n, p ri vacy an d ot he r fu nc tions m ak e
the AV830 SD IR s uitab le f or v ar io us spec ia l en vi ro nment s. A wat er pr oo f an d vanda l
proof d es ig n, c om bined w it h a 3- ax is d irect io na l br ac ke t allow s fo r cu st om ized
viewi ng , 24 ho ur m onito ri ng a nd s im ple ope ra ti on .
1. Make sure to u se t he a pp ro pr ia te p ow er s up pl y when instal li ng t he AV8 30 SD IR , the
input pow er i s DC 12 V/ AC 24 V.
Be sure to co nn ec t th e wi re s co rr ec tl y, inc or re ct i ns ta ll at io ns o f th e power source ma y
cause malfu nc ti on a nd /o r da ma ge t o th e vi deo camera.
2. Do not att em pt t o di sa ss em bl e th e ca me ra u nit as eclect ic s ho ck m ay o cc ur.
Do not remo ve t he c am er as s et s cr ew s or c ov er, the camera has n o se rv ic ea bl e in te rn al
parts. If s er vi ce i s re qu ir ed s ee k ou t a qu al ified technic ia n.
3 .Handle the c am er a wi th c ar e; a vo id d ro pp in g, striking o r im pa ct in g th e ca me ra a s th is
could resul t in d am ag e to t he u ni t.
4. Do not sto re t he c am er a in co rr ec tl y or e xp ose it to rain or moi st ur e.
Do not plac e th e ca me ra s in t he f ol lo wi ng l oc ations:
Locatio ns w it h te mp er at ur es l ow er t he n -10C or higher th an 5 0C
Locatio ns w it h hu mi di ty t ha t ex ce ed s 95 %
Locatio ns w it h la rg e am ou nt s of w at er v ap or or steam.
5. Clea n th e CC D fa cepla te w it h ca re.
When cl ea ni ng t he CCD us e on ly a s of t cloth o r pi ec e of l ens pap er. E th an ol may
also be u se d.
6. Do not a im t he c am era at th e su n or a ny b right l ig ht s ou rce as th is m ay d am ag e
the CCD .
7. Do not i ns ta ll t he came ra s ne ar e quipm en t th at e mits st ro ng e le ctrom ag ne ti c
field s su ch a s wi reles s co mm un icati on d ev ic es . Thi s in te rfere nc e ma y ca use
pictu re s ir re gular it y an d st atic on t he v id eo m on ito r.
1/3 S ony Ex– view HA D CCD is em ploye d by the AV83 0S DIR .
The S ony Ex- view co mes wit h advan ced WDR c ompe nsa ti on wh ich gr eat ly
imp roves i mage qu ality w hen de ali ng w ith h igher l evel s of co nt ras t.
Advan ce d Di gi tal Sig na l Pr oc es sin g Tech no logy
Highe r br ig ht ness, b y de si gn a nd an ext en de d LE D li fe
Hig h Resol ution
Hor izont al 700TVL reso lu ti on
HS –BLC
Autom at ic l ig ht filt er f or b et ter con tr as t in b right l ig ht , hi gher im ag e qu al ity
and bet te r im ag e contr ol .
DC1 2V/AC 24 Dupl icate s Supply De si gn
Aut omati c power m otori ng and sh iftin g from DC12 V an d AC2 4V
Wat erpro of a nd v andal p ro of
Wat erpro of , du st pr oof and van da l pr oof
Motio n De te ct ion
Vid eo m ot io ns de te ct io n fu nct io na li ty w ith a B lu e LE D hi gh light . Qu al it y alarm
eff ec ts
3 Axis B racke t
Int ernal 3 -Axis d irect ional b racke t, full y adjus table w ith eas y opera tion
OSD M enu
Pow erful m enu opt ions th at cont rol all / funct ions of t he came ra

OSD f unc tion se t:
Men u: ch oose fu nct ion or back t o
las t lev el.
Up/ dow n: Up or
dow n to mo ve v ert ica lly.
Lef t/righ t: to mov e left o r right hori zonta lly o r modify param eters, m eans wi th
sub ordina te
men u set .
Cam era i nstal lat ion
Adjustment for camera direction
Appea ra nc e size
Setup
Menu operation
Specific at ions
* .Spe cif icati ons s ubj ect to cha nge wit hou t not ice
In ca mer a the key to se t th e cam era
Main me nu
LENS
SHUT TE R/AGC
WHIT E BA L
MANUAL
ANTI CR
PUSH
OFF
HLC
MIRROR
CONTRAST
HUE
OFF
OFF
OFF
OFF
COLOR
OFF
AUTO
AUTO
AWC -S ET
USER 2
MANUAL
BLC
BIGHTNESS
SHARPNESS
GAIN
ON
ON
ON
B/W
ON
ON
BACK LI GHT
PICT ADJU ST
ATR
MOTI ON D ET
PRIVACY
DAY/NIG HT
NR
CAME RA ID
LANG UA GE
CAME RA RE SET
SAVE
EXIT
MANUAL
AT W
USER 1
AUTO
107 mm
150 mm
700 TVLi ne s
PAL:752(H)*582(V )/ NT SC :7 68 (H )* 49 4( V)
Intern al
Light ne ss /C on tr ast/Sha rp ne ss /T on e/Satur at io n
1/3″SO NY E x- view HADⅡCC D
1120 g
-10℃~5 0℃
DC ICR 2.8 mm ~1 1m m
DC12 V/ AC24V
DC12 V/ 600mA ,A C24V/5. 6W
D
R
To inst all the AV8 30 SDI R loose n, usin g a scre wdr iver th e 3 exter nal scr ews tha t secur e the
gla ss dom e-c over. R emo ve the g la ss do me-c ove r an d th en l oos en the i nt ern al s et -sc rews
and se par ate th e s ubp anel f ro m th e ca mera b od y. U se t he S ubpan el as a gui de and ma rk
3 ho les o n th e surf ace w her e you i ntend to in sta ll the came ra. Remo ve th e su bpane l and
dri ll the se 3 h ol es. (P lea se mak e su re t hat the sur face y ou a tta ch t he c am era too is s tur dy
eno ugh t o su ppo rt the sc rew s and the came ra) . P lace wall fast ene rs in the three hol es,
pla ce t he s ubpan el o n to p of the wal l fa st ene rs, makin g su re t he h ol es line up with the
fas tener s. Plac e o ne s cre w tho ugh t he S ubp anel and int o the fast ener and the n ti ght en
wit h sc rew dri ver. In r eg ard to wi rin g th e AV8 30SDI R co me with a d efa ult, vert ica l wi rin g
con figur ation . The AV830 SD IR a lso c omes w ith a fro nt s et s cre w that c an b e rem oved f or a
hor izont al wire c onfig urati on. Be su re to pre -set y our c on fig urati on, pri or to ins tall to a void
dam aging t he wiri ng harn ess.
Aft er ins ta ll ati on is c omple te you ca n no w a dju st the ca mer a and t he fie ld of v ie w. T he
max imum ve rtica l rotat ion the AV8 30 SD IR is 3 55 d eg ree s, maxi mum hor izont al rota tion
is 35 d egr ee a nd the max im um dipp ing r otati on is 3 55 degr ee s. To adju st th e ZO OM,
loc ate an d adjus t bo th t he Z oo m and Foc us a dj us tme nt l ev er s, wh ich ar e lo cat ed o n th e
cam era m od ul e i ns ide of t he do me co ve r. Once yo u h ave a ch ieved the des ir ed zo om
and foc us l oc k th e tw o adj ustme nt lev ers by pl acing a sma ll scr ewd river int o th e lo ck ing
set screw h ole, lo cated j ust bel ow the ca mera mo dule.
IP Rat e
IP 66
 Loading...