

Page 1
Thank you fo r your pu rchasing t his produc t. Before at tempting to c onnect or opera te this prod uct,
please
read these i nstructi ons carefully an d save this man ual for futu re use.
DESCRIPTION
AV762SDI R ado pts adv anced i mage proce ssing t echno logy.Resolution is as high as
700TV L.,ad vanced digital wide dynamic range, HS-BL C,etc .Powe rful OSD m enu includes
brigh tness , contr ast and
other f uncti ons, which ensure clea r and bright pictures. Mirror,mot ion det ection, privacy an d
other a ided fu nctio ns mak e it suit able for various special environments; waterpro of desig n,
uniqu e 3 axis bracket help t o carry o ut a 24-hour monitoring and an easy
color s atura tion ad justments, mu lti-a rea BLC ,white balance, AGC and
conve nient o perat ion.
AV762SDIR
PRECAUTIONS
1. Use the Appropri ate Power Supply
The input po wer fo r is DC12V/A C24V. Be sure to conn ect it to the appr opriate power .
Wrong connecti on may cause malfunctio n and/or dam age to the v ideo camera .
2. Do not attempt to d isassemb le the camera .
To prevent elec tric shock , do not remo ve screws or co vers. The re are no user se rviceabl e parts i nside.
Ask a qualified ser vice perso n for servic ing.
3. Handle th e ca mera with care.
Do not abuse the cam era. A void strik ing, shaki ng, etc. The ca mera could b e damage d by imprope r
handling o r storage.
4. Do not expos e the camera to rain o r moisture, o r try to o perate it in wet a reas.
Do not place the camera in the follo wing locat ions:
Location s where temp erature is low er than -10 C or higher than 50 C;
Location s where humi dity is hi gher than 95%;
Location s where ther e are la rge amounts of wate r vapor and steam .
AV762SDI R
adopts adv anced imag e proc essing tec hnology
.Resolut ion is as high as 700T VL
realize cl ear and shar p image .
480 TV Lin e
700 TV Line
5. Clean the C CD facepla te with car e
When clean ing the CCD pa nel, do not u se strong or abrasive de tergents . Use a piece of lens
cotton tip ped applic atortissue or and ethano l.
6. Do not atte mpt to aim the ca mera at the sun
Do not attem pt to aim the camera a t the
sun or other
extreme
ly bright
objects
that cause s
mear
to appear ir respecti ve of w hether the c amera i s operatin g or not. Th is can damage the CCD
(Charge C oupled Device ).
7. Do not put t he camera i n a place wi th interfe ren ce.
When this ca mera is instal led near t he equipme nt like wireles s communic ation devi ce whic h
strong ele ctromagn etic field ,emits some irreg ularity su ch as n oise on
monitor sc reen may happen .
1/3" SONY Ex-view HAD CCD is Employed
Advanced W DR compens ation largely i mproves im age effect whe n there is
much contr ast.
Advanced Digital Signal Processing Technology
Design,whose brightness is several times higher
and working life longer than an ordinary LED's.
High Resol ution
Horizontal 700TVL resolution
HS-BLC
It can utoma tically de tect stron glight, ke ep out t he part with strong l ight in the
image to imp rove t he whole sce ne definit ion and carr y out an effe ctive mornit oring
more clear ly
1
FEATURES
PARTS INSTRUCTION
3
DC12V/AC24 Duplicate Supply Design
DC12V and AC24V, which can automatically shift to the correct model as per the power in.
Waterproof and vandalproof
Waterproof ,dust proof and vandalproof
Motion detection
Video motion detection function, blue highlight LED, good alarm effect.
3 axis bracket
inside 3 axi s bra cket,ful l angle adju stment,easy operat ion.
OSD menu
Powerful menu operation, which can set all functions of the camera.
5
UP
ZOO M
FOC US
LEFT
RIGH T
SET
DOWN
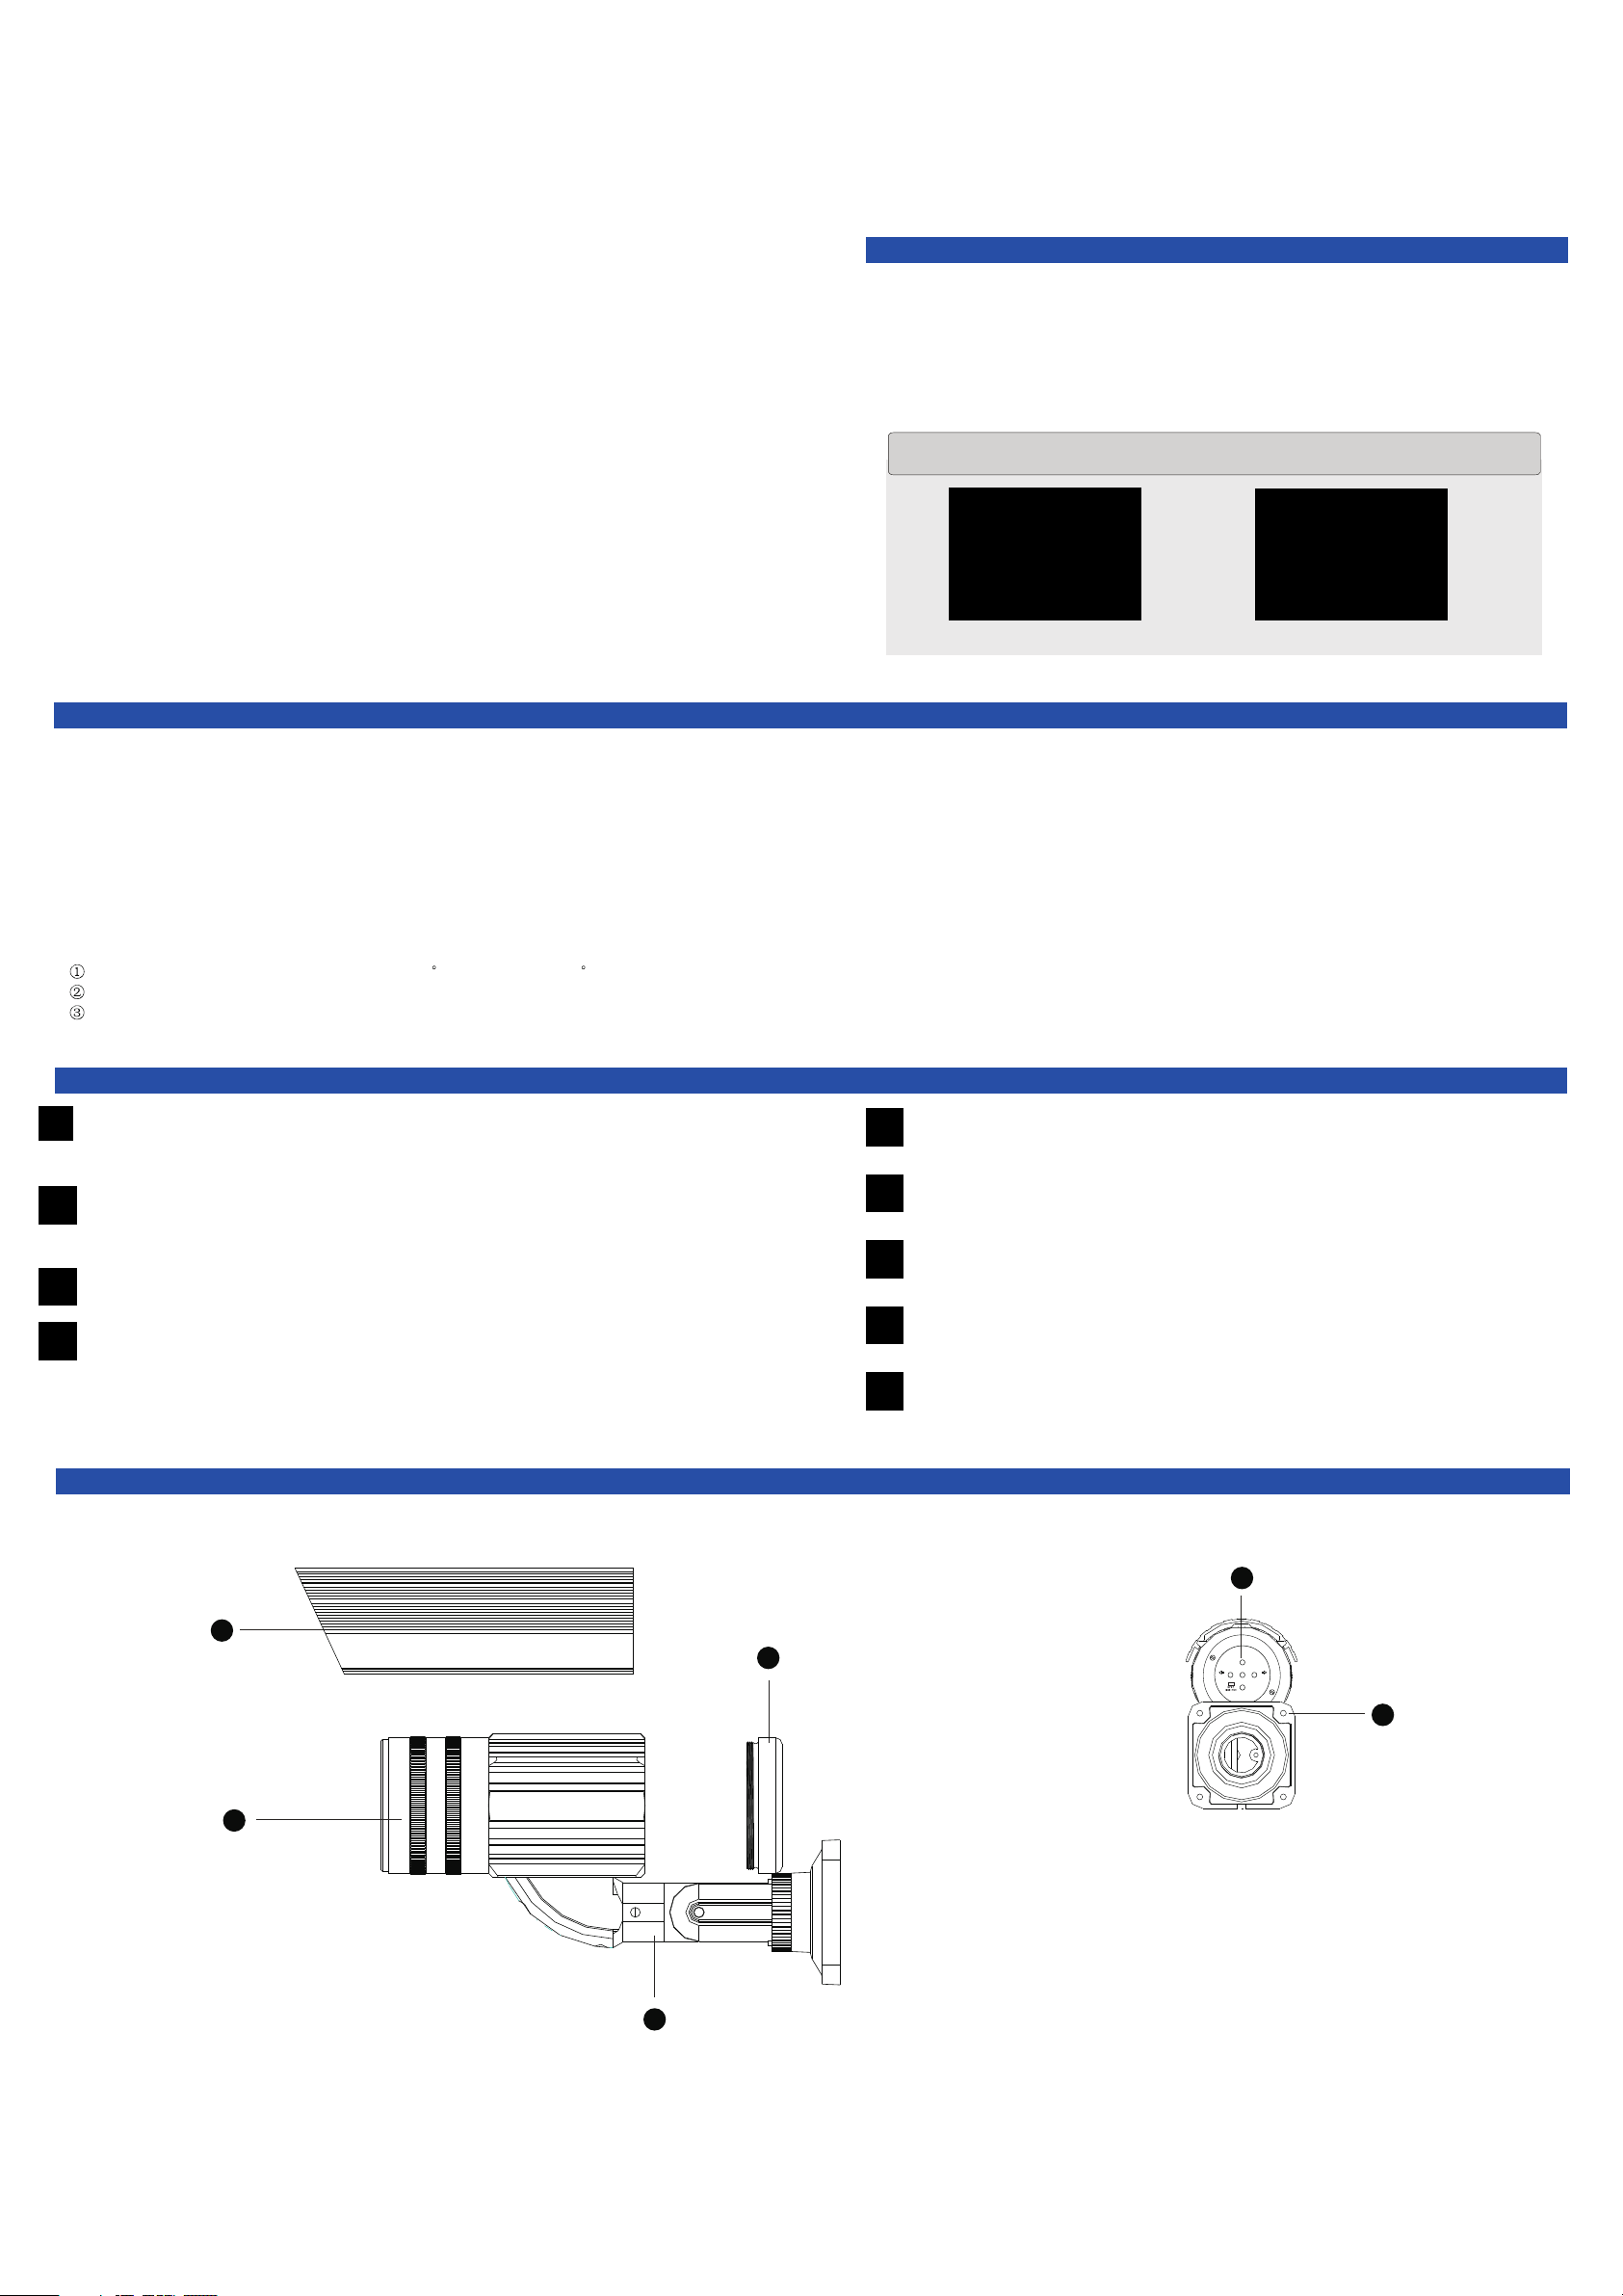
6
2
Hood
1.
2. Camera body
3. Back cover
4. 3 axis bracket
5. OSD(take off the back cover)
4
6. Four install screws holes
(at bottom of the bracket)
Page 2
Setup
1180 Miraloma Way Suite C
Sunnyvale, CA 94085
TEL: (408) 481-9355, FAX: (408) 481-9366
www.avueinc.com
2.8~12mm DC ICR
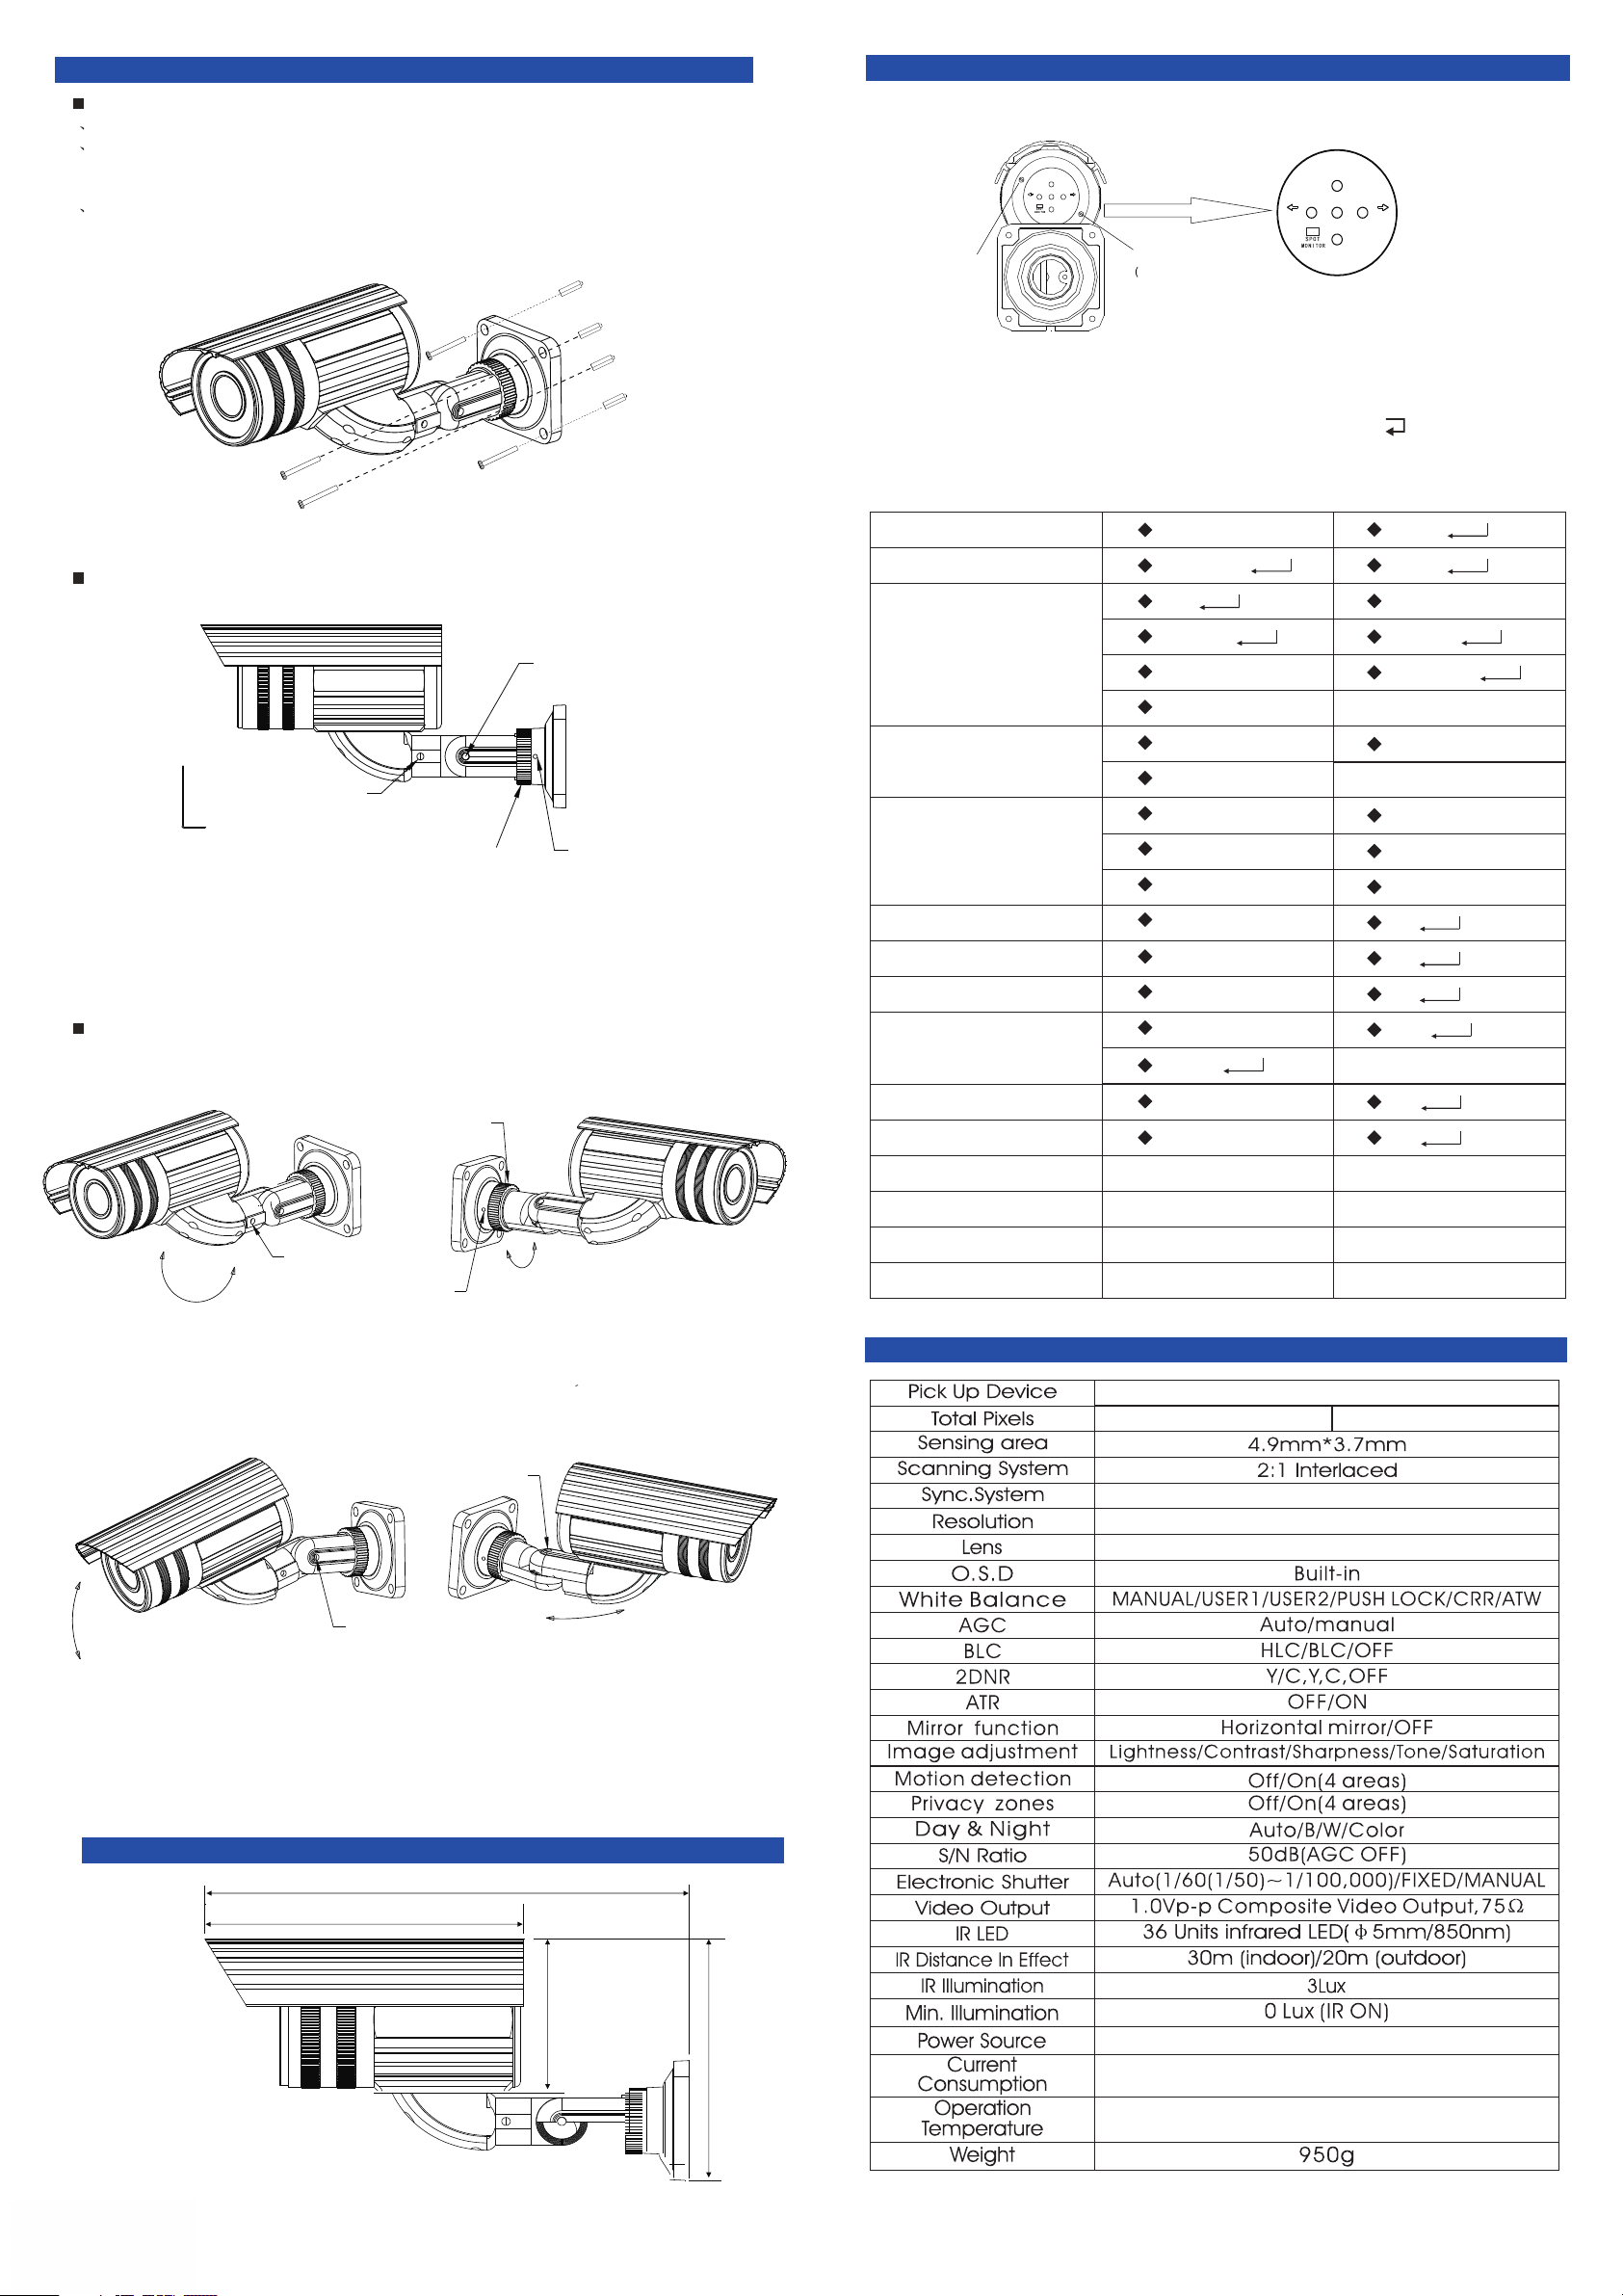
Camera ins tallatio n
1 Usin g the foam pat t o locate hol es in the wall
2
Drill 4 hole s in the posit ion needed i n accordan ce with the in stallati on hole on the
subpanel o f the bracke t, push the ex pansion bo lt inside th en tighten t he screws, make
the instal lation hol e aim at the fou r screws and f ix it.
3
Get the wire o ut from the bo ttle of the br acket.
Menu operation
In camera th e ke y to set th e camera
UP
ZOO M
FOC US
LEFT
RIGH T
SET
DOWN
H
a
n
d
l
e
H
a
n
d
l
e
(
a
d
j
OSD functi on set:
SET: choos e function or back to last level.
Up/down: U p or down to mov e vertic ally.
Left/rig ht: to move l eft or right horizo ntally or mo dify parameter s, means wit h
menu set.
B
u
s
t
t
h
e
f
o
c
u
s
)
A
t
h
e
d
i
s
t
a
n
c
e
o
f
i
m
a
g
e
)
FO CU S
LE FT
DO WN
UP
ZO OM
RI GHT
SE T
Main menu
subordin ate
Assembl y instruc tion of 3 D cable bra cket
Screw 3
Screw 1
L-shape spanner
Fixed loop
Screw 2
Figure 1
Take the sc rews ou t of the acce ssori es pouch an d use L-s hape span ner
to assemb le, as sh own in the fi gure 1
Adjustm ent ins tructio n of 3D bra cket
LENS
SHUTTER/AGC
WHITE BAL
BACKLIGHT
PICT ADJUST
ATR
MOTION DET
PRIVACY
DAY/NIGHT
MANUAL
MANUAL
A T W
USER 1
ANTI CR
PUSH
OFF
HLC
MIRROR
CONTRAST
HUE
OFF
OFF
OFF
COLOR
AUTO
AUTO
AUTO
AWC-SET
USER 2
MANUAL
BLC
BIGHTNES S
SHARPN ES S
GAIN
ON
ON
ON
B/W
360 rotati on°
As shown in t he figu re 2, loose n
the screw 1 t o rotat e 360°
180 vertical rotation°
Figure 4
Figure 2
Screw 1
Fixed loop
Screw 2
Screw 3
360 rotati on°
Figure 3
As shown in t he figu re 3, loose n the scr ew 2
and the fix ed loop t o rotate 36 0°
Screw 3
180 ho rizontal rotation°
Figure 5
NR
CAMERA ID
LANGUAGE
CAMERA RESET
SAVE
EXIT
OFF
OFF
Specifications
1/3″SONY Ex-view HADⅡCCD
PAL:752(H )*582(V)
Internal
700 TVLines
NTSC:768(H)*494(V )
ON
ON
As shown in t he figu res 4 and 5, lo osen th e screw 3 to
from up to do wn or fro m left to rig ht
Appearance size
259.3 mm
173 mm
rotate 18 0°
76.7 mm
DC12V/AC24V
DC12V/600mA,AC24V/12W
131.7 mm
- 10°C~50°C
* .Specific ations sub ject to ch ange without no tice
 Loading...