

Page 1
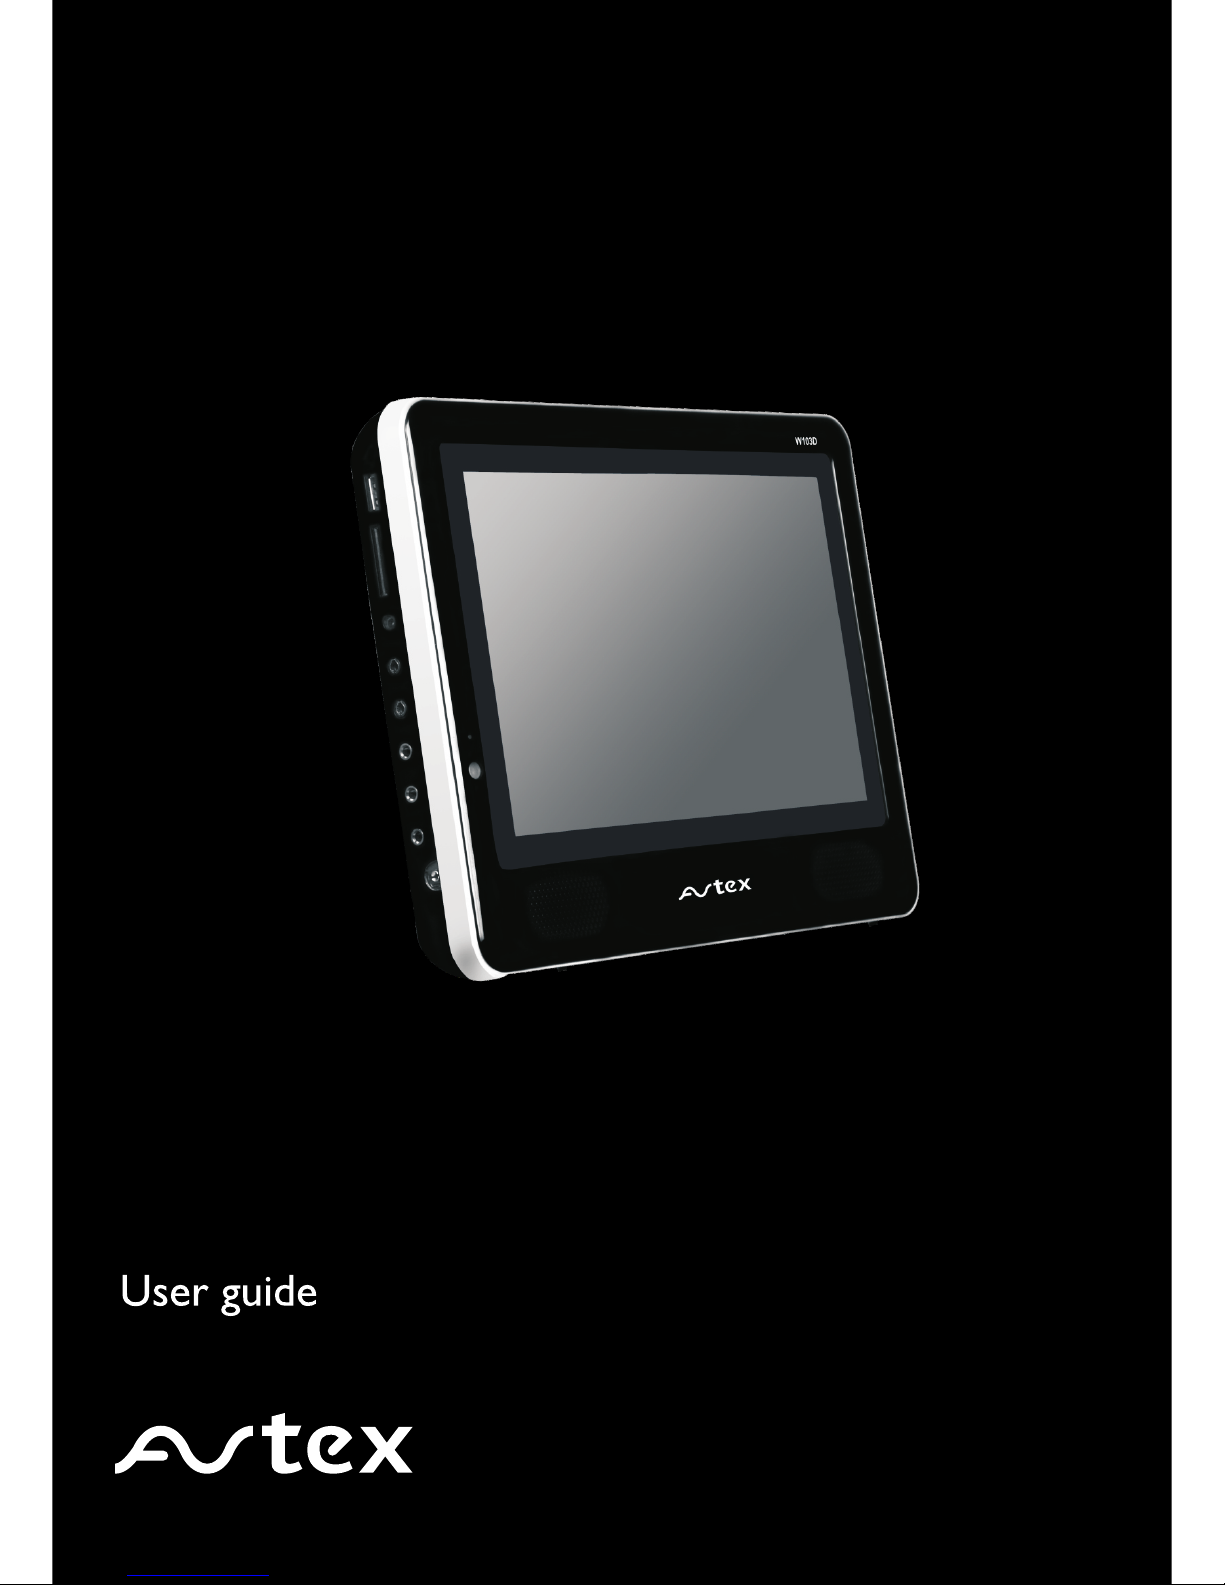
Model:W103D
10.1 inch digital TV/DVD
Page 2
DVD
Compatible Disc Types
27
Disc pla
yback mode
30
Card reader and usb operation
38
DVD function settings
42
45
46
10.1 inch TV/DVD user guide 2
3
3
3
4
4
4
5
4
5
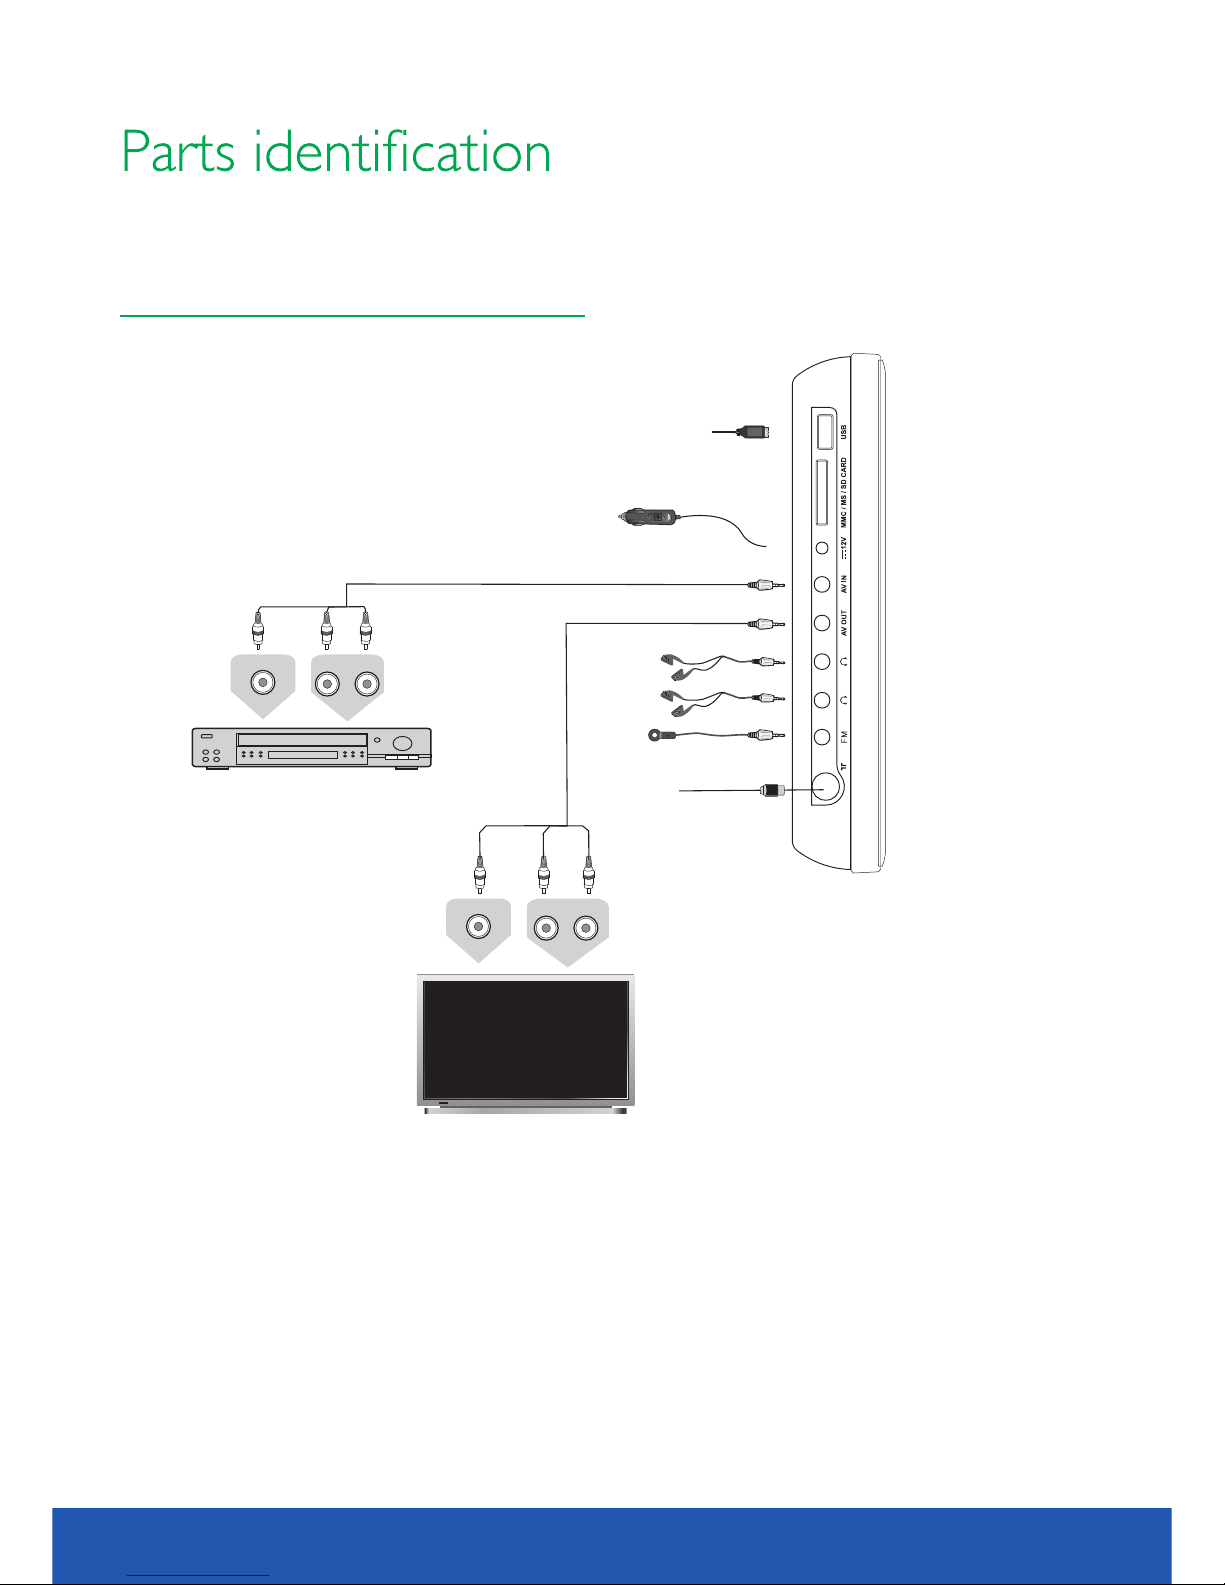
CONNECTING DIAGRAM
6
7
10
Switchi ng on/off
Tuning th e TV
11
11
11
12
12
12
12
12
12
12
13
13
13
13
13
13
Program me
14
16
16
19
20
20
21
21
21
21
21
21
21
21
22
23
24
25
FM MENU OPERATION
FM SETTIN G
25
SOUND
26
FUNCTIO N
26
27
Brief Introduction to DVD
27
Disc playback
29
Pause/playback
29
47
46
46
21
Page 3
10.1" tel evision
/DVD
/DVD
10.1 inch TV/DVD user guide
Power ada pter
Automot ive Power socket a dapter
Battery
AV cord
FM antenn a
3
Page 4
410.1 inch TV/DVD user guide
warrant y.
Page 5
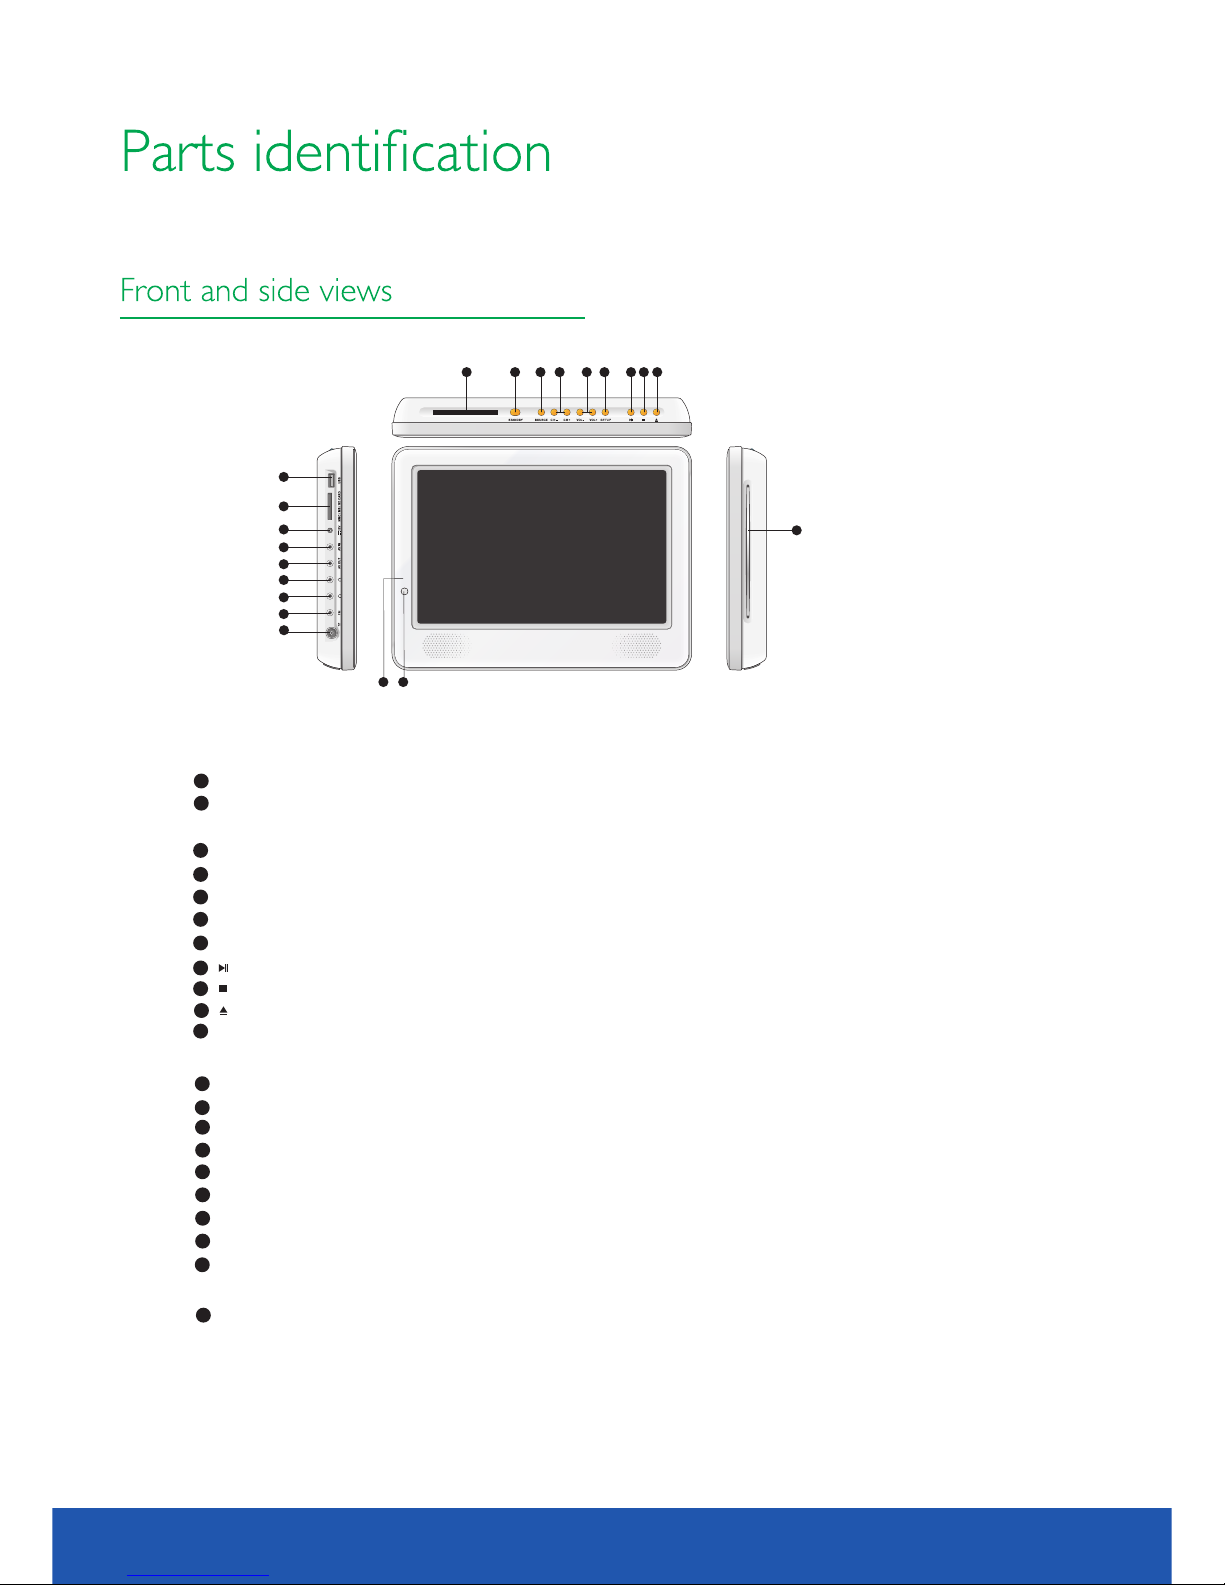
Indicator( )Indicator is red when in standby mode, green when worki ng normally.
1
IR sensor window
2
Front pan el
Top panel
3
STANDBY (To switc h from standby mode to power-on mode )
4
SOURCE (Select input source)
5
CH-/+ (Increase or decrease channel number/to mov e selected menu item)
6
VOL-/+ (Increas e or decrease volume/characteristics)
7
SETUP (Enter or exi t setup menu)
Left pane l
USB jack
12
MEDIA CARD socket
13
12-24Volt DC power input socket
14
AV audio video inpu t jack
15
Headphone jack
18
Right pan el
21
Disc in/out door
8
(Play/pause button)
9
(Stop button)
10
(Eject button)
AV audio video output jack
16
17
Headphone jack
FM antenna input
19
3 4 5 6
7 8 9 10
1
12
13
14
15
16
17
19
22
18
2
11
21
11
PCMCIA interface
RF input terminali
20
5
10.1 inch TV/DVD user guide
Page 6
CONNECTING DIAGRAM
DVD or VCR player
The left of TV set
RL
VI DEO
RL
VID EO
TV
NOTE
You should insert any interconnecting cables BEFORE plugging in the power cord.
610.1 inch TV/DVD user guide
DC
Page 7
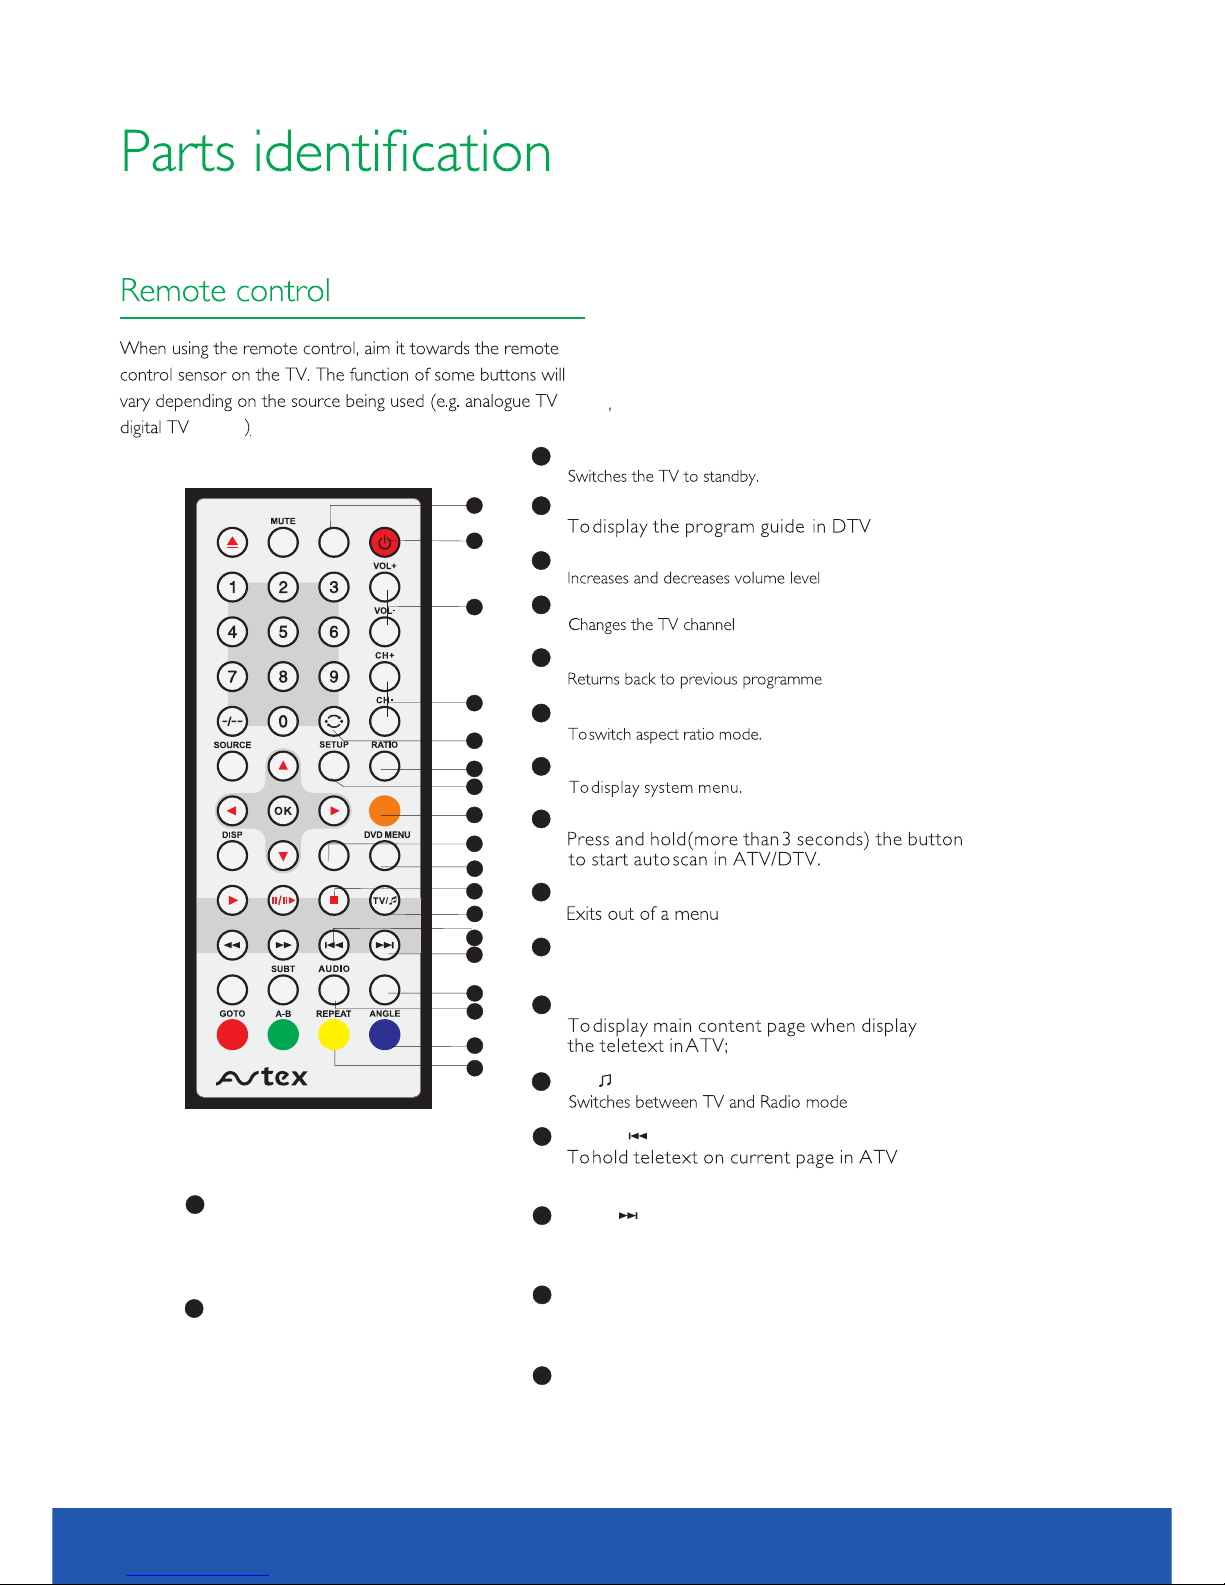
Gui de
EXI T
IND EX
REV EAL HOL D SIZ E
W103D
AQT
REC
TEX T MIX
CAN CEL
INF O
FAV
(ATV)
(DTV)
STANDB Y
1
CH ANN EL+/-
4
SE TUP
7
AQ T
8
16
AUD IO
To change sound track in DTV/ATV /DVD.
1
2
3
5
8
11
7
10
6
17
4
9
14
9
EX IT
10
DV D MEN U
Display DVD menu or open/close P BC;
13
12
16
RATIO
6
17
ANG LE
Change camera a ngle in DVD;
Display recording list in DTV
mode when USB is being used.
RE PEAT
To repeat playb ack in DVD.
18
15
18
SI ZE/
To magnif y teletext page;
To select track . the next chapte r or
14
RE C
To start record ing digital TV pr ogram;To hide recording
Dialog.
15
Gu ide
2
11
IN DEX /STOP
To stop playing o r recording.
13
HO LD/
To sele ct the pr evious cha pter or track
7
10.1 inch TV/DVD user guide
12
TV /
in DTV.
VO LUM E+/-
3
RE TUR N
5
.
.
.
.
.
.
;
Page 8
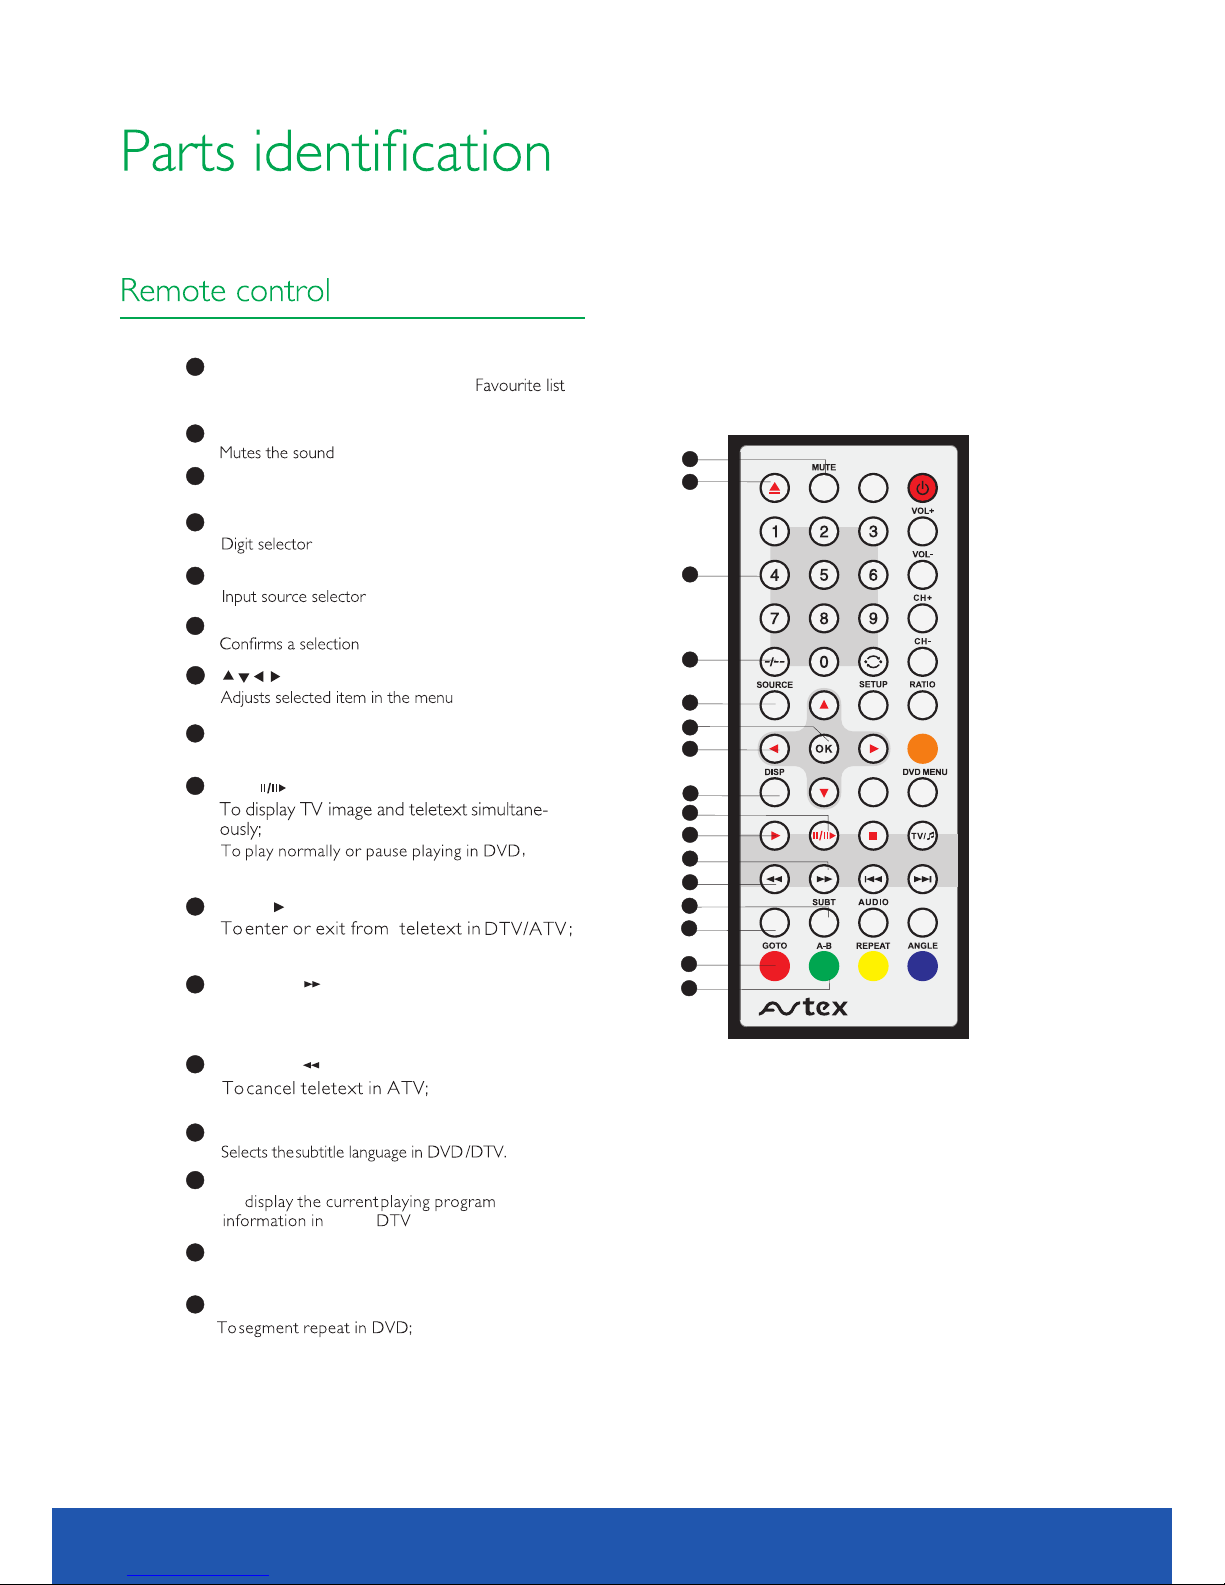
EJ ECT /FAV
Disc in/out in DVD;
19
MU TE
20
TW O-D IGIT bu tto n
22
DI SP
26
Display inf ormation .
Nu mbe r butto ns
To select pro gram number.
21
Gui de
EXI T
IND EX
REV EAL HOLD S IZE
W103D
AQT
REC
TEX T MIX
CAN CEL
INF O
FAV
25
29
20
21
22
23
24
26
28
27
30
32
33
34
19
31
810.1 inch TV/DVD user guide
SO URC E
23
To displa y
in
DTV/ATV .
OK b utt on
24
27
MI X/
and card re ader.
GO TO
33
To play a D VD from a cert ain time-poin t.
SU BT
31
IN FO
32
RE VEA L/
29
Fast forwar ds in playback.
A- B
34
30
To fast backw ard
28
TE XT/
To play norma lly.
To display th e hidden teletext information in
ATV;
CA NCE L/
in playback .
To
DVD/ .
25
.
.
.
.
To operat e Time shift funct ion in DTV;
USB
in TV modes .
Page 9
BATTERY LIFE
NOTES
CAUTION:
Please put battery in a place children cannot access. I f swallowed by accident, please
contact your local doctor immediately.
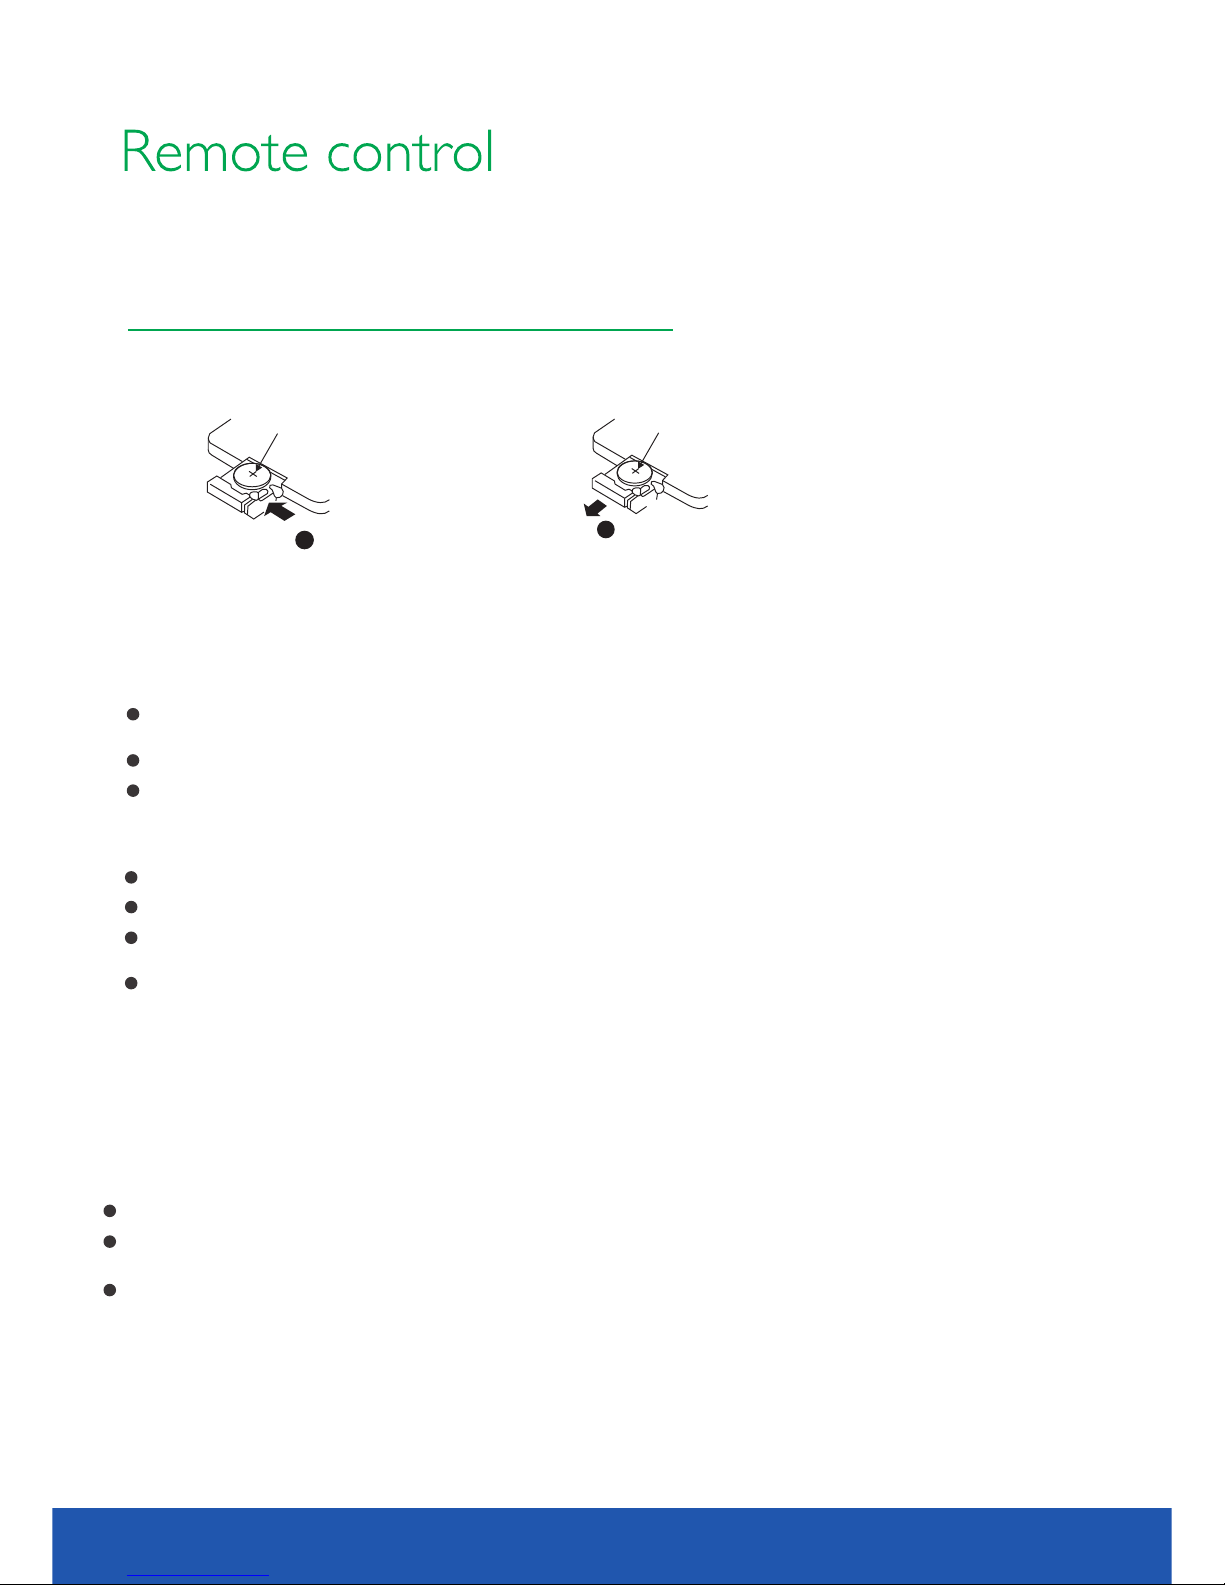
BATTERY INSTALLATION
When installing battery , please match the two polari ties of the battery with the two polar ities
inside the battery case (positive upward, negativ e downward), as in the following fig ure:
1
2
Step 1: Push the button toward left.
Step 2: Pull the battery holder out.
CR2025CR2025
Generally speaking, the battery can be used for one yea r. But the detai ed battery life
and usage times are related to the remote control opera tion.
l
If the remote control is still not operating when near to t he unit, please replace the batter y.
Do not charge the battery, short-circuit, disasse mble, heat or throw it into fire.
Take care not to fall and beat the remote control, which wi ll damage the remote control
or cause function trouble.
Please use CR2025 battery.
Do not use rechargeable battery .
If the battery of remote control will not be used for a long ti me, please take it out.
Please confirm whether the accessories contain th e power adapter.
Please make sure to use power adapter within the specif ication range, otherwise it will
cause damage.
POWER SUPPLY
Step3: Insert one 3VOL LITHIUM BATTERY matching the -/+ polarities of the battery to
the -/+ marks inside the battery compartment, as in the diagram.
Use the car adapter in the accessories, connect one end t o the socket in your car, the
other to the DC socket in the TV.
9
10.1 inch TV/DVD user guide
Page 10
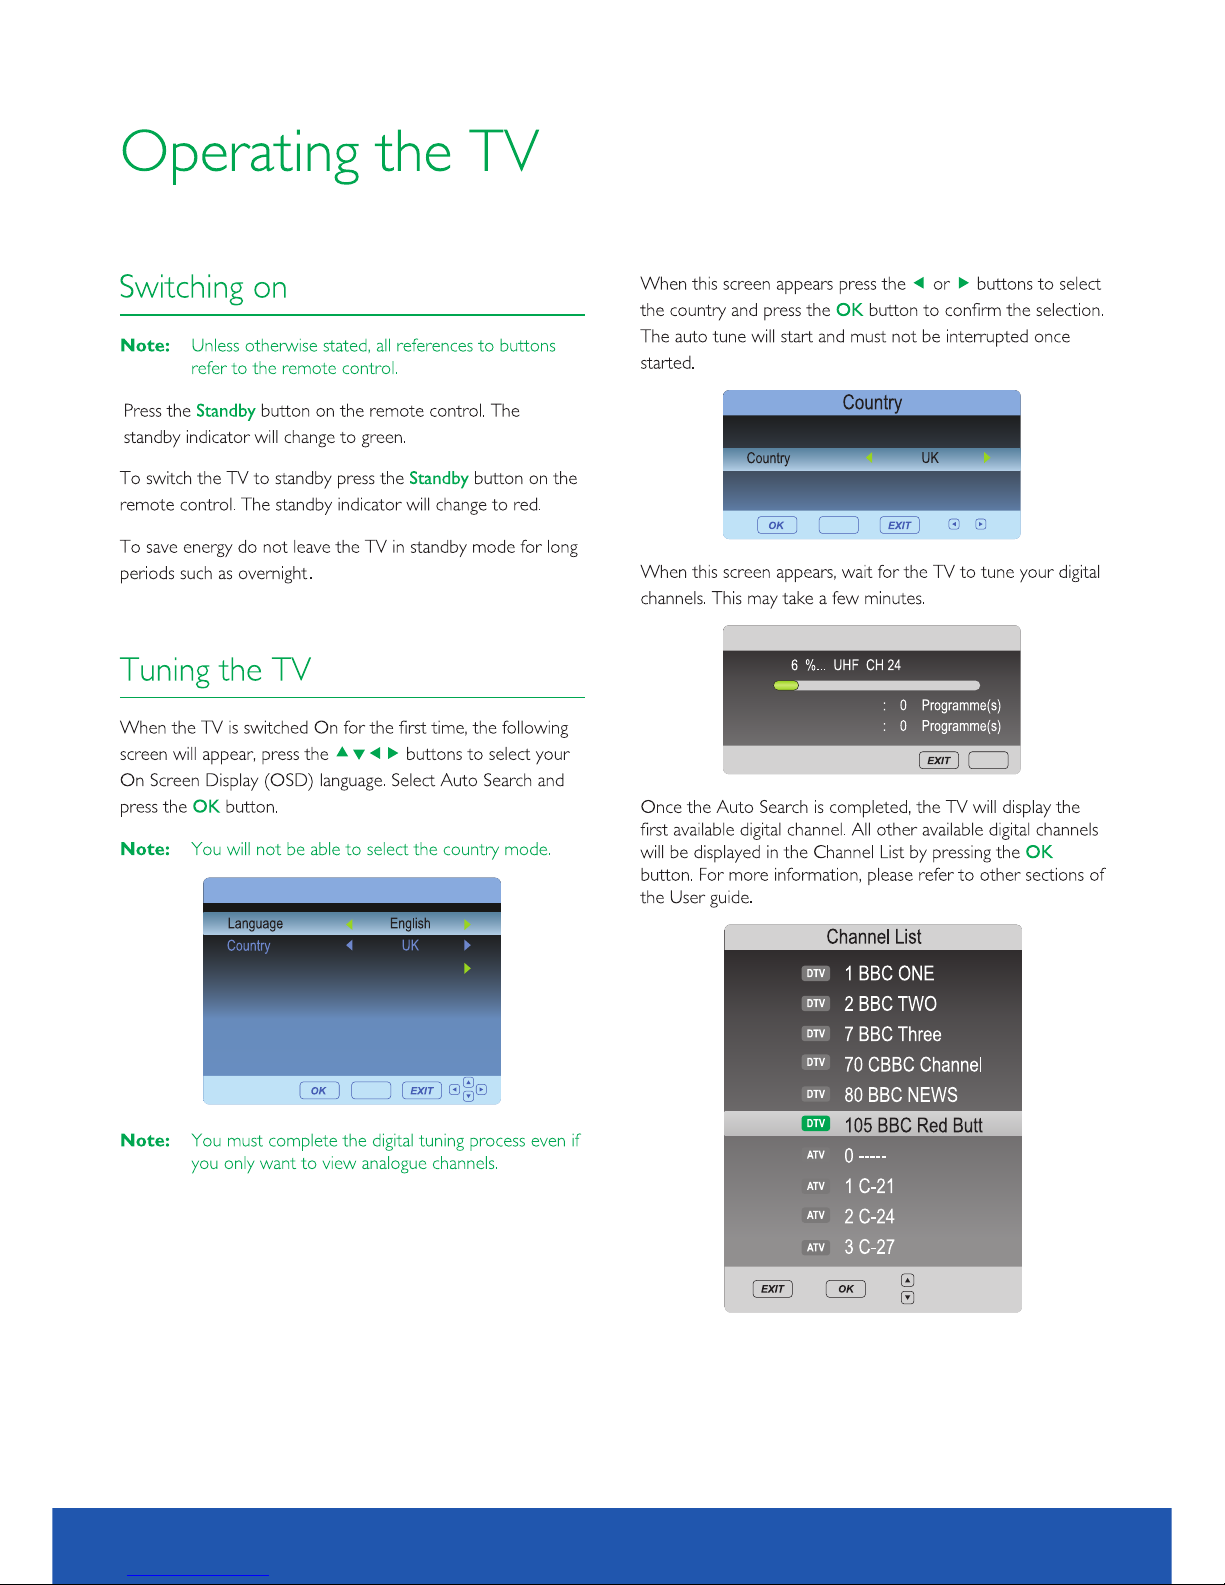
Auto Tun ing
SET UP
/off
Unplugi ng the TV please.
1010.1 inch TV/DVD user guide
Install ation Guide
SET UP
DTV
Chann el Tun ing
RADIO
SET UP
DTV
Page 11
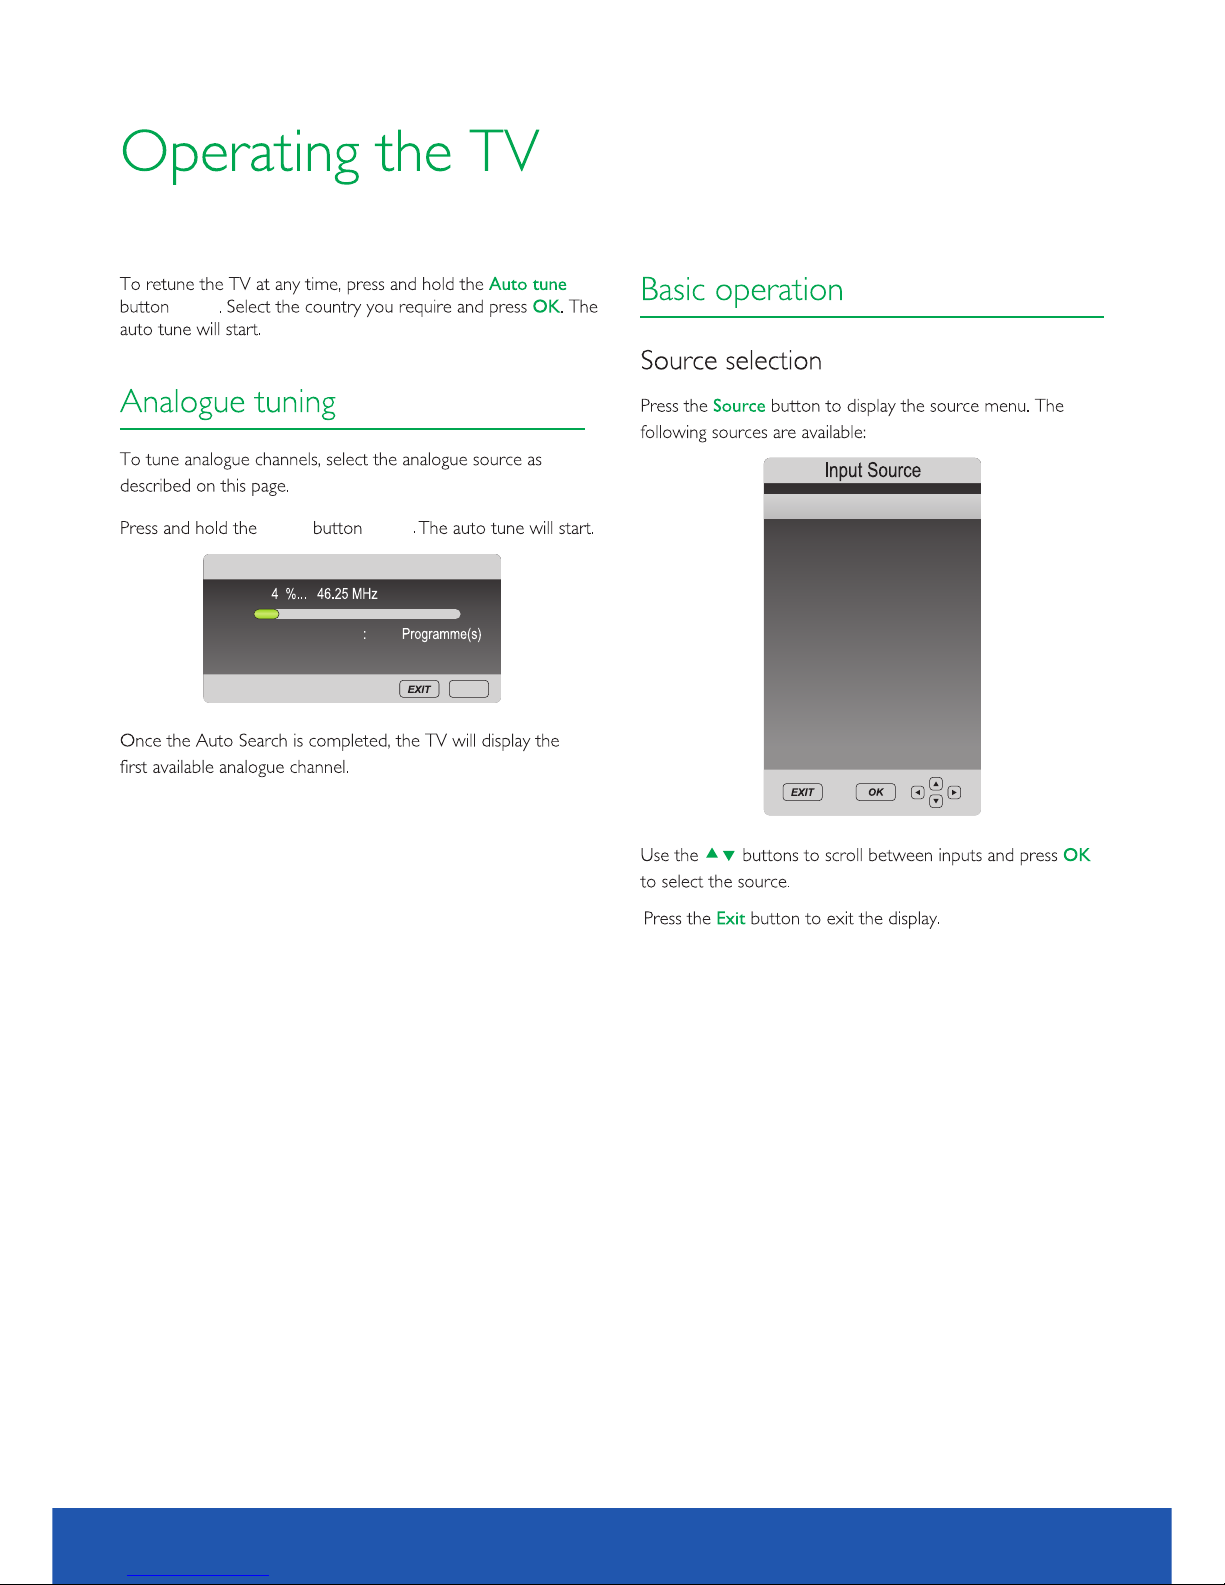
(AQT)
(AQT)
Tune
11
10.1 inch TV/DVD user guide
Chann el Tun ing
ATV
ATV
2
SET UP
DTV
ATV
AV
DVD
FM
USB
CARD
Page 12
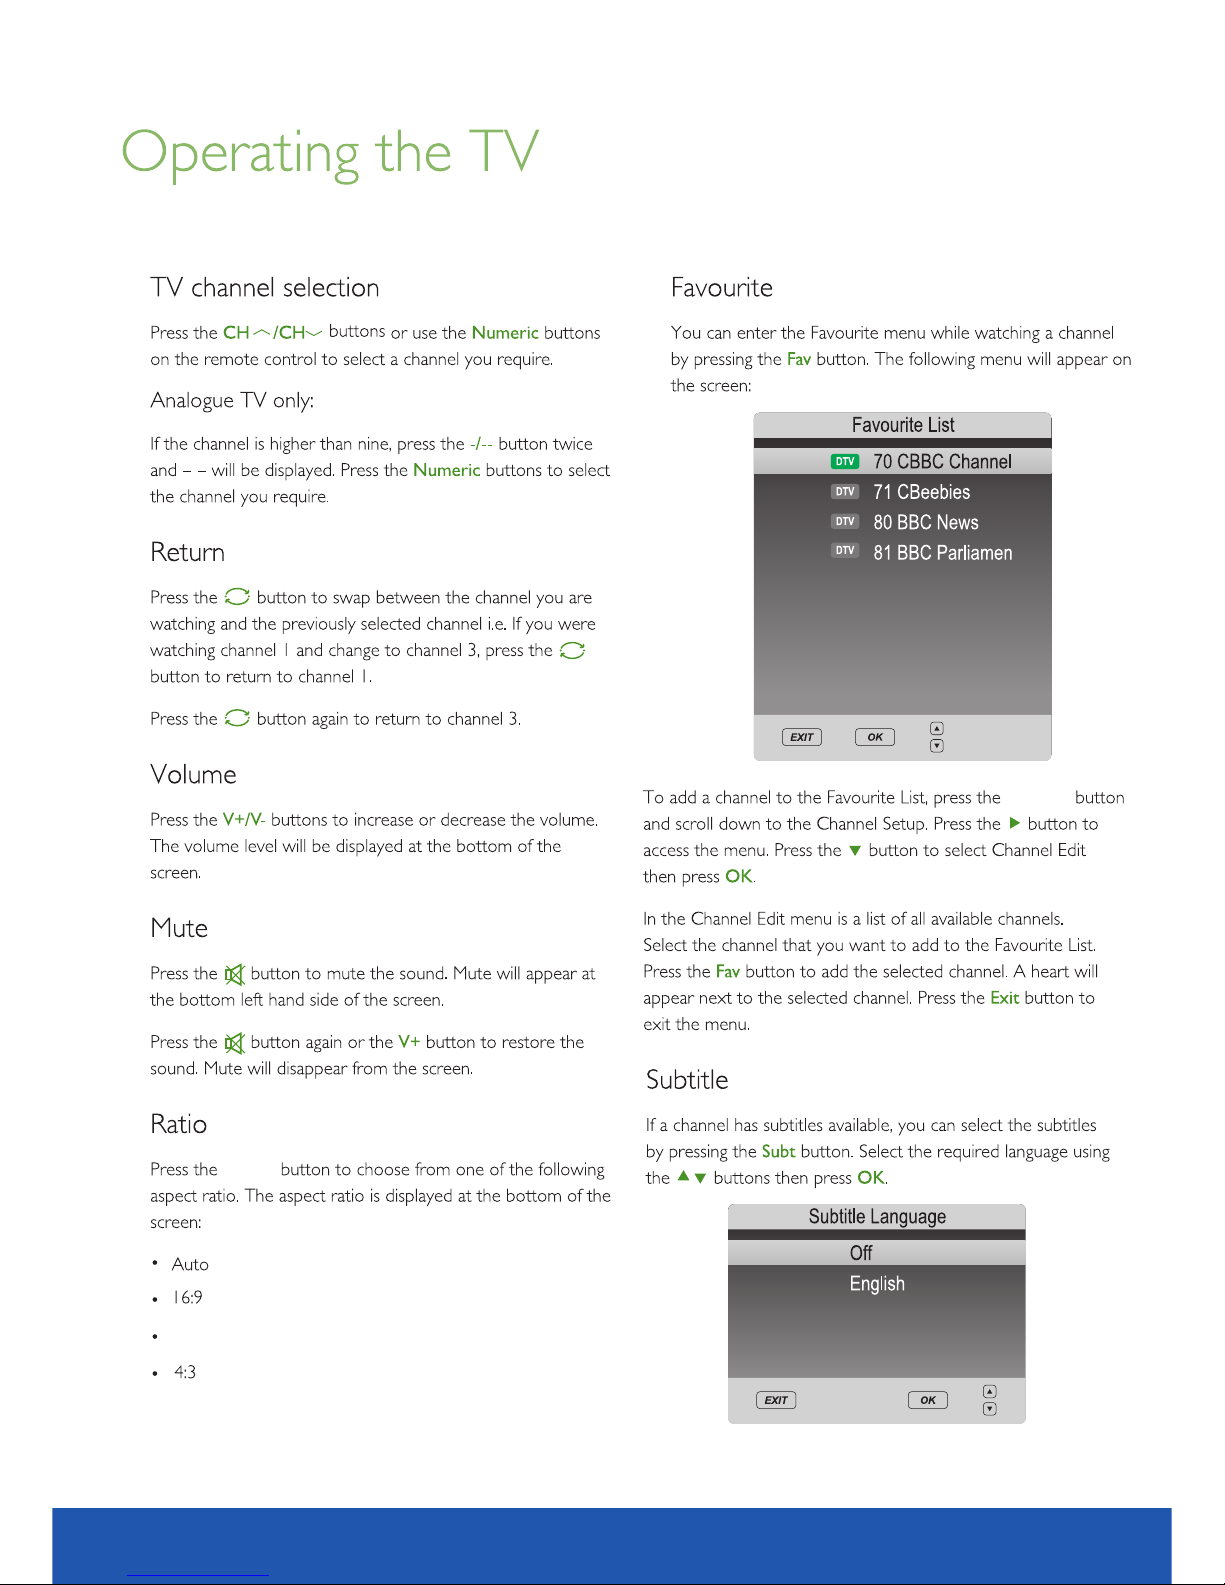
Ratio
14:9
12
SETUP
10.1 inch TV/DVD user guide
Page 13
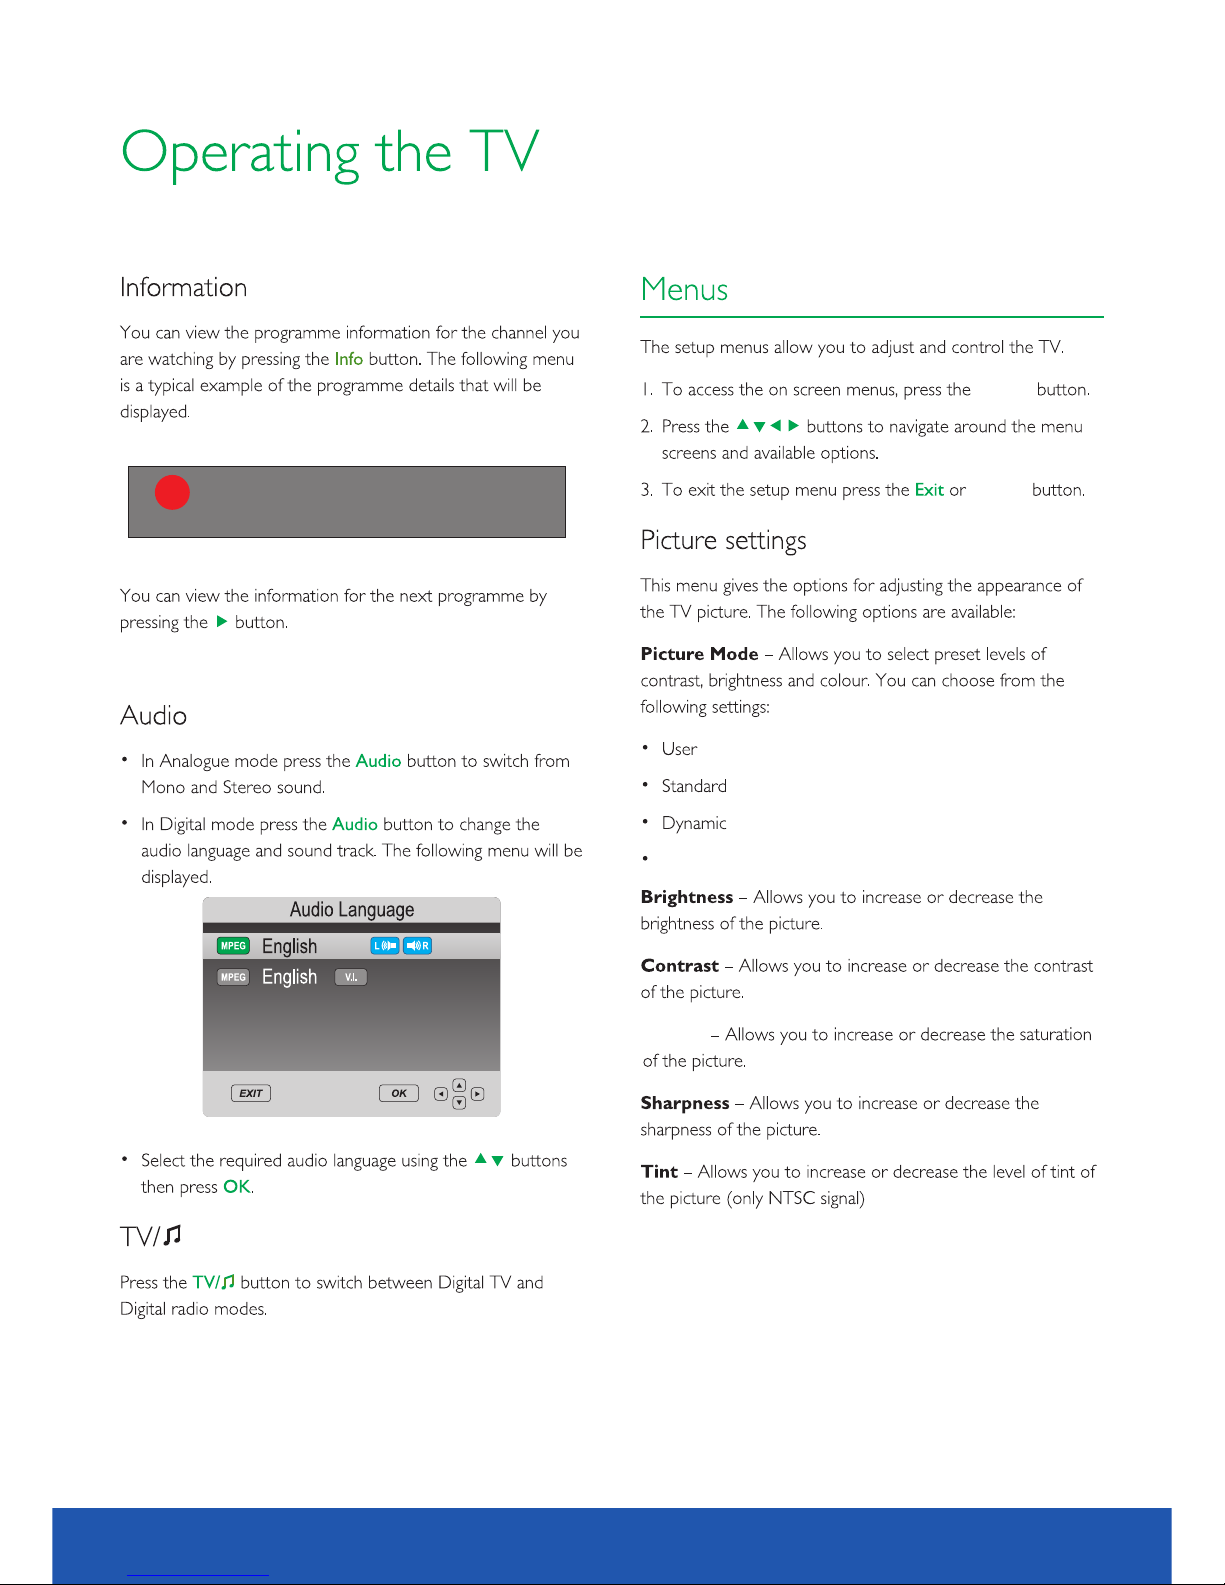
Mild
Color
SETUP
SETUP
13
10.1 inch TV/DVD user guide
REC
[00:0 0:0 8]
5 five
NO Info rma tio n
Recor din g
14:48
(3328 M B)
Page 14
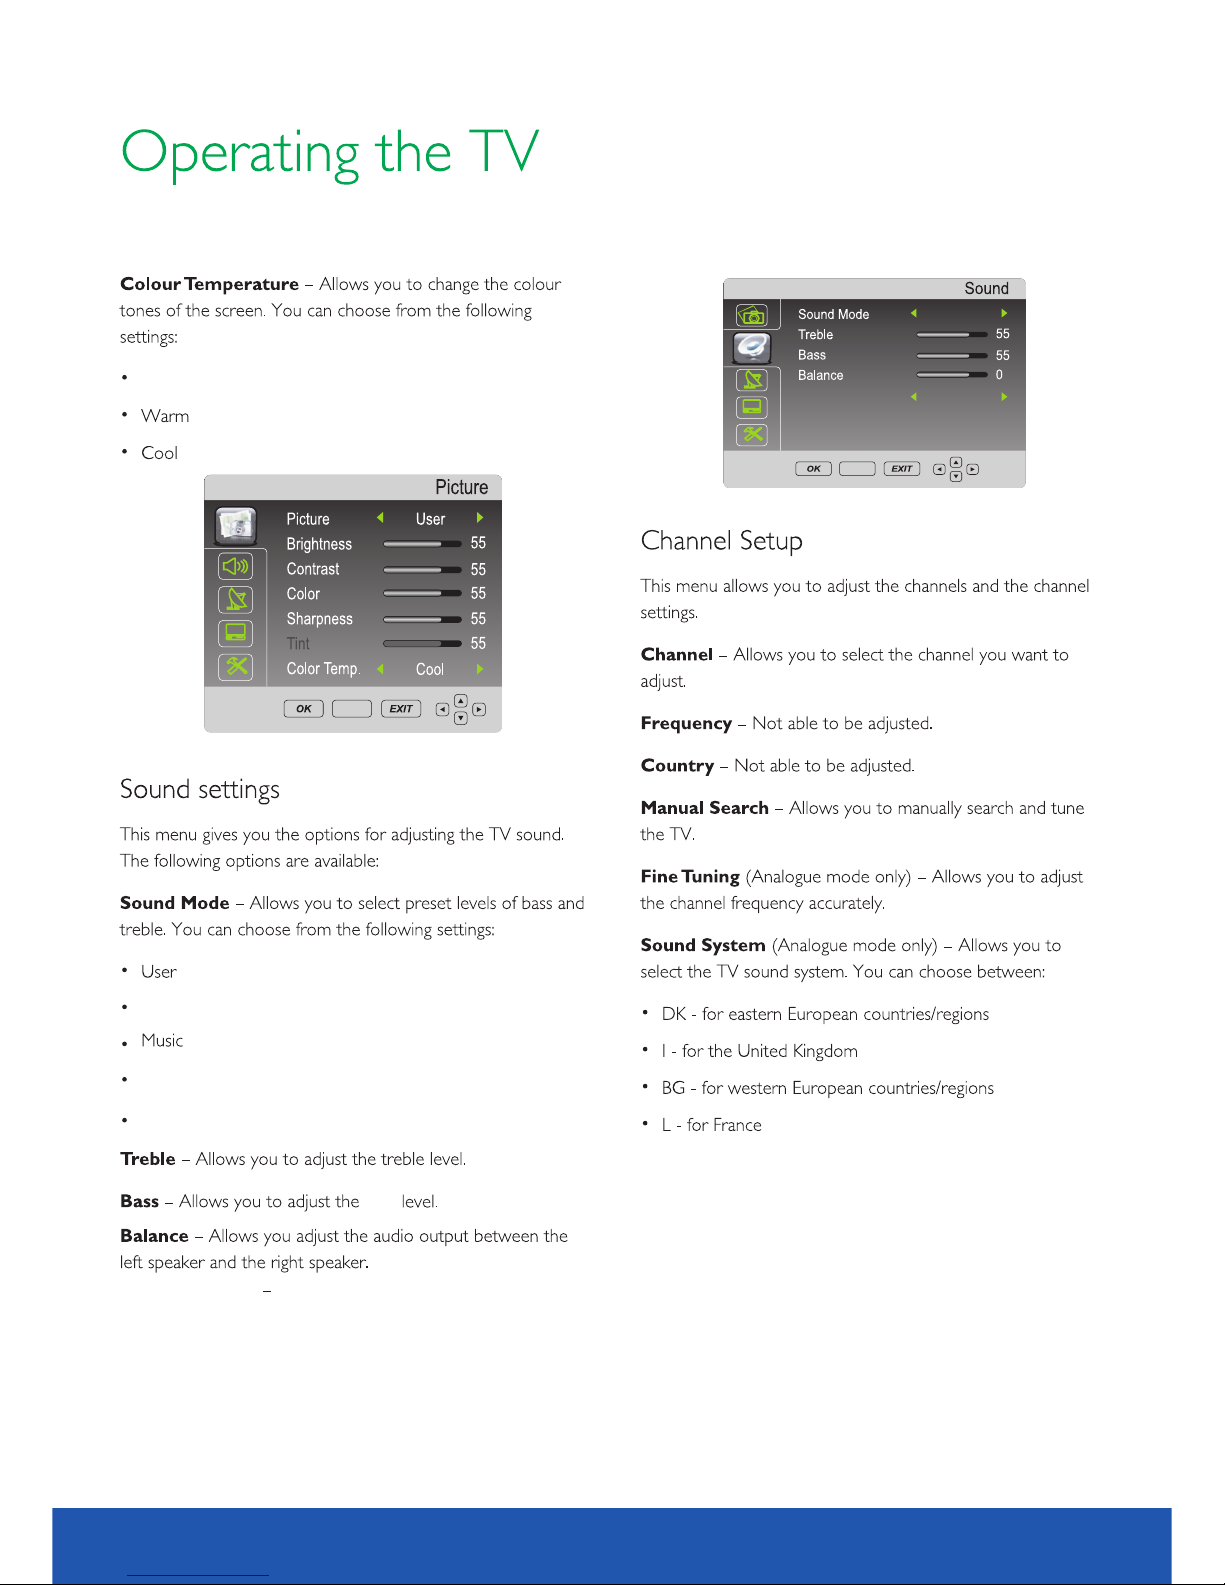
SET UP
Standard
Sports
Auto Volume All ows you to open and cl ose auto
volume ad justment
Medium
Film
Film
Auto Volu me
SET UP
Off
1410.1 inch TV/DVD user guide
bass
Page 15
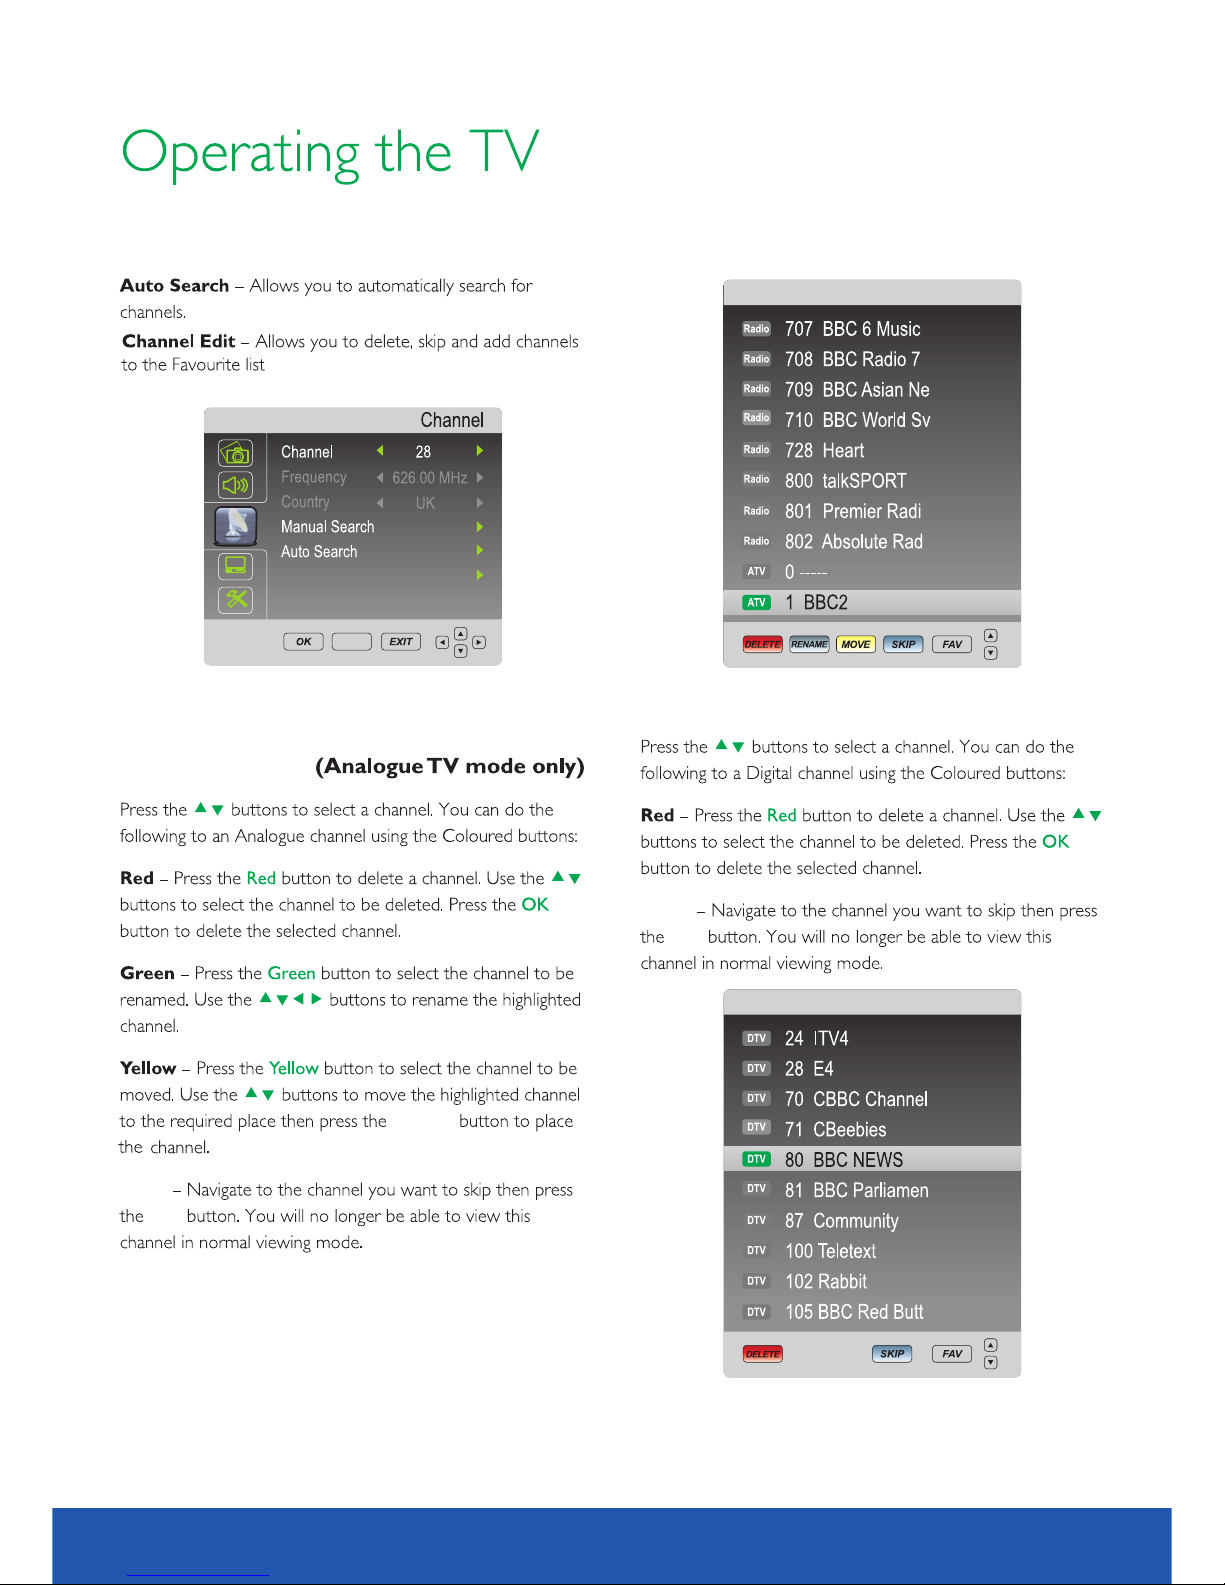
Program me Edit
Program me Edit
Programme Edit
Program me Edit
Programme Edit
Programme Edit
SET UP
15
SETUP
10.1 inch TV/DVD user guide
;Allows y ou to rename and mov e
channel s .
Cyan
Cyan
Cyan
Cyan
Page 16
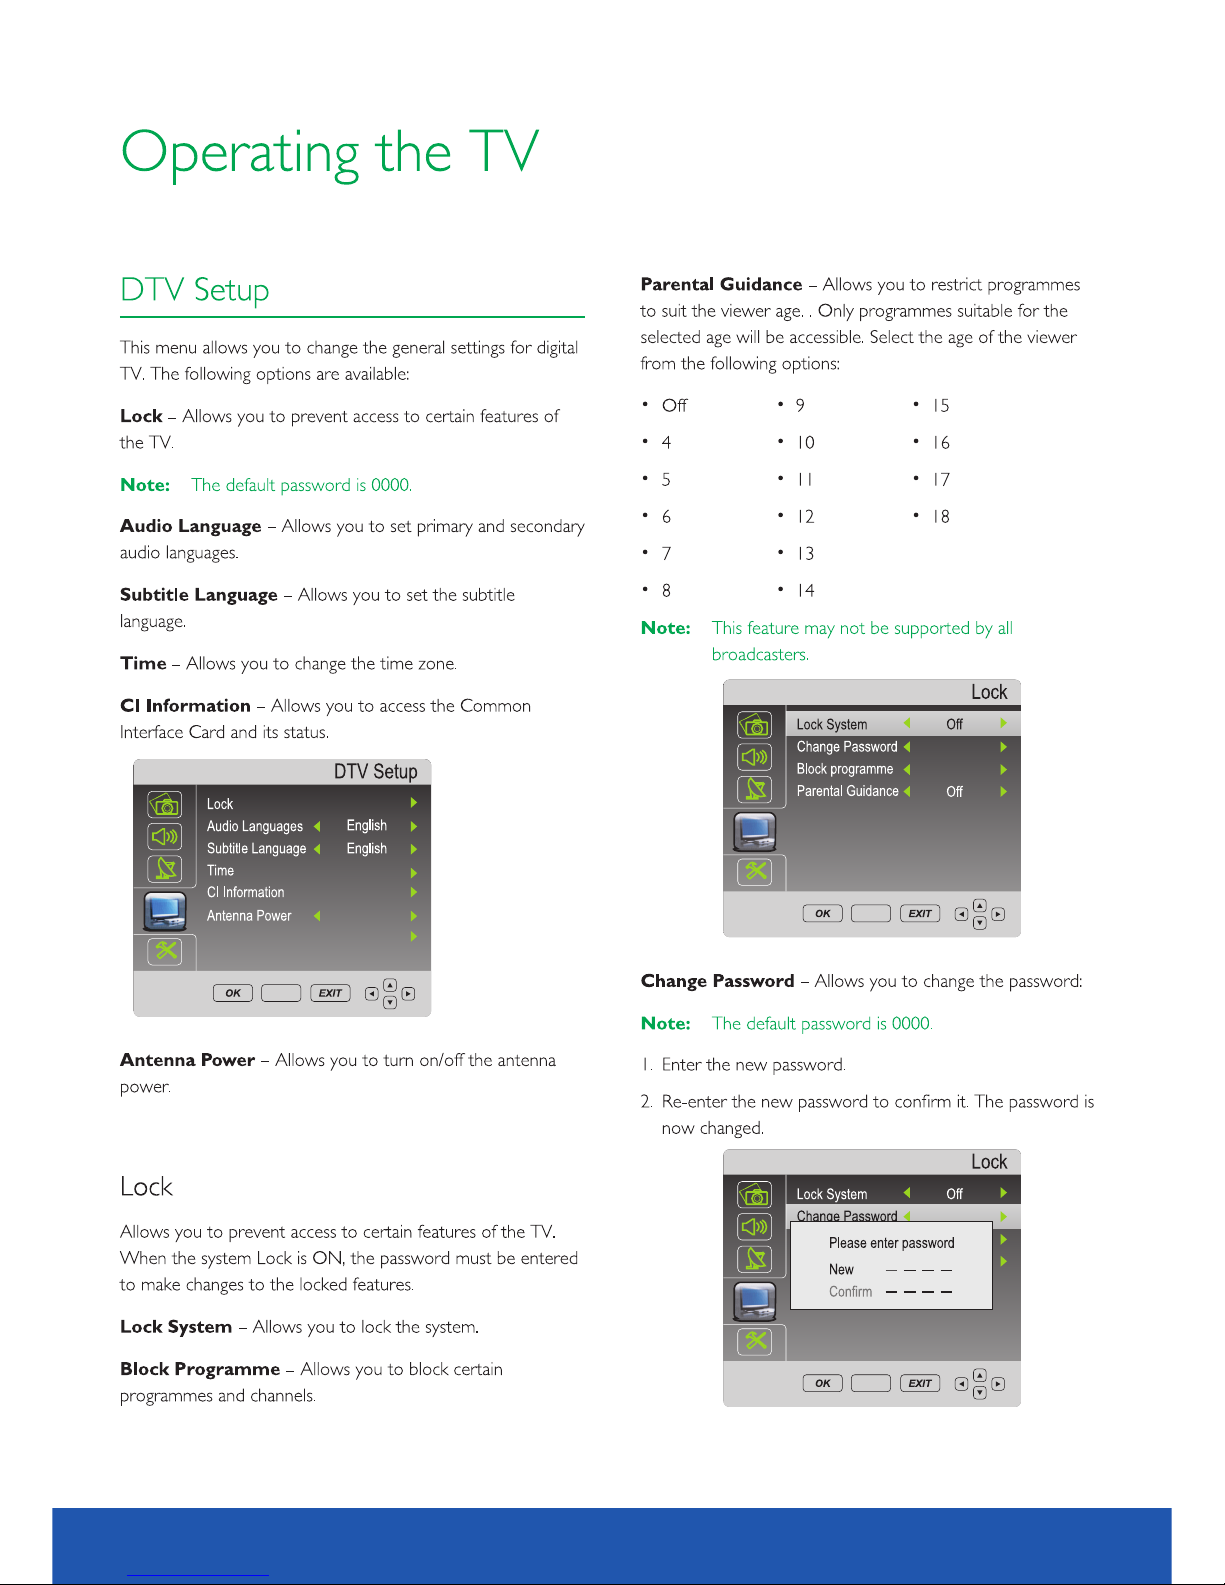
PVR File Sy stem- Allows you to setup record
file system
SET UP
PVR F ile Sys tem
off
SET UP
SET UP
1610.1 inch TV/DVD user guide
Page 17
17
SET UP
PVR File Sy stem
Select D isk C:
Check PV R Fil e Syst em St art
Format
Max reco rd ti me 6Hr.
USB Disk
Tim e Shift Siz e
Speed
10.1 inch TV/DVD user guide
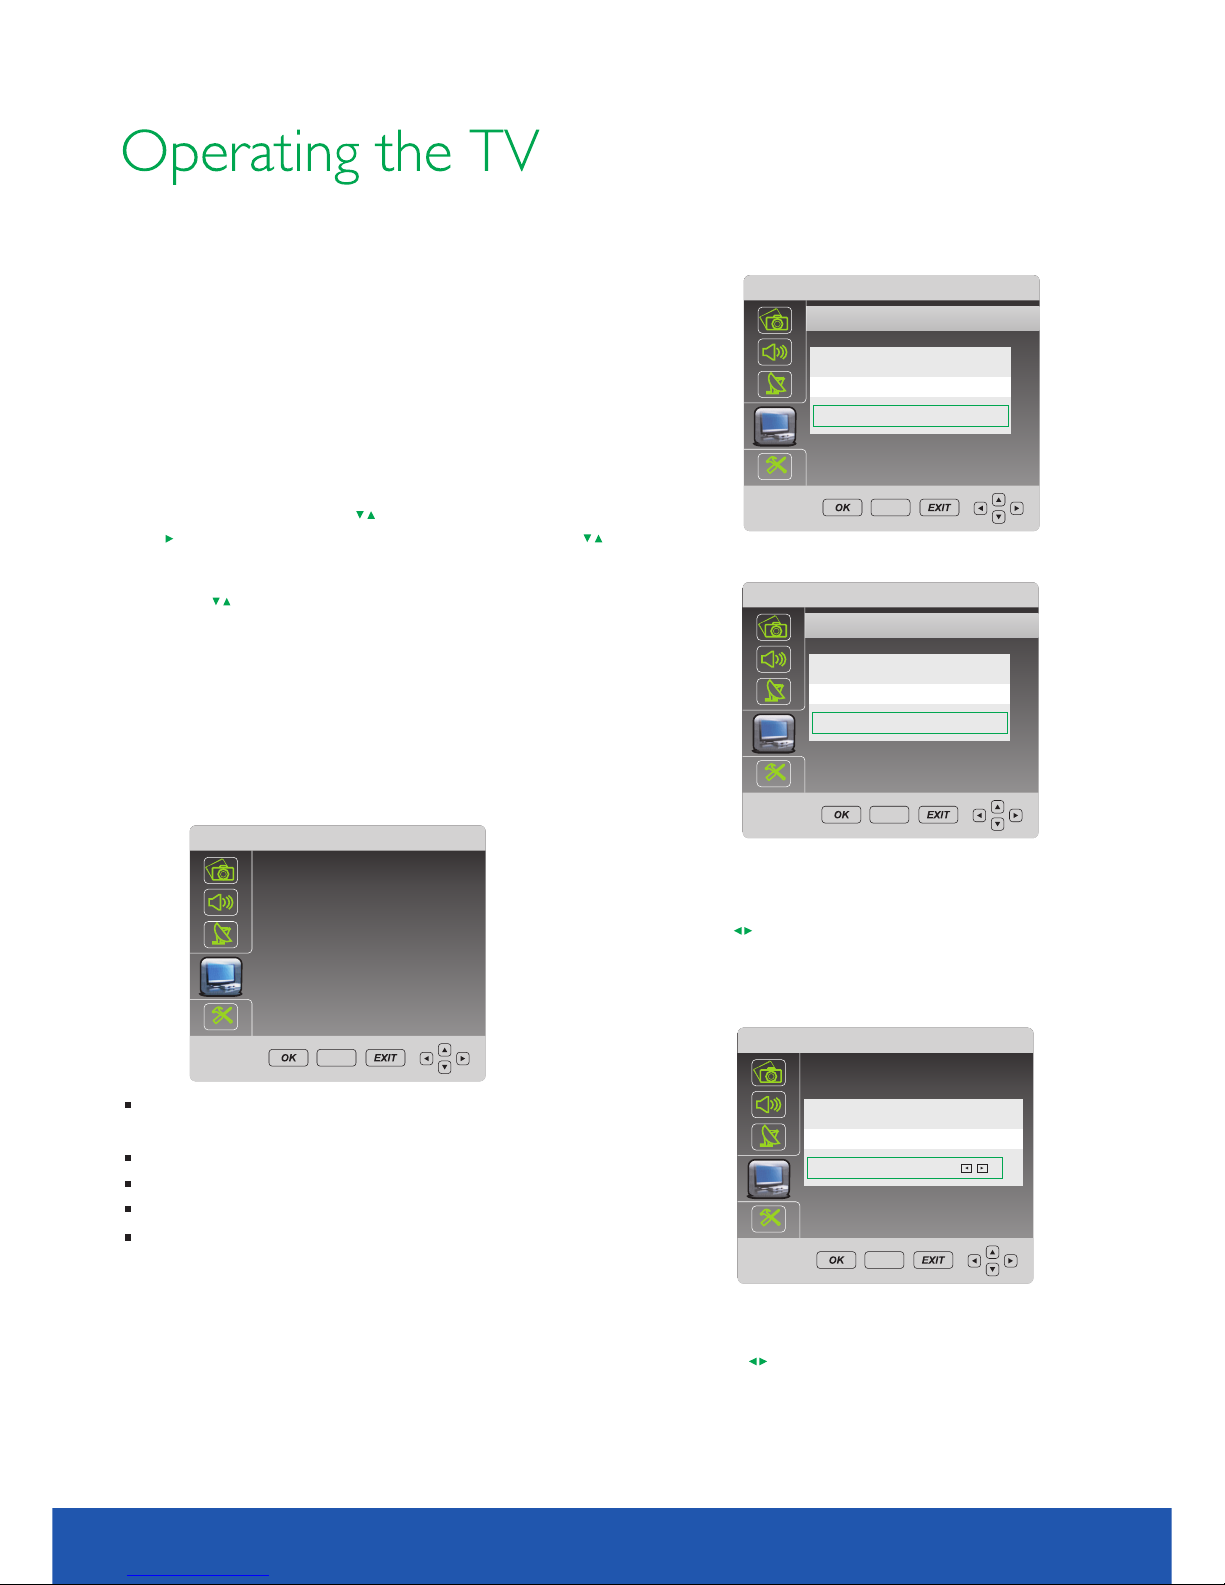
Plug in USB d isk or HDD.Then en ter SELECT DISK.
PVR File system
Select D isk C:
Selec t Dis k
Disk C:
OK Cancel
Max record time 6Hr.
SET UP
PVR File system
Select D isk C:
File Sy ste m Siz e
All S D 107 min . HD 30mi n.
OK Cancel
Max record time 6Hr.
SET UP
PVR File system
Select D isk D:
Selec t Dis k
Disk D:
OK Cancel
Max record time 6Hr.
SET UP
Operating the TV.
Recording to a memory device.
When inserting a memory device for the first time you may
receive a message FORMAT VERSION CH NGED. Before A
recording can take place the inserted USB or HDD needs to
be formatted.
To format your memo ry device and create a PVR file, press
the setup key on the remote whilst in DTV mode. Scroll down
through the menu us ing the keys to DTV SETUP.
Press key to access the menu options and using the
key select the PVR FILE SYSTEM and press
OK .
1.PVR FILE SYSTEM MENU
2. CHECK PVR File System
Using the keys to navigate through the PVR FILE SYSTEM
menu options, select CHECK THE PVR FILE SYSTEM and then
FORMAT part or all of the USB/HDD.
Once this procedu re is complete, the PVR function on the
TV will allow you to record content to a USB or HDD. This
can be done using the instant record button on the remote
or by scheduling a recording in the program Guide.
Select Disk will select the destination disk for
recording DTV program.
Check PVR File system.
Format will format the disk ready for recording.
Max record time will limit the max record time.
After recording , press blue color button to display f iles
information. Pr essing button to display details. info
If using a US B device, defaul t disk name is DISK C:
If using a HD D, and HDD has two or mo re partitions,
the syste m allows you to sele ct C:/D: disk and so o n by
pressin g
Select OK t o continue.
Select Ca ncel to exit.
.
Allows you select USB disk or HDD size for
recording.
Pressing to change.
System wi ll show max record ing time for SD and HD
signal.
You can’t s elect file ‘s defi nition for recor ding.
It’s dete rmined by the inpu t signal .
Select OK t o continue.
Select Ca ncel to exit.
Page 18
18
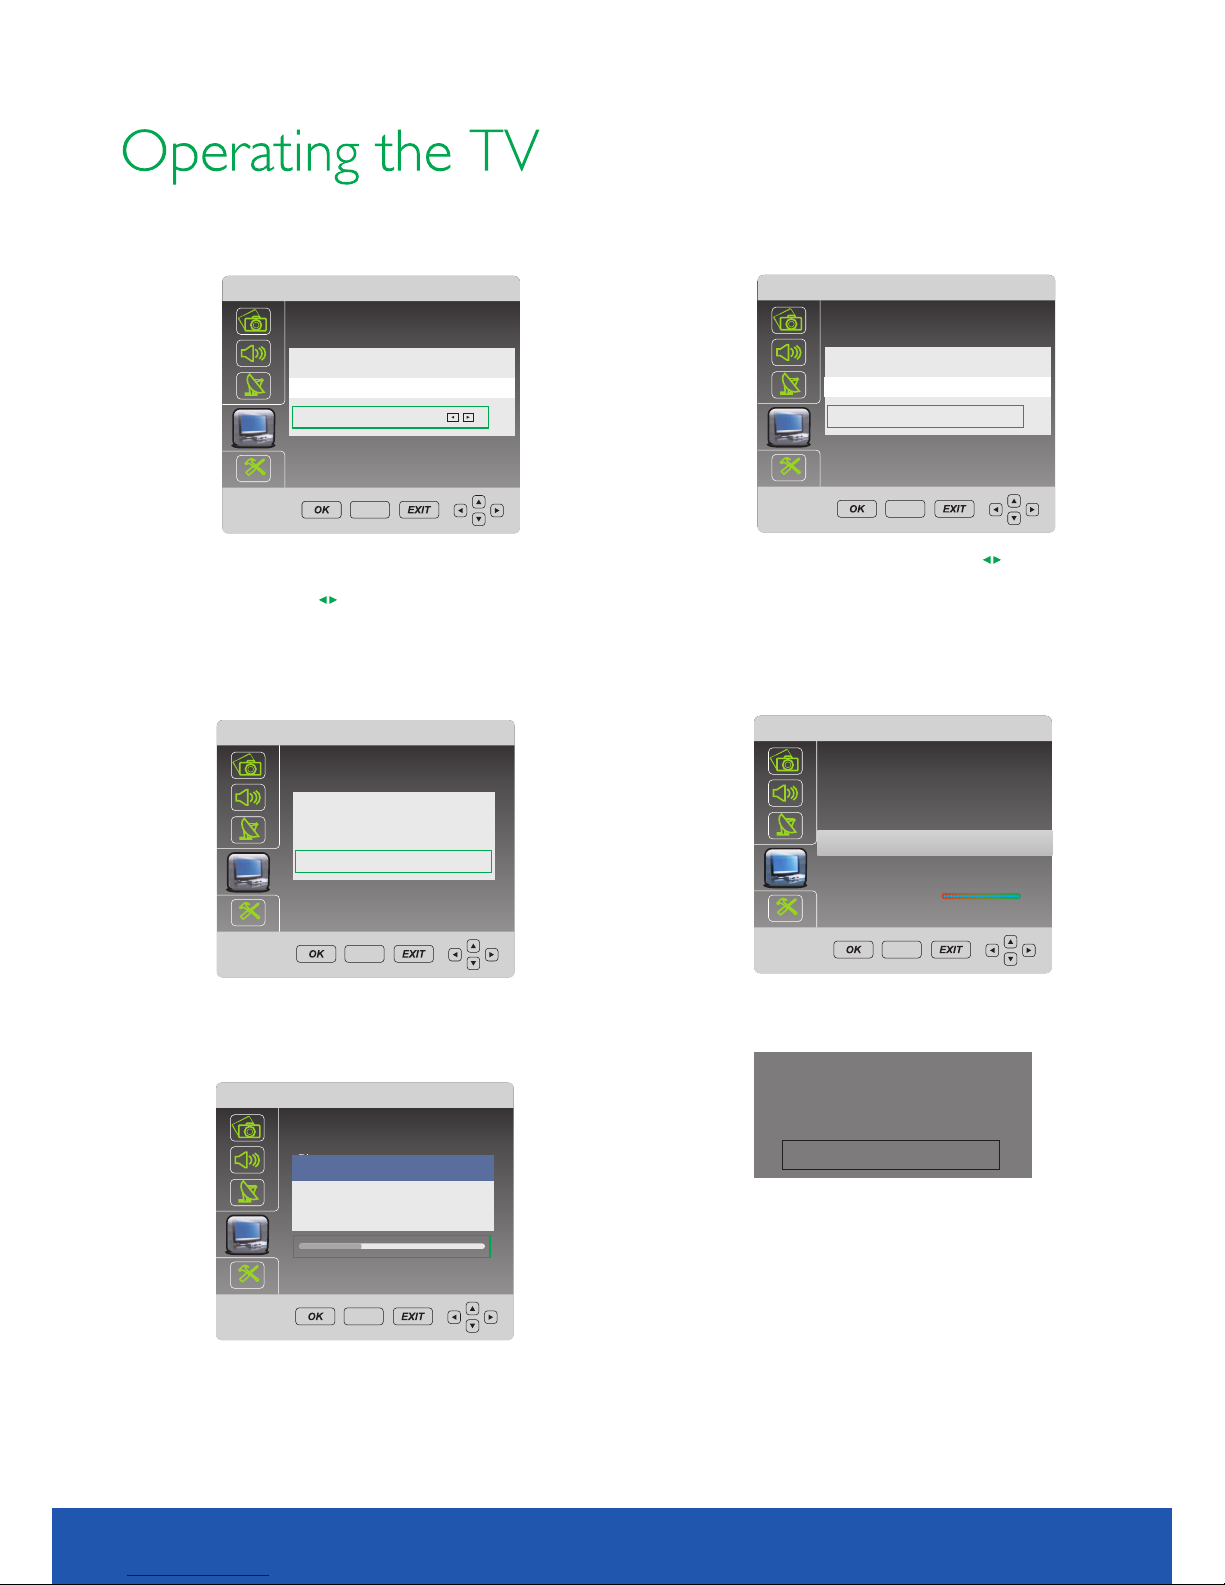
PVR File Sy stem
Select Disk C:
Check PVR File System SUCCESS
Speed
Max record time 6Hr.
USB Disk Pass
Time Shift Size 512 MB
Format Pass
Ful l HD Supp ort
6912 KB/s
PVR File system
Select D isk C:
Max record time 6Hr.
OK Cancel
Are you su re?
All USB da ta wil l be lost.. .
Select OK t o continue.
Select Ca ncel to exit..
PVR File system
Select D isk C:
Max record time 6Hr.
Do no t unplu g USB dev ice
Cre ate PVR f ile sys tem,p lease w ait.. .
Forma t dis k
For examp le, if USB disk is 4G. S ystem allows you s elect
1G/2G/3 G/all by pressin g
Select OK t o continue.
Select Ca ncel to exit..
Allows yo u set size for recor ding.
PVR File system
Select D isk C:
Tim e Shift Size
512 MB SD 14 mi n. HD 4 min .
OK Cancel
Max record time 6Hr.
Allows yo u set Time Shift siz e. Pressing to select
size.
For examp le, if USB disk is 4G. S ystem allows you s elect
512MB/1 G/2G/3G.
System wi ll show max shifti ng time for SD and HD si gnal.
Select OK t o continue.
Select Ca ncel to exit.
Do you want to r eco rd?
Yes NO
After for matted, press b utton to start rec ording.
Select YE S to continue.
REC
PVR File system
Select D isk C:
File Sy ste m Size
2GB S D 56 min. H D 16min .
OK Cancel
Max record time 6Hr.
SET UP
SET UP
SET UP
SET UP
SET UP
10.1 inch TV/DVD user guide
3.FORMATTING
After rec ording, press button to v iew info.Cyan
Formatt ing . Don't unplug U SB device during t his process.
If format ting is successf ul, the menu above w ill be display.
System wi ll exit this menu in 5 s econds automat ically.
Warning:
Please make sure your USB or hard disk
has at least 500RM free space and then
create PVR file system before you record
DTV program.
If it is the first time being used, the system
will format your USB disk and HDD.
Page 19
19
10.1 inch TV/DVD user guide
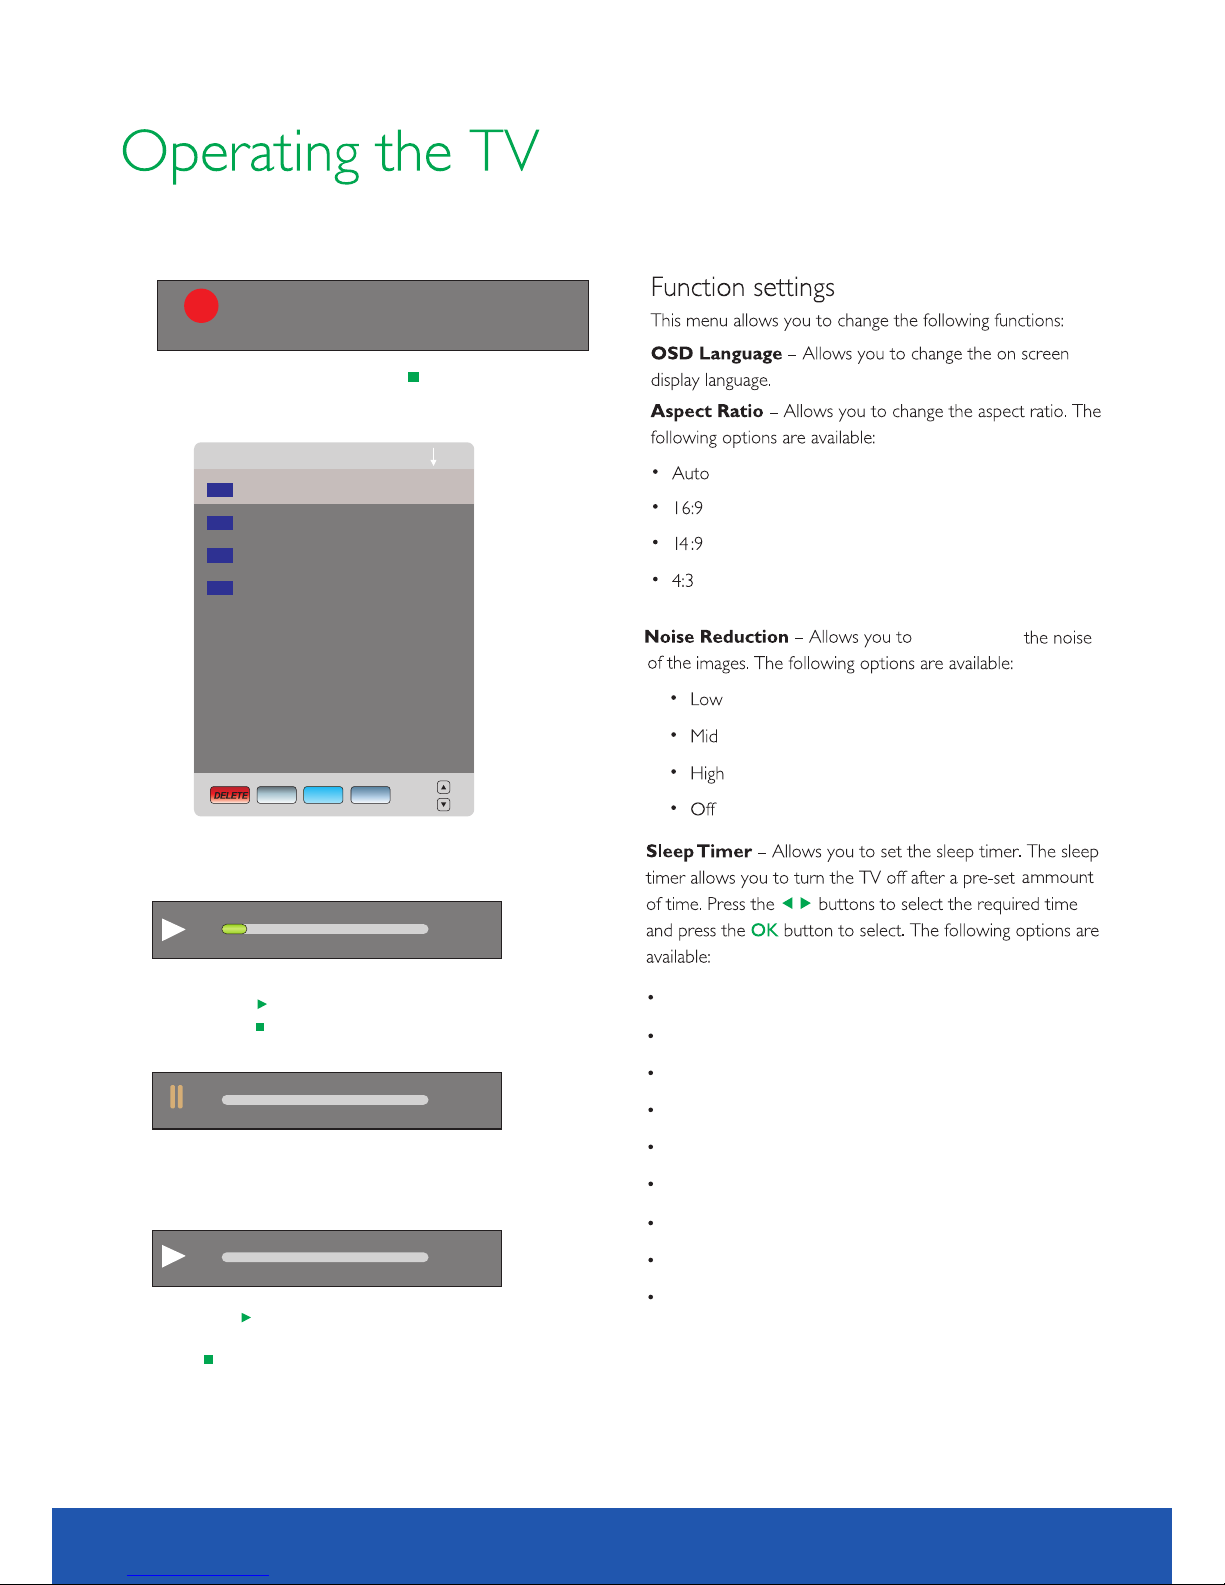
Off
10min
20min
30min
60min
90min
120min
180min
240min
REC
[00:00:0 8]
5 five
NO Informa tio n
Recordin g
14:48
(3328 MB)
Recor ded L ist -Pr ogramme
The Str eets of S an Fr...
Pla y
The Str eets of S an Fr...
The Str eets of S an Fr...
The Str eets of S an Fr...
Pla y
Pla y
Pla y
INF O LI ST OK
Playback
[00 :00:0 5/00: 00:15 ]
5 fiv e
The S treet s of San Fr ancis co
14: 47
Tim e Shift
[-0 0:00: 04/00 :00:0 0]
14: 51
Tim e Shift
[-0 0:00: 08/00 :20:0 0]
14: 51
You can lis t all recorded fil es by pressing buttonCyan
You can pla yback files in rec orded list.
By pressi ng or to playback.
By pressi ng to stop.
OK
Press the butto n to enter Time shif t
recordi ng mode.
Mix
Press the
mode.
Press but ton to exit.
button to e nter time shift pl ayback
You can sto p recording by pre ssing button.
Recordi ngs under 20seco nds cannot be play ed back in USB mode.
File can' t be played back in DV D source.
reduce/ alter
Page 20
Reminder
10 Mar 20 09 14:49
Progr amme 23 bid- up.tv
Date Wed.1 0
Month M ar
Hour 15
Minut e 08
Sched ule
SET UP
Restore Factory D efault
FM Transmit-All ows you to transmit audio by
FM frequency
SET UP
Language E ngli sh
16: 9
Mid
FM Transm it off
off
Tra nsmit Fre quency 93 MHz
Restor e Fac tory D efa ult
2010.1 inch TV/DVD user guide
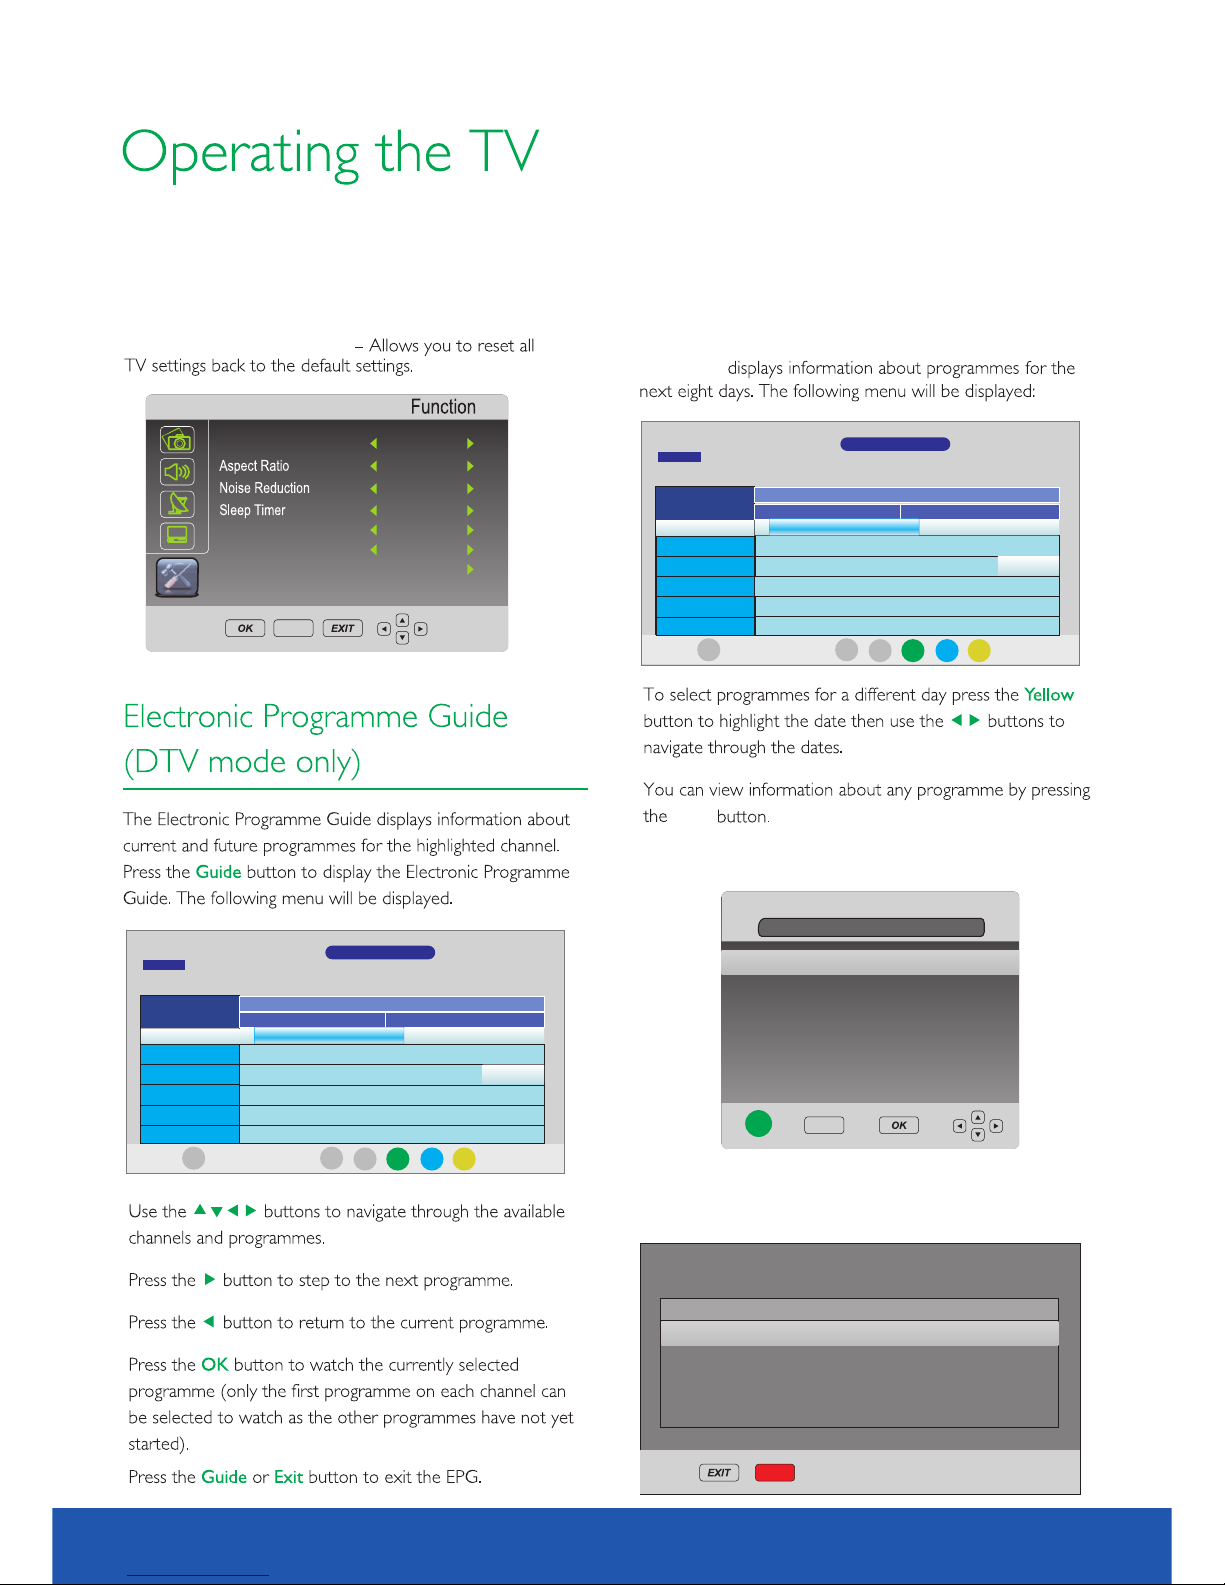
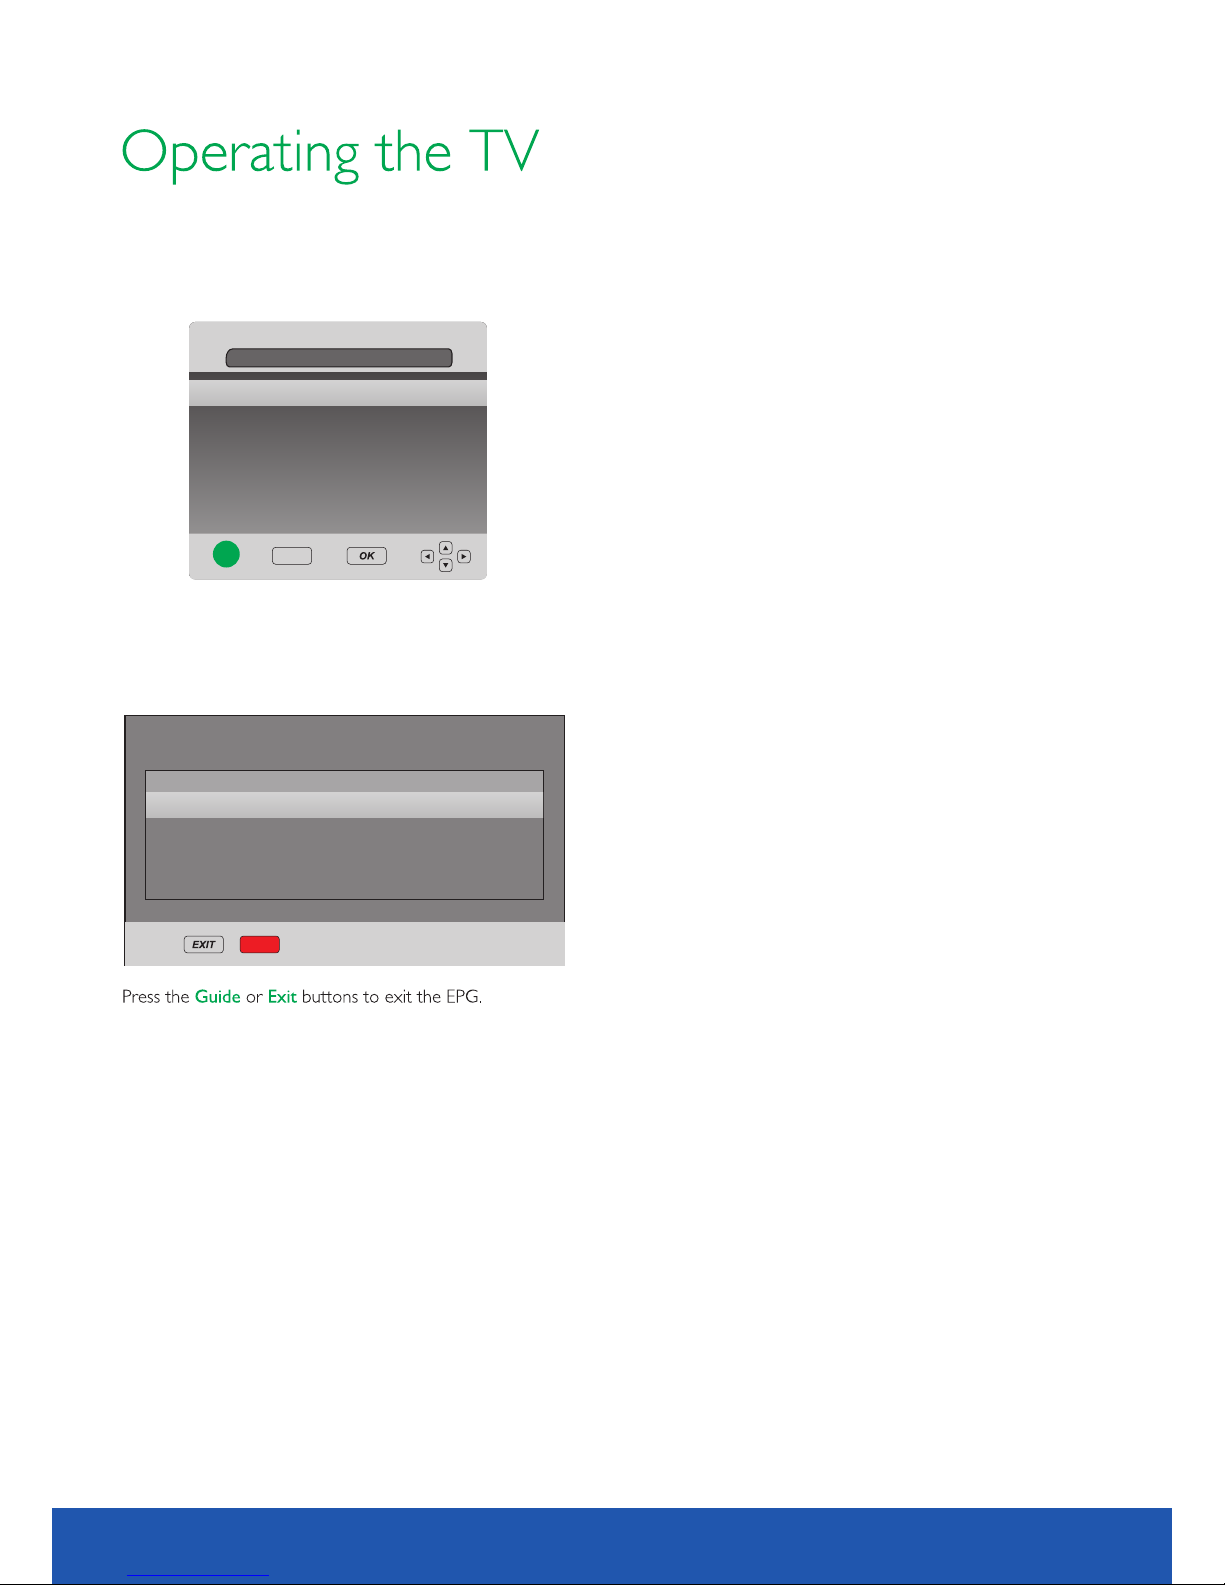
EPG scroll and use the coloured
buttons to navigate
EPG scrol l
Info
DTV
5 fiv e
15 Ch 15
16 QV C
17 UK G old
23 bi d -up.t v
25 TCM
14: 30 15: 30
10 Ma r
Gol d Worksh op With J an Spri nger
INFO
EXIT
No In forma tion
No In forma tion
No In forma tion
No In forma tion
PROGRAMME G UID E
DTV 5 f ive
14: 35-15 :38 The S tree ts of San F ranci sco
10 Ma r 2009 14 :50
.
The St reets o f San Fra ncisc o
No In forma tion
Fun stamp s
Sched ule
Remind er
DATE
REC
DTV
5 fiv e
15 Ch 15
16 QV C
17 UK G old
23 bi d -up.t v
25 TCM
14: 30 15: 30
10 Ma r
Gol d Worksh op With J an Spri nger
INFO
EXIT
No In forma tion
No In forma tion
No In forma tion
No In forma tion
PROGRAMME G UID E
DTV 5 f ive
14: 35-15 :38 The S tree ts of San F ranci sco
10 Ma r 2009 14 :50
.
The St reets o f San Fra ncisc o
No In forma tion
Fun stamp s
Sched ule
Remind er
DATE
REC
Allows yo u setup programm es reminder by pre ssing .
button
Cyan
Press gre en button to displ ay schedule list .
You can del ete schedule her e.
SCHEDULE LIST
10 Mar 200 9 14: 57
Tit le St art D ate E nd Da te Pr ogr amm e
No Title 20 09/ 03/1 0 14: 59 2009/0 3/10 15:3 8 5 fiv e
DELE TE
After fin ished setup, pre ss to conf irm.OK
Page 21
Recorder
10 Mar 20 09 14:49
Progr amme 5 five
Start D ate 2009/0 3/10
Start Ti me 14:35
End Dat e 2009/03/ 10
End Time 1 5:38
MODE On ce
After fin ished setup, pre ss to conf irm.OK
Sched ule
SET UP
In EPG main m enu, allows you se tup timer record ing by press
button.REC
Recorde r schedule list wi ll display as belo w
You can del ete schedule her e.
RECODER SCHEDULE LIST
10 Mar 200 9 14: 57
Tit le St art D ate E nd Da te Pr ogr amm e
No Title 20 09/ 03/1 0 14: 59 2009/0 3/10 15:3 8 5 fiv e
DELE TE
21
10.1 inch TV/DVD user guide
Page 22
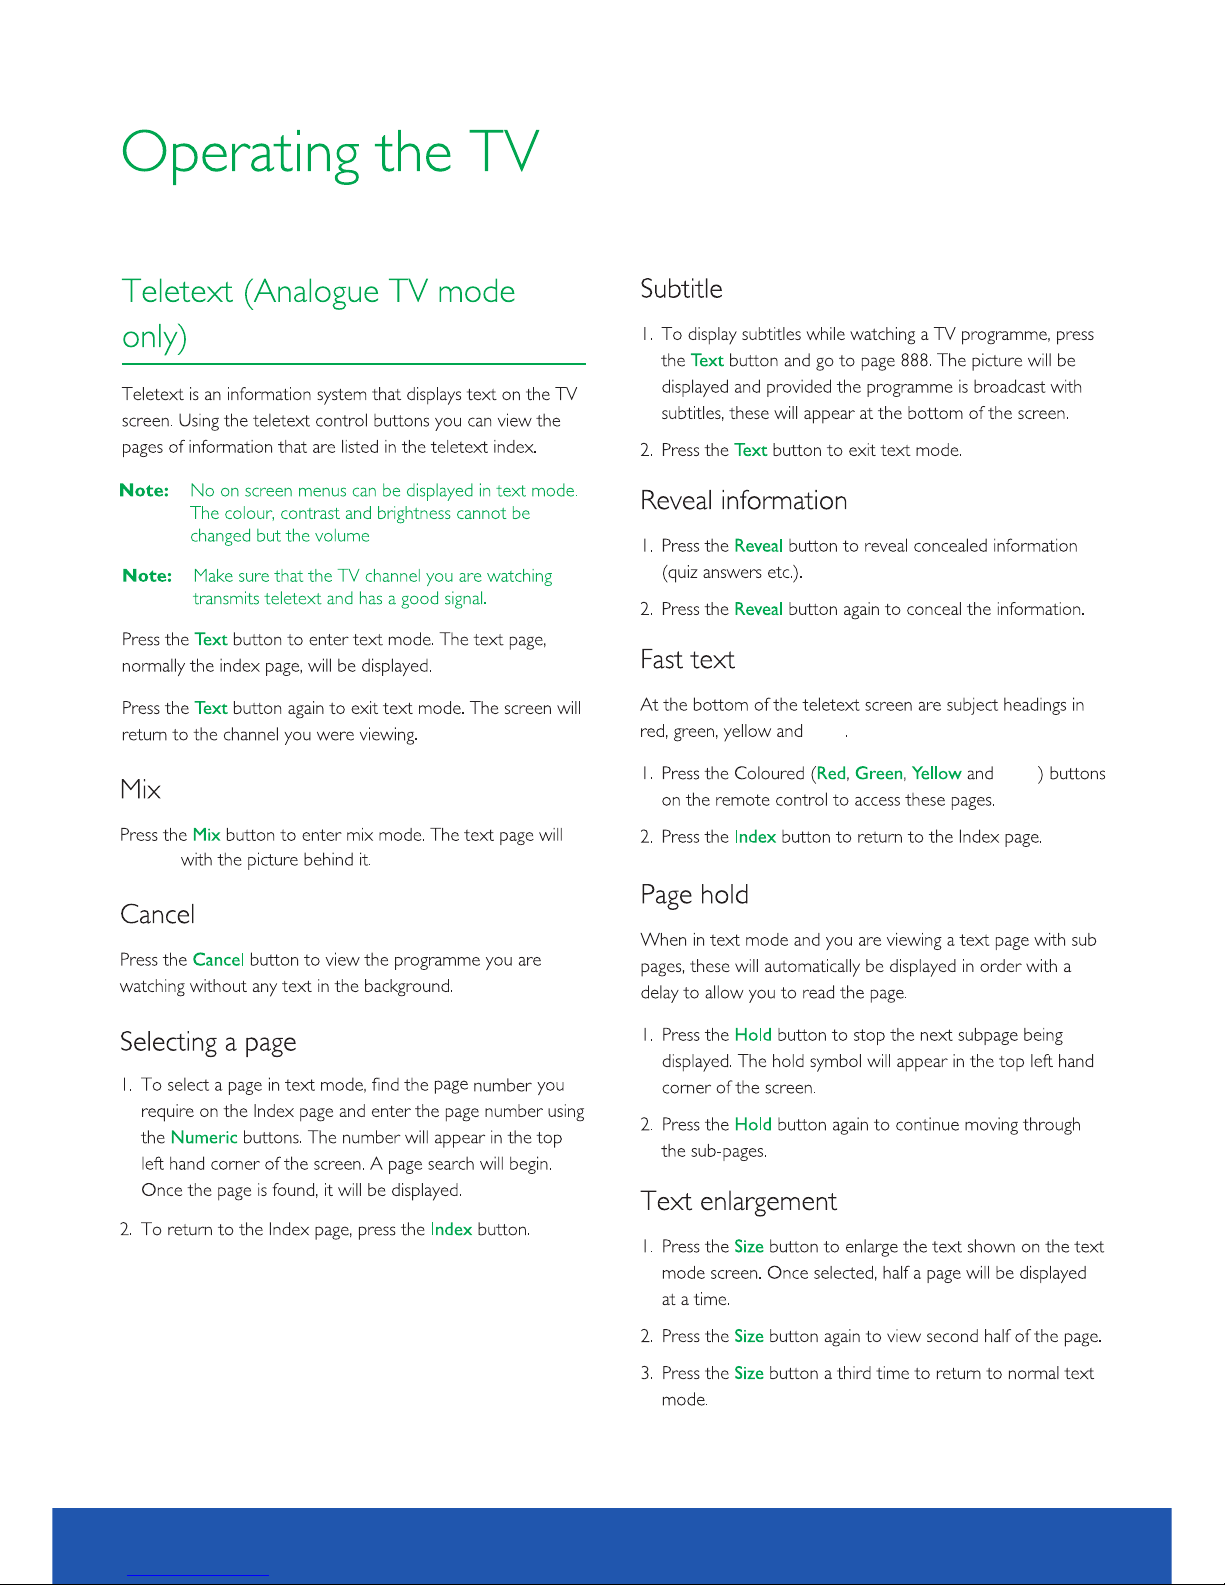
Cyan
cyan
can still b e adjusted.
display
2210.1 inch TV/DVD user guide
Page 23
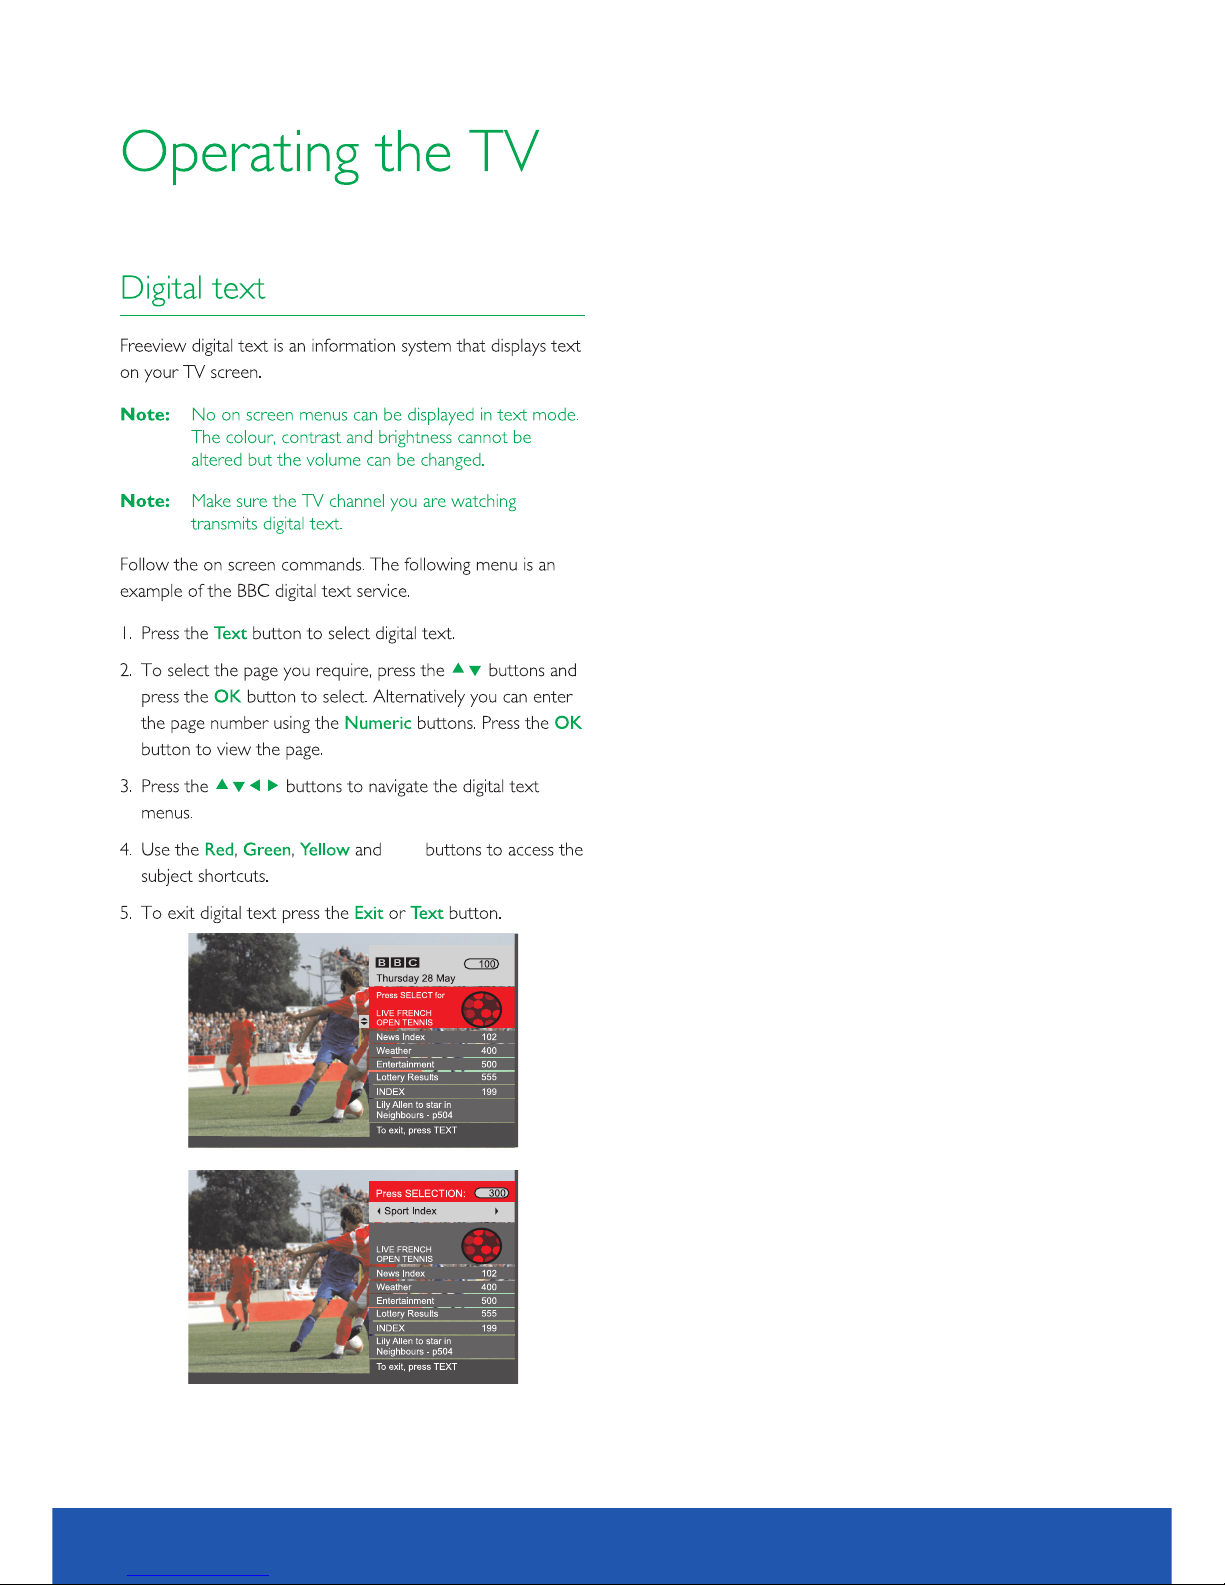
Cyan
23
10.1 inch TV/DVD user guide
Page 24
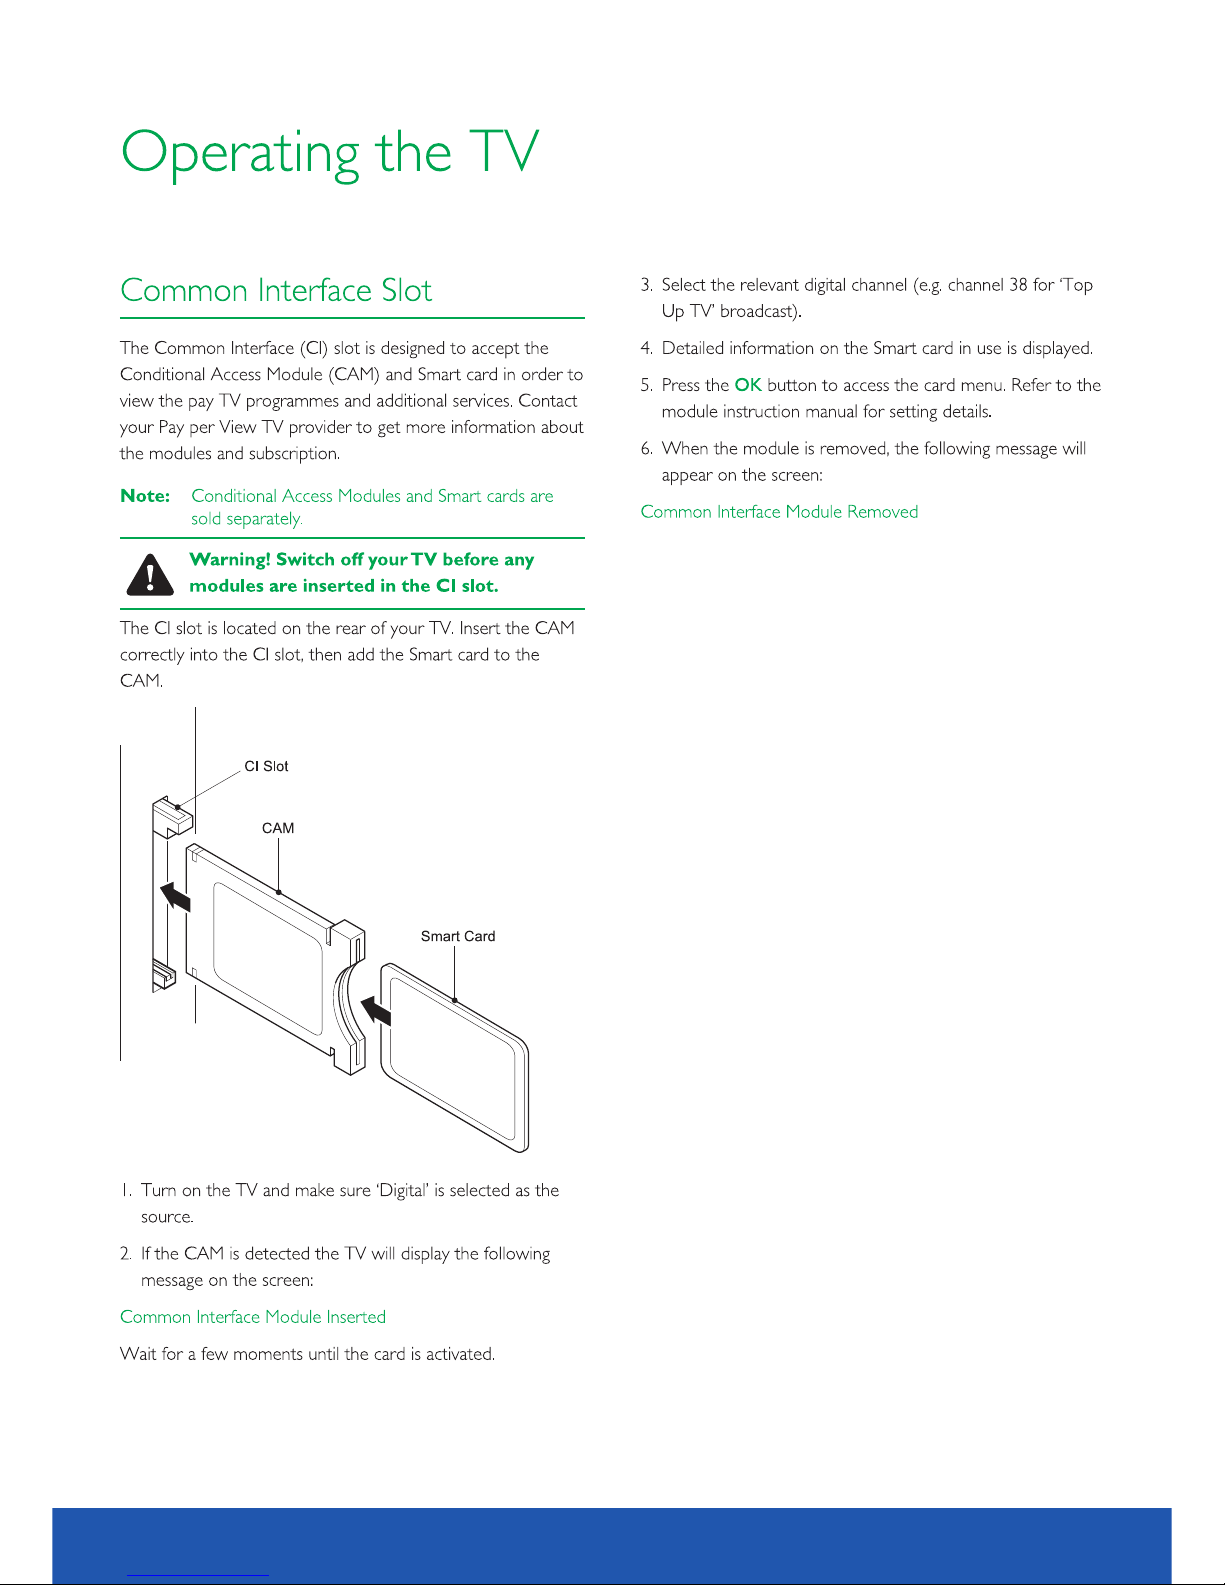
2410.1 inch TV/DVD user guide
Page 25
detecte d
25
10.1 inch TV/DVD user guide
Page 26
FM MENU OPERATION
FM SETTING
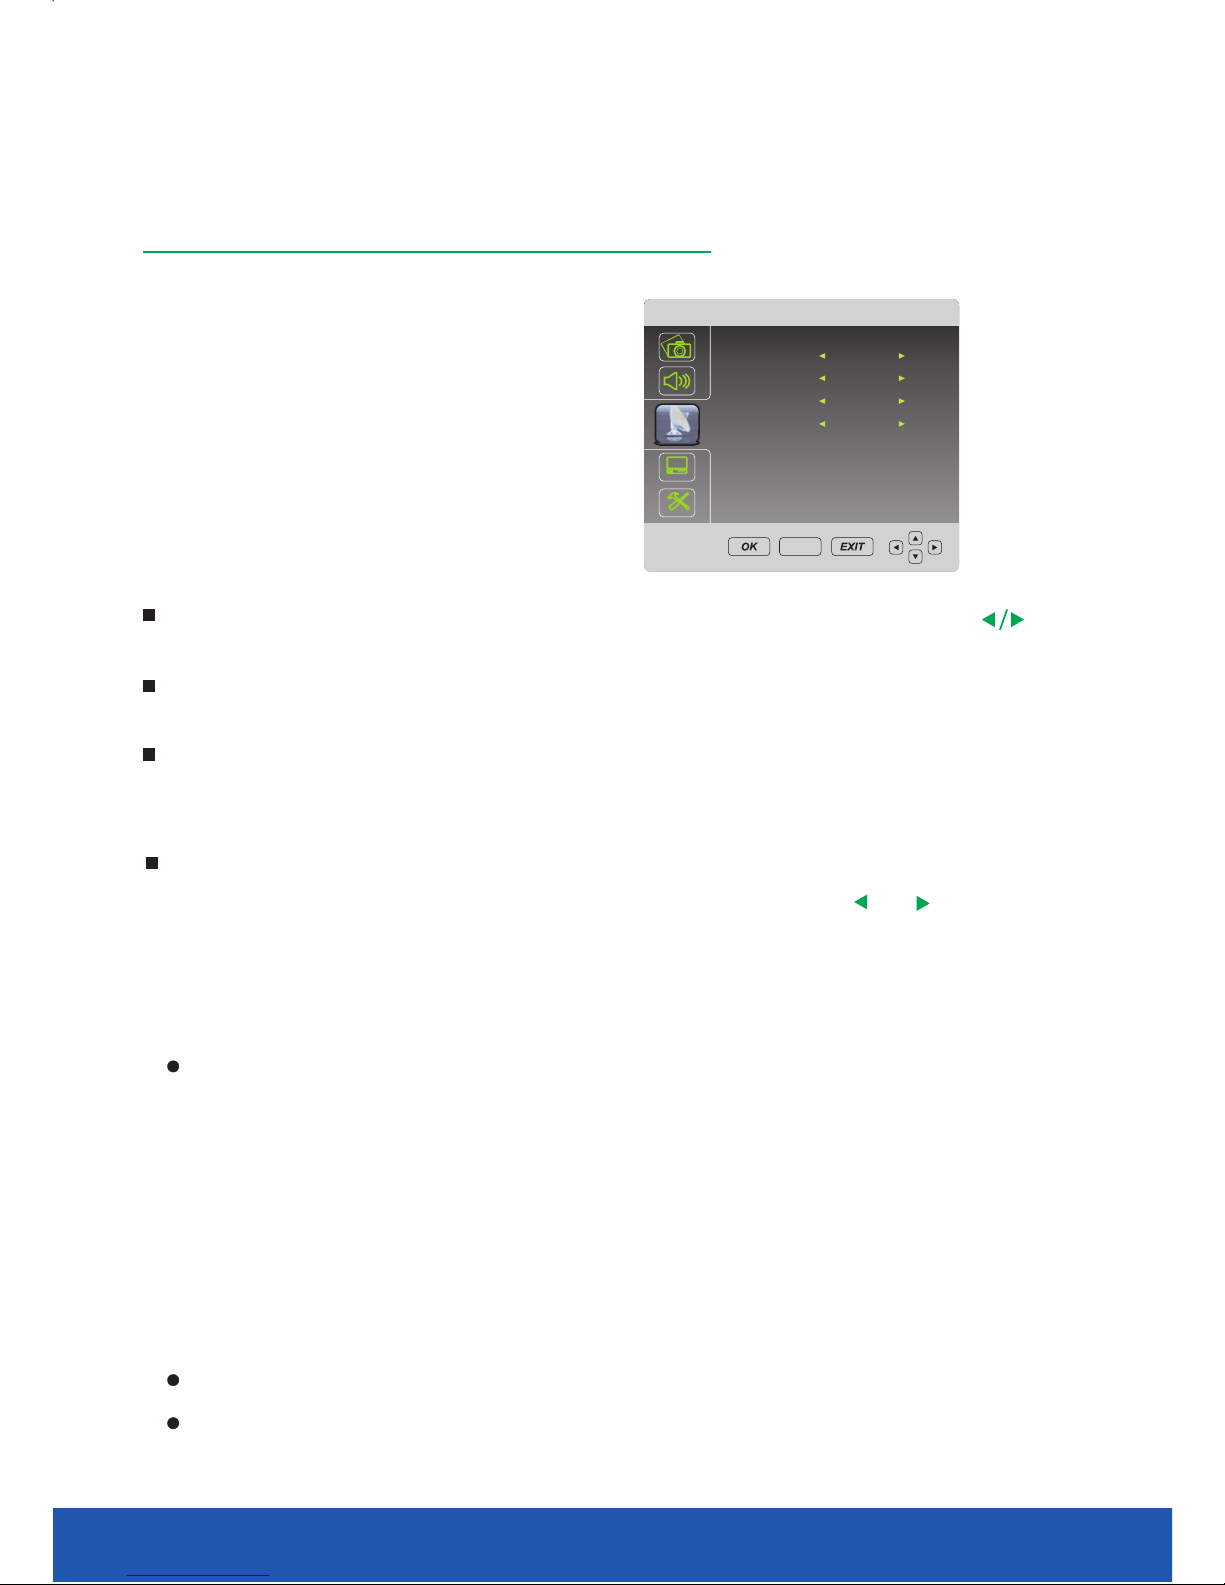
Connect FM antenna with FM terminal on the left side
of analog TV, change source to FM. Press
button and a menu will show as follows:
SETUP
NOTES
Up to 40 programs can be preset/stored, and you can select them in 2 ways:
For programs 1.2.3 and 4,press the "1"."2"."3" and "4" button and wait for 3
seconds to access to them. For programs 5~40, press the number buttons to
access to them directly.
Method 1:
Method 2:
Press button to decrease channel and press button to increase
channel.
CH- CH+
During scanning, you can press button to stop it.SETUP
If without any operation in 5 minute, the panel will turn off automatically. In
saving power mode, any operation can turn on the panel.
Channel preset enables you to display current channel number, press
button to change channel.
Frequency item enables to adjust it and press button to save the new
frequence of the channel.
OK
Manual Tuning enables you to decrease frequency and press button to
increase frequency. When a program is found, manual search will stop, press
button to save the new channel.
SAVE
OK
Auto Tuning item enables you to search and store all the channels in FM band
87.5-108MHz. Move the cursor to auto search, then press or button to
begin auto search. Press button to cancel auto search. SETUP
SET UP
F M SE TTI NG
Fre quenc y
Aut o Tuning
Man ual Tuni ng
Cha nnel
255
377 .97MH z
2610.1 inch TV/DVD user guide
Page 27
S O U N D
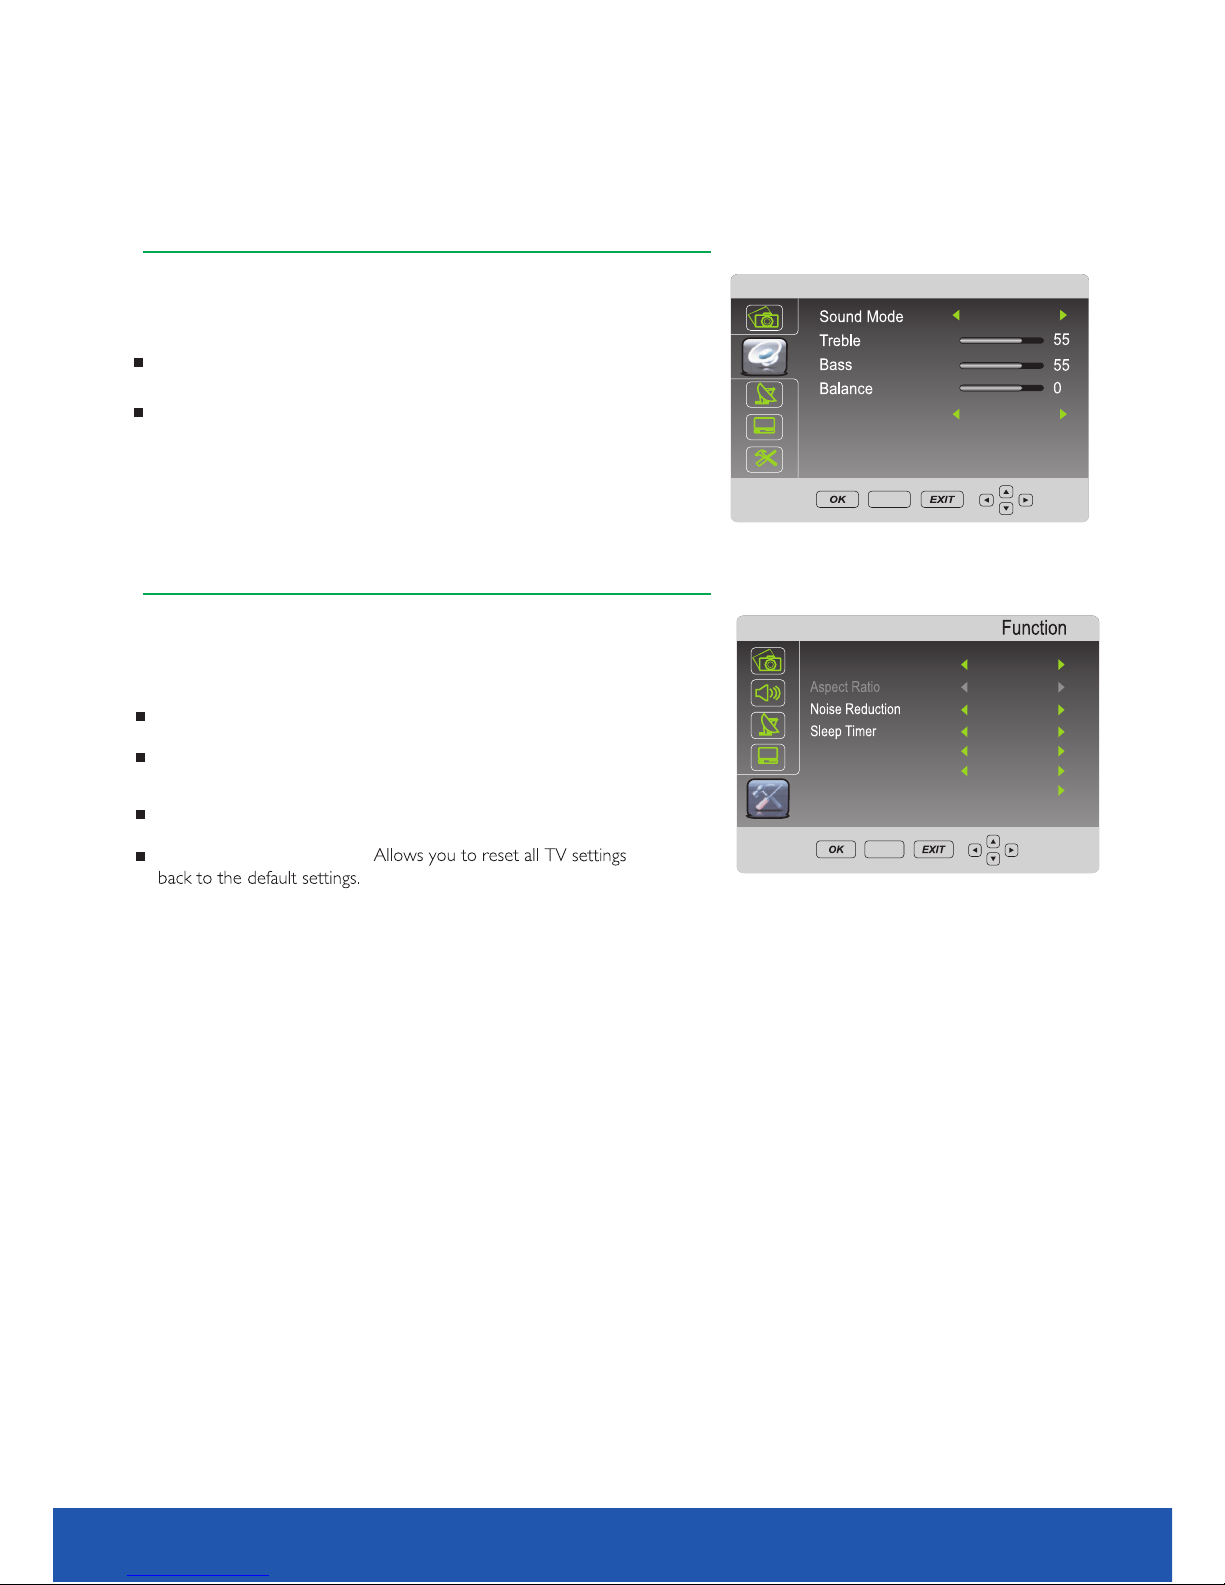
Sound Mode item can be changed between User, Sports,
Music,Film.
Select FUNCTION i tem to adjust function parameter s.
You may select Language, Sleep Timer, FM transmit and
Restore factory default Noise reduction
Language item enables to select the OSD language.
Sleep Timer item en ables to set the sleep timer
( .Off,10min,20m in,30min,60min,120min,180min and 240min)
Select SOUND item t o adjust sound parameters.You ma y adjust
Sound Mode, Trebl e, Bass,Balance, Auto Volume and S urround
Sound.
F U N C T I O N
FM MENU OPERATION
Film
Auto Vol ume
SET UP
Off
SOUND
Auto volume- Allo ws you open or close auto volume
adjustment
SET UP
Language E ngli sh
16: 9
Mid
FM Transm it off
off
Tra nsmit Fre quency 93 MHz
Restor e Fac tory D efa ult
FM transmit- Allows you transmit audio by FM frequenc y
Restore factory default-
27
10.1 inch TV/DVD user guide
Page 28
DVD Operation
Brief Introduction to DVD
16:9
4:3
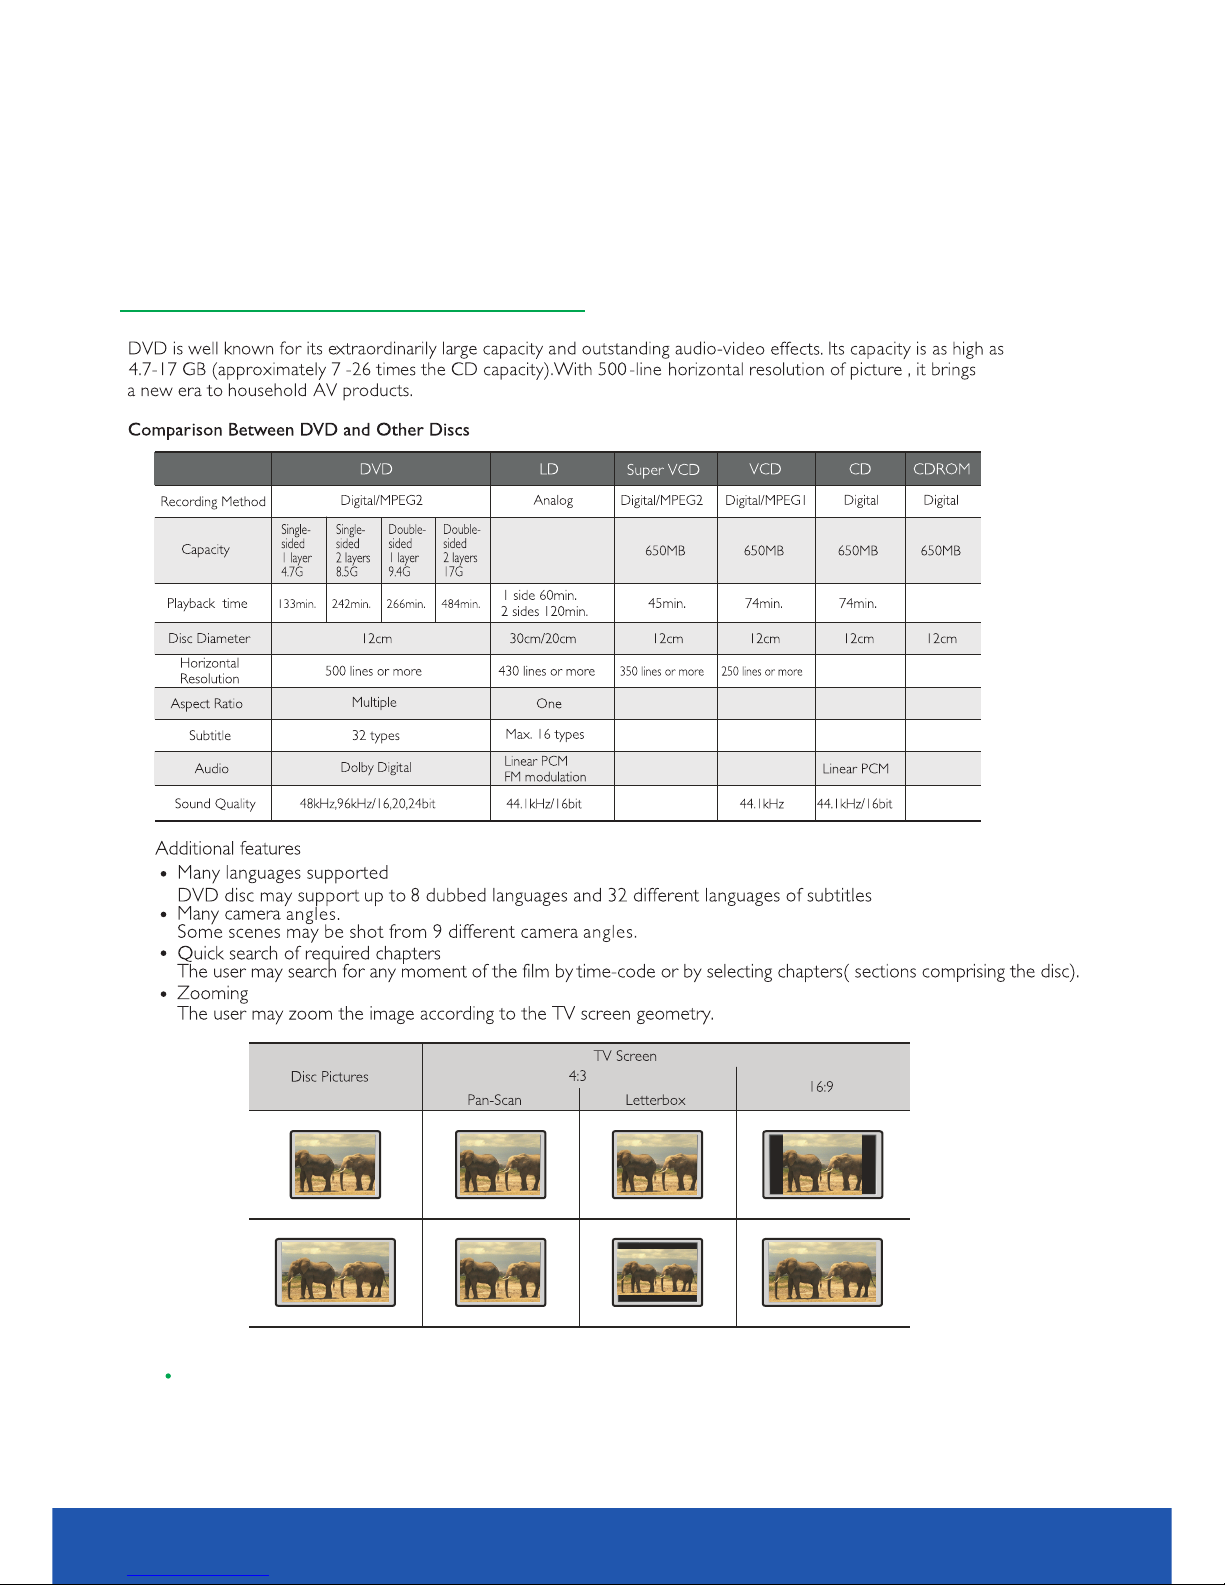
Not all DVD disc support Pan & Scan mode. The movie will be displayed correctly on 4:3 T V (without
ovided that the DVD disc is recorded accordingly. Never theless, even in Pan & Scan
will take place.
NOTE
black lines)
pr
mode some data loss
2810.1 inch TV/DVD user guide
Page 29
DVD Operation
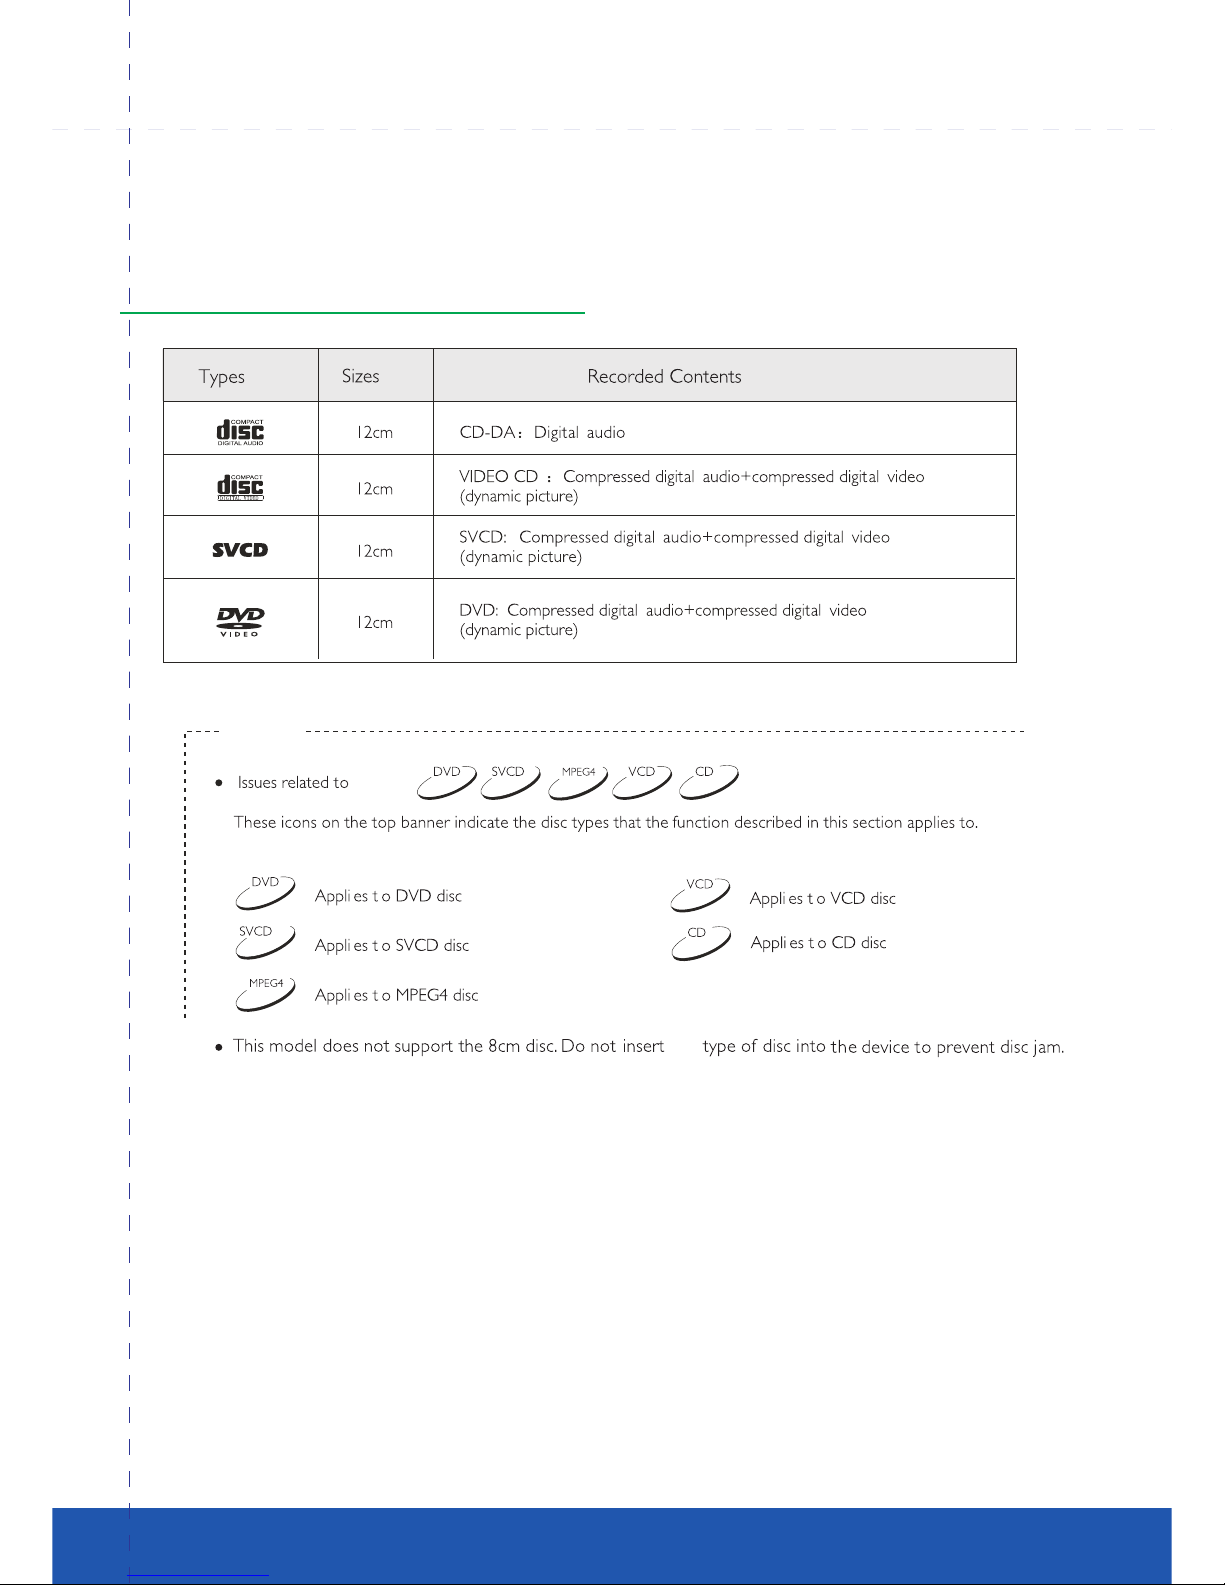
Compatible Disc Types
NOTES
29
10.1 inch TV/DVD user guide
this
Page 30
Color system selection
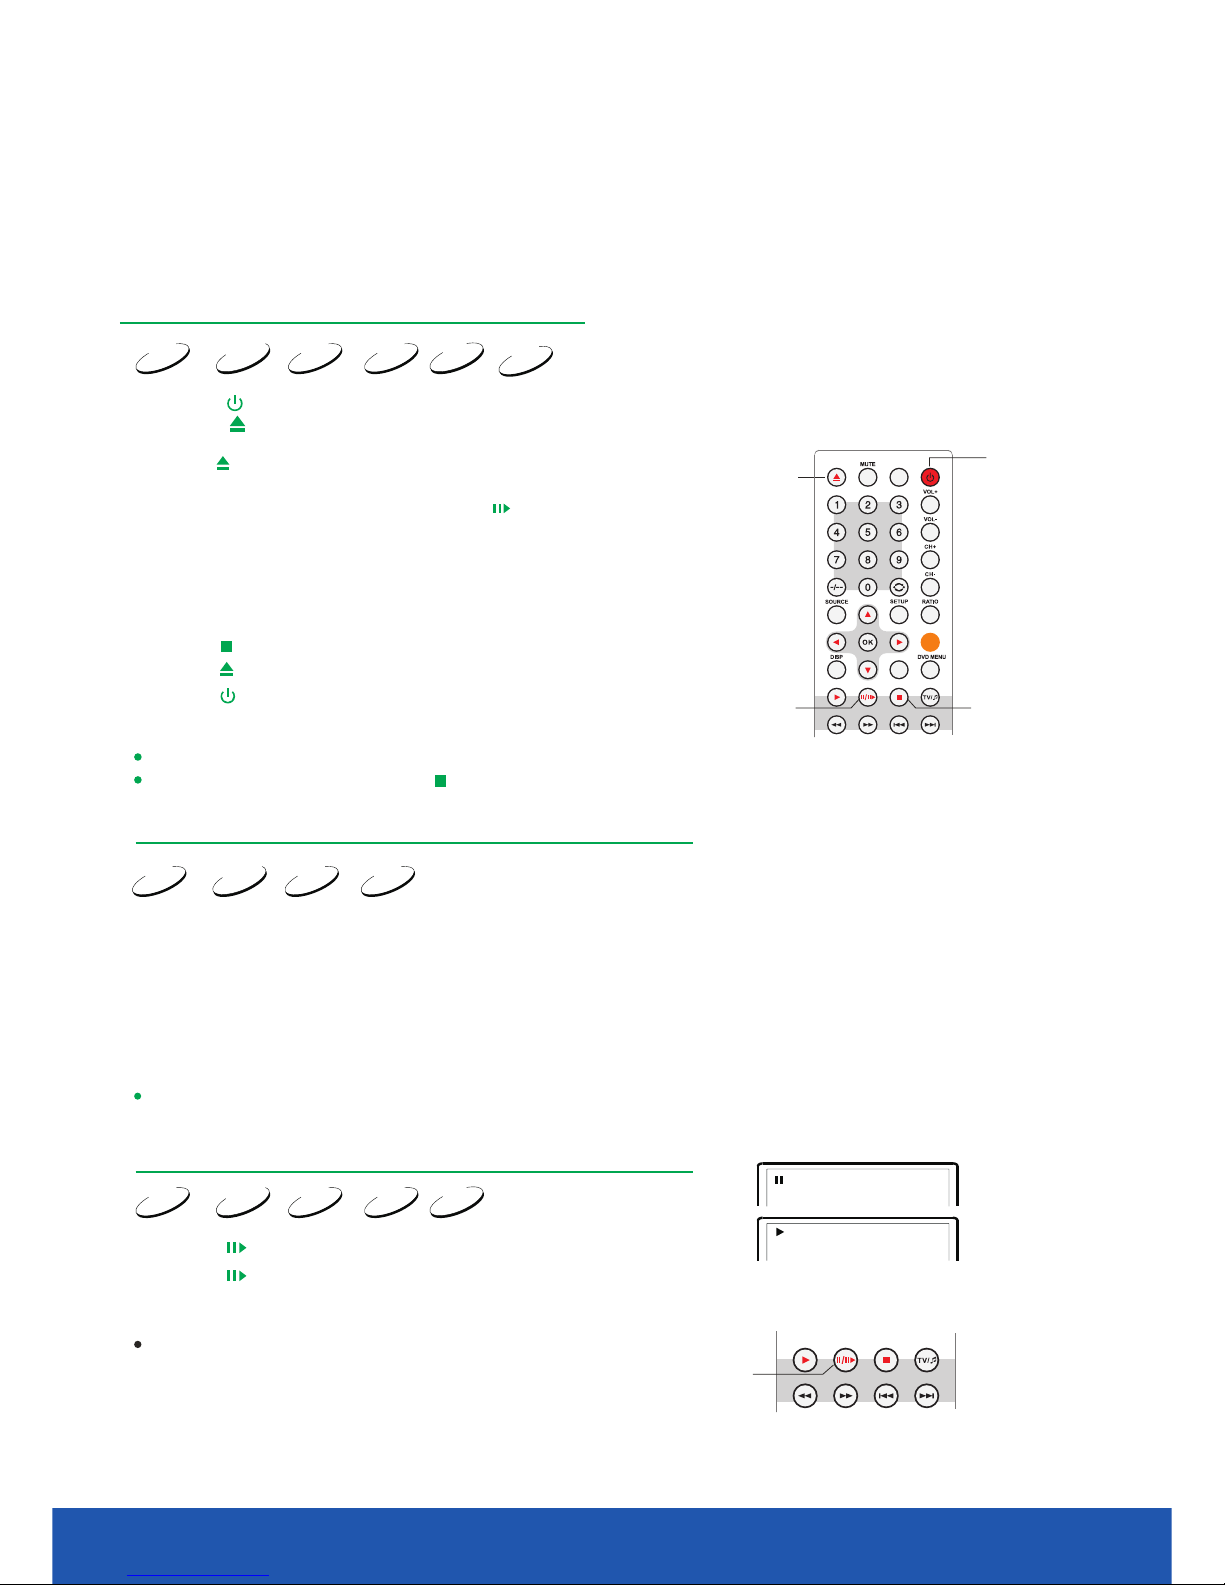
Pause/playback
1. Press the button to turn on the device.
A menu will pop up on the TV screen when you play a DVD disc.
When you play a SVCD or VCD2.0 disc a special menu will appear
on the TV screen and the device will be switched to PBC mode.
When you play CD, HDCD or VCD1.1 discs the tracks will be played
according to the play list.
3. Press the button again to retract the disc tray.
4. Depending on the disc format, the playback may start immediately or
you will be prompt to choose a file and press the .
2. Press the button.
The disc tray will be ejected. Load a disc with the label side facing up forward.
5. Press the button to stop the playback.
Press the SETUP button. Choose the image settings menu
6. Press the button to eject the disc.
7. Press the button to switch the player into standby mode.
NOTES
NOTE
NOTE
Unplug the device from the wall outlet if you are not going to use it for a long time.
Some features or entire disc may be displayed incorrectly if you select a wrong color system.
We suggest you set the color system of the device into PAL mode.
When you set the screen save mode to ON, the display on TV screen
turns to screen saver status after the picture on TV screen keep still
for about 2 minutes (in mode such as pause mode, stop mode, menu
select, set up menu, no disc mode and so on).
When you play a DVD-disc press the button twice to completely stop the playback.
Choose the device color system according to the TV color system.
1. If you use a PAL TV set, set the Image/TV-system to PAL mode.
1. Press the button during the playback to stop the playback.
2. Press the button again to resume the playback.
2. If you use a NTSC TV set, set the Image/TV -system to NTSC mode.
3. Set the Image/TV-system to auto mode to choose the system auto selection mode,
if you use a multi-system TV.
DVD
Super VC D
VCD
MPEG-4 CD
WMA
DVD
Super VC D
VCD
MPEG-4
DVD
Super VC D
VCD
MPEG-4 CD
Disc playback mode
Disc playback
EJECT
STOP
PLAY
GUIDE
EXIT
TEXT MI X INDE X
CANCE L REV EAL HOLD SIZE
AQT
FAV
STANDBY
TEXT MIX IN DEX
CANC EL REVEAL H OLD SIZ E
PLAY
3010.1 inch TV/DVD user guide
Page 31
Disc playback mode
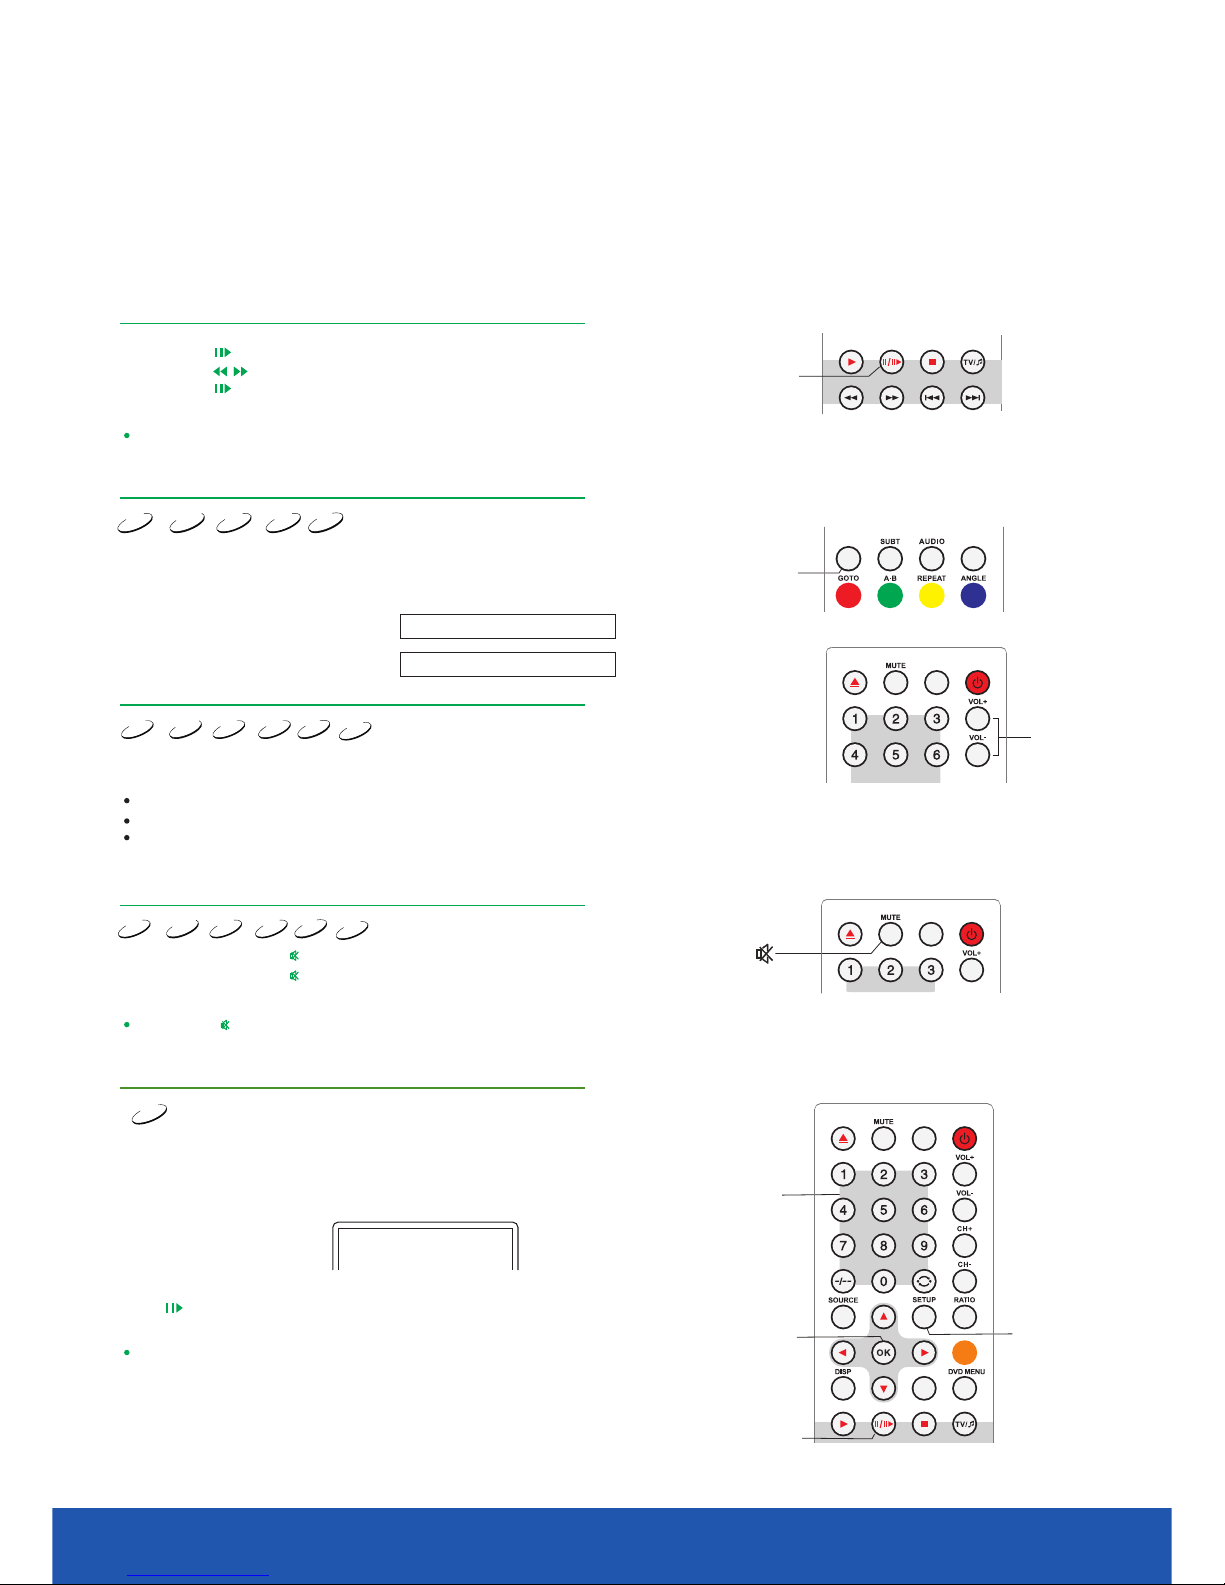
1.Press t he button during t he playback to the s top the playback .
2.Press t he button to start f rame-by- play back.frame
/
3.Press t he button again to r esume to the playb ack.
NOT E
The frame -by-frame play back function is o nly valid when pla ying DVD-disc.
Information
DVD
Sup er VCD
VCD
MPE G-4 CD
Press the I NFO button.
The disc in formation will a ppear on the TV scre en.
DVD disc:
CD, SVCD or V CD disc:
INFO
Volume adjusting
DVD
Sup er VCD
VCD
MPE G-4 CD
WMA
1.To adju st the volume, pre ss the VOLUME butt on on the TV or amplif ier.
2.Press t he .VOLUME bu tton the remote co ntrol of the devic e
Press the V OLUME+ button to i ncrease the soun d volume.
Press the V OLUME- button to d ecrease the soun d volume.
The maxim um volume is 100.
MUTE
DVD
Sup er VCD
VCD
MPE G-4 CD
WMA
1.Mute on .Press the butto n during playbac k to turn off the soun d.
2.Mute of f.Press the butt on again to turn on th e sound.
NOT E
Press the b utton if there is no s ound at all.
DVD playback menu
DVD
Some DVD di scs have their own m enu.
1.Press t he button to displa y the menu on the TV scr een.Follow
the on-sc reen hints to sele ct options using n umeric buttons.
SETUP
Tim e_: _:_ Ti tle _Ch apt er_
Tim e_: _:_ Tr ack _of _
Roo t menu
1. .. .
2. .. .
3. .. .
2.Using t he direction but tons select the re quired track and t hen press
the or button .OK
NOT E
Press the S ETUP button to ret urn to main menu.
Differe nt disc have diffe rent menus.
PLAY
Number
OK
SETUP
Disc playback mode
TEXT MIX IN DEX
CANC EL REVEAL H OLD SIZ E
PLAY
INFO
REC
VOL
GUID EFAV
GUID E
EXIT
TEXT MIX IN DEX
AQT
FAV
GUID EFAV
31
10.1 inch TV/DVD user guide
Page 32
PBC function
Sup er VCD
VCD
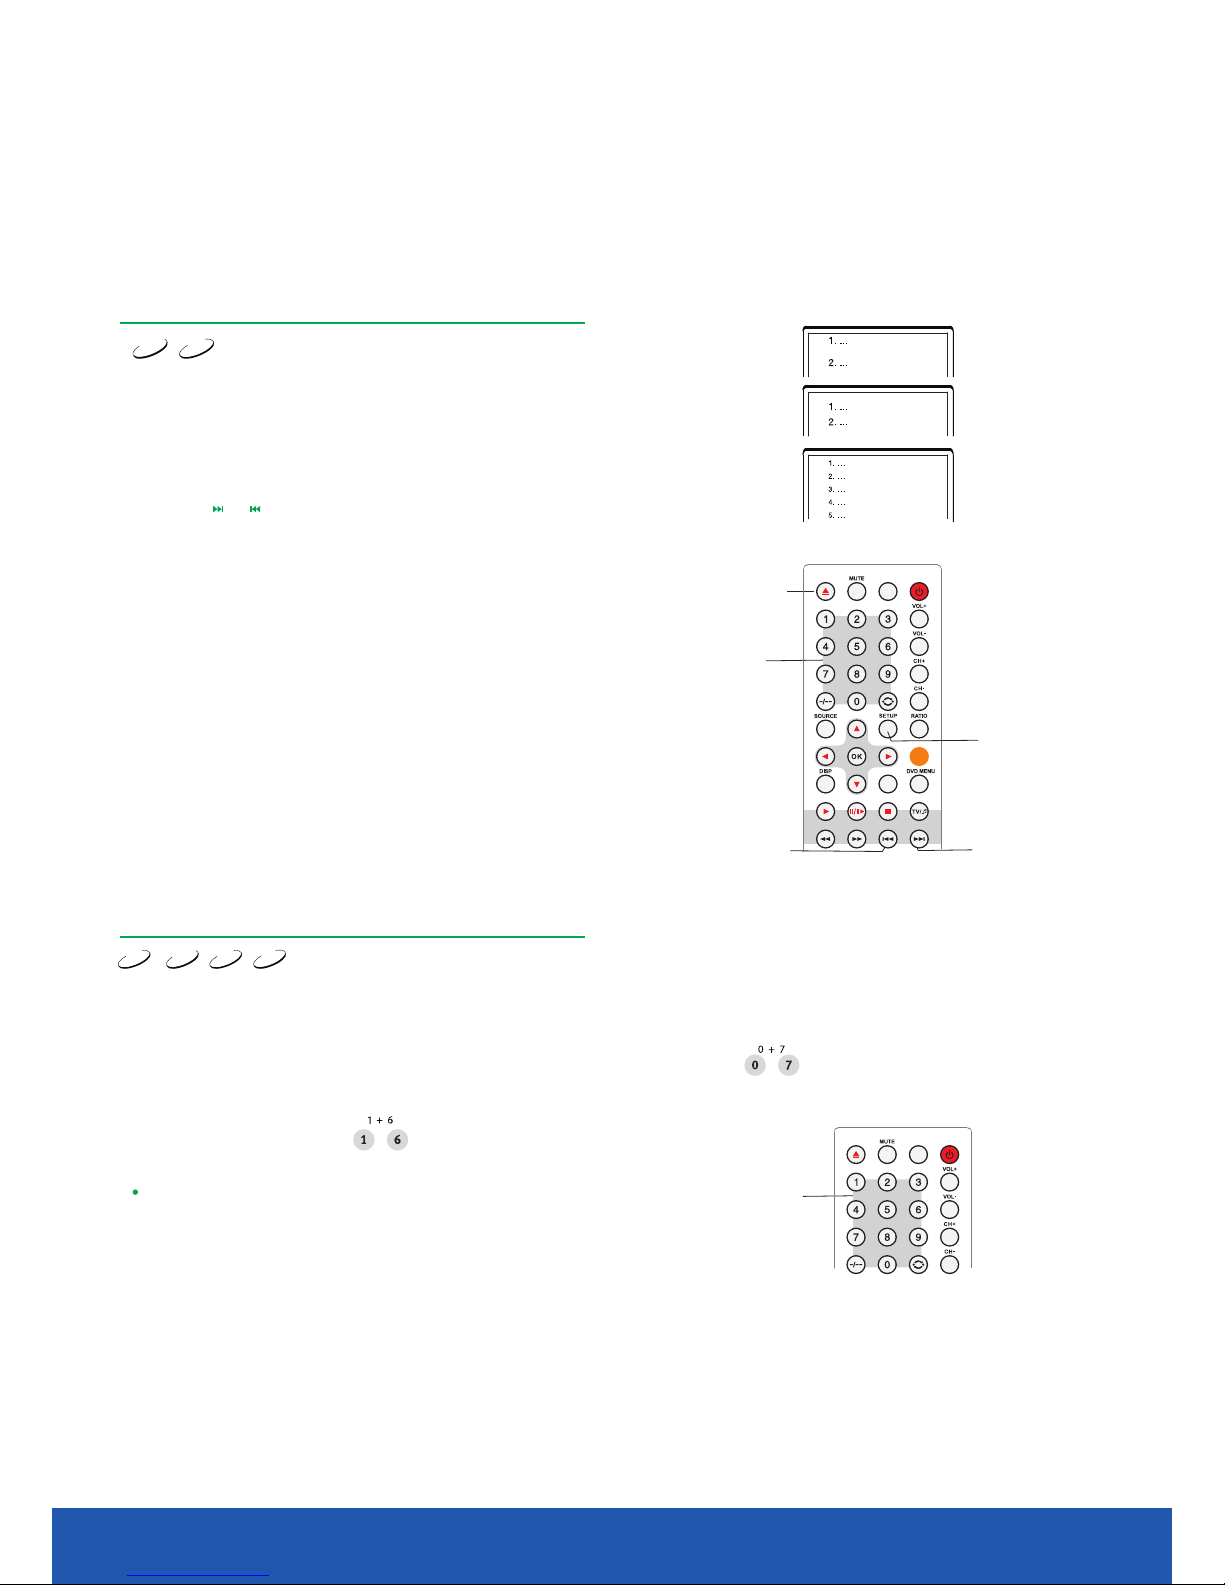
Use the PBC function for playing SVCD, VCD2.0 discs with PBC function enabled.
1. TV screen main menu:
2. You will see a submenu after entering the main menu no1.
4. Press the numeric button to select the submenu item. For example,
press 5 to start playing from track no5.
Press the numeric button for selection.
For example choose the main menu no1.
TV screen will display:
5. Press the button to go back to submenu. Press theSETUP SETUP
button again to go back to main menu.
3. Press the or button to go to required page.
6. Press the button again to turn the PBC function ofSETUP f and start
normal playback.
PREV
Number
SETUP
NEXT
Selecting chapter or track using
numeric buttons
DVD
Sup er VCD
VCD
CD
1. Load the disc. After the DVD player starts reading press the numeric button to select
the chapter or track
to play. You may skip between chapters or tracks by pressing the
LEFT or RIGHT cursor buttons.
2. If the chapter/track number is
<10, press button 1-9. For instance select track 7:
3. If the chapter/track number is
>10, press button 1-9, then press numeric button 0-9 again.
For instance select track 16:
NOT E
When you pl ay VCD or VCD2.0 dis cs this function i s available if the
PBC mode is t urned off.
Disc playback mode
EJECT
GUIDE
EXIT
TEXT MI X INDE X
CANCE L REV EAL HOLD SIZE
AQT
FAV
Number
GUIDEFAV
3210.1 inch TV/DVD user guide
Page 33
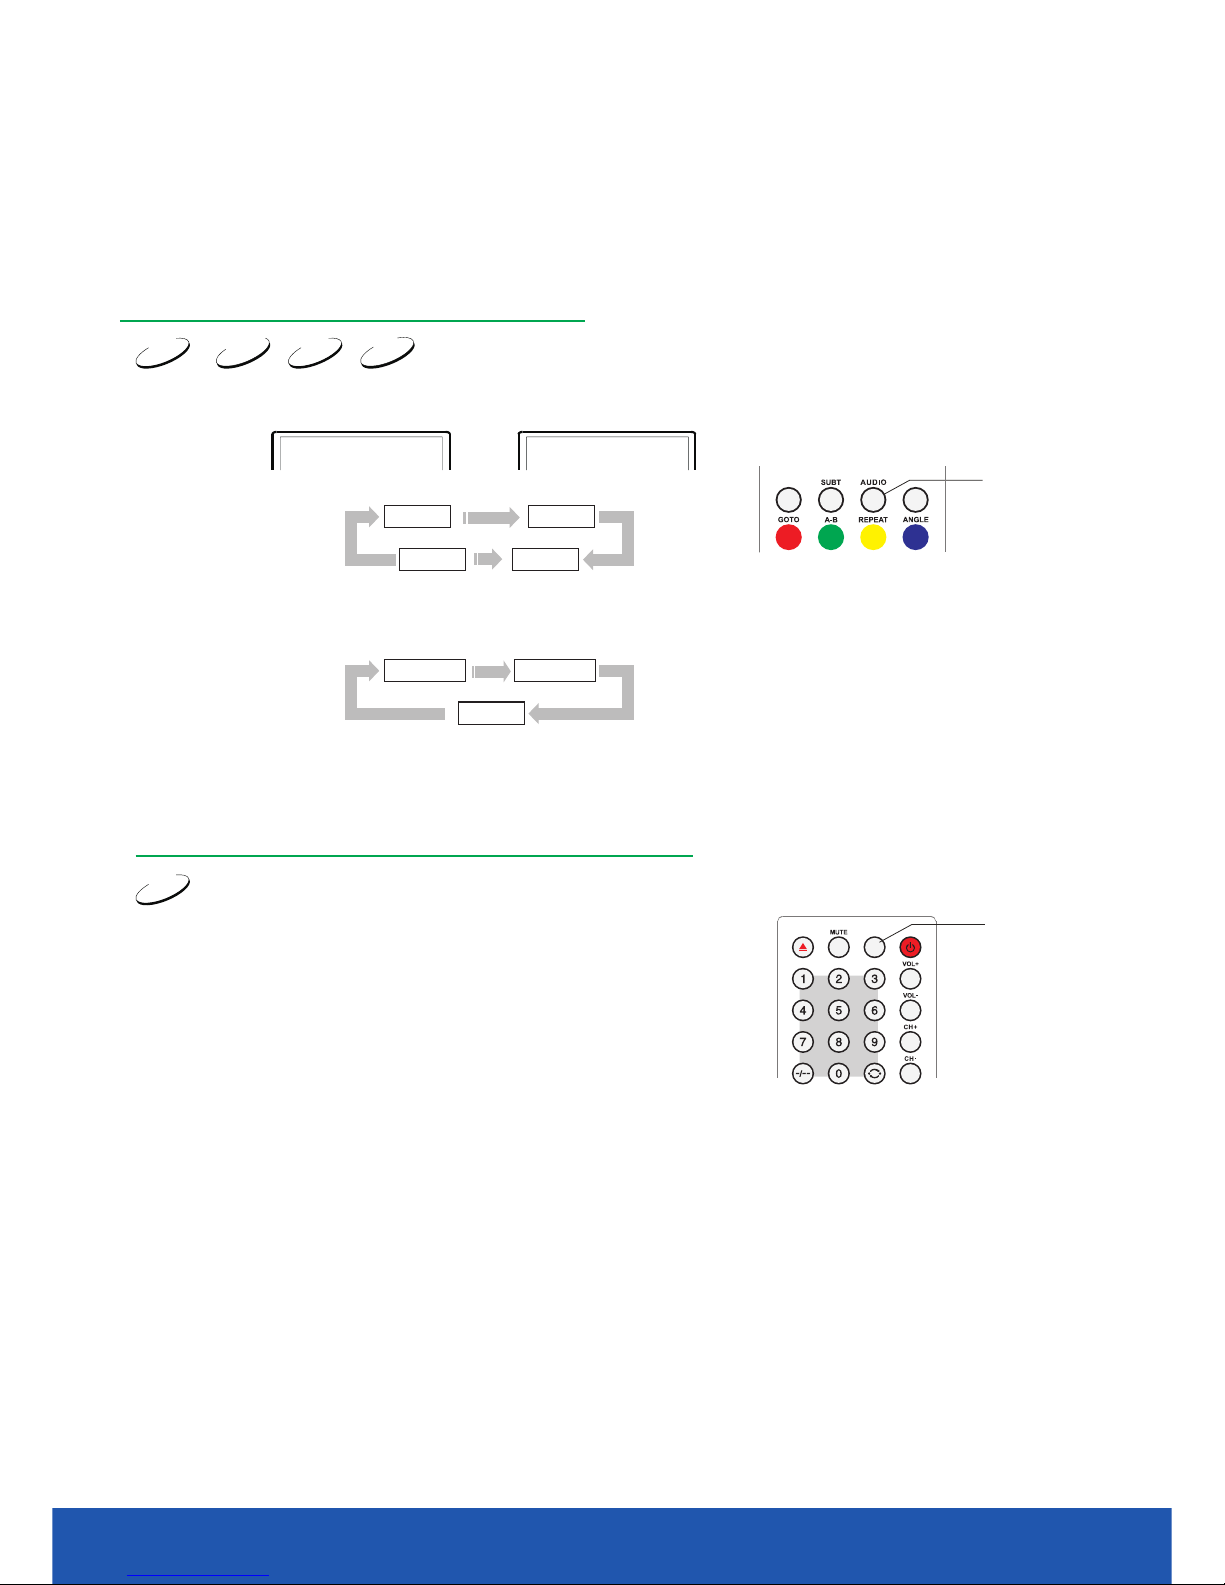
NOTES
DVD
Super VC D
VCD
CD
Disc playback mode
Language/audio channel selection
Press the button.AUDIO
You may sel ect the desired la nguage if you play a D VD or SVCD disc supp orting multipl e language.
DVD disc:
SVCD disc :
Aud io 1/2: Engl ish Aud io 2/2: Russ ian
AUDIO 1 AUDIO 2
AUDIO 3 A UDI O 4
Some VCD an d SVCD discs have a se parate audio cha nnel for each dubb ed languages.
You may sel ect the audio chan nel of the preferr ed language in mon o or stereo.
VCD,CD di sc:
MONO Lef t
STEREO
MONO Rig ht
Languag es selection dep ends on the disc rec ording.
When you pl ay DVD-Video dis cs, if you press the l anguage switch b utton , the current track
may be play ed from the Very beg inning.
Direct play
DVD
Direct pl ay is a creative fun ction that very he lpful for users to e njoy DVD.
With dire ct play function , you can play DVD dir ectly, skippin g the legal
Warning , advertisemen ts, chapter sele ction and other th ing that come
before th e movies start. Yo u can enjoy pure mov ies without both ering.
When the di sc is loaded and the l egal warning ,ad vertisements ,chapter
selecti on message shows , just press butto n to activate dire ct play
functio n and start a pure mov ies playback.
NOTES
When you ar e enjoying VCD wit h PBC function, di rect play can disa ble the PBC and VCD
will be pla yed in sequence.
GUIDE
AUDIO
INFO
REC
GUID EFAV
GUIDE
33
10.1 inch TV/DVD user guide
Page 34
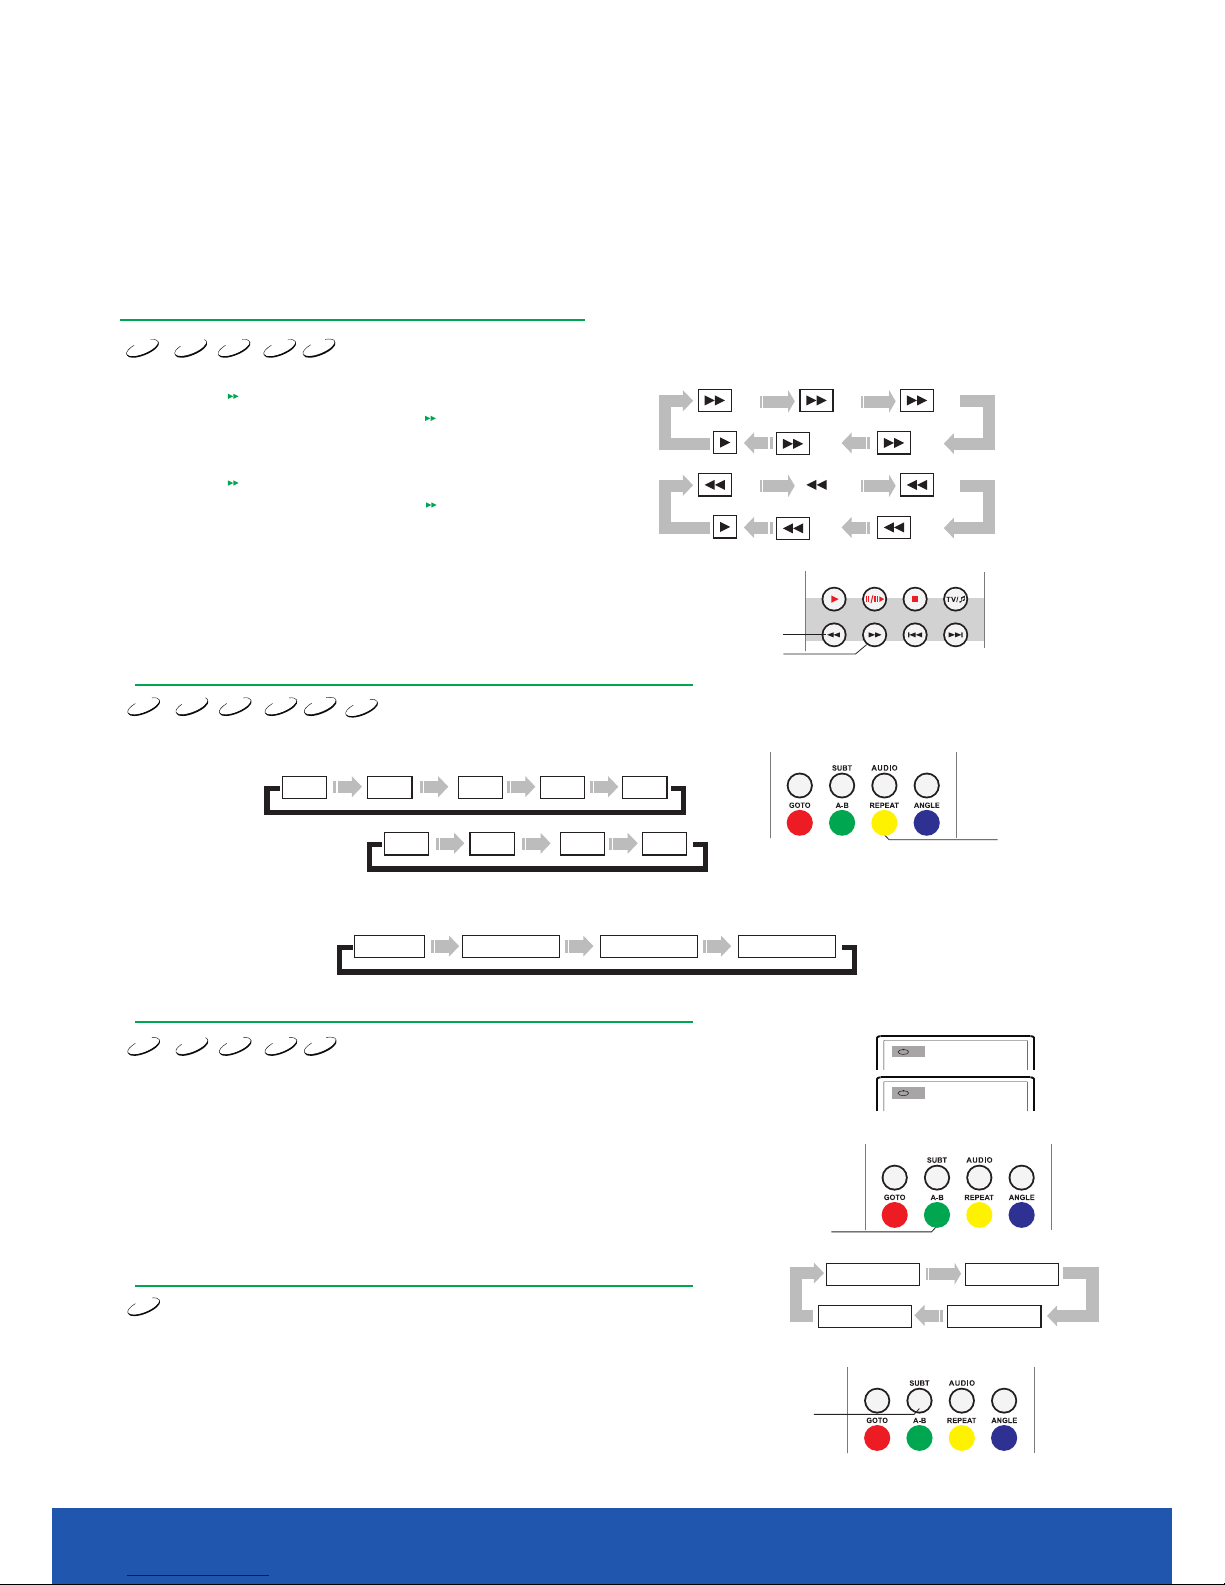
Fast playback
You may fas t forward or rever se to search for a cer tain point durin g playback.
Repeat playback
Repeat the selected section
DVD
Sup er VCD
VCD
MPE G-4 CD
1.Press t he button and the re ceiver will star t forward
playbac k. Each time you pre ss the button you sw itch
the playb ack speed of DVD, SV CD , VCD, MPGE-4,
CD discs in t he following seq uence:
2.Press t he button and the re ceiver will star t fast reverse
playbac k. Each time you pre ss the button you sw itch
the playb ack speed of DVD, SV CD , VCD, MPGE-4,
CD discs in t he following seq uence:
2X 4X 8X
32X
16X
2X 4X 8X
32X
16X
NOTES
The fast fo rward/revers e playback of some M PGE-4 discs
may diffe r from standart sc anning.
DVD
Sup er VCD
VCD
MPE G-4 CD
WMA
You may rep eat a certain chap ter, title, trac k or disc.Each tim e you press the
Repeat bu tton you will see th e following info rmation on the TV screen.
DVD disc:
Off
A-B
Cha pter T itle All
SVCD, VCD o r CD disc:
Off
A-B
Tra ck A ll
You may use t his function on SV CD and VCD2 discs on ly when the PBC is dis abled.
For VCD1. 1 and CD disc this fun ction is availab le in both modes.
WMA and MPE G-4 disc:
Single file Repeat Single Repeat All Repeat off
DVD
Sup er VCD
VCD
MPE G-4 CD
1.Durin g normal playbac k, Press the button on t he remote contro l at the desired
beginni ng point(Point A ).The followin g information will be displayed on the TV screen:
A-B
2.When pl ayback reaches t he desired endin g point (pointB) , press the butto n again.
The follo wing informati on will be display ed on the TV screen:
3.Press t he b utton once more to r esume normal pla yback.
A-B
A-B
NOTES
Some disc d o not support this f unction.
The secti on shall be with one t rack when the PBC mo de is enabled.
Selecting subtitles
DVD
A
AB
Press the butt on. You may select t he language of sub titles if your
disc has se veral subtitle s in different lan guages. Each tim e you press the
button yo u will change the la nguage of the subt itles, as shown on t he figure:
SUBT
SUBT
DVD
You may cho ose from 32 differ ent languages fr om your DVD disc,
but the num ber of languages d epends on the DVD re cording.
SUB TITLE S 01/03 SUB TITLE S 02/03
SUB TITLE S OFF SUB TITLE S 03/03
Disc playback mode
FWD
TEXT MIX IN DEX
CANC EL REVEAL H OLD SIZ E
REW
REPEAT
INFO
REC
REPEAT
INFO
REC
SUBT
INFO
REC
3410.1 inch TV/DVD user guide
Page 35
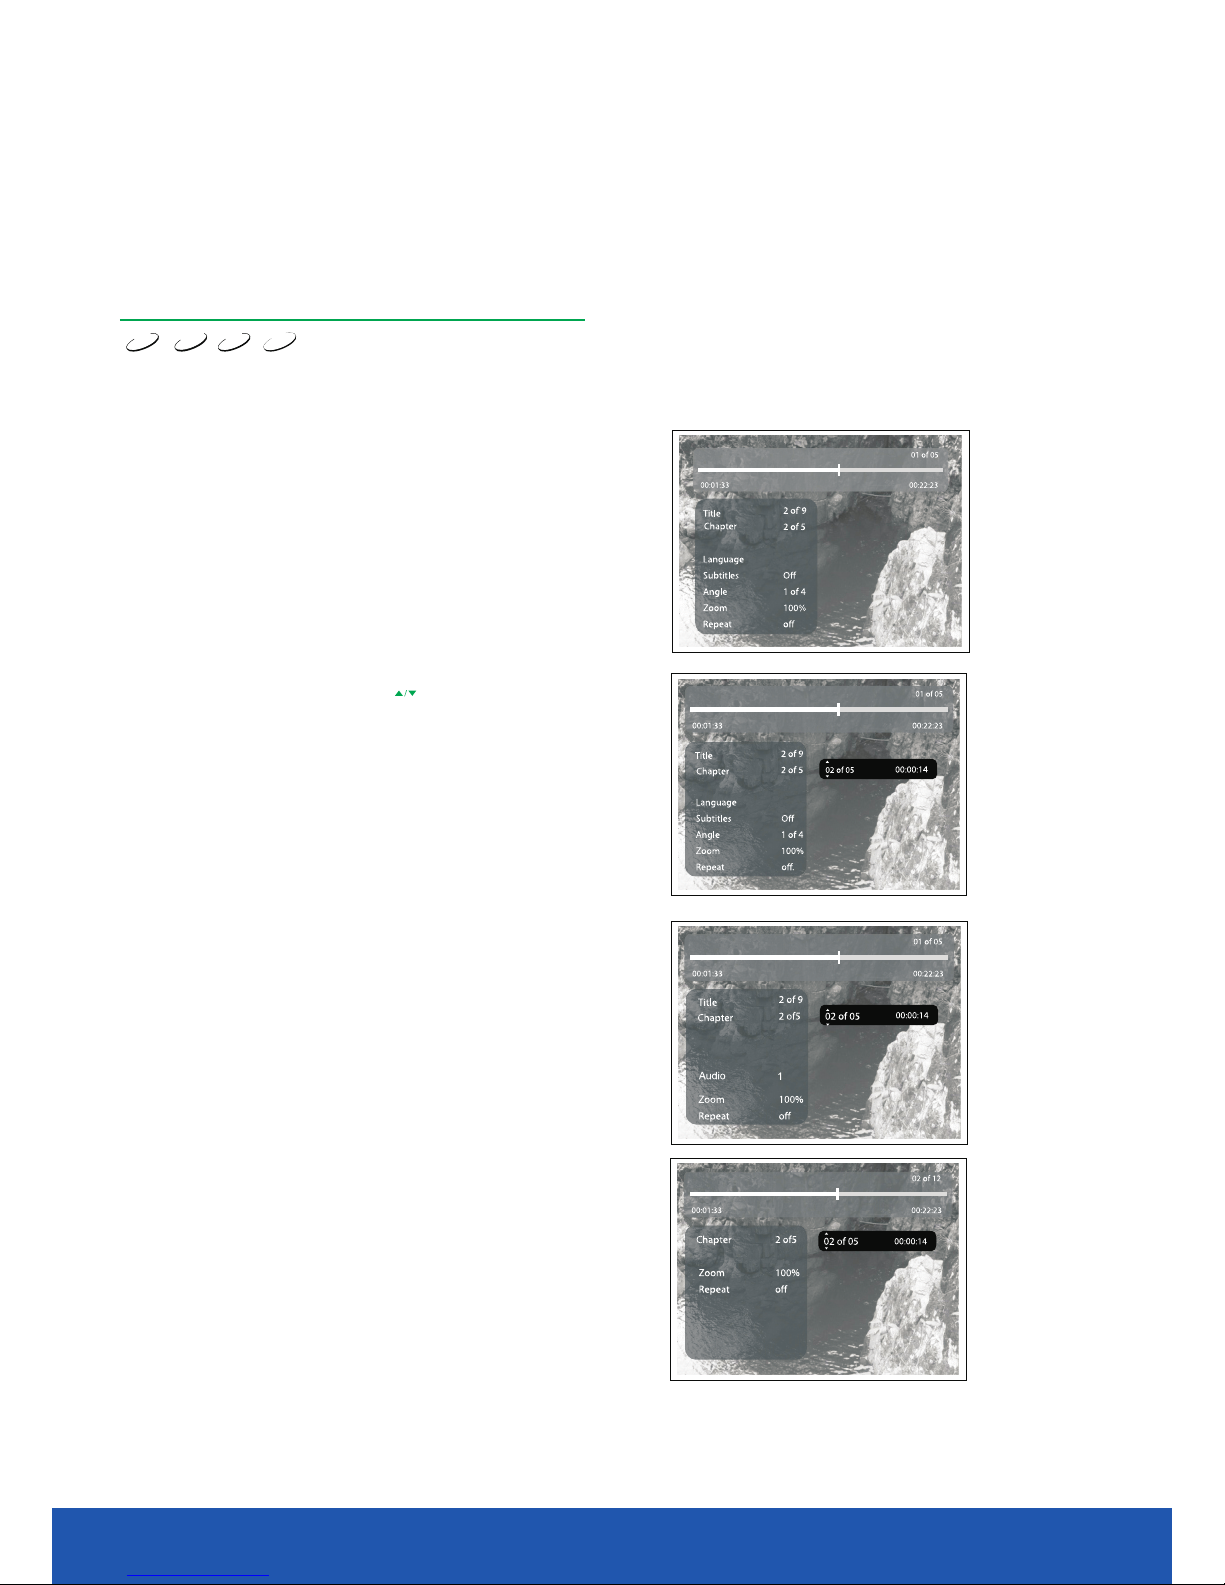
Track Browser
DVD
Sup er VCD
VCD
CD
This menu provides you simultaneous access to such functions and information as: chapter, title,
dubbing, subtitles, camera angel, zooming, repeated playback and time code.
Press the BROWSE button on the remote control.
The following information will be displayed on the screen:
DVD disc:
For example choose the chapter, press OK to confirm.
Enter the chapter number using numeric buttons. For
instance press 0 and 2, the DVD player will start playing
from the second chapter.
The number of the loaded
chapter shall not exceed the number of titles.
Choose the required item using the buttons.
Press the button on the remote control. BROWSE
The following information will be displayed on the screen:
SVCD disc:
Press the button on the remote control. BROWSE
The following information will be displayed on the screen:
VCD disc:
Disc playback mode
Page 36
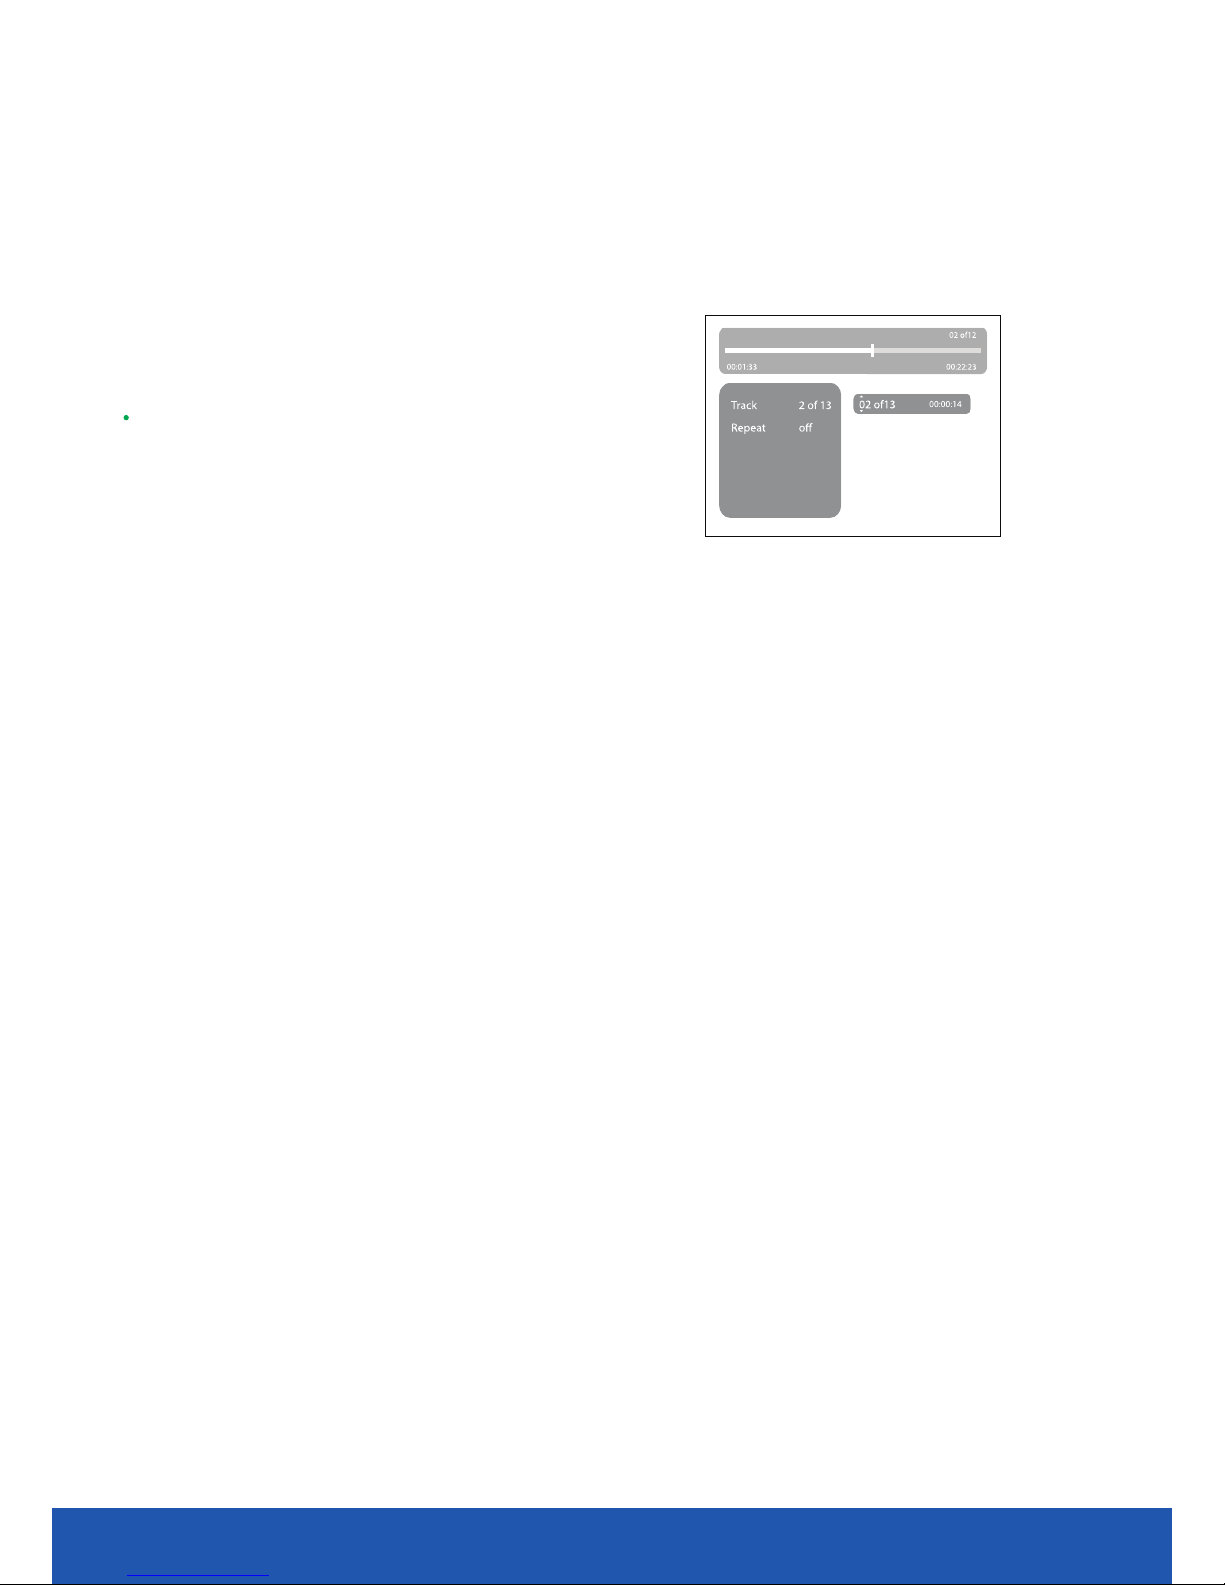
CD disc:
NOTE
You may choose options only while playing the
disc.
Press the button on the BROWSE remote control. The following
information will be displayed on the screen:
To disable the unction, press the f BROWSER BROWSE button again.
Disc playback mode
3610.1 inch TV/DVD user guide
Page 37
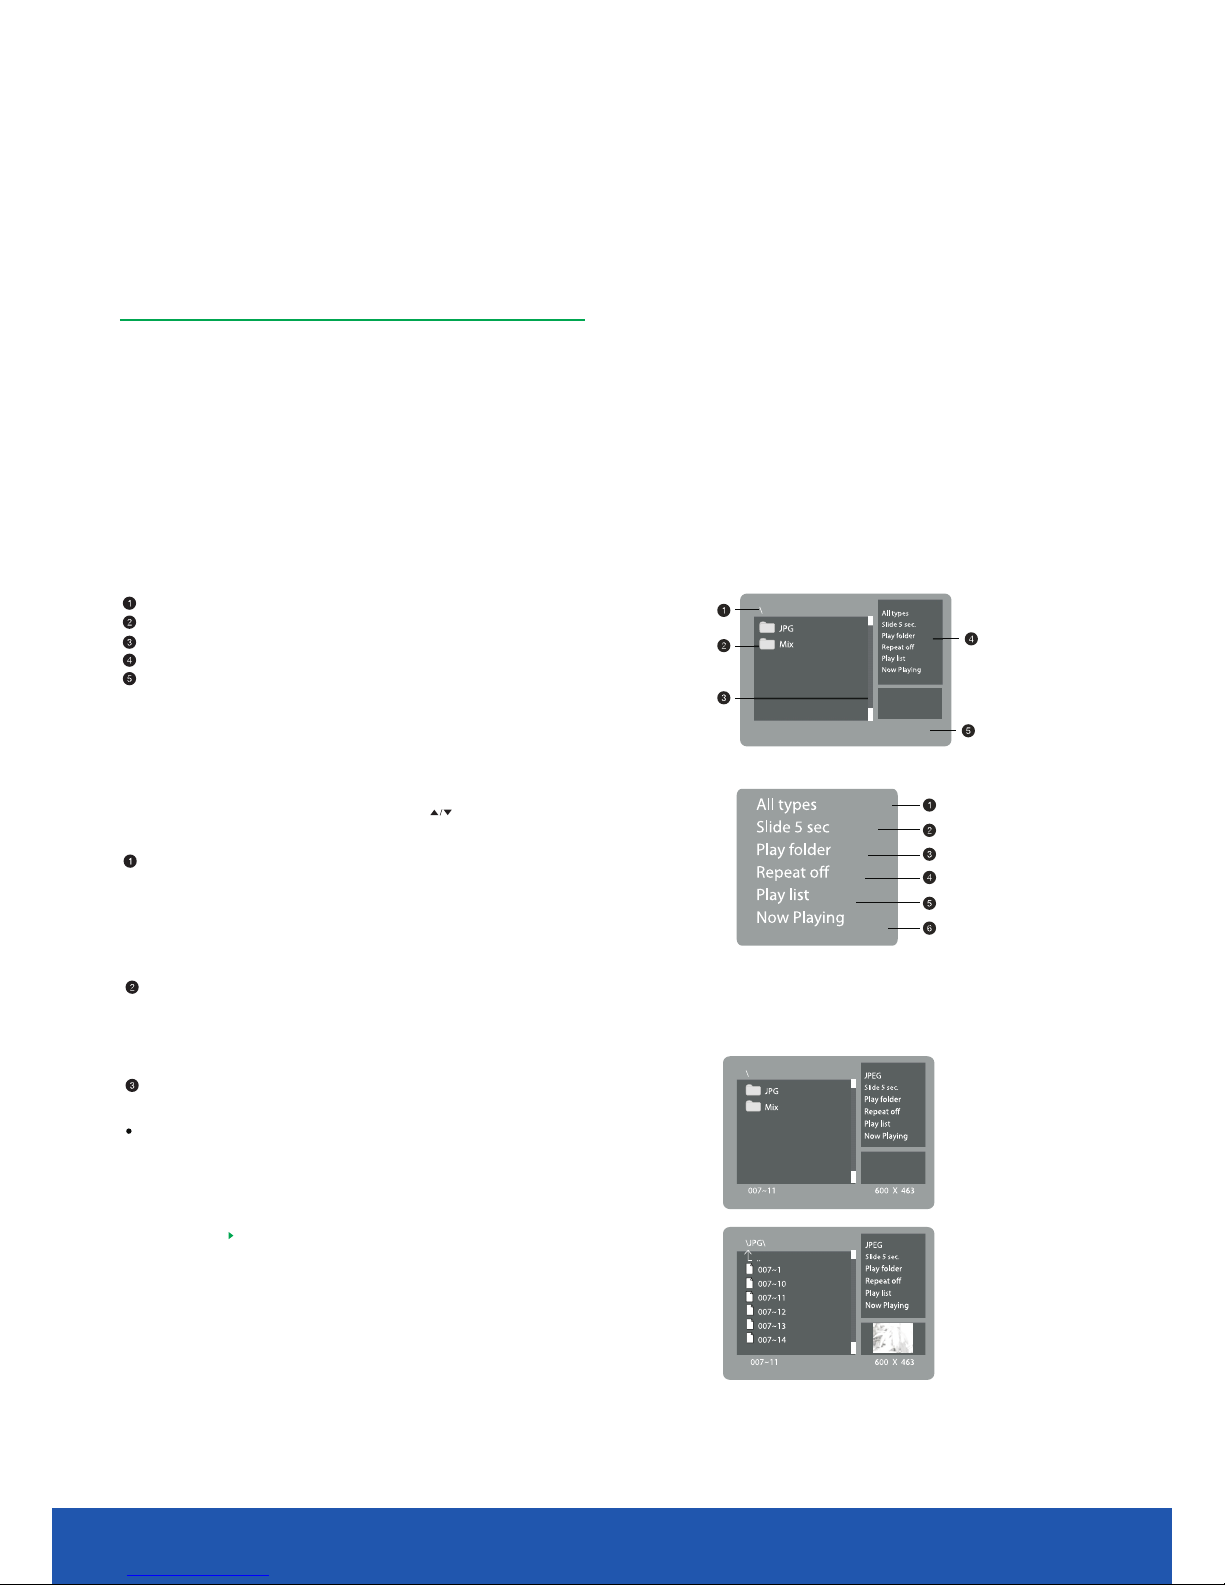
Playing WMA, JPEG, MPEG-4 files
WMA is an international standard of audio compression, compressing audio data 12 times to 1/12 of their
size. One CD disc may store more than 600 minutes of music (more than 170 songs). And the quality of
WMA disc approximates to the audio CD disc quality
.
JPEG (Joint Photographic Expert Group)- image compression algorithm, used all over the world and
providing high level of compression of the source data. Any graphics editor may edit images of this
format and their sizeis 15-20 times less then the original images.
MPEG-4 is the standard for transmitting audio and video data via channels with low capacity. This
format is very popular since it made possible to place full-length movies with good enough resolution
on one CD, and to exchange video files through the internet.
This DVD player may decompress and playback files of these formats using one user-friendly interface.
Playback settings:
All disc types
Press the button of the remote control to go the playback
setup. Select the required item using the buttons, press
OK for confirmation.
Playback of supported files.
Each time you press the button, the file format will change OK
by rotation.
All disc types - Audio - Picture- Video -A+V - A+P -P+V
Slide show
Choose the slide show speed of displaying JPEG files.
Each time you press the button, the slide show speed or OK JPEG files displaying will change by rotation.
Slide 5sec- Slide 10sec - Slide 15sec - Slide 20sec - Slide 25sec - Slide 30sec
Play the folder
Choose Play folder or Play disc.
1. Press the button to OK play the folder.
2. Press the button to go to the files window.
3. Press the button to go to the directory menu. SETUP
Select the required directory , press for confirmation.OK
Disc playback mode
37
10.1 inch TV/DVD user guide
Directory window. Displays the current file directory.
Files window. Displays the directory contents.
Scroll bar. Displays file location in the directory
.
Playback features.
Preview window. Preview of JPEG files.
Page 38
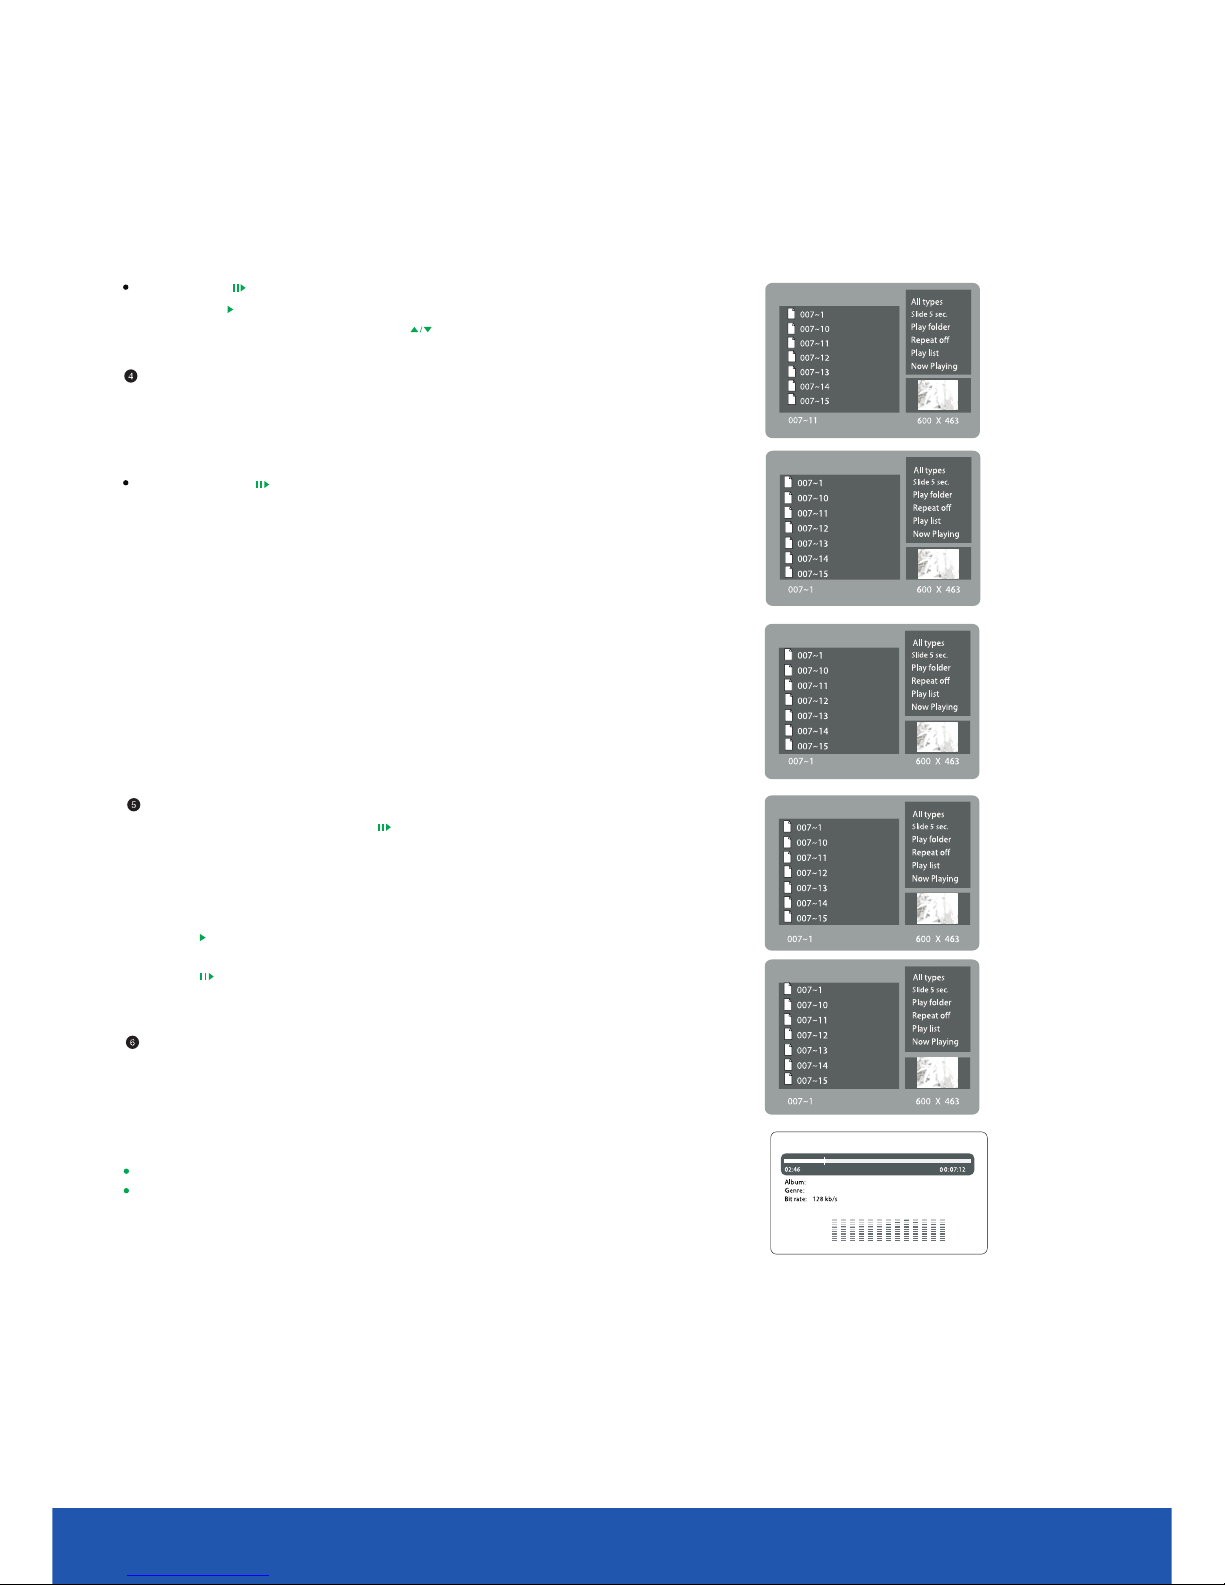
Disc playback mode
1. Press the button to play the entire disc.
2. Press the button of the remote control to go to the files window.
Choose the required file using the buttons, press OK for
confirmation.
Disable repeat
Choose playback repeat mode to adjust playback repeat options.
Each time you press the button, the playback repeat mode will OK
change by rotation. If the feature is in disabled Repeat mode, the
files will be played in normal sequence without repeat.
Single press the button for playback repeat of the desired file.
Play list
Player
Choose the play list option using buttons of the remote
control. Press the OK button to create programmable file list.
Press the button of the remote control to go to the file window. Select
the required file using the wheel, press to put it onOK list. Thereafter
press the button to play the created play list. To disable the play list
choose it in the setup menu and press the button.OK
Choose the player option using the wheel when playing WMA files
and press the button, thereuponOK you will see information on the
played file. Press the buttonSETUP to switch the player off.
3810.1 inch TV/DVD user guide
NOTES
Press the MENU button to go to the files selection window.
This device may not display all files of MPEG-4 format. Some
files may not be readable due to their coding or recording
specifics.
Page 39
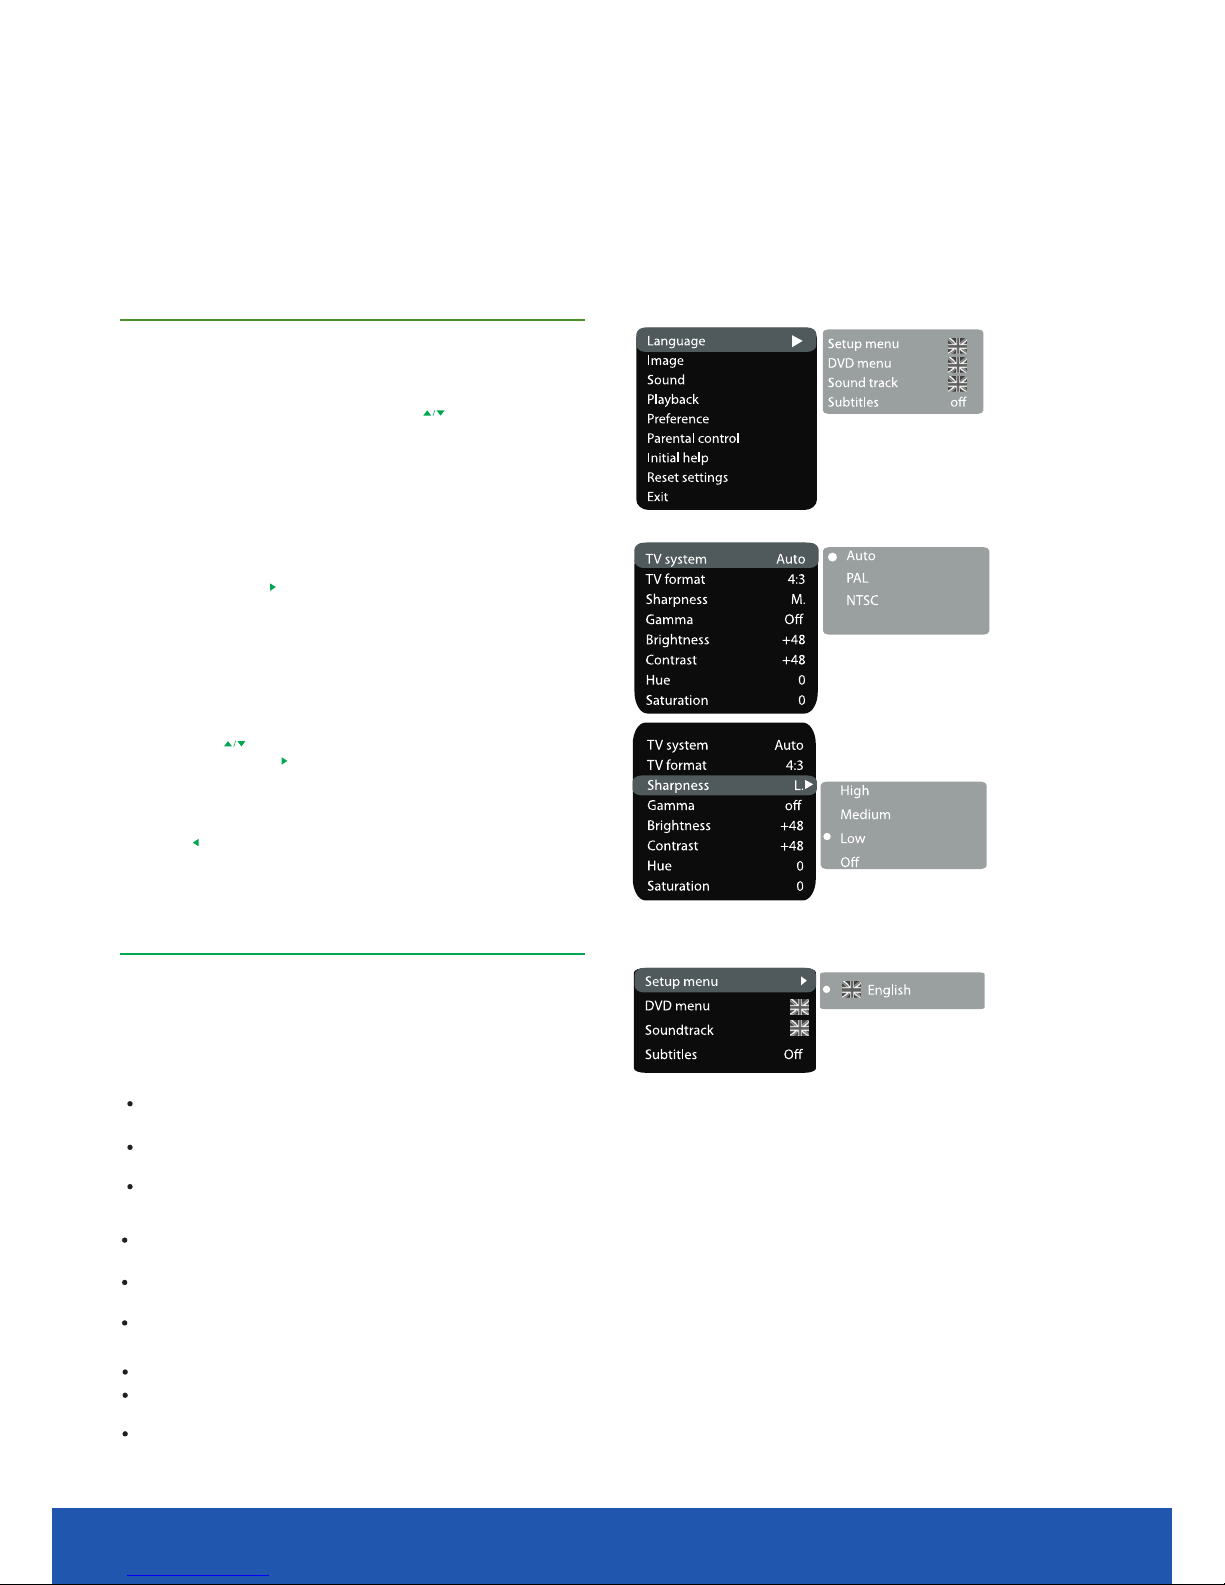
DVD function settings
Function selection and change
Press the button toSETUP show the setup menu.
You will see the following image on the screen, as
shown on the figure:
Select the desired menu item using the buttons,
press the button for confirmation.OK
1. For example, if you wish to change the image
settings, you have to select the image item and
press the or button.OK
2. Using the buttons, select the desired item
and press or button. ForOK example, select
the sharpness item. Settings will appear on the
screen. Then select the desired sharpness level
and press for confirmation.OK
3. Press button for exit to previous menu level.
4. Press button to exit setup menu.SETUP
Language settings
1. Setup menu: interface language set-up.
Options: English, default option: English.
2. DVD menu: selection of disc menu language.
DVD menu language options: English, French, Spanish, German, Swedish, Dutch, Russian, Chinese,
default DVD menu language option: English.
Selection of other languages: select the OTHERS item using the wheel and press Enter the languageOK.
code using the numeric buttons and press .OK
If the language you selected is not recorded on the DVD disc, another available language will be displayed.
3. Sound: selection of translation language.
Disc menu/translation language options: English, French, Spanish, German, Swedish, Dutch, Russian,
Chinese, default menu/translation language option: Englis
h.
Selection of other languages: select the OTHERS item using the wheel and press Enter the languageOK.
code using the numeric buttons and press .OK
If the language you selected is not recorded on the DVD disc, another available language will be used.
4. Subtitles: selection of subtitles language
Options: off, English, French, Spanish, German, Swedish, Dutch, Russian, Chinese, default option: off.
Selection of other languages: select the
OTHERS item using the wheel and press Enter the language OK.
code using numeric buttons and press .OK
If the language you selected is not recorded on the DVD disc, another available language will be displayed.
39
10.1 inch TV/DVD user guide
Page 40
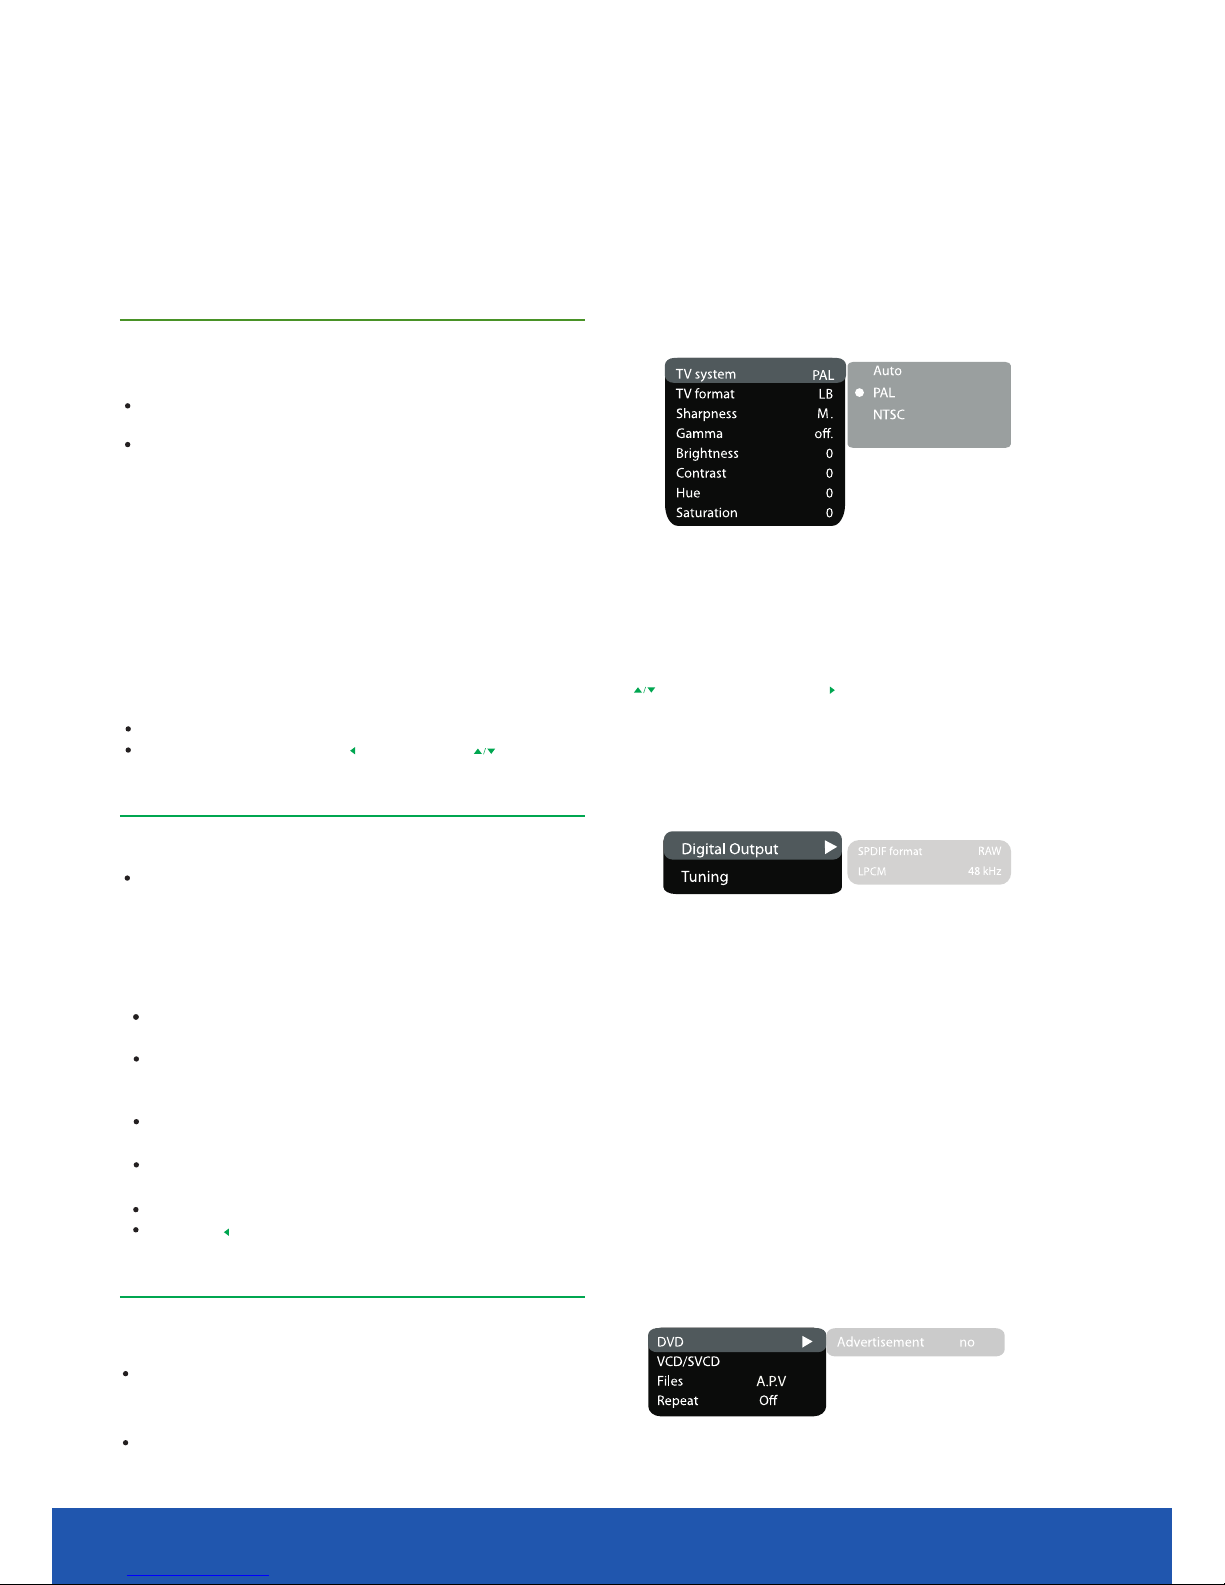
DVD function settings
Image settings menu
1. TV system: TV system selection
2. TV Format: image ratio settings
Options: Auto, PAL, NTSC. Default option: PAL.
Options: 4:3 pan&scan, 16:9 TV, 4:3 LB.
Default option: 4:3LB.
Some discs are recorded with support of only one
ratio. The selected ratio must comply with the TV
screen.
Options: High, Medium, Low. Default option: Medium.
3. Sharpness: image sharpness adjustment
4. Gamma: adjustment of image color temperature
Options: High, Medium, Low, Off. Default option: Off.
5. Brightness: adjustment of image brightness
6. Contrast: adjustment of image contrast
7. Hues: adjustment of image hues
8. Saturation: adjustment of image saturation
Adjustment of image brightness, contrast,
hues and saturation:
Select the desired item of the image adjustment section using the buttons. Press or buttonOK
to start adjusting the relevant option.
Change the option value using the wheel.
Upon completion press the button of the buttons to return to image setup menu.
Sound settings menu
1. Digital audio output
A) SPDIF format: set-up of digital audio output options.
Options: RAW, PCM. Default options: RAW.
When you select the RAW option, the not decoded signal is transferred to the LCD TV s digital outputs, the
decoded signal is transferred to analog outputs. Decoding is preformed by the built-in decoder of the LCD TV.
'
This feature is meant to ensure that signal decoding at digital outputs is performed by an external device
(e.g. An amplifier).
If you select the PCM option, a PCM coded signal will be transferred to the LCD TV's digital outputs.
B) LPCM: set-up of digital audio output options to comply with different amplifiers and receivers.
Options: 48 KHz 16 bit, 96 KHz 24 bit, 192KHz 24bit. Default option:48 KHz 16 bit.
2. Sound correction
A) equalizer: equalizer modes
Options: Off, rock, pop, live, dance, techno, classic, soft. Default option: Off.
B) Echo: echo effects
Options: Off, concert, living room, hall, bathroom, cave, arena, church. Default option: Off.
C) Tone balance: adjustment of tone balance level.
Adjust the tone balance level using the cursor buttons.
Press the button to return to sound correction set-up menu.
Playback settings
1. DVD
Advertisement skip: skip the unskippable block while
playing a DVD disc.
Options: Yes, No. Default option: No
Options: On, Off. Default option: On.
2. VCD/SVCD
PBS menu: PBC menu on/off
4010.1 inch TV/DVD user guide
Page 41
Preference settings
DVD function settings
Options: Audio, Pictures, Video, any of there combination. Default option: A.P.V.
Options: Off, Single, All. Default option: Off.
3. Files: selection of reproduced files on the disc
4. Repeat: file repeat mode
If on option is set, while reproducing discs, a menu will appear, in which you can select the order of playing
the disc content. If the Of f option is set, the reproducing of content is performed in the order, in which it is
recorded on the disc.
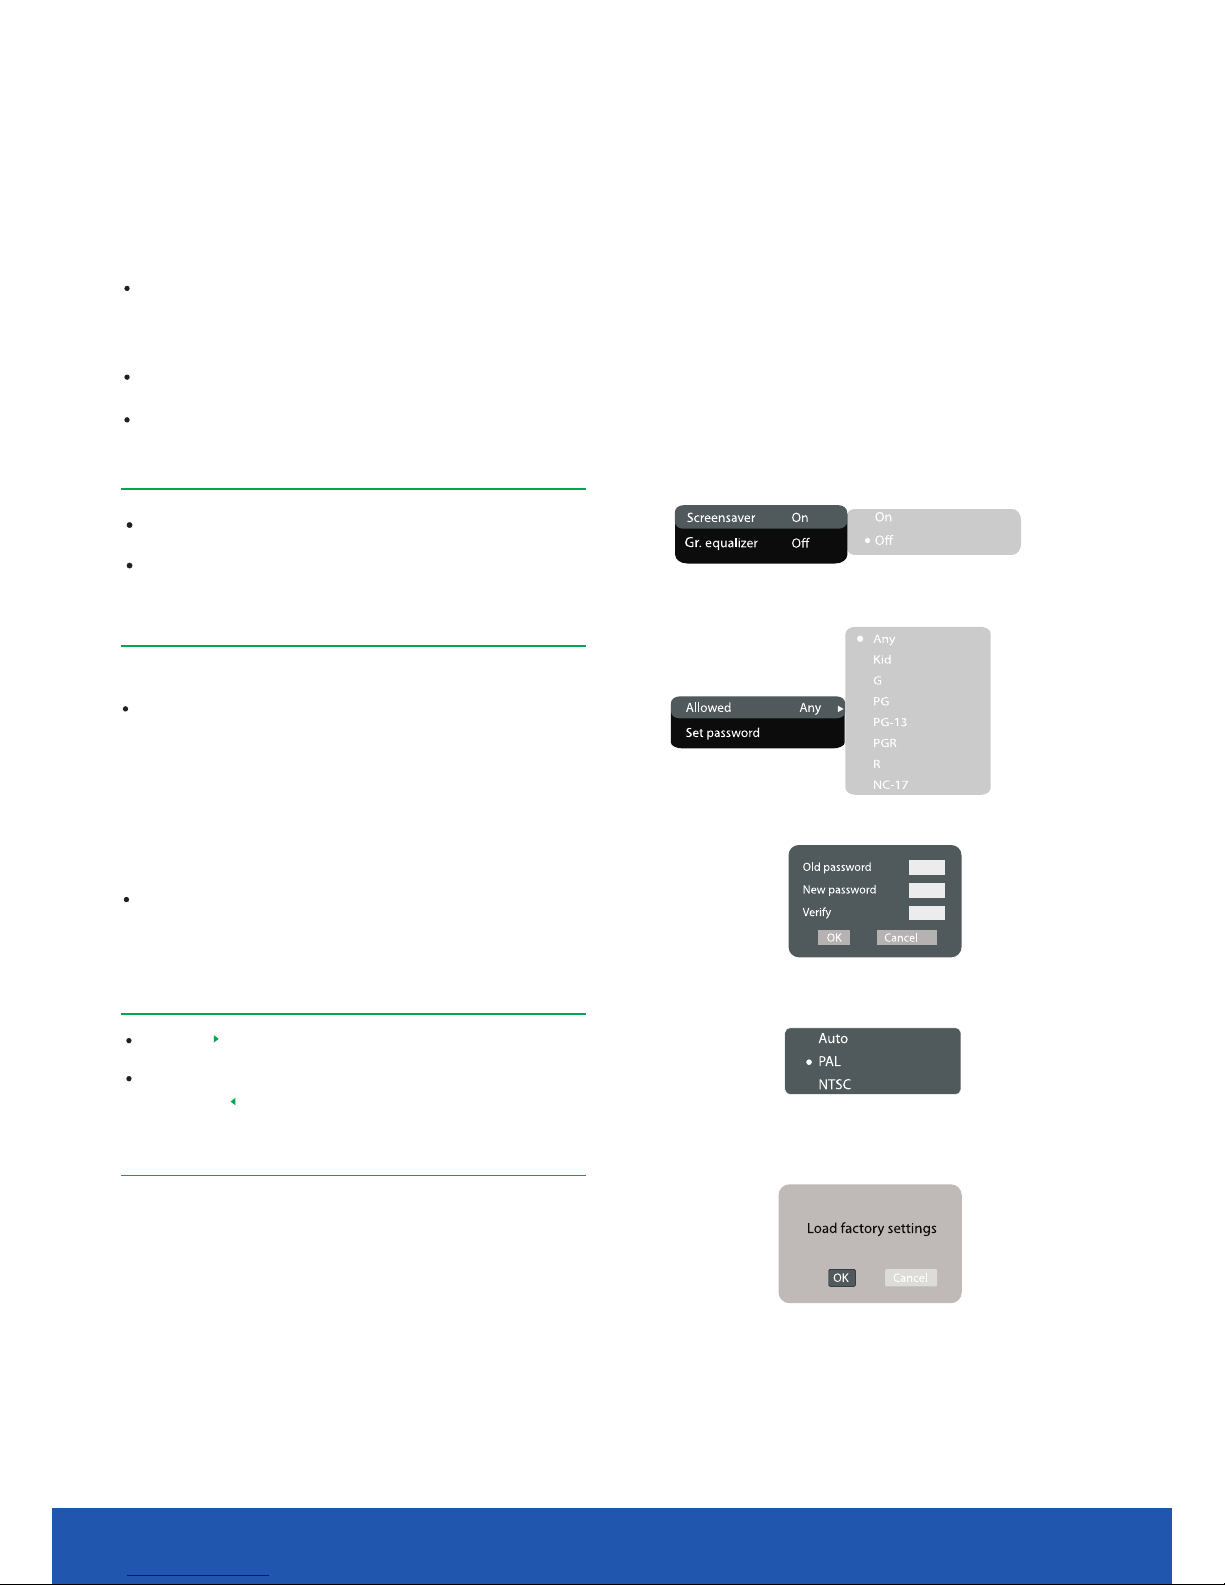
1. Screen saver: screen saver on/of
Options: On, Off. Default option: Off.
Options: On, Off. Default option: Off.
2. Gr.equalizer: spectrum analyzer
Parental control settings
1. Category: set-up of age restrictions to prevent children
from seeing undesirables discs.
Options: Any, Kid, G, PG, PG-13, PGR, R, NC-17.
Default option : Any
.
2. Change password: set-up of a four-digit password to change
the level of age restrictions.
Default option: 9210.
Initial setup menu
Press the button to enter the initial settings menu, then select the
desired item using the cursor buttons and press button for confirmation.OK
While being in this menu section, you cannot return to the previous level by
pressing the button.
Reset setting to default
Resetting all settings and restoring default options, except age
restrictions level and password.
41
10.1 inch TV/DVD user guide
Page 42
DVD function settings
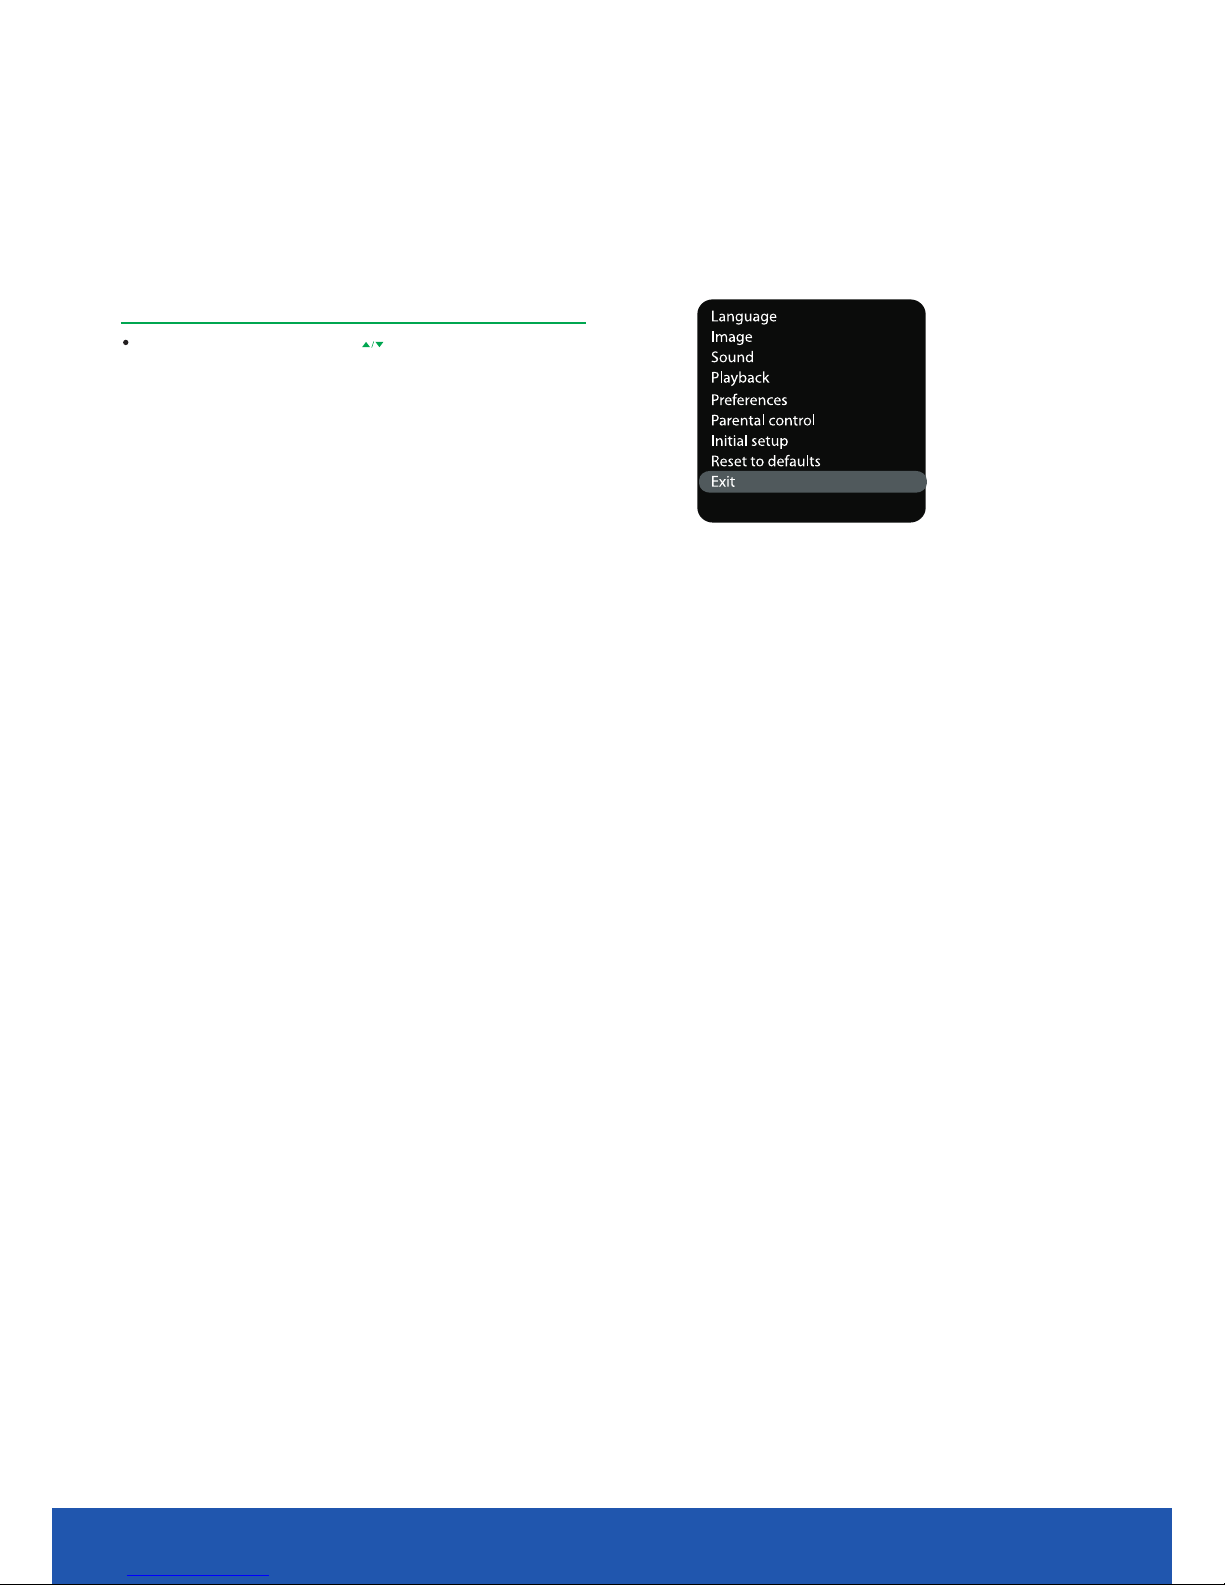
Exit settings menu
Select the exit item using the buttons and press the buttonOK
to exit the menu.
4210.1 inch TV/DVD user guide
Page 43
Card reader and USB operation
Usage of USB device and 3-in-1 card reader
USB refers to Universal Serial Bus. Most of USB devices on the market are USB2.0.
Here are some common types of USB 2.0 devices:
Monitors, Communication devices, Audio Human Input Device(HID), Mass storage drives etc.
Most flash memory, USB HDD etc. belongs to Mass Storage Class. Mass Storage Class includes 2 transport
manners:
1. USB 2.0 Mass Storage Class Control/Bulk/Interrupt (CBI) Transport
2. USB 2.0 Mass Storage Class Bulk-Only Transport
This unit supports USB 2.0 Mass Storage Class Bulk-Only Transport.
When using USB 1.1 Mass Storage Class Bulk-Only Transport devices, please note that the file operation
system only supports Windows FAT, it does not support FAT32 and NTFS
file system. The 3-in-1 card
reader
of this player can read SD Card (Secure Digital Card), MMC Card (Multi Media Card) MS Card (Memory
Stick
Card).
Important: Before you use the USB or card reader function, you should change the input
source of the
TV to
DVD or press
DVD/USB/CARD button.
1. Using USB devices:
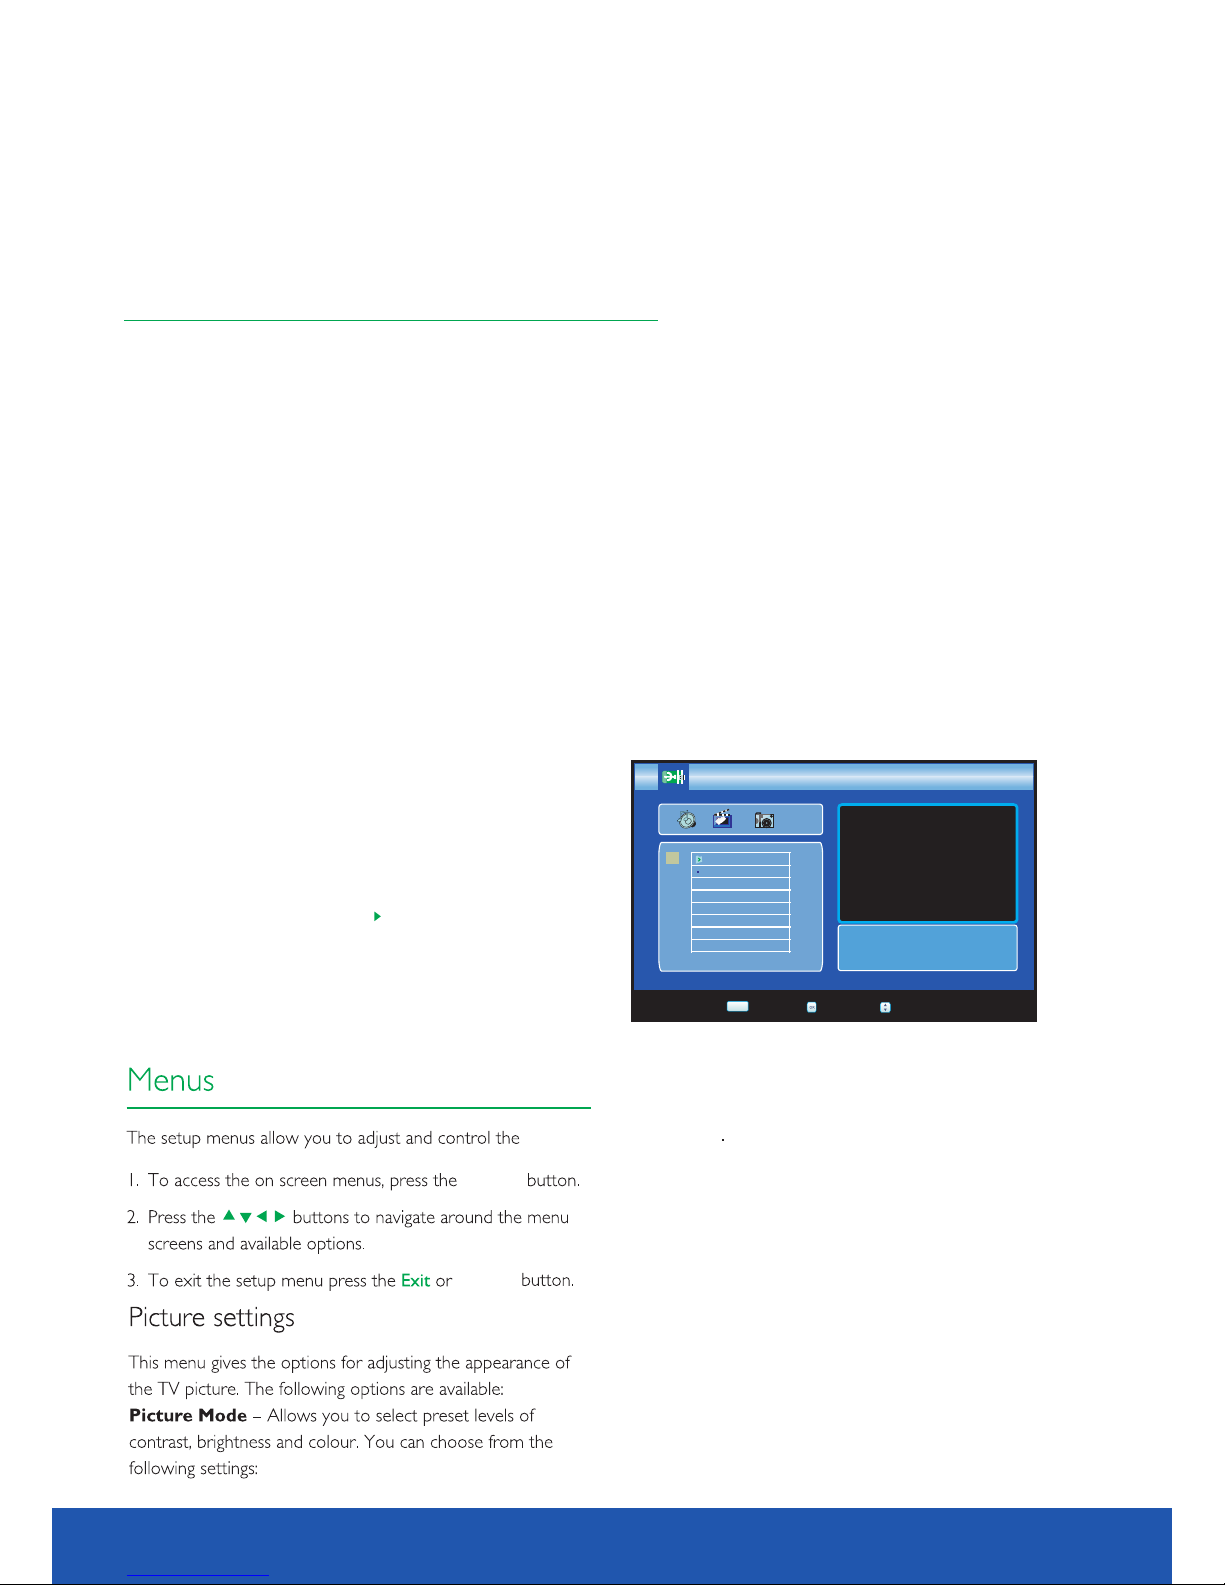
Please insert USB devices into the USB jack of this unit then change source to DVD. After correctly
reading USB devices data, the screen will display an operation menu.
2. Play 3-in-1 CARD READER
Change source to CARD, then insert CARD devices
After correctly reading
CARD devices data, the screen will display an operation
menu.
After selected file, press " " button to
playback.
USB and card reader
SETUP
SETUP
into the CARD jack of this unit.
C:
\
SEL ECT
ENT ER
EXIT
EXI T
USB 2. 0
[].Em pire. of.S~
43
10.1 inch TV/DVD user guide
Page 44
Card reader and usb operation
Standard
Sports
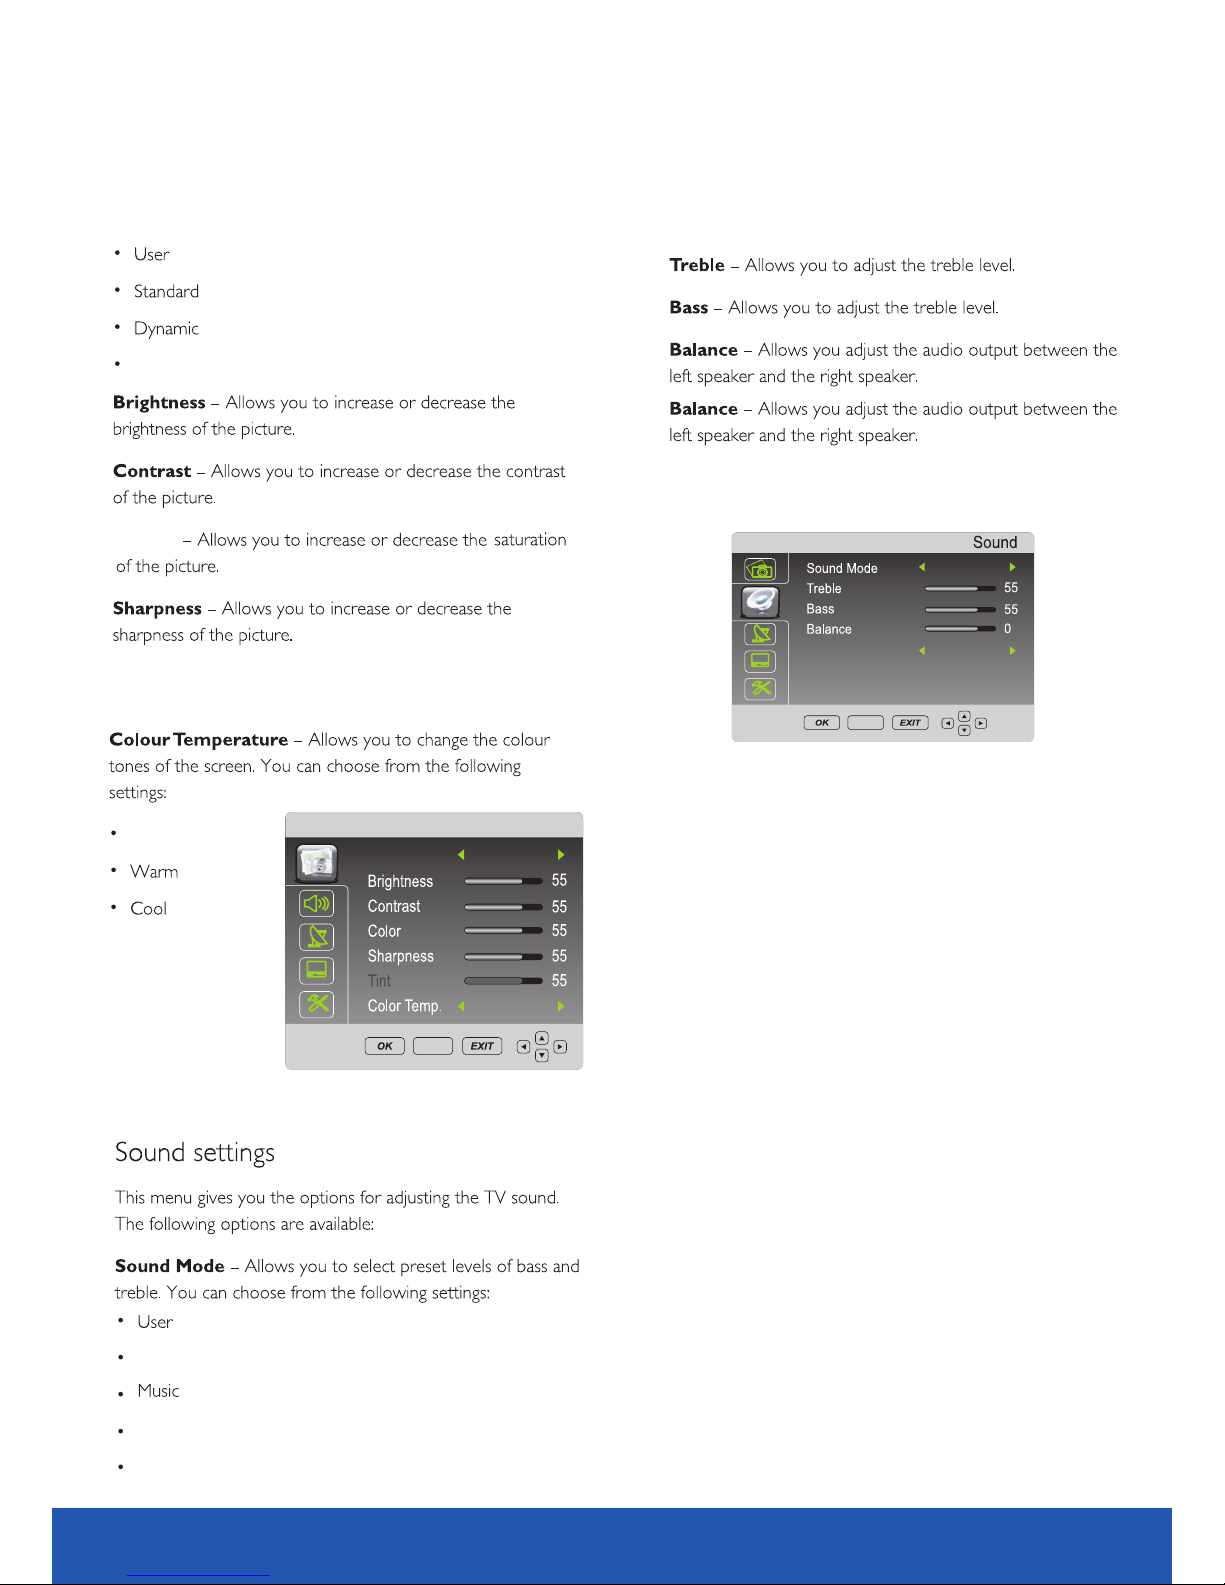
Auto Volume-Allows you to open and clo se
auto volume adjustment
Mild
Medium
Film
Color
SET UP
PICTURE
Picture Mode
Dynamic
Medium
Film
Auto Volu me
SET UP
Off
4410.1 inch TV/DVD user guide
Page 45
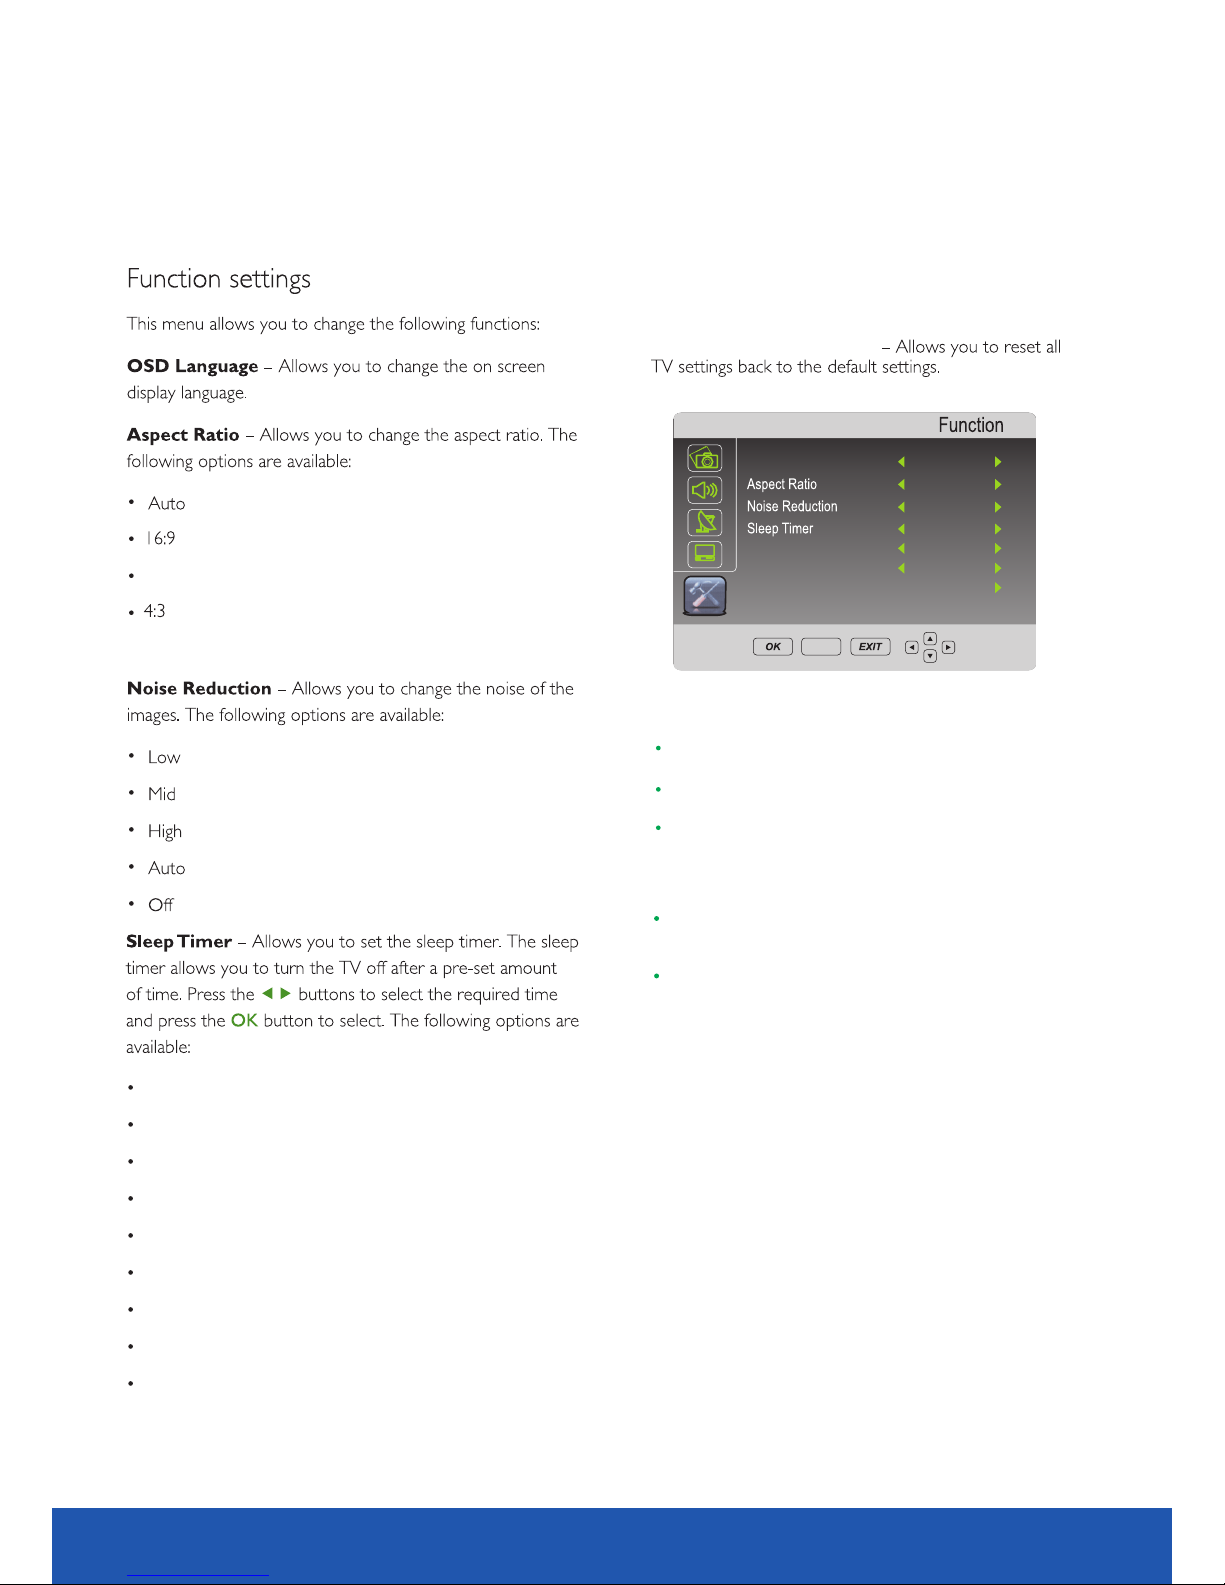
Card reader and usb operation
Restore Factory D efault
FM Transmit-All ows you to transmit audio by
FM frequency
14:9
Off
10min
20min
30min
60min
90min
120min
180min
240min
SET UP
Language E ngli sh
16: 9
Mid
FM Transm it off
off
Tra nsmit Fre quency 93 MHz
Restor e Fac tory D efa ult
NOTES
This player can play USB devices and MPEG4 and JPEG files in
SD, MMC and MS cards.
When reading MPEG files with large size in USB device or media
card, pause may appear.
If a USB device or media card which are unsupported by the
machine have been connected, the unit
may 'lock-up' and won't
commands. In this event please switch
equipment or media card, and then switch the power
reset the machine.
When inserting a media card, you should insert it in the right
direction: If you are facing the
make sure you plug-in
with its connector facing away from you.
Please take off the USB while it stops playing. Never take off it
off the power,
take out USB
TV screen,
respond to
back on to
the card
while it's playing.
45
10.1 inch TV/DVD user guide
Page 46
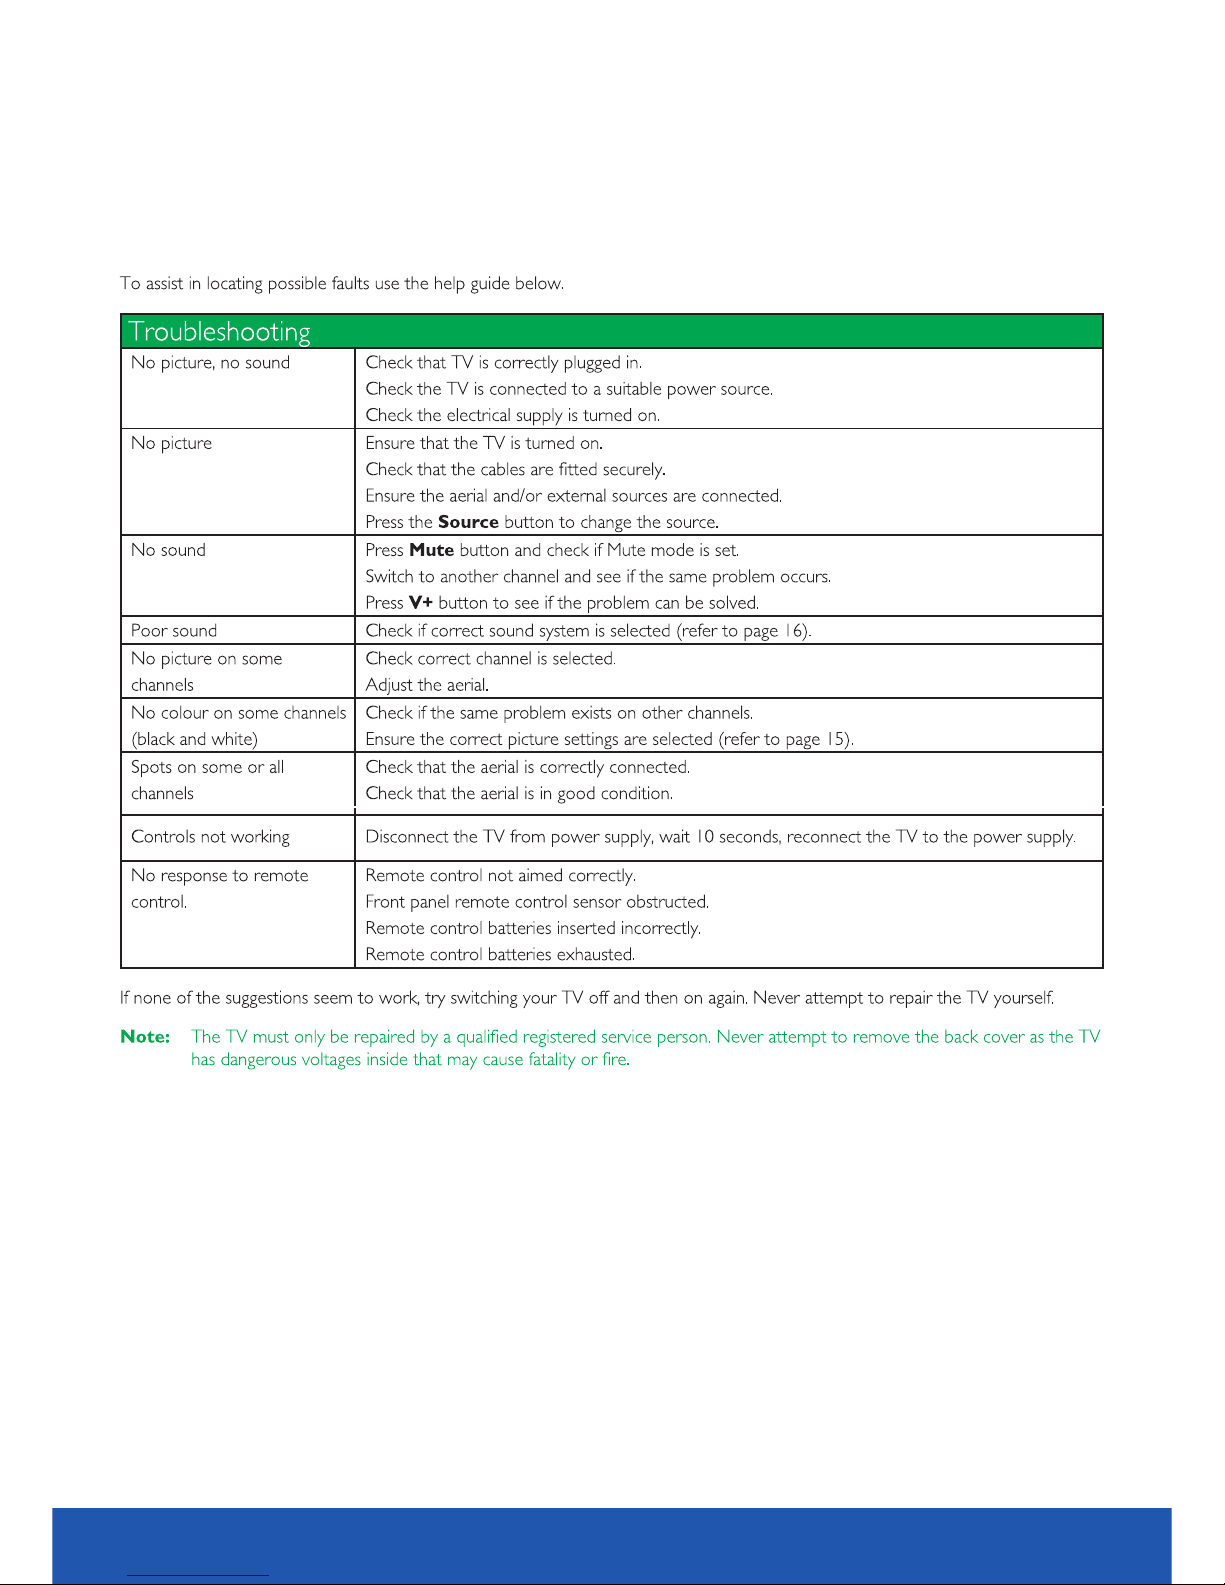
TROUBLESHOOTING
4610.1 inch TV/DVD user guide
Page 47
AVTEX
1
47
10.1 inch TV/DVD user guide
Page 48
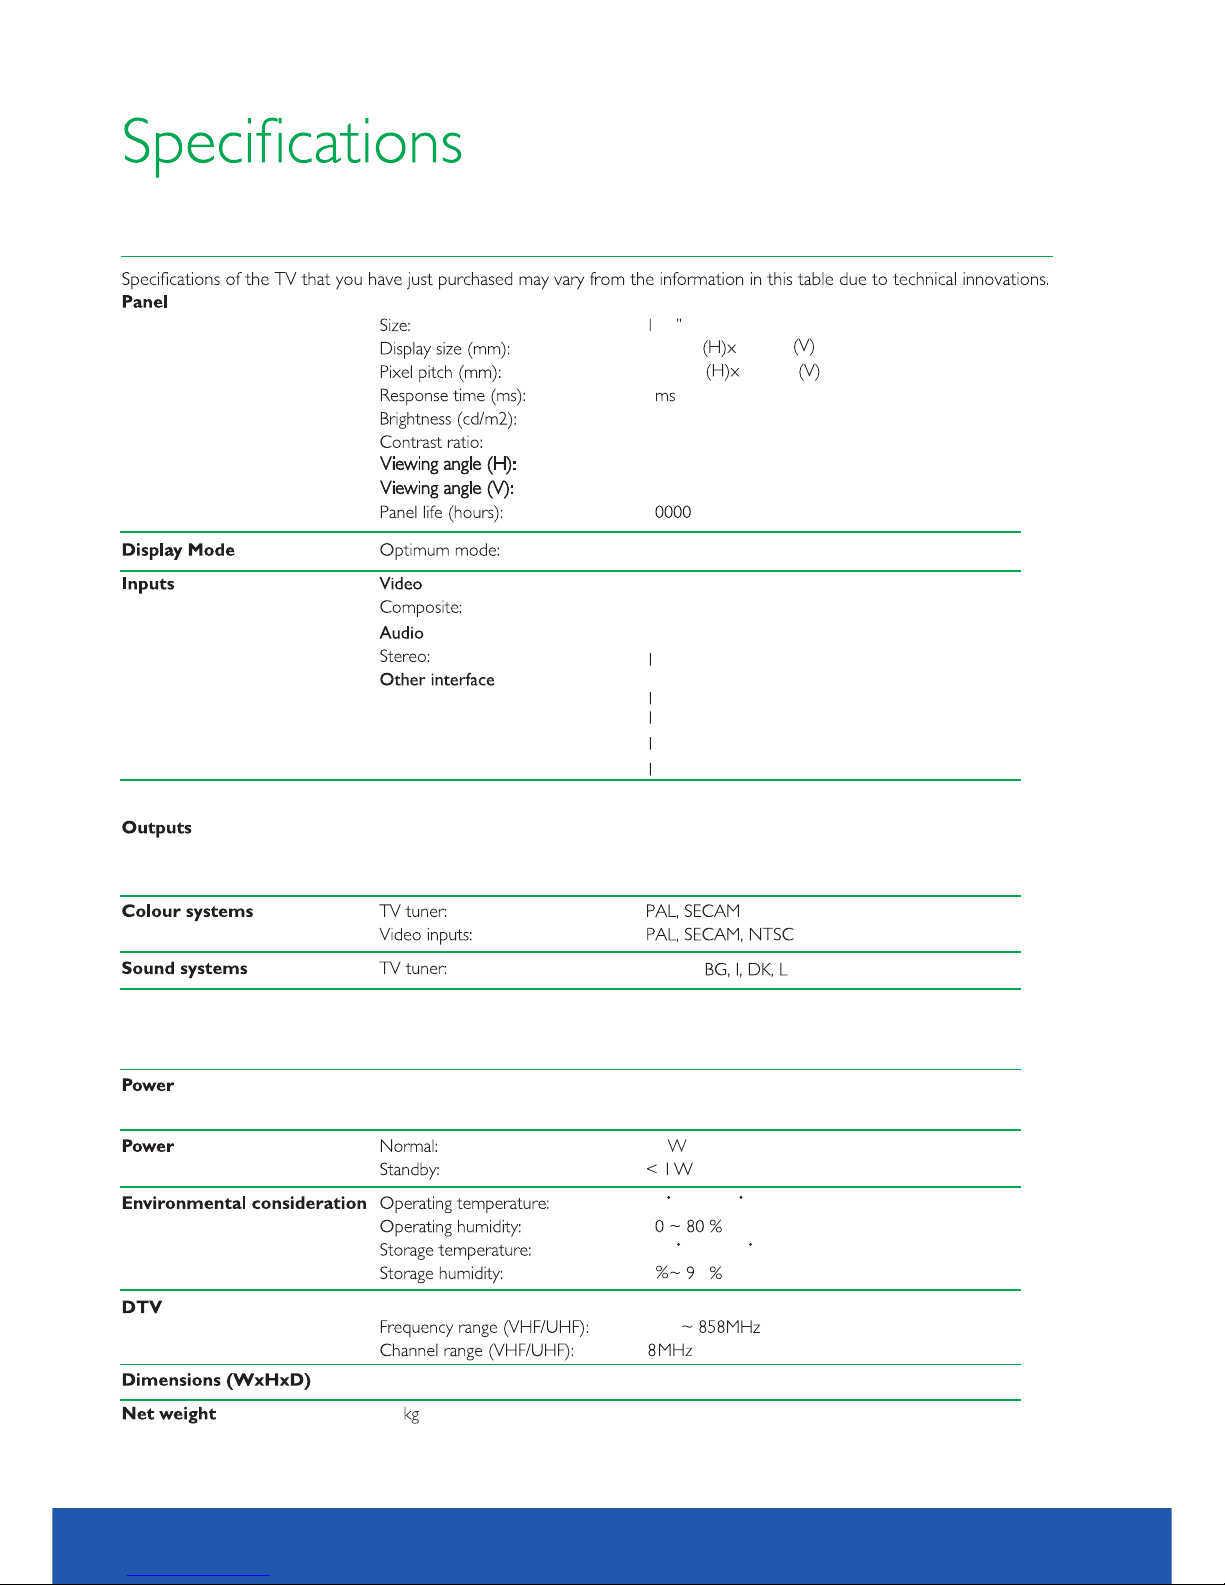
0.1
222.72 125. 28
0.2175
0.2088
8
170
500:1
1
45
35
1024X600;60Hz
1(CVBS)
3.58,NTSC 4.43,PAL6 0
AUTO,
30
adapter
Input
Output
~100V-260V,5 0/60 Hz
-
- - -
12V,2A
+5 C ...+35 C
1
+20 C ...+45 C
5
5
Input connecto r
474
IEC-Type,IEC169.2 ,Fema le
280mmx210mmx36mm
1.3
USB
CARD reader
FM antenna
RF
DVD
Disc type CD-R/RW, DVD-R /RW, DV D+R/R W
Formats
DVD-Video, SVC D, VCD, C D-DA
HDCD, WMA, Kodak Pictur e CD,JP EG
Video
Audio
Composite 1
Stereo 1
Headphone 2
(Type )
4810.1 inch TV/DVD user guide
Page 49
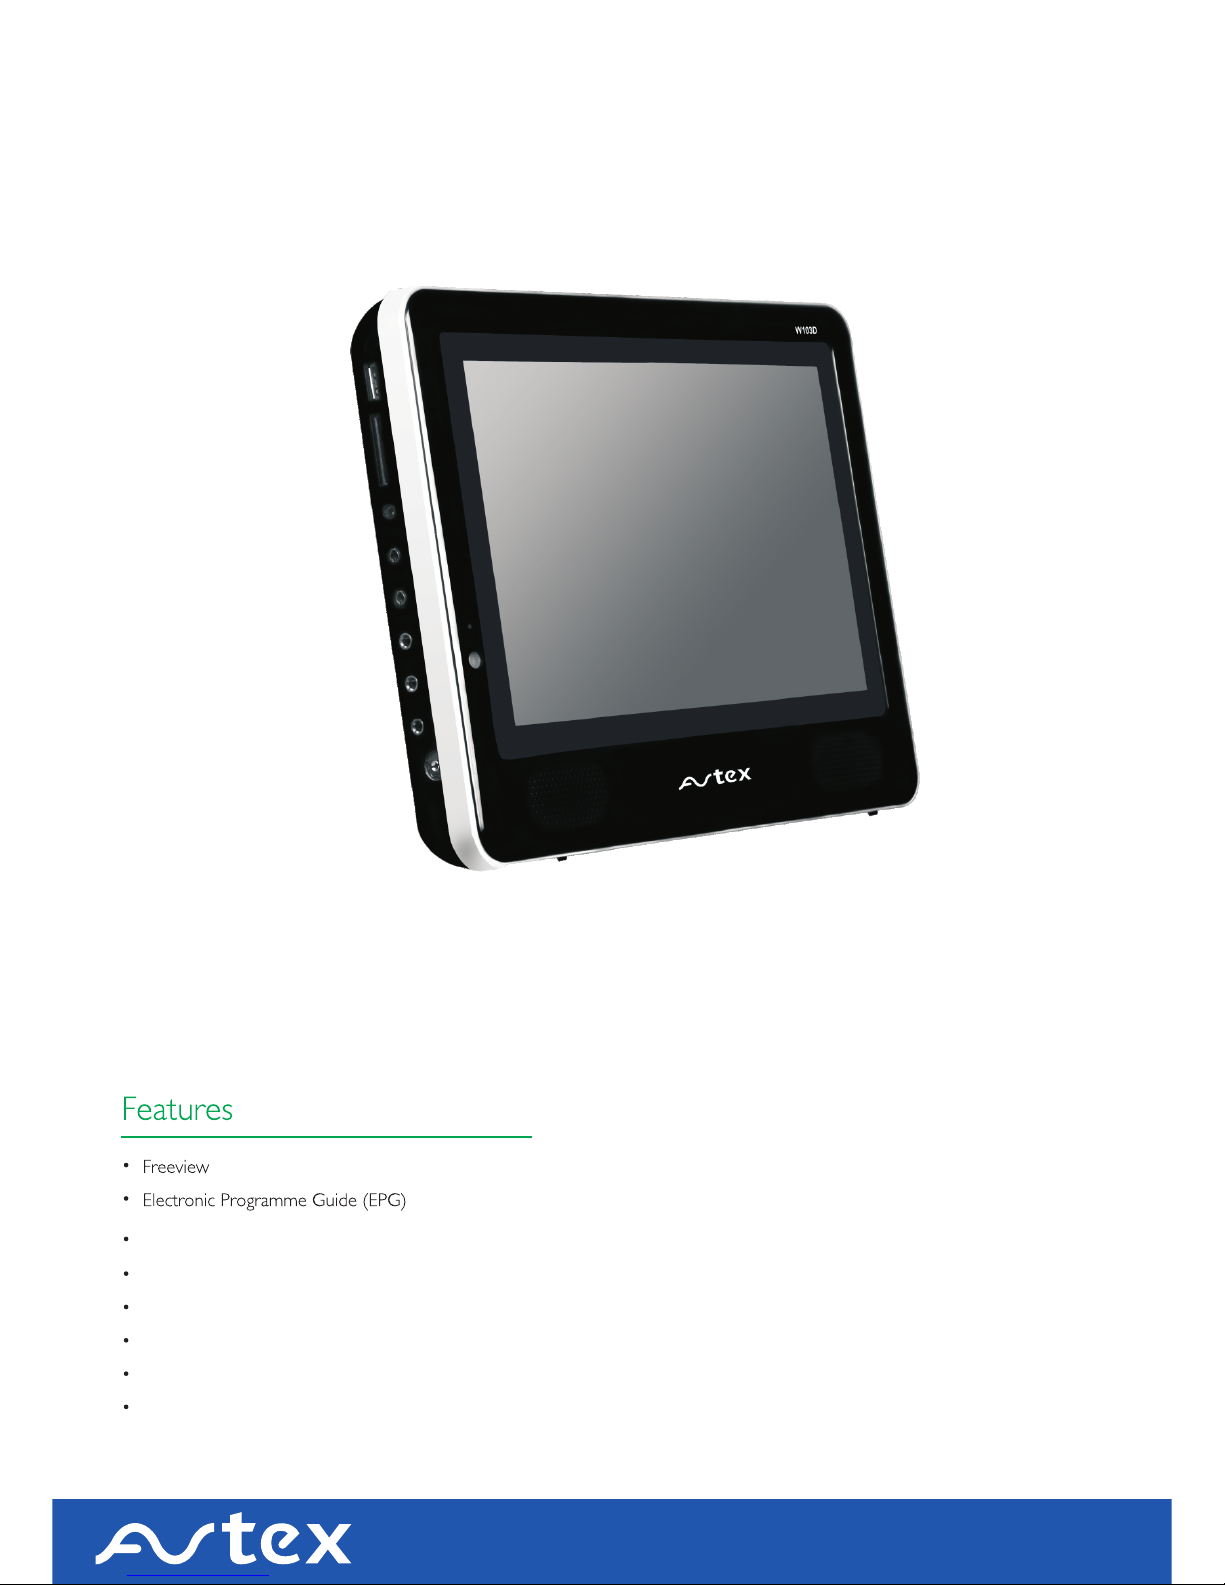
Model:W 103D
DVD Combi nation
USB Inter face
Card read er
Wide View ing Angle
PVR recor d function
FM receiv er
 Loading...