


Model: L199DRS-PRO/L219DRS-PRO/L249DRS-PRO

Introduction
Safety is important
In the box
3
3
Safety information
Electrical information
4
Instruction
Battery safety guidelines
Safety warnings
Parts identification
Front , side and above view
Rear view
Remote control
Connecting the TV
Connecting the aerial
Connecting external devices
HDMI lead
Remote control
Remote control
Installing the batteries
Using the remote control
Operating the TV
Switching on
Switching off
Tuning in digital TV
Tuning in satellite TV
Advanced Setup
To Add New Services/Channels
Frequently Asked Questions
Basic operation
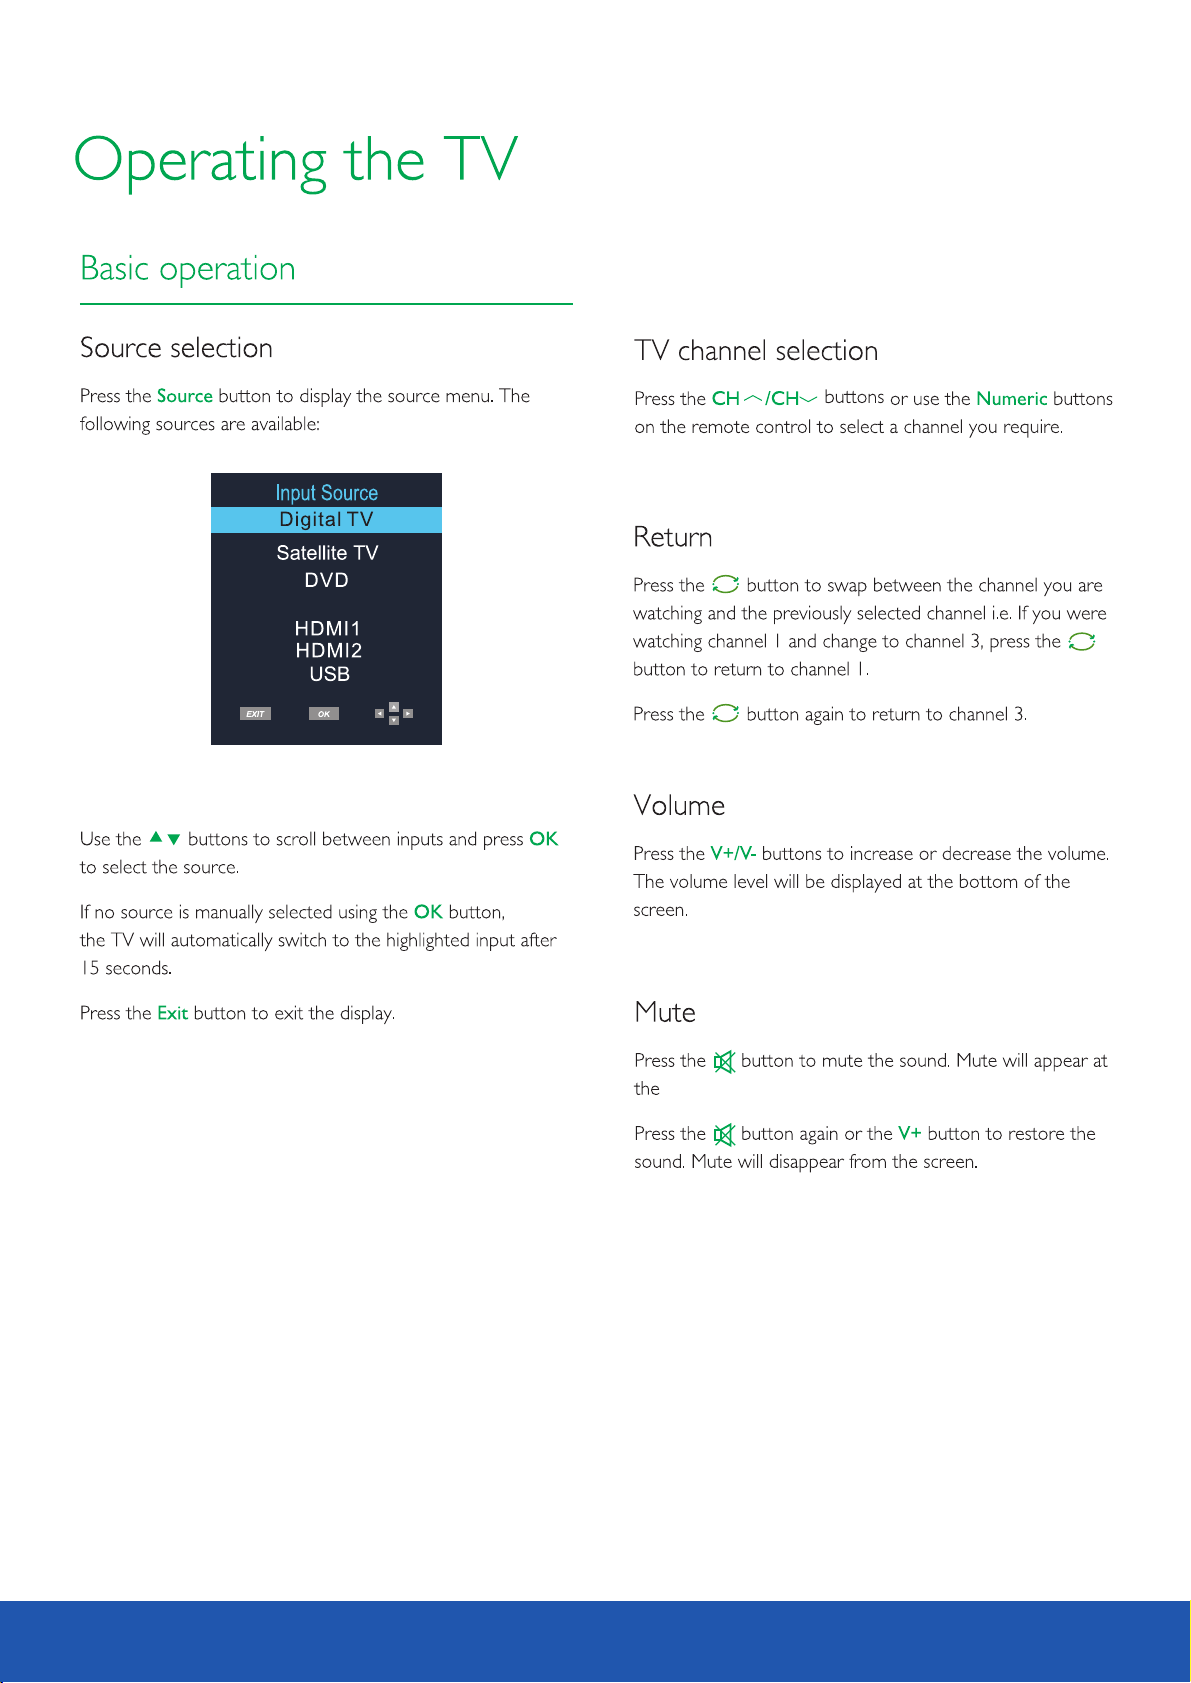
Source selection
TV channel selection
Return
Volume
Mute
Favourite
Subtitle
Information
Audio
TV/
Menus
Picture settings
Sound settings
Channel Setup
Channel Edit
TV Setup
Lock
Function settings
Electronic Programme Guide
Watch and Record
Direct Record
6
7
9
9
10
11
12
12
12
12
13
13
13
13
14
14
14
14
15
15
16
17
18
18
18
18
18
18
19
19
19
19
19
20
20
20
21
21
22
22
23
24
24
24
Viewing Recordings
Pause Live TV
Digital text
Analogue teletext
Common Interface Slot
HDMI/AV setup
PVR
25
25
25
26
27
27
28
DVD 30
DVD Operation
Disc playback mode
JPEG file playing
DVD function settings
USB operation
Trouble shooting
Care and maintenance
Disposal
Guarantee
Manufacturer
Specifications
30
31
36
37
39
40
41
41
41
41
42

AVTEX TV
Power cord
12 Volt DC lead
3.5mm to RCAx3 cable


Instruction
This equipment has been designed and manufactured to
meet international safety standards but, like any electrical
equipment, care must be taken if you are to obtain the best
results and safety is to be assured.
DO read the operating instructions before you attempt to
use the equipment.
DO ensure that all electrical connections (including the
mains plug, extension leads and interconnections between
the pi eces of equipment) are properly made and in
accordance with the manufacturer’s instructions. Switch off
and wi thdraw the mains plug before making or changing
connections.
DO consult your dealer if you are ever in doubt about the
installation, operation or safety of your equipment.
DO route the mains lead so that it is not likely to be walked
on, crushed, chafed, or subject to excessive wear and tear or
heat.
DON’T remove any fixed cover as this may expose
dangerous voltages.
DON’T obstruct the ventilation openings of the equipment
with items such as newspaper, tablecloths, curtains, etc.
Overheating will cause damage and shorten the life of the
equipment.
DON’T allow electrical equipment to be exposed to dripping
or splashing, or objects filled with liquids.
DON’T place hot object or naked fame sources such as
lighted candles or night-lights on, or close to equipment.
High temperatures can melt plastic and lead to fires.
DON’T use makeshift stands and NEVER fix legs with wood
screws-to ensure complete safety always fit the
manufacturer’s approved stand or legs with the fixings
provided according to the instructions.
DON’T use equipment so that you are distracted from the
requirements of traffic safety.
DON’T listen to headphones at high volume, as such use can
permanently damage your hearing.
DON’T leave equipment switched on when it is unattended
unless it is specifically stated that it is designed for unattended
operation or has a stand-by mode. Switch off by unplugging
the equipment and make sure that your family know how to
do this. Special arrangements may need to be made for infirm
or handi-capped people.
DON’T continue to operate the equipment if you are in any
doubt about it working normally, or if it is damaged in any
way-sw itch off, wit hdraw the mains plug and consult your
deal er.
ABOVE ALL,
- NEVER let anyone especially children push anything i nto
holes, slots or any other opening in the equipment - this
could result in a fatal electrical shock;
- NEVER guess or take chances with electrical equipment of
any ki nd. It is better to be safe than sorry!
5

Battery safety guidelines
Used correctly, domestic batteries are a safe and dependable source of portable power.
Problems can occur if they are misused or abused- resulting in leakage or, in extreme cases, fire o r explosion .
Here are some simple guidelines to safe battery use designed to eliminate any such problems.
Take care to fi t your batter ies
correctly , observing t he plus
and minus mar ks on the
battery a nd a ppliance.
Incorrect f itting can ca use
leakage or, i n extreme cas e,
fire or even an e xplosion.
Remove dead b atteries fr om
the unit
and all bat te ries from the u nit
you know you ar e not going to
use for a long ti me. Otherwi se
the batte ri es may leak and
cause damag e.
Replace the w hole set of
batteries a t one time, tak ing
care not to m ix o ld and new
batteries o r different t ypes,
since this ca n result in lea kage
or, in extrem e cases, fire o r
even an explo sion.
Make sure bat tery
compartme nts are secur e.
Supervise c hildren if th ey are
replacing b atteries th emselves
in order to ens ure these
guideline s are followe d.
Never dispo se of batteri es in
fire as this ca n cause them to
explode. Pl ease recycl e dead
batteries ; do not put with
the normal ho usehold was te.
Store unuse d batteries i n
their packa ging and away
from metal ob jects which
may cause a sho rt-circui t
resulting i n leakage or, i n
extreme cas es, fire or eve n
an explosio n.
Never attem pt to recharg e
ordinary ba tteries, ei ther in a
charger or by a pplying hea t to
them. They ma y leak, cause f ire
or even explo de. There are
special rec hargeable b atteries
which are cle arly marked a s
such.
6

Safety warnings
Use in a vehicle
Note
For use only when vehicle is Stationary.
• Read all the instructions carefully before using the unit
and ke ep them for future reference.
• Retain the manual. If you pass the unit onto a third
part y make sure to in clude this manual.
Chec k that the voltage marked on the rating label
matc hes your mains voltage.
Damage
• Inspect the unit for damage after unpacking.
• Do not continue to operate the unit if you are in any
doub t about it work ing normally, or if it is damaged in
any wa y -switch off, withdraw the mains plug and
cons ult your dealer.
Location of Unit
• The unit must be placed on a flat stable surface and
shou ld not be subjected to vibrations.
• Do not place the unit on sloped or unstable surfaces as
the un it may fall off or tip over.
• The mains socket must be located near the unit and
shou ld be easily accessible.
Temperature
• Avoi d extreme degrees of temperature, either hot or
cold . Place the unit well away from heat sources, such
as rad iators or gas /electric fires.
• Avoi d exposure to direct sunlight and other sources of
heat .
Naked Flames
• Neve r place any type of candle or naked flame on the
top of o r near the unit.
Moisture
• To reduce the risk of fire, electric shock or product
dama ge, do not expo se this unit to rain, moisture,
drip ping or splashing. No objects filled with liquids,
shou ld be placed on the unit.
• If you spill any liquid into the unit, it can cause serious
dama ges. Switch it off at the mains immediately.
With draw the mains plug and consult your dealer.
Ventilation
• To pre vent the risk of electric shock or fire hazard due
to ove rheating, ensure that curtains and other
mate rials do not obstruct the ventilation vents.
• Do not install or place this unit in a bookcase, built-in
cabi net or in another confined space.
Ensure the unit is well ventilated.
Safety
• Always disconnect the unit from the mains supply
befo re connecting/disconnecting other
devi ces or moving the unit.
• Unplug the unit from the mains socket before a
ligh tning storm.
Mains Cable
• Make s ure the unit or the unit stand is not resting on
top of t he mains cable, as the weight of the unit may
dama ge the cable an d create a safety hazard.
Interference
• Do not place the unit on or near appliances which may
caus e electromagnetic interference. If you
do, it m ay adversel y affect the operating performance
of the u nit, and cause a distorted picture or sound.
7

Safety warnings
Batteries
• Batt eries used in the remote control for this unit are
easi ly swallowed by young children and this is
dang erous.
• Keep l oose batteries away from young children and
make s ure that the ba ttery holder tray is secure in the
remo te control. Seek medical advice if you believe a
cell h as been swallowed.
• Dispose of batteries correctly by following the
guid ance in this manual.
Supervision
• Children should be supervised to ensure that they do
not pl ay with the unit and the remote control.
• Neve r let anyone especially children push anything into
the ho les, slots or any other openings in the case -this
coul d result in a fatal electric shock.
Service
• To reduce the risk of electric shock, do not remove
scre ws. The unit does not contain any user-serviceable
part s. Leave all ma intenance work to qualified
pers onnel.
• Do not open any fixed covers as this may expose
dang erous voltages.
Maintenance
• Ensure the unit is fully unplugged from the power
supp ly before cleaning.
• Do not use any type of abrasive pad or abrasive
clea ning solutions as these may damage the unit’s
surf ace.
• Do not use liquids to clean the unit.
CAUTION
RISK OF ELECTRIC SHOCK
DO NOT OPEN
The li ghtning fla sh with arrowhead symbol,
with in an equilat eral triang le, is intended to
aler t the user to the p resence of un insulated
“dan gerous volt age” within t he unit’s enclosure
that m ay be suffici ent magnitu de to constitute a
risk o f electric sh ock.
The ex clamation p oint within an equilateral
tria ngle is inten ded to alert th e user to the
pres ence of impor tant operat ing and
main tenance (se rvicing) instructions in the
manu al accompan ying the unit.

,
above
3
6
8
7
3
4
5
6
7
8
4
5

USB USB RE C PCM CIA
HDMI2
12V/24V (AR C)
HDMI1 CO AXI AL AV RF SAT 1 SAT2
1
2
3
4
5
1 USB
2 USB for record
3 PCMC IA card Slots f or external Conditional Access(CA)-modules.
4 12V/24V DC input terminal
5 HDMI1/HDMI2 in socket. Refer to HDMI lead on page12
6 Coax ial audio out
7 AV input
8 Head phone output terminal
9 RF input terminal(Aerial)
10 SAT 1 input terminal
11 SAT 2 input for record
9
8
7
6
10
11

.
Except DVD
/SAT.
DTV
fo r DVD
BATT
40
41
39
38
/
BATT
38.
To display TV supply voltage.
S/Q
39.
To display signal strength and quality.
PICTURE
40.
To change picture mode.
SOUND
41.
To change sound mode.
11

You can connect the TV to a compatible device using
a HDMI lead, using this method will give you optimum
picture.
Connect satellite cable to the SAT1 socket for watching
and re cord, and SAT2 socket for record.
To watch and record different satellite programmes a
separate signal needs to be applied to both Sat 1 and Sat 2
inputs. If only one satellite signal available this MUST be
appl ied to Sat 1 inpu t. It will still be possible to record one
sate llite channel and watch another source simultaneously
Rear connection panel
Satellite
RF cable
Connect the cable from the HDMI equipment to one
of the TV HDMI sockets.
The HDMI2 will support the ARC function, so it is
possible to connect the TV to an audio device that
also has ARC capabilities. Please activate this function
in the TV setup menu by setting the CEC and ARC
settings to ON, allowing the standard supplied TV
remote control to control the audio device volume
and st andby conditions.
HDMI 2
(ARC )
COAXIAL AV RF SAT1 S AT2
HDMI2
12V/24V (AR C) HDMI 1
HDMI 1
DVD o r V CR pl ayer
12

13

Press the switch on the left hand side of the TVpower
blue
periods such as overnigh t. Switch t he TV off using the Power
switch on the side of the TV.
Cha nnel
Dat a : 0 Progr amme( s)
in digital TV
OSD L anguage
Country
Auto Search
UK
English
Pri mary Re gion
Sec ondar y Regio n
Terti ary Reg ion
Wale s
Please wait for channels to populate the list, there may
be a s mall delay as all channels are correctly a llocated.
For your information HD channels ar e populated
in the list fro m channel 1 01 onwards.
ALL
PAGE+
PAGE-
hold down
14

Tuning in satellite TV
For convenience your 199/219/249DRS-PRO co mes
with a default channel list from first switch on, you are
able to edit and sort this list to your own personal
preference. I f any furth er channels are required then
you must start a full scan .
To perform a full scan
ALL
OK
OK
S
Q
Press TV SETUP and select “Channel”, press or
Select the wanted satellite(default is Astra 28.2)
Confirm there is signal in the indicator
Scroll down and select “ Search Transponder”, press
This will then start a complete scan of the selected satellite
Channel
Satellite
Transponder
Channel
Search
Advanced Setup
Channel Edit
Favourite List
OK
EXI T
ASTRA 2 28.2E
10714 H 22000
Transponder
SET UP
A scan will locate all new services on the selected satellite and
add after the default channel list.
Advanced Setup
By default your satellite TV will automatically scan all Free
To Air or all Scramble channels on the satellite you have
chosen in the Channel menu. There is however an opportunity
to modify any of these auto settings in the Advanced Setup
menu.
It is advised not to change any default setting unless
advised by qualified personnel.
To enter Advanced Setup you will need to input password
(default 0000).
Advanced Setup
Satellite
Transponder
LNB Type
LNB Power
22KHz
ToneBurst
DisEqc1.0
DisEqc1.1
DisEqc1.2
Search
Channel
MANAGER
SCAN
OK
SETUP
ASTRA 2 28.2E
12538 V 41248
09750/10600
13/18V
AUTO
Off
Off
Off
Off
Transponder
Load to USB
EXI T
S
Q
36 %... 036 11527MHz V27500KHz
DTV :
Radio :
EXI T
107 programme(s)
8 programme(s)
SET UP
Any new/wanted channels can now be edited/sorted to the
users desired preferance, please refer to page 21 for channel
edit feature.
15
Auto Search
Load to/from USB (Satellite only)
At any time, it i s possible to downlo ad any of the
alte rations m ade to the channel lis t or favour ite lists.
Insert a USB me mory device into USB1 of the TV and
enter advance d menu. Sel ect Channel and using cursor
keys set to “Load to USB” press OK. This will download
the current satellite ch annel settings to the memory
devi ce, and if needed in t he future c an be used to upload
back into the TV by changi ng the sett ing to Load from USB.
Setting Favourites (Satellite Only)
Press TV SETUP and select “Channel” , using the cursor
keys select Favourite Li st and pres s OK. It is n ow possible
to set up to 5 Favourite lists. Press the FAV button to
select the list and then a dd the want ed programmes using
the RED button. To delete any programmes from the
favourite lis t, use the cursor keys to highlig ht and pres s
YELLOW to delete.

To select your favourite list whils t viewing p ress the FA V
button and use the cursor keys to bro wse through the lists.
Advanced Setup
When selectin g a program me to watch either use r the
cursor keys and select OK, or enter t he channel number
to view, (needs to be a 3-digit entry i.e. Chann el 3 will be
entered as 003).
To Add New Services/Channels
Due to broadcast changes and to future proof your Satellite TV
it is possible to add additional transponders so you have the
opportunity to add any new channels that may get added to the
channel list.
To add a transponder follow the procedure below:
Access Advanced Setup menu, you will need to input password
(default 0000)
Press the button to enter satellite and TP Manager
Select the satellite you are tuned to (default Astra 28.2), and
press the button enter TP list.
GREEN
01 028.2E Ku_ASTRA 2 28.2E
02 019.2e Ku_ASTRA 1 19.2E
03 013.0E Ku_HOTBIRD 13.0E
04 160.0E Ku_OPTUS D1 160.0E
05 152.0E Ku_ASTRA 1E 1G 3A
06 156.0E Ku_NILESAT 101 10
07 023.5E Ku_ASTRA 3 23.5E
08 001.0W Ku_SIRUS 4.8E
09 000.8W Ku_THOR 0.8W
10 005.0W C_ATLANTIC BIRD3 5W
MANAGER
SCAN
OK
SETUP
Advanced Setup
001 10714MHz H 22000KHz
002 10729MHz V 22000KHz
003 10744MHz H 22000KHz
004 10758MHz V 22000KHz
005 10773MHz H 22000KHz
006 10788MHz V 22000KHz
007 10803MHz H 22000KHz
008 10817MHz V 22000KHz
009 10832MHz H 22000KHz
010 10847MHz V 23000KHz
EXI T
S
Q
01 028.2E Ku_ASTRA 2 28.2E
02 019.2e Ku_ASTRA 1 19.2E
03 013.0E Ku_HOTBIRD 13.0E
04 160.0E Ku_OPTUS D1 160.0E
05 152.0E Ku_ASTRA 1E 1G 3A
06 156.0E Ku_NILESAT 101 10
07 023.5E Ku_ASTRA 3 23.5E
08 001.0W Ku_SIRUS 4.8E
09 000.8W Ku_THOR 0.8W
10 005.0W C_ATLANTIC BIRD3 5W
MANAGER
Press scanning button, your Satellite TV will then
BLUE
SCAN
Add Transponder
Transponder
Transponder
Symbol
Polarity
OK
001 10714MHz H 22000KHz
002 10729MHz V 22000KHz
003 10744MHz H 22000KHz
96
004 10758MHz V 22000KHz
10714
005 10773MHz H 22000KHz
22000
006 10788MHz V 22000KHz
H
007 10803MHz H 22000KHz
008 10817MHz V 22000KHz
008 12647MHz V22420KHz
009 10832MHz H 22000KHz
010 10847MHz V 23000KHz
EXI T
SETUP
S
Q
automatically scan the new transponder and add any new
channels found and add them to you channel list.
Transponder Search
DTV
Radio
9
5
Bad Good
SETUP
EXI T
OK
Press button Add the new frequency. Symbol rate and
RED
polarity.
Press to store.
OK
16

Frequently Asked Questions
For satellite setup
17
AV
top ri ght hand side of the screen.
18

Favourite(Digital TV only)
PAGE+
PAGE-
TV SETUP
S
MHEG5
10:05
Narra tion
1 BBC O NE West
23:0 0 Sat Oct 2 1 2017
576i
MPEG
3/10. A For eign Fi eld:A ustra lian cr ime dra ma.wh ey the bo dy of a man i s found i n a park. i t falls t o Dr Luci en Blak e to find o ut not ju st how he d ied but a lso the m an’s tru e ident ity.[A D,S]
Subti tle
16:15
Engli sh
REC
SD
DTV
Q
23 bi d tv
19
Audio language option is dependent on broadcast.

TV SETUP
TV SETUP
Sound Mode
Tre ble
Bass
Balance
Hearing Impaired
AD Switch
AD Volume
Sound
50
50
0
Off
Off
50
col
Hear ing Impaired-
impaired
Allows you to turn on/off hearing
in DTV
is dep endent on broadcast.
Hearing Impaired option
20

AD Swi tch
- Allows you to turn on/off AD Switch.
in DTV
AD Volume
- Allows you to adjust AD Volume.
Channel Setup(Digital TV only)
PAGE+ PAGE-
Software Update(OAD)
Allows you to update
MOV E
PAGE+
PAGE-
21

Cacel
22

User setup - Allows you to adjust setting for Aspect
Ratio, Noise reduction, Sleep Timer, OSD time, Auto sleep
and headphone.
HDMI C EC - Connect an ARC compatible sound system to
the HD MI2 and set the s ettings as be low to use TV rem ote
control to control volume and standby operation.
Funtion
OSD Language
User Setup
HDMI CEC
Reset
English
Aspe ct Ratio - Allows you to set up aspect ratio:
HDMI ARC
HMDI CEC
HMDI ARC
Auto Standby
Auto TV on
Device contro l
Device list AVTEX HT711
OSD Time-Allows you to set OSD menu display time out.
5s
20s
10s
25s
15s
30s
35s
Auto Sleep-Allows you to turn on/off the auto sleep after
four hours.
Head phone - Allows you to turn on/off the headphone
output.
User Setup
OSD Time
Headphone
15s
23

It is no w possible to select other channels and sources whilst
the recording continues. Press the info on the remote
control and a RED icon will be displayed right hand side of
the ba nner to indicate programme currently recording.
PRO GRAMM E GUIDE
17/ 10/20 17 14:1 5-15: 10 1 BBC ON E West
Cha nnel Na me
2 BBC T WO
3 ITV Wales
4 S4C
5 Cha nnel 5
6 ITV 2
7 BBC T HREE
9 BBC F OUR
REC
SCHE DULE
+12 H
Th.. ..
The Gr eat Bri tis.. .
Cegi n Bryn: I ndi.. .
-12 H
15: 00
Esca pe to the C ...
New: 1 000 Hea rbeat s
Ange ls and Or namen ts
The Je remy Ky le Show
PAGE+
15: 30
Home C omfor ts at chr ist.. .
The Gr eat Anit ...
Babi D el: Ward ...
This I s BBC Thr ee
This I s BBC Fou r
PAGE-
PAGE+ PAGE-
+12H -12H scroll information about
programmes for the next seven days.
16: 00
The Wo rld’s Mo ...
Tippi ng Poin t
A wr Fawr
Chri stmas S witch
The Je remy Ky le Show
OK
INF O
07: 32 17/1 0/201 7
16: 30
Flog I t!
Woga n: The Bes ...
EXI T
S
MHEG5
10:05
Narra tion
1 BBC O NE West
23:0 0 Sat Oct 2 1 2017
576i
MPEG
3/10. A For eign Fi eld:A ustra lian cr ime dra ma.wh ey the bo dy of a man i s found i n a park. i t falls t o Dr Luci en Blak e to find o ut not ju st how he d ied but a lso the m an’s tru e ident ity.[A D,S]
Subti tle
16:15
Engli sh
REC
SD
DTV
Q
23 bi d tv
To stop the recording at any time, press the STOP button on
the remote control.
Stop recordin g, are you sur e?
...
Yes
No
Select "Yes" to stop recording or "No" to continue the
recording.
Setting a record from the EPG
You can also set timer recordings from the , sele ct
the de sired programmes and press .
EPG
Watch and Record
The Pro range will allow the user to record a programme
whilst watching any other programme (depending on signal)
or another source (Ex. USB).
Direct Record
Insert USB memory device into the REC USB (do not have
any other device in USB to use this feature). Press the REC
on the remote control and the current programme will
record directly, an info box will appear bottom right corner
then will time out.
[00:00:05]
REC
DTV(USB)
1 BBC ONE Wa
Red Rock
DELE TE
24

Viewing Recordings
Pause Live TV
To view any recorded programmes, press the List button
on the remote. (Depending on file size there can be a small
delay displaying the list). Highlight the wanted programme
and pr ess Info will display programme details. To watch
highlight the programme and press play on remote control.
To delete, highlight in the list and press the RED button.
Recorded li st Programm e
The Darling Buds of M...
DELE TE
INFO
LIST
EXIT
OK
To pau se live TV, press the Time Shift button, the
programme will stop. To continue watching press the
Play b utton and the programme will resume. To return
to liv e TV press the Stop button.
Please note:
If a mem ory device is inserted into USB this will take priority
and pr event the possibility to fully utilise the "Watch and
Record" feature.
To record one satellite channel and watch another will
require a twin LNB satellite system.
Digital text is an information system that display s text on your
TV screen.
25

Analogue
video
video
26

/AV
AV
27

the setup key on the remote .
Scorll down through the menu using the keys to
Digital TV or Satellite TV.
Insert
Note : USB must be in USB (not USB REC) to format
Select Disk C:
Check PVR File System SUCC ESS
C:
Check PVR File Sy stem Start
Format
Max record time 6 H our
SETU P
Select Disk will select the destination disk for recording
TV program.
Chec k PVR File system.
Form at will format the disk.
Max re cord time wil l limited the max record time.
Afte r recording, press button to display files
info rmation. Pressing button to display details.
list
info
For mat Pass
Tim e Shi ft Si ze ALL
Speed HD s upp ort 2730 KB/s
Max record time 6H our
SETU P
Allows you select USB disk or HDD size for recording.
Pressing to chang e.
to
28

File System S iz e
PVR File System Type FAT32
PVR File System S iz e Al l
SD 300 Mins
HD 85 Mins
SETU P
if you want to format disk,
Please
.
Recorded li st Programm e
Ex it
Warning:
Please make sure your USB or hard disk has at least 500MB
free space and then create PVR file system before you record
Digital TV program.
DELE TE
INFO
LIST
EXIT
OK
29

30

u
313233


343536


You may select TV Display, Screen, Saver, Downmix and OSD Lang.
TV display: this is used to set the output picture ratio of this unit.
Optional settings: 4:3/PS, 4:3/LB, 16:9; Default: 4:3/PS
Screen Saver: Open or close the screen saver.
Optional settings: Off, On; Default: On
Downmix: this item is used to set this unit’s DOWNMIX mode to change multi-channel
audio into 2-channel audio output.
Optional settings: Stereo, LT/RT; STR Default
OSD lang: Select OSD languages. Default is English.
TV Type: To set the output video system of this player.
Optional settings: Auto, PAL, NTSC; Default; PAL PBC: this item is used to set PBC state.
When playing SVCD, VCD2.0 discs, if PBC is set On, this unit
enters PBC playback mode; if PBC is set Off, the unit plays the
disc according to track sequence.
Optional settings: On, Off; Default: On
Audio: this item is used to set the preference audio language when
playing.
Subtitle: this item is used to set the preference subtitle language
when playing discs with subtitle content.
Disc menu language: this item is used to set the prefered disc menu language when playing.
Default of disc menu language: English
Default of subtitle: English
37

38

on the USB there may be a long pause.
In movie playback mode if wanted image is too small press play button to fill whole screen.
are
become unresponsive to
down TV and remove USB and switch on the TV.
Do not remove the USB whilst it is reading/playing.
The symbol shown below means an invalid operation has been attempted.
39

40

Manufacturer
0
U
3
41

Mini AV:
HDMI:
Coaxial
19.53’’
434.88.38(H) x 238.68(V)
0.2265(H)x0.221(V)
20ms
3000:1
176
176
1920 x 1080;75Hz
1
2
448.9mm x 278.2mm x 46.2mm
2.7kg
3.3
39
0.5
42

21.5’’
476.064(H) x 267.786(V)
0.24795(H) x 0.24795(V)
25ms
3000:1
178
178
Mini AV:
HDMI:
Coaxial
1
2
3.3
40
0.5
43
491.9mm x 308.2mm x 46.2mm
3.1

23.6’’
521.28(H) x 293.22(V)
0.2715(H) x 0.2715(V)
15ms
1000:1
178
178
6
Mini AV:
HDMI:
Coaxial
1
2
3.3
40
0.5
533.7mm x 333.7mm x 47.4mm
3.5
44

Full HD
Watch an d record
Mode l: L199DRS-PRO/L 219DRS-PRO/L249DRS- PRO
 Loading...