

Page 1
Avtek TT-BOARD 3000/4000
Instrukcja obsługi...........................................1
User manual.....................................................8
Gebrauchsanweisung....................................15
Notice d’utilisation.........................................22
Návod k použití...............................................29
Návod na použitie...........................................36
Руководство...................................................43
Manual de utilizare.........................................50
Használati útmutató......................................57
PL
EN
DE
FR
CZ
SK
RU
RO
HU
Page 2

Page 3

1
Najnowszą instrukcję obsługi oraz wszelkie informacje
dotyczące tablic interaktywnych Avtek można znaleźć na
stronie http://www.avtek.eu
Page 4
2
1. Zawartość opakowania
Po otwarciu opakowania należy sprawdzić zawartość. W przypadki braku lub uszkodzeniu jakiejkolwiek
z wymienionych części prosimy skontaktować się ze sprzedawcą.
Zawartość:
Model 3000/4000
Nazwa części Ilość Informacja
Tablica interaktywna 1 Odpowiedni model
Przewód USB 1
Karta gwarancyjna 1
Instrukcja obsługi 1
Pisaki 2
Zestaw montażu ściennego 1
Uwaga:
Powierzchnia tablic interaktywnych Avtek TT-BOARD 3000/4000 została zoptymalizowana pod kątem
wyświetlania jak najlepszego obrazu z projektora i eliminacji efektu odbicia światła. W tym celu zastosowano
specjalną powłokę powierzchni. Aby zachować najlepsze parametry powierzchni, należy zetrzeć ją zaraz po
naniesieniu notatek wykonanych pisakami suchościeralnymi. Zalecane jest również regularne pielęgnowanie
powierzchni ogólnodostępnymi środkami czyszczącymi do tablic suchościeralnych.
• czyszczenie należy wykonywać regularnie lub gdy zauważone zostaną ślady pisaków po wytarciu
powierzchni tablicy interaktywnej
• nie należy używać markerów permanentnych lub innych nieprzystosowanych do powierzchni
suchościeralnych
• w przypadku niestosowania się do zaleceń producenta, powierzchnia może ulec trwałemu zabrudzeniu
Wymagania systemowe:
Minimalne wymagania systemowe: Zalecane parametry systemu:
Procesor
1.0 GHz x86
Pamięć
256 MB
Karta graczna
Wyświetlająca min. 256
kolorów
Dysk twardy - wolna
przestrzeń
150 MB
Rozdzielczość ekranu
800x600, 1024x768,
1280x1024
Port USB
1.1
Procesor
2.0 GHz x86
Pamięć
512 MB lub więcej
Karta graczna
256 kolorów lub więcej
Dysk twardy - wolna
przestrzeń
500 MB
Rozdzielczość ekranu
1024x768, 1280x1024
Port USB
2.0
Tablica interaktywna Avtek jest urządzeniem typu HID przez co po podłączeniu do portu USB jest automatycznie
rozpoznawana oraz instalowana przez system. Dzięki temu instalacja dedykowanych sterowników jest
opcjonalna. W systemach operacyjnych MS Windows 7 oraz wyższych proces kalibracji można przeprowadzić
z poziomu narzędzia wbudowanego w system operacyjny (zobacz rozdz. 5).
Page 5
3
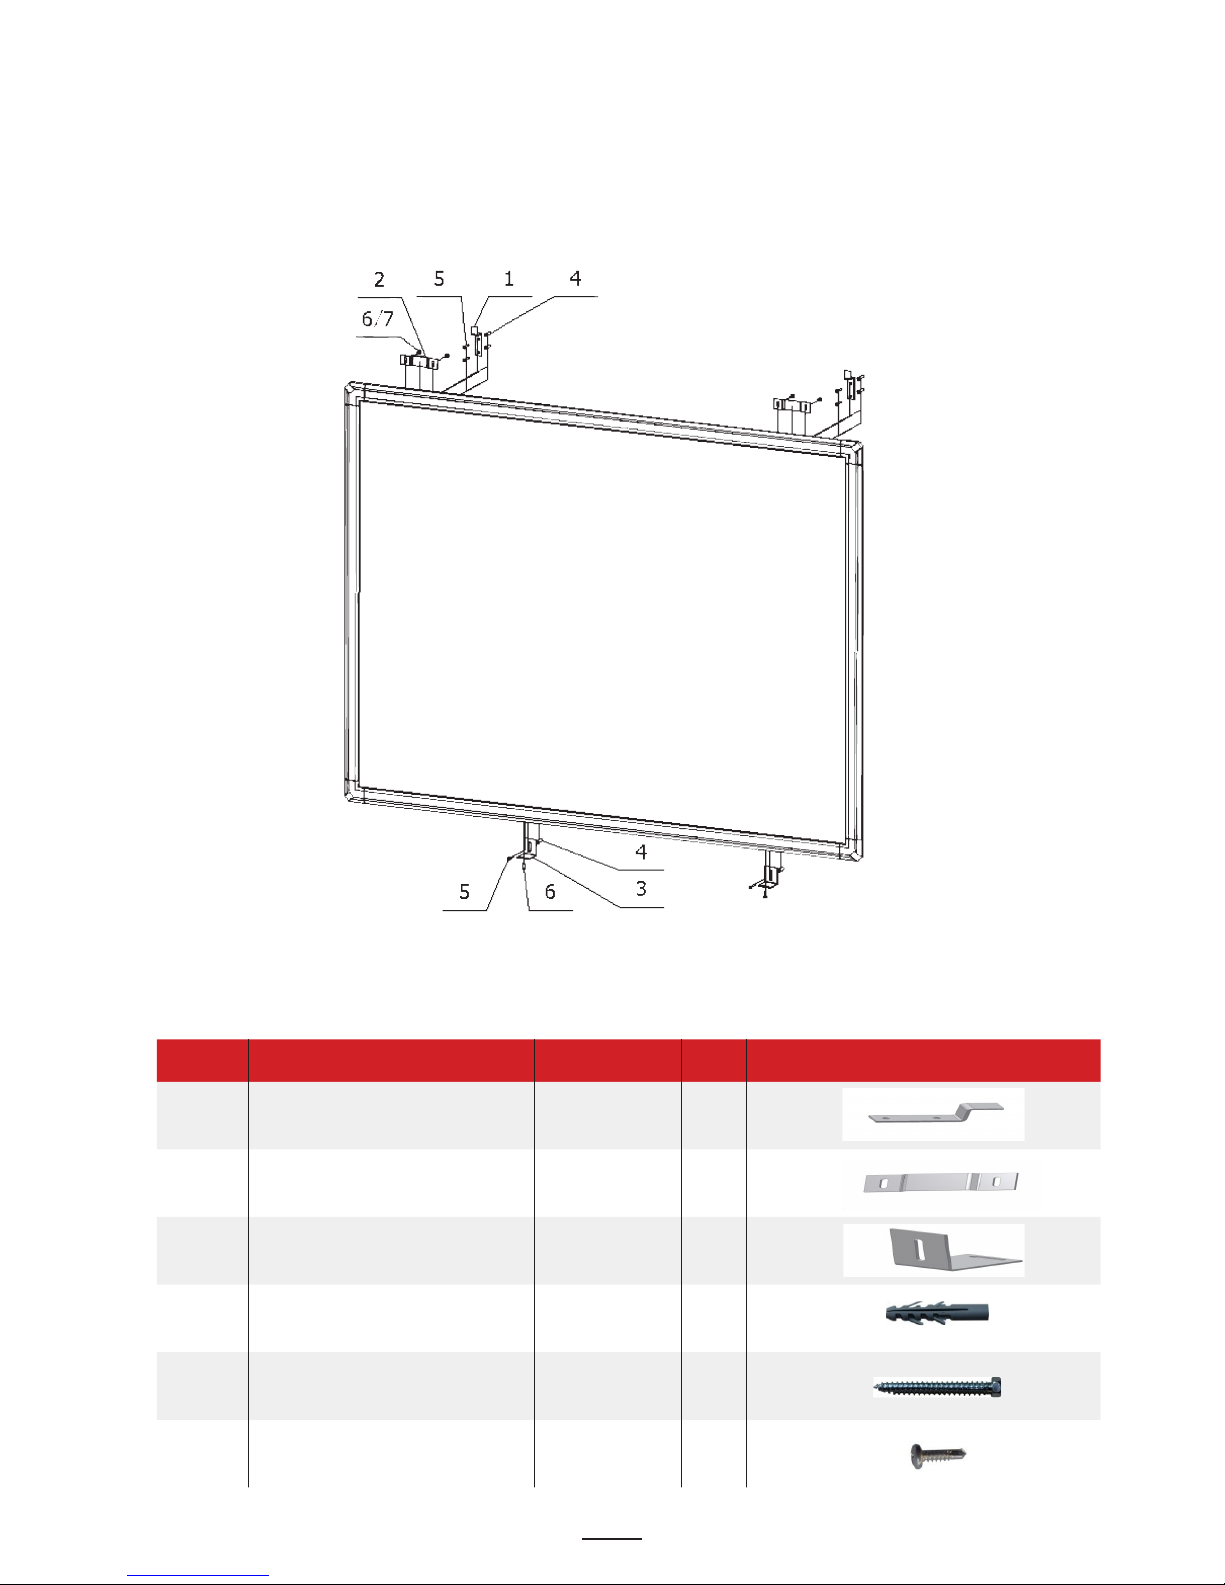
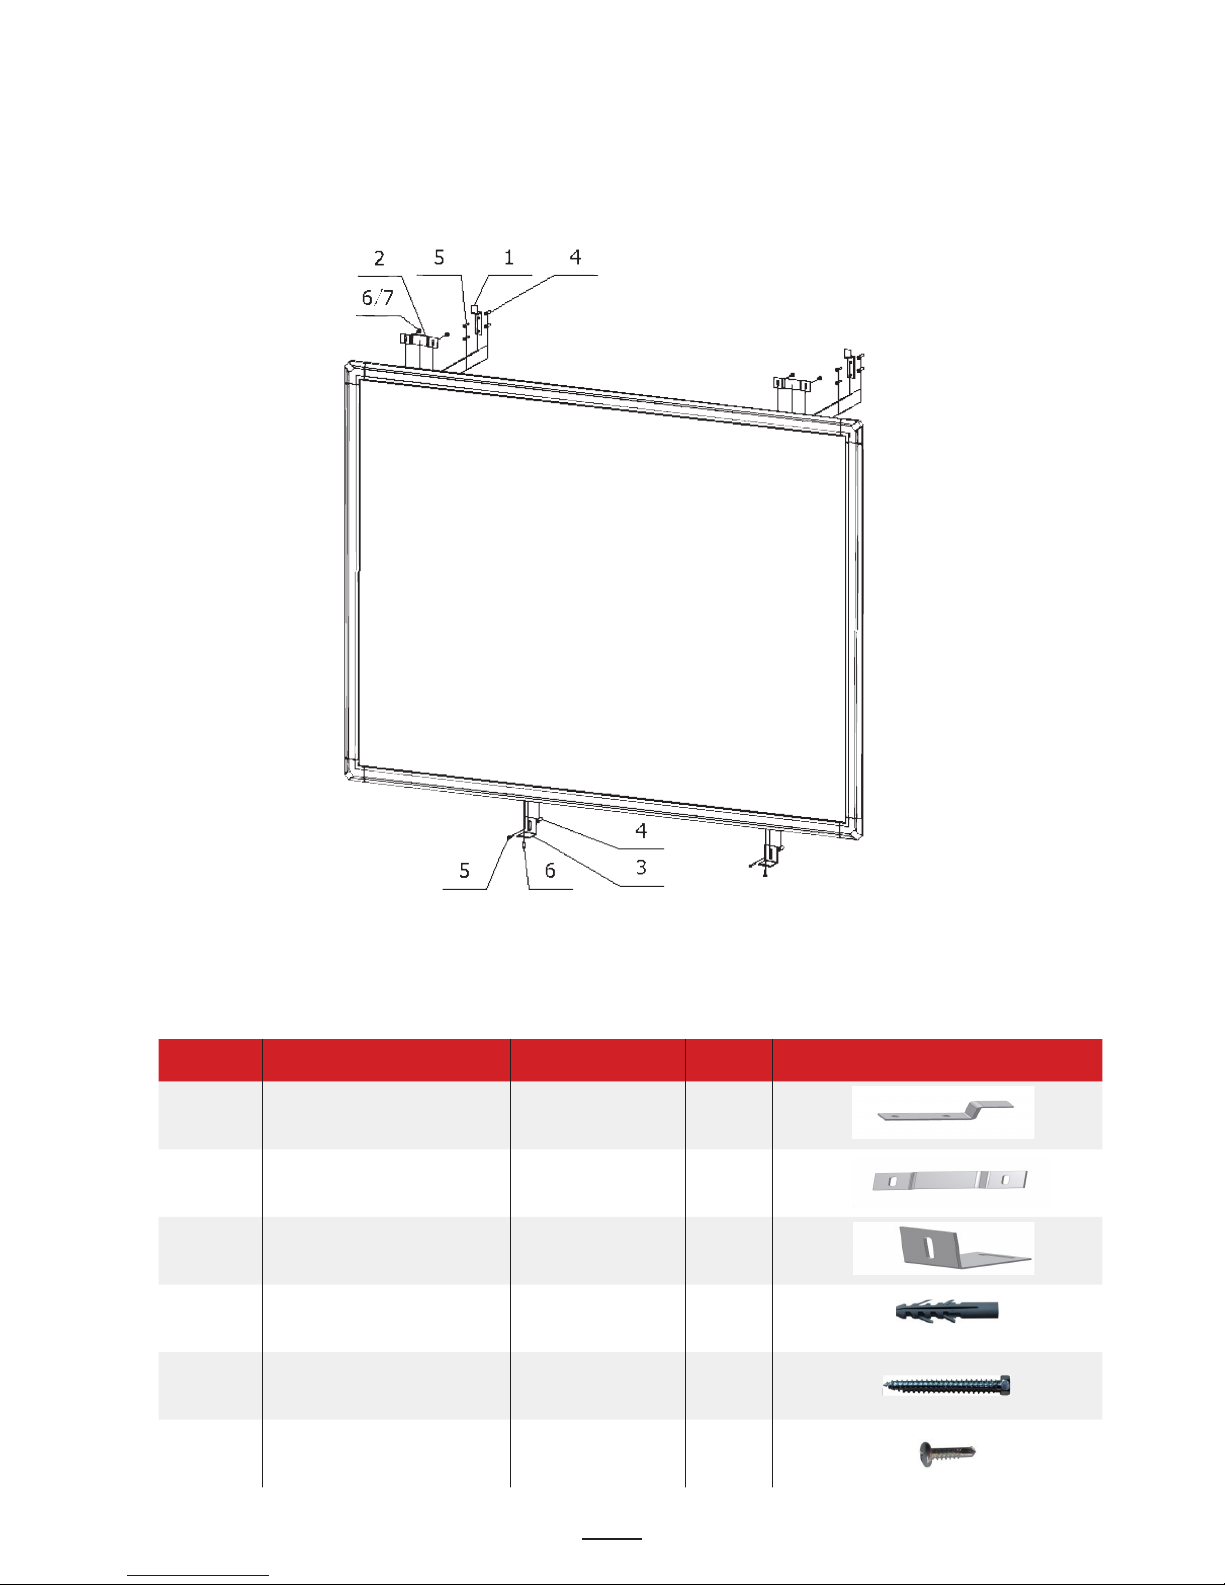
2. Montaż tablicy
Poniższe procedury przedstawiają sposób naściennego montowania tablicy interaktywnej TT-Board
3000/4000.
1. Przed instalacją należy się upewnić, że wszystkie potrzebne do montażu akcesoria zostały dostarczone.
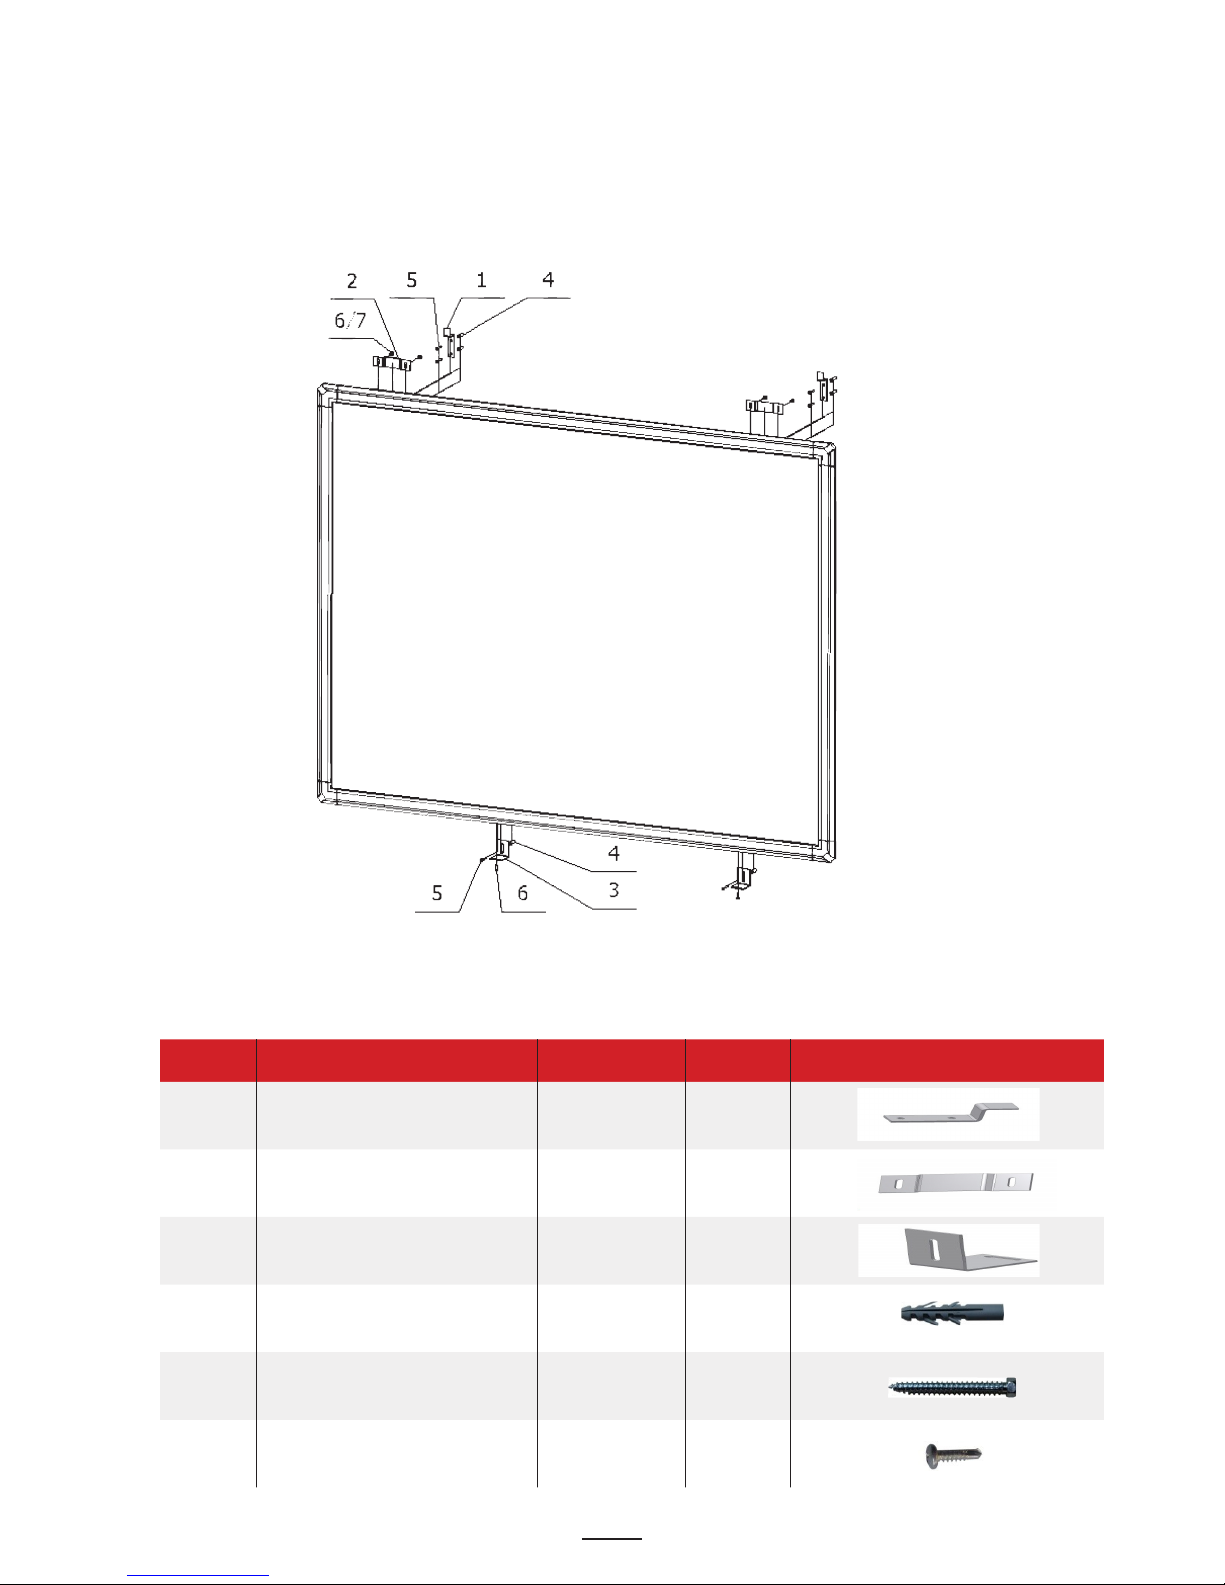
Rysunek 1. Wsporniki naścienne
Numer Nazwa Specykacja Ilość Zdjęcie
1 Hak mocowany na ścianie A k c e s o r i a
standardowe
2
2 Zaczep montowany na tablicy A k c e s o r i a
standardowe
2
3 Zaczep montowany na ścianie A k c e s o r i a
standardowe
2
4 Kołek rozporowy M6 x 30 6
5 Wkręt samogwintujący M4 x 30 6
6 Wkręt samogwintujący M4 x 16 6
Elementy uchwytu ściennego
Page 6

4
2. Zamontuj oba zaczepy (element nr 2) na tablicy, za pomocą czterech śrub samogwintujących (element
nr 6).
Rysunek 2. Montaż uchwytu na górnej ramie tablicy
3. Wywierć otwory w ścianie, przy pomocy wiertarki, jak wskazano na Rysunku 3, a mianowicie: 4
otwory dla dwóch haków (element 1) oraz 2 otwory dla dwóch zaczepów ściennych (element 3). Przed
wywierceniem otworów w ścianie, zmierz i potwierdź następujące odległości:
• H1: odległość pomiędzy dwoma hakami na górze (element 1) = 100 cm
• H2: odległość pomiędzy dwoma zaczepami na dole (element nr 3) = 100 cm
Rysunek 3. Rozstaw otworów w ścianie
Uwagi:
• Upewnij się, że odległość pomiędzy dolnym zaczepem (element nr 3) a podłożem waha się pomiędzy
700 a 800 mm.
• Upewnij się, że układ sześciu otworów montażowych wywierconych w ścianie pasuje do tablicy.
4. Do każdego z otworów wsuń kołek rozporowy.
5. Zamontuj dwa haki (element nr 1) i dwa zaczepy (element 3) na ścianie za pomocą sześciu wkrętów
samogwintujących (element nr 5).
6. Przymocuj zaczepy (element nr 2) do tylnej części tablicy za pomocą śrub samogwintujących (element
nr 6).
7. Zawieś tablicę na ścianie.
8. Dostosuj ustawienie zaczepów ściennych (element nr 3) przy użyciu dwóch samogwintujących się
wkrętów (element nr 6) jak wskazano na Rysunku 1, aby prawidłowo zamontować tablicę.
ściana
Otwory 6xΦ6, 50cm
Dolna krawędź zaczepu
(element nr 2)
Page 7

5
3. Podłączenie tablicy
1. Należy przygotować (zamontować) tablicę.
2. Dopasować pozycje tablicy i projektora.
3. W lewym dolnym rogu tablicy (patrząc od frontu) znajduje się kabel zakończony żeńską końcówką
USB – należy podłączyć tam dostarczony przewód USB.
Podłączając tablicę do komputera za pomocą przewodu USB należy zabezpieczyć przewód tak, aby
wyeliminować możliwość przypadkowego pociągnięcia za przewód (np. podczas przechodzenia).
Zalecane jest użycie oryginalnego przewodu USB dostarczanego z tablicą (w przypadku użycia innego
ważne jest, aby miał on opór poniżej 0.5 Ω).
4. Drugi koniec przewodu należy podłączyć do komputera.
5. Należy podłączyć komputer do projektora (więcej szczegółów znajduje się w instrukcji obsługi
projektora).
Page 8

6
4. Kalibracja tablicy
Kalibracja w systemie Windows 7, 8 i wyższych
System Windows od wersji 7 i wyższych posiada wbudowane, bardzo intuicyjne narzędzie do kalibracji
ekranów dotykowych.
1. Szybko przesuń od prawej krawędzi do środka ekranu, a następnie naciśnij panel Wyszukiwanie.
(Jeśli używasz myszy, wskaż prawy dolny róg ekranu, przesuń wskaźnik myszy w górę, a następnie
kliknij panel Wyszukiwanie).
lub
2. W polu wyszukiwania wprowadź hasło Kalibruj, a następnie naciśnij lub kliknij pozycję Kalibruj
ekran pod kątem pióra lub wprowadzania dotykowego, aby otworzyć okno ustawień tabletu.
Można wyszukać również hasło Tablet, a następnie nacisnąć lub kliknąć pozycję Ustawienia komputera
typu Tablet.
Alternatywna ścieżka do kalibracji: Panel Sterowania -> Sprzęt i dźwięk -> Ustawienia komputera typu
Tablet -> Kalibruj
3. Upewnij się, że pozycja wyświetlona w polu Ekran odpowiada projektorowi, który wyświetla obraz
na tablicy.
4. Naciśnij lub kliknij pozycję Kalibruj, a następnie postępuj zgodnie z instrukcjami wyświetlanymi na
ekranie.
Kalibracja alternatywna, dostępna po instalacji sterownika
Tablica Avtek TT-Board 3000/4000 jest urządzeniem z interfejsem HID co oznacza, że nie wymaga
instalacji osobnych sterowników do poprawnego działania. Z tego powodu głównym narzędziem do
kalibracji jest narzędzie wbudowane w system Windows.
W przypadku problemów z wykrywaniem tablicy przez system Windows lub korzystania z wersji MAC
lub Linux – należy udać się na stronę http://www.avtek.eu gdzie na stronie produktu znajdują się sterowniki
do powyższych wersji z wbudowanym narzędziem do kalibracji.
Page 9
7
5. Rozwiązywanie problemów
Poniższa tabela dotyczy problemów i ich rozwiązań dla tablicy połączonej za pomocą przewodu USB.
Problem Objaw Możliwa przyczyna Rozwiązanie
Tablica interaktywna nie
działa
Instalacja urządzenia
HID (automatyczna) nie
powiodła się
Ze względu na swoje
ograniczenia wybrane
wersje systemu Windows
mogą mieć problemy z
rozpoznawaniem urządzeń
HID
Należy zainstalować
sterownik zewnętrzny.
Uszkodzenie kabla USB Proszę dokładnie sprawdzić
czy kabel USB nie posiada
oznak uszkodzenia, a
następnie sprawdzić tablice
z innym kablem USB
Uszkodzony port USB w
komputerze
Należy podłączyć kabel
USB do innego portu USB
w komputerze
Nie pojawiają się punkty do
kalibracji
Nie widać punktów
kalibracji
Część obrazu
wyświetlanego przez
projektor może być poza
obszarem tablicy
Należy upewnić się, że
projektor nie wyświetla
punktów kalibracji poza
obszarem tablicy. Jeżeli
tak należy ponownie
dostosować ustawienia
projektora i jego położenie
względem tablicy
Nie można pisać po tablicy Widać kursor myszy, ale nie
pojawia się efekt pisania
Oprogramowanie nie jest w
trybie pisania
Przełączyć w tryb pisania
W trybie pulpitu widać
kursor, ale w trybie pisania
nie można pisać
Kolor pisania jest taki sam
jak tło
Należy zmienić kolor
pisaka na inny niż tło
Pisak pisze, ale
nieprawidłowo
Zniekształcenia są tylko na
niektórych obszarach
Błędna kalibracja Należy ponownie
skalibrować tablicę
Wyświetlony obraz jest
zniekształcony
Należy zmienić ustawienia
projektora
Pisak pisze, ale bardzo
powoli
Ślad pisaka jest wolniejszy
niż faktyczna pozycja
wskaźnika (palca)
Spowolnienie przez
program antywirusowy
Należy wyłączyć program
antywirusowy
Na komputerze jest
uruchomionych zbyt wiele
aplikacji
Należy zamknąć
niepotrzebne aplikacje.
Komputer jest zbyt słaby Należy wymienić komputer
na model z lepszą
konguracją.
W przypadku dalszych problemów zalecany jest kontakt z autoryzowanym serwisem tablic Avtek.
W celu uzyskania szczegółowych informacji należy skontaktować się ze sprzedawcą.
Page 10
8
The latest instruction manual and any information
relating to Avtek interactive whiteboards can be found at
http://www.avtek.eu
Page 11
9
1. Contents of the container
After opening the package, verify its contents. If any parts mentioned below are of damaged or missing,
please contact the seller.
Contents:
Model 3000/4000
Name of the part Qua Information
Interactive whiteboard 1 Respective model
USB cable 1
Warranty card 1
Instruction manual 1
Pens 2
Wall-mounting kit 1
Note:
The surface of Avtek TT-BOARD 3000/4000 interactive whiteboard has been optimized for the best possible
image from the projector and the elimination of the glare resulting from light reection. For this purpose, a
special surface coating was used. In order to maintain high-quality performance of the whiteboard, wipe it
immediately after making notes with dry-erase pens. It is also recommended to clean its surface on a regular
basis using household cleaners for dry-erase whiteboards.
• Clean the whiteboard regularly or whenever you notice that the dry-erase ink remains on the whiteboard
surface after wiping
• Do not use permanent pens or others, unsuitable for dry-erase surfaces
• In the case of non-compliance with the manufacturer’s instructions, the surface can become permanently
dirty
System requirements:
Minimum system requirements: Recommended system parameters:
Processor
1.0 GHz x86
Memory
256 MB
Graphics card
at least 256 colours
Hard drive – free space
150 MB
Screen resolution
800x600, 1024x768,
1280x1024
USB port
1.1
Processor
2.0 GHz x86
Memory
512 MB or more
Graphics card
256 colours or more
Hard drive – free space
500 MB
Screen resolution
1024x768, 1280x1024
USB port
2.0
The Avtek interactive whiteboard is a Human Interface Device (HID); therefore, once connected to the USB
port, it is automatically detected and installed by the system. As a result, it is not necessary to install dedicated
drivers. MS Windows 7 (and higher) operating systems have built-in tool that allows the calibration process
(see Point 5 for more details).
Page 12
10
2. Mounting the interactive whiteboard
Following procedures show how to mount the TT-Board 3000/4000 interactive whiteboard on a wall.
1. Before installation, make sure that all required mounting accessories are provided.
Figure 1 . Wall-mounting brackets
Number Name Specication Quantity Picture
1 Wall-mounted hook S t a n d a r d
accessories
2
2 W h i t e b o a r d- m o u n t e d
fastener
S t a n d a r d
accessories
2
3 Wall-mounted fastener S t a n d a r d
accessories
2
4 Wall anchor M6 x 30 6
5 Self-tapping screw M4 x 30 6
6 Self-tapping screw M4 x 16 6
Mounting parts
Page 13
11
2. Attach both fasteners (item no 2) on the whiteboard using four self-tapping screws (item no 6).
Figure 2 . Mounting the fastener on the whiteboard upper frame
3. Drill six holes in the wall using drill as shown in Figure 3, namely: four holes for two hooks (item no
1) and two holes for two wall brackets (item no 3). Before drilling the holes, measure and conrm the
following distances:
• H1: the distance between two hooks at the top (item no 1) = 100 cm
• H2: the distance between two fasteners at the bottom (item no 3) = 100 cm
rysunek
Figure 3 . Spacing of holes in the wall
Notes:
• Make sure that the distance between bottom fastener (item no 3) and the oor ranges between 700 and
800 mm.
• Make sure that the arrangement of six mounting holes drilled in the wall matches the whiteboard size.
4. Insert the wall anchor into each hole.
5. Mount two hooks (item no 1) and two fasteners (item no 3) on the wall using six self-tapping screws
(item no 5).
6. Secure the fasteners (item no 2) to the back of the whiteboard using self-tapping screws (item no 6).
7. Hang the whiteboard on the wall.
8. Adjust the arrangement of two wall-mounting brackets (item no 3) using two self-tapping screws (item
no 6) as shown in Figure 1 to properly mount the whiteboard.
Lower edge of the
fastener (item no 2)
Page 14

12
3. Connecting the whiteboard
1. Prepare (mount) the whiteboard.
2. Dopasować pozycje tablicy i projektora.
3. In the lower-left corner of the board (looking at the front) there is a cable with a female USB tip.
Connect one end of the included USB cable to the cable suspended from your interactive whiteboard.
When connecting the whiteboard to the computer using the USB cable, secure the cable in order to
minimize the risk of the cable being accidentally pulled out (e.g. when walking by).
It is recommended to use the original USB cable supplied with the whiteboard (should you use another
cable, make sure its resistance is below 0.5 Ω).
4. Connect the other end of the USB cable to your computer.
5. Connect your computer to the projector (see the projector instruction manual for more details).
Page 15

13
4. Calibration of the whiteboard
Calibration in Windows 7, 8 and higher
Windows 7 and higher has a built-in, highly intuitive tool to calibrate touch screens.
1. Quickly swipe from the right edge to the centre of the screen, then press the Search panel.
If you are using a mouse, point to the lower-right corner of the screen, move the mouse pointer up, and
then click the Search panel.
lub
2. In the search box, enter the command Calibrate, and then press or click Calibrate the screen for pen or
touch input to open Tablet PC settings window.
You may also search the word Tablet, then press or click Tablet PC Settings. Alternative path for calibration:
Control Panel -> Hardware and Sound -> Tablet PC Settings -> Calibrate
3. Make sure the item displayed in the Screen box corresponds to the projector that displays the image
on the whiteboard.
4. Press or click the command Calibrate, and then follow the instructions on the screen.
Alternative calibration, available after driver installation
The Avtek TT-Board 3000/4000 interactive whiteboard is a human device interface, which means it does
not require any separate drivers to operate properly. Thus the main tool for calibration is Windows built-in
tool.
If your computer does not detect the whiteboard or if you use MAC or Linux version, go to http://www.
avtek.eu to download drivers for operating systems that have built-in calibration tool.
Page 16
14
5. Troubleshooting
Please refer to this list if your whiteboard uses standard USB connection:
Problem Symptom Possible reason Solution:
Interactive whiteboard does
not work.
Automatic installation of
Human Interface Device
has failed.
Due to Windows OS
limitations, some versions
thereof may fail to detect
Human Interface Devices.
Install an external driver.
USB cable is damaged. Double check if your USB
cable does not have signs of
damage, and then check the
whiteboard using another
USB cable.
USB port on your computer
is damaged.
Connect USB cable to
another USB port on your
computer.
Calibration points do not
appear.
Cannot see the calibration
points.
A part of the image
displayed by the projector
falls outside the whiteboard
projection area.
Make sure that the projector
does not display calibration
points outside the
whiteboard projection area.
If so, readjust the projector
settings and its position
towards the whiteboard.
Cannot write. Can see the mouse pointer
move, but there is no stroke.
The software is not in
writing mode.
Switch to writing mode.
Under desk mode, can see
the mouse pointer move,
but under writing mode,
cannot write.
Stroke colour is same to
background colour.
Change stroke colour or
background colour.
Wireless pen can write, but
there is warp.
Only some area is warped. Bad calibration. Re-calibrate the whiteboard.
The displayed image is
distorted.
Change the projector
settings.
Wireless pen can write but
very slowly.
The stroke is slower than
the pen tip.
Anti-virus software. Close anti-virus software.
The computer is running
too many applications.
Close some applications
you do not use.
The computer is not
efcient enough.
Upgrade your computer
hardware.
In case of further problems, it is recommended to contact the authorized Avtek whiteboards service.
Please contact your seller for more details.
Page 17

15
Die neueste Bedienungsanleitung und alle Informationen
über die interaktive Tafel Avtek nden Sie unter http://
www.avtek.eu
Page 18

16
1. Packungsinhalt
Nach dem Öffnen der Verpackung, prüfen Sie den Inhalt. In Fällen, dass eines dieser Teile fehlt oder
beschädigt ist, wenden Sie sich bitte an Ihren Fachhändler.
Inhalt:
Model 3000/4000
Bezeichnung der Teile Anzahl Information
Interaktive Tafel 1 Entsprechendes Modell
USB-Leitung 1
Garantiekarte 1
Bedienungsanleitung 1
Markers 2
Wandmontagesatz 1
Bemerkung:
Die Fläche der interaktiven Tafeln Avtek TT-BOARD 3000/4000 wurde optimiert, für ein bestmögliches Bild
vom Projektor und für die Beseitigung der Lichtreexions-Wirkung. Zu diesem Zweck wird eine spezielle
Oberächenbeschichtung verwendet. Um die besten Parametern von der Oberäche zu behalten, wischen Sie
sie sofort ab, nach dem Auftragen von Notizen mit trocken abwischbaren Markern. Es wird auch empfohlen
regelmäßige Pege durchzuführen, mit allgemein zugänglichen Oberächenreiniger für trockenabwischbare
Tafeln.
• die Reinigung sollte regelmäßig durchgeführt werden, oder wenn Sie Spuren von Markern entdecken,
nachdem die Oberäche der interaktiven Tafel abgewischt worden ist,
• verwenden Sie keine Filzstiften oder andere ungeeignete für trocken abwischbare Oberächen,
• bei Nichtbeachtung der Anweisungen des Herstellers zu , kann die Oberäche dauerhaft verschmutzt
werden.
System-Anforderungen:
Minimale Systemanforderungen: Zalecane parametry systemu:
Prozessor
1.0 GHz x86
Speicher
256 MB
Grakkarte
Zeigt min. 256 Farben
Festplatte - ein
Freiraum
150 MB
Bildschirmauösung
800 x 600, 1024 x 768, 1280
x 1024
Port USB
1.1
Prozessor
2.0 GHz x86
Speicher
512 MB oder mehr
Grakkarte
256 Farben oder mehr
Festplatte - ein
Freiraum
500 MB
Bildschirmauösung
1024x768, 1280x1024
Port USB
2.0
Die interaktive Tafel Avtek ist ein Gerät Typ HID, dadurch, wenn es an den USB-Port angeschlossen wird, wird
es vom System automatisch erkannt und installiert. Dadurch ist die Installation von dedizierten Controllern
optional. In Betriebssystemen MS Windows 7 und höheren kann der Kalibrierungsprozess von dem im
Betriebssystem eingebettetem Kommando durchgeführt werden (siehe Kap. 5).
Page 19
17
2. Montage der Tafel
Die folgenden Verfahren zeigen, wie man die interaktive Tafel TT-Board 3000/4000 an die Wand
montiert.
1. Vor der Installierung, stellen Sie sicher, dass alle benötigten Montagezubehör geliefert worden sind.
Bild 1: Wandhalterungen
Nummer Bezeeichnung Spezikation Anzahl Aufnahme
1 Wand-Haken Standardzubehör 2
2 Haken auf der Tafel
montiert
Standardzubehör 2
3 Haken auf der Wand
montiert
Standardzubehör 2
4 Dübel M6 x 30 6
5 s e l b s t s c h n e i d e n d e
Schraube
M4 × 30 6
6 s e l b s t s c h n e i d e n d e
Schraube
M4 × 16 6
Elemente der Wandhalterung
Page 20

18
2. Bringen Sie die zwei Haken (Element Nr. 2) an die Tafel an, mit vier selbstschneidende Schrauben
(Element Nr. 6).
Bild 2. Montage des Hakens am oberen Rahmen der Tafel
3. Bohren Sie Löcher in der Wand, mit einem Bohrer, wie im Bild 3 gezeigt, und zwar: 4 Löcher für die
beiden Haken (Element 1) und 2 Löcher für zwei Wandhaken (Element 3). Vor dem Bohren von Löchern
in der Wand, messen und bestätigen Sie die folgenden Distanzen:
• H1: Distanz zwischen den beiden oberen Haken (Element Nr. 1) = 100 cm
• H2: Distanz zwischen den beiden unteren Haken (Element Nr.3) = 100 cm
Bild 3. Abstand der Löcher in der Wand
Bemerkungen:
• Stellen Sie sicher, dass der Abstand zwischen dem unteren Haken (Element Nr. 3) und dem Untergrund
im Bereiche zwischen 700 und 800 mm liegt.
• Stellen Sie sicher, dass das System der sechs Montagelöcher in der Wand gebohrten zur Tafel passt.
4. In jedes Loch stecken Sie ein Dübel hinein.
5. Bringen Sie die zwei Haken (Element Nr. 1) und zwei Haken (Element Nr. 3) an die Wand an, mit sechs
selbstschneidenden Schrauben (Element Nr. 5).
6. Bringen Sie die Haken (Element Nr. 2) an der Rückseite der Tafel an, mit den selbstschneidenden
Schrauben (Element Nr. 6).
7. Hängen Sie die Tafel an die Wand.
8. Stellen Sie die Wandhaken (Element Nr. 3) mit zwei selbstschneidenden Schrauben (Element Nr. 6) ein,
wie in Bild 1 dargestellt, um die Tafel richtig zu montieren.
Der untere Rand des
Hakens (Element Nr. 2)
Wand
Löcher 6xΦ6, 50cm
Page 21

19
3. Anschluss der Tafel
1. Die Tafel soll vorbereitet (anmontiert) sein.
2. Die Lage der Tafel und des Projektors gegenseitig anpassen.
3. In der linken unteren Ecke der Tafel (von vorne gesehen) ist ein Kabel mit einem weiblichen USBEnde - man soll dort das mitgelieferte USB-Kabel anschließen.
Beim Anschluss der Tafel an den Computer über das USB-Kabel, sichern Sie das Kabel so, um die
Möglichkeit des versehentlichen Ziehen an der Schnur zu beseitigen (z.B. beim Vorbeigehen).
Es wird empfohlen, das mit der Tafel gelieferte Original-USB-Kabel zu gebrauchen (im Fall der
Verwendung eines anderen, ist es wichtig, das dieses eine Resistanz unter 0,5 Ω hat).
4. Verbinden Sie das andere Ende des Kabels mit dem Computer.
5. Schließen Sie den Computer an den Projektor an (Details sehen Sie in der Bedienungsanleitung des
Projektors).
Page 22

20
4. Kalibrierung der Tafel
Kalibrierung im Betriebssystem Windows 7, 8 und höheren
Die Betriebssysteme Windows ab der Version 7 und höheren verfügen über ein integriertes, intuitives
Werkzeug, um die Touchscreens zu kalibrieren.
1. Machen Sie einen schnellen Durchzug von der rechten Kante in die Mitte des Bildschirms, und
drücken Sie dann das Suche-Panel.
(Wenn Sie mit einer Maus arbeiten, zeigen Sie auf die rechte untere Ecke des Bildschirms, bewegen Sie
den Mauszeiger hoch, und klicken Sie dann auf Suche-Panel).
lub
2. Geben Sie in das Suchfeld das Passwort Kalibrieren ein, und danach drücken Sie oder klicken Sie auf
Kalibrieren den Bildschirm für die Stift- oder Touch-Eingabe, um das Tablett-Einstellungsfenster zu
öffnen.
Sie können auch das Tablett-Passwort suchen, und dann drücken Sie oder klicken Sie auf die Position der
PC-Einstellungen des Tablett-Typs.
Der alternative Weg zum Kalibieren: Panel Sterowania -> Sprzęt i dźwięk -> Ustawienia komputera typu
Tablet -> Kalibruj (Controller-Panel -> Hardware und Audio -> PC-Einstellungen des Tablett-Typs)
3. Stellen Sie sicher, dass die auf dem Bildschirm angezeigte Positiondem Projektor entspricht, der das
Bild auf der Tafel zeigt.
4. Drücken Sie oder klicken Sie auf die Position Kalibrieren, und folgen Sie den Anweisungen auf dem
Bildschirm.
Die Alternative Kalibrierung ist nach dem Installieren des Controllers verfügbar
Die Tabfel Avtek TT-Board 3000/4000 ist ein Gerät mit HID-Schnittstelle, das heißt, Sie brauchen keinen
separaten Controller für einen ordnungsgemäßen Betrieb zu installieren. Aus diesem Grund ist das
Hauptwerkzeug zum Kalibrieren in die Windows als Werkzeug integriert.
Im Falle von Problemen mit der Erkennung der Tafel von Windows oder mit einer MAC oder LinuxSoftware - sollte man auf die Website http://www.avtek.eu sich begeben, wo die Produktseite Controller
für diese Versionen mit integriertem Werkzeug für die Kalibrierung enthält.
Page 23

21
5. Fehlersuche
Fehler Erscheinung Mögliche Ursache Lösung
Die interaktive Tafel
funktioniert nicht
Das Installieren des HIDGerätes (automatische) ist
nicht gelungen
Aufgrund von
Einschränkungen bei
einigen WindowsVersionen können unter
Umständen HID-Geräte
nicht erkannt werden
Man soll einen externen
Controller installieren.
USB-Kabel beschädigt Bitte überprüfen Sie Ihres
USB-Kabel ob es keine
Beschädigungen hat, und
dann überprüfen Sie die
Tafel mit einem anderen
USB-Kabel
Beschädigter USB-Port im
Computer
Sie müssen das USB-Kabel
an einen anderen USBAnschluss an den Computer
anschließen
Es erscheinen keine
Kalibrierungs-Punkte
Die Kalibrierungspunkte
sieht man nicht
Ein Teil des durch den
Projektor dargestellten
Bildes kann außerhalb der
Tafel sein
Stellen Sie sicher, dass
der Projektor nicht
K al ib ri er un g s pu nk te
außerhalb der Tafel anzeigt.
Wenn es so ist, sollten
Sie erneut die ProjektorEinstellung und seine
Position relativ zur Tafel
anpassen
Auf der Tafel kann man
nicht schreiben
Man sieht den Kursor der
Maus, aber die SchreibWirkung erscheint nicht
Software ist nicht im
Schreibmodus
In Schreibmodus
umschalten
Im Desktop-Modus kann
man den Cursor sehen, aber
im Schreibmodus kann man
nicht schreiben
Schriftfarbe ist gleich mit
dem Hintergrund
Sie sollten die Stiftfarbe
gegen eine andere als
Hintergrund ändern
Stift schreibt, aber nicht
korrekt
Die Verzerrungen sind nur
in einigen Bereichen
Falsche Kalibrierung Sie müssen neu die Tafel
kalibrieren
Das angezeigte Bild ist
verzerrt
Sie müssen die ProjektorEinstellungen verändern
Stift schreibt, aber sehr
langsam
Die Stiftspur ist langsamer
als die tatsächliche Position
des Zeigers (Finger)
Die Verlangsamung durchs
Antivirus-Programm
Schalten Sie die AntivirusSoftware aus
Im Computer laufen zu
viele Anwendungen
Schließen Sie alle nicht
benötigten Anwendungen.
Ihr Computer ist zu
schwach
Tauschen Sie das
Computermodell gegen
eine besseren Konguration
aus.
Bei weiteren Problemen, ist es empfehlenswert, mit dem autorisierten Service für Avtek-Tafeln zu
kontaktieren. Für weitere Informationen, wenden Sie sich bitte an Ihren Fachhändler.
Die folgenden Tabelle bezieht sich auf Probleme und ihre Lösungen für die Tafel bei ihrer Verbindung mit
einem USB-Kabel.
Page 24

22
Le manuel d’utilisation le plus récent et toute information
concernant les tableaux interactifs Avtek peuvent être
trouvés sur http://www.avtek.eu
Page 25

23
1. Contenu de l’emballage
Après avoir ouvert, il faut vérier le contenu du paquet. S’il y des pièces manquantes ou endommagées,
nous vous prions de contacter le vendeur.
Contenu:
Model 3000/4000
Nom de pièce Quantité Information
Tableau interactif 1 Modèle approprié
Câble USB 1
Carte de garantie 1
Manuel d’utilisation 1
Stylets 2
Supports montage muraux 1
Attention:
La surface des tableaux interactifs Avtek TT-BOARD 3000/4000 a été optimalisée pour produire une image
de haute qualité du projecteur et éliminer l’effet de réexion lumineuse. Pour ce faire, une surface spéciale
a été employée. Pour garder les meilleurs paramètres de la surface, il faut l’effacer juste après avoir mis des
notes par les stylets. Il est aussi recommandé de soigner la surface avec des nettoyants disponibles pour les
tableaux blancs.
• le tableaux doit être nettoyé de façon régulière ou quand on observe des traces des stylets après avoir
effacer la surface du tableaux interactif
• on ne peut pas utiliser de marqueurs permanents ou autres qui ne sont pas adaptés aux tableaux blancs
• en cas de non-conformité aux recommandation du fabricant, la surface peut devenir sale en permanence
Exigences:
Exigences minimales: Paramètres de système recommandés:
Processeur
1.0 GHz x86
Mémoire
256 MB
Carte graphique
Afchant au moins 256
couleurs
Disque dur – espace
libre
150 MB
Résolution de l’écran
800 x 600, 1024 x 768, 1280
x 1024
Port USB
1.1
Processeur
2.0 GHz x86
Mémoire
512 MB ou plus
Carte graphique
256 couleurs et plus
Disque dur – espace
libre
500 MB
Résolution de l’écran
1024x768, 1280x1024
Port USB
2.0
Le tableau interactif Avtek est un outil type HID, ce qui fait que quand on le branche dans le port USB, le
système le détecte et installe automatiquement. Grâce à ceci l’installation des pilotes est optionnelle. Dans les
systèmes opérationnels MS Windows 7 et postérieurs, le processus de calibration peut être effectué au niveau
d’un logiciel intégré dans le système opérationnel (voir chapitre 5).
Page 26

24
2. Montage de tableau
Les procédures au-dessous monter la façon de montage mural du tableau interactif TT-Board 3000/4000.
1. Avant installation il faut vérier si tous les éléments nécessaires pour le montage ont été fournis.
Dessin 1. Supports muraux
Numéro Nom Spécication Quantité Photo
1 Crochet mural Ac cesso ir es
standard
2
2 Attelage monté sur le tableau Ac cesso ir es
standard
2
3 Attelage monté sur le tableau Ac ce sso ir es
standard
2
4 Goujon M6 x 30 6
5 Vis autotaraudeuse M4 × 30 6
6 Vis autotaraudeuse M4 × 16 6
Eléments de support mural
Page 27

25
2. Montez deux attelages (élément no 2) sur le tableau à l’aide de quatre vis autotaraudeuses (élément no
6).
Dessin 2. Montage de prise sur le cadre supérieur de tableau
3. Percez les trous avec une perceuse, comme monter sur le Dessin 3, c’est-à-dire: 4 trous pour deux
crochets (élément 1) et 2 trous pour deux attelages (éléments 3). Avant de percer les trous dans le mur,
mesurez et conrmer les distances suivantes:
• H1: distance entre deux crochets au-dessus (élément no 1) = 100 cm
• H2: distance entre deux attelages au-dessous (élément no 3) = 100 cm
rysunek
Dessin 3. Espacement des trous dans le mur
Attention:
• Assurez-vous que la distance entre l’attelage inférieur (élément no 3) et le sol est entre 700 et 800 mm
• Assurez-vous que le positionnement des trous de montage percés dans le mur correspond au tableau.
4. Insérer un goujon dans chaque trou.
5. Montez deux crochets (élément no 1) et deux attelages (élément 3) sur le mur à l’aide de six vis
autotaraudeuses (élément no 5).
6. Fixez les attelages (élément no 2) à la partie arrière du tableau à l’aide de vis autotaraudeuses (élément
no 6).
7. Montez le tableau au mur.
8. Ajustez la position des attelages muraux (élément no 3) à l’aide de deux vis autotaraudeuses (élément
no 6) comme montré sur le Dessin 1, pour correctement monter le tableau.
Bord inférieur d’attelage
(élément no 2)
Mur
Trous 6xΦ6, 50cm
Page 28

26
3. Connection de tableau
1. Il faut préparer (monter) le tableau.
2. Ajuster les positions du tableau et du projecteur.
3. Du côté bas du tableau (vu de front) on peut trouver le câble USB avec le port femelle – c’est là où il
faut connecter le câble USB fourni.
Pendant la connexion du tableau à l’ordinateur il faut protéger le câble USB pour prévenir d’une
déconnection accidentelle (par exemple en passant).
Il est recommandé d’employer le câble USB original fourni avec le tableau (en cas d’utilisation d’un câble
différent il faut qu’il ait la résistance au-dessous de 0.5 Ω).
4. L’autre bout du câble il faut connecter à l’ordinateur.
5. L’ordinateur doit être connecté au projecteur (plus de détail dans le manuel d’utilisation du projecteur).
Page 29

27
4. Calibration du tableau
Calibration dans le système Windows 7, 8 et supérieurs
Le système Windows dans la version 7 et supérieurs possède un outil intuitif pour calibration des écrans
tactiles.
1. Après un mouvement rapide du côté droit vers le milieu de l’écran, choisissez Recherche.
(Si vous utiliser un souris, montrez le côté droit en bas, déplacer le pointeur de souris vers le haut et puis
cliquer le panel Recherche).
lub
2. Dans le champs de recherche entrer le mot Calibrer, et puis appuyez ou cliquez la position Calibrer
l’écran pour stylo ou la saisie tactile, pour ouvrir la fenêtre des paramètre de tablette.
On peut également rechercher le mot Tablette et puis appuyer ou cliquer la position Paramètres de
l’ordinateur tablette.
Façon alternative pour accéder à la calibration: Panneau de conguration-> Matériel et audio -> Paramètres
de l’ordinateur tablette -> Calibrer
3. Assurez-vous si la position afchée dans le champs Ecran correspond au projecteur qui afche sur le
tableau.
4. Appuyez ou cliquer la position Calibrer, et puis suivez les instructions afchées à l’écran.
Calibration alternative, disponible après installation de pilote
Le tableau Avtek TT-Board 3000/4000 est un outil avec l’interface HID, ce qui veut dire qu’il n’a pas
besoin de pilotes additionnels pour être fonctionnel. Alors l’outil principal pour la calibration est celui
intégré dans le système Windows.
Si le système Windows ne voit pas le tableau ou l’utilisateur emploie la version MAC ou Linux – il faut
visiter le site http://www.avtek.eu pour trouver les pilotes pour les versions précédentes avec l’outil pour
la calibration.
Page 30

28
5. Dépannage
Ce tableau concerne des problèmes et leurs solutions pour le tableau connecté à l’aide du câble USB.
Problème Symptôme Raison possible Solution
Le tableau interactif ne
marche pas
Installation de dispositif
HID (automatique) a
échoué
Certaines versions du
système Windows peuvent
avoir du mal à reconnaitre
les dispositifs HID
Il faut installer le pilote
externe.
Câble USB endommagé Veuillez vérier si le câble
USB n’est pas endommagé
et puis essayer avec un
autre câble USB
Port USB de l’ordinateur
endommagé
Connecter le câble USB
à un autre port USB de
l’ordinateur
Les points pour calibration
ne s’afchent pas
Les points pour calibration
ne sont pas visibles
Une partie d’image afché
peut être au-delà de la
surface du tableau
Il faut s’assurer que le
projecteur n’afche pas les
points au-delà de la surface
du tableau. Si c’est le cas, il
faut réajuster le projecteur
et sa position en relations
avec le tableau
Il n’est pas possible d’écrire
sur le tableau
On peut voir le pointeur de
souris mais l’effet d’écrire
ne s’afche pas
Le logiciel n’est pas en
mode d’écriture
Passez au mode d’écriture
On peut voir le pointeur
dans le mode bureau mais
on ne peut pas écrire dans le
mode d’écriture
La couleur d’écriture est la
même que celle de l’arrière-
plan
Il faut changer la couleur du
stylet
Le stylet écrit mais pas
correctement
Seulement certaines zones
sont déformées
Calibration erronée Il faut calibrer le tableau
encore une fois
L’image afchée est
déformé
Il faut changer de
paramètres du projecteur
Le stylet écrit mais très
lentement
La trace du style test plus
long que la position actuelle
de l’indicateur (doigt)
Ralentissement est
provoqué par un logiciel
antivirus
Il faut arrêter le
fonctionnement de logiciel
antivirus
Il y trop d’applications
allumées sur l’ordinateur
Il faut éteindre des
applications inutiles
L’ordinateur est trop faible Il faut acheter un ordinateur
plus performant
En cas de problèmes ultérieurs, il est recommandé de contacter un point de service autorisé de
tableaux Avtek. Pour obtenir des informations plus détaillés, nous vous prions de contacter le vendeur.
Page 31

29
Aktuální návod k použití a veškeré informace tykající se
interaktivní tabule Avtek naleznete na straně http://www.
avtek.eu
Page 32

30
1. Obsah balení
Po otevření balení zkontrolujte obsah. V případě poškození nebo nedostatku součástek obraťte se na
prodejce.
Obsah:
Model 3000/4000
Název dílu Počet Informace
Interaktivní tabule 1 Odpowiedni model
USB kabel 1
Záruční list 1
Návod k použití 1
Pera 2
Nástěnná montážní sada 1
Pozor:
Povrch interaktivní tabule Avtek TT-BOARD 3000/4000 je optimalizován pro co nejlepší obraz z projektoru
a odstranění efektu odrazu světla. K tomuto účelu je použitá speciální povrchová úprava. Chcete-li zachovat
nejlepší vlastnosti povrchu, setřete jej ihned po zapsání poznámky k tomu určenými pomůckami. Doporučuje
se také pravidelné ošetřování povrchů tabule všeobecně dostupnými čisticími prostředky.
• Čištění by mělo být provedeno pravidelně, nebo pokud jsou pozorovány stopy pera po otření povrchu
interaktivní tabule
• Nepoužívejte pro označení nesmazatelná pera nebo jiné nevhodné prostředky
• V případě nedodržení pokynů výrobce, může být povrch trvale špinavý
Systémové požadavky:
Minimální požadavky: Doporučené parametry:
Procesor
1.0 GHz x86
Paměť
256 MB
Gracká karta
displej min. 256 barev
Pevný disk – volné
místo
150 MB
Rozlišení obrazovky
800 x 600, 1024 x 768, 1280
x 1024
USB port
1.1
Procesor
2.0 GHz x86
Paměť
512 MB nebo více
Gracká karta
256 barev nebo více
Pevný disk – volné
místo
500 MB
Rozlišení obrazovky
1024x768, 1280x1024
USB port
2.0
Avtek interaktivní tabule je HID zařízení, které při připojení k USB portu je automaticky rozpoznán a
nainstalován v systému. Díky tomu instalace vybraných ovladačů je volitelná. Operační systémy MS Windows
7 a vyšší kalibrace procesu může být provedena z příkazu do operačního systému (viz. Kapitola 5).
Page 33

31
2. Montáž tabule
Následující postupy ukazují způsob montáže na stěnu interaktivní tabule TT-Board 3000/4000.
1. Před instalací se ujistěte, že všechny požadované montážní příslušenství jsou dodány.
Obrázek 1. Nástěnné držáky
Číslo Název Specikace Počet Obrázek
1 Hák připevněný na stěnu S ta nd a r d n í
příslušenství
2
2 Háček namontovaný na desce S t an dar d n í
příslušenství
2
3 Háček namontovaný na stěně S t an dar d n í
příslušenství
2
4 Hmoždinka M6 x 30 6
5 Samořezný šroub M4 × 30 6
6 Šroubek M4 × 16 6
Části nástěnných držáku
Page 34

32
2. Zamontuj oba háčky (viz číslo 2) na tabuli pomocí čtyř šroubků (viz. číslo 6).
Obrázek 2. Montáž háčku na horním ramenu tabule
3. Vyvrtejte vrtačkou do zdi díru (viz. obrázek číslo 3), a to: 4 otvory pro dva háky (element 1) a 2 otvory
pro háčky určené pro montáž na stěnu (element 3). Před vyvrtáním otvorů v stěně nejdříve změřte a pak
potvrďte následující délky:
• H1: odległość pomiędzy dwoma hakami na górze (element 1) = 100 cm
• H2: odległość pomiędzy dwoma zaczepami na dole (element nr 3) = 100 cm
rysunek
Obrázek 3 Rozteč děr ve stěně
Pozor:
• Ujistěte se, že vzdálenost mezi spodním hákem (element číslo 3) a podložkou se pohybuje mezi 700
a 800 mm.
• Ujistěte se, že systém se šesti montážní otvory vyvrtanými do stěny odpovídá tabulce.
4. Do každé díry vložte hmoždinky.
5. Zamontujte dva háky (element číslo 1) a dva háky do stěny (element 3) pomocí 6 samořezných šroubků
(element číslo 5).
6. Připevněte háčky (element číslo 2) do zadní části tabule pomocí šroubků (element číslo 6).
7. Zavěste tabuli na stěně.
8. Přizpůsob nastavení háčku (element číslo 3) při použití dvou šroubků (element číslo 6) jak je zobrazeno
na obrázku číslo 1, aby bylo možné řádně namontovat tabuli.
Spodní okraj háku
(element číslo 2)
Stěna
Díra 6xΦ6, 50cm
Page 35

33
3. Připojení tabule
1. Připravte (zamontujte) tabuli.
2. Vyrovnejte pozici pole tabule a projektoru.
3. V levém dolním rohu tabule (při pohledu zepředu) nachází se kabel s objímajícím koncem USB – tam
se připojí dodaný USB kabel.
Připojte tabuli k počítači pomocí USB kabelu. Zajistěte kabel tak, aby se vyloučila možnost náhodného
vytažení kabelu (např. při průchodu).
Je doporučeno používat originální USB kabel dodaný spolu s tabulí (v případě použití jiného kabelu je
důležité, aby kabel měl odpor nižší než 0.5 Ω).
4. Druhý konec kabelu se zapojuje do počítače.
5. Připojte počítač k projektoru (podrobnosti viz v návodu k použití projektoru).
Page 36

34
4. Kalibrace tabule
Kalibrace v systému Windows 7, 8 a vyšší verze
Systém Windows od verze 7 a výše má vestavěný, vysoce intuitivní nástroj pro kalibraci dotykové obrazovky.
1. Rychle přejeďte z pravého okraje do středu obrazovky, a potom stiskněte tlačítko panel Hledej.
(Pokud používáte myš, přejděte na pravém dolním rohu obrazovky, posuňte ukazatel myši nahoru a
klepněte na tlačítko panel Hledej).
nebo
2. Do vyhledávacího pole zadejte heslo Kalibruj, a stiskněte tlačítko Kalibruj displej pro interaktivní
pero nebo pro dotykový systém, otevřete okno nastavení tabletu.
Můžete také hledat heslo Tablet, a následně stiskněte tlačítko nebo přejděte na pozici Nastavení počítače
typu Tablet.
Alternativní způsob kalibrace: Panel Ovládaní -> Zařízení a zvuk -> Nastavení počítače typu Tablet ->
Kalibruj
3. Ujistěte se, že položka, která se zobrazí na obrazovce odpovídá návrhu, který zobrazuje obraz na
desce.
4. Stiskněte tlačítko nebo přejděte na pozici Kalibruj, a pak postupujte podle pokynů na obrazovce.
Alternativní kalibrace, dostupná po instalaci ovladače
Tabule Avtek TT-Board 3000/4000 je interface zařízení HID což znamená, že nevyžaduje instalaci
samostatných ovladačů pro správnou funkci. Z tohoto důvodu je hlavním kalibračním nástrojem, nástroj
zabudovány do systému Windows.
V případě problémů s detekcí poli Windows nebo pomocí verze MAC nebo Linux – měli byste jít na
stránky http://www.avtek.eu kde na stránce produktu se nachází ovladače pro tyto verze s vestavěnými
nástroji pro kalibraci.
Page 37

35
5. Řešení problému
Následující tabulka se týká problému a jejich řešení pro tabule připojené pomocí USB kabelu.
Problém Symptom Možné příčiny Řešení
Interaktivní tabule
nepracuje
Instalace zařízení HID
(automaticky) neproběhla
Vzhledem k omezením
s některými verzemi
systému Windows, může
mít problémy rozpoznávat
zařízení HID
Nainstalujte vnější ovladač.
Poškození USB kabelu Prosím zkontrolovat
zda USB kabel nemá
známky poškození, a pak
zkontrolujte tabuli s jiným
USB kabelem
Poškozený USB port v
počítači
Musíte připojit USB kabel
k jinému portu USB na
počítači
Neobjevují se body do
kalibrace
Nemůžete vidět kalibrační
body
Část snímku zobrazeného
projektorem může být
mimo desku
Ujistěte se, že projektor
nezobrazuje kalibrační body
mimo pole. Pokud ano,
měli byste znovu upravit
nastavení projektoru a jeho
pozici vzhledem k tabuli
Nelze psát po tabuli Lze vidět kurzor myši, ale
není vidět, účinek psaní
Software není v režimu
psaní
Přepnout do režimu psaní
V režimu pracovní plochy
můžete vidět kurzor, ale
v režimu psaní nelze
zapisovat
Barva písma je stejná jako
pozadí
Měli byste změnit barvu
pera na něco jiného, než
pozadí
Pero píše, ale nesprávně Zkreslení je pouze v
některých oblastech
Chybná kalibrace Musíte znovu kalibrovat
tabulku
Zobrazený obrázek je
zkreslený
Je nutné změnit nastavení
projektoru
Pero píše ale velmi pomalu Stopa pera je pomalejší než
skutečná poloha ukazatele
(prstu)
Zpomalení kvůli
antivirovému programu
Vypněte antivirový
software
V počítači je spuštěno příliš
mnoho aplikací
Zavřete všechny nepotřebné
aplikace.
Počítač je příliš nevýkonný Vyměňte počítačový model
s lepší kongurací.
V případě dalších problémů, doporučuje se obrátit na autorizované servisní Avtek tabulky. Pro více
informací, obraťte se na prodejce.
Page 38

36
Najnovší návod na použitie a všetky informácie týkajúce
sa interaktívnych tabúľ nájdete na
stránke http://www.avtek.eu
Page 39

37
1. Obsah balenia
Po otvorení balenia skontrolujte jeho obsah. V prípade poškodenia alebo chýbajúcich akýchkoľvek
uvedených častí sa skontakujte prosím s predajcom.
Obsah:
Model 3000/4000
Názov časti Množstvo Informácia
Interaktívna tabuľa 1 Vybraný model
Kábel USB 1
Záručný list 1
Návod na použitie 1
Perá 2
Nástenná montážna sada 1
Pozor:
Povrch interaktívnej tabule Avtek TT-BOARD 3000/4000 bol optimalizovaný pre čo najlepší obraz z projektora
bez efektu odrazu svetla. Pre tento účel bola použitá špeciálna povrchová úprava. Pre zachovanie čo najlepších
parametrov povrchu, ju po napísaní poznámok suchými xkami hneď zotrite. Odporúča sa tiež pravidelné
čistenie povrchu všeobecne dostupnými čistiacimi prostriedkami určenými pre tabule.
• čistenie vykonávajte pravidelne alebo ak si všimnete stopy po perách po utretí povrchu interaktívnej tabule
• nepoužívajte trvalé xky alebo iné perá nevhodné pre tabule
• v prípade nedodržiavania odporúčaní výrobcu sa môže povrch natrvalo zašpiniť
Systémové požiadavky:
Minimálne systémové požiadavky: Odporúčané systémové požiadavky:
Procesor
1.0 GHz x86
Pamäť
256 MB
Gracká karta
Zobrazujúca min. 256 farieb
Pevný disk – voľné
miesto
150 MB
Rozlíšenie obrazovky
800 x 600, 1024 x 768, 1280
x 1024
Port USB
1.1
Procesor
2.0 GHz x86
Pamäť
512 MB alebo viac
Gracká karta
256 farieb a viac
Pevný disk – voľné
miesto
500 MB
Rozlíšenie obrazovky
1024x768, 1280x1024
Port USB
2.0
Interaktívna tabuľa Avtek je zariadenie typu HID, vďaka čomu je po pripojení do USB portu automaticky
rozpoznaná a nainštalovaná systémom. Inštalovanie driverov je voliteľné. V operačných systémoch MS
Windows 7 a vyššie môže byť kalibrácia vykonaná na úrovni nástrojov vstavaných v operačnom systéme (viď
kap. 5).
Page 40

38
2. Montáž tabule
Nižšie uvedené pokyny ukazujú spôsob montáže interaktívnej tabule TT-Board 3000/4000.
1. Pred montážou sa uistite, že celé príslušenstvo potrebné pre montáž bolo doručené.
Obrázok 1. Nástenné držiaky
Číslo Názov Špecikácia Množstvo Obrázok
1 Nástenný hák Š t a n d a r d n é
príslušenstvo
2
2 Úchyt pripevnený na tabuli Š t a n d a r d n é
príslušenstvo
2
3 Nástenný úchyt Š t a n d a r d n é
príslušenstvo
2
4 Zápustný kolík M6 x 30 6
5 Samorezná skrutka M4 × 30 6
6 Samorezná skrutka M4 × 16 6
Elementy montážnej nástennej sady
Page 41

39
2. Pripevnite oba úchyty (element č. 2) na tabuľu pomocou štyroch samorezných skrutiek (element č. 6).
Obrázok 2. Montáž úchytu na hornom ráme tabule
3. Vyvŕtajte otvory do steny pomocou vŕtačky tak, ako je to zobrazené na Obrázku 3, a to: 4 otvory na
dva háky (element č. 1) a 2 otvory na dva nástenné úchyty (element č. 3). Pred vŕtaním otvorov v stene si
odmerajte a skontrolujte nasledujúce vzdialenosti:
• H1: vzdialenosť medzi dvomi hákmi hore (element č. 1) = 100 cm
• H2: vzdialenosť medzi dvomi úchytmi dole (element č. 3) = 100 cm
rysunek
Obrázok 3. Rozostup otvorov v stene
Poznámky:
• Uistite sa, že je vzdialenosť medzi dolným úchytom (element č. 3) a podlahou medzi 700 a 800 mm.
• Uistite sa, že systém šiestich montážnych otvorov vyvŕtaných do steny zodpovedá tabuli.
4. Do každého otvoru vložte zápustný kolík.
5. Pripevnite dva háky (element č. 1) a dva nástenné úchyty (element č. 3) pomocou šiestich samorezných
skrutiek (element č. 5).
6. Pripevnite úchyty (element č. 2) k zadnej časti tabule pomocou samorezných skrutiek (element č. 6).
7. Tabuľu zaveste na stenu.
8. Úchyty (element č. 3) nastavte pomocou dvoch samorezných skrutiek (element č. 6) ako je to zobrazené
na Obrázku 1, pre správne namontovanie tabule.
Dolná hrana úchytu
(element č. 2)
Stena
Otvory 6xΦ6, 50cm
Page 42

40
3. Pripojenie tabule
1. Pripravte (namontujte) tabuľu.
2. Prispôsobte polohu tabule a projektora.
3. V ľavom dolnom rohu tabule (pri pohľade z predu) sa nachádza USB kábel s portom – pripojte k nemu
pribalený USB kábel.
Pri pripájaní tabule k počítaču pomocou USB kábla, je potrebné ho zabezpečiť tak, aby sa zamedzilo
prípadnému potiahnutiu kábla (napr. počas prechádzania).
Odporúča sa používať originálny USB kábel pribalený k tabuli (v prípade použitia iného je dôležité, aby
mal nižší odpor ako 0.5 Ω).
4. Druhý koniec kábla pripojte k počítaču.
5. Počítač pripojte k projektoru (viac detailov nájdete v návode na použitie projektora).
Page 43

41
4. Kalibrácia tabule
Kalibrácia v systéme Windows 7, 8 a vyššie
Systém Windows má od verzie 7 a vyššie vstavaný, vysoko intuitívny nástroj pre kalibráciu dotykových
obrazoviek.
1. Rýchlo potiahnite prstom z pravého okraja obrazovky do stredu a stlačte panel Vyhľadávanie.
(Ak používate myšku, prejdite na pravý dolny roh obrazovky, presuňte kurzor myšky smerom hore a
následne stlačte panel Vyhľadávanie).
alebo
2. Do vyhľadávacieho poľa zadajte heslo Kalibrovať, a následne stlačte alebo kliknite na pozíciu
Kalibrácia obrazovky pre pero alebo dotykové ovládanie, pre otvorenie okna nastavenia tabletu.
Môžete tiež vyhľadávať heslo Tablet, a následne stlačte alebo kliknite na pozíciu Nastavenie počítača
typu Tablet.
Alternatívna cesta pre kalibráciu: Ovládací panel -> Hardvér a Zvuk -> Nastavenie počítača typu Tablet
-> Kalibrovať
3. Uistite sa, že zobrazená pozícia na poli Obrazovka zodpovedá projektoru, ktorý premieta obraz na
tabuľu.
4. Stlačte alebo kliknite na pozíciu Kalibrovať, a následne postupujte podľa pokynov na obrazovke.
Alternatívna kalibrácia, k dispozícii po inštalácii drivera
Tabuľa Avtek TT-Board 3000/4000 je zariadenie s rozhraním HID čo znamená, že nevyžaduje inštaláciu
samostatných driverov pre správne fungovanie. Z tohto dôvodu je hlavným nastrojom pre kalibráciu je
vstavané v systéme Windows.
V prípade problémov s nájdením/detekciou tabule systémom Windows alebo pri používaní verzie MAC
alebo Linux – prejdite na stránku http://www.avtek.eu kde sa na stránke výrobkov nachádzajú drivery pre
tieto verzie s vstavaným nastrojom pre kalibráciu.
Page 44

42
5. Riešenie problémov
Nasledujúca tabuľka zobrazuje problémy a ich riešenia pre tabuľu pripojenú pomocou USB kábla.
Problém Príznaky Možná príčina Riešenie
Interaktívna tabuľa
nefunguje
Inštalácia zariadenia HID
(automatická) sa nepodarila
Vzhľadom na svoje
obmedzenia môžu mať
vybrané systemy Windows
problémy s rozpoznaním
HID
Nainštalujte externý driver.
Poškodenie USB kábla Dôkladne skontrolujte či
USB kábel nejaví známky
poškodenia a následne
vyskúšajte tabuľu s iným
USB káblom.
Poškodený USB port v
počítači
Pripojte USB kábel do
iného USB portu v počítači
Nezobrazujú sa body pre
kalibráciu
Nevidieť kalibračné body Časť zobrazeného obrazu
projektorom sa nachádza za
tabuľou (mimo tabuľu)
Uistite sa, či projektor
nezobrazuje kalibračné
body mimo tabule. Ak
áno, je potrebné opätovne
nastaviť projektor a jeho
polohy vzhľadom k tabuli
Nie je možné písať na tabuli Vidieť kurzor myši, ale
nevidieť písmo
Program sa nenachádza v
režime písania
Prepnite na režim písania
V režime pracovnej plochy
vidieť kurzor, ale v režime
písanie nie je možné písať
Farba písma je taká istá ako
pozadie
Zmeňte farbu pisma na inú
ako pozadie
Pero píše, ale nesprávne Deformácie sa nachádzajú
len v niektorých častiach
Chybná kalibrácia Opätovne skalibrujte tabuľu
Premietaný obraz je
deformovaný
Zmeňte nastavenia
projektora
Pero píše, ale veľmi pomaly Stopa písania je pomalšia
ako skutočná poloha
ukazovateľa (prsta)
Spomalenie kvôli
antivírovému programu
Vypnite antivírusový
program
V počítači je spustených
príliš veľa aplikácií
Vypnite zbytočné aplikácie.
Počítač je príliš slabý Vymeňte na počítač s lepšou
konguráciou
V prípade ďalších problémov odporúčame kontakt s autorizovaným servisom tabúľ Avtek. Za účelom
získania podrobných informácií sa skontakujte s predajcom.
Page 45

43
Новейшую инструкцию по эксплуатации
с дополнительной информацией об
интерактивных досках Avtek Вы можете найти
на сайте http://www.avtek.eu
Page 46

44
1. Содержимое упаковки
После открытия упаковки следует проверить содержимое. В случае отсутствия или повреждения
элементов, обратитесь к продавцу.
Содержимое:
Модель 3000/4000
Название элемента Кол. Информация
Интерактивная доска 1 Правильная модель
Провод USB 1
Гарантийный талон 1
Инструкция по эксплуатации 1
Маркеры 2
Набор для настенного монтажа 1
Внимание:
Поверхность интерактивных досок Avtek TT-BOARD 3000/4000 была оптимизирована для лучшего
изображения и для устранения эффекта отражения света. Для этого было применено специальное
покрытие на поверхности. Для сохранения максимальных параметров поверхности следует протирать
ее сразу после нанесения записей стираемым маркером. Рекомендуется также регулярных уход за
поверхностью общедоступными чистящими средствами для сухостираемых досок.
• чистку следует выполнять регулярно или в случае обнаружения следов от маркера после протирки
поверхности интерактивной доски
• не следует использовать перманентные маркеры на сухостираемых поверхностях
• в случае невыполнения инструкций изготовителя, поверхность может поддаться загрязнению
Системные требования:
Минимальные системные требования: Рекомендуемые системные требования:
Процессор
1.0 GHz x86
Память
256 MB
Видеокарта
мин. 256 цветов
Жесткий диск –
свободное место
150 MB
Разрешение экрана
800 x 600, 1024 x 768, 1280
x 1024
Порт USB
1.1
Процессор
2.0 GHz x86
Память
512 MB или больше
Видеокарта
256 цветов или больше
Жесткий диск –
свободное место
500 MB
Разрешение экрана
1024x768, 1280x1024
Порт USB
2.0
Интерктивная доска Avtek - это устройство типа HID, благодаря чему после подключения к порту USB
оно автоматически разпознается и устанавливается системой. Благодая этому установка встроенных
драйверов производится на усмотрение. В операционных системах Windows 7 и выше процесс
калибровки можно выполнить с уровня иснструмента, встроенного в операционную системы (смотри
пункт 5).
Page 47

45
2. Монтаж доски
Следующие действия показывают способ настенного монтажа интерактивной доски TT-Board
3000/4000.
1. Перед установкой убедитесь в наличии всех необходимых аксессуаров для монтажа.
Рисунок 1. Стеновые кронштейны
Номер Название Спецификация Кол. Фото
1 Крюк для монтажа на
стене
С т а н д а р т н ы е
аксессуары
2
2 Зацепка для крепления
на доске
С т а н д а р т н ы е
аксессуары
2
3 Зацепка для крепления
на стене
С т а н д а р т н ы е
аксессуары
2
4 Дюбель M6 x 30 6
5 Саморез M4 × 30 6
6 Саморез M4 × 16 6
Элементы стенового кронштейна
Page 48

46
2. Установите обе зацепки (элемент номер 2) на доске с помощью четырех саморезов (элемент
номер 6).
Рисунок 2. Монтаж кронштейна на верхней раме доски
3. Просверлите отверстия в стене с помощью дрели, как показано на рисунке 3, а именно: 4
отверстия для двух крюков (элемент 1) и 2 отверстия для двух стенных кронштейнов (элемент 3).
Перед сверлением отверстий в стене, измерьте и подтвердите следующие расстояния:
• H1: расстояние между двумя крюками в верхней части (элемент 1)= 100 см
• H2: расстояние между двумя точками зацепками в нижней части (элемент 3) = 100 см
rysunek
Рисунок 3. Расстояние отверстий в стене
Примечания:
• Убедитесь, что расстояние между нижней зацепкой (элемент номер 3) и основанием составляет
между 700 i 800 мм.
• Убедитесь, что система шести монтажных отверстий, просверленных в стене подходит к доске.
4. В каждое отверстие вставьте дюбель.
5. Установите два крюка (элемент номер 1) и две зацепки (элемент 3) на стене, с помощью шести
саморезов (элемент номер 5).
6. Закрепите зацепки (элемент номер 2) к задней части доски с помощью саморезов (элемент номер
6).
7. Закрепите доску на стене.
8. Отрегулируйте настройки стенных зацепок (элемент номер 3), с использованием саморезов
(элемент номер 6), как показано на рисунке 1, для правильной установки доски.
Нижнее ребро зацепки
(элемент номер 2)
Стена
Отверстия 6xΦ6, 50см
Page 49

47
3. Подключение доски
1. Следует подготовить (установить) доску.
2. Отрегулировать позицию доски и проектора.
3. В левом нижнем углу доски (смотреть спереди) находится кабель с головкой USB - следует
подключить там кабель USB.
Подключая доску к компьютеру, с помощью кабеля USB, следует предохранить кабель так, чтобы
исключить возможность случайного потягивания провода (например, во время хождения).
Рекомендуется использовать оригинальный кабель USB, прилагаемый к доске (в случае
использования другого, важно, чтобы его сопротивление было ниже 0,5 Ω).
4. Второй конец кабеля следует подключить к компьютеру.
5. Следует подключить компьютер к проектору (более подробная информация находится в
инструкции по эксплуатации проектора).
Page 50

48
4. Калибровка доски
Калибровка в системе Windows 7, 8 и выше
Система Windows от версии 7 и выше имеет встроенный, интуитивный инструмент для калибровки
сенсорных экранов.
1. Быстрым движением передвиньте с правого края в центр экрана, а затем нажмите на панели
Поиск:
(Если Вы используете мышку, перенесите указатель в правый нижний угол экрана, затем перенесите
указатель вверх, а затем нажмите на панели Поиск).
или
2. В поле поиска введите слово Калибровка, а затем нажмите позицию Калибровка экрана под
углом пера или сенсорного ввода для открытия окна настроек планшета.
Можно найти также слово Планшет, а затем нажать или нажать позицию Настройки компьютера
типа Планшет.
Альтернативный путь для калибровки:: Панель управления -> Оборудование и звук -> Настройки
компьютера типа Планшет -> Калибровка
3. Убедитесь, что позиция, указанная в рубрике Экран соответствует проектору, который
отображает изображение на доске.
4. Нажмите или щелкните позицию Калибровка, а затем следуйте согласно инструкциям на
экранеekranie.
Альтернативная калибровка доступна после установки драйвера
Доска Avtek TT-Board 3000/4000 - это инструмент с интерфейсом HID, благодаря чему не требует
установки отдельных драйверов для правильной работы. Из-за этого главным инструментом для
калибровки является инструмент, встроенный в систему Windows.
В случае проблем с обнаружением доски в системе Windows или в системе MAC или Linux, следует
перейти на сайт http://www.avtek.eu, где на странице продукта находятся драйвера для всех версий
с встроенным инструментом для калибровки.
Page 51

49
5. Решение проблем
Следующая таблица касается проблем и их решений для доски, соединенной с помощью кабеля
USB
Проблема Признак Возможная причина Решение
Интерактивная доска не
работает
Установка оборудования
HID (автоматическая)
была не выполнена
Из-за своих ограничений,
некоторые версии
системы Windows могут
иметь проблемы с
нахождением устройств
HID
Следует установить
внешний драйвер.
Повреждение кабеля USB Проверьте на наличие
повреждений на вашем
кабеле USB, а затем
проверьте доску с другим
кабелем USB.
Поврежденный порт USB
в компьютере
Следует подключить
кабель USB к другому
порту USB в компьютере
Не появляются пункты
для калибровки
Не видно пунктов
калибровки
Часть изображения,
о т о б р а ж а е м о г о
проектором может
находиться за пределами
доски
Следует убедиться, что
проектор не отображает
пунктов калибровки
за пределами доски.
Если да, следует
повторно отрегулировать
настройки проектора и его
положения относительно
таблицы
Нельзя писать на доске Видно указатель мышки,
но не появляется эффект
записи
П р о г р а м м н о е
обеспечение не находится
в режиме записи
Переключение в режим
записи
В режиме рабочего
стола видно курсор, но в
режиме писания нельзя
писать
Цвет писания такой же,
как заставка
Следует заменить цвет
маркера на другой, чем
цвет заставки
Маркер пишет
неправильно
Искажения появляются
только в некоторых
районах
Неправильная калибровка Следует повторно
скалибрировать доску
О т о б р а ж а е м о е
изображение искажено
Следует изменить
настройки проектора
Маркер пишет медленно След от маркера
появляется медленнее,
чем фактическое
положение указателя
(пальца)
Замедление из-за
антивирусной программы
Следует выключить
антивирусную программу
На компьютере открыто
слишком много
приложений
Следует закрыть
ненужные приложения
Компьютер слишком
слабый
Следует заменить
компьютер на модель с
лучшей конфигурацией
В случае дальнейших проблем, рекомендуем обратиться в авторизованный сервис досок
Avtek. Для получения более подробной информации, пожалуйста, обратитесь к продавцу.
Page 52

50
Cel mai recent manual de utilizare și informații despre
tabla interactivă Avtek sunt disponibile pe pagina:
http://www.avtek.eu
Page 53

51
1. Conținutul setului
După despachetarea ambalajului e necesar de a verica conținutul acestuia.În cazul lipsei sau defectării
oricărei piese de schimb e necesar a se conecta cu vînzătorul.
Conținutul:
Model 3000/4000
Denumirea piesei Cantitatea Informația
Tabla interactivă 1 Modelul potrivit
Cablul USB 1
Garanția 1
Instrucția de folosire 1
Pixuri 2
Setul de xare pe perete 1
Atenție:
Suprafața tablei interactive Avtek TT-BOARD 3000/4000 a fost optimizată în vederea așării cît mai perfecte
a imaginii din proiector și eliminării efectului de recul. În acest scop suprafața a fost acoperită cu un strat
special. Pentru a păstra parametrele suprafeței, e necesar a șterge după ecare aplicare a notițelor effectuate cu
ajutorul pixului cu ștergere uscată. Recomandată este îngrijirea sistematică a suprafeței cu soluții de curățare
folosite pe larg specic tabelelor cu ștergere uscată.
• curățirea trebuie efectuată sistematic sau cînd vor depistate urme de pix după ștergerea suprafeței tablei
interactive
• Nu se recomandă a folosi markere permanente sau alte obiecte pentru suprafețe cu ștergere uscată
• În cazul nerespectării recomandărilor producătorului, suprafața poate permanent murdărită
Cerințele referitoare la sisteme:
Cerințele minimalne referitoare la sisteme: Cerințe recomandate referitoare la sistem:
Procesor
1.0 GHz x86
Memorie
256 MB
Placa gracă
Așează min. 256 culori
Discul dur – spațiul
liber
150 MB
Rezoluția ecranului
800 x 600, 1024 x 768, 1280
x 1024
Port USB
1.1
Procesor
2.0 GHz x86
Memorie
512 MB sau mai mult
Placa gracă
256 culori sau mai multe
Discul dur – spațiul
liber
500 MB
Rezoluția ecranului
1024x768, 1280x1024
Port USB
2.0
Tabla interactivă Avtek este un dispozitiv de tip HID iar după conectarea cu portul USB este automat
recepționată și conectată la sistem. Datorită acestuia instalația dedicată regulatorului este opțională. În
sistemele operaționale MS Windows 7 sau mai performante, procesul de calibrare poate efectuat cu ajutorul
echipamentului instalat în sistemul operațional (vezi secția 5).
Page 54

52
2. Montarea tabelei
Procedurile de mai jos prezintă modalitatea de asamblare a montării tabelei interactivă TT-Board
3000/4000 pe perete.
1. Înainte de instalare e necesar a se convinge că toate accesoriile necesare pentru montare au fost livrate.
Desenul 1. Suporturi de perete
Număr Denumire Specicație Cantitate Fotograe
1 Cîrlig xat pe perete A c c e s o r i i
standart
2
2 Zăvor de xare pe tablă A c c e s o r i i
standart
2
3 Zăvor de xare pe perete A c c e s o r i i
standart
2
4 Diblu conexpand M6 x 30 6
5 Șuruburi autoletante M4 × 30 6
6 Șuruburi autoletante M4 × 16 6
Elementele suportului de perete
Page 55

53
2. Monteză ambele zăvoare (elementul nr 2) pe tablă, cu ajutorul a patru șuruburi autoletante (elementul
nr 6).
Desenul 2. Montarea dispozitivului de xare pe rama superioară a tablei
3. Găuriți peretele, cu ajutorul perforatorului, cum e indicat în desenul 3, dar anume: 4 găuri pentru două
cîrlige (elemental 1) și două găuri pentru două zăvoare de perete (elementul 3).Înainte de a găuri peretele,
măsoară și conrm următoarele distanțe:
• H1:distanța dintre două cîrlige superioare (elementul 1) = 100cm
• H2:distanța dintre două cîrlige inferioare (elementul 3) = 100 cm
rysunek
Desenul 3. Distanța dintre găuri pe perete
Atenție:
• Asigurăte că distanța dintre zăvorul interior (elementul nr 3) și podea oscilează între 700 și 800mm.
• Asigurăte că poziționarea celor șase găuri perforate în perete corespund tablei.
4. Pentru ecare din găuri introduce diblu conexpand.
5. Montează două cîrlige (elementul nr 1) și două zăvoare (elementul 3) pe perete cu ajutorul celor șase
șuruburi autoletante (elementul 5).
6. Fixează zăvorul (elementul 2) la partea inferioară a tabelei cu ajutorul șurubului autoletant (elementul
6).
7. Aplică tabla pe perete.
8. Reglează poziționarea zăvoarelor de perete (elementul nr 3) cu ajutorul a două șuruburi autoletante
(elementul nr 6) așa cum e indicat în Desenul nr 1, cu scopul montării corecte a tablei.
Muchia inferioară a
zăvorului (elementul nr 2)
Peretele
Găuri 6xΦ6, 50cm
Page 56

54
3. Conectarea tablei
1. E necesar de a pregăti (monta) tabla.
2. Reglează poziția tablei și a proiectorului.
3. În colțul de jos a tablei (Vezi Din față) se aă un cablu care are la capăt oriciul USB – e necesar a
conecta cablul USB livrat.
Conectînd tabla la computer cu ajutorul cablului USB e necesar a asigura cablul în așa mod, încît să
eliminăm posibilitatea tragerii accidentale a cablului (de exemplu în timpul mersului).
E recomandat de a folosi cablul original USB livrat împreună cu table (în cazul folosirii altuia e necesar
să vericăm rezistența maximal mai jos decît 0.5 Ω).
4. Capătul celălalt trebuie conectat la computer.
5. E necesar a conecta computerul la proiector (mai multe instrucții se găsesc n. instrucția de folosire a
proiectorului).
Page 57

55
4. Calibrarea tablei
Calibrarea în sistemul Windows 7, 8 și mai performante
Sistemul Windows de la versiunea 7 și mai performante posedă echipamente integrate, foarte intuitivă pentru
calibrarea ecranelor tactile.
1. Rapid mișcă de la muchia dreptă spre mijlocul ecranului, iar apoi accesează panelul Căutare.
(Dacă folosești Mouse-ul, indică colțul drept a ecranului, mișcă indicatorul mousului în sus, iar apoi
tastați Căutare).
sau
2. În cîmpul de căutare indicăm parola Calibrare, apoi tastăm poziția Calibrează ecranul cu ajutorul
pixului sau introducerii tactile, cu scopul de a deschide ecranul setărilor tabelei.
Se poate găsi la Fel parola Tablet, iar apoi accesați poziția Setări a computerului tip Tablet.
Calea alternativă pentru calibrare: Panoul de control -> Hardware și sunet -> Setări a computerului tip
Tablet -> Calibrează
3. Convingete că, poziția așată în cîmpul Ecran corespunde proiectorului, care așează imagine ape
tablă.
4. Tastează sau fă clic pe poziția Calibrează, iar apoi urmează instrucțiunile așate pe ecran.
Calibrarea alternativă, accesibilă după instalarea regulatorului
Tabla Avtek TT-Board 3000/4000 este un echipament cu interface HIB ce înseamnă că nu necesită
instalarea separată a regulatorului pentru funcționarea corectă.Din acest motiv echipamentul principal
pentru calibrare este echipamentul integrat în sistemul Windows.
În cazul problemelor legate de descoperirea tablei prin sistemul Windows sau utilizarea versiunii MAC sau
Linux – e necesar a accesa pagina http://www.avtek.eu unde pe pagina productului se găsesc regulatorii
pentru versiunile de mai sus cu echipament integrat pentru calibrare.
Page 58

56
5. Soluționarea problemelor
Tabela de mai jos conține informații referitoare la problemele posibile și rezolvarea acestora cu ajutorul
cablului USB.
Problema Semne Motivele posibile Soluționarea
Tabla interactivă nu
funcționează
Instalația echipamentului
HID (automată) a eșuat
Din cauza unor restricții
unele versiuni Windows pot
avea probleme cu depistarea
echipamentului HID
E necesar de a instala
regulatorul ex tern.
Defectarea cablului USB E necesar de a verica dacă
cablul USB posedă semne
de defectare, iar apoi să
conectați alt cablul USB la
tablă.
Portul USB al computerului
defectat
E necesar de a conecta
cablul USB la alt computer
Nu apar punctele de
calibrare
Nu se observă punctele de
calibrare
O parte a imaginii așate de
proiector poate în afara
ariei tabelei
E necesar de a se convinge
că proiectorul nu așează
punctele calibrării în afara
tabelei.Dacă da e necesar a
regula setările proiectorului
și poziționarea lui față de
tablă
Nu se poate scri pe tablă Se poate observa cursorul
mouse-ului, dar nu apare
efectul de scriere
Programul nu este în modul
de scriere
Conectează modul de
scriere
Pe desktop apare cursorul,
dar în modul de scriere nu
este posibilă scrierea
Culoarea scrierii este la fel
ca cea a fundalului
E necesar a schimba
culoarea indicatorului de
scriere pe alta decît cea a
fundalului
Pixul scrie incorect Deformeayă unele imagini
pe anumite zone
Calibrarea incorectă E necesar a calibra din nou
computerului
Imaginea aşată este
deformată
E necesar a schimba setările
proiectorului
Pixul scrie foarte lent Urmele pixului apar mai
lent decît mişcarea efectivă
a indicatorului (degetului)
Scăderea vitezii din cauya
programului antivirus
E necesar a deconecta
programul antivirus
Pe computer sunt pornite
prea multe aplicaţii
E necesar a închide
aplicaţiile inutile
Computerul e prea slab E necesar de a schimba
computerul pentru unul cu
generaţie mai nouă
În cazul nesoluţionării problemelor e necesar a contacta serviciul autorizat table Avtek. Pentru de a
primi informaţii specice e necesar de a se contacta cu vînzătorul.
Page 59

57
A legújabb használati utasítást és az Avtek interaktív
táblákra vonatkozó információk megtálalhatóak a
http://www.avtek.eu weboldalon
Page 60

58
1. Csomagolás tartalma
A csomagolás felnyitását követően ellenőrizni kell a tartalmat. Abban az esetben, ha lent felsorolt
tartozékokból bármelyik hiányzik, vagy sérült, forduljon a forgalmazóhoz.
Csomagolás tartalma:
3000/4000 modell
Elem megnevezése Menn. Információ
Interaktív tábla 1 Megfelelő modell
USB kábel 1
Garancialap 1
Használati utasítás 1
Markerek 2
Falra szerelési készlet 1
Figyelem:
Az Avtek TT-BOARD 3000/4000 interaktív tábla felülete a projektor által adható legjobb képre, és a
fényvisszaverődés hatásának minimalizálására lett optimalizálva. Erre a célra egy speciális felületi bevonatot
alkalmazott a gyártó. A legjobb teljesítmény fenntartása érdekében a szárazon törölhető markerrel történt
feljegyzések után közvetlenül, mindig töröljük a táblát. Ajánlatos a tábla rendszeres ápolása és tisztítása az
ilyen típusú felületekhez ajánlott, általánosan hozzáférhető szerekkel.
• a tisztítást rendszeresen kell végezni, vagy abban az esetben, ha az interaktív tábla törlése után észrevesszük
a markerek nyomait
• nem szabad használni permanens markereket, vagy más szárazon törölhető felületekre alkalmatlan
írószereket.
• ha nem tartja meg a gyártó utasításait, a tábla felülete tartósan piszkossá válhat
Rendszerkövetelmények:
Minimális rendszerkövetelmények: Zalecane parametry systemu:
Processzor
1.0 GHz x86
Memória
256 MB
Videokártya
min. 256 szín
Merevlemez – szabad
hely
150 MB
Képernyő felbontás
800 x 600, 1024 x 768, 1280
x 1024
USB Port
1.1
Processzor
2.0 GHz x86
Memória
512 MB, vagy e felett
Videokártya
256 szín vagy jobb
Merevlemez – szabad
hely
500 MB
Képernyő felbontás
1024x768, 1280x1024
USB Port
2.0
Az Avtek interaktív tábla HID típusú eszköz, ami azt jelenti, hogy az USB porthoz történt csatlakozás után a
rendszer automatikusan felismeri az eszközt és telepíti a megfelelő illesztőprogramot. A dedikált illesztőprogram
telepítése opcionálissá válik. A Microsoft Windows 7 és ettől újabb operációs rendszerek esetében, az eszköz
kalibrálása az operációs rendszerbe beépített szoftverrel lehetséges (lásd 5. fejezet).
Page 61

59
2. A tábla szerelése
A következő eljárások azt mutatják, hogyan kell a TT-Board 3000/4000 interaktív táblát a falra erősíteni.
1. A rögzítés megkezdése előtt győződjön meg arról, hogy az összes szükséges szerelési tartozék
megtalálható.
1. rajz. Fali konzol
Elem Megnevezés Leírás Menn. Kép
1 Fali akasztó S z t e n d e r d
tartozék
2
2 Táblára szerelt akasztó S z t e n d e r d
tartozék
2
3 Falra szerelt akasztó S z t e n d e r d
tartozék
2
4 Műanyag tipli M6 x 30 6
5 Önmetsző csavar M4 × 30 6
6 Önmetsző csavar M4 × 16 6
Fali konzol elemei
Page 62

60
2. Erősítsd a két akasztót (2. számú elem) a táblára, a négy lemezcsavar segítségével (6. számú elem).
2. rajz. A tábla keretének tetejére szerelt akasztó
3. A fúrógép segítségével fúrjunk lyukakat a falba úgy, ahogy a 3. rajzon látható: 4 lyukat 2 akasztónak
(1. számú elem), és 2 lyukat két akasztónak (3. számú elem). Furás előtt meg kell mérni a következő
távolságokat:
• H1: fenti fali akasztók közötti távolság (1. számú elem) = 100 cm
• H2: lenti fali akasztók közötti távolság (3. számú elem) = 100 cm
rysunek
3. rajz. A falban lévő furatok elhelyezkedése
Figyelem:
• Győződjön meg arról, hogy a távolság az alsó fali akasztó és a padló között 700 és 800 mm közé esik.
• Győződjön meg arról, hogy a falba fúrt 6 lyuk illeszkedik a táblához.
4. Mindegyik furatba helyezzük egy – egy tiplit.
5. Erősítse a két kampót (1. számú elem), és a két horgot (3. számú elem) a falra a hat önmetsző csavar
segítségével (5. számú elem).
6. Rögzítse a tábla hátsó részére rögzíthető akasztót (2. számú elem) önmetsző csavar segítségével (6.
számú elem).
7. Akassza a táblát a falra.
8. A tábla falra történő, megfelelő rögzítése érdekében, állítsa be a fali akasztót (3. számú elem) a két
önmetsző csavar segítségével (6. számú elem) úgy, mint ahogy az az 1. számú rajzon látható.
Az akasztó alsó széle
Fal
Furat 6 x Φ 6, 50 cm
Page 63

61
3. A tábla csatlakoztatása
1. Elő kell készíteni a táblát (rögzítés a falhoz).
2. A tábla és a projektor megfelelő illesztése egymáshoz.
3. A tábla bal alsó sarkában (a tábla elejéről nézve) női végű USB port tálalható – oda kell csatlakoztatni
az általunk csatolt USB kábelt.
Amikor csatlakoztatjuk a táblát a számítógéphez az USB-kábel segítségével, akkor úgy kell rögzíteni a
kábelt, hogy kizárjuk a kábel véletlen kihúzódósát (pl. a kábelben megakad a lábunk).
Javasoljuk, hogy használja az eredeti, a táblához mellékelt USB-kábelt (más kábel használata esetén
fontos, hogy az 0,5 Ω-nél kisebb ellenállással rendelkezzen).
4. Csatlakoztassuk a kábel másik végék a számítógéphez.
5. Csatlakoztassuk a projektort a számítógéphez (a részleteket lásd a projektor használati utasításában).
Page 64

62
4. A tábla kalibrálása
A tábla kalibrálása Windows 7, 8 és ettől újabb operációs rendszerekhez
A Windows 7. operációs rendszer és az ettől újabb változatok jó intuitív érintőképernyő kalibrálási
tulajdonságokkal rendelkeznek.
1. Pöccintsen befelé a képernyő jobb széléről, és koppintson a Keresés elemre.
(Ha egeret használ, mutasson a képernyő jobb alsó sarkára, húzza a mutatót felfelé, és kattintson a Keresés
elemre).
vagy
2. Írja be a keresőmezőbe a kalibrálás szót, majd A képernyő kalibrálása tollal, vagy érintéses bevitel
elemre koppintva, vagy kattintva nyissa meg a Táblagép beállításai eszközt.
Rá is kereshetünk a Táblagép szóra és arra koppintva vagy kattintva nyissuk meg a Táblaszámítógép
beállításai eszközt.
A kalibrálás alternatív útvonala: Vezérlőpult -> Hardver és hang -> Táblaszámítógép beállításai ->
Kalibrálás
3. Ellenőrizze, hogy a Képernyő mezőben látható eszköz megegyezik azzal a projektorral, mely kivetíti
a képet.
4. Koppintson, vagy kattintson a Kalibrálás gombra, és kövesse a képernyőn megjelenő utasításokat.
Alternatív kalibrálás az illesztőprogram telepítését követően
Az Avtek TT-Board 3000/4000 tábla HÍD interfésszel rendelkezik, ami azt jelenti, hogy a megfelelő
működéséhez nem kell külön illesztőprogramokat installálni. Ennek érdekében a kalibrálás fő eszköze be
van építve a Windows operációs rendszerbe.
A Windows, MAC vagy Linux operációs rendszer alatt észlelt tábla felismerési problémák esetén a http://
www.avtek.eu honlapra kell menni és az ott tálalható drivereket kell alkalmazni az aktuális verzióhoz, a
kalibráció beépített eszközeivel.
Page 65

63
5. Problémák megoldására vonatkozó táblázat
Az alábbi táblázattal kezelheti az USB kábel segítségével csatlakoztatott interaktív tábla alkalmazása során
felmerülő problémákat
Probléma Tünet Lehetséges ok Megoldás
Az interaktív tábla nem
működik
A HID eszköz telepítése
(automatikus) sikertelen
volt
A saját korlátozások
miatt néhány Windowsverziónak gondot okozhat a
HID eszköz felismerése.
Telepíteni szükséges
egy külső, dedikált
illesztőprogramot
USB kábel Kérjük, ellenőrizze,
hogy az USB-kábel
nincs megsérülve, majd
ellenőrizze a táblát egy
másik USB kábellel
USB port megsérült a
számítógépben
Az USB-kábelt egy
másik USB porthoz kell
csatlakoztatni
A kalibrációs pontok nem
jelennek meg
Nem lehet látni a kalibrációs
pontot
A projektor által kivetített
kép egy része lehet, hogy a
táblán kívülre esik
Győződjön meg arról,
hogy a projektor nem vetíti
ki a kalibrációs pontokat
a táblán kívülre. Ha így
van, újra be kell állítani
a kivetítő beállításait és
annak pozícióját a táblához
képest.
Nem lehet írni a táblára Látjuk a kurzort, de nem
jelenik meg az írás
A szoftver írásvédett módra
van beállítva
Kapcsold át az írásmódot
Asztali üzemmódban
látható a kurzor, de írási
módban nem lehet írni
Az írás színe ugyanaz, mint
a háttér
Meg kell változtatni a stylus
színét, hogy más legyen,
mint a háttér
Stylus ír, de helytelenül A torzítás mindössze
néhány területen észlelhető
Hibás a kalibrálás Újra kell kalibrálni a táblát
A megjelenített kép torzít Meg kell változtatni a
projektor beállításait
Stylus ír, de nagyon lassan A Stylus nyoma lassabb,
mint a tényleges mutató
(ujj) helyzete
A víruskereső program
lassítja a gépet
A víruskereső programot ki
kell kapcsolni
A számítógépen túl sok
alkalmazás fut egyszerre
Zárja be az összes
szükségtelen alkalmazást.
A számítógép túl gyenge Jobb kongurációs
számítógép modell
kiválasztása.
További problémák esetén javasoljuk, hogy vegye fel a kapcsolatot az Avtek tábla márkaszervizzel.
További információért kérjük, forduljon a forgalmazóhoz.
Page 66

64
PL
Prawidłowa utylizacja produktu (przepisy dotyczące zużytego sprzętu elektrycznego i elektronicznego) (Dotyczy krajów korzystających z oddzielnych systemów segregacji
odpadów).
Takie oznaczenie umieszczone na produkcie, akcesoriach lub w instrukcji wskazuje, że produktu i jego elektronicznych akcesoriów (np. ładowarki, zestawu słuchawkowego,
kabla USB) po upływie okresu użytkowania nie należy wyrzucać wraz z innymi odpadami pochodzącymi z gospodarstw domowych. W celu uniknięcia skażenia środowiska
lub narażenia na utratę zdrowia z powodu nieprawidłowej utylizacji należy oddzielić te odpady od innych i pozbyć się ich w sposób odpowiedzialny i umożliwiający ponowne
wykorzystanie surowców.
Użytkownicy domowi powinni skontaktować się ze sprzedawcą produktu lub z organizacjami samorządowymi w celu uzyskania informacji na temat miejsca i sposobu
bezpiecznej utylizacji tych produktów. Użytkownicy instytucjonalni powinni skontaktować się ze swoim dostawcą i sprawdzić warunki umowy zakupu. Produktu i jego
elektronicznych akcesoriów nie należy usuwać wraz z innymi odpadami komercyjnymi.
Prawidłowa utylizacja baterii używanych wraz z produktem (Dotyczy krajów korzystających z oddzielnych systemów segregacji odpadów).
Takie oznaczenie umieszczone na baterii, w instrukcji lub na opakowaniu wskazuje, że po upływie okresu użytkowania baterii nie należy usuwać wraz z innymi odpadami
pochodzącymi z gospodarstw domowych. Chemiczne symbole Hg, Cd lub Pb wskazują, że bateria zawiera rtęć, kadm lub ołów w ilościach przekraczających poziom określony
w dyrektywie 2006/66/WE. W przypadku nieprawidłowej utylizacji baterii substancje te mogą stanowić zagrożenie dla zdrowia człowieka lub dla środowiska.
Aby chronić zasoby naturalne oraz promować ponowne wykorzystywanie materi ałów, należy oddzielić baterie od innych o dpadów i utylizować je, korzystając z lokalnego,
bezpłatnego systemu zwrotu baterii
EN
Correct Disposal of This Product (Waste Electrical & Electronic Equipment) (Applicable in countries with separate collection systems)
This marking on the product, accessories or literature indicates that the product and its electronic accessories (e.g. charge r, headset, USB cable) should not be disposed of
with other household waste at the end of their working life. To prevent possible harm to the environment or human health f rom uncontrolled waste disposal, please
separate these items from other types of waste and recycle them responsibly to promote the sustainable reuse of material resources.
Household users should contact either the retailer where they purchased this product, or their local government office, for details of where and how they can take these
items for environmentally safe recycling. Business users should contact their supplier and check the terms and conditions of the purchase contract. This product and its
electronic accessories should not be mixed with other commercial wastes for disposal.
Correct disposal of the batteries in this pro duct (Applicable in countries with separate collection systems)
This marking on battery, manual or packaging indicates that the batteries in this product should not be disposed of with othe r household waste at the end of their working
life. Where marked, the chemical symbols Hg, Cd or Pb indicate that the battery contains mercury, cadmium or lead above the reference levels in E C Directive 2006/66. If
batteries are not properly disposed of, these substances can cause harm to human health or the environment.
To protect natural resources and to promote material reuse, please separate batteries from other types of waste and recycle them through your local, free battery return
system.
DE
Ordnungsgemäße Entsorgung dieses Geräts (Elektro- & Elektronik-Altgeräte) (Anwendbar in Ländern mit Systemen zur getrennten Sammlung von Wertstoffen).
Diese Kennzeichnung auf dem Gerät, dem Zubehör oder der Dokumentation bedeutet, dass das Gerät sowie das elektronische Zubehö r (z. B. Ladegerät, Headset, USBKabel) am Ende ihrer Lebensdauer nicht im normalen Hausmüll entsorgt werden dürfen. Entsorgen Sie diese Geräte bitte getrennt von anderen Abfällen, um der Umwelt
bzw. der menschlichen Gesundheit nicht durch unkontrollierte Müllbeseitigung zu schaden. Recyceln Sie das Gerät, um die nachhaltige Wiederverwertung von stofflichen
Ressourcen zu fördern. P
rivate Nutzer sollten den Händler, bei dem das Produkt gekauft wurde, oder die zuständigen Behörden kontaktieren, um in Erfahr ung zu bringen, wie sie das Gerät auf
umweltfreundliche Weise recyceln können. Gewerbliche Nutzer wenden sich an ihren Lieferanten und überprüfen die Konditionen ihres Kaufvertrags. Dieses Gerät und
seine elektronischen Zubehörteile dürfen nicht zusammen mit anderem Gewerbemüll entsorgt werden.
Ordnungsgemäße Entsorgung der Batterien in diesem Gerät (Anwendbar in Ländern mit Systemen zur getrennten Sammlung von Wertstoffen).
Diese Kennzeichnung auf der Batterie, dem Handbuch oder der Verpackung bedeutet, dass die Batterien am Ende ih rer Lebensdauer nicht im normalen Hausmüll entsorgt
werden dürfen. Die Kennzeichnung mit den chemischen Symbolen „Hg“, „Cd“ oder „Pb“ bedeutet, dass die Batterie Quecksilber, Cadmium oder Blei in Mengen enthält, die
die Grenzwerte der EU-Direktive 2006/66 übersteigen. Wenn Batterien nicht ordnungsgemäß entsorgt werden, können diese Substanzen die Gesundheit von Menschen
oder die Umwelt gefährden.
Zum Schutz der natürlichen Ressourcen und zur Förderung der Wie derverwertung von Materialien trennen Sie die Ba tterien von anderem Müll, und führen Sie sie Ihrem
örtlichen Recyclingsystem zu.
FR
Instructions de mise au rebut de ce produit (déchets d'équipements électriques et électroniques) (Applicable dans les pays pratiquant la collec te sélective de déchets)
Ce symbole présent sur le produit, ses accessoires ou sa documentation indique que ni le produit, ni ses accessoires électroniques usagés (chargeur, casque audio, câble
USB, etc.) ne doivent être jetés avec les autres déchets ménagers. La mise au rebut incontrôlée des déchets présentant des risques pour l'environnement et la santé publique,
veuillez séparer vos produits et accessoires usagés des autres déchets. Vous favoriserez ainsi le recyclage de la matière qui les compose dans le cadre d'un développement
durable.
Les particuliers sont invités à contacter le magasin leur ayant vendu le produit o u à se renseigner auprès des autorités locales pour connaître les procédures et les points
de collecte de ces produits en vue de leur recyclage.
Les utilisateurs professionnels doivent contacter leur fournisseur et consulter les conditions générales du contrat d'achat. Ce pr oduit et ses accessoires ne doivent pas être
jetés avec les autres déchets professionnels et commerciaux.
Mise au rebut des piles de ce produit (Applicable dans les pays pratiquant la collecte sélective de déchets)
Ce symbole présent sur le manuel, l'emballage ou les piles indique que celles-ci ne doivent pas être jetées avec les autres déchets ménagers. L'indication éventuelle des
symboles chimiques Hg, Cd ou Pb signifie que la pile ou l'accumulateur contient des quantités de mercure, de cadmium ou de pl omb supérieures aux niveaux de référence
stipulés dans la directive CE 2006/66. Si les piles ne sont pas correctement mises au rebut, ces substances peuvent porter préjudice à la santé humaine ou à l'environnement.
Afin de protéger les ressources naturelles et de favoriser la réutilisation du matériel, veillez à séparer les piles des autres types de déchets et à les recycler via votre système
local de collecte gratuite des piles et accumulateurs.
ViDiS S.A., 53-204 Wrocław, Ojca Beyzyma 7, POLAND www.vidis.pl
Page 67

65
CZ
Správná likvidace tohoto výrobku (odpady z elektrických & elektronických zařízení) (platí v zemích se zavedenými systémy třídění odpadu)
Toto označení na výrobku, na příslušenství a v tištěných materiálech znamená, že by se tento výrobek a jeho elektronické příslušenství (např. nabíječka, sluchátka či ka bel
USB) na konci životnosti neměly likvidovat společně s jiným domovním odpadem. Oddělením od jiných druhů odpadu a zodpovědnou recyklací podpoříte trvale udržitelné
opakované využití materiálních zdrojů, zabráníte znečištění životního prostředí nebo poškození zdraví způsobenému neřízenou likvidací odpadu.
Domácí uživatelé by měli kontaktovat buď maloobchodního prodejce, u kterého tento výrobek zakoupili, nebo úřad místní správy a vyžádat si informace o tom, kam a jak
mohou tyto jednotky dopravit za účelem recyklace bezpeč né pro životní prostředí. Firemní uživatelé by se měli obrátit na svého dodavatele a zkontrolovat podmínky kupní
smlouvy. Tento výrobek a jeho elektronická příslušenství by neměla být slučována s jiným hospodářským odpadem.
Správná likvidace baterií v tomto výrobku (platí v zemích se zavedenými systémy třídění odpadu)
Toto označení na baterii, v příručce nebo na obalu znamená, že by baterie na ko nci své životnosti neměla být likvidována společně s jiným domovním odpadem. Označení
chemickými symboly Hg, Cd nebo Pb znamená, že baterie obsahuje vyšší úroveň rtuti, kadmia nebo olova než určuje směrnice ES 2006/66. Pokud nebudou baterie vhodně
zlikvidovány, tyto látky mohou poškozovat zdraví nebo životní prostředí.
V zájmu ochrany přírodních zdrojů a opětovného po užití materiálů vás žádáme, abyste oddělili baterie od ostatních typů odpadu a recyklovali je v rámci místního sys tému
recyklace baterií.
SK
Správna likvidácia tohto produktu (odpad z elektrických a elektronických zariadení) (Platné v krajinách so systémom separovaného zberu)
Toto označenie na výrobku, príslušenstve alebo v sprievodnej brožúre znamená, že po skončení životnosti produktu a elektronického príslušenstva (napríklad nabíjačka,
náhlavná súprava, kábel USB) by sa tieto položky nemali likvidovať s iným komunálnym odpadom. V záujme zabránenia možnému poš kodeniu životného prostredia alebo
ľudského zdravia spôsobeného nekontrolovanou likvidáciou odpadu oddeľte tieto položky od iných typov odpadu a zodpovedne ich recyklujte, aby ste podporili nepretržité
opätovné využívanie materiálnych zdrojov.
Domáci používatelia musia ohľadom informácií o tom, kde a akým spôsobom môžu odniesť tieto položky za účelom recyklácie ohľaduplnej k ž ivotnému prostrediu,
kontaktovať predajcu, u ktorého si daný produkt zakúpili, alebo miestny úrad. Priemyselní používatelia by mali kontaktovať svojho dodávateľa a preveriť si podmienky kúpnej
zmluvy. Tento výrobok a elektronické príslušenstvo by sa nemali likvidovať spolu s ostatným priemyselným odpadom.
Správna likvidácia batérií v tomto zariadení (Platné v krajinách so systémom separovaného zberu)
Toto označenie na batérii, príručke alebo balení indikuje, že batérie v tomto zariadení by sa po skončení životnosti nemali li kvidovať s iným komunálnym odpadom. Ak sú
vyznačené, chemické symboly Hg, Cd alebo Pb naznačujú, že batéria obsa huje ortuť, kadmium alebo olovo, ktoré presahuje referenčné hladiny v norme ES 2006/66. Ak sa
batérie správne nelikvidujú, tieto látky môžu škodiť ľudskému zdraviu alebo životnému prostrediu.
Aby sa chránili prírodné zdroje a podporovalo sa opätovné použ ívanie materiálov , oddeľujte batérie od iného typu odpadu a recyklujte ich prostredníctvom miestneho
bezplatného systému vrátenia batérií.
HU
Megfelelő hulladékkezelés (leselejtezett elektromos és elektronikus készülékek) (A szelektív gyűjtőrendszerekkel rendelkező o rszágokban alkalmazandó.)
Ez a jelölés a terméken, a tartozé kon vagy az útmutatóban azt jelenti, hogy a készüléket és elektronikus tartozékait (pl. töltő, fejhallgató, USB-kábel) élettartamuk végén
nem szabad a háztartási hulladékkal együtt kidobni. A szabálytalan hulladékkezelés által okozott környezetszennyezés és egészségkárosodás megelőzése érdekében
különítse el a terméket és tartozékait a többi hulladéktól, és felelősségteljesen gondoskodjon a hulladék leadásáról az anyagok fenntartható újrafelhasználása céljá ból.
A háztartási felhasználók a készülék értékesítőjénél vagy a helyi önkormányzati szerveknél érdeklődhetnek arról, ho gyan kell a készüléket és tartozékait a környezet
szempontjából biztonságos módon újrahasznosítani. Az üzleti felhasználók lépjenek kapcsolatba a forgalmazóval, és vizsgálják meg az adásvételi szerződésben rögzített
feltételeket. A készülék és elektronikus tartozékai nem kezelhetők háztartási hulladékként.
A termékben lévő elemek helyes leselejtezése (A szelektív gyűjtőrendszerekkel rendelkező országokban alkalmazandó.)
Ha ez a jelzés látható az elemen, a használati útmutatóban vagy a csomagoláson, az azt jelenti, hogy élettartamának végén az elem nem kezelhető háztartási hulladékként.
Ha a Hg, Cd vagy Pb vegyjel szerepel valahol, az azt jelenti, hogy az elem a 2006/66/EK irányelvben meghatározott határérték fölötti mértékben tartalmaz higanyt, kadmiumot
vagy ólmot. Az ilyen elemek nem megfelelő leselejtezése esetén ezek az anyagok káros hatással lehetnek az emberi egészségre és a környezetre.
A természeti erőforrások megóvása, továbbá az újrahasznosítás elősegítése érdekében ne dobja az akkumulátorokat vagy az elemeket a háztartási hulladék közé, hanem
adja le őket a használt elemek gyűjtőhelyén.
RU
Правильная утилизация данного изделия (Утилизация электрического и электронного обо рудования) (Действительно для стран, использующих систему
раздельного сбора отходов)
Подобная маркировка на изделии, принадлежностях или в руководстве к нему предупреждает, что по истечении срока службы изделие или электронные
принадлежности для него (например, зарядное устройство, наушники, кабель USB) не следует выбрасывать вместе с другим бытовым мусором. Чтобы избежать
вредного воздействия на окружающую среду или на здоровье человека от неконтролируемой утилизации отходов, следует отделять маркированные подобным
образом изделия от другого мусора для соответствующей переработки и повторного использования в качестве сырья. Потребителям необходимо обратится либо
к продавцу данного устройства, либо в местную государственную администрацию для получения детальной информации о месте и способе экологически
безопасной утилизации. Юридическим лицам необходимо обратиться к поставщику, чтобы проверить сроки и условия договора купли-продажи. Это изделие
нельзя утилизировать вместе с другими коммерческими отходами.
Правильная утилизация батарей данного устройства (Действительно для стран, использующих с истему раздельного сбора отходов)
Данная маркировка, имеющаяся на батарее, упаковке или в руководстве, указывает на то, что по истечении срока службы батареи, установленные в данном
устройстве, не следует выбрасывать с другим бытовым мусором. Маркировка, обозначающая химические элементы Hg, Cd или Pb, указывает на то, что батареи
содержат ртуть, кадмий или свинец в количестве, которое превышает контрольные уровни, предусмотренные Директивой ЕС 2006/66. В случае ненадлежащей
утилизации батарей эти вещества могут нанести ущерб здоровью человека или окружающей среде.
Чтобы обеспечить защиту природных ресурсов и способствовать повторному использованию материалов, собирайте батареи отдельно от других отходов и
утилизируйте их, пользуясь услугами местной системы бесплатного сбора батарей.
RO
Eliminarea corectă a acestui produs (deşeuri de echipamente electrice & electronice) (Aplicabil în ţările cu sisteme de colectare separată)
Acest marcaj aplicat pe produs sau pe accesorii sau inclus în documentaţie indică faptul că produsul şi accesoriile sale electronice (de ex. încărcăt orul, căştile, cablul USB)
nu trebuie eliminate împreună cu alte deşeuri menajere la sfârşitul duratei de viaţă. Pentru a împiedica posibila afectare a mediului înconjurător sau a sănătăţii umane ca
urmare a eliminării necontrolate a deşeurilor, vă rugăm să separaţi aceste articole de alte tipuri de deşeuri şi să le reciclaţi în mod responsabil, pentru a promova reutilizarea
durabilă a resurselor materiale.
Utilizatorii casnici trebuie să contacteze fie comerciantul de la care au achiziţionat acest produs, fie autoritatea guvernamentală locală pentru a afla detalii despre locul şi
modalitatea în care aceste articole pot fi reciclate ecologic în condiţii de siguranţă. Utilizatorii industriali trebuie să contacteze furnizorul şi să consulte termenii şi condiţiile
contractului de achiziţie. Acest produs şi accesoriile sale electronice nu trebuie amestecate cu alte deşeuri comerciale pentru eliminare.
Eliminarea corectă a bateriilor din acest produs (Aplicabil în ţările cu sisteme de colectare separată)
Acest marcaj aplicat pe baterie, pe manual sau pe ambalaj indică faptul că bateriile din acest produs nu trebuie eliminate îm preună cu alte deşeuri menajere la sfârşitul
duratei de utilizare. Acolo unde sunt marcate, simbolurile chimice Hg, Cd sau Pb indică faptul că bateria conţine mercur, cadmiu sau plumb peste nivelurile de referinţă
specificate de Directiva CE 2006/66. Dacă bateriile n u sunt eliminate corespunzător, aceste substanţe pot afecta sănătatea umană sau mediul înconjurător.
Pentru a proteja resursele naturale şi a promova reutilizarea materialelor, vă rugăm să separaţi bateriile de alte tipuri de deşeuri şi să le reciclaţi prin intermediul sistemului
local gratuit de colectare a bateriilor.
ViDiS S.A., 53-204 Wrocław, Ojca Beyzyma 7, POLAND www.vidis.pl
Page 68

66
www.avtek.eu
GWARANCJA
Produkty Avtek objęte są europejską gwarancją. Szczegółowe informacje znajdują
się na stronie
www.avtek.eu/warranty.
WARRANTY
Avtek products are covered with European warranty. For more details please visit
www.avtek.eu/warranty.
GARANTIE
Die Produkte von Avtek umfasst eine europäische Garantie. Ausführliche
Informationen finden Sie auf der Seite
www.avtek.eu/warranty.
GARANTIE
Les produits AVTEK possède une garantie européenne. Pour plus de détails
veuillez consulter notre site
www.avtek.eu/warranty.
ZÁRUKA
Na výrobky AVTek se vztahuje evropská záruka. Více informací naleznete na
webové stránce
www.avtek.eu/warranty.
ZÁRUKA
Na výrobky Avtek sa vzťahuje európska záruka. Viac informácií nájdete na
webovej stránke
www.avtek.eu/warranty.
ГАРАНТИЯ
Продукция Avtek имеет европейскую гарантию. Подробная информация
размещена на сайте
www.avtek.eu/warranty.
GARANŢIA
Produsele Avtek sunt acoperite de garanţie europeană. Informaţii detaliate pot fi
găsite la
www.avtek.eu/warranty.
GARANCIA
az Avtek a termékeire európai garanciát ad. A részletes információk a
www.avtek.eu/warranty találhatók.
Page 69

67
Page 70

ViDiS S.A., ul. Ojca Beyzyma 7, 53-204 Wroclaw, Poland
www.avtek.eu
 Loading...