

Page 1

UHD Player
Manual
Version 2017|10|10
Based on Firmware Version: 1.1.x
AV Stumpfl GmbH | Austria | www.AVstumpfl.com
Page 2

TABLE OF CONTENTS
1. USAGE NOTICE ................................................................................................. 1
1.1. SAFETY INFORMATION .................................................................................................... 1
1.2. WARNING ........................................................................................................................ 1
1.3. MAINTENANCE TIPS ........................................................................................................ 1
2. TECHNICAL DATA .............................................................................................. 2
2.1. SUPPORTED FILE FORMATS ............................................................................................. 2
2.1.1. VIDEO ........................................................................................................................ 2
2.1.2. IMAGES ..................................................................................................................... 2
2.1.3. AUDIO ....................................................................................................................... 3
2.2. DATA CARRIER ................................................................................................................. 3
2.3. SD CARD / USB FILE SYSTEM ........................................................................................... 3
2.4. POWER SUPPLY ............................................................................................................... 3
2.5. DIMENSIONS .................................................................................................................... 3
2.6. WEIGHT ........................................................................................................................... 3
2.7. AMBIENT CONDITIONS .................................................................................................... 3
3. SCOPE OF DELIVERY .......................................................................................... 4
4. HARDWARE OVERVIEW .................................................................................... 5
4.1. FRONT PANEL VIEW AND PORTS ..................................................................................... 5
4.1.1. REAR PANEL VIEW AND PORTS ................................................................................ 7
4.1.2. LEFT SIDE PANEL VIEW AND PORTS ......................................................................... 8
4.1.3. RIGHT SIDE PANEL VIEW AND PORTS ....................................................................... 9
5. FIRST STEPS ....................................................................................................10
5.1. INSTALLATION ............................................................................................................... 10
5.2. CONNECTING OUTPUT DEVICES .................................................................................... 10
5.2.1. VIDEO ...................................................................................................................... 10
5.2.2. AUDIO ..................................................................................................................... 10
5.3. CONNECTING THE PLAYER TO THE NETWORK .............................................................. 11
5.4. POWERING THE PLAYER ................................................................................................ 12
5.5. PLAYBACK MEDIA FILES ................................................................................................. 12
6. UHD PLAYER CONFIGURATION .......................................................................14
6.1. WEB INTERFACE ............................................................................................................ 15
Page 3

6.1.1. WEB INTERFACE OVERVIEW ................................................................................... 16
6.1.2. CONFIGURING THE WEB INTERFACE ...................................................................... 18
6.2. INITIALIZATION FILE ....................................................................................................... 19
6.2.1. OVERVIEW INITIALIZATION FILE ............................................................................. 19
6.2.2. CONFIGURING THE INITIALIZATION FILE ................................................................ 21
7. NETWORK SETTINGS ......................................................................................22
8. DISPLAY CONFIGURATION ..............................................................................24
9. CONTENT ........................................................................................................27
9.1. VIDEO ............................................................................................................................. 27
9.2. IMAGES .......................................................................................................................... 27
9.3. AUDIO ............................................................................................................................ 28
9.4. RENDERING GUIDELINE ................................................................................................. 28
9.5. MUXING MULTIPLE AUDIO STREAMS ........................................................................... 30
10. MEDIA FILE PLAYBACK ..................................................................................32
10.1. PLAY MODE ................................................................................................................. 32
10.2. DEFAULT DISPLAY TIME ............................................................................................... 34
10.3. VOLUME ...................................................................................................................... 35
10.4. SKIPSIZE ....................................................................................................................... 37
10.5. PLAYLIST ...................................................................................................................... 38
10.5.1. HOW TO CREATE AND USE A PLAYLIST ................................................................ 38
10.5.2. OBLIGATORY PLAYLIST ENTRIES ........................................................................... 39
10.5.3. OPTIONAL PLAYLIST ENTRIES ............................................................................... 40
10.5.4. CUSTOMIZED ASSIGNMENTS ............................................................................... 44
11. MEDIA FILE MANAGEMENT ..........................................................................47
11.1. .. VIA COMPUTER’S FILE BROWSER ............................................................................. 47
11.2. .. VIA FTP AUTO-DOWNLOAD ...................................................................................... 47
11.3. .. VIA LOCAL FTP SERVER ............................................................................................. 53
11.4. .. VIA THE WEB INTERFACE .......................................................................................... 55
12. HDMI INPUT .................................................................................................60
13. SYNCHRONIZED PLAYBACK ...........................................................................61
14. EXTERNAL CONTROL .....................................................................................65
14.1. RS232 INTERFACE ........................................................................................................ 66
14.1.1. TERMINAL ............................................................................................................. 67
Page 4

14.1.2. SERIAL OUT VIA AVIO ........................................................................................... 69
14.2. UDP CONTROL ............................................................................................................. 70
14.3. USB DEVICES ................................................................................................................ 72
14.3.1. LOGITECH PRESENTER .......................................................................................... 73
14.3.2. JADE PRESENTER .................................................................................................. 74
14.3.3. KEYBOARD ............................................................................................................ 75
14.3.4. MOUSE ................................................................................................................. 75
14.4. GPIOS - REMOTE IN ..................................................................................................... 76
14.5. AVIO ............................................................................................................................. 77
15. SYSTEM SETTINGS ........................................................................................79
15.1. DATE & TIME ............................................................................................................... 79
15.2. CHANGE UHD PLAYER NAME ...................................................................................... 80
15.3. UNDO LAST CHANGES ................................................................................................. 80
15.4. SAVE & LOAD CONFIGURATION .................................................................................. 81
15.5. REBOOT ....................................................................................................................... 81
15.6. FACTORY RESET ........................................................................................................... 82
15.7. FIRMWARE UPDATE .................................................................................................... 82
16. BACKUP AND RESTORE .................................................................................84
17. TROUBLESHOOTING .....................................................................................85
18. APPENDIX .....................................................................................................86
18.1. RS232/UDP CONTROL COMMANDS ............................................................................ 86
18.1.1. PLAYBACK ............................................................................................................. 87
18.1.2. AUDIO ................................................................................................................... 89
18.1.3. FILE ORGANISATION ............................................................................................. 90
18.1.4. SYSTEM ................................................................................................................. 91
18.2. CHANGELOG ................................................................................................................ 92
Page 5

1
1. USAGE NOTICE
1.1. SAFETY INFORMATION
Safety information for storage, installation and usage
→ Read the entire manual to ensure safe and proper usage.
→ All warranty claims become void once you open or damage the device.
→ During transport and storage, temperatures may differ considerably. In order to avoid
defects resulting from condensation, do not begin to operate your device until the difference
in temperature has been levelled out.
→ Please ensure that the voltage supply meets the specification. Use only the supplied power
adapter. The device will not function with an incorrect voltage supply. Incorrect voltage
supply may damage the UHD Player.
→ Avoid overheating the UHD Player. Direct sunshine, heat sources in the immediate vicinity of
the UHD Player, a location without ventilation or several UHD Players mounted on top of one
another may cause damage.
→ Avoid any soiling of the device and its ports. Soiling may cause limited functionality of the
UHD Player.
→ Avoid high humidity in the vicinity of the UHD Player. Humidity may damage the device and
cause port corrosion.
→ Protect the UHD Player from liquids and water splashes, in order to prevent damage.
→ Never connect a SCNET Show Control device to the LAN port of the UHD Player. This may
damage the UHD Player.
→ Check the plug direction and do not apply force when connecting the devices or cables to the
UHD Player, as this could cause irreparable damage to the port pins.
→ If peripheral devices are not recognized or functions are not available, check whether or not
the UHD Player firmware is up to date.
→ Please note the difference in the USB ports: The USB peripheral ports support peripheral
devices, and the USB data port supports USB data carriers.
→ The UHD Player is only ready for operation after booting has been completed. (LED lights up
red → Device is booting. LED lights up in green → device is ready for operation.)
→ The UHD Player will only play supported file formats. Media files with a size of up to 30 GB
have been tested.
→ After enabling the write protection of the SD Card, changes can no longer be saved or files
deleted.
1.2. WARNING
Danger of electric shock!
Touching defective cables or any other open electrical components may cause electric shock. The
degree of injury ranges from slight burns to lethal cardiac dysrhythmia.
→ Do not use defective cables or devices.
→ Do not touch any open electrical components.
1.3. MAINTENANCE TIPS
→ Do not use any abrasive or corrosive cleaning products.
→ Avoid wet cloths.
Page 6

2
2. TECHNICAL DATA
2.1. SUPPORTED FILE FORMATS
Here is a list of all file formats that are supported by the UHD Player.
For additional information and tips on how to create content that works best with the UHD Player,
please see the content chapter.
2.1.1. VIDEO
The UHD Player supports the following video formats:
Video Codec: The video must be encoded as a h.265 (HEVC) or VP9 (webm) file with a
maximum resolution of 4096x2160@60p. h.264 that can be used up to
1920x1080@60p.
Resolution: The maximum supported resolution is 3840x2160@60p or 4096x2160@60p
for h.265 or VP9 files and 1920x1080@60p using h.264 files.
Color Depth: All video must be encoded at 4:2:0 chroma subsampling with 8 bits (Main
Profile) or 10 bits (Main 10 Profile) of color depth using h.265 codec and a
color depth of 8 bits using h.264 codec.
Frame Rate: The maximum supported frame rate is 60 frames per second, and it is also
affected by your display hardware. We recommend using exactly the same or
an integral fraction of the frame rate that is shown on the display. So, if your
display has a refresh rate of 60 frames per second, it is recommended to
render the video with 30p or 60p.
Container Format: The following container formats are supported: .mov, .mp4, .mkv, .webm
Bitrate: A constant bit rate (CBR) of between 25 and 30 Mbps is recommended.
Playback Media: All videos must be played from a Class 10 SD Card. If you are using a USB
drive or a USB stick, please ensure that the read capability is at least 30 MB/s.
Seamless Loop: Seamless Loop function works for all supported container formats:
.mov, .mp4, .webm, .mkv
2.1.2. IMAGES
The UHD Player supports the following image formats:
Image Format: JPG, PNG.
Resolution: The maximum resolution for still images is 8192x8192 pixels.
Color Depth: The UHD Player supports 8 Bit color depth and a chroma subsampling of
4:4:4.
PLEASE NOTE:
Due to the capability of the Still Image Decoder, all images will be displayed with a maximum
resolution of 1920x1080px, regardless of their native resolution. To avoid this downsizing and to
take full advantage of your display’s resolution, you may create a video out of the images by using
an external video editing software, e.g. ffmpeg (see content chapter).
Page 7

3
2.1.3. AUDIO
The UHD Player supports the following audio formats:
Audio Codec: AAC and MP3 up to 320 KB/s, PCM via WAV, FLAC
Sample Rates: 32 kHz, 44.1 kHz and 48 kHz are supported
2.2. DATA CARRIER
SD / SDHC Cards (Class 10),
USB Sticks or USB Drives with a read capability of at least 30 MB/s
2.3. SD CARD / USB FILE SYSTEM
NTFS, FAT32, ExFAT
2.4. POWER SUPPLY
8V to 16V DC wide-range input, 12W for SD Card, DC polarity
2.5. DIMENSIONS
238 mm / 177,5 mm / 39,7 mm
(Length / Width / Height)
2.6. WEIGHT
940 g, metal housing
2.7. AMBIENT CONDITIONS
Description in operation out of operation
Temperature -10 to +40 °C -20 to +60 °C
Humidity 10 to 80 % RH max. 90 % RH
max. 27 °C wet bulb max. 35 °C wet bulb
Elevation max. 3 000 m max. 12 000 m
Vibration 0.08 G (Z-axis) 0.30 G (z-axis)
0.06 G (X/Y-axis) 0.15 G (X/Y-axis)
5 to 500 Hz 5 to 500 Hz
Page 8
4
3. SCOPE OF DELIVERY
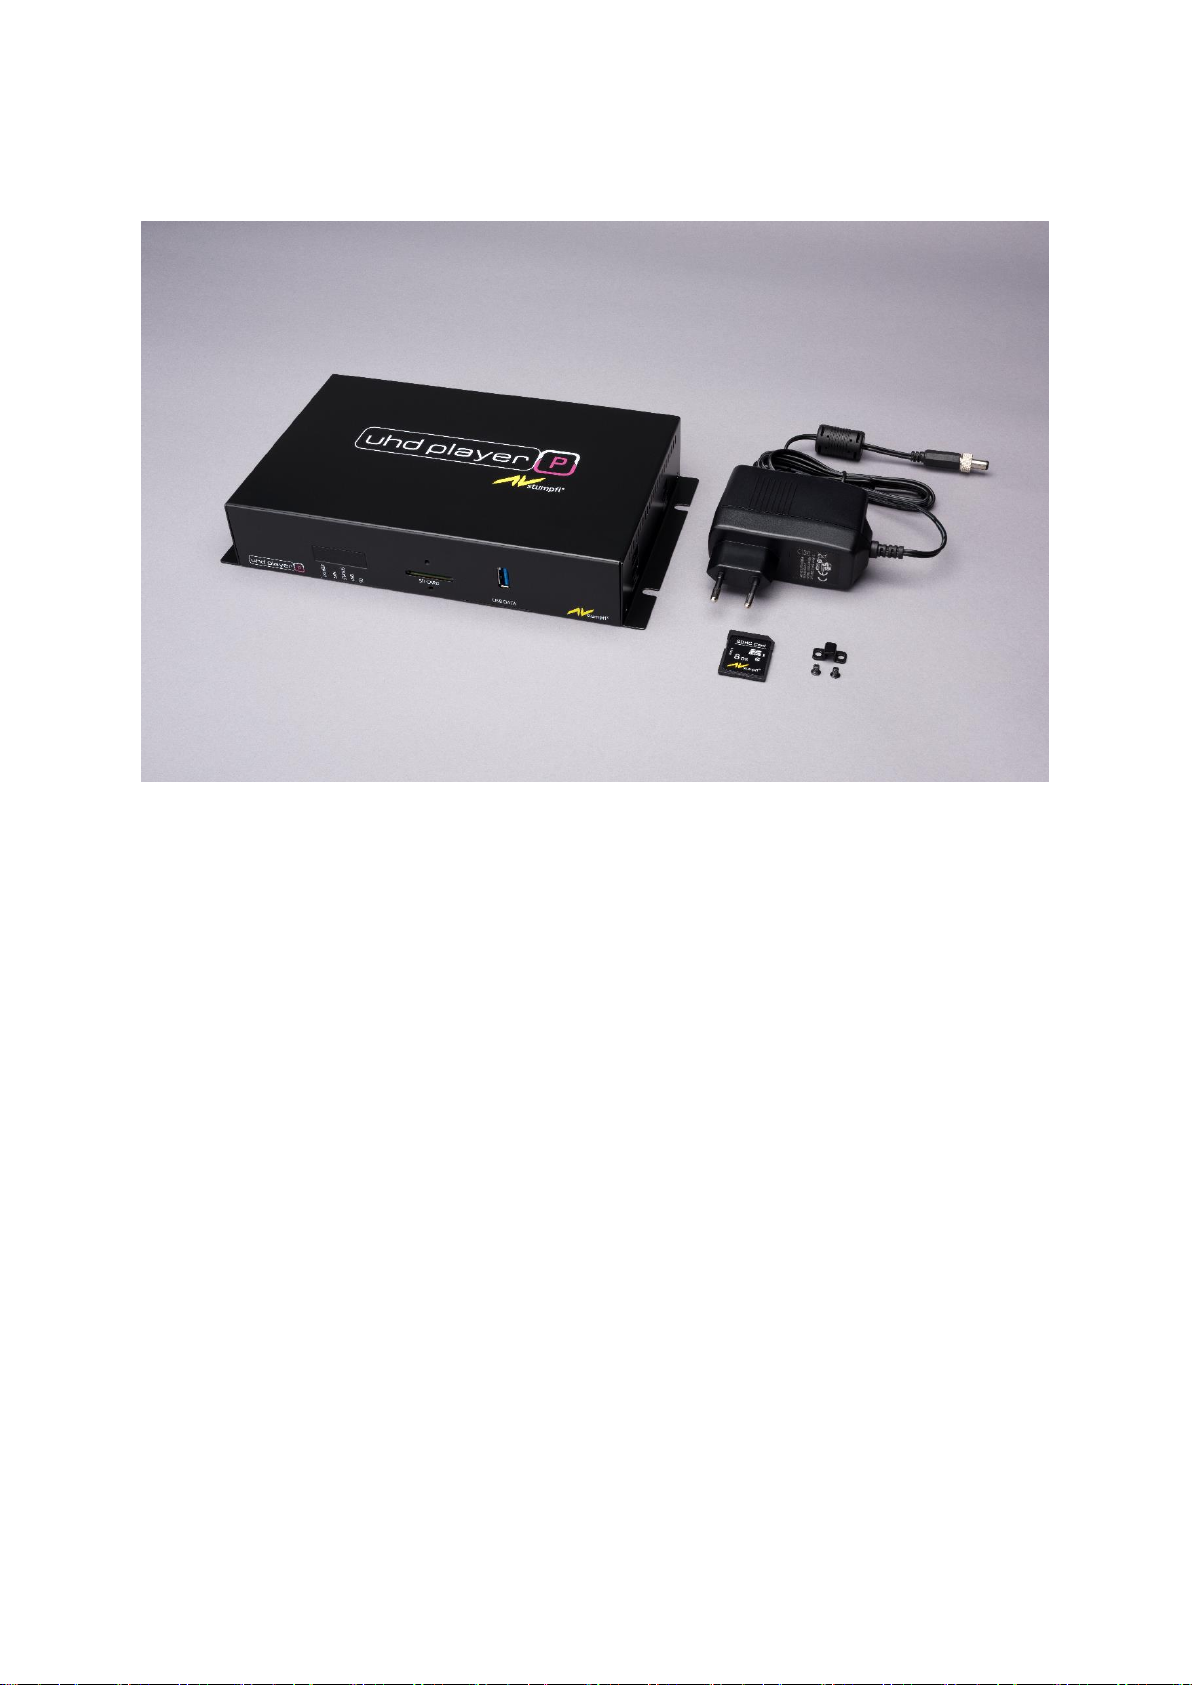
Fig. 1: UHD Player and accessories
1x UHD Player
1x Power adapter 12V / 2A
1x 8 GB SDHC Card
1x UHD Player Manual
1x Retaining clip for SD Card slot
FILES ON THE SD CARD UPON DELIVERY
The following files will be on the SD Card upon delivery:
Sample media file (AVS Story.mkv)
UHD Player Manual (Manual.pdf)
Code.ini (comes with UHD Player Pro only, and it contains the Avio Pro approval code)
Initialization File (UHDPlayerSetting.ini)
Serial number information (Serial.txt)
Page 9
5
4. HARDWARE OVERVIEW
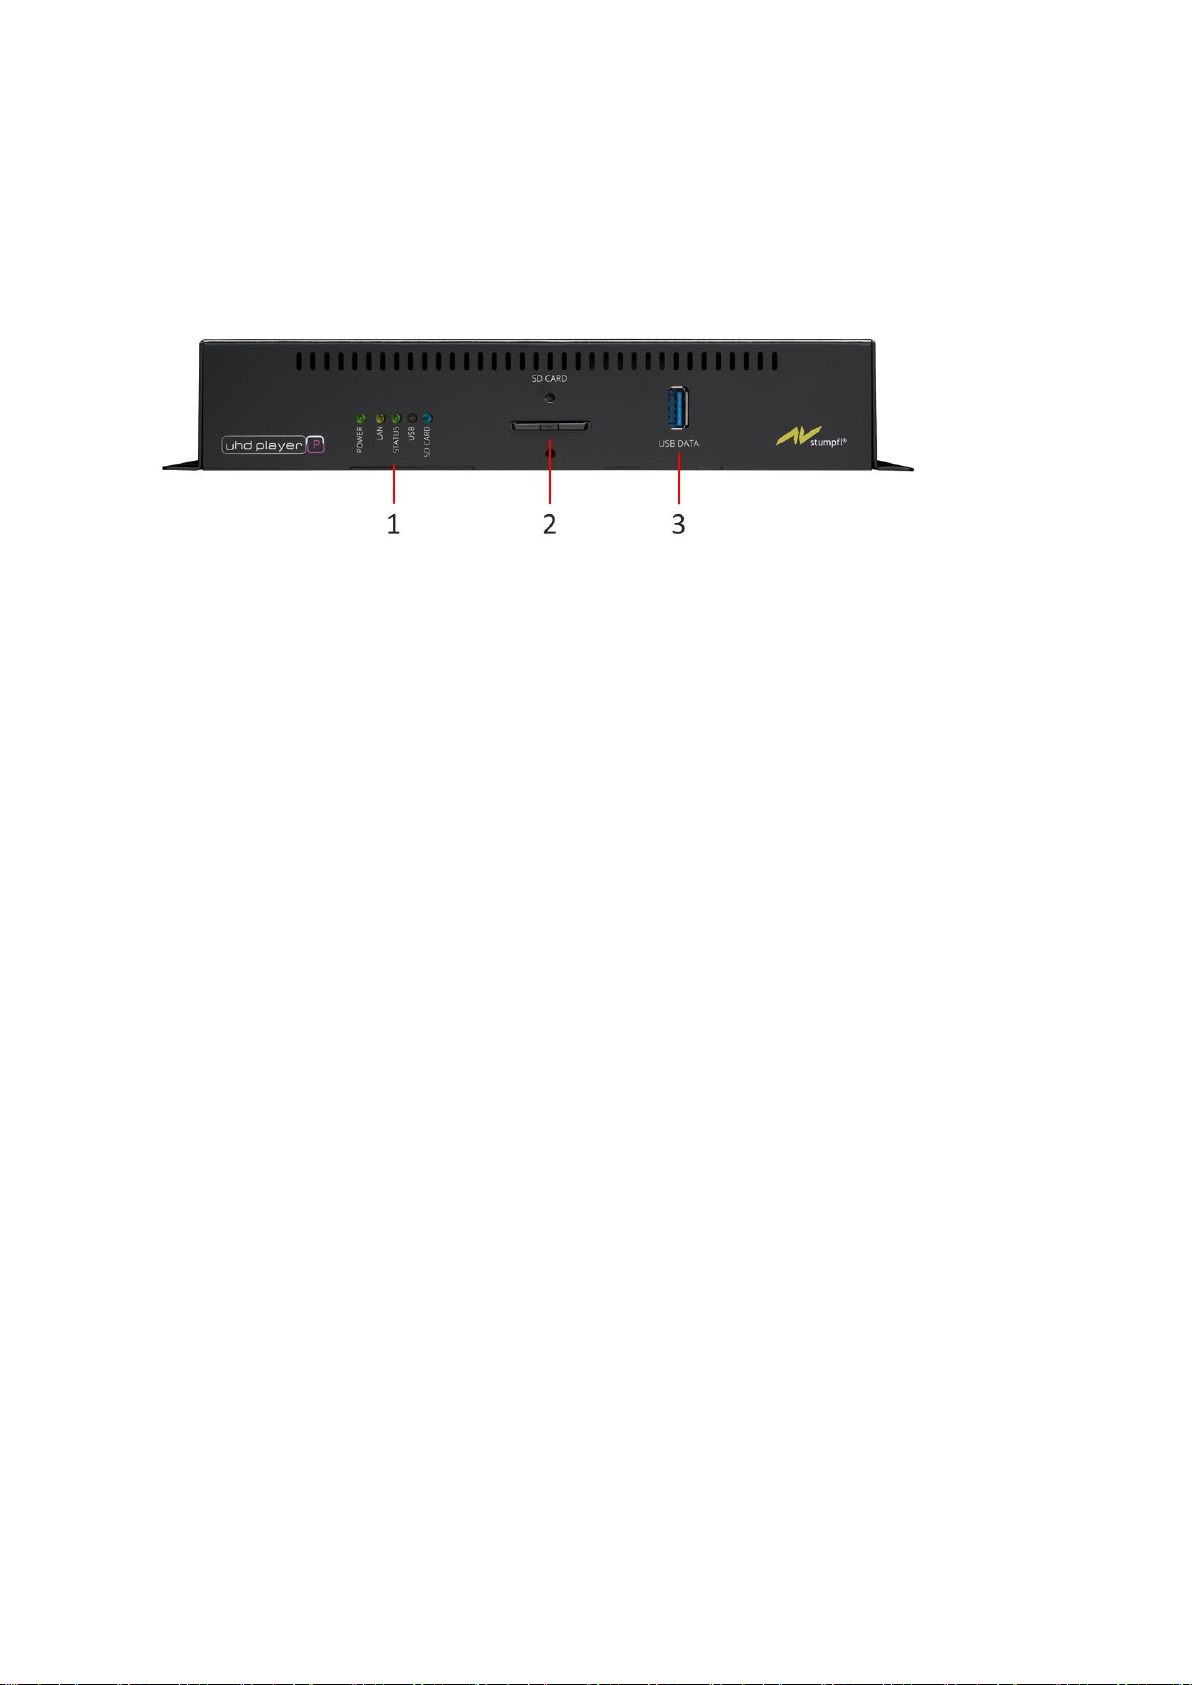
Here is an overview of the ports of the UHD player’s front and rear panels:
4.1. FRONT PANEL VIEW AND PORTS
Fig. 2: UHD Player front panel
1 LEDS
2 SD CARD SLOT
3 USB DATA PORT
(1) LEDS
The LEDs indicate from left to right:
POWER | LAN | STATUS | USB | SD
POWER
Green: UHD Player is powered and ready for operation
Orange/Red: LED turns from orange to red while UHD Player is booting
Off: UHD Player is not connected to power
LAN
Green: Network connection available
Off: No network connection available
STATUS
Green: UHD Player is ready for operation
Off: Player is still booting or an error occurred
SD
Blue: Indicates that an SD Card is recognized at the SD Card port
and flashes when the player reads from this device
Off: No SD Card data recognized at the SD Card port
USB
Blue: Indicates that a USB data carrier is attached to the USB data port
and flashes when the player reads from this device
Off: No USB data carrier recognized at the USB data port
(2) SD CARD SLOT
The SD Card slot works with class 10 SD / SDHC Cards that use the FAT32, NTFS or exFAT file system.
Page 10

6
SD Cards with up to 16 GB of memory are tested. SD Cards with a read speed of minimum 30
MByte/s are recommended.
To prevent the SD Card from being ejected by mistake, you can use the enclosed retaining clip. Place
it over the SD Card and attach it to the player using the two enclosed screws.
(3) USB DATA PORT
The USB 3.0 port on the front side is a USB data port. Insert your USB data stick or USB drive
(formatted with FAT32, NTFS or exFAT file system) here. USB sticks with up to 16 GB of memory and
USB drives with up to 400 GB memory are tested. USB data carriers with a read speed of minimum 30
MByte/s are recommended.
For USB peripheral devices, e.g. a keyboard, please use the USB peripheral port on the side panel.
Please note that a USB drive may need an external power supply.
Page 11
7
4.1.1. REAR PANEL VIEW AND PORTS
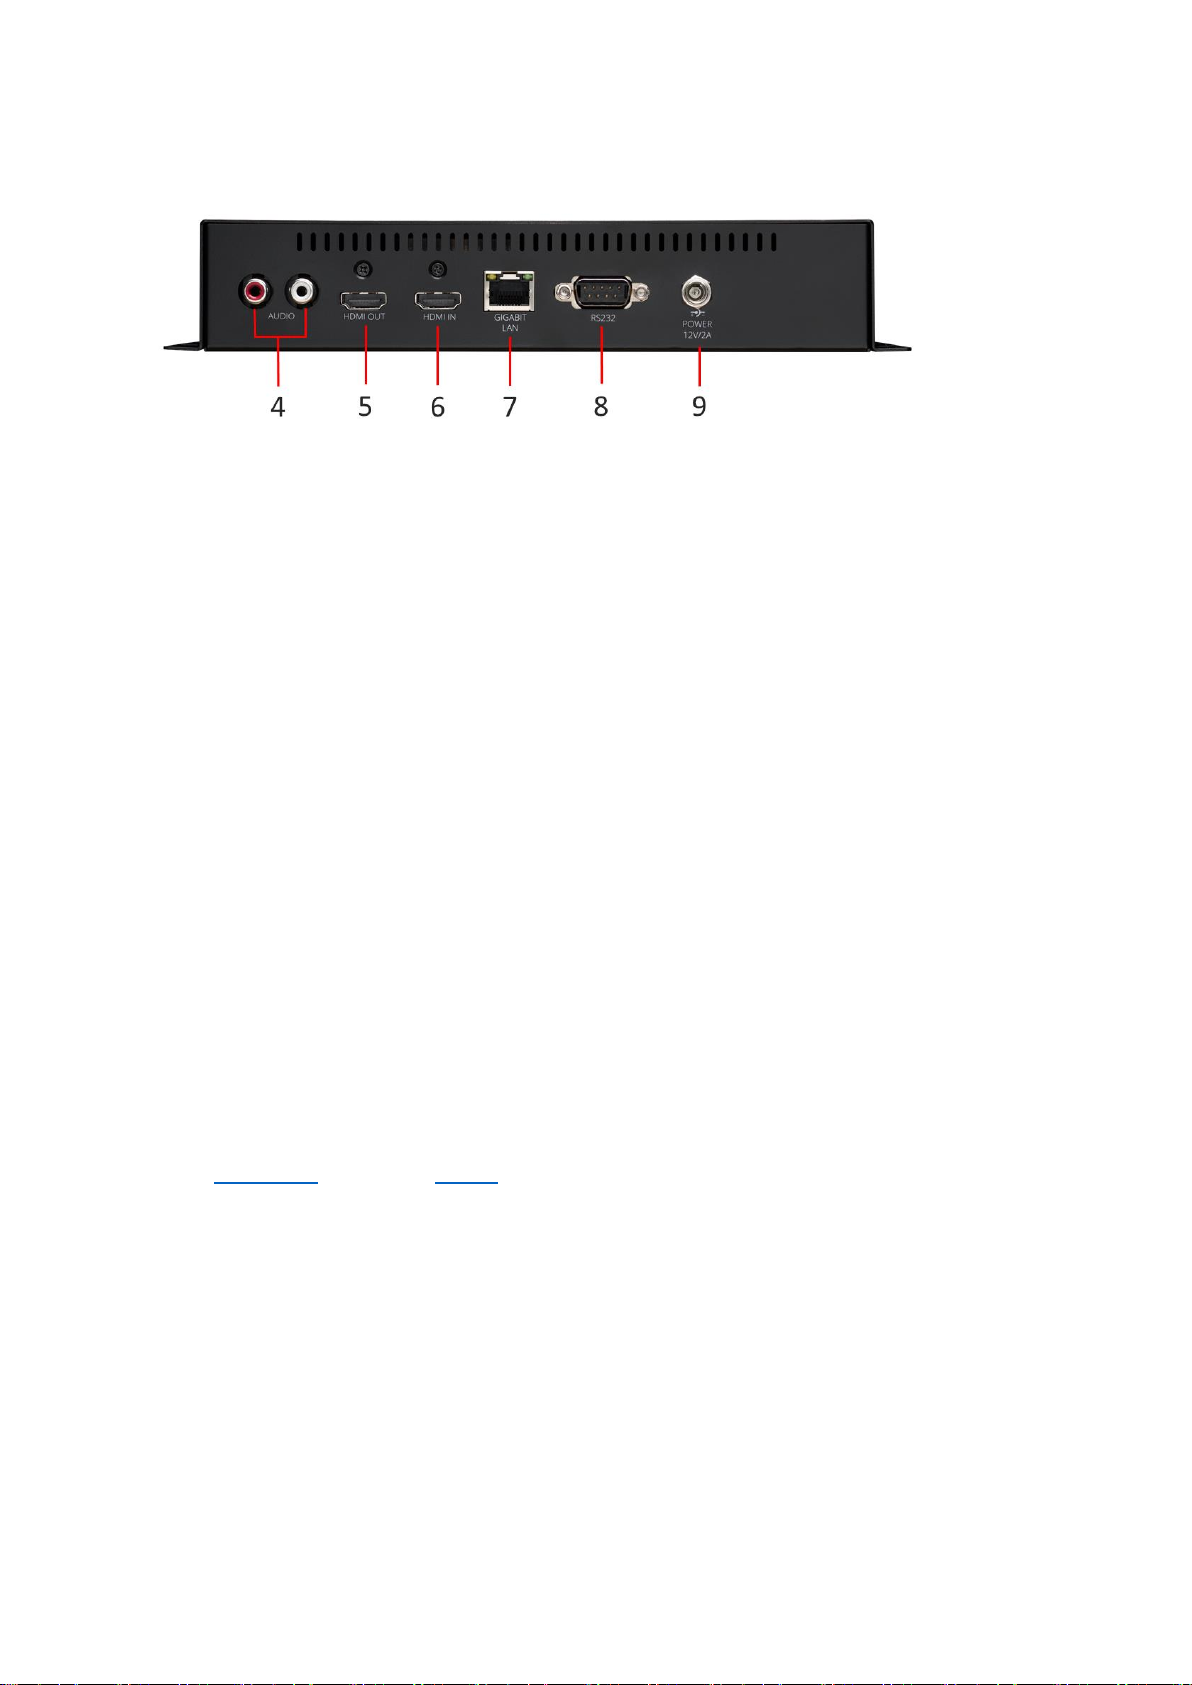
Fig. 3: UHD Player rear panel
4 ANALOG STEREO AUDIO RCA CONNECTORS
5 HDMI OUT Port
6 HDMI IN Port
7 LAN PORT
8 RS232 SERIAL PORT
9 POWER CONNECTOR
(4) ANALOG STEREO AUDIO RCA CONNECTORS
To use the stereo analog audio out, please connect your audio devices to these RCA female
connectors.
RED connector = right audio channel
WHITE connector = left audio channel
(5) HDMI OUT PORT
Connect your digital output device, e.g. a display or projector, to the player and send out digital video
and audio via this HDMI 2.0 out port.
(6) HDMI IN PORT
The HDMI 2.0 Input port on the rear panel enables you to use an external video/audio source as (live)
input. The external video/audio source may then be displayed just like media content that is stored
on the attached data carrier.
The HMDI Input port supports incoming video signals of up to UHD 3840x2160@60p.
See the HDMI Input chapter and Playlist for details of how to integrate this input port.
(7) LAN PORT
The UHD Player’s LAN Port is a standard RJ-45 connector for 1000 Base-T Ethernet communications.
Connect the UHD Player to your network if you want to use its web interface, to sync several players
or to control it, e.g. via an Avio Master Device.
(8) RS232 SERIAL PORT
The RS232 serial port is a serial communication interface that allows you to control the player from a
PC or other control devices. Use a standard DE-09 connector to connect your device to the player.
Communication settings:
The default baud rate is 9600, 8 data bits, with no parity bit and one stop bit.
The baud rate may be changed via the Web Interface or the Initialization File.
Page 12
8
(9) POWER CONNECTOR
Please use the provided power supply (12V / 2 A) to power the UHD player.
4.1.2. LEFT SIDE PANEL VIEW AND PORTS
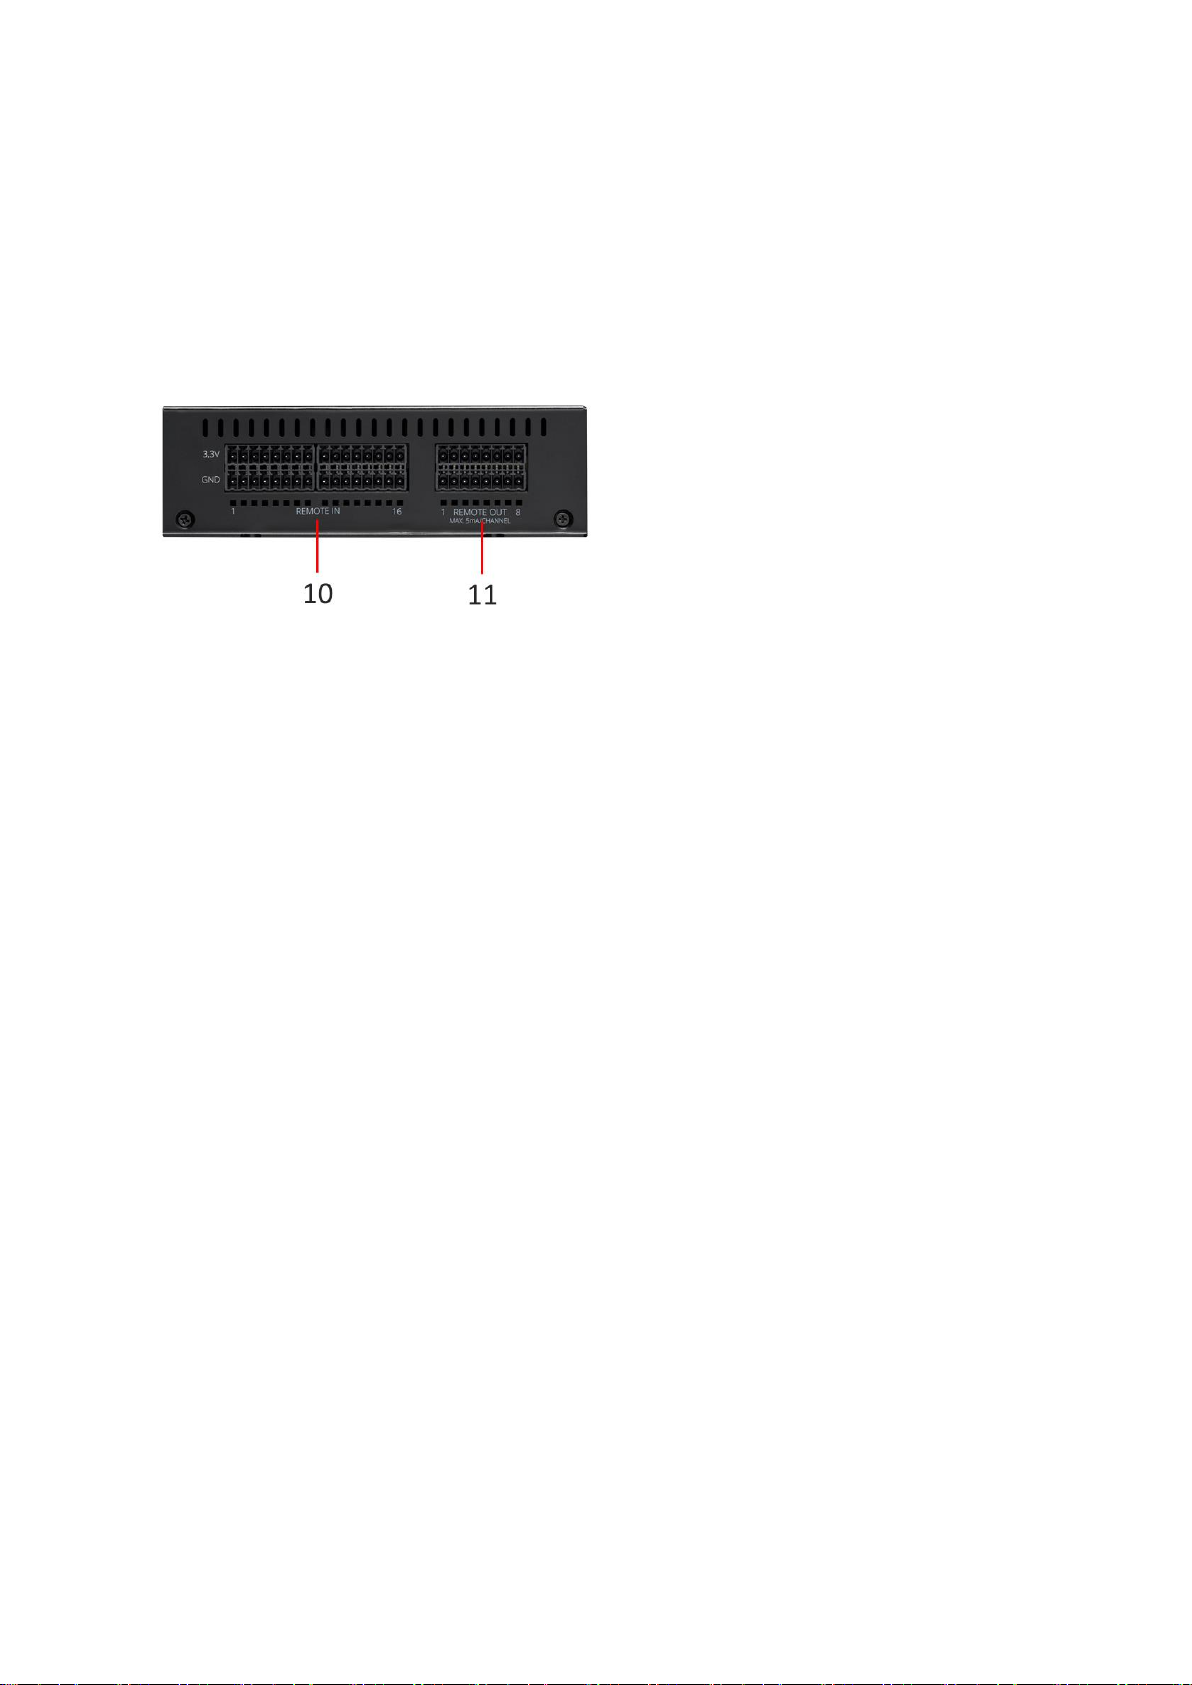
Fig. 4: UHD Player left side panel
10 REMOTE IN
11 REMOTE OUT
(10) REMOTE IN
The UHD Player provides 16 GPIOs (General-purpose input/output) that can be used with a default
key assignment but may also be customized to perform special actions.
The GPIOs will trigger when the integrated circuit (Ground to 3,3V) is closed.
(11) REMOTE OUT
- Currently without function -
Page 13
9
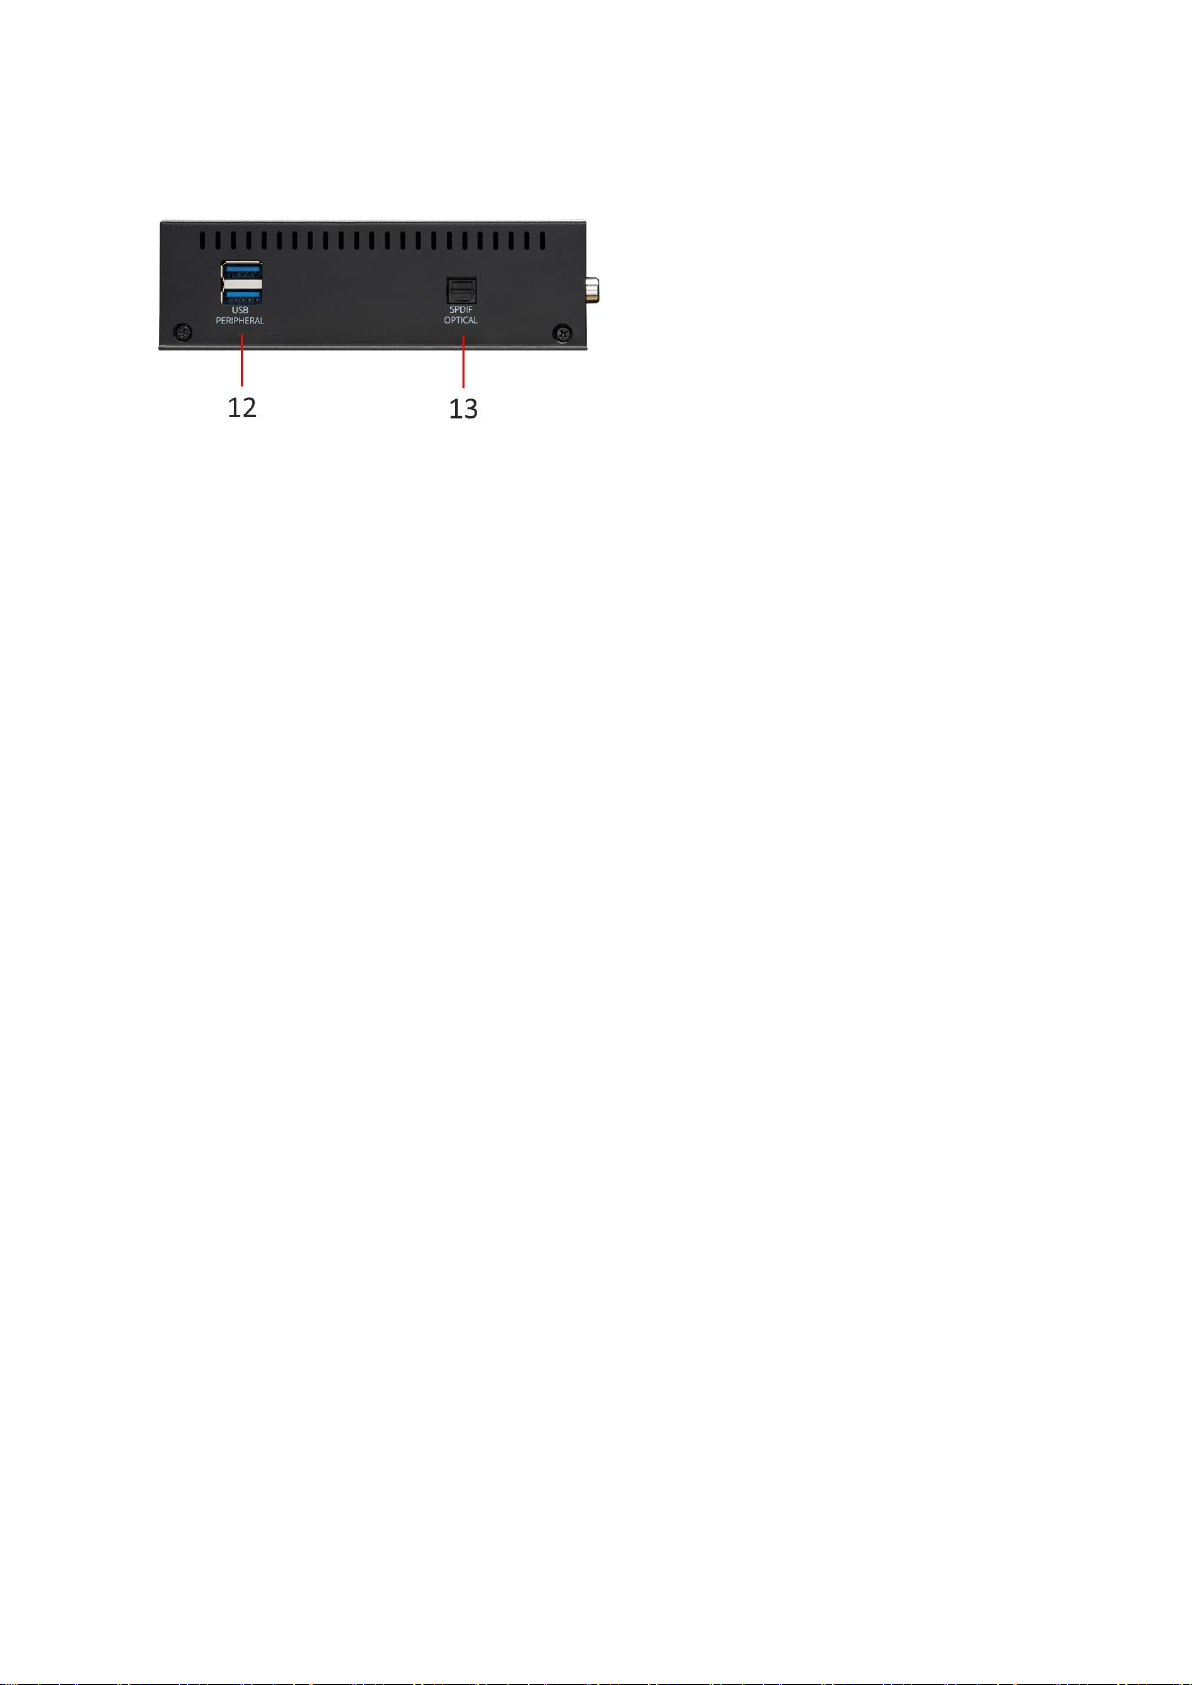
4.1.3. RIGHT SIDE PANEL VIEW AND PORTS
Fig. 5: UHD Player right side panel
(12) USB PERIPHERAL PORTS
The two USB 3.0 ports on the right side are USB ports for PERIPHERAL DEVICES only. Insert your USB
peripheral device here, e.g. a keyboard / presenter.
A USB data carrier containing video or audio content must be connected to the USB data port on the
front panel!
(13) SPDIF OPTICAL PORT
This port is used for digital-audio transmission. Use an optical fiber cable with a TOSLINK connector
to send digital audio to your audio devices.
Page 14

10
5. FIRST STEPS
5.1. INSTALLATION
Remove the UHD player and its accessories from the packaging.
Place the player on a flat surface or mount it on a wall. Use the brackets on both sides.
Make sure there is sufficient ventilation and, to avoid overheating, do not place several players on
top of one another.
5.2. CONNECTING OUTPUT DEVICES
5.2.1. VIDEO
Connect the UHD Player to your display device via the HDMI Out Port on the UHD Player’s rear side.
By default, the player is set to Auto EDID “On”. As soon as the player is connected to a display, it
recognizes the incoming EDID and the display can be used immediately without the need to adjust
any further display configuration. Having no data carrier plugged into the player, the display will then
show the player’s settings screen as soon the player is powered and ready for operation.
For information about further video settings, refer to the Display Configuration chapter.
5.2.2. AUDIO
You have three options for using audio ports:
- Digital via the HDMI OUT port on the UHD Player’s rear side
- Digital via the SPDIF optical port on the UHD Player’s right side
- Analog via the stereo audio RCA connectors on the UHD Player’s rear side
The digital and analog audio connectors transmit stereo (analog: white connector = left channel, red
connector = right channel).
In case you want to use audio, be sure to connect your speakers to one of the player’s audio ports.
There is no need for further configuration, as the audio is transmitted via all output ports at the same
time.
Page 15
11
5.3. CONNECTING THE PLAYER TO THE NETWORK
For the following functions, the UHD Player needs to be integrated into your network:
• Configuration via the Web Interface
• Syncing several players
• UDP Control
• AVIO Control
• FTP Server
• Auto Download Content from an FTP Server
• NTP Time Synchronization
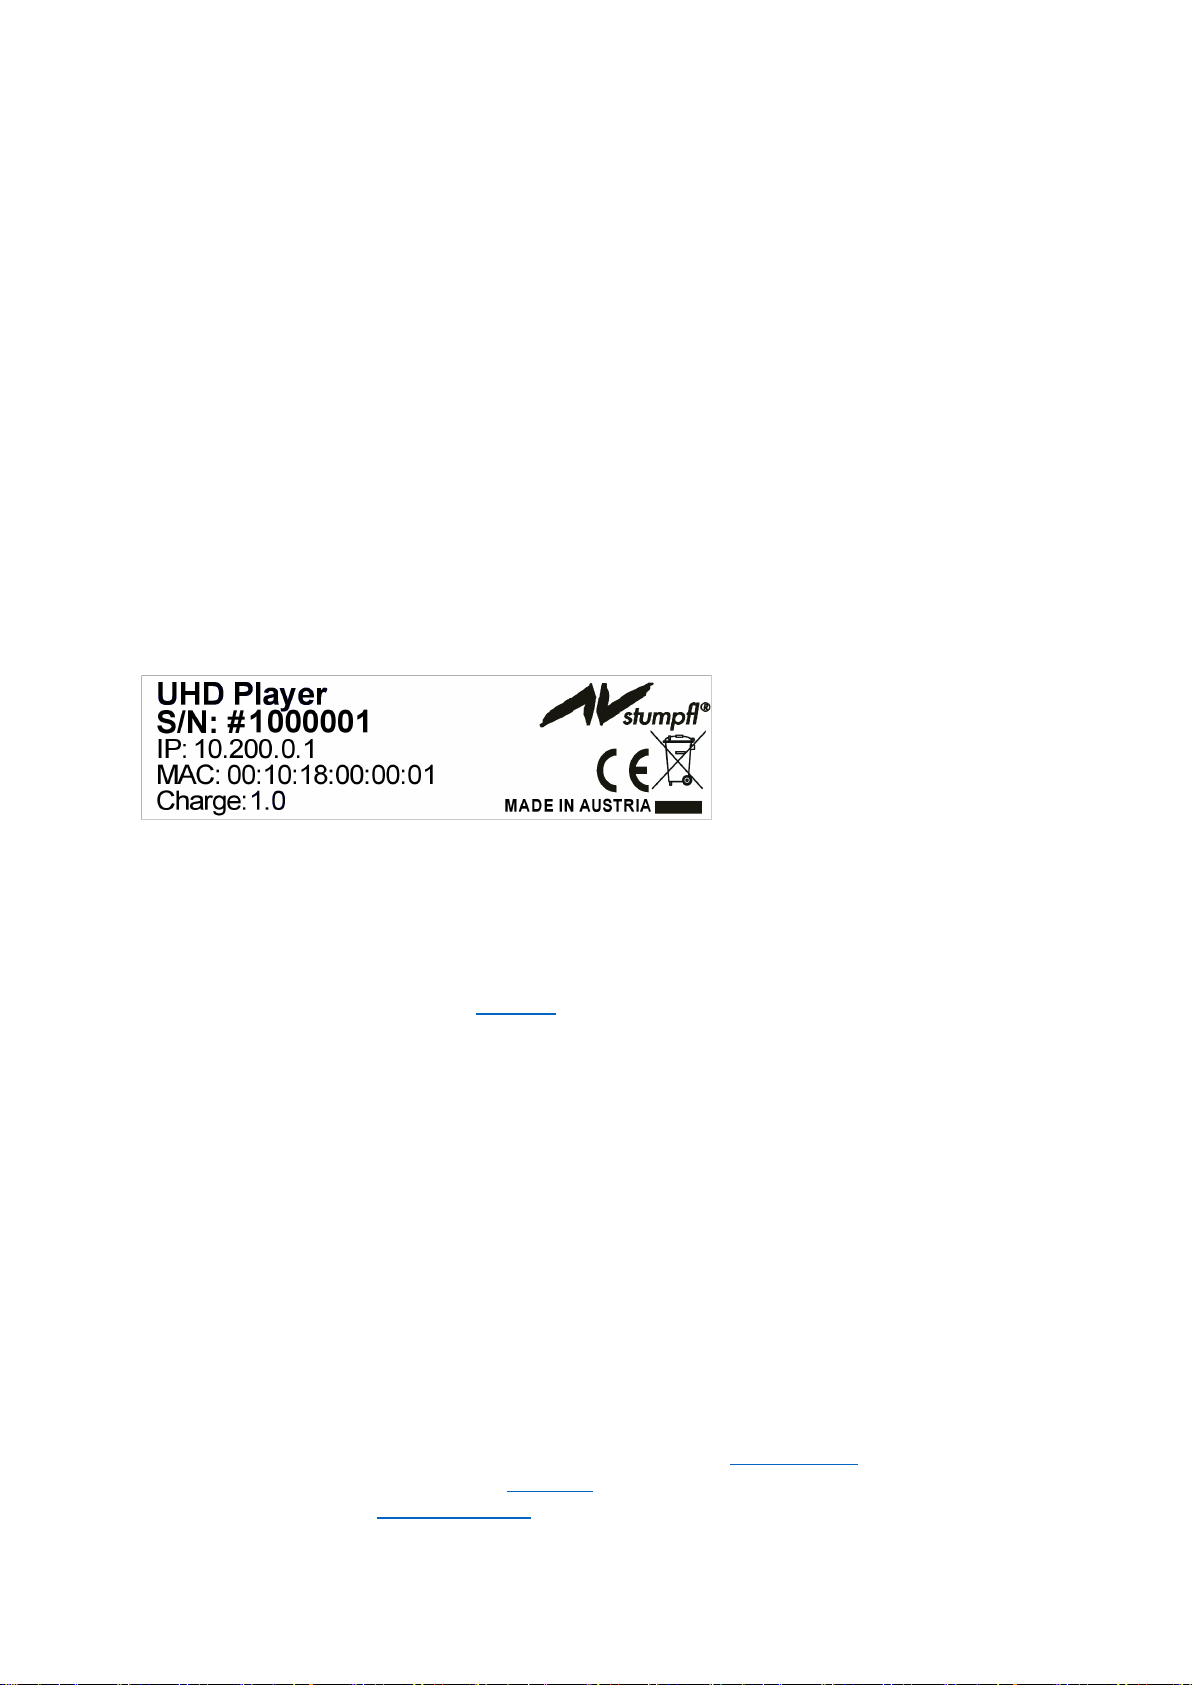
The UHD Players default network settings are as follows:
DHCP: Disabled
IP address: See the label at the bottom of the UHD Player
Subnet: 255.0.0.0
Gateway: Same as IP address
DNS: Same as IP address
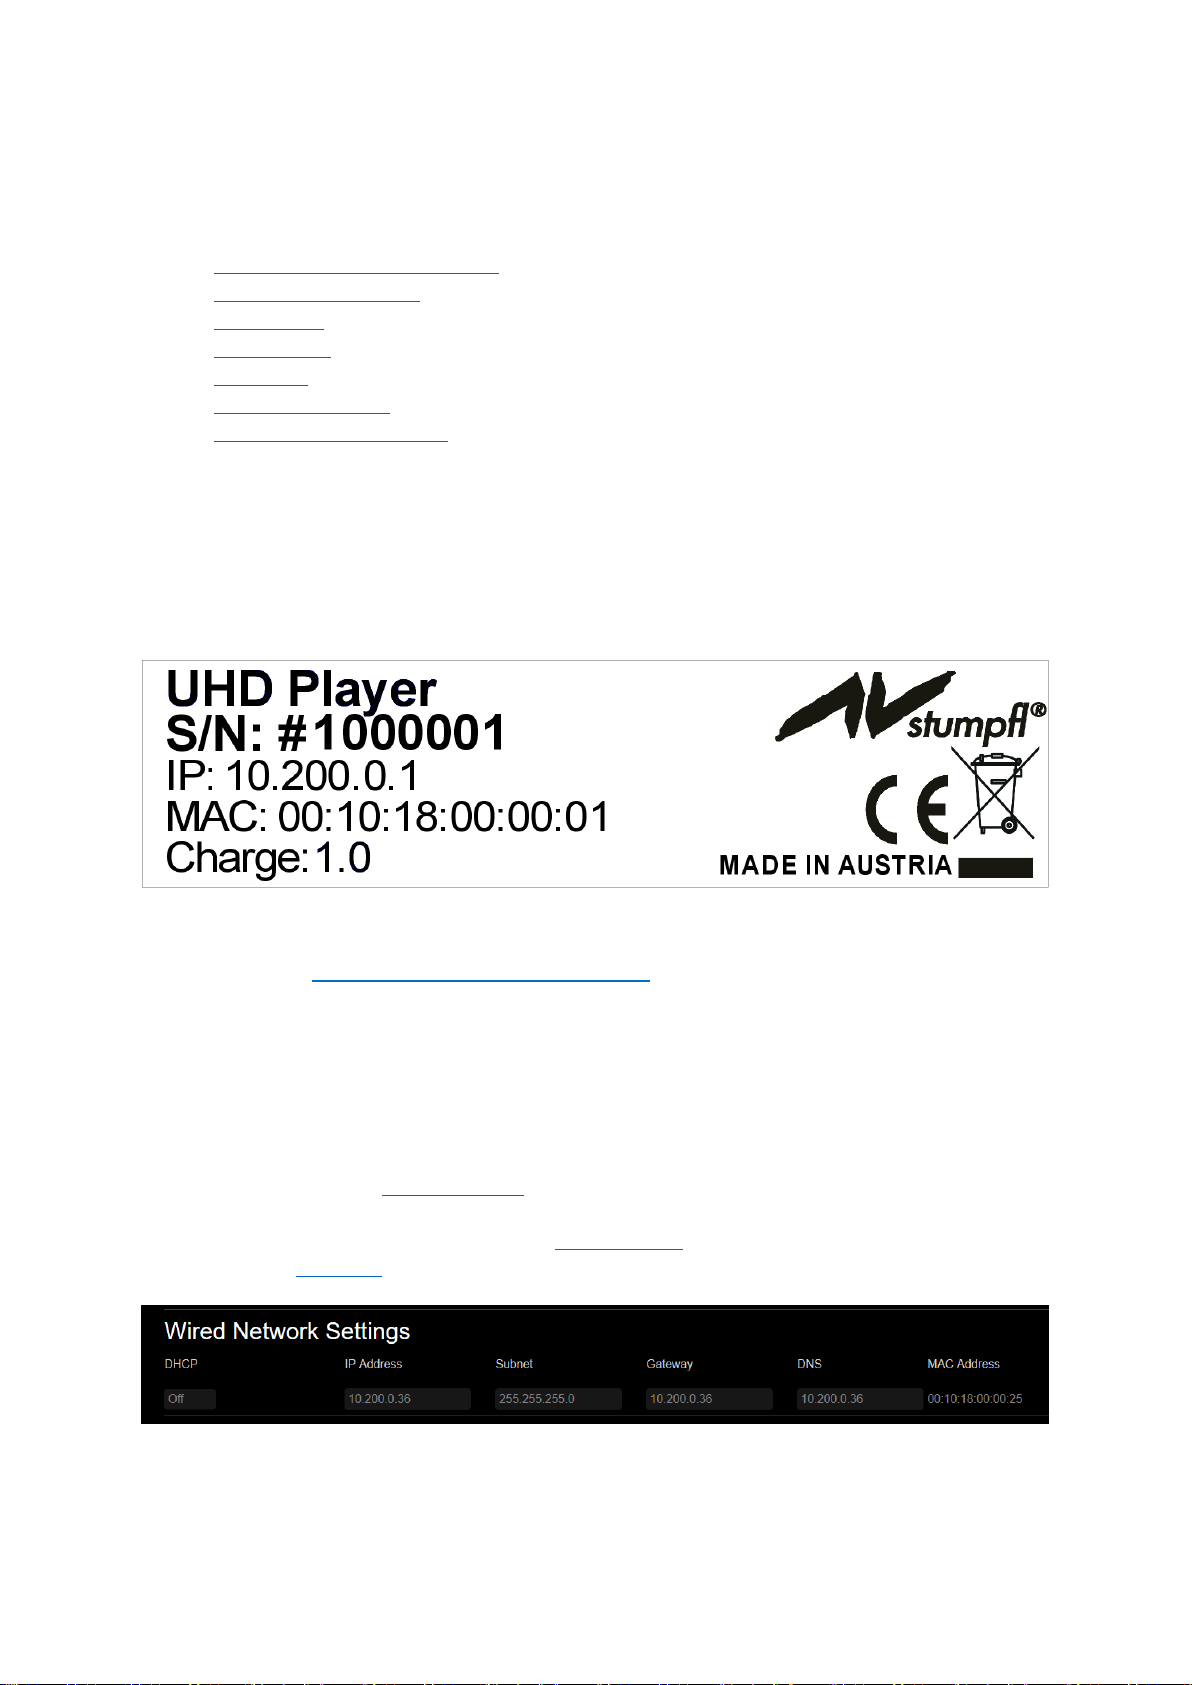
Fig. 6: Example of a type label attached to the bottom of the UHD Player
Please follow these steps to connect to the UHD Player to your local network:
STEP 1: CABLE CONNECTION
Connect a Cat5 Ethernet cable to the LAN port on the UHD Player’s rear side and your computer or
network switch in order to prepare the player for network access. The cable length should not
exceed 100 meters. Distance may be extended with a repeater.
STEP 2: IP ADDRESS
The UHD Player and your computer must be in the same IP range, otherwise they will not be able to
communicate. Proceed with one of the following possibilities:
(A) CHANGE THE COMPUTER’S IP ADDRESS:
Set the computer’s IP address to the same IP range of the player’s IP address.
Example: If the UHD Player’s IP address is 10.200.0.123, you could set your computer to the IP
address 10.200.0.1, so long as this one is not used by another device.
(B) CHANGE THE PLAYER’S IP ADDRESS - DIRECTLY AT THE PLAYER:
Set the player’s IP address to the same IP range of the computer’s IP address. To do so, connect a
mouse (additional keyboard is not necessary) to the player’s USB data port. When there is no data
carrier plugged into the player, the settings screen of the player’s Web Interface will be shown on the
display. Click on [BASIC SETTINGS] in the menu bar and the [Wired Network Settings] will appear. Edit
all necessary settings (see Network Settings chapter for detailed description) and press [APPLY
SETTINGS] at the bottom of the Web Interface.
Page 16
12
(C) CHANGE THE PLAYER’S IP ADDRESS – USING A TEXT EDITOR:
Each player is delivered with an SD Card containing an initialization file. To set the player’s IP address
into the same IP range of the computer’s IP address, modify the player’s initialization file by changing
the default IP address to a new, unique IP address (see Initialization File and Network Settings for
detailed information). Plug the SD Card containing the modified initialization file back into the player
or save the file to a USB data carrier if you want to use this device instead of an SD Card. The Player
will immediately accept the changes.
STEP 3: WEB BROWSER
Open your web browser and enter the UHD Player’s IP address in the address bar.
The Web Interface will now appear.
5.4. POWERING THE PLAYER
Plug the power adapter into the power connector on the UHD Player’s rear side. When the player
boots up, the Power LED on the UHD Player’s front side will first light up orange and then red. As
soon as the player is ready for operation, it will turn green.
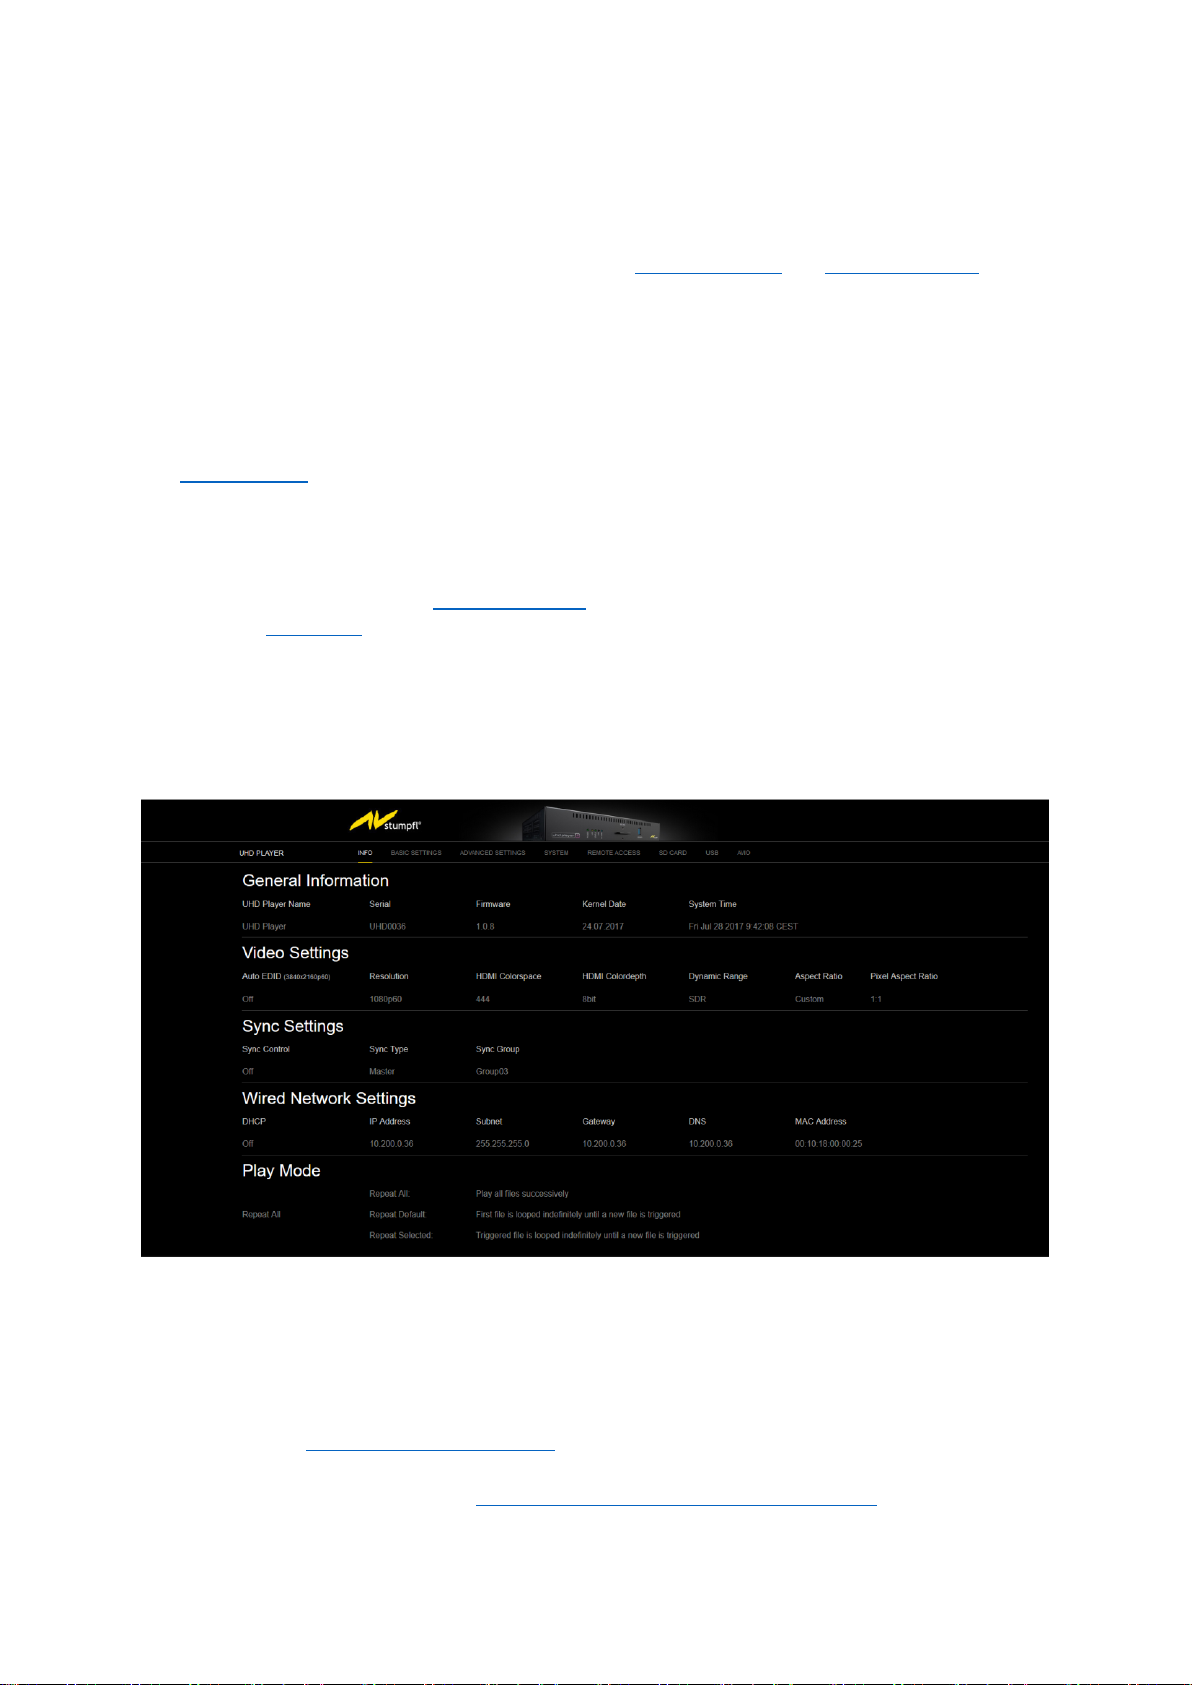
If no SD Card or USB Data Stick is plugged in, the player’s Web Interface Info Screen will show up on
your HDMI output device and display information about the network and video settings, sync mode,
current firmware, serial number, etc.
Fig. 7: The UHD Player’s Web Interface Info Screen is displayed when there is no data carrier inserted.
5.5. PLAYBACK MEDIA FILES
The simplest way of playing back media files with a UHD Player in Standalone Mode is as follows:
• Save your video, audio and image files to the root folder of the supplied SD Card or any other
USB data carrier (e.g. SD:/ or USB:/).
• Plug the data carrier into the corresponding port on the player’s front side.
Page 17

13
The player is set to Play Mode “Repeat All” by default, and it will play your media files successively in
alphanumeric order.
The UHD Player is designed for 24/7 operation. If you want to stop playback, just interrupt the power
supply or remove the data carrier.
See the Media File Playback chapter for detailed playback options.
PLEASE NOTE:
Only one data carrier at a time can be used. The SD Card always has priority. So long as it’s plugged
into the player, no additional USB data carrier will be recognized.
Page 18

14
6. UHD PLAYER CONFIGURATION
The UHD Player can be configured in two different ways:
1. Via the player’s Web Interface
2. Via the Initialization File that you can find on the delivered SD Card
Web Interface vs. Initialization File: Which to choose?
This depends on your situation and personal preference. However, we recommend using the Web
Interface because:
• It gives you a good visual overview of all settings.
• You get the information about the current playback.
• You can upload new files or change the configuration, in case it’s installed in a place that’s
difficult to access.
• You need a network connection anyway, if you wish to sync several players or upload
content via ftp servers.
If you only have a few players installed running as standalone devices, you may want to use the
text-based initialization file for configuration instead. Please note that the data carrier on the
player’s front panel should always be physically accessible in order to modify the initialization file
or the media content.
After explaining the general configuration handling of the player via the Web Interface and the
Initialization File respectively in the next two sections, all available functions will be listed and
specified for both ways of configuring the UHD Player—see Web Interface and Initialization File
chapters.
Page 19
15
6.1. WEB INTERFACE
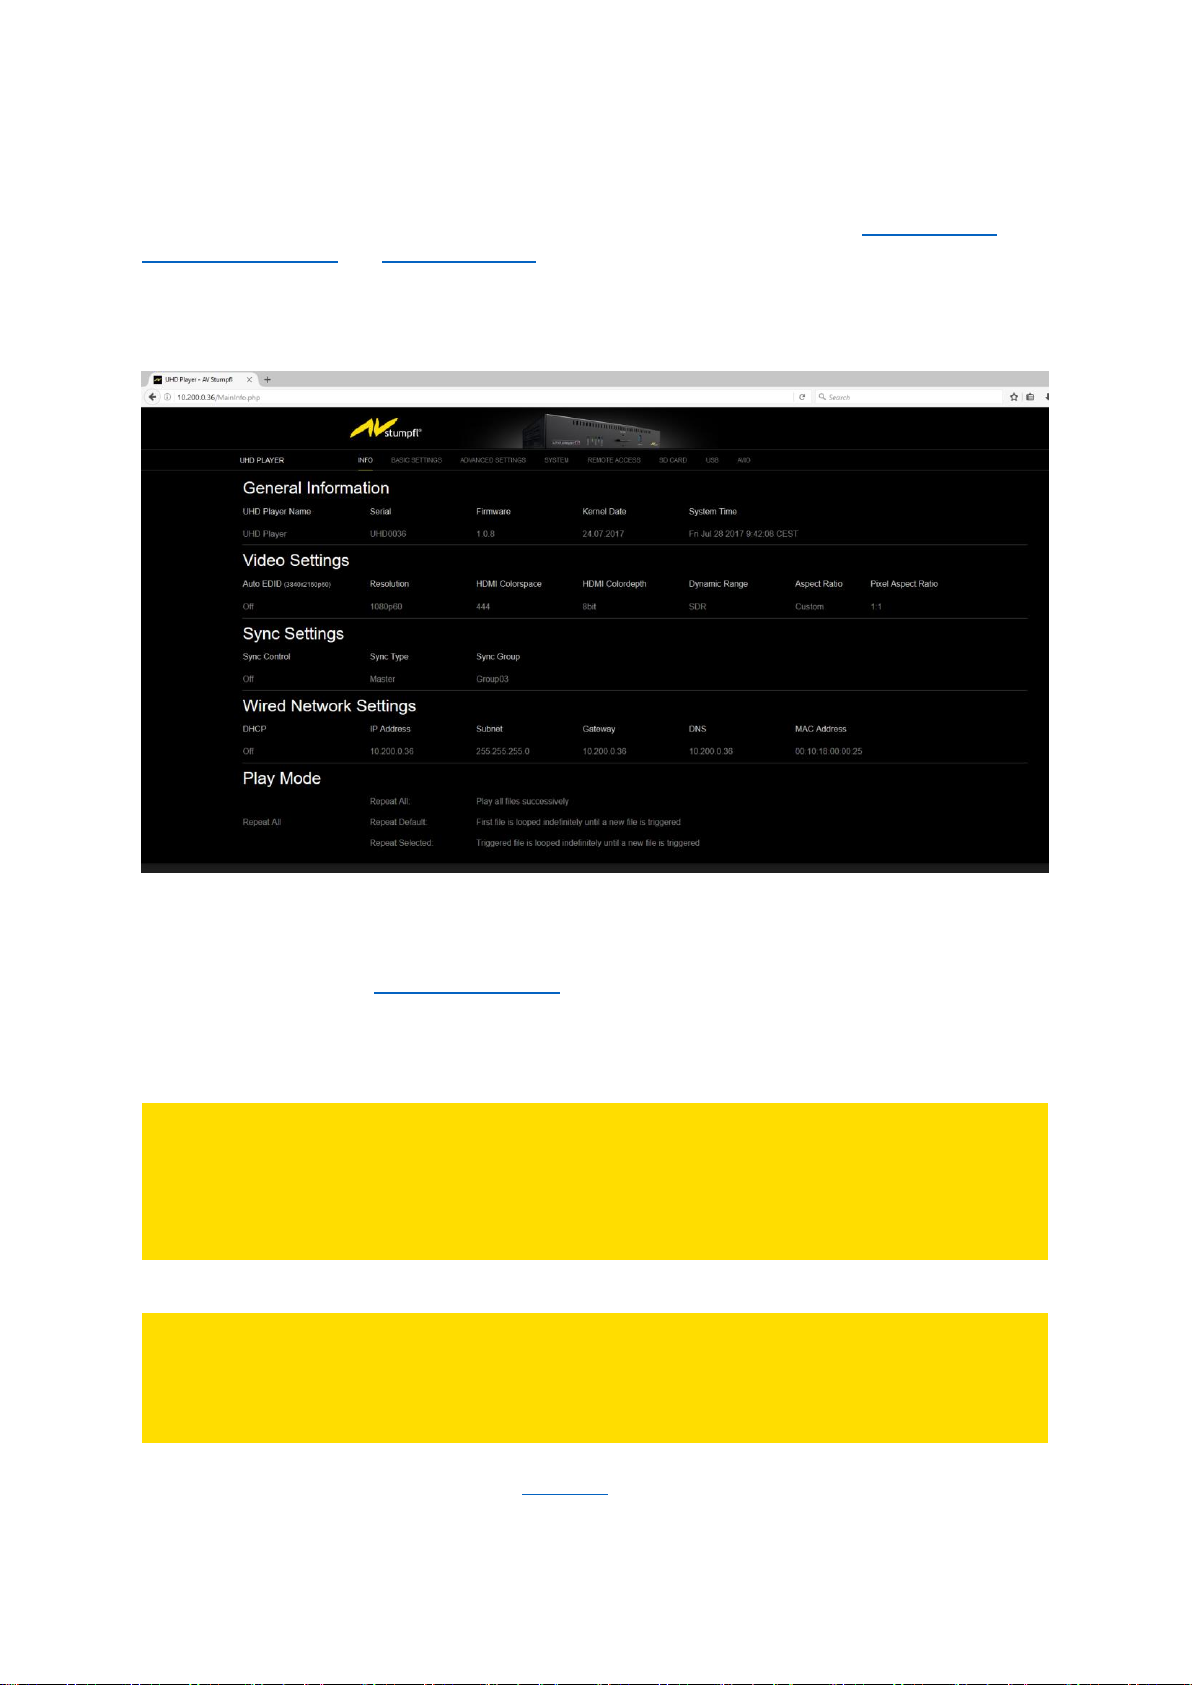
Using the Web Interface is a fast and intuitive way of configuring the UHD Player. You need a
network connection to access the UHD Player via its web interface. Refer to the Connecting the
Player to the Network and Network Settings chapters for network details.
Open your web browser and enter the UHD Player’s IP address in the address bar. The Web Interface
will now appear.
Fig. 8: The UHD Player’s Web Interface shows the Info Page.
Alternatively, the UHD Player’s Web Interface may be directly accessed with a mouse (and keyboard)
connected to the player’s USB peripheral ports, e.g. when no LAN connection is available. Make sure
that your HDMI output device is attached to the player and that the player is powered. If there is
only a mouse connected, all settings where text fields need to be filled can be modified using the onscreen keyboard.
PLEASE NOTE:
If your output device does not show anything, it may be that it does not support the current
resolution. With the following keyboard shortcuts, two different resolutions can be set and tested:
Ctrl+F2 or Ctrl+F Sets the resolution to 1920x1080p60
Ctrl+F3 or Ctrl+U Sets the resolution to 3840x2160p60
PLEASE NOTE:
If the playback is active, remove the data carrier or use the following keyboard shortcut to toggle
between the Web Interface and the Playback:
Ctrl+F5 or Ctrl+S Toggles Settings/Playback
See all available keyboard shortcuts in the Keyboard chapter.
Page 20
16
6.1.1. WEB INTERFACE OVERVIEW
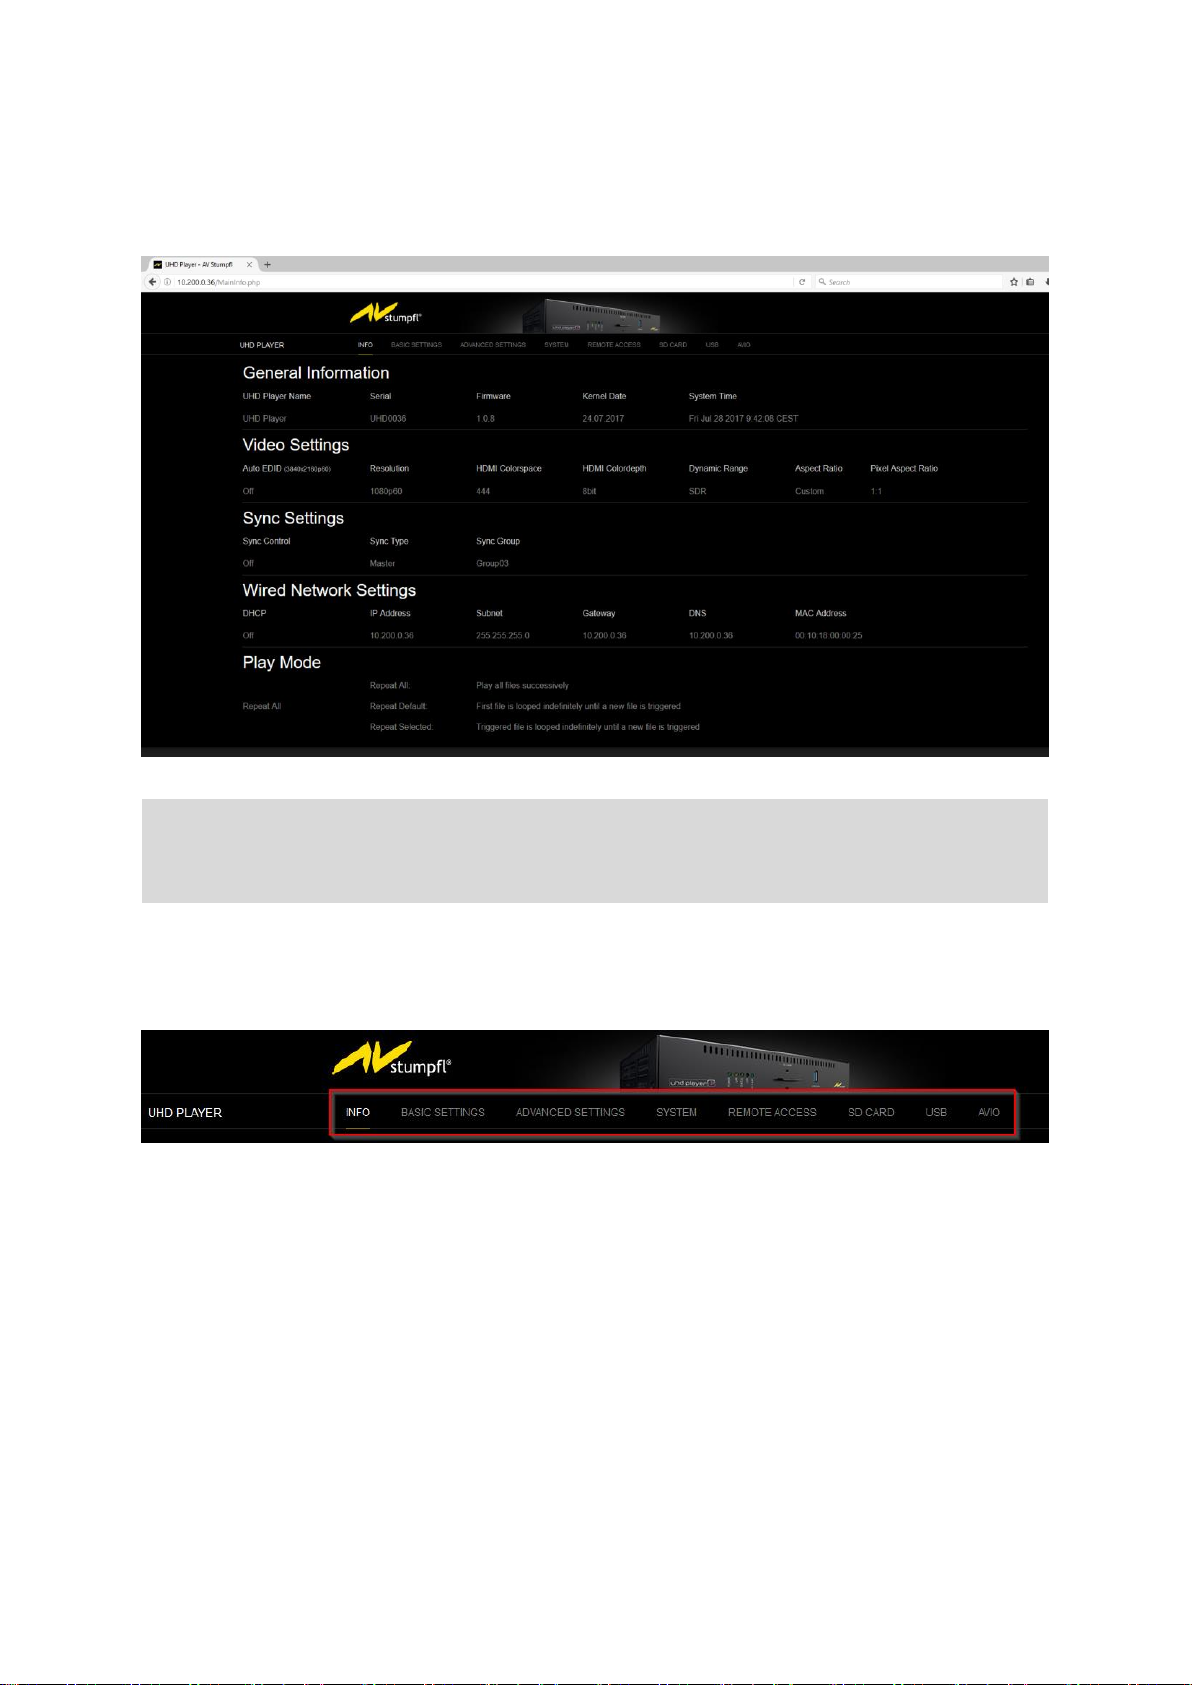
Open your web browser and enter the UHD Player’s IP address into the address bar. The main page
of the Web Interface will then be displayed in the web browser.
Fig. 9: Main page of the UHD Player’s Web Interface with IP address in the web browser’s address line
Info:
Compared to the illustrations in this manual, the Web Interface may be displayed in a slightly
different way, depending on the web browser used.
MENU BAR
In the upper area of the Web Interface, the menu bar allows access to all available functions.
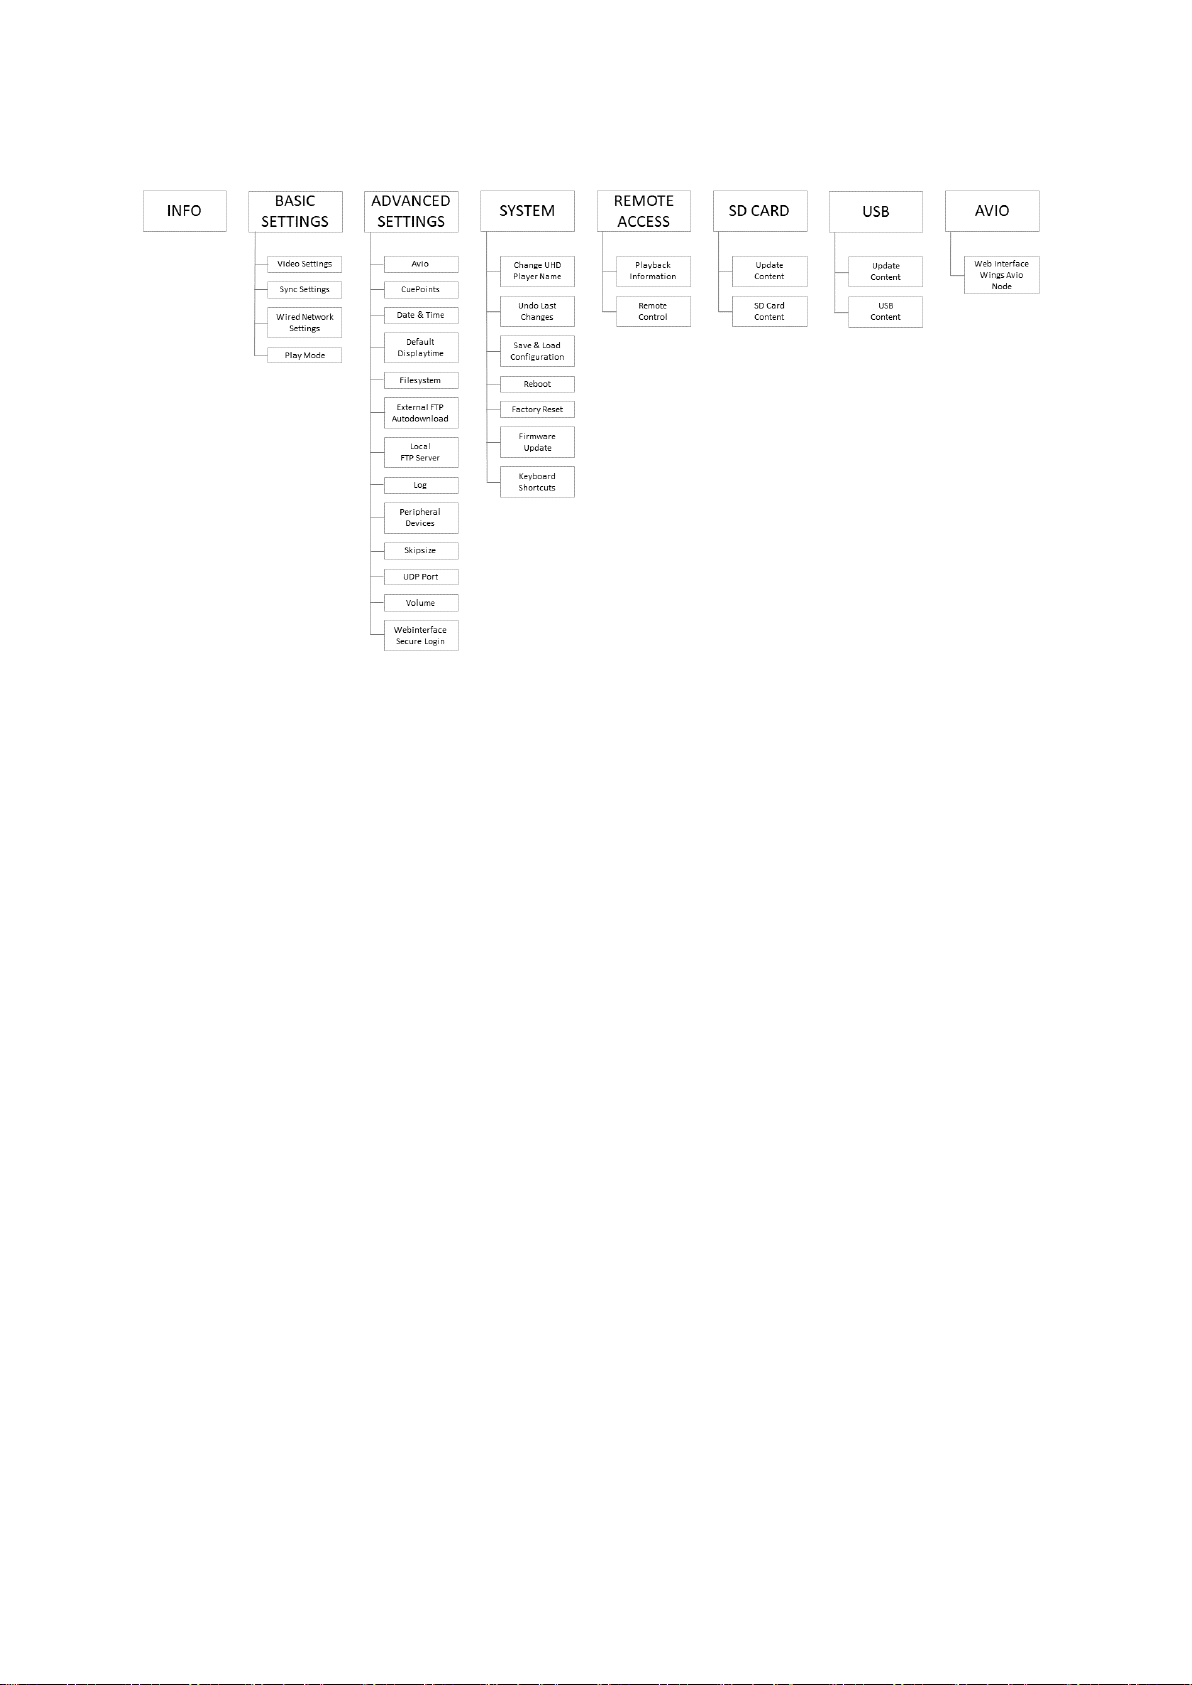
Fig. 10: Menu Bar in Web Interface
It consists of eight different tabs. You can see all subsections of each tab listed in the site map below:
Page 21
17
Fig. 11: Sitemap of the Web Interface
[INFO] gives a quick overview of the player’s basic settings.
[BASIC SETTINGS] and [ADVANCED SETTINGS] allow access to all settings that refer to the playback.
[SYSTEM] enables all system-relevant settings to be modified.
[REMOTE ACCESS] gives information about the player’s current state and lets you control the
playback.
[SD CARD] and [USB] allow the viewing and modification of the data carrier’s media content and
playlists.
[AVIO] gives access to the Wings Avio Node settings.
Page 22
18
6.1.2. CONFIGURING THE WEB INTERFACE
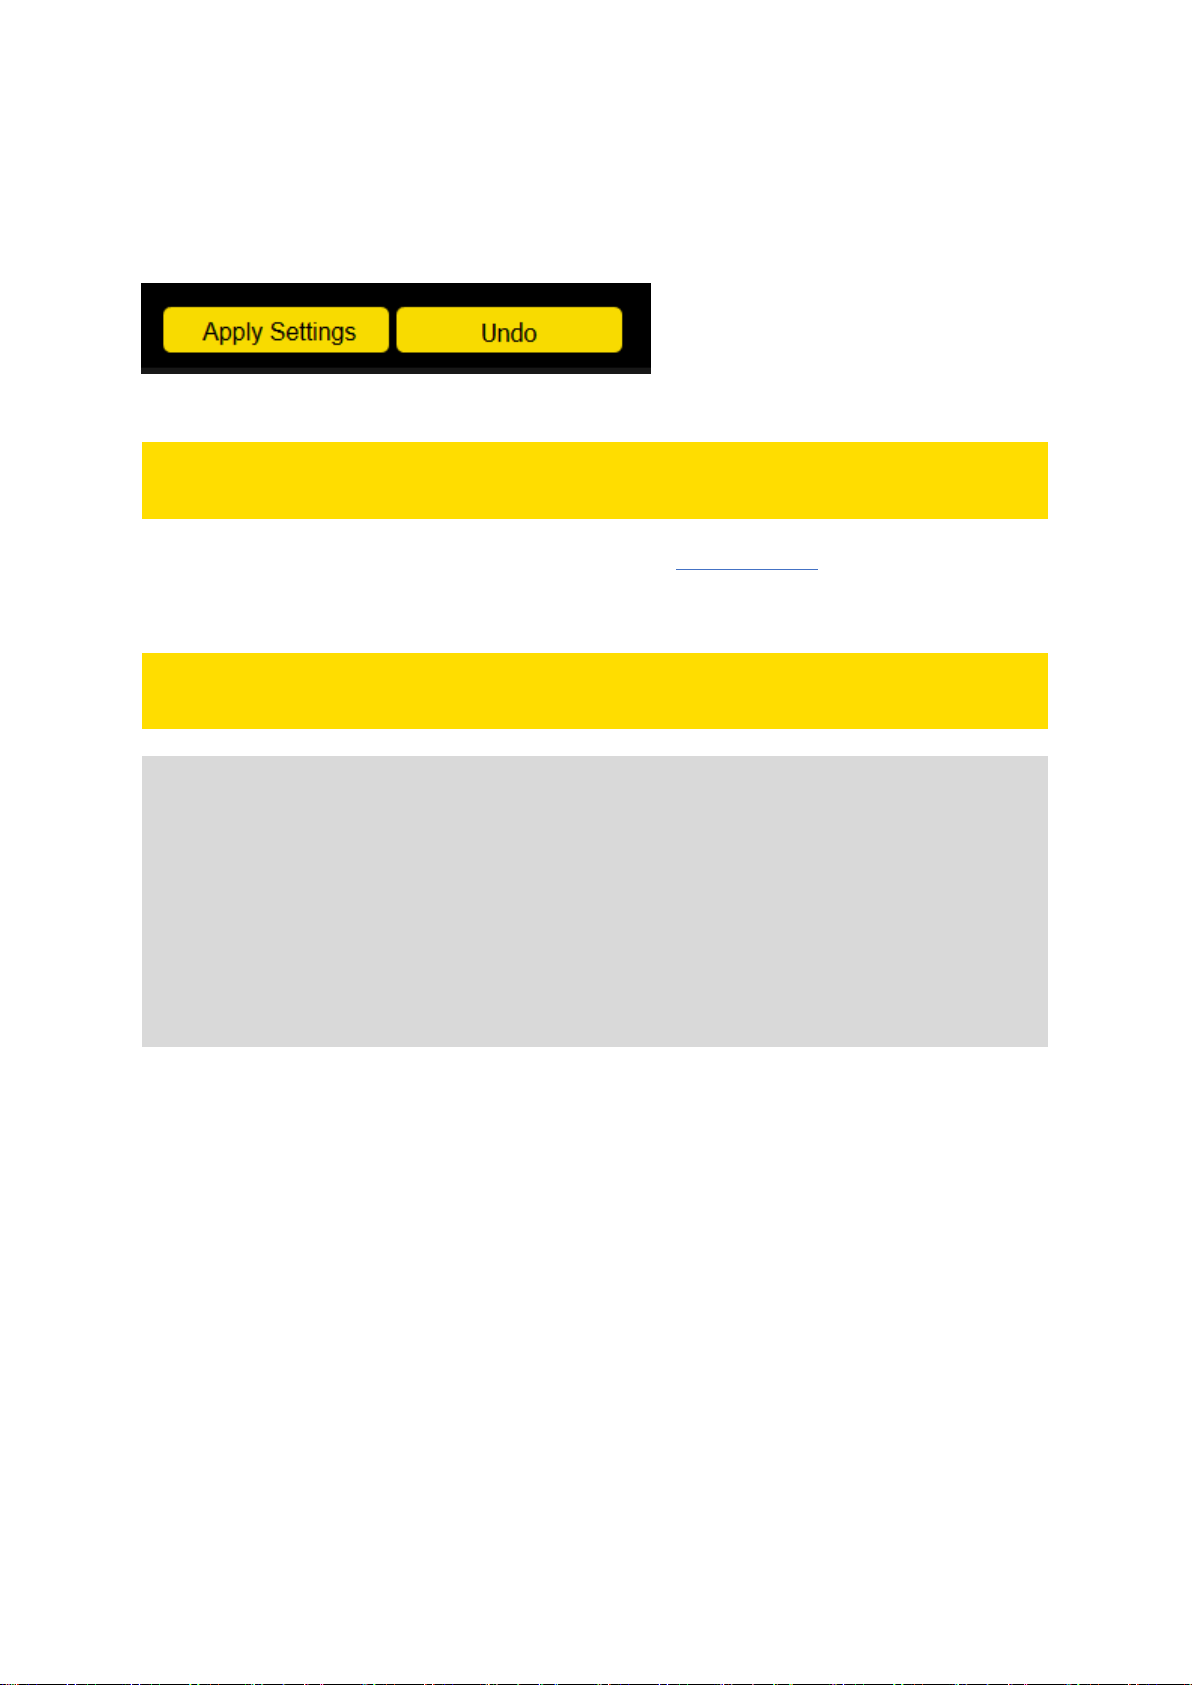
After having edited one or several settings in the [Basic Settings] or [Advanced Settings] tab, these
changes need to be applied. To do this, press [Apply Settings] at the bottom of the Web Interface. To
restore the previous configuration, press [UNDO].
Fig. 12: [Apply Settings] and [Undo] buttons in the Basic Settings and Advanced Settings tab
PLEASE NOTE:
Only the last five configurations are stored until reboot.
By changing the configuration via the Web Interface, a new initialization file will be automatically
saved to the data carrier after clicking on [Apply Settings]. The original initialization file will be
renamed to UHDPlayerSetting.old.
PLEASE NOTE:
Automatic saving of an initialization file is only possible if the SD Card is not write-protected.
Attention:
It is recommended to only change the configuration when a data carrier is plugged into the player.
If there is no data carrier present while changing the configuration, the new settings will be stored
internally.
By inserting a data carrier already containing an initialization file, all internal settings will be
overwritten by the newly inserted initialization file!
In case you applied new settings without a data carrier present, insert a data carrier that does NOT
contain any initialization file, browse to one of the functions in the basic or advanced settings
menu, click inside one of its parameters to activate it, and press [Apply Settings] again. A new
initialization file will now be saved on the data carrier.
Page 23
19
6.2. INITIALIZATION FILE
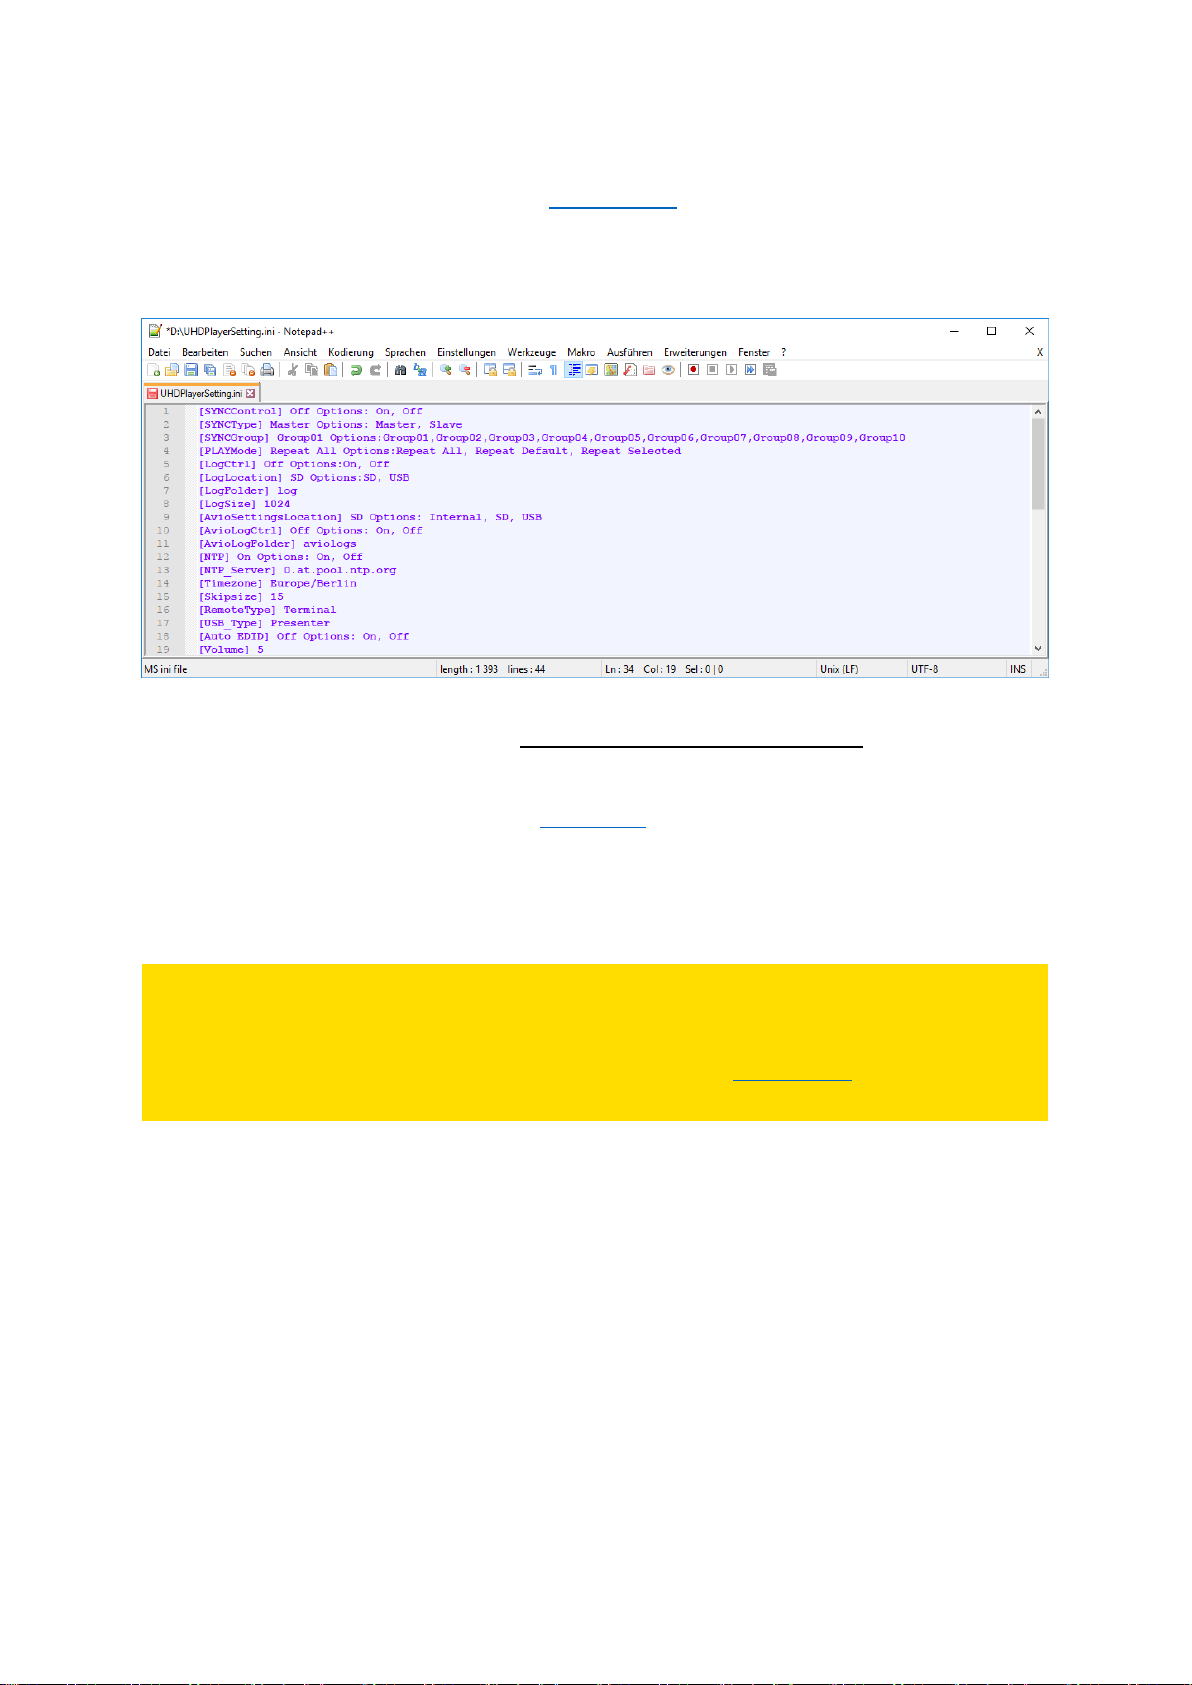
Instead of configuring the UHD Player via the Web Interface, all settings can also be edited within the
player’s Initialization File. The initialization file “UHDPlayerSetting.ini” can be found on the supplied
SD Card. This file contains the current configuration of the UHD Player, with all possible options. It
can be edited on a computer by using any text editor.
Fig. 13: The UHD Player’s Initialization File opened in a text editor
After a file is edited, it always needs to be saved without its name being changed, in order to be
accepted by the player.
Once the SD Card has been plugged into the SD card slot, the UHD Player automatically accepts the
configuration changes.
Instead of the SD Card, you can also use a USB data carrier to do the job. To do this, please save the
initialization file in the root folder of your USB data carrier.
PLEASE NOTE:
Data transfer is usually faster via an SD Card than via a USB data carrier. When using a USB data
carrier, please ensure that the read speed is minimum 30 MByte/s.
The UHD Player will only read from the USB data carrier (use the USB data slot) if the SD Card has
been removed.
6.2.1. OVERVIEW INITIALIZATION FILE
The initialization file contains the following data:
[Auto EDID] On Options: On, Off
[Resolution] 3840x2160p60
[Color Space] Auto Options: Auto, RGB, 420, 422, 444
[Color Depth] 8bit Options: Auto, 8bit, 10bit
[Dynamic Range] SDR Options: Auto, SDR, HDR10, HLG
[Pixel Aspect Ratio] Auto Options: Auto, Custom
[Sync Control] Off Options: On, Off
[Sync Type] Slave Options: Master, Slave
[Sync Accuracy] Low Options: High, Medium, Low, Off
Page 24

20
[Sync Group] Group01 Options: Group01, Group02, Group03, Group04, Group05, Group06, Group07,
Group08, Group09, Group10
[DHCP] On Options: On, Off
[IP Address] 192.168.3.177 Options: IP Address of UHD Player
[Subnet] 255.255.255.0 Options: Subnet of UHD Player
[Gateway] 192.168.3.1 Options: Gateway of UHD Player
[DNS] 192.168.3.1 Options: DNS of UHD Player
[Play Mode] Repeat All Options: Repeat All, Repeat Default, Repeat Selected
[Avio Settings Location] SD Options: Internal, SD, USB
[Avio Log Control] On Options: On, Off
[Avio Log Folder] Log Options: Subfolder for Avio Log-File
[Cue-Points] Off Options: On, Off
[NTP Control] Off Options: On, Off
[NTP Server] 0.at.pool.ntp.org Options: IP Address of NTP Server
[Timezone] CET Options: Time zone of the UHD Player
[Default Display Time] 5 Options: Time in seconds
[SD Card Auto Repair] Off Options: On, Off
[FTP Auto Download] On Options: On, Off
[FTP Auto Download Server] deactivated
[FTP Auto Download Username] deactivated
[FTP Auto Download Password] deactivated
[FTP Auto Download Serverfolder] deactivated Options: Server Subfolder Name, Off
[FTP Auto Download Mode] active Options: Passive, Active
[DelayedContentChange] Off Options: On, Off
[FTP Auto Download Date] 1.1.2015
[FTP Auto Download Time] 0:0:59
[FTP Auto Download Intervall] 0 Options: Value in seconds
[FTP Auto Download Hourly] Off Options: On, Off
[FTP Auto Download Daily] Off Options: On, Off
[FTP Auto Download Weekly] Off Options: On, Off
[FTP Auto Download Monthly] Off Options: On, Off
[FTP Auto Download Overwrite] Off Options: On, Off
[FTP Server] On Options: On, Off
[FTP User] AVS Options: Username for FTP Login
[FTP Password] AVStumpfl Options: Password for FTP Login
[Log Control] On Options: On, Off
[Log Location] SD Options: SD, USB
[Log Folder] log Options: Subfolder for Log-File
[Log Size] 512 Options: Maximum size of Log-File in kb
[Serial Device] Term Options: Term, Avio
[Baud] 2400 Options: 2400, 4800, 9600, 19.200, 38.400, 57.600, 76.800, 115.200
[USB Device] Logitech-Presenter Options: Logitech-Presenter, Jade-Presenter
[Skipsize] 5 Options: Value in seconds
[UDP Port] 4950 Options: UDP Port of UHD Player
[Volume] 5 Options: Value range from 0 (mute) to 10 (highest)
[Web Interface Login] Off Options: On, Off
The entry in squared brackets names the function. The options available for the function follow after
a space character. Possible options are listed (most of the time) after another space character.
Page 25

21
6.2.2. CONFIGURING THE INITIALIZATION FILE
Open the initialization file with any text editor, for example, the freeware “Notepad++”, which can be
downloaded here: https://notepad-plus-plus.org/.
Browse to find the function you want to modify and replace the current option by another one.
Example:
[Auto EDID] On Options: On, Off
The function “Auto EDID” is enabled. To disable Auto EDID, change the option from “On” to “Off”:
[Auto EDID] Off Options: On, Off
After all changes are made, save the file under the same name, and then eject the SD Card / USB data
carrier and insert it into the UHD Player again.
Page 26
22
7. NETWORK SETTINGS
For the following functions, the UHD Player must be integrated into your network:
• Configuration via Web Interface
• Syncing several players
• UDP Control
• AVIO Control
• FTP Server
• FTP Auto Download
• NTP Time Synchronization
The factory default network settings of the UHD Players are as follows:
DHCP: Disabled
IP address: See label attached to the bottom of the player
Subnet: 255.0.0.0
Gateway: Same as IP address
Fig. 14: Example of a type label attached to the bottom of the UHD Player
Please refer to the Connecting the Player to the Network chapter if you need guidance on how to
communicate with the UHD Player via Ethernet.
TIP
How to determine the IP address of a UHD Player on the local network:
A) Remove the data carrier from the UHD Player and it will display its Web Interface Info
Screen, including the current network configuration on the local display.
B) Check the player’s initialization file. You will find it on the player’s data carrier.
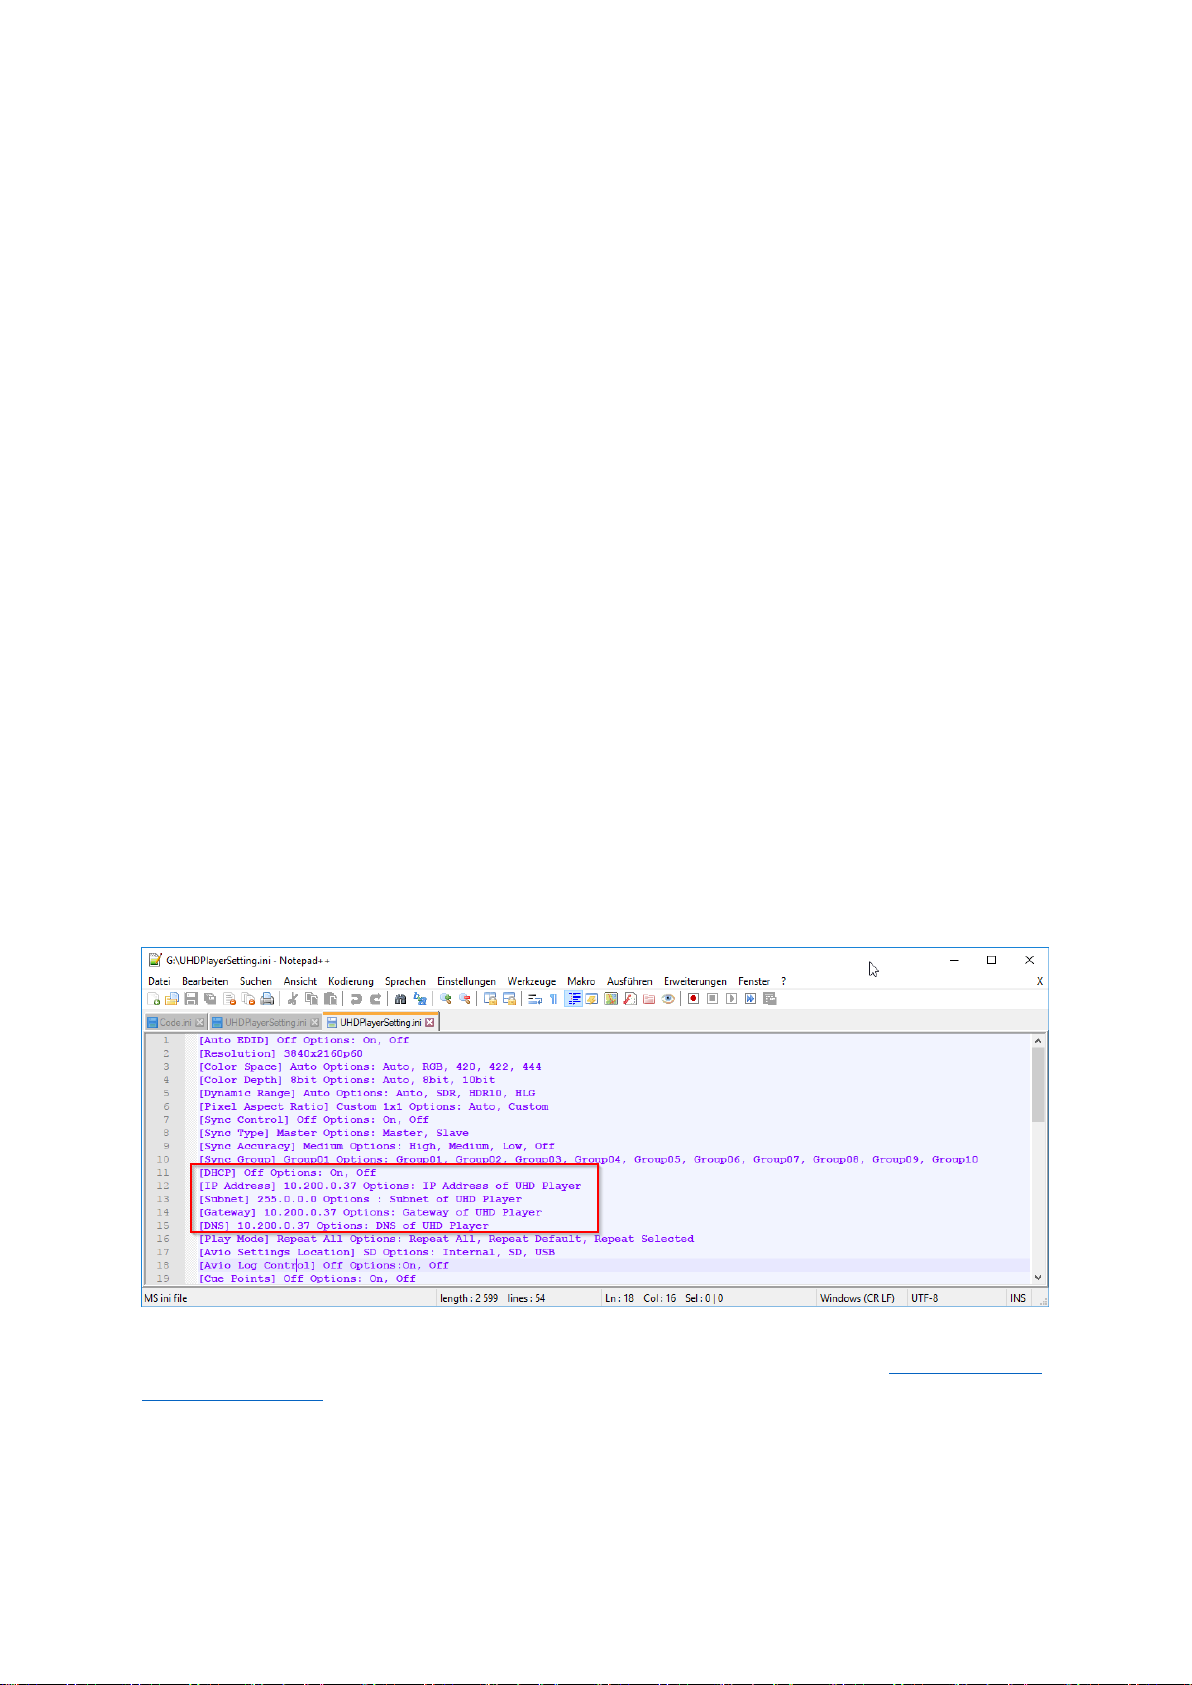
To edit the player’s network settings, open its Web Interface in your browser, click on [BASIC
SETTINGS] in the menu bar and the [Wired Network Settings] with all editable options will appear.
Fig. 15: Wired Network Settings in the Web Interface
Page 27
23
Modify these settings, if need be:
[DHCP]
You can manually assign an IP address for the player when DHCP is turned off (this is the default
setting), or you can have the player use DHCP to obtain an IP address automatically if there is a DHCP
server set up in the local network. Please note that with DHCP set to “On”, the IP address is not
permanently assigned and unprecedented interruptions may occur.
[IP address]
Upon delivery, the UHD Player’s IP address is pre-configured to a unique IP address that can be found
on the label attached to the bottom of the player. You can assign a suitable IP address manually by
entering a new one here. DHCP needs to be turned off first.
[Subnet]
Upon delivery, the subnet mask is set to the same value as the UHD Player’s IP address. You can
change the subnet mask by entering a new one here. DHCP needs to be turned off first.
[Gateway]
Upon delivery, the default gateway is set to the same value as the UHD Player’s IP address. Change
this parameter by entering a new one here. DHCP needs to be turned off first.
[DNS]
Upon delivery, the default Domain Name Server (DNS) is set to the same value as the UHD Player’s IP
address. Change this parameter by entering a new one here. DHCP needs to be turned off first.
After all changes are made, press [Apply Settings] at the bottom of the web page.
As soon as a new IP address is set and applied, it will be entered into the browser’s address line
automatically, and you may continue the configuration via the Web Interface.
In the initialization file (“UHDPlayerSetting.ini”), the player’s network settings can be found within
the first half of the list.
Fig. 16: Network Settings in Initialization File
For more information about how to handle the initialization file, please refer to the Configuration via
the Initialization File chapter.
Page 28

24
8. DISPLAY CONFIGURATION
In the Web Interface, click on [BASIC SETTINGS] in the menu bar and the [Video Settings] topic with
all editable options will appear below.
Fig. 17: Video Settings in the Web Interface
By default, Auto EDID is set to “Off” and the resolution 1080p60 (1920x1080@60) will be used.
[HDMI Color Space], [Dynamic Range] and [Pixel Aspect Ratio] are set to “Auto” and [HDMI Color
Depth] is set to 8bit.
If you need to edit these default settings, please see the description of all options below.
[Auto EDID] Typically, the output devices send their EDID to the connected video source via the HDMI
cable. By enabling Auto EDID, the UHD Player will automatically attempt to detect the native
resolution of the attached output device.
If [Auto EDID] is set to “On”, entering any value for [Resolution] will be ignored.
[HDMI Color Space], [HDMI Color Depth], [Dynamic Range] and [Pixel Aspect Ratio] are not linked to
the Auto-EDID function and can be edited independently.
[Resolution]
To change the resolution for your output device manually, Auto EDID needs to be set to “Off” first.
Then you may choose the desired resolution from the drop-down list. Most common resolutions are
supported.
[HDMI Color Space]
The following color spaces are supported by the UHD Player: RGB, 420, 422, 444.
By default, it is set to “Auto”: The color space is chosen based on receiver and transmitter
preferences and capabilities. If you want to define the color space instead of using the value reported
by the HDMI receiver, choose it from the drop-down list.
[HDMI Color Depth]
The default setting of the color depth is “8bit” in order to ensure that the player’s video signal can be
displayed, because all HDMI devices must have this setting implemented. Alternatively, the color
depth can be set to “10bit” if the attached output device supports this option. “Auto” will select the
highest quality supported color depth as reported by the output device.
PLEASE NOTE:
Some HDMI display devices do not support true 10bit color space but do support 8-bit+FRC (Frame
Rate Control). This may lead to problems when using the “10bit” color depth. In case a video signal
cannot be displayed on your output device and the color depth is set to “Auto” or “10bit”, set it
back to “8bit”.
[Dynamic Range]
The default setting for dynamic range is “Auto”, which means that the video source forces this
setting. For example, when playing a H.265 video with High Dynamic Range (HDR), the output device
will automatically be set to “HDR”. Having this playback followed by a video with Standard Dynamic
Range (SDR), the display switches to “SDR” on the fly.
Page 29
25
Alternatively, you may set a fixed dynamic range. To do so, choose between the following options:
“SDR”, “HDR10”, “HLG” (Hybrid Log-Gamma).
[Pixel Aspect Ratio]
The value for [Pixel Aspect ratio] should typically remain set to “Auto”. This means that square pixels
are used for the video files (pixel aspect ratio = 1:1), which means that all common video files will be
displayed in their correct aspect ratio on the output device.
Choosing a “Custom” pixel aspect ratio should be done in very special cases only, e.g. to process a
pre-distorted video file so that it’s displayed in the correct way on the output device.
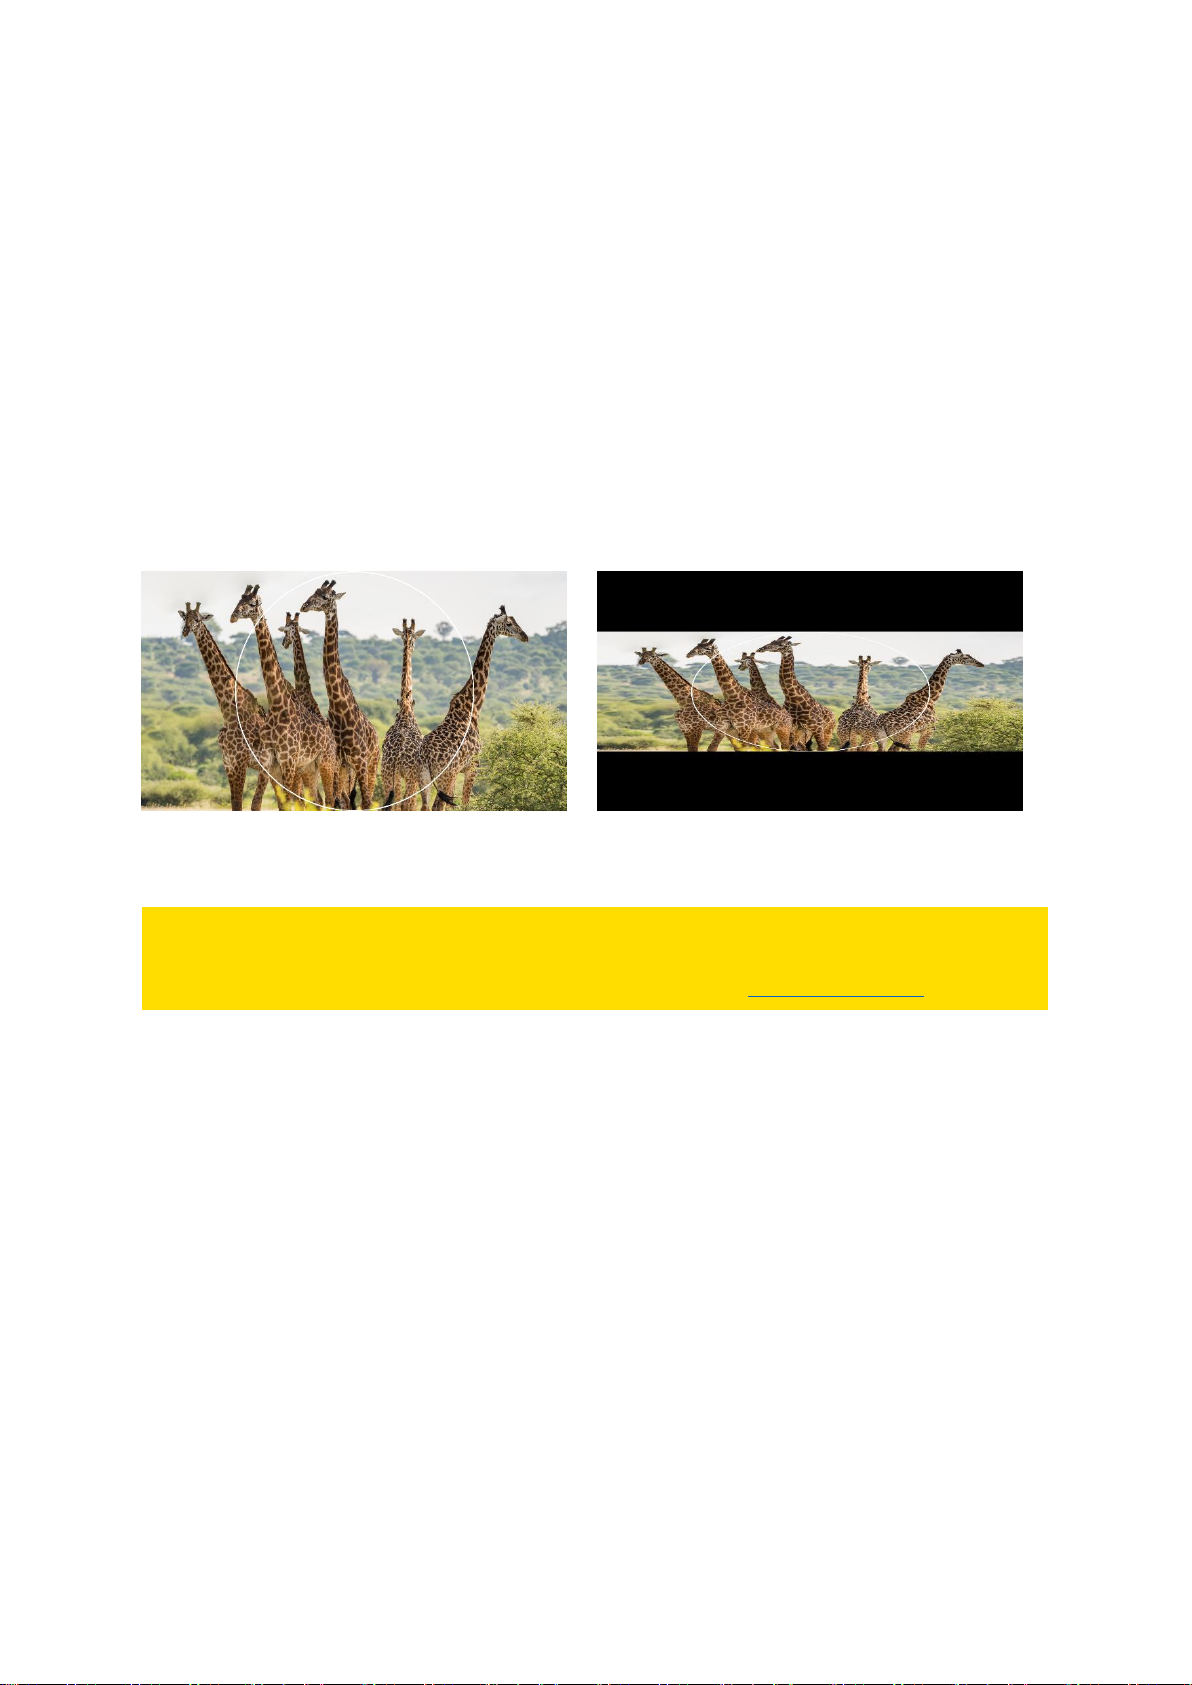
Example:
When the Pixel Aspect Ratio is set to “Auto”, a 16b:9 video file will be displayed correctly, filling the
whole screen of a 16b:9 display. When the Pixel Aspect Ratio is changed to “Custom 2:1”, the file will
be distortedly displayed, reducing the file’s height by factor 2.
Fig. 18: Left—a 16:9 video file with Pixel Aspect Ratio set to “Auto”
Right—the same video file with Pixel Aspect Ratio set to “Custom 2:1”
PLEASE NOTE:
This function only affects video files; it does not apply for image files! For more details on how
media content is displayed and handled by the player, refer to the Media File Playback chapter.
[Force Display Activation]
Usually, the EDID detection works well and [Force Display Activation] can remain disabled. If
problems occur, it can be set to “On”, then the EDID detection that is done while the player is
booting will be done once again, after fifteen seconds.
After all changes are made, press [Apply Settings] at the bottom of the web page.
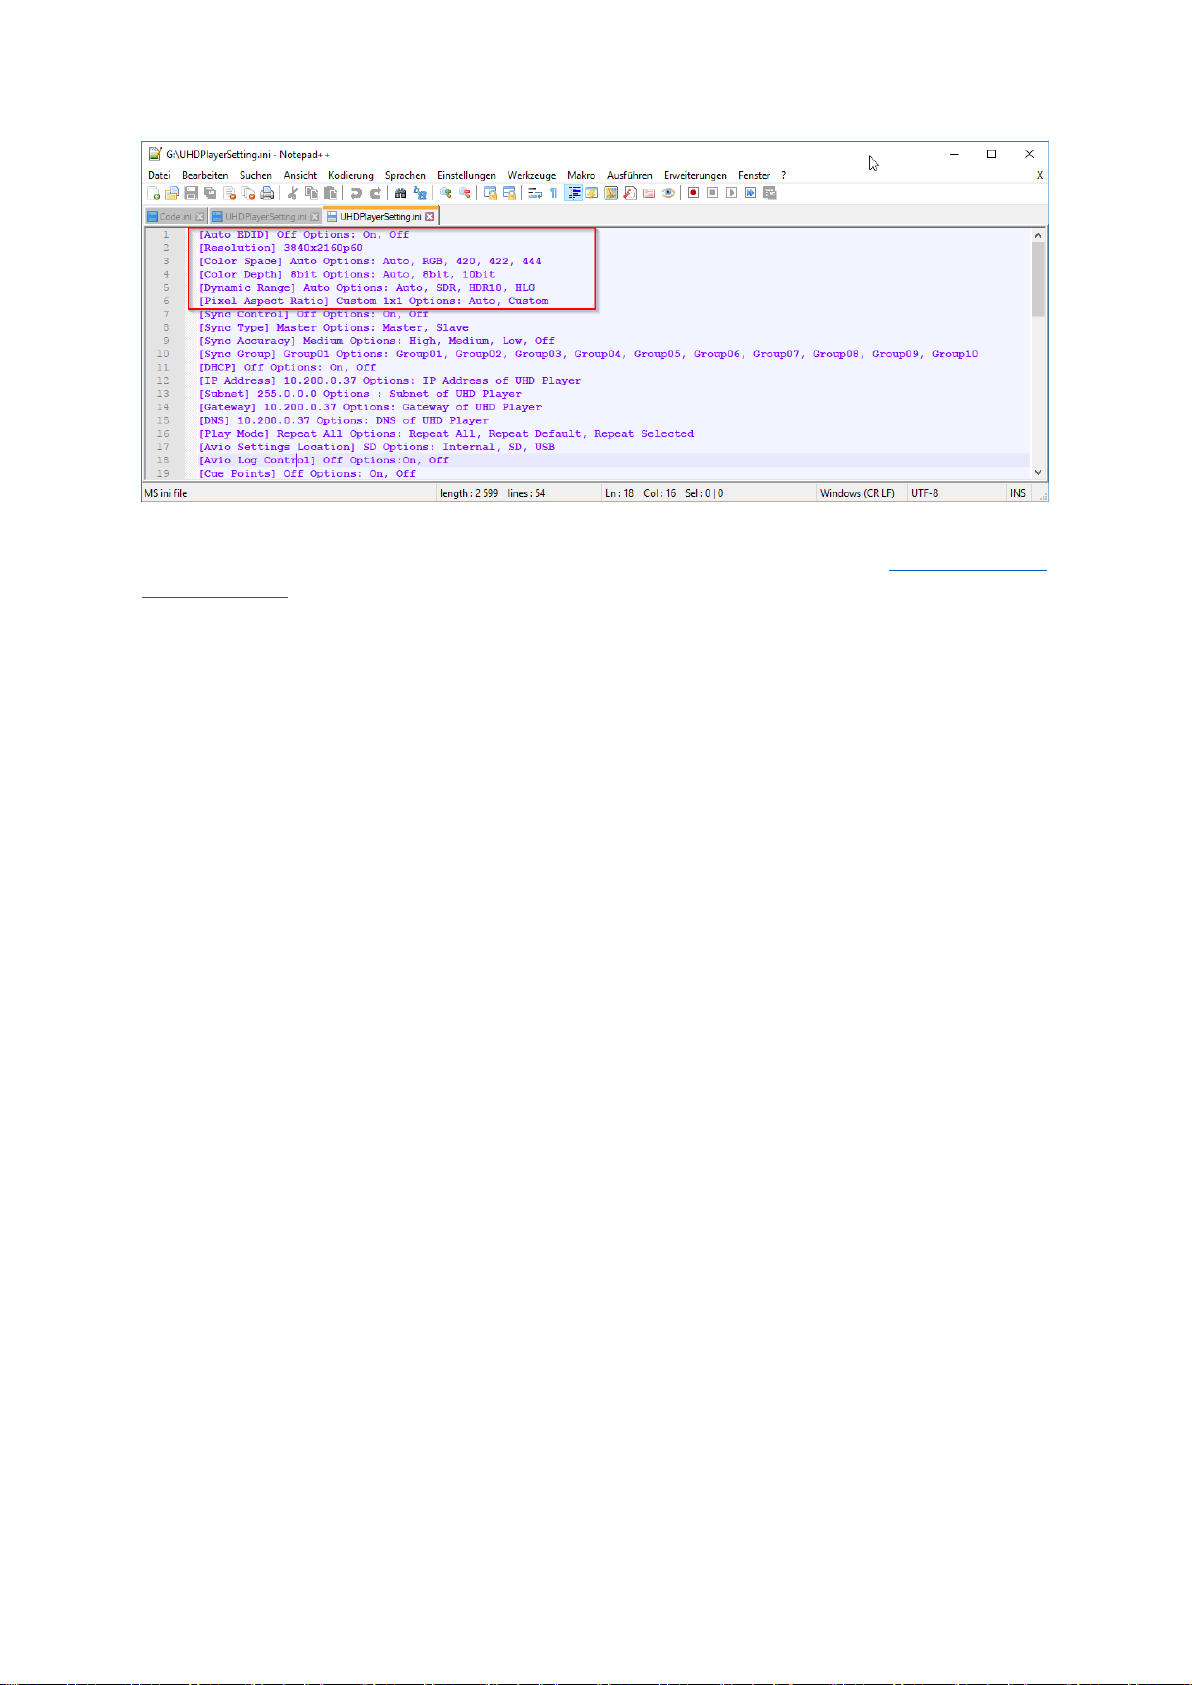
In the initialization file (“UHDPlayerSetting.ini”), the player’s network settings can be found at the
beginning of the list.
Page 30
26
Fig. 19: Display Configuration in the Initialization File
For more information about how to handle the initialization file, please refer to the Configuration the
Initialization File chapter.
Page 31

27
9. CONTENT
THE UHD Player can playback videos, images and audio files in various formats. To be sure to create
media files that run with the best playback performance, please see our content guidelines below for
video, image and audio files.
9.1. VIDEO
The UHD Player supports the following video formats:
Video Codec: The video must be encoded as a h.265 (HEVC) or VP9 (webm) file with a
maximum resolution of 4096x2160@60p.
A h.264 file can be used for up to 1920x1080@60p.
Resolution: The maximum supported resolution is 3840x2160@60p or 4096x2160@60p
for h.265 or VP9 files, and 1920x1080@60p, if using h.264 files.
Color Depth: All video must be encoded at 4:2:0 chroma subsampling with 8 bits (Main
Profile), or 10 bits (Main 10 Profile) of color depth using a h.265 codec and 8
bits of color depth using a h.264 codec.
Frame Rate: The maximum supported frame rate is 60 frames per second, and it is also
affected by your display hardware. We recommend using exactly the same or
an integral fraction of the frame rate as on the display. So, if your display has
a refresh rate of 60 frames per second, we recommended rendering the
video with 30p or 60p.
Container Format: The following container formats are supported: .mov, .mp4, .mkv, .webm
Bitrate: A constant bit rate (CBR) of between 25 and 30 Mbps is recommended.
Playback Media: All videos must be played from a Class 10 SD Card. If you are using a USB
drive or a USB stick, please ensure that the read capability is at least 30 MB/s.
Video Loop Function: Video Loop function works for all supported container formats:
.mov, .mp4, .webm, .mkv
9.2. IMAGES
The UHD Player supports the following image formats:
Image Format: JPG, PNG.
Resolution: The maximum resolution for still images is 8192x8192 pixels.
Color Depth: The UHD Player supports 8 Bit color depth and a chroma subsampling of
4:4:4.
PLEASE NOTE:
Due to the capability of the Still Image Decoder, all images will be displayed with a maximum
resolution of 1920x1080px, regardless of their native resolution. To avoid this downsizing, and to
take full advantage of your display’s resolution, you may create a video out of the images using an
external video editing software, e.g. ffmpeg (see Rendering Guideline chapter).
Page 32

28
9.3. AUDIO
The UHD Player supports the following audio formats:
Audio Codec: AAC and MP3 up to 320 KB/s, PCM via WAV, FLAC
Sample Rates: 32 kHz, 44.1 kHz and 48 kHz are supported
9.4. RENDERING GUIDELINE
We recommend using one of these software solutions to encode/transcode your video content:
ffmpeg, Adobe Media Encoder, Handbrake, AnotherGUI (http://www.stuudio.ee/AnotherGUI/).
We supply our customers with Adobe Media Encoder presets (=AME Presets), Handbrake presets and
AnotherGUI presets for common resolutions and frame rates. These can be downloaded here:
www.AVStumpfl.com/EncodingPresets.
If you have complex content, we recommend using 2-pass encoding to ensure the best video quality.
This can be done very easily using ffmpeg (see the description below) and AnotherGUI with our
supplied presets: www.AVStumpfl.com/EncodingPresets.
If you need 10 Bit support, the only option on windows PCs is to use Adobe Media Encoder, because
ffmpeg or Handbrake do not have 10 Bit support for h.265 files. On Linux systems, there is a ffmpeg
build with 10bit support. If you want to use Linux for encoding your videos, we supply a bootable USB
Stick for this purpose. The image can be downloaded from here:
www.AVStumpfl.com/EncodingPresets.
However, while testing h.265 with 10 Bit support, we did encounter some rendering problems when
using Adobe Media Encoder, so please make sure that you review your content after rendering. The
maximum resolution Handbrake can render is 3840x2160 pixels.
If you want to encode VP9 videos using Adobe Media Encoder or Adobe Premiere, you need to install
the following plugin: http://www.fnordware.com/WebM/.
PLEASE NOTE:
ffmpeg, Handbrake, AnotherGUI or Adobe Media Encoder are not products of AV Stumpfl and,
therefore, we cannot support these software solutions.
FFMPEG
Here is a short guide on how to install ffmpeg on a windows operating system:
Download an ffmpeg build from this site: https://ffmpeg.zeranoe.com/builds/.
Unzip the downloaded file and copy the entire content of the folder to C:\ffmpeg\.
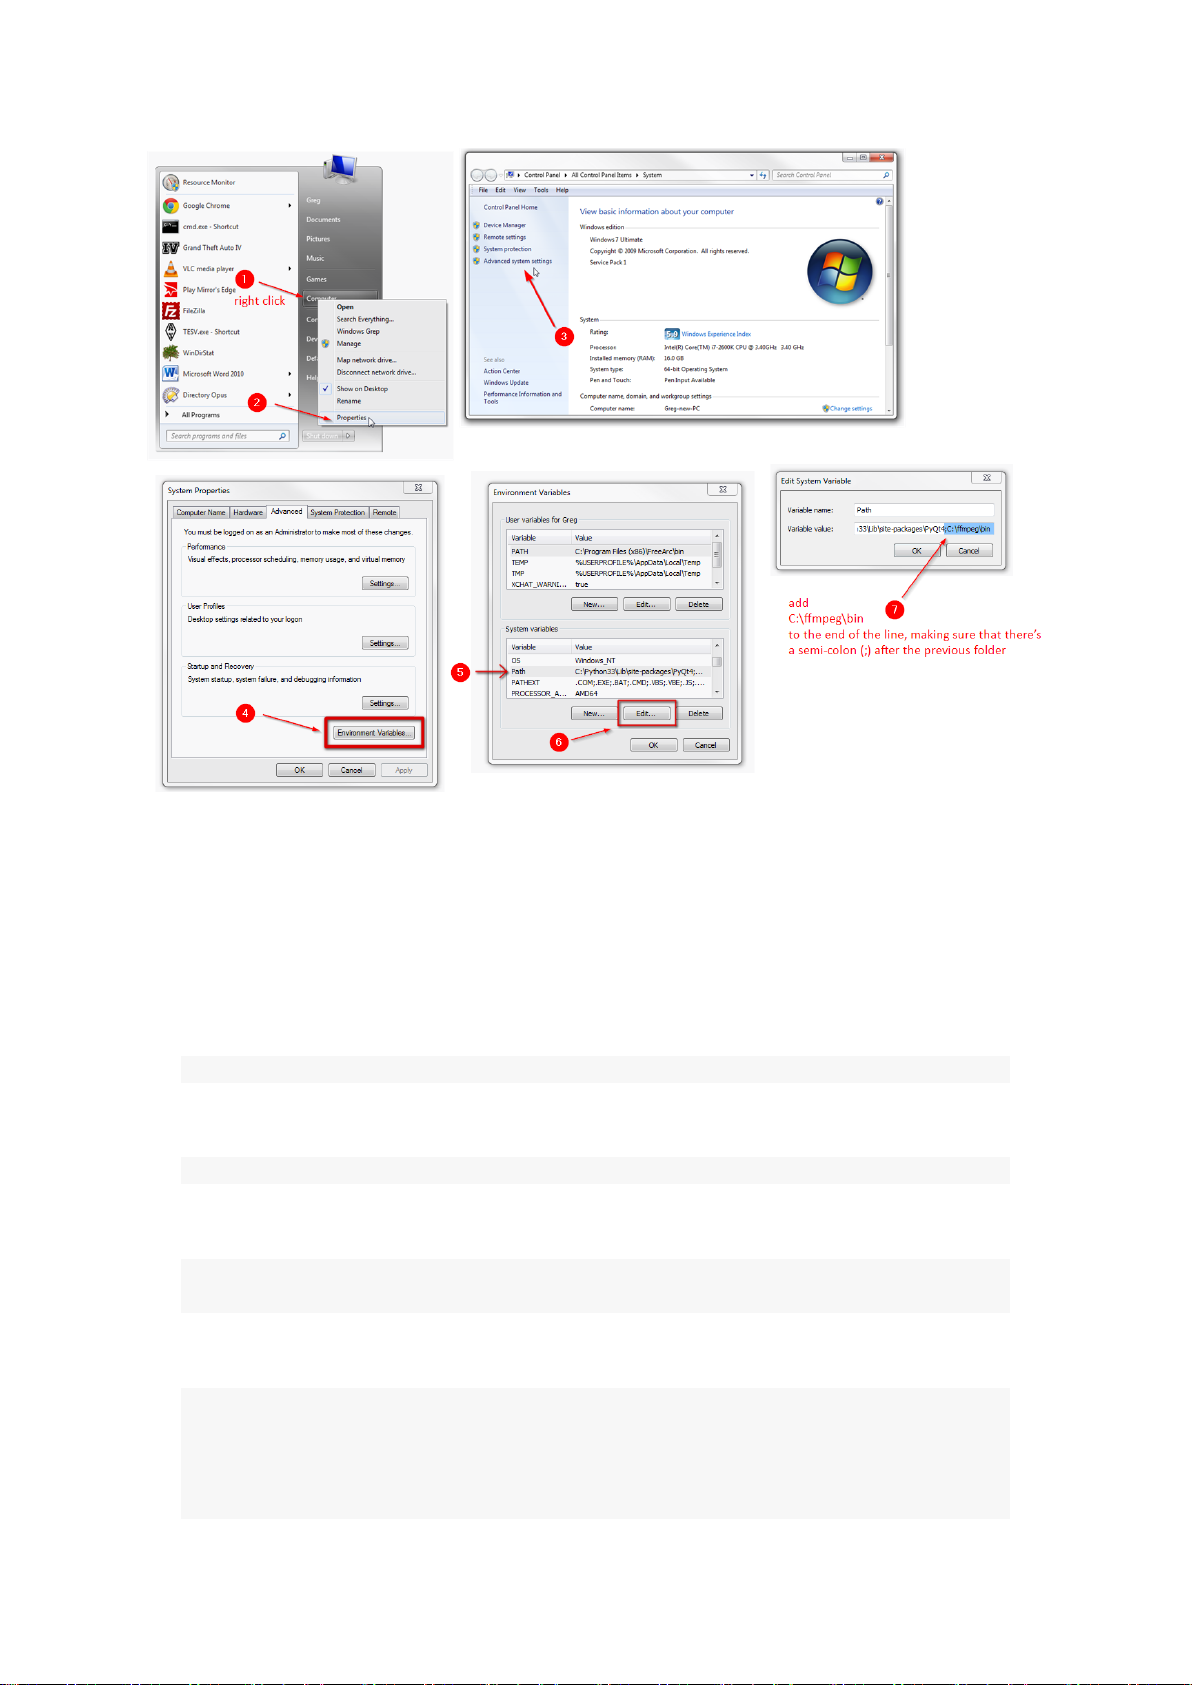
Define C:\ffmpeg\bin in your path environmental variable—see image below.
Page 33
29
Fig. 20: Short instructions on how to define the C:\ffmpeg\bin in your path environmental variable
USING FFMPEG
VP9:
ffmpeg -i input.mp4 -c:v libvpx-vp9 -minrate 30M -maxrate 30M -b:v 30M output.webm
h.265:
ffmpeg -i input.mp4 -c:v libx265 -minrate 30M -maxrate 30M -b:v 30M output.mp4
Create a video from a set of images (image sequence):
ffmpeg -framerate 60 -i input%04d.tif -c:v libx265 -minrate 30M -maxrate 30M -b:v 30M -r
60 output.mp4
h.265 2-pass coding and use Video Buffer Verifier:
ffmpeg -framerate 60 -i input%04d.tif -c:v libx265 -b:v 35M -x265-params pass=1:vbvmaxrate=35000:vbv-bufsize=70000 -pix_fmt yuv420p -f mp4 -y NUL
ffmpeg -framerate 60 -i input%04d.tif -c:v libx265 -b:v 35M -x265-params pass=2:vbvmaxrate=35000:vbv-bufsize=70000 -pix_fmt yuv420p output.mp4
Page 34

30
Definition:
ffmpeg Calls the program
-i Defines an input file
-c:v Defines the codec used for video encoding (libx265 for h.265 and libvpx-vp9
for VP9)
-minrate Defines the minimum bitrate (in that case 30 Mbit)
-maxrate Defines the maximum bitrate (in that case 30 Mbit)
-b:v Defines the average bitrate
-i input%04d.tif Defines the leading zeros of the picture sequence (e.g.: input0001.tif,
input0002.tif, …)
-x265-params Uses the x265 CLI interface for advanced x265 settings
pass= Defines the encoder pass
vbv-maxrate= Defines the maximal bitrate for the video buffer verifier feature
vbv-bufsize Defines the maximal buffer size for the video buffer verifier feature
-pix_fmt Defines the pixelformat. Needs to be YUV 4:2:0. For 10Bit encoding you need
to specify yuv420p10le. Please not that 10Bit is only supported on Linux
builds at the moment.
-f Defines the container format for the first encoder pass
-y Allows overwriting existing files
NUL Write the first encoder pass to NUL (no file will be encoded). If you are using
Linux or a Mac, please use /dev /null && instead of NUL.
-framerate Defines the framerate of the input file. If you do not set the frame rate,
ffmpeg will use the default framerate of 25fps.
-r Defines the framerate of the output file. If you do not set the frame rate,
ffmpeg will use the default framerate of 25fps.
If your source material is complex, it is highly recommended to use 2-pass encoding to archive a
stable bitrate with no peaks so that the decoder does not get a buffer overflow. Another benefit is
that normally the file size will shrink on second encoder pass. It is recommended to use an
uncompressed source file for the best output results.
9.5. MUXING MULTIPLE AUDIO STREAMS
The UHD Player is able to play videos containing more than one audio stream. Like on a DVD, you can
switch between languages without stopping the video playback. The different audio tracks can be
switched either by using AVIO or UDP commands. The player can use up to 10 audio streams. ffmpeg
can mux several audio streams into one video file. This cannot be done with Handbrake or Adobe
Media Encoder.
This can be achieved by the following command:
ffmpeg -i input.mp4 -i language1.mp3 -i language2.mp3 -map 0:v -map 0:a:0 -map 1:a -map
2:a -metadata:s:a:0 language=ger -metadata:s:a:1 language=eng -metadata:s:a:2
language=fre -c copy -shortest output.mp4
Definition:
Page 35

31
ffmpeg Calls the program
-i Defines an input file
-map 0:v Maps the first video stream of the first input file (in this case, the input.mp4)
-map 0:a:0 Maps the first audio stream of the first input file (in this case, the input.mp4)
-map 1:a Maps the audio stream of the second input file (in this case, the
language1.mp3)
-map 2:a Maps the audio stream of the third input file (in this case, the
language2.mp3)
-metadata:s:a:0 Defines the metadata for the first audio stream (in this case language=ger for
German)
-c copy Just copies all streams—there is no transcoding going on
-shortest Interrupts the encoding after the first input file has finished. So please be
sure that all of your streams are of the same length.
For a detailed description or more examples, take a look at the ffmpeg documentation:
https://ffmpeg.org/ffmpeg.html
If you want to tweak your h.265 stream to bleeding edge features or search for more detailed
information, you should take a look at the x265 documentation:
http://x265.readthedocs.io/en/default/.
ffmpeg will interpret most of the CLI commands when using the following prefix:
-x265-params followed by the CLI command of x265.
Page 36

32
10. MEDIA FILE PLAYBACK
As described in the First Steps chapter, the simplest way of playing back media files with the UHD
Player in Standalone Mode is as follows:
• Save your video, audio and image files to the root folder of the supplied SD Card or any other
USB data carrier (e.g. SD:/ or USB:/).
• Plug the data carrier into the corresponding port on the player’s front panel.
The player is set to Play Mode “Repeat All” by default and will play your media files successively in
alphanumeric order. All image files will be displayed for 5 seconds, and the volume for audio
playback is set to 50%.
There are several possibilities for a more customized playback of your media files. Please see the
following sections for further information:
• Play Mode – How the file playback is handled without a playlist on the data carrier
• Default Display Time – How to define a general display time for image files
• Volume – How to define a general volume for media files containing audio
• Playlist – How to take advantage of the various playback possibilities and individual settings
for each media file
• HDMI Input – How to display an external video/audio source via the HMDI Input port
• Synchronized Playback – How to sync several players
UHD Players can play video contents in Loop Mode, which means that there is no gap when the
playback loops from the last to the first video frame. Of course, this is also possible when multiple
players are operating in Network Synchronization Mode.
PLEASE NOTE:
The SD Card (or the USB data carrier) must remain installed in the player during playback and
networking operations. The player cannot play presentations or receive content over the network
without a storage device connected because it has no internal storage.
10.1. PLAY MODE
The default Play Mode “Repeat All” will play your media files successively in alphanumeric order,
whereby media files with uppercase file names will be processed before media files with lowercase
file names. After the last item, the playback will restart again from the first item.
See here for an example of how the alphanumeric playback order works, with the following files
saved on the data carrier:
• 01_video.mp4
• 02_video.mp4
• House_inside.jpg
• House_outside.jpg
• handshake.mp4
When working with triggers from external devices, like buttons (via GPIO Remote In) or
RS232/UDP/Avio Control, you may want to use a different play mode. Either “Repeat Default“ or
“Repeat Selected“ can be chosen.
Page 37
33
PLEASE NOTE:
The Play Mode in use will always be overwritten when a playlist is added to the data carrier!
To edit the Play Mode via the Web Interface, click on the [BASIC SETTINGS] tab in the Menu Bar and
the [Play Mode] function will appear. Choose one of the options from the drop-down list on the left.
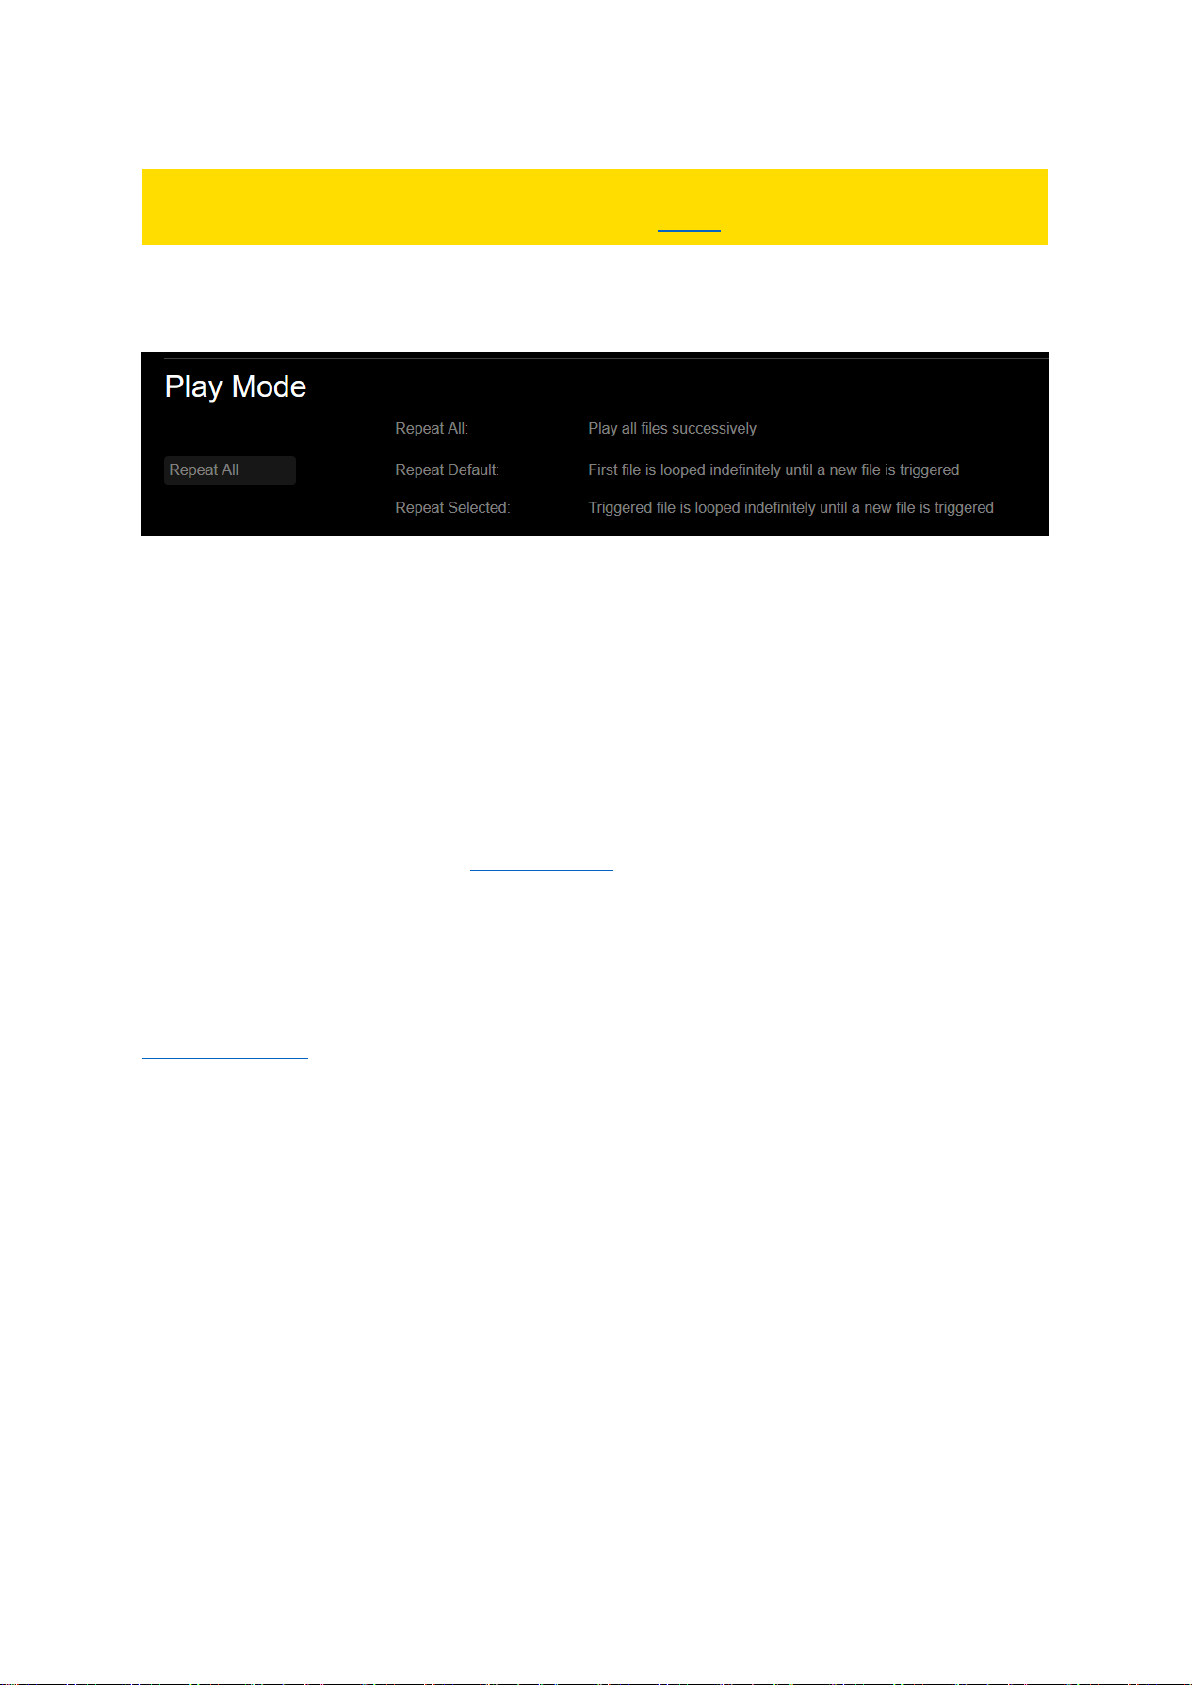
Fig. 21: Play Mode settings in the Web Interface
[Play Mode]
Choose a Play Mode from the drop-down list.
“Repeat All”: Plays your media files successively in alphanumeric order, whereby media files with
uppercase file names will be processed before media files with lowercase file names. After the last
item, the playback will restart again from the first item.
“Repeat Default”: The first file in the playback order loops indefinitely until a new file is triggered.
Example:
The first file is a short video showing an overview of all available video files. It loops indefinitely until
one of the other files is triggered via external control. When the playback of the triggered file ends,
the first file showing the overview will again loop indefinitely until another file is triggered.
“Repeat Selected”: The triggered file is looped indefinitely until a new file is triggered.
Example:
A venue displays a looping video file showing the current menu on a screen. If there is an exclusive
event taking place, the prices for food and drinks will be more expensive. Via buttons attached to the
Remote Input Port, the organizer can trigger different menu video files for different events.
Please confirm your changes by pressing [Apply Settings] at the bottom of the page.
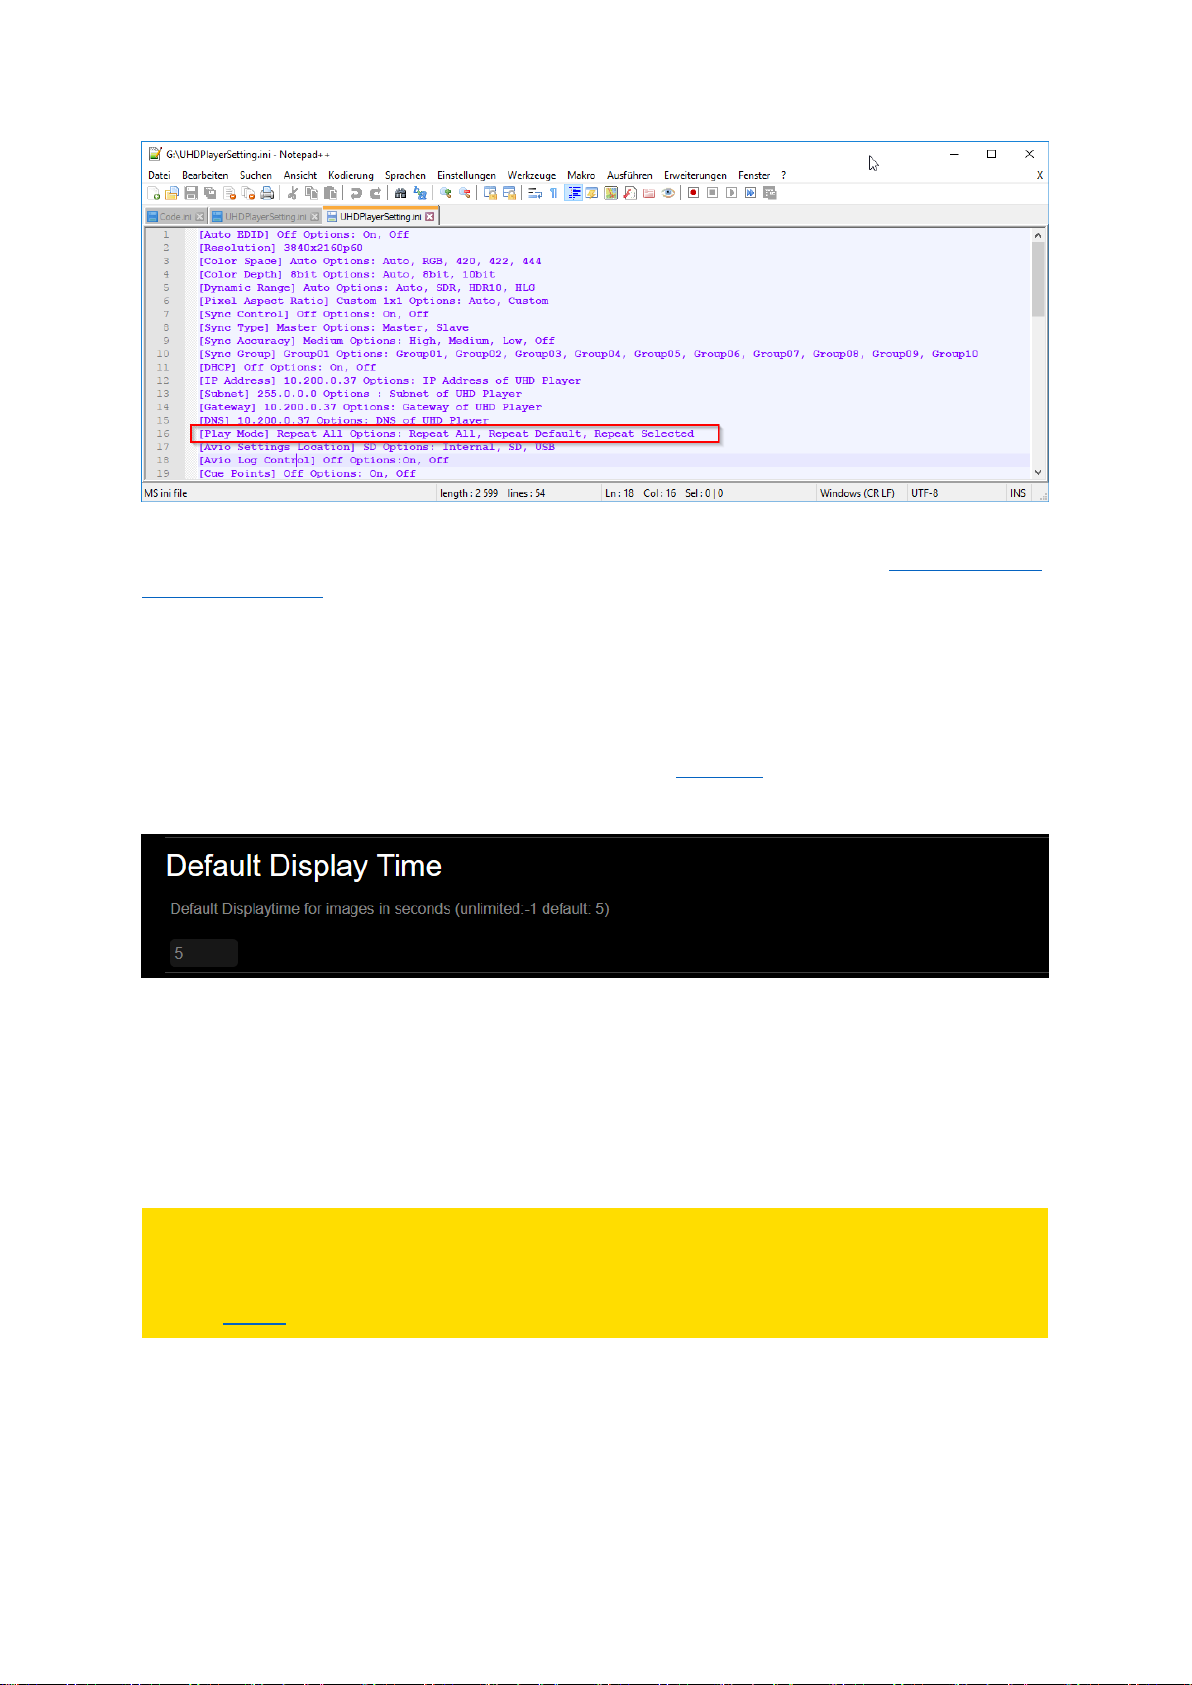
In the initialization file (“UHDPlayerSetting.ini”), the player’s Play Mode setting can be found within
the first half of the list.
Page 38
34
Fig. 22: Play Mode Options in the Initialization File
For more information about how to handle the initialization file, please refer to the Configuration via
the Initialization File chapter.
10.2. DEFAULT DISPLAY TIME
The duration of video and audio files is defined through their individual file length. Image files do not
have a fixed display time, as such. It is set to 5 seconds by default and can be changed.
In the Web Interface, click on [ADVANCED SETTINGS] in the menu bar and then on [Default Display
Time]. The drop-down menu opens and the current value for the default display time will appear.
Fig. 23: Default Display Time setting in the Web Interface
The “Default Display Time” of images is set to 5 seconds by default. You may enter a different value
(in seconds) in the text field on the left.
By entering “-1”, the image will be displayed for an indefinite time, unless another media file is
triggered from an external control.
Please confirm your changes by pressing [Apply Settings] at the bottom of the page.
PLEASE NOTE:
The default display time applies to all image files on your data carrier, so long as there is no
additional playlist used in which every single item may have a different display time. For details,
see the Playlist chapter.
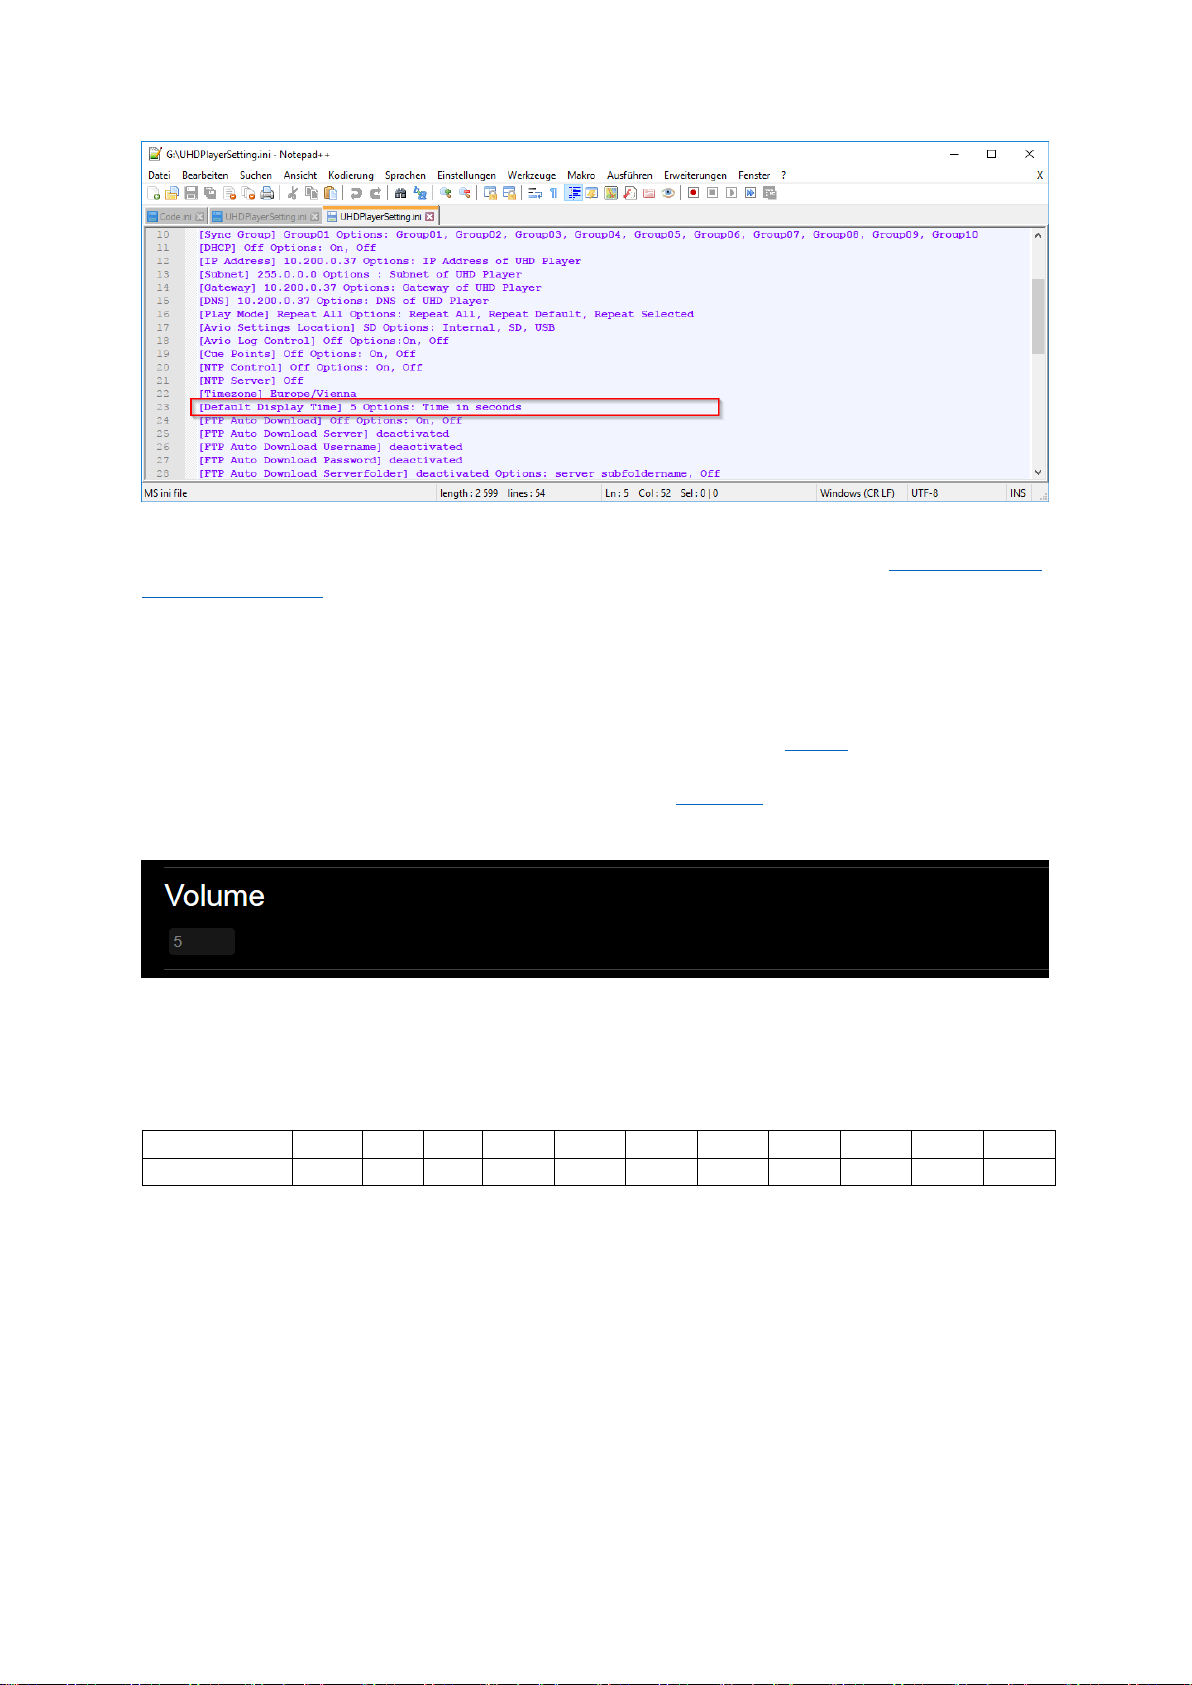
In the initialization file (“UHDPlayerSetting.ini”), the player’s default display time setting can be
found in the middle of the list.
Page 39
35
Fig. 24: Default Display Time Setting in the Initialization File
For more information about how to handle the initialization file, please refer to the Configuration via
the Initialization File chapter.
10.3. VOLUME
Basically, there is one volume value (default: 8/approx. 0 dB) set up for all media files containing
audio. If you wish to assign an individual volume value to a media file, a playlist needs to be created.
In the Web Interface, click on [ADVANCED SETTINGS] in the menu bar and then on [Volume]. The
drop-down menu will open and the current value for the volume will appear.
Fig. 25: Volume settings in the Web Interface
Click on the volume value below the heading and you can choose a different value from the dropdown list.
The value range extends from 0 (muted, 0%) to 10 (100%).
Volume Value
0 1 2 3 4 5 6 7 8 9 10
Approx.
Mute
10%
20%
30%
40%
50%
60%
70%
80%
90%
100%
Please confirm your changes by pressing [Apply Settings] at the bottom of the page.
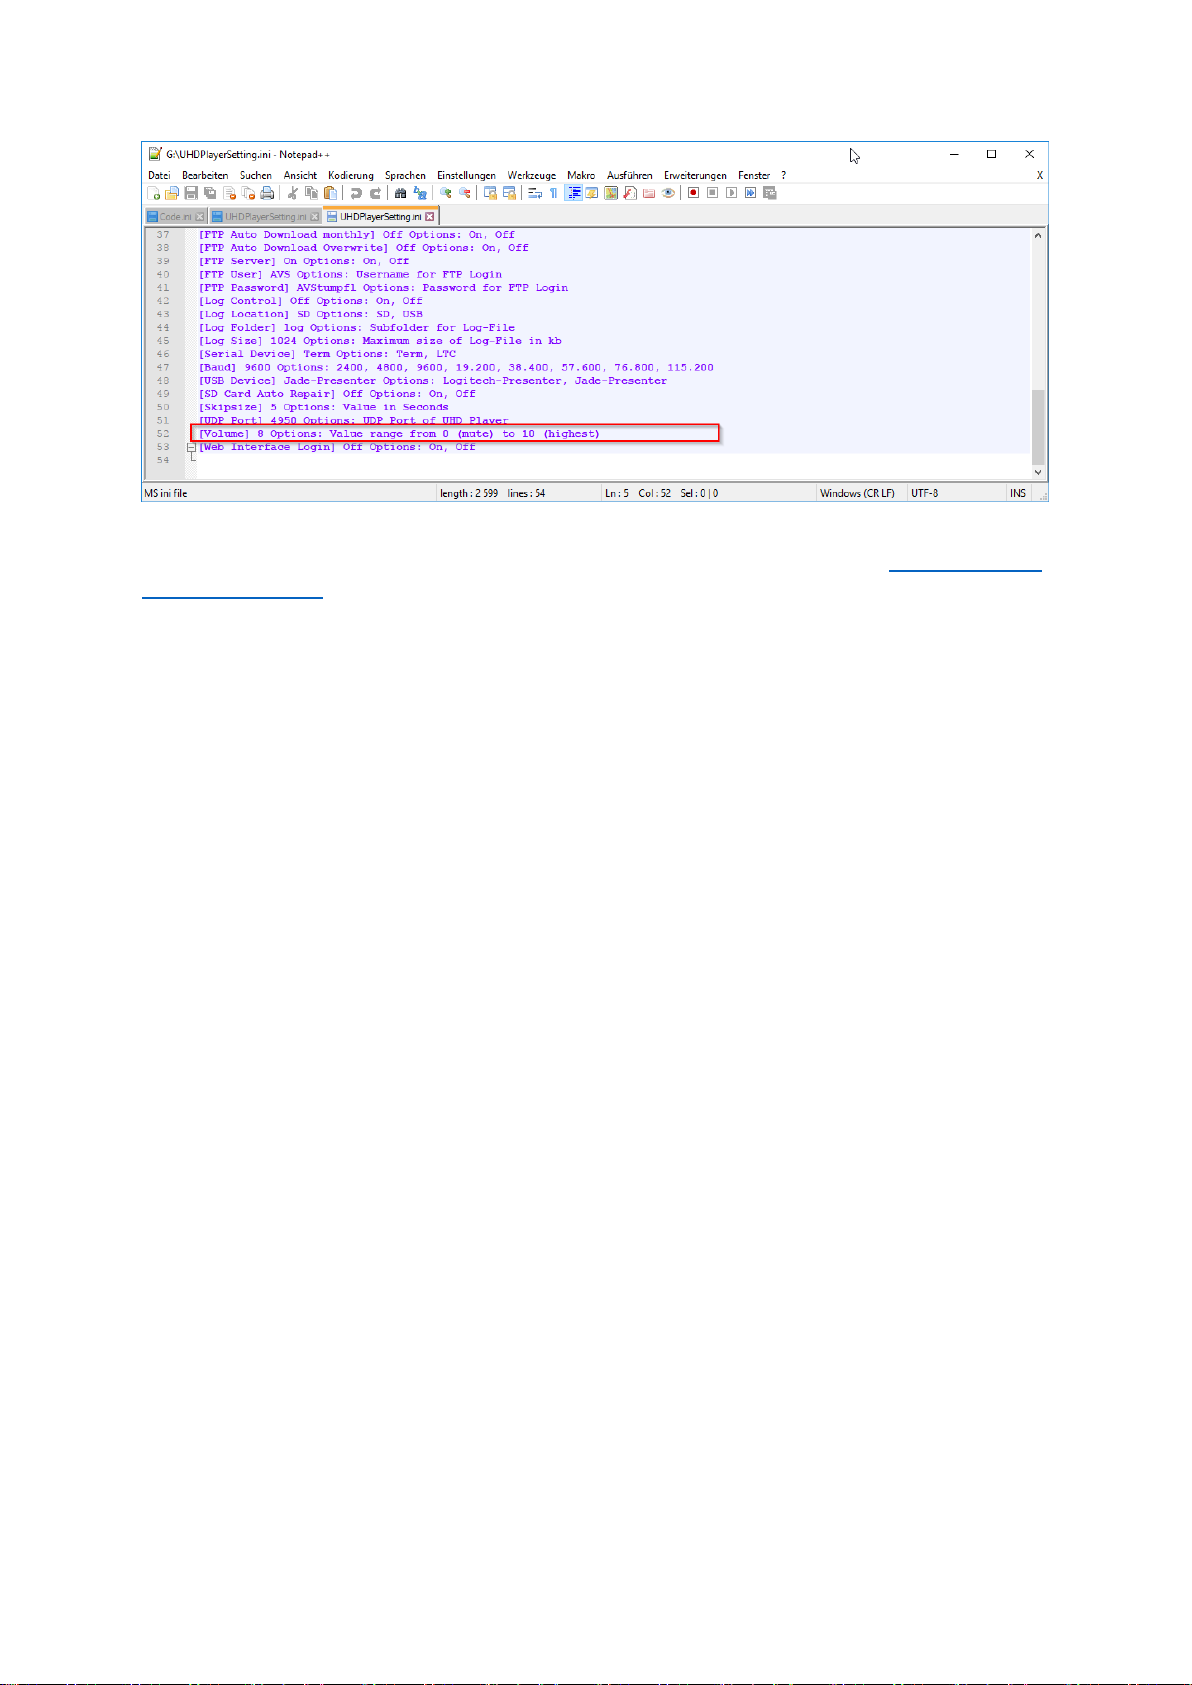
In the initialization file (“UHDPlayerSetting.ini”), the player’s volume setting can be found at the end
of the list.
Page 40
36
Fig. 26: Volume setting in the Initialization File
For more information about how to handle the initialization file, please refer to the Configuration via
the Initialization File chapter.
Page 41
37
10.4. SKIPSIZE
Via External Control it is possible to jump within the currently played media file. The number of
seconds that can be skipped forward or backward is defined as “Skipsize”.
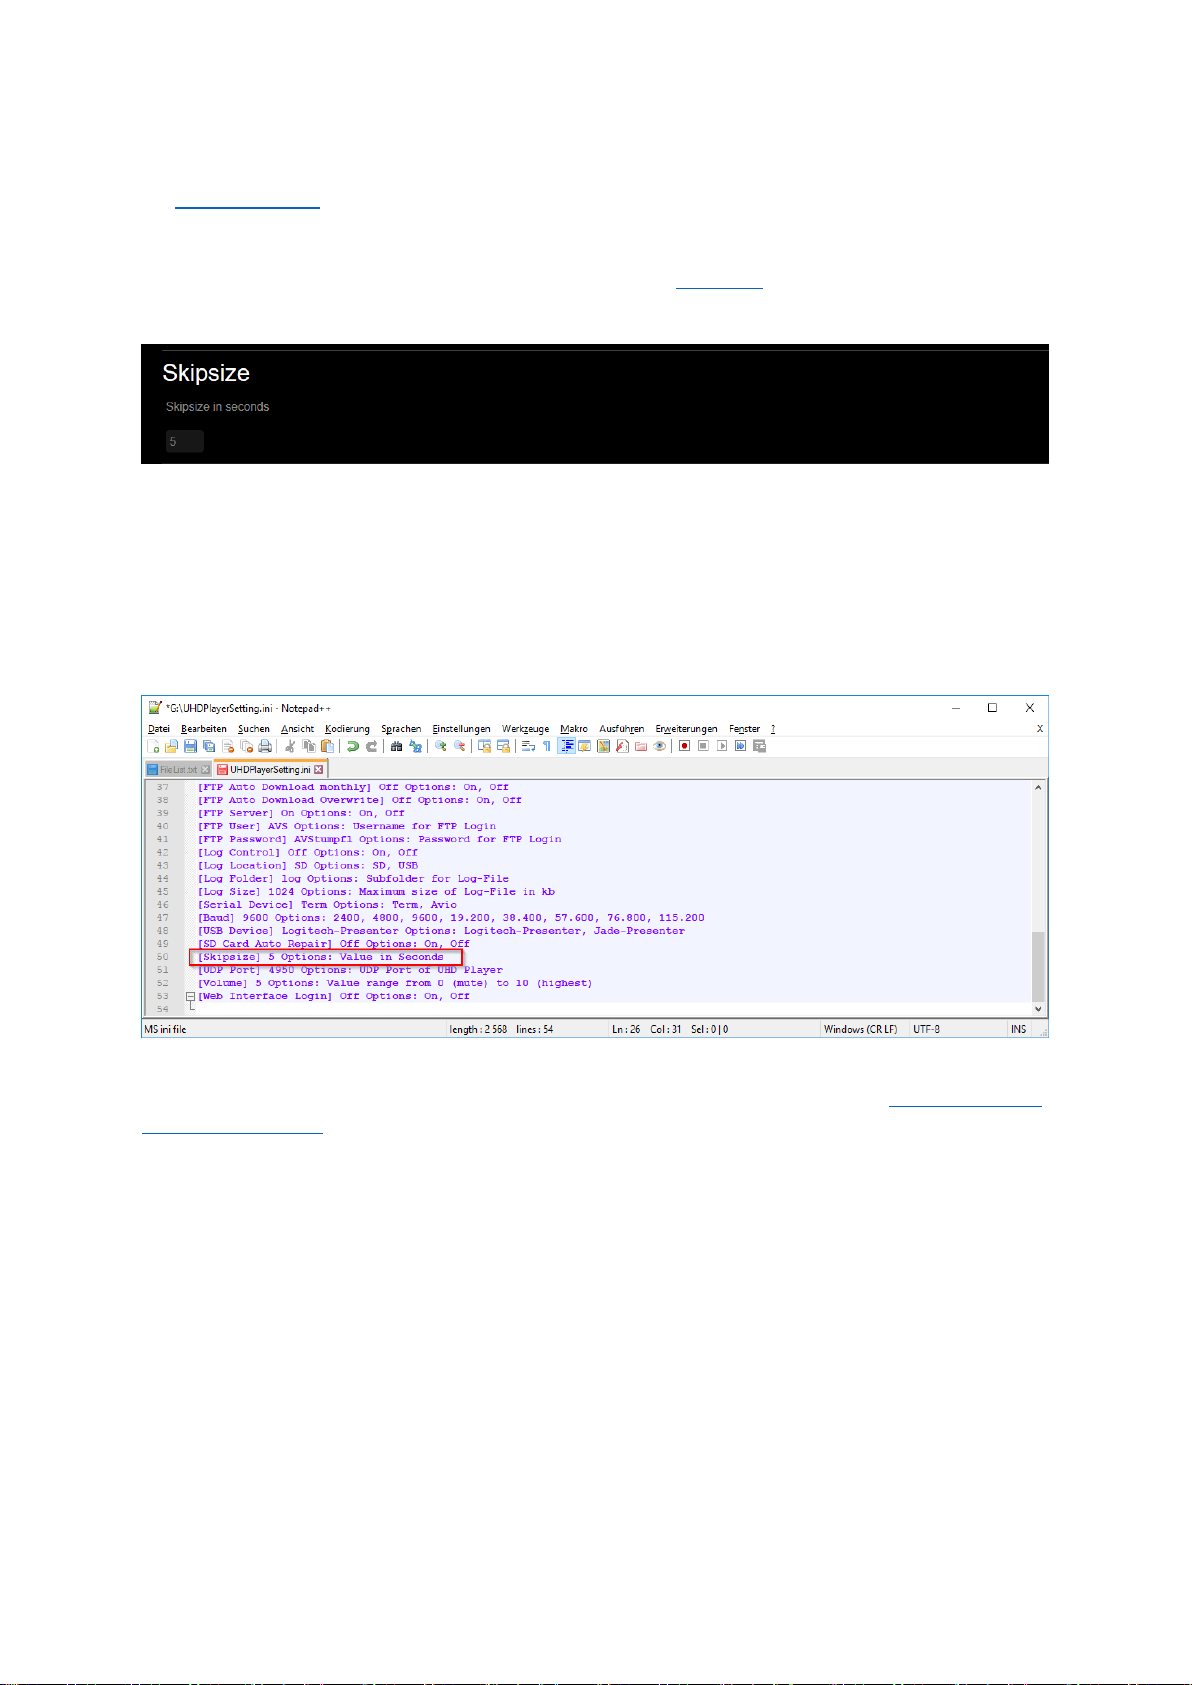
In the Web Interface, click on [ADVANCED SETTINGS] in the menu bar and then on [Skipsize]. The
drop-down menu will open and the current skipsize value will appear.
Fig. 27: Skipsize settings in the Web Interface
[Skipsize]
By default, the skipsize is set to 5 seconds. You may enter any other value in the text field.
Please confirm your changes by pressing [Apply Settings] at the bottom of the page.
In the initialization file (“UHDPlayerSetting.ini”), the player’s skipsize setting can be found at the end
of the list.
Fig. 28: Skipsize setting in the Initialization File
For more information about how to handle the initialization file, please refer to the Configuration via
the Initialization File chapter.
Page 42

38
10.5. PLAYLIST
The media files on your data carrier can be organized via a playlist. This is a text file named
“playlist.txt”, in which a variety of options for each playlist item may be set. A short overview is given
below:
An individual display time can be defined for each image file, and each media file containing audio
can be set to an individual volume. Define the next item to follow if special playback order is needed.
In order to avoid interruptions to the playback that are triggered from external controls, use the
scheduler and define—via date and time—the entries for when a certain media should be displayed.
It is also possible to activate the HDMI input port via the playlist in order to handle the incoming
HDMI signal, just like a media file that is stored on the data carrier.
ATTENTION:
The Playlist always overwrites the alphanumeric playback order that is valid if NO playlist is stored
on the data carrier!
The playlist always overwrites the current Play Mode!
When syncing several players, the playlists on each involved player must be harmonized or
deleted, otherwise the sync will fail! This is valid for the master and all slave devices.
10.5.1. HOW TO CREATE AND USE A PLAYLIST
Create a text file using any text editor.
The items of your playlist must always contain the three obligatory parameters as described and
listed below. After these obligatory parameters, optional parameters can be added in any order.
PLEASE NOTE:
Every parameter (including the last one) must be terminated by pressing the ENTER key.
Every item must be separated from the next item by a blank line.
No blank lines are allowed between the individual parameters.
If your playlist is completed, save it as “PLAYLIST.txt” on the data carrier. As soon as the player’s data
carrier contains a playlist file, the playback order will be performed as defined in this playlist. If the
playlist is removed from the data carrier, the playback will continue in alphanumeric order again.
Page 43
39
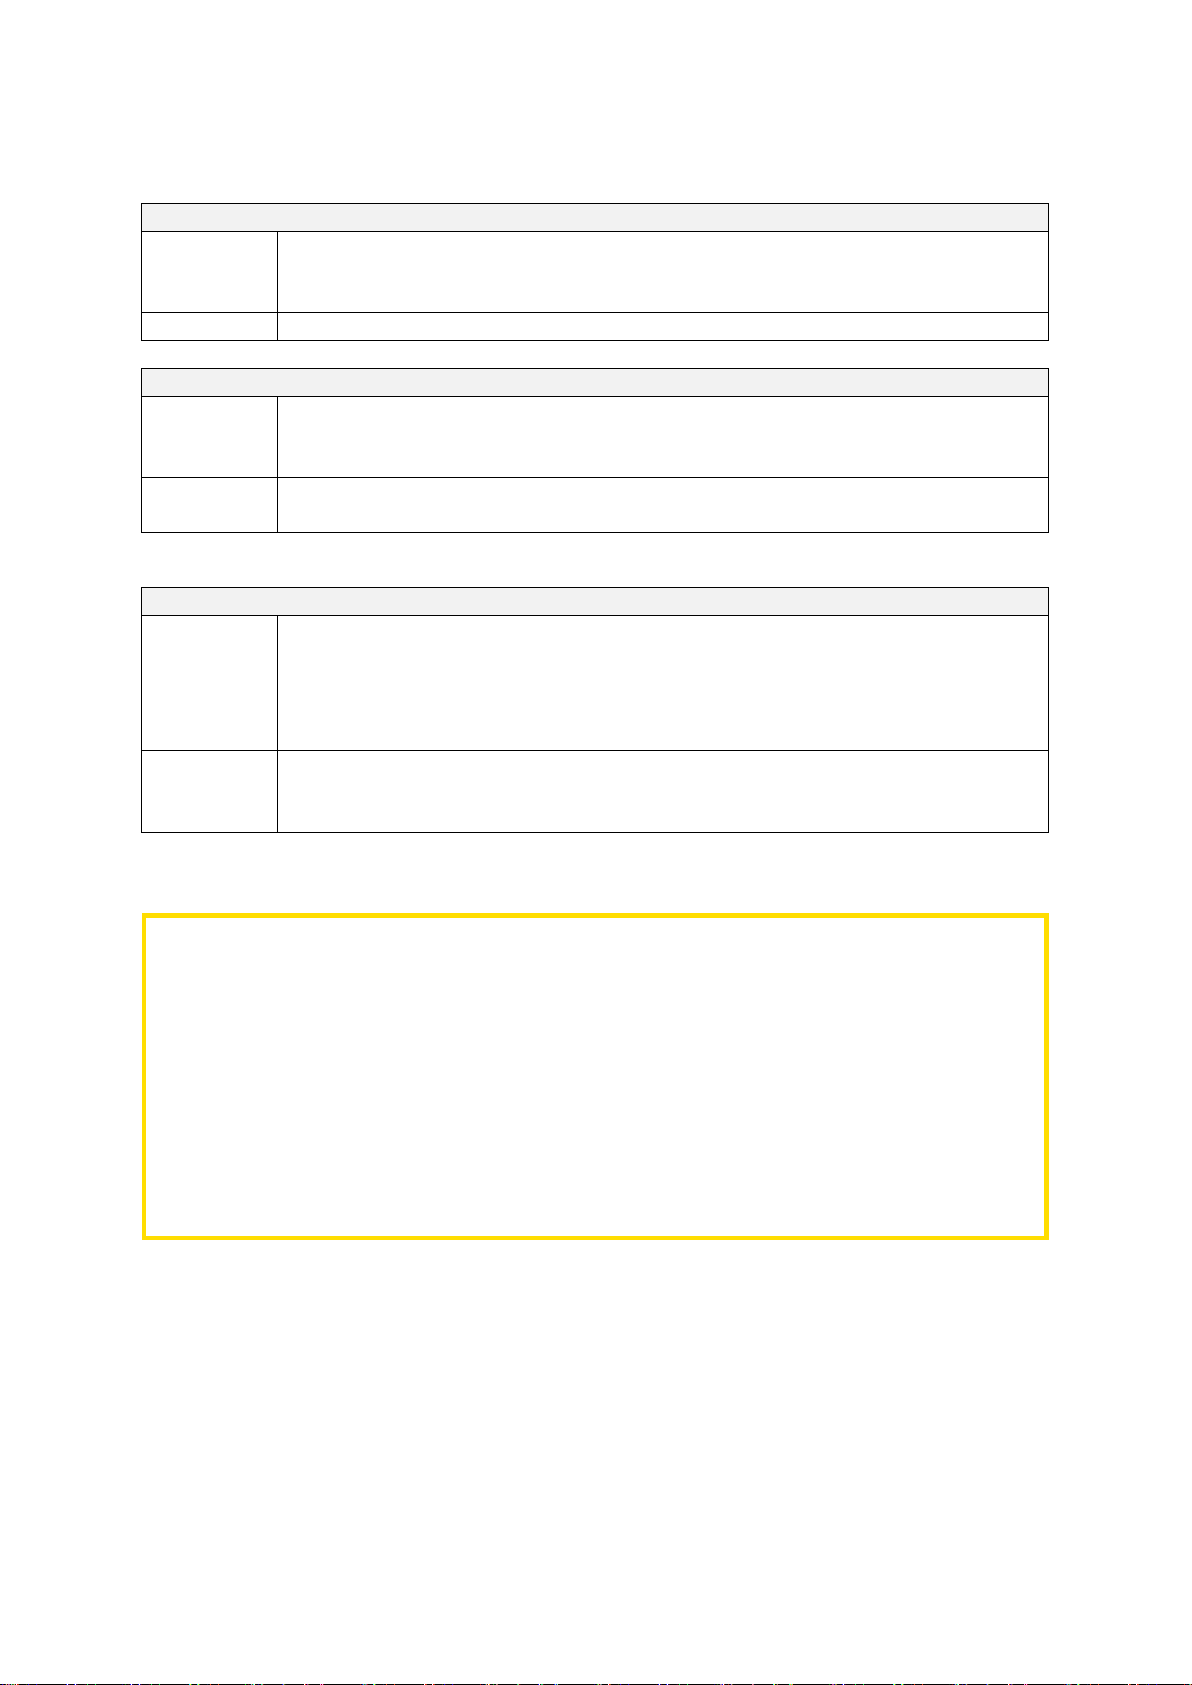
10.5.2. OBLIGATORY PLAYLIST ENTRIES
[ITEM <no.>]
Description:
Every item in the playlist must be started with this start parameter. The start
parameter can be numbered from 0 to 2047 in an ascending order. Please note the
capital letters, the space between “ITEM” and “number”, and the square brackets.
Example:
[ITEM 3]
File=<filename>
Description:
Enter the name of the media file you want to allocate to the item. Make sure the
name is entered correctly. The UHD Player differentiates between capital and small
letters (case sensitive) and reads every space.
Example:
File=sample.mp4
The media file with the name “sample.mp4” will be allocated to the Item.
Displaytime=<seconds>
Description:
This entry is obligatory for image files as they do not have a defined file length. An
entry of “5” results in an image file being displayed for 5 seconds before the next
item is called. If you want an image file permanently displayed, enter “-1”.
For video and audio files, the display time entry will be ignored and, therefore, may
be omitted.
Example:
Displaytime=10
The current image file will be displayed for 10 seconds, then the next one in the
playlist will be called.
EXAMPLE
[ITEM 0]
File=Sample.jpg
Displaytime=3
[ITEM 1]
File=03_nature.mp4
Sample.jpg is assigned to ITEM 0. It is displayed for 3 seconds, followed by the video file
03_nature.mp4. After the video ends, the playlist starts from the beginning again.
Page 44
40
10.5.3. OPTIONAL PLAYLIST ENTRIES
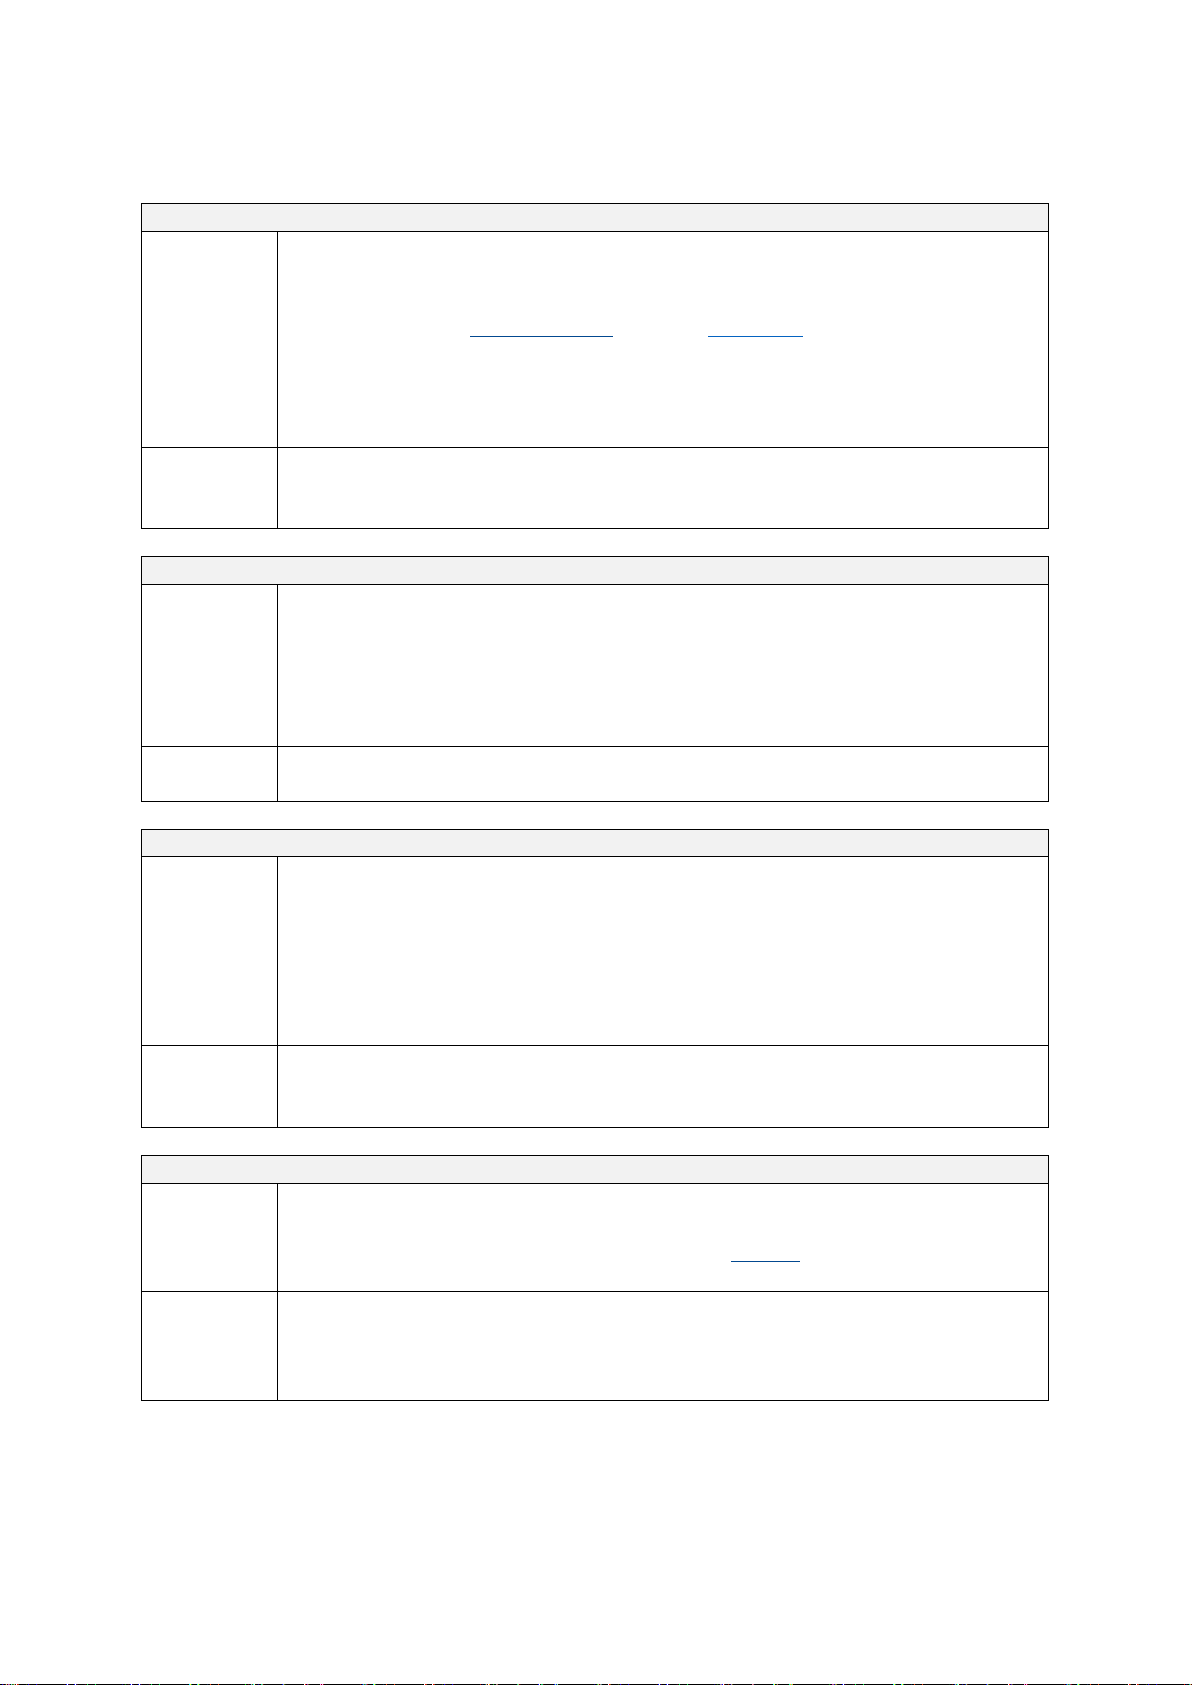
Loop=<amount>
Description:
The parameter “Loop” is required to play single media files in a loop.
“Loop=-1” causes permanent loop operation. Any media file following this item will
not be played any longer. This permanent loop operation can only be interrupted
by a trigger from an external control (compare Play Mode “Repeat Selected” when
no playlist is present).
“Loop=5” causes the corresponding media file to be played 5 times before the UHD
Player continues executing the playlist. You can use any number to define the
number of repetitions.
Example:
Loop=3
The item will be looped three times, then the playlist will continue with the next
item.
Succ=<item no.>
Description:
This parameter allows you to define the item that follows the current one. An entry
of “0” means that [ITEM 0] will be executed after the current item has been
finished. If no “Succ” entry is defined, the next item on the playlist follows
automatically.
Please note: If using the “Loop=” entry, the file will be looped first before “Succ=”
will be executed.
Example:
Succ=3
The current item will be followed by the media file allocated to Item 3.
Interruptible=<TRUE/FALSE>
Description:
This entry defines whether the current media file may be interrupted by an
external trigger.
FALSE means that this item cannot be interrupted. The media file is always played
to its end and further triggers are ignored.
TRUE means that this item can be interrupted at any time by a new trigger (e.g. to
start a new media file).
No entry corresponds to TRUE. Please remember to use capital letters.
Example:
Interruptible=FALSE
The current item cannot be interrupted. The media file will always be played to its
end and further triggers will be ignored.
Volume=<value>
Description:
This parameter allows you to set a customized volume temporarily for the duration
of this item, and the player’s default volume will remain unchanged. The value
range extends from 0 (muted) to 10 (100%)—see Volume chapter. No entry means
that the default volume of the UHD Player will be applied.
Example:
Volume=4
The volume of the current media file is set to 40%. The volume of the media file
following the current one will remain unchanged and be played with the player’s
default volume.
Page 45

41
EXAMPLE
Precondition: The player’s default volume is set to “8”.
[ITEM 0]
File=Sample.jpg
Displaytime=-1
[ITEM 1]
File=01_nature.mp4
Displaytime=0
Succ=0
Interruptible=FALSE
Volume=4
[ITEM 2]
File=02_nature.mp4
Loop=3
Displaytime=0
Succ=0
ITEM 0 will be displayed continuously (“Display Time=-1”) until ITEM 1 or ITEM 2 are triggered via
external control.
ITEM 1 is too loud, so the volume is temporarily reduced to the value “4”. ITEM 1’s playback
cannot be interrupted by any trigger (“Interruptible=FALSE”), and it will be followed by ITEM 0
(“Succ=0). Therefore, ITEM 2 can only be triggered while ITEM 0 is displayed.
ITEM 2 will be played with the “master” volume (value “8”, see precondition) again. After being
looped 3x, it will also be followed by ITEM 0.
Page 46
42
SCHEDULER
In the following, all scheduler entries are listed.
Please make sure that the date and time of your UHD Player are correctly set!
Start Date=<dd.mm.yyyy>
Description:
This parameter allows the definition of a start date for the item. Before that, the
item will be skipped.
Example:
Start Date=30.10.2017
From October 30, 2017 onward, this item will be included in the playback.
End Date=<dd.mm.yyyy>
Description:
This parameter allows the definition of an end date for the item. After that, the
item will be skipped.
Example:
End Date=31.10.2017
After October 31, 2017 onward, this item will be skipped in the playback.
Start Time=<HH:MM:SS>
Description:
This parameter allows the definition of a start time for the item. Earlier in the day,
the item will be skipped.
Example:
Start Time=10:00:00
From 10 am onward, this item will be included in the playback.
End Time=<HH:MM:SS>
Description:
This parameter allows the definition of an end time for the item. Later in the day,
the item will be skipped.
Example:
End Time=18:30:00
After 6.30 pm onward, this item will be skipped in the playback.
Weekdays=<weekday>
Description:
This parameter allows the definition of the weekdays on which the item is to be
played. Possible entries are “Mon”, “Tue”, “Wed”, “Thu”, “Fri”, “Sat”, and “Sun”.
For several weekdays, separate the days by using commas but without using any
space characters, e.g. “Weekdays=Mon,Wed,Fri”.
Example:
Weekdays=Mon,Tue
The item will be included in the playback on Mondays and Tuesdays. On all other
weekdays, this item will be skipped in the playback.
Page 47
43
EXAMPLE
[ITEM 0]
File=logo.jpg
Displaytime=30
Start Date=04.08.2017
End Date=31.12.2017
[ITEM 1]
File=opened.mp4
Displaytime=0
Start Date=04.08.2017
End Date=31.12.2017
Start Time=10:00:00
End Time=18:00:00
[ITEM 2]
File=special.png
Displaytime=10
Weekdays=Wed,Thu
A museum runs an exhibition from 04.08. to 31.12.2017.
ITEM 0, the exhibition’s logo will be displayed while the exhibition is running, but before and after
that, it will not be included in the playback.
ITEM 1 follows ITEM 0 during the same period, but only during the museum’s opening times: 10
am to 6 pm. Earlier or later in the day, ITEM 1 will be skipped in the playlist.
ITEM 2 will be included in the playback every Wednesday and Thursday throughout the day, no
matter the current date and time.
HDMI INPUT
Description:
To assign an incoming HDMI video or audio signal to a playback item, the entry
“HDMI INPUT” needs to be used instead of “File=”. Contrary to video or audio files
in your playlist, it is obligatory to define the display time for this HDMI Input.
Example:
[ITEM 0]
File=test.mp4
[ITEM 1]
HDMI-INPUT
Displaytime=600
The playlist starts with the video file “test.mp4”. Afterward, the HDMI Input is
displayed for 600 seconds.
Page 48
44
10.5.4. CUSTOMIZED ASSIGNMENTS
Customized Assignments for external control devices will overwrite the default key assignment. For
example, the first GPIO of the remote input port triggers [Item 1] in the playlist by default, no matter
which item is currently being played. To assign a different command to this trigger, the new and
customized assignment must be entered for every item in the playlist for which it should be valid.
PLEASE NOTE:
In the playlist, you have to disable the default key assignment for every item by entering “KeyOff”
before adding the customized assignments.
The following attributes can be assigned to a key:
Attribute
Name
Function
.d
Distance
Allows you to jump a certain amount of items forward or backward in
the playlist
.t
Trick Mode
Toggles the playback between pause and play. “1” pauses the playback
and “-1” resumes the playback.
.v
Volume
Increases or reduces the volume by a certain amount of values
(volume’s value range extends from 0 (muted) to 10 (approx. 0 dB))
.j
Jump
Allows you to jump a certain amount of seconds forward or backward
within the current playback
.x
Random
Enables a random playback order (value is always “1”)
The entry for the customized assignment will be composed by the following elements:
KeyOff
<Key Name>=<Value><Attribute>
<Key Name>=<Value><Attribute>
…
Description:
The “KeyOff” needs to be entered first in order to disable the default Key
Assignment.
Enter the Key Name and the newly assigned action, as in the table above:
<Value>.d triggers a jump of x items forward or backward in the playlist.
<Value>.t toggles between Play and Pause: “1” pauses the playback and “-1”
resumes the playback.
<Value>.v triggers a toggle between Play and Pause.
<Value>.j jumps a certain amount of seconds forward or backward within the
current playback.
<Value>.x enables a random playback order (value is always “1”).
Example:
KeyOff
Key1=-2.d
Key2=1.v
Key3=-1.v
When Key1 is triggered, the current playback (e.g. of Item 5) is interrupted, jumps
two items backward in the list (e.g. to Item 3) and plays the media file that is
assigned to this item. When Key2 is triggered, the volume of the current media file
will be increased by 1 value (=10%) and Key3 will decrease the volume by 1 value.
Page 49
45
To call a certain playlist item when the default key assignment is turned off by adding “KeyOff”, use
the following syntax:
KeyOff
<Key Name>=<Item number>
…
Description:
When “KeyOff” is used in a playlist item to disable the default key assignment, <Key
Name>=<Item number> will allow you to start a certain playlist item during the
current playback.
Enter the Key Name and the Item number of the media file that should be
triggered.
Example:
KeyOff
Key1=1
Key2=2
Key3=1.t
Key4=-1.t
When Key1 is triggered, the current playback (e.g. of Item 5) is interrupted, and the
media file that is assigned to Item 1 will be started. When Key2 is triggered, the
media file that is assigned to Item 2 will be started. A trigger of Key3 pauses the
playback and a trigger of Key4 resumes it again.
DEFAULT KEY ASSIGNMENTS OF AVAILABLE DEVICES
GPIO / REMOTE IN
The GPIO1 … GPIO16 are specified as Key1 … Key16 or GPIO1 … GPIO16.
The default key assignment is:
“Key1” or “GPIO1” starts the playback of [Item 1], “Key2” or “GPIO2” starts the playback of [Item 2],
etc.
LOGITECH PRESENTER
The buttons are specified as Key19 … Key23.
For the default key assignment, please see Logitech Presenter in the External Control chapter.
JADE PRESENTER
The inputs are specified as Key36 … Key43
For the default key assignment, please see Jade Presenter in the External Control chapter.
Page 50

46
EXAMPLE
[ITEM 1]
File=show1.mp4
KeyOff
Key1=1
Key2=2
Key3=1.t
Key4=-1.t
[ITEM 2]
File=show2.mp4
KeyOff
Key3=1.t
Key4=-1.t
Four buttons are connected via the GPIO Input Ports, triggering GPIO1 to GPIO4.
Button presses while ITEM 1 is running:
When Button1 is pressed, the playback of ITEM 1 starts again.
When Button2 is pressed, ITEM 2 starts.
Button3 pauses and Button4 resumes the playback of ITEM 1.
Button presses while ITEM 2 is running:
When Button1 or Button2 are pressed, nothing will happen because the default key assignment is
turned off and there is no action defined for Key1 and Key2.
Button3 pauses and Button4 resumes the playback of ITEM 2.
Page 51

47
11. MEDIA FILE MANAGEMENT
The media content that is played by the UHD Player needs to be stored on the player’s SD Card or
USB device; there is no internal storage for media files.
There are several possibilities to manage the content of the player’s data carrier:
- Via a file browser on your computer, having the data carrier inserted
- By automatically downloading the files from an external FTP Server (FTP Auto Download)
- By using the player’s local FTP Server
- By using the Web Interface to delete files.
The different ways are explained below.
PLEASE NOTE:
Precondition for changing the content over network is that the used data carrier is plugged into
the player and that the SD Card (if using this device as data carrier) is not write-protected.
11.1. .. VIA COMPUTER’S FILE BROWSER
Insert the player’s data carrier (SD Card or USB device) into your computer. Save your video, audio
and image files and, if appropriate, a playlist to the root folder of this data carrier (e.g. SD:/ or USB:/).
Then plug the data carrier into the corresponding port on the player’s front side.
11.2. .. VIA FTP AUTO-DOWNLOAD
The content of the player’s data carrier can be automatically updated via the FTP Auto-Download
function. The automatic update can be proceeded hourly, daily, weekly, monthly (every 28 days), or
after an individually selected interval (in seconds).
To copy all files from the specified folder of the external FTP server to the player’s data carrier, you
just have to configure the external FTP Auto Download.
If all or certain files on the player’s data carrier should be deleted when new files are transferred
from the FTP server, or if you just want to transfer certain files from the FTP server, a “FileList.txt”
must be used. See the How to create and use a FileList section below.
In the Web Interface, click on [ADVANCED SETTINGS] in the menu bar and then on [EXTERNAL FTP
AUTO DOWNLOAD]. The drop-down menu will open and the settings for the FTP Auto Download will
appear.
Page 52
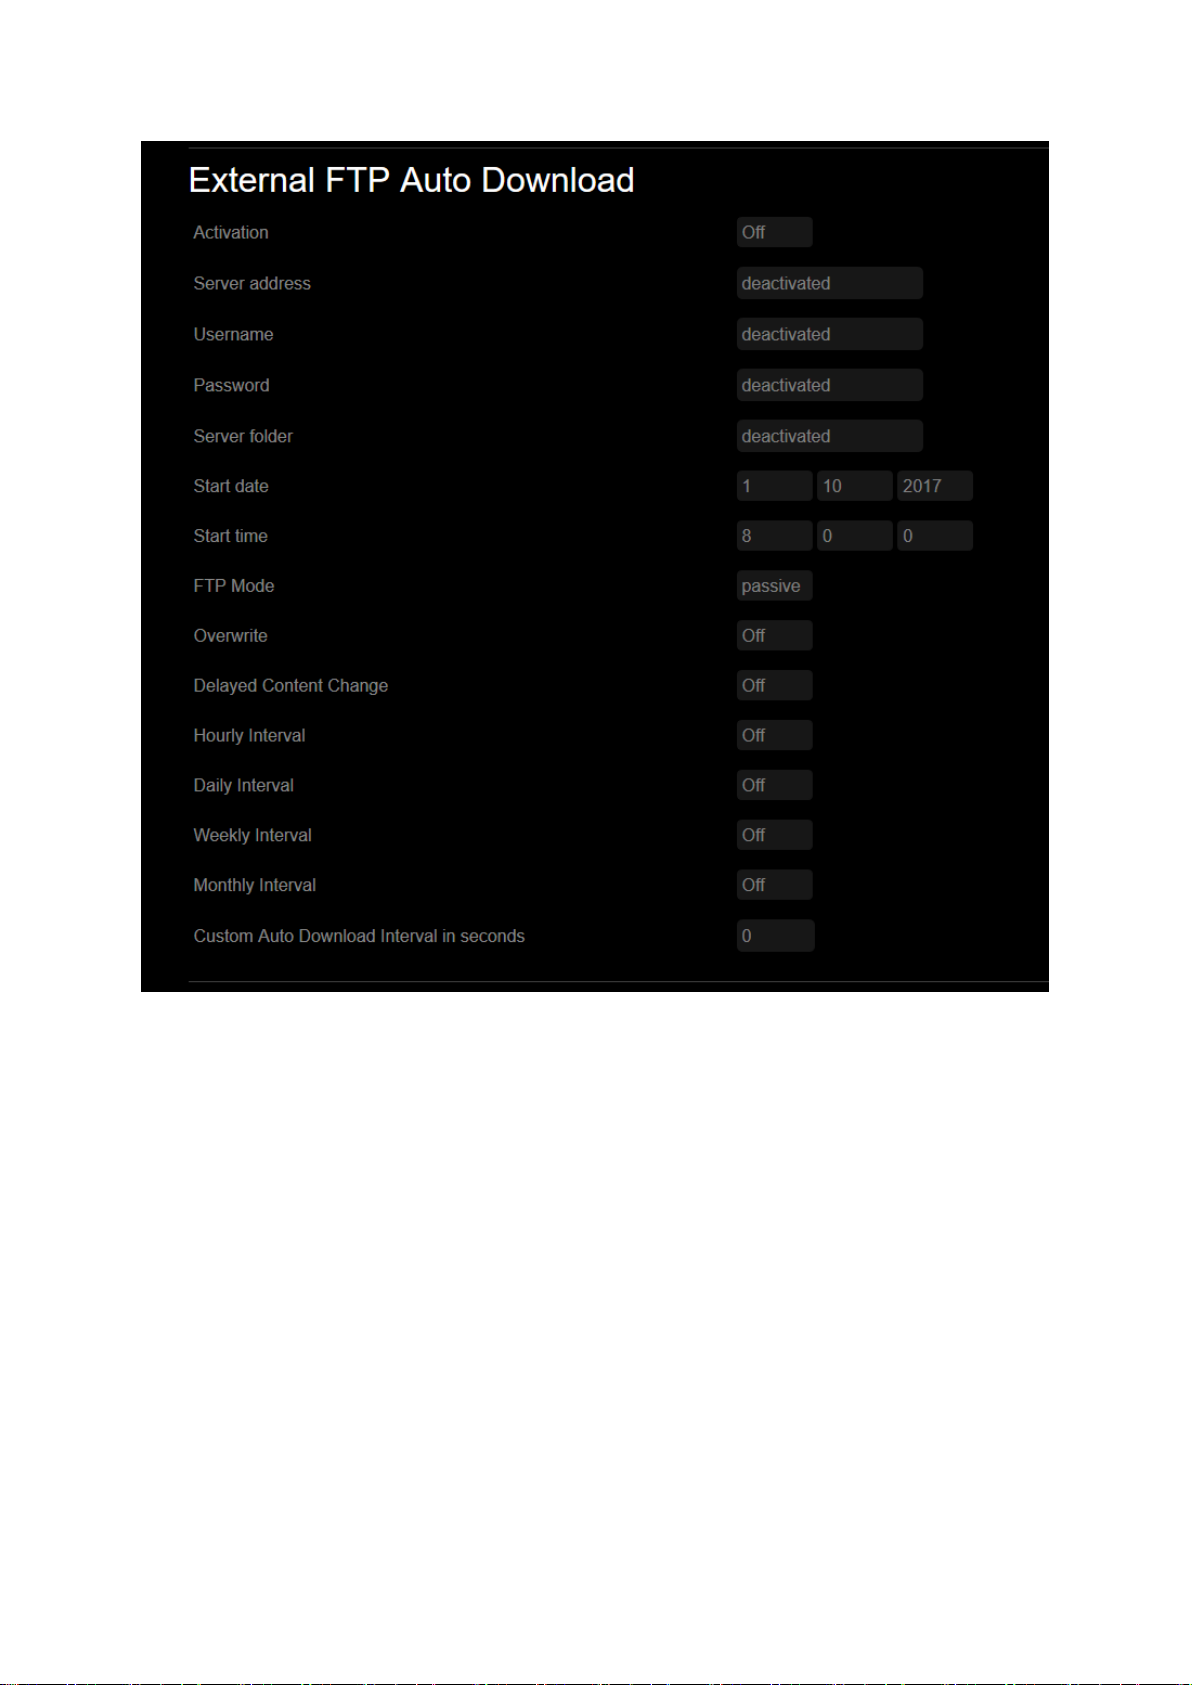
48
Fig. 29: External FTP Auto Download settings in the Web Interface.
[Activation]
Enable the External FTP Auto Download by setting [Activation] to “On”. If you do not need this
function any more, set it back to “Off”.
Enter the FTP Server’s login data in the corresponding text fields right of the item, consisting of:
[Server address] e.g. ftp.dummy.com
[Username] e.g. “User1”
[Password] e.g. “secret”
[Server folder] e.g. “/UHD Player content”
[Start date] & [Start time]
Set a [start date] in the format (dd:mm:yyyy) and a [start time] in the format (hh:mm:ss) by choosing
the values from the corresponding dropdown menus. This is needed to define the beginning of the
External FTP Auto Download.
[FTP Mode]
The FTP Mode defines how a data connection between FTP server and client is established.
By default, the FTP mode is set to “passive”. Alternatively, “active” can be chosen from the dropdown list.
Page 53
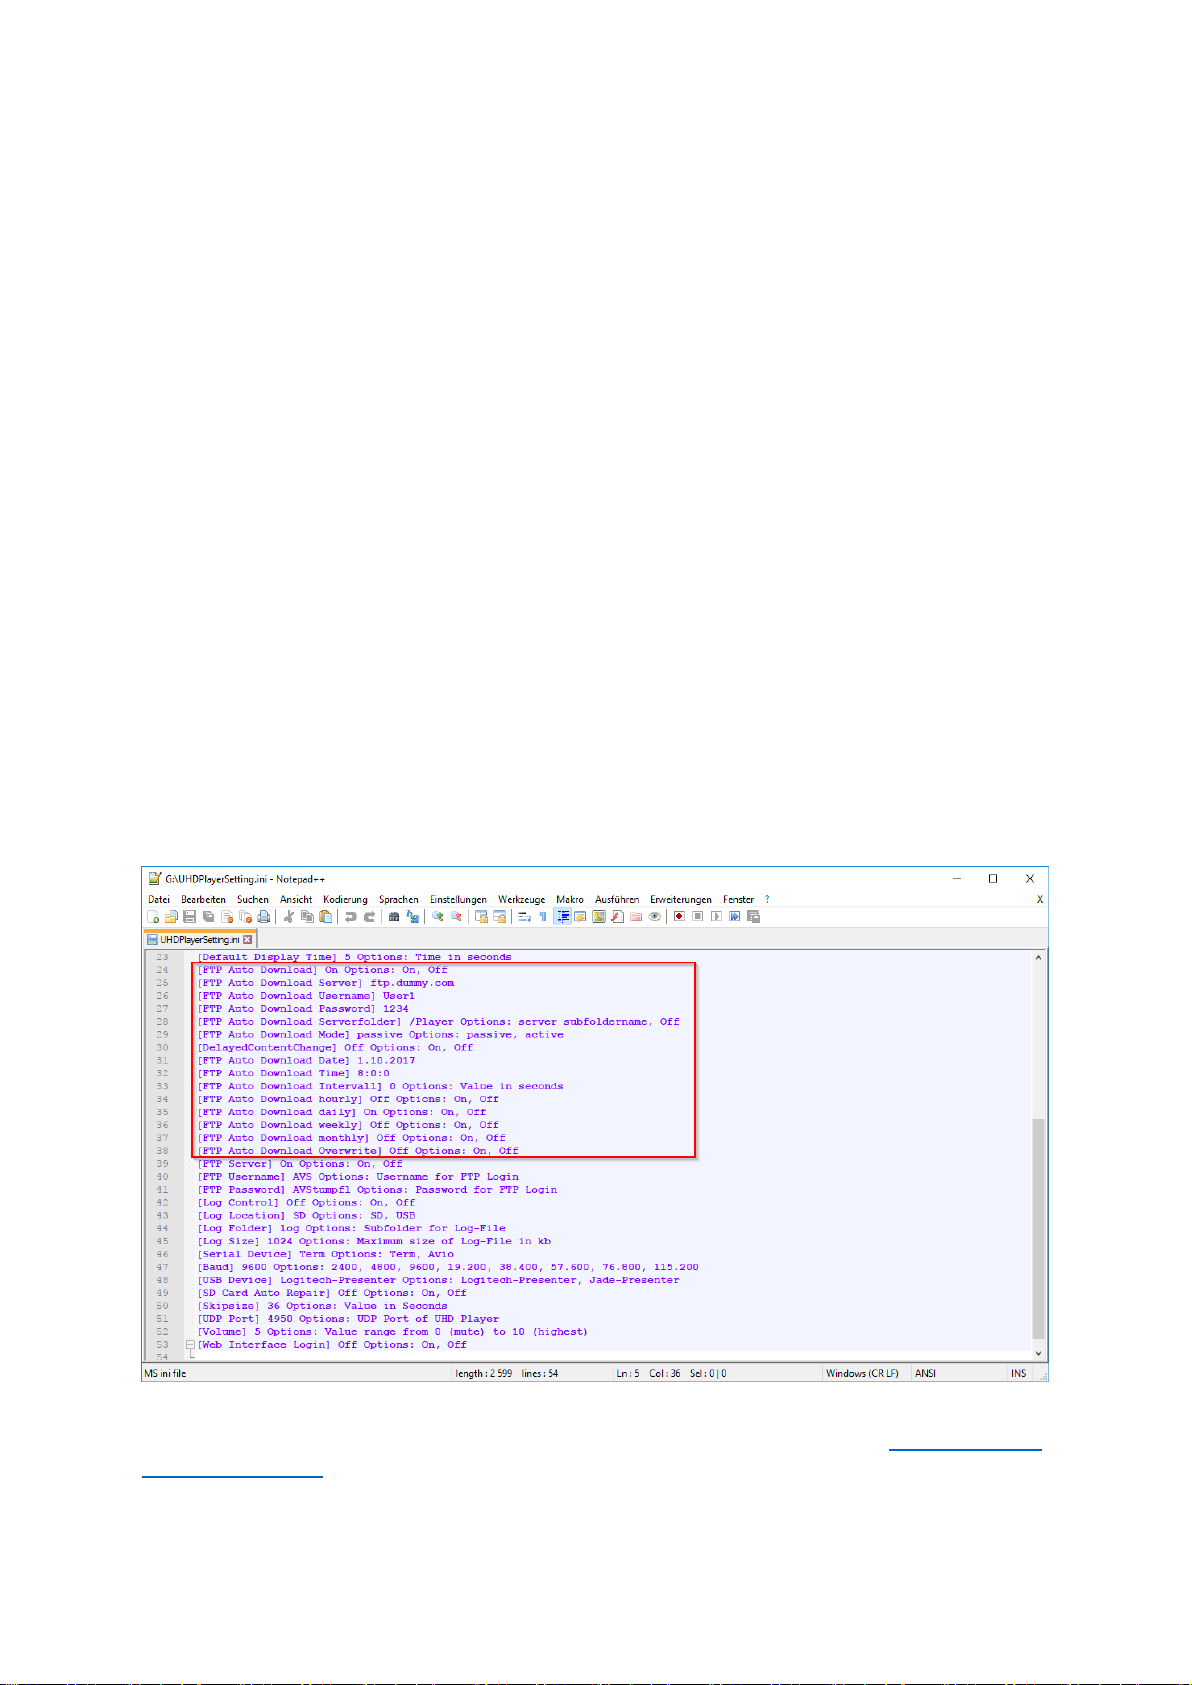
49
[Overwrite]
Overwrite is set to “Off” by default. If there is a file with the same name on the player’s data carrier
and on the external FTP server as well, the file on the player’s data carrier won’t be overwritten. Set
[Overwrite] to “On” in order to always copy all files from the external FTP server.
[Delayed Content Change]
By default, this function is set to “Off”. This means that all files that will be copied from the external
FTP server will directly be written on the player’s data carrier. This may interrupt the playback of a
running media file.
Set this function to “On” and all files will be downloaded into a temp folder first, before they are
copied from the temp folder to the data carrier’s root folder. This minimizes the interruption of
running media files.
[… Interval]
When the defined start date and start time is reached, the UHD Player tries to establish a connection
to the FTP server and starts the Auto Download process. Based on the initial time, you can define
whether this procedure will be repeated hourly, daily, weekly, monthly (every 28 days), or after an
individually selected interval (in seconds). Set the desired interval to “On”, or enter the individually
selected interval into the corresponding text field.
Please confirm your changes by pressing [Apply Settings] at the bottom of the page.
In the initialization file (“UHDPlayerSetting.ini”), the settings for the player’s External FTP Auto
Download can be found at the lower end.
Fig. 30: External FTP Auto Download options in the Initialization File
For more information about how to handle the initialization file, please refer to the Configuration via
the Initialization File chapter.
Page 54
50
HOW TO CREATE AND USE A FILE LIST
Use a file list (“FileList.txt”) if you want to do one of the following things while executing the External
FTP Auto Download:
- Delete files from the player’s data carrier
- Copy only certain files from the external FTP server
Create a text file using any text editor.
Every file that should be deleted from the player’s data carrier must be listed in a single line, using
the syntax as described below for DELETE FILES.
Every file that should be downloaded from the external FTP server must be listed in a single line,
using the syntax as described below for COPY FILES.
If your file list is completed, save it as “FileList.txt” in the specified folder of the FTP User. As soon as
the player is connected to the FTP server, it checks the file list and manages the content as defined in
there. Without any filelist.txt on the external FTP server, the player will just download all files from
the specified server folder.
PLEASE NOTE:
Every delete or copy command in the file list (including the last one) must be terminated by
pressing the ENTER key.
No blank lines are allowed between the delete or copy commands.
DELETE FILES
Delete_<data carrier>:<filename>
Description:
Deletes the specified file from the root folder of the player’s data carrier.
For <data carrier> enter “SD” or “USB”, depending on the data carrier that is
currently used by the player.
For <filename> enter the complete name of the file, including the file extension,
e.g. “01.mp4”.
Example:
Delete_SD:01.mp4
Delete_SD:02.mp4
The files 01.mp4 and 02.mp4 will be deleted from the player’s SD Card (if present).
COPY FILES
data carrier>:<filename>
Description:
Copies the specified file from the External FTP server to the root folder of the
player’s specified data carrier.
For <data carrier> enter “SD” or “USB”, depending on the data carrier that is
currently used by the player.
For <filename> enter the complete name of the file, including the file extension,
e.g. “welcome.jpg”.
Example:
SD:welcome.jpg
SD:pause.jpg
SD:playlist.txt
Copies the files welcome.jpg, pause.jpg, and the new playlist file (playlist.txt) from
the External FTP Server to the player’s SD Card (if present).
Page 55
51
PLEASE NOTE:
As soon as a “FileList.txt” is used, e.g. to delete files from the player, only the files that are
specified in this text document will be downloaded from the external FTP server to the player’s
data carrier.
EXAMPLE 1 – WITHOUT FILE LIST
BEFORE Auto Download is started
Content on the Player’s SD Card:
Content on the External FTP server:
01.mp4
02.mp4
Event.jpg
Byebye.mp4
Pause.jpg
Welcome.mp4
AFTER Auto Download is executed
Content on the Player’s SD Card:
01.mp4
02.mp4
Byebye.mp4
Event.jpg
Pause.jpg
Welcome.mp4
As there is no FileList.txt present on the external FTP server, all files are copied from there to the
player’s data carrier.
EXAMPLE 2 – WITH FILE LIST
BEFORE Auto Download is started
Content on the Player’s SD Card:
Content on the External FTP server:
01.mp4
02.mp4
Event.jpg
Welcome.mp4
Byebye.mp4
Pause.jpg
FileList.txt
Playlist.txt
FileList.txt contains the following text:
Delete_SD:Event.jpg
SD:Welcome.mp4
SD:ByeBye.mp4
SD:Playlist.txt
Page 56
52
AFTER Auto Download is executed
Content on the Player’s SD Card:
01.mp4
02.mp4
ByeBye.mp4
Welcome.mp4
As defined in the FileList.txt on the external FTP server, the file “Event.jpg” is first deleted, then
only the files Welcome.mp4, ByeBye.mp4 and Playlist.txt are copied from the FTP server to the
player’s data carrier.
Page 57
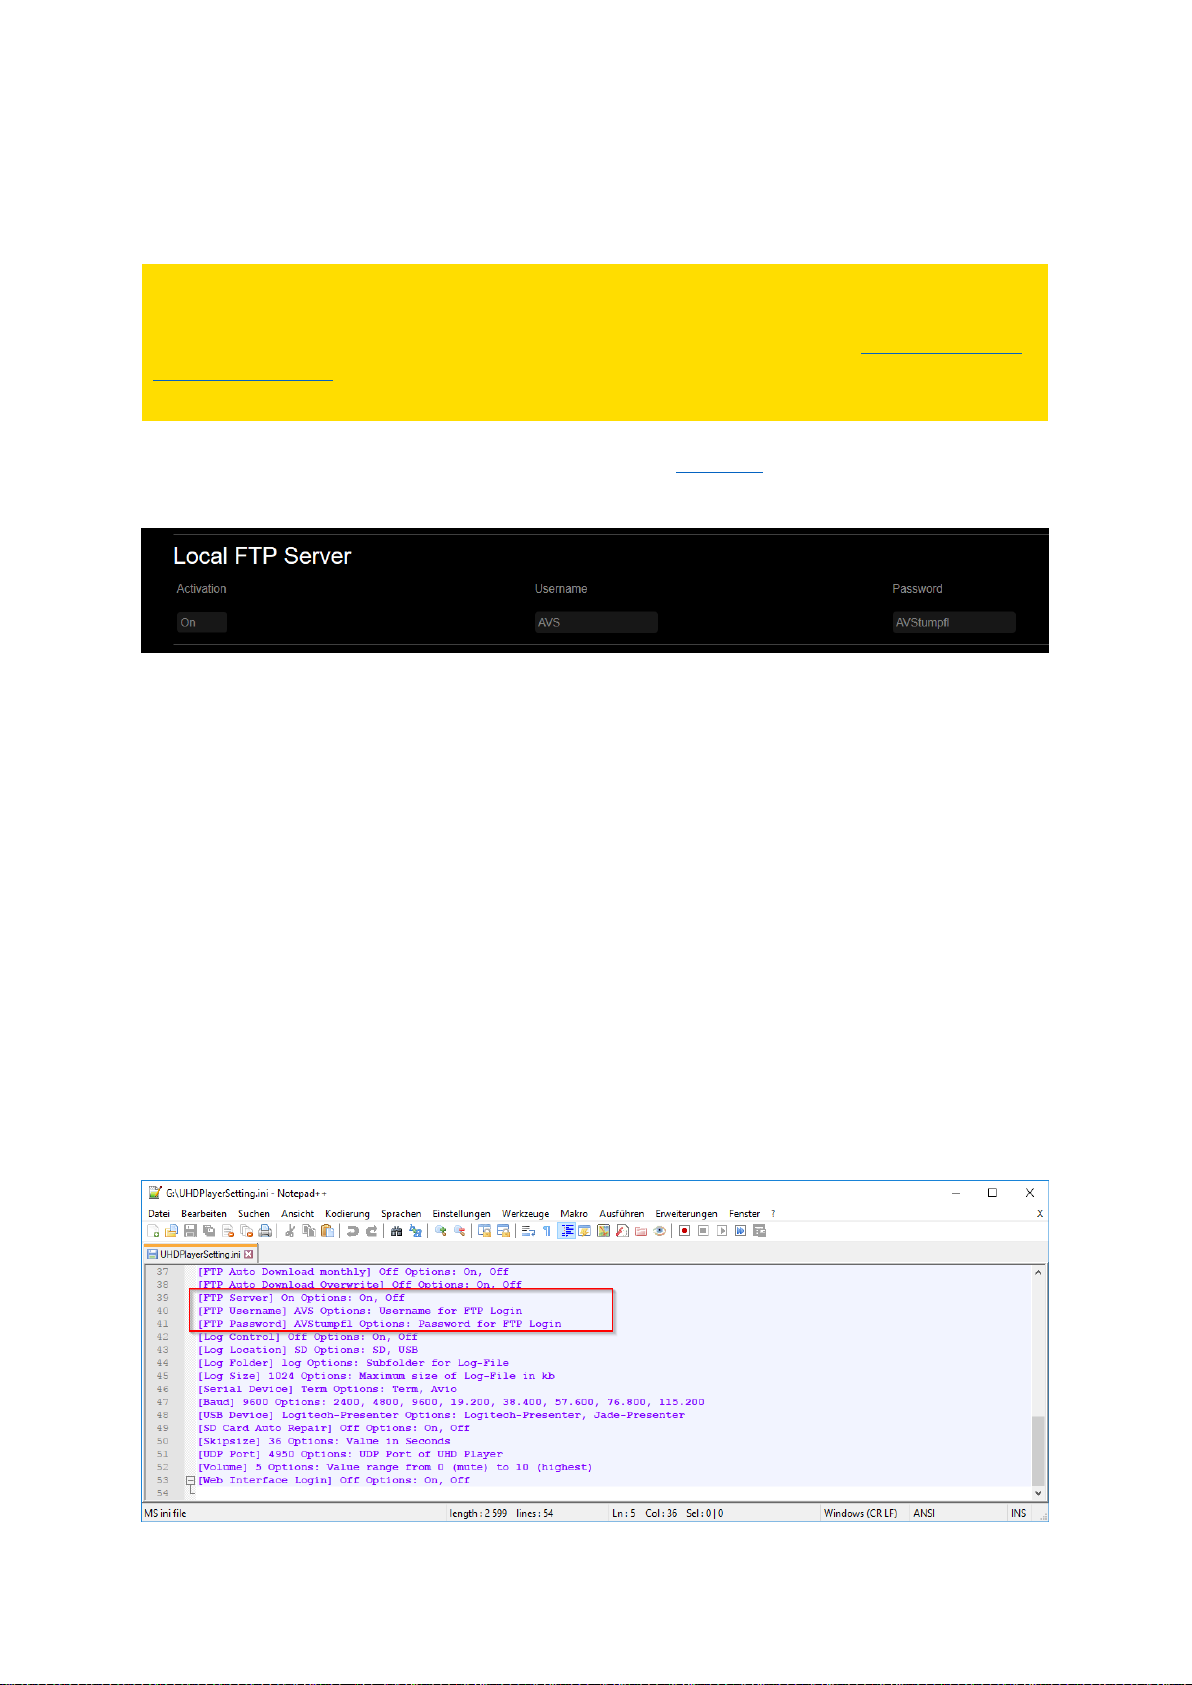
53
11.3. .. VIA LOCAL FTP SERVER
The UHD Player hosts a local FTP Server. Using any FTP Client software, you may connect to the UHD
Player and delete and/or copy files from/to the player’s SD Card.
PLEASE NOTE:
If you have changed the contents on the SD Card through FTP access or the file browser in the
Web Interface, the UHD Player needs to rescan the sources. Please click on the update SD CARD /
USB content symbol on the “SD Card” or “USB” page of the Web Interface (depending on which
data carrier device is used) to start the scan.
In the Web Interface, click on [ADVANCED SETTINGS] in the menu bar and then on [LOCAL FTP
SERVER]. The drop-down menu will open and the settings for the local FTP Server will appear.
Fig. 31: Local FTP Server settings in the Web Interface
[Activation]
The player’s Local FTP Server is activated by default. If you do not want to use this function, you may
disable the Server by choosing “Off” from the drop-down list.
[Username]
By default, the user name of the player’s local FTP server is set to “AVS”. You may change this name
to any other by entering it into the text field below.
[Password]
The Password for the Username is set to “AVStumpfl” by default. This can be changed to any other
word by entering it into the text field below.
Please confirm your changes by pressing [Apply Settings] at the bottom of the page.
In the initialization file (“UHDPlayerSetting.ini”), the settings for the player’s Local FTP Server can be
found at the lower end.
Fig. 32: Local FTP Server options in the Initialization File
Page 58
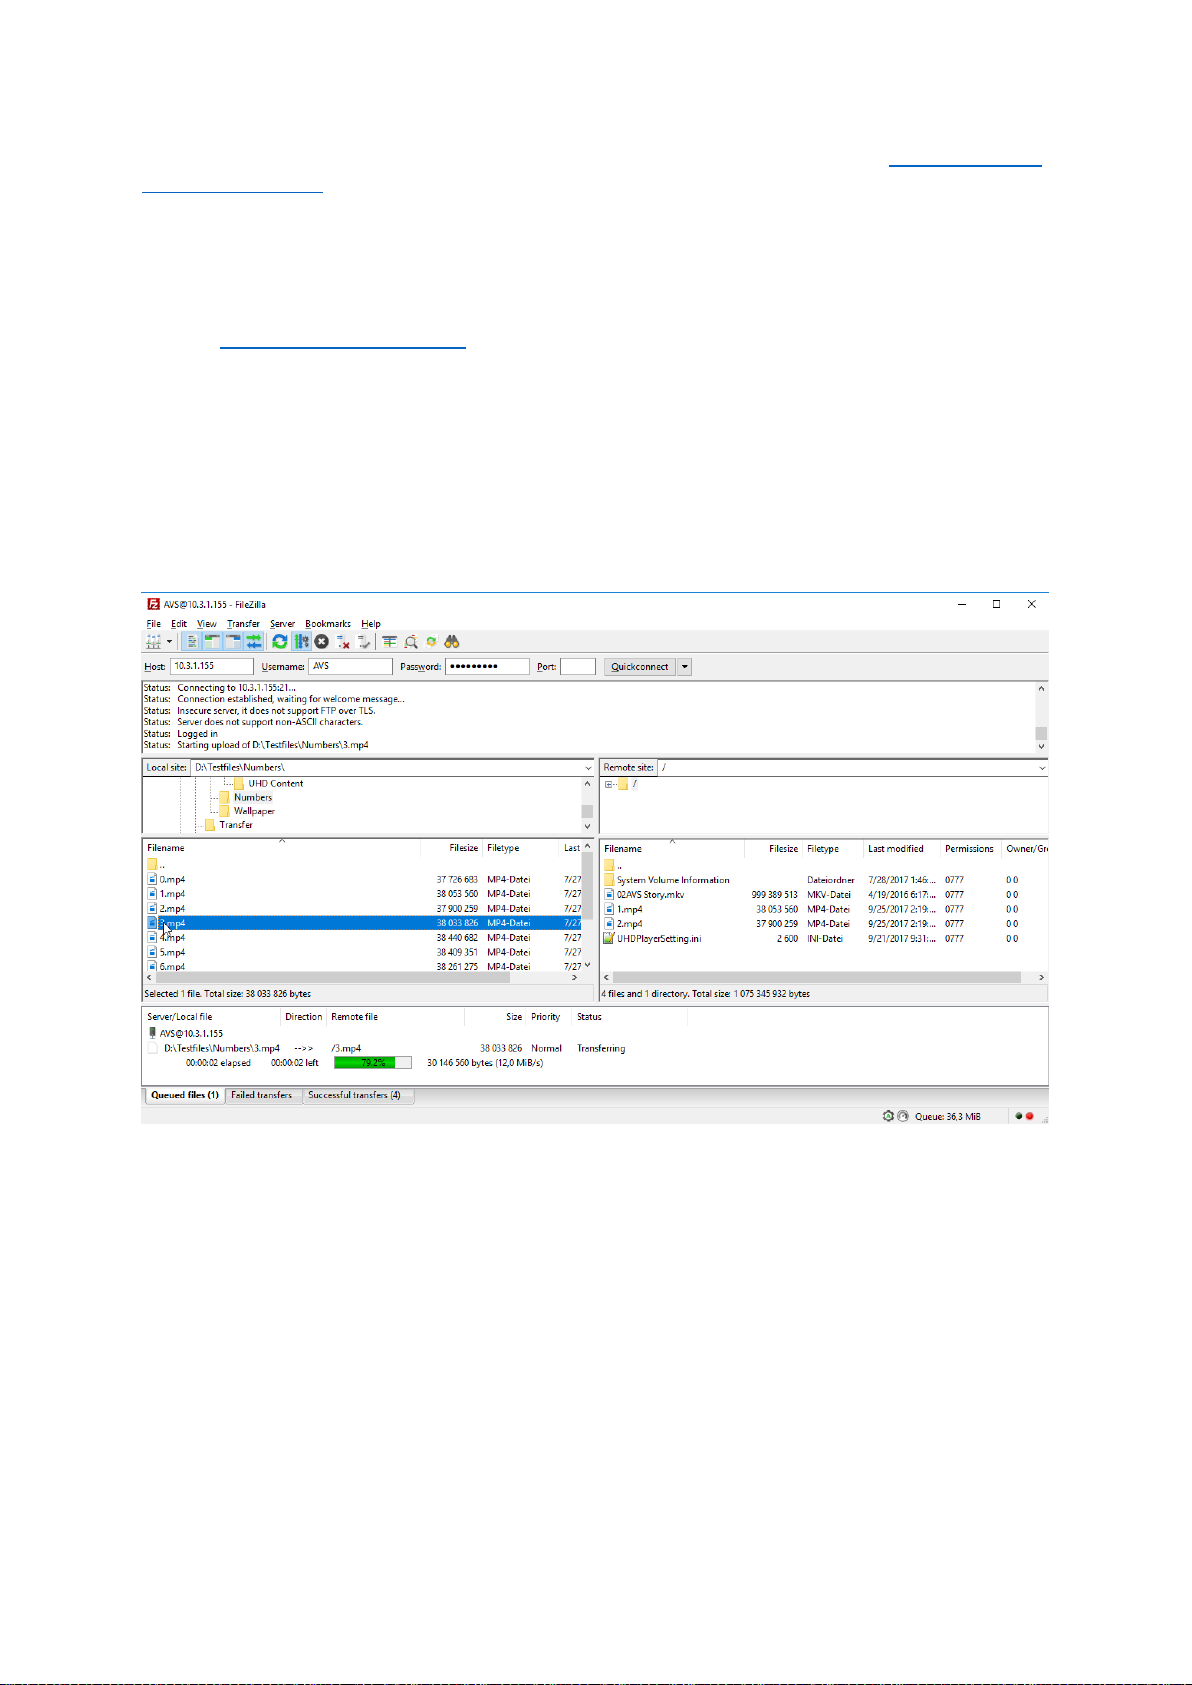
54
For more information about how to handle the initialization file, please refer to the Configuration via
the Initialization File chapter.
CONNTECTING TO THE LOCAL FTP SERVER
You may use any FTP Client Software to connect to the UHD Player’s Server, e.g. the freeware
FileZilla (https://filezilla-project.org/).
Within your FTP Client Software, connect to the player’s FTP Server (or host) by entering the player’s
IP address (e.g. “10.3.1.155”). Enter the defined user name (e.g. “AVS”) and the corresponding
password (e.g. ”AVStumpfl”). The player’s local FTP Server uses the standard FTP Server command
port 21.
As soon as the connection is established, within your FTP Client software you may transfer content
from your computer to the player’s data carrier and delete content from the data carrier, as well.
Fig. 33: File transfer via the player’s Local FTP Server, using FileZilla
Page 59
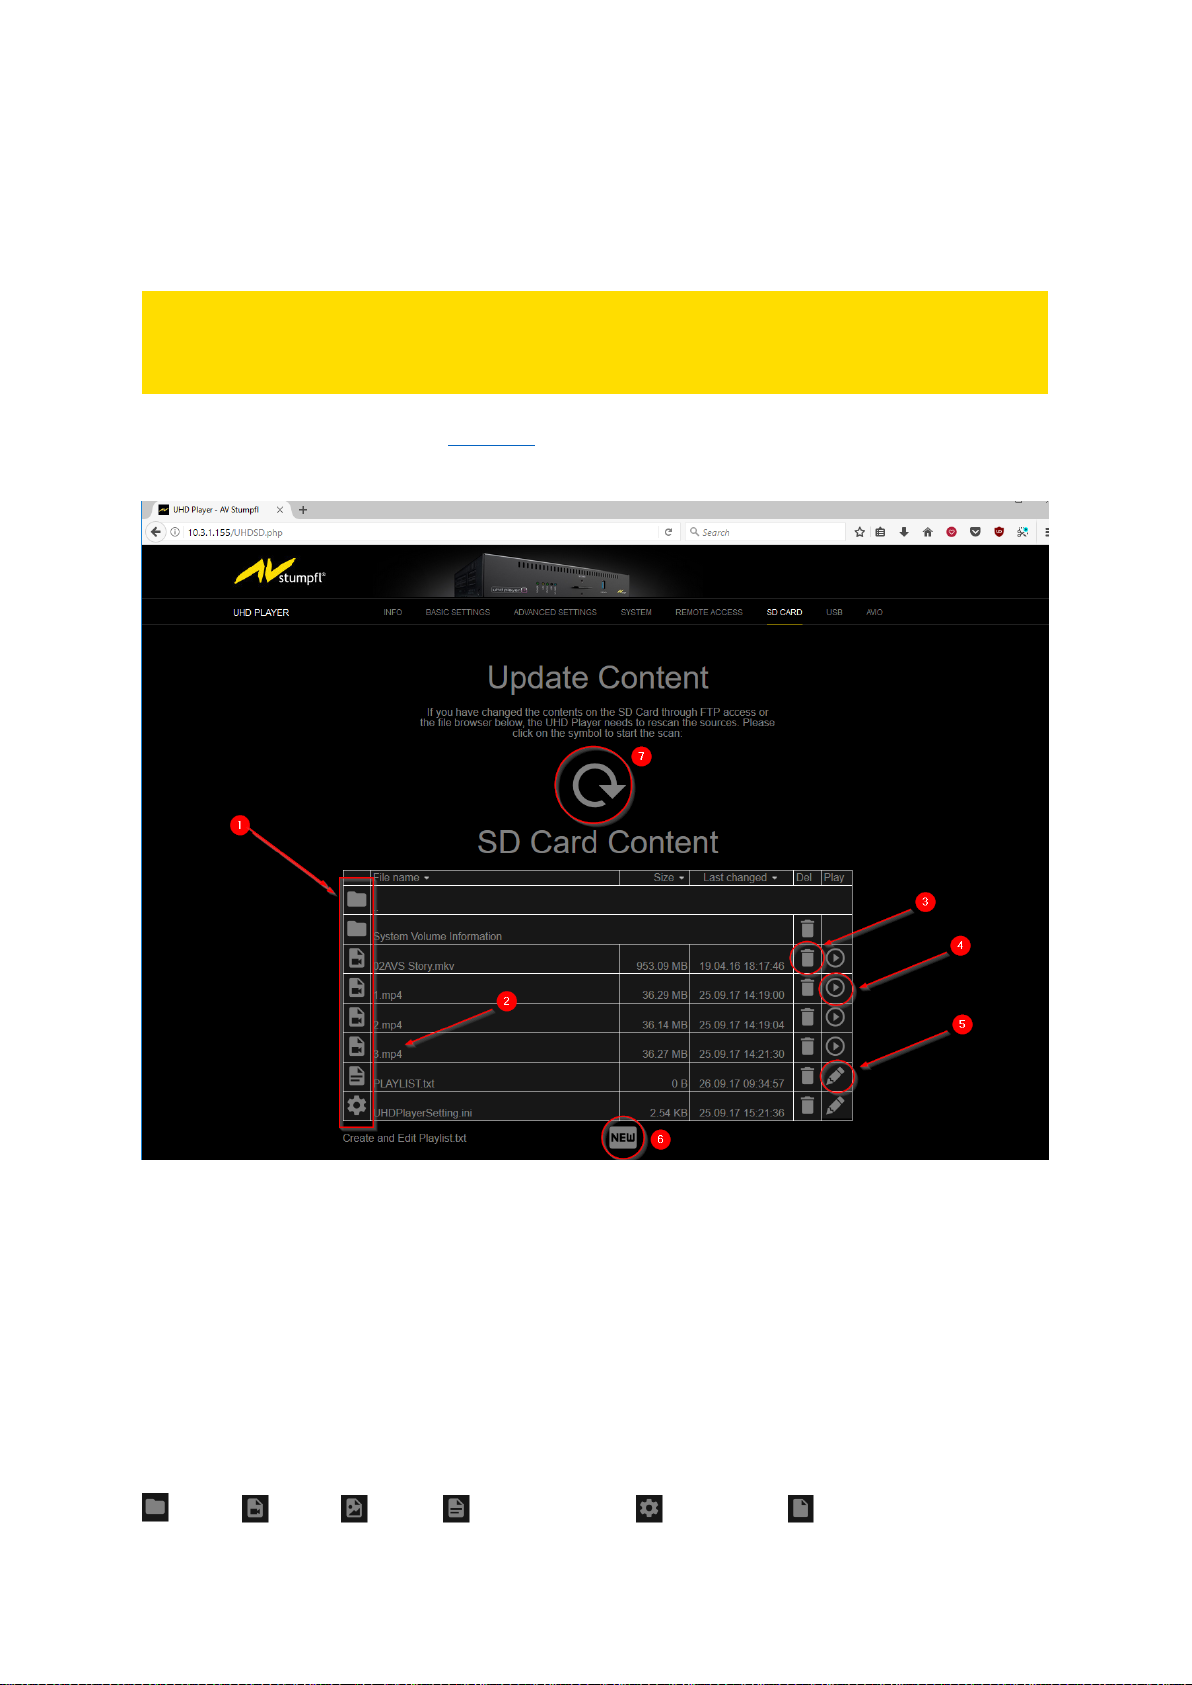
55
11.4. .. VIA THE WEB INTERFACE
The Web Interface allows you to view all files that are located on the player’s data carrier and offers
to preview, trigger and delete them. A playlist can be created and edited. The initialization file
(UHDPlayerSettings.ini”) can also be edited.
PLEASE NOTE:
If you have changed the contents on the SD Card through FTP access or the file browser below, the
UHD Player needs to rescan the sources. Please click on the update symbol to start the scan.
Click on [SD CARD] or [USB] in the menu bar (depending on the data carrier that is plugged into the
player) and the root folder of the data carrier with all files and folders will be listed.
Fig. 34: SD Card file browser in the Web Interface
1 FILE TYPES
2 MEDIA FILE PREVIEW
3 DELETE FILE
4 TRIGGER FILE PLAYBACK
5 EDIT SETTINGS FILE / PLAYLIST
6 CREATE PLAYLIST
7 UPDATE SD CARD CONTENT
(1) FILE TYPES
In the first row of the content table, the symbols show the different file types:
Folder, Video, Image, Editable text file, Settings file, Unknown file type
Page 60
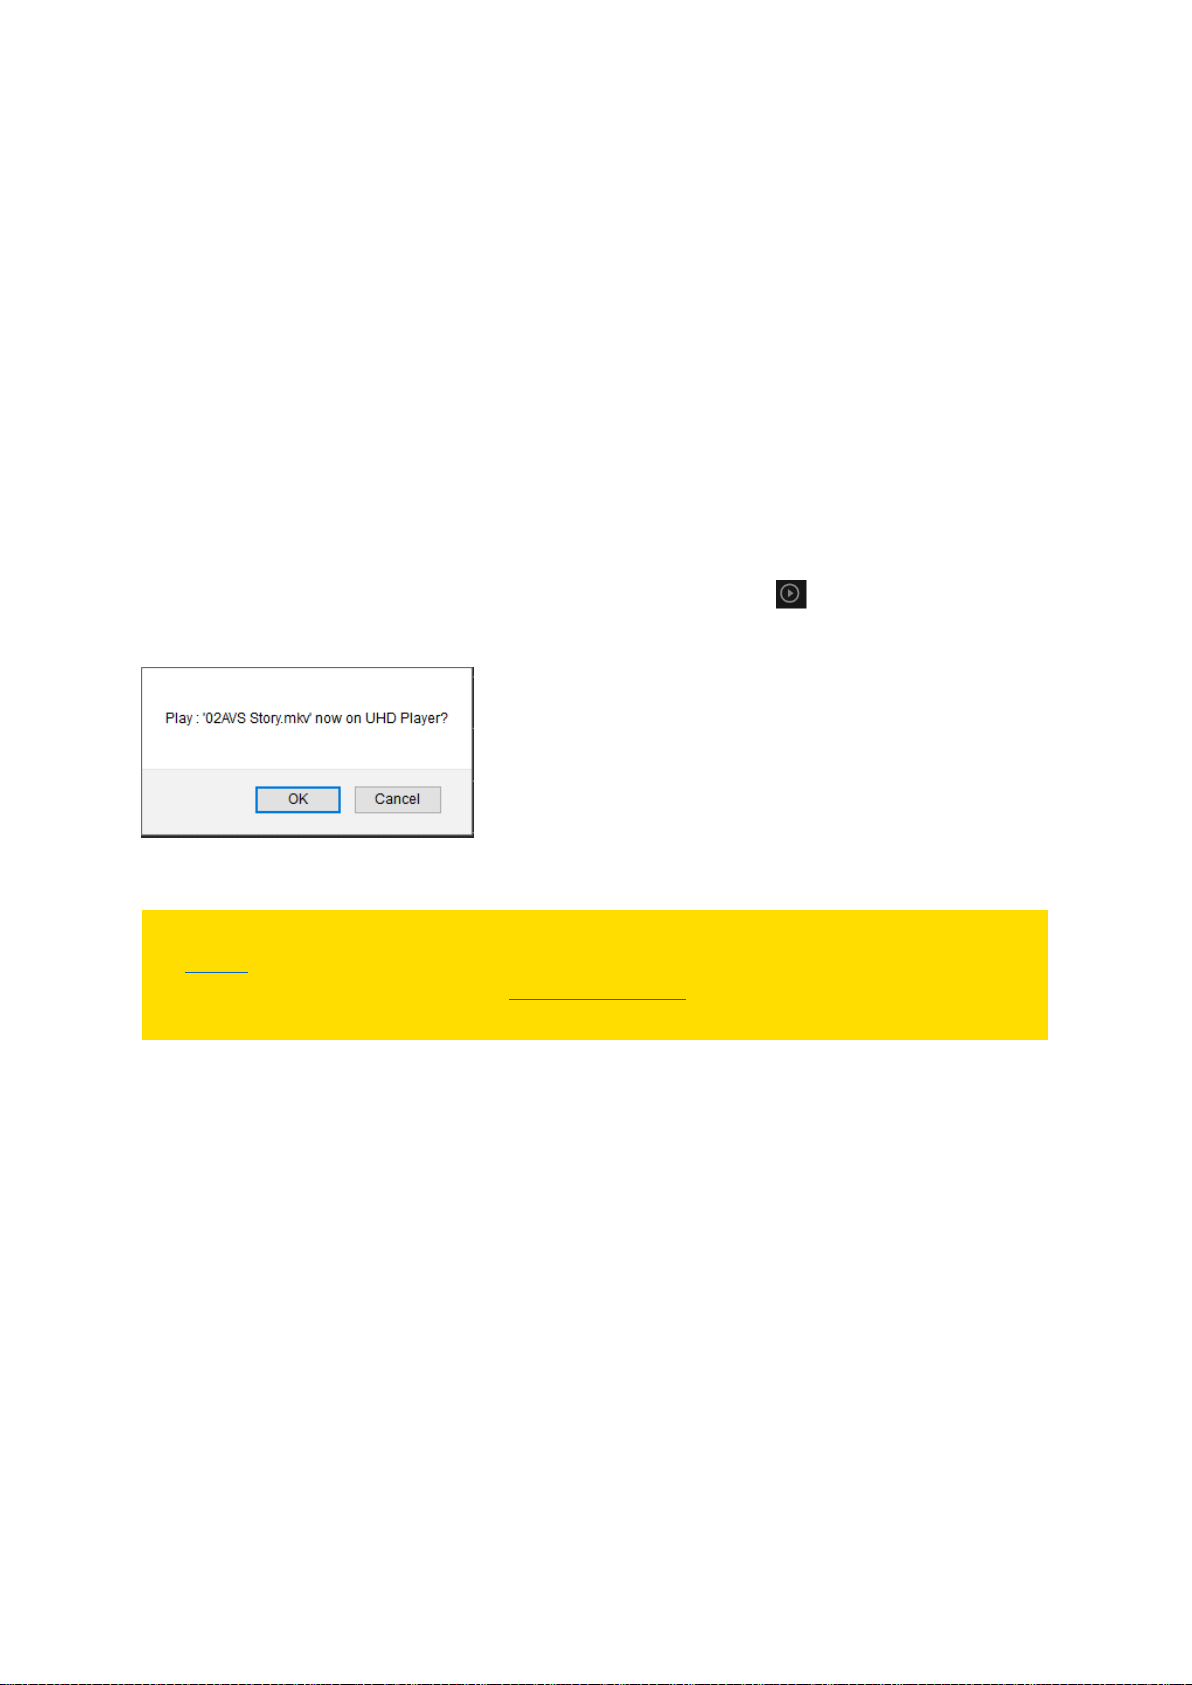
56
(2) MEDIA FILE PREVIEW
Click on the name of a video, image, settings or text file. Depending on the browser that is used to
view the Web Interface, the file will be displayed directly in your browser, or a dialog box will appear
and ask whether the file should be opened with a certain program or saved on your computer.
(3) DELETE FILE
Click on the trash symbol and the corresponding file will be deleted from the player’s data carrier.
(4) TRIGGER FILE PLAYBACK
Video and image file playback can be triggered directly within the Web Interface. To interrupt the
current playback and start another media file, click on the Play Symbol next to the media file. A
pop-up dialog will appear and you will be asked to confirm this action.
Fig. 35: A Pop-up dialog appears when triggering a media file in the Web Interface.
PLEASE NOTE:
If a playlist is used, only files that are included in the playlist can be triggered.
If a playlist item uses the playlist entry “Interruptible=FALSE”, another media file cannot be
triggered while this file is playing.
Page 61
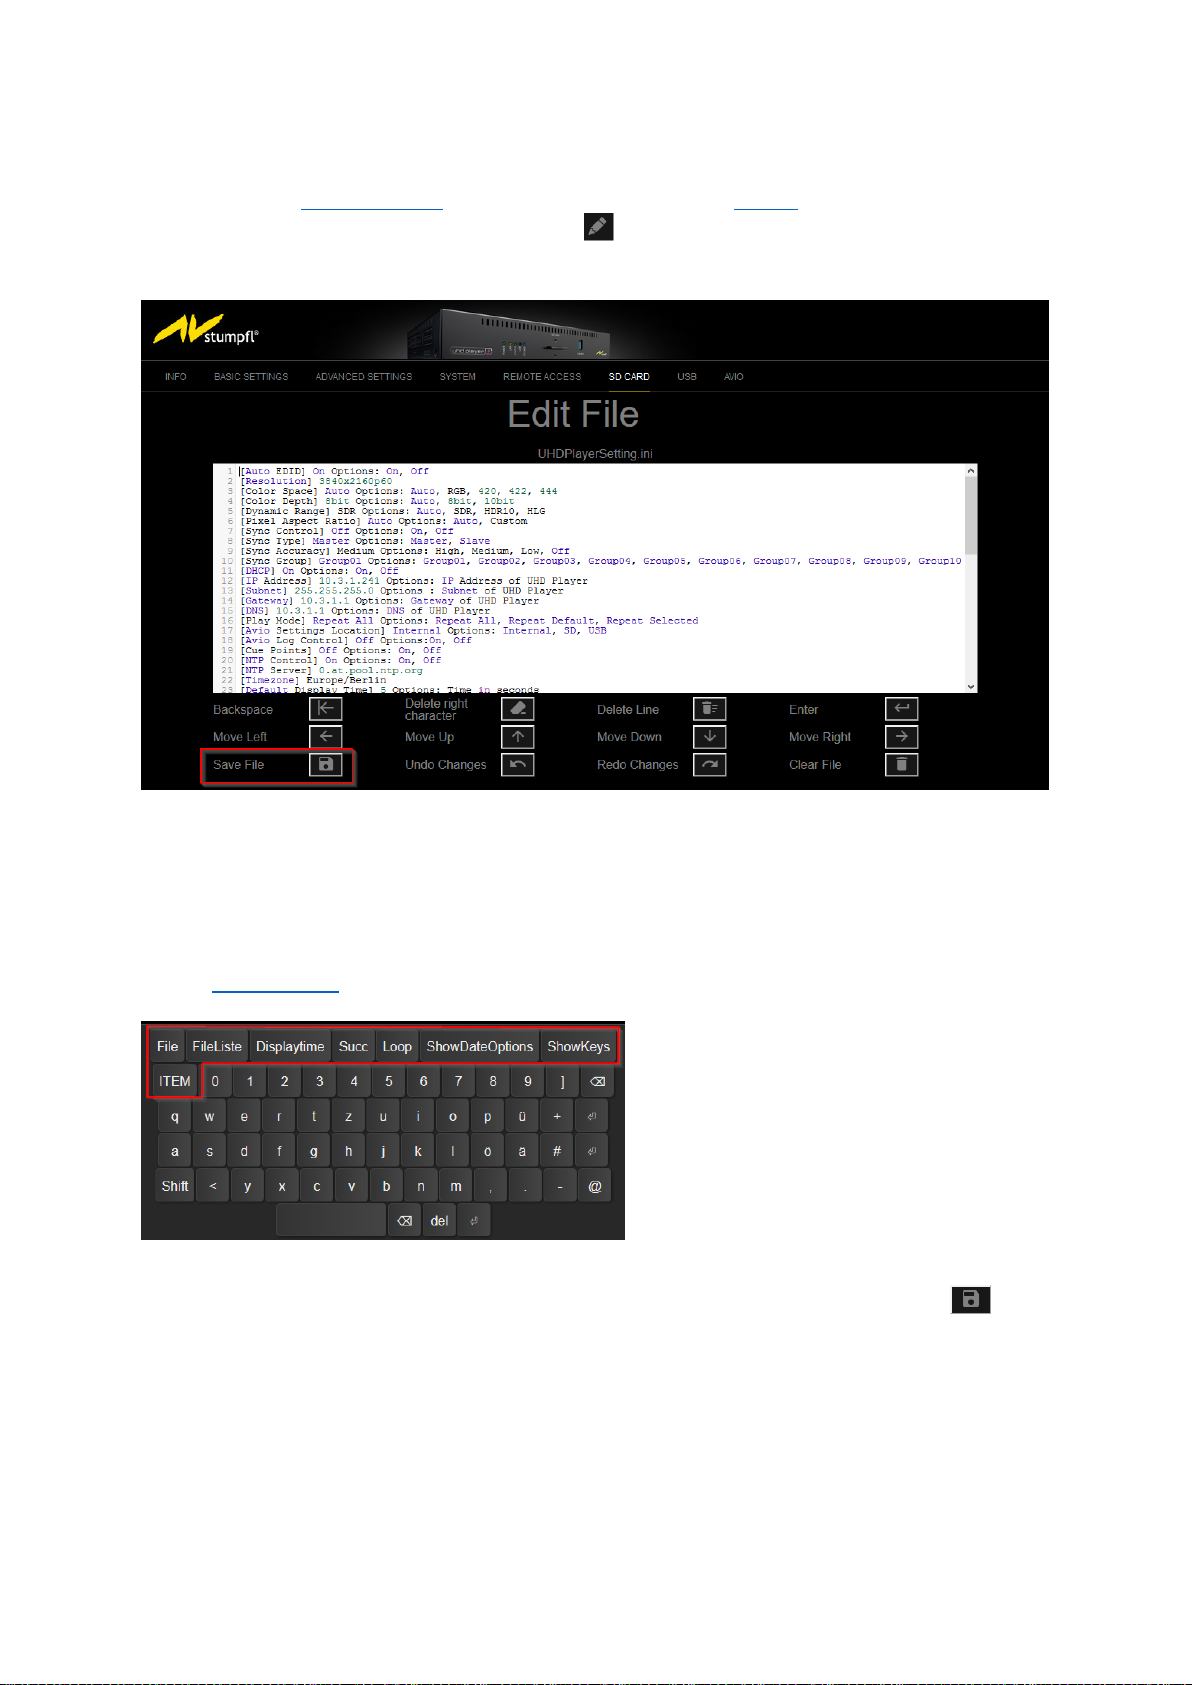
57
(5) EDIT INITIALIZATION FILE / PLAYLIST
The UHD Player’s initialization file (“UHDPlayerSettings.ini”) and a playlist can be edited within the
Web Interface. To do so, click on the Edit Symbol next to the file and it will open in a text editor
that is integrated into the Web Interface.
Fig. 36: Initialization file opened in the Web Interface with marked [Save File] button
The file may now be edited by using your computer’s mouse and keyboard. Right below the editor’s
window, you find several function buttons that can be helpful within the editing process.
Additionally, an extended onscreen keyboard opens below the text editor. The first buttons, marked
in the figure below, allow you to create and edit a playlist very fast. For a detailed description, please
see the Create Playlist section below.
Fig. 37: Extended onscreen keyboard in the Web Interface with marked buttons for fast playlist editing
When all changes are made, save the file by clicking on the save symbol next to [Save File] in the
functional buttons area - see the two marked figures above.
Page 62
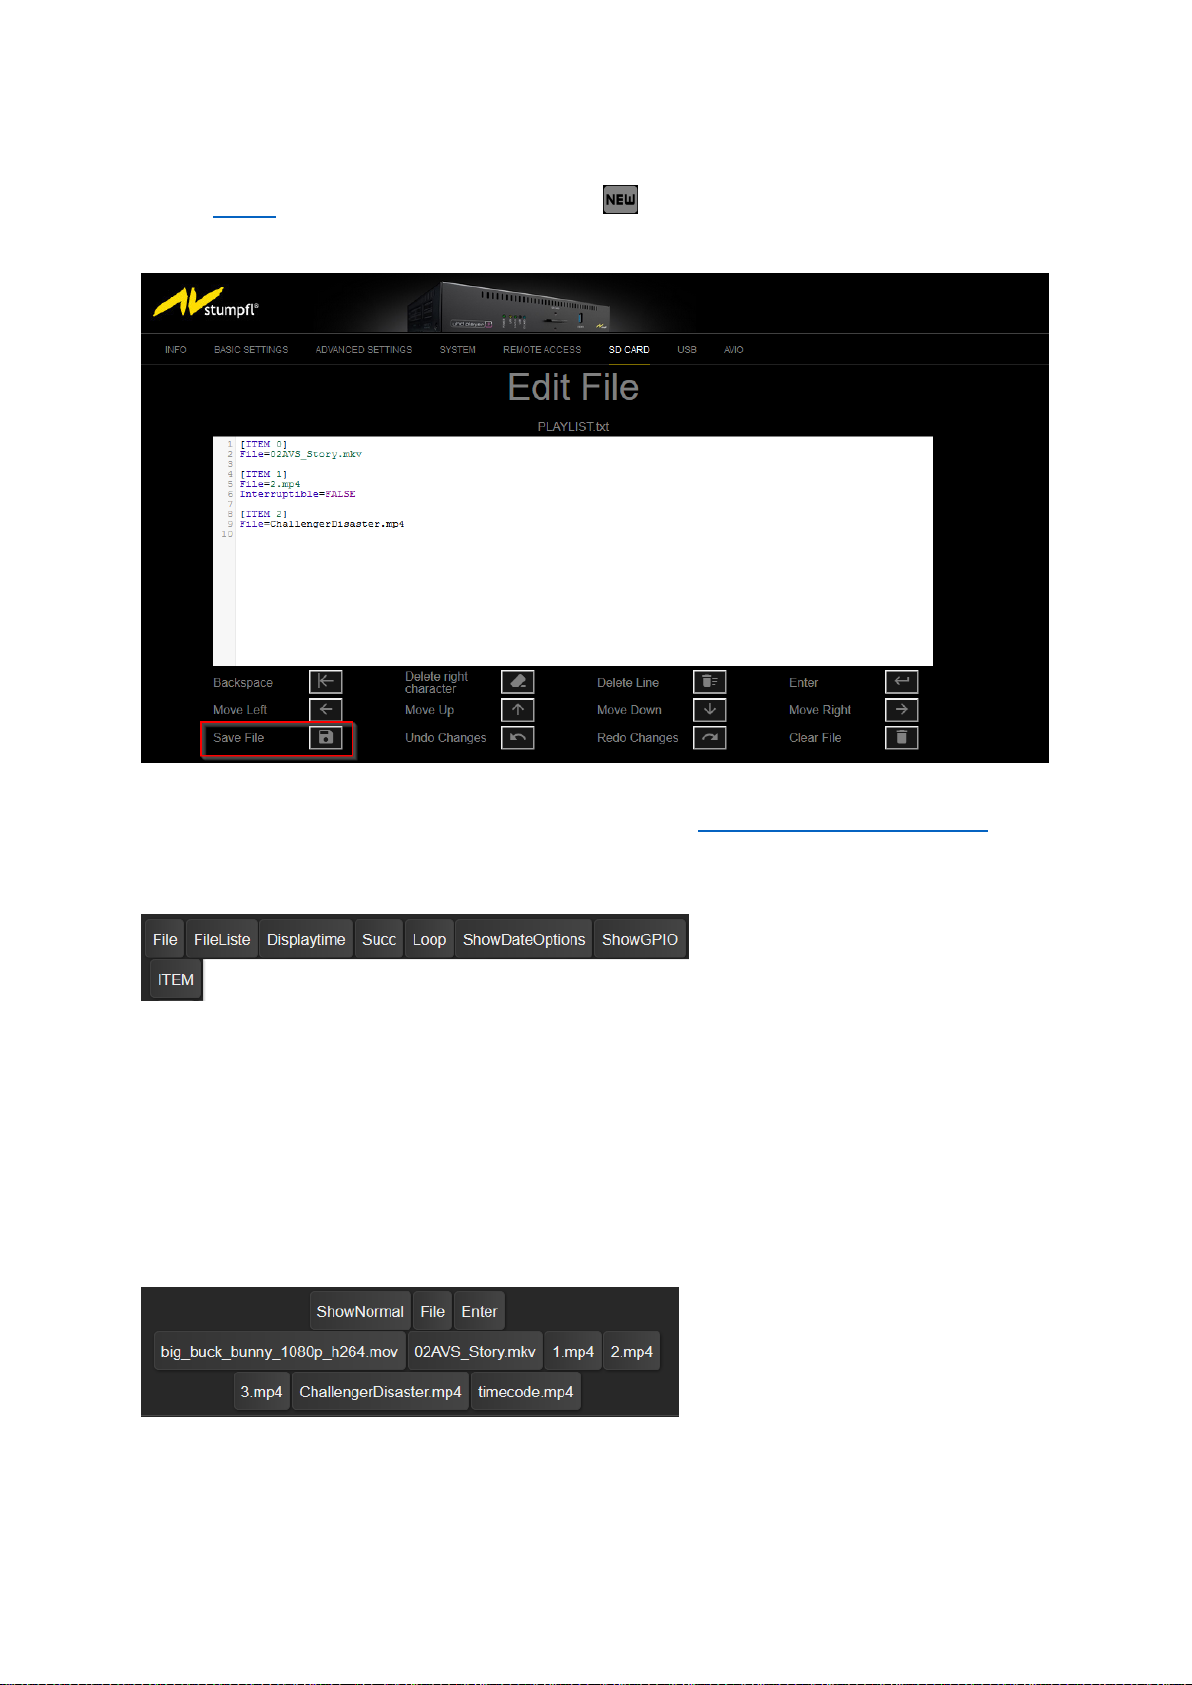
58
(6) CREATE PLAYLIST
A blank playlist can be created by clicking on [New] below the file browser. If there is already a
playlist located in the root folder of the player’s data carrier, this one will open in the text editor
instead of a blank one.
Fig. 38: Playlist file opened in the Web Interface with marked [Save File] button
Write or edit the playlist following the syntax described in the How to Create and Use a Playlist
chapter. The first line of buttons of the extended onscreen keyboard will help you with the correct
syntax.
Fig. 39: Helpful buttons for playlist editing of the extended onscreen keyboard in the Web Interface
[ITEM]: Adds the text “[ITEM “ to the editor. Now you only have to enter the desired number of the
playlist item and “]” to complete the first obligatory entry of a playlist item.
[File]: Adds the text “File=” to the editor. Now the exact name of the media file needs to follow.
Click [FileList] and the onscreen keyboard shows buttons for every media file located on the player’s
data carrier, see figure below. By clicking one of these buttons, the name of the corresponding media
file will automatically be inserted into the text editor. Click on [ShowNormal] and the onscreen
keyboard will toggle back to the default buttons view.
Fig. 40: FileList Buttons of the extended onscreen keyboard in the Web Interface
[Displaytime] adds the entry “Displaytime=”. The buttons [Succ] and [Loop] work in the same way.
Page 63
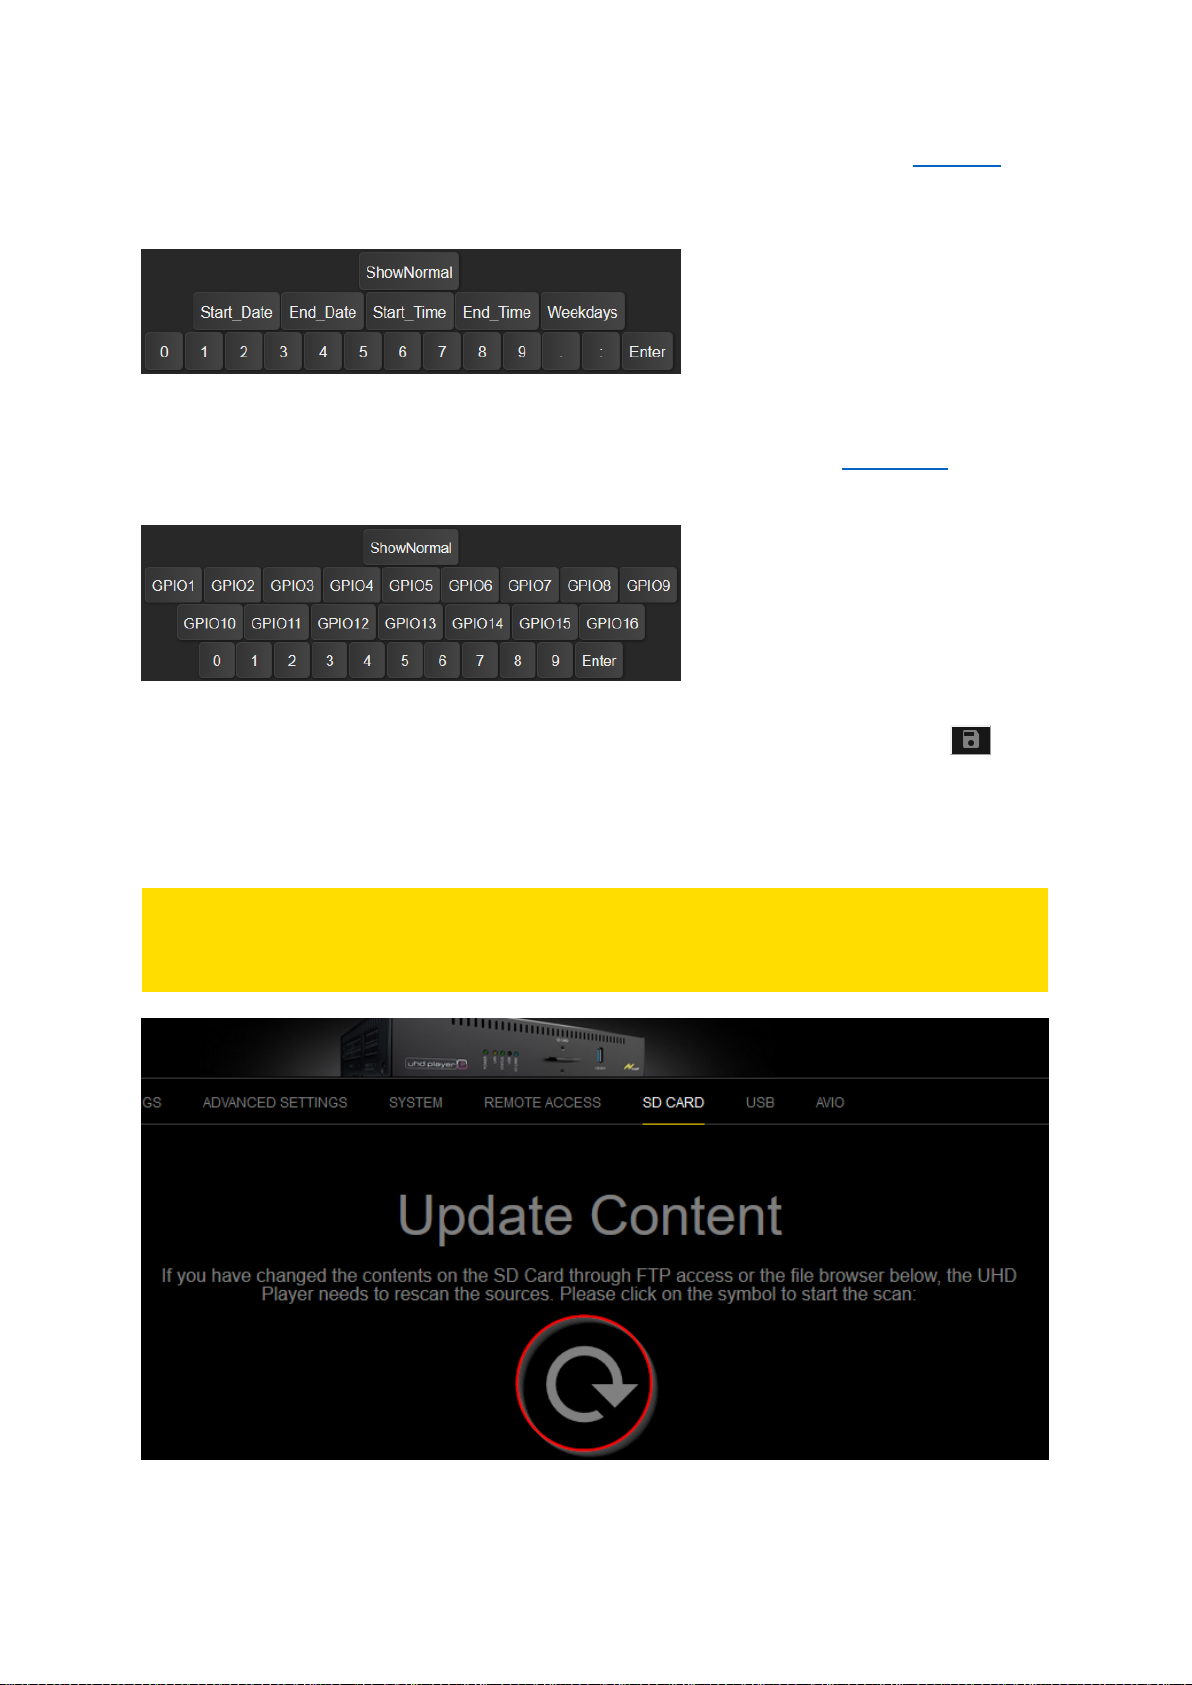
59
[ShowDateOptions] will show buttons that allow you to easily enter the syntax for the scheduler
functions, see image below. Click on [ShowNormal] and the onscreen keyboard toggles back to the
default buttons view.
Fig. 41: Date Buttons of the extended onscreen keyboard in the Web Interface
[ShowKeys] will show buttons that allow you to easily enter the syntax for the GPIO inputs, see image
below. Click on [ShowNormal] and the onscreen keyboard toggles back to the default buttons view.
Fig. 42: Key Buttons of the extended onscreen keyboard in the Web Interface
When all changes are made, save the file by clicking on the save symbol next to [Save File] in the
functional buttons area below the editor.
(7) UPDATE SD CARD / USB CONTENT
PLEASE NOTE:
If you have changed the contents on the SD Card through FTP access or the file browser below, the
UHD Player needs to rescan the sources. Please click on the update symbol to start the scan.
Fig. 43: Update Content button in the Web Interface
Page 64
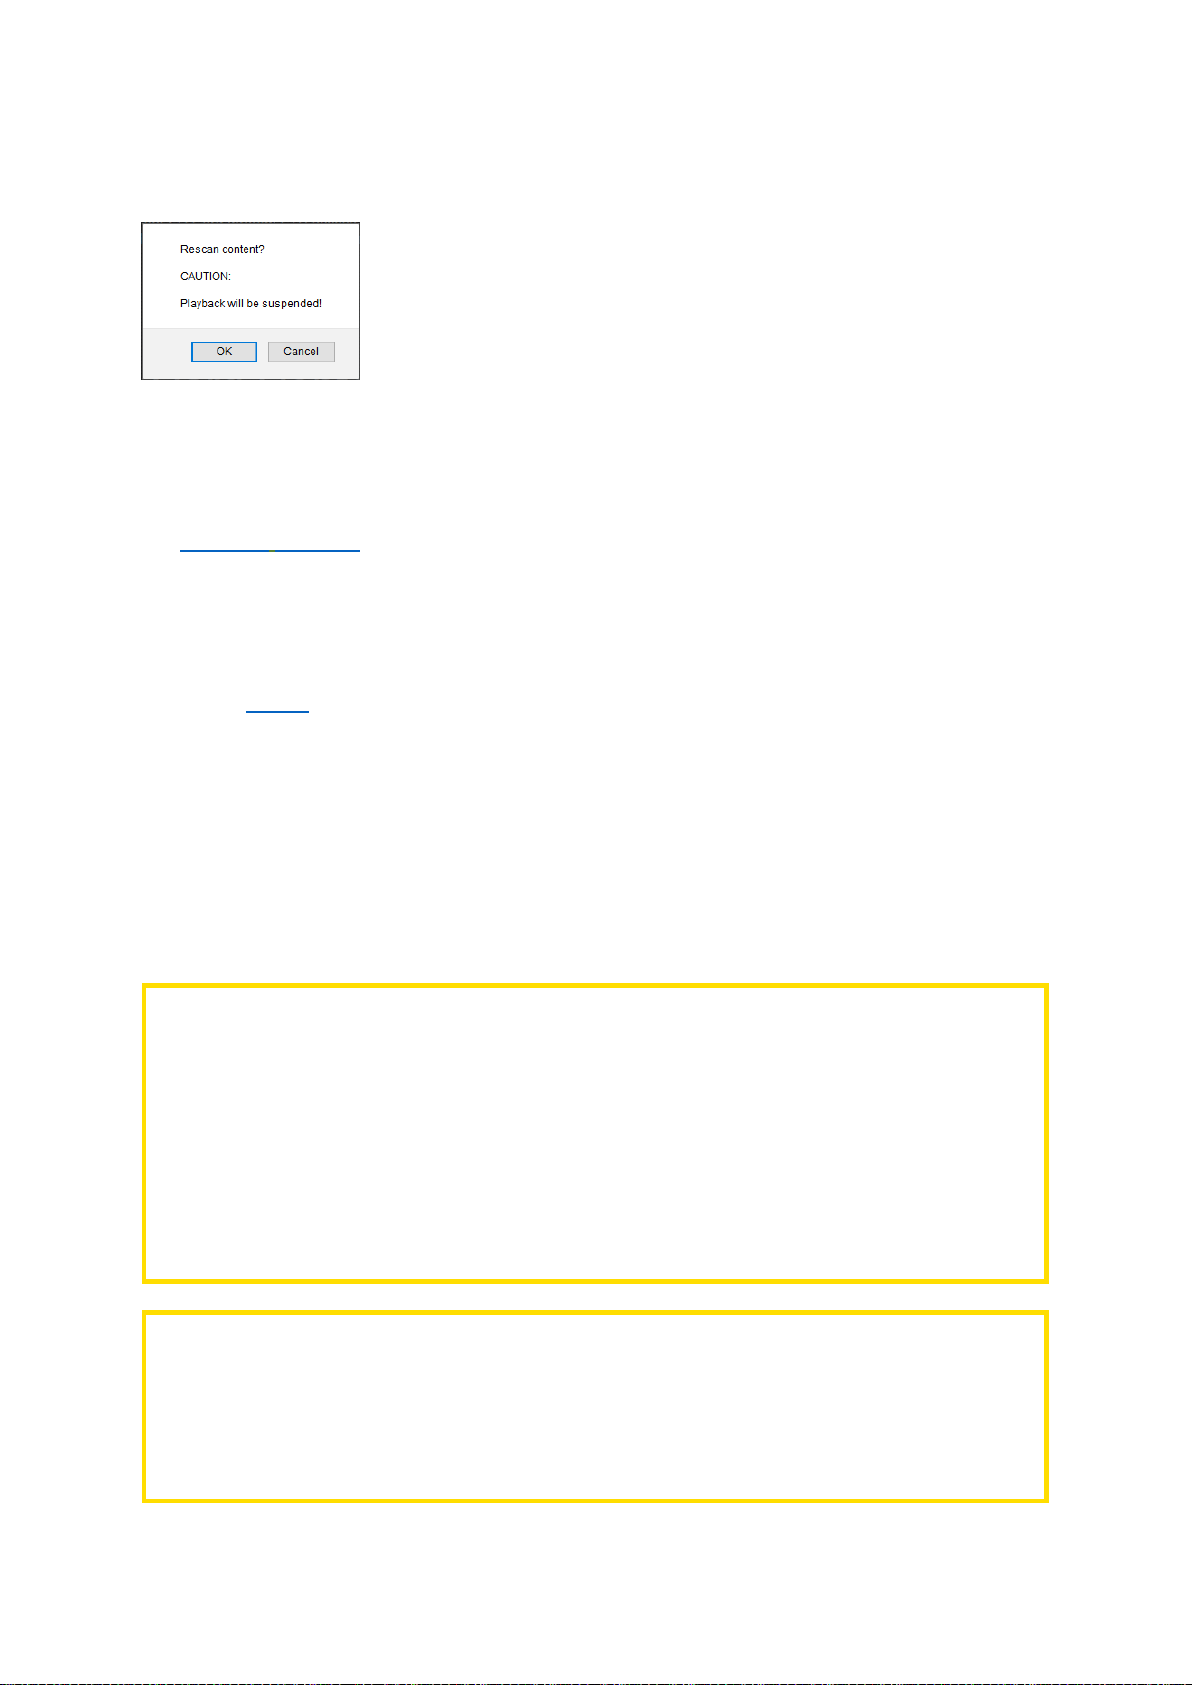
60
A pop-up dialog will appear, informing you that the playback will be suspended. Confirm this to
proceed with the SD Card scan.
Fig. 44: Pop-up dialog after [Update Content] button was clicked
12. HDMI INPUT
The HDMI 2.0 Input port on the rear panel enables you to use an external video/audio source as (live)
input. The external video/audio source may then be displayed just like media content that is stored
on the attached data carrier.
The HMDI Input port supports incoming video signals up to UHD 3840x2160@60p.
Connect your HDMI video/audio source to the HDMI Input port. To include this HMDI input in your
playback, a playlist must be used.
Assign an incoming HDMI video or audio signal to a playback item from your playlist by using the
playlist entry “HDMI INPUT” instead of “File=”. Contrary to video or audio files in your playlist, it is
obligatory to define the display time for this HDMI Input.
The complete entry in the playlist should look like this:
[ITEM <no.>]
HDMI-INPUT
Displaytime=<seconds>
EXAMPLE 1:
[ITEM 0]
File=test.mp4
[ITEM 1]
HDMI-INPUT
Displaytime=600
The playlist starts with the video file “test.mp4”. Afterward, the HDMI Input is displayed for 600
seconds.
EXAMPLE 2:
[ITEM 1]
HDMI-INPUT
Displaytime=-1
The playlist perpetually displays the HDMI Input.
Page 65
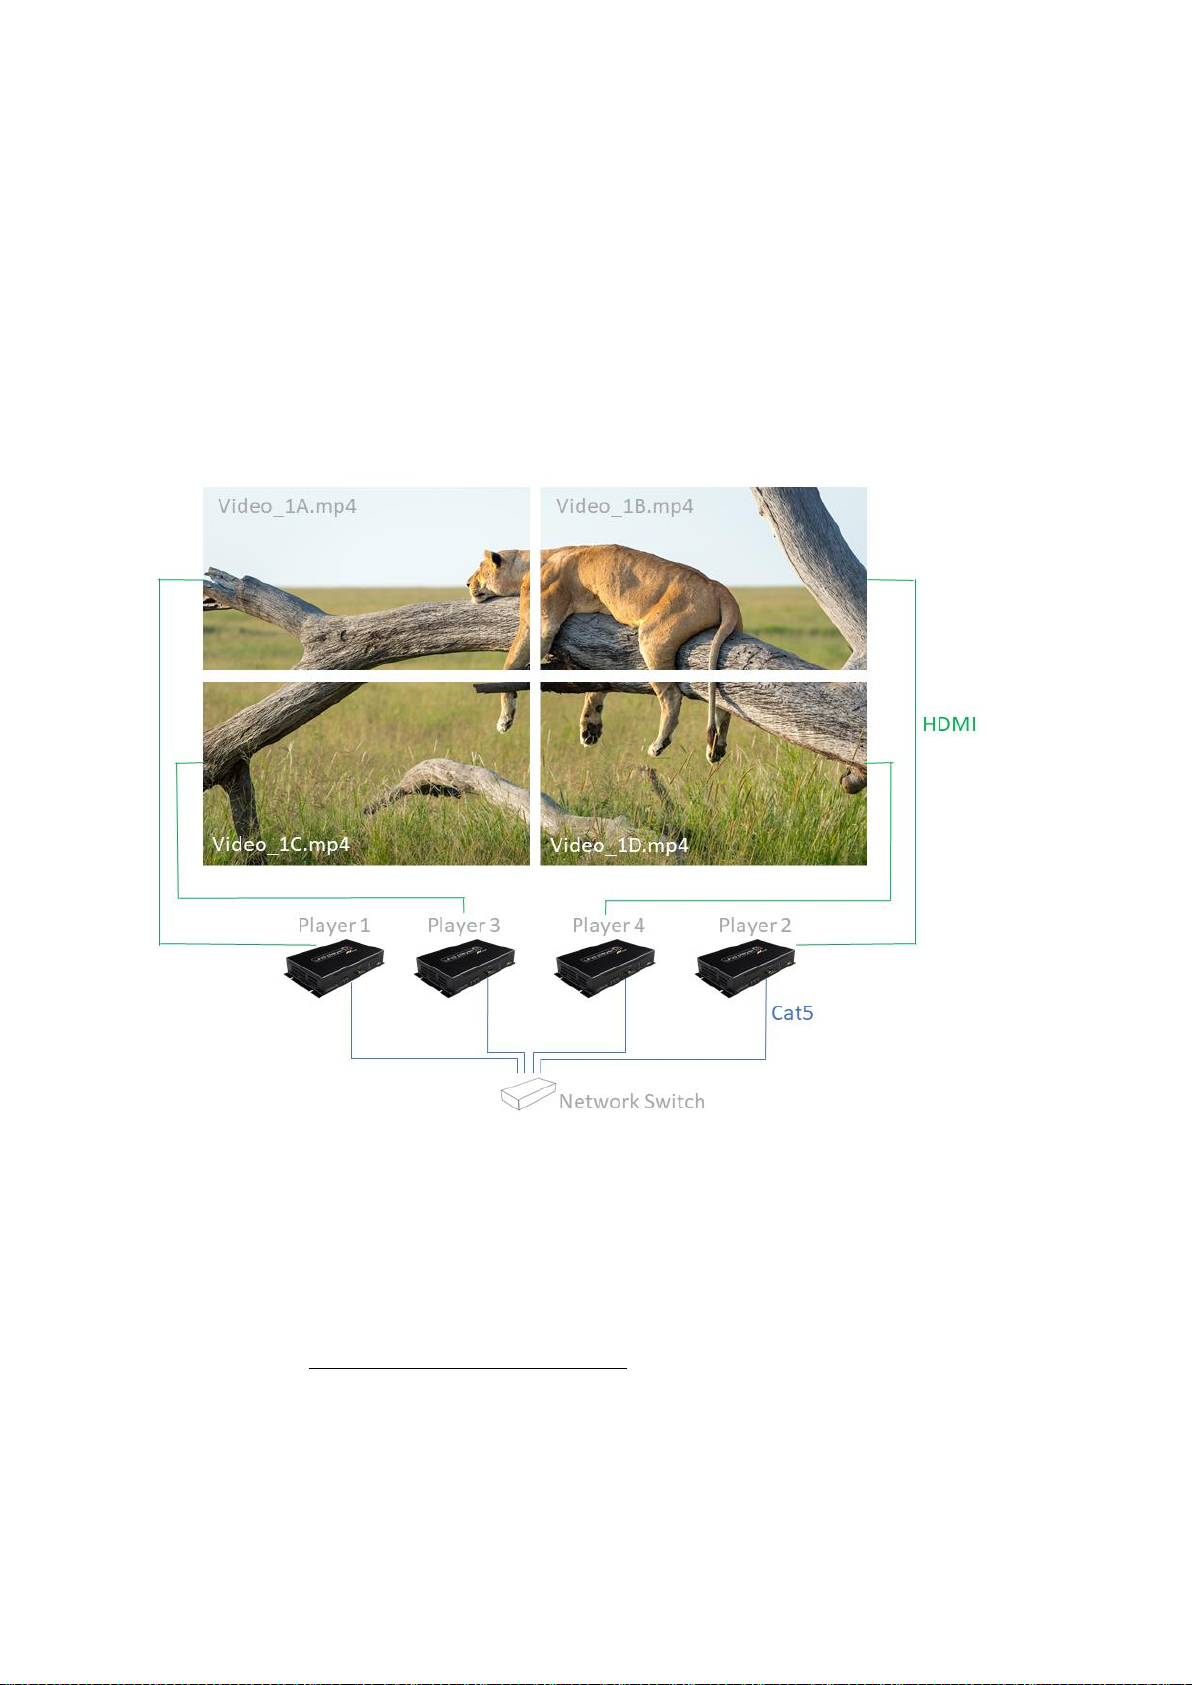
61
13. SYNCHRONIZED PLAYBACK
Multiple UHD Players can be frame synchronized via network to play multi-display presentations.
Even if one player goes offline and/or returns to online state at any time, it is automatically
resynchronized to the remaining players of the setup. There is no limitation to the number of players
that can be synced.
Basically, there is one player that is set up as the master and all others that should be synced to this
one will be set up as the slaves. Within a network, it is also possible to run several sync groups
separately from each other.
Fig. 45: Multi-display presentation showing four split videos synced to each other
To set up a multi-display presentation like the one represented in the picture above, please follow
the steps outlined below.
STEP 1: PREPARE THE CONTENT
To achieve a perfectly synced playback, it is important that all the files of the multi-display
presentation have the same file length and framerate!
The file names do not have to be identical, but it is recommended that they be named using the
same naming structure, e.g. “Video_1A.mp4”, “Video_1B.mp4”, “Video_1C.mp4”, etc. This is not
only to allow for a better overview but also in case there are several split files played without a
playlist.
Page 66

62
STEP 2: COPY THE CONTENT ON THE DATA CARRIER
Copy the media files for display 1 to the data carrier of player 1, and copy the media files for display 2
to the data carrier of player 2, etc.
You do not have to use the same kind of data carriers, e.g. it is possible to use an SD Card for player 1
and a USB stick for player 2.
STEP 3A: PLAYBACK WITHOUT PLAYLIST
When no playlist is used, the media files on the data carrier will be played in alphanumeric order.
Every player should have the same number of media files on its data carrier.
Please make sure every player uses the same Play Mode!
Example:
SD Card of Player 1 contains:
BeWelcome_A.jpg
UHDPlayerSetting.ini
Video_1A.mp4
Video_2A.mp4
Video_3A.mp4
SD Card of Player 2 contains:
BeWelcome_B.jpg
UHDPlayerSetting.ini
Video_1B.mp4
Video_2B.mp4
Video_3B.mp4
[…]
STEP 3B: PLAYBACK WITH PLAYLIST
If a playlist is used, the media files on the data carrier will be played in the order that is determined in
the playlist. Please make sure that the playlists of all players are harmonized! They need the same
number of items (with identical Item Numbers) and the media (split) files belonging together should
be listed in the same order.
EXAMPLE:
SD Card of Player 1 contains:
The playlist of Player 1 contains:
Video_1A.mp4
Video_2A.mp4
Video_3A.mp4
Playlist.txt
UHDPlayerSetting.ini
Welcome_A.jpg
[ITEM 1]
File=Welcome_A.jpg
Displaytime=20
[ITEM 2]
File=Video_1A.jpg
[ITEM 3]
File=Video_2A.jpg
[ITEM 4]
File=Video_3A.jpg
Page 67
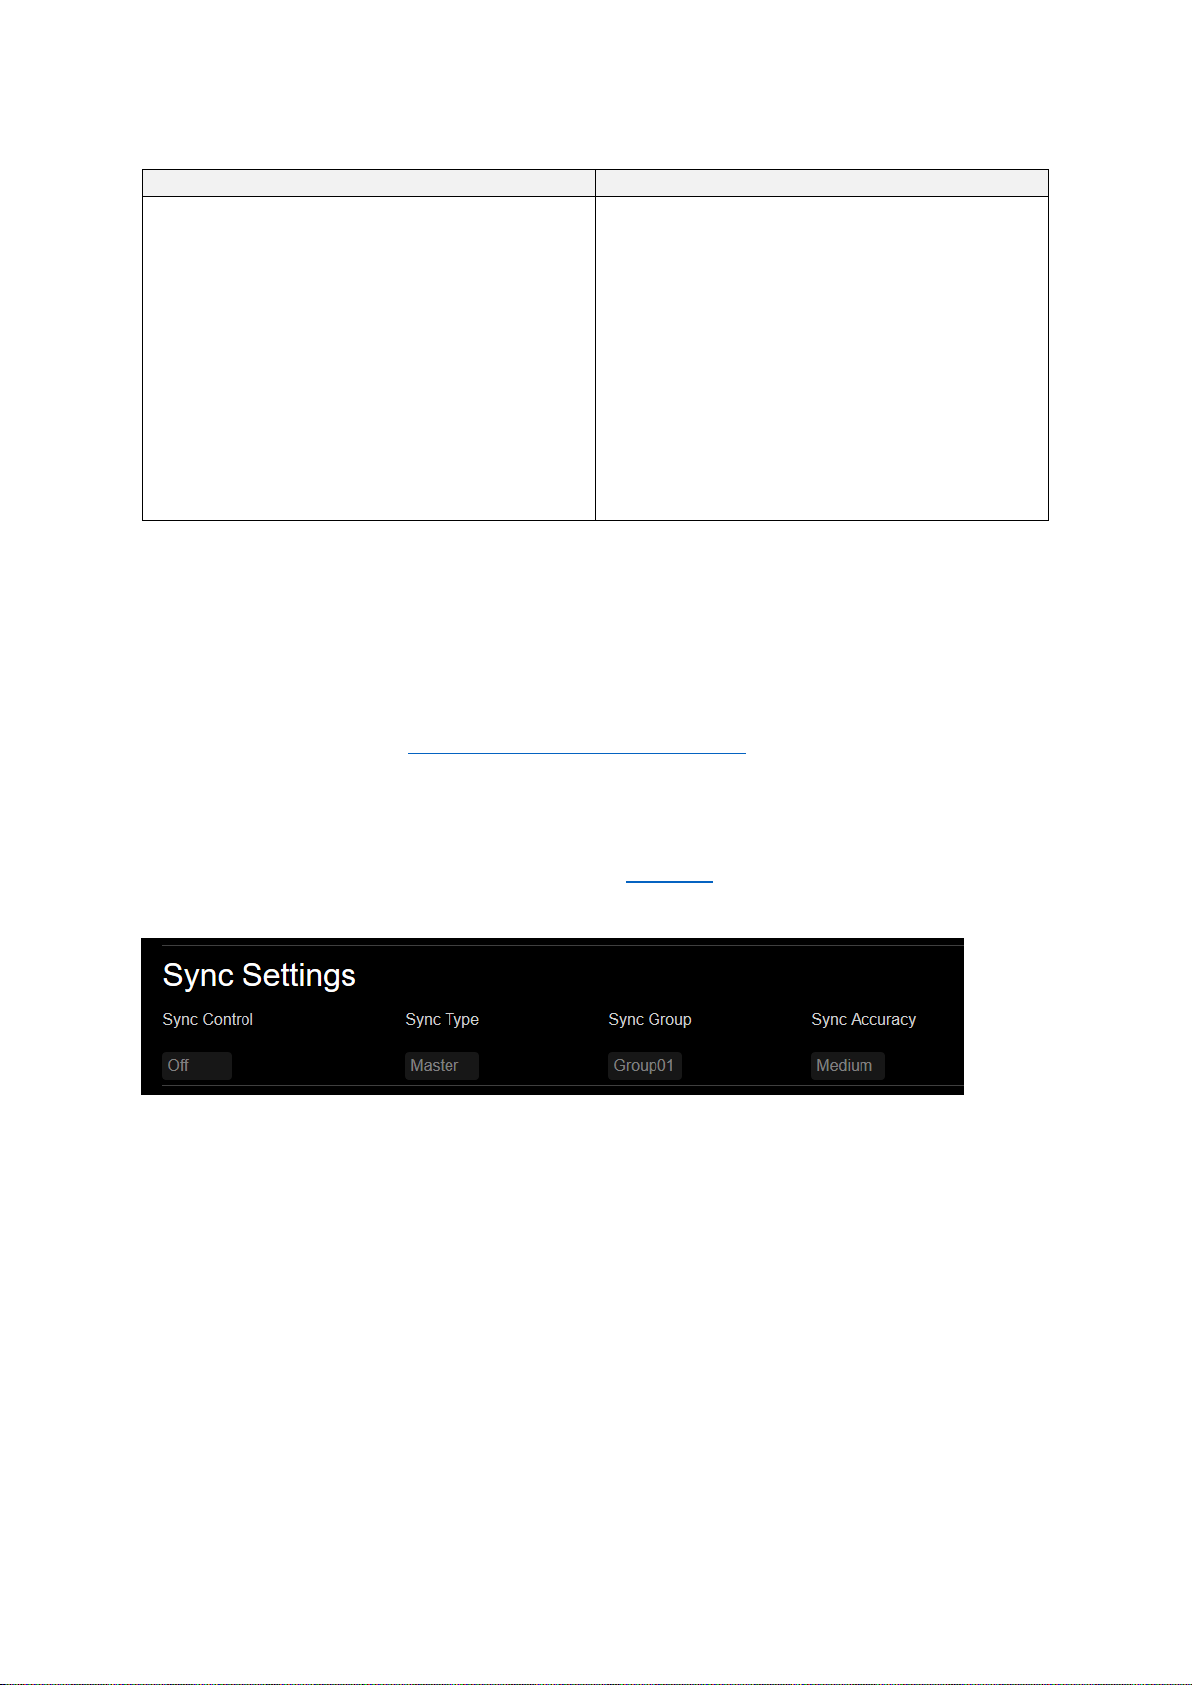
63
SD Card of Player 2 contains:
The playlist of Player 2 contains:
Video_1B.mp4
Video_2B.mp4
Video_3B.mp4
Playlist.txt
UHDPlayerSetting.ini
Welcome_B.jpg
[ITEM 1]
File=Welcome_B.jpg
Displaytime=20
[ITEM 2]
File=Video_1B.jpg
[ITEM 3]
File=Video_2B.jpg
[ITEM 4]
File=Video_3B.jpg
[…]
STEP 4: CONNECT PLAYERS VIA NETWORK
It is obligatory that all players are connected to the same network, as the sync control only works
over Ethernet. Please see the Connecting the Player to the Network chapter for further information.
STEP 5: SET UP THE SYNC MODE
In the Web Interface, click on [BASIC SETTINGS] in the menu bar and then on [Sync Settings]. The
drop-down menu will open and the current sync settings will appear.
Fig. 46: Sync Settings in the Web Interface
[Sync Control]
The Sync Control of each player (the master as well as all slaves) needs to be set to “On” in order to
perform a synced playback.
[Sync Type]
Define one of the players as the “Master” and set all other players as “Slaves”. The “Master” will
send out the sync control via network and the “Slaves” will receive the instructions.
[Sync Group]
A Sync Group consists of one master player and one or several slave players. All players that should
be synced to one another must belong to the same Sync Group. For example, set all the players of
your multi-display presentation to Sync Group “Group01”.
If there are several multi-display presentations in the same network, these presentations can be
separated from each other by setting different Sync Groups.
Page 68

64
[Sync Accuracy]
The sync accuracy defines how exact the synced playback will be.
“High“: A deviation of < 3 ms is tolerated
“Medium”: A deviation of < 16ms is tolerated
“Low”: A deviation of < 1000ms is tolerated
“Off”: Only the start of a media file is triggered and then the playback is in free-run
The option to set the Sync Accuracy to lower values is implemented in case slave players output
audio. When the video sync is very accurate, the slave players re-sync within the shortest intervals to
the master’s playback. This can sometimes lead to audio reactions on the slave player. Setting down
the Sync Accuracy to a lower value will stop this.
PLEASE NOTE:
All players of the same sync group need the same sync accuracy value!
STEP 6: SYNCHRONIZED PLAYBACK
If there is a master and one or more slave players and the network connection is available, the slave
players will sync to the master player’s playback.
If a slave player loses the sync while a media file is playing (because of network problems, etc.), the
playback of the media file will continue in free-run. If the sync is still missing at the end of the media
file, the player will wait 5 seconds for the master’s sync before it continues the playback with the
next media file.
Page 69
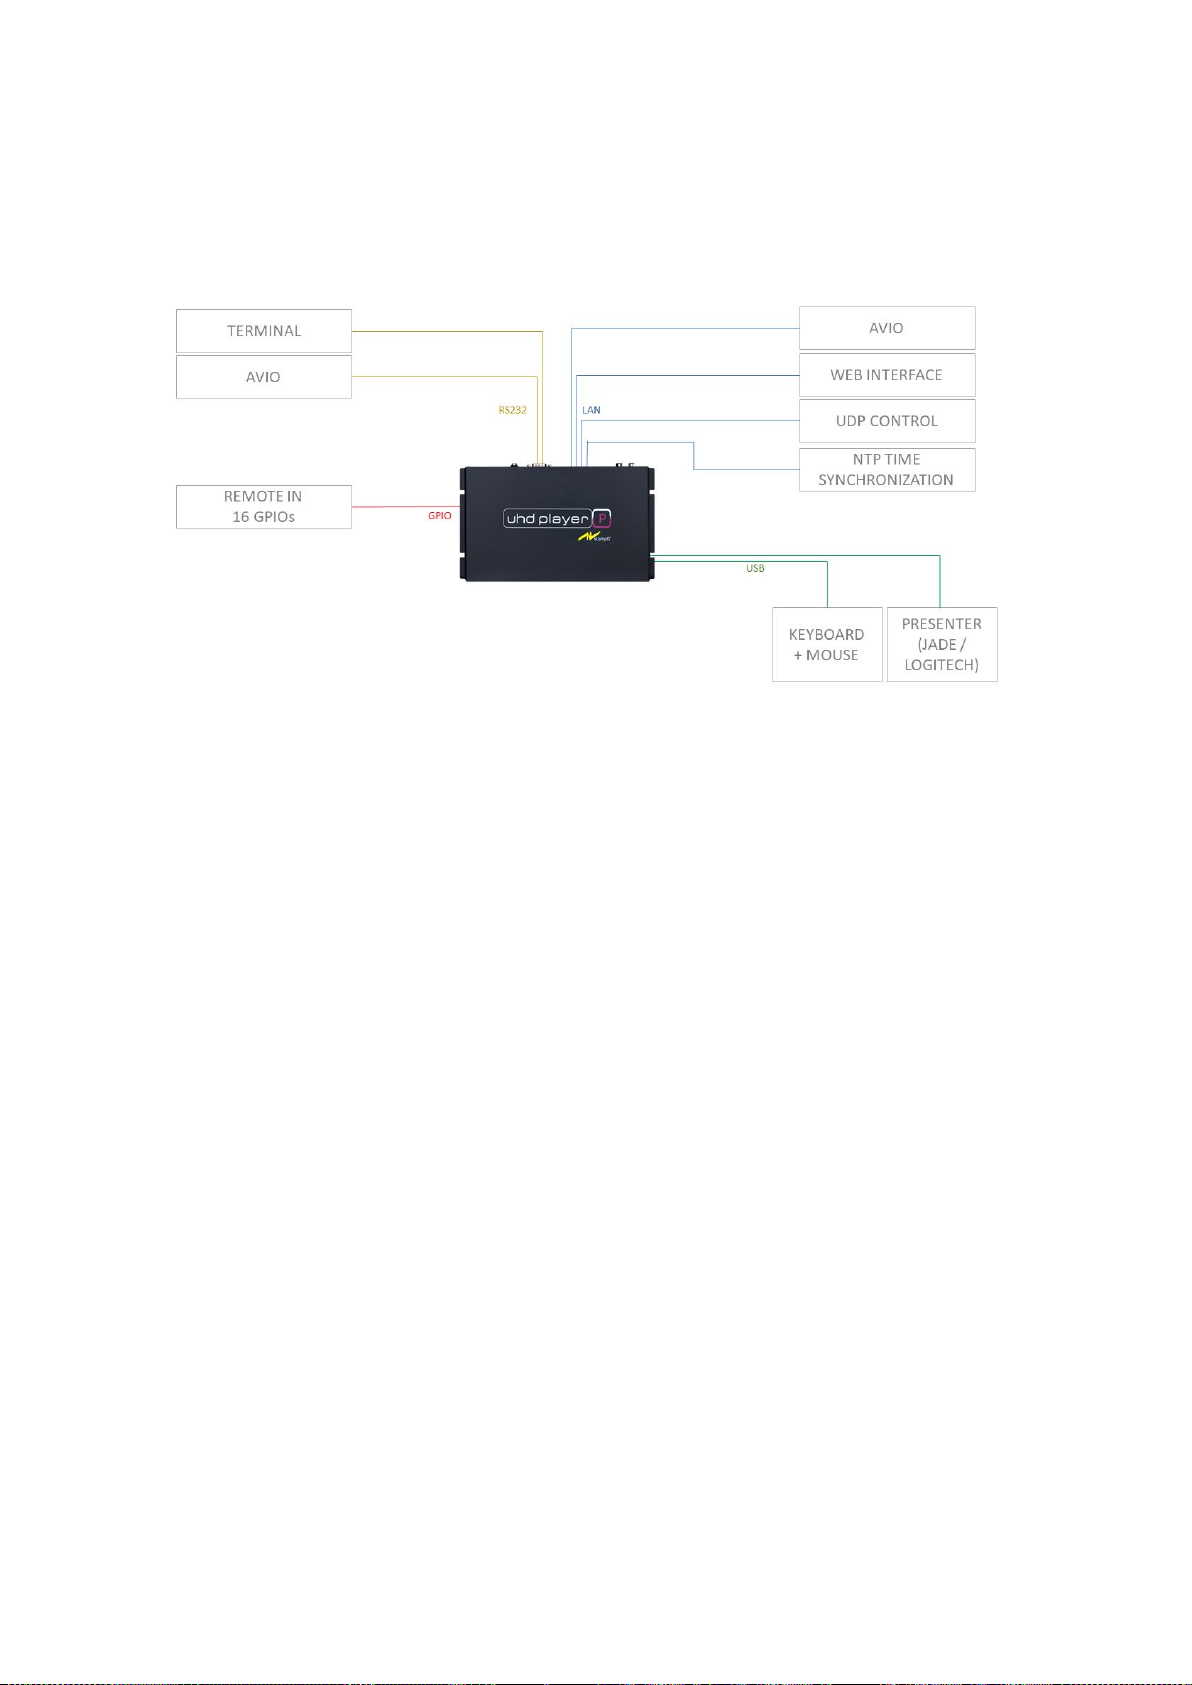
65
14. EXTERNAL CONTROL
Fig. 47: Overview of External Control Devices
UHD Players can be interactively controlled, e.g. by the Web Interface, proximity sensors, gesture
detection or just by push buttons and light barriers. Below is a list of possible control devices:
- Web Interface
- Commands sent via UDP or RS232
- Avio, which can be used to integrate proximity sensors and gesture detection
- Push buttons or light barriers connected to the GPIO interface
- USB presenters …
Page 70
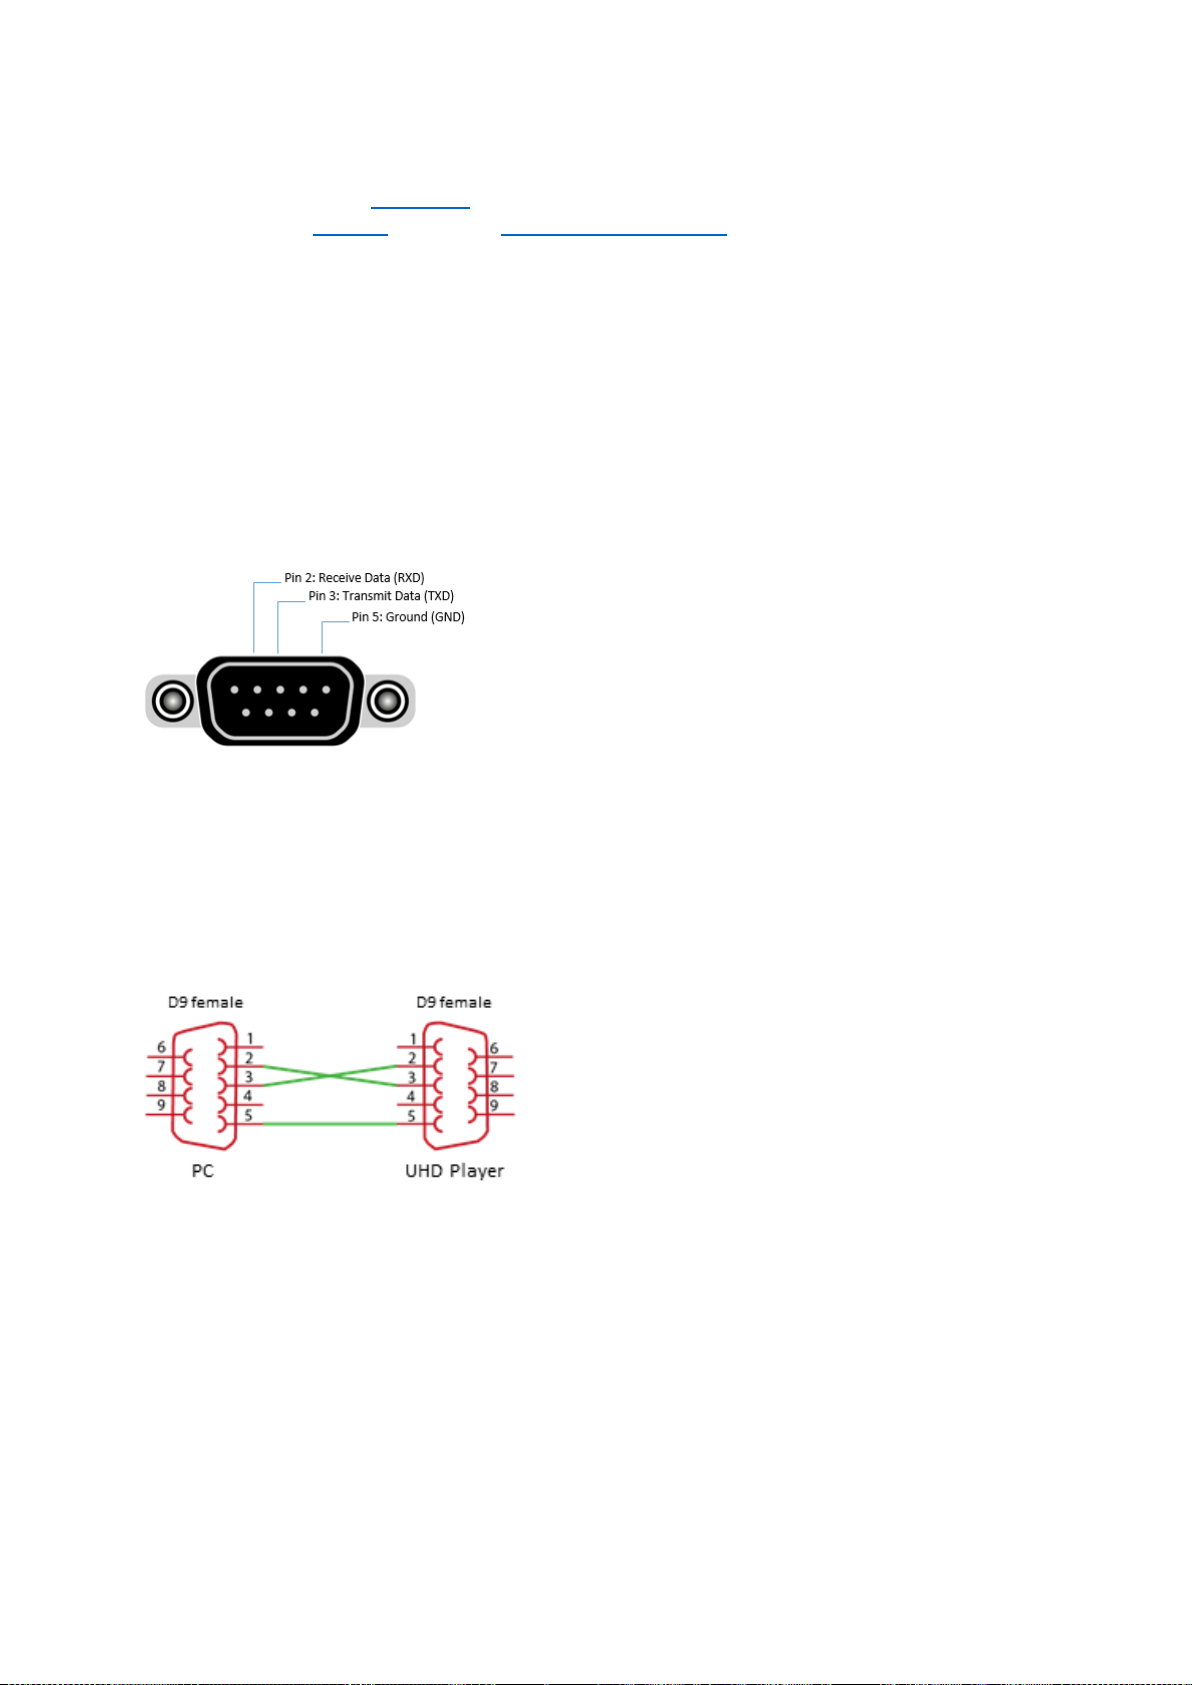
66
14.1. RS232 INTERFACE
The UHD Player offers an RS232 port for serial communication. This allows the UHD Player to receive
commands via any terminal or send out serial commands via Avio.
The following are the default serial settings for the UHD Player. The baud rate can be changed but all
other parameters are fixed.
Baud rate: 9600
Data: 8 bit
Parity: none
Stop: 1 bit
Flow control: None
The Pin assignment of the UHD Player’s RS232 interface is displayed below.
Fig. 48: PIN assignment RS232 interface
Use a null-modem cable without handshake to connect your device to the RS232 interface. You may
want to use a null-modem cable that can be purchased from AV Stumpfl (Accessory: STK-C012).
Fig. 49: Null-modem cable without handshake (AV Stumpfl Accessory: STK-C012)
Page 71
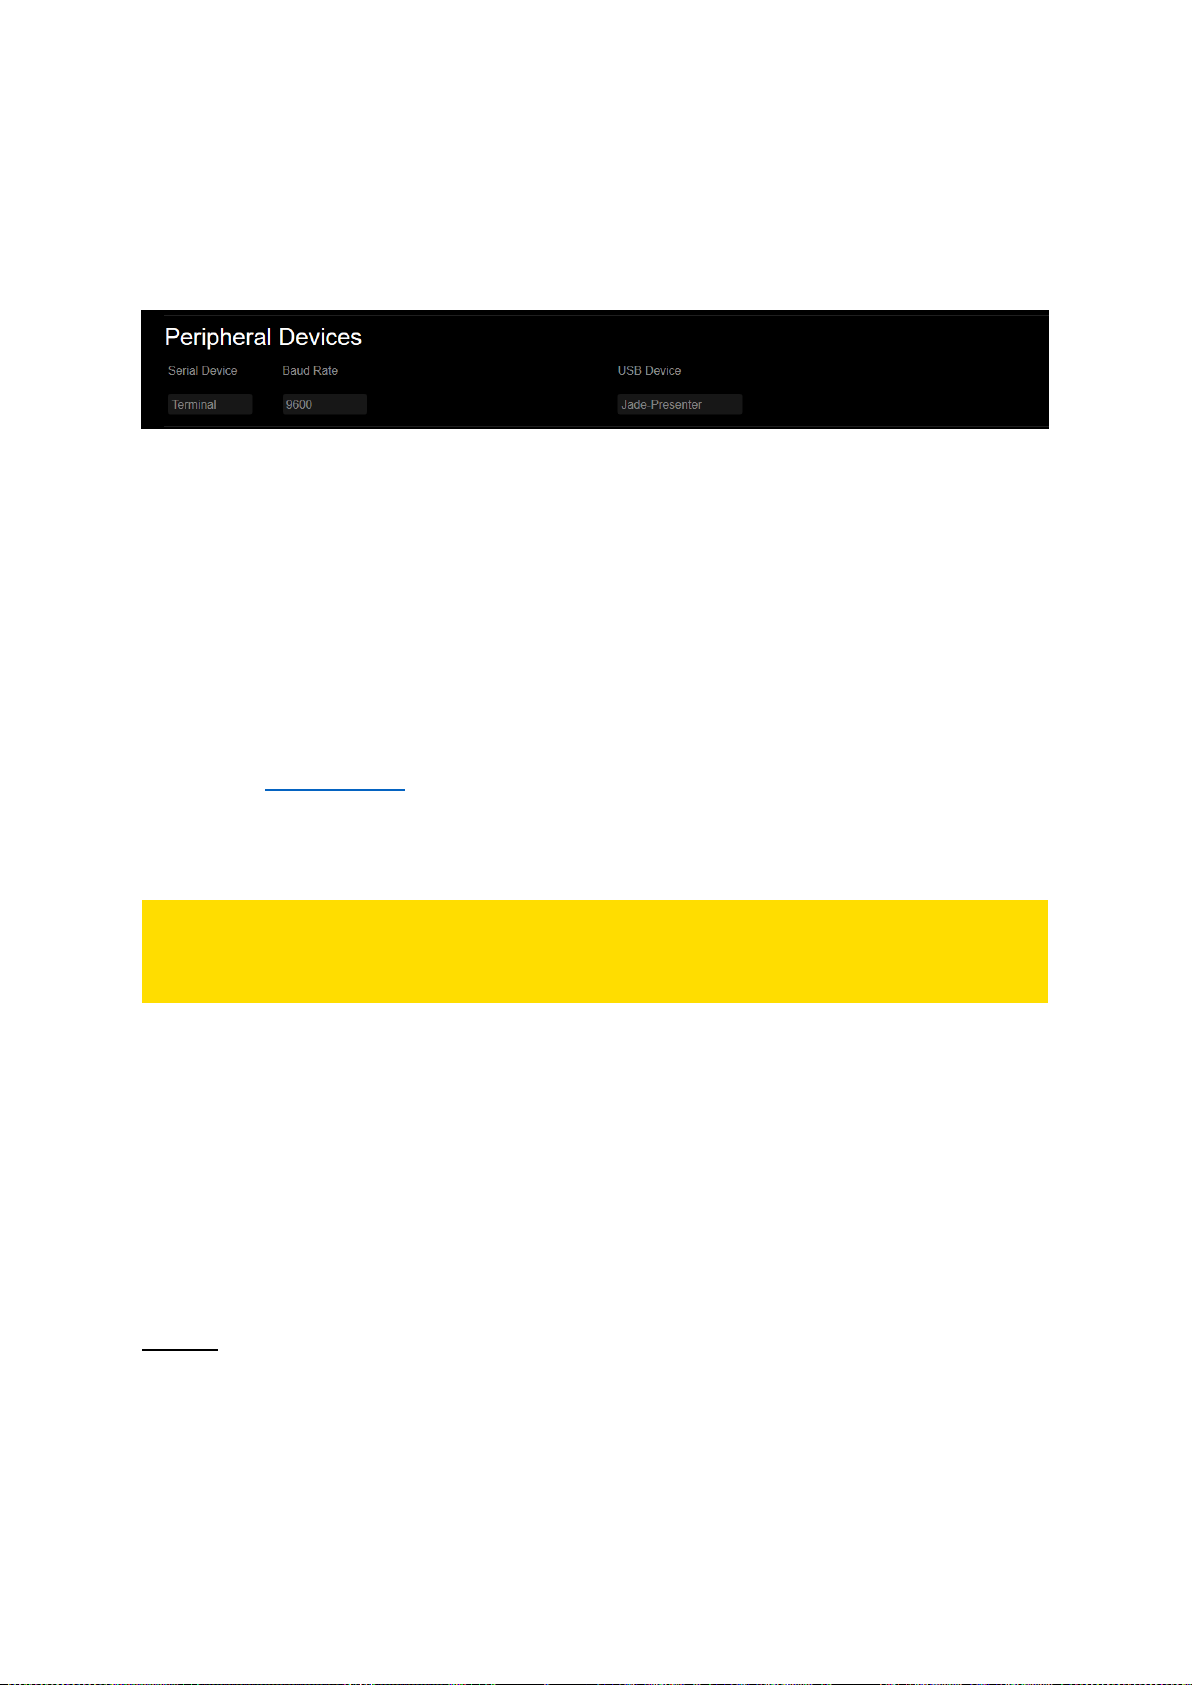
67
14.1.1. TERMINAL
To receive serial commands from any terminal via the player’s RS232 interface, the serial device
needs to be set up. Click on [ADVANCED SETTINGS] in the menu bar of the Web Interface and then
on [Peripheral Devices].
Fig. 50: Peripheral Devices settings in the Web Interface
[Serial Device]
Please choose “Terminal” from the drop-down list.
[Baud Rate]
The default baud rate is set to “9600”. If you need a different one that fits to your sending device,
choose it from the drop-down list. Other available options are: 2400, 4800, 14.400, 19.200, 28.800,
38.400, 57.600 or 115.200.
Please confirm your changes by pressing [Apply Settings] at the bottom of the page.
Now that the RS232 interface is set up on the software side, use a null-modem cable without
handshake to connect the UHD Player to your terminal device (e.g. PC).
The UHD Player is now ready to receive your serial command strings.
PLEASE NOTE:
For all serial and UDP commands, the command string must be terminated with carriage return
and line feed (CR LF or 0x0D 0x0A)!
When sending commands with arguments, do not put any space character between the command
and the argument.
Command: <command><argument> [CR LF]
Example:
Setting the volume to the value “8” using the command “VOLUME=”
Command: VOLUME=8 [CR LF]
When the UHD Player receives a command string and determines that it is valid, it performs the
command and sends a response to the host device (when using UDP: on the same port).
Command: <command> [CR LF]
Response: Received:<command> [CR LF]
Example
Command: PAUSE [CR LF]
Response: Received:PAUSE [CR LF]
When the UHD Player is unable to perform the command because the command is invalid or
contains invalid parameters, the player returns nothing.
Page 72
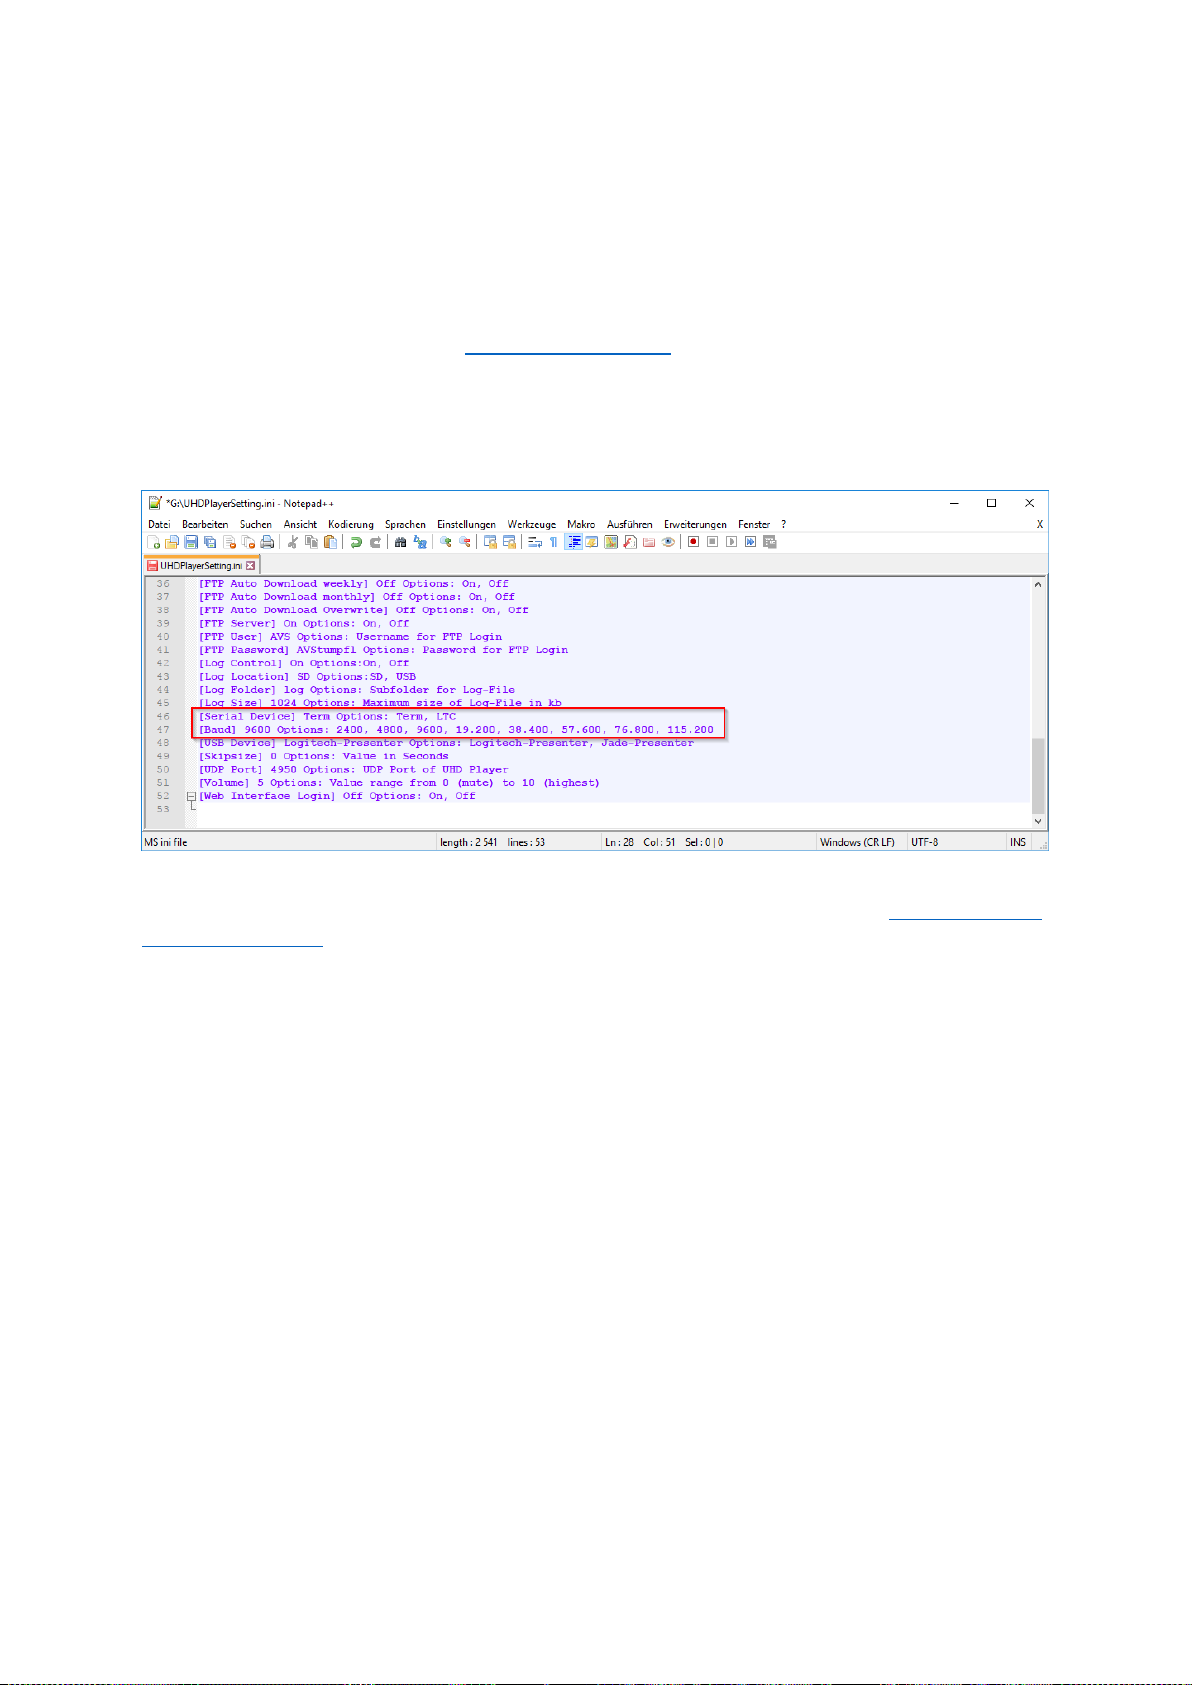
68
When the UHD Player receives a request string (characterized by an ending with a “?”), it will return
the corresponding answer.
EXAMPLE:
Request: MUTE? [CR LF]
Response: MUTE=0
For all available commands, see the RS232/UDP commands chapter in the Appendix.
In the initialization file (“UHDPlayerSetting.ini”), the settings for the player’s peripheral devices can
be found at the lower end.
Fig. 51: Peripheral Devices options in the Initialization File
For more information about how to handle the initialization file, please refer to the Configuration via
the Initialization File chapter.
Page 73
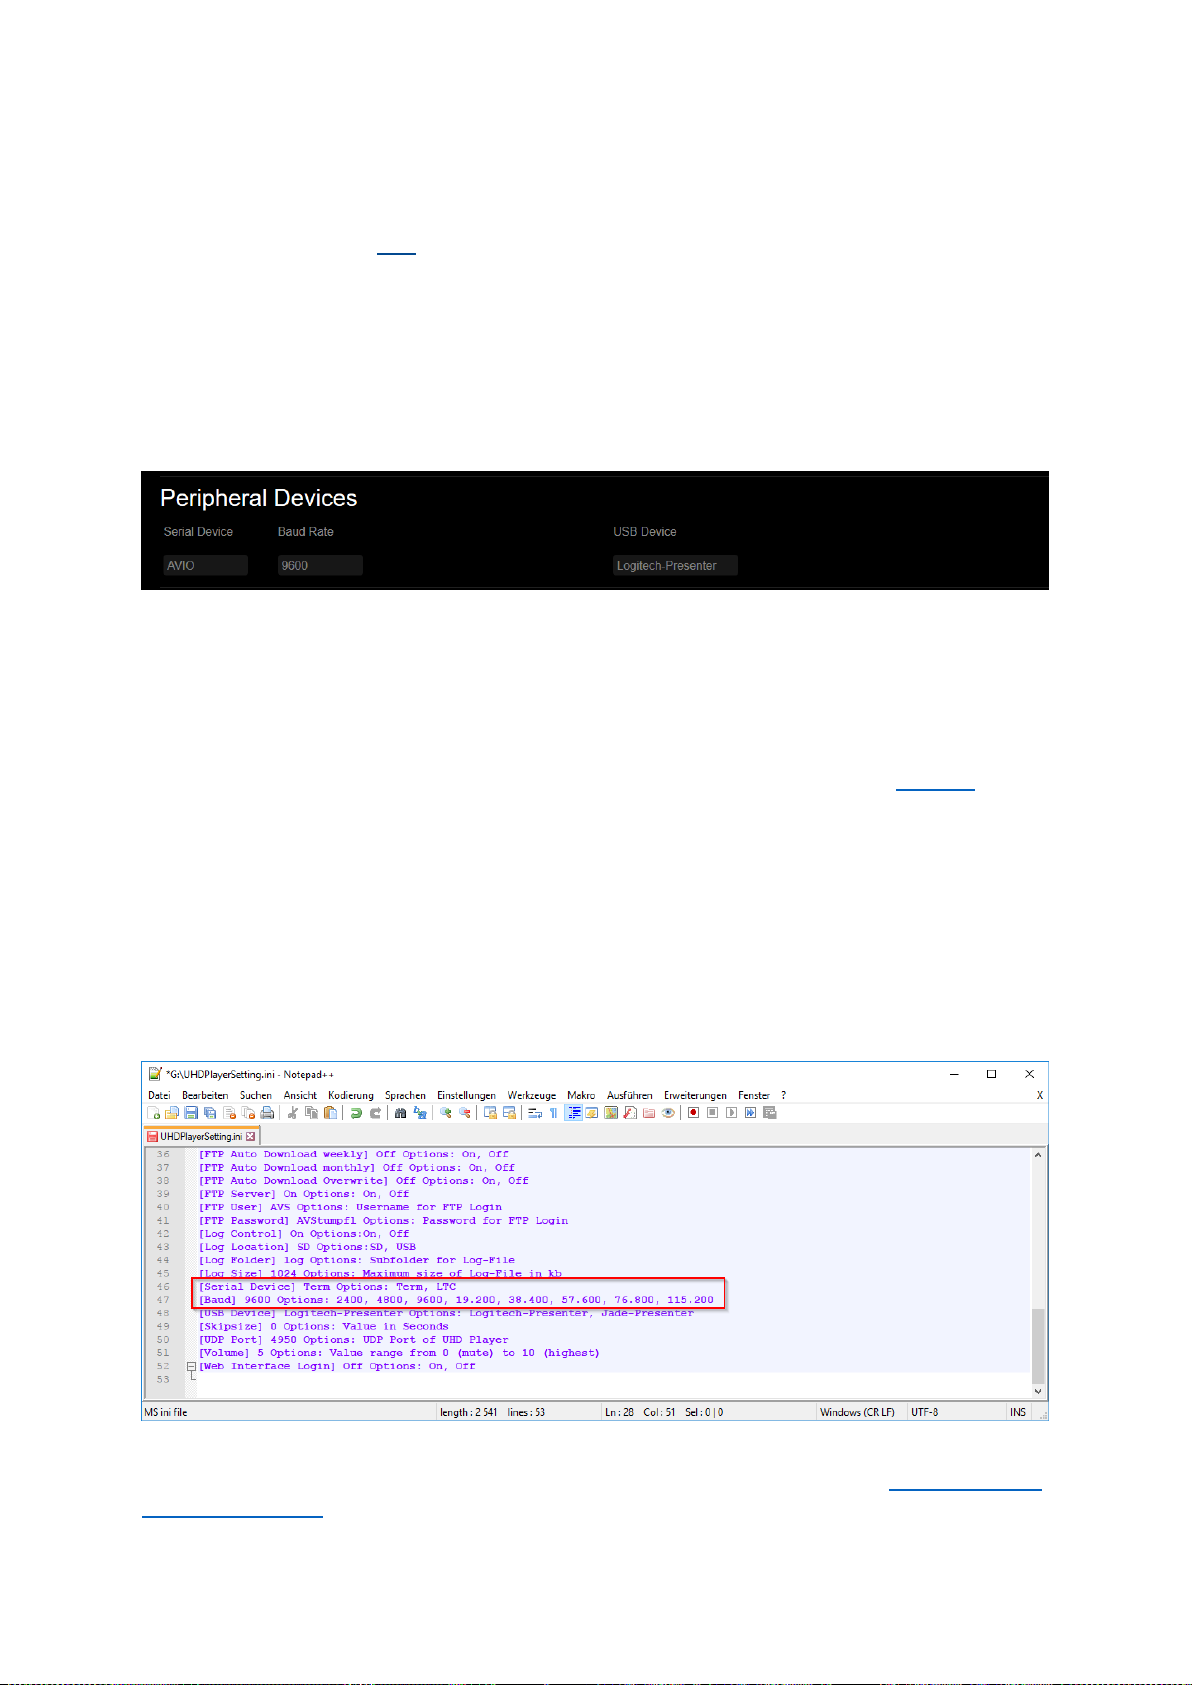
69
14.1.2. SERIAL OUT VIA AVIO
When using a UHD Player with an Avio PRO License (you can check the license on the player’s initial
Avio Settings screen—see Avio), Avio can be used to send out serial messages via the RS232 interface
from your UHD Player to other devices, instead of only receiving serial messages.
Every UHD Player can be updated to an Avio Pro License. Please contact the AV Stumpfl Sales
department.
The RS232 interface needs to be configured to be able to send serial messages. Click on [ADVANCED
SETTINGS] in the menu bar of the Web Interface and then on [Peripheral Devices].
Fig. 52: Peripheral Devices settings in the Web Interface
[Serial Device]
Please choose “Avio” from the drop-down list. If this option is not available, your player does not
have the Avio Pro License. In this case, please contact AVStumpfl to upgrade your Avio license.
[Baud Rate]
This baud rate setting only affects the RS232 interface when it is used as Input (see “Terminal”
section). As soon as the interface is controlled via AVIO, the baud rate needs to be set up in the AVIO
driver.
Please confirm your changes by pressing [Apply Settings] at the bottom of the page.
For further information on how to work with Avio, please refer to the Avio manual (in progress).
In the initialization file (“UHDPlayerSetting.ini”), the settings for the player’s peripheral devices can
be found at the lower end.
Fig. 53: Peripheral Devices options in the Initialization File
For more information about how to handle the initialization file, please refer to the Configuration via
the Initialization File chapter.
Page 74
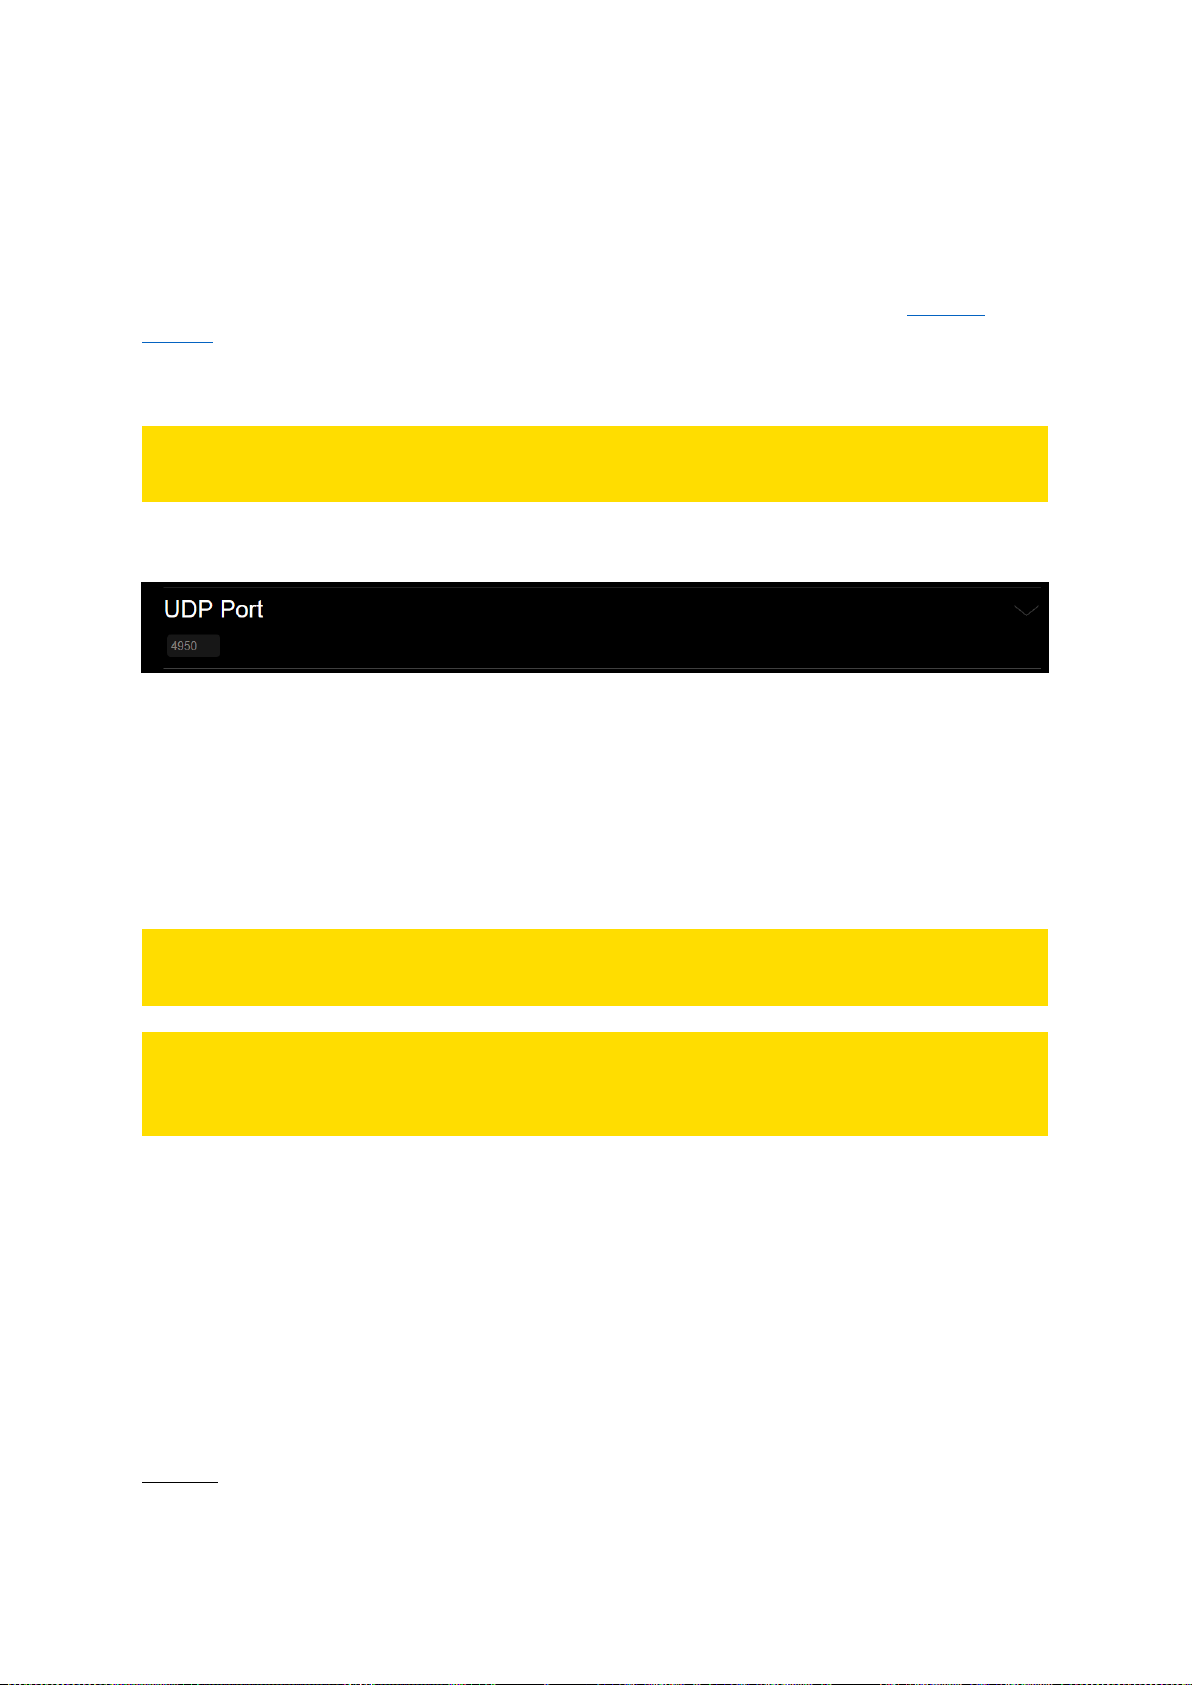
70
14.2. UDP CONTROL
The UHD Player can be remotely controlled via UDP network protocol:
Control the playback, edit the player’s settings and query the player’s file and playback state.
Therefore, the UHD Player needs to be integrated correctly into the network. See the Network
Settings chapter. The UHD Player’s receiving UDP port needs to be set up as well. By default, the UDP
port is set to 4950. If this port is already in use on your control device, assign a free UDP port in the
Web Interface.
PLEASE NOTE:
It is not recommended to change the player’s UDP port.
Click on [ADVANCED SETTINGS] in the menu bar of the Web Interface and then on [UDP Port].
Fig. 54: UDP Port setting in the Web Interface
[UDP Port]
The default UDP Port is set to 4950. Enter the new UDP port in the text field.
Please confirm your changes by pressing [Apply Settings] at the bottom of the page.
Now that the UDP port is set up, the UHD Player is ready to receive your command strings. In your
control device, start a UDP connection to the UHD Player’s IP address with the corresponding UDP
port for incoming and outgoing messages.
PLEASE NOTE:
Set the same UDP port for all players when they run in sync mode.
PLEASE NOTE:
For all serial and UDP commands, the command string must be terminated with carriage return
and line feed (CR LF or 0x0D 0x0A)!
When sending commands with arguments, do not put any space character between the command
and the argument.
Command: <command><argument> [CR LF]
Example:
Setting the volume to the value “8” using the command “VOLUME=”
Command: VOLUME=8 [CR LF]
When the UHD Player receives a command string and determines that it is valid, it performs the
command and sends a response to the host device (when using UDP: on the same port).
Command: <command> [CR LF]
Response: Received:<command> [CR LF]
Example
Command: PAUSE [CR LF]
Response: Received:PAUSE [CR LF]
Page 75
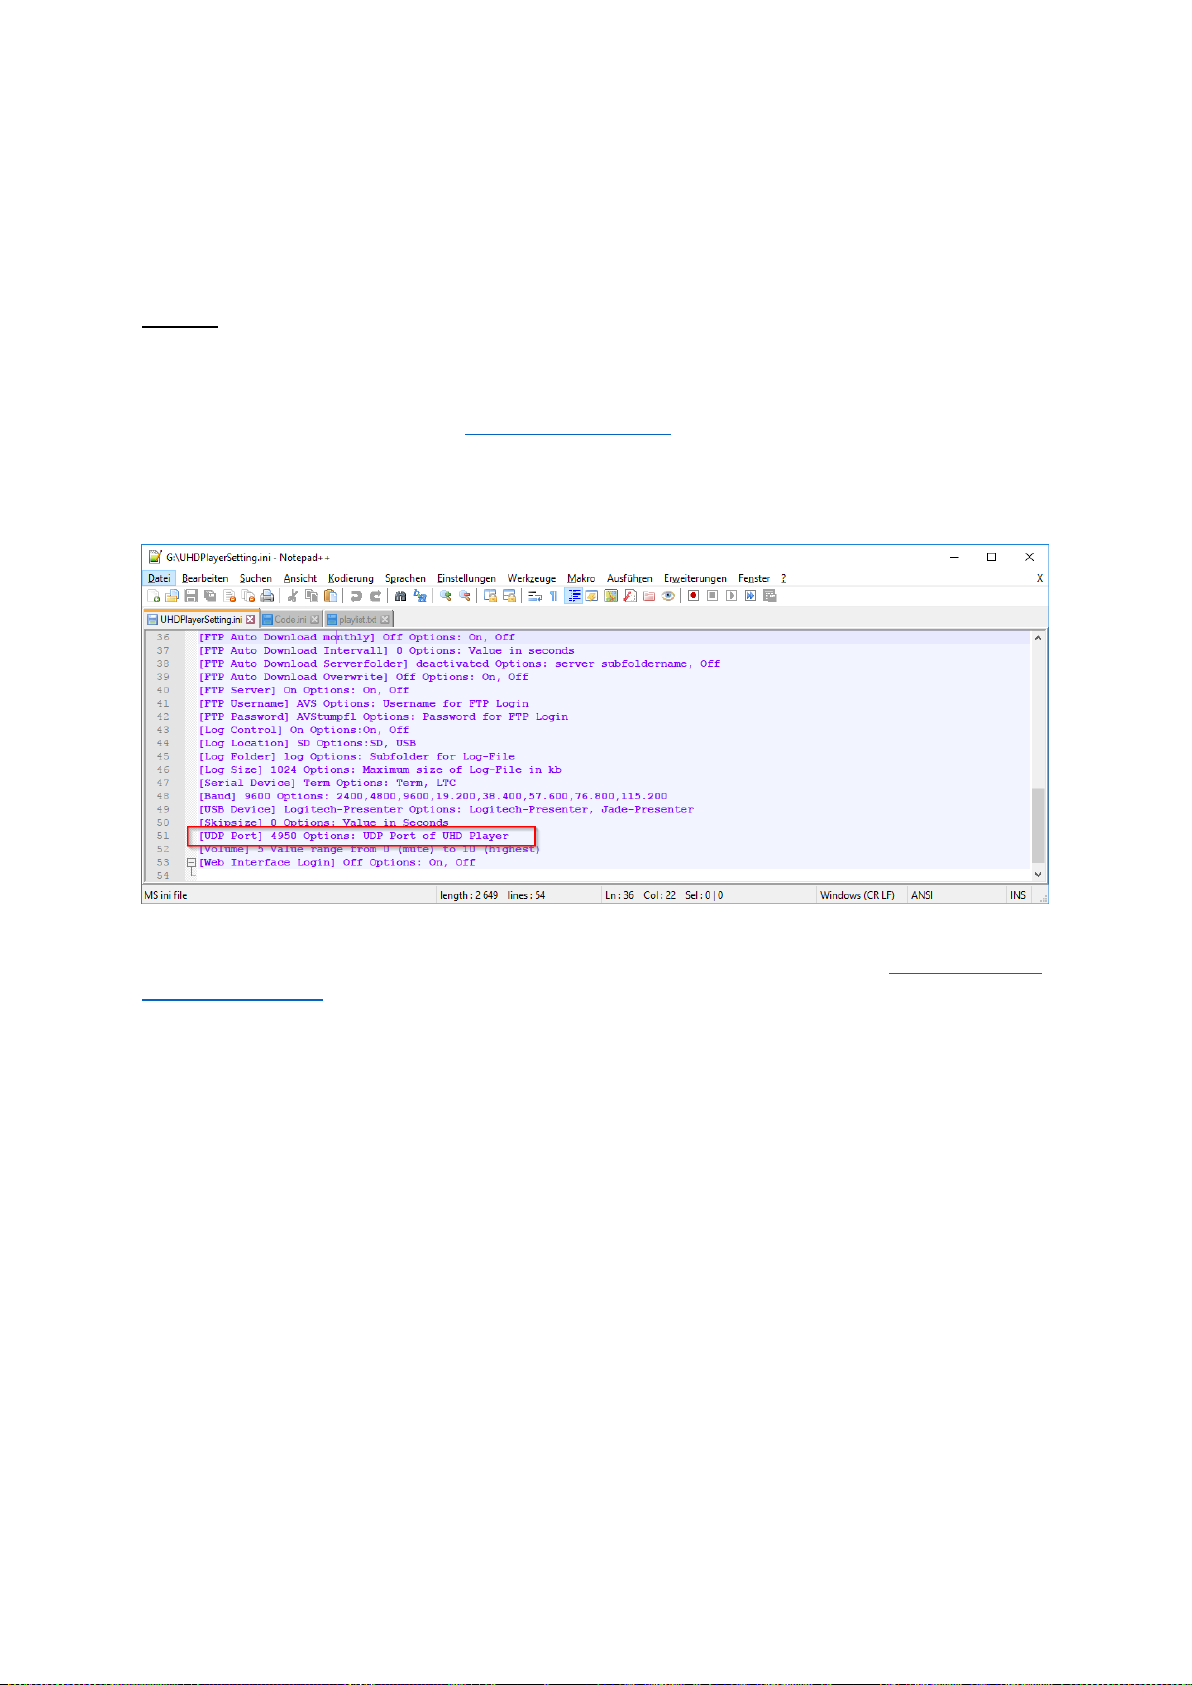
71
When the UHD Player is unable to perform the command because the command is invalid or
contains invalid parameters, the player returns nothing.
When the UHD Player receives a request string (characterized by an ending with a “?”), it will return
the corresponding answer.
Example
Request: MUTE? [CR LF]
Response: MUTE=0
For all available commands, see the RS232/UDP commands chapter in the Appendix.
In the initialization file (“UHDPlayerSetting.ini”), the setting for the player’s UDP Port can be found at
the lower end.
Fig. 55: UDP Port option in the initialization file
For more information about how to handle the initialization file, please refer to the Configuration via
the Initialization File chapter.
Page 76

72
14.3. USB DEVICES
The UHD Player can be remotely controlled by the following USB devices:
- Logitech Presenter
- Jade Presenter
- Keyboard
- Mouse
The USB device must be plugged into one of the USB peripheral ports at the UHD Player’s right side.
The following sections will give you additional information about how to configure and use these
devices.
Page 77
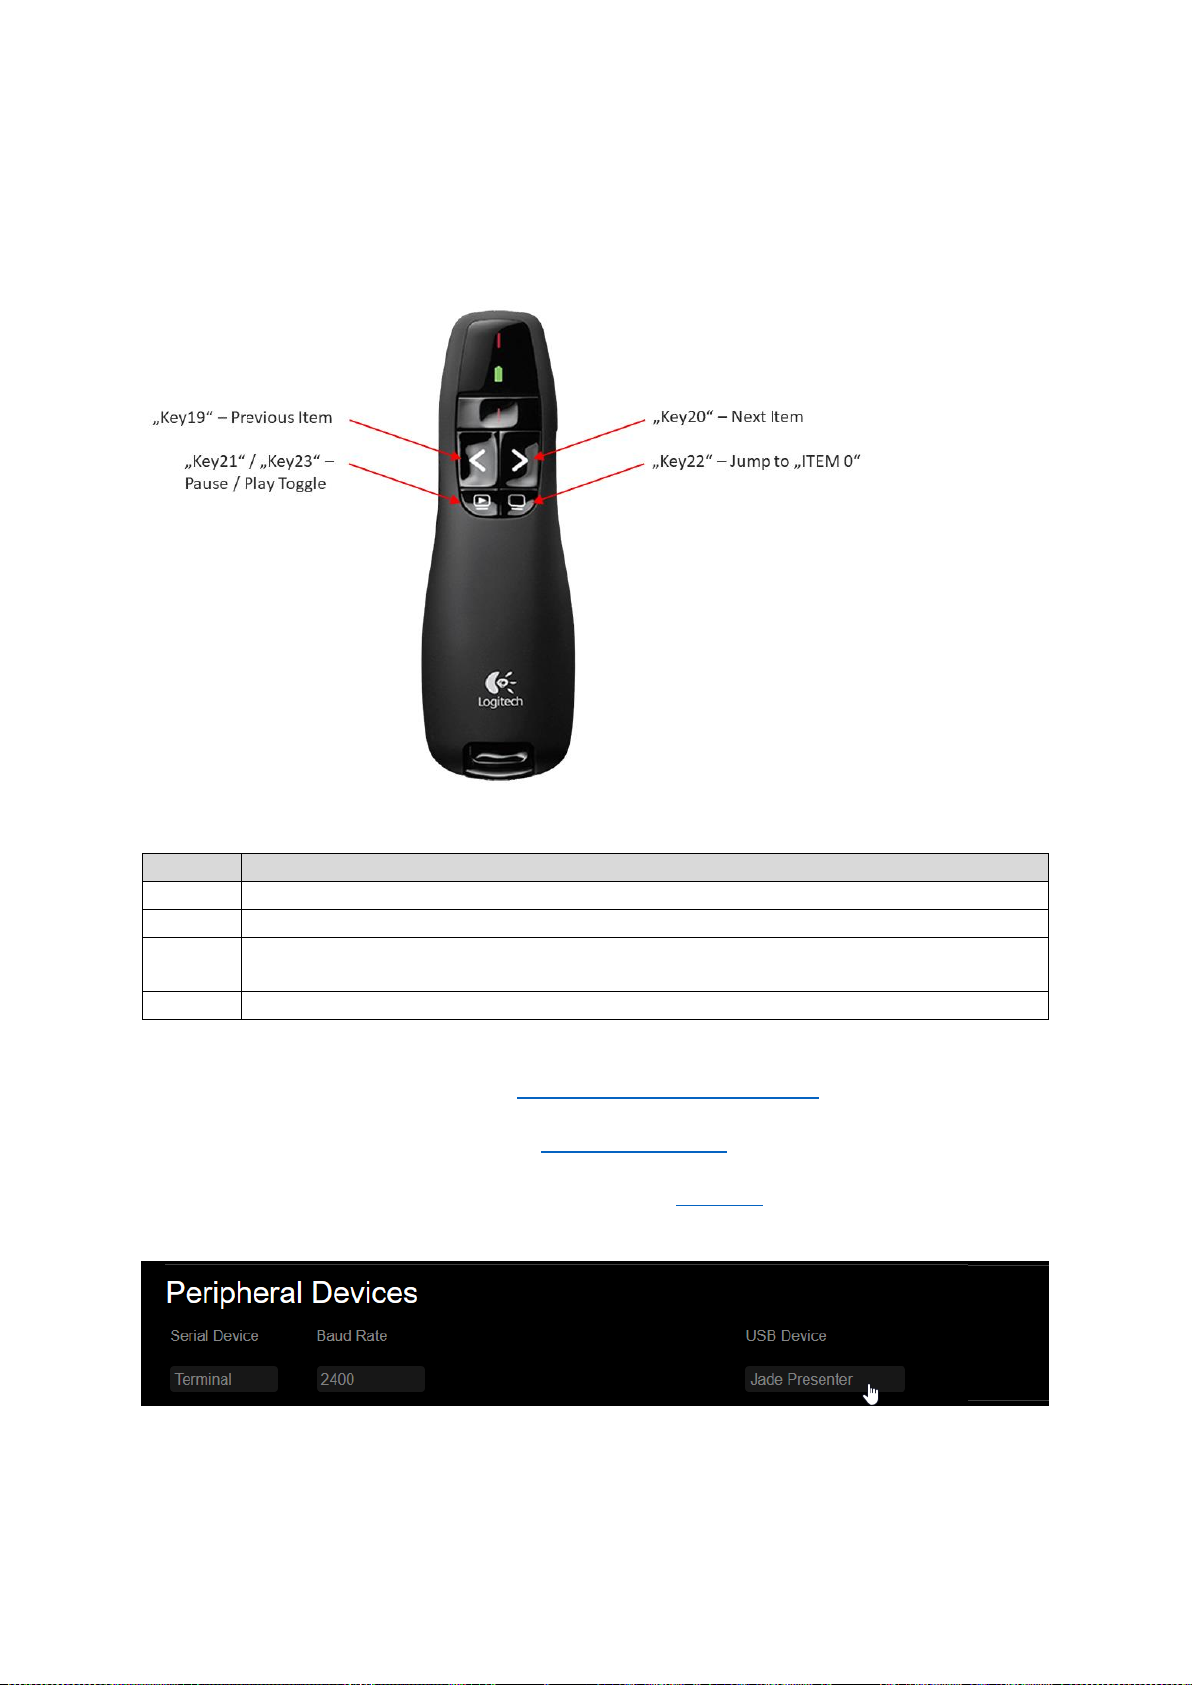
73
14.3.1. LOGITECH PRESENTER
The Logitech Presenter R400 allows you to control the UHD Player via one of the USB peripheral
ports. It has eight buttons that have default actions assigned—see image and list below.
Fig. 56: The Logitech R400 Presenter with default key assignment
Key
Action
Key19
Previous Item
Key20
Next Item
Key21 /
Key23
Toggles between Pause and Play
Key22
Jumps to “ITEM 0”— the first file in the list
It is also possible to use customized button assignments via the playlist. Information on how to make
your own assignment can be found in the Playlist - Customized Assignments chapter.
Plug the presenter’s receiver into one of the USB peripheral ports on the UHD Player’s right side.
In the Web Interface, click on [ADVANCED SETTINGS] in the menu bar and then on [PERIPHERAL
DEVICES]. The drop-down menu will open and the settings for the peripheral devices will appear.
Fig. 57: Peripheral Devices settings in the Web Interface
Click the field below [USB Device], choose your presenter from the drop-down list and click [Apply
Settings].
Page 78
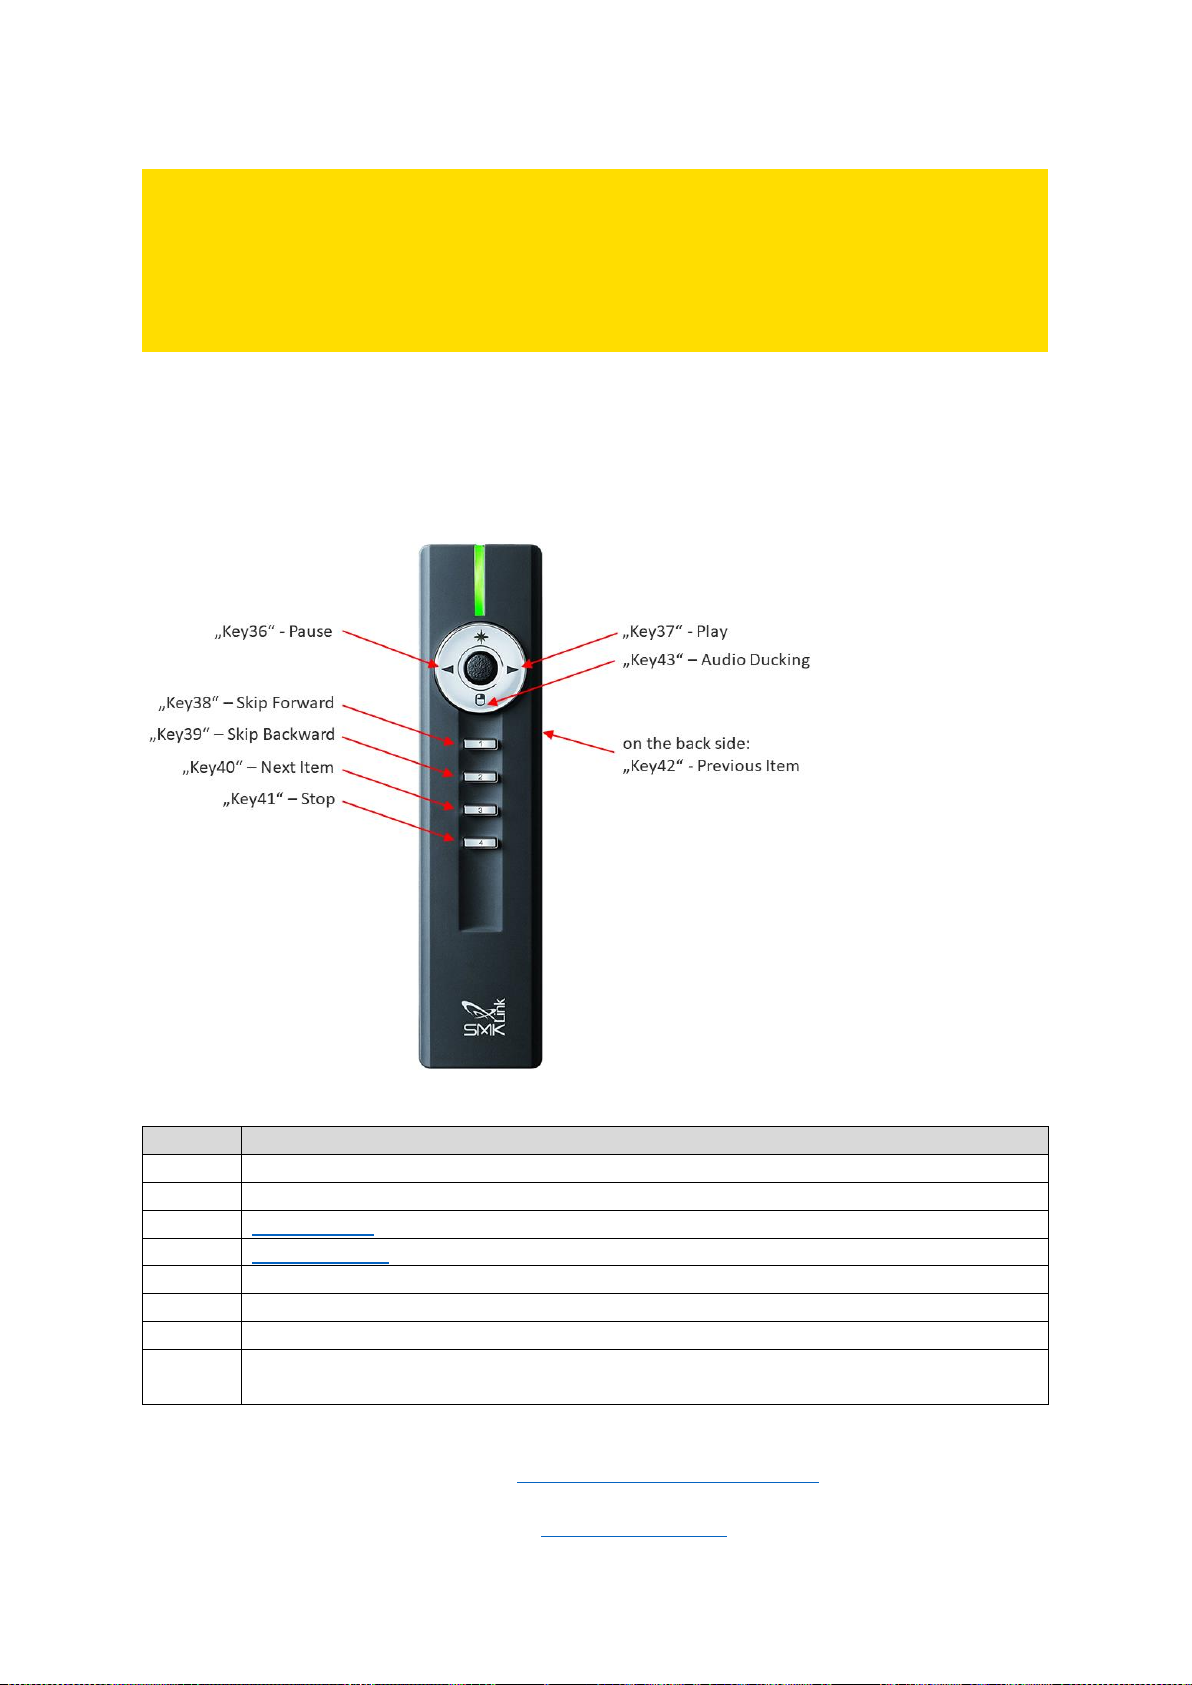
74
PLEASE NOTE:
While the UHD Player shows its Web Interface, the presenter’s buttons as mentioned above are
without function. In this state, the presenter acts as a mouse device: The pointing stick in the
middle moves the mouse pointer and the button on the back-side executes a left-mouse-click.
Insert the data carrier into the player, or if it is already plugged in, toggle the display back into
playback mode using the keyboard shortcut [CTRL+F5] or [CTRL+S].
14.3.2. JADE PRESENTER
The Jade Presenter allows you to control the UHD Player via one of the USB peripheral ports. It has
eight buttons that have default actions assigned—see image and list below.
Fig. 58: The Jade Presenter with default key assignment
Key
Action
Key36
Pause
Key37
Play
Key38
Skips forward within the current media file
Key39
Skips backward within the current media file
Key40
Next Item
Key41
Stop
Key42
Previous Item
Key43
Audio Ducking—reduces the current volume by 5 values and toggles it back to the
initial value by the next click
It is also possible to use customized button assignments via the playlist. Information on how to make
your own assignment can be found in the Playlist - Customized Assignments chapter.
Plug the presenter’s receiver into one of the USB peripheral ports on the UHD Player’s right side.
Page 79
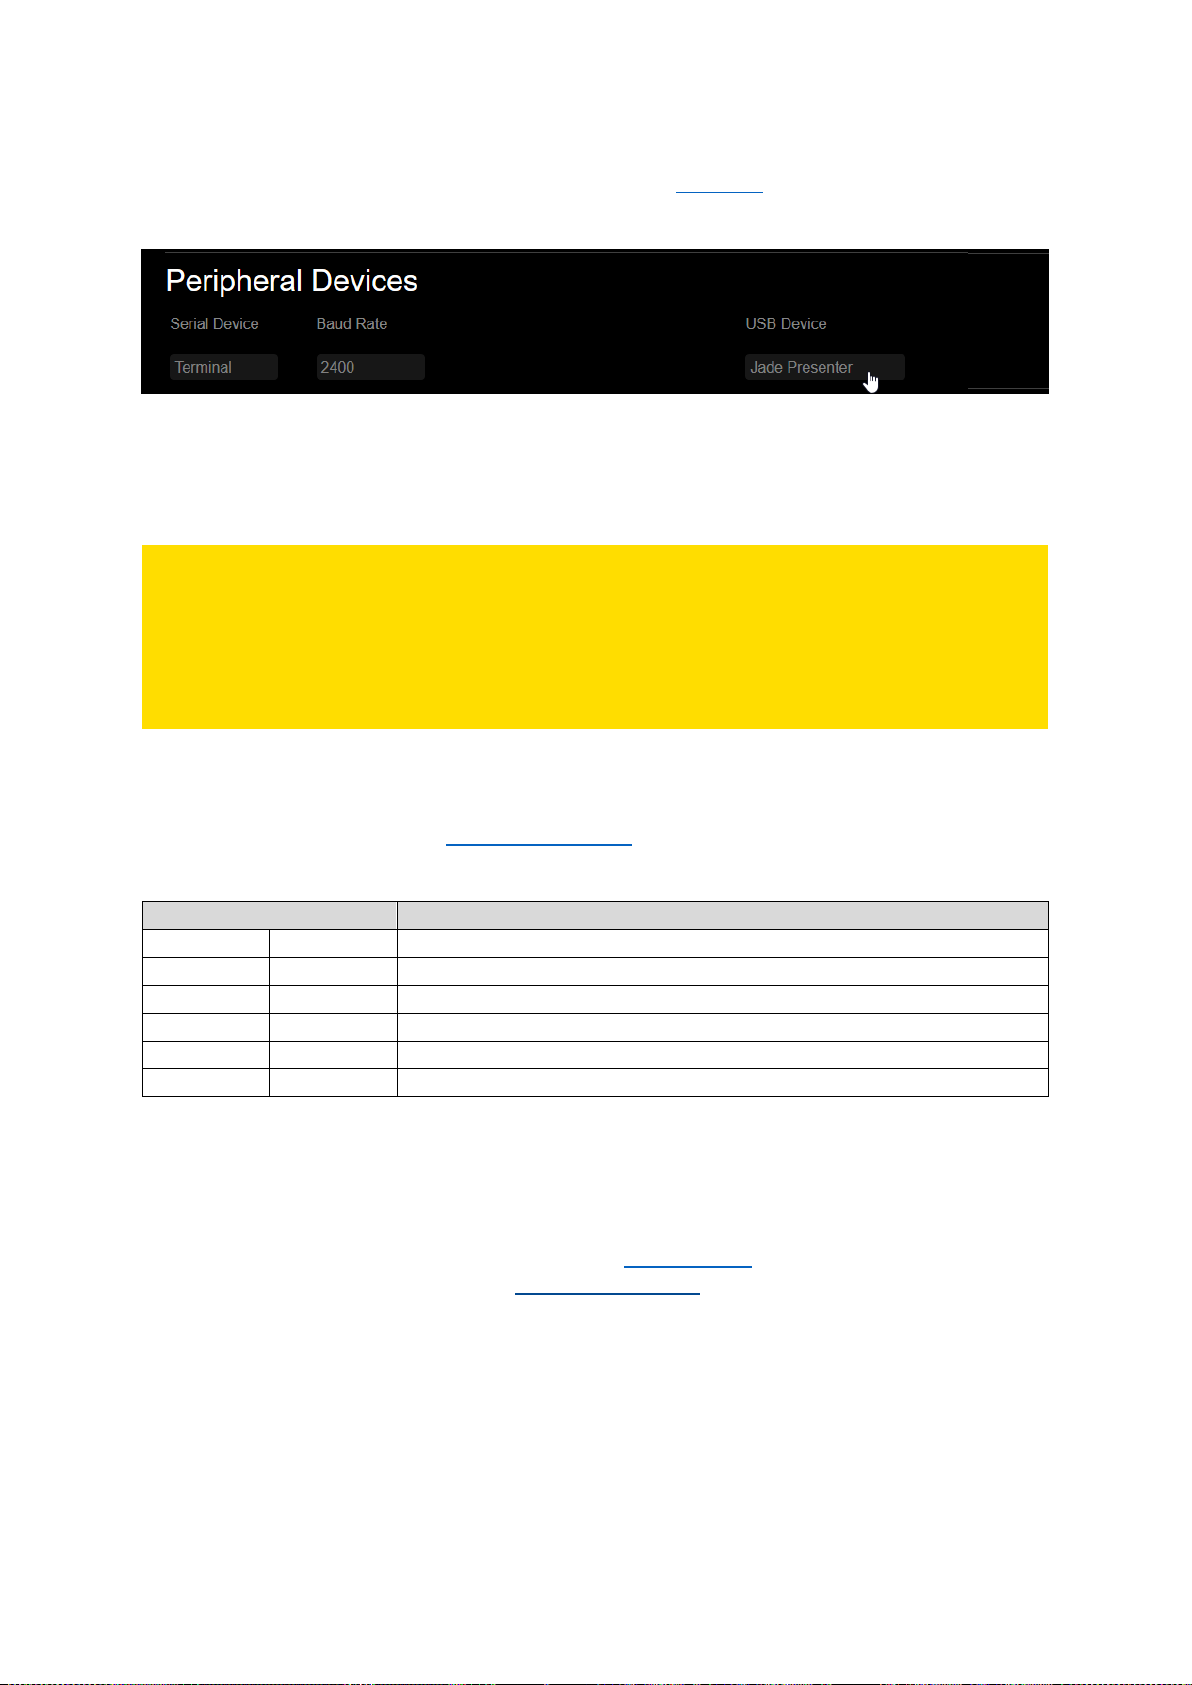
75
In the Web Interface, click on [ADVANCED SETTINGS] in the menu bar and then on [PERIPHERAL
DEVICES]. The drop-down menu will open and the settings for the peripheral devices will appear.
Fig. 59: Peripheral Devices settings in the Web Interface
Click the field below [USB Device], choose your presenter from the drop-down list and click [Apply
Settings].
PLEASE NOTE:
While the UHD Player shows its Web Interface, the presenter’s buttons as mentioned above are
without function. In this state, the presenter acts as a mouse device: The pointing stick in the
middle moves the mouse pointer and the button on the back-side executes a left-mouse-click.
Insert the data carrier into the player, or if it is already plugged in, toggle the display back into
playback mode using the keyboard shortcut [CTRL+F5] or [CTRL+S].
14.3.3. KEYBOARD
Connect a keyboard to one of the USB peripheral ports on the UHD Player’s right side. The following
functions can be activated by executing the corresponding keyboard shortcut.
Keyboard Shortcut
Function
Ctrl+F1
Ctrl+E
Toggle Auto EDID
Ctrl+F2
Ctrl+F
Set Resolution to 1920x1080p60
Ctrl+F3
Ctrl+U
Set Resolution to 3840x2160p60
Ctrl+F4
Ctrl+D
Toggle DHCP
Ctrl+F5
Ctrl+S
Toggle Settings / Playback
Ctrl+F12
Ctrl+R
Load Default Configuration (press for 5 Seconds for a factory reset)
The keyboard shortcuts are also listed in the player’s Web Interface on the “System” page.
14.3.4. MOUSE
The complete configuration of the UHD Player via the Web Interface can be done using a mouse.
Simply connect your mouse to one of the USB peripheral ports on the UHD Player’s right side and
then remove the data carrier from the player (or press Ctrl+S if a keyboard is also attached), then the
Web Interface will appear.
You may browse through all functions, like you do when connecting to the player’s Web Interface via
your internet browser. An on-screen keyboard will open when text fields need to be edited.
Page 80
76
14.4. GPIOS - REMOTE IN
The UHD Player provides 16 GPIOs that can be used to control the playback with various, customized
devices, e.g. buttons, switches and any kind of sensor. The GPIO triggers listen for pin state changes
and then perform their default action or a customized one.
The GPIO1 … GPIO16 are specified as Key1 … Key16.
The default key assignment is:
“Key1” starts playback [Item 1], “Key2” starts playback [Item 2], etc.
When no playlist is used, “Key1” triggers the first item on the data carrier in alphanumeric order, and
“Key2” triggers the second one, etc.
By using a playlist, it is possible to assign a different action to a GPIO trigger. See the list below for
available actions:
Attribute
Function
Distance (.d)
Allows you to jump a certain amount of items forward or backward in the playlist
Trick Mode (.t)
Toggles the playback between pause and play. “1” pauses the playback, “-1”
resumes the playback
Volume (.v)
Increases or reduces the volume by a certain amount of values (volume’s value
range extends from 0 (muted) to 10 (approx. 0 dB))
Jump (.j)
Allows you to jump a certain amount of seconds forward or backward within the
current playback
Random (.x)
Enables a random playback order (the value is always “1”)
See the Playlist - Customized Assignments chapter for details of how to perform user defined actions
when a GPIO is triggered.
Page 81
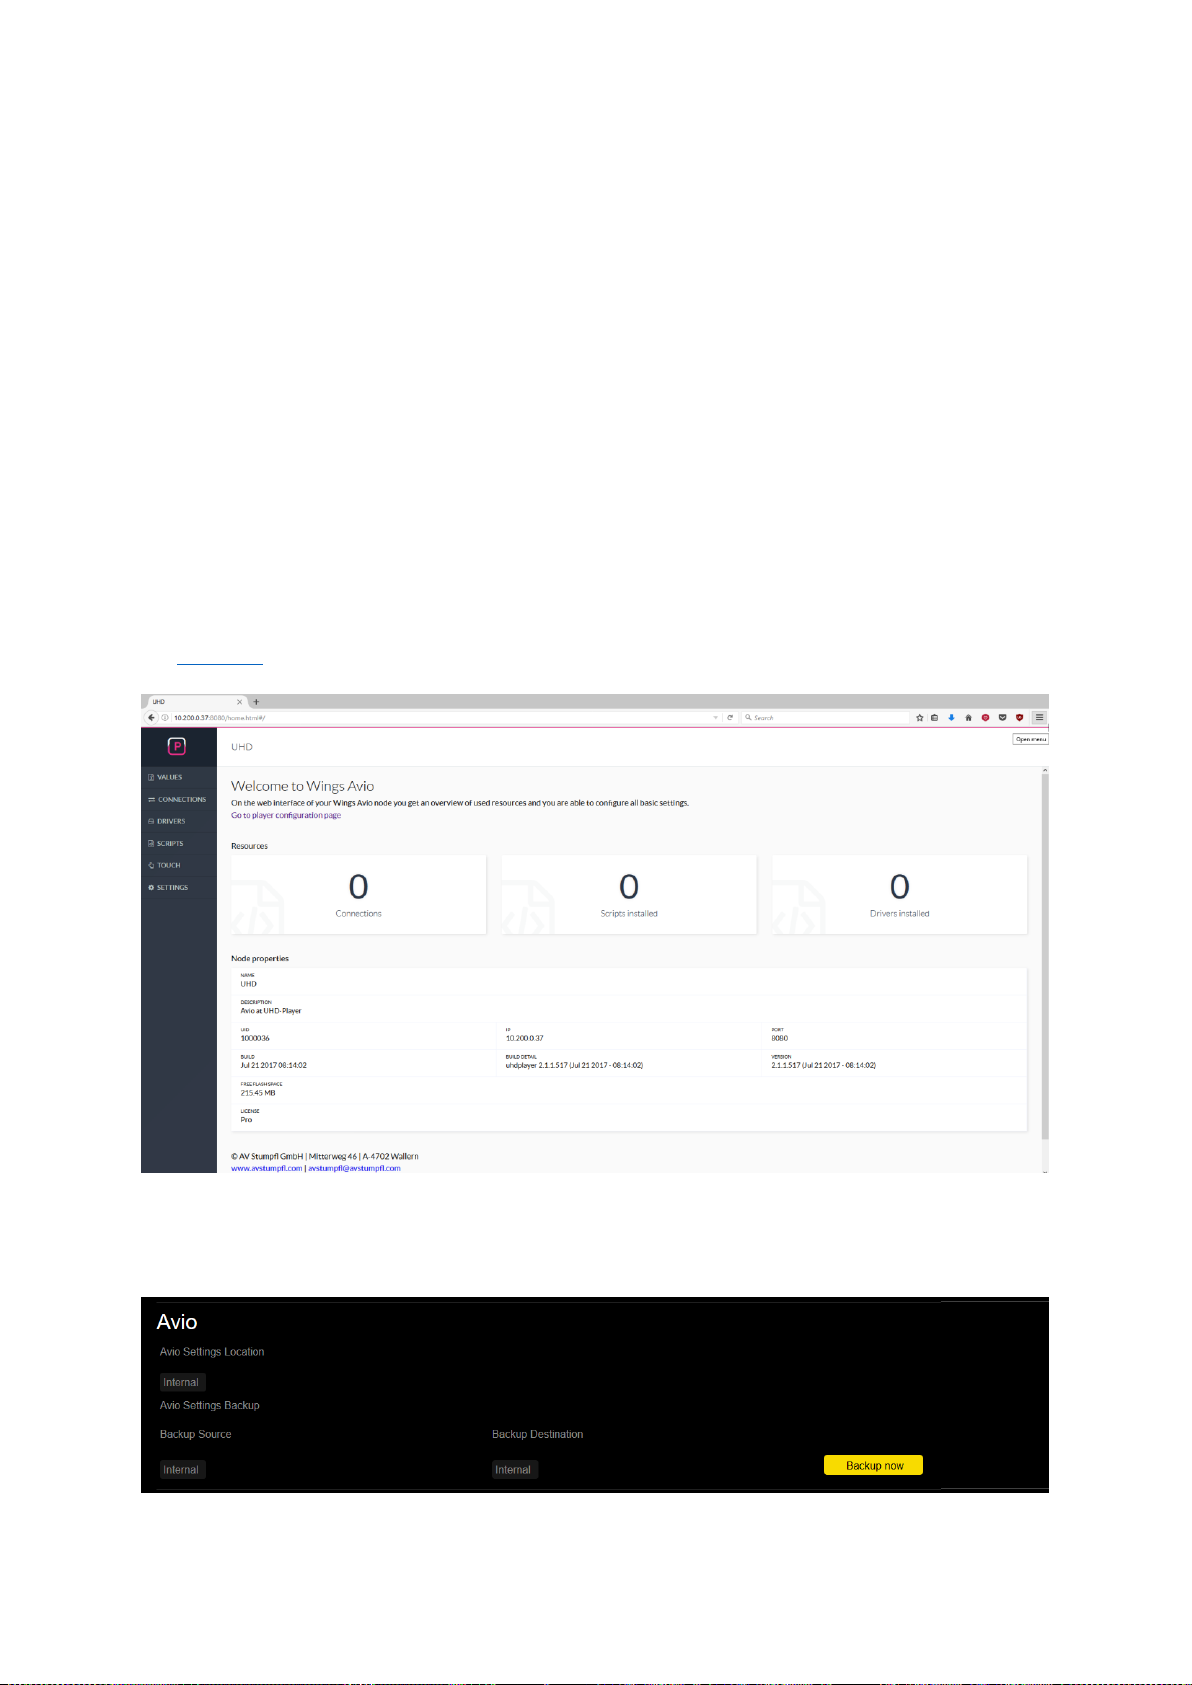
77
14.5. AVIO
Avio is a network protocol and a sophisticated control logic system developed for AV installations.
The idea behind Avio is to bring all devices of an AV installation, e.g. media servers, players, show
controllers, lights, effects, projectors, switchers, scalers, etc., to the same abstraction layer.
All device ports and controls show up automatically in a tree-view topology of the network and can
be “wired” to each other using a simple Drag & Drop editor. It is possible to connect the button of a
touch panel with a light bulb, but it is also possible to connect the gesture controls of a Microsoft
Kinect unit with the playback parameters of a UHD Player.
Avio is not working as a central server handling all connections and control logics; it follows a
different approach. Its design is decentralized, which makes it fail-passive. There is no central server
or computer required. Every Avio device communicates directly with the other devices and stores its
connection information. If one device fails, only the affected connections are interrupted, and the
only maintenance work required is the exchange of that single device for a new one with the
configuration (which is stored on a data carrier) of the existing one.
The UHD Player’s Avio Settings can be configured via the player’s Web Interface. Click on [AVIO] in
the menu bar and a new page with a design differing from all others will appear.
Fig. 60: Avio settings overview in the Web Interface
The location where all the UHD Player’s Avio settings will be saved can be chosen in the Web
Interface. Click on [ADVANCED SETTINGS] in the menu bar and then on [AVIO].
Fig. 61: Avio settings location in the Web Interface
Page 82

78
[Avio Settings Location]
The player will use the location that is entered here for its Avio settings (save changes and operate).
By default, the location of all Avio Settings is the SD Card. You may change this option to operate
from a USB data stick or from the player’s internal storage.
HOW TO BACK UP AVIO SETTINGS AND COPY THEM TO ANOTHER PLAYER
When a backup of all Avio Settings should be done from the Internal Storage (when operating from
this location) to the SD Card, choose “Internal” as [Backup Source] and “SD” as [Backup Destination].
Then click [Backup now] and all settings will be copied to the SD Card.
To transfer these Avio Settings to another player, insert the SD Card into that player and open its
Web Interface. Choose “SD Card” as [Backup Source] and, for example, “Internal” as [Backup
Destination], when operating from the Internal Storage. Then click [Backup now] and all settings will
be copied from the SD Card to the backup destination. Former Avio Settings that where saved to the
internal storage will be overwritten by this action.
PLEASE NOTE:
If you want to copy Avio Settings or content from one player to another one without changing any
player configuration (e.g. resolution, IP address), please be sure that there is no
UHDPlayerSettings.ini-File on the SD Card that you insert into the player. Otherwise, this
initialization file will overwrite the player’s previous settings.
Please confirm your changes by pressing [Apply Settings] at the bottom of the page.
For further information on how to control the player via Avio, please refer to the Avio manual (in
progress).
Page 83
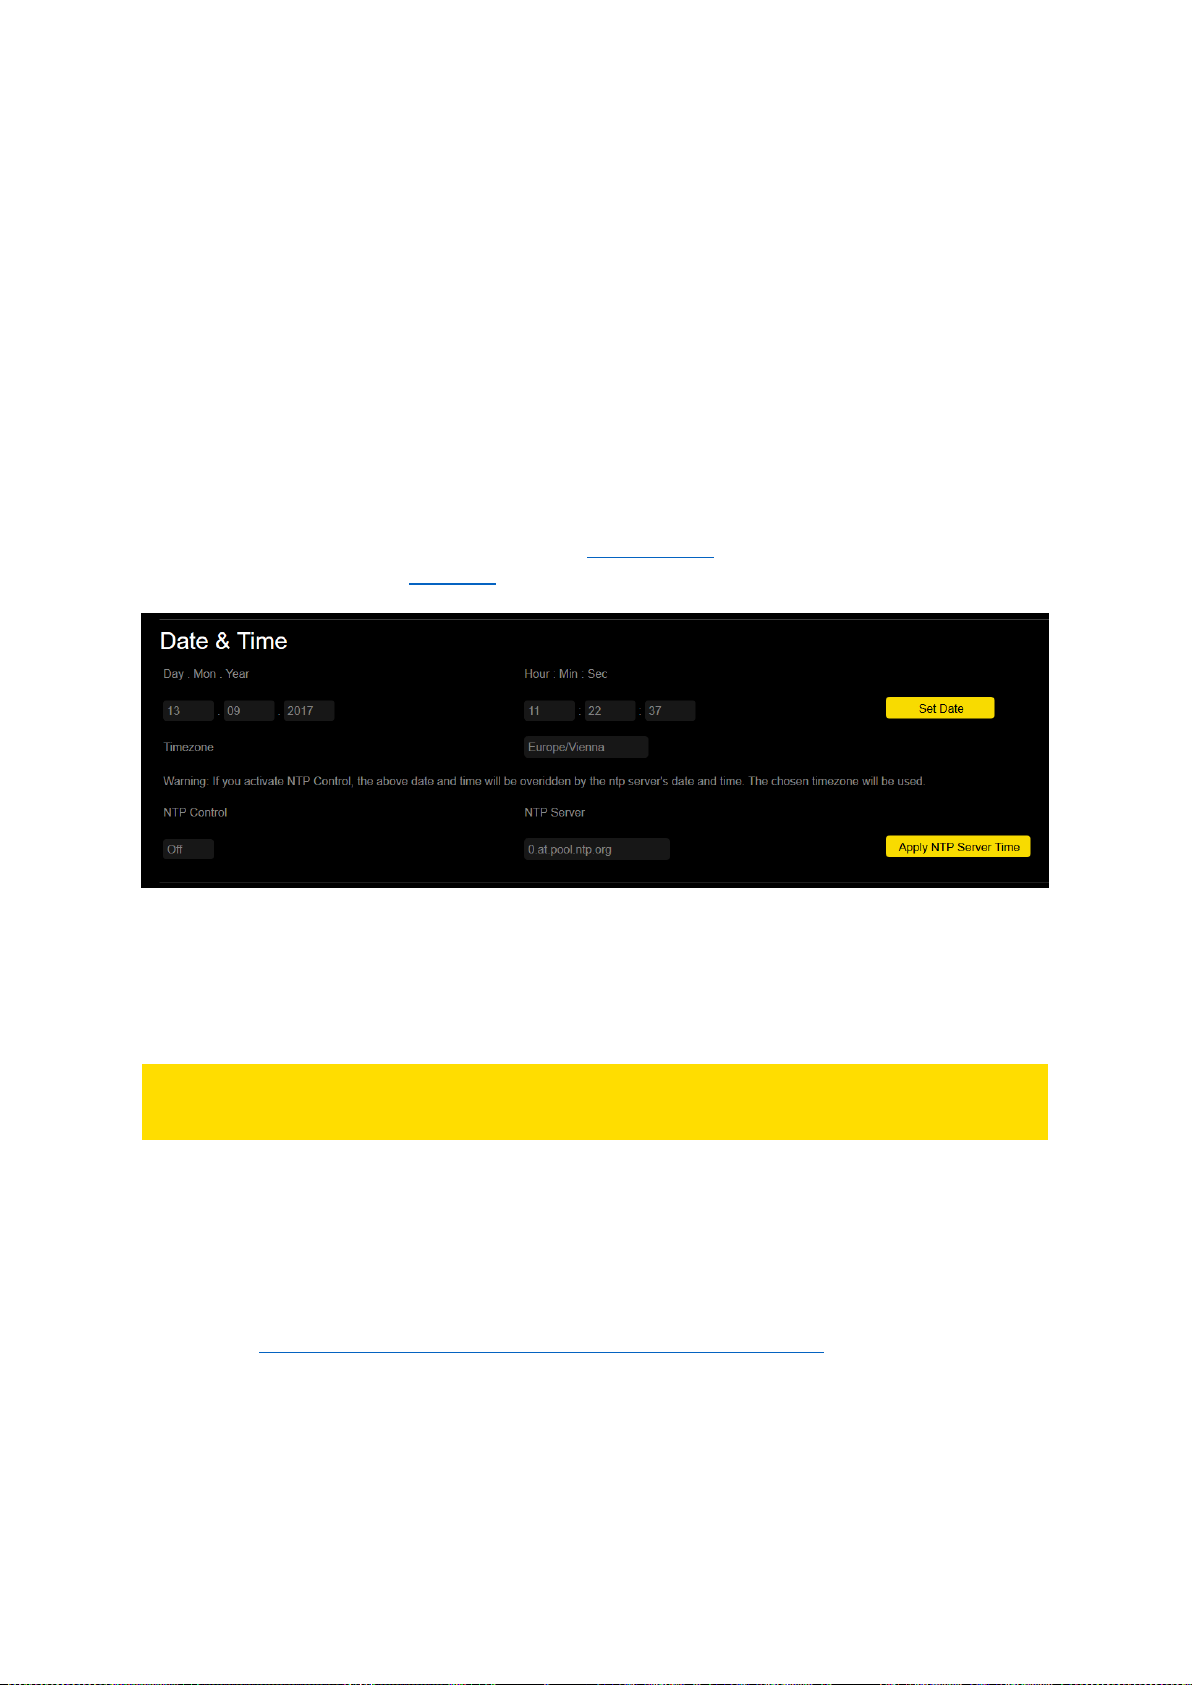
79
15. SYSTEM SETTINGS
15.1. DATE & TIME
By default, the UHD Player’s date and time will automatically be set by an external NTP Server, using
the time zone of Europe/Berlin. Network Time Protocol (NTP) is a networking protocol for clock
synchronization between computer systems over a network. Please note that internet access is
needed on your network. Every time the player is booted, it’s date and time will be synchronized
with the NTP Server’s time, according to the chosen time zone.
Without internet access, the player uses the date and time that is currently set.
Turn off NTP Control if you do not wish to synchronize to an NTP Server at all.
To edit the player’s date & time settings, open its Web Interface in your browser, click on
[ADVANCED SETTINGS] in the menu bar and then on [Date & Time].
Fig. 62: Date & Time settings in the Web Interface
[Day.Mon.Year] & [Hour.Min.Sec]
To manually edit the date and time, click on the highlighted fields and choose the correct entry for
the day, month and year from the drop-down lists, and then for the hour, minutes and seconds.
Confirm your changes by clicking on [Set Date].
PLEASE NOTE:
NTP Control needs to be set to “Off” before, otherwise these changes will not take effect.
[Timezone]
The time zone is only important when using NTP Control. The player then will receive the time from
the NTP Server according to your time zone.
To edit the current time zone, click in the text field below and enter the new one. The following
website lists the syntax of all time zones that can be set, please refer to column three of the table,
named “TZ”: https://en.wikipedia.org/wiki/List_of_tz_database_time_zones.
[NTP Control]
By default, NTP Control is set to “On” and the player receives its date and time from the NTP Server
after every system boot, using the time zone that is entered above. To synchronize with the NTP
Server’s clock during the player’s run-time, click [Apply NTP Server Time].
Without internet access, the player will continue with the date and time that were used before.
Page 84
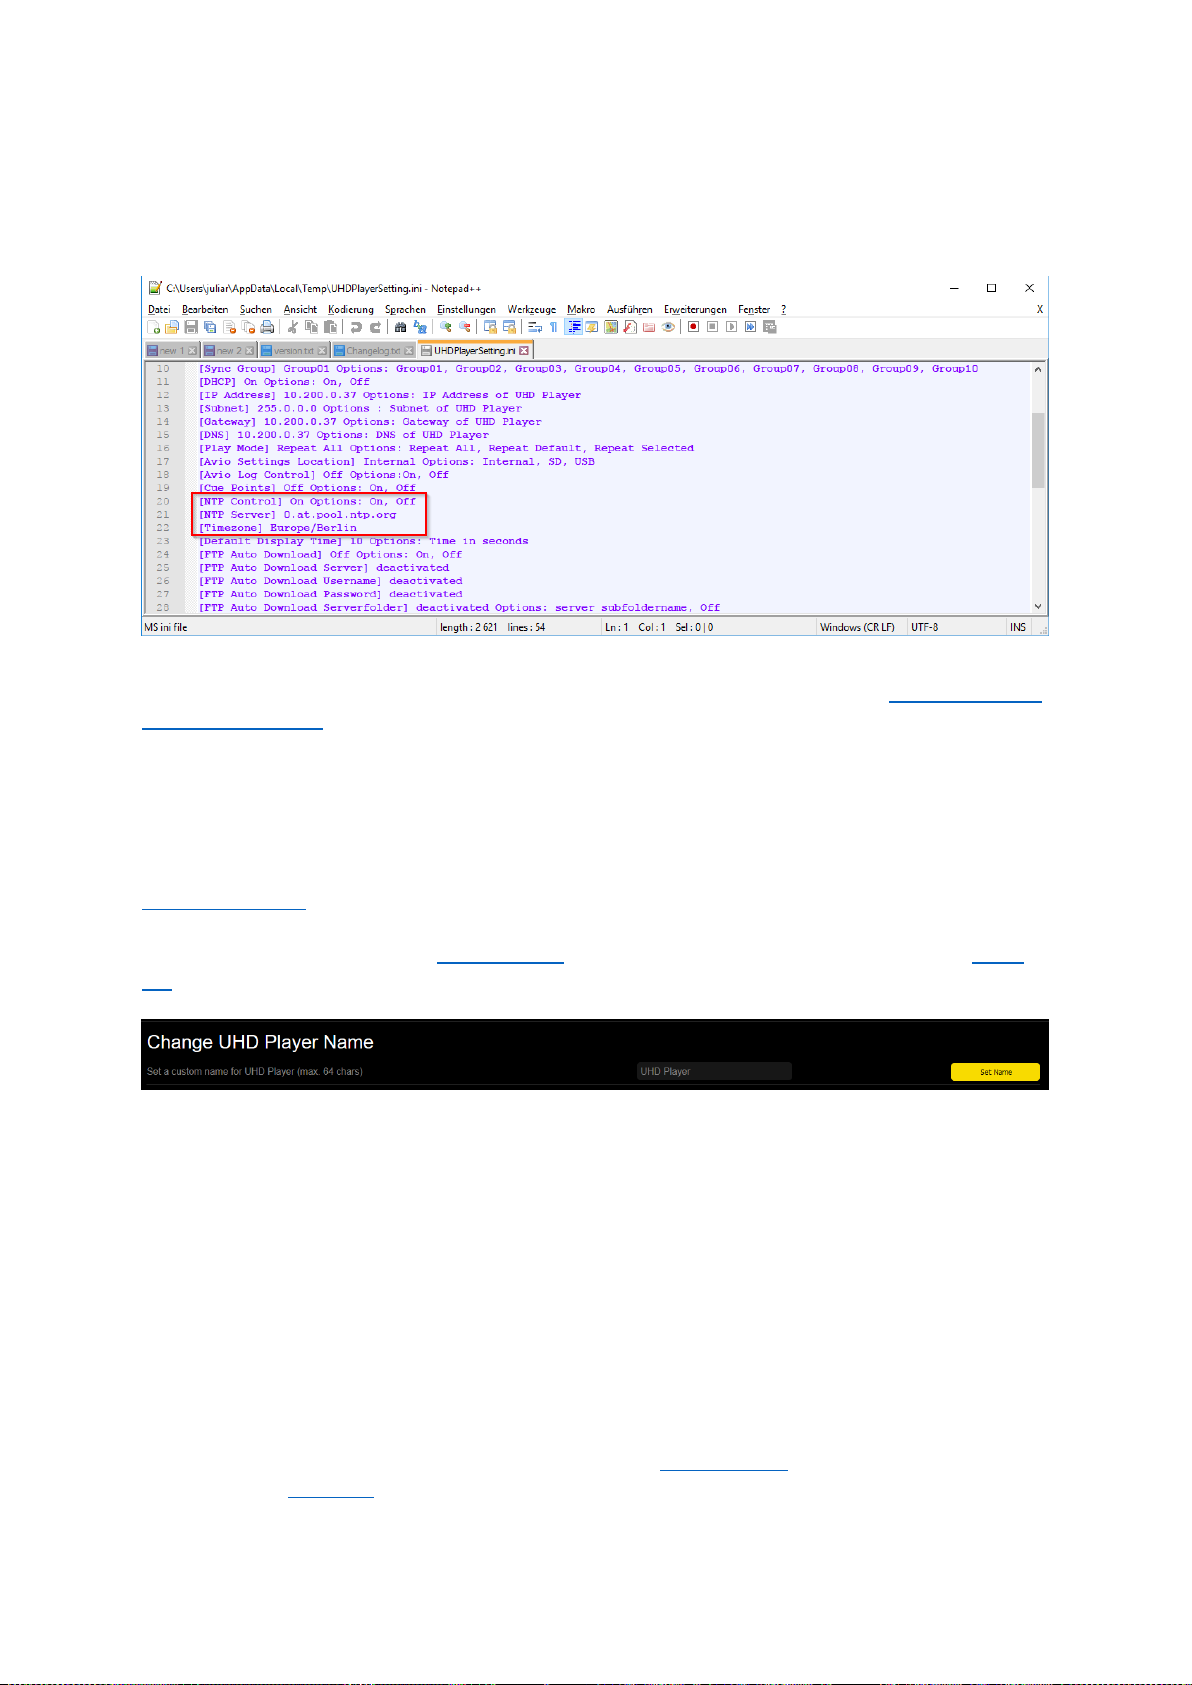
80
Turn NTP Control to “Off” if you always want to continue without date and time synchronization.
Click [Apply Settings] at the bottom of the page to keep your changes.
In the initialization file (“UHDPlayerSetting.ini”), the player’s NTP Server settings can be found in the
center of the list. The date and time can’t be set within this file.
Fig. 63: NTP Server settings in the Initialization File
For more information about how to handle the initialization file, please refer to the Configuration via
the Initialization File chapter.
15.2. CHANGE UHD PLAYER NAME
By default, the UHD Player’s name is “UHD Player”. This name can be found on the player’s
Settings/Information Screen, which is displayed when no data carrier is used or when it is called via
keyboard shortcut. When using several players, a unique player name could be very helpful.
To edit a player’s name, open its Web Interface in your browser and click on [SYSTEM] in the menu
bar. In the upper area of this page, you will find the option “Change UHD Player Name”.
Fig. 64: UHD Player Name setting in the Web Interface
To edit the player’s default name, “UHD Player”, click in the text field on the right and enter the new
name, consisting of maximum 64 characters. Click on [Set Name] to apply your changes.
The UHD Player’s name can’t be changed via the initialization file.
15.3. UNDO LAST CHANGES
The Web Interface offers the possibility to undo the last 5 changes that were made in the UHD
Player’s configuration. Definition of the term “change”: A change is performed after a setting in the
Web Interface was edited and applied by clicking on [Apply Settings].
To undo the last configuration changes, open the player’s Web Interface in your browser and click on
[SYSTEM] in the menu bar. In the upper area of this page, you will find the option “UNDO LAST
CHANGES”.
Page 85
81
Fig. 65: Undo Last Changes option in the Web Interface
To undo the last change in the player’s configuration, click on [Undo] here in the system’s tab.
Alternatively, click on [UNDO] at the bottom of the pages in [BASIC SETTINGS] or [ADVANCED
SETTINGS]. The last change will be undone by this; the Web Interface will reload. Please note: The
last 5 configurations are stored until the player is rebooted.
15.4. SAVE & LOAD CONFIGURATION
The Web Interface allows you to manually save and reload player configurations to and from these
three locations: Internal Storage, SD Card or USB data carrier.
Why should you do this? Imagine that your player is used on different setups and, depending on the
setup, different configuration settings are needed, like a different resolution or play mode setting.
For such a case, setup A could be stored as “setup-A.ini” in the internal storage, and setup B as
“setup_B.ini”. After the setup is changed, you can easily reload the corresponding setup file from the
internal storage and optionally save it as “UHDPlayerSettings.ini” on the data carrier that is attached
to the player.
To achieve the Save & Load Configuration option, open the player’s Web Interface in your browser
and click on [SYSTEM] in the menu bar. In the lower area of this page, you will find the option “Save
& Load Configuration”.
Fig. 66: Undo Last Changes option in the Web Interface
[Save active configuration]
To save the player’s active configuration with a special name and in a certain location, choose the
storage location (Internal Storage, SD Card or USB data carrier) from the drop-down list (first grey
field on the right). The configuration can be given a unique name. To do so, enter the name in the
text field (second grey field on the right). Make sure to keep the file ending “.ini”. Click [Save
Configuration].
[Load configuration]
To load a certain player configuration, choose the initialization file from the drop-down list (second
grey field on the right). Click [Load Configuration] to set this configuration as active configuration.
If you want to delete a configuration that was stored and is not needed any more, choose it from the
drop-down list and click on [Delete].
15.5. REBOOT
The UHD Player can be rebooted by manually power cycling it or by a trigger via external control.
To perform a reboot via the Web Interface, open the player’s web interface in your browser and click
on [SYSTEM] in the menu bar. In the lower area of this page, you will find the “Reboot” option.
Page 86
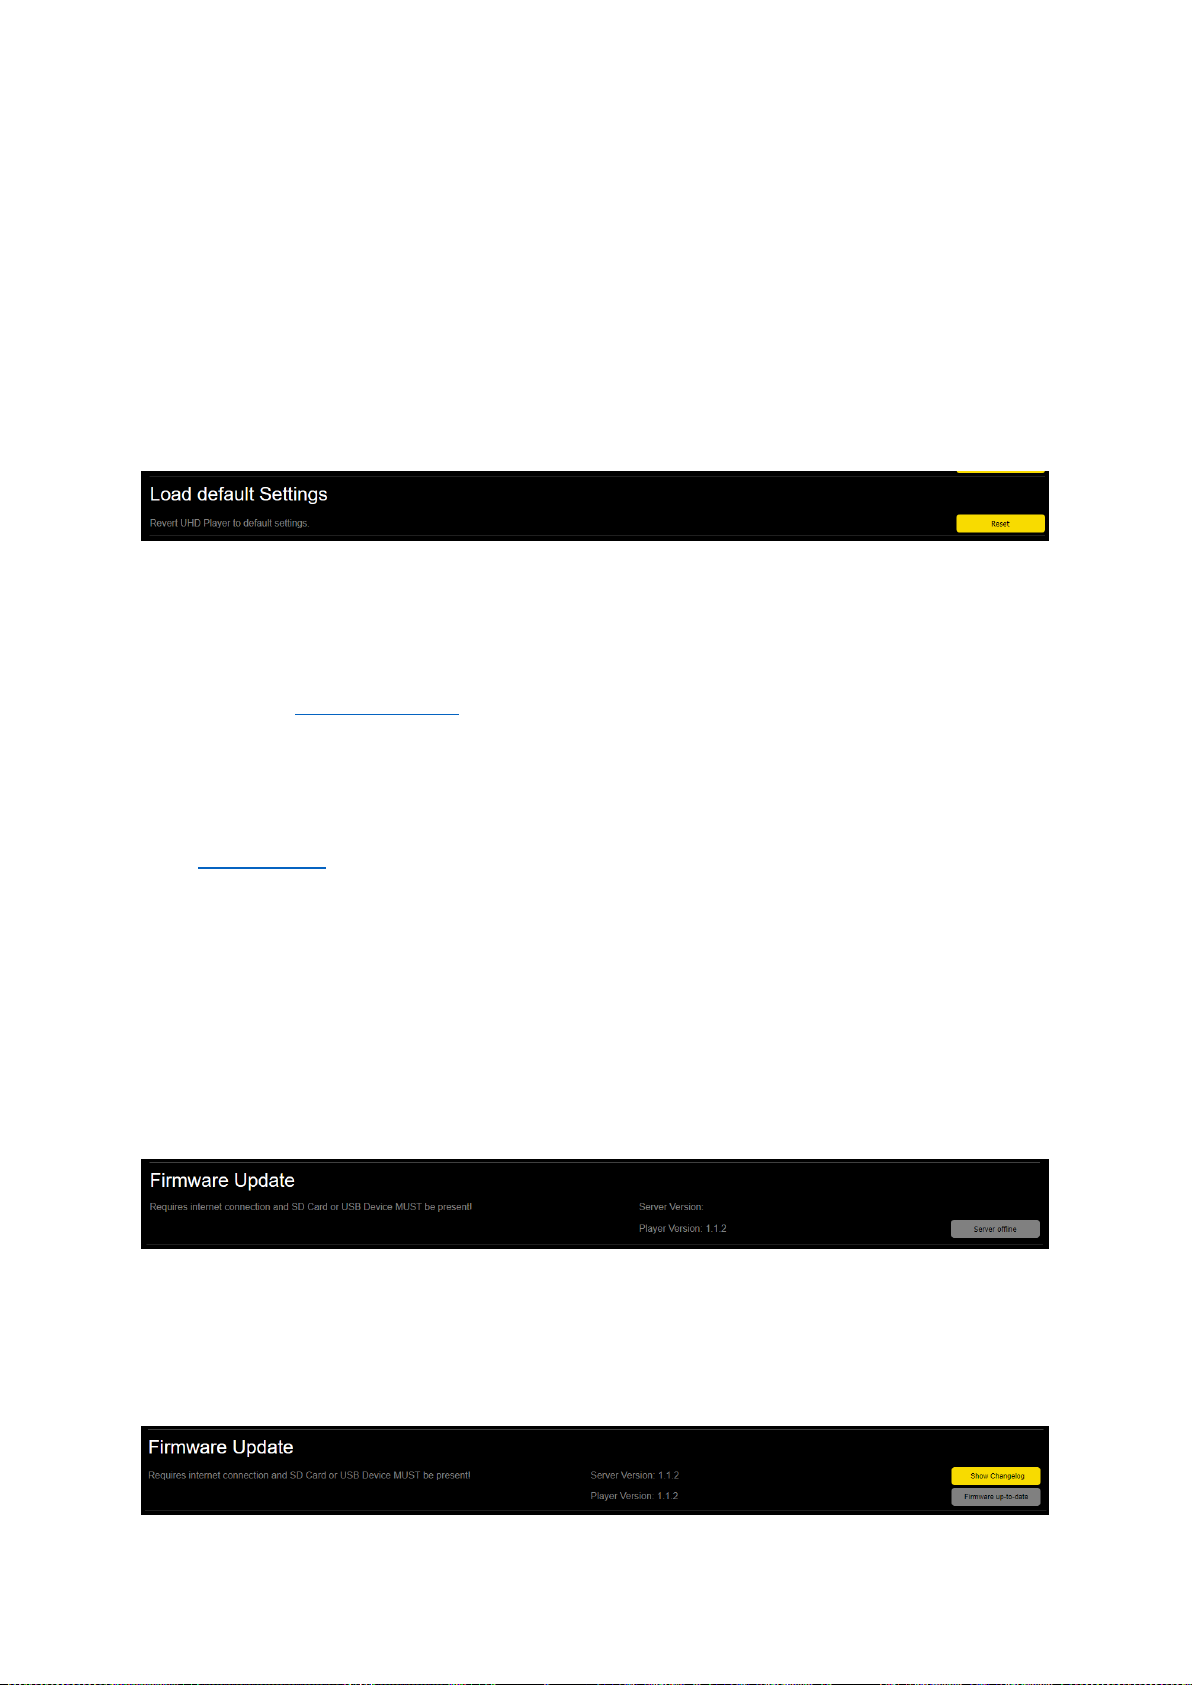
82
Fig. 67: Reboot option in the Web Interface
Click [Reboot] on the right side to reboot the player.
15.6. FACTORY RESET
The Web Interface can perform a factory reset on the UHD Player. This will set the player to its
factory defaults, including the network settings.
To do so, open the player’s Web Interface in your browser and click on [SYSTEM] in the menu bar. In
the lower area of this page, you will find the “Factory Reset” option.
Fig. 68: Load default Settings option in the Web Interface
Click [Reset] to immediately perform a full factory reset. During this process, the player will reboot.
Attention: there will be no further dialog that needs to be confirmed!
Alternatively, the factory reset can be performed with a USB keyboard attached directly to the
player. Press the keyboard shortcut CTRL+F12 and hold it down for at least 5 seconds.
15.7. FIRMWARE UPDATE
If there is a new firmware update available for the UHD Player, the UHD Player can be easily updated
via its Web Interface. This requires internet access and an SD Card or USB data carrier MUST be
present. Alternatively, the player can be updated manually by downloading the Update-Files and
performing the update via the player’s SD Card.
A firmware update does not affect any UHD Player settings that have been made to the player
before.
UPDATE VIA THE WEB INTERFACE
Open the player’s Web Interface in your browser and click on [SYSTEM] in the menu bar. In the lower
area of this page, you will find the “Firmware Update” option.
Fig. 69: Firmware Update settings option in the Web Interface: Server is not available
The player can’t be updated via the Web Interface without internet access. If the internet connection
is missing, the button on the right reports “Server offline”, as in the figure above. Please check your
internet connection. If you can’t get it running, you may manually update the Firmware, as outlined
in “Update via Manual Download” in the section below.
Fig. 70: Firmware Update Settings option in the Web Interface: Player is up-to-date
Page 87
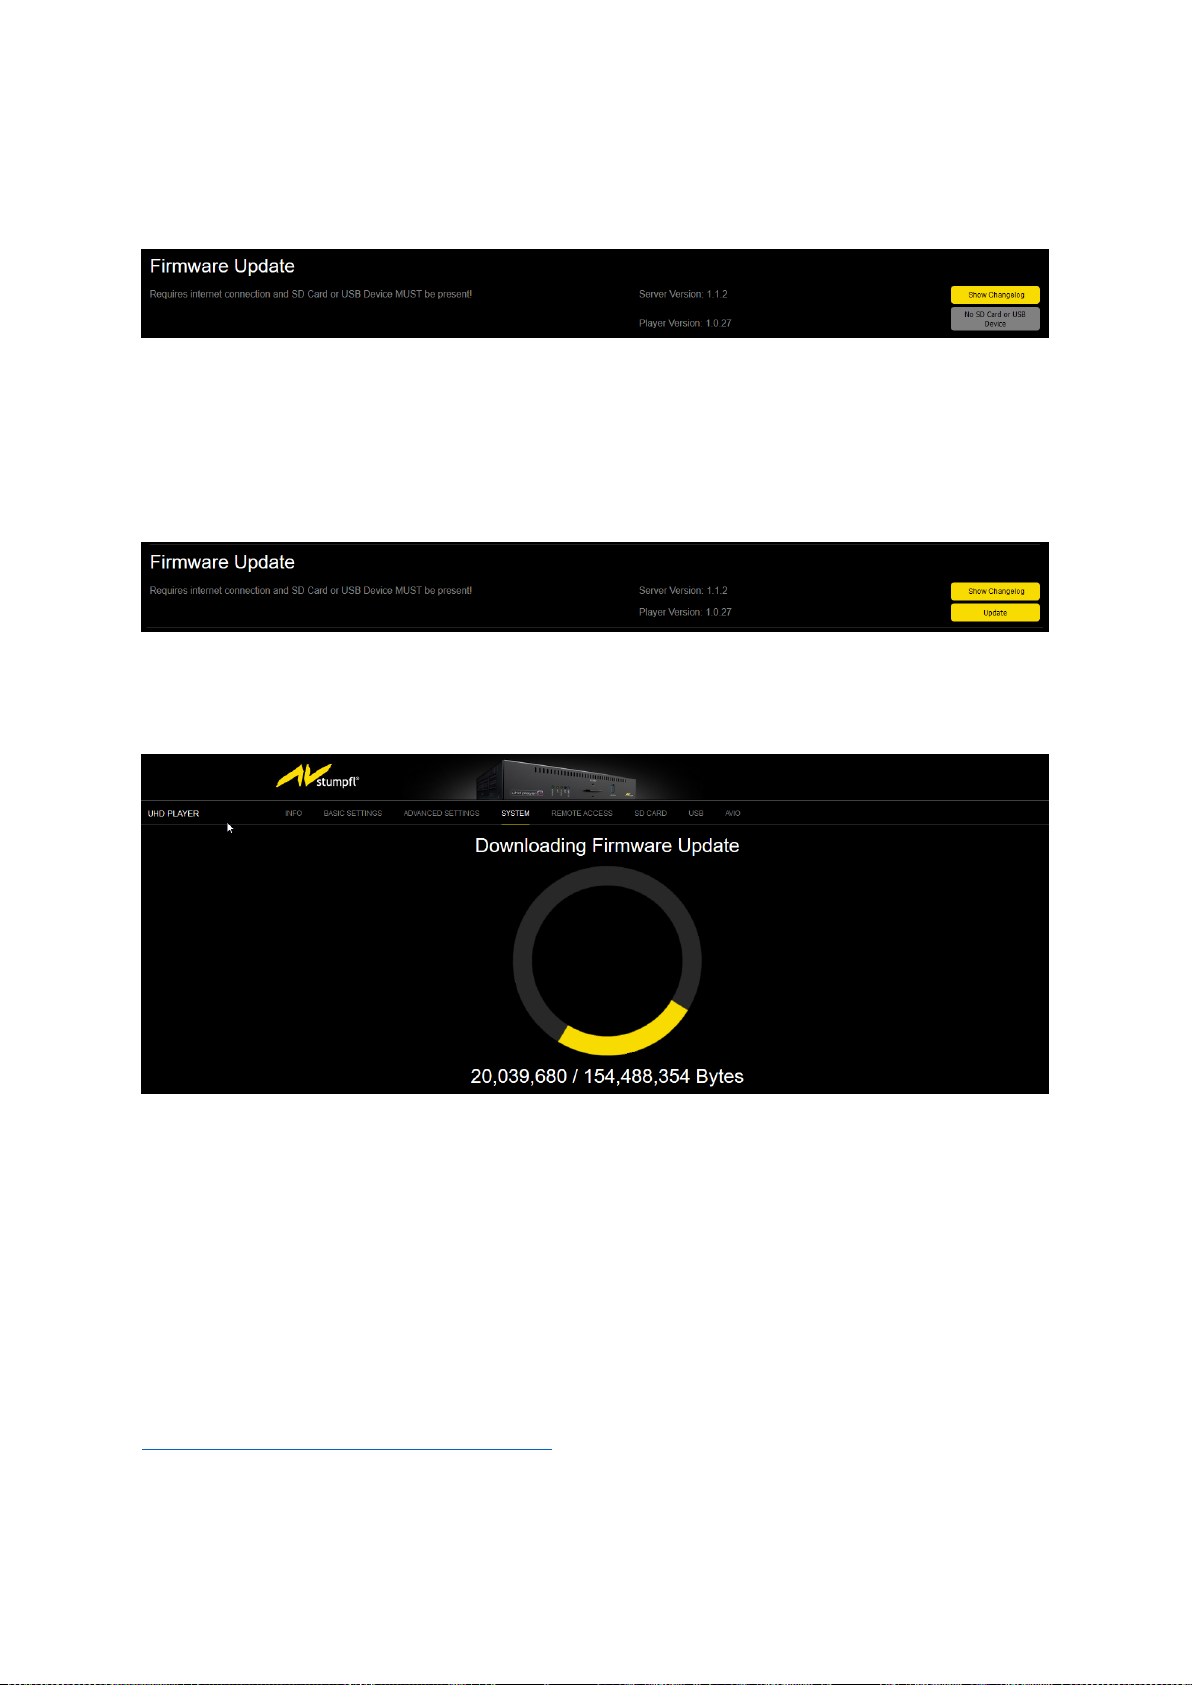
83
The UHD is up-to-date when the server’s Firmware Version matches the player’s Firmware Version.
The second button on the right then displays [Firmware up-to-date].
Click on [Show Changelog] to view all changes that were done in the firmware versions.
Fig. 71: Firmware Update settings option in the Web Interface: Missing Data Carrier
When there is a new firmware version available, the Update Server reports that there is an available
version that is higher than the player’s current version. To perform the firmware update, an SD Card
or USB data carrier must be present. If there is no data carrier plugged into the player, the message
“No SD Card or USB Device” will be displayed on the second button on the right. Insert a data carrier,
refresh the Web Interface in your browser and the grey button will turn yellow, displaying [Update].
Fig. 72: Firmware Update settings option in the Web Interface: Player Version needs to be updated
If a new firmware version is available and there is a data carrier plugged into the player, click
[Update] to start the firmware update.
Fig. 73: A Firmware Update is running. The Web Interface displays the download progress.
The update will be downloaded from the Firmware Update Server and the Web Interface will display
the download progress.
Do not power off the player while the firmware update is running. After a reboot, the player will
again be ready for operation. With some browsers, the Web Interface needs to be refreshed in order
to display the System’s page again with all settings.
UPDATE VIA MANUAL DOWNLOAD
If the player needs to be updated manually, download the latest UHD Player Firmware Version from
http://avstumpfl.com/en/service/downloads/. Extract the .zip-file. The extracted folder will contain
two files: md5 and UHD_<Firmware-Version-Number>.cfp. Copy these two files to the root folder of
an SD Card and plug it in the player’s SD Card slot. Reboot the player. During the boot, the player will
output the message “Firmware update is running” on the display that is attached. As soon as the
Page 88
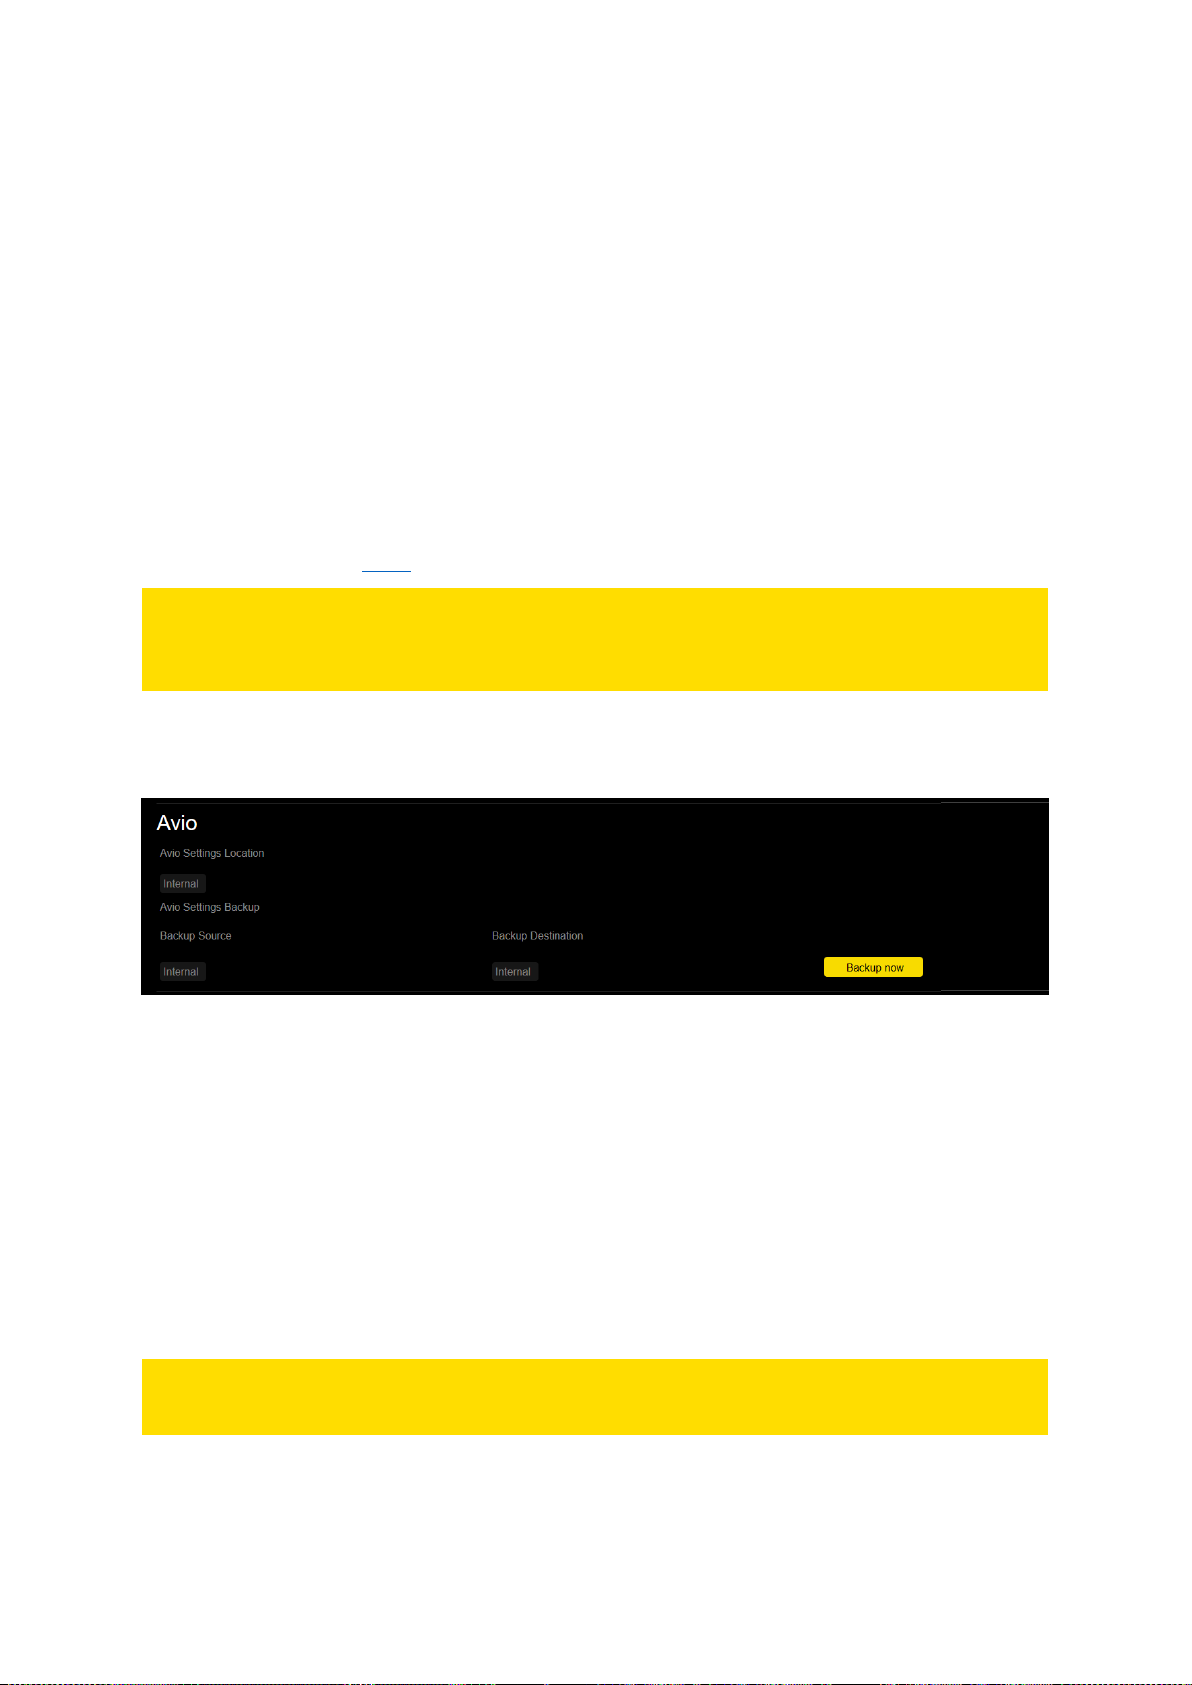
84
player reboots after the Firmware Update is complete, the player is then ready for operation and the
Update-Files may be deleted from the SD Card.
16. BACKUP AND RESTORE
It is very easy to back up a complete UHD Player, as all relevant media and settings files are already
bundled on the player’s data carrier. Just remove the player’s SD Card or USB device and copy the
entire content to your computer’s hard drive or any other data storage.
To run another UHD Player with this backed up content and setup, copy the backup files to an empty
SD Card or USB device and insert this data carrier into the player. The player will read the
UHDPlayerSettings.ini file from the data carrier and automatically accept it as a new configuration.
BACKUP WHEN USING AVIO
PLEASE NOTE:
If you run Avio on the player that you want to back up, please check the Avio settings location first
before backing up the player!
To edit the Avio settings location, click on [ADVANCED SETTINGS] in the menu bar of the Web
Interface and then on [AVIO].
Fig. 74: Avio settings location in the Web Interface
If the Avio Settings Location is set to “Internal”, as it is by default, the AVIO settings need to be
copied from the player’s internal storage to your data carrier:
Choose “Internal” as Backup Source and “SD” or “USB” (depending on your setup) as Backup
Destination. Then click [Backup now] and all Avio settings will be copied to the SD Card or USB
device.
If the Avio Settings Location is already set to the data carrier that is used, nothing needs to be done
within the Avio settings. Now the backup of the player can be done as outlined above.
To run a UHD Player with the backup including Avio settings, copy the backup files to an empty SD
Card or USB device and insert this data carrier into the player. The player will read the
UHDPlayerSettings.ini file from the data carrier and automatically accept it as a new configuration.
PLEASE NOTE:
Make sure that the player adopts the Avio settings from the backup!
Take one of the following steps:
Page 89

85
• Set the Avio settings location to “SD” or “USB”, depending on the data carrier that contains
the backup. Then the player will read the Avio settings from this location and changes in the
Avio configuration will also be stored here.
OR
• Copy the Avio settings from the data carrier to the internal storage, if the player should store
the Avio settings here. To do this, choose “SD” or “USB” (depending on the data carrier that
contains the backup) as Backup Source. The Backup Destination must be set to “Internal”.
Click [Backup Now] and the Avio settings will be copied from your data carrier to the internal
storage.
17. TROUBLESHOOTING
DISPLAY TURNS BLACK AND THEN SHOWS THE SETTINGS SCREEN AFTER SD CARD WAS
INSERTED
1. Please verify that the SD Card is recognized correctly by the player. Insert it until it snaps in
the slot.
2. Are you using a playlist? If yes, remove the playlist from the SD Card and insert it again. If the
player then starts to play your media files, some of the syntax in the playlist is wrong.
3. If your media files won’t play without a playlist, please check if the file formats and codecs
match the supported file formats.
LAST ITEM OF PLAYLIST DOES NOT SHOW UP
If all playlist items work fine but the last one is always skipped, please make sure that the last line in
your playlist.txt file is terminated by pressing the ENTER key.
Furthermore, every item must be separated from the next item by a blank line. No blank lines are
allowed between the individual parameters.
Page 90

86
18. APPENDIX
18.1. RS232/UDP CONTROL COMMANDS
GENERAL
The UHD Player can be controlled remotely by sending the ASCII commands (listed
Below) within a UDP packet sent to the default UDP port 4950 (or the one you entered in the UDP
Port configuration) or via the player’s RS232 interface.
PLEASE NOTE:
For all serial and UDP commands, the command string must be terminated with carriage return
and line feed (CR LF or 0x0D 0x0A)!
When sending commands with arguments, do not put any space character between the command
and the argument.
Command: <command><argument> [CR LF]
Example:
Setting the volume to the value “8” using the command “VOLUME=”
Command: VOLUME=8 [CR LF]
When the UHD Player receives a command string and determines that it is valid, it performs the
command and sends a response to the host device (when using UDP: on the same port).
Command: <command> [CR LF]
Response: Received:<command> [CR LF]
Example
Command: PAUSE [CR LF]
Response: Received:PAUSE [CR LF]
When the UHD Player is unable to perform the command because the command is invalid or
contains invalid parameters, the player returns nothing.
When the UHD Player receives a request string (characterized by an ending with a “?”), it will return
the corresponding answer.
Example
Request: MUTE? [CR LF]
Response: MUTE=0
Page 91
87
See below for all remote commands, listed thematically.
18.1.1. PLAYBACK
PAUSE
Description:
Pauses the current playback
Example:
PAUSE [CR LF]
RESUME or PLAY
Description:
Resumes the playback of a paused media file
When the playback is stopped, it starts the playback from the beginning of the
playlist (or alphanumeric order when no playlist is used).
Example:
RESUME [CR LF] or PLAY [CR LF]
PAUSEPLAY
Description:
Toggles between playback and pause
Example:
PAUSEPLAY [CR LF]
STOP
Description:
Stops the playback, the display turns black
Example:
STOP [CR LF]
PLAYSTATE?
Description:
Returns the current playback mode (playing, paused, stopped)
Example:
PLAYSTATE? [CR LF]
Example response: Playstate: Playing SD
NEXT
Description:
Jumps to the next media file
Example:
NEXT [CR LF]
PLAYINDEX=
Description:
Plays the media file with the specified index (according to the item number in the
playlist or alphanumeric order when no playlist is used)
Please note: the play index of alphanumeric order starts with “0”!
Example:
PLAYINDEX=2 [CR LF]
Plays the media file of item 2 in the playlist / plays the 3rd media file in
alphanumeric order when no playlist is used
PLAYFILE=
Description:
Plays the media file according to the specified file name (exact file name)
Example:
PLAYFILE=01.mp4 [CR LF]
Plays the media file “01.mp4”
Page 92
88
SPEED=
Description:
It sets the playback speed of the current media file (in %). The playback speed of
media files with audio output can only be set to a value between 50% and 120%.
Example:
SPEED=75 [CR LF]
Sets the playback speed to 75%
SPEED?
Description:
Returns the current playback speed (in a common fraction)
Example:
SPEED? [CR LF]
Example response: SPEED=75/1 (this corresponds to 75%)
SKIPSIZE?
Description:
Returns the current skipsize
Example:
SKIPSIZE? [CR LF]
Example response: SKIPSIZE=6
SKIPSIZE=
Description:
Sets the skipsize (in seconds)
Example:
SKIPSIZE=6 [CR LF]
Sets the skipsize to 4 seconds.
SKIPFORWARD
Description:
Skips forward within the playback with the defined skipsize
Example:
SKIPFORWARD [CR LF]
SKIPBACKWARD
Description:
Skips backward within the playback with the defined skipsize
Example:
SKIPBACKWARD [CR LF]
JUMPTIME=
Description:
Jumps to a certain location within the playback (in milliseconds)
Example:
JUMPTIME=5000 [CR LF]
Jumps to the time “5 seconds” within the current media file
JUMPPERCENT=
Description:
Jumps to a certain location within the playback (by percentage)
Example:
JUMPPERCENT=50 [CR LF]
Jumps into the middle of the media file
PLAYBACKTIME?
Description:
Outputs the current playback time (in ms)
Example:
PLAYBACKTIME? [CR LF]
Example response: PLAYBACKTIME=5500
The current media file has already been played for 5500ms = 5.5 secs.
Page 93
89
TIMETOFINISH?
Description:
Returns the remaining playback time of the current media file (in seconds)
Example:
TIMEFOFINISH? [CR LF]
Example response: TIMETOFINISH=80
The current media file will end in 80 seconds.
18.1.2. AUDIO
VOLUP
Description:
Increases the volume by 1 step
Example:
VOLUP [CR LF]
VOLDOWN
Description:
Reduces the volume by 1 step
Example:
VOLDOWN [CR LF]
VOLUME=
Description:
Sets the volume to a specific value: value range from 0 (mute) to 10 (highest)
Example:
VOLUME=3 [CR LF]
Sets the volume to the value “3”
VOLUME?
Description:
Returns the current playback volume
Example:
VOLUME? [CR LF]
Example response: VOLUME=5
MUTE
Description:
Mutes the audio
Example:
MUTE [CR LF]
UNMUTE
Description:
Unmutes the audio
Example:
UNMUTE [CR LF]
TOGGLEMUTE
Description:
Toggles between mute/unmute audio
Example:
TOGGLEMUTE [CR LF]
Mutes the audio if it was unmuted before and unmutes the audio if it was muted
before
Page 94

90
MUTE?
Description:
Returns the Mute Mode
0: Player is unmuted
1: Player is muted
Example:
MUTE? [CR LF]
Example response: MUTE=1
AUDIOTRACK=
Description:
It selects the (stereo) audio track of a video file. If there is only one audio track
available, this one will be active, even if another one was chosen.
This function is often used to change the language of a video file.
Example:
AUDIOTRACK=2 [CR LF]
Selects audio track number 2 of the current video file
AUDIOTRACK?
Description:
Returns the active audio track of the current media file
Example:
AUDIOTRACK? [CR LF]
Example response: Audiotrack=1
18.1.3. FILE ORGANISATION
INDEXLIST?
Description:
It returns a list of all media files on the data carrier with assigned play index,
whether there is a playlist in use or not. The first play index number is always “0”.
Example:
INDEXLIST? [CR LF]
UPDATEPLAYLIST
Description:
Scans the data carrier again to update the playlist file
Example:
UPDATEPLAYLIST [CR LF]
PLAYLIST?
Description:
It returns all files that are included in the playlist with their play index. The index
corresponds to the item number. When there is no playlist available, a list of all
media files on the data carrier will be returned.
Example:
PLAYLIST? [CR LF]
FOLDERLIST?
Description:
Returns the list of all folders and files located in the data carrier’s root folder
Example:
FOLDERLIST? [CR LF]
STARTAUTODOWNLOAD
Description:
Starts the Auto Download from the defined FTP server
Example:
STARTAUTODOWNLOAD [CR LF]
Page 95
91
18.1.4. SYSTEM
DATE=
Description:
Sets date or date and time. Syntax: <DD.MM.YYYY> <HH:MM:SS>
Example:
DATE=31.12.2017 23:59:59 [CR LF]
SHOWMAININFO
Description:
It shows the Main Info Page of the player’s Web Interface on the output device.
Use the command SHOWPLAYBACK to leave this view again.
Example:
SHOWMAININFO [CR LF]
SHOWPLAYBACK
Description:
Shows the current playback again when the Main Info Page is called
Example:
SHOWPLAYBACK [CR LF]
CONFIG?
Description:
Returns the player’s configuration as listed in the UHDPlayerSetting.ini-file.
Example:
CONFIG? [CR LF]
Example response:
[Auto EDID] Off Options: On, Off
[Resolution] 3840x2160p60
[Color Space] Auto Options: Auto, RGB, YCbCR 4:2:0, YCbCR 4:2:2, YCbCR 4:4:4
[Color Depth] 8bit Options: Auto, 8bit, 10bit
[Dynamic Range] Auto Options: SDR, HDR10, HLG, Auto
[Pixel Aspect Ratio] Custom 1x1 Options: Auto, Custom XxY
….
SYNCON
Description:
Enables the Sync Control
Example:
SYNCON [CR LF]
SYNCOFF
Description:
Disables the Sync Control
Example:
SYNCOFF [CR LF]
OUTPUTOFF
Description:
Switches the output device off via CEC protocol (only possible via HDMI)
Example:
OUTPUTOFF [CR LF]
OUTPUTON
Description:
Switches the output device on via CEC protocol (only possible via HDMI)
Example:
OUTPUTON [CR LF]
Page 96

92
18.2. CHANGELOG
UHD Player Firmware Changelog
V1.1.2 (Kernel Date: 12.09.2017)
- Fixed: Default Displaytime is now interpreted correctly when not using a playlist.
V1.1.1 (Kernel Date: 12.09.2017)
- Fixed: Apply Settings at the Web Interface did not reload the settings correctly.
V1.1.0 (Kernel Date: 12.09.2017)
- New: A new AVIO Channel for the runtime of the player is implemented.
- New: A new AVIO Channel to get an acknowledgment when the played file ends or is implemented
- Fixed: Server check for online update could fail with a timeout
- Fixed: If secure Web Interface was activated, the settings screen did not appear.
Known Issues V1.1.2
- External FTP Auto Download does not work properly
- Undo Last Changes does not work properly
- Save & Load Configuration does not work properly
- When using a HDMI to DVI cable and playback of a file in BT.2020 color space, the colors are not
correct on the DVI monitor.
- When ejecting the SD Card while the player is in STOP mode, the settings screen will not be
displayed.
 Loading...