

Page 1

SC MASTER LITE
AV Stumpfl
Page 2

Page 3

SC MASTER LITE Contents • i
Contents
Introduction 1
Control centre and MP3 player ............................................1
The Features .......................................................................2
Versions and Scope of Supply.............................................5
Accessories.....................................................................5
Address ...............................................................................7
Documentation Status.....................................................7
Front and Rear Views 9
Front View............................................................................9
Rear View ..........................................................................10
IR remote control unit ........................................................11
Getting Started 13
General .........................................................................13
Cable Connections and Power Supply ..............................13
Programming shows 16
Overview............................................................................16
Programming with Wings Platinum....................................17
Preparatory steps..........................................................17
Creating a project..........................................................18
Page 4

ii • Contents
Creating a Show Medium 21
General ............................................................................. 21
Generating data for the SC MASTER ............................... 23
The FlashCard Dialog in Wings Platinum..................... 23
Generating presentation data for the CF Card ............. 25
Specifying show properties .......................................... 29
Editing Remote Properties of Shows ................................ 31
Special settings ............................................................ 33
Editing Remote Properties in SHOW.INI...................... 34
Data Transfer to CF Card ................................................. 37
Copying the show data onto a CF Card ....................... 37
Playing back shows 39
Presentations - compact layout and comfortable handling 39
Navigation within a show.............................................. 41
Extended selection of shows........................................ 42
IR remote control range................................................ 43
Continuing a show after power failure............................... 44
Show Start with Timer....................................................... 45
SC Net System 46
General......................................................................... 46
Cable Connections and Power Supply ............................. 46
Address configuration ....................................................... 47
Setting addresses in the Media Pool............................ 47
Setting the addresses at the hardware......................... 48
Ensuring communication within the SC Net...................... 49
The Menu 51
Layout of the Menu ........................................................... 51
How to use the menu ........................................................ 53
Page 5

SC MASTER LITE Contents • iii
Menu operation via IR remote control ...........................56
Menu Chart........................................................................57
The Menu Items 58
Setting ...............................................................................58
Load ..............................................................................58
Save..............................................................................58
Factory ..........................................................................58
Options ..............................................................................61
AuxAdrs (Auxiliary Address) .........................................61
RSOAdrs (RS-Out Address) .........................................61
SCNet (SCNet Communication)....................................61
ContShw (Continue Show)............................................62
TrayStP (Tray Starting Position) ...................................62
PDCMode......................................................................63
Display ..........................................................................63
FastDsp (Fast Display) .................................................65
IRRecve (IR-Receive) ...................................................65
DMX (DMX 512)............................................................65
HighLgt (High Light Function) .......................................66
DataIO (Data In/Out).....................................................66
Sound ................................................................................67
Master ...........................................................................67
SaveVol (Save Volume) ................................................68
Signal.................................................................................69
Priorty (Priority) .............................................................69
Cue-In ...........................................................................69
ContDLC (Continual DLC).............................................70
RSOut................................................................................71
Driver ............................................................................71
NumOfPr (Number of Projectors)..................................72
Timer..................................................................................73
Page 6

iv • Contents
AutoTim (Auto Timer) ................................................... 73
Command..................................................................... 73
TTime (Timer Time)...................................................... 73
Info .................................................................................... 75
Trouble shooting 76
Finding faults..................................................................... 76
List of problems................................................................. 77
Updating the operating software 80
Updating............................................................................ 80
Technical Appendix 82
ASCII protocol................................................................... 82
Connector configuration.................................................... 85
RS232-IN / CAN connector .......................................... 85
RS232-OUT connector................................................. 86
CUE IN connector ........................................................ 87
CUE-OUT connector .................................................... 87
Audio connectors.......................................................... 88
REMOTE connector ..................................................... 89
DATA IN / OUT connector............................................ 90
POWER connector ....................................................... 91
Technische Daten ............................................................. 91
Glossary 92
Index 95
Page 7

SC MASTER LITE Introduction • 1
Introduction
Control centre and MP3 player
SC MASTER series units are MP3 players with a higher Show
Control management system for controlling multi-media
events. Within the SC Net network, they form the central
control system with a variety of input and output options.
Sound and control information is stored on a memory card the
size of a postage stamp. Direct and undelayed access ensures
both synchronization and interaction. The SC MASTER gives
you "complete control"! Congratulations and welcome to the
Stumpfl system!
The core of the device is a microprocessor with programmable
operating software which allows the many features and functions of this new generation of control units to be implemented.
The required configuration settings can be made, saved and
called up in the entry menu. Any future developments can
easily be incorporated via software updates, which will keep
your unit always up-to-date.
This manual with its step-by-step instructions should help you
to familiarize yourself with all the features and possibilities of
this device. This manual is also available as PDF document.
The latest version can be downloaded from our website.
Page 8

2 • Introduction
The Features
In order to get a feeling for the extraordinary efficiency of the
SC MASTER LITE you will find an overview over the most
important features below. If some of the topics inspire your
curiosity, just follow the cross references for further information.
Audio
•
The integrated audio player offers stereo sound and does
not use any movable parts. It is therefore virtually wearfree
and uses a Compact Flash Card (called CF Card for short)
as data carrier. The audio data are compressed in accordance with the Fraunhofer MPEG1 Layer3 audio compression format (called MP3 for short).
•
On a CF card the size of a postage stamp with a storage
capacity of 512 MB more than eight hours of stereo sound
can be stored at a quality which is similar to that of a CD.
•
IR remote control for volume and sound (bass and treble
control), as well as Start, Stop, Skip, etc.
•
Integrated 2 x 10 W audio amplifier for the LS variant of
the SC MASTER LITE.
Control
•
Control of external components via SC NET, DLC data
signal or the integrated RS232 interface.
•
Control of lighting and other devices via DMX512 signals.
The first six channels are available via a special optional
Page 9

SC MASTER LITE Introduction • 3
cable, control of up to 64 channels via the optional DMX
Upgrade Module. Transmitting IR commands is not possible with the DMX output in use.
•
Multi-functional DATA I/O port for linking up with peripheral
devices, e.g. transponder reader for identification of individual visitors.
•
Comprehensive timer function and synchronization with
DCF77 signal with the optional radio clock module.
•
Freely definable show configurations via Scheduler file.
Even highly complex conditions can be specified.
•
Remote control via the RS 232 input for integration with
higher media control systems.
•
Remote input for direct starting of shows via simple keypads.
•
Direct connection of keyboard matrix with up to 24 keys.
•
Connection of light barriers and motion detectors.
•
Interactive show design in response to a variety of input
conditions, e.g. branching to other show sections by
pressing a key.
•
In the case of a power failure while playing back a show
from CF Card, SC MASTER automatically saves the position where the show was broken off. After starting up
again, you can resume the show from the same position.
•
Simple, intuitive programming of all sequences via Wings
Platinum software. Subprograms can be called up via the
Call Function; sequences that remain the same needn't be
programmed more than once.
Page 10

4 • Introduction
•
All settings are menu driven via a display which is well
readable from all angles, with the brightness being adjustable. Up to six set-up configurations can be saved and retrieved at any time.
•
The SC MASTER operating software can be updated via a
file and a Windows PC at any time.
Page 11

SC MASTER LITE Introduction • 5
Versions and Scope of Supply
SC MASTER LITE is also available as LS variant with an
integrated 2 x 10 W audio amplifier, which allows direct connection of passive loudspeakers. All the other functions, however, are absolutely identical:
Included in the delivery are the following:
•
IR remote control unit
•
2 cinch cables
•
RS 232 cable STK-C010
•
Power supply unit AC-3 or STZ-NG3-Switch
•
User manual
•
Wings Platinum CD ROM
Accessories
•
Compact Flash Cards (CF-Card) with different memory
capacities of up to 512 MB.
•
Special cable SCK-A-SCM-SCN for simultaneous connection of computer and SC Net modules.
•
Start keypad with up to 3 keys for connection to the
REMOTE connector
•
Keyboard with 16 keys for direct connection to the RS 232IN port
Page 12

6 • Introduction
•
Transponder for object oriented event triggering
•
Motion detectors and light barriers
•
Radio clock module for time-controlled presentation, to be
connected to the REMOTE connector.
•
OC/analog module with 16 open collector switch outputs
and 8 analog outputs 0 – 10 V.
•
DMX upgrade module for direct control of up to 64 DMX
channels.
•
DMX512 extension cable for connection to REMOTE connector, SCK-MDMXE
•
External IR receiver for connection to the REMOTE connector
Page 13

SC MASTER LITE Introduction • 7
Address
If you would like to contact us, just write a letter, send us a fax
or an e-mail. We'll be pleased to hear from you!
Visit our website on the Internet. We'll always have the latest
information and software ready for you!
AV Stumpfl GmbH
Mitterweg 46
A-4702 Wallern
Tel.: 0043-7249/42811
Fax: 0043-7249/428114
e-mail: [email protected]
Internet: http://www.AVstumpfl.com
Documentation Status
Last reviewed:
29.04.2004
SC Master LITE operating software:
3.63
Wings Platinum Version:
1.33
This manual has been prepared with care and contains all
information about the SC MASTER LITE available at the time
of print.
This documentation is also available as a PDF file, which,
under certain circumstances, may be more up-to-date than the
printed version. If necessary, contact us for the latest Help
versions.
Page 14

Page 15
SC MASTER LITE Front and Rear Views • 9
Front and Rear Views
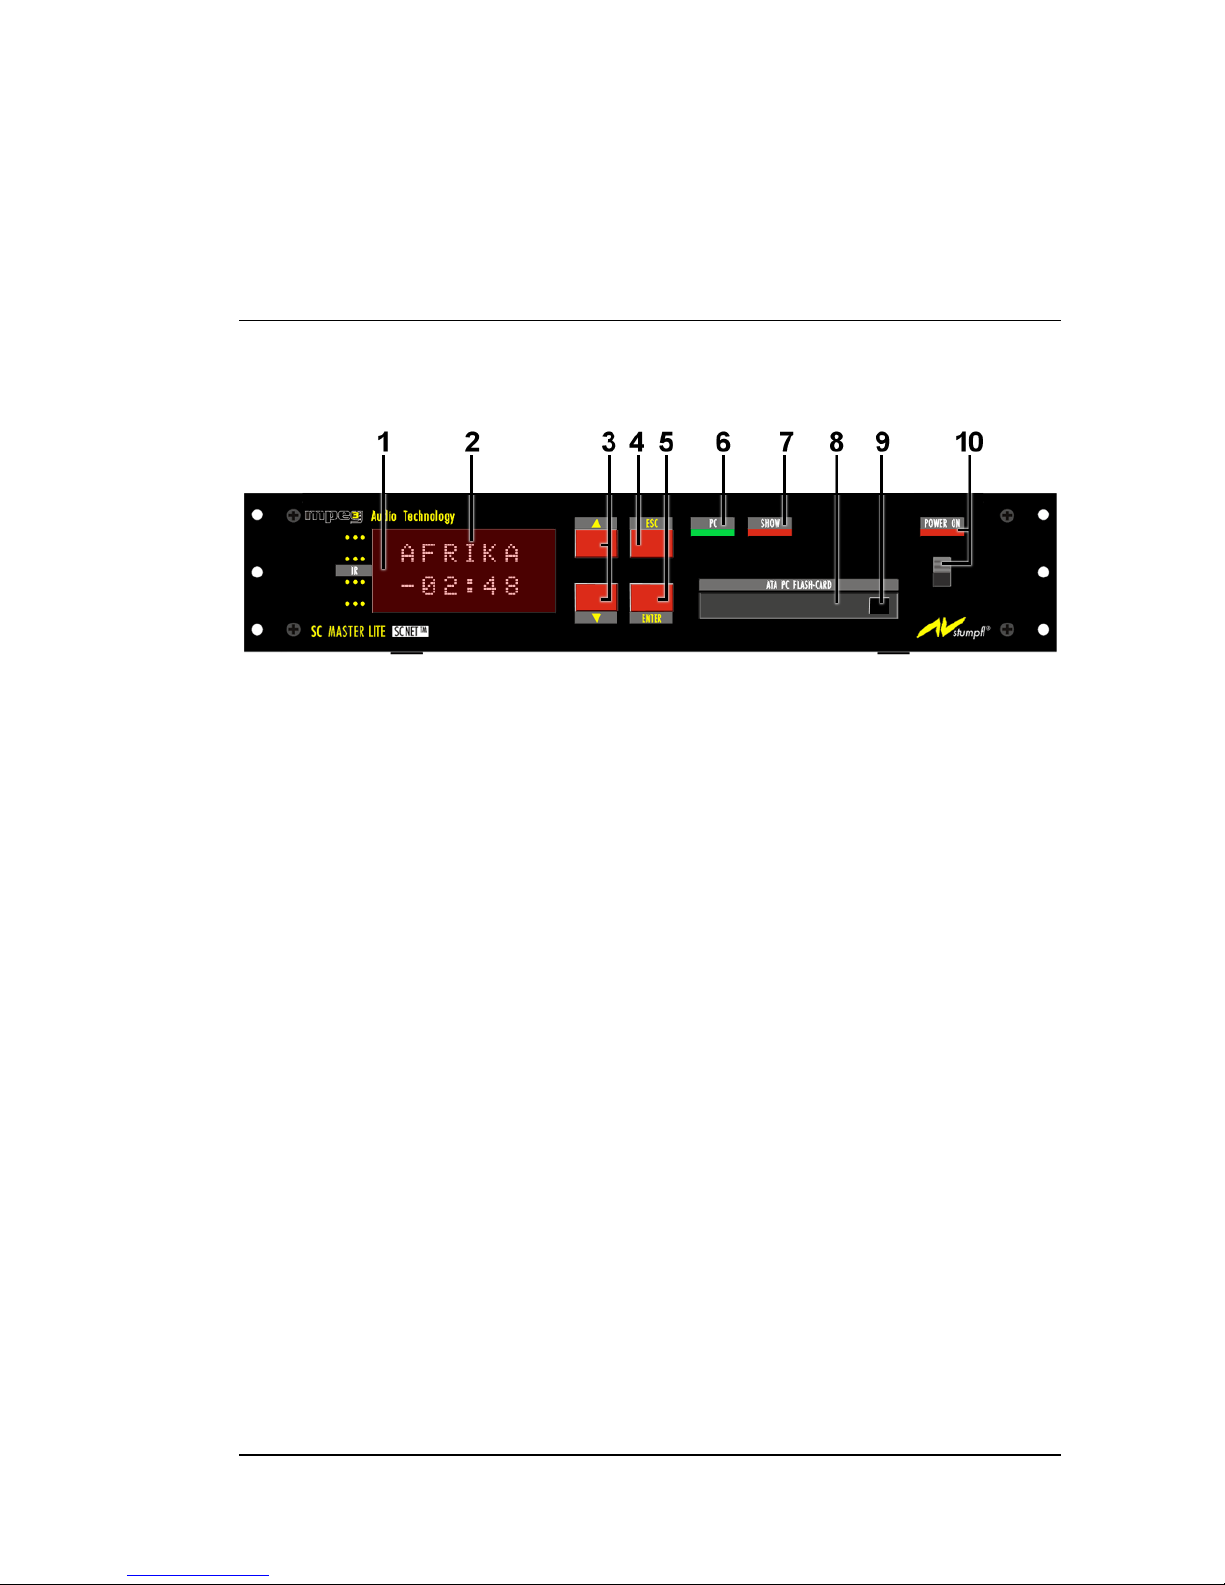
Front View
1. IR receiving diode behind the display
2. Dot matrix display
3. Keys for menu and show selection as well as for volume
control
4. ESC key for the menu and for aborting running shows
(press for more than one second)
5. ENTER key for the menu, for show start and restart from
X-times or pause markers.
6. PC LED lights up, when the PC is connected
7. SHOW LED is on while a show is running; it starts blinking
when an X-time has been encountered.
8. Compact Flash Card slot (CF Card for short)
9. Eject button for the memory card
10. ON/OFF switch with control LED, lights up when ON
Page 16
10 • Front and Rear Views
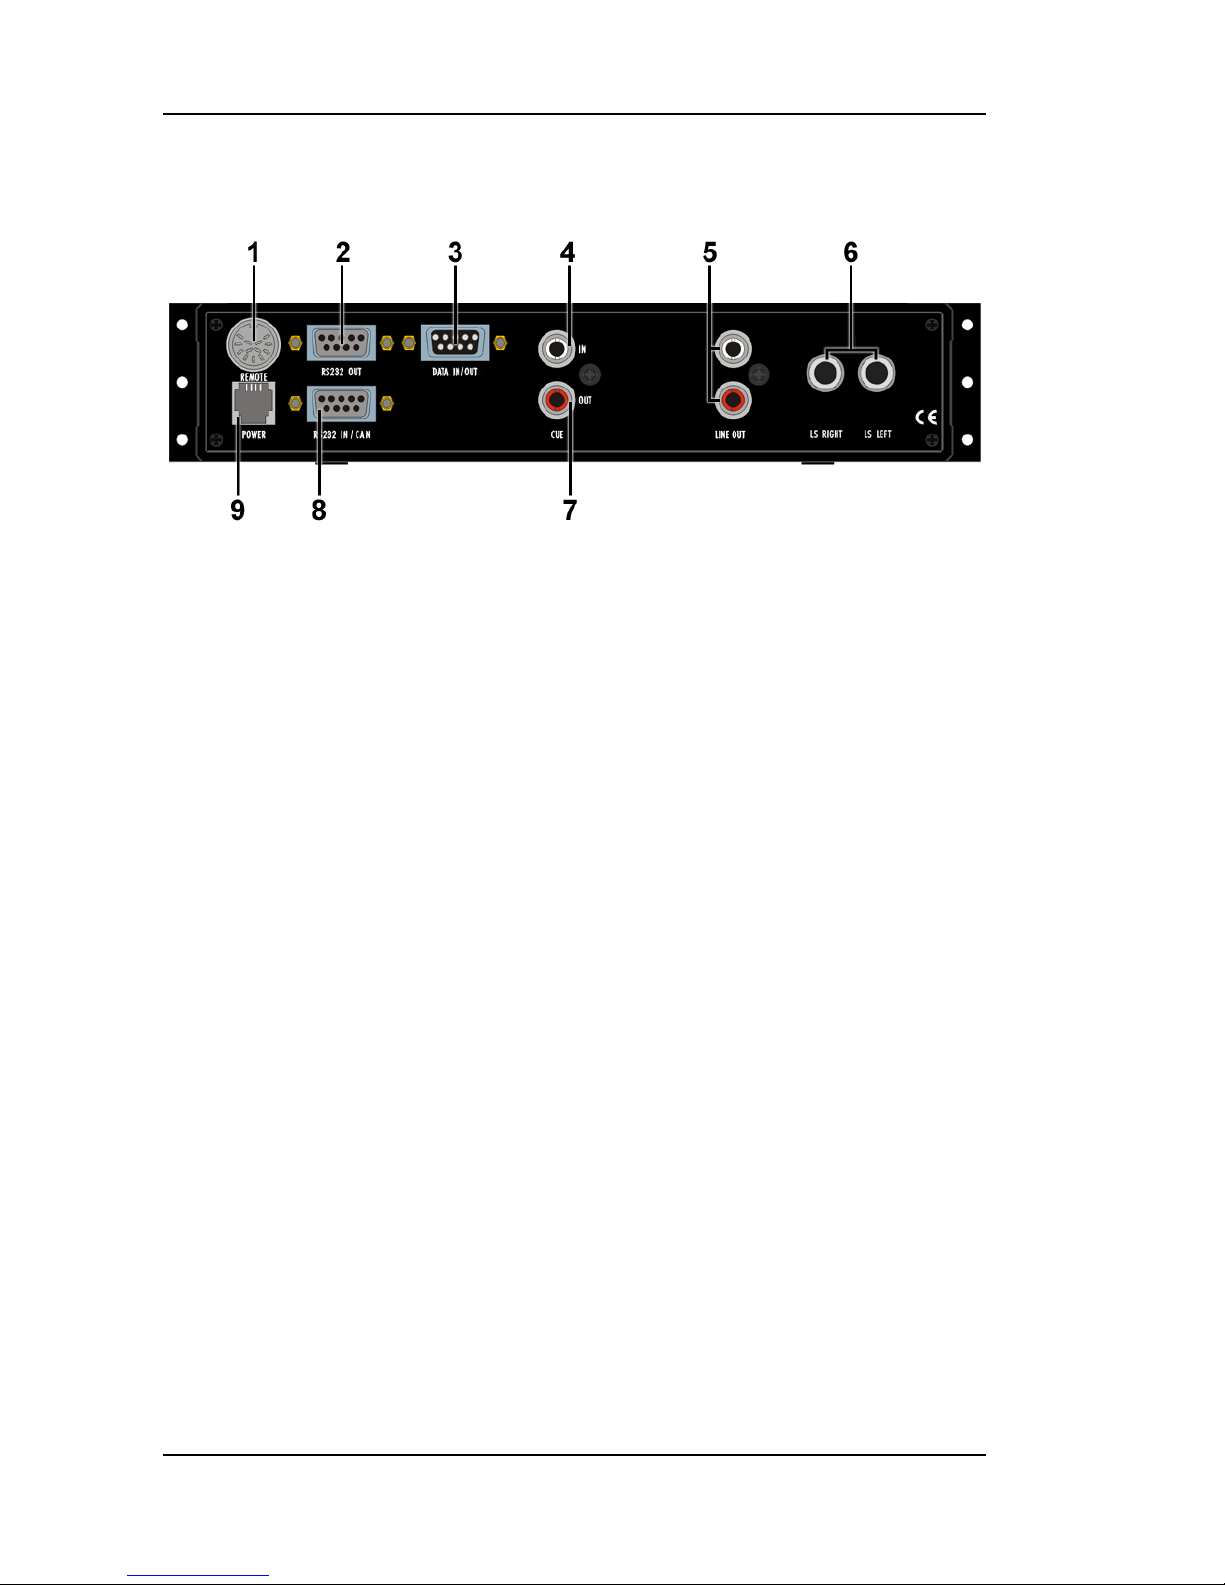
Rear View
1. Connector for cable remote control units, double slider
controls, DMX extension cable
2. RS232-OUT connector, serial interface RS232 for control
of external devices
3. Data jack incl. 8 IN/OUT channels for controlling special
interfaces. See page 66.
4. CUE-IN connector, configurable interface for time code,
control signals and digital audio signals with control information. See page 69.
5. LINE-OUT connector, stereo output for the MP3 player
6. 2 x 10 W loudspeaker outputs, LS variant only
7. CUE OUT connector, control signal output
8. RS232 IN/CAN, serial port for computer connection and
connection to the SC NET modules (requires special SC
Net cable).
9. Connector for power supply unit AC-3
Page 17
SC MASTER LITE Front and Rear Views • 11
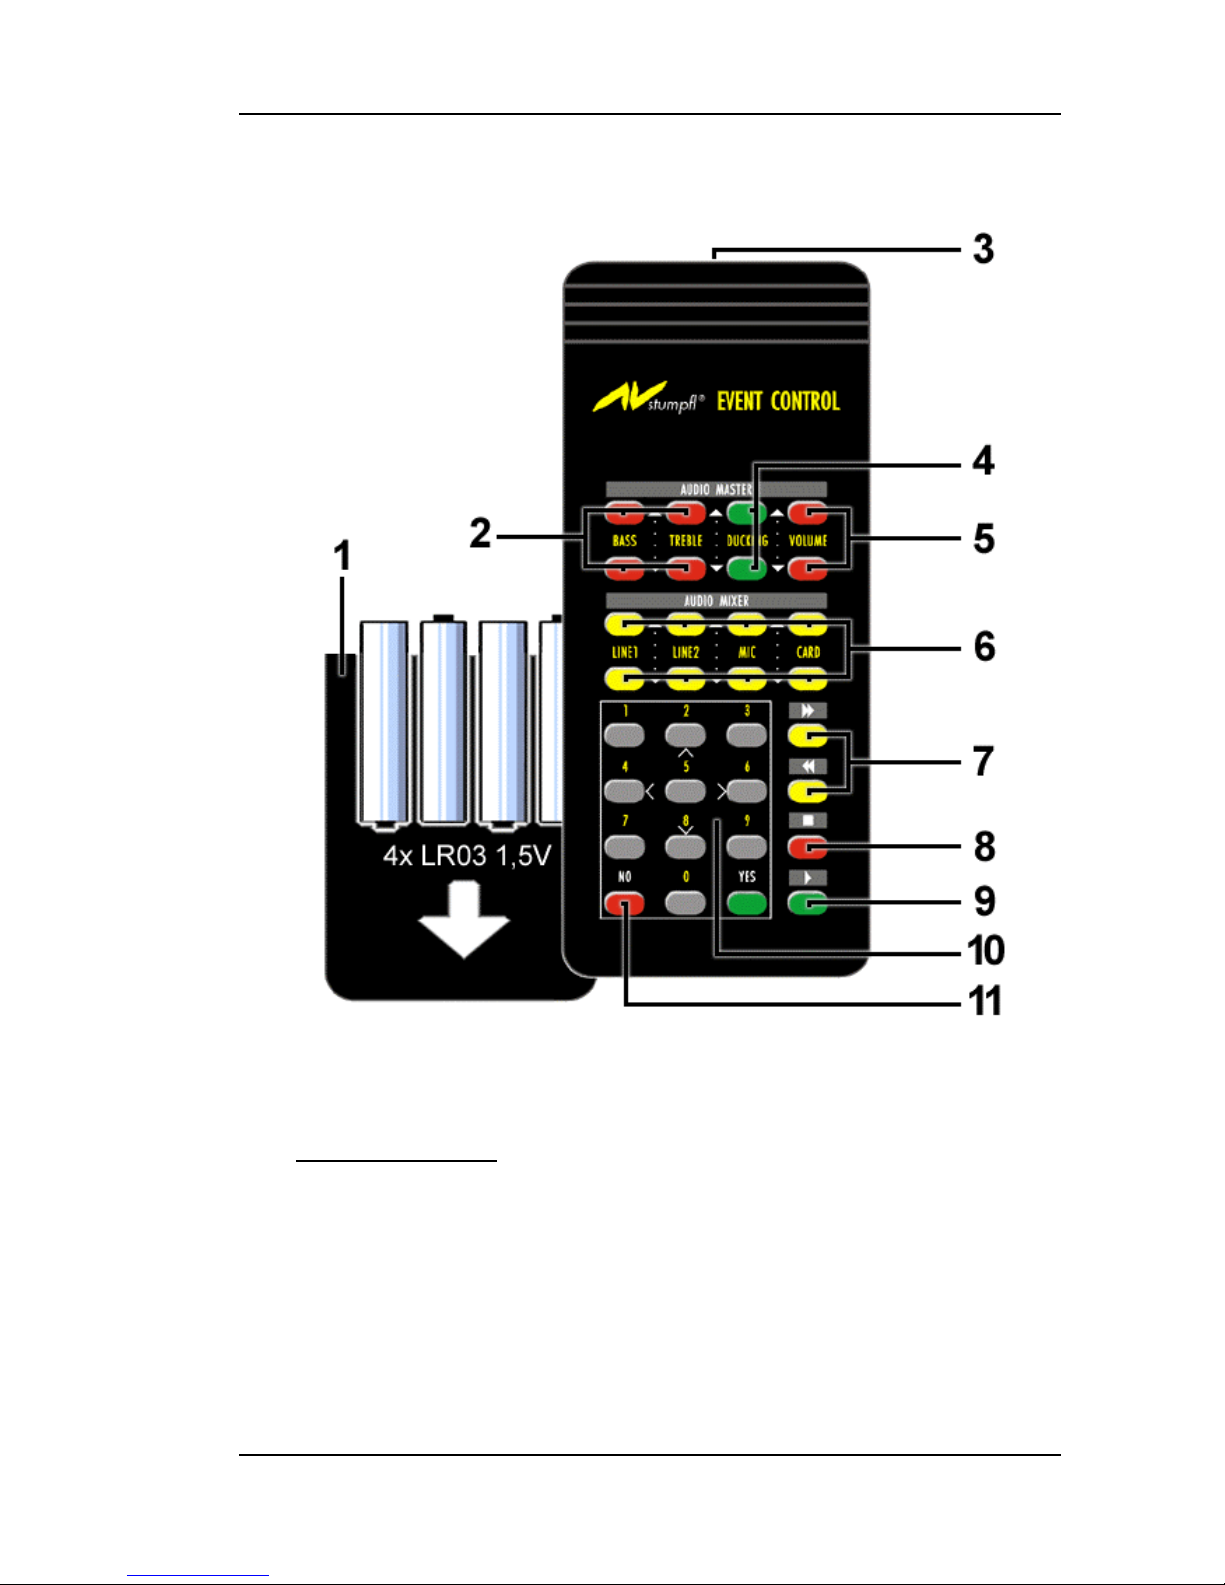
IR remote control unit
1. Cover of battery compartment, on the rear.
Warning:
Strictly observe
the correct polarity indicated at the bottom
of the battery compartment when inserting the batteries!
2. Bass and treble control
3. IR transmitting diodes (range between 10 to 20m)
4. Ducking keys are without function
Page 18

12 • Front and Rear Views
5. Volume control
6. Volume control (and Mute keys) for the card player; keys
LINE Line1, Line2 and Mic are without function.
7. Skip
/Skip: For selecting a piece of music when no
show is running; selection of jump markers within a particular show in mode "Show Pause"; key functions and
for menu operation
8. Stop
: Terminates a piece of music when the SC
MASTER is used as card player. When a show is running
...pressed briefly: "Show Pause" on/off, .... pressed for
more than 2.5 seconds: Show is aborted; during menu operation: ESC key
9. Play
: Starts a piece of music when the SC MASTER is
used as card player; restarts the show from X-times or
pause markers within a show; ENTER key for menu operation
10. Keys for selecting or starting shows. See also Extended
selection of shows on page 42. Number keys can also be
used for starting from X-times.
11. NO key for special functions when selecting shows.
Page 19
SC MASTER LITE Getting Started • 13
Getting Started
General
You may be burning to start testing your new SC MASTER.
However, before you can start presenting your first show, you
will have to take a few preparatory steps.
Cable Connections and Power Supply
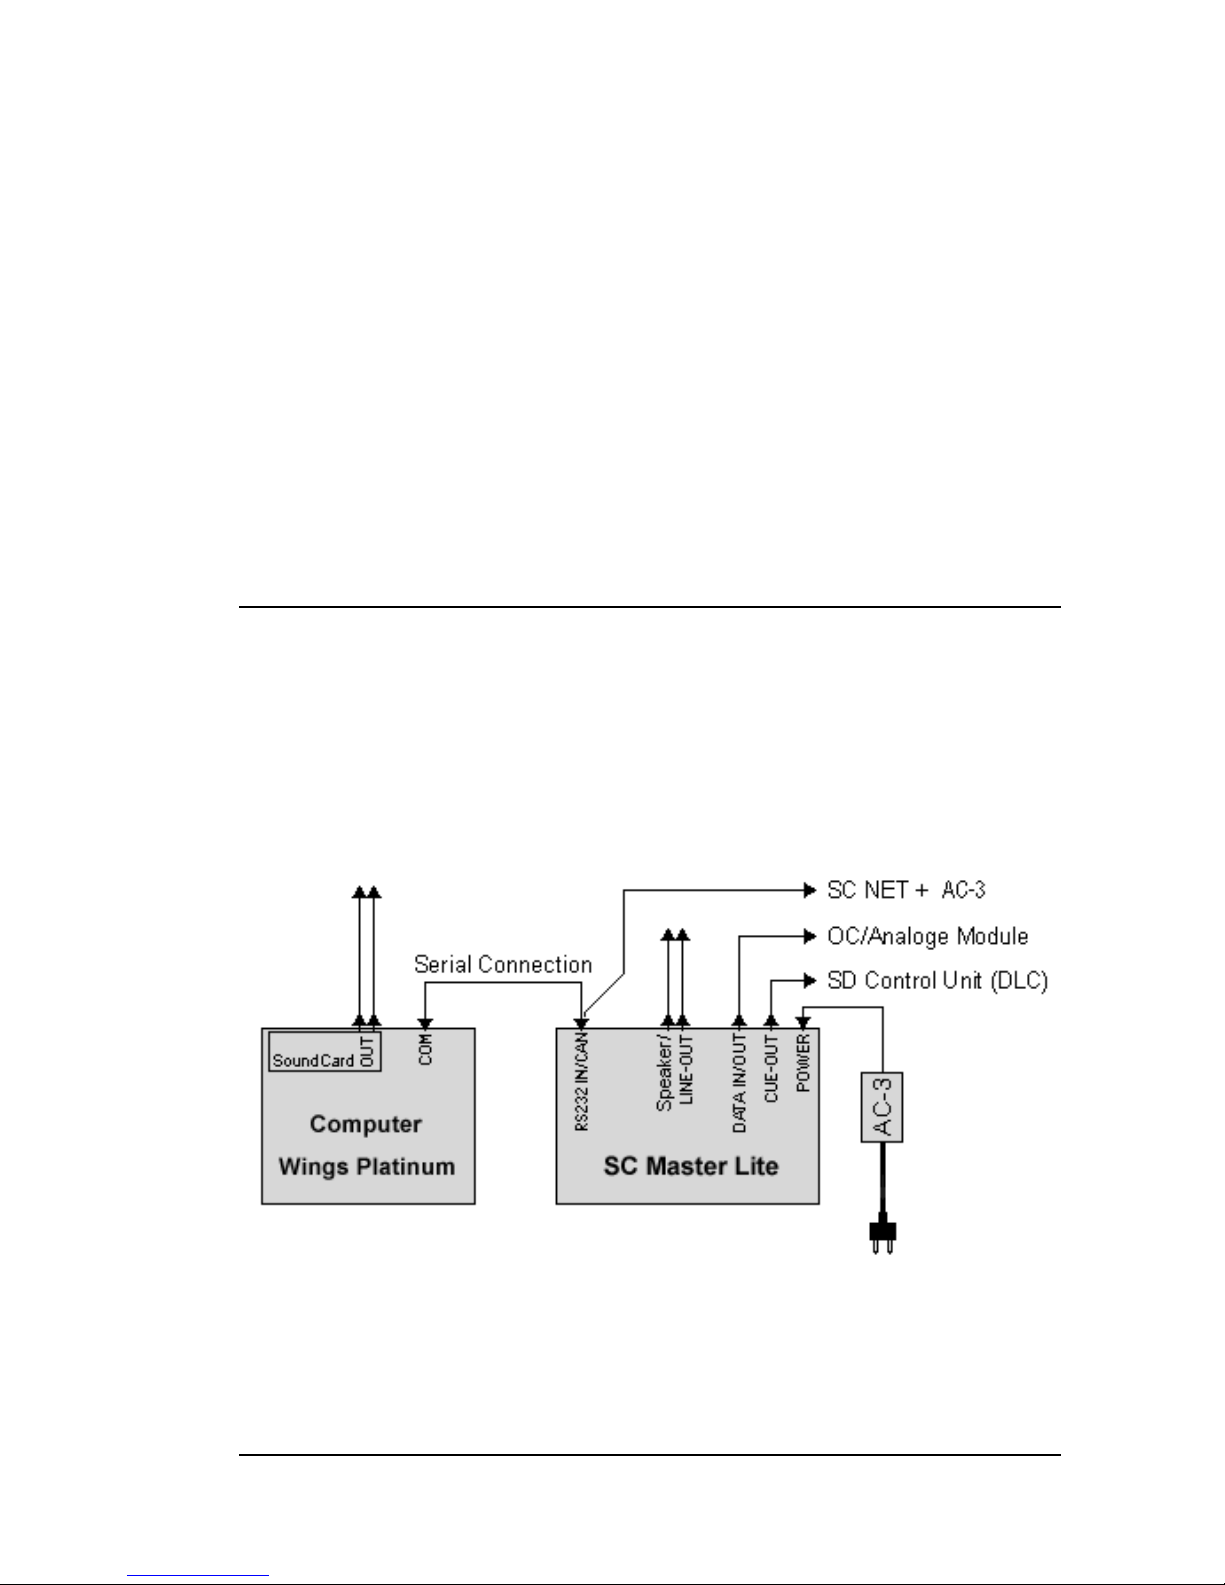
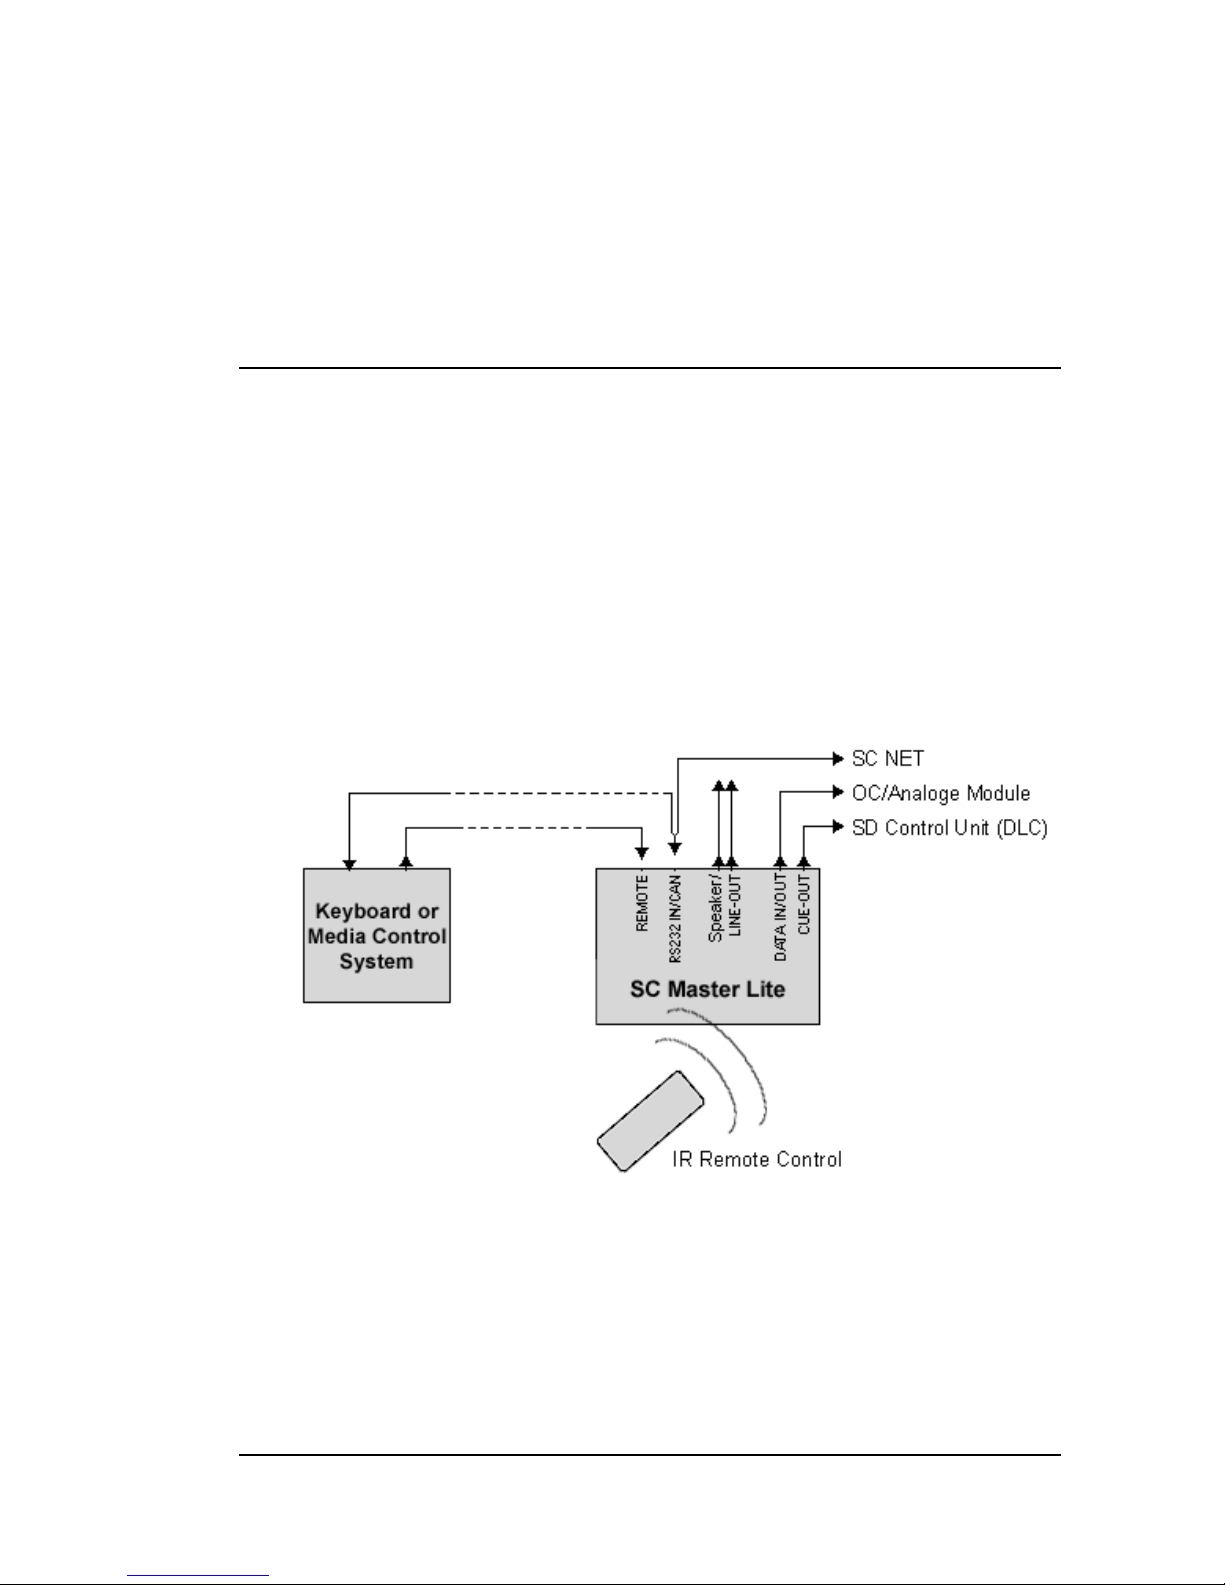
Connecting the system cables
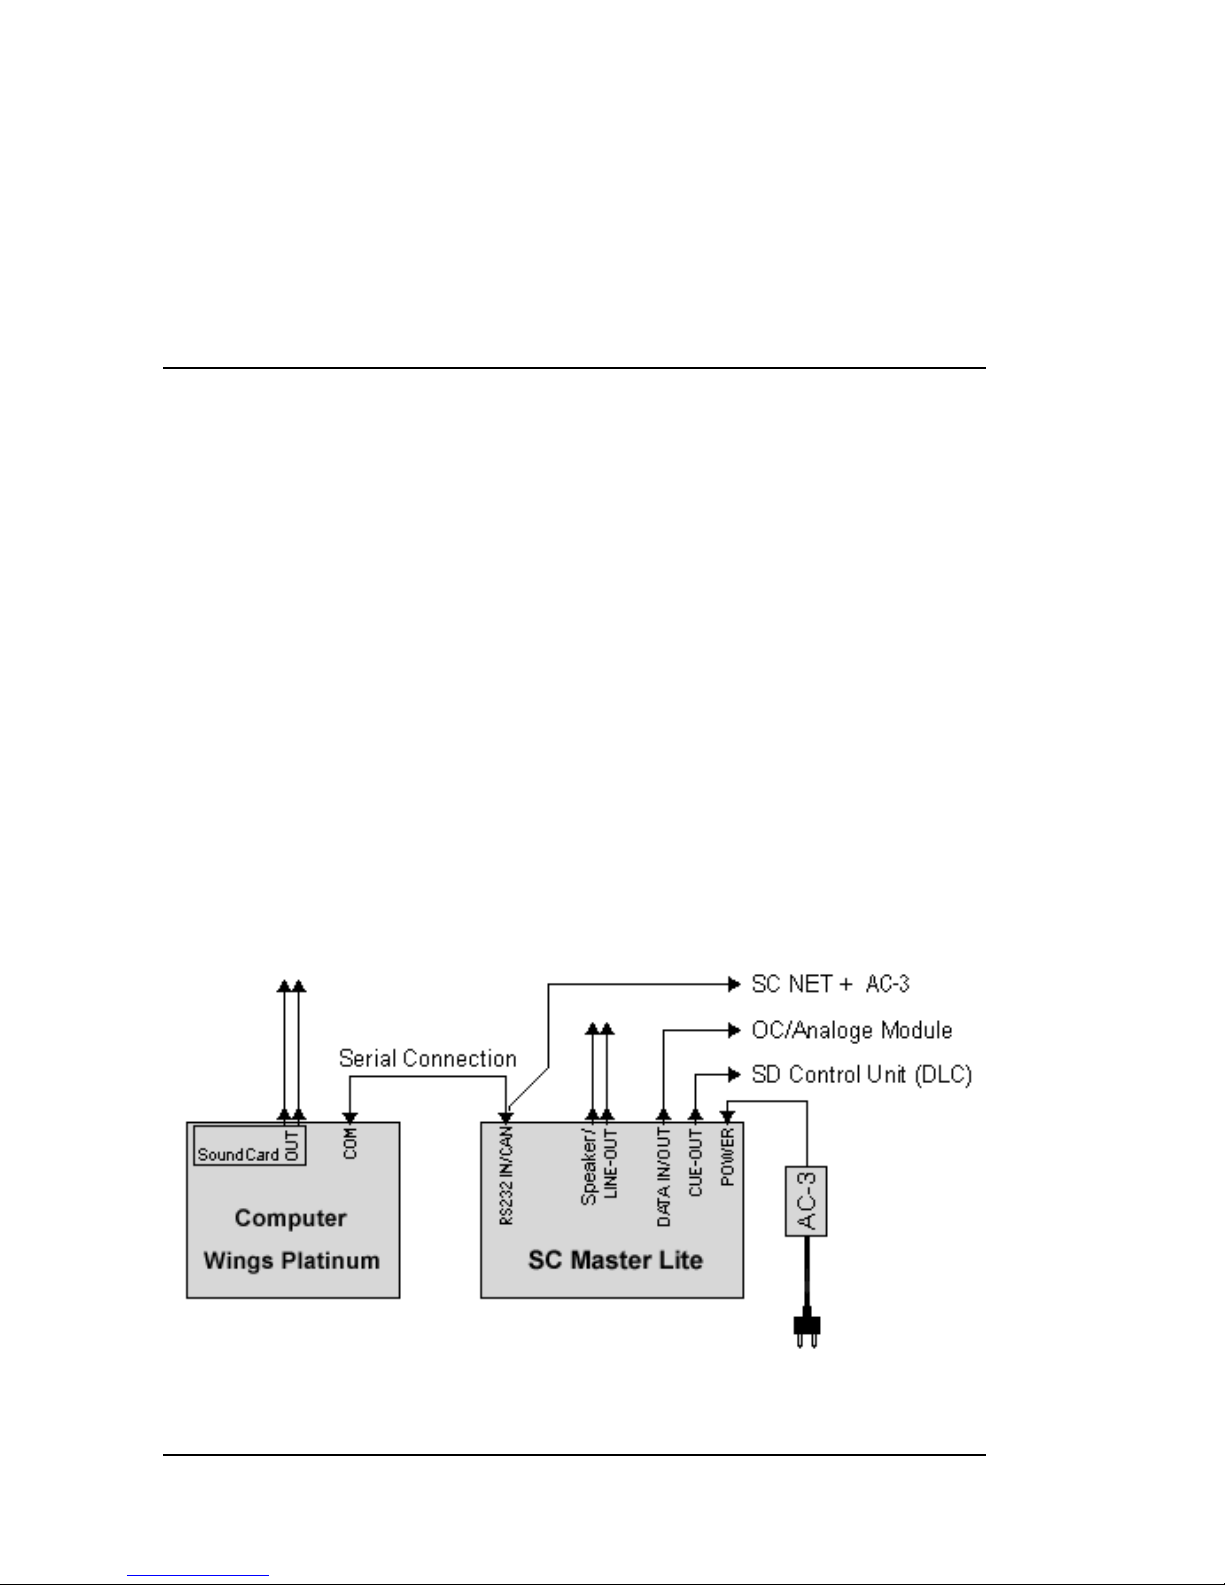
Connect the cables as displayed below.
Once you have set up the connections between the system
components, you can start programming with Wings Platinum.
Page 20
14 • Getting Started
In order to find out how this is done, refer to the corresponding
chapters.
Please note the following:
•
Simultaneous connection of computer and SC Net Modules requires the special cable SCK-A-SCM-SCN, which is
available as an accessory. The SC Net modules are supplied via additional power supply units. Apart from a few
exceptions, the power supply unit AC-3 can supply up to
five SC Net modules.
•
Other connection diagrams in this manual do not include
the power supply unit and take its existence for granted.
•
The
LS variant
required the power supply unit
STZ-NG3-
Switch
.
Switching on
Press the main switch (POWER ON) to switch on the
SC MASTER. The red LED above it lights up and the display
shows several messages one after the other. After about 3
seconds the following display should appear:
Page 21

SC MASTER LITE Getting Started • 15
Inserting the batteries into the IR remote control unit
The battery compartment is located at the rear of the remote
control unit. Push the cover of the battery compartment downwards by pressing on the arrow symbol and insert four batteries size LR03 (round cell 1.5 V) in accordance with the polarity
indication. Slide the cover back to close the battery compartment again.
Important: Strictly observe
the correct polarity indicated
at the bottom of the battery compartment when inserting
the batteries!
The SC MASTER is now ready for operation.
Page 22
16 • Programming shows
Programming shows
Overview
For programming, SC MASTER interacts with Wings Platinum.
It is the link between multi-media units and computer. Communication with the computer is via a serial port.
1. First of all, with the devices being deactivated, connect the
RS232-IN connector of the SC MASTER with the serial interface (Com 1...4) of your computer. You should use the
supplied cable STK-C010 to avoid possible problems
caused by ground loop and interfering voltage. If you want
to connect SC Net modules as well you should use the
special cable SCK-A-SCM-SCN instead of the supplied
cable STK-C010. The SC Net modules cannot supplied via
the SC Master LITE but require separate power supply
units.
Page 23

SC MASTER LITE Programming shows • 17
2. Now switch on the computer, followed by switching on the
SC MASTER.
3. Start Wings Platinum, load a project or create one. A
device port "Stumpfl DLC" or "Stumpfl SC Net" using the
corresponding interface must be configured in the project.
4. In the Wings Platinum tool bar click on
"Enable device
ports". After the connection has been established, the
green PC LED lights up and button "Enable device ports"
appears depressed and in colour.
If you have problems establishing a connection with the PC,
proceed according to the checklist, which you can find in the
Online Help of Wings Platinum under "
Problems
... ".
Programming with Wings Platinum
Preparatory steps
Hard disk recording allows parallel production of sound track
and control program. This means that you don't have to mix
and complete the sound track first before you can start programming or synchronizing but that the sound can be added
piece by piece when producing the control program. This
allows for maximum flexibility. The
Workshop For Beginners
in the Wings Platinum Help Menu provides some project
examples to find out about the various functions available.
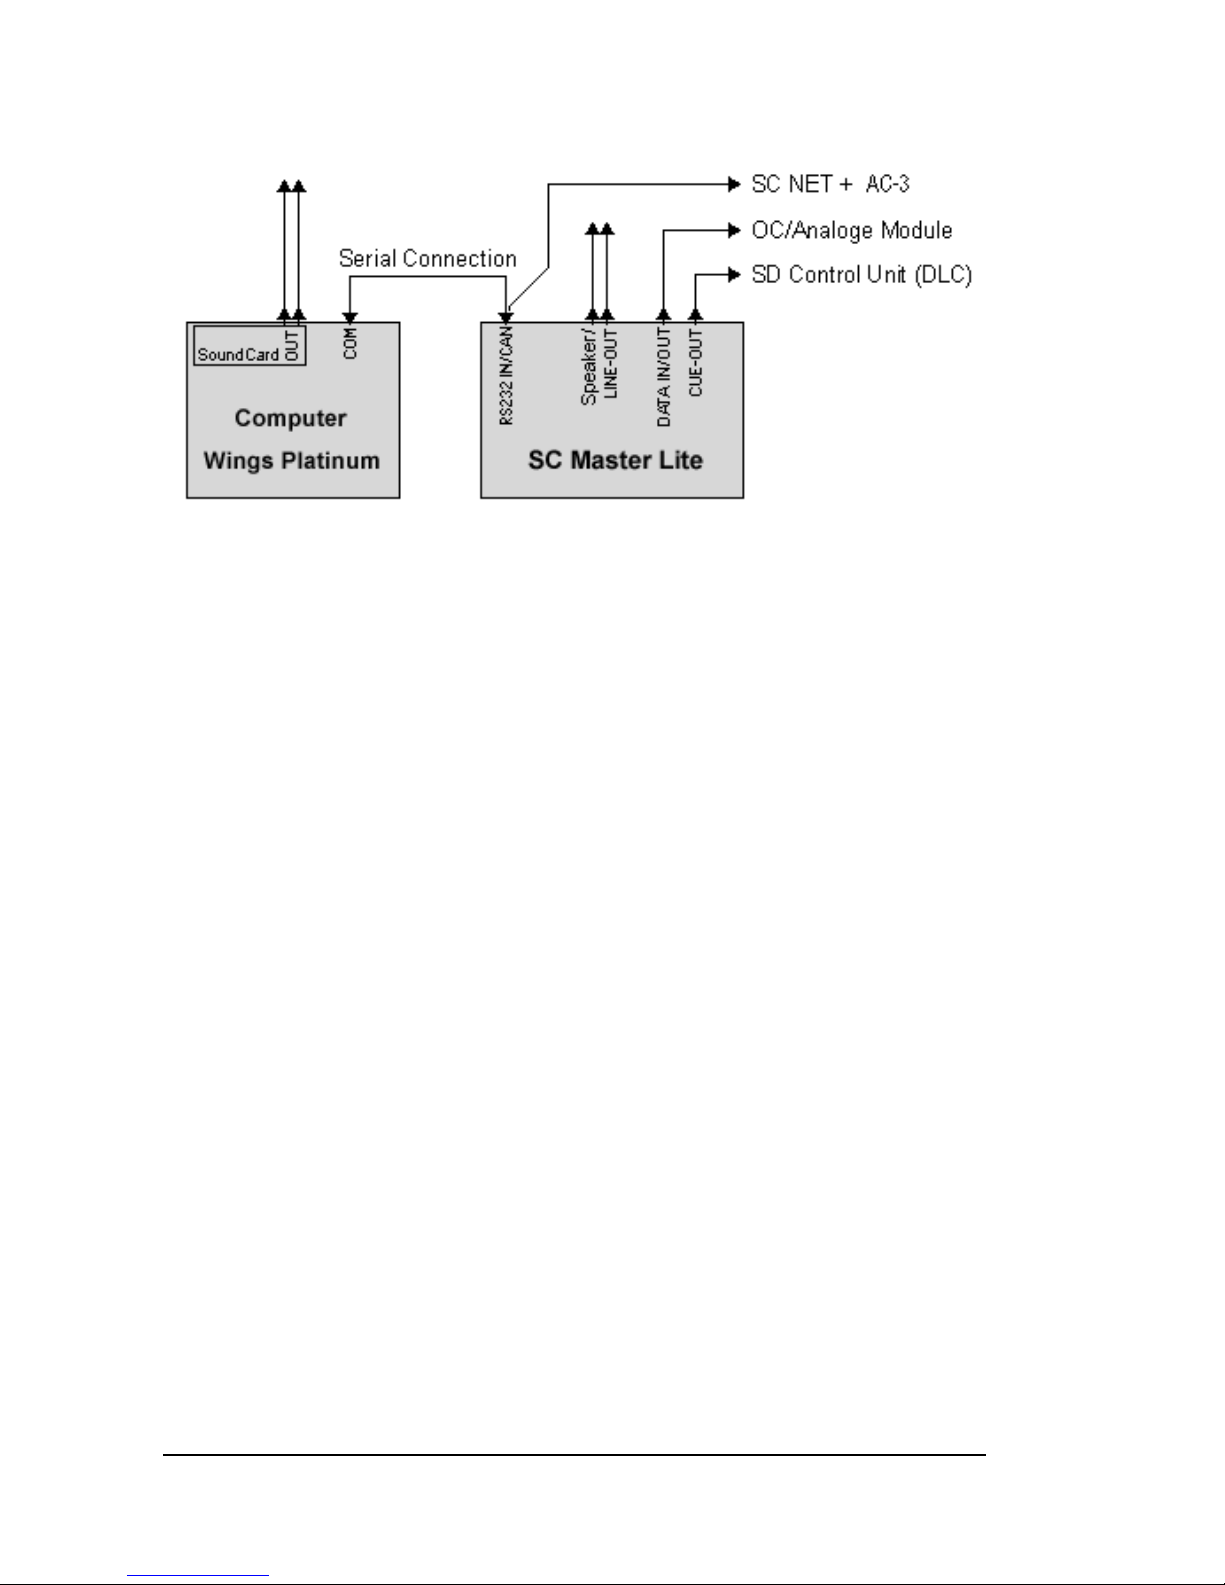
In principle, the set-up for programming and sound tracking is
as follows:
Page 24
18 • Programming shows
What and how many external devices are connected, depends
entirely on your project.
Establish communication between control unit and computer
as described on page 16 and activate your system.
Creating a project
Before SC MASTER can play back sound, you need to create
the corresponding project and copy it onto CF card. In addition
to MP3 audio samples, it also requires a show file containing
playback information for the samples and, most of the time,
also information for the devices to be controlled.
In Wings Platinum, project creation is media or object-oriented.
This means that pictures, videos, music and control functions
are arranged as desired while the image mix can immediately
be viewed on the virtual screen. All components involved are
accurately synchronized. The steps to take, which are ex-
Page 25

SC MASTER LITE Programming shows • 19
plained in more detail in the Wings Platinum Online Help, are
as follows:
Creating a project:
The fastest and easiest way to do so is
via one of the Project Wizards or via project templates.
Capturing media:
Use Wings Platinum to capture and save
music and sounds on your hard disk. Wings Platinum helps
you to do so in a variety of ways. As an alternative, you can
copy existing media files onto your hard disk and import the
corresponding media files into the Media Pool.
Arranging control objects in line with sound:
Drag the
corresponding control objects and pieces of music from the
Media Pool into the corresponding track in the timeline. All the
resulting objects can be shifted, dissolved or cut in virtually the
same way, which means that learning to edit is quite easy.
Test run with devices:
A sequence that has been prepared in
Wings Platinum can immediately be checked via the connected devices. They will follow the Locator position in Wings
Platinum when the device ports are enabled.
Creating presentation data:
Once you have completed your
project and want to present it without PC you need to create
presentation data for the SC MASTER.
Details on how to produce presentation data for CF card can
be found from page 21 onwards. Refer to the Online Help to
find out about the effective ways of programming with Wings
Platinum. This help is context-sensitive, i.e. by pressing the F1
key the topic matching the open dialog box will usually be
displayed. The help also contains example projects for classical show control applications.
Page 26

Page 27

SC MASTER LITE Creating a Show Medium • 21
Creating a Show Medium
General
Once you have finished programming your show, you continue
by creating the presentation medium, which allows you to
present your show even without computer.
Unbelievable, but true! MP3 audio data compression
Strictly speaking this compression technology developed by
the Fraunhofer Institute is called MPEG 1 Layer 3. In the
meantime, however, it's only called MP3 for short among
experts. That's what we do, too.
But more important is what there is to it: It is hardly conceivable that a reduction of audio data by up to 90% does not
result in an audible loss of quality. This compression technology is based on psychoacoustics, i.e. perception of sound by
people. In long series of scientific tests it has been found out
what a person can actually hear, what is essential for hearing.
And this is exactly what MP3 compression is about. All other,
unimportant signals clearly fall victim to the compression!
However, the result is really worth hearing. Only trained ears
will be able to notice the difference between the compressed
music and the original one although this also depends on the
type of music The compression of solo instruments is more
Page 28

22 • Creating a Show Medium
critical than that of pop arrangements. Your can choose the
extent of compression yourself, which means that you can
influence the quality and choose the right compression suitable for your music.
Gaining first experience with MP3 is something to look forward
to!
In the list below you can find out about the dependencies
between memory space requirements and extent of compression. It applies to stereo sound.
Data rate CF Card 48 MB 96 MB 192 MB
96 kbits/s Playing time 63 min 126 min 252 min
128 kbits/s Playing time 47 min 95 min 185 min
192 kbits/s Playing time 31 min 63 min 125 min
256 kbits/s Playing time 23 min 47 min 93 min
The playing time is reduced further, when a high number of
shows or data-intensive shows, e.g. shows containing commands for slider control, are stored on the CF card.
Page 29

SC MASTER LITE Creating a Show Medium • 23
Generating data for the SC MASTER
There are two steps to produce a CF Card to be used as
presentation medium:
1. The presentation data for the CF card are generated and
stored on the hard disk
to start with. These are the control
signals for the show on the one hand, and the sound track
elements compressed in accordance with the MP3 data
compression format on the other.
2. The presentation data prepared such are then transferred
from the hard disk to the CF card. This requires a computer with CF card drive, which is also available as external model with USB connection. Or, as an alternative, you
can also use the PCMCIA slot of your notebook via a CF
Card adapter.
The FlashCard Dialog in Wings Platinum
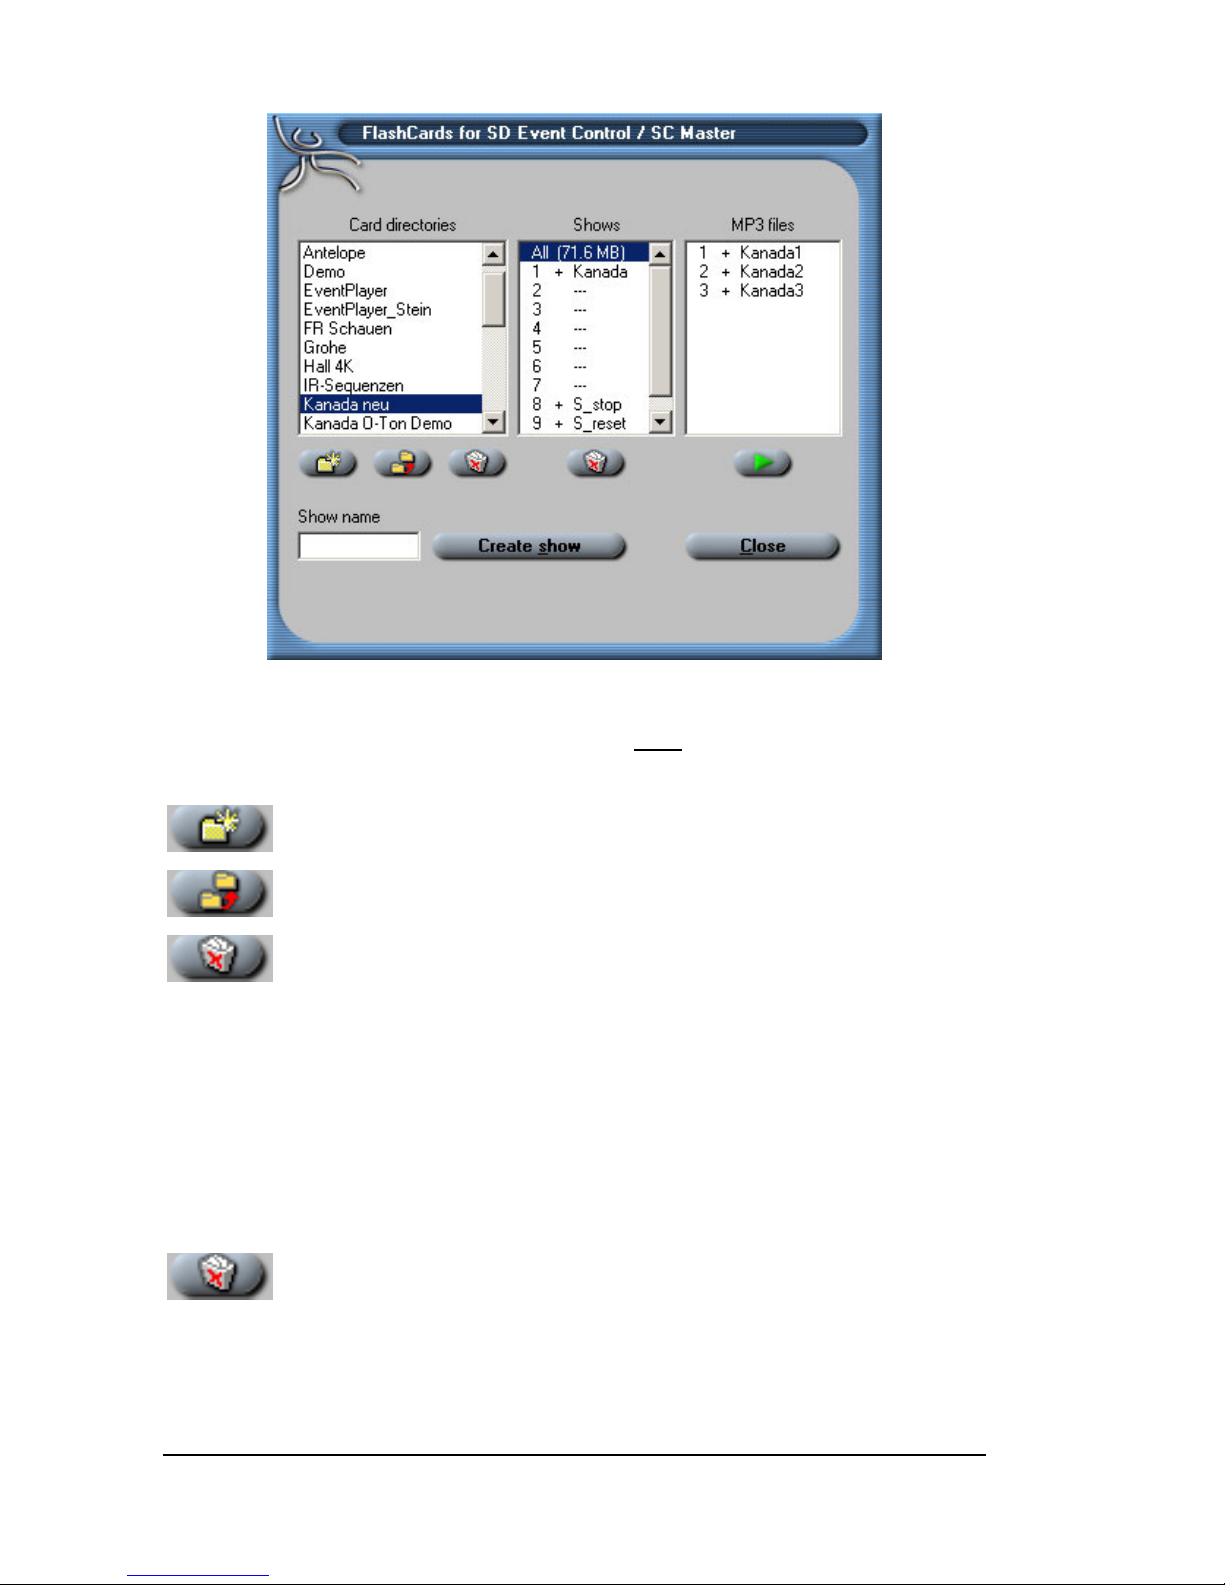
The presentation data for CF Card are generated in Wings
Platinum via the FlashCard dialog, which can be called up via
the main menu "Output"/"Create FlashCard...".
The FlashCard Dialog is the central tool for generating, transferring and managing CF Card presentation data.
Page 30
24 • Creating a Show Medium
The left field contains a list of card directories. One directory
always stands for the contents of one
CF card, i.e. it is the
inverted image of a CF card on the hard disk.
creates a new card directory.
copies a card directory onto the CF Card.
deletes a card directory and its contents.
The centre field lists the shows contained in the marked card
directory. The number in front of the show refers to its position
on the CF Card. The plus sign indicates that the required data
for the show are available. A question mark would indicate that
the data are missing. At the top, next to "All" you can see the
volume of data contained in the marked card directory.
deletes a show and the pertaining MP3 files
Page 31

SC MASTER LITE Creating a Show Medium • 25
The field on the right lists all MP3 compressed audio files used
in the marked show. The plus sign in front of a name indicates
that the required data for the show are available. A question
mark would indicate that the data are missing.
plays an MP3 file
Double-click the show name or MP3 file to open a dialog box
where you can specify the name and other properties for
shows. More information can be found from page
Fehler!
Textmarke nicht definiert.
onwards.
By check marking
Update Show File (without audio files)
you can up-date the presentation data without having to recompute the sound track. To do so, mark the show to be
updated in the centre column and click "Save show". Only use
this option if you have not made any changes to the sound
track! Otherwise show playback may no longer be synchronized.
Generating presentation data for the CF Card
During this process, the presentation data for a project are,
first of all, created and then saved to the hard disk. Please
note that an MP3 encoder must be available on the computer
to be able to compress audio data in accordance with the MP3
compression format. Numerous MP3 encoders can be downloaded from the Internet. Further information on how to install
them can be found in the Wings Platinum Online Help.
Page 32
26 • Creating a Show Medium
This is how you generate the presentation data:
1. Load the show or project you want to generate presentation data for and click "
Output – Create FlashCard...
" in
the main menu.
2. Under "
Card directories
" mark the card directory you
want the new data to be copied into. Or create a new card
directory, by clicking .
3. In field "
Show name
" enter a name for your show. The
maximum number of characters is eight. No special characters are allowed. Now click "
Create show
".
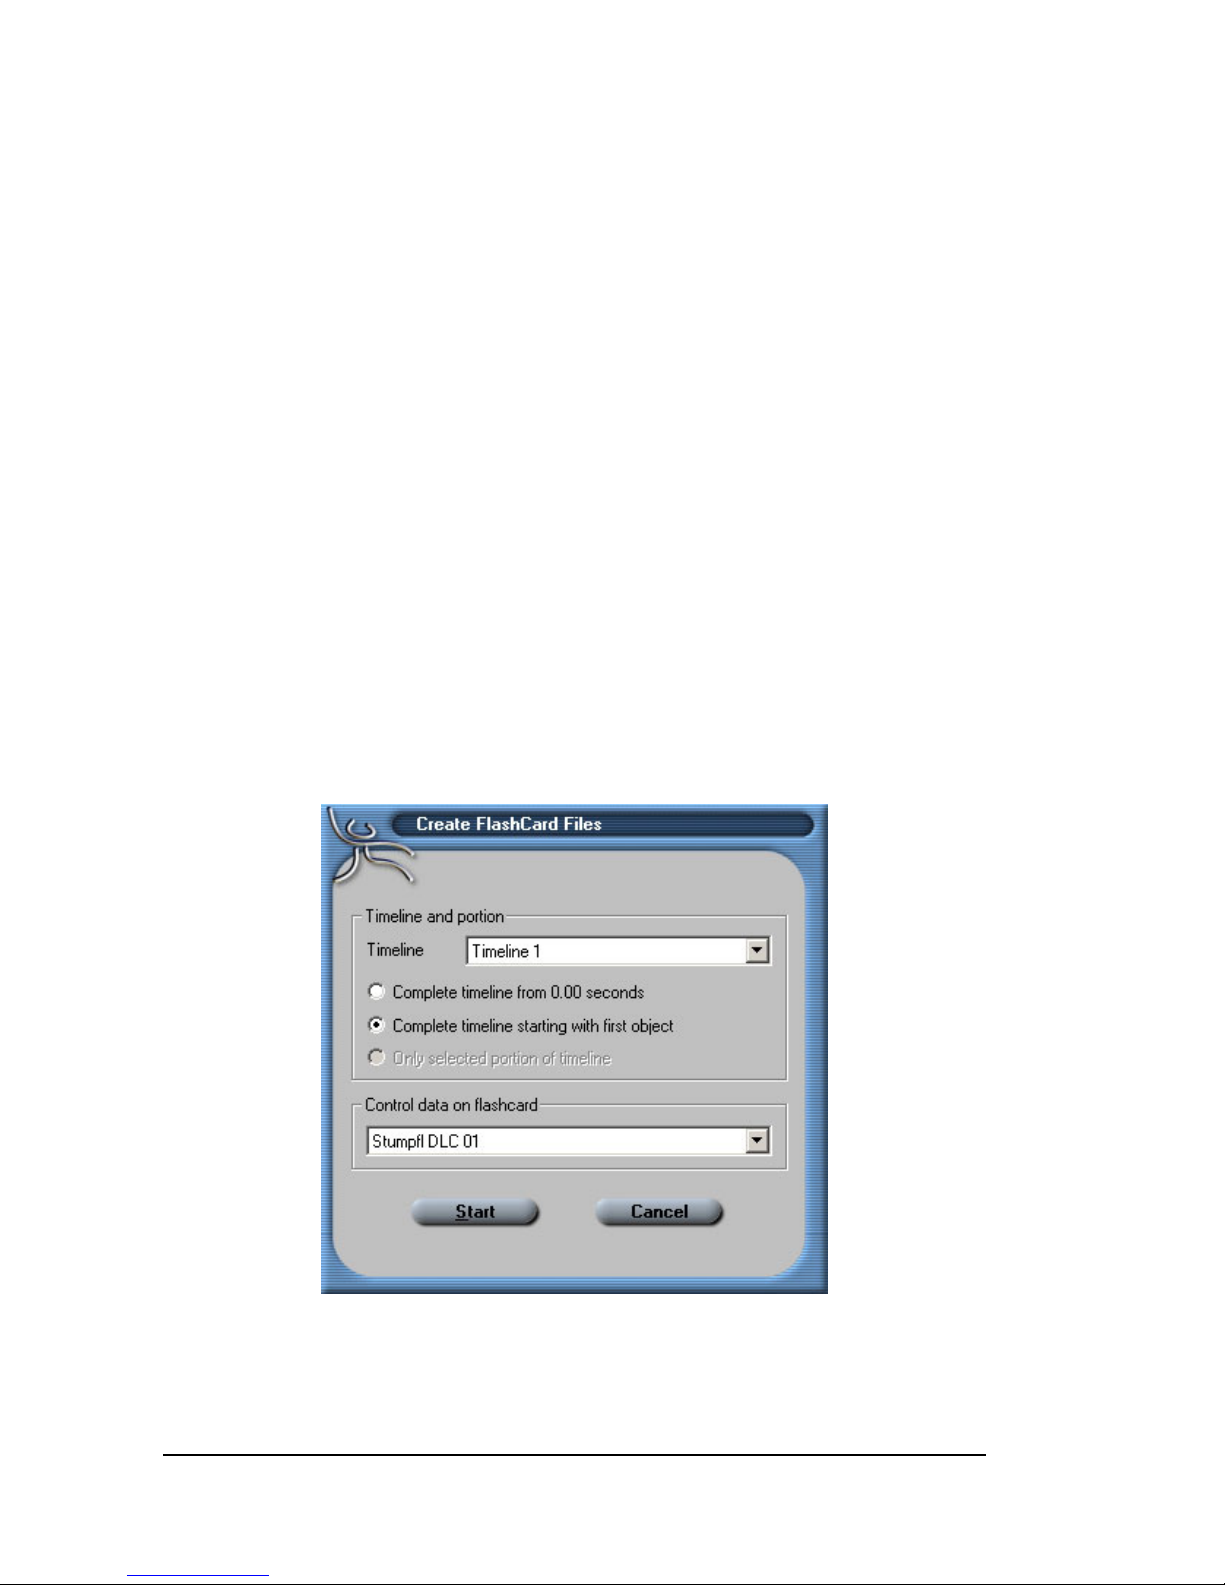
4. Select the required timeline under "
Timeline and Por-
tion
". The default setting "
Timeline1
" only needs to be
changed when there are several timelines.
Page 33

SC MASTER LITE Creating a Show Medium • 27
5. Select the project portion for which presentation data are
to be generated.
The following options are available:
•
"
Complete timeline from 0:00 seconds
" ... just like
the timeline, the show starts at zero seconds, so that
a possible leader up to the first object is also included
and finishes after the last object.
•
"
Complete timeline starting with first object
" ... the
show starts before the first and finishes after the last
object. (.... recommended for CF Cards)
•
"
Only selected portion of timeline
" .... only the se-
lected portion of the timeline will be considered. If no
portion is marked this option cannot be selected.
6. Select the device port the control data of which are to be
used. Normally, you can leave the default setting. Alterations may only be necessary when there are several device ports being used. Now click "
Start
".
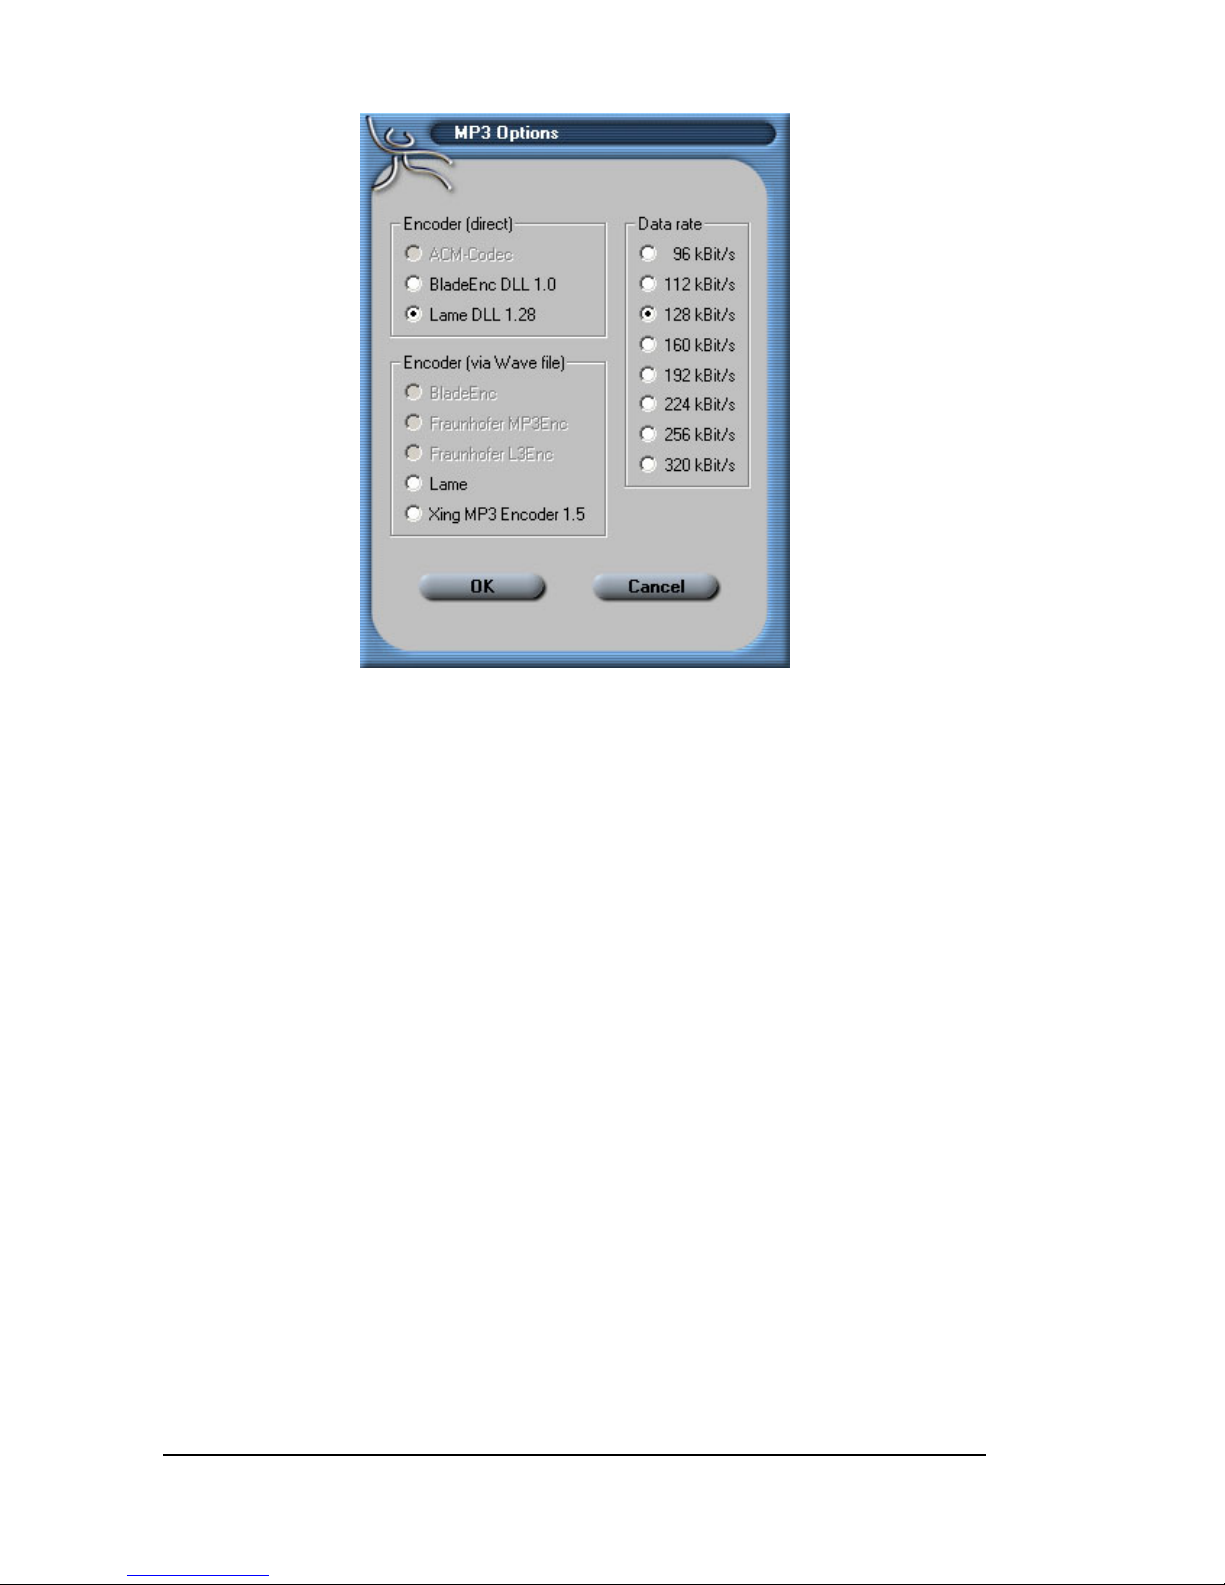
7. Select an MP3 encoder. Encoders listed under "
Encoder
(direct)
" will generate the MP3 files without saving any
temporary data on hard disk. "
Encoders (via wave file)
"
will temporarily save the sound track as wave file in the
FlashCard directory, use it to produce MP3 files and finally
delete the wave file again. You only need to make sure
that the drive of the FlashCard directory has enough
memory capacity.
Page 34
28 • Creating a Show Medium
8. Now select a data rate. Usually, 128 kbits/s should be
sufficient for CD quality. If you are not satisfied with the
quality try to improve the result by choosing a higher data
rate.
9. Click "
OK
". The presentation data are being generated.
Please note the following:
•
While creating the presentation data, several windows will
appear, in accordance with the MP3 encoder used and
disappear again.
•
When presentation data have already been generated for
a project, any alterations to the picture objects can easily
be updated without renewed sound track computation:
Simply mark the corresponding show in the FlashCard dialog field, put a checkmark by "Create show data only" followed by clicking Create Show .
Page 35
SC MASTER LITE Creating a Show Medium • 29
•
Only change the contents of card directories via the
FlashCard dialog in Wings. When using Windows Explorer
to do so, pieces of information relevant for the
SC MASTER may not be updated and you might end up
with problems running the shows.
Specifying show properties
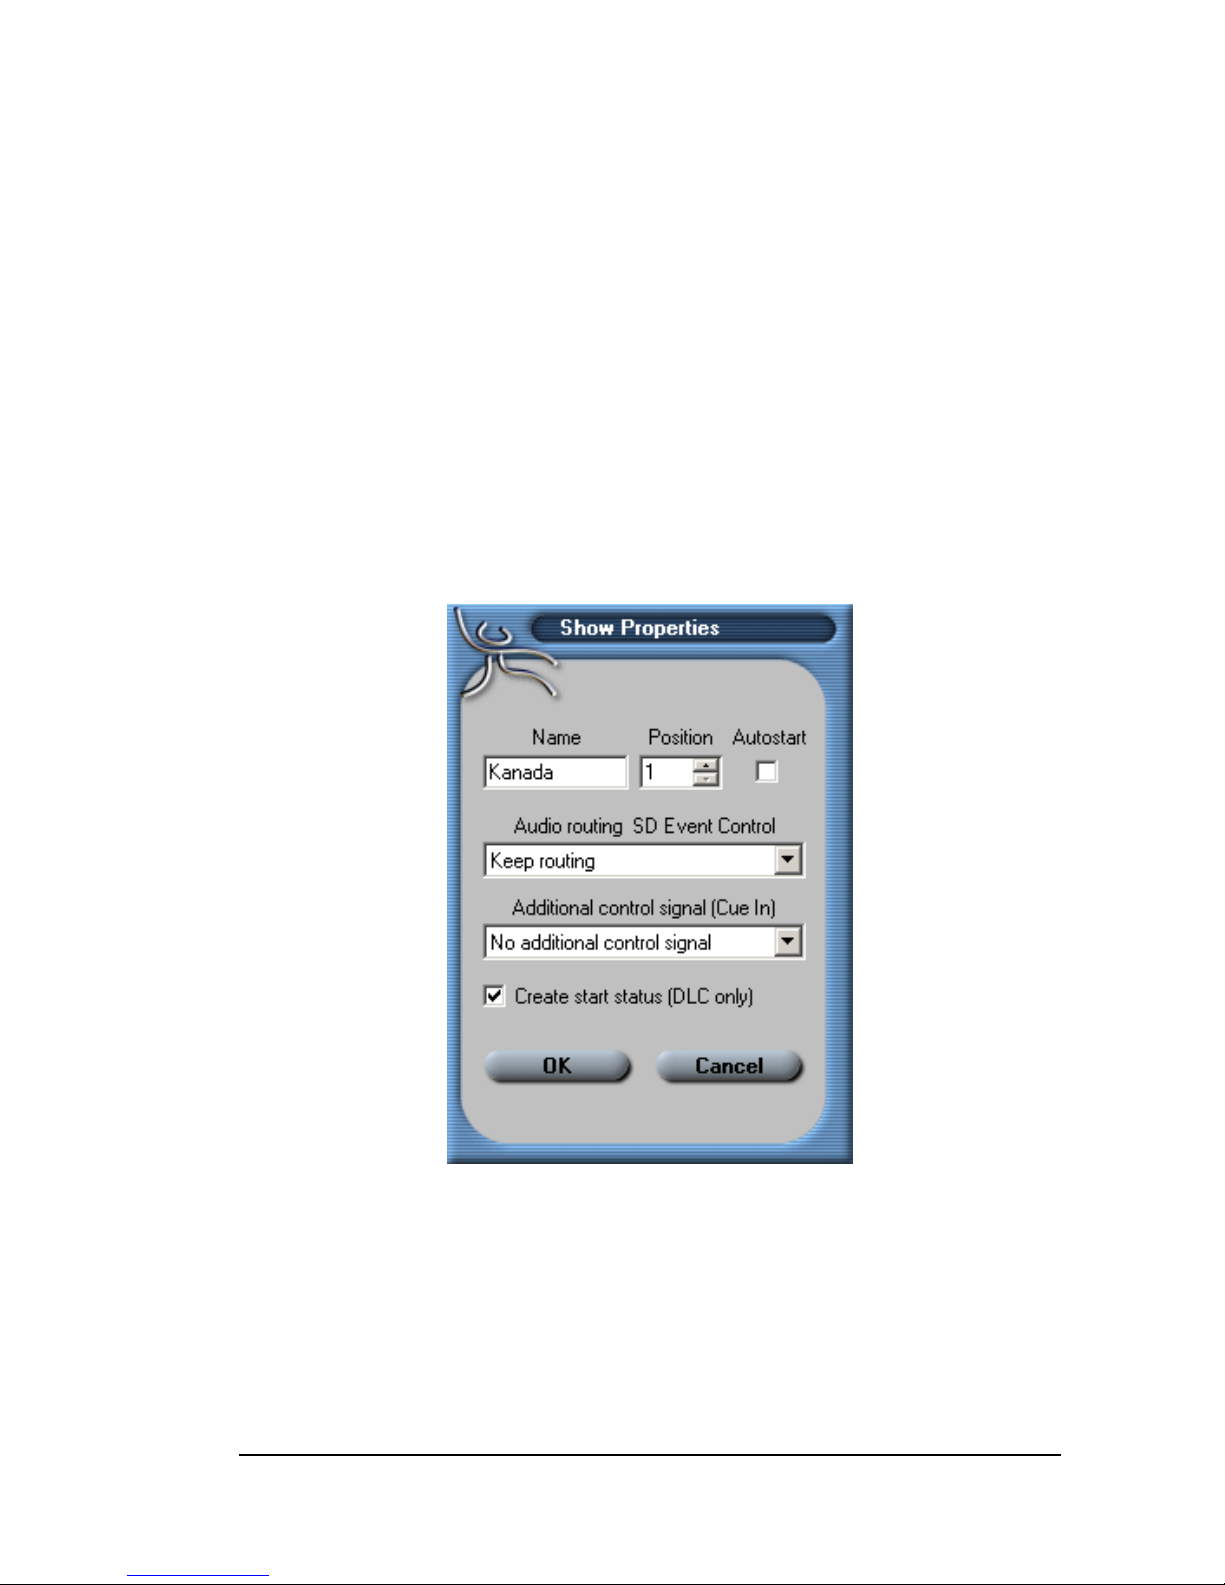
You can assign certain control properties or audio functions to
shows, to be evaluated by the SC MASTER during show
presentation. The dialog field opens up by double-clicking the
show name.
The name can be altered in field "
Show Name
".
Field "
Position
" defines the position of the show on the CF
Card. This is the number you can enter later on via the IR
remote control to start the show.
Page 36
30 • Creating a Show Medium
By activating "
Autostart
", the show is automatically started
after powering up SC Master.
The settings in field "Audio Routing" are not relevant for SC
MASTER LITE.
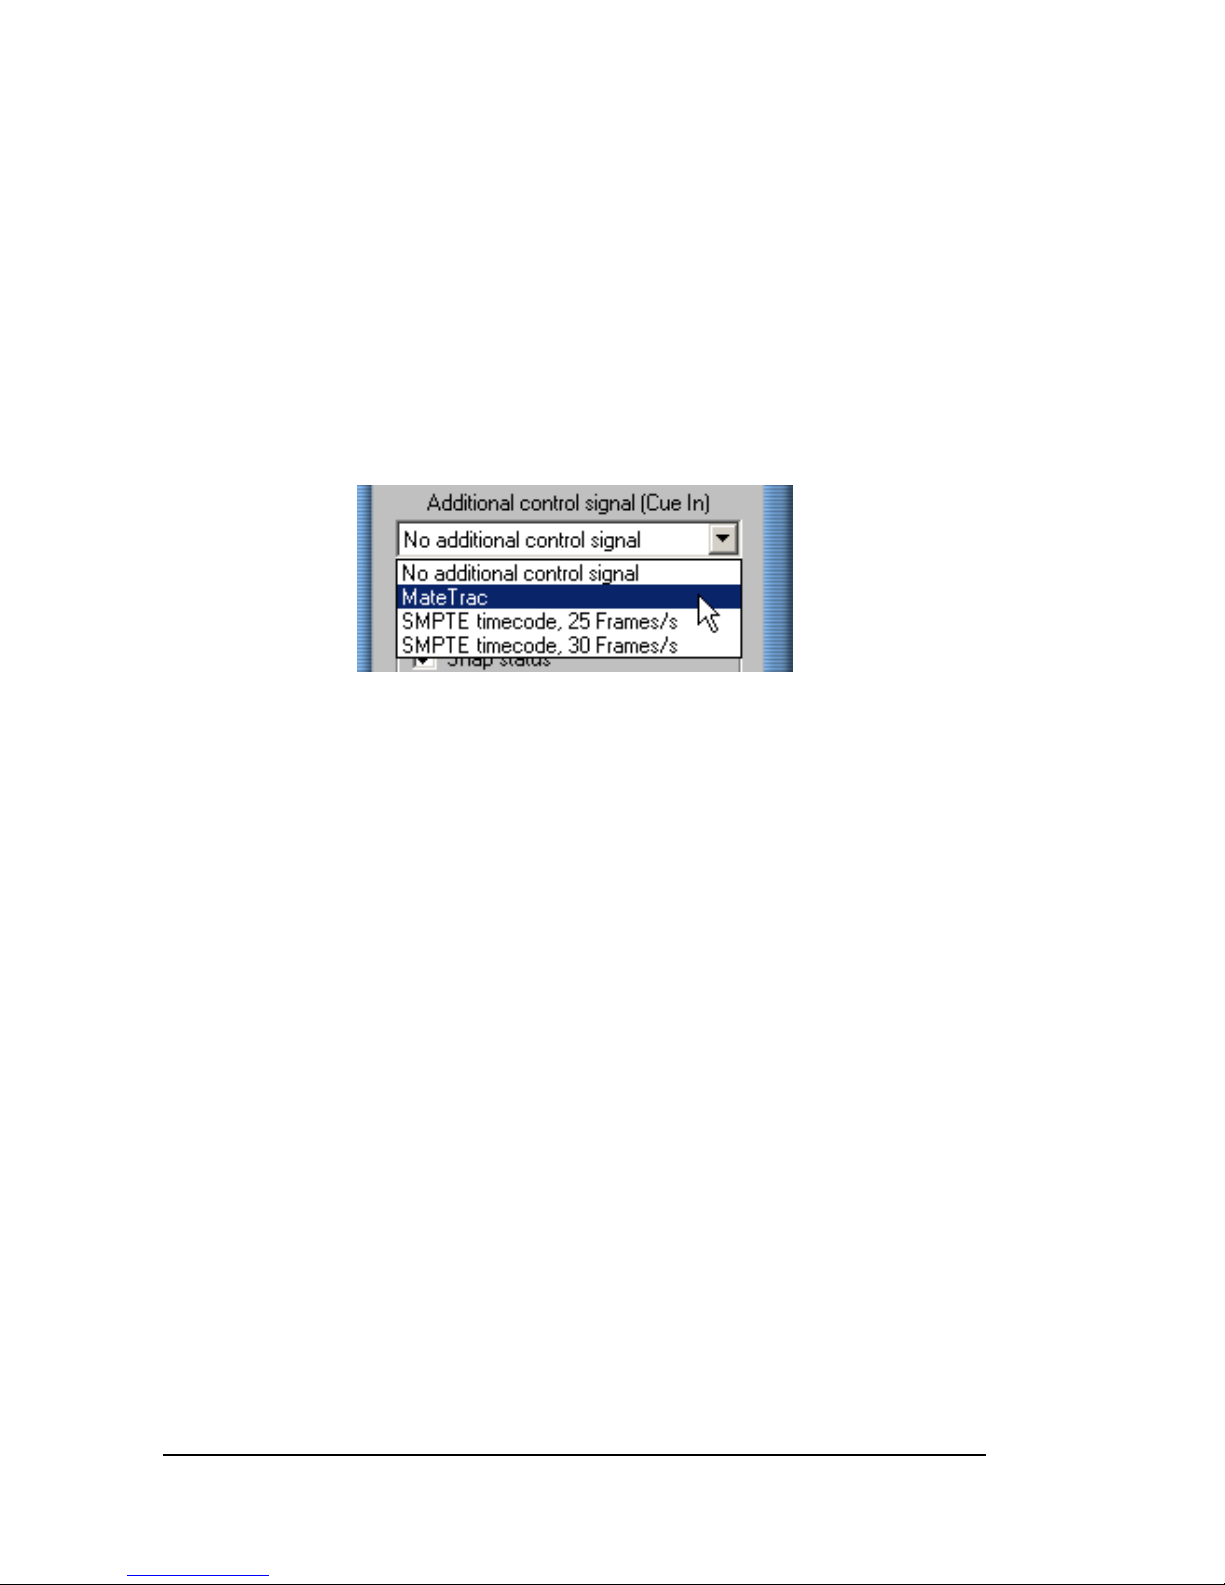
In field "
Additional data signal
" you can specify whether an
additional data signal is to be output at the CUE-IN connector
in addition to the DLC signal.
If you want to use older control units which can only read
MateTrac, for example, select "MateTrac". If you want to
synchronize multi-media components via time code, select the
time code with the corresponding frame rate.
Under
Create Start Status
you can lay down whether the start
status of the show is to be transferred to the control system, or
whether playback is to start on the basis of the individual
control system status. This parameter is only relevant for DLC
signals.
Click "OK" to save all selected properties along with your
show.
Page 37

SC MASTER LITE Creating a Show Medium • 31
Editing Remote Properties of Shows
For Show Control applications, shows frequently need to be
remote-controlled. The SC MASTER allows you to start shows
simultaneously or interactively from CF Card by pressing
certain keys or via remote commands. This is defined in the
CF Card Remote Table. The following operations are possible:
•
Linking keys on an IR remote control unit to a show
•
Linking remote commands (RS 232 or keyboard) to a
show
•
Allocating a mode for show start.
And this is how it is done:
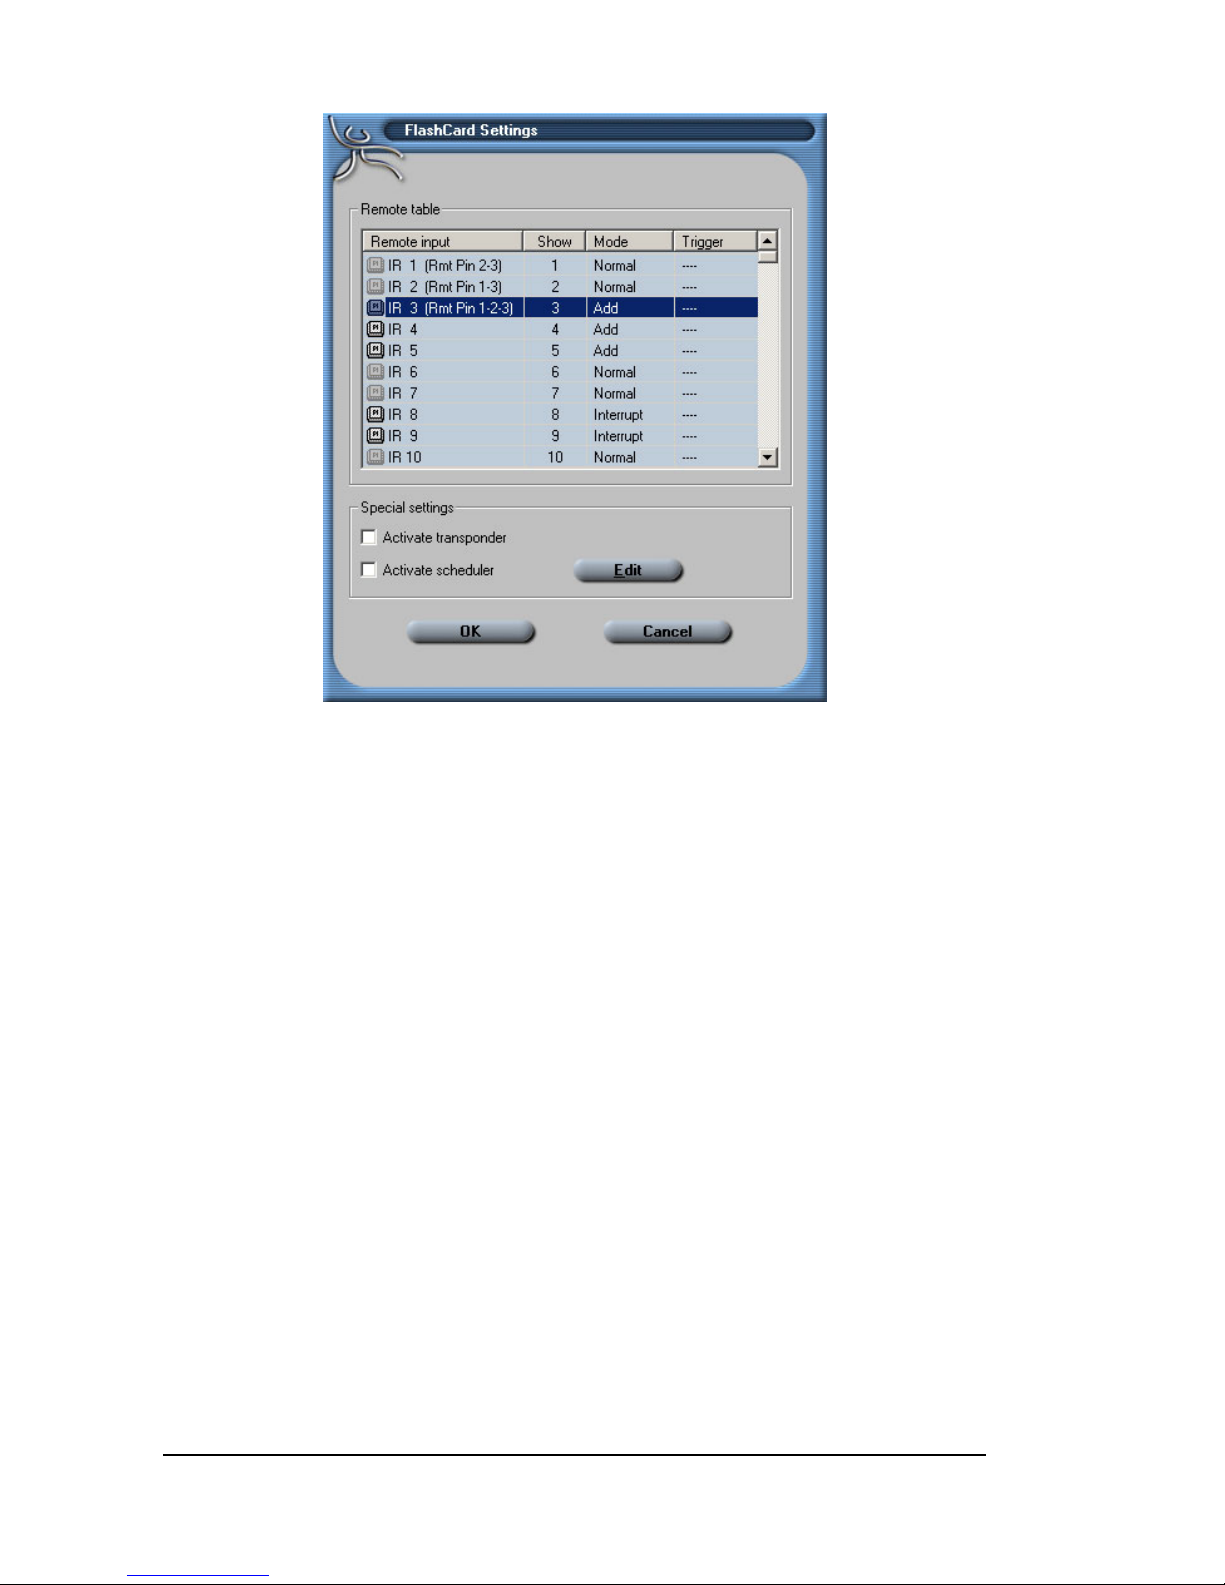
1. In the main menu, click
Output – Create FlashCard...
And the FlashCard dialog will appear.
2. Double-click the corresponding FlashCard directory and
the dialog
FlashCard Settings
will appear.
3. Under
Remote Input
you will find the 32 keys of an IR
remote control unit, followed by an additional 120 remote
inputs below. Each of these Remote inputs can be linked
to a show and a mode for show start be determined.
Page 38
32 • Creating a Show Medium
4. Highlight the corresponding Remote input.
5. In column
Show
click on the entry field, enter the corre-
sponding show number and press
Enter
.
6. In column
Mode
right-click the entry field and select the
corresponding mode for the remote behaviour of the show.
The various modes have the following effects:
•
Normal
...normal show start, the running show is not
interrupted.
•
Interrupt
....show start interrupts any show being
played back.
•
Terminate
...show start terminates only other shows
but not itself.
•
Add
...added start; show is run simultaneously in addition to the running show. A maximum of 10 shows can
be run simultaneously.
Page 39

SC MASTER LITE Creating a Show Medium • 33
•
End
...terminates show playback. Is used for
terminating individual shows; other shows continue.
•
Continue
...continues the selected show, when it is
waiting at a Pause Marker or an X-time.
•
Continue all
... continues all shows that
are waiting at Pause Markers or X-times.
•
Memory
...show is preselected and started automati-
cally at the end of the running show.
•
Restart
...a running show is started again from the
beginning, other shows continue.
7. When using one of the inputs
Remote 1
to
120
you can
specify whether the show is to start when the switching contact opens or closes. Right-click column
Trigger
and select
Close
or
Open
.
8. Finally, click on
OK
.
Special settings
Below you will find a few special settings:
•
Activate transponder
...prepares a CF Card for commu-
nication with a transponder.
•
Activate scheduler
...prepares a CF Card for timecontrolled show start. In addition to this you need to create
a scheduler file containing the control information for the
show starts. Further information can be found in the Wings
Platinum Online Help.
Page 40

34 • Creating a Show Medium
Editing Remote Properties in SHOW.INI
Remote Properties can also be edited in SHOW.INI with an
ASCII Editor, e.g. Notepad. This may be very useful in emergency situations. SHOW.INI is located in every CF Card
directory. Unless you have specified any other location, the
show data for the SC MASTER can be found in
"C:\Programs\Wings Platinum\EventControl Data" or on the CF
Card.
Important:
•
Only edit sections "Key Table" and "Remote Table"; never
any other sections.
•
Only
use the FlashCard Dialog in Wings Platinum to edit
contents of CF Card folders; never use Windows Explorer
to copy files.
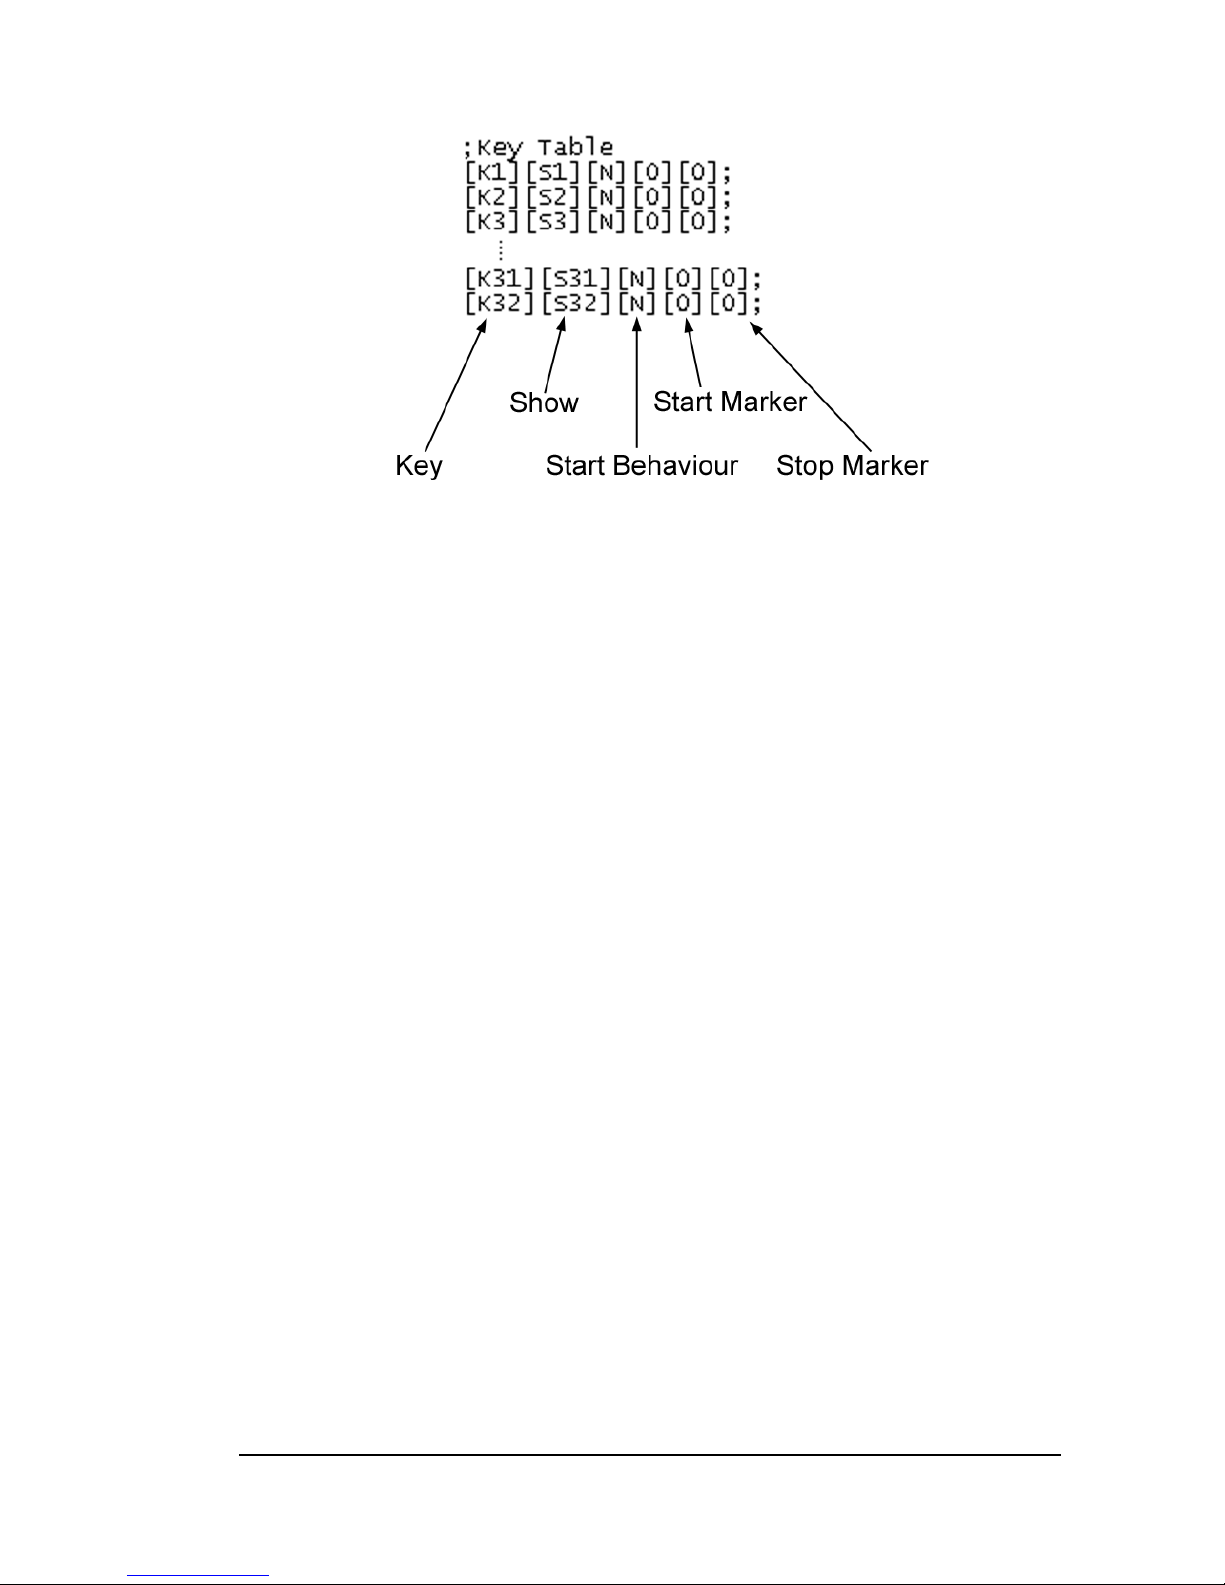
The Key Table
This section is located at the end of SHOW.INI and defines the
properties for using an IR remote control unit. It refers to keys
1 to 9 on the standard IR remote control unit or to all 32 keys
on the unlabelled IR remote control unit (customized version).
The parameters are arranged as follows:
Page 41
SC MASTER LITE Creating a Show Medium • 35
K
1...32 addresses the corresponding key on the IR remote
control unit
S
1...120 addresses the corresponding show to be started by
means of the previously defined key.
The
Start Behaviour
of the addressed show can be defined
as follows: -
N
Normal start, the running show is not interrupted
I
Interrupt Start; every running show is interrupted
B
A running show is started again from the beginning,
other shows continue
T
Terminate Start; terminates only other shows but not
itself
M
Memory Start, show is preselected and started automatically at the end of the running show
A
Added Start; show is run simultaneously in addition to
the running show. A maximum of 10 shows can be run
simultaneously.
Page 42

36 • Creating a Show Medium
E
End of show playback. Is used for terminating individual shows; other shows continue.
If only a section of a show is to be executed,
Start
and
Stop
markers
programmed in Wings Platinum can be addressed.
The Remote Table
This section of SHOW.INI is located directly below the Key
Table. It refers to a keyboard matrix with 16 keys connected to
the DATA IN/OUT connector. The syntax for the Remote Table
is identical to that of the Key Table. Only the Start and Stop
markers are missing.
Page 43

SC MASTER LITE Creating a Show Medium • 37
Data Transfer to CF Card
After generating the presentation data for the SC MASTER,
you can transfer them onto CF Card. For copying onto CF
Card, the computer must be equipped with a CF Card drive.
Such drives are also available as external drives with USB
connection. If you use a notebook, a CF Card adapter for the
PCMCIA slot will suffice.
Copying the show data onto a CF Card
This is how you copy previously prepared presentation data
onto CF Card:
1. In the main menu, click "
Output – Create Flash Card...
"
2. Insert the CF Card into the CF Card drive of your computer.
3. Under Card directories mark the card directory you want
copied onto CF Card and click .
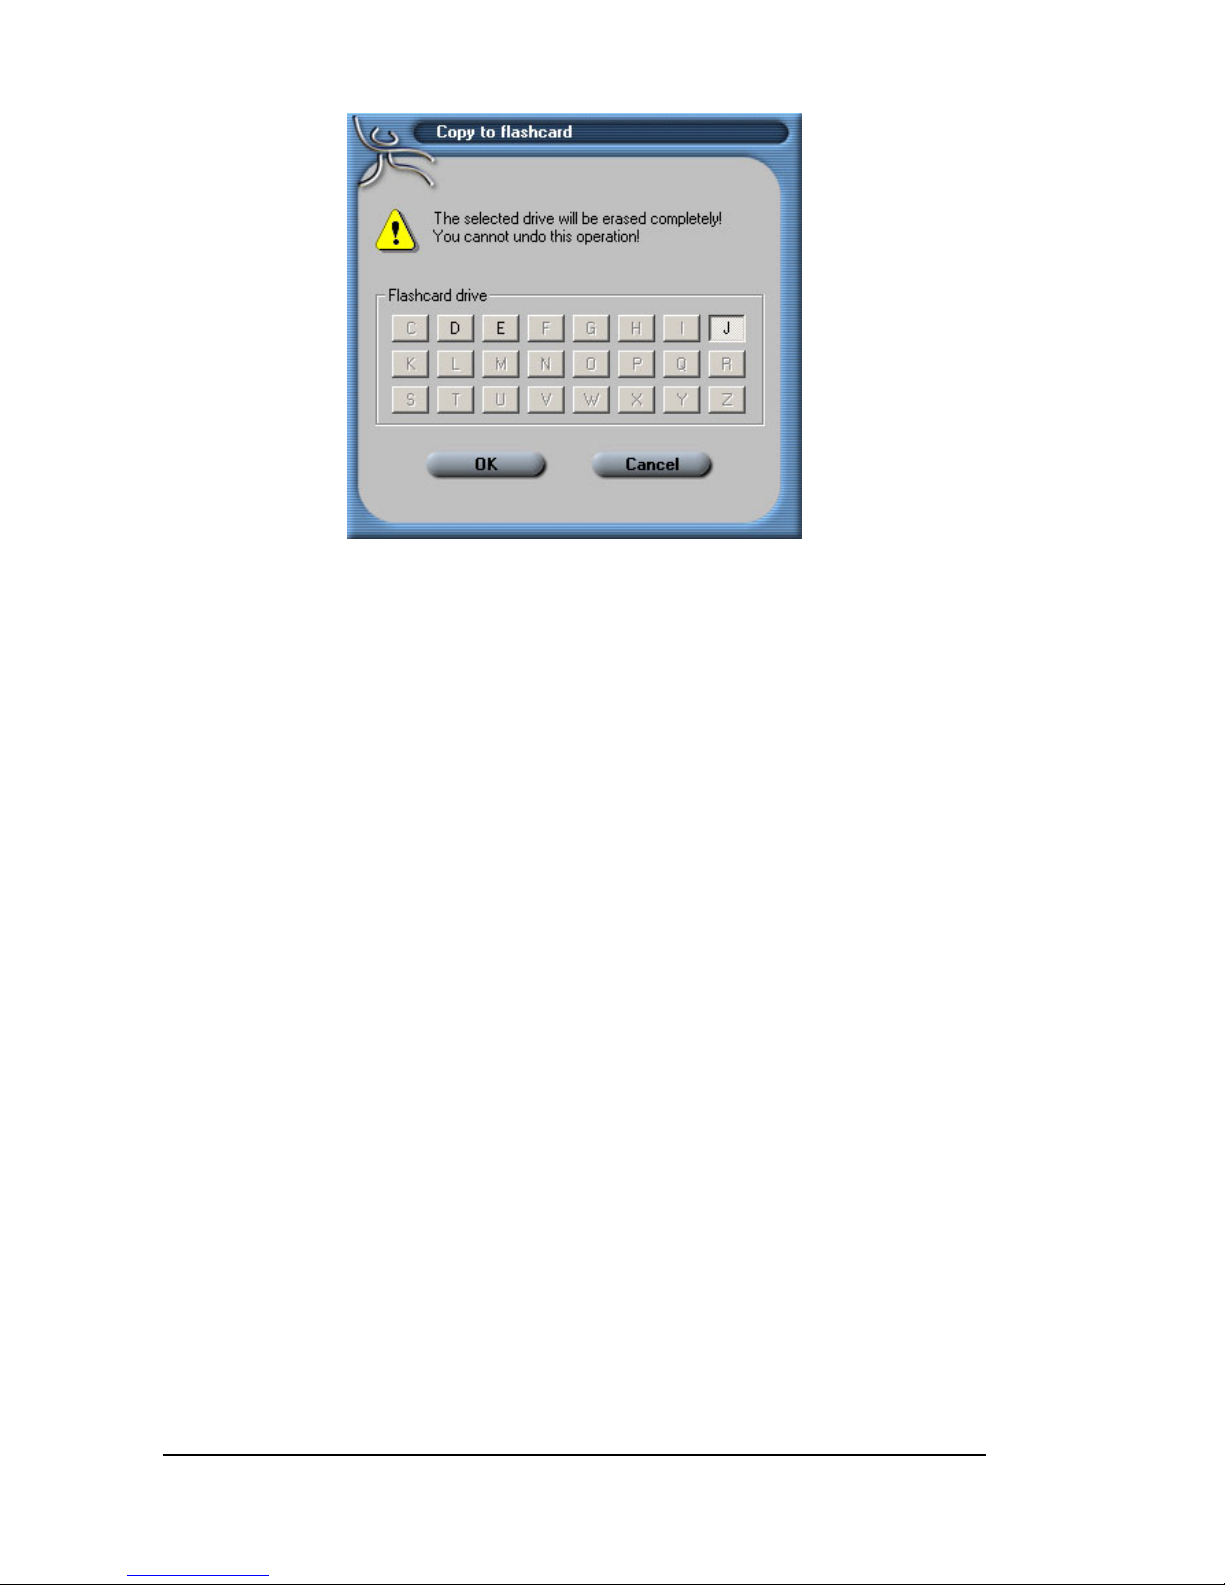
4. Select the letter for your CF Card drive. If you don't remember, look it up in the Windows Explorer.
Page 44
38 • Creating a Show Medium
5. Click "
OK
". The data are then transferred onto the CF
card.
Please note the following:
•
If you transfer a card directory onto the CF card, the
existing files on this CF card will be erased!
•
The situation is different for updating a show or for a
directory which is already located on the CF Card: In this
case, only the altered or new files are transferred. This is a
great advantage for editing shows as data transfer and
transfer time are reduced to the absolutely necessary.
•
Should there be an error during the file transfer, the CF
card must be formatted (using the FAT16 file system only!)
and the presentation data be transferred again. Otherwise
you may end up with problems while playing back the
shows.
Page 45
SC MASTER LITE Playing back shows • 39
Playing back shows
Presentations - compact layout and comfortable handling
For playing back show or audio projects you need a CF Card
containing the show data prepared beforehand using Wings
Platinum. In principle, the configuration is the same as for
programming. However, no PC is required but possibly an
additional, external remote control unit.
What and how many external devices are connected, depends
on your project.
This is how you start a show:
Start up the system
Page 46

40 • Playing back shows
Insert the CF Card into the SC MASTER slot, unless this
has been done beforehand. As a consequence, a message will appear on the SC MASTER display that the card
was detected.
Starting the show: Select and start the show by pressing
the corresponding number keys on the IR remote control
unit. On the SC MASTER display the show title appears
and the red SHOW LED lights up or flashes when an X
time or a pause marker is encountered. CUE LED on the
control unit lights up as a sign that the projectors are controlled.
The show is running ...!
Press key PLAY
or a number key to start from an X
time. The display and the flashing SHOW LED will tell you
when the program stops at an X-time.
Press key STOP
on the IR remote control unit to stop
the show. The message on the display will be "Show
Pause". Press the STOP key
once again and the show
will continue.
The volume can be controlled via the two CARD keys on
the IR remote control unit.
If you want to abort the show prematurely, press the STOP
key
for more than 2.5 seconds or the ESC key on the
SC MASTER for more than one second.
Please note the following:
•
With position markers in your show, it is possible to navigate between them via the skip keys in mode "Show
Pause". Further information can be found on page 40 and
in the Wings Platinum Online Help.
Page 47

SC MASTER LITE Playing back shows • 41
Navigation within a show
The SC MASTER offers elegant ways of navigating within a
show during the presentation. This can be done via the keys
on the IR remote control unit.
Scrolling within a show
While playing back, press and hold a skip key for fast scrolling
forward
or backward within the show.
Jumping to position markers
After stopping your show you can use the skip keys
and
in mode "Show Pause" to jump to the position markers you
have programmed in Wings. The corresponding marker number will be visible in the display.
And the show immediately
moves to the corresponding position. Once the trays have
reached the corresponding positions, you can deactivate mode
"Show Pause" by pressing the PLAY
or the STOP key and
continue playing back.
Jumping back to the STOP position
After stopping the show and jumping to a
position marker
(Mode "Show Pause") you can jump back to the STOP position by pressing the NO key. The display will show "Stop
Position".
Page 48

42 • Playing back shows
Setting and jumping to spontaneous markers
Spontaneous markers can be set while
playing back a show.
To do so, simply press the YES key. The display will briefly
show "Set Marker".
After pressing the STOP key
in mode "Show Pause", you
can jump to this spontaneous marker by pressing the YES
key. The display will show "Marker: Memory". Press PLAY
to continue at this position. A spontaneous marker remains
stored even after the SC MASTER is switched off. You can
only overwrite it by setting a new spontaneous marker.
Extended selection of shows
Switch on your system and insert the CF card into the SC
MASTER. We can offer two ways of selecting shows:
Via the IR remote control unit
Press the YES key: The display will show "Start
Show:___".
Now enter a number from 1 to 120 in order to select a
show. Any keying errors can be deleted by pressing the
"NO" key and entering the number again. Interrupt the
show selection by pressing "NO" once again.
By pressing button "YES" the selected show is started.
Page 49

SC MASTER LITE Playing back shows • 43
Via the keys on the unit
Press the ENTER key: The display will show: "Start Show?"
Confirm with ENTER.
Select the required show with keys and . The display
will give you show number and title. Hold keys or to
make the display "run". This is a nice feature if you want to
move to far-away positions very quickly.
Press ENTER, if the name of the required show is displayed, and the show will start immediately.
Note:
Shows can also be started via switch and RS 232. Refer
to page 31 and the Wings Platinum Online Help.
IR remote control range
The IR remote control unit works perfectly at a distance of
between 0.3 m and 15 m. At a distance below the minimum
distance of 30 cm overdrive problems may occur which restrict
infrared reception. At the maximum distance of 15 to 30 m it
largely depends on the layout of the projection room. Light
absorbing components, such as curtains etc. may reduce the
range. In such a case, we would recommend using a cable
remote control, which can be connected to the REMOTE
connector at the SC MASTER.
For professional presentations in large halls, we recommend
using cable remote control to improve operational reliability.
Page 50

44 • Playing back shows
Continuing a show after power failure
A power failure during a show is every presenter's nightmare.
SC MASTER can't prevent the power failure itself, but it offers
very comfortable ways of continuing safely and synchronously
from the point of interruption. Once you have read through this
chapter, just go ahead practising the "worst case".
Leave all main switches on or switch the units on again
after the power supply is resumed. Wait for the automatic reset
of the peripheral devices.
After switching on, SC MASTER will not display the usual
message but "Continue Show?" to find out whether you want
to continue the show.
Confirm this message by pressing the ENTER key on the
device or the YES key on the remote control. Following this,
the control signal containing the status at the position of interruption is output to the peripheral devices.
You can continue your show be pressing the ENTER key or
the PLAY key
.
Please note the following:
•
If you answer the question "Continue Show?" by pressing
the ESC key instead of the ENTER key, SC MASTER will
start up as usual in the normal operating mode.
Page 51

SC MASTER LITE Playing back shows • 45
•
Function "Continue Show" can be deactivated in menu
"Options" / "CntShw" via CS=OFF. This may be useful for
permanent installations.
Show Start with Timer
SC MASTER is equipped with a timer for time-controlled show
playback.
Parameter settings can be made in menu "Timer". Further
information can be found in chapter Timer from page 73 onwards.
Page 52

46 • SC Net System
SC Net System
General
The SC Net System is a network consisting of an SC Master
unit and one or several SC Net modules for controlling a
variety of different devices. All SCNet modules are run via one
single bi-directional network connection, which also serves as
a power supply.
Cable Connections and Power Supply
All components are run via one single network connection
made of standard Cat5 cable with a length of up to 1,000 m.
Usually, the modules are connected in series. With a distributor module, however, the arrangement of cables can also be
star shaped. The compact dimensions of these modules allow
them to be located next to the devices to be controlled so that
the numerous connecting cables only need to be branched off
at this location and can be kept very short. Unused SC Net
outputs must be terminated. In large, widely branched networks, you should use modules with Iso-PlugIns for potential
insulation and optimum operating safety.
The SC Net modules are supplied via additional power supply
units. The power supplied additionally is not only available for
the module connected to the power supply unit, but for all SC
Page 53

SC MASTER LITE SC Net System • 47
Net modules within the network. Usually, the power supply unit
AC-3 can supply up to five SC Net modules. However, there
are also some modules which require a separate power supply
unit.
Address configuration
Device address 1 is always allocated to the master unit. Device addresses 2 to 125 are used for the modules (slaves)
within the network. If address 2 or higher is allocated to an SC
Master unit, it is regarded as a module within the network.
Every SC Net device offers particular functions to be addressed via sub addresses. After adding SC Net devices
under "
Devices
" in the Wings Platinum Media Pool, they are
listed with their particular functions while Wings Platinum
automatically allocates an address, which, however, can be
altered at any time. An SC RELAY 8out, for instance, would be
visible as 8 switching contacts with addresses
2/1
to
2/8
, i.e. 2
would be the device address and 1 to 8 the sub addresses of
the individual relay contacts.
Setting addresses in the Media Pool
If you want to change the address settings in Wings Platinum,
e.g. when different hardware is to be used for controlling,
proceed as follows:
1. Click tab
Devices
in the Media Pool . If the corresponding
devices are not displayed, click on the plus sign in front of
the device port.
Page 54

48 • SC Net System
2. Right-click the corresponding control channel and select
Properties
. The Properties Dialog will appear.
3. Under
Address
enter the new address and confirm with
OK
.
Setting the addresses at the hardware
For an SC Net Module to be able to perform the programmed
functions, the device address listed in the Media Pool under
Devices
must be set in the module. Currently the address
setting is performed via SC Master components. At a later
time, this will also be possible via Wings Platinum.
This is how you set the device addresses at the SC Master
and the SC Net Modules:
1. Connect the SC Master with the SC Net Modules and
switch on the system.
2. In the SC Master menu go to "Options – SC-Net –
Ne-
tAdrs
" and select
NA=1
.
3. In order to establish communication within the SC Net,
switch on the SC Master and off again. When starting up
the SC Master, a message such as "
SC-Baud: 460800
"
must briefly be displayed (the value depends on the baud
rate). After communication has been established, the blue
SC NET
LED at the SC Net modules will blink at an interval of a few seconds. In the event of no communication
being established, refer to page 49 for further information.
4. Return to the menu and select the address you want to
allocate to an SC Net Module, e.g.
EA=2
under "Options –
SC-Net –
ExtAdrs
".
Page 55

SC MASTER LITE SC Net System • 49
5. By pressing Enter at the SC Master, all connected SD Net
modules are set to configuration mode. This is indicated
by the
DATA
LEDs blinking while the SC Master is sending the address into the network. Both remain active for 20
seconds.
6. During this time, press the Setup button on the SC Net
module to be configured to save the address. You may
have to use a pen to press the Setup button. This terminates configuration mode.
Note:
You can now check the address set for the module. If
you press the Setup button, the module address is briefly
displayed on the Master unit display. If this does not work for
your units, you may have to update the operating software.
Ensuring communication within the SC Net
For an SC Net system to work safely, the data rate needs to
be set to an appropriate value. SC Master automatically negotiates the baud rate with the modules, provided setting "
Au-
doBd
" has been chosen in Menu "Options – SC Net –
SCN
Baud
". However, the SC Master does not know how many
modules are connected. This is why, after powering up the
system, you need to check whether all SC Net modules communicate with the SC Master. The are certain LEDs at the SC
modules which indicate whether communication has been
established:
•
POWER
LED ...red lamp that blinks every second when
power supply and module are in working order. If the LED
Page 56

50 • SC Net System
is on permanently or not on at all, there is either a malfunction or no power supply.
•
DATA
LED ... lights up in green while the data for the set
module address are arriving.
•
SC NET
LED ... lights up in blue when the module detects
a valid activity on the network, which usually happens
every 3 seconds in a passive state. If there is more activity
on the network bus, the LED lights up more frequently and
may even light up permanently.
After powering up the system, all the
POWER
LEDS at the SC
Net modules must light up and blink every second, while the
SC NET LEDs must briefly blink every three seconds. If there
is no communication with one module – something that may
happen in widely branched networks – you need to reduce the
SD Net baud rate manually until even the last module starts
communicating within the network. This can be done in menu
"Options – SC Net –
SCN Baud
". Further information is avail-
able from page 61 onwards.
Page 57

SC MASTER LITE The Menu • 51
The Menu
Layout of the Menu
SC MASTER is a modern, software-controlled unit with a
number of functions, which would be very difficult to control via
switches and keys only. This is why it has an extensive menu
for configuration purposes.
Via this menu, SC MASTER is told what to do. In combination
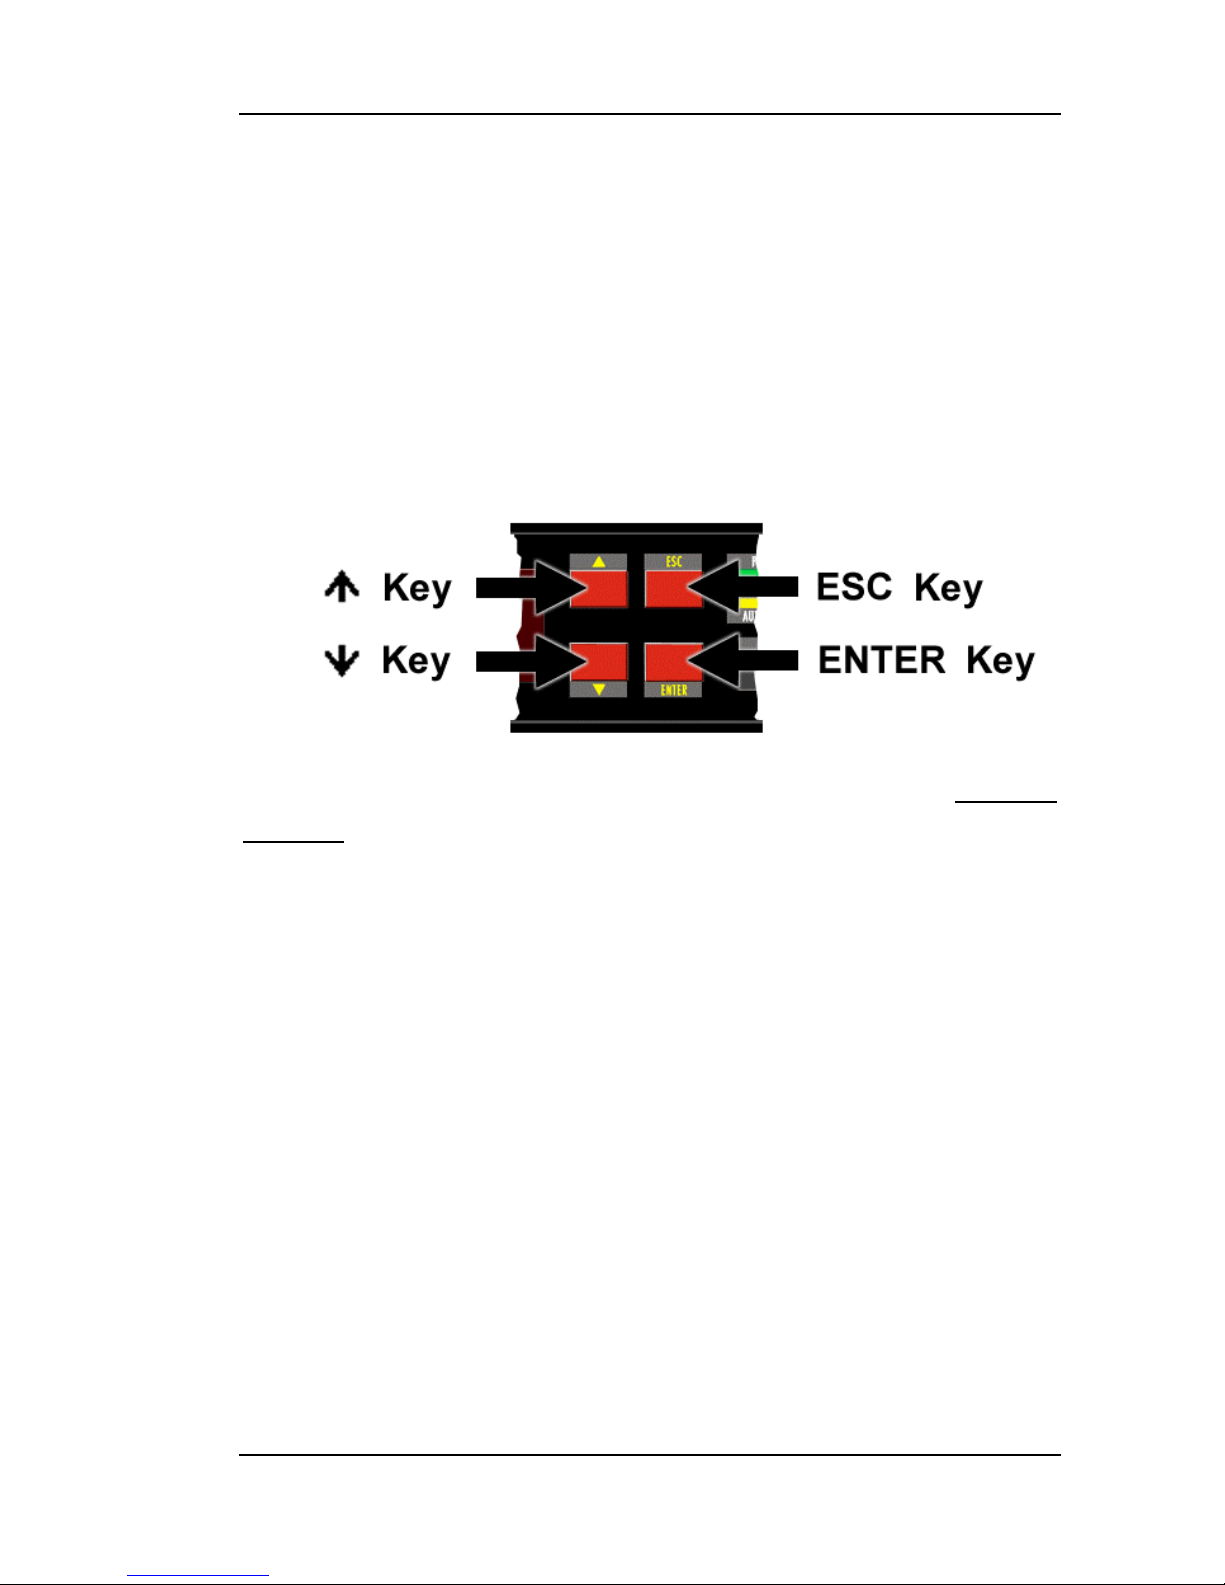
with the display and the keys , , ESC and ENTER, the
menu is the central input instrument. The menu layout is as
follows:
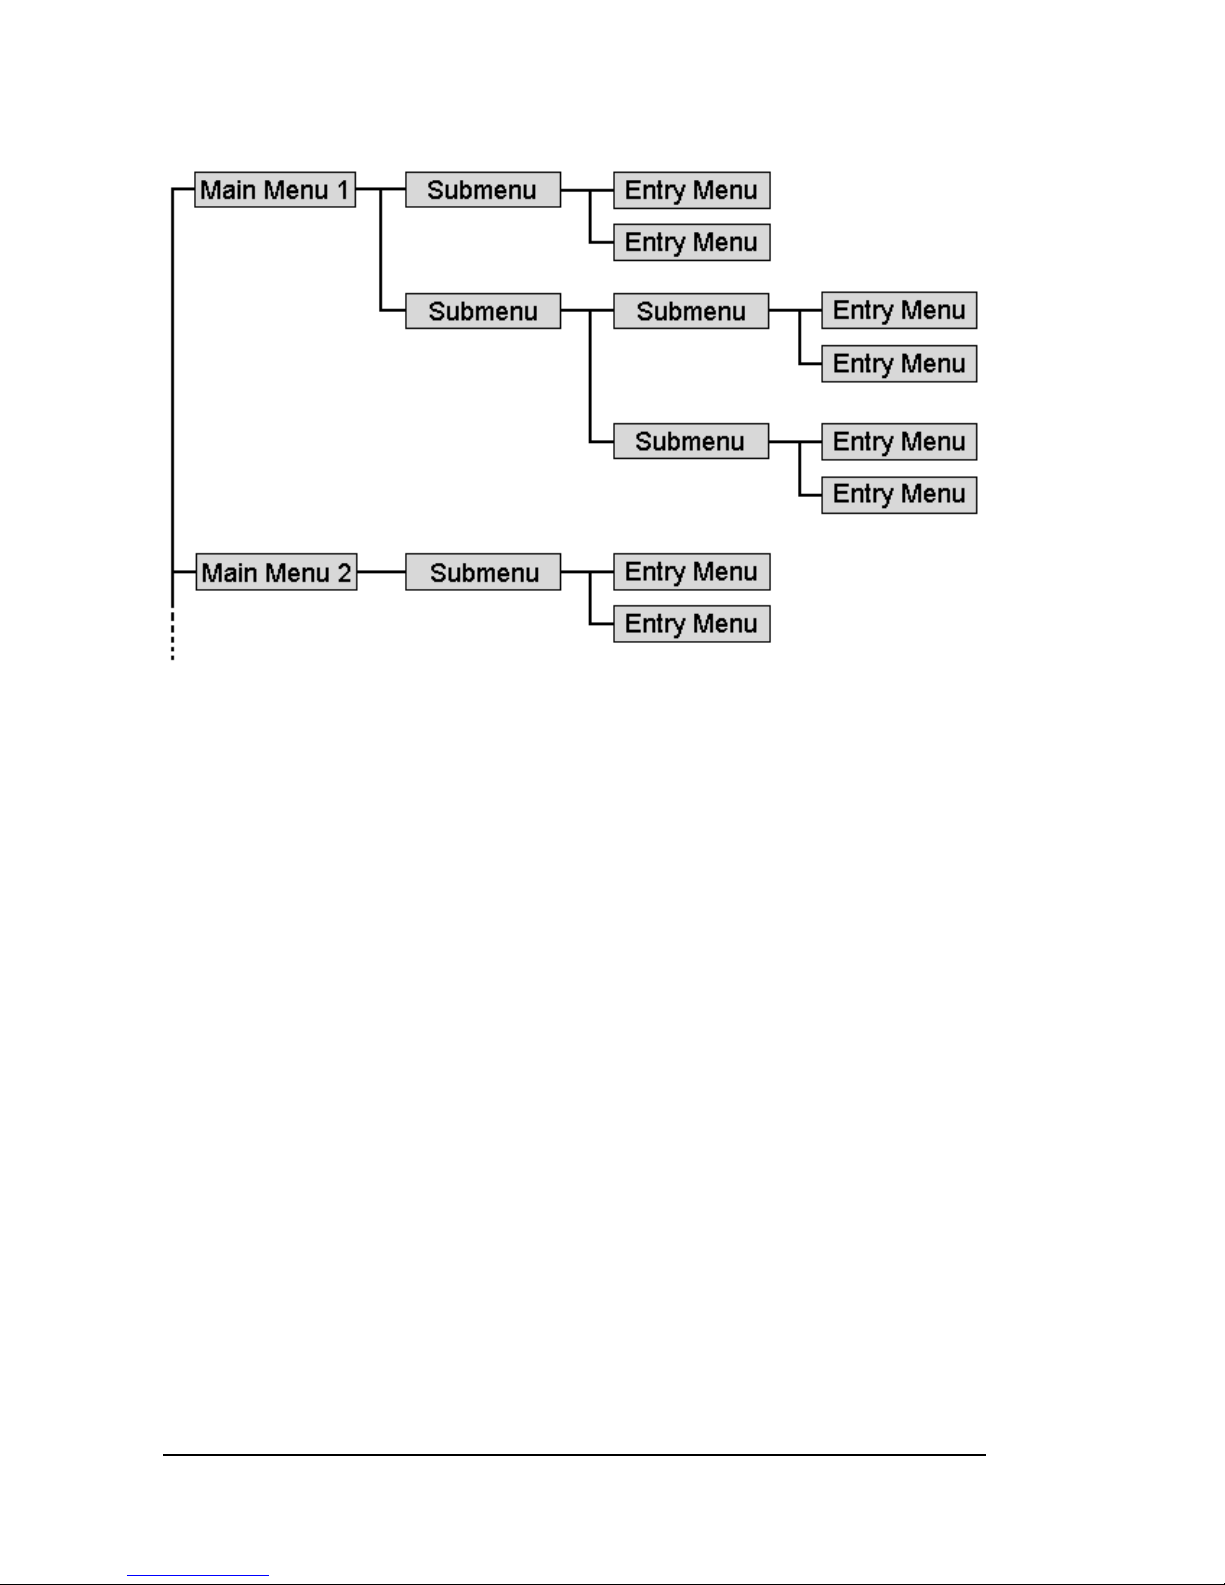
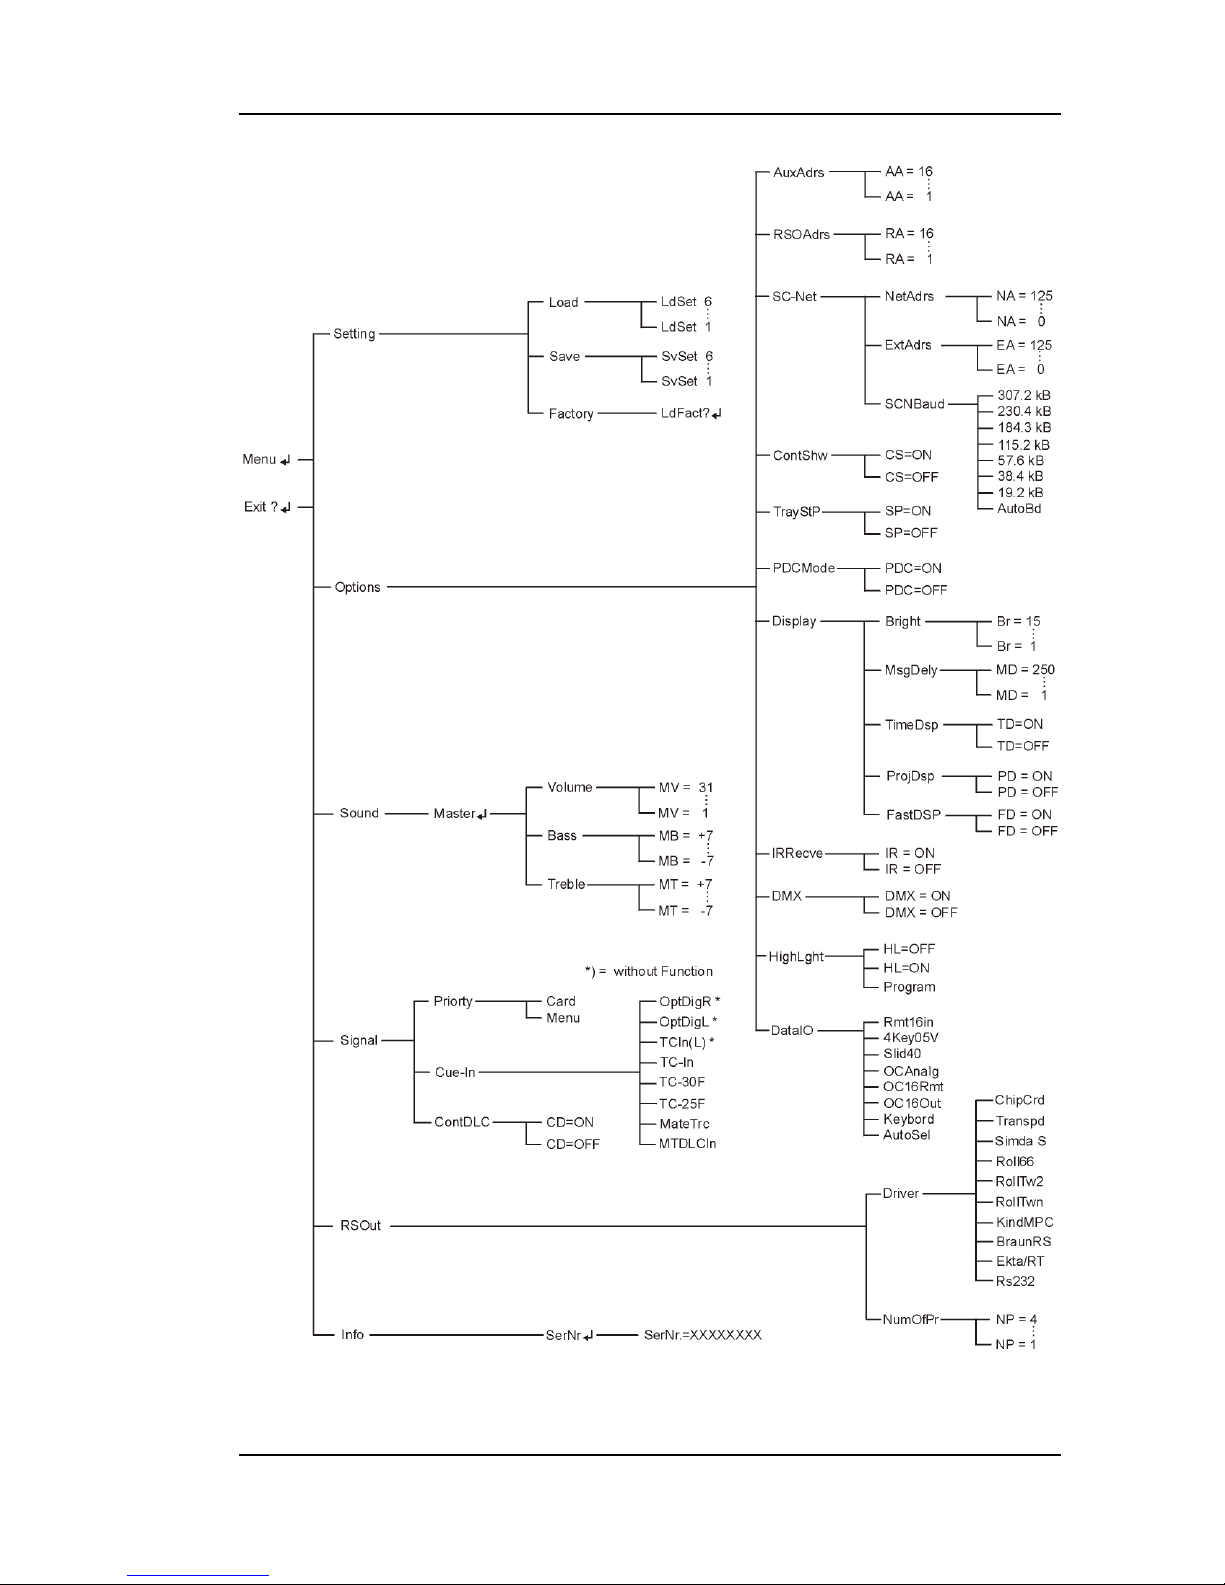
Page 58
52 • The Menu
The vertical structure is divided into menu trees while the
horizontal structure is divided into menu branches. Every
menu branch starts with the main menu and ends with the
entry menus.
Now what can be seen on the display? Just imagine covering
this structure with a sheet of paper with a rectangular window
just as large as the menu name. What you can see now corresponds to the display. By moving the sheet you can move to
other locations in the menu. The display, therefore, only shows
a selectable section of the complete menu.
Page 59
SC MASTER LITE The Menu • 53
How to use the menu
The best way to comprehend the operating steps is to switch
on your control unit and try out the following steps. Print-out or
copy the menu chart and place it next to the unit - this will help
you find the corresponding menu more easily.
To enter the menu, press both keys ESC and ENTER simultaneously. The display will show "-Menu-". Confirm with the
ENTER key and the main menu opens up. The arrows to the
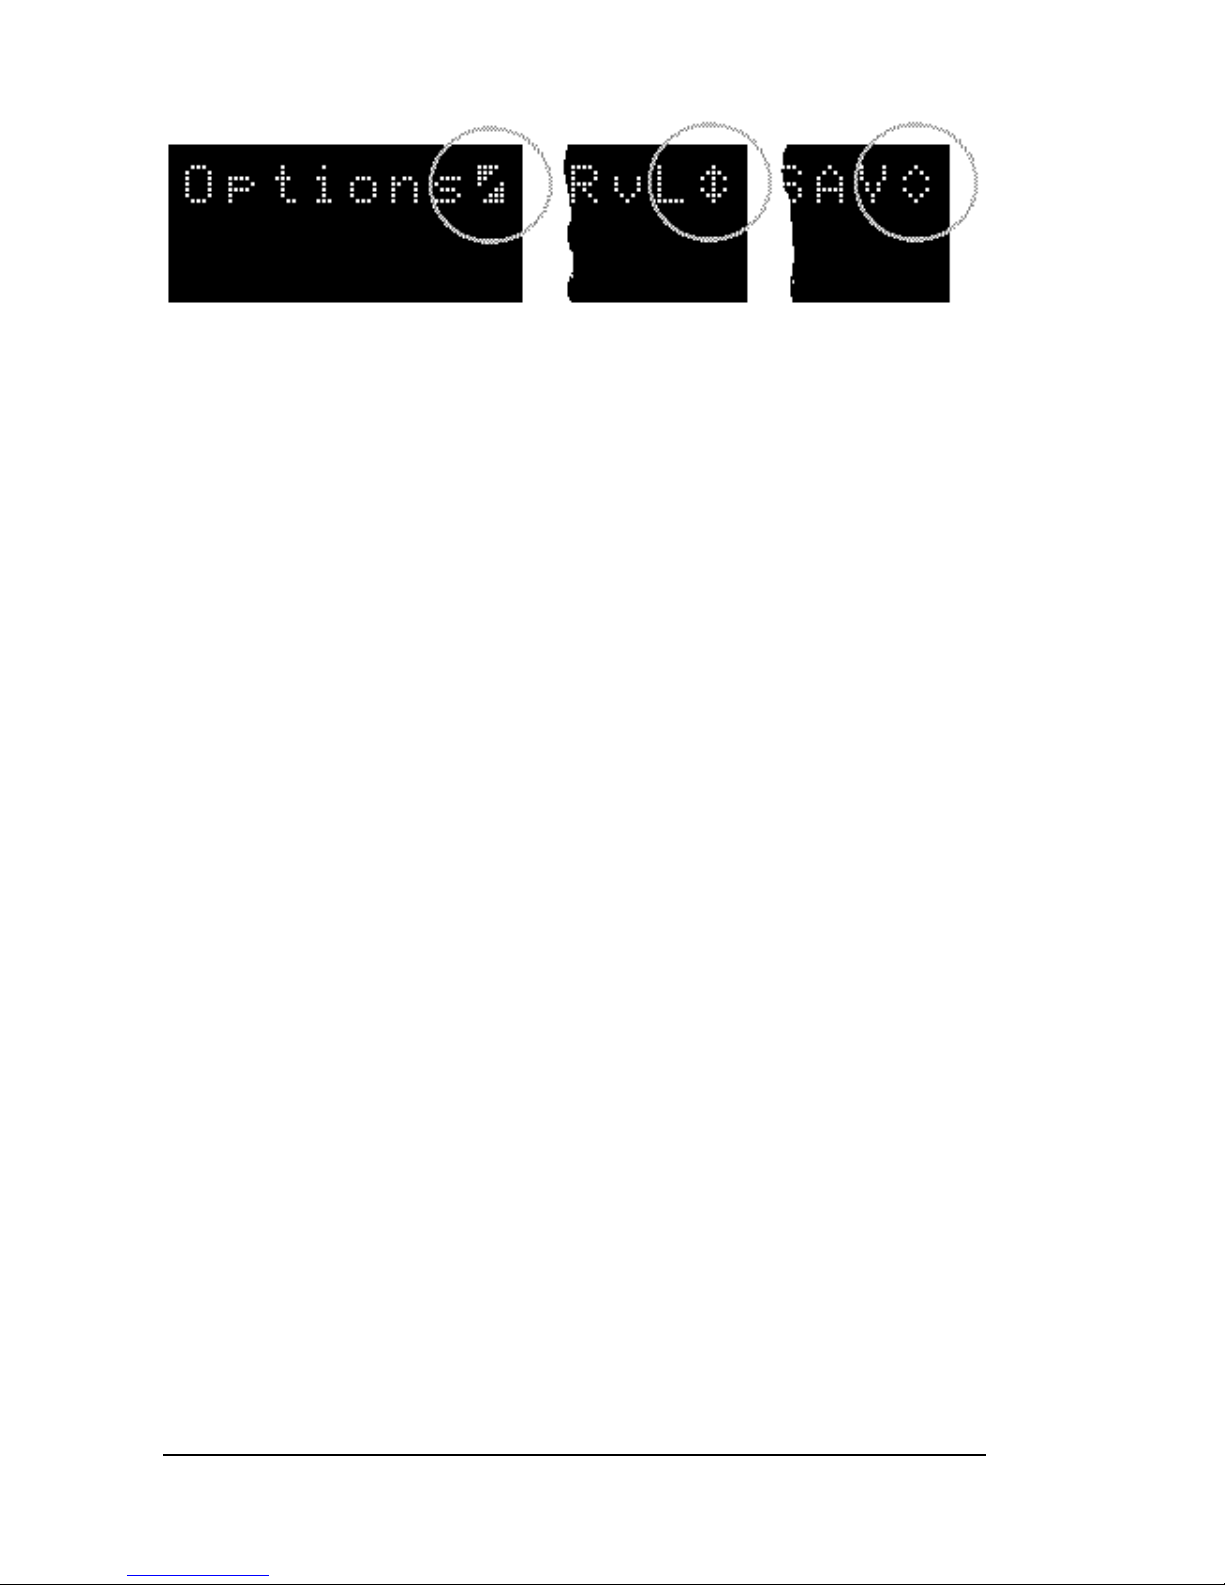
right of the menu name indicate the following:
•
The type of arrows shows us that we are in the main
menu, as sub and entry menus have different arrow symbols.
•
The direction of the arrows signalizes whether any further
menu items can be found above or below. The double arrows visible in the picture indicate that further menus can
be found above and below.
Page 60
54 • The Menu
Main menu, submenu, and entry menu arrows
Let's briefly remember our sheet of paper and the window. Use
keys and to move the window up and down, i.e. in vertical direction along a menu tree. The ENTER key moves the
window to the right, the ESC key to the left, i.e. in horizontal
direction along a menu branch.
You can step through the various items of the main menu with
keys and . The main menu is structured as follows:
•
"Settings" for loading and saving configurations
•
"Options" for selecting special features
•
"Sound" for configuration of card player and mixer functions
•
"Signal" for configuration of control signal functions
•
"RSOut" for configuration of the serial port, e.g. for the
projector module
•
"Timer" for setting the timer functions
•
"Info" provides information about the device version.
If you want to move to a sub menu, simply press the ENTER
key. The type of arrow will now change as a sign that you are
in a sub menu, and the direction of the arrows indicates
whether further menu items can be found above or below.
Page 61
SC MASTER LITE The Menu • 55
Press the ENTER key again, and you will move to the next sub
menu tree or the actual entry menu. This depends on whether
there are any further sub menus in this menu branch or not.
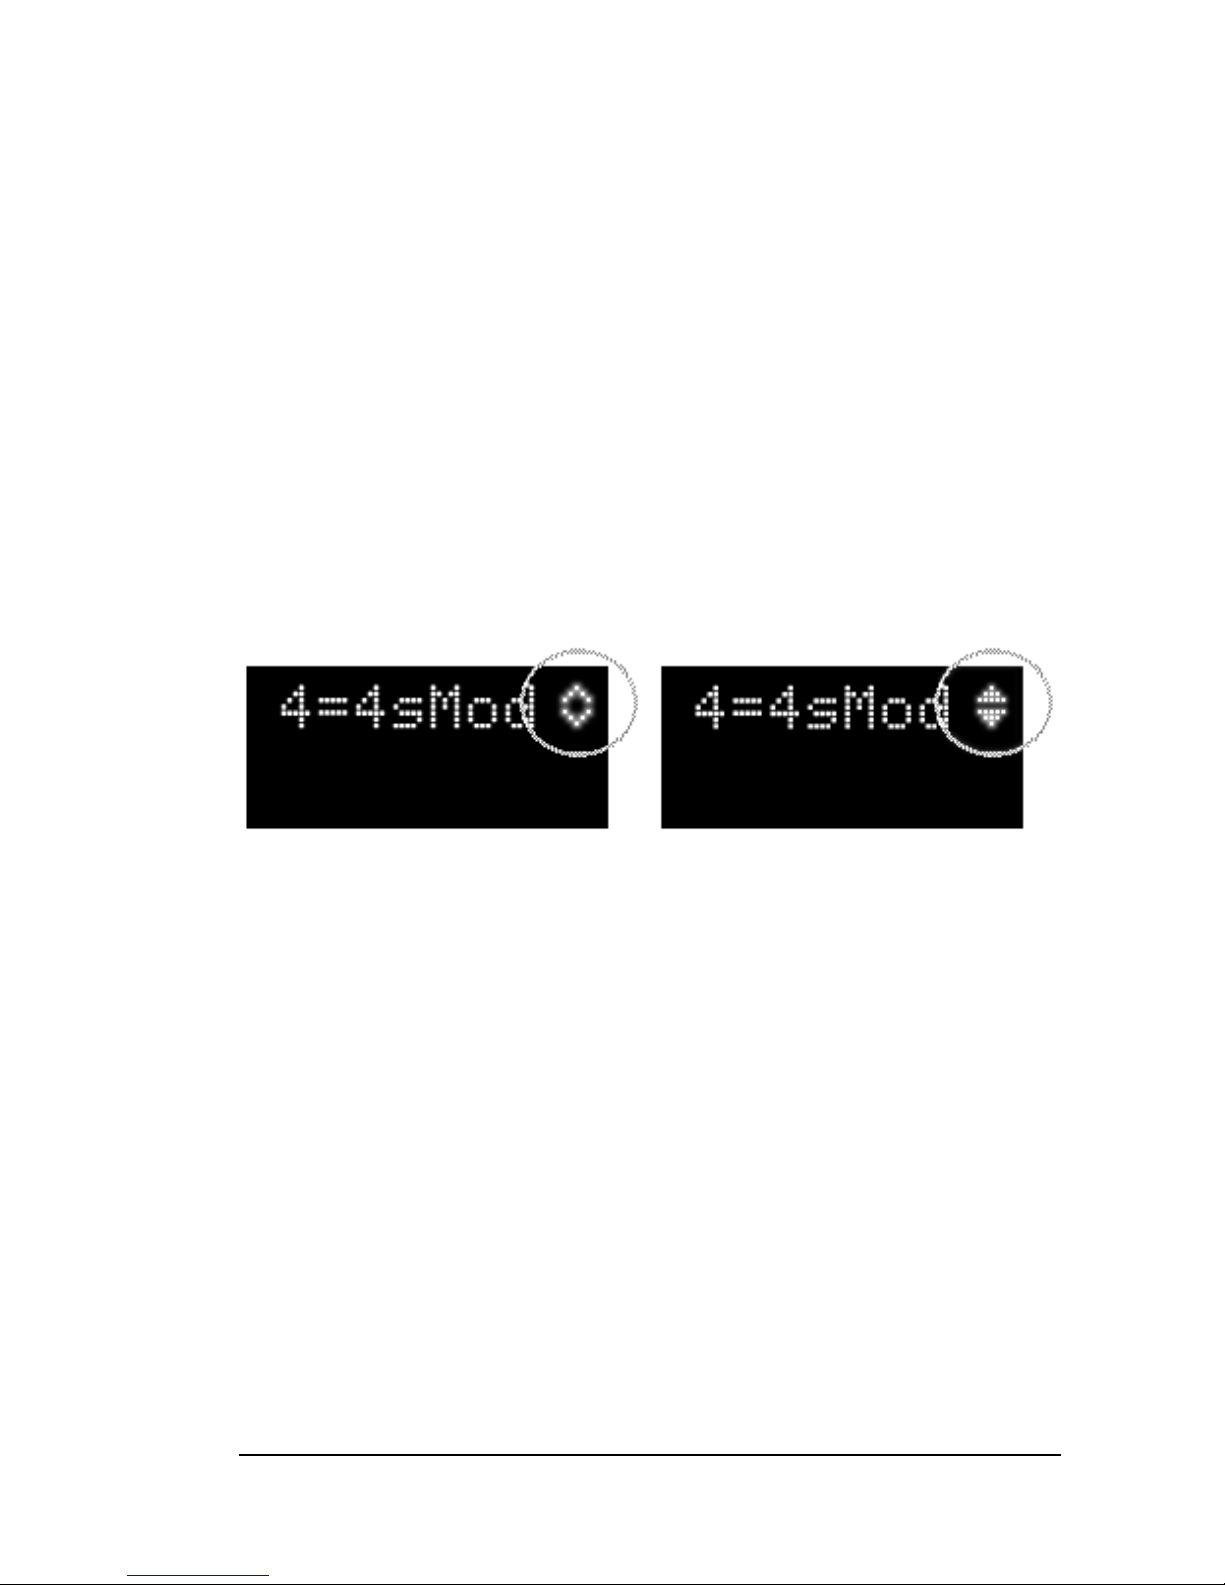
From the arrow symbols taking the form of triangles you can
see whether you have reached an entry menu. What you can
see now is the current setting. This is indicated by the triangles
being filled.
Use keys and to choose from a number of other possible
settings. For parameters which have not been activated the
arrows take the form of lines. By pressing ENTER the new
setting is activated and, as a confirmation, the arrows take the
form of filled triangles.
Parameters not activated Parameters activated
Via the ENTER key you can reach the menu branch but you
can also, step by step, move back to the main menu by pressing the ESC key. Once you have reached the main menu and
press the ESC key once more, the question "Exit?" will appear
together with an ENTER symbol. By the way, this symbol
signalizes that a confirmation is required before the corresponding menu item can be activated. By pressing the ENTER
key you can exit the menu.
Good. Now you know how to enter a menu, how to navigate
through it and how to make settings. So nothing can keep you
from exploring and finding out about all the other menus. On
Page 62

56 • The Menu
the next page you will find a menu chart and, in the following
chapters, information about any possible settings, organized
according to main menu items.
Menu operation via IR remote control
Once you have entered the menu, the menu functions can
also be controlled via IR remote control:
IR remote control unit Menu function
PLAY key
ENTER
STOP key
ESC
Skip keys
and
Keys and
Page 63
SC MASTER LITE The Menu • 57
Menu Chart
Page 64

58 • The Menu Items
The Menu Items
Setting
Load
For loading or activating all previously saved configurations,
i.e. complete menu settings. Via input menu "LdSet 1...6" you
can select one from seven previously saved configurations.
Save
For saving complete menu settings. Entry menu "SvSet 1...6"
allows you to select one from seven memory locations. It is
always the loaded or activated configuration which is saved.
Factory
In case of operating errors or if you happen to have muddled
up things, just use "LdFact?" to restore the factory-set parameter configuration. It is defined as follows:
AuxAdrs AA=1
RSOAdrs RA=1
NetAdrs NA=0
Page 65

SC MASTER LITE The Menu Items • 59
ExtAdrs EA=2
SCNBaud AutoBd
ContShw CS=ON
TrayStP TS=1
PDC Mode PDC=OFF
Display/Brightness Br=12
Display/Message-Delay MD=80
Display/TimeDsp TD=OFF
Display/ProjDsp PD=OFF
FastDsp FD=OFF
IRRecve IR=ON
DMX DMX=OFF
HighLgt Program
DataIO AutoSel
Master/Volume MV=31
Master/Bass MB=0
Master/Treble MT=0
VolCard VC=31
Signal/Priorty Card
Cue-In MTDLCIn
ContDLC CD=OFF
Driver RS232
NumOfPr NP=1
AutoTim AT=OFF
Page 66

60 • The Menu Items
Command TC=0
TTime TTime=0000:05
Page 67

SC MASTER LITE The Menu Items • 61
Options
AuxAdrs (Auxiliary Address)
In this menu you can specify which of the 16 addresses in the
control signal are to be evaluated for the AUX relay
(AA=1...16).
RSOAdrs (RS-Out Address)
In this menu you can specify which of the 16 addresses in the
control signal are to be evaluated for the output of serial commands (RA=1...16). The read commands are output to the
RS232-OUT connector.
SCNet (SCNet Communication)
NetAdrs (SCNet Address)
Use "NetAdrs" to set the SC MASTER address for show
control applications within the SCNet (NA=0...125). The default
value for a master unit is always NA=1, a value of NA=0
disables SC Net operation.
ExtAdrs (External SCNet Addresses)
This menu is used for allocating addresses to SC Net modules. The SC Net module is set to Config Mode and configured
Page 68

62 • The Menu Items
by selecting the corresponding address (EA=2....125). Further
information can be found in the SC Net module operating
instructions.
SCNBaud (SC Net Baud Rate)
This menu allows you to influence the speed of communication
within the SC Net. The default setting is "Auto Baud" (AudoBd). This means that the SC MASTER automatically negotiates the baud rate for communication with the SC Net modules. For networks with a large number of modules or long
cable connections it will be safer to set the baud rate manually.
Choose a baud rate which ensures that even the last SC Net
Module is still able to communicate. If no communication can
be established although the cable connection is correct, the
baud rate setting is too high.
ContShw (Continue Show)
Here you can deactivate function "Continue Show" (CS=OFF).
This may be useful for permanent installations which are to be
activated or deactivated centrally. Further information can be
found in chapter Continuing a show after power failure on
page 44.
TrayStP (Tray Starting Position)
This menu item is only relevant when a projector module is
connected. You can specify whether, after a reset or after
activating the control unit, the trays are to be moved to position
"1" or "0". "SP=1" means starting position 1 and "SP=0" start-
Page 69

SC MASTER LITE The Menu Items • 63
ing position 0. For circular trays a setting of "SP=0" is usually
better than the default setting "SP=1".
PDCMode
This menu item is only relevant when a projector module is
connected. It is used for activating and deactivating PDC
Mode. It should be activated (PDC=ON), if shows are run
which were programmed with the Kodak PDC control unit or
the Bässgen system and the following problem comes up:
PDC control units do not recognize the mechanical 0-position
and automatically assume that the show is started from tray
position 1. As a matter of fact, circular trays are usually installed in the 0-position of the projector, and the required
transport step to slide 1 is programmed. In this case, however,
the tray position information in the data signal, is "Slide 2
",
while the actual tray position is slide 1. This difference by one
slide between the programmed and the actual tray position
can be corrected in PCD Mode.
Display
Bright (Brightness)
For adjusting the display brightness. Settings from "Br=1...15"
can be selected. What value is appropriate depends on ambient brightness. Just try it out.
Page 70

64 • The Menu Items
MsgDely (Message Delay)
Special information on various events are only displayed
briefly on the graphic display. This refers, for example, to
controlling the volume via the IR remote control unit.
The period of time these messages are to be displayed can be
adjusted via this menu item. The values to be entered range
from 0.1 to 2.49 seconds (MD=1...249). The factory-set value
is 0.8 seconds.
Value MD=250 has a special meaning and causes a message
to be displayed until some other information comes up.
TimeDsp (Time Display)
For setting the time display to be seen while playing MP3 files
within a show. With TD=ON the playing time of an MP3 sample is counted down to zero. This means that the presenter of
a Speaker Support show knows exactly when to start after the
countdown. TD=OFF, on the other hand, means that during
the whole show the time counts in accordance with the timeline in Wings.
ProjDsp (Projector Display)
This is a very important menu item for users of the projector
module. It allows you to activate the projector status display
(PD=ON). Temporary messages for volume changes or show
selection will be displayed all the same. PD=OFF resumes
unrestricted display for the SC MASTER.
Page 71

SC MASTER LITE The Menu Items • 65
FastDsp (Fast Display)
This menu allows you to define whether the firmware version
is to be displayed (FD=OFF) upon starting up the device,
which is the default setting, or whether it should immediately
be ready for operation (FD=ON). This setting is appropriate
when the SC MASTER is to perform certain functions immediately upon starting up the system.
IRRecve (IR-Receive)
Use this menu item to switch off reception of IR remote control
signals. For large-scale installations with a variety of IR controllable SD components it may be useful to activate IR reception for the "Master" unit only (IR=ON), and to deactivate IR
reception (IR=OFF) for all other "slave" units.
DMX (DMX 512)
This menu serves for activating (DMX=ON) or deactivating
(DMX=OFF) the output of DMX512 commands. The commands are output at the REMOTE connector. The required
cable adapter SCK-MDMXE is available as an accessory. As a
standard, channels 1 to 6 can be used. By adding the optional
DMX Upgrade Module output can be extended to channels 1
to 64. Always the first 6 or 64 DMX addresses, respectively
are referred to, the address position cannot be changed.
Note:
When DMX output is activated, IR commands can no
longer be transmitted because both features use the same
output port.
Page 72

66 • The Menu Items
HighLgt (High Light Function)
Here you specify whether and how the HighLight Function of
Ektapro and Leica RT projectors it to take effect. With a setting
of HL=OFF the HighLight function is permanently deactivated,
with HL=ON permanently activated. After selecting "Program",
the HighLight commands contained in the control program are
evaluated for activation of the HighLight Function. This is the
default setting.
DataIO (Data In/Out)
This menu allows you to select the devices to be operated at
DATA IN/OUT. With a default setting of "Auto-Select"
(AutoSel), the SC Master will only detect devices
OC 16 out
,
OC analog
, the
Slider
or a
matrix keyboard
. Any other
devices must be chosen manually:
•
RMT16in
...for the Remote 16 In Module, which allows
direct connection of 16 keys without matrix. Keystrokes
are also evaluated when the keys are activated simultaneously.
•
4Key05V
...for 0 - 5 Volt dimmer (Conrad C-Control Dim-
mer) and four switching inputs.
•
Slid40
...for a special interface with 40 faders.
•
OCAnalg
...for the OC Analog Module with 16 open-
collector outputs and 8 analog outputs (0 – 10 V).
•
OC16Rmt
...for the OC 16 Remote Module with 16 open-
collector outputs and 8 inputs, e.g. for starting shows.
•
OC16Out
...for the OC 16 Out Module with 16 open-
collector outputs
Page 73

SC MASTER LITE The Menu Items • 67
•
Keyboard
...for 4x4 matrix keyboards; the keyboard
control system can only evaluate one key stroke after the
other.
Sound
This menu allows you to carry out settings for the
SC MASTER audio section. Please note that all explanations
refer to the LITE version using a four-channel card player. The
2M version also allows all functions and menus to be selected.
However, this does not extend to channels 3 and 4 because
they are not available.
Master
The values laid down in the following menus apply to the
summed mixer level, i.e. to the mix of all audio sources.
Volume
In this menu you can enter the master control volume for
SC MASTER after switching on (MV=0...31). Please note: 0 =
-79 dB and 31 = 0dB. Via the IR remote control you can adjust
the volume, starting from the pre-set value.
Bass
For bass settings. Values between -7 and +7 can be set. In
this context, MB=0 means that there is no change as com-
Page 74

68 • The Menu Items
pared to the original, -7 = -14 dB (100 Hz) and 7 = +14 dB
(100 Hz). Via the IR remote control you can adjust the bass
portion individually, starting from the pre-set value.
Treble
For treble settings. Values between -7 and +7 can be set. In
this context, MT=0 means that there is no change as compared to the original, -7 = -14 dB (100 Hz) and 7 = +14dB (100
Hz). Via the IR remote control you can adjust the treble portion, starting from the pre-set value.
Input - VolCard (Volume Card)
Defines the volume setting for the card player input control
after activation (VC=0...31). A value of 0 = -79 dB and 31 = 0
dB. Via the IR remote control you can adjust the volume
individually, starting from this pre-set value.
SaveVol (Save Volume)
Saves all current volume levels set via the IR remote control
unit. When starting up SC MASTER again, those very same
volume settings take effect.
Page 75

SC MASTER LITE The Menu Items • 69
Signal
In combination with other AV components, SC MASTER is a
most versatile unit. A necessary precondition is flexibility in
managing the control signals, which can be adjusted in the
menus listed below.
Priorty (Priority)
This menu is used for defining whether the control signal
specified in Wings and saved with the show or that specified in
the SC MASTER menu is to take effect. Setting "Card" uses
the routing saved along with the show for playing back (Default
setting). Setting "Menu", on the other hand, gives priority to the
parameters chosen in menu "AudioRt".
Cue-In
Depending on the menu setting, the CUE IN connector may be
used as input or output for a variety of signals. For possible
configurations see below:
MTDLCIn (MateTrac DLC In)
...connector CUE IN is configured for reading MateTrac and
DLC signal (default setting). In combination with a projector
module, shows can be played back via control signals from
CD, DAT or tape. Playback from DAT only supports a sampling rate of 44.1 kHz.
Page 76

70 • The Menu Items
MateTrac
The control program of a show in progress is output as MateTrac data signal at the CUE-IN connector, but only to the extent
it is supported by the MateTrac set of commands. This MateTrac data signal is output in parallel with the DLC signal, which
is applied to CUE OUT as usual.
TC-25F
The individual time positions within a show are output at CUEIN as SMPTE time code at 25 f/s.
TC-30F
The individual time positions within a show are output at CUEIN as SMPTE time code at 30 f/s.
TC-In
SMPTE time code at 25 or 30 f/s is read, with the frame rate
being detected automatically. A show in progress is synchronized in accordance with the time code read.
ContDLC (Continual DLC)
This menu item allows you to specify whether output of a DLC
control signal is to be continued at the end of a show (CD=ON)
or not (CD=OFF; default setting).
With CD=ON, the DLC control signal is applied to CUE OUT
even after the show has finished and continues to transfer the
current status to the connected devices. If, on the other hand,
Page 77

SC MASTER LITE The Menu Items • 71
you require manual control of the devices, e.g. in order to
change the trays or to switch the projectors to Standby Mode,
the control signal may prove to be irritating. Therefore, CD=ON
should be used for special installations only.
Note:
You can switch the control signal on or off even during
normal operation by pressing keys and simultaneously
for half a second. The display will briefly show "Record" (signal
was activated) or "Playback" (signal was deactivated).
RSOut
These menus are used for selecting drivers for serial control of
projectors and multi media components.
Driver
Below you will find the corresponding driver for your application:
RS232 for serial control of special devices
Ekta/RT for Ektapro and Leica RT projectors
BraunRS for Braun Multimag SC 669
KindMPC for Kindermann Silent 2500 MPC
RollTwn for Rollei Twin MSC 3xx P
RollTw2 for Rollei Twin MSC 3xx P in simple mode *
Roll66 for Rollei Vision MSC 66 Dual
Page 78

72 • The Menu Items
Simda S for Simda 3245/3445 and 3262/3462
Transpd for special applications
ChipCrd for reading of and writing on chip cards
*) In Simple Mode for Rollei Twin there is no automatic allocation of odd tray numbers to A and even tray numbers to B.
This mode must not be used in combination with Wings Platinum.
NumOfPr (Number of Projectors)
This menu enables you to select the number of slide projectors
used in your set-up, e.g. NP=4, for four projectors. Choose
NP=2 for RolleiTwin projectors.
Page 79

SC MASTER LITE The Menu Items • 73
Timer
SC MASTER is equipped with a timer for time-controlled
dissolves by means of a projector module or for starting whole
shows from CF card. The following menus allow you to select
the corresponding timer parameters.
AutoTim (Auto Timer)
By activating the auto timer (AT=ON), SC MASTER starts
timer operation immediately after starting up. This may come
in handy for fixed installations running over a period of several
days. Set AT=OFF to switch off the timer.
Command
For entering the required commands. (TC=1...9). Numbers 1 to
9 correspond to the functions on the IR remote control unit.
When a projector module is connected, these commands
cause dissolves at a speed ranging from 0.2 to 30 seconds,
according to the key pressed or the number entered. When a
CF card is inserted in the unit, shows 1 to 9 can be started via
the timer.
TTime (Timer Time)
Here you can specify the interval. I.e. the time between slide
changes for dissolves or the period before the next show start.
The time is entered in minutes and seconds, i.e. a value for
TTime= 0140:15 means 2 hours, 20 minutes and 15 seconds.
Page 80

74 • The Menu Items
Entries in this menu can be performed via the IR remote
control unit. The keys have the following functions:
IR remote control unit Menu function
PLAY key
ENTER
STOP key
ESC
Skip keys
and
Keys and
Use the YES key to activate numerical entry and to change
over between minutes and seconds. Numbers are entered via
the numerical keyboard. By pressing the NO key the numbers
of the active field can be deleted.
Page 81

SC MASTER LITE The Menu Items • 75
Info
This menu contains information about the SC MASTER.
SerNr
stands for the serial number of the device.
Upgrade
show the current device version in terms of available
DMX
channels.
This menu is also used for installing upgrades to the DMX
module. The licence number on your upgrade licence is entered as follows:
Press ENTER several times to select "DMX 6" and press
ENTER once more for eight additional dashes to be displayed.
The first of the eight dashes is blinking. Use keys and to
enter the first digit of the licence number and confirm with
ENTER. Now the second dash will start blinking. Proceed as
before until the complete licence number has been entered.
After confirming the last digit the display will show "DMX 64"
as an indication that the upgrade has been completed successfully.
Should the display be the same as in the beginning, you may
have made a mistake in entering the number. Check by pressing ENTER once again and correct the number if necessary.
Page 82

76 • Trouble shooting
Trouble shooting
Finding faults
The SC MASTER is only one from a number of components in
your dissolve system. Therefore, errors might also be caused
by other devices - which doesn't make trouble shooting any
easier. In such a case it can be an advantage to understand
what is happening. Don't panic and try a systematic approach
to the problem.
•
Try to find out about the interaction between the devices
for the particular application.
•
Check whether the necessary cables are connected.
•
Switch on all necessary devices and select the corresponding mode.
•
Check, if necessary by means of other devices, i.e. via
audio level displays or by exchanging devices, whether the
correct signals are actually applied.
•
Look up your problem in the list of problems on the next
pages to find out whether there is a solution to your problem.
Page 83

SC MASTER LITE Trouble shooting • 77
List of problems
In the following list of problems you can find some solutions to
problems, sorted according to topics:
After inserting the CF Card the display shows "Reinsert
Card".
The CF Card has not been detected after insertion. You can
repeat this process or switch the SC MASTER off and on
again with the CF card remaining in the slot. When starting up,
it is easier for the SC MASTER to detect the CF card.
When copying presentation data onto CF card the following message appears: "Not enough memory" although the
CF card is new or empty.
Presumably the CF card still needs formatting. This can be
done in the Windows Explorer. Use the standard FAT format
instead of FAT 32 – SC MASTER does not support the latter.
After inserting the CF Card in the control unit, message
"No Show.in file" appears on the display.
In principle, this may have two reasons:
The CF card is empty or Show.ini is not available.
Solu-
tion:
Copy presentation data onto CF Card.
The CF Card was formatted using the FAT32 file system.
Solution:
Format the CF Card using the FAT16 file system. In
the Windows Explorer, right-click the CF Card, followed by
Page 84

78 • Trouble shooting
Format
... Select file system
FAT
and format the CF Card.
Then copy the presentation data once again onto CF Card.
IR remote control does not work.
Check the batteries and their position. When the remote
control is activated at a normal distance (approx. 0.5 to 1.5 m)
the control unit should react.
Make sure that IR reception for the control unit is activated
in menu "Options", see page 65.
Please note that the range of the IR remote control can be
quite different for distances beyond 15 m! See on page 43.
Sound track is not in sync with the devices.
Maybe you have edited the sound track in Wings Platinum
and transferred the updated show only (i.e. only the control
programme) onto CF Card. Recompute all presentation data
for your show and transfer them to CF card.
Slide projectors do not react; the control unit does not
respond to control signals.
Check whether the control unit is in Record Mode, which
can be recognized by the sand glass and the rhombus on the
display . If necessary, terminate this mode.
If all these attempts have been without success ...
If neither the list of problems in the manual nor
the SC
MASTER Online Help can contribute in any way to solving
Page 85

SC MASTER LITE Trouble shooting • 79
your problem you should turn to your dealer or directly to us
giving a detailed description of the problem. For the address
refer to page 6.
Page 86

80 • Updating the operating software
Updating the operating
software
Updating
Your SC MASTER control unit, which includes a processor
with operating software, can very simply be kept up-to-date by
loading new software.
Download an Update File from the Internet. It is available at
www.stumpfl.com under "Download" / "SD Update". If you do
not have access to the Internet, turn to our Support for help.
Connect the RS232-IN port of the SC MASTER to one of
the serial computer ports (Com 1....4).
Start your computer and switch on the SC MASTER.
Double-click the downloaded file
SDUpdateEx....x.exe
to
start it. Information about updateable devices will appear. Now
click "
Setup
".
Page 87
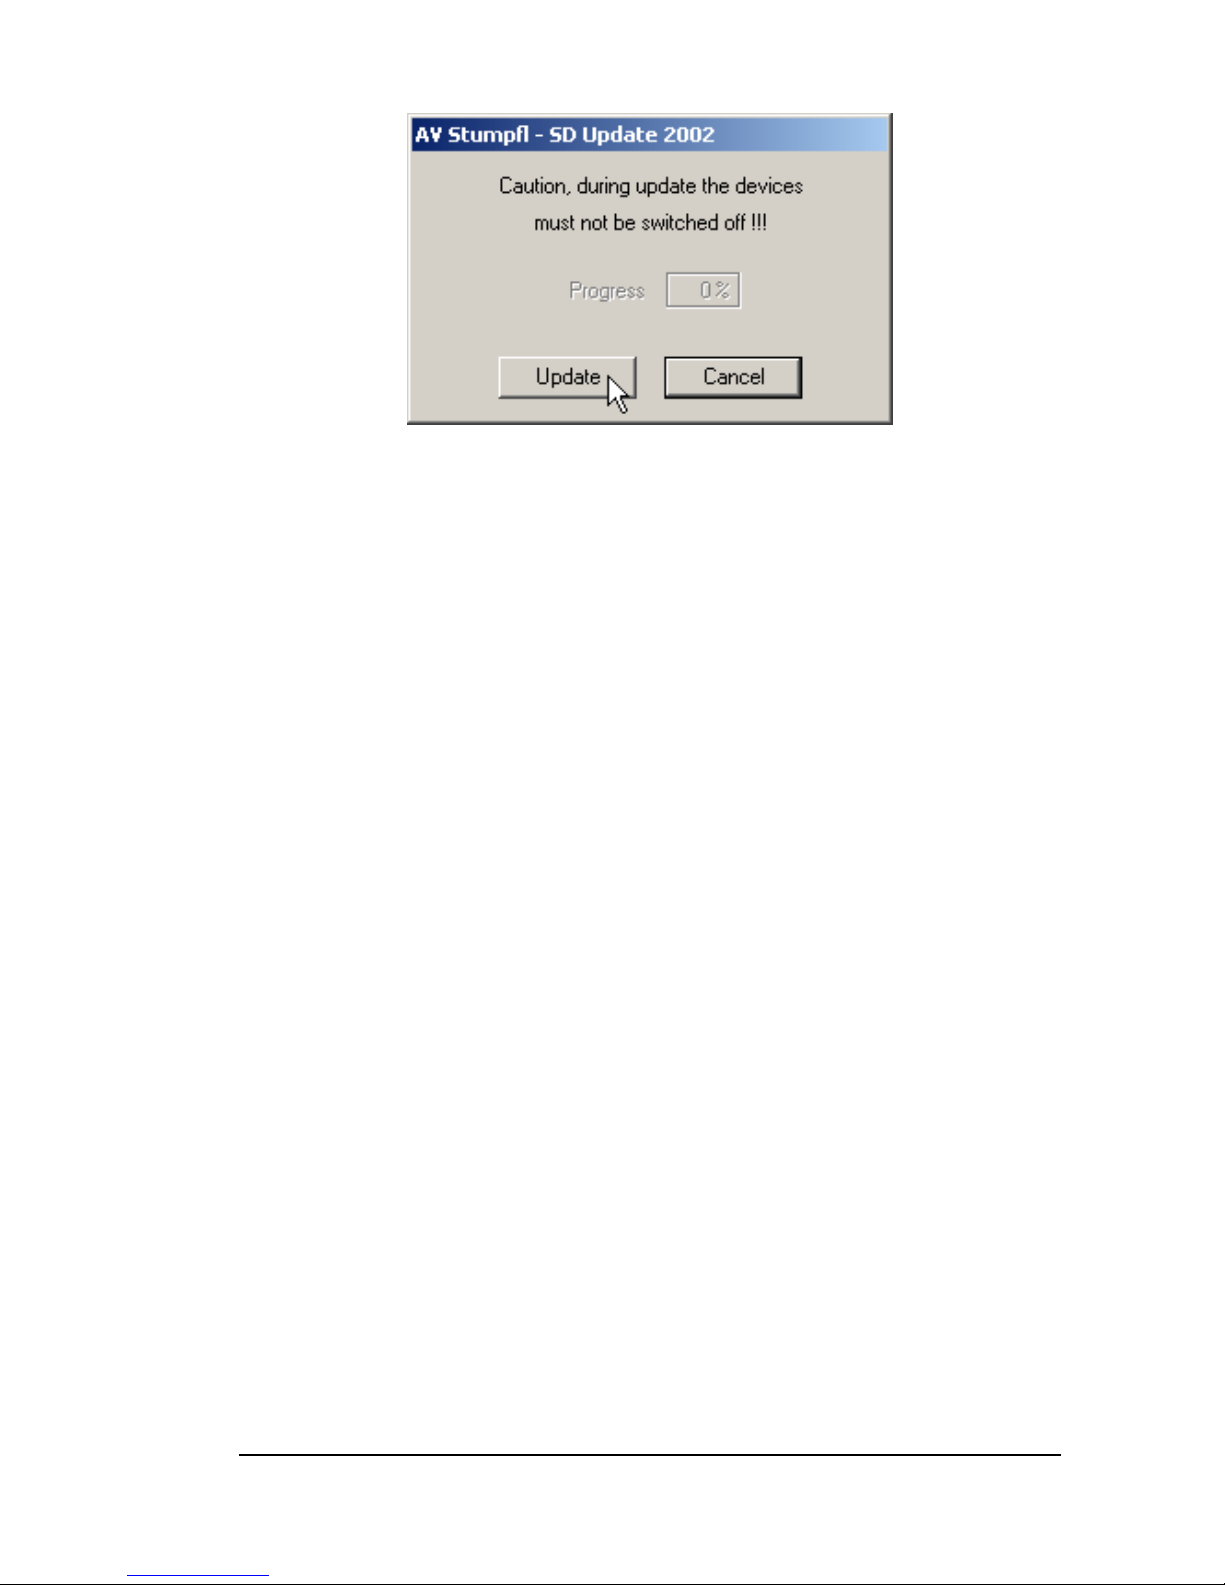
SC MASTER LITE Updating the operating software • 81
Click on "
Update
". Progress can be monitored in the dialog
box. The SC MASTER display will show messages on the
updating process.
After about 15 minutes the updating process should be
complete – a corresponding message will appear on the
display. SC MASTER will boot automatically and be ready for
use again after that.
Important note:
•
While updating, SC MASTER must by no means be
switched off nor the connection to the computer be broken!
•
If a screen saver is activated during the update, the update dialog may appear in white. In this case you should
wait for updating to be completed. This can be recognized
by the information on the SC MASTER display.
Page 88

82 • Technical Appendix
Technical Appendix
ASCII protocol
The ASCII protocol allows SC MASTER to be conveniently
integrated into comprehensive multi-media installations controlled by media control systems.
Via the serial port (RS232-IN) and ASCII commands the IR
remote control can be simulated. Moreover, this feature also
allows selective control of shows played back from CF card.
No initialization is necessary before ASCII commands can be
sent to the control unit. The communications protocol is 9600
Baud, 8 data bits, no parity bit and one stop bit.
ASCII command identification "a" (= 61 Hex, 97 Dec) must be
sent as first character. Command end identification "#" (= 23
Hex, 35 Dec) must be sent as last character. No spaces are
allowed. The maximum time interval between two characters
must not exceed 20 ms, otherwise the command is ignored.
Page 89
SC MASTER LITE Technical Appendix • 83
ASCII code Function
aSNxxx# Normal show start. The current show is interrupted.
xxx = show number from 1 to 120
aSTxxx# Terminate show start. Only the show that is
unequal to xxx is aborted.
xxx = show number from 1 to 120
aSIxxx# Interrupt show start. The current show is interrupted.
xxx = show number from 1 to 120
aSNxxxMyy Normal show start from marker. xxx = show number
from 1 to 120, yyy = marker number from 1 to 255
aSIxxxMyyyInterrupt show start from marker. xxx = show
number from 1 to 120, yyy = marker number from 1
255
aSS# Show is stopped immediately.
aSSMyyy# Show is stopped when marker yyy is encountered.
xxx = marker number from 1 to 255
aExxxx# Reserved for audio matrix
aV+# Master Volume up
aV-# Master Volume down
aV:xx# Adjusts the Master volume to the value specified by
xx. xx = 0 to 31. Commands including values >31
are ignored.
aB+# Master Bass up
aB-# Master Bass down
aB:xx# Adjusts the Master bass to the value specified by xx.
xx = 0 to 14. 0 = -7dB, 7 = 0dB, 14 = +7dB
aT+# Master Treble up
aT-# Master Treble down
aT:xx# Adjusts the Master treble to the value specified by xx.
xx = 0 to 14. 0 = -7dB, 7 = 0dB, 14 = +7dB
aL1+# Line1 volume up *
aL1-# Line1 volume down *
aL1:xx# Adjusts the Line1 volume to the value specified by xx.
*
xx = 0 to 31. Commands including values >31
are ignored.
aL2+# Line2 volume up *
aL2-# Line2 volume down *
Page 90
84 • Technical Appendix
aL2:xx# Adjusts the Line2 volume to the value specified by xx.
*
xx = 0 to 31. Commands including values >31
are ignored.
aC+# Card volume up *
aC-# Card volume down *
aC:xx# Adjusts the card volume to the value specified by xx. *
xx = 0 to 31. Commands including values >31
are ignored.
aM+# Micro volume up *
aM-# Micro volume down *
aM:xx# Adjusts the microphone volume to the value specified
by xx. *
xx = 0 to 31. Commands including values >31
are ignored.
aX# Starts at an X-time
aP# PAUSE function. Corresponds to the PAUSE key
on the remote control unit
aY# YES function. Corresponds to the YES key on the rem
o
control unit
aRx# Set sound routing x. x = values from 1 to 7
correspond to the possible routings in Wings*
axPyyy# Start player x at track number yyy. X = value of 1
or 2 corresponding to the EC Pro player *
yyy = values from 1 to 256 correspond to entry
SHOW.INI; 0 = stop
aTKxxx# Start track number xxx; xxx = value from 1 to 256.
Corresponds to entry in SHOW.INI (player 1)
aTS# Stop Track (Player 1)
aJMxxx# Jump to Marker; xxx = number of markers. Values
from 1 to 255. Show is continued after Jump.
aJMWxxx# Jump to Marker and Wait; xxx = Number of marker.
Values from 1 to 255. After jump, additional entry via
t
keyboard s waited for.
aActtt# Set AUX relay; c = 1 to 4 corresponds to AUX 1 to 4,
ttt = 0 -> open; ttt = 1 -> close; ttt >=2 and <= 255
switching pulse at a time of ttt in 1/10 seconds.*
* not available for SC MASTER LITE
Page 91
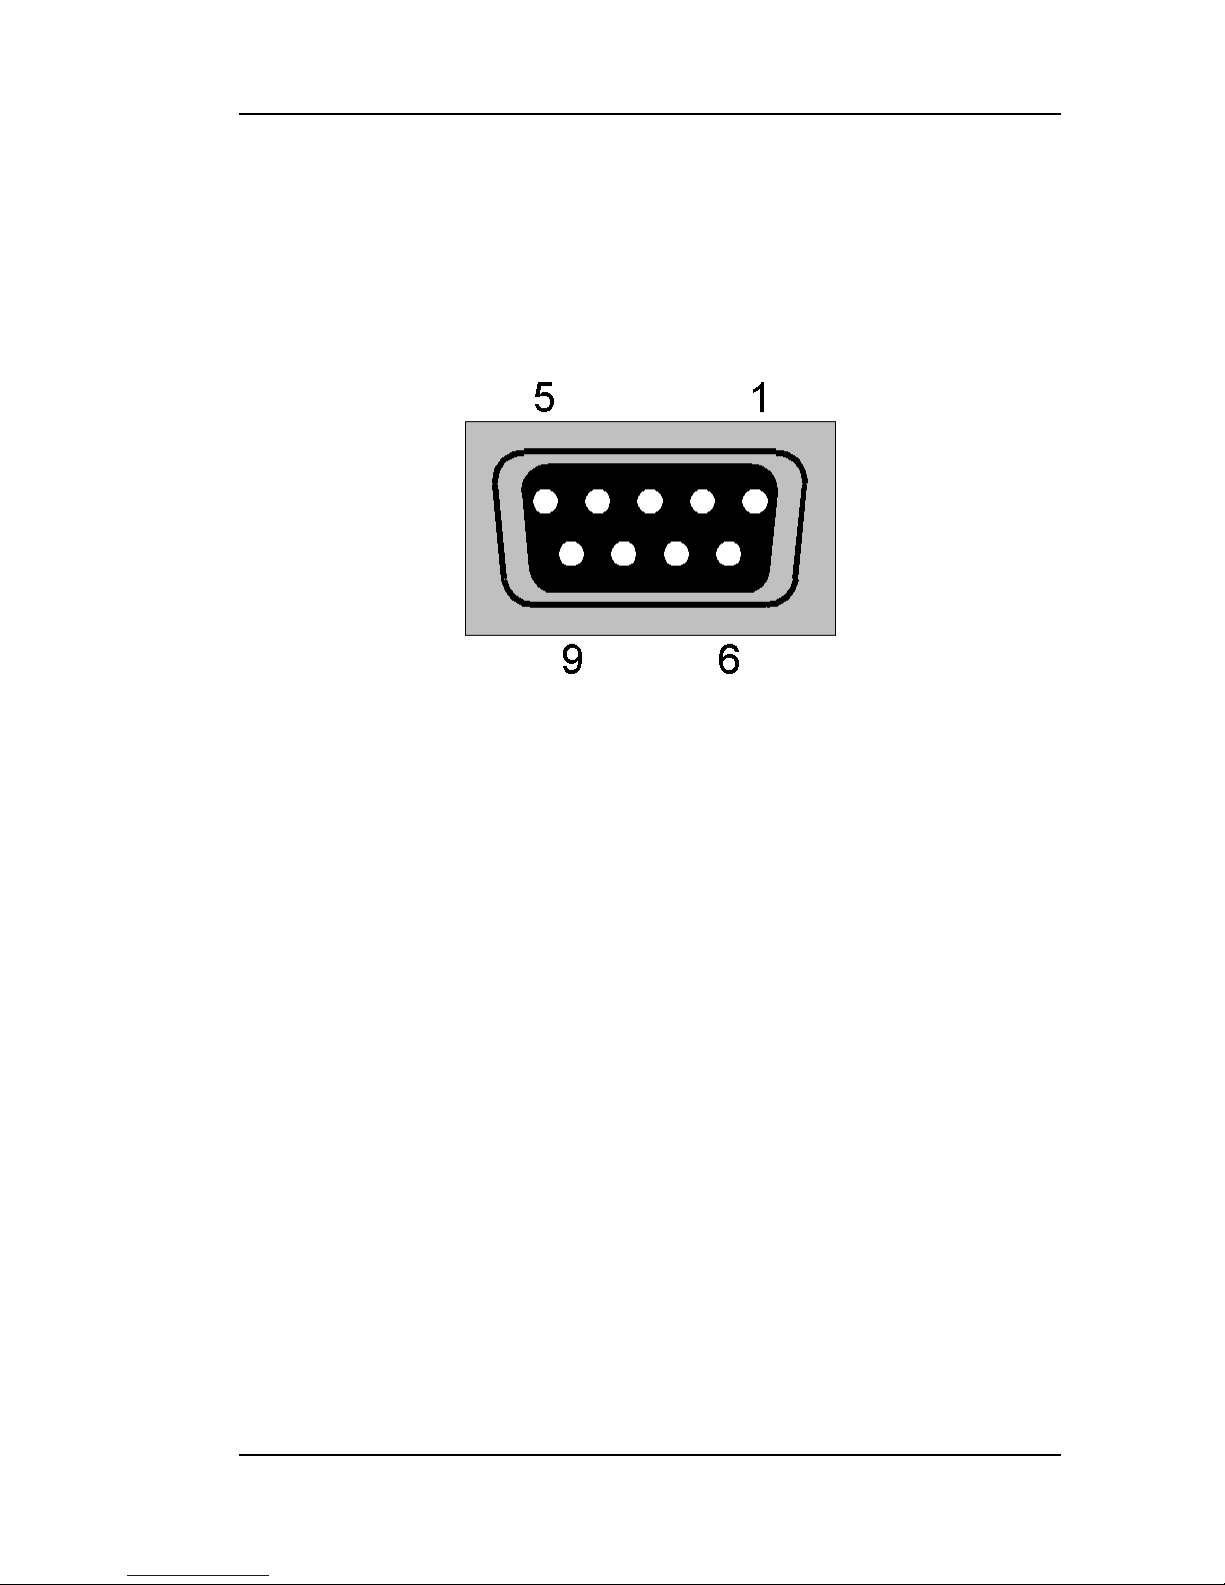
SC MASTER LITE Technical Appendix • 85
Connector configuration
RS232-IN / CAN connector
1. N.C. N.C. = not connected
2. TxD
3. RxD
4. N.C.
5. GND internal
6. N.C.
7. CAN_RX
8. CAN_TX
9. N.C. Shield = internal GND
Page 92
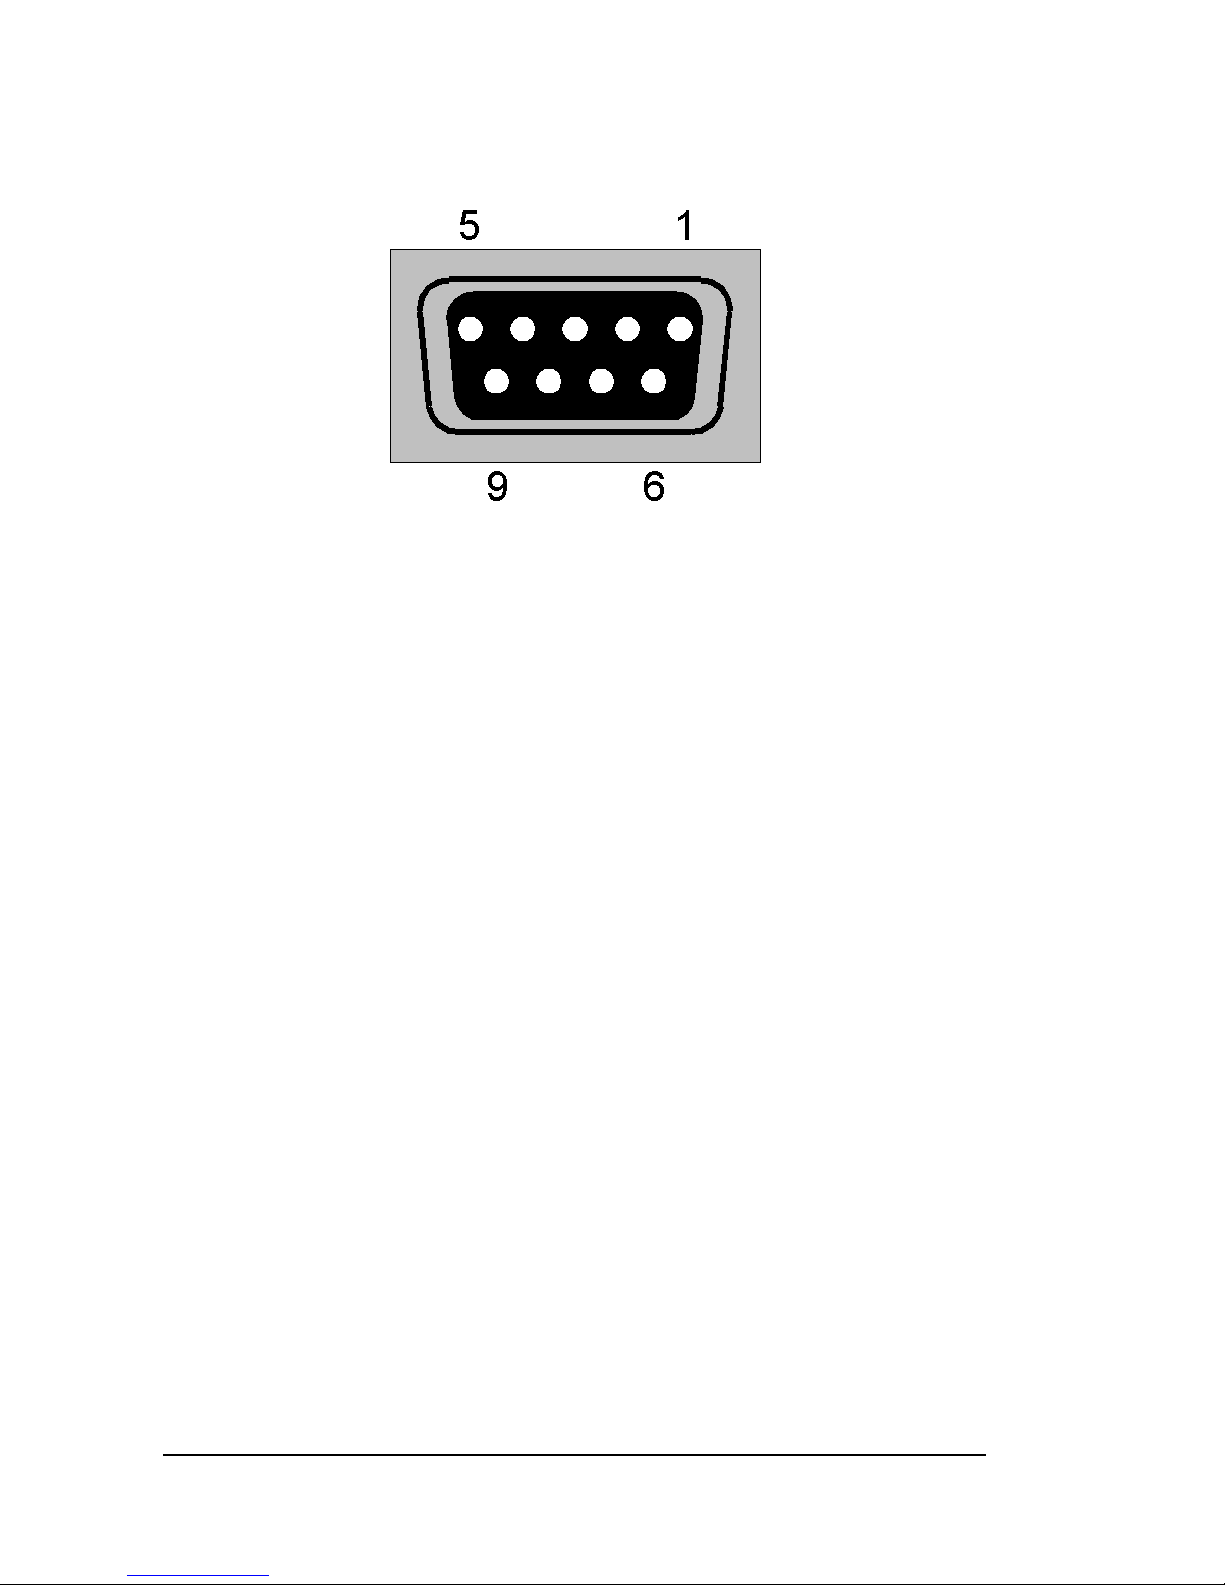
86 • Technical Appendix
RS232-OUT connector
1. N.C. N.C. = not connected
2. TxD
3. RxD
4. N.C.
5. GND internal
6. N.C.
7. CTS
8. RTS
9. N.C. Shield = internal GND
Page 93
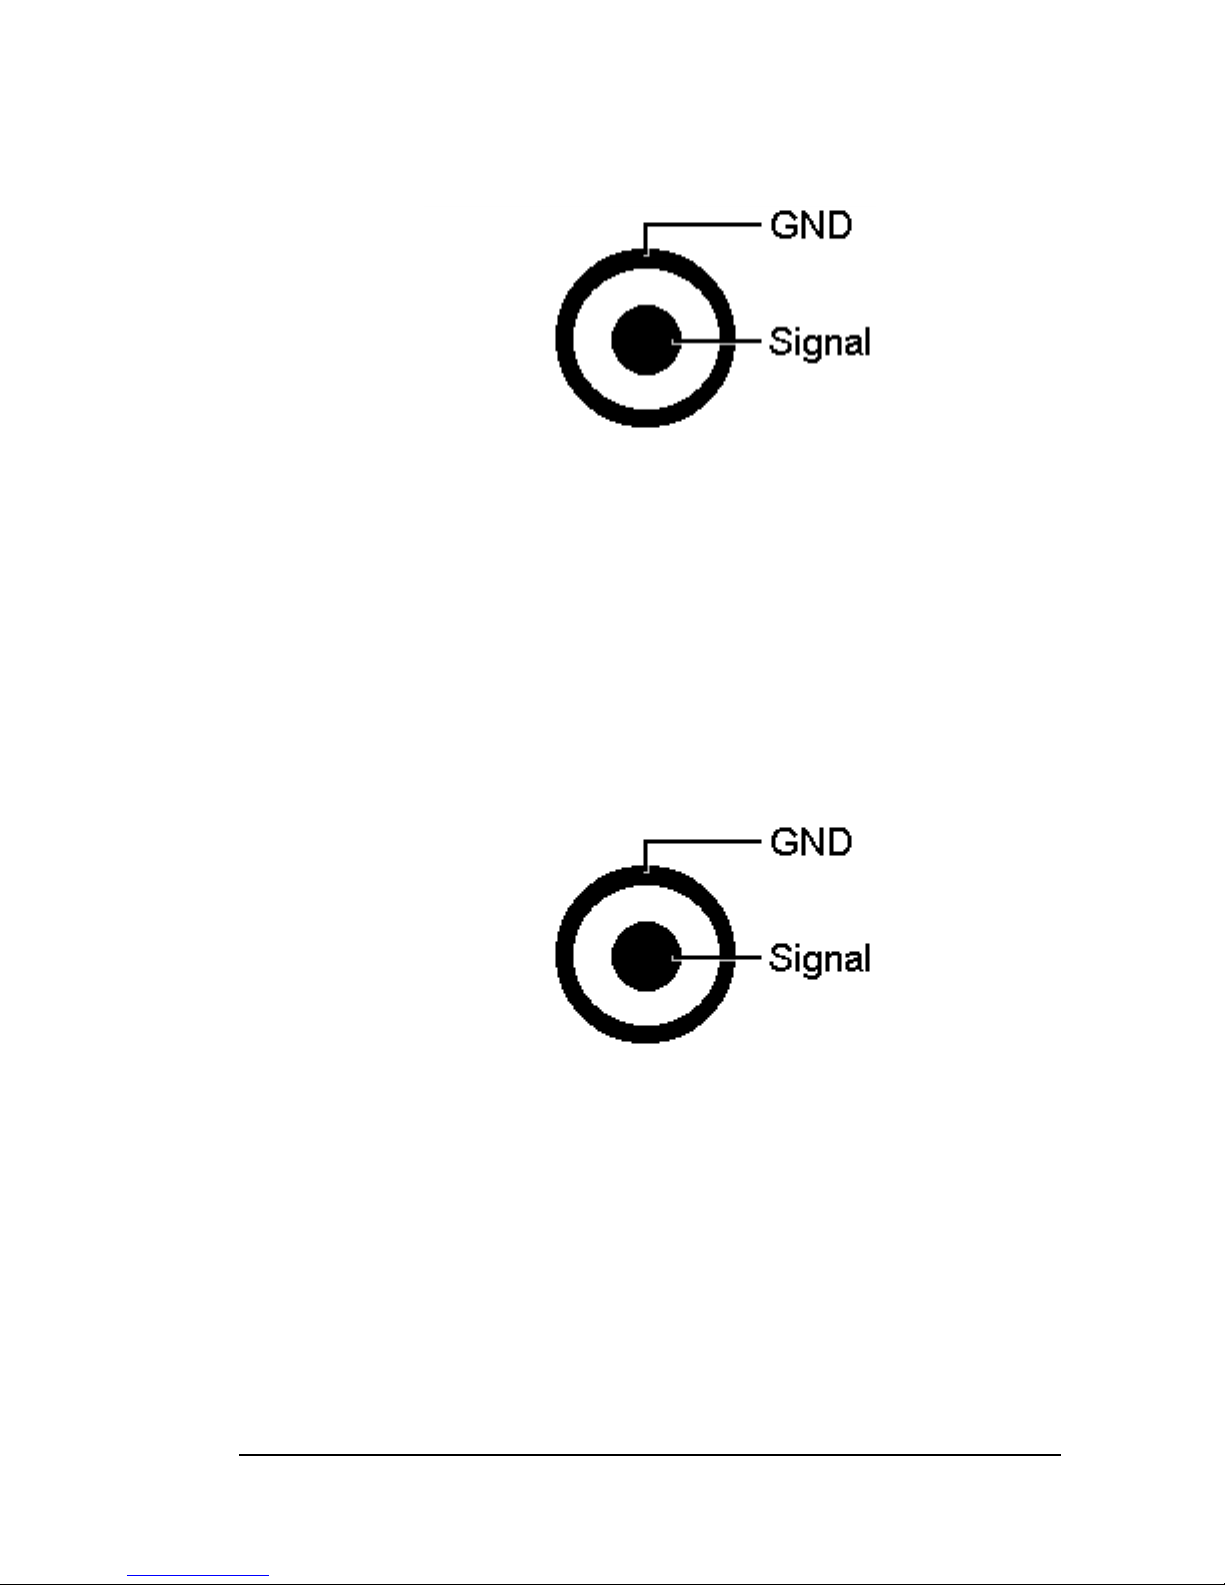
SC MASTER LITE Technical Appendix • 87
CUE IN connector
GND internal
CUE-IN sensitivity 0,3mV (-10dBV, -7,8dBu)
CUE-OUT connector
GND internal
CUE OUT output level: 5V (14dBV, 16,2dBu)
(0dBV is referenced to 1Veff, 0dBu is referenced to 775mVeff)
Page 94
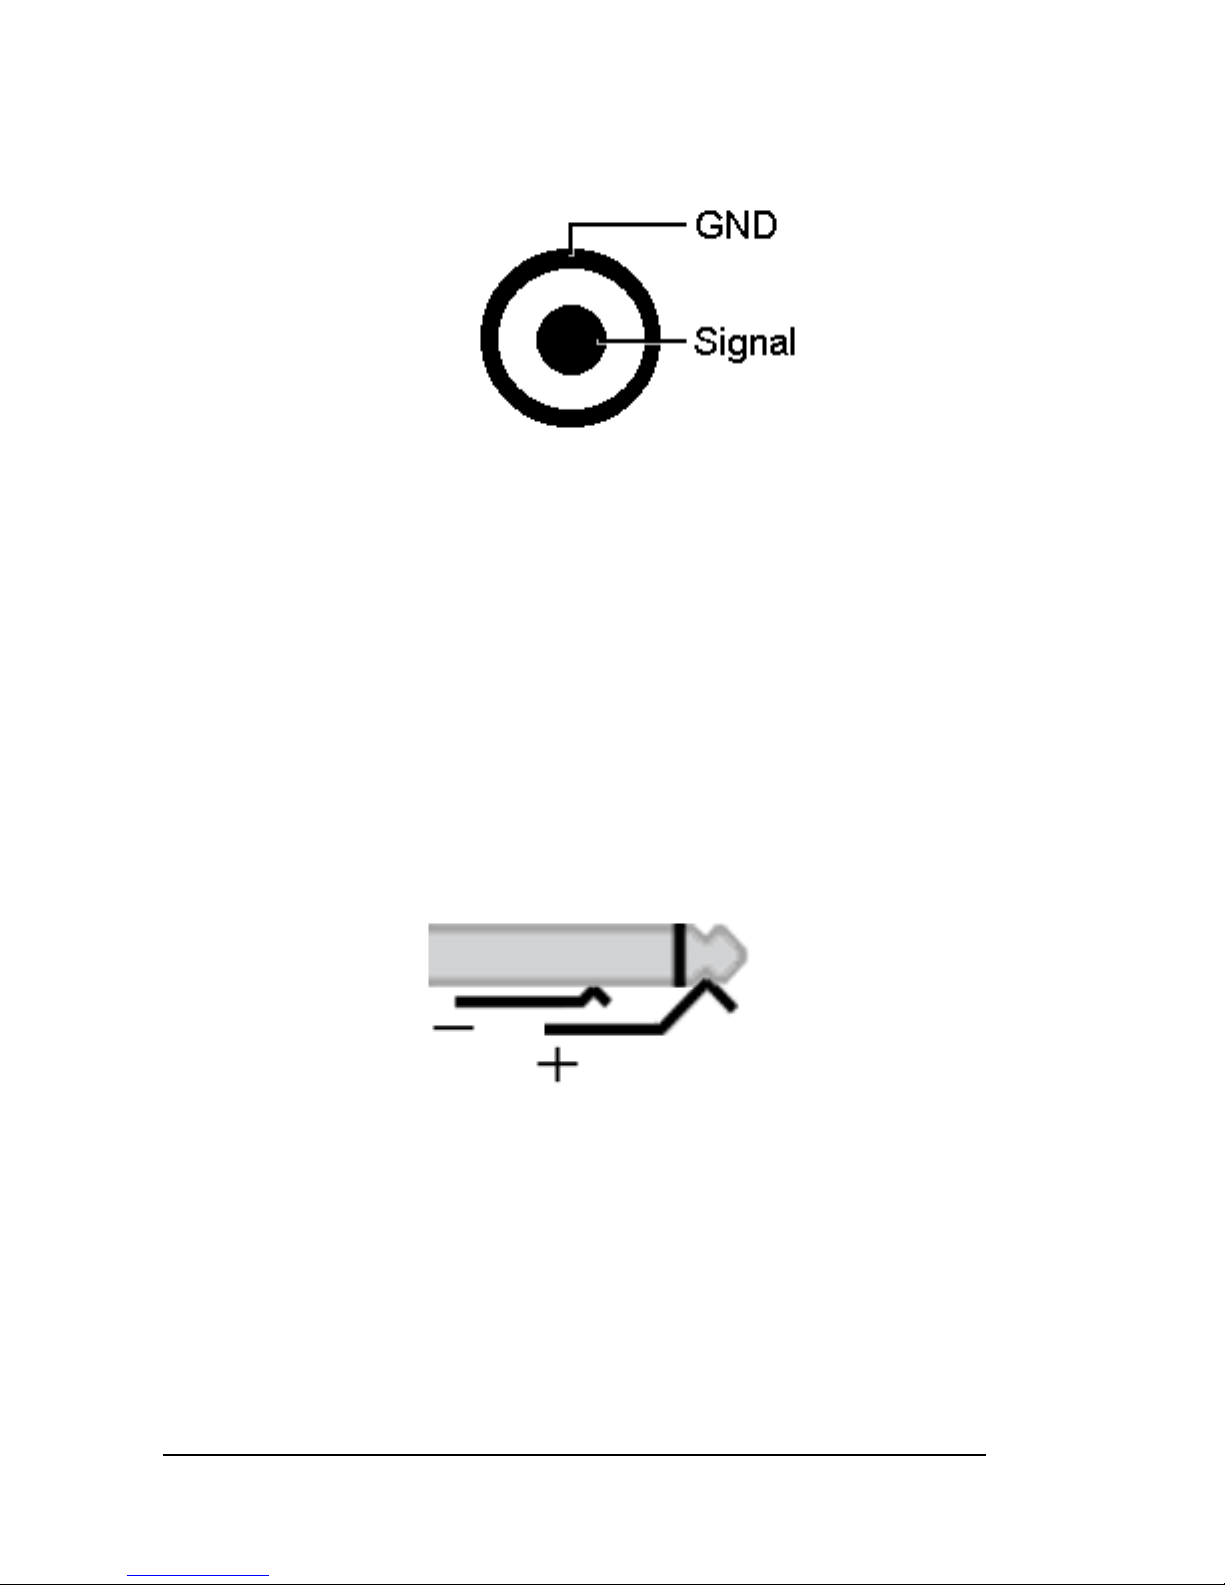
88 • Technical Appendix
Audio connectors
LINE-IN
With a 0dB dB signal (sine wave) generated by Wings Platinum and converted into an MP3 file, SC MASTER generates a
4,1V peak-peak output level (equal to 2.9V RMS).
All internal settings of the SC MASTER are adjusted to 0dB (=
card volume 29 and Master Volume 31).
SPEAKER
Loudspeaker sockets are only available for the LS variant. The
integrated power amplifier supplies 2 x 10 W into 4 Ohm.
Page 95
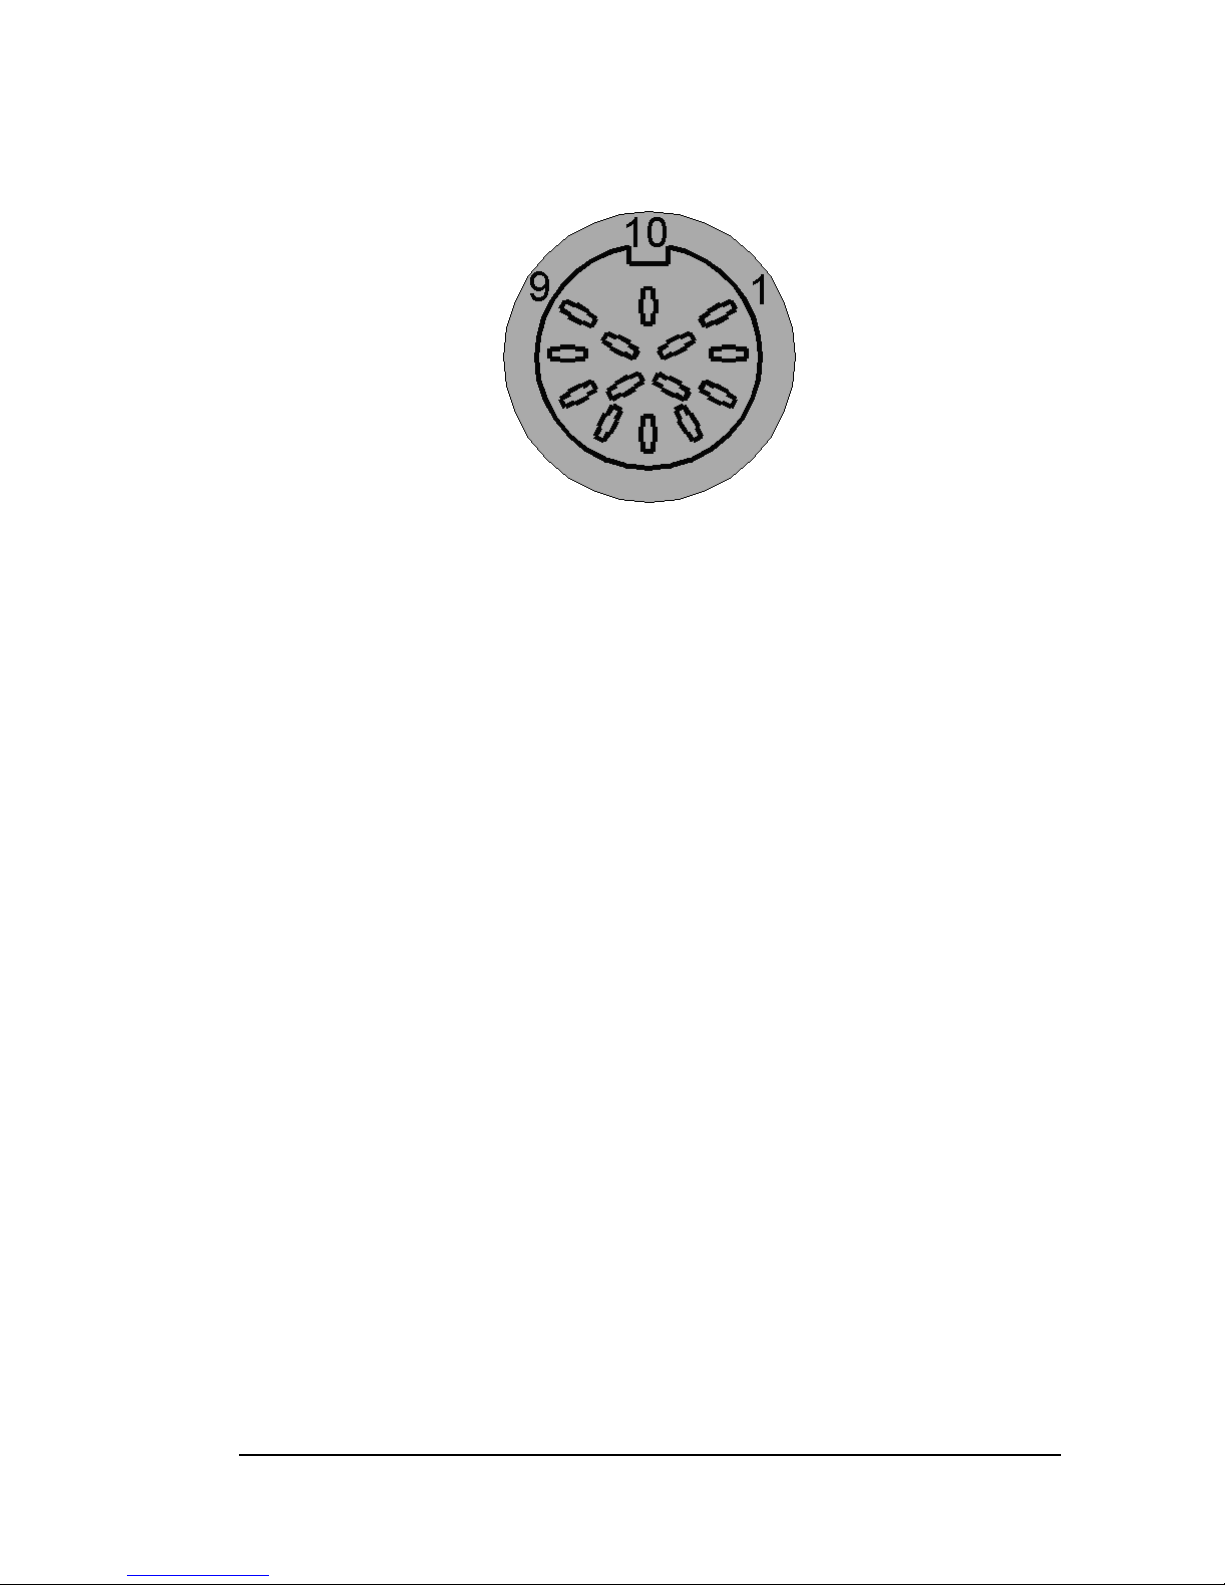
SC MASTER LITE Technical Appendix • 89
REMOTE connector
1. Start Show 2
2. Start Show 1
3. + 12 VDC up to + 40 VDC (unstable) Output
4. N. C.
5. +5V DC regulated Output (max. 20mA)
6. GND intern
7. Toggle Input
8. Open Collector Output (IR-Out 2)
9. Analog Input1 (max. 0-5VDC)
10. + 12 VDC up to + 40 VDC (unstable) Output (connected to Pin3)
11. External IR Input
12. Open Collector Output (IR-Out 1, DMX-Out)
13. GND internal
14. Analog Input2 (max. 0-5VDC)
Page 96
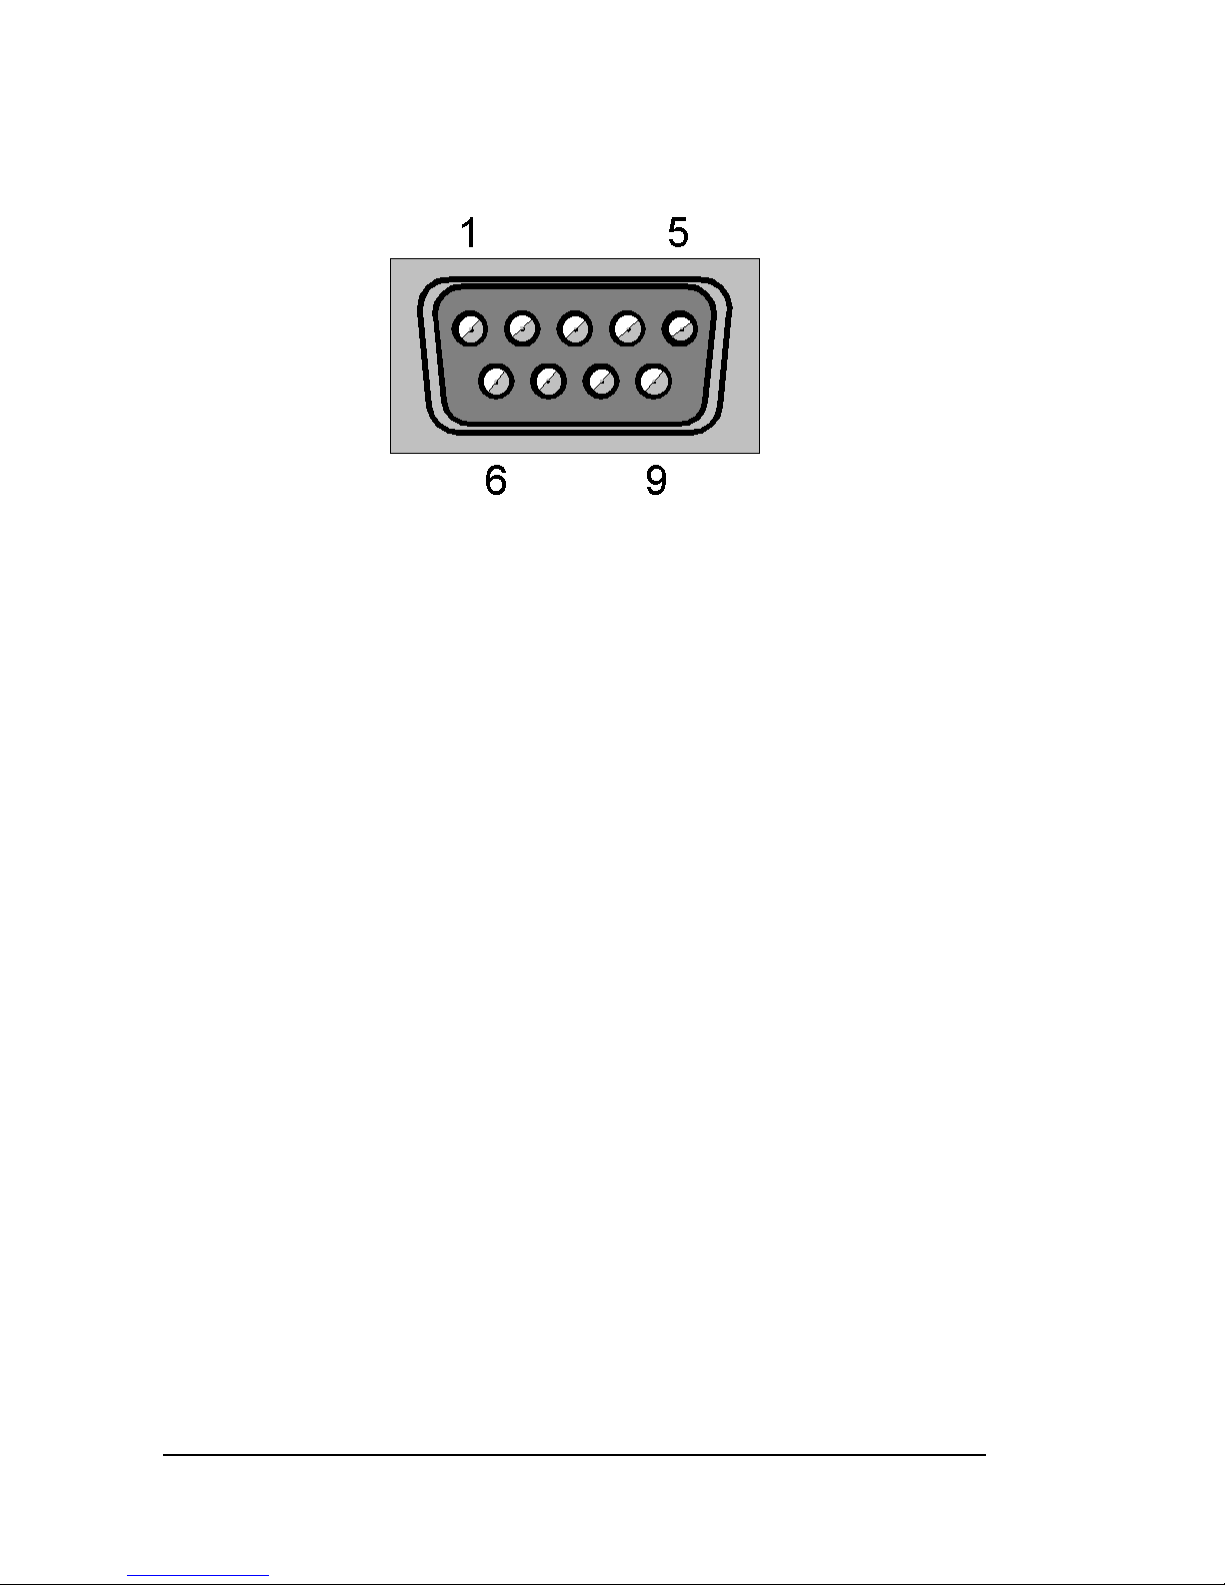
90 • Technical Appendix
DATA IN / OUT connector
1. Data In 1 N.C. = not connected
2. Data In 2
3. Data In 3
4. Data In 4
5. Data In/Out 1
6. Data In/Out 2
7. Data In/Out 3
8. Data In/Out 4
9. +5VDC (max 20mA) Shield = internal GND
Page 97
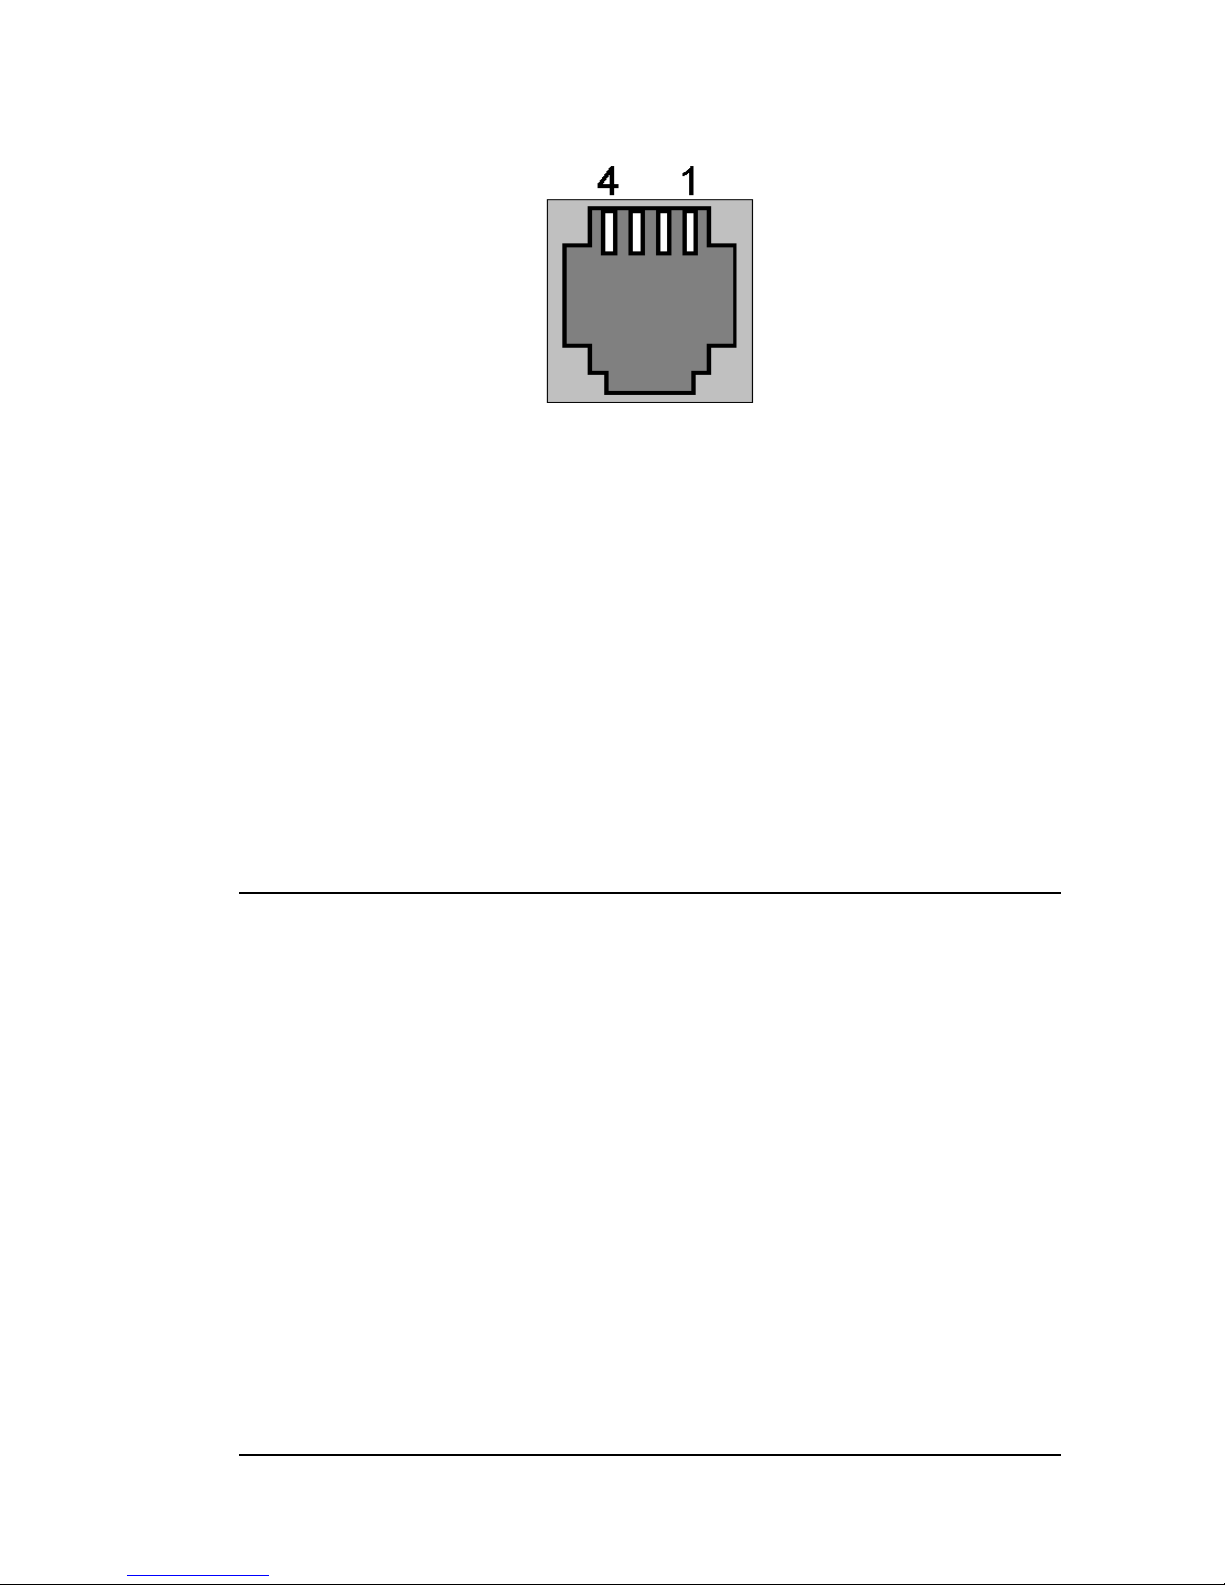
SC MASTER LITE Technical Appendix • 91
POWER connector
1. + 2. 15VAC (Winding 1 of Power Supply Unit AC-3)
3. + 4. 15VAC (Winding 2 of Power Supply Unit AC-3)
Power Supply AC-3 (2x15V/500mA) must be used!
Other
Stumpfl power supplies do not have enough power handling
capacity!
LS variant required STZ-NG3-Switch
Technische Daten
SC MASTER LITE
Dimensions (H/W/D): 45 x 212 x 170 mm
Weight: 1060 g / LS variant 1120 g
Power supply: 15 VAC to 24 VAC / 50, 60 Hz
Stand-by current: 500 mA / LS variant max. 1,8 A
Page 98

92 • Glossary
Glossary
Cascading
Connecting devices in series. With the SC MASTER this is
done via control signal lines or by means of serial connections
via RS232.
CD-R
A CD for writing on with a CD writer, which can also be read
by normal audio CD players. It can only be written on once
and cannot be deleted.
CF Card
CompactFlash Card, a memory card the size of a postage
stamp which is also used for digital cameras. It has a fixed
memory, works without movable components and is wear free.
Copy protection bit
A protective measure introduced by the music industry to allow
digital copying only once.
CD-R
A CD for writing on with a CD writer, which can also be read
by normal audio CD players. It can only be written on once
and cannot be deleted.
Page 99

SC MASTER LITE Glossary • 93
Cues
Control commands of a slide show which can be recorded as
control signals on a sound carrier.
DAT Recorder
D
igital Audio Tape - cassette recorder for digital storage of
audio signals in CD quality.
DLC
D
ynamic Link Code - modern control signal standard, intro-
duced by AV Stumpfl in 1994.
Ducking
...is a voice-controlled automatic volume reduction of music or
the audio program, respectively.
HDR
Hard disk recording - recording of audio signals on hard disk
and processing in the computer.
Hucht RSPpro
A procedure developed by Hucht for encoding control information in digital audio signals. This encoding system features
particularly high fidelity.
MateTrac
Widely used control signal standard of Arion, USA. AV Stumpfl
has been using this control signal since 1983.
Mixdown
..Mix of various sound channels or parallel samples into a
stereo sum or stereo sample.
Page 100

94 • Glossary
MP3
Method for scaleable compression of audio data; developed by
the Fraunhofer Institute.
Port
In slide control technology, this term stands for a softwareconfigured port.
Random Access
Direct access to every slide in the tray within few seconds.
S/PDIF
S
ony/Philips Digital Interchange Format – Standard for digital
audio signals in the consumer range
Sample
The term used in sound engineering for "sound element".
Time code
A time signal developed by film industry for synchronization of
different systems, e.g. for picture and sound.
X Time
correspond to pause markers in Wings Platinum. Control
commands provided with an X time can be started manually at
any time. They are used for impulsive synchronization with
music as well as for controlling speaker support sequences.
 Loading...