

Page 1

1
User Manual
HD Player Pro Rev.2
AV Stumpfl GmbH
Mitterweg 46
A-4702 Wallern
Tel.: +43-7249-42811
Fax: +43-7249-428114
E-Mail: [email protected]
Internet: http://www.AVstumpfl.com
Page 2

2
FCC Notices
It’s herewith confirmed to comply with the requirements of FCC Part 15 Rules. Operation is
subject to the following two conditions:
This device may not cause harmful interference.
This device must accept any interference received, including interference that may
cause undesired operation.
Note: This equipment has been tested and found to comply with the limits for a Class B
digital device, pursuant to part 15 of the FCC Rules. These limits are designed to
provide reasonable protection against harmful interference when the equipment is
operated in a residential installation. This equipment generated uses and can radiate
radio frequency energy and if not installed and used in accordance with the instruction
manual may cause harmful interference to radio communications. However, there is no
guarantee that interference will not occur in a particular installation. If this equipment
does cause harmful interference to radio of television reception, which can be
determined by turning the equipment off or on, the user is encouraged to try to correct
the interference by one or more of the following measures:
Reorient or relocate the receiving antenna.
Increase the separation between the equipment and receiver.
Connect the equipment into an outlet on a circuit different from that to which the
receiver is connected.
Consult the dealer or an experienced radio TV technician for help.
CE Declaration
This device complies with CE class B.
EN55022 IEC 61000-4-4
EN61000-3-2 IEC 61000-4-5
EN61000-3-3 IEC 61000-4-6
EN55024 IEC 61000-4-8
IEC 61000-4-2 IEC 61000-4-11
IEC 61000-4-3
Printed in Taiwan R.O.C.
All contents are subject to change without notice.
All trademarks are the property of their respective owner.
Page 3

3
Index
1. PACKAGE CONTENTS ........................................................................................................................5
2. INTRODUCTION ..................................................................................................................................5
3. FEATURES ...........................................................................................................................................6
4. HARDWARE OVERVIEW .....................................................................................................................7
5. REMOTE CONTROL ............................................................................................................................8
5.1 Entering Text or IP-Address .............................................................................................................9
6. START THE HD PLAYER PRO .............................................................................................................9
7. SETTING UP ...................................................................................................................................... 10
7.1 Networksetup ................................................................................................................................ 10
7.1.1 Setting the Network from the OSD Menu ......................................................................... 10
7.1.2 Setting the Network from the IP Detect Tool ..................................................................... 12
7.2 FTP Setup ..................................................................................................................................... 15
7.3 Video Setup ................................................................................................................................... 17
7.4 Other Setup ................................................................................................................................... 18
7.5. Scrolling Text Setup ................................ ................................................................ ....................... 20
8. USING THE HD PLAYER PRO ........................................................................................................... 21
8.1 Play media files on the CF-Card .................................................................................................... 21
8.1.1 Using the Remote Control when Media File is playing ..................................................... 22
8.2 Multiple display zones .................................................................................................................... 24
8.3 Log function ................................................................................................................................... 25
8.4 Seamless-Function ........................................................................................................................ 25
8.5 FTP auto download function .......................................................................................................... 26
8.6 Controlling the HD Player Pro (RS232/TCP) .................................................................................. 29
8.7 How to sync several HD Player Pro ............................................................................................... 30
8.7.1 Important to know: ........................................................................................................... 33
9. HTTP COMMAND FUNCTION ........................................................................................................... 34
9.1 Control ........................................................................................................................................... 35
9.2 Network ......................................................................................................................................... 36
9.3 Server ............................................................................................................................................ 37
9.4 Time .............................................................................................................................................. 38
Page 4

4
9.5 Features ........................................................................................................................................ 39
10. SCHEDULE FUNCTION ................................................................................................ ..................... 40
10.1 Install the Schedule software ......................................................................................................... 40
10.2 Start the Schedule Software ................................................................................................ .......... 41
10.2.1 Basic Schedule ................................................................................................................ 41
10.2.2 Advance Schedule........................................................................................................... 43
10.2.3 Explanation of the Warning Message ............................................................................... 45
10.3 Apply the Schedule on the HD Player Pro...................................................................................... 45
11 OPTIONAL AUXILIARY EQUIPMENT ................................................................................................. 46
11.1 Play-Button Box (SCV-HDZ-PBB) .................................................................................................. 46
11.2 IR cable (SCV-HDZ-IRC) ............................................................................................................... 46
11.3 PIR sensor (SCV-HDZ-PIR) ........................................................................................................... 47
11.3.1 Using the PIR Sensor ...................................................................................................... 47
11.4 Touch sensor button (SCV-HDZ-WIR5SB) ..................................................................................... 47
11.4.1 Features of the Touch-Sensor Buttons ............................................................................. 47
11.4.2 Ex. Using the wireless Touch Sensor Buttons .................................................................. 48
11.4.3 Connect to the Touch-Sensor Buttons .............................................................................. 48
11.4.4 Play the Demo Files ........................................................................................................ 48
11.5 LED button box .............................................................................................................................. 49
14. USB AUTO-COPY FUNCTION ........................................................................................................... 50
13 TROUBLESHOOTING ........................................................................................................................ 51
15. RECOMMENDED CF-CARDS ............................................................................................................ 52
16. RECOMMENDED VIDEO FILE FORMATS ......................................................................................... 52
Page 5
5
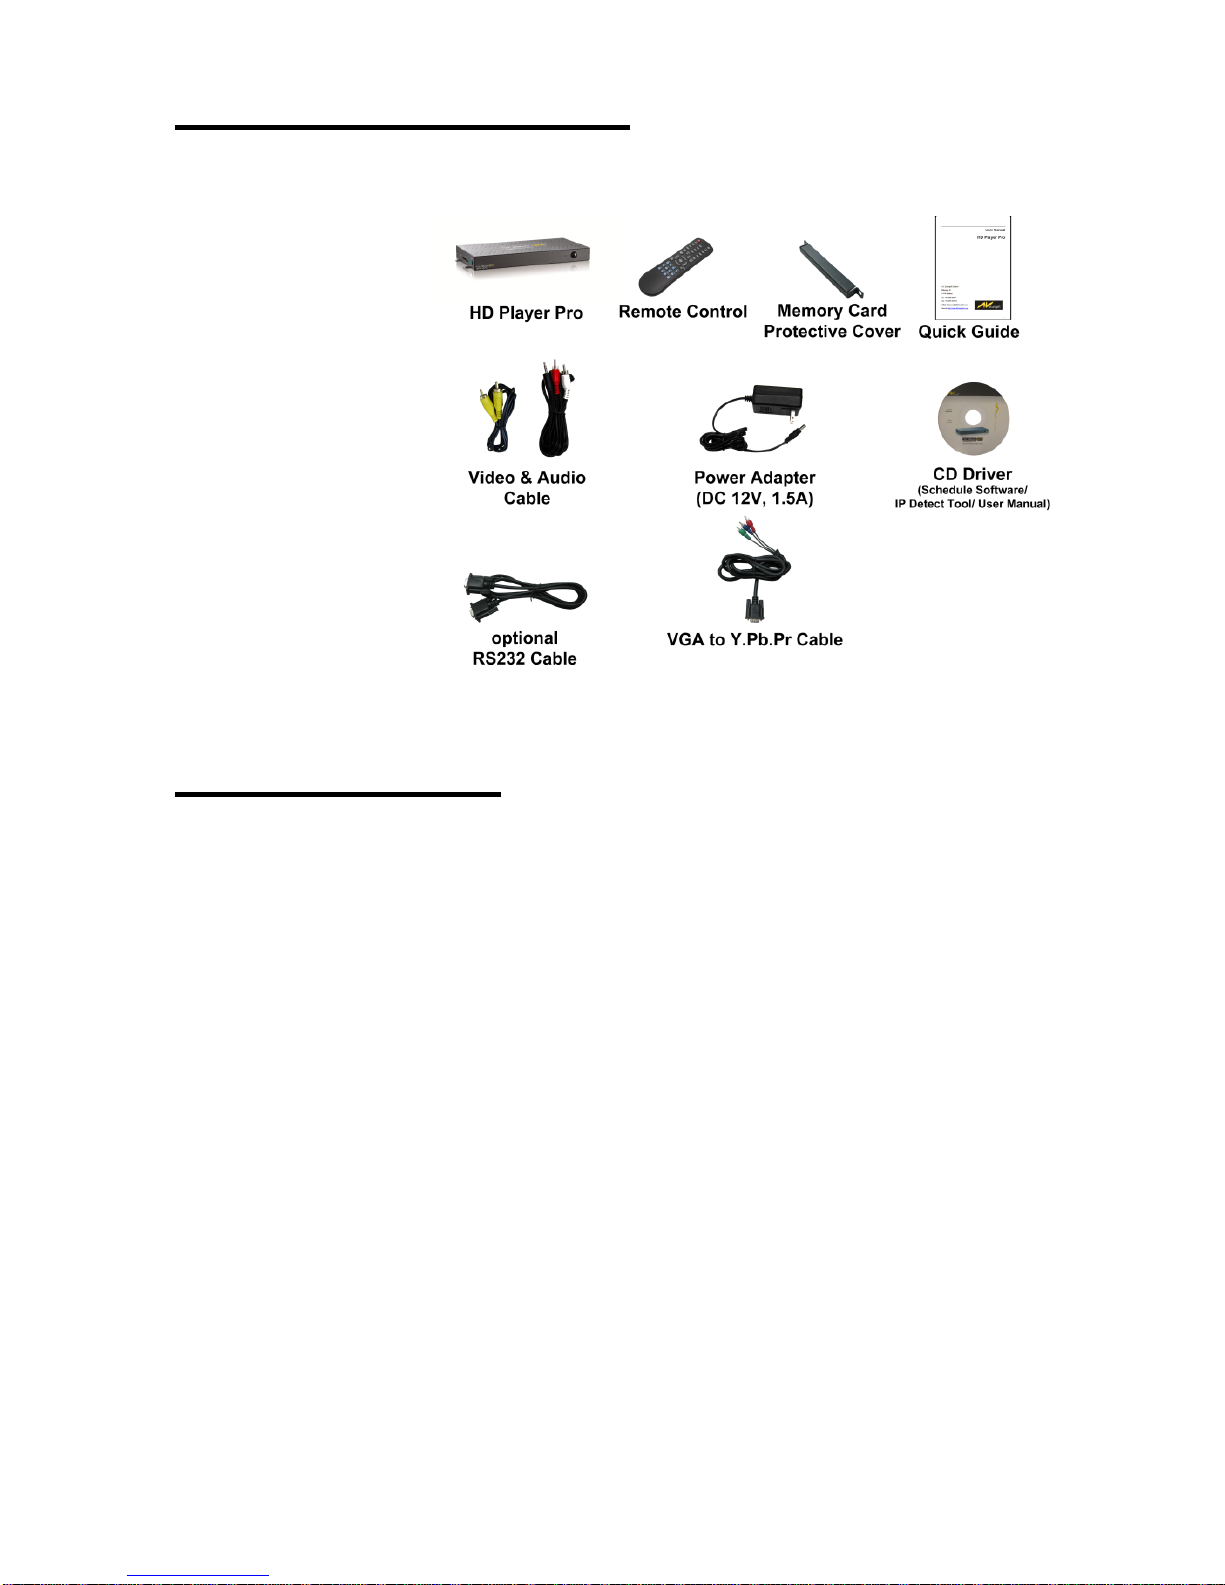
1. PACKAGE CONTENTS
1. HD Player Pro
2. Remote Control
3. CF Card Protective Cover
4. Video & Audio Cable
5. RS-232 Cable (optional)
6. VGA to Y.Pb.Pr Cable
7. Power Adapter
8. Quick Guide
9. CD Driver
- Schedule Software
- IP Detect Tool
- User Manual
2. INTRODUCTION
The new „HD Player“ by AV Stumpfl supports professional High Definition video playback from
Compact Flash card.
Integrated hardware decode acceleration ensures smooth full HD playback and clear images.
Flexible playback, control and configuration options allow the HD Player to be adapted to a variety of
different requirements.
Integration into the Iseo system and media update via the Internet provides for a decentralized Digital
Signage network.
The HD Player does not contain any wear or shock sensitive parts and is therefore the optimum
solution for continuous Operation.
Its compactness and low price open up new fields of application on any display device for advertising,
presentations, training and other media applications.
Page 6

6
3. FEATURES
Synchronized Playback Function: Synchronize up to 254 units using Ethernet on same
subnet.
Seamless-function: possibility to playback videos with nearly no breakout
(only for H.264)
Support NTFS/FAT32 formatted CF-Cards
High-performance and high stability: With the same resolution and bit rate as Blu-ray players
The source of HD WMV9 MP@HL (Main Profile / High Level) supports resolution up to
1920x1080 (1080p30) and the maximum bit rate is 40Mbps
Supports multiple file formats: WMV9,MPEG4, MPEG2, H.264, MP3 and WMA
Supports Video, Y.Pb.Pr, HDMI, VGA and Audio output
HDMI Output: 576p/576i/ 720p/ 1080i/ 1080p
HDMI 1.1, 1.2 and 1.3 compliant
VGA output supports resolution: 640x480/ 800x600/ 1024x768/ 1280x1024/ 1360x768/
1366x768
Supports RS-232 port for computer control with ASCII command (play, stop, pause…etc)
Supports Multiple Display Zones: Displays the movies, picture (supports png format/ size:
213x641/ 96DPI) and scrolling text on the screen simultaneously
The display speed of scrolling text can be adjusted, and scrolling text supports multi
languages (Latin1/ Latin2/ Japanese/ Greek)
Schedule Function: The HD Player Pro will auto play the specific file at the specific date
Supports Log Function: Recording the file name and start time of the played files
Ethernet network supports up to 100Mbps
Supports CF memory cards. (We suggest using the high speed (200X) CF cards)
In general we recommend to use tested CF cards from AV Stumpfl
Supports HTTP Control Function
Supports Auto Key Lock Function
Export of the Configuration Value: You can export the configuration value to the CF card
The configuration value can be modified on your PC, and can be applied to the HD Player Pro
Supports FTP Auto Download Function: Connect to Remote FTP server and download data to
the CF card automatically
Play files and FTP Auto Download Simultaneously: The HD Player Pro can play files while
downloading
Embedded FTP Server
Supports NTP Network (G.M.T) Timer
Supports Universal Plug and Play (UPnP) and DHCP
Supports SLIDE SHOW Function
Page 7
7
4. HARDWARE OVERVIEW
Page 8
8
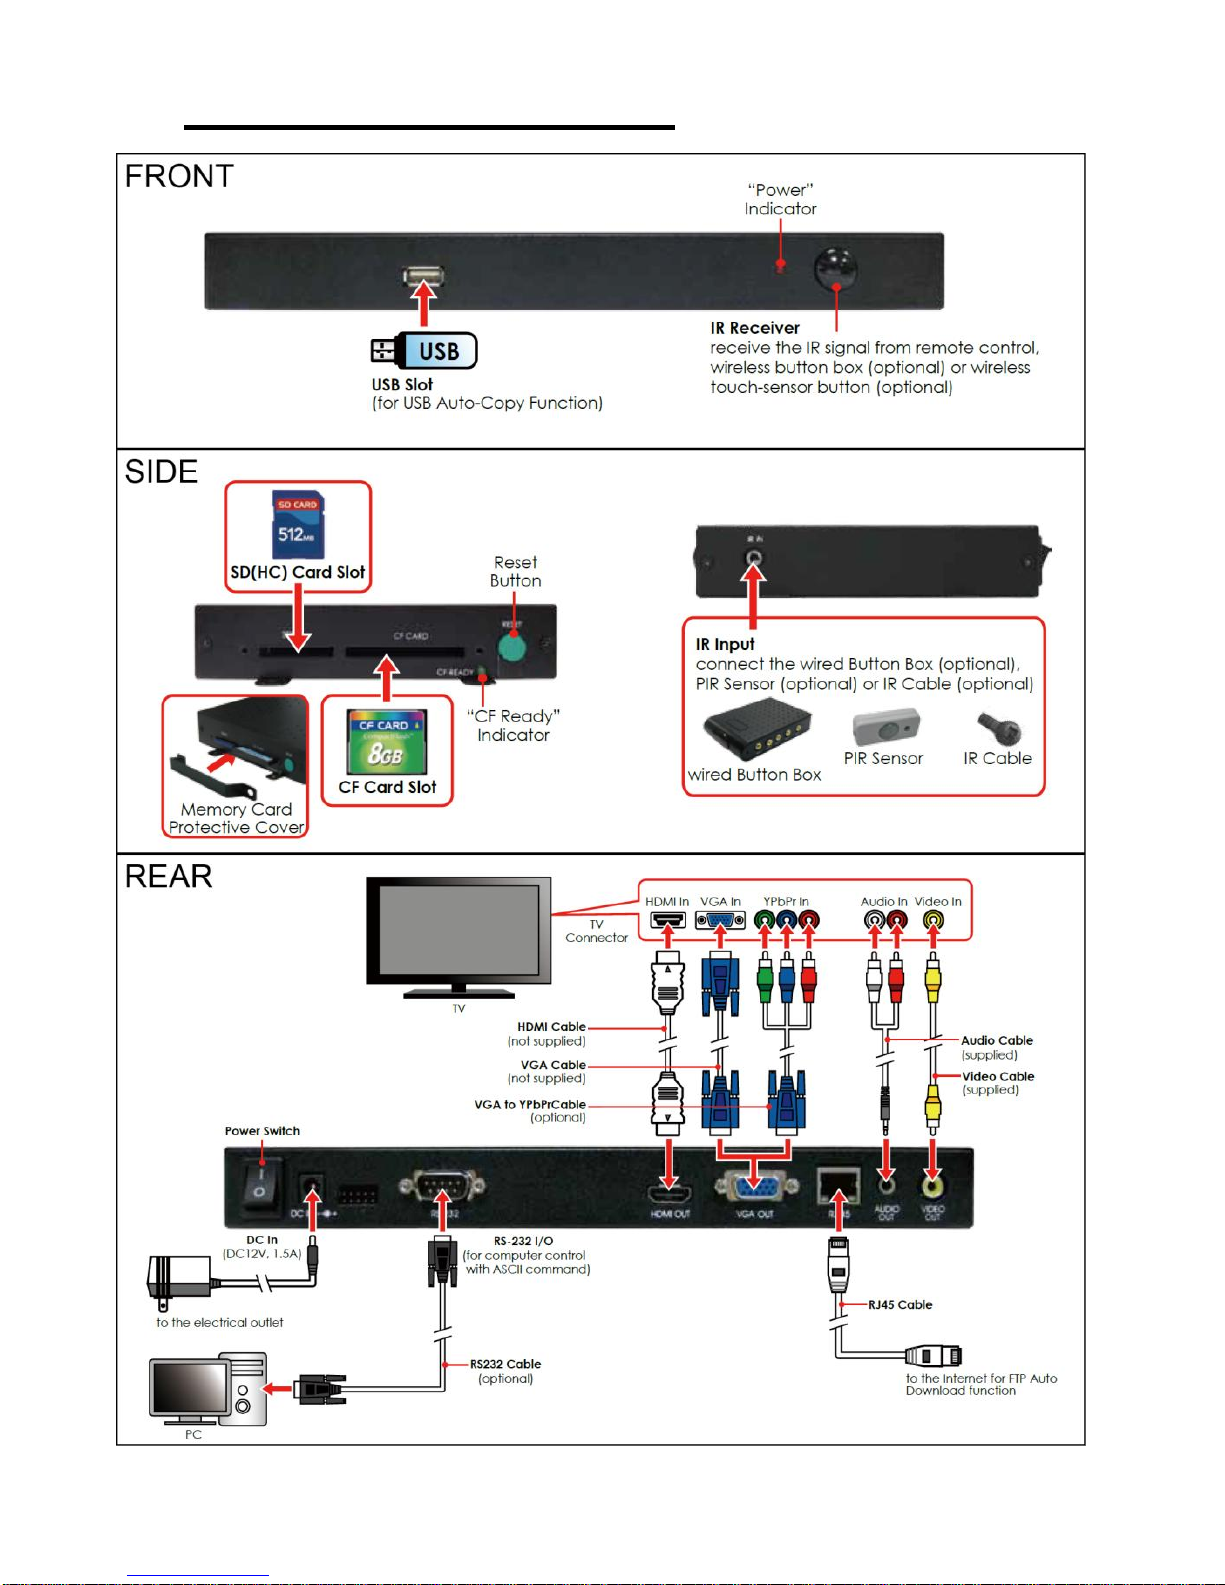
Power Switch: Toggle between main power on & off
DC Input: for the power adapter. (DC 12V / 1.5A)
VGA Output
HDMI Output
RJ-45 Ethernet Connector: Connecting to router or PC by RJ-45 Cable
Audio Output
Video Output
IR Input: Connection for PIR Sensor (optional) or IR Cable (optional)
RS-232 Connector: Connection for computer control with ASCII command
“CF READY” LED: Steady green confirms that the CF card is inserted correctly
CF Card Socket: for Compact- Flash memory card
SDHC-Card Socket: for Secure- Digital- High- Capacity Cards
“RESET” Button: for restarting the HD Player Pro
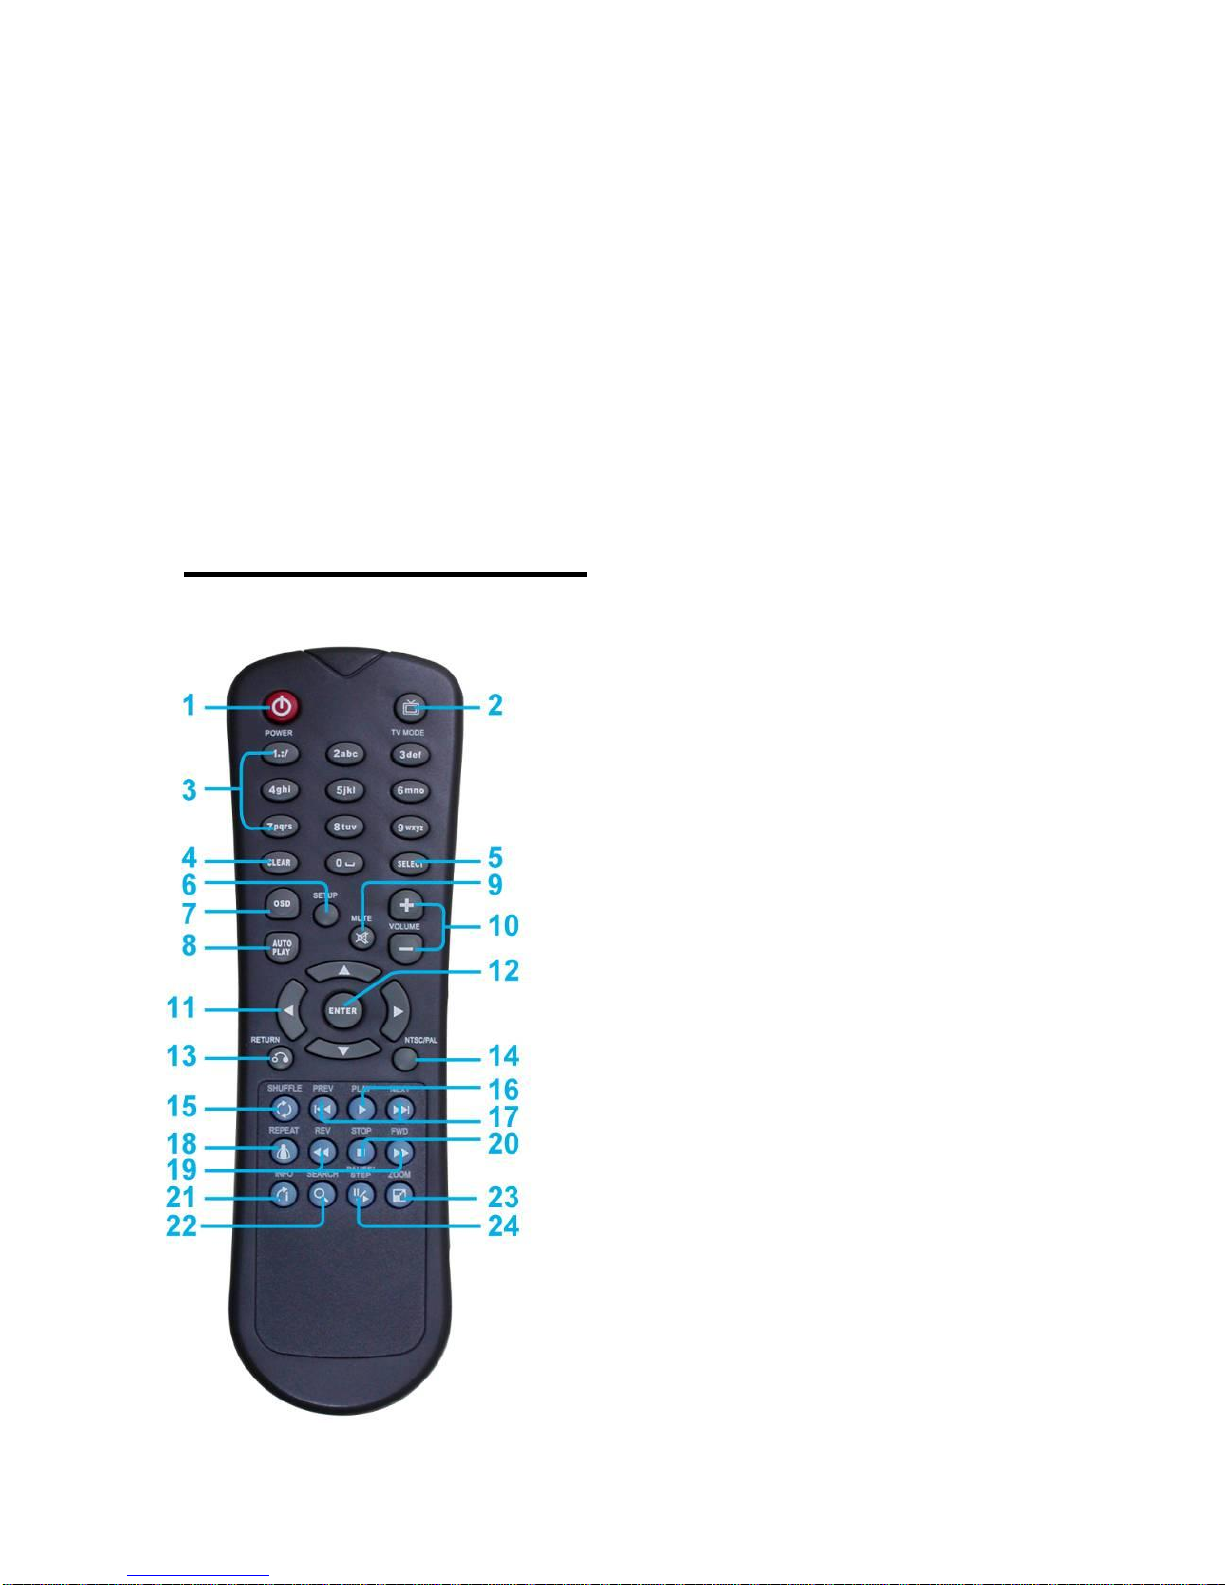
5. REMOTE CONTROL
1
2
3
4
5
6
7
8
9
10
11
12
13
14
15
16
17
18
19
20
21
22
23
24
Power on/ off
Select the output mode
Numeric Key
Delete last entry
Select a function or to play the selected file
Open the setup menu
OSD display function on/ off
Auto-play function on/ off
Mute sound
Volume up/ down
Move the cursor
Confirm the selection/ entry
Go back one layer
Select the TV type (NTSC/ PAL)
Shuffle on & off
Play the selected file
View the previous/ next file
Play the previous/ next file if in playback
Select the repeat mode
Rewind/ forward movie or music files
Stop playback
Show the information of the selected file
Search video (movie) timeframe
Zoom in/ out on the movie or picture
Pause the playback or play frame by frame
Page 9
9
5.1 Entering Text or IP-Address
Keys need to be pressed multiple times to enter the letter corresponding to that key.
For Example: To enter the letter “a” press the button “2” twice
Enter an IP Address
For Example: To enter IP address”192.168.100.100”,
Step 1: Press “1” once, then “1” is displayed, and color of “1” is orange
Step 2: When the color of “1”turns white, press “9” once, then “9” is displayed
Step 3: Repeat steps 1 and 2 to enter and complete the IP address
6. START THE HD PLAYER PRO
Power On
Insert a CF-Card or SDHC-Card on which music, images or videos are stored.
NOTE: Never insert both cards in the Slot at the same time.
Press the “POWER” button to power on the HD Player Pro, and then press the “TV MODE”
button to select the output mode.
Status After Power On
Status 1: If the “AUTOPLAY (Movie/ Picture/ All Files/ MultiLayer)” function is enabled and
there are media files on the CF card or the HD Player Pro is already connected to the display
device, the HD Player Pro will auto play media files after Power on.
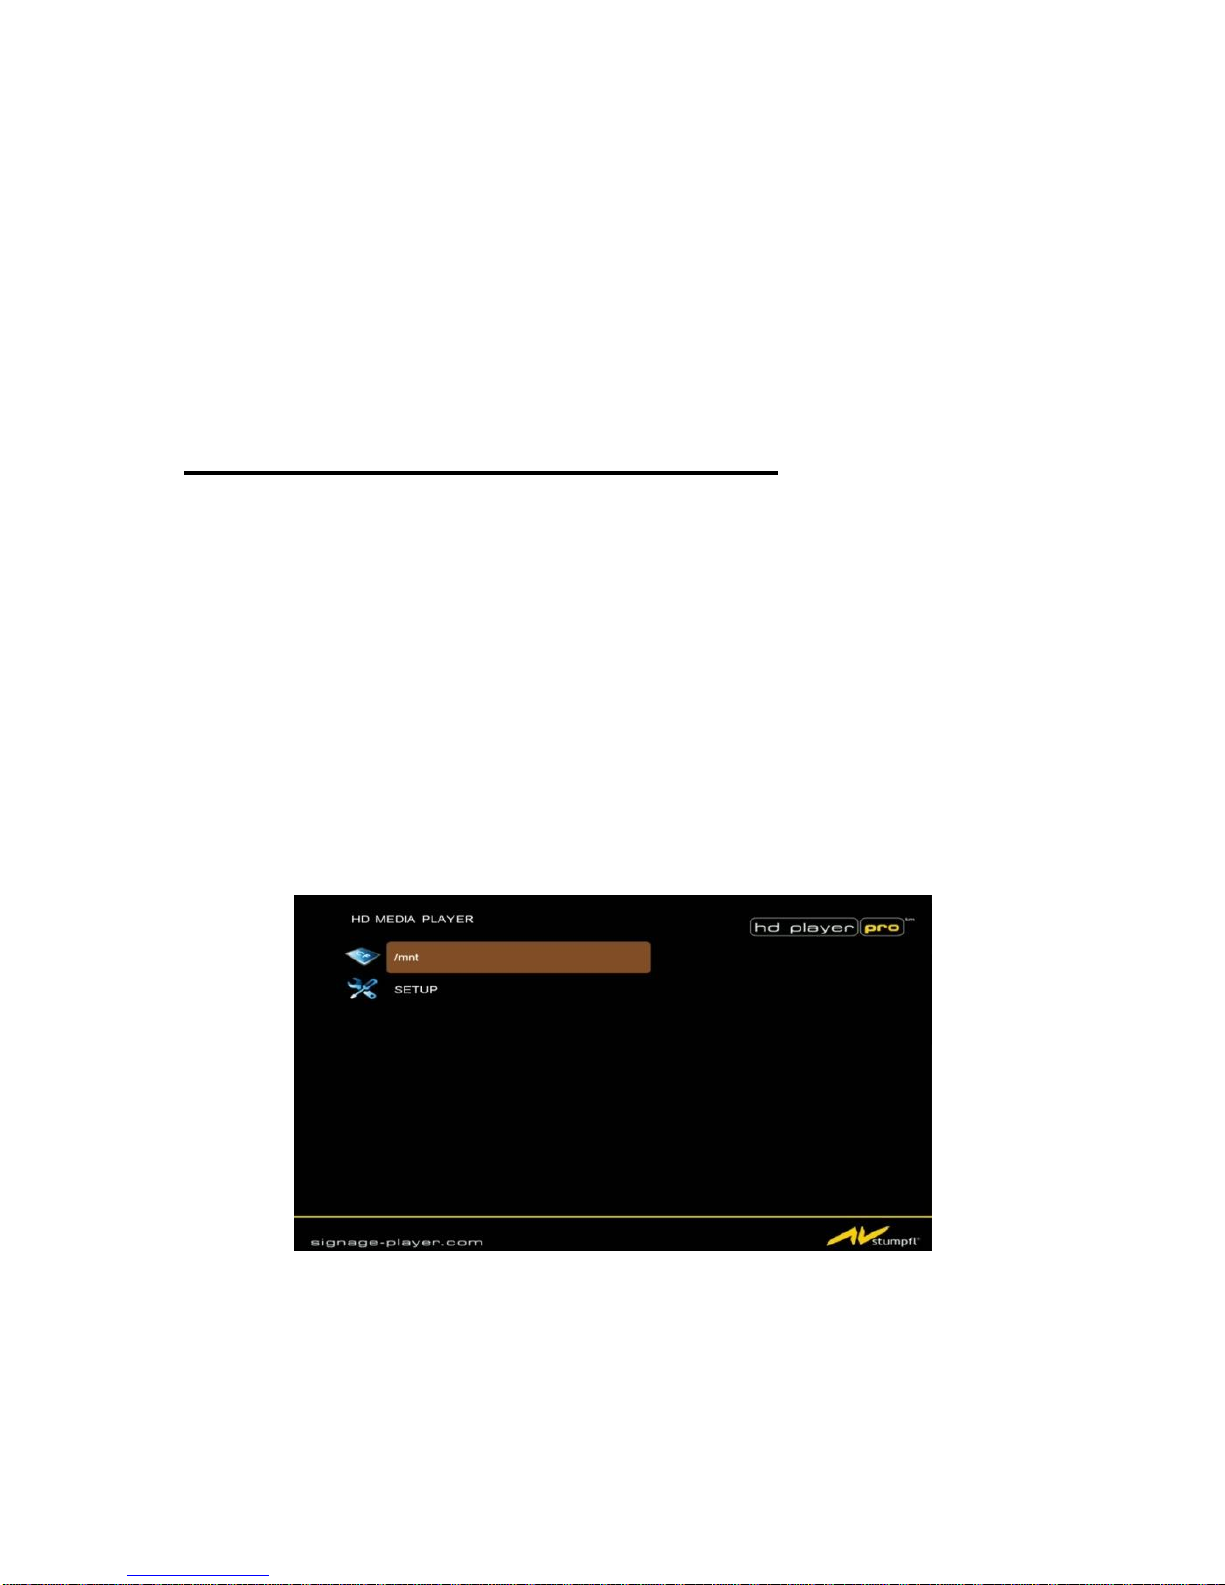
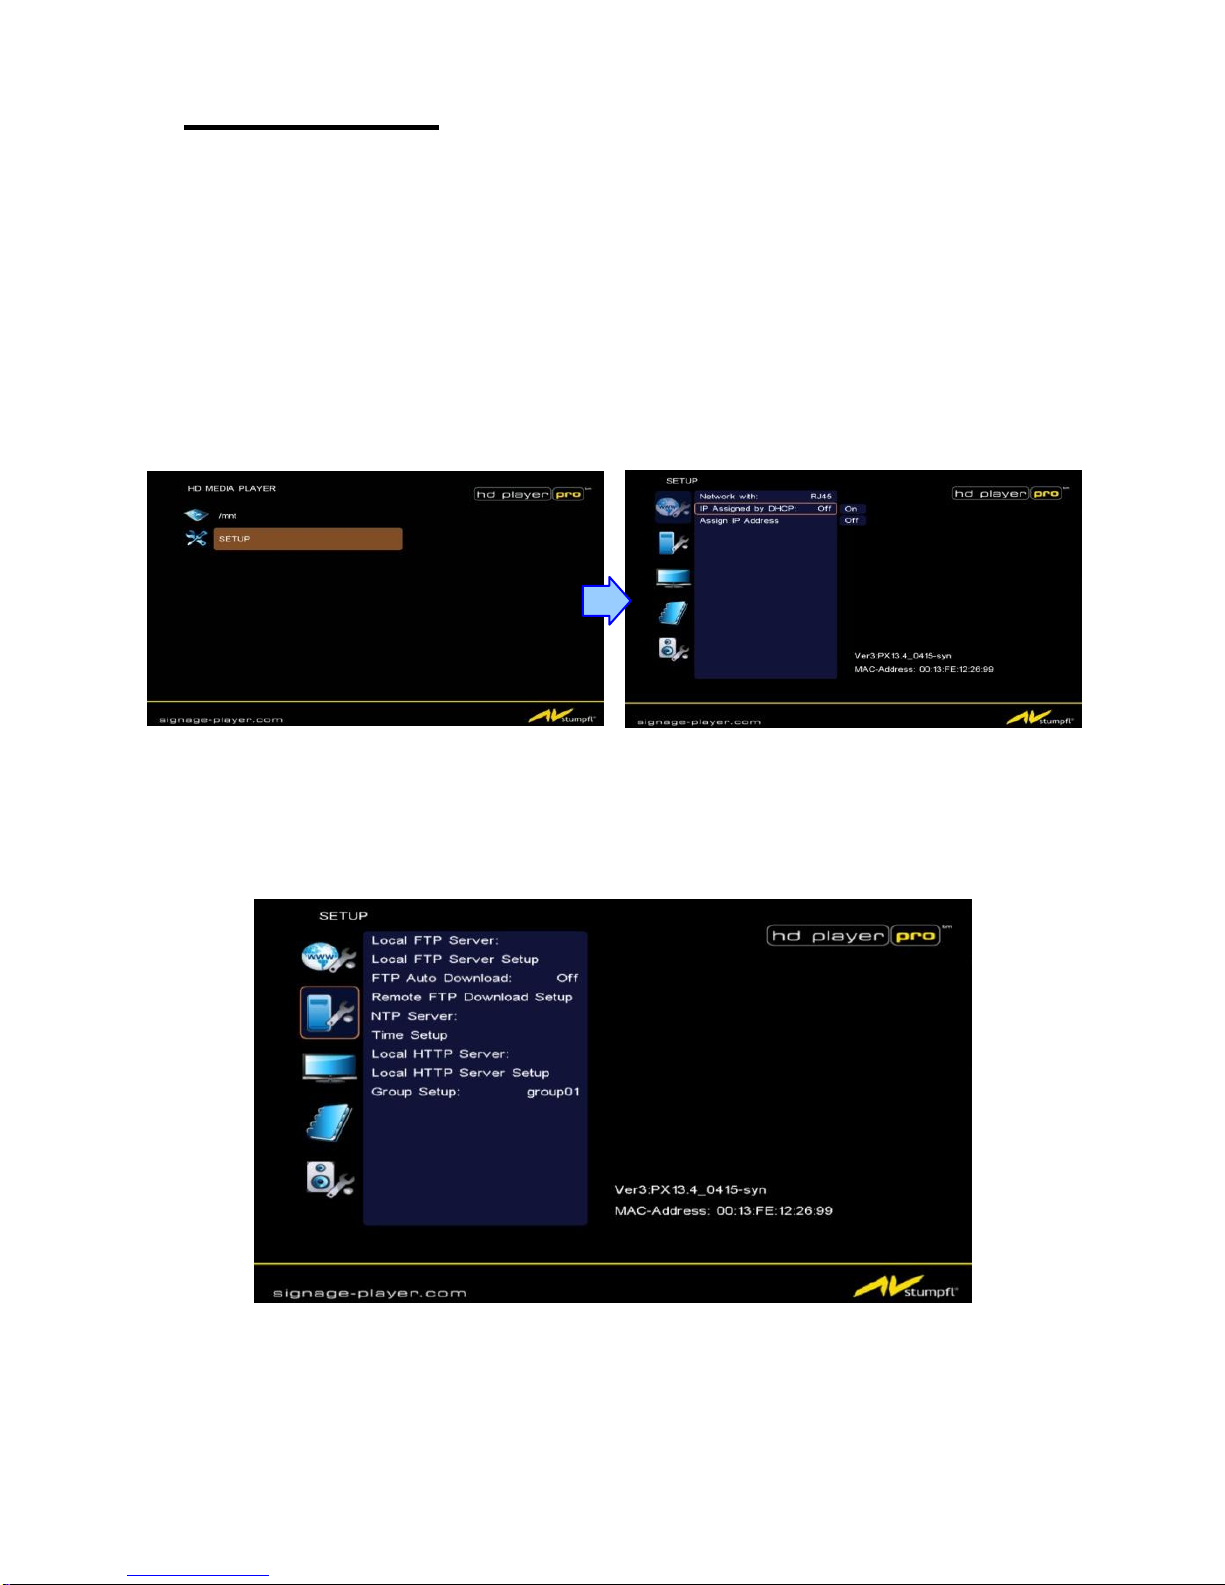
Status 2: If the “AUTOPLAY” function is disabled, after power on the main menu will appear as
shown in the following figure. There are two groups in the main menu (“/mnt/CF” and
“SETUP”).
Power Off: Press the “POWER” button again to power off.
Page 10
10
7. SETTING UP
In the main menu, using the “▼” button on remote control to select the “SETUP” item, and then
press the “ENTER” button. You will be presented with the HD Player Pro settings screen.
You can also press the “SETUP” button on remote control to directly open the settings screen.
(If the HD Player already plays a file you’ll have to stop before entering the Setup)
There are five groups of sub-menu in the main menu (“Network Setup”, “FTP Setup”, “Video
Setup”, “Other Setup” and “Scrolling Setup”).
In the settings screen, you can use the “▲、▼、
▲、▼
” buttons to select an item, and press
the “ENTER” button to confirm the selection.
Press the “SETUP” button on remote control to save and quit the settings screen.
7.1 Networksetup
7.1.1 Setting the Network from the OSD Menu
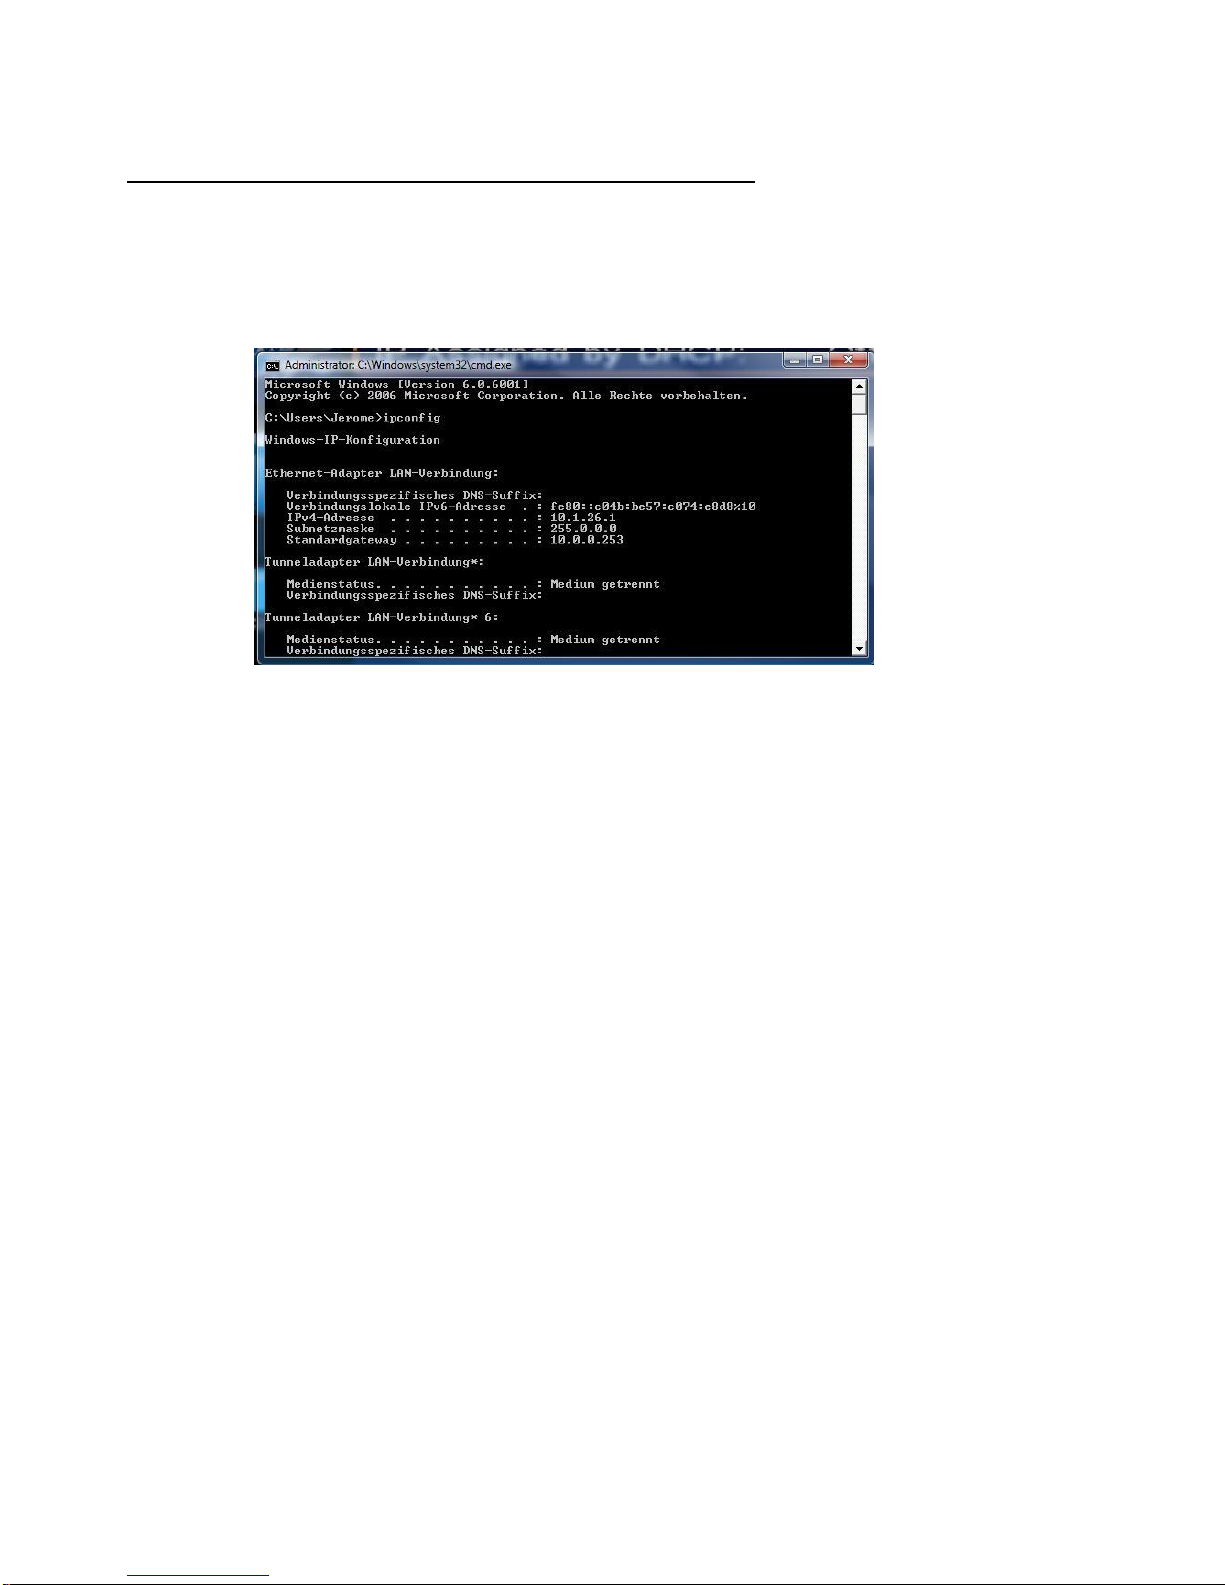
Network with: Select your network connection Disable/ RJ45.
IP Assigned by DHCP: If you have a DHCP-enabled router, please select “On”, and then the
router will automatically assigns an IP address to the HD Player Pro. If you don’t have a DHCP
–enabled router, select “Off” and type the network information in “Assign IP Address”.
Page 11
11
Assign IP Address: If the HD Player Pro is connected to a network without a DHCP server or
you want to use Local FTP Server function, enter the fixed IP address, Mask, Gateway and
DNS for the HD Player Pro.
PS. Refer to 5.1 for how to enter IP address by remote control.
NOTE: Before setting the IP address, Mask, Gateway and DNS, check the network information of
your PC. Please follow the steps below to get the network information of your PC.
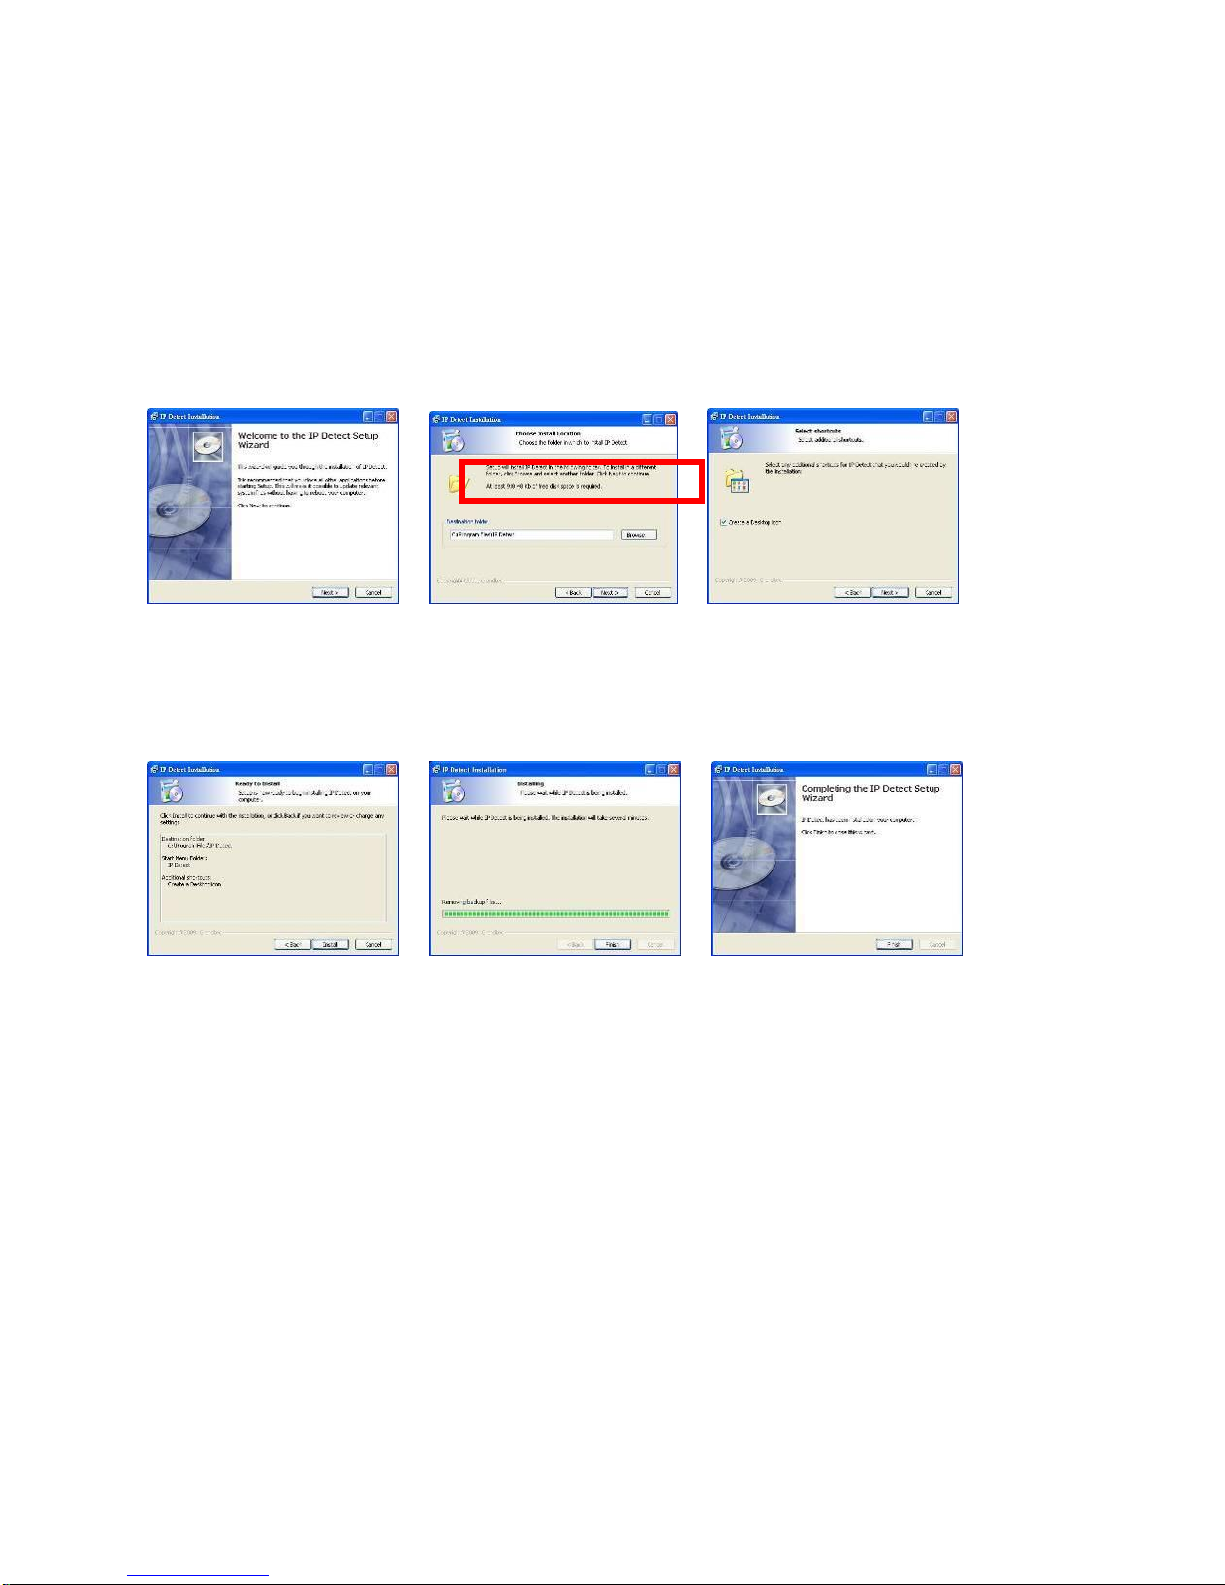
Step 1: Click on “Start” → “Run” and type in “command”, then press “ENTER”.
The MS-DOS window will appear - type in “ipconfig” and then press “ENTER” to get the
network information.
Step 2: Assign IP Address, Mask (Subnet Mask) and Gateway (Default Gateway) for the HD Player
Pro.
Enter the same values of the Subnet Mask and Gateway, and be careful not to enter the
values of IP address that are already used by other devices on the network.
Page 12
12
7.1.2 Setting the Network from the IP Detect Tool
With the bundle tool “IP Detect”, users can search for HD Player Pro on the local area network. Users
are also able to change the IP setting via this tool. For example, you want to assign a static IP to HD
Player Pro by the steps as below:
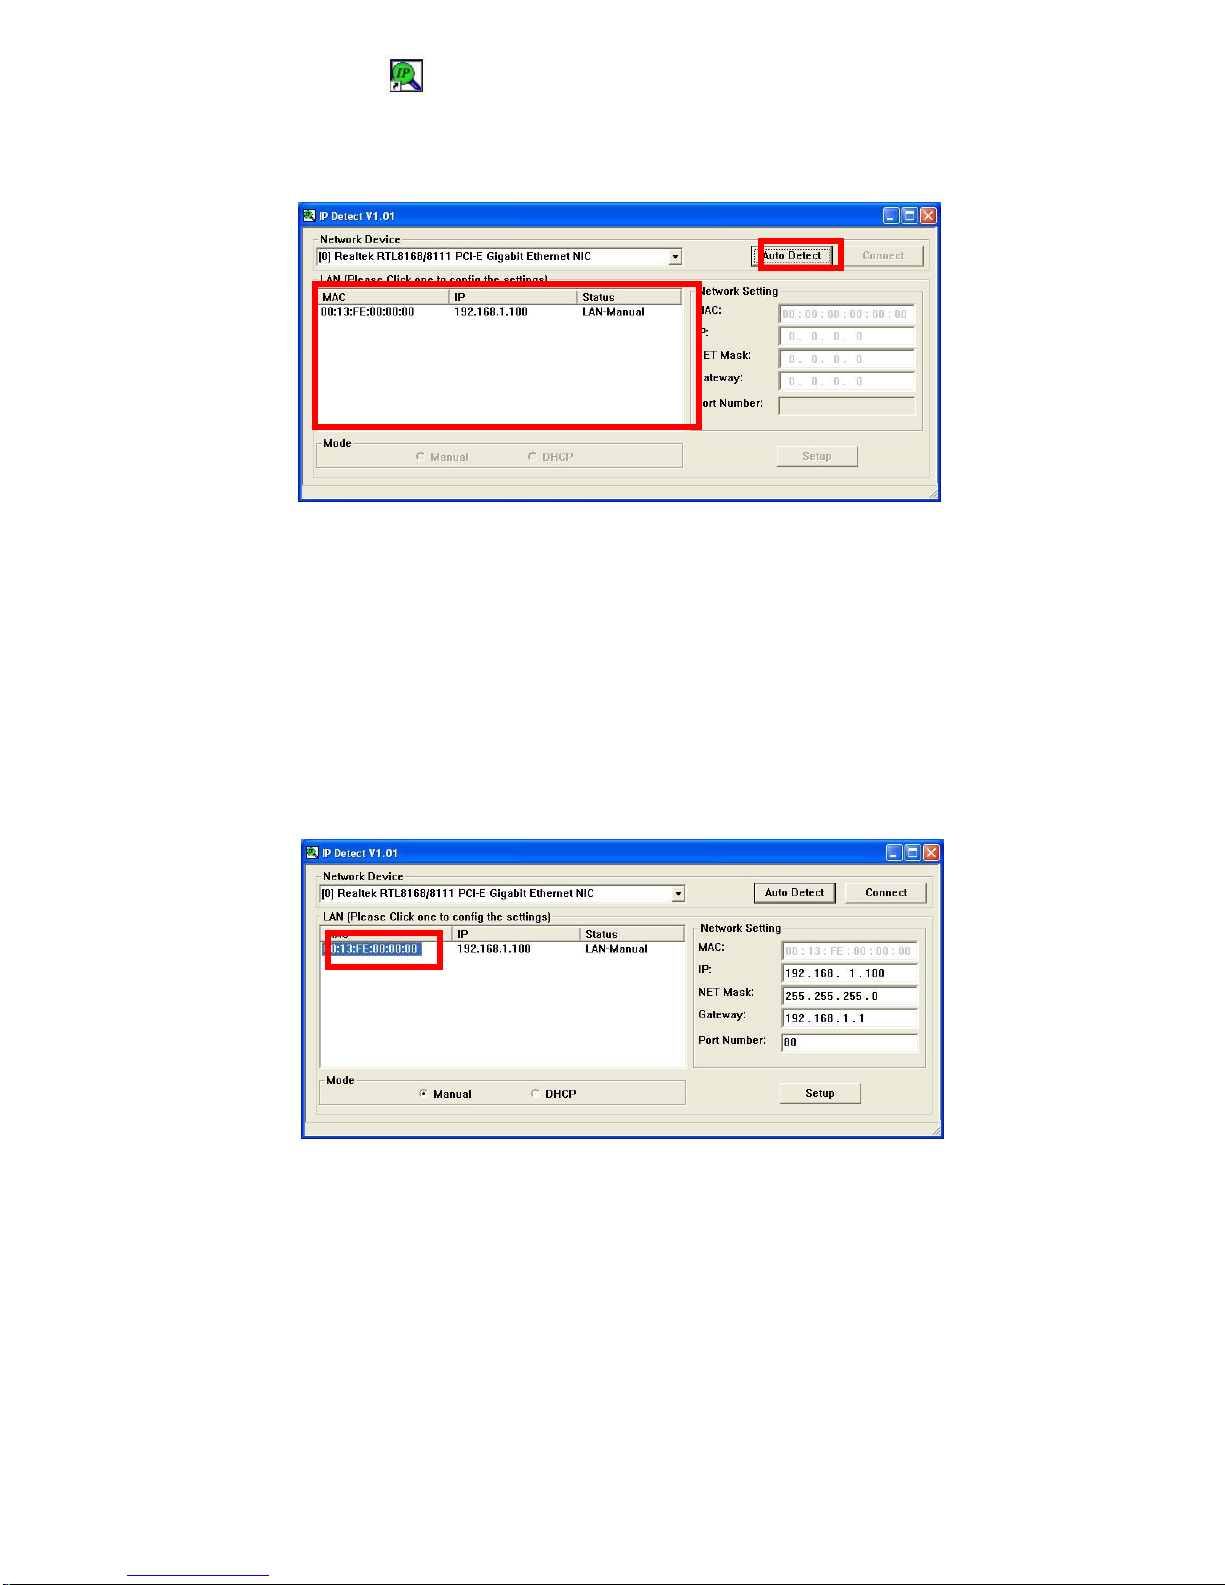
Step1: Insert the driver CD into your CD-ROM drive, then open the Folder IP Detect and run the
IPSetup.exe.
Step2: Click on the Install IP Detect to install the IP detect tool.
NOTE: The IP Detect Tool doesn´t support all Network adapters
Click Next to continue
Select the installation
folder and click Next to
continue
Create a desktop icon
and click Next to
continue
Click Install to start the
installation
Installing
Click Finish to complete
the installation
Page 13
13
Step3: Double click on the icon to start the tool.
Step4: Click on the “Auto Detect” button, then the tool will show all available HD Player Pro in the local
area network.
NOTE: When use HD Player Pro under a DHCP-enabled network, user sometimes does not know
which IP address is assigned to HD Player Pro. User could also use this tool as a “Finder”, for
locating the IP address of HD Player Pro. By pressing the “Connect” button, IE browser will show
up and access to the build-in web of HD Player Pro automatically.
Step5: Select the HD Player Pro that you want to configure (by identifying the MAC address).
Page 14
14
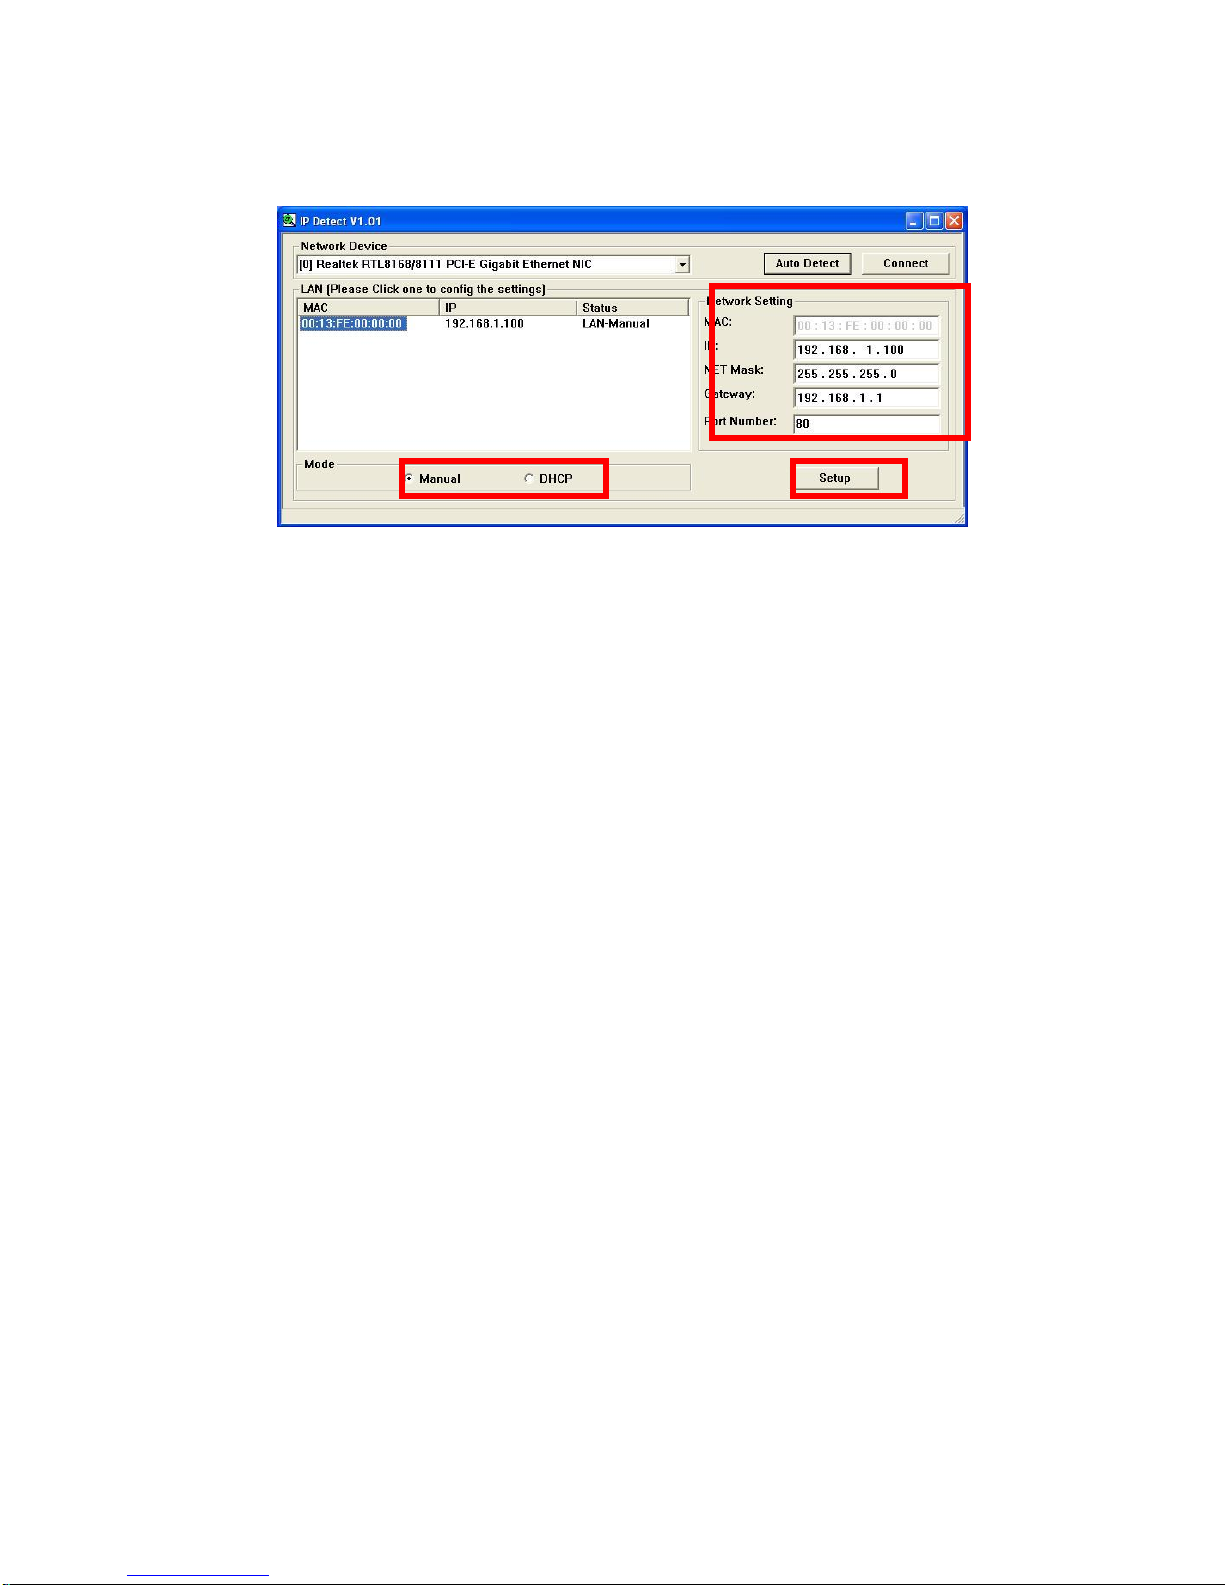
Step6: The default IP mode of HD Player Pro is DHCP. User should change the mode to “Manual”, if
he wants to assign a static IP address to HD Player Pro. Then enter the preferred “IP”, “Net Mask”
and “Gateway” in the “Network Setting”. Finally, click on the “Setup” button for completing the
setting.
NOTE: The IP setting will not show on the OSD menu instantly, but it should be available after
pressing “Setup” button. The prefer IP address will show on the OSD menu when HD Player
Pro restart.
Page 15
15
7.2 FTP Setup
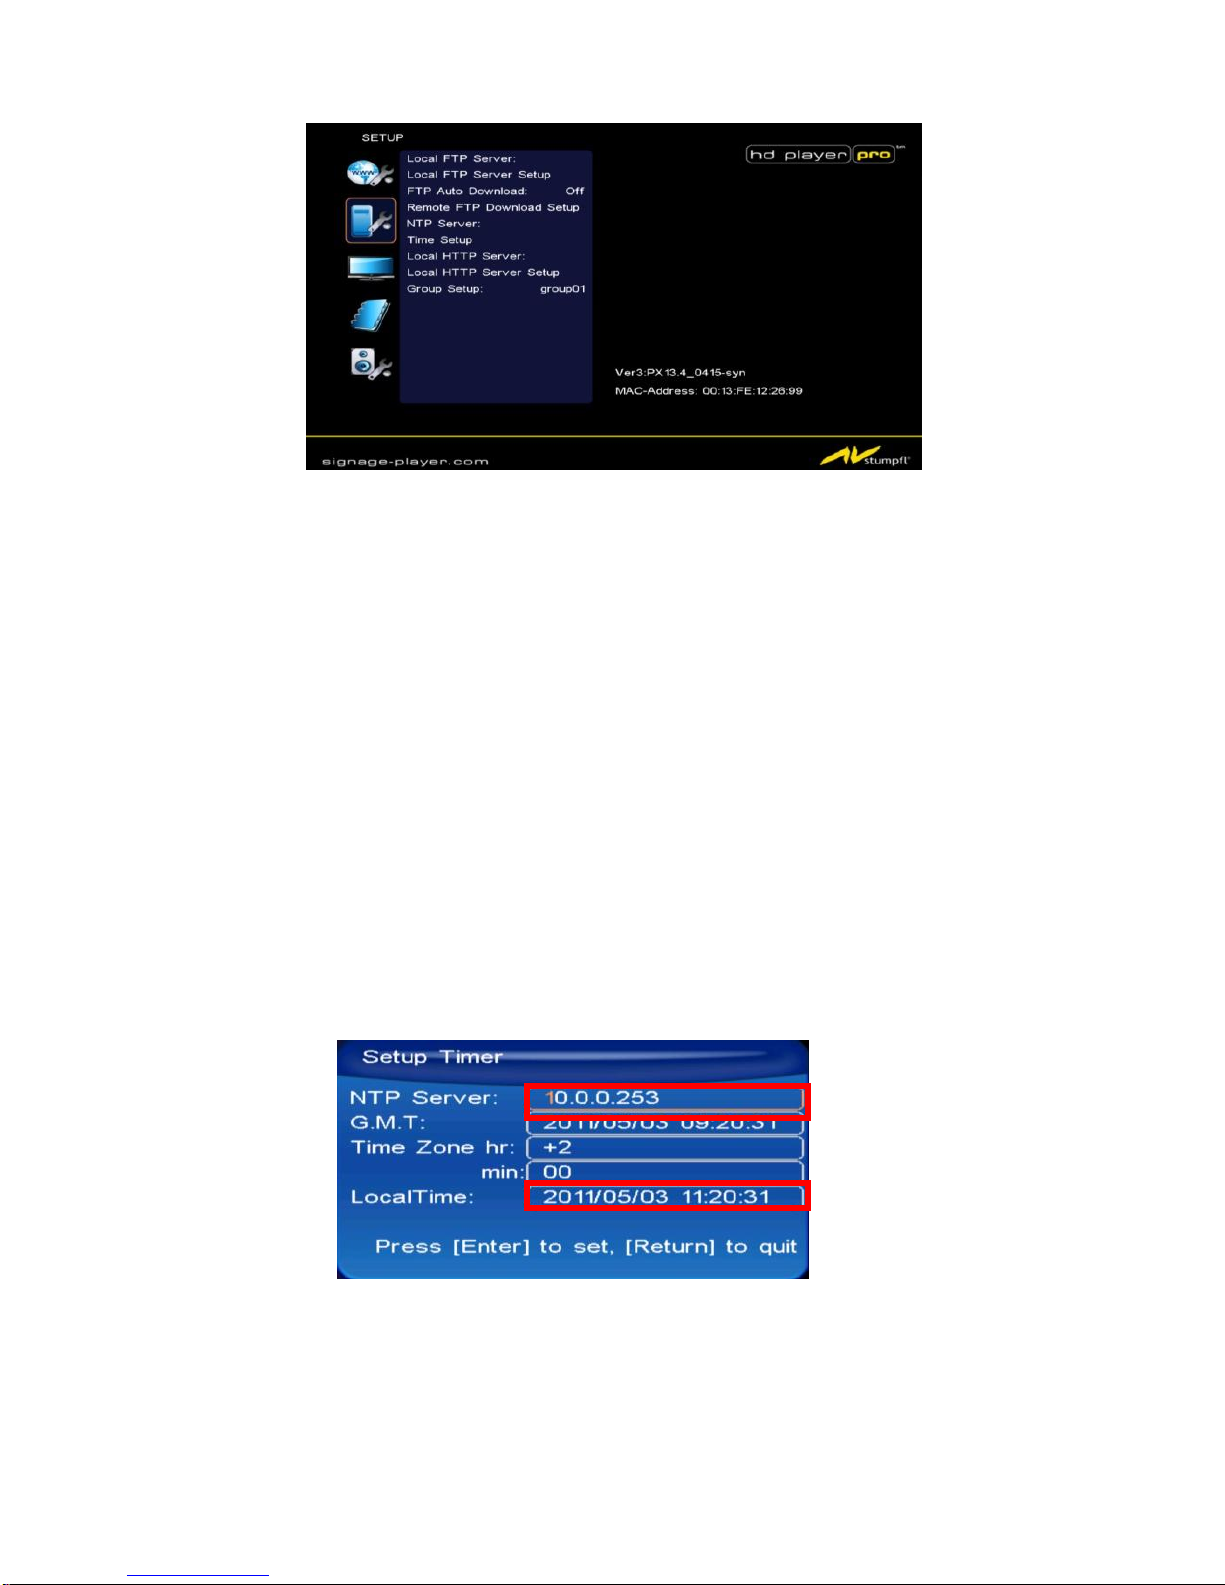
Local FTP Server: Turn on/ off the HD Player Pro server.
(If you use the HD Player Pro server, please disable the DHCP function and input a fixed IP
address, Mask, Gateway and DNS of the HD Player Pro)
Local FTP Server Setup: Set the “Port”, “User ID” and “Password” of the HD Player Pro.
(The Default Port: 21, User ID: root, Password: admin)
FTP Auto Download: Enable/ Disable the FTP auto download function.
Remote FTP Download Setup
- Server IP: Enter the domain name or IP address of the FTP as was given to you by your
Web hosting provider.
- Port: The default port for FTP is 21. In most cases you should not change this number. If the
FTP site uses a port other than 21, you should enter the correct port.
- User ID: Enter the user name of the Remote FTP server.
- Password: Enter the Password of the Remote FTP server.
- FTP Path: Enter the folder path that you want to share.
NTP Server: Enable/ Disable the NTP server function. (if the HD Player Pro isn’t connect to
internet, please disable the NTP Server function)
- Time Setup: Set the NTP Server and Local Time here.
NTP Server (the HD Player Pro must be already connected to the network)
- NTP Server: Enter the NTP server IP address like: 10.0.0.253.
- .M.T: After HD Player Pro gets the time from NTP server, it will update the G.M.T field.
- Time Zone: Use the Volume +, - and Numeric Key to set the time zone of your location.
(time zone must be set properly for the Auto-Download and Schedule functions)
①
②
Page 16
16
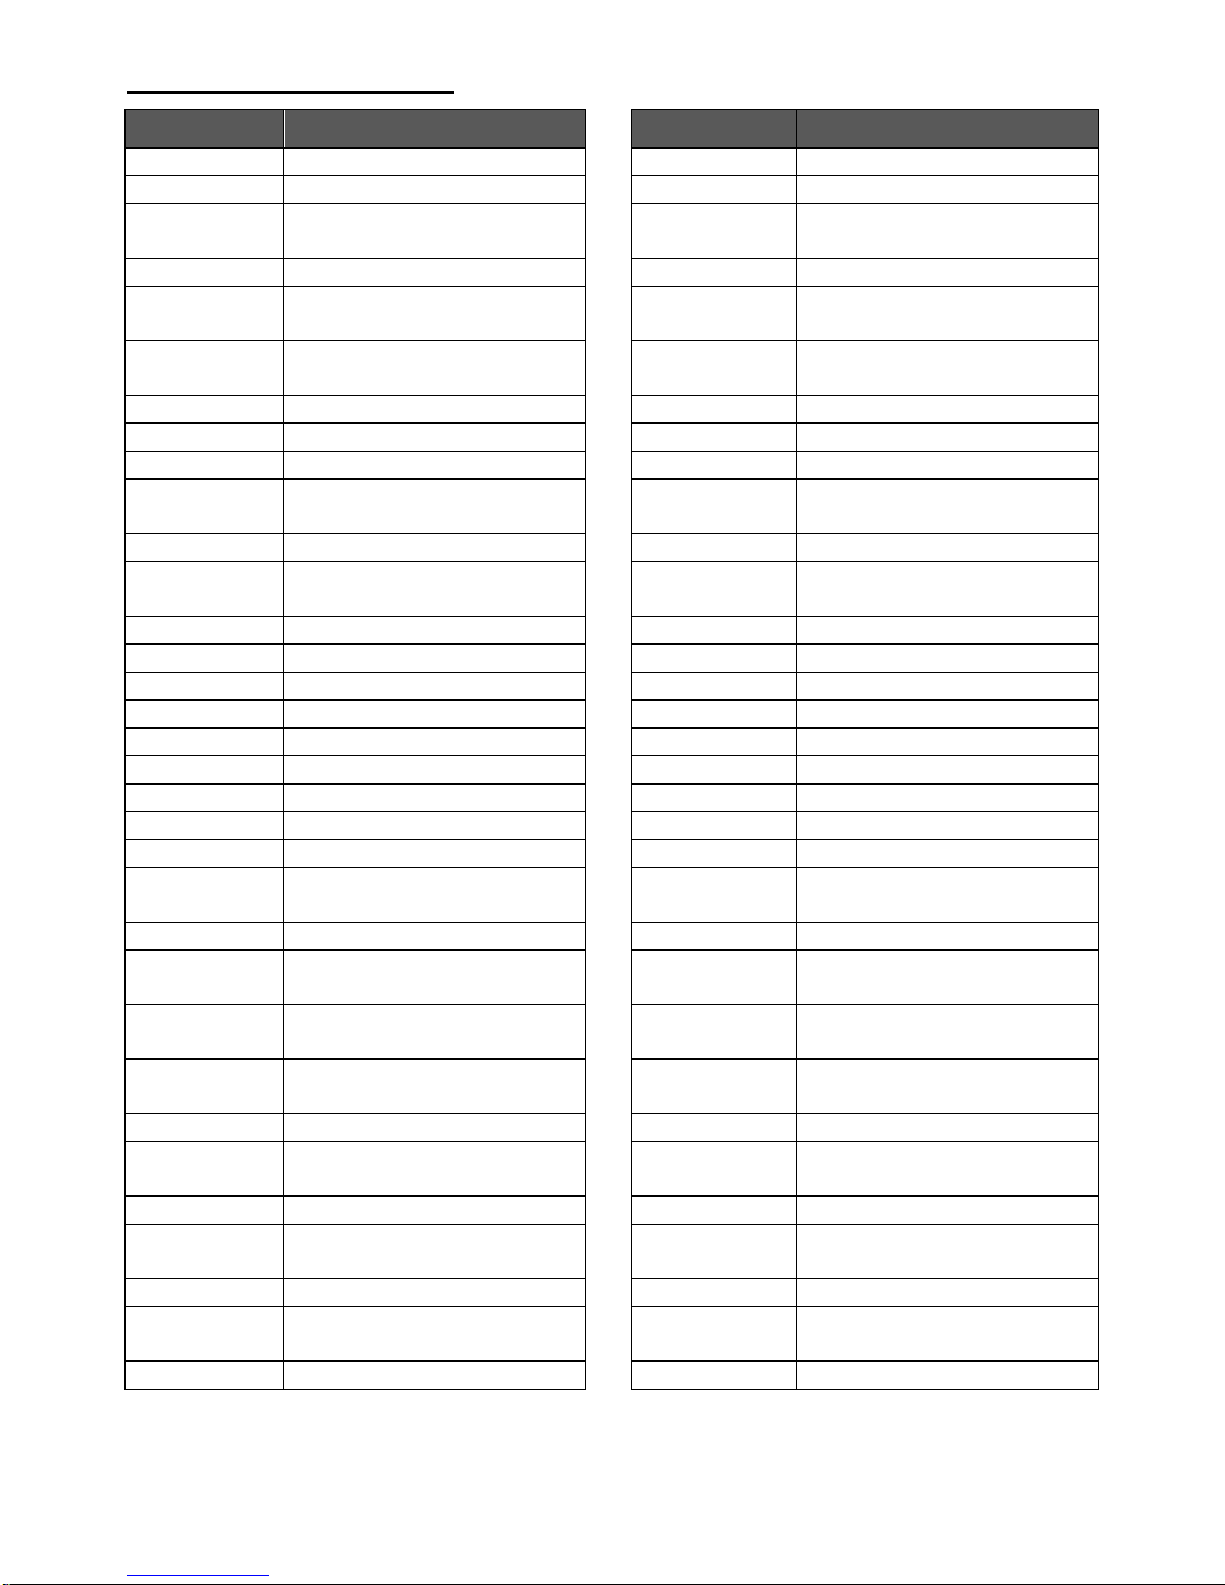
NOTE: GMT and applied regions
Time Zone
Region
Time Zone
Region
(GMT-12:00)
Eniwetok, Quazalen
(GMT+02:00)
Helsinki, Riga, Tallinn
(GMT-11:00)
Midway, Ireland, Samoa
(GMT+03:00)
Nairobi
(GMT-10:00)
Hawaii
(GMT+03:00)
Moscow, Saint Petersburg,
Volgograd
(GMT-09:00)
Alaska
(GMT+03:00)
Baghdad
(GMT-08:00)
Pacific GMT (U.S. & Canada);
Tijuana
(GMT+03:00)
Kuwait, Raid
(GMT-07:00)
Continental GMT (U.S. &
Canada)
(GMT+03:30)
Tehran
(GMT-07:00)
Arizona
(GMT+04:00)
Baku, Tbilisi, Ere van
(GMT-06:00)
Mexico city
(GMT+04:00)
Abu Dhabi, Muscat
(GMT-06:00)
Saskatchewan
(GMT+04:30)
Kabul
(GMT-06:00)
Eastern Coast GMT (U.S. &
Canada)
(GMT+05:00)
Yekaterinburg
(GMT-06:00)
Indiana (Eastern Coast)
(GMT+05:00)
Islamabad, Karachi, Tashkent
(GMT-04:00)
Atlantic GMT (Canada)
(GMT+05:30)
Calcutta, Chennai, Mumbai, New
Delhi
(GMT-04:00)
Santiago
(GMT+05:45)
Katmandu
(GMT-04:00)
Caracas, La Paz
(GMT+06:00)
Sri Jayewardenepura Kotte
(GMT-04:00)
Newfoundland
(GMT+06:00)
Astana, Dakar
(GMT-03:00)
Greenland
(GMT+08:00)
Irkutsk, Ulan Bator
(GMT-03:00)
Buenos Aires, Georgetown
(GMT+08:00)
Kuala Lumpur, Singapore
(GMT-03:00)
Brasilia
(GMT+08:00)
Taipei
(GMT-02:00)
Mid-Atlantic
(GMT+08:00)
Perth
(GMT-01:00)
Capo Verde Is.
(GMT+09:00)
Seoul
(GMT-01:00)
Azores
(GMT+09:00)
Yakutsk
(GMT-00:00)
Greenwich GMT; Dublin,
Edinburgh, Lisbon, London
(GMT+09:00)
Osaka, Sapporo, Tokyo
(GMT-00:00)
Casablanca, Monrovia
(GMT+09:30)
Darwin
(GMT+01:00)
Beograd, Bratislava, Budapest,
Ljubljana, Prague
(GMT+09:30)
Adelaide
(GMT+01:00)
Brussels, Copenhagen, Madrid,
Paris
(GMT+10:00)
Guam, Port Moresby
(GMT+01:00)
Sarajevo, Skopje, Sofia, Vilnius,
Warsaw, Zagreb
(GMT+10:00)
Brisbane
(GMT+01:00)
Midwest Africa
(GMT+10:00)
Vladivostok
(GMT+01:00)
Amsterdam, Berlin, Bern, Rome,
Stockholm, Vienna
(GMT+10:00)
Canberra, Melbourne, Sydney
(GMT+02:00)
Bucharest
(GMT+10:00)
Hobart
(GMT+02:00)
Athens, Istanbul, Minsk
(GMT+11:00)
Magadan, Solomon Is., New
Caledonia
(GMT+02:00)
Jerusalem
(GMT+12:00)
Auckland, Wellington
(GMT+02:00)
Cairo
(GMT+12:00)
Fiji, Kamchatka Pen., Marshall
Is.
(GMT+02:00)
Harare, Pretoria
(GMT+13:00)
Nuku'alofa
Page 17
17
Local Time: Set the system time manually.
NOTE: If the NTP Server and Local Time have been set, the NTP Server will be the first
priority (the HD Player Pro is already connected to the network).
Local HTTP Server: Enable/ Disable the HTTP command function.
Local HTTP Server Setup: To set the “Port”, “User ID” and “Password” of the HD Player Pro.
(The Default Port: 80, User ID: root, Password: admin)
NOTE: Press the “SETUP” button on the remote control to save the settings, and it will auto exit
the settings screen, then restart the HD Player Pro.
7.3 Video Setup
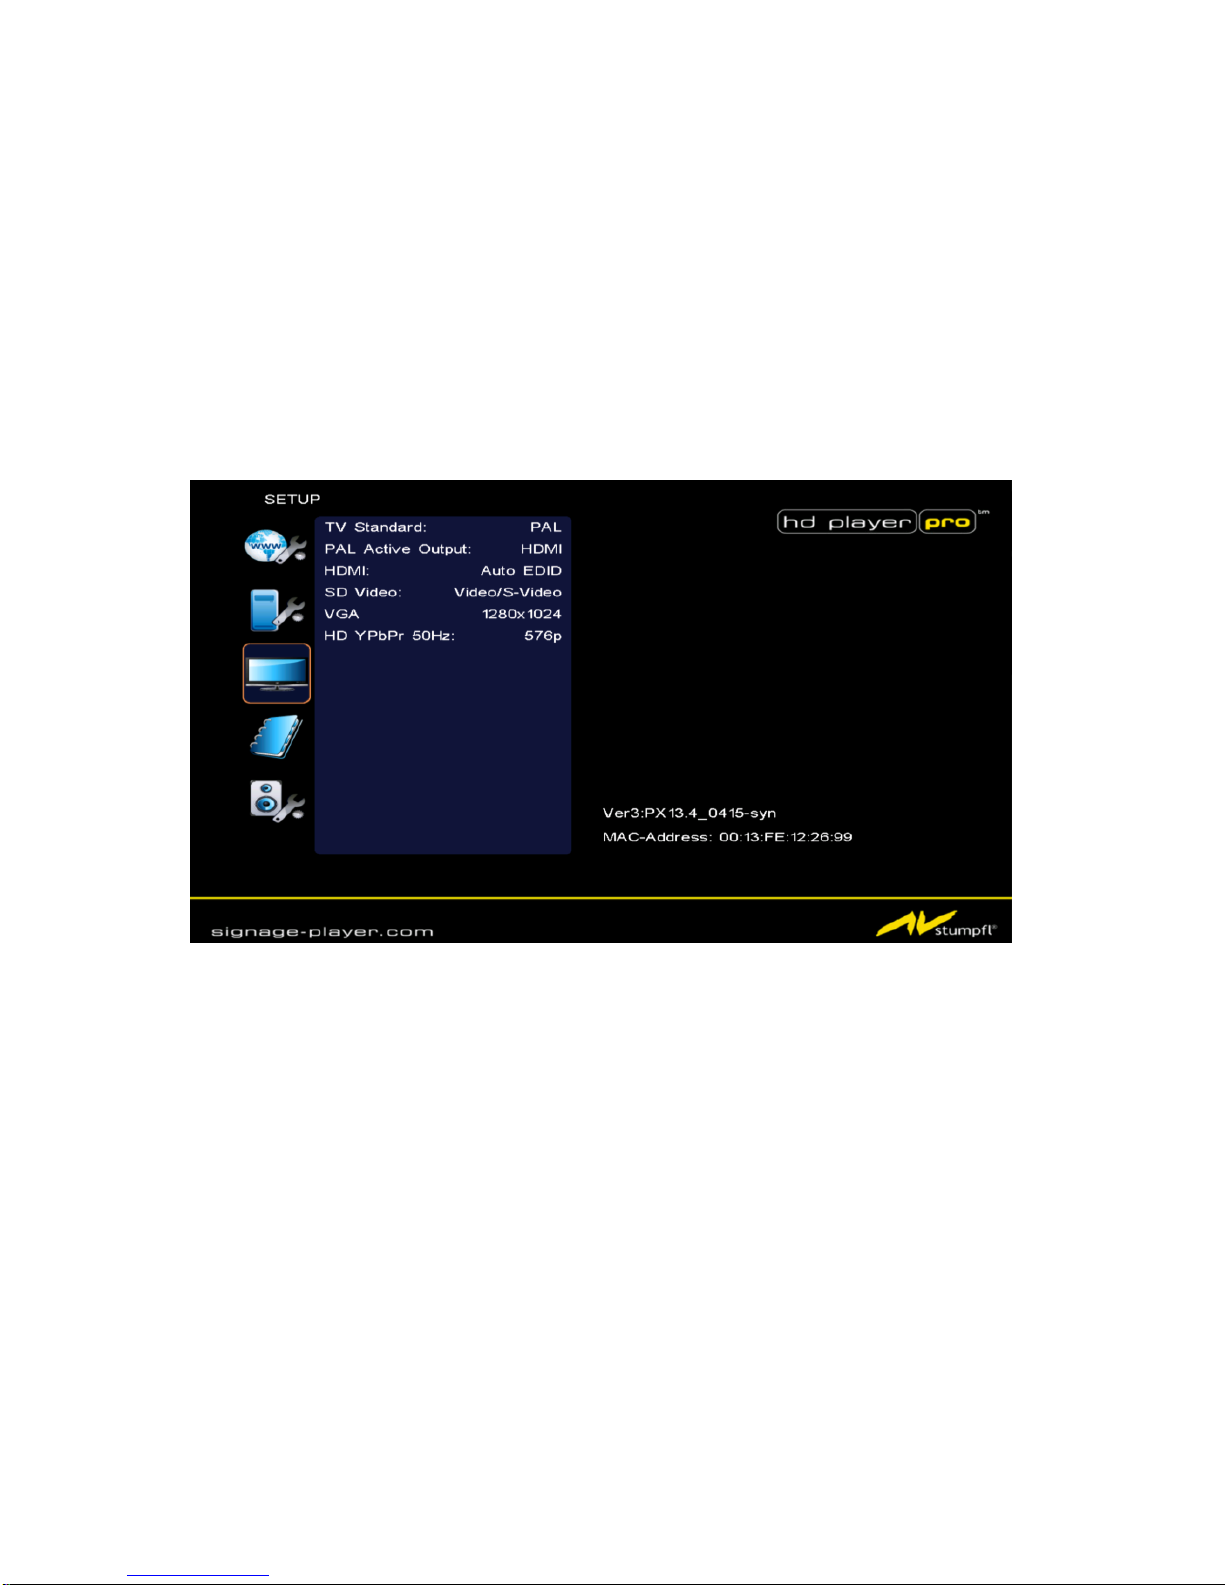
TV Standard: Select the output TV video format (NTSC / PAL).
NTSC Active Output: Select the output mode. (HDMI/ SD Video/ VGA/ HD Y.Pb.Pr)
You can also press directly the “TV MODE” button on the remote controller to select output mode.
HDMI: Select the HDMI output resolution among 480i / 480p/ 720p / 1080i/ 1080p.
Select the “Auto EDID”, the HD Player Pro will scan the display device connected and set the
correct resolution automatically.
SD Video: Select the SD output mode. (“Video/ S-Video” or “Y.Cb.Cr”)
VGA: Select the VGA output resolution.
(640x480 / 800x600/ 1024x768/ 1280x1024/ 1360x768/ 1366x768)
HD Y.Pb.Pr: Select the Y.Pb.Pr output resolution among 480p / 720p / 1080i.
Page 18
18
7.4 Other Setup
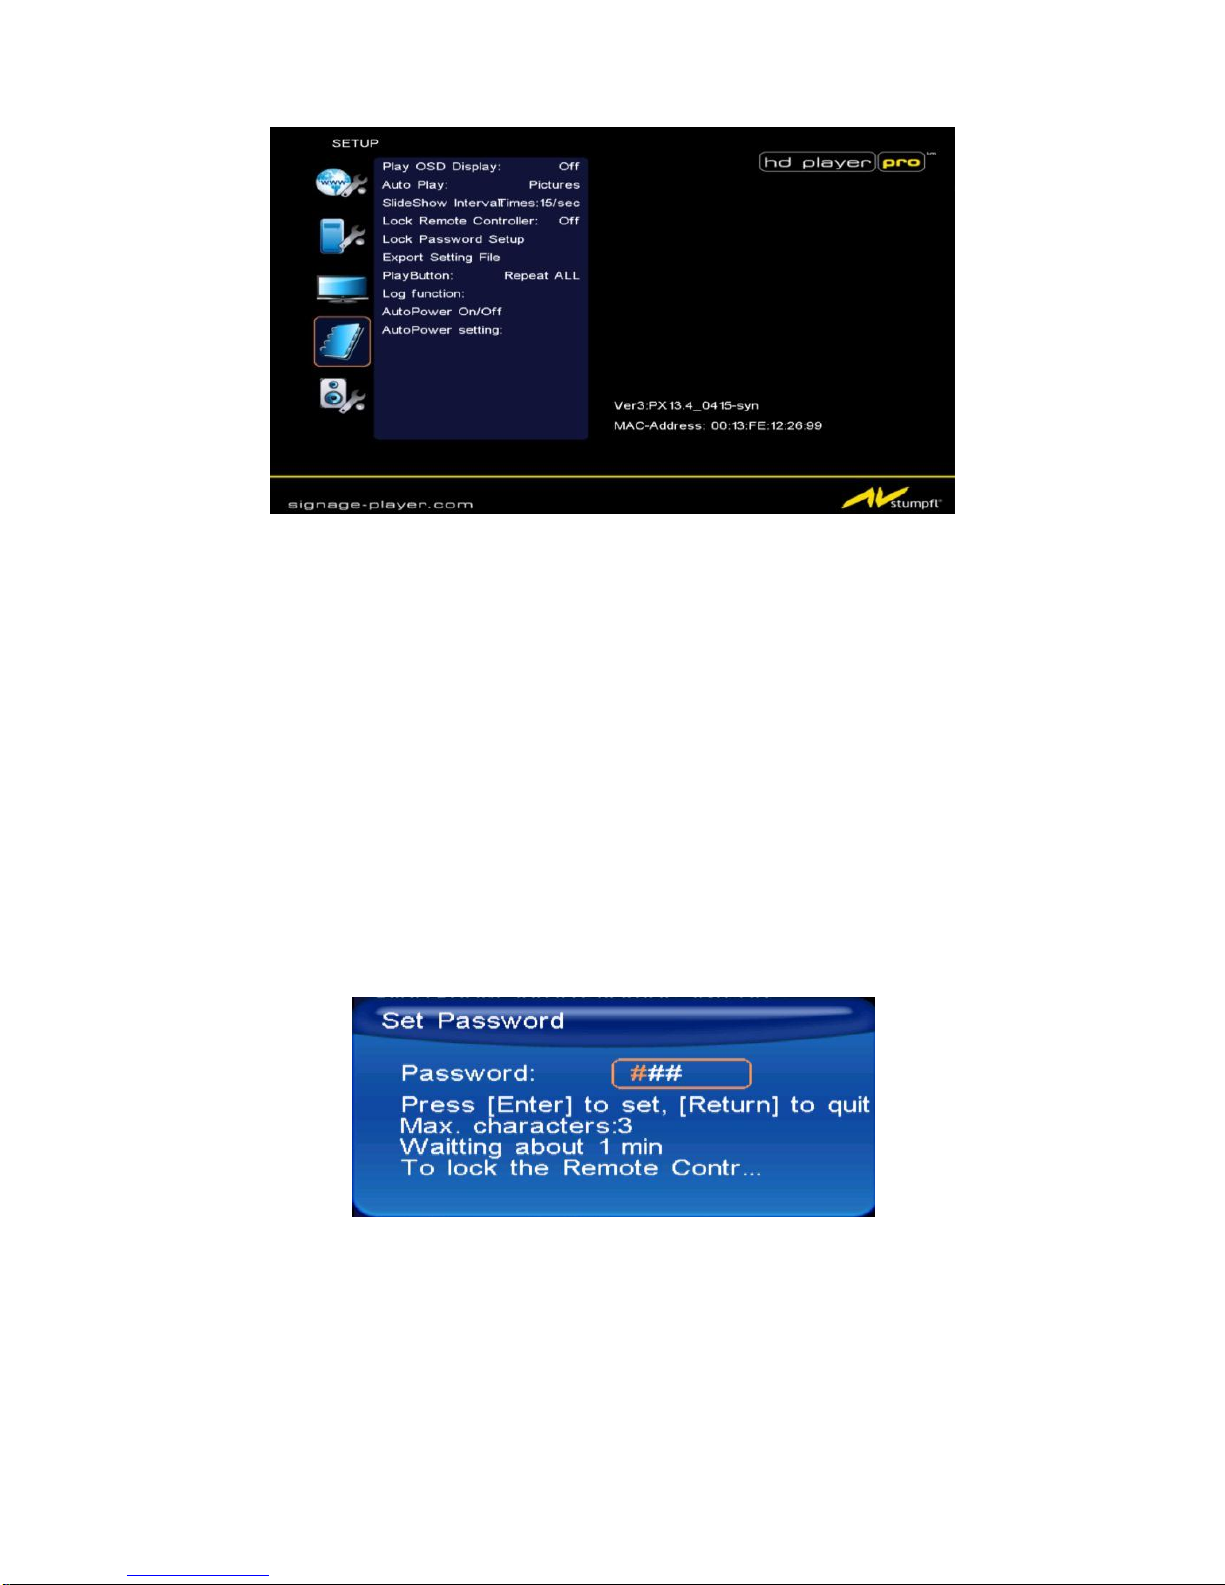
Play OSD Display: Enable or disable the OSD display.
Auto Play
Movies: Auto play movie files on the CF card after power on.
Pictures: Auto play picture files on the CF card after power on (slideshow function).
All Files: Auto play all files (movie and picture files) on the CF card after power on.
MultiLayer: Directly execute Multiple Display after power on.
Off: Turn off the Auto Play function.
SlideShow Interval: Set the time each photo is shown to 10, 15, 30 seconds or 1, 10, 15, 30
minutes or 1 hour. .
Lock Remote Controller: Enable/ disable the auto key lock function. (The HD Player Pro will
auto lock when there is no further input for 1 minute.)
Lock Password Setup: Press the “Enter” button to open the “Set Password” window. Enter
the password with numeric buttons and press the “Enter” button to save the new password
(The default password: 123).
Page 19
19
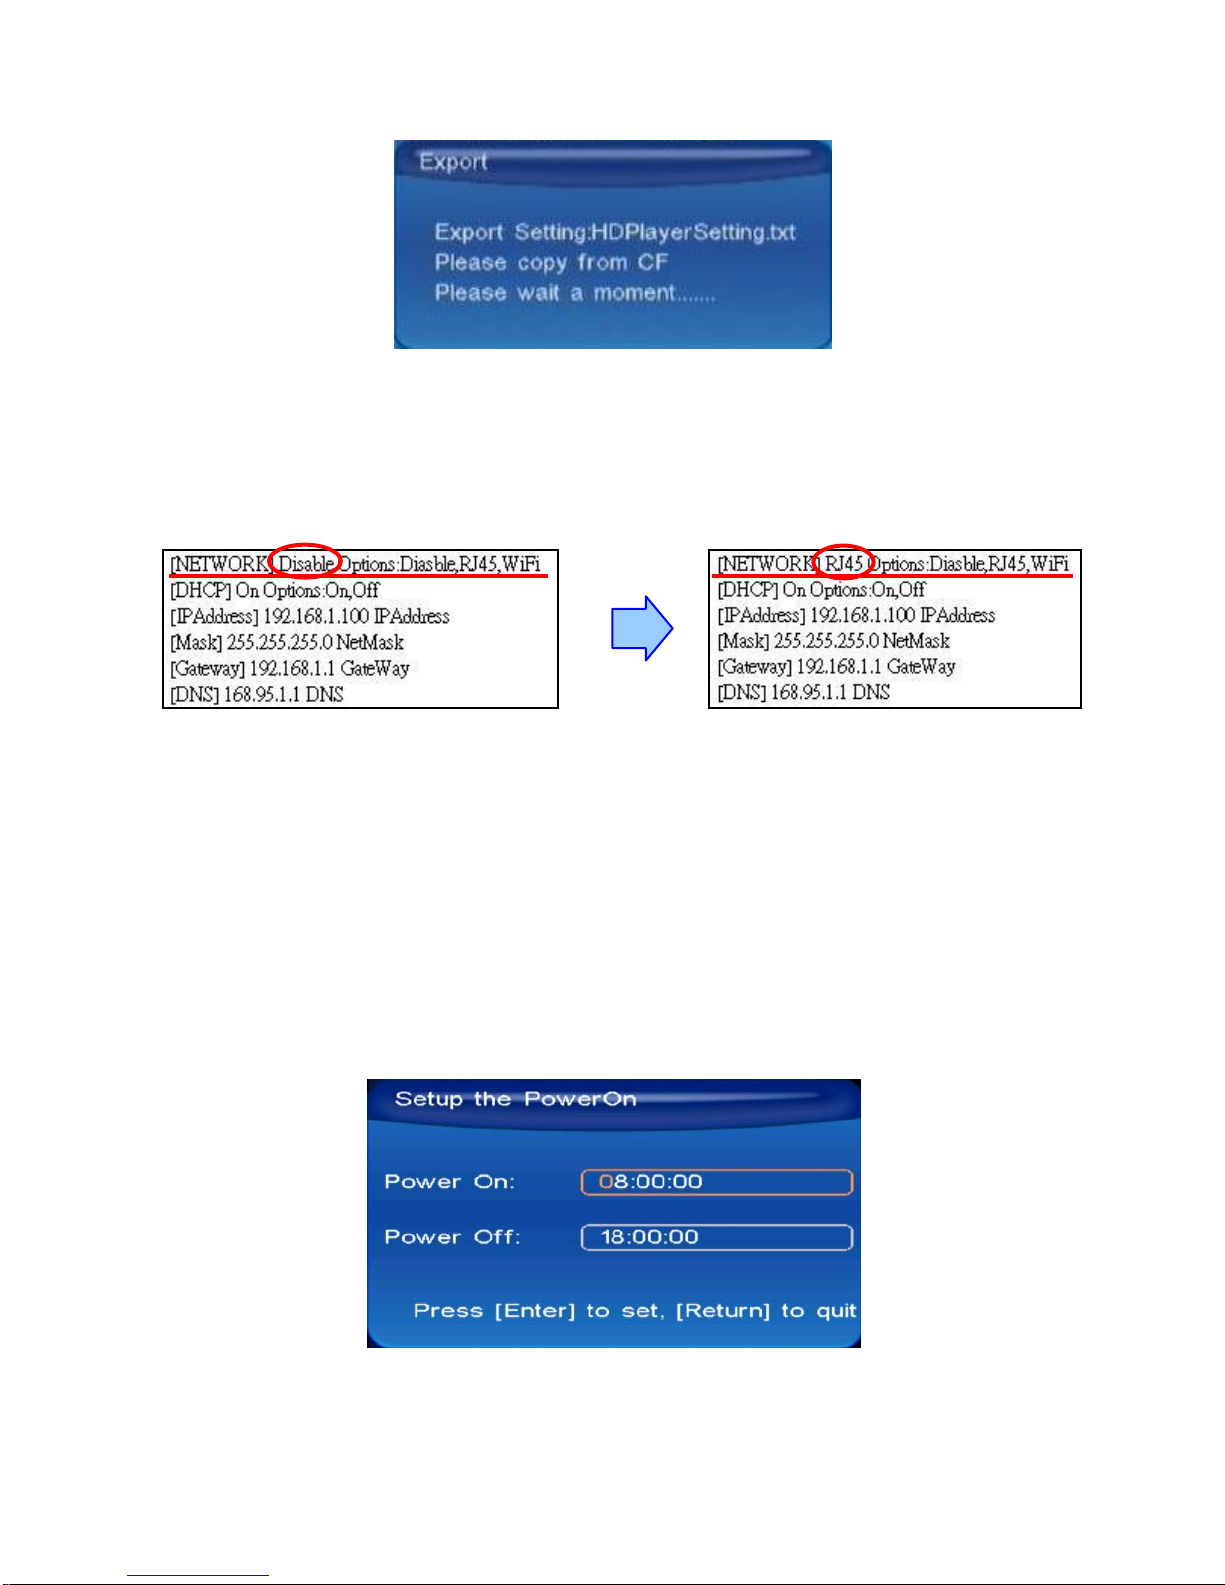
Export Setting File: Press the “Enter” button to export the configuration value to the CF card.
Step1: Copy the file “HDPlayerSetting.txt” on the CF card to your PC. Use the “Wordpad” to open the file,
and you can see all the configuration value of HD Player Pro.
Step2: You can modify directly the configuration value on your PC.
Example: [NETWORK] Disable Options: Disable, RJ45, WiFi
The “Network” function is disabled; you can directly change the mode to RJ45.
Step3: Copy the completed file “HDPlayerSetting.txt” from PC to CF card. Insert the CF card to the HD
Player Pro, the HD Player Pro will apply the new settings automatically.
Play Button: Only for used with play buttons. The HD Player Pro supports two options
(Repeat Default / Repeat All) when the demo file finishes playing.
Log Function: Enable or disable the Log function.
Auto Power: Enable or disable the Auto Power function. If this function is enabled, user might
set a definite time for HD Player Pro to power on/off automatically
AutoPower Setting: Press “Enter” button on the remote controller, the “PowerOn” setting
window will pop up. You could set the power on/off time here:
Page 20
20
7.5. Scrolling Text Setup
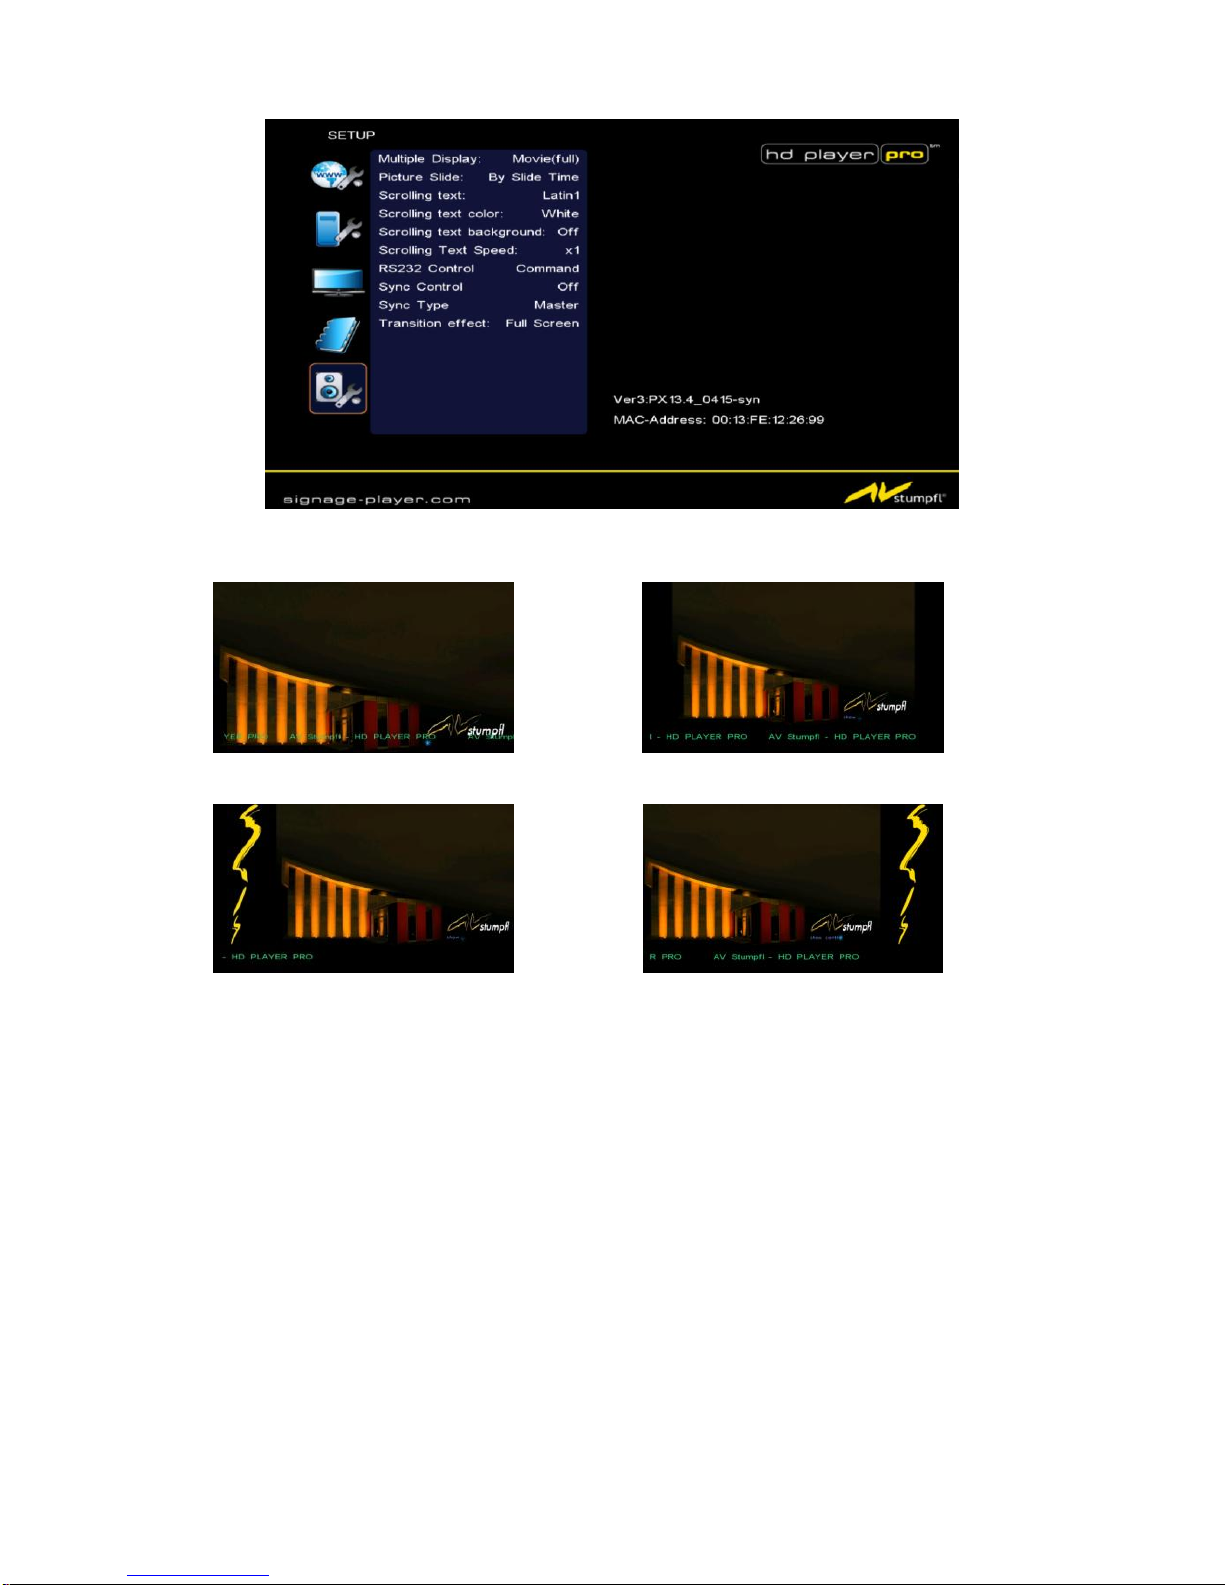
Multiple Display:
Movie (full) Movie (small)
Movie + Pic (L) Movie + Pic (R)
Picture Slide: Sets the mode of picture slideshow (By Slide Time/ Match Video).
Scrolling text: Sets the style of the font. Supported fonts are: Latin1, Latin2, Japanese and
Greek
Scrolling text color: Select the color of the text; you can choose between white, yellow, green
or rotation of this three colors.
Scrolling text background: Turn “on” or “off” the background of the scrolling text
Scrolling text speed: Adjust the speed of the scrolling text
RS232 Control: Enable or disable the RS232 control function
Sync Control: Enable or Disable the Sync Control
Sync Type: Select the Sync Type of the HD Player (Master/Slave)
Transition effect: Select the transition when displaying pictures
Page 21
21
8. USING THE HD PLAYER PRO
8.1 Play media files on the CF-Card
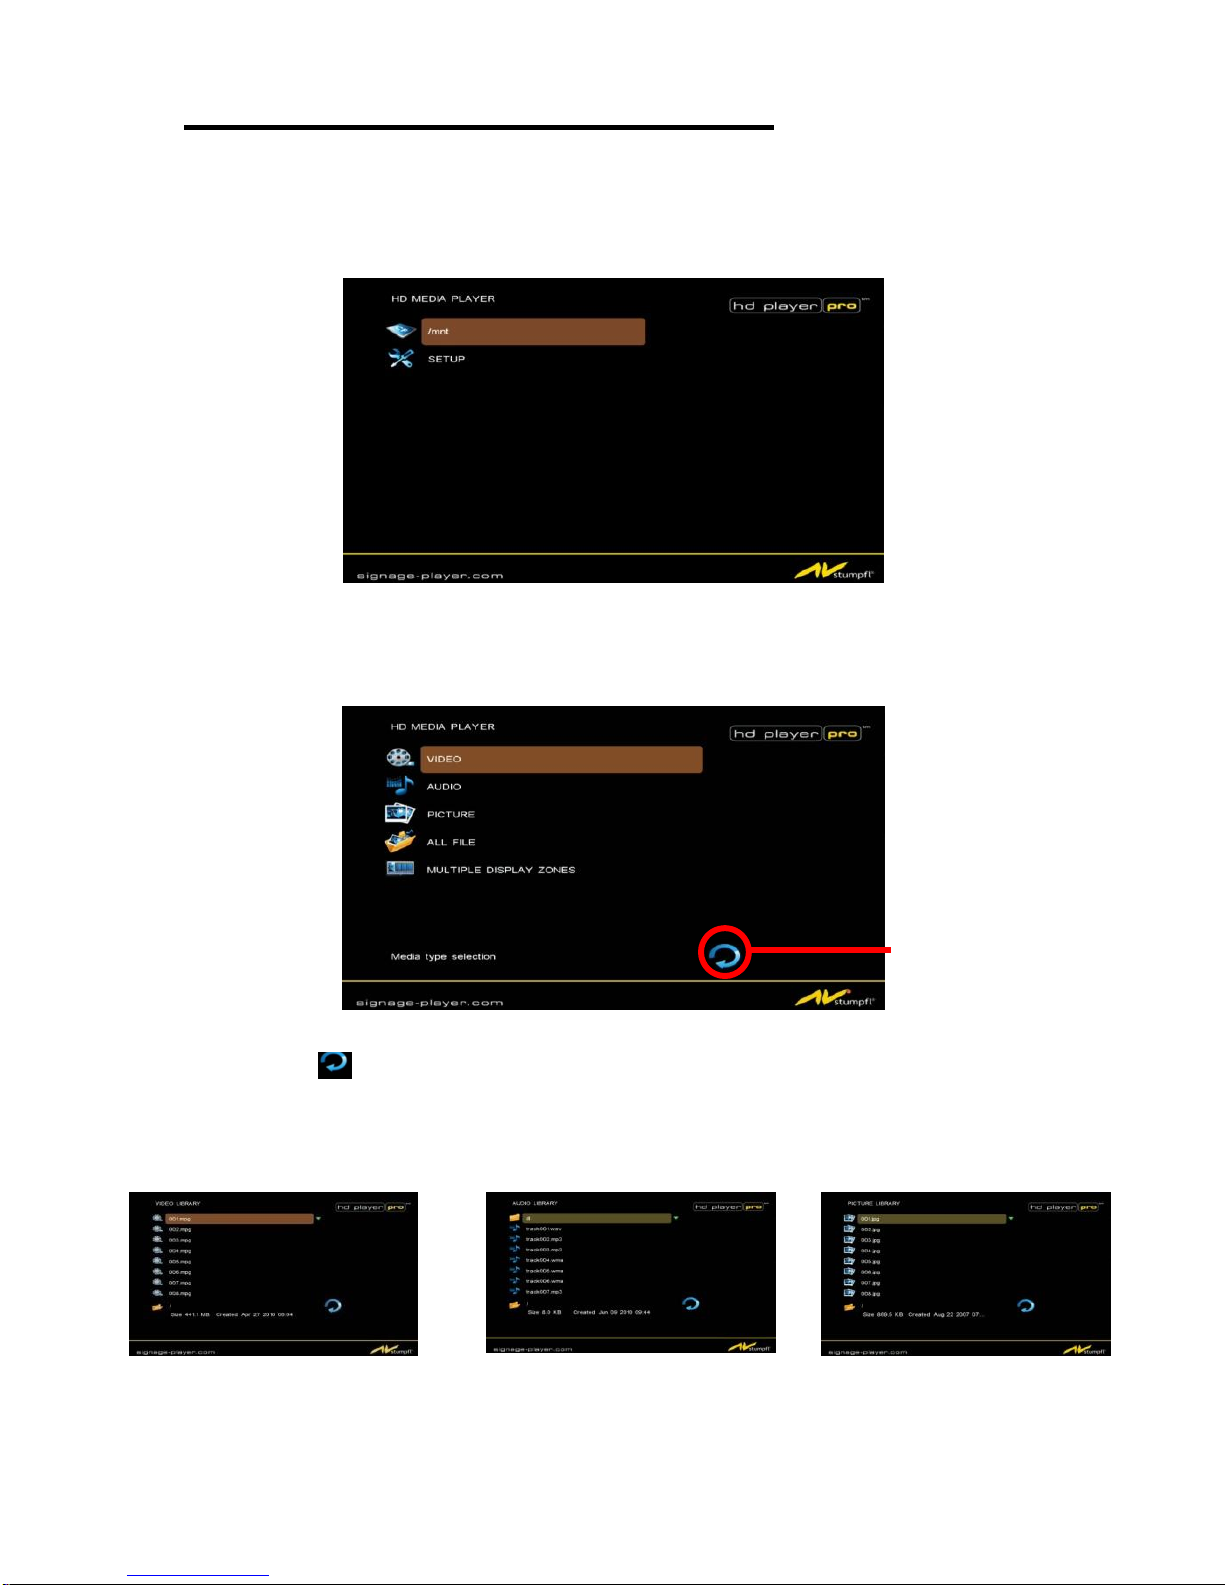
Step 1: Insert the CF card with media files, then turn on the HD Player Pro and press the “ENTER”
button on the remote control when “’mnt/CF” is highlighted to take you into the CF card.
Step 2: Select the type of data (VIDEO/ AUDIO/ PICTURES) you want to play, and then press the
“ENTER” button on remote control to switch into the “VIDEO LIBRARY”, “AUDIO LIBRARY” or
“PICTURE LIBRARY”.
Note: If the symbol (return) appears on the screen, you can use “RETURN” button of the
remote control to go back one layer.
Step 3: Select the file you want to play, and press “ENTER” or “PLAY” button on the remote control to
play the file.
VIDEO LIBRARY AUDIO LIBRARY PICTURE LIBRARY
RETURN
Page 22
22
8.1.1 Using the Remote Control when Media File is playing
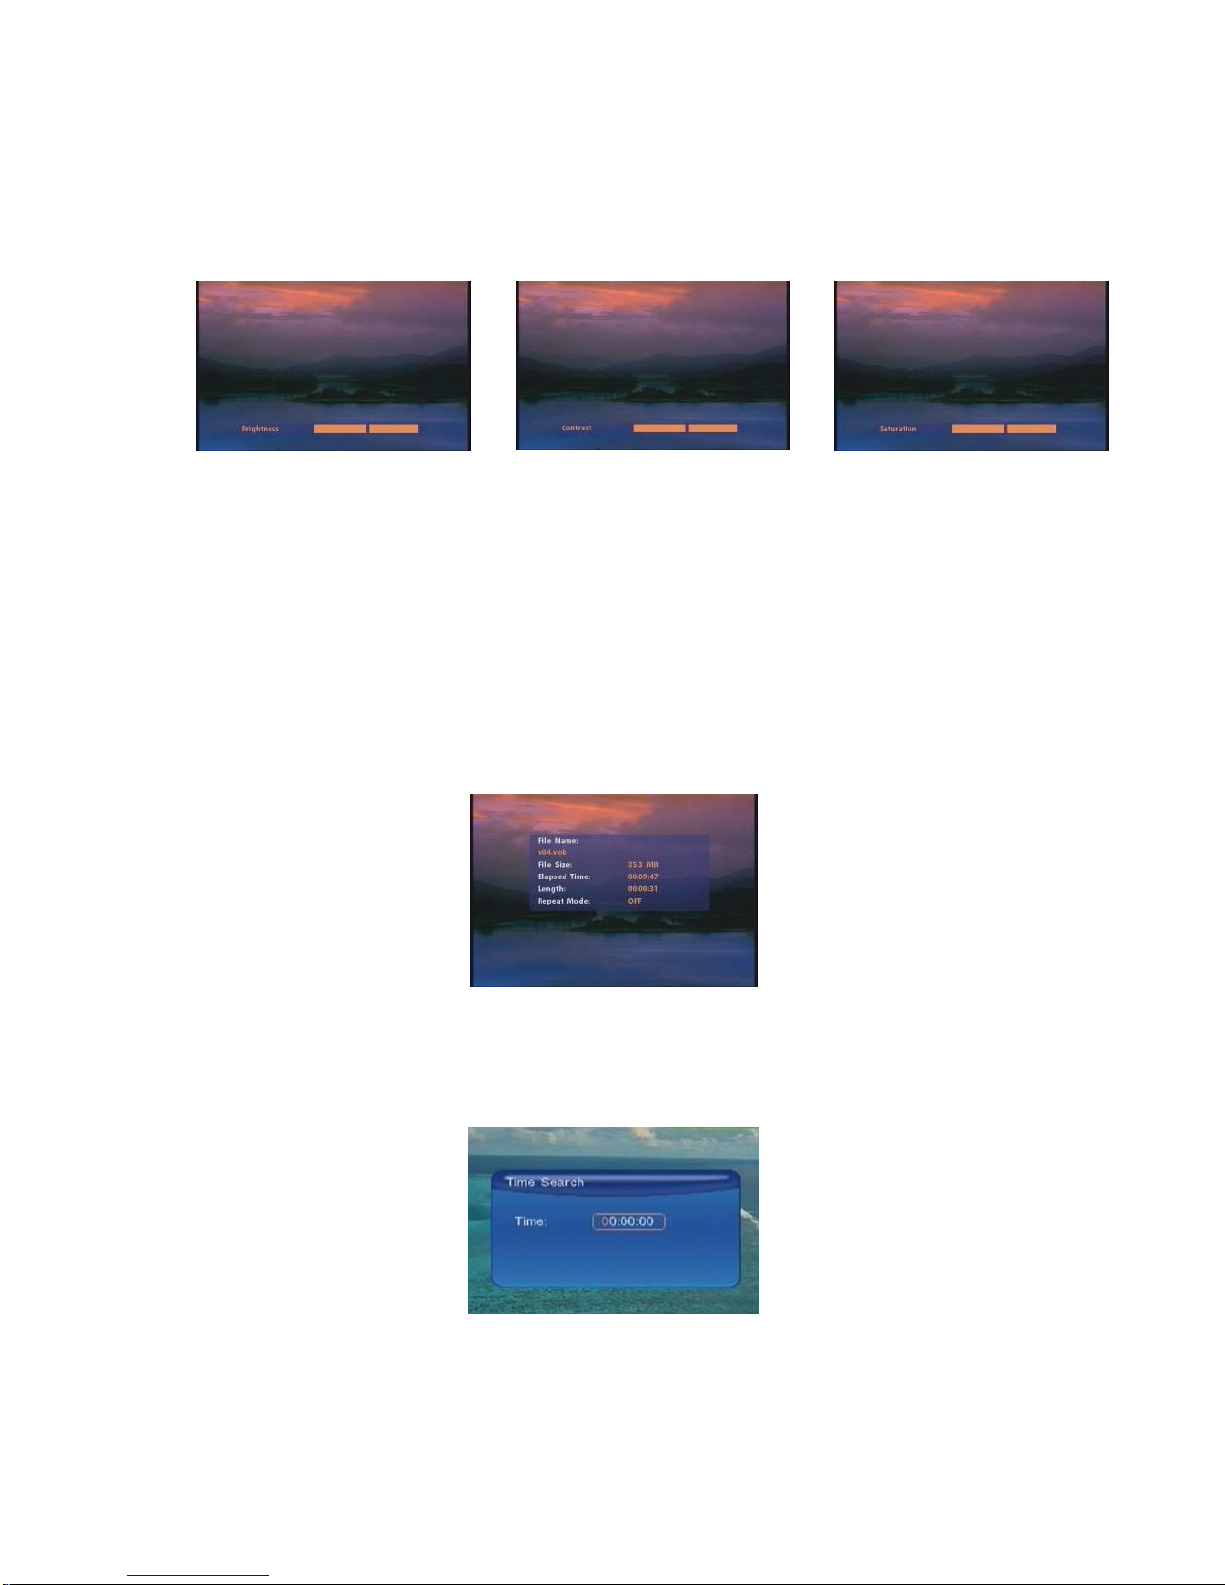
SETUP: Press the button to adjust the brightness, contrast or saturation while the video or picture
is displayed. With the “+ VOLUME –” button
- First Press: Adjust the brightness
- Second Press: Adjust the contrast
- Third Press: Adjust the saturation
Brightness Contrast Saturation
MUTE: Mute the sound while the movie or music is playing
+ VOLUME -: Increase/ decrease the volume while the video or music is playing
SHUFFLE: Turn on/ off the shuffle function
PREV / NEXT: Play the previous/ next file
REPEAT: Select the repeat mode
REV / FWD: Rewind/ forward movie or music file
STOP: Stop playing, and go back one layer
INFO: Display the file information
File Information
SEARCH: Search video (movie) timeframe
Press the “SEARCH” button, and enter the initial time that you want to start at, then press the
“ENTER” button to play.
PAUSE/STEP: Pause the playback or play frame by frame
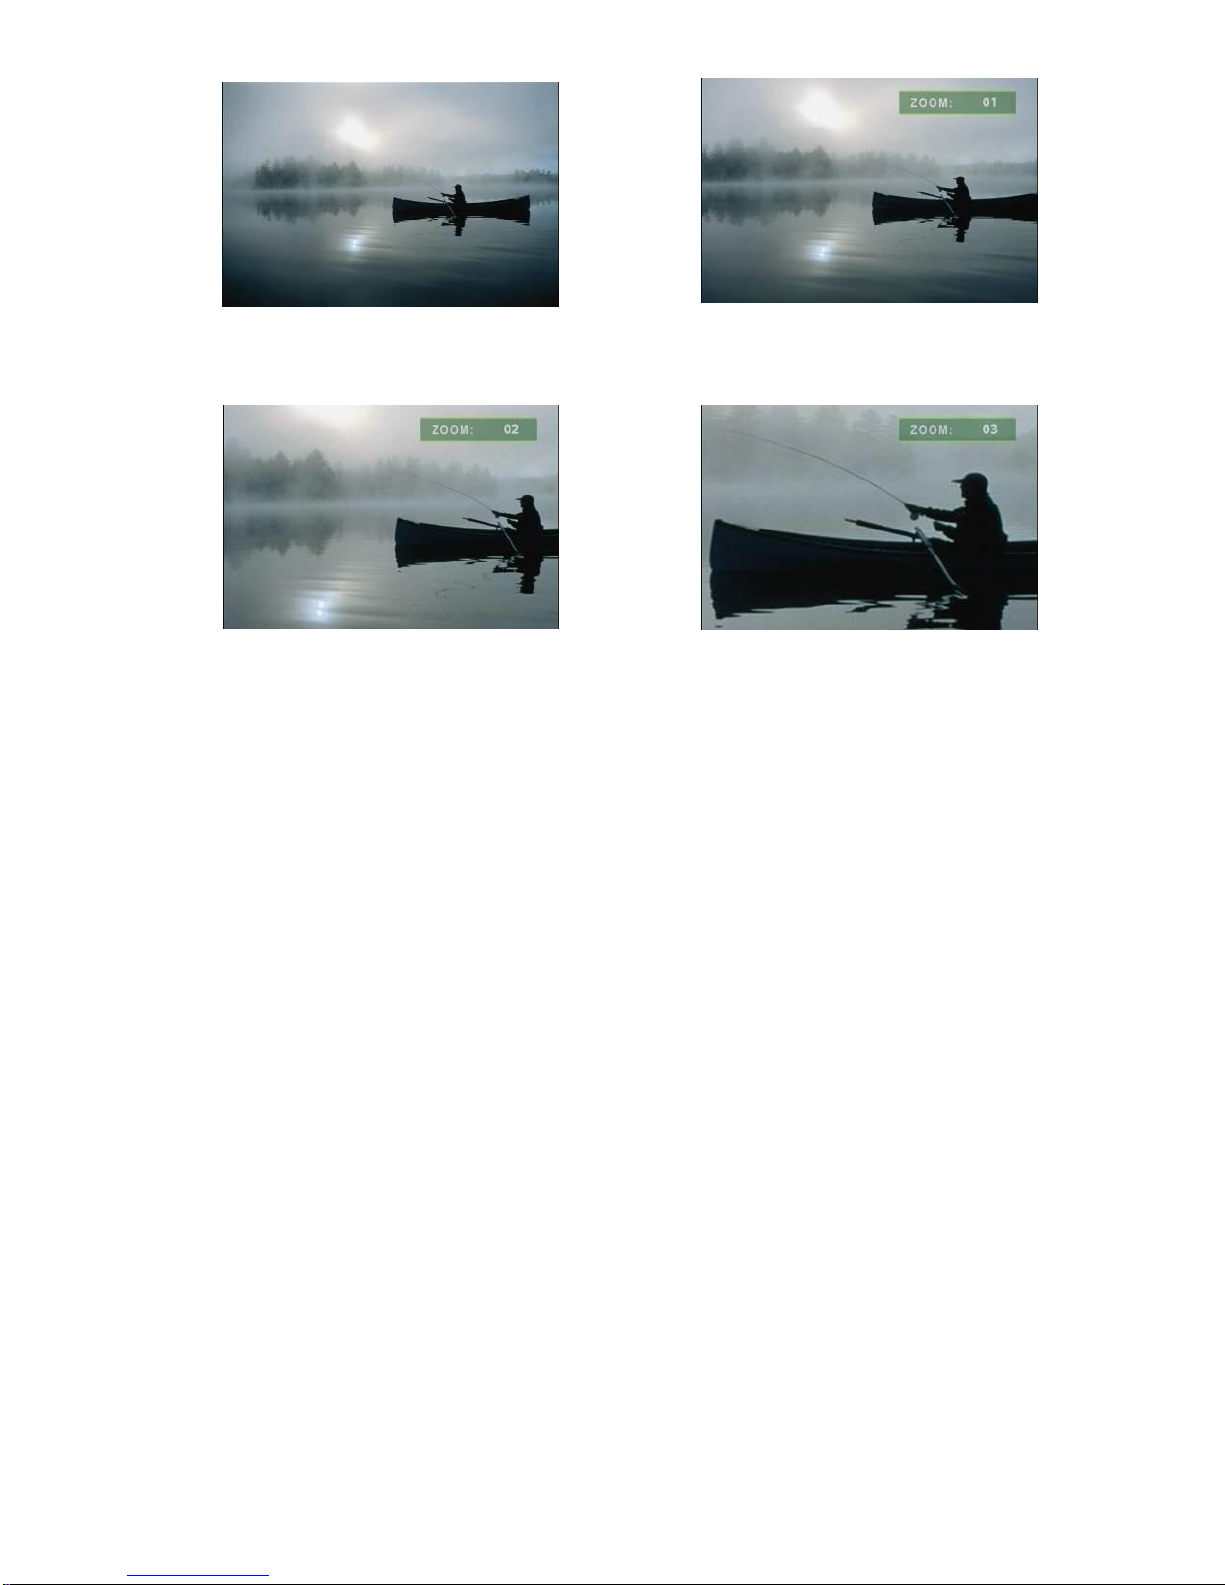
ZOOM: Zoom in/ out on the movie or picture.
Page 23
23
Original Size First Press:ZOOM 01
Second Press:ZOOM 02 Third Press:ZOOM 03
Page 24
24
8.2 Multiple display zones
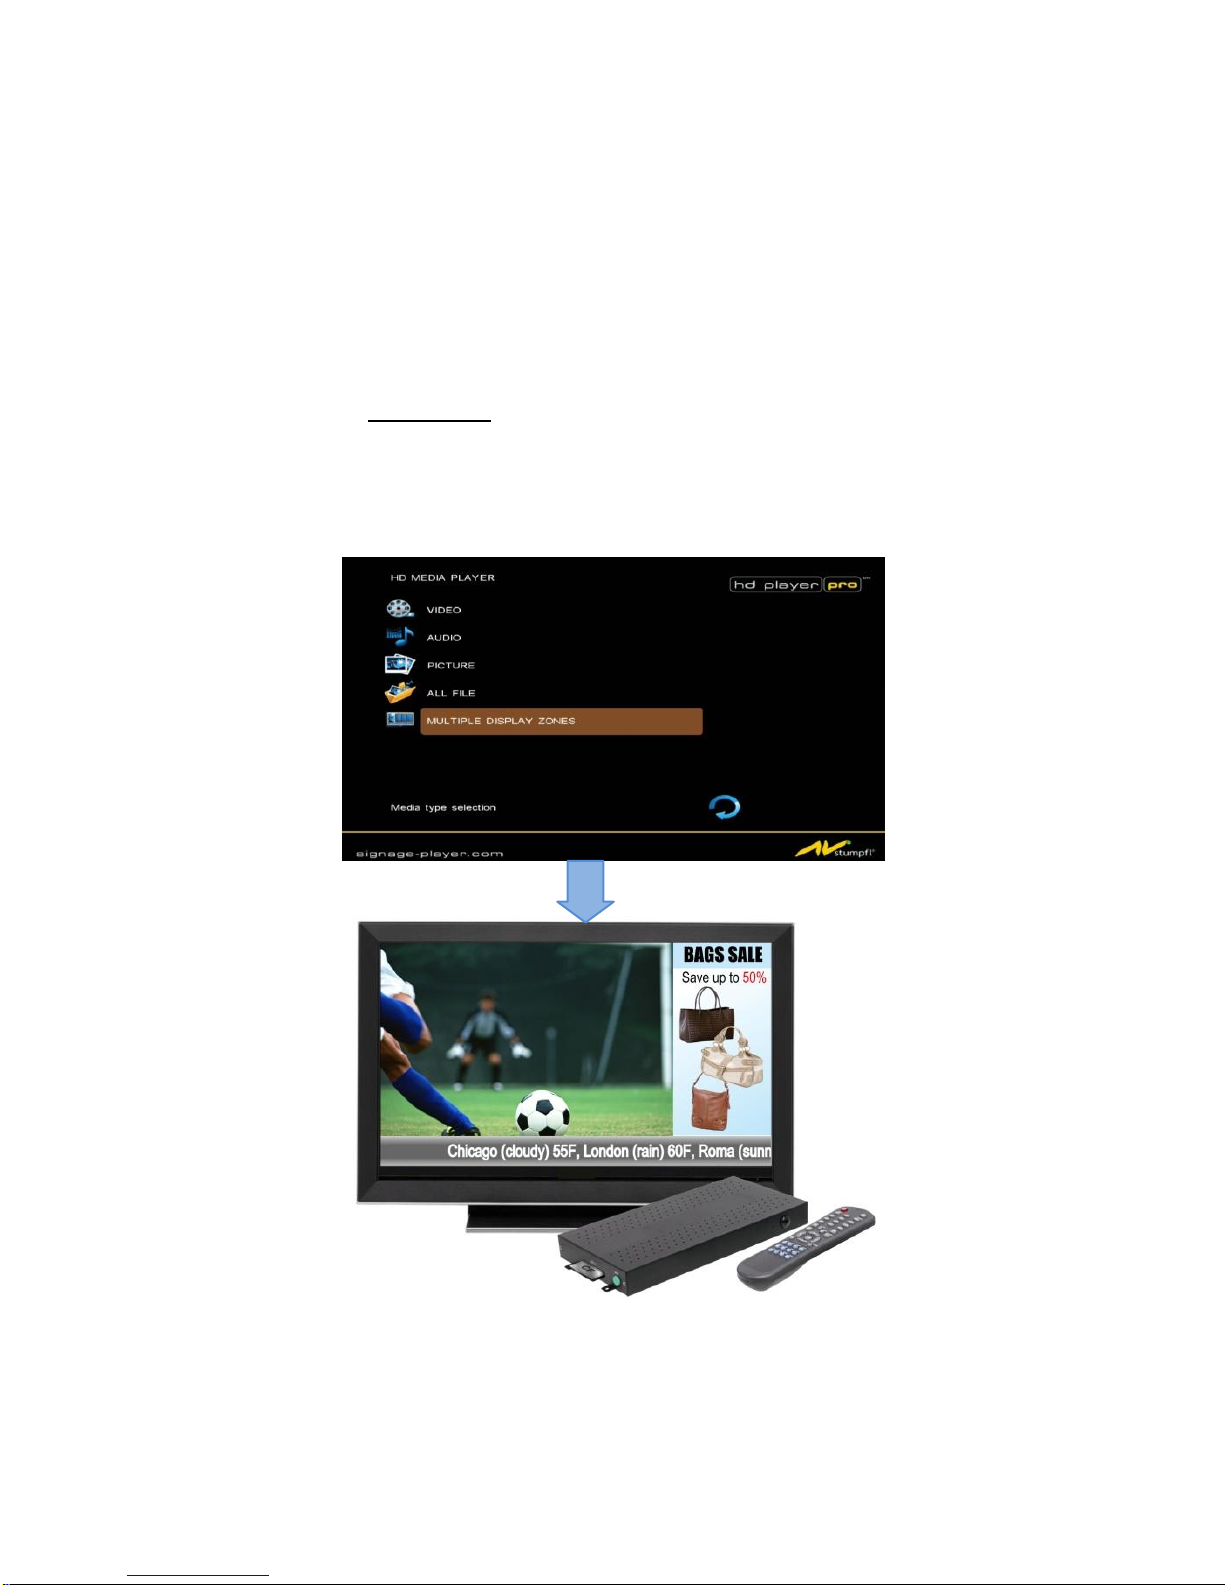
Step 1: Put your movies, pictures (only supports PNG format/ size: 213x641/ 96DPI) and text file on
the CF card.
Picture Files
If you select the “By Slide Time” item of the picture slide mode; please name the picture files
0.png ~ 9.png.
If you select the “Match Video” item of the picture slide mode, the file name of the picture must
be the same of the corresponding movie file.
Text File
Use the “Notepad” to create a text file on your PC. Enter the message that you want to display
and name the file “message.txt”.
Step 2: Select the Multiple Display Zones item to display the movies and pictures with scrolling text
immediately.
Page 25
25
8.3 Log function
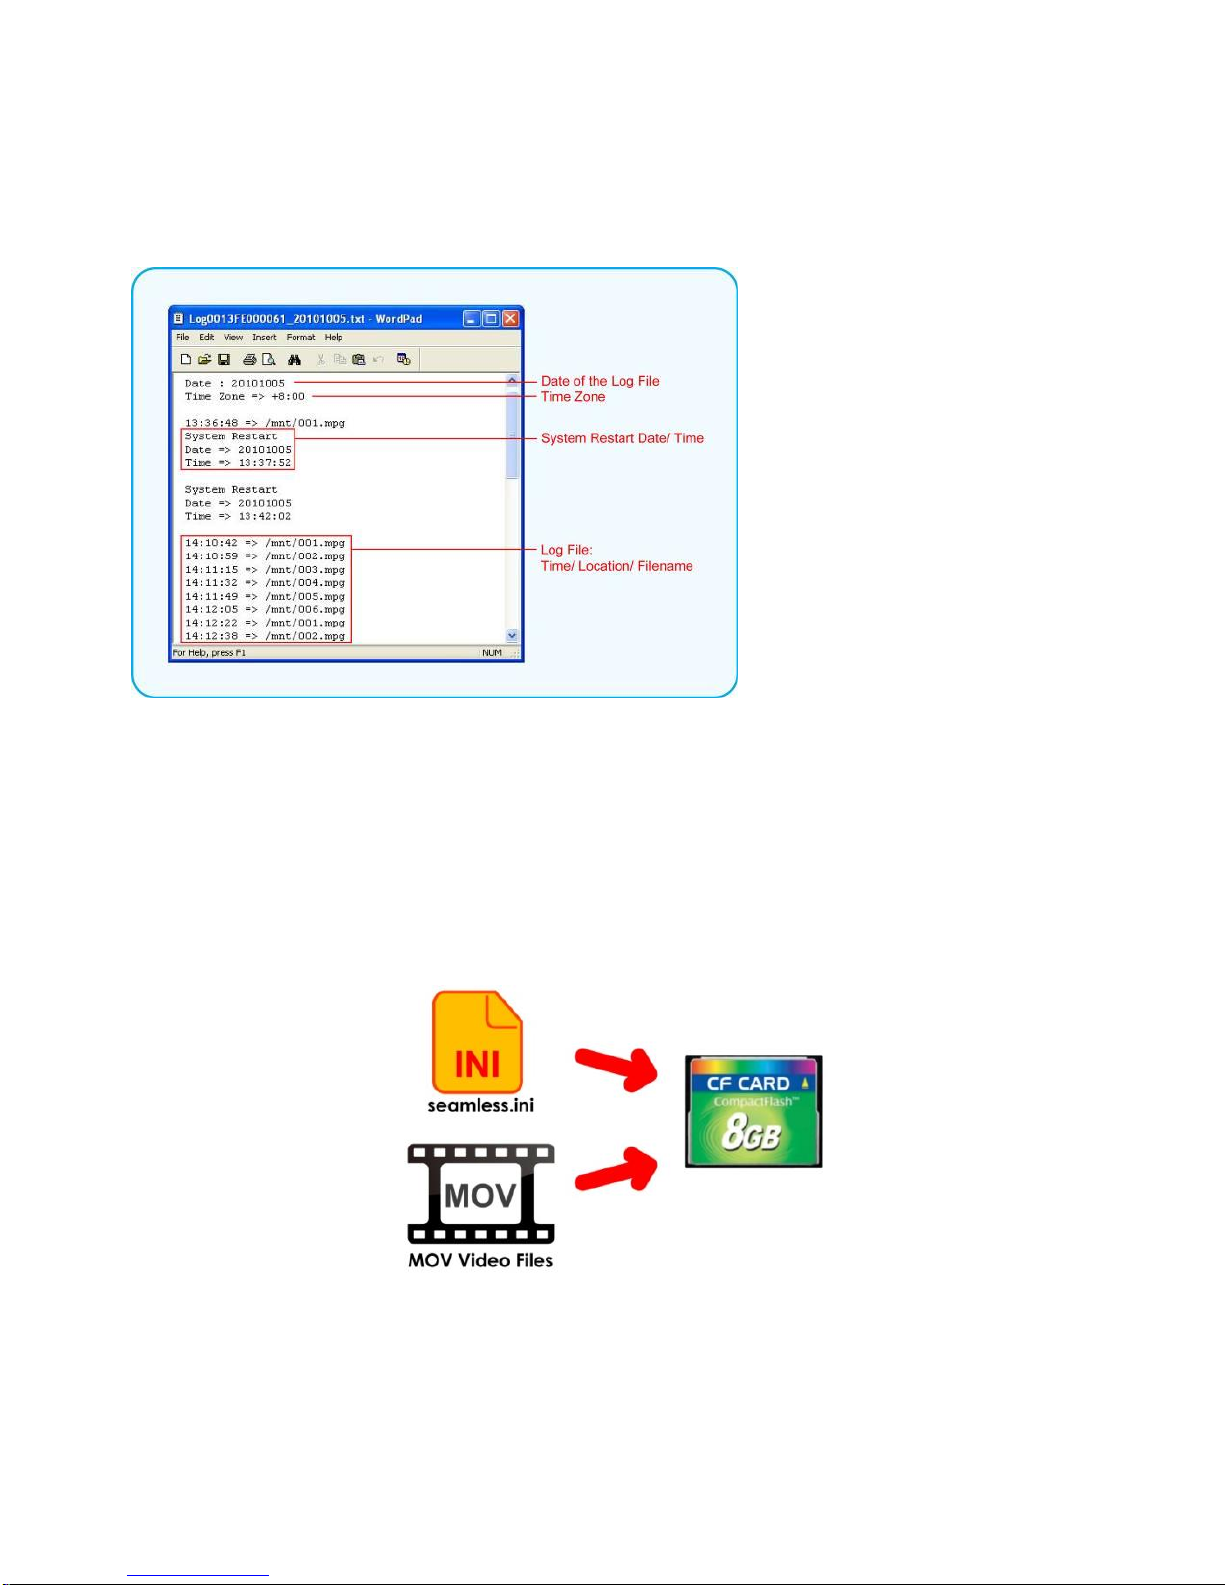
Step1. Please turn on the Log Function first. (Refer to 7.4 Other Setup)
Step2 .The new log files are automatically generated every day (the log files will be stored in the
“syslog” folder on the memory card).
Step3. The log file (.txt) can be viewed on your PC using WordPad.
8.4 Seamless-Function
The Seamless Playback function allows the HD Player Pro to transition between videos using LED
Buttons Box (page 50) or Play Button Box (page 47) without any delay.
To enable the Seamless Playback function, put the setting file “seamless.ini” and videos (only
supports MOV video file) to CF card.
Use “Notepad” to create a file and name the file “seamless.ini”(this File must be empty).
NOTE:
1. MOV video file limitation:
- Frame rate: up to 30fps
- Bit rate: 30~40 Mbps
- Resolution: up to 1080p
2. If the Seamless Playback function is enabled, the HD Player Pro can only play the MOV videos.
Page 26
26
8.5 FTP auto download function
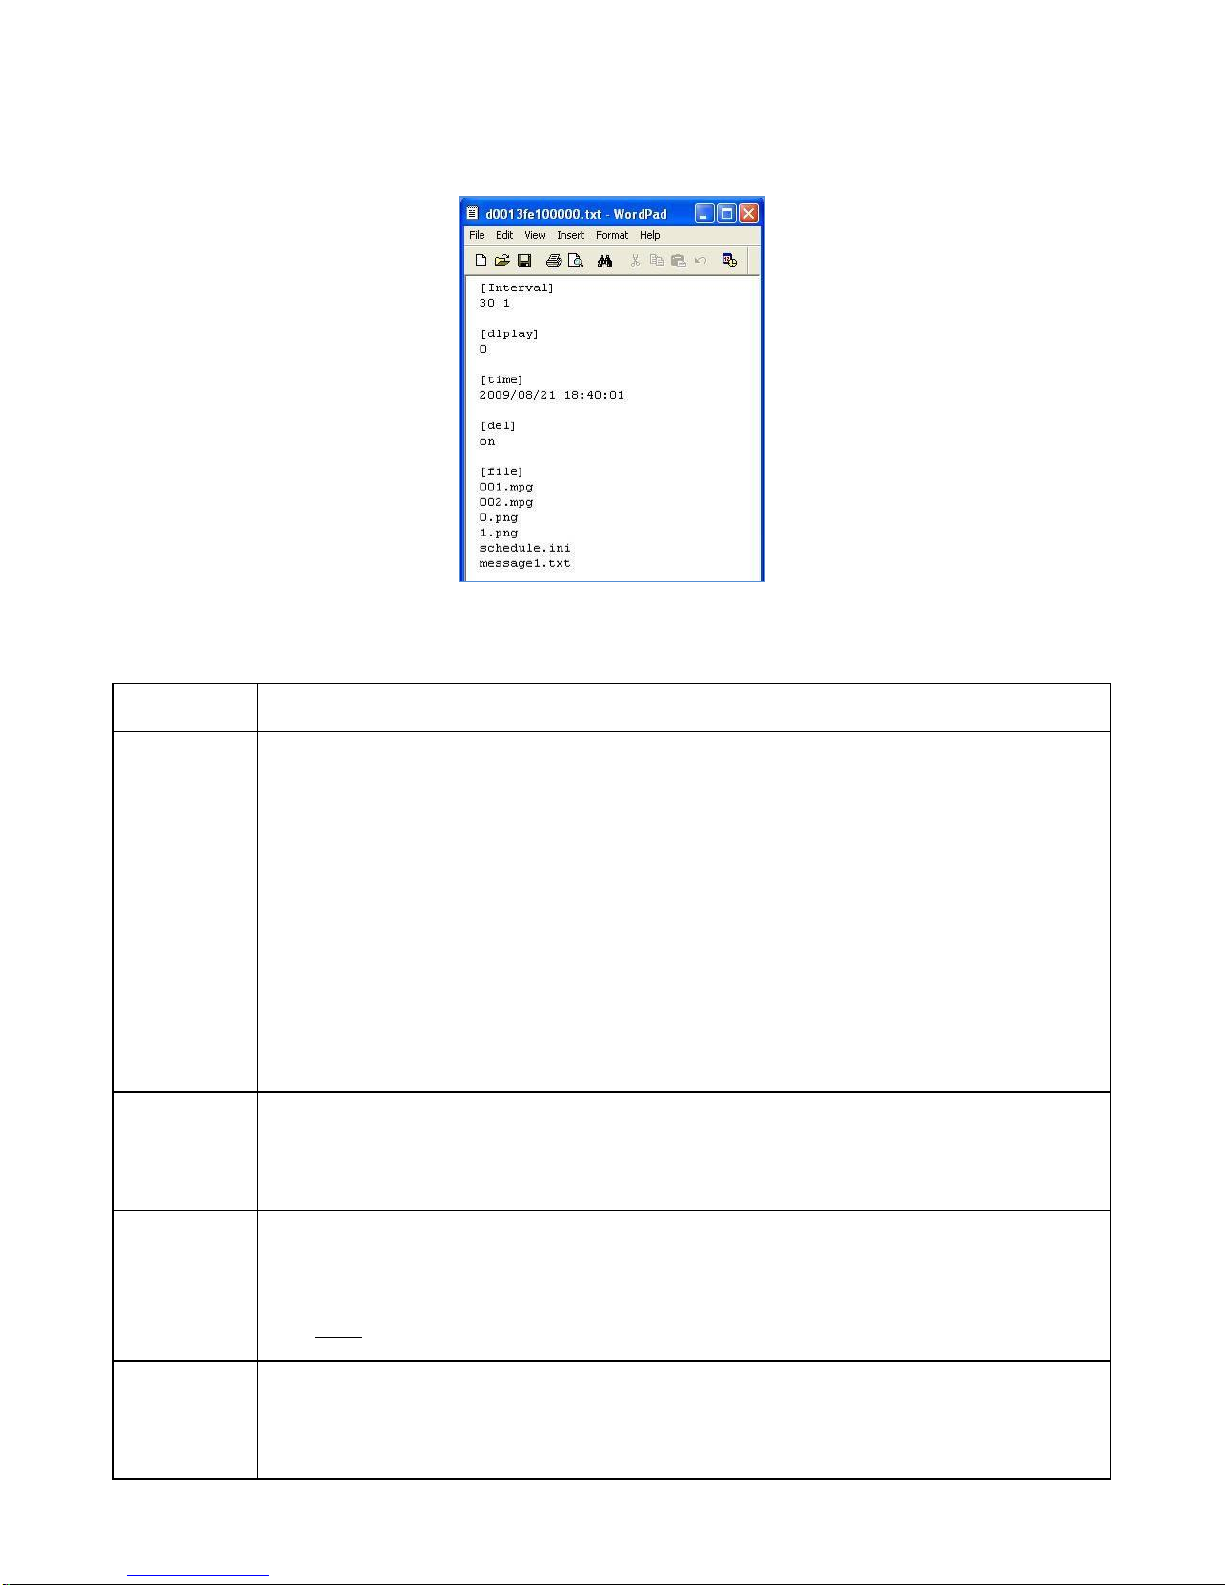
Step1: Use the “Notepad” to create a commands file on your PC as shown below (you can refer to the
sample file (d0013fe100000) on the provided CD):
Item
Description
[Interval]
30 1
Initial time and interval time setting (for connecting to the FTP server and checking whether the
commands file in the FTP)
The first value is the Initial Time (unit: minutes)
The second value is Interval Time (unit: minutes)
Example 1: the current time of the HD Player Pro is 00:00,and the entered value is 25 6.
The HD Player Pro will connect to the FTP server and check whether the commands file in the
FTP server at 00:25, than again every 6 minutes (00:31, 00:37, 00:43, 00:49, 00:55…).
Example 2: the current time of the HD Player Pro is 00:10,and the entered value is 45 15.
The HD Player Pro will connect to the FTP server and check whether the commands file in the
FTP server at 00:45, than again every 15 minutes (01:00, 01:15, 01:30, 01:45, 02:00…).
[dlplay]
0
Enable or disable the function (play files & FTP auto download simultaneously)
0: Disable the function (the speed of download will be faster)
1: Enable the function (the speed of download will be slower)
[time]
2009/08/21
10:40:0
1
Set the time to restart the HD Player Pro after finish downloading (replace the downloaded
files).
Format: yyyy/mm/dd hh/mm/ss
Note: This field cannot be blank; otherwise the HD Player Pro won’t restart nor play the
downloaded files.
[del]
on
Delete the original files on the CF card after finish downloading.
on: Delete the original files on the CF card
off: Keep the original files. The HD Player Pro will overwrite a file of the same name.
Page 27
27
Item
Description
[file]
001.mpg
002.mpg
0.png
1.png
schedule.ini
message1.txt
Enter the filename you want to download.
Note: The length of file name and extension cannot exceed 20 characters.
The file schedule.ini is created by the Schedule Maker software. (refer to section 10)
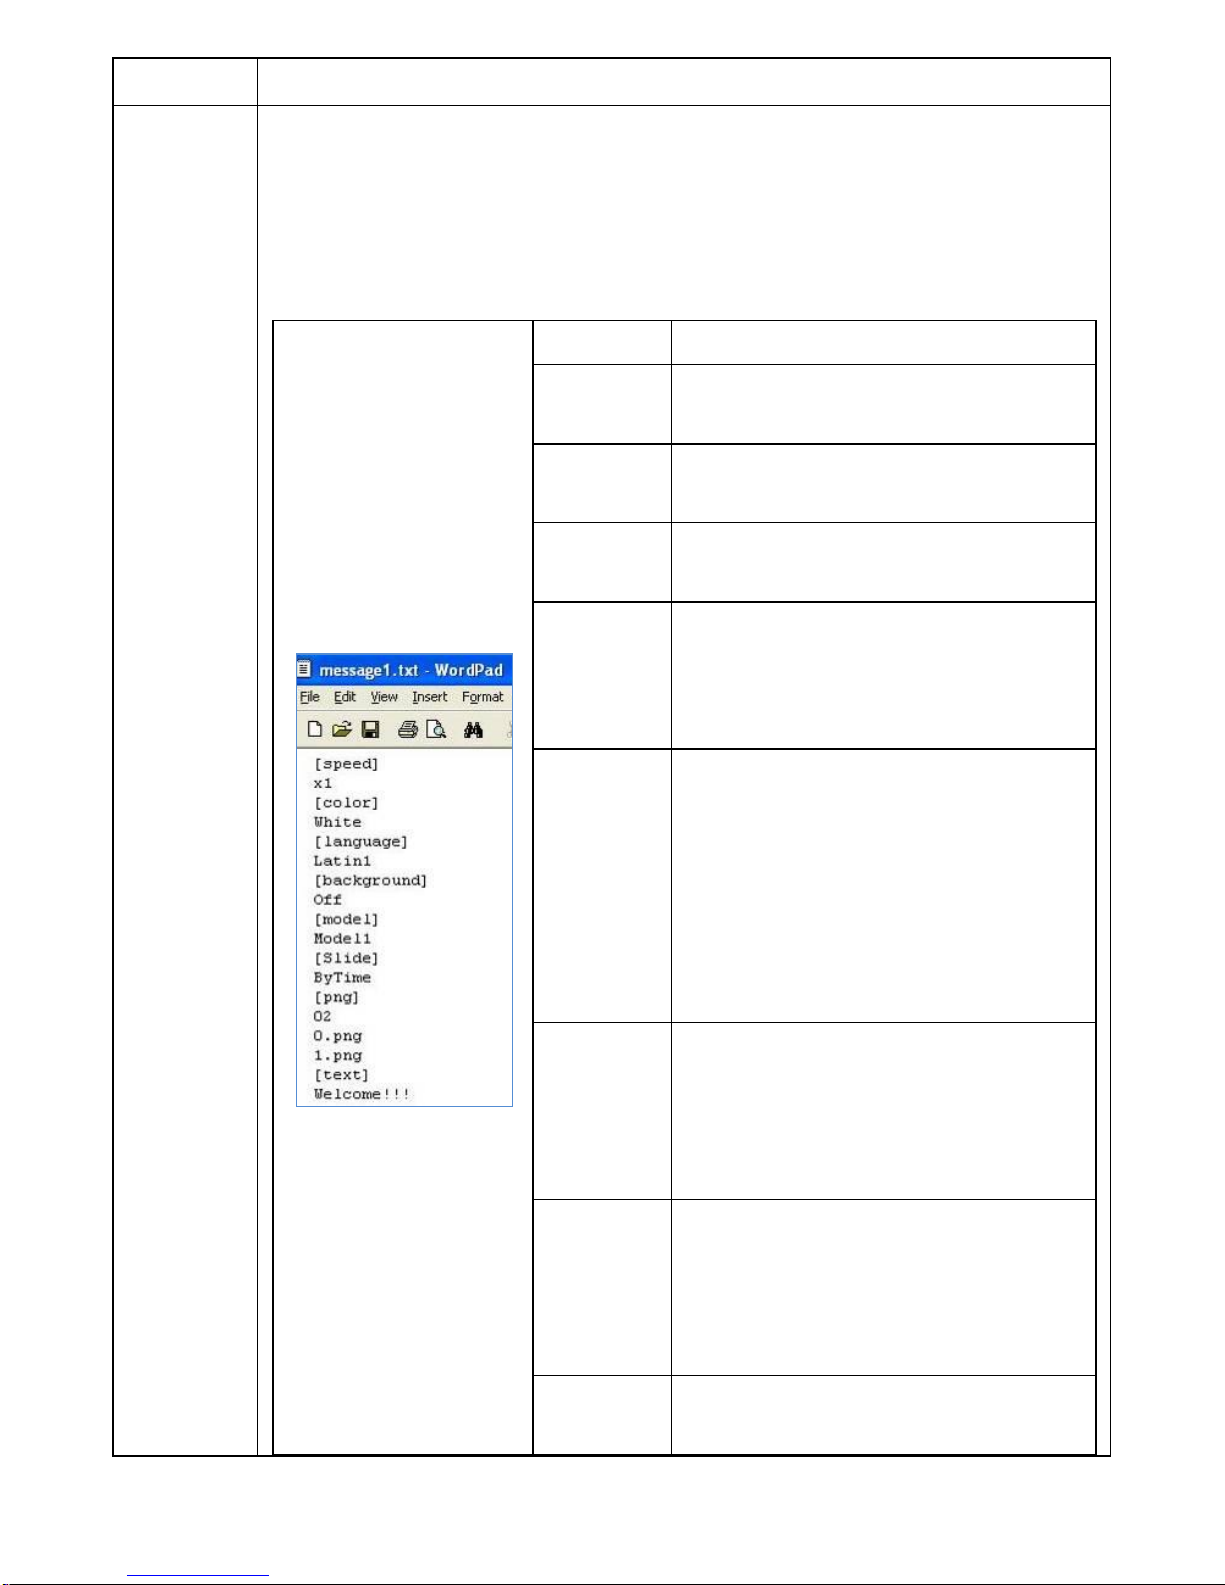
The file message1.txt is a text file that can change scrolling text settings. Use the “Notepad” to
create the text file on your PC as shown below, and named the file message1.txt (you can
refer to the text file (message1.txt) on the provided CD).
Item
Description
[speed]
X1
Set the display speed of the scrolling text.
Please enter X1, X2 or X3.
[color]
White
Set the scrolling text color.
Please enter White, Yellow, Green or Rotation.
[language]
Latin1
Set the font of scrolling text.
Please enter Latin1, Latin2, Japanese or Greek.
[background]
Off
Enable or disable the scrolling text
background.
On: Enable the background.
Off: Disable the background.
[model]
Model1
Set the model of the multiple display zone.
Model1: Play videos with scrolling text.
Model2: Play videos, pictures and scrolling text
simultaneously, and the pictures are on
the left.
Model2: Play videos, pictures and scrolling text
simultaneously, and the pictures are on
the right.
[Slide]
ByTime
Set the picture slideshow mode.
ByTime: Change the pictures with the internal
time.
MatchVideo: Change the pictures with the
videos.
[png]
02
0.png
1.png
Enter the quantity and filename of pictures.
The first value is the quantity of picture.
Example: If there are two pictures. Please enter
02, and then enter the filename of the two
pictures (0.png and 1.png).
[text]
Welcome!!!
Enter the message that you want to display.
Page 28
28
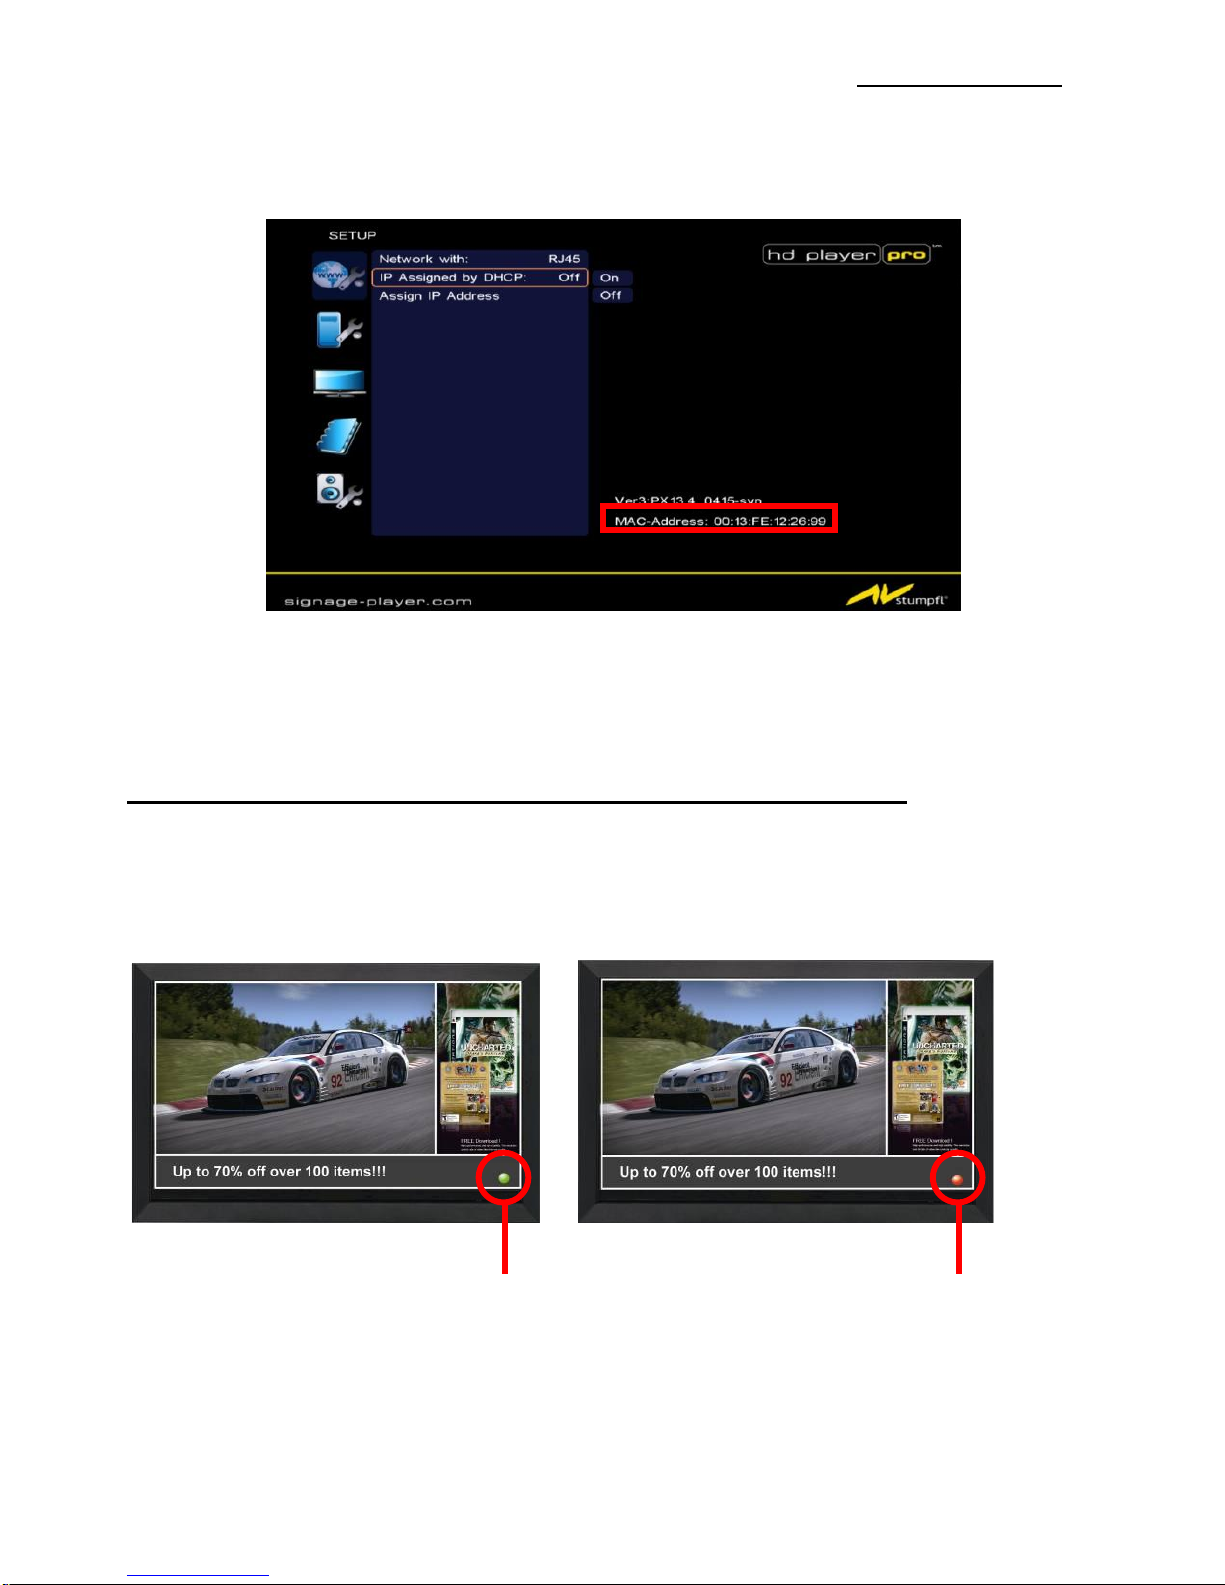
Step2: Remember to save the file after editing, and named the command file d + MAC address.txt.
Example: The MAC address of HD Player Pro is 0013fe098819, and named the file
d0013fe098819.txt.
NOTE: The MAC address of HD Player Pro will be displayed in the setup menu.
Step3: Put all the files (included media files/ command file (ex. d0013fe098819.txt/ schedule.ini/
message1.txt) to the FTP server. The HD Player Pro will read the command file (ex.
d0013fe098819.txt), and download the specified files.
NOTE: The filename of the media files in FTP server cannot have any spaces.
Step4: The download status will be displayed in lower right corner of the screen
Blinking Green Light: indicate the HD Player Pro is downloading.
Blinking Red Light: the connection to the FTP server has failed.
Blinking Green Light
Blinking Red Light
Blinking Red Light
Page 29
29
8.6 Controlling the HD Player Pro (RS232/TCP)
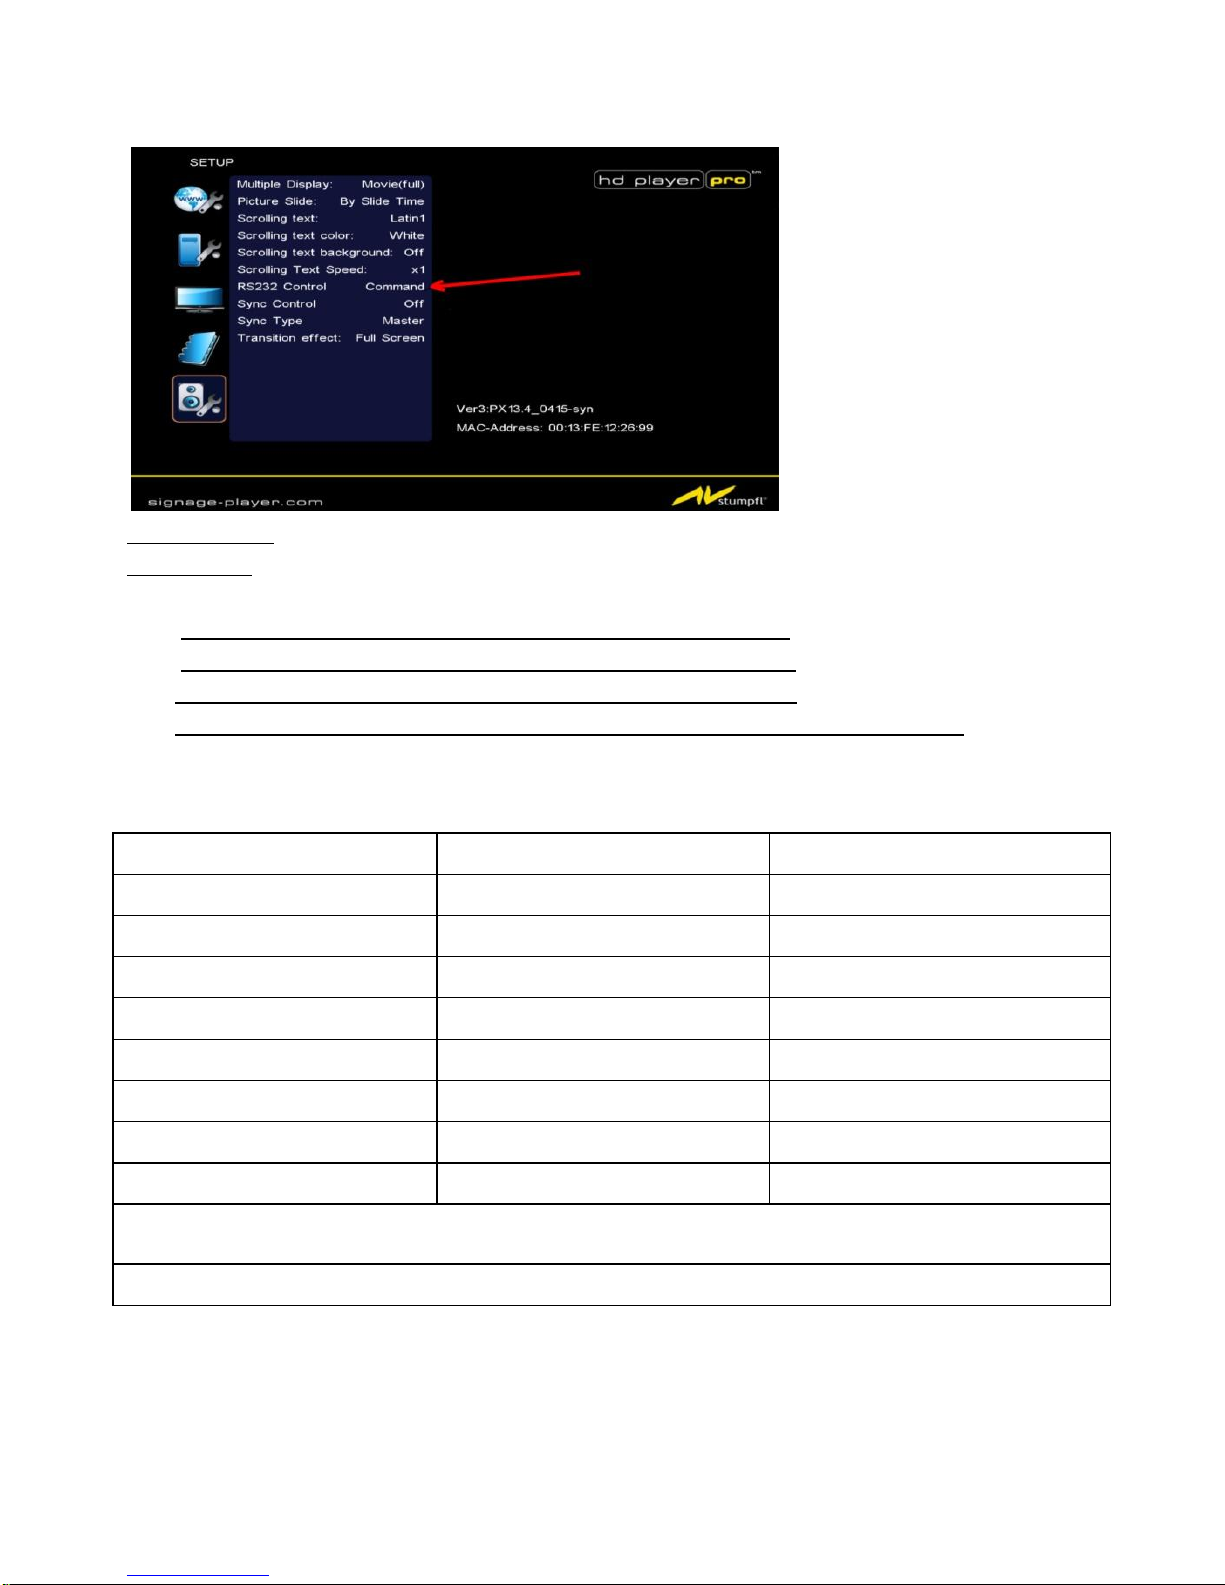
Use the tool “Tera Term” or other tools to control the HD Player Pro with ASCII command.
To enable this function the RS232 Control must be set to “Command”
RS232-Control: baud rate: 19200 8N1
TCP-Control: Port 23
NOTE:
1. The reaction time of the HD Player Pro is up to three seconds.
2. Make sure the RS232 function is enabled (refer to section 7.5).
3. Use an crossed RS232-Cable for controlling the HD Player Pro
4. For controlling the HD Player via RS232 the Autoplay-function must be turned on
Command Table
q:POWER
+:VOL +
w:SLOW
R:RETURN
-:VOL -
>:NEXT
!:REPEAT
*:MUTE
<:PREW
~:SETUP
S:SELECT
u:UP
#:TV MODE
p:PLAY
d:DOWN
%:AutoPlay
P:PAUSE/STEP
l:LEFT
i:INFO
x:STOP
r:RIGHT
m:NTSC/PAL
f:FFW
s:ENTER
$:SEARCH
b:REW
C:CLEAR
(XXXXX.XXX):Play The File (xxxxx.xxx is the file name)
NOTE:Must include the round brackets.
[number]: Play the file by index. (numbers < upper case letters < lowercase letter)
Page 30
30
8.7 How to sync several HD Player Pro
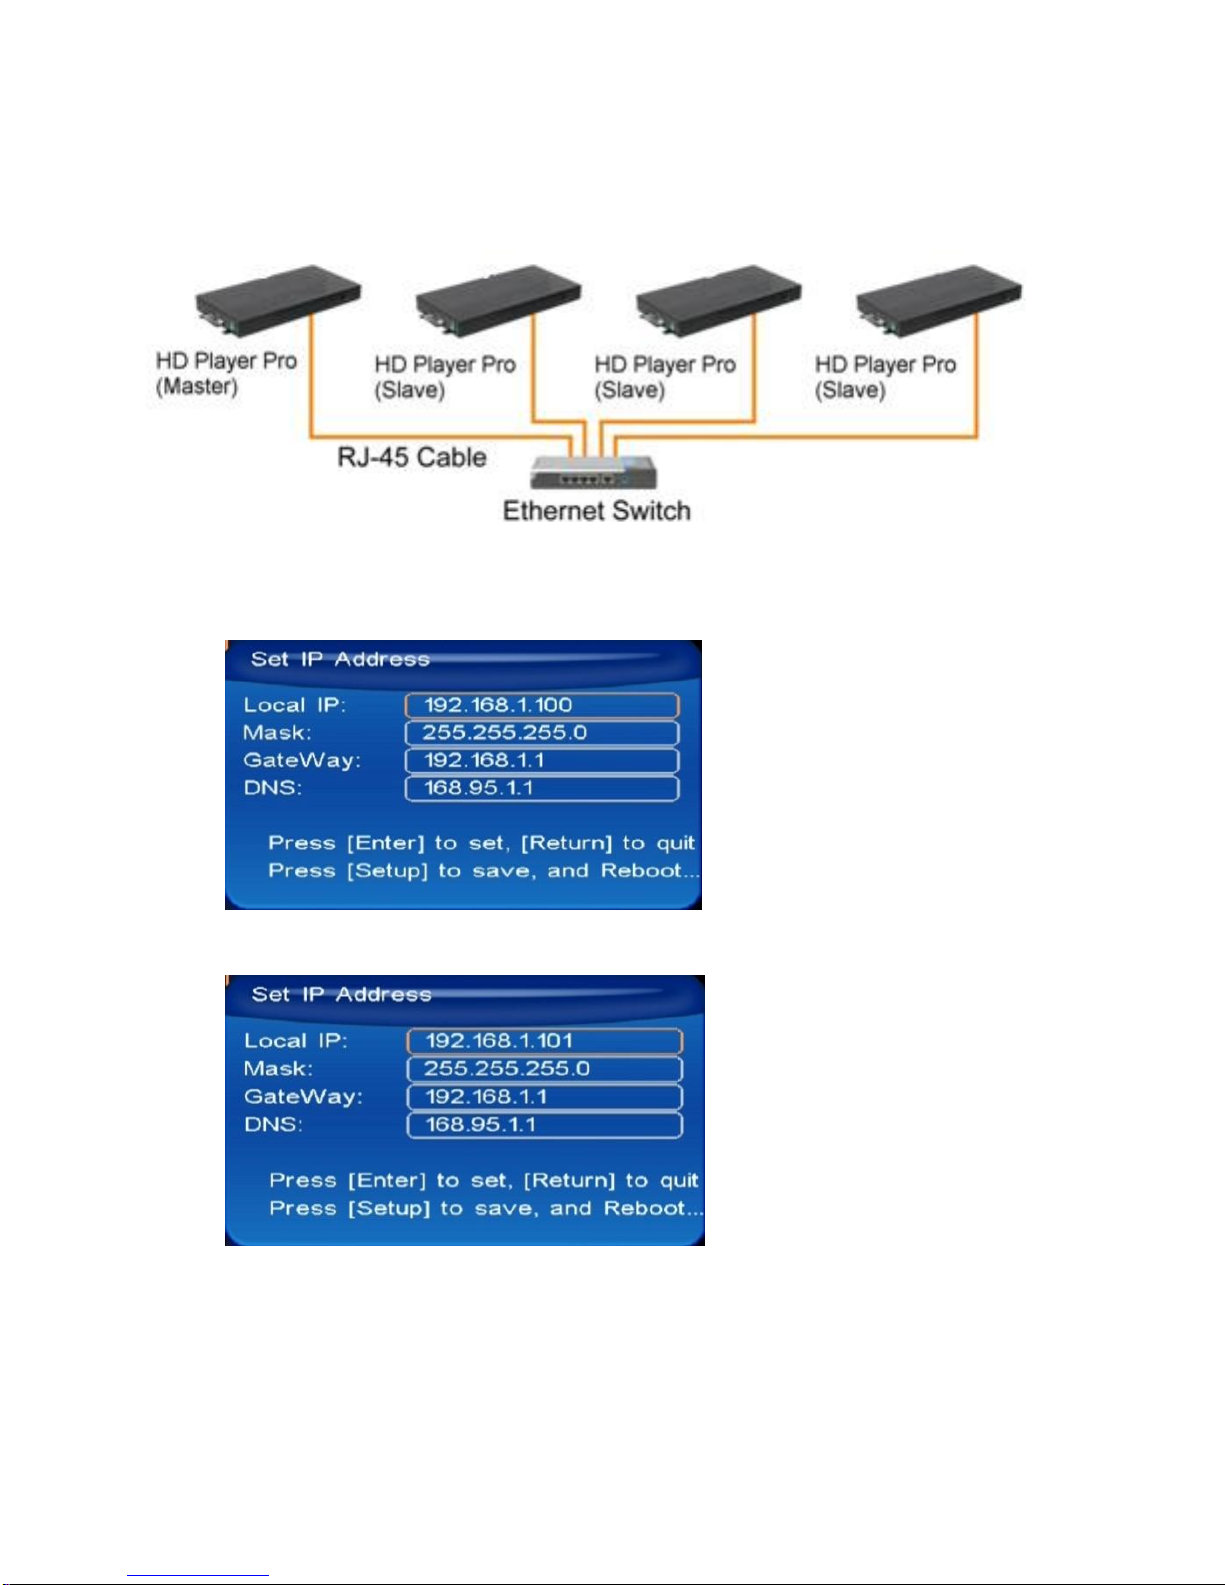
Step1. Please connect all HD Player Pro via a RJ-45 Cable with an Ethernet Switch
Step2. Assign IP Address to HD Player Pro:
The Address must be in the same Subnet, Gateway and DNS.
e.g.: Master
e.g.: Slave 1
Please make sure that you never assign the same IP Address several times.
Page 31
31
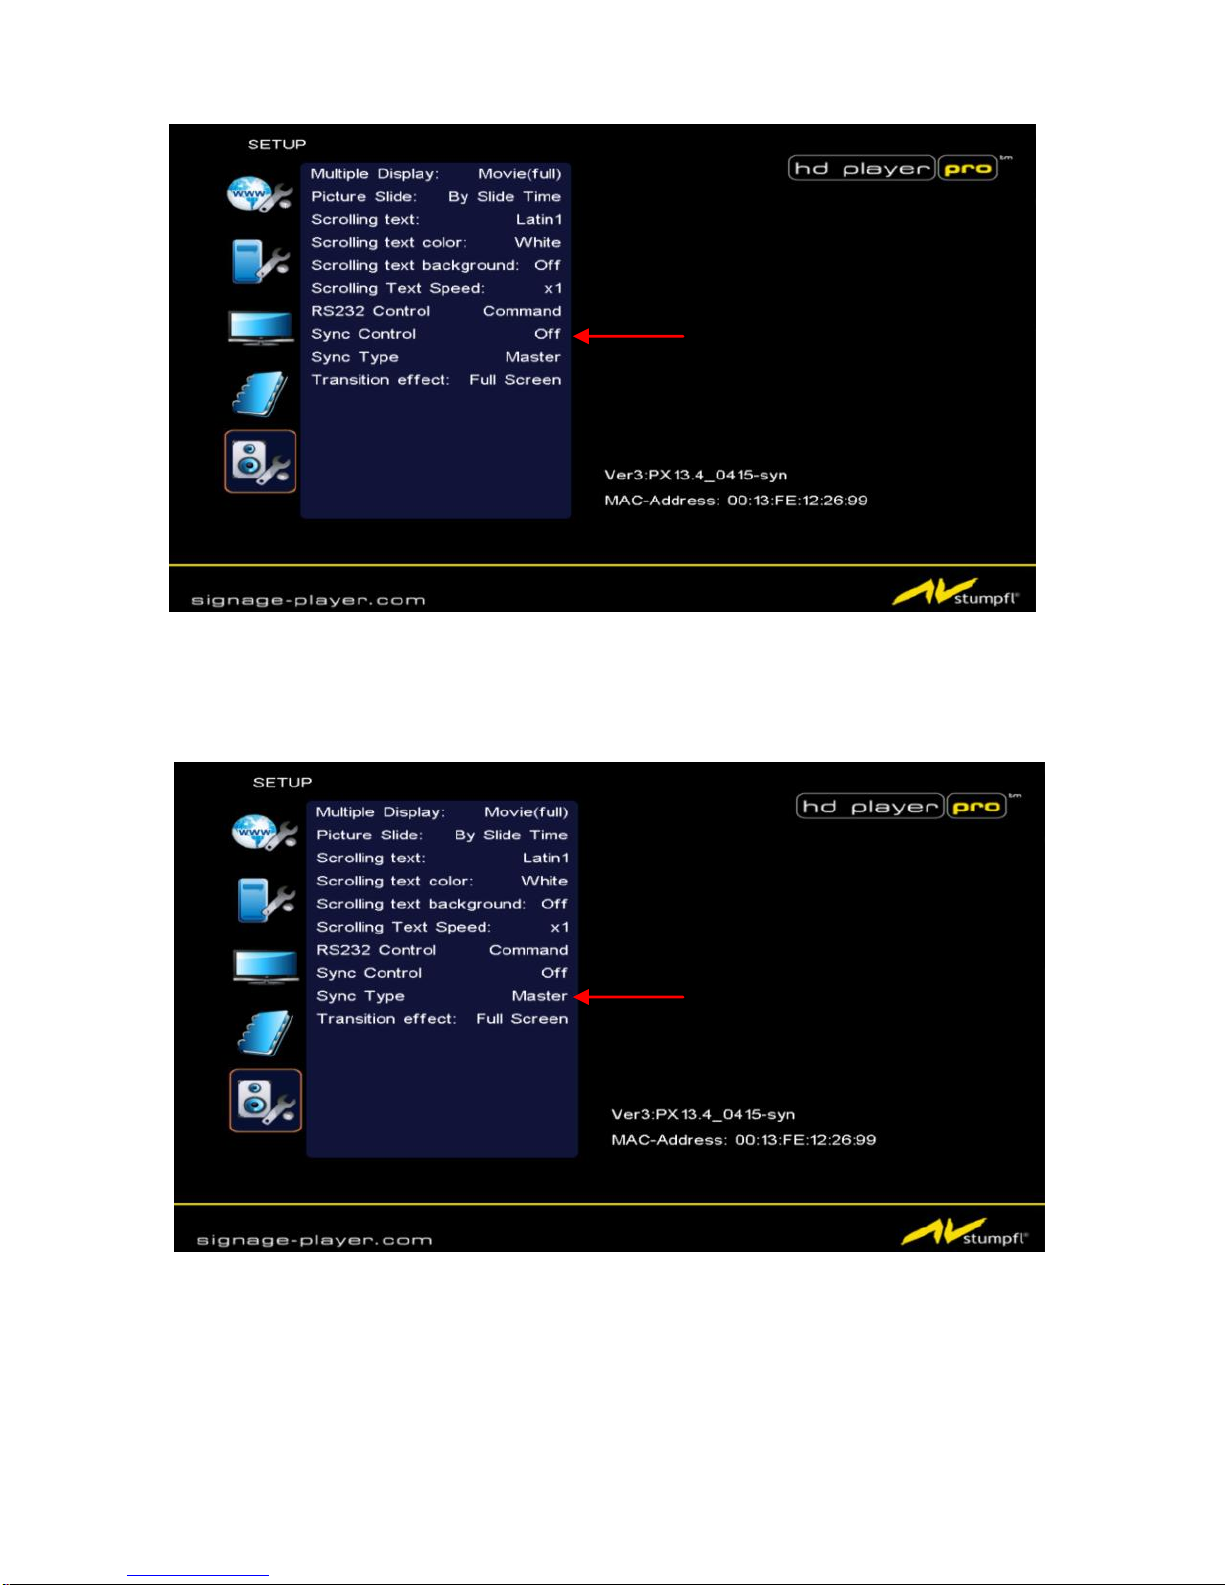
Step3. Turn on the Sync-Control on every HD Player:
Step4. Set Master/Slave:
Set one HD Player Pro to be the Master and the other units (up to 254 units) to be Slaves.
Page 32
32
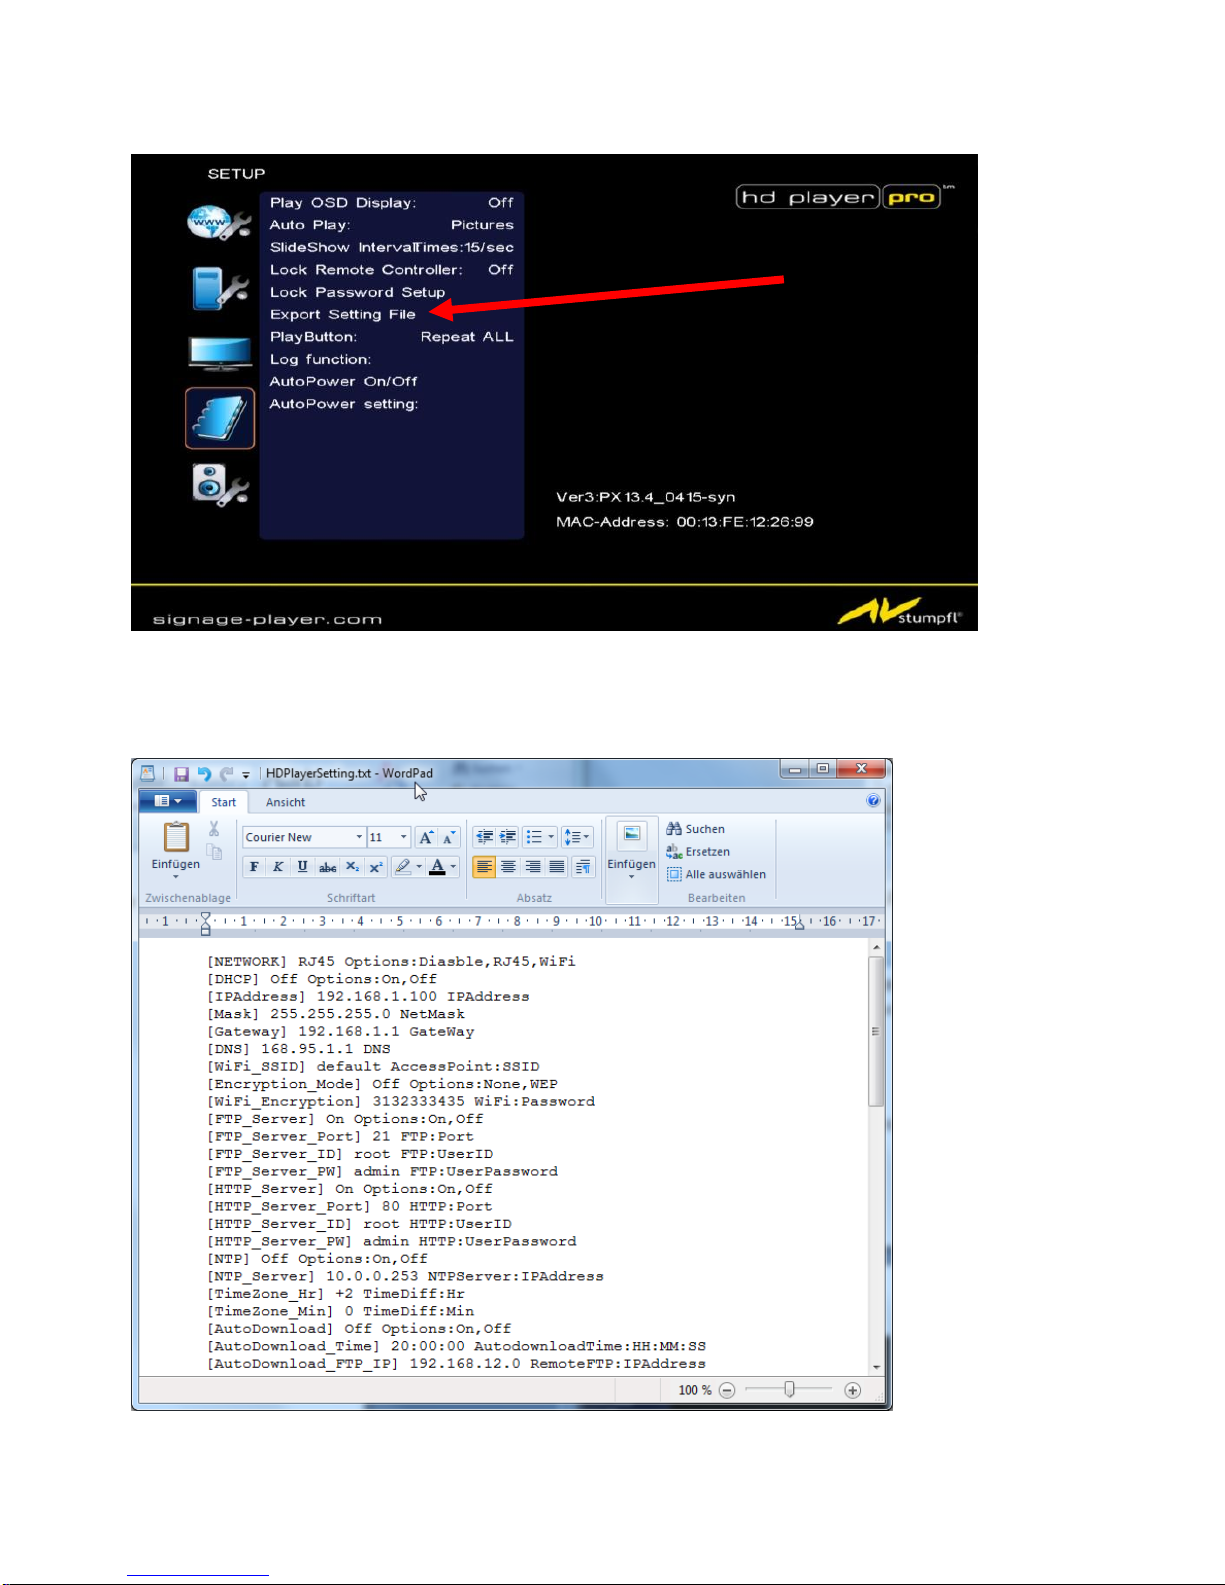
NOTE: HDPlayerSettings.txt-File
For easier configuration you are able to export the “Settings File” of the HD Player onto the CFCard:
Insert the CF-Card with the “HDPlayerSettingsd.txt” in your PC.
Open the “HDPlayerSettings.txt”-File with notepad.exe or wordpad.exe or any other text editor.
Press Enter to Export Settings File
Page 33

33
In the HDPlayerSettings.txt-File you can assign a new IP Address and change other Settings.
When you now reinsert the CF-Card to the HD Player Pro it will “read” these Settings and assumes
these Settings as the new ones.
ATTENTION:
If you set a Local IP, please turn of “IP Assigned by DHCP” (ref.: 7.1.1)
8.7.1 Important to know:
General
The HD Player sync-Function only work after an “Autostart” movie of the HD Player Pro
(Startup time approx. 90s)
For starting another video on the CF-Card you need a Play Button Box which is connected to the
HD Player Pro Master unit only or RS-232 commands to master unit.
The Repeat settings of the different HD Player Pro must be the same (Repeat Default/All)
Video content:
The video file on the CF-Card must have the same length/Bitrate/Framerate on every HD Player
Pro
For starting another Video file on the CF-Card this File must have the same Name on every CF-
Card.
For playing a single video file it could be named various on the different HD Player Pro.
The file name should not be longer than 8 characters and not include any special characters.
Sync-Function:
The first half second of the video is used for Synchronization and should be rendered black
therefore.
Frame tolerance from Master to Slave +/- 1 Frames
Page 34
34
9. HTTP COMMAND FUNCTION
Make sure that the HD Player Pro is already connected to the network. (Refer to 7.1)
Also check the “Local HTTP Server” function has been enabled, and the “Local HTTP Server
Setup” has been completed (refer to 7.2).
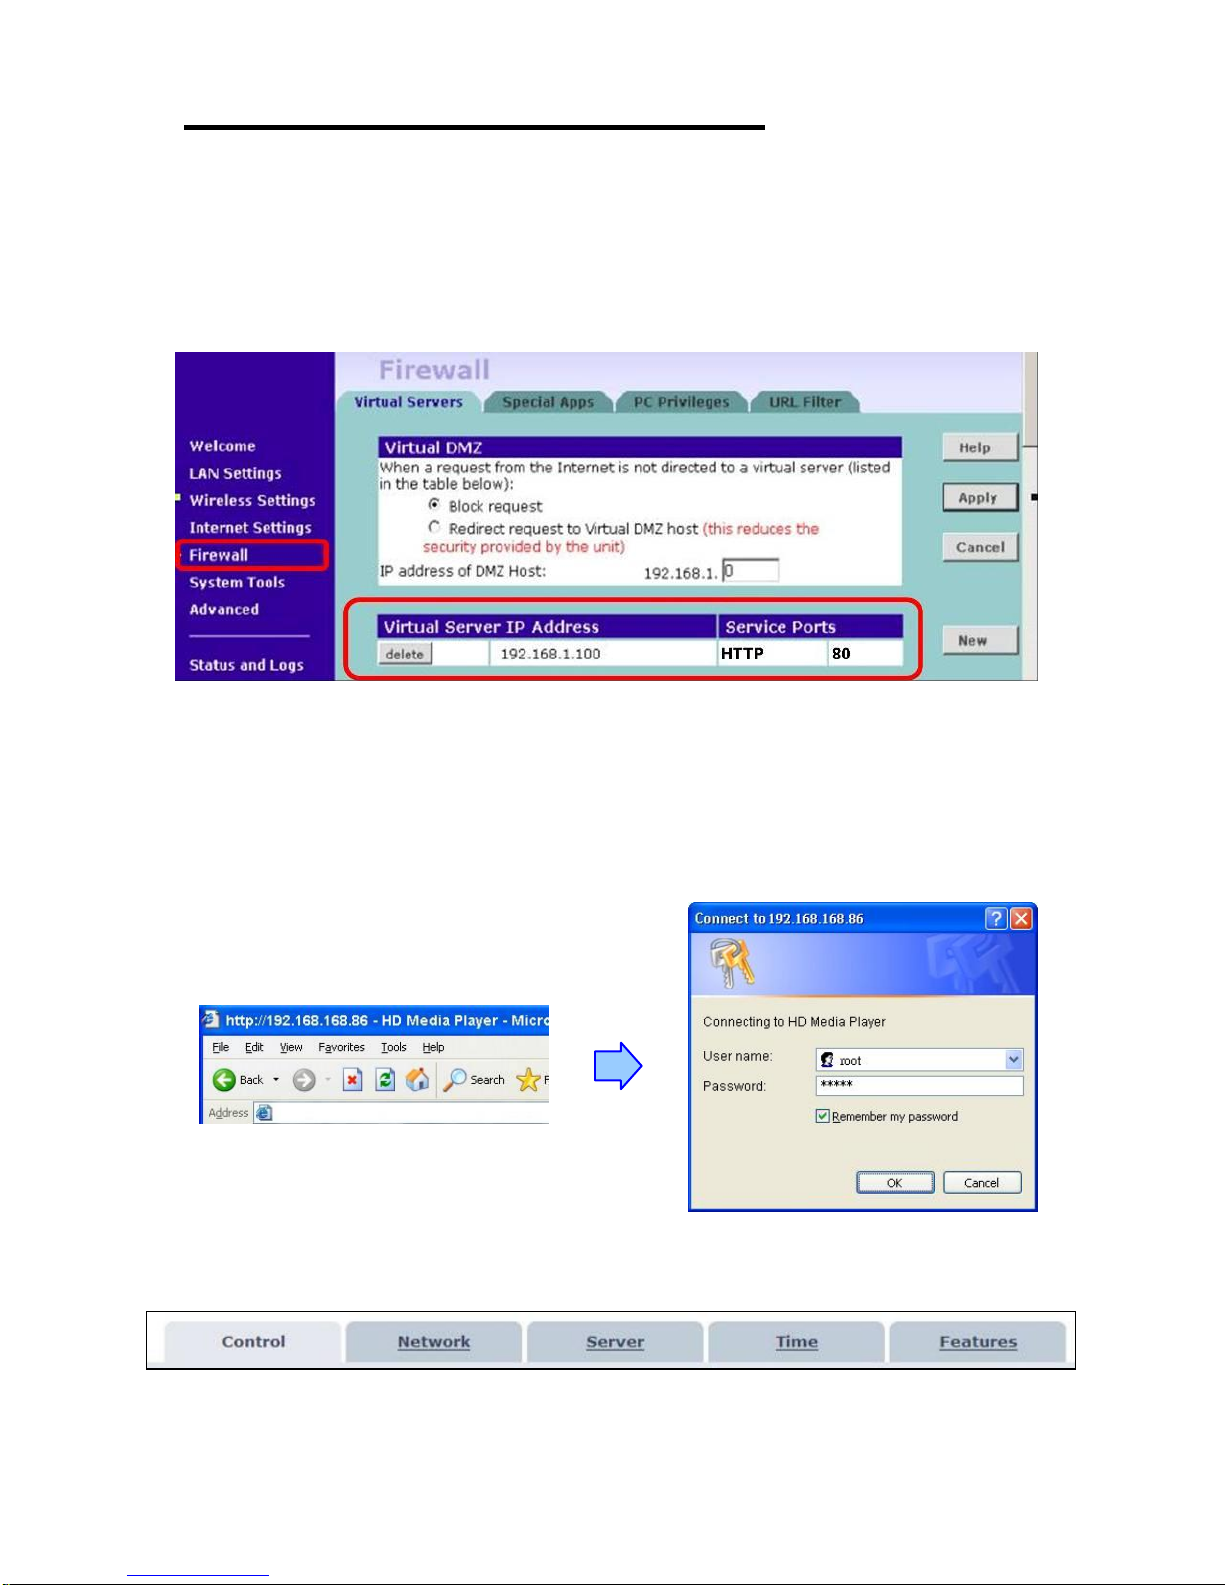
Set your router or firewall, and open the port 80 for the HD Player Pro. The following figure is an
example - please refer to your user’s manual of router for opening ports.
Start IE Browser on PC and type the HTTP site or IP:
In the local PC, please type “http://192.168.1.100”.
In the remote PC, please type “http://61.30.13.40:80”.
Type the “User Name”, “Password” and click “OK” to log on. (Default User Name: root Default
Password: admin)
There are five items: “Control”, “Network”, “Server”, “Time” and “Features”
Page 35
35
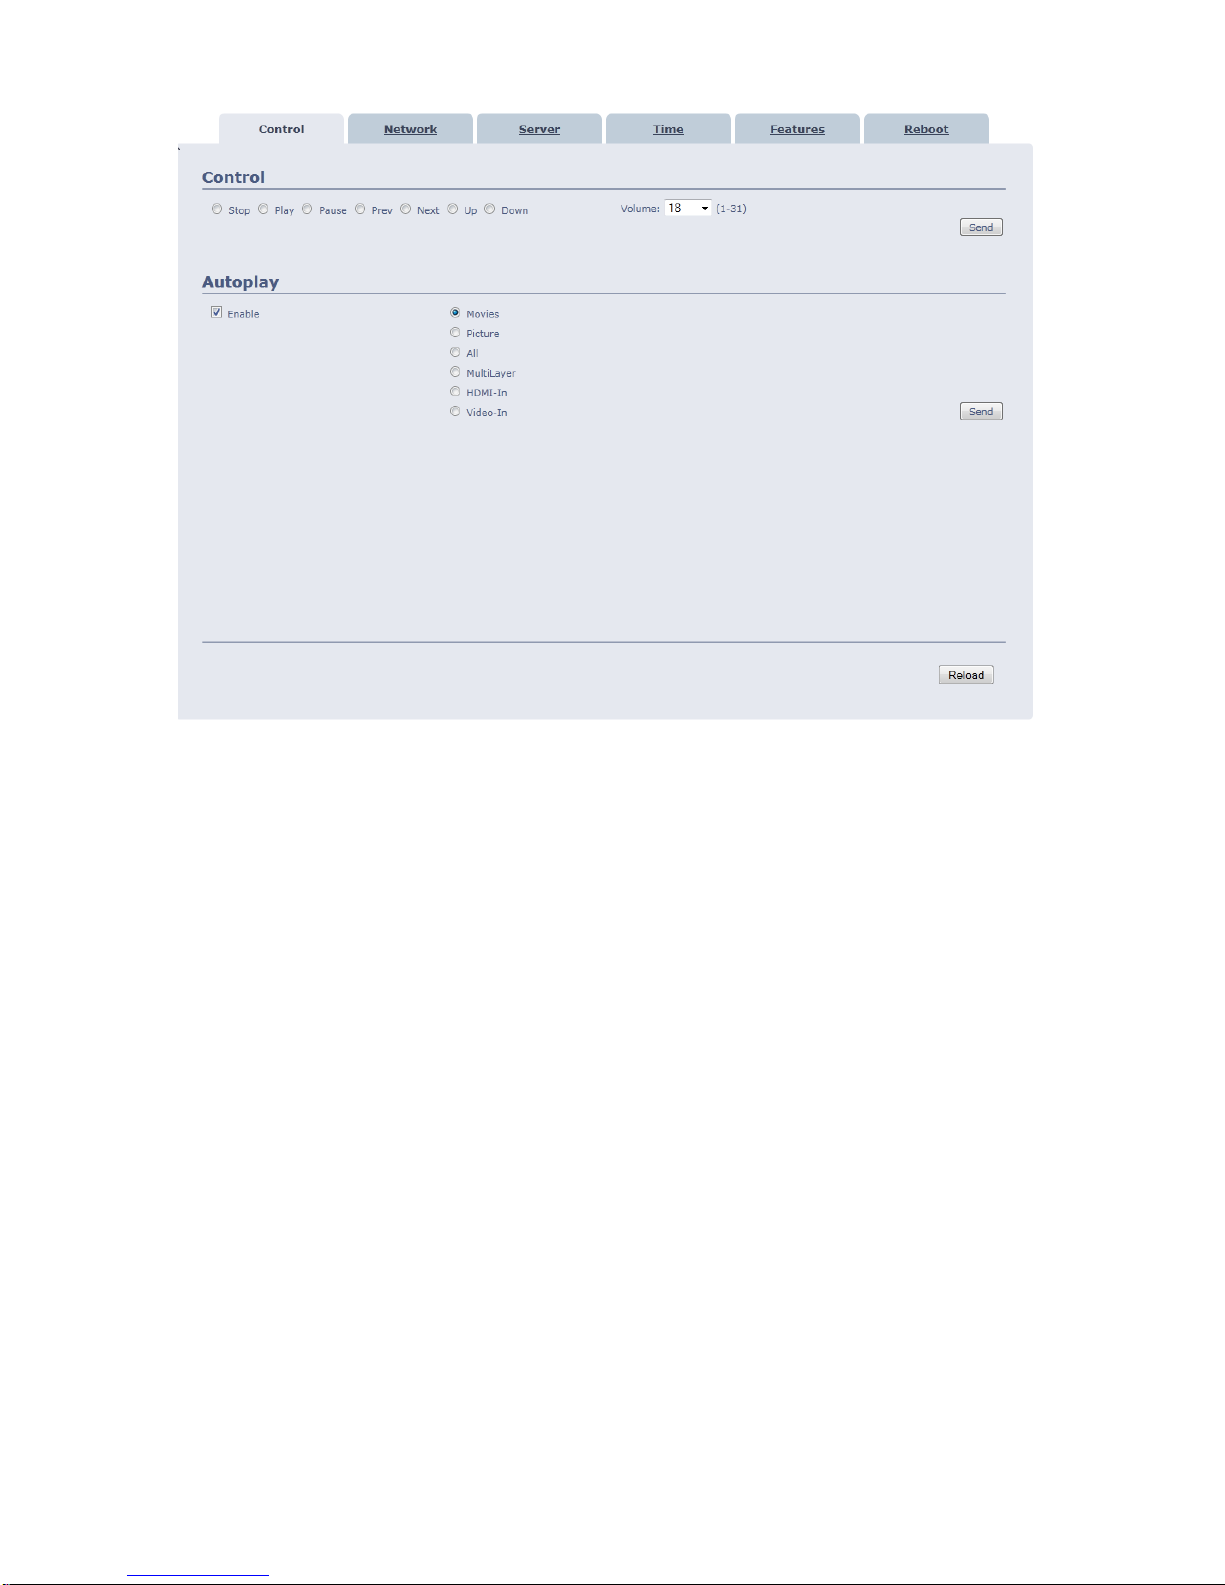
9.1 Control
Control: Select one of the control command s, and press the “Send” to control the HD Player Pro
immediately.
Stop: Stop playback
Play: Start playback.
Pause: Pause the playback.
Prev: Play the previous file.
Next: Play the next file.
Volume: Adjust the volume.
Up: Cursor up
Down: Cursor down
Autoplay: Select the auto play mode.
Enable: Enable or disable the auto play function.
Movies: Auto play movie files on the CF card after power on.
Pictures: Auto play picture files on the CF card after power on (slideshow function).
All: Auto play all the media files on the CF card after power on.
Multi Layer: Directly execute Multiple Display function after power on
Page 36
36
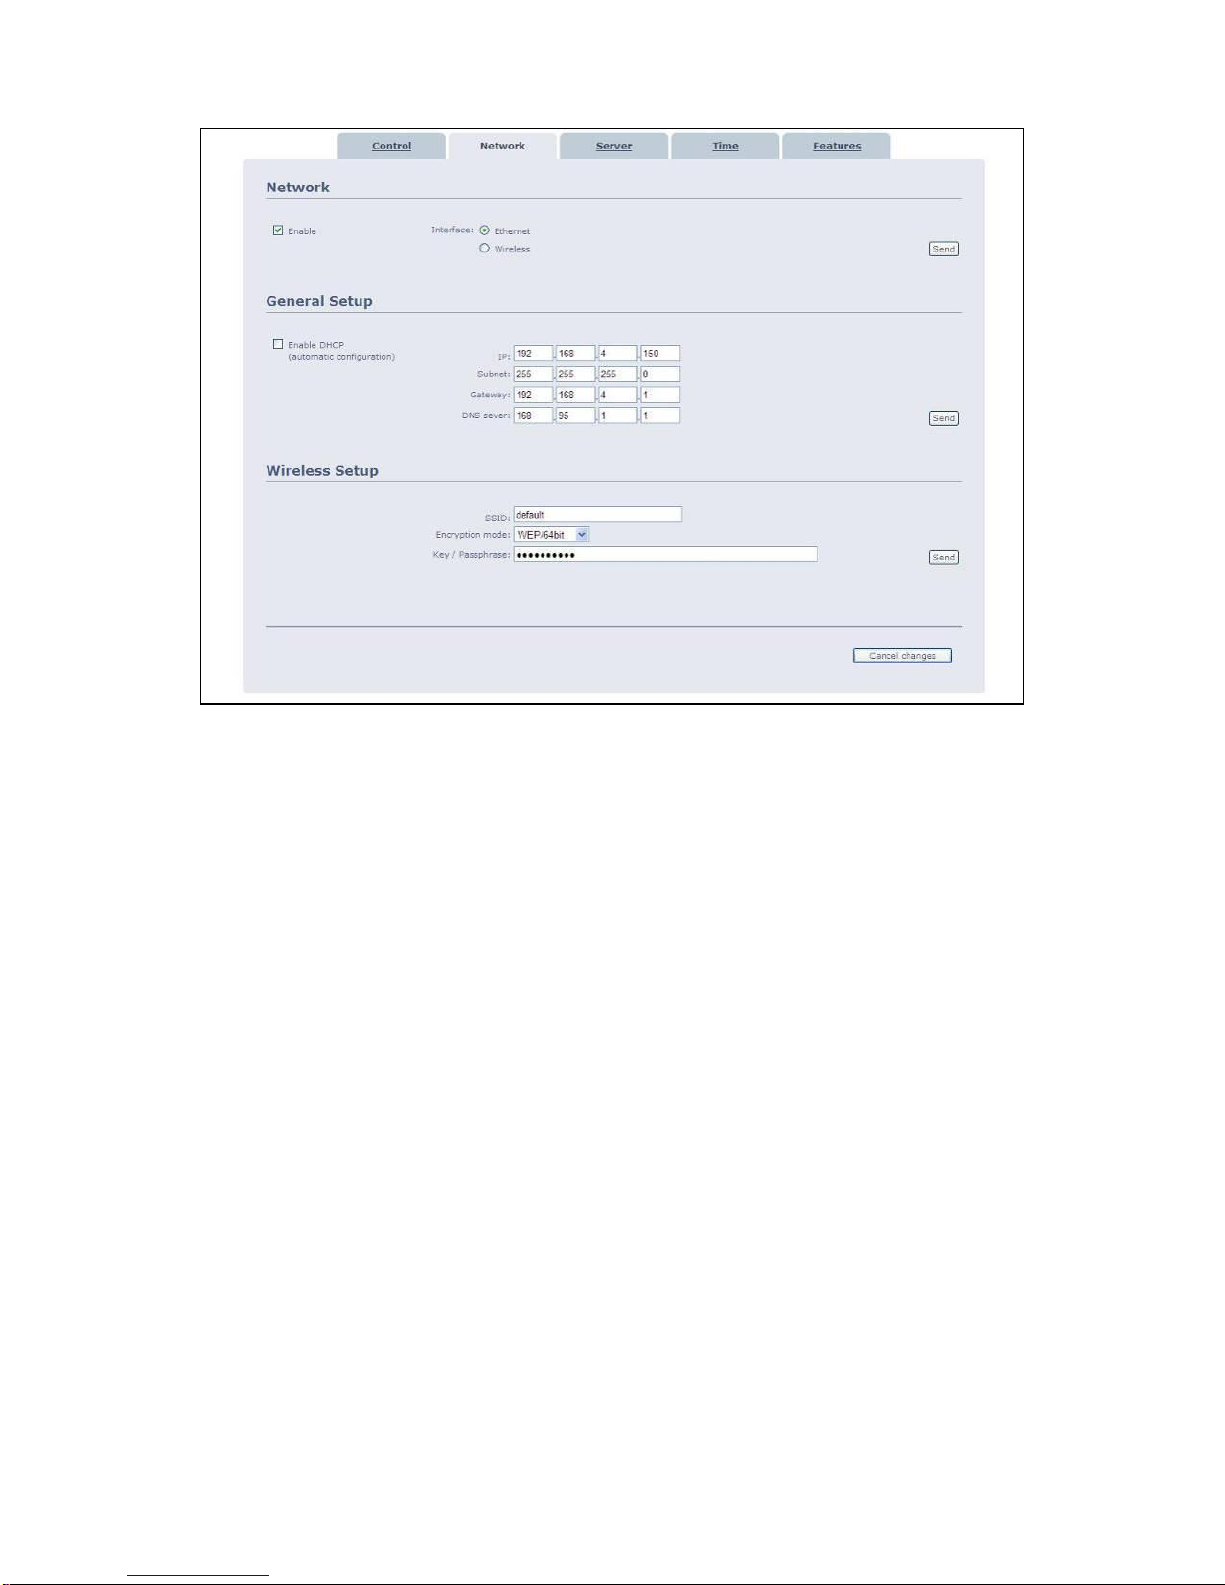
9.2 Network
Network
Enable: Enable or disable the network function.
Interface: Select your network connection Ethernet (wired) or Wireless.
General Setup
Enable DHCP: Enable or disable the DHCP function.
IP/ Subnet/ Gateway/ DNS server: Enter the fixed IP address, Subnet, Gateway and
DNS for the HD Player Pro.
Wireless Setup (not used for this type of Player)
Page 37
37
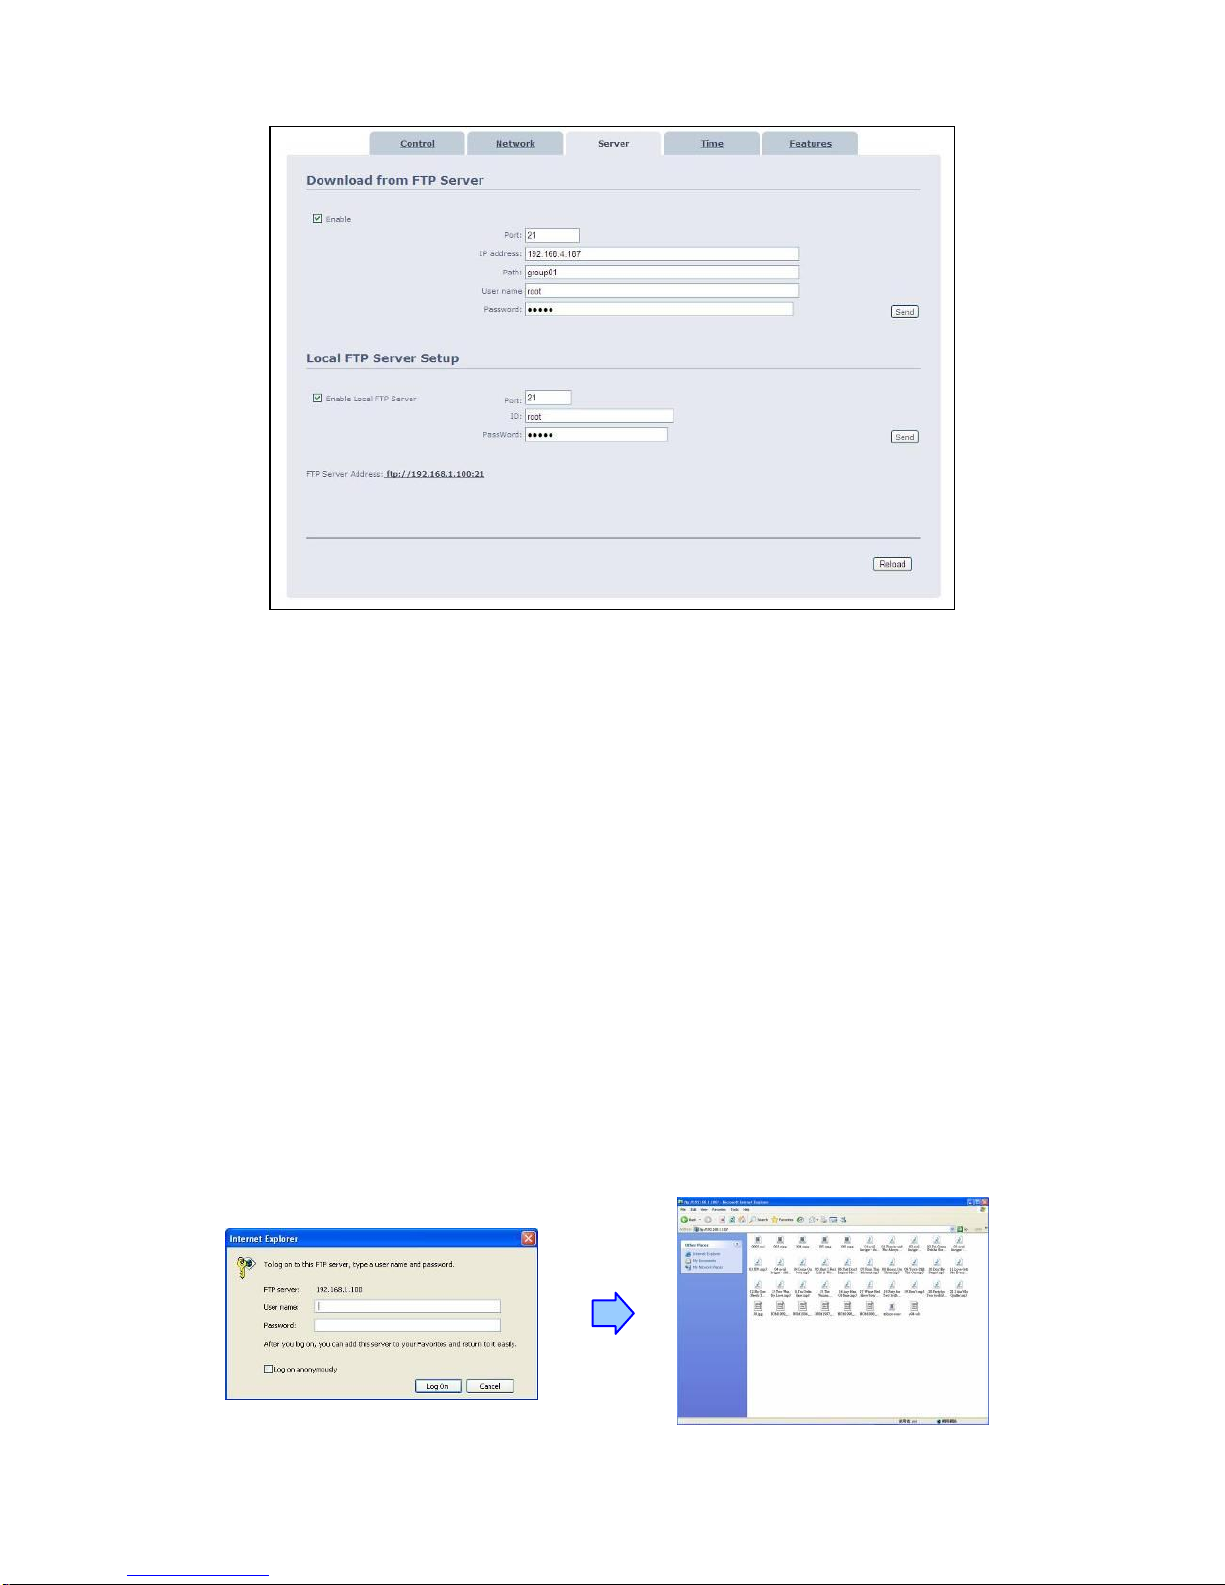
9.3 Server
Download from FTP Server
Enable: Enable or disable the FTP auto download function.
Port: The default port for FTP is 21. In most cases you should not change this number. If
the FTP site uses a port other than 21, you should enter the correct port.
IP address: Enter the domain name or IP address of the remote FTP server.
Path: Enter the folder path that you want to share.
User name: Enter the user name of the remote FTP server.
Password: Enter the password of the remote FTP server.
Local FTP Server Setup
Enable: Turn on/ off the HD Player Pro server.
Port: Enter the port of the HD Player Pro
ID: Enter the user name of the HD Player Pro (default ID: root).
Password: Enter the password of the HD Player Pro (default password: admin).
FTP Server Address: Click on the address to directly connect to the HD Player Pro server. Enter
the user name and password (Default User Name: root, Default Password: admin) to log on.
After logging on all the media files on the CF card will be listed. You can download and upload the
media files between CF card and your PC.
Page 38
38
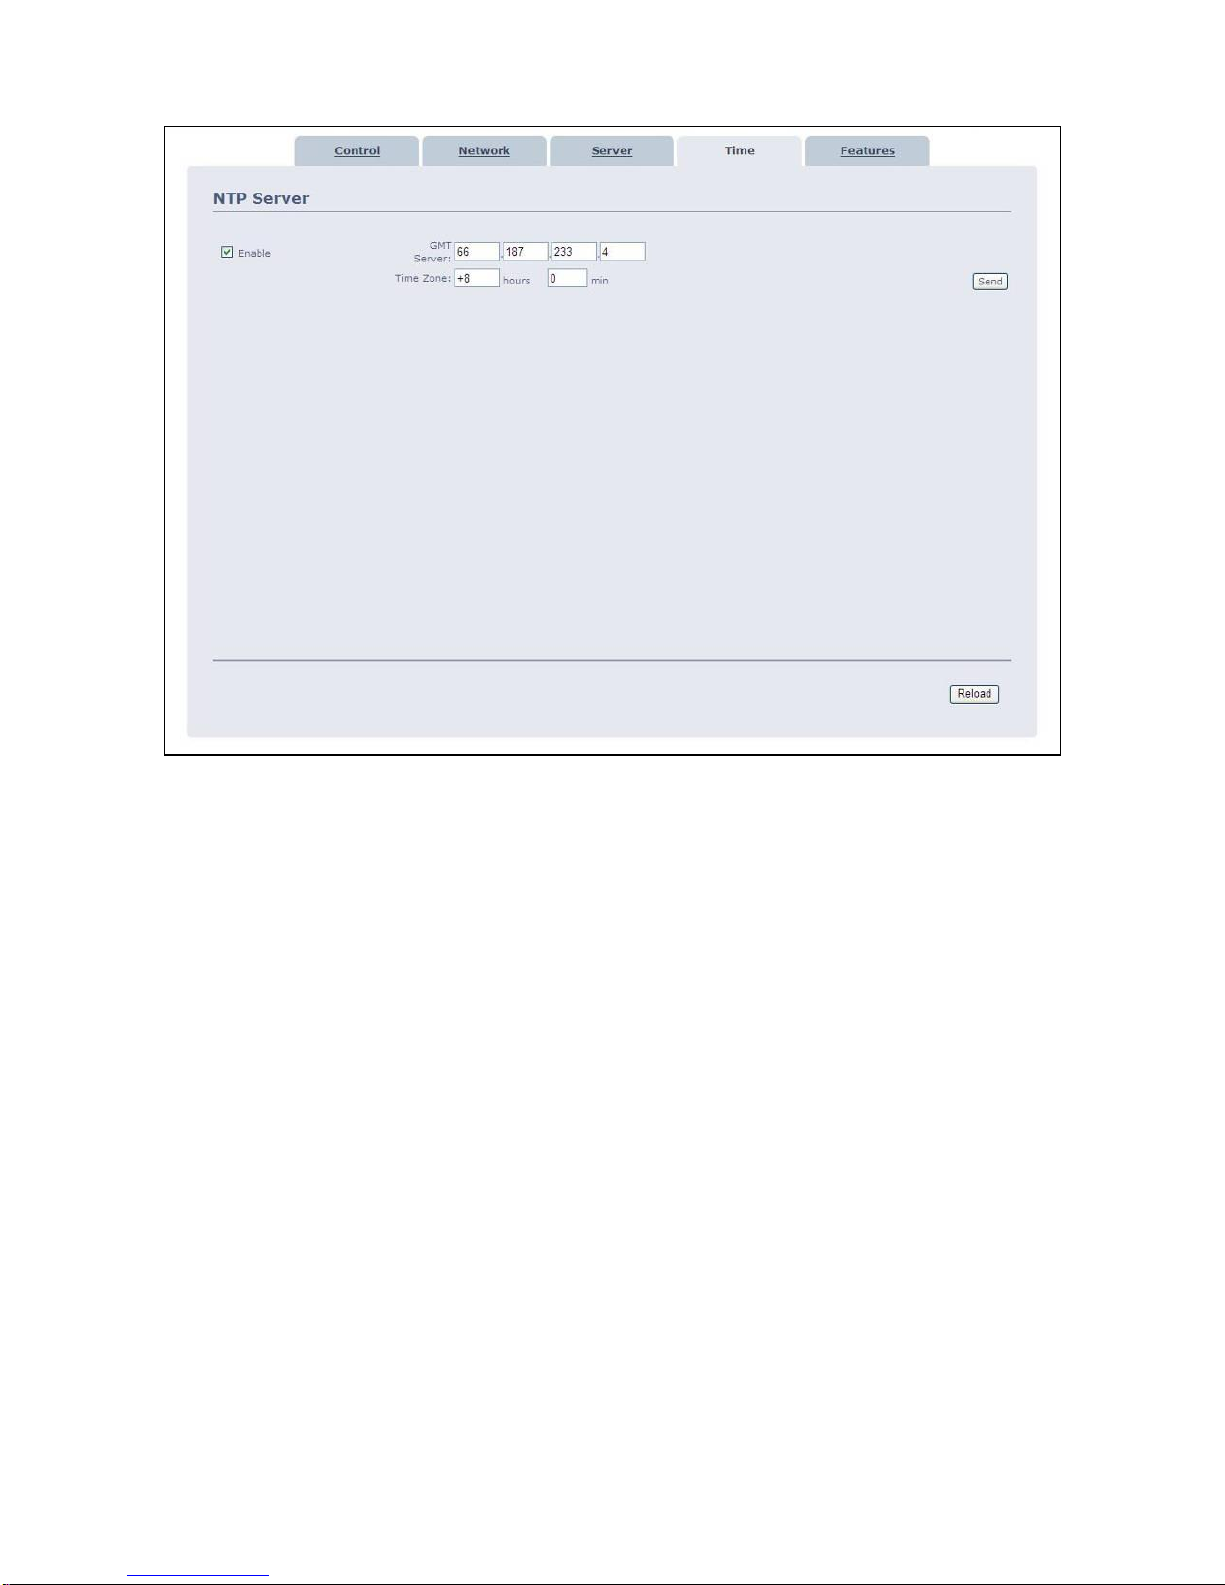
9.4 Time
NTP Server
Enable: Enable or disable the NTP server function.
GMT Server: Enter the NTP server IP address like: 66.187.233.4.
Time Zone: Set the time zone of your location.
Page 39
39
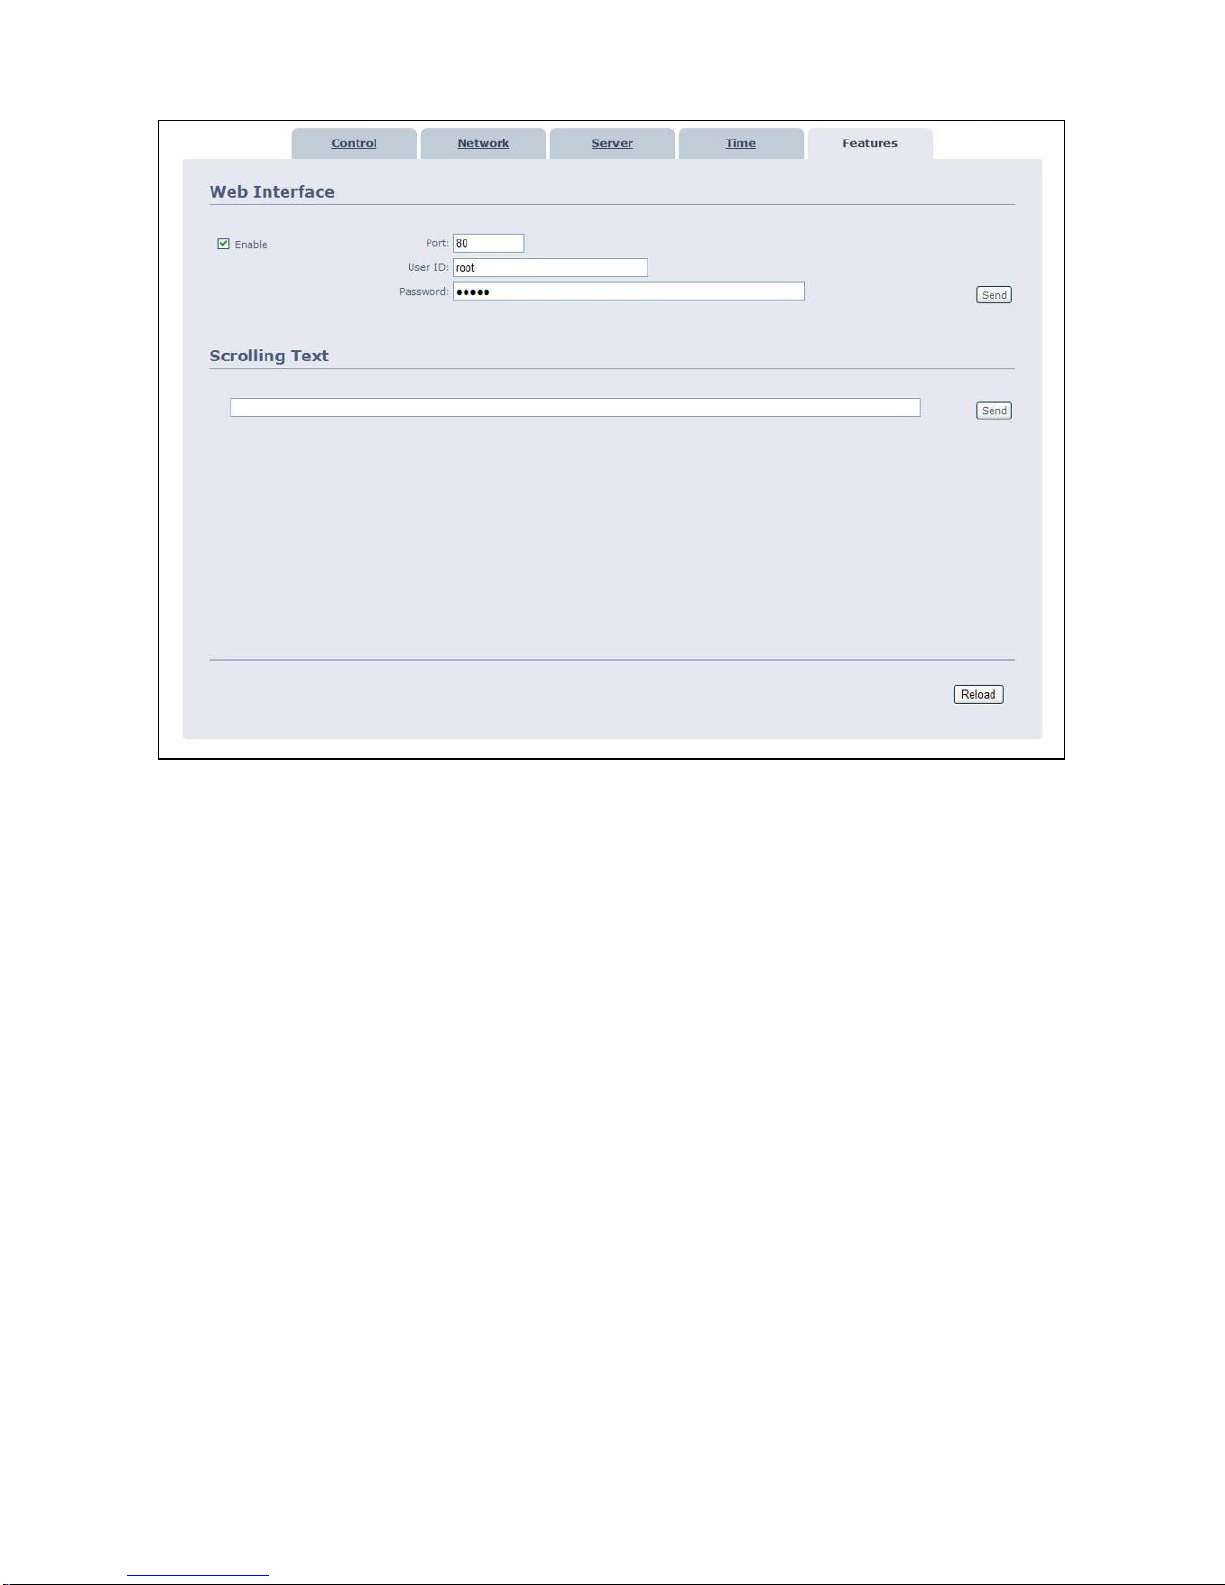
9.5 Features
Web Interface
Enable: Enable or disable the HTTP command function.
Port: Enter the port of the HD Player Pro (default port: 80)
User ID: Enter the user name of the HD Player Pro (default ID: root).
Password: Enter the password of the HD Player Pro (default password: admin).
Scrolling Text: Enter the message that you want to display, and press “Send” to display the
scrolling text message on the screen immediately (the message you entered through the http
function will not be stored on CF card).
Page 40
40
10. SCHEDULE FUNCTION
NOTE: The “NTP Server” or “Local Time” must be set before using the Schedule
Function. (refer to 7.2)
10.1 Install the Schedule software
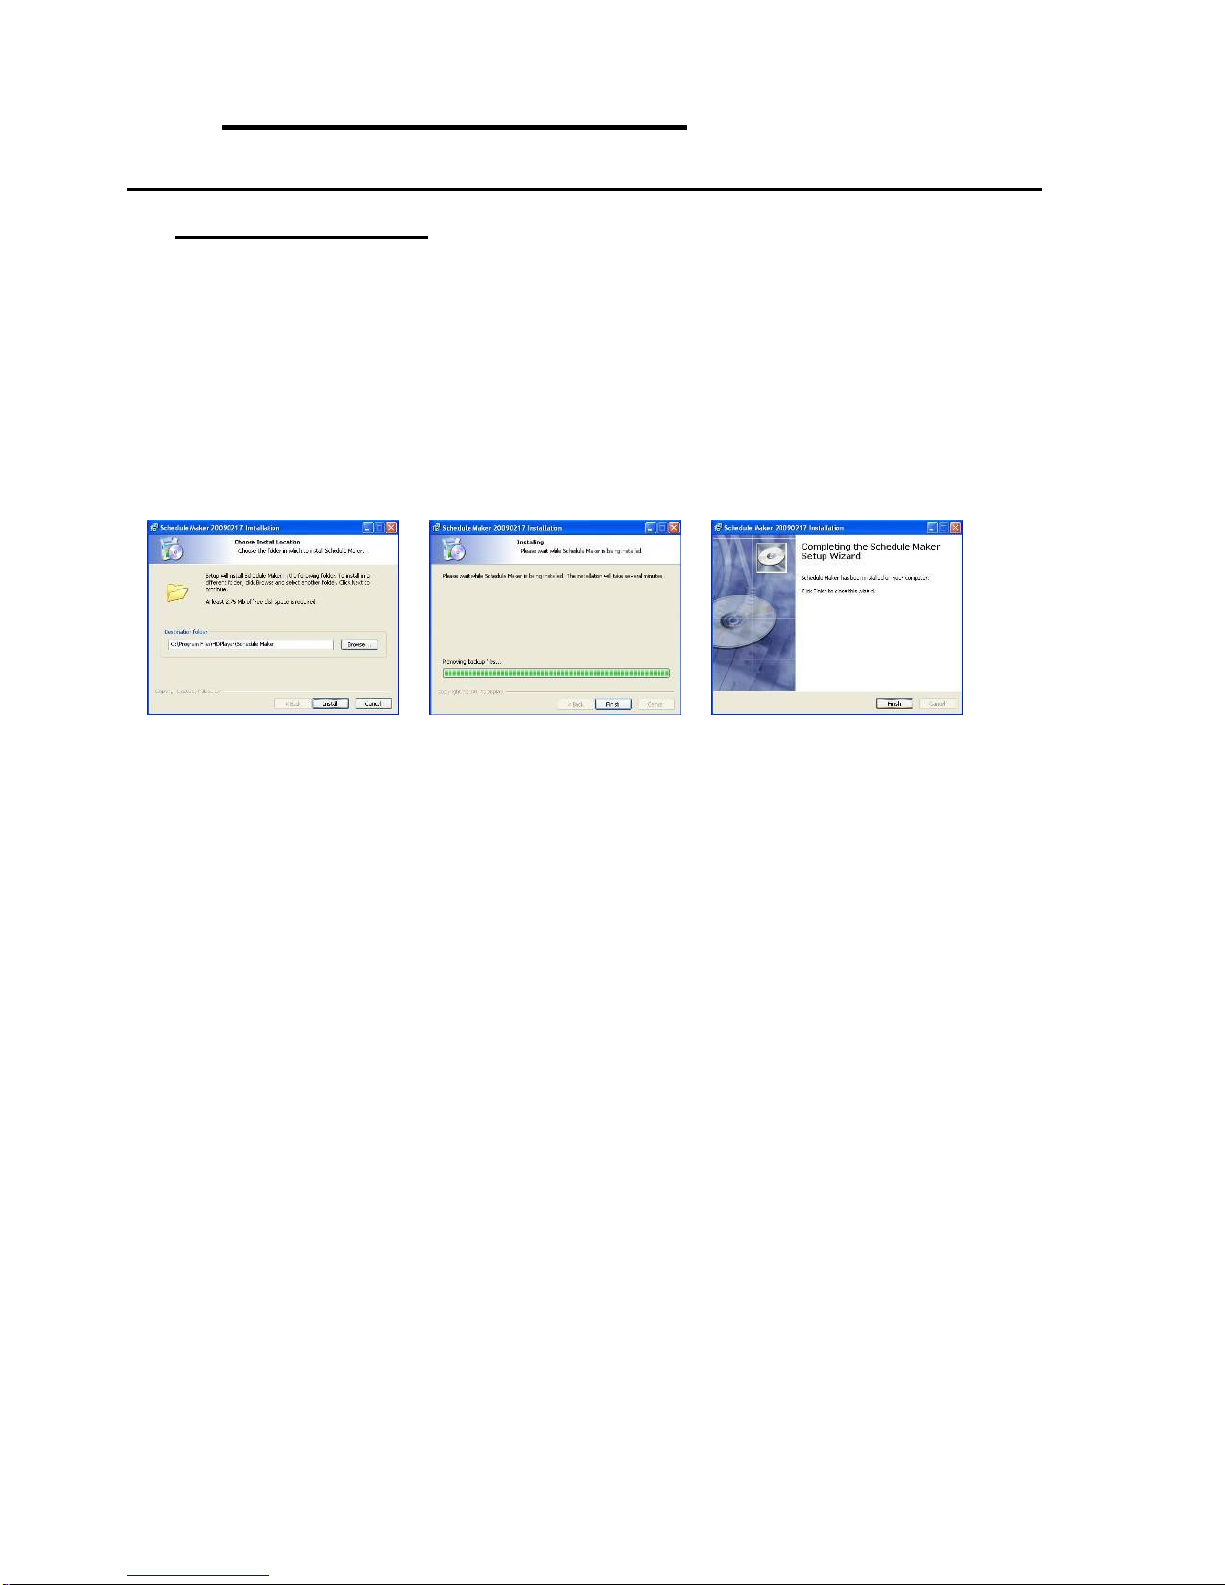
Step1: Insert the driver CD into your CD-ROM drive, then open the Folder “Scheduler” and run the
IPSetup.exe.
Step2: Click on the Install IP Detect to install the IP detect tool.
.
Step3: After installing the schedule software, the “Schedule Maker” icon ( ) should appear on your
desktop. Or you could also find the shortcut of “Schedule Maker” by click on < Start > → <
Programs > → < Schedule Maker 20090217 > → < Schedule Maker >.
Select the installation folder
and click Install to continue
Installing
Click Finish to complete the
installation
Page 41
41
10.2 Start the Schedule Software
You might double click the “Schedule Maker” icon on your desktop for opening the “Schedule
Generator”. Or you might click on <Start> → <Programs> → <Schedule Maker 20090217> → <
Schedule Maker > for starting the program.
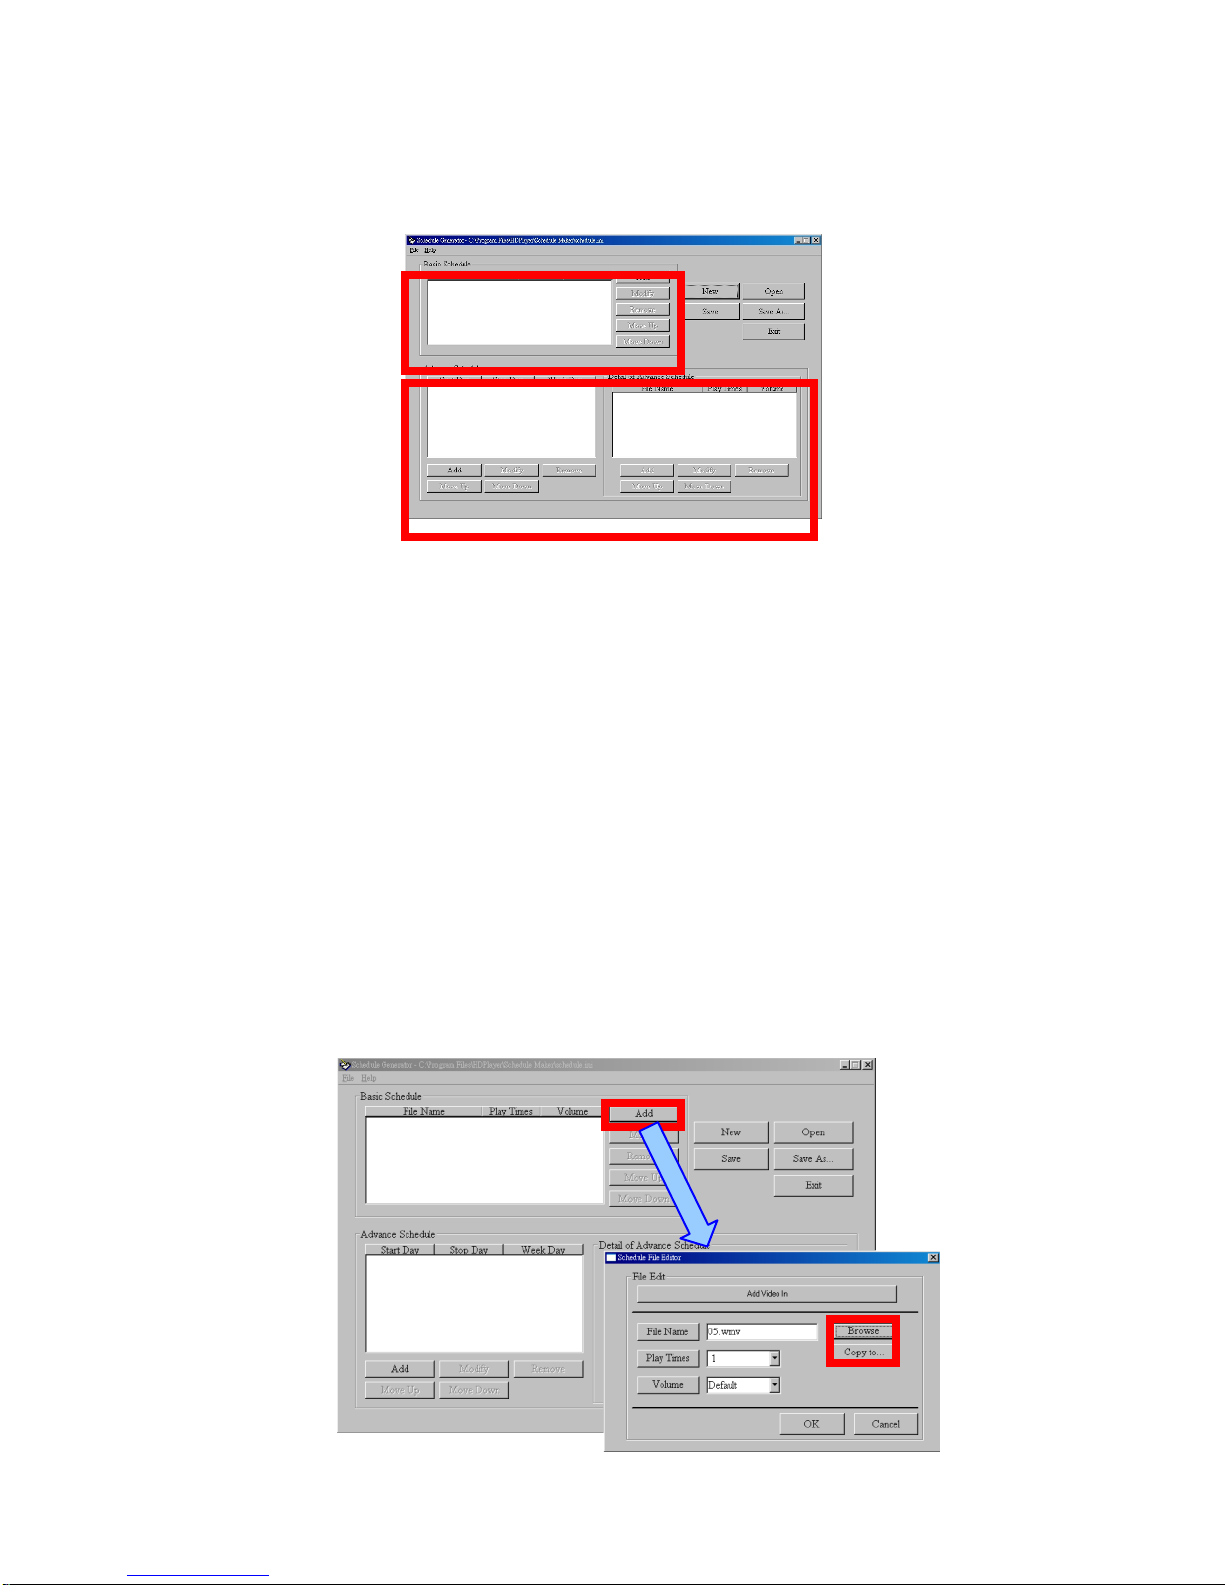
There are two parts of program: “Basic Schedule” and “Advance Schedule” in the window.
10.2.1 Basic Schedule
In the “Basic Schedule” mode, you could arrange a basic schedule that instructs the player to play specified
video files in the ordinary time. You could also set up the play times of each video file on the schedule.
Add: Click this button to choose a video file. The following diagram appears:
Click on “Add Video In” button for instructing the player to play the HDMI input only
Click the “Browser” button to search for files that you want to add. You can also set up the
“Play Times” and “Volume” of the file in this window. Click the “OK” button to complete the
setup.
Click the “Add” button again to add other file. If you choose “Video In” in the previous step, the
“Add” button will be blank. That means you want the player to play the “Video In” in the
ordinary time. And if you’d like the player switching between the “Video In” and video files in
the specific time, you might combine a Video In Basic Schedule with an Advance Schedule
function.
COPY Function: Click the “Copy to…” button to copy directly the added file to the memory
card.
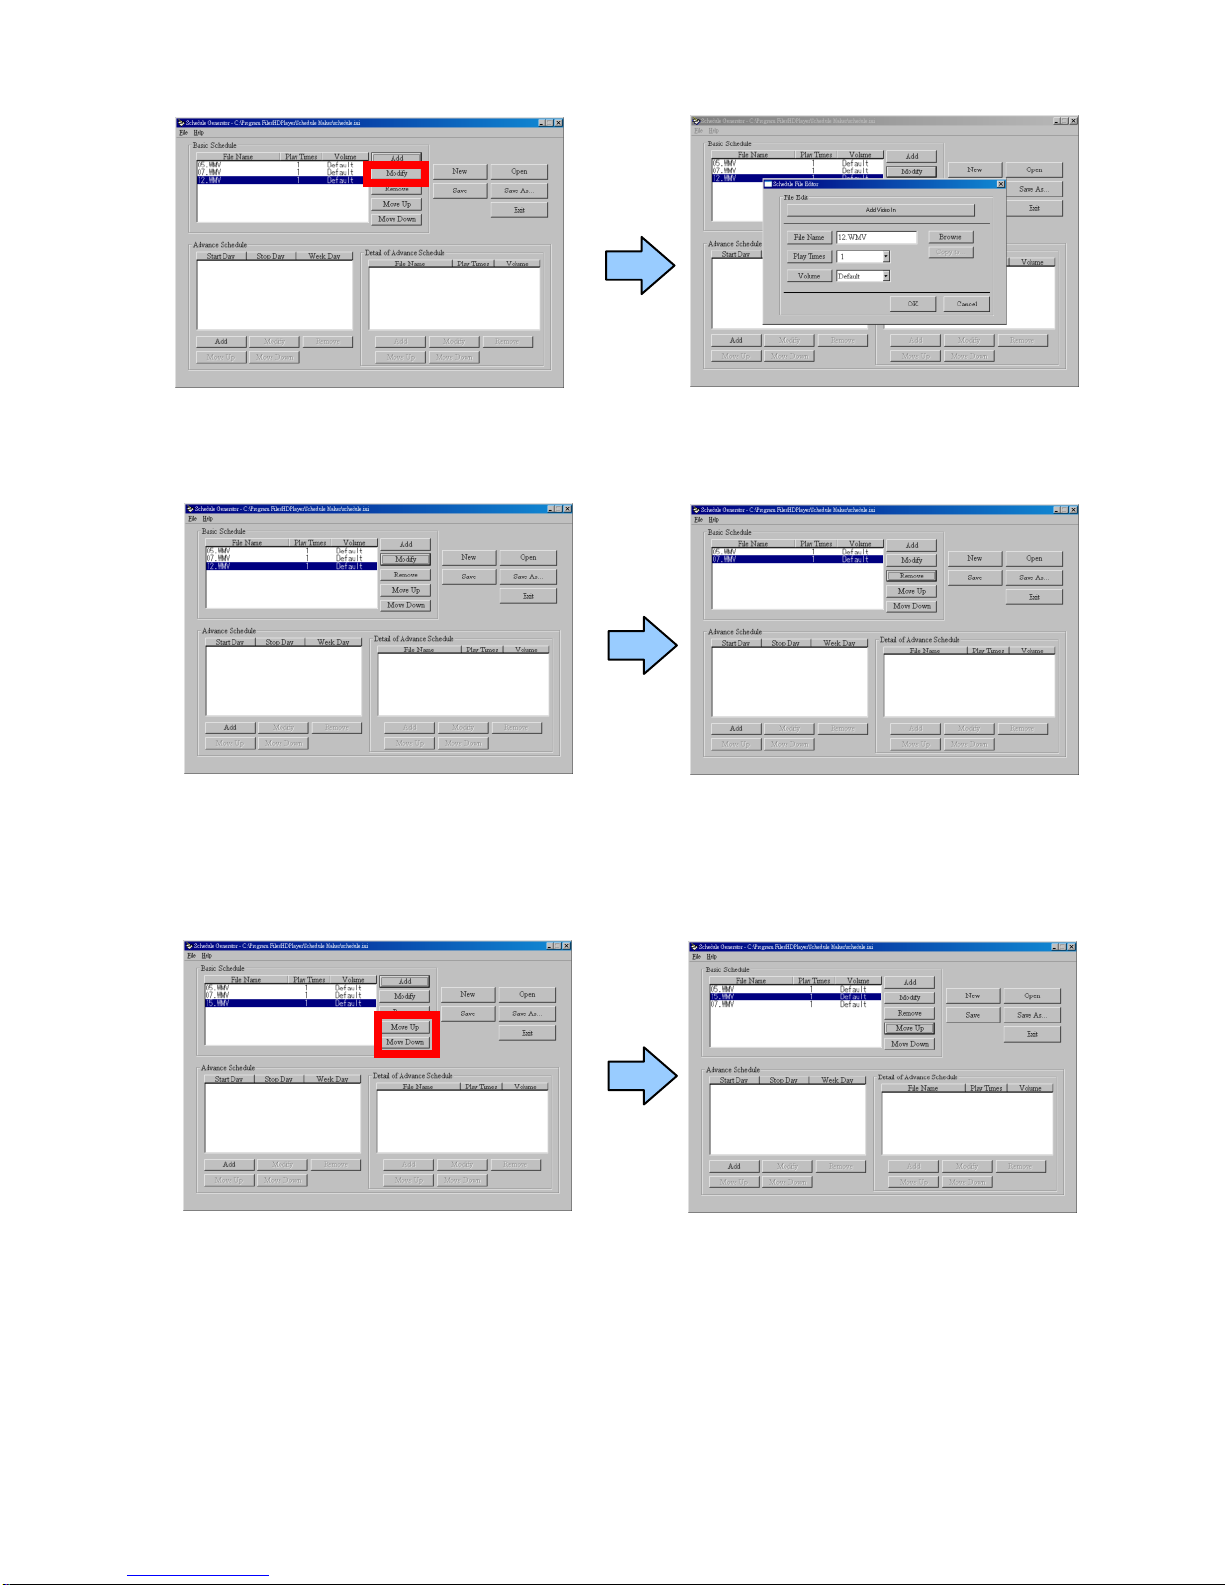
Modify: Click this button to modify the file in the list.
Page 42
42
Select the file that you want to modify in the list, and press the “Modify” button.
Remove: Click this button to remove the file from the list.
Move Up / Move Down: Click these buttons to change the order that the files are played.
Page 43
43
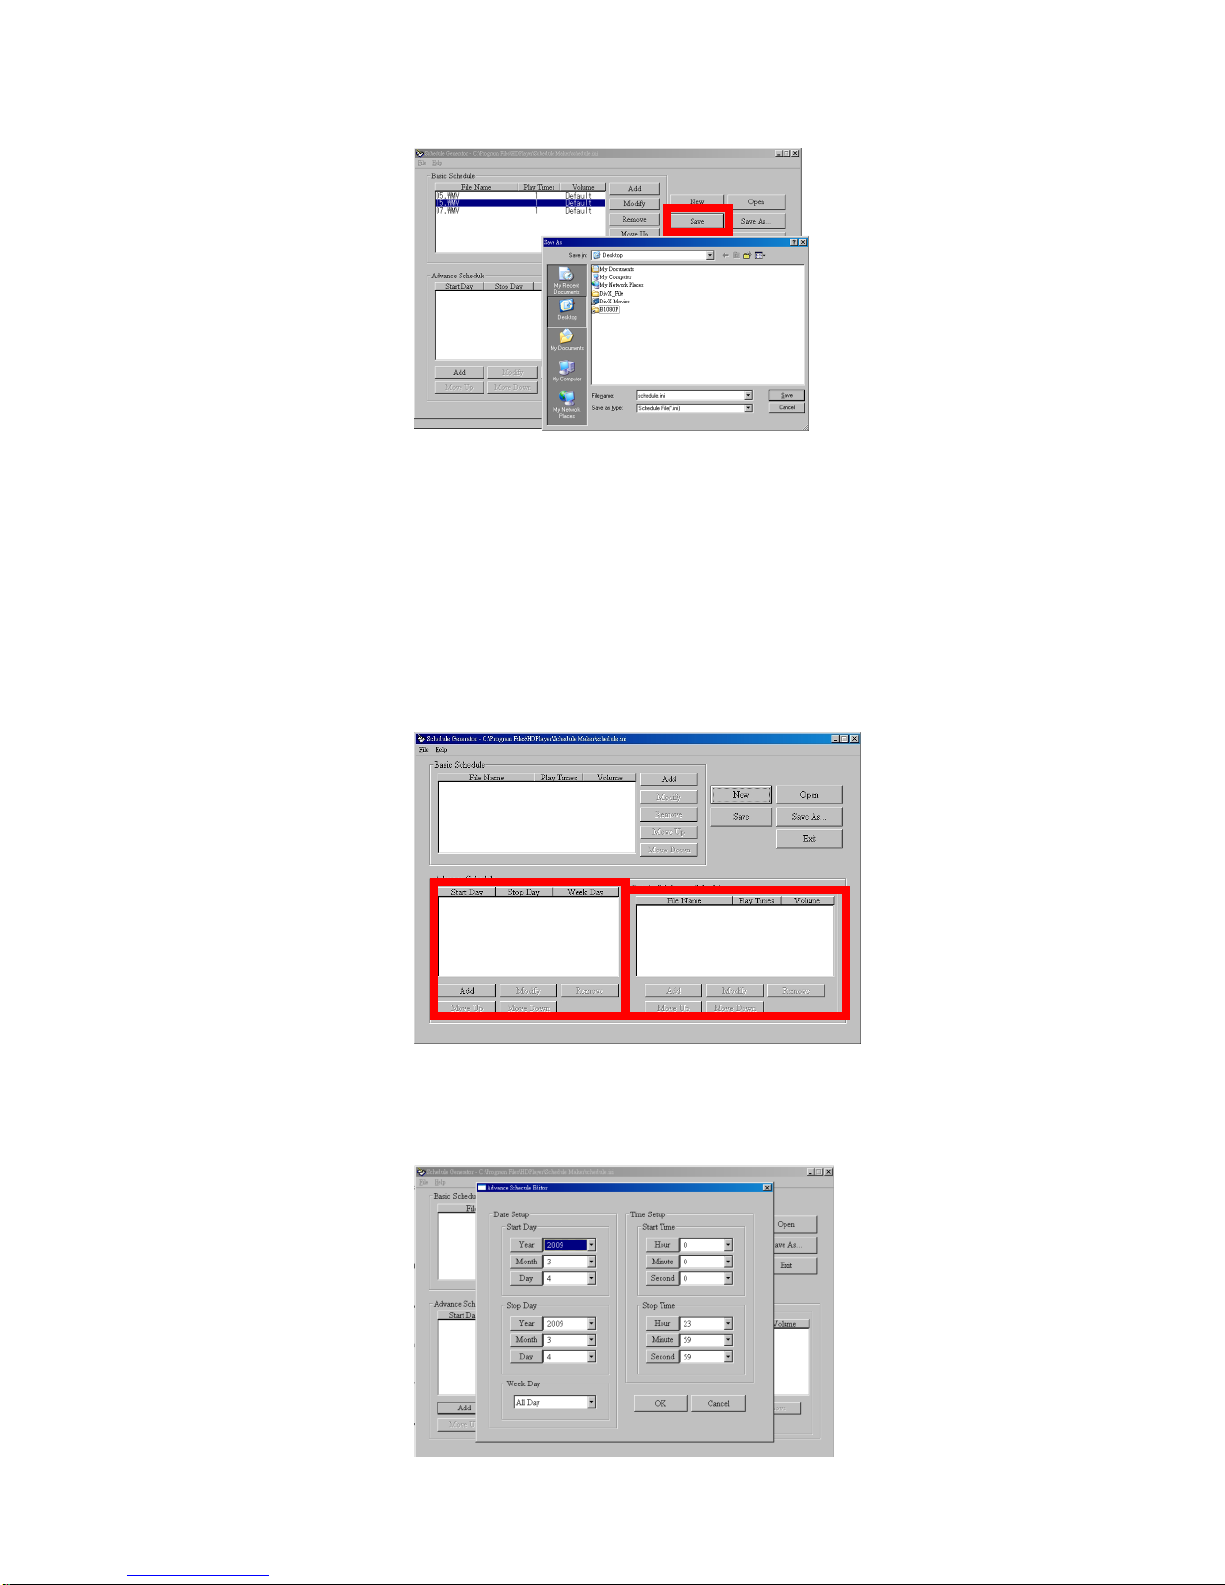
Press the “SAVE” button and a pop-up window will appear. Select the path, then click the “SAVE”
button to save your setup.
NOTE: Do not rename the file (schedule.ini), otherwise the HD Player Pro will not be able to read the
file.
10.2.2 Advance Schedule
In the “Advance Schedule” mode, you can select files that you want to play, and can also set up the
play times, and the initial and end time of each file. There are “Time Setup” and “File Setup” in the
“Advance Schedule”.
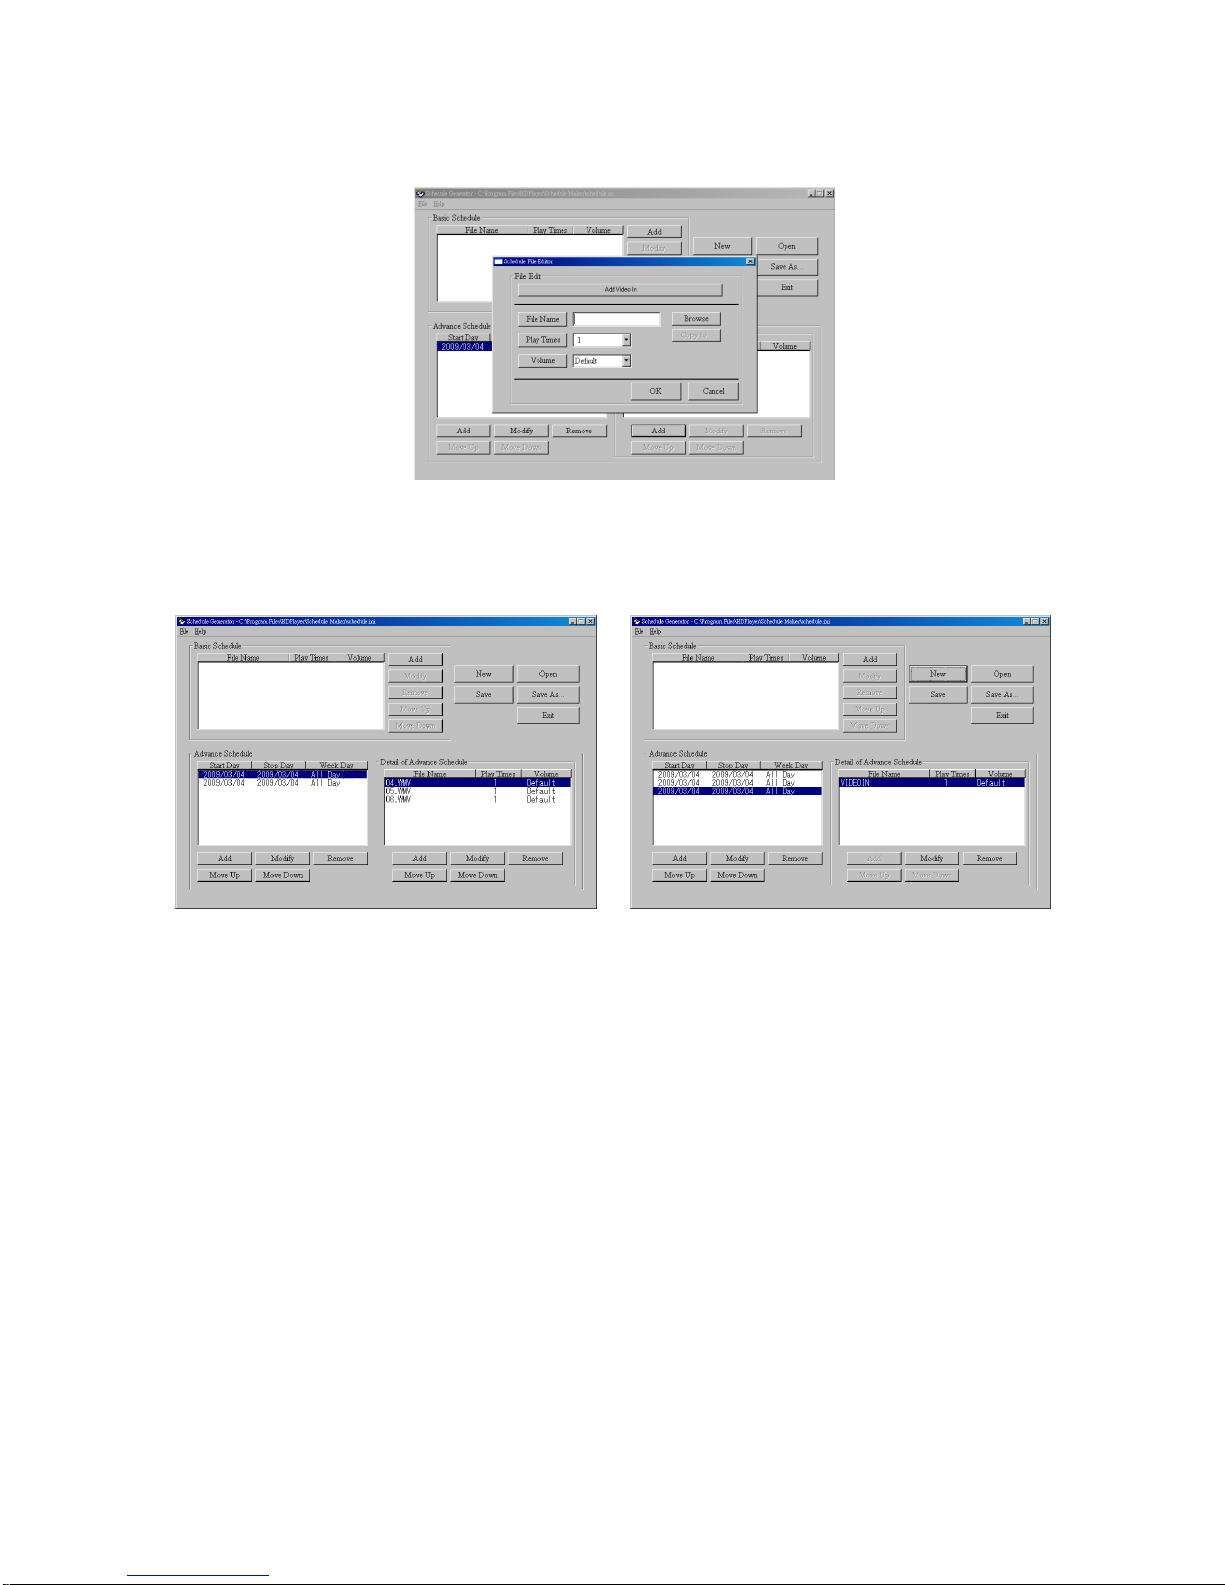
Step 1: Click the “Add” button in the “Time Setup” section to open the “Advance Schedule Editor”
window. Set up the Start and Stop Date, Start and Stop Time and the Week Day, then click “OK”
to quit the window.
Page 44
44
Step 2: Click the “Add” button in the “File Setup” section to open the “Schedule File Editor” window.
Click the “Browser” button to select a file that you want to play. You can also set up the “Play
Times” of the file in the window. Click the “OK” button to complete the setup.
Step 3: Repeat the steps 1 and 2 to add other files.
Step 4: After finishing all setup, press the “SAVE” button and a pop-up window will appear. Select the
path, then click the “SAVE” button to save.
NOTE: Do not rename the file (schedule.ini), otherwise the HD Player Pro will not be able to read the
file.
Page 45
45
10.2.3 Explanation of the Warning Message
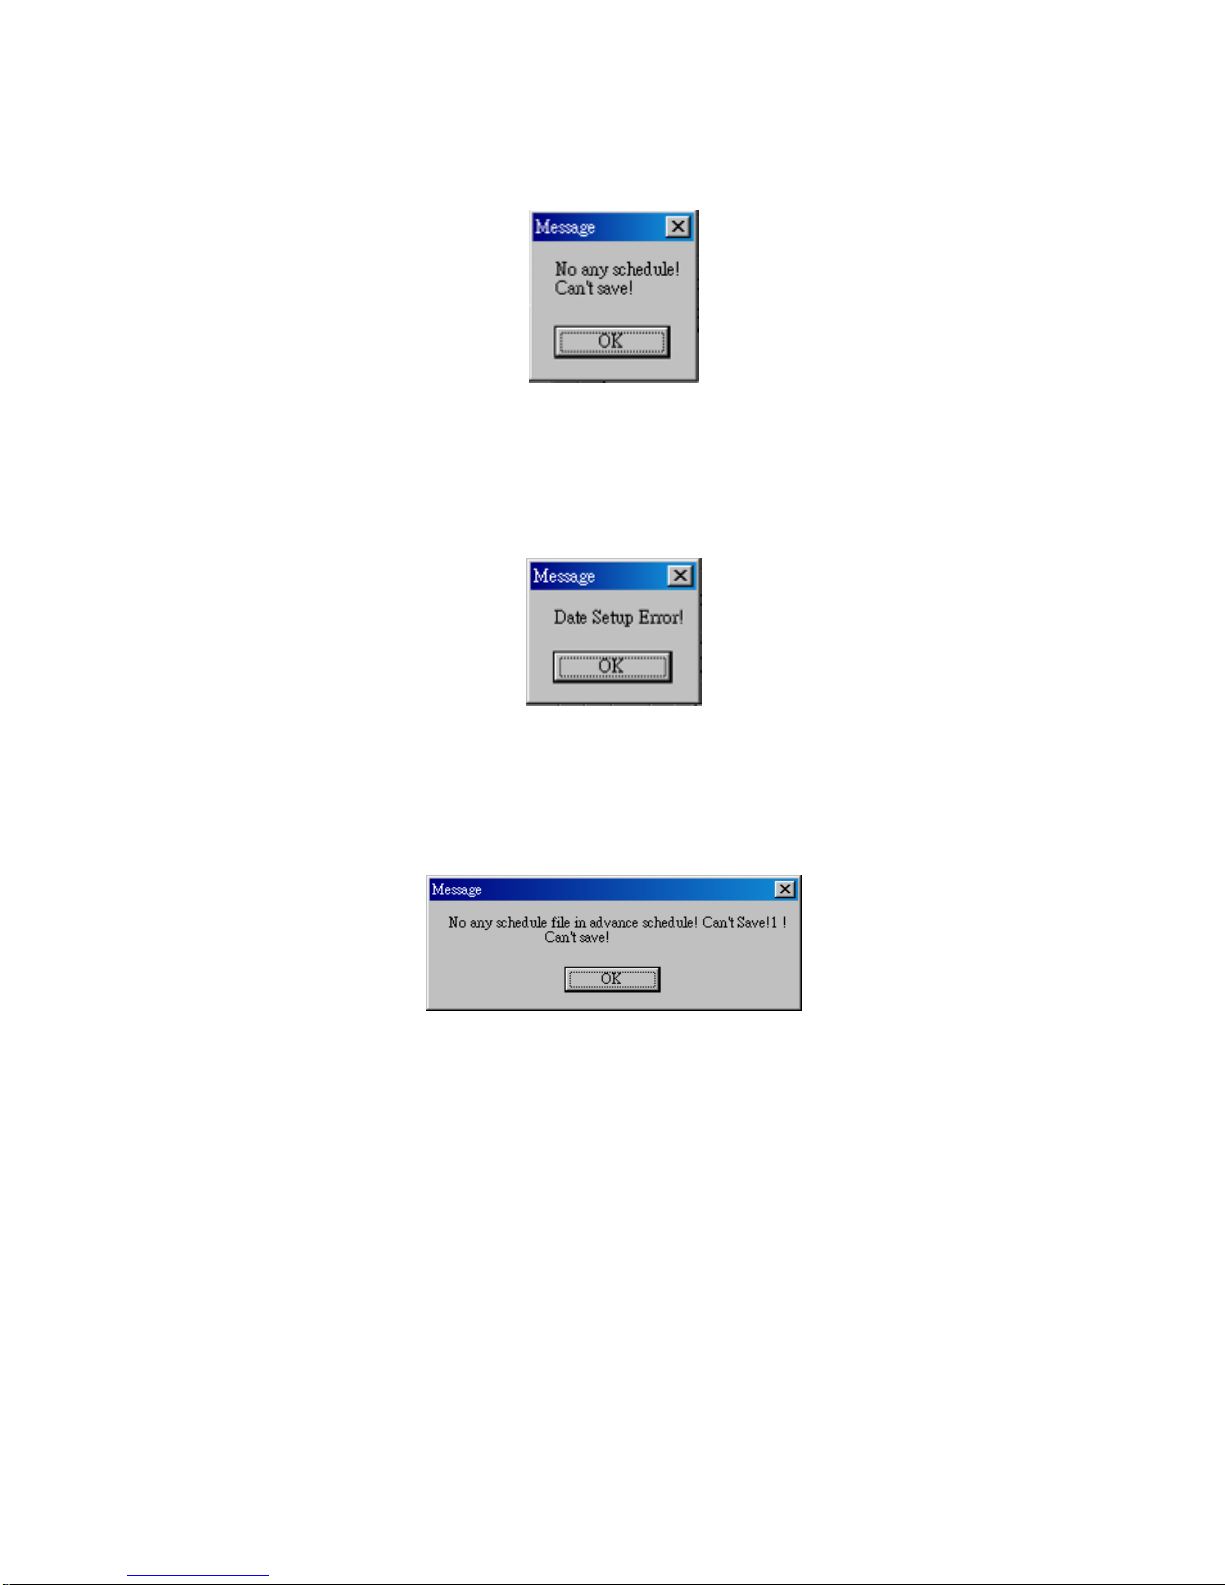
No any schedule!!Can’t Save!
There is no schedule file in the “Basic Schedule” or “Advance Schedule” can be saved. Please add
and edit a new schedule file first.
Date Setup Error!
There are some errors in the “Advance Schedule”. Check the date/ time of the schedule for conflict or
error.
No any schedule file in advance schedule!!Can’t Save!!
There is no schedule file in the advance schedule. Please add files that you want to play in the
advance schedule.
10.3 Apply the Schedule on the HD Player Pro
Put the “schedule.ini” file and the associated media files on the memory card, and insert the memory
card to the HD Player Pro. The HD Player Pro will auto play the files at the designated time.
Page 46
46
11 OPTIONAL AUXILIARY EQUIPMENT
11.1 Play-Button Box (SCV-HDZ-PBB)
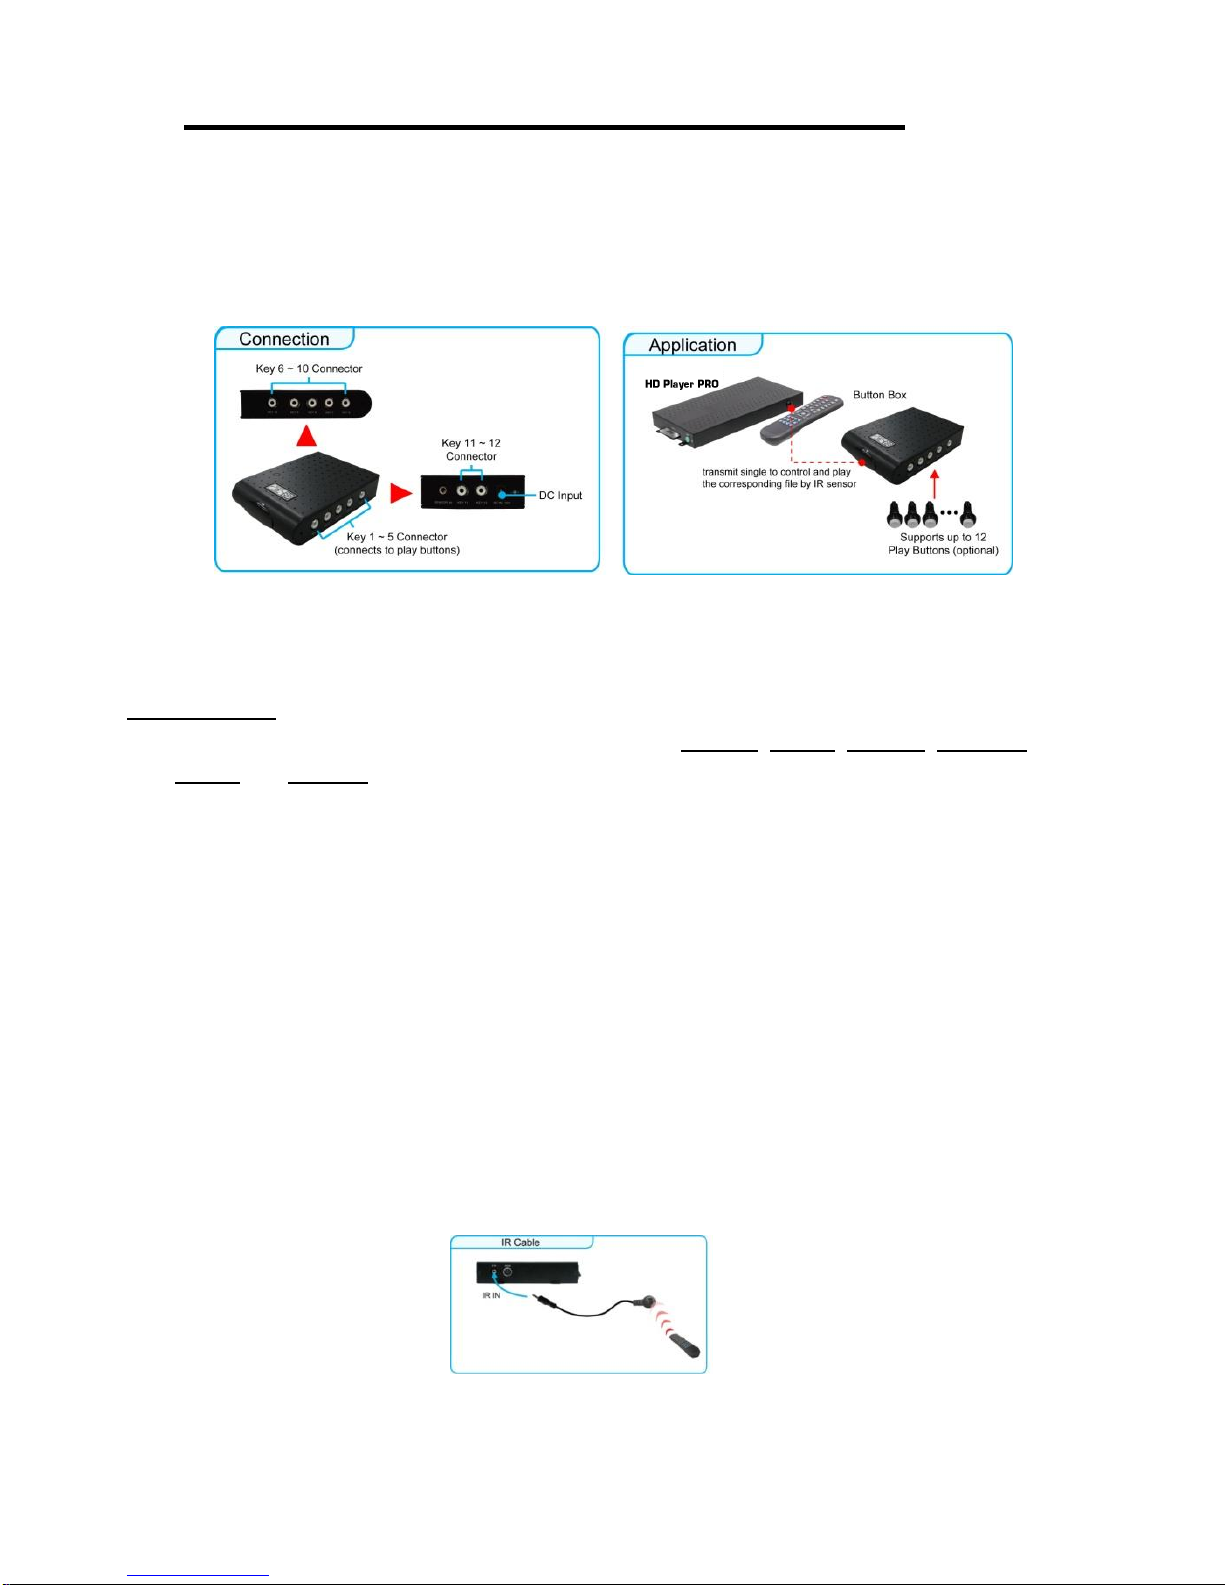
The Play Button Box supports up to 12 play-button inputs.
Press one of the play buttons to play the corresponding file.
Hardware Connection
Step 1: Put 6 demo files on CF card. (1 default file and 5 demo files)
NOTE: The files are sorted by filename in ascending order or in alphanumerical order. Each button is
mapped to a file by this order.
For Example:
There are 6 demo files on the CF card. The file names are a01.xxx, 33.xxx, b55.xxx, 1abc.xxx,
07.xxx and A01.xxx. (xxx is extension of the file)
Default File:07.xxx Demo File 1:1abc.xxx Demo File 2:33.xxx
Demo File 3:A01.xxx Demo File 4:a01.xxx Demo File 5:b55.xxx
Step 2: Insert the CF card to the HD Player Pro, and the HD Player Pro will play the default file
automatically while powered on.
Step 3: Press one of the buttons 1-5 to play the corresponding demo file.
Step 4: The HD Player Pro supports two options (Repeat Default / Repeat All) when the demo file
finishes playing. The functions can be set in the setup menu. (Other Setup → Play Button)
- Repeat Default: The HD Player Pro will automatically play the default file when the demo file
finishes playing.
- Repeat All: The HD Player Pro will automatically play all the demo files one after another.
11.2 IR cable (SCV-HDZ-IRC)
The IR cable is an external remote control receiver. Connect the IR Cable to the IR input.
Page 47
47
11.3 PIR sensor (SCV-HDZ-PIR)
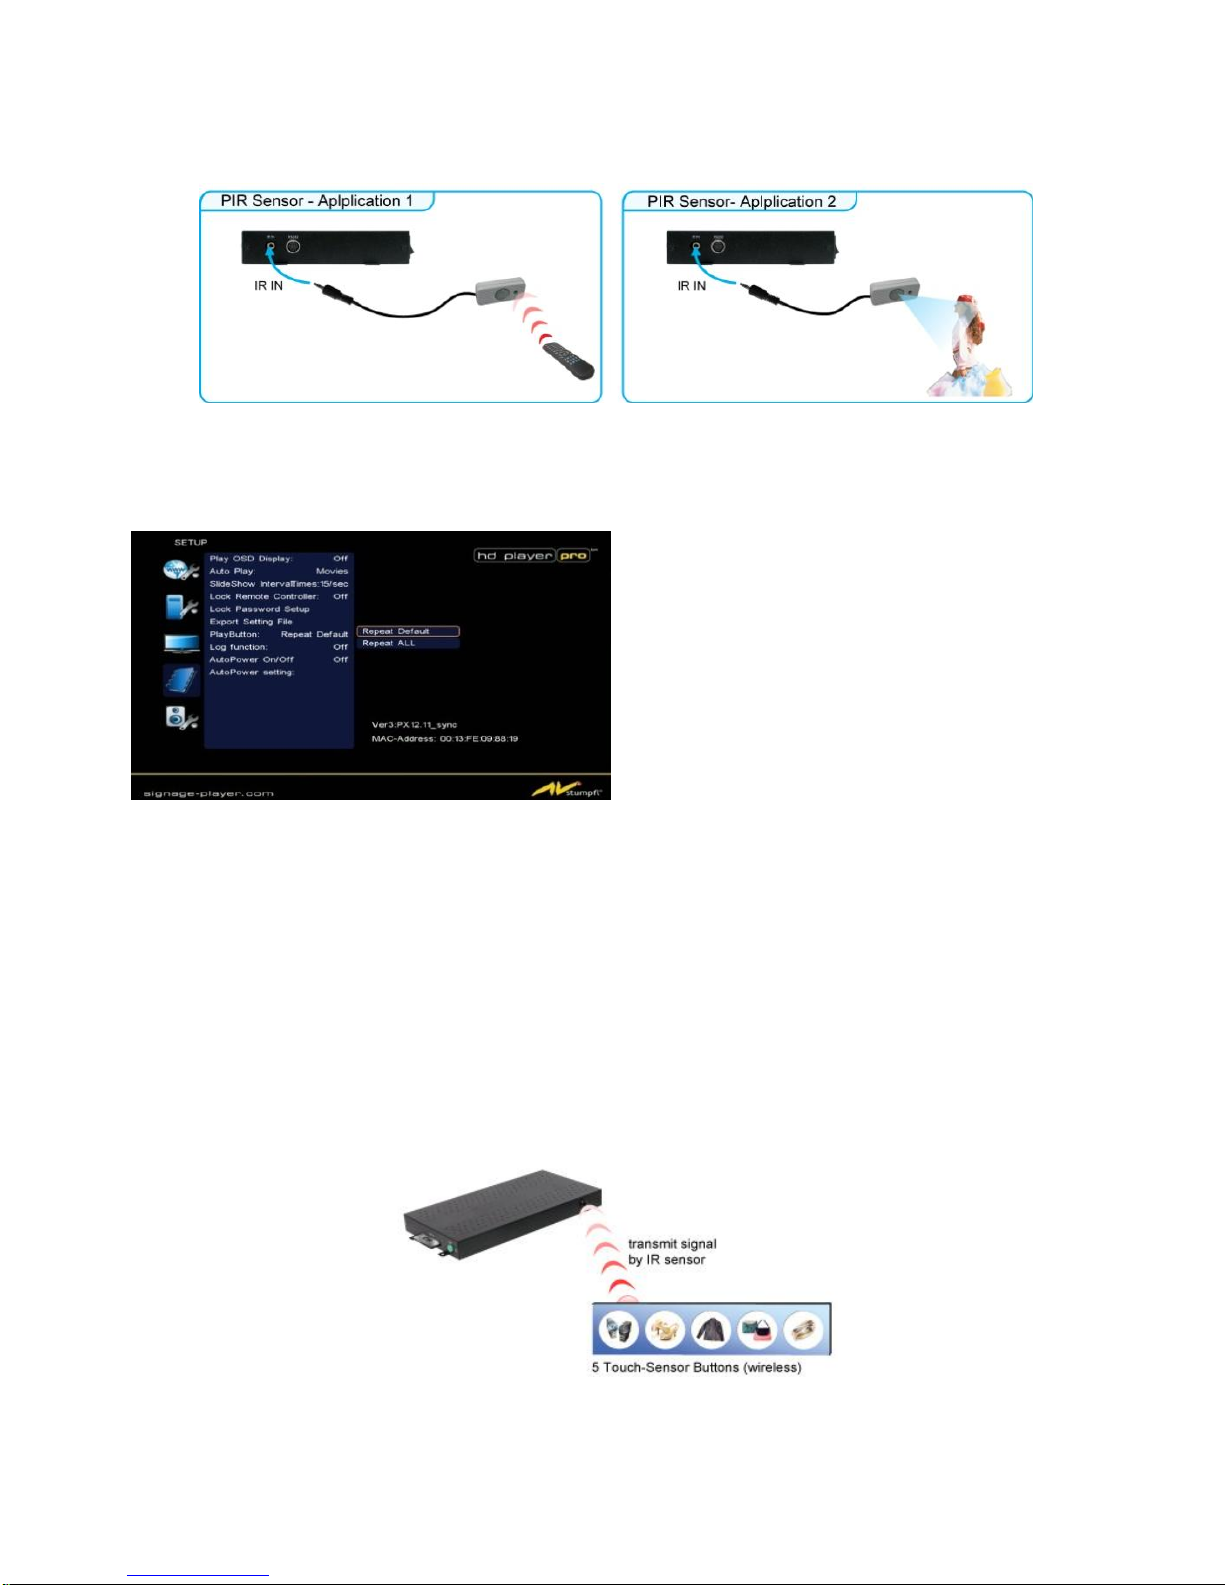
Application 1: The PIR Sensor is an external remote control receiver.
Application 2: The PIR Sensor is a motion detector.
11.3.1 Using the PIR Sensor
Step 1: Set the repeat mode to the “Repeat Default”.
Step 2: Insert the CF card to the HD Player Pro, and the HD Player Pro will play the default file
automatically while powered on.
Step 3: After sensing approaching subjects, the HD Player Pro will play all the demo files once.
11.4 Touch sensor button (SCV-HDZ-WIR5SB)
11.4.1 Features of the Touch-Sensor Buttons
The number of touch-sensor buttons can be customized to 12, 24 or 36 for OEM project.
Used with various operating environment (glass, plastics and acrylic material, except metal
material), the thickness supports 3mm -5mm, and it can be customized to 5cm for OEM project.
Page 48
48
11.4.2 Ex. Using the wireless Touch Sensor Buttons
Put 6 demo files on CF card. (1 default file and 5 demo files)
NOTE: The files are sorted by filename in ascending order or in alphanumerically order. Each button is
mapped to a file by this order.
For Example:
There are 6 demo files on the CF card. The file names are a01.xxx, 33.xxx, b55.xxx, 1abc.xxx,
07.xxx and A01.xxx. ( xxx is extension of the file )
Default File:07.xxx Demo File 1:1abc.xxx Demo File 2:33.xxx
Demo File 3:A01.xxx Demo File 4:a01.xxx Demo File 5:b55.xxx
11.4.3 Connect to the Touch-Sensor Buttons
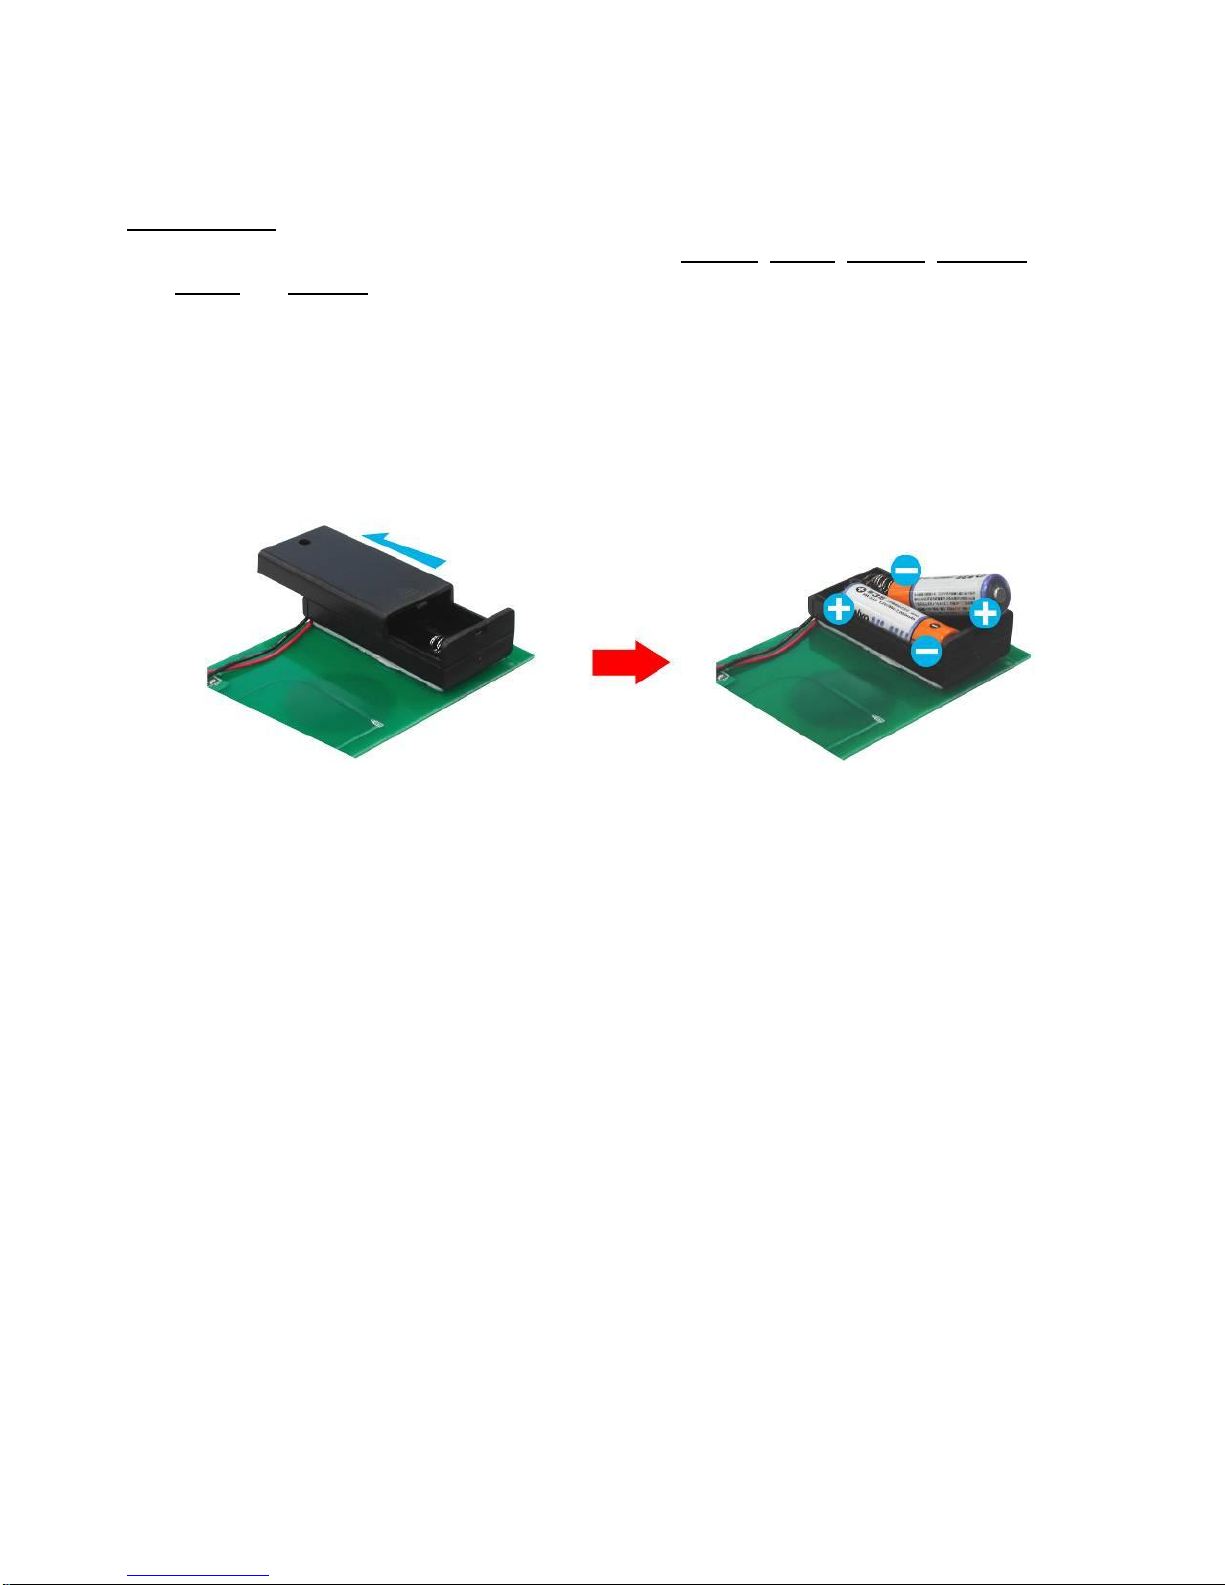
Open the battery cover and place the batteries (AA size) as shown below. Pay attention to the
polarity of the batteries!.
11.4.4 Play the Demo Files
Step 1: Insert the CF card to the HD Player Pro, and the HD Player Pro will play the default file
automatically while powered on.
Step 2: Press one of the touch-sensor buttons 1-5 to play the corresponding demo file.
Step 3: The HD Player Pro supports two options (Repeat Default / Repeat All) when the demo file
finishes playing. The functions can be set in the setup menu. (Other Setup → Play Button)
- Repeat Default: The HD Player Pro will automatically play the default file when the demo file
finishes playing.
- Repeat All: The HD Player Pro will automatically play all the demo files one after another.
Page 49
49
11.5 LED button box
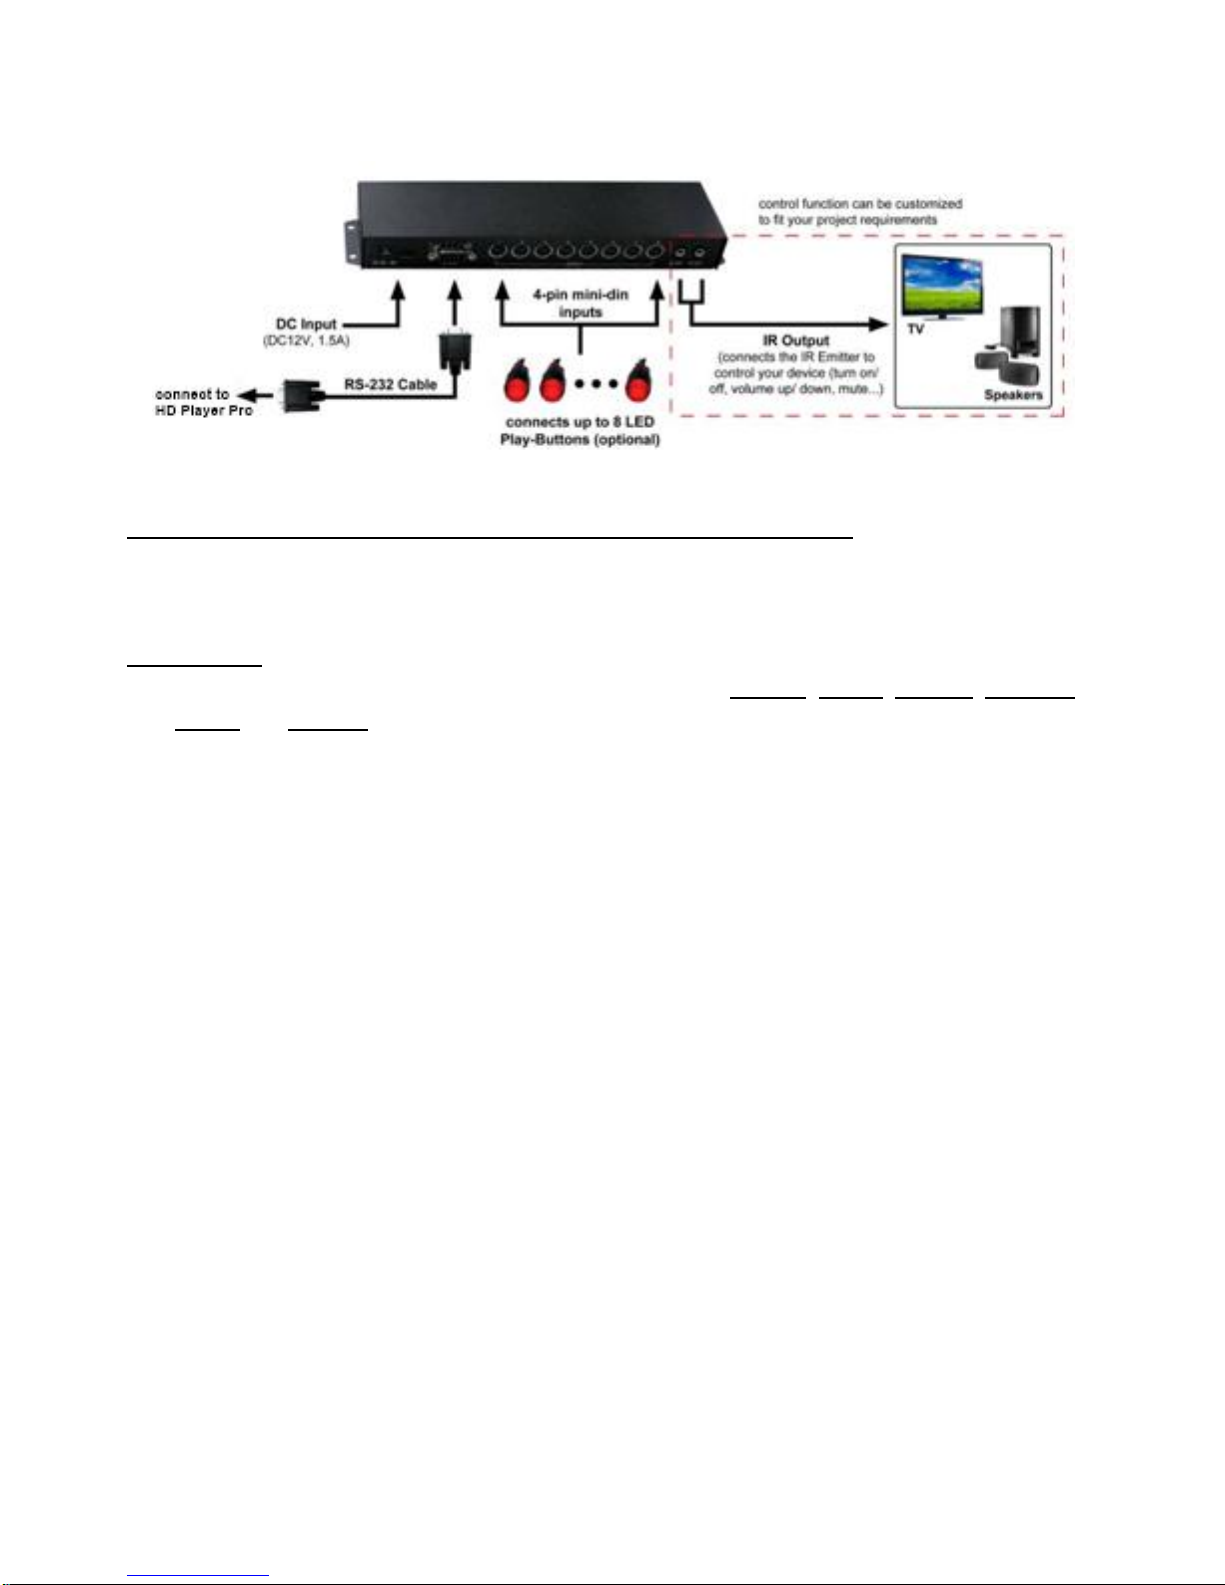
Hardware Installation
Control Video Playback using the LED Play-Button
ex. 5 LED Play-Buttons (Button Box supports up to 8 LED Play-Buttons)
Step1. Put 6 demo files on memory card. (1 default file and 5 demo files)
NOTE: The files are sorted by filename in ascending order or in alphanumerical order. Each button is
mapped to a file by this order.
For Example:
There are 6 demo files on the memory card. The file names are a01.xxx, 33.xxx, b55.xxx, 1abc.xxx,
07.xxx and A01.xxx. (xxx is extension of the file)
Default File: 07.xxx Demo File 1: 1abc.xxx Demo File 2: 33.xxx
Demo File 3: A01.xxx Demo File 4: a01.xxx Demo File 5: b55.xxx
Step2. Insert the memory card to the HD Player Pro, and the HD Player Pro will play the default file
automatically while powered on.
Step3: Make sure the Play Button item is set Repeat Default (refer to section 7.4 <Play Button> →
<Repeat Default>)
Step4: Make sure the RS232 Control item is set Led Button Box (refer to section 7.5 <RS232
Control> → <Led Button Box>)
Step5: Restart the HD Player Pro, and it will play the default file continuously.
Step6. Press one of the buttons 1-5 to play the corresponding demo file. The HD Player Pro will
automatically play the default file when the demo file finishes playing.
Status of the LED Play-Buttons
- Status1. When none of the LED play-buttons are pressed, all the LED play-buttons will stay blinking
and the HD Player Pro will play the default file continuously.
- Status2. Press one of the LED play-buttons, the HD Player Pro will play the corresponding file and
the pressed LED play-button will light constantly, and the other LED play-buttons will go off.
Page 50
50
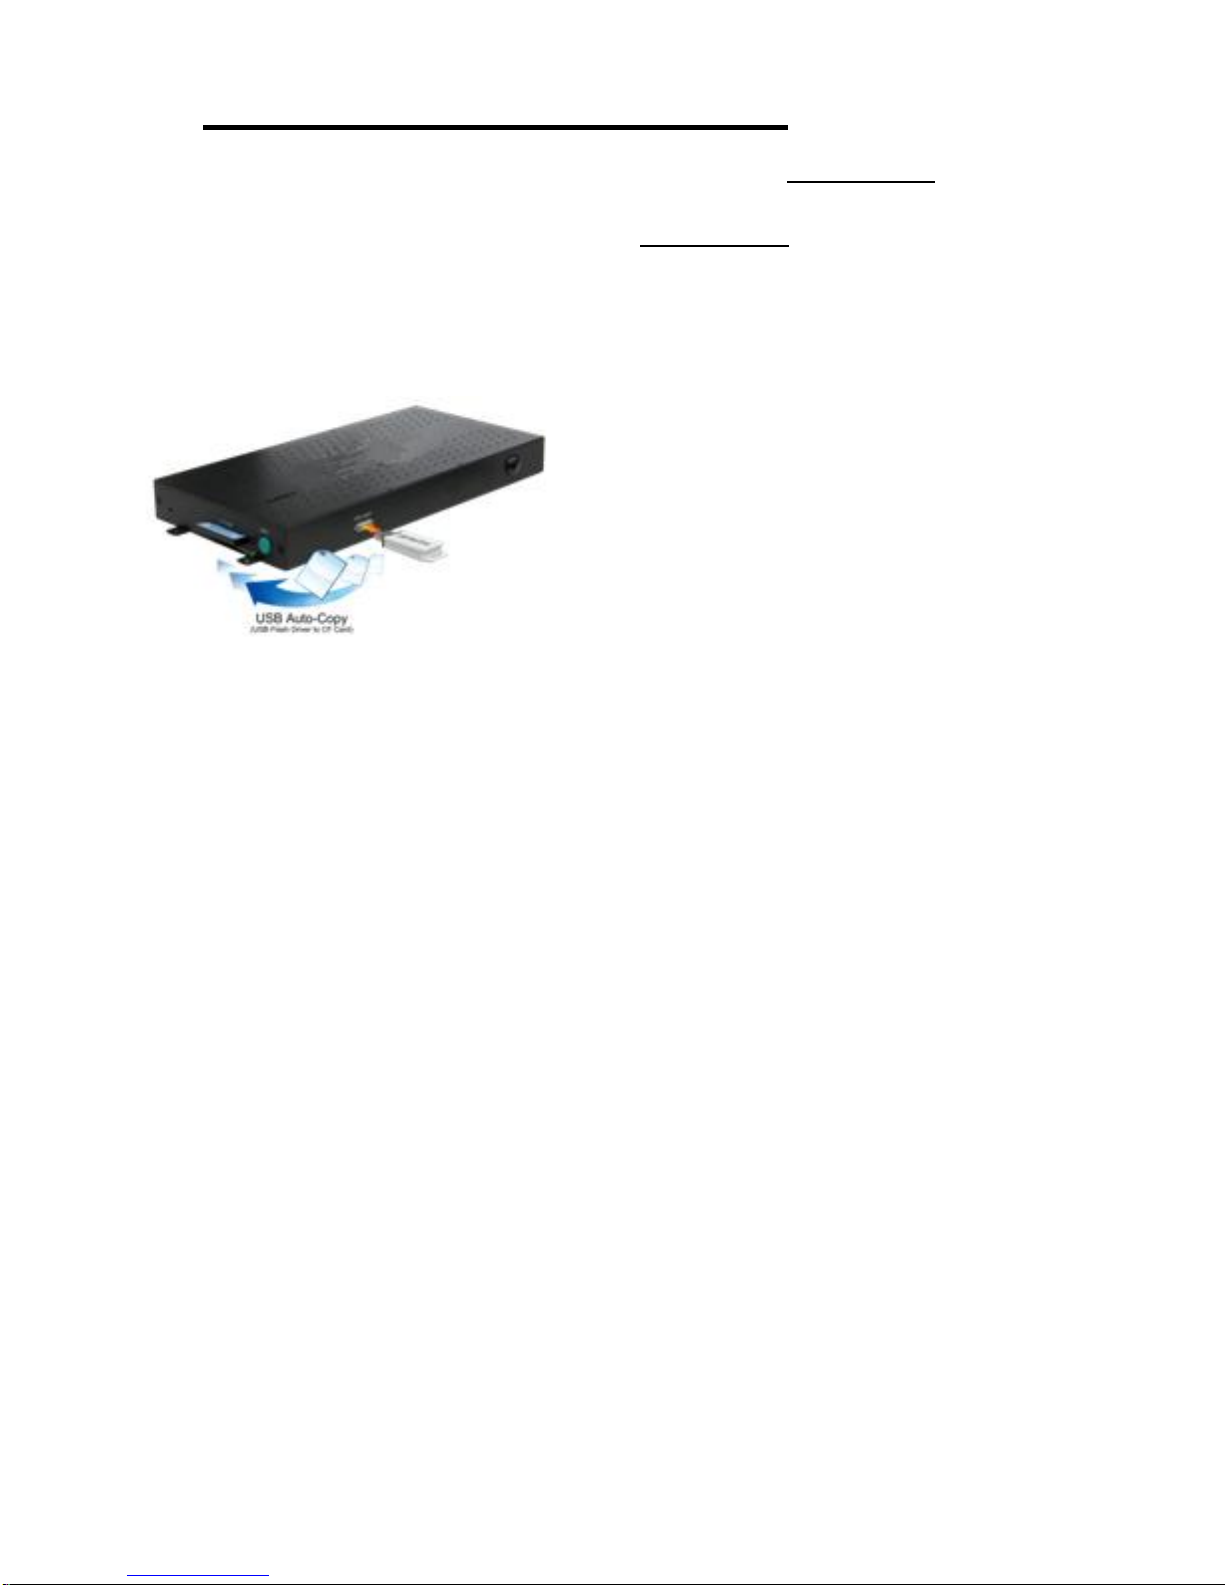
14. USB AUTO-COPY FUNCTION
Step1: Use “Notepad” to create a file on your PC and named the file “AUTOCOPY.ini” (this File must
be empty).
Step2: Put the files that you want to copy and the file “AUTOCOPY.ini” onto the USB flash driver.
Step3: Insert the USB flash drive to the HD Player Pro, and it will automatically copy the files from
USB flash drive to CF card (it takes about 30sec until the HD Player starts copying the Files).
ATTENTION: All Files on the CF-Card/SDHC-Card will be deleted.
Step4: After copying all Files, the HD Player automatically reboot and playback the new Files.
Page 51

51
13 TROUBLESHOOTING
Situation
Check Point
No Picture
1. Check power cable and power switches.
2. Ensure the video cables are connected between the player and
the HD Player Pro.
3. Press the “TV MODE” button on the remote control several times
to select the correct output mode.
4. Make sure the file format on the CF card is correct
(NTFS/FAT32).
5. Check if the display device is switched to correct video input
source.
No Response From
the Remote Control
1. Check that the batteries (2 batteries (AAA size) for the remote
control is installed correctly.
2. Check that there are no obstacles between the remote control
and the remote control sensor window.
3. Check if Lock Remote Control is turned off
No sound
1. Check if the mute function is on.
2. Check if the volume is set properly.
3. Check if audio cable has been connected correctly.
4. Check if the audio codec is supported
No Responding while
pressing the wirelesstouch –
sensor buttons
1. Confirm the polarity of the battery.
2. Check that there are no obstacles between the touch-sensor
buttons and the sensor window.
Network Not Working
1. Check your IP settings on the Network Setup page. (refer to 7.1)
2. If using wired network, make sure the network cable is plugged in
on both the HD Player Pro and your network hub.
Players are not in sync
1. Check connections of the RJ45-Cabel
2. Check if the Switch is turned on
3. Check if “sync.-Control” is turned on
4. Check if only one Master is connected to the switch
5. Check if the IP-Address is set correctly
6. Make sure to using fast enough CF Cards (Sandisk Extreme III or
faster – we recommend using CF cards tested by AV Stumpfl)
HD Player Pro doesn´t react
on the RS233/TCP Commands
1. Check if RS232/RJ45 is connected properly
2. Check if “RS232-Control” is set to Command
3. Check if “Lock Remote Control” is turned off
4. Check if sent Command is correct
My Video playback is bucking
1. Make sure using a fast enough CF-Card (min 200x)
2. Make sure using a supported Video file format
Page 52
52
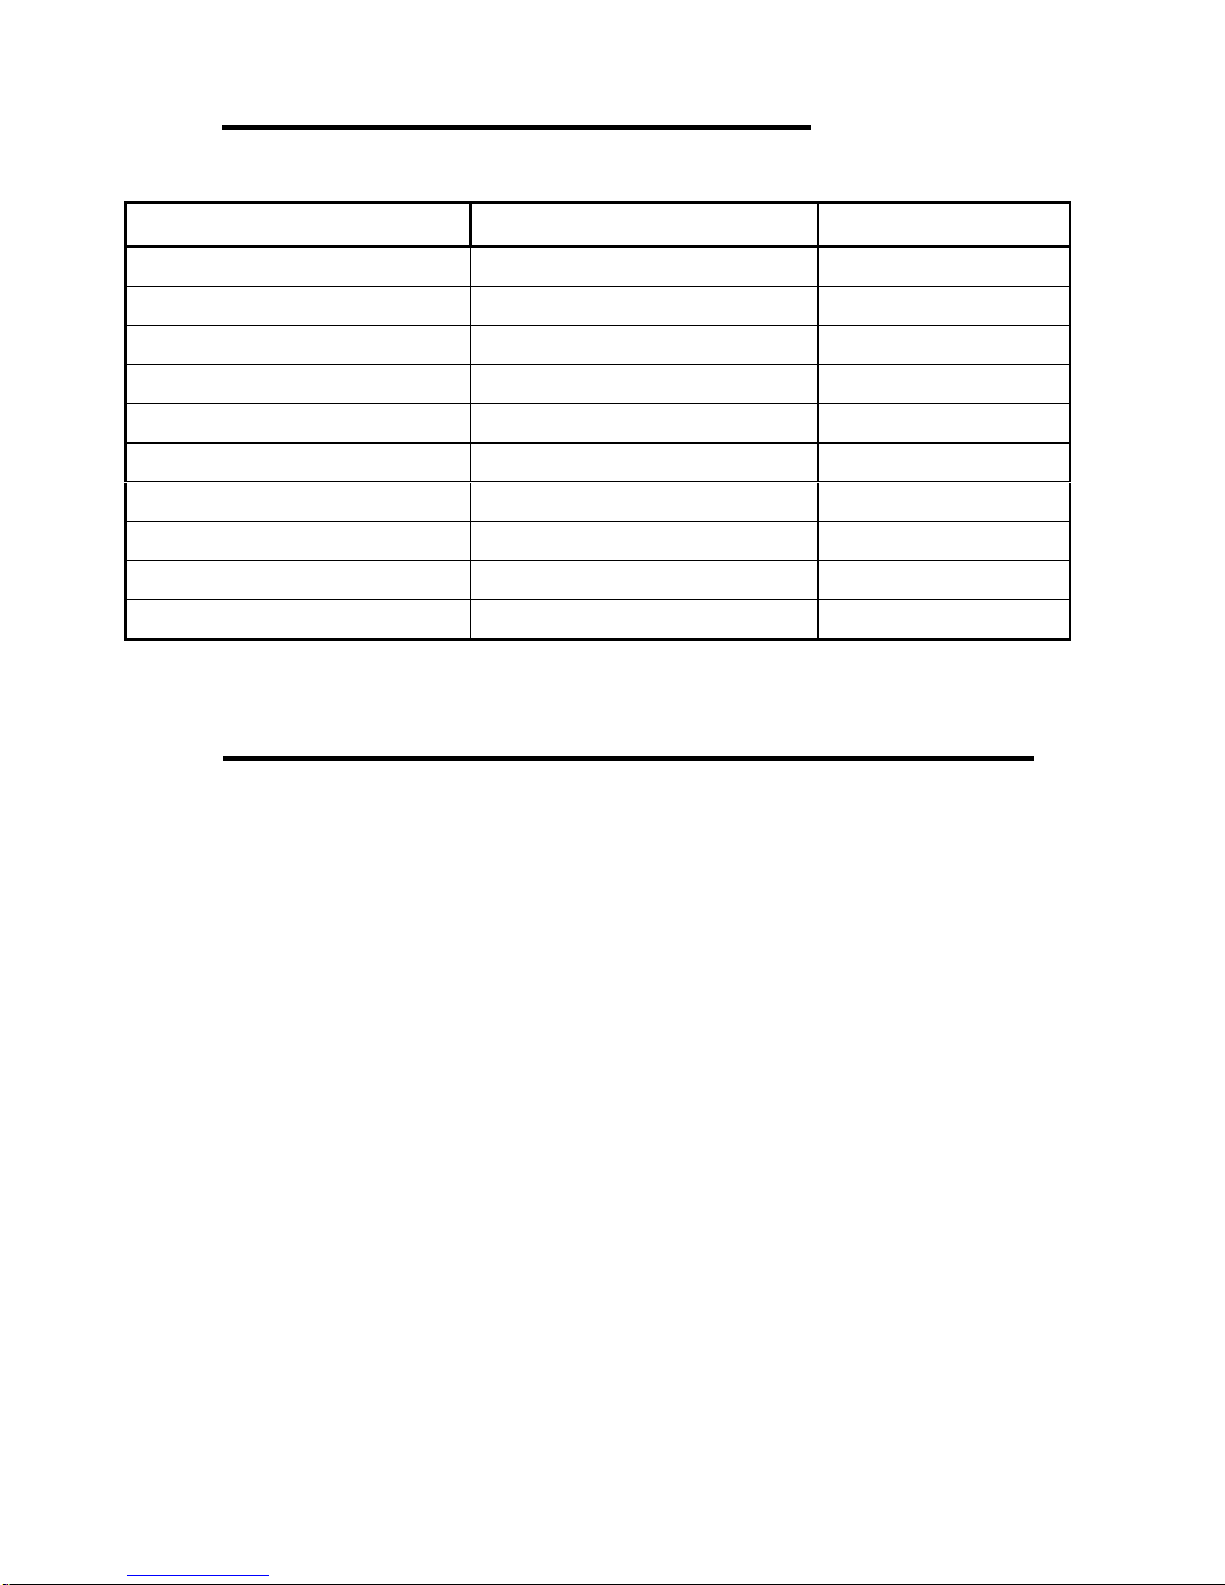
15. RECOMMENDED CF-CARDS
Manufacturer
Productname
Size [GB]
SanDisk
OEM
4
SanDisk
OEM
8
SanDisk
OEM
16
SanDisk
Extreme
8
SanDisk
Extreme III
2
SanDisk
Extreme IV
4
SanDisk
Extreme IV
8
Transcend
600x
8
Transcend
400x
16
Kingston
ultimate600x
16
16. RECOMMENDED VIDEO FILE FORMATS
MPEG-4.10 (H.264) BP@L3
SMPTE 421M (VC-1) MP@HL and AP@L3
WMV9 MP@HL
MPEG-2 MP@HL
MPEG-4.2 ASP@L5 (720p, 1-point GMC)
max. Bitrate: 40 Mbps.
max. Framerate 30fps
 Loading...