

Page 1

All-in-one GPS + DVD
Car Entertainment System
(MKT Platform)
User Manual
Ver. 1.0
(2014-05-30)
AVSON MTK User Manual-en Page 1 / 28
Page 2

CONTENTS
PRECAUTIONS FOR USE....................................................................................................4
BASIC FUNCTIONS..............................................................................................................5
SETTINGS.............................................................................................................................7
1 BACKGROUND WALLPAPER............................................................................................................ 7
1.1 Background Options........................................................................................................................ 7
1.2 Customized Background.................................................................................................................. 7
2 START UP LOGO..........................................................................................................................8
3 GENERAL SETTINGS..................................................................................................................... 8
3.1 Button Beep..................................................................................................................................... 9
3.2 MUTE when Reversing.................................................................................................................... 9
3.3 Virtual Disk Recording Location....................................................................................................... 9
3.4 Satellite Signal................................................................................................................................. 9
3.5 Restore Factory Settings................................................................................................................. 9
3.6 Touch Screen Calibration................................................................................................................. 9
4 DISPLAY SETTINGS....................................................................................................................... 9
4.1 Daytime Brightness.......................................................................................................................... 9
4.2 Night Brightness............................................................................................................................ 10
4.3 Small Lamp Auto-Detection........................................................................................................... 10
4.4 Screen Saver................................................................................................................................. 10
5 SOUND SETTINGS...................................................................................................................... 10
5.1 EQ Settings.................................................................................................................................... 10
5.2 Balance Settings............................................................................................................................ 10
5.3 Loudness Setting........................................................................................................................... 11
5.4 Subwoofer Setting.......................................................................................................................... 11
6 VIDEO SETTINGS........................................................................................................................ 11
6.1 Watching video is forbidden while driving...................................................................................... 11
6.2 Reverse Video Mirrored................................................................................................................. 11
6.3 Show time while video playing....................................................................................................... 12
7 BLUE-TOOTH SETTINGS.............................................................................................................. 13
7.1 Device Name................................................................................................................................. 13
7.2 Pin Code........................................................................................................................................ 13
7.3 Auto Connect................................................................................................................................. 13
7.4 Auto Answer................................................................................................................................... 13
8 NAVIGATION SETTINGS................................................................................................................ 14
8.1 Volume (Navigation Voice) ............................................................................................................ 14
8.2 Volume Mixed................................................................................................................................ 14
8.3 Navi Monitored............................................................................................................................... 14
8.4 Navi Mixed..................................................................................................................................... 14
8.5 Autostart Navigation....................................................................................................................... 14
8.6 File Path......................................................................................................................................... 14
9 LANGUAGE SETTING...................................................................................................................15
10 STEERING WHEEL CONTROL PROGRAMMING...............................................................................15
11 DATE & TIME SETTINGS............................................................................................................ 16
RADIO OPERATION ..........................................................................................................17
GPS NAVIGATION OPERATION........................................................................................18
DISC OPERATION..............................................................................................................18
USB / SD OPERATION......................................................................................................20
AVSON MTK User Manual-en Page 2 / 28
Page 3

VIRTUAL MULTI CD (OPTION) .........................................................................................22
IPOD MUSIC CONNECTION (OPTION).............................................................................23
AV-IN OPERATION..............................................................................................................23
BLUETOOTH HANDS-FREE OPERATION........................................................................24
BLUETOOTH MUSIC..........................................................................................................25
GPS ANTENNA INSTALLATION........................................................................................26
HEAD UNIT INSTALLATION GUIDE AND WIRING DIAGRAM........................................26
TROUBLESHOOTING.........................................................................................................27
DECLARATION STATEMENTS..........................................................................................28
AVSON MTK User Manual-en Page 3 / 28
Page 4

Precautions for Use
Considering of safety, please avoid watching video and operating the device while driving. Please also
adjust the volume to proper level such that alert sound from outside the vehicle can be heard. Before
operating the device, please read this manual and other related system manual thoroughly and acknowledge
the safety precaution and warning message in this manual and in the device. Keep this booklet in a place
for easy access and reference at any time.
1. Always pay attention to Traffic Safety.
2. If you encounter difficulties in using the system, please park the car at a safe place before continue
to operate it.
3. Do not let kids operate this device to avoid personal injury or damage to the device.
4. Please follow the road signs and rules when using the navigation function.
5. Please do not use this device in places such as, gas stations, refinery and strong electromagnetic
area.
6. Do not try to install or service this device by yourself if you are not familiar with car electronics.
7. Do not install or service this device when the power is on.
8. Do not install this device in a location expose to direct sunlight and/or air conditioner ventilation.
Overheat and/or moisture may cause serious damage to the device.
9. Do not use sharp objects to scratch the touch screen display.
10. Do not use sharp or pointed objects to scratch or press the display screen.
The DVD/CD module of this device can only play one 12cm disc per time. Do not insert 8cm disc or other
object into the device which may cause the laser head or the mechanical parts malfunction.
AVSON MTK User Manual-en Page 4 / 28
Page 5

Basic functions
System Reset
1. Gently press the “RESET” or “RST” button using a pointed object for at least 3 seconds. This will
restore the device back to factory default settings.
2. When the system becomes unstable and/or abnormal conditions occurred during operation, use the
RESET button to restore the device back to normal.
Note: the “RESET” button, or sometimes labelled as “RST”, is usually inside a small hole on the panel of the
device. Please use a pointed object to gently press the button (e.g. a paper clip). A small click can be heard
or felt.
Turning ON / OFF the device
When the car key is in ACC, ON1, I or II position: press the “POWER” or “PWR” button on the panel will
switch on the device; or insert a DVD/CD into the disc slot will also make the device turned on automatically.
When the device is on, press and hold the “POWER” button on the panel or take out the car key will turn off
the device.
Volume adjustment
Rotate the volume knob on the device panel can adjust the volume of the speakers. In some models,
volume controls are the "VOL +” and “VOL -" buttons.
Mute Switch
Press the “MUTE” button on the panel to instantly turn the speakers volume to minimum. Press it again or
adjust the volume to restore the sound to the previous level.
Backlight Switch
Press on the panel or press on the LCD display will toggle the ON and OFF of the
screen.
Rear-view camera
When the car is switched on and in reverse gear, the screen will automatically display to rear-view camera
image, regardless the device is turned on or off.
Source Selection
Press the “MODE” button on the panel or on the steering wheel will circle amongst Radio, DVD, USB, SD,
Virtual Disc, Digital TV (optional), iPOD (optional), AUX or AV-IN.
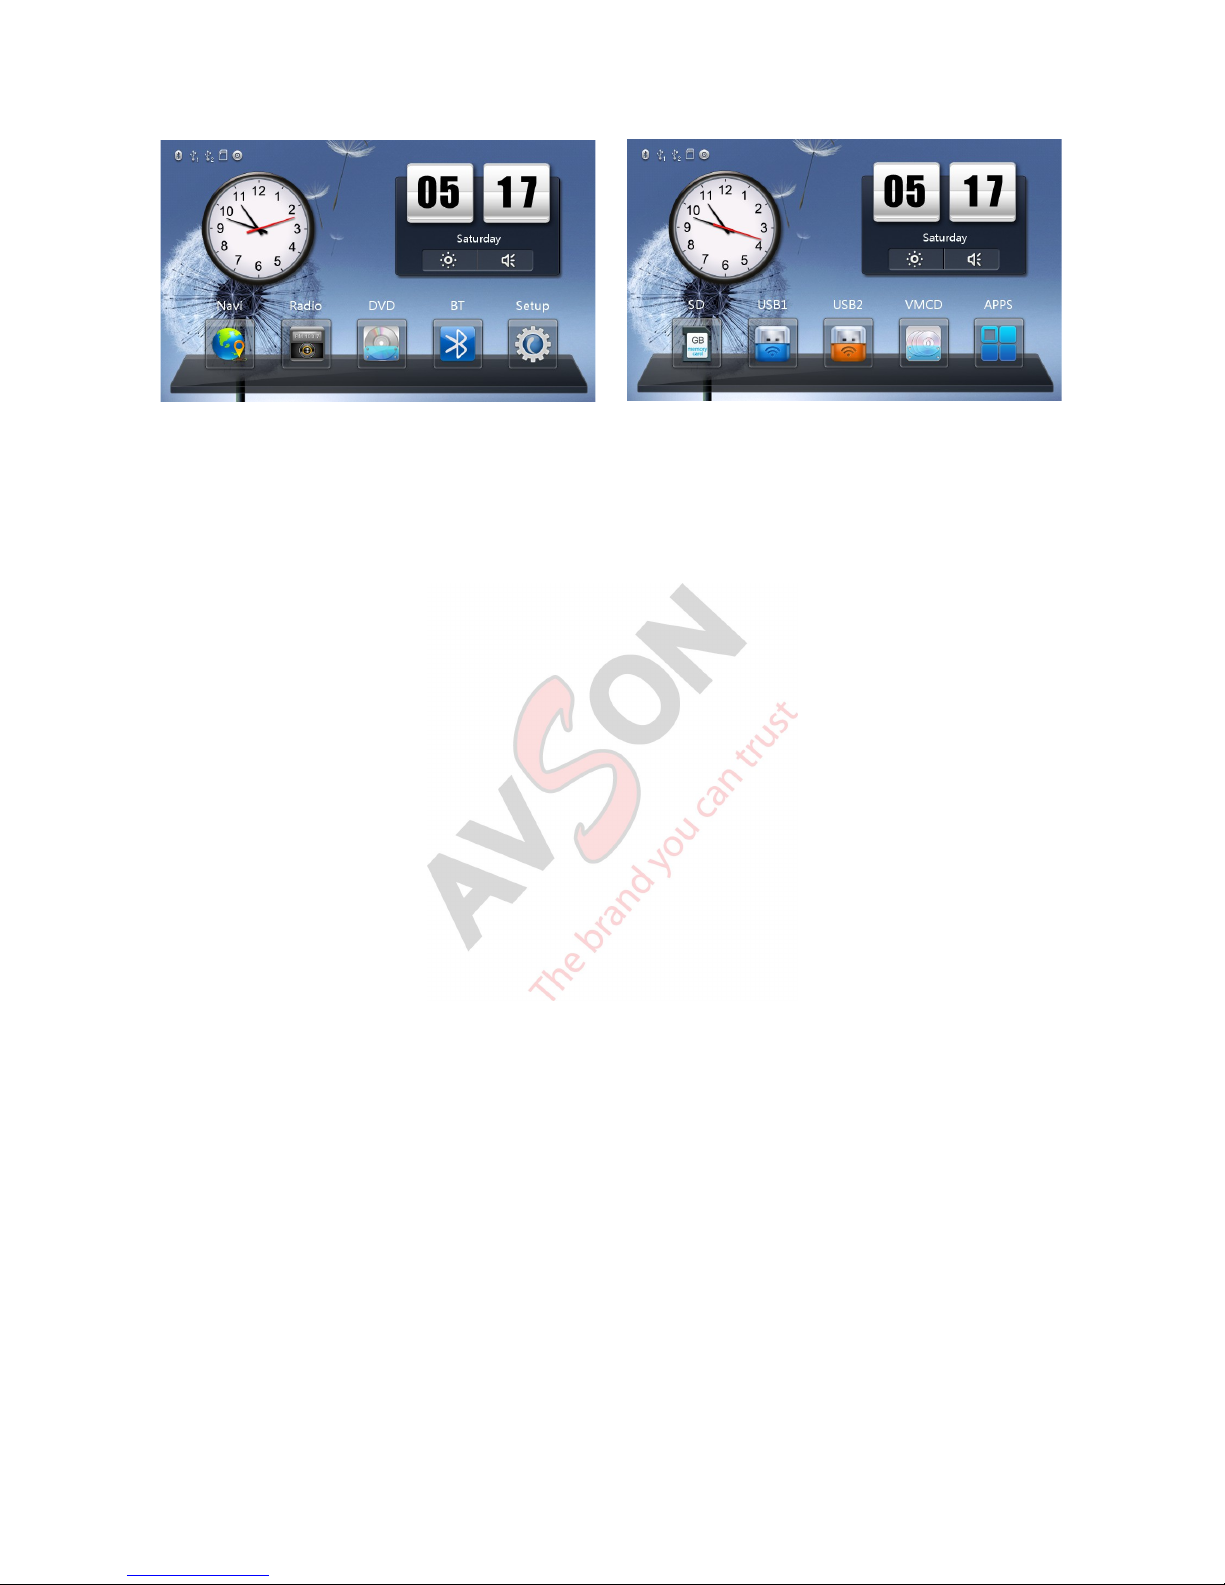
Press the “MENU” or “SRC” button on the panel will lead to the homepage. Press the icons on the
homepage to switch to various functions of the device. The operations of these functions will be described
later in this manual. Slide the homepage to the left or right to bring up additional pages.
AVSON MTK User Manual-en Page 5 / 28
Page 6
Disc ESP (Electronic Shock Proof) function
This device is equipped with Electronic Shock Proof function. When the car is running on bad condition
roads, the audio and video disc playback will not be affected. Depends on different disc types and formats,
the shock proof time is about: 5 seconds for DVD; 10 seconds for CD/VCD and 150 seconds for MP3.
Mode and Play Position Memory
Every time when the car is started, the device will return to the previous mode and status. For example, if
the device is OFF, it will stay in OFF mode when the car restarts. If it is in Radio mode, it will continue on the
last station selected. If it is in audio or video mode, it will start to play from the last position.
AVSON MTK User Manual-en Page 6 / 28
Page 7
Settings
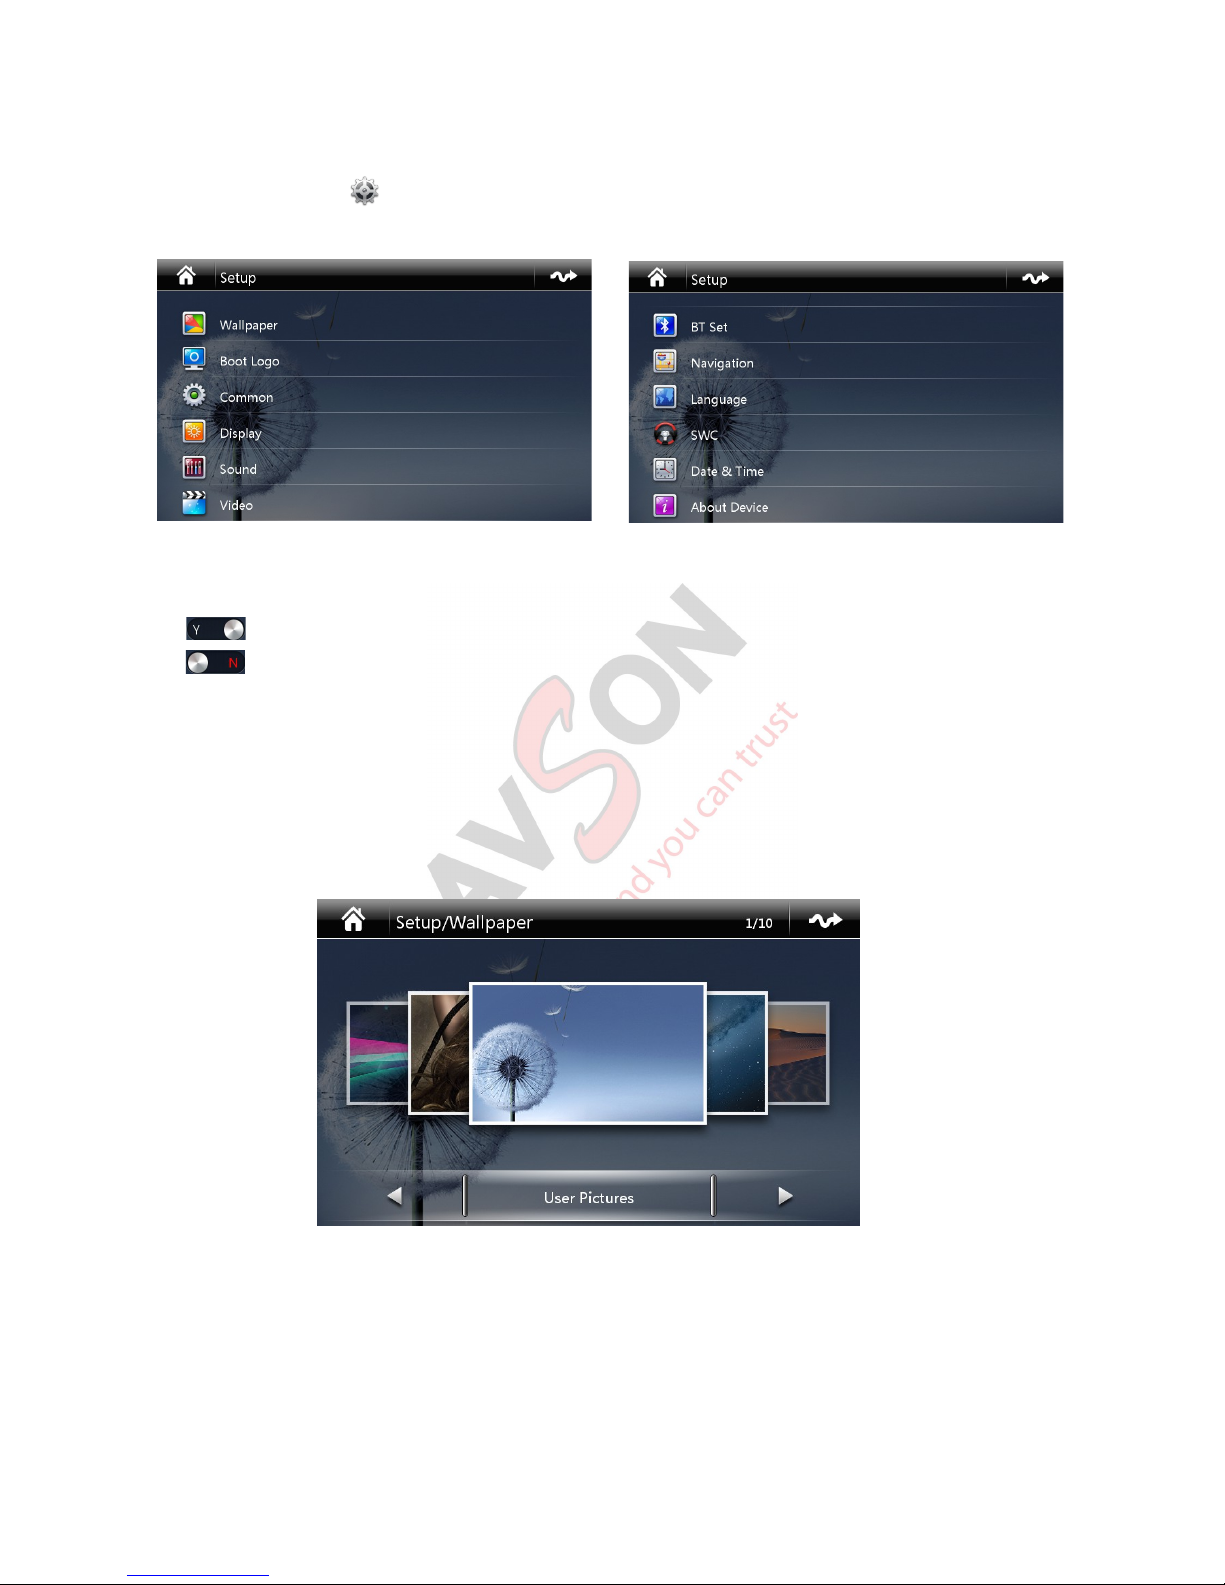
Press the Setup icon on the homepage to enter Setup menu. Press the corresponding icon on the
Setup menu to choose the respective setting. Drag the screen up and down to bring out more setting items.
Note:
Turn on/off Slider Display in Setting
Slider display is on.
Slider display is off.
1 Background Wallpaper
1.1 Background Options
Click Wallpaper to enter background setting menu as below:
Flip around the images and select the favourite one.
1.2 Customized Background
If the built-in background images do not meet your requirement, the device allows you to use your own
AVSON MTK User Manual-en Page 7 / 28
Page 8
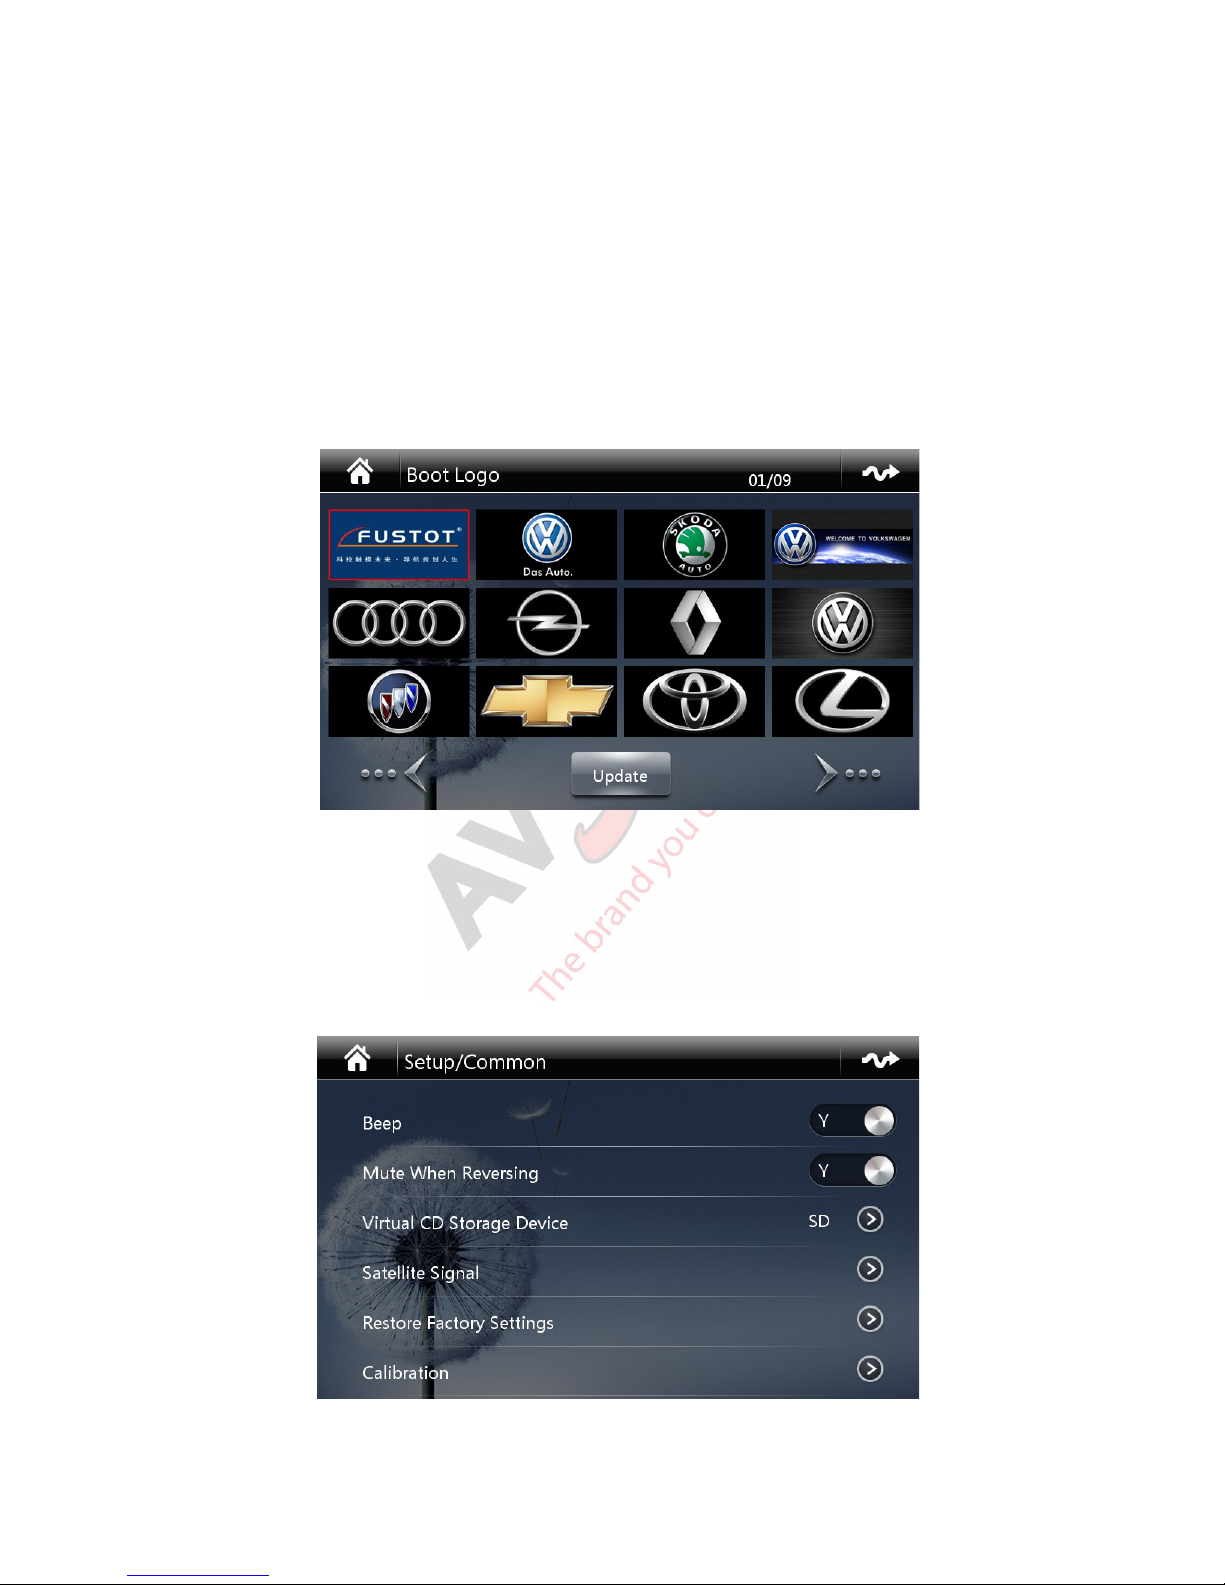
image as background subjected to the following criteria:
• the width of the image must be between 800 – 1000 pixels;
• the height of the image must be 480 pixels;
• the file format must be JPG
• the image file must be stored under the root directory of the GPS navigation SD Card.
Click “User Pictures” and the device will search from the navigation SD Card the appropriate image files for
selection.
2 Start up Logo
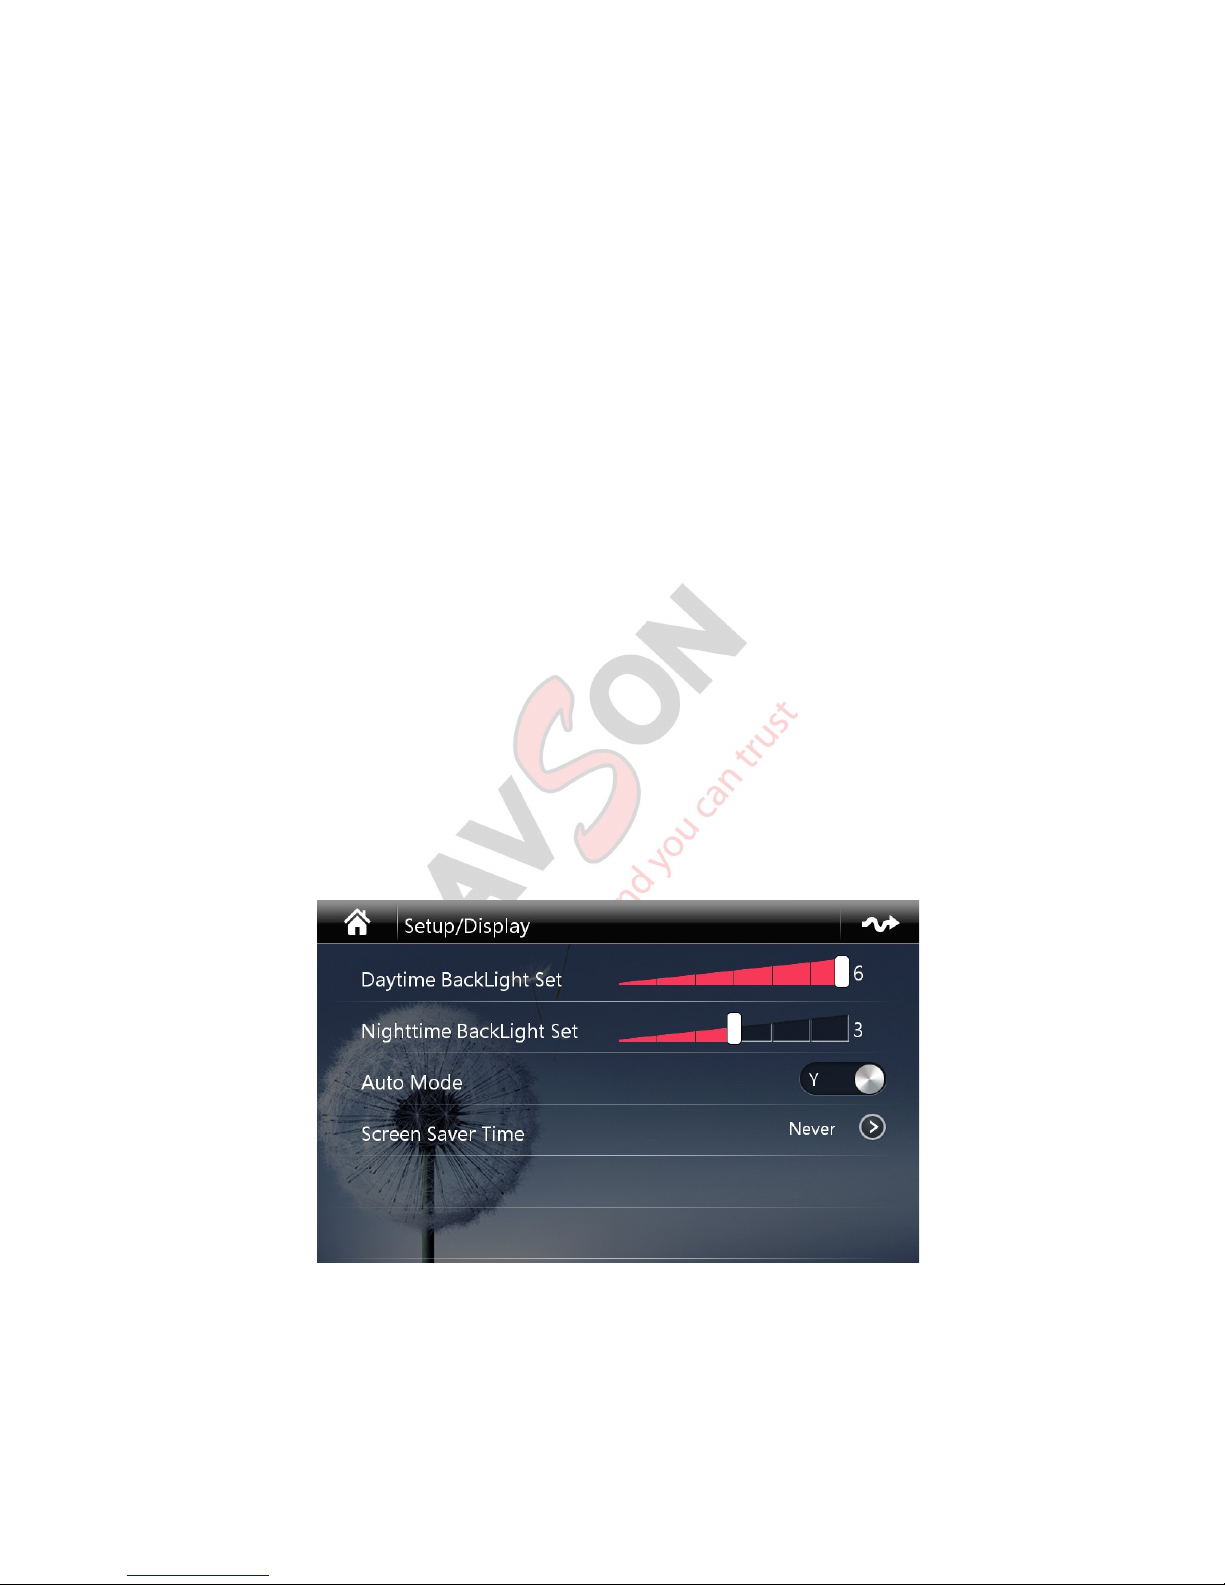
Press the Boot Logo icon and enter password (3368) to go into the Start up picture selection screen. Use
the left and right arrows to move between pages. Select the favorite Boot Logo image by highlighting it and
press the “Update” button to activate it.
3 General Settings
Select ”Common” to enter the general settings pages.
AVSON MTK User Manual-en Page 8 / 28
Page 9
3.1 Button Beep
The ”Beep” option turns ON or OFF the beep sound when a button is pressed.
3.2 MUTE when Reversing
Switch on the MUTE option will turn off any sound or music when the car is in reverse gear. For safety
reasons, MUTE is recommended.
3.3 Virtual Disk Recording Location
Determine the virtual disk recording location in USB or SD card.
3.4 Satellite Signal
Provide information on current satellite signal and GPS status of the device.
3.5 Restore Factory Settings
Click to reset the device to factory default settings. A message will pop up requesting confirmation. Press
“OK” to restart and restore the settings of the device.
3.6 Touch Screen Calibration
Press to enter touch screen calibration mode. Follow the prompt and tap the four corners and the center of
the screen which is marked with the “+” sign.
Note: if the current deviation is so huge that makes entering the Setting menu impossible, simply Press and
Hold the “NAVI” or “GPS” button on the panel will lead to the calibration mode.
4 Display Settings
4.1 Daytime Brightness
Drag the slider to select screen brightness value during the day.
AVSON MTK User Manual-en Page 9 / 28
Page 10
4.2 Night Brightness
Drag the slider to select screen brightness value at the night.
Note: adjust the screen brightness of day and night at a proper level will make watching the screen more
comfortable.
User can also click the icon on the homepage or by turning on the instrument light to switch between
Day and Night mode manually.
4.3 Small Lamp Auto-Detection
Select “YES” to turn on the instrument lamp detection mode. When instrument lamp is on, the system will
change from Day mode to Night mode automatically.
4.4 Screen Saver
Press the icon to select the elapsed time before entering the screen saver mode.
Note: when playing video and images, the system will not enter the screen saver mode regardless of the
setting here.
5 Sound Settings
5.1 EQ Settings
There are several ways to enter the sound EQ setting screen:
• press the “SOUND” option in the Setup menu
• press the icon in the user interface of each media playback function, e.g. DVD, SD, USB etc.
• press the EQ button on the panel (only certain models have this button)
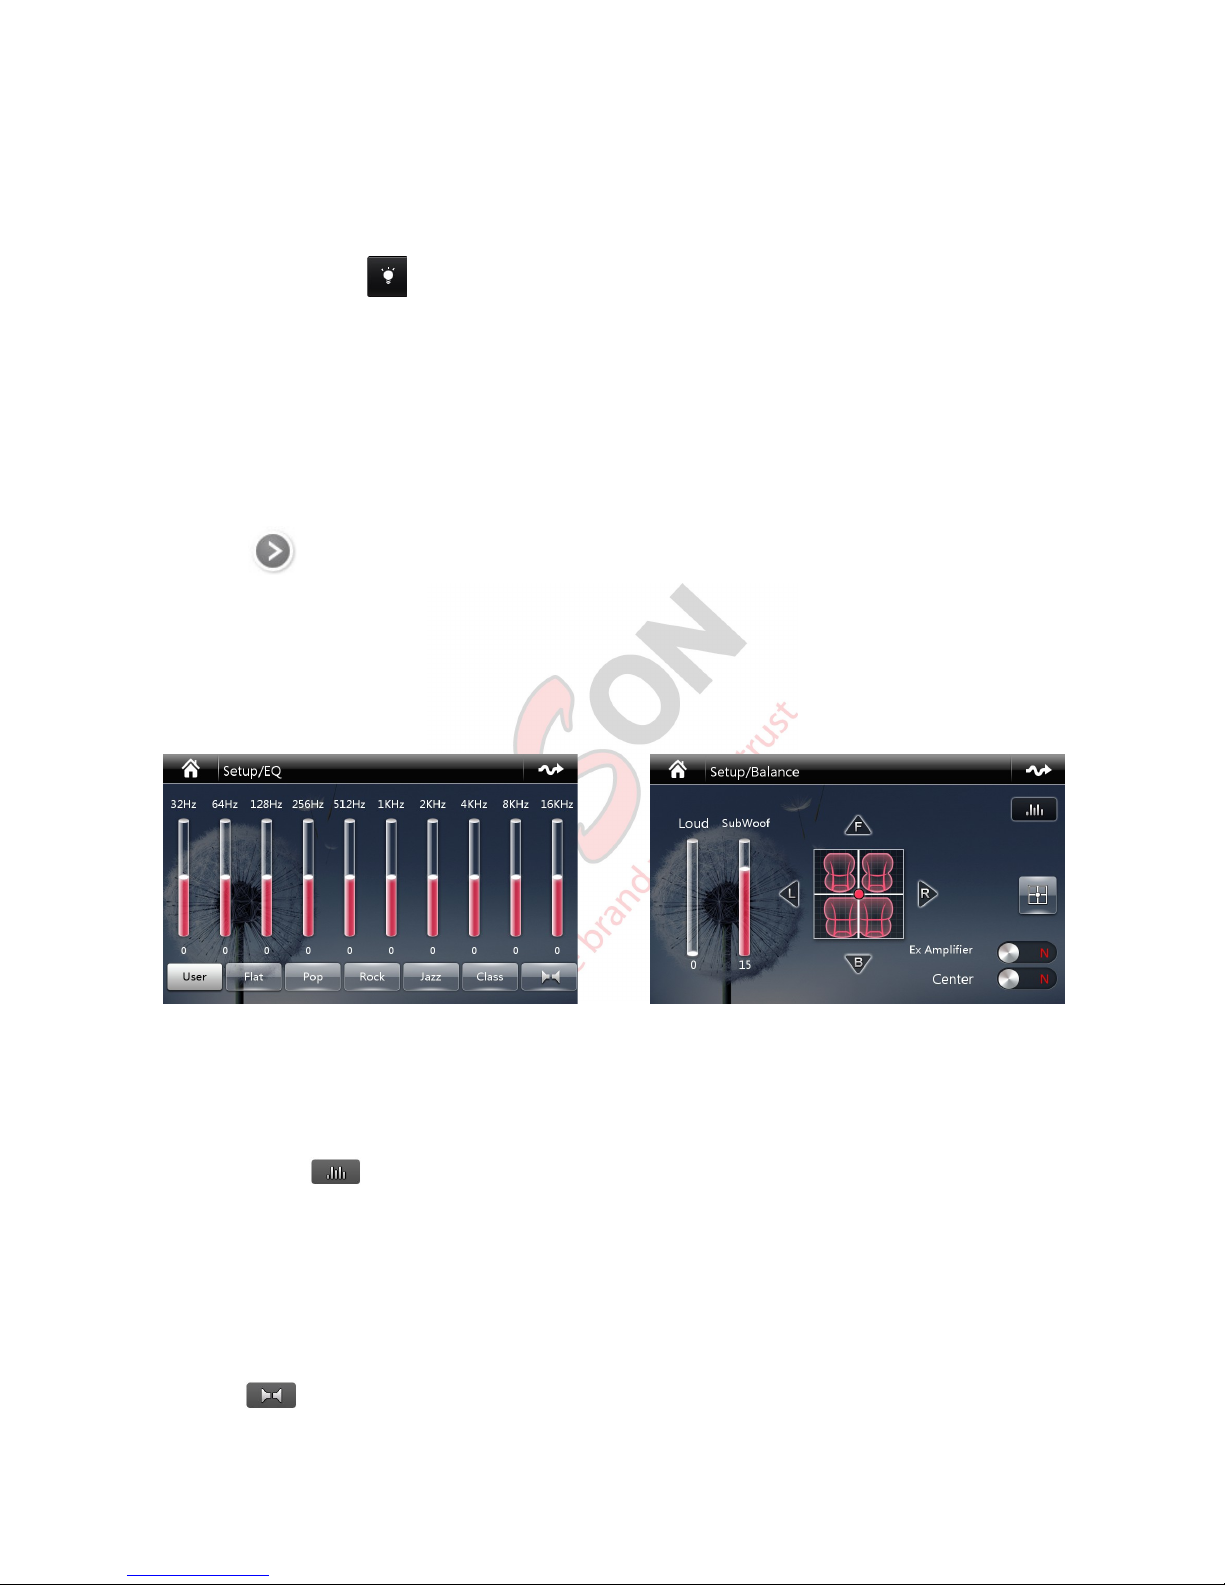
The device provides 10 bands of DSP EQ settings and 6 types of EQ pre-sets for user to choose. Personal
customized setting is automatically saved in the USER button.
5.2 Balance Settings
Press the balance icon to enter the Balance setting screen. Use the up, down, left and right arrows to
AVSON MTK User Manual-en Page 10 / 28
Page 11
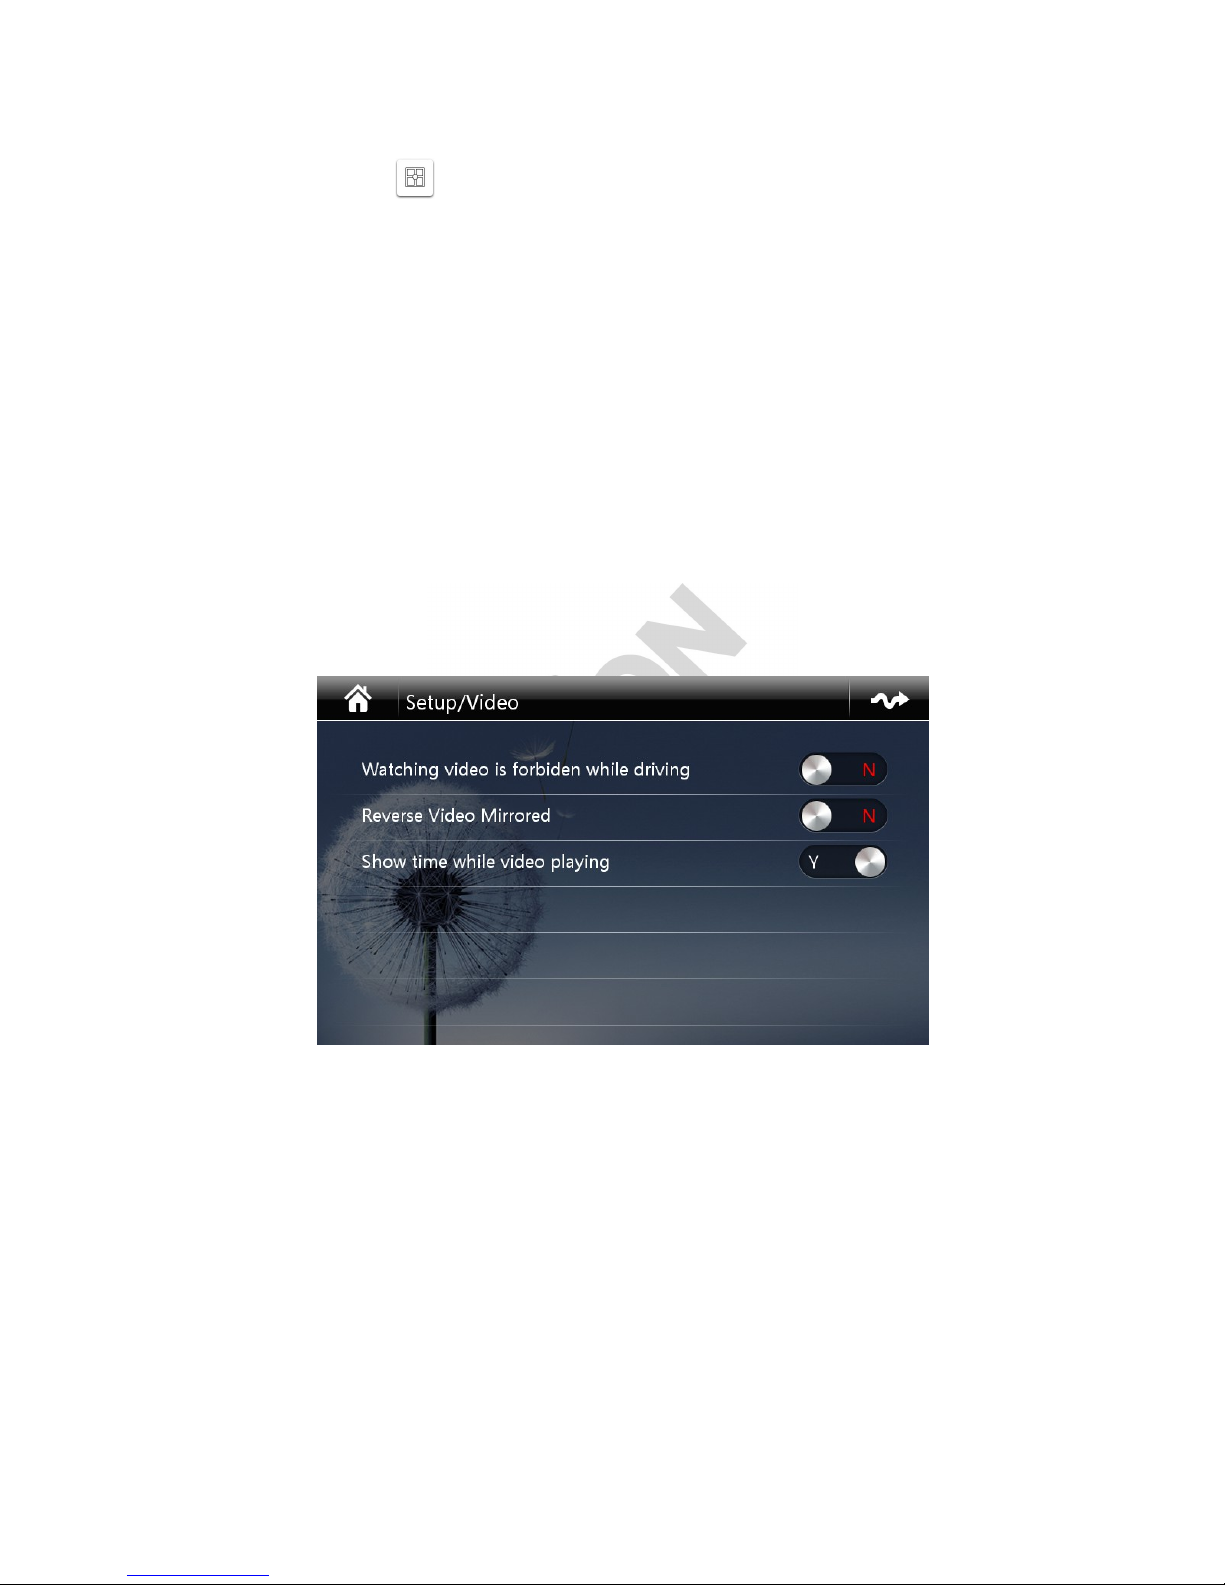
adjust the individual speaker sound level respectively. User can also drag and drop the “Red Dot” for speedy
adjustment.
Press the “CENTER” button will bring the “Red Dot” back to the center and all four speakers will output
the same sound level.
“Ex Amplifier” option controls the switching on of External Amplifier attached to the system.
5.3 Loudness Setting
Adjust the slider up and down in the “Loud” bar to change the current loudness value. Increase loudness
value will enhance the gain of low frequency sound. Depends on the speakers system in the car, excessive
loudness may result in sound distortion.
5.4 Subwoofer Setting
Slide the “SubWoof” bar up and down to change the SubWoofer output value. This only works if an external
sub-woofer box is connected to the system.
6 Video Settings
6.1 Watching video is forbidden while driving
When this function is switched on and the signal detection wire is connected to the hand brake, all Video
playback will have sound only and blank screen.
Note: for safety reasons, it is recommended to switch on this setting.
6.2 Reverse Video Mirrored
According to the reverse camera installed, please adjust this setting if the reverse camera image is left and
right flipped over.
AVSON MTK User Manual-en Page 11 / 28
Page 12

6.3 Show time while video playing
If turned on, time will be shown on the top left corner in video playback. If turned off, no time will be shown
during video playback.
AVSON MTK User Manual-en Page 12 / 28
Page 13
7 Blue-tooth Settings
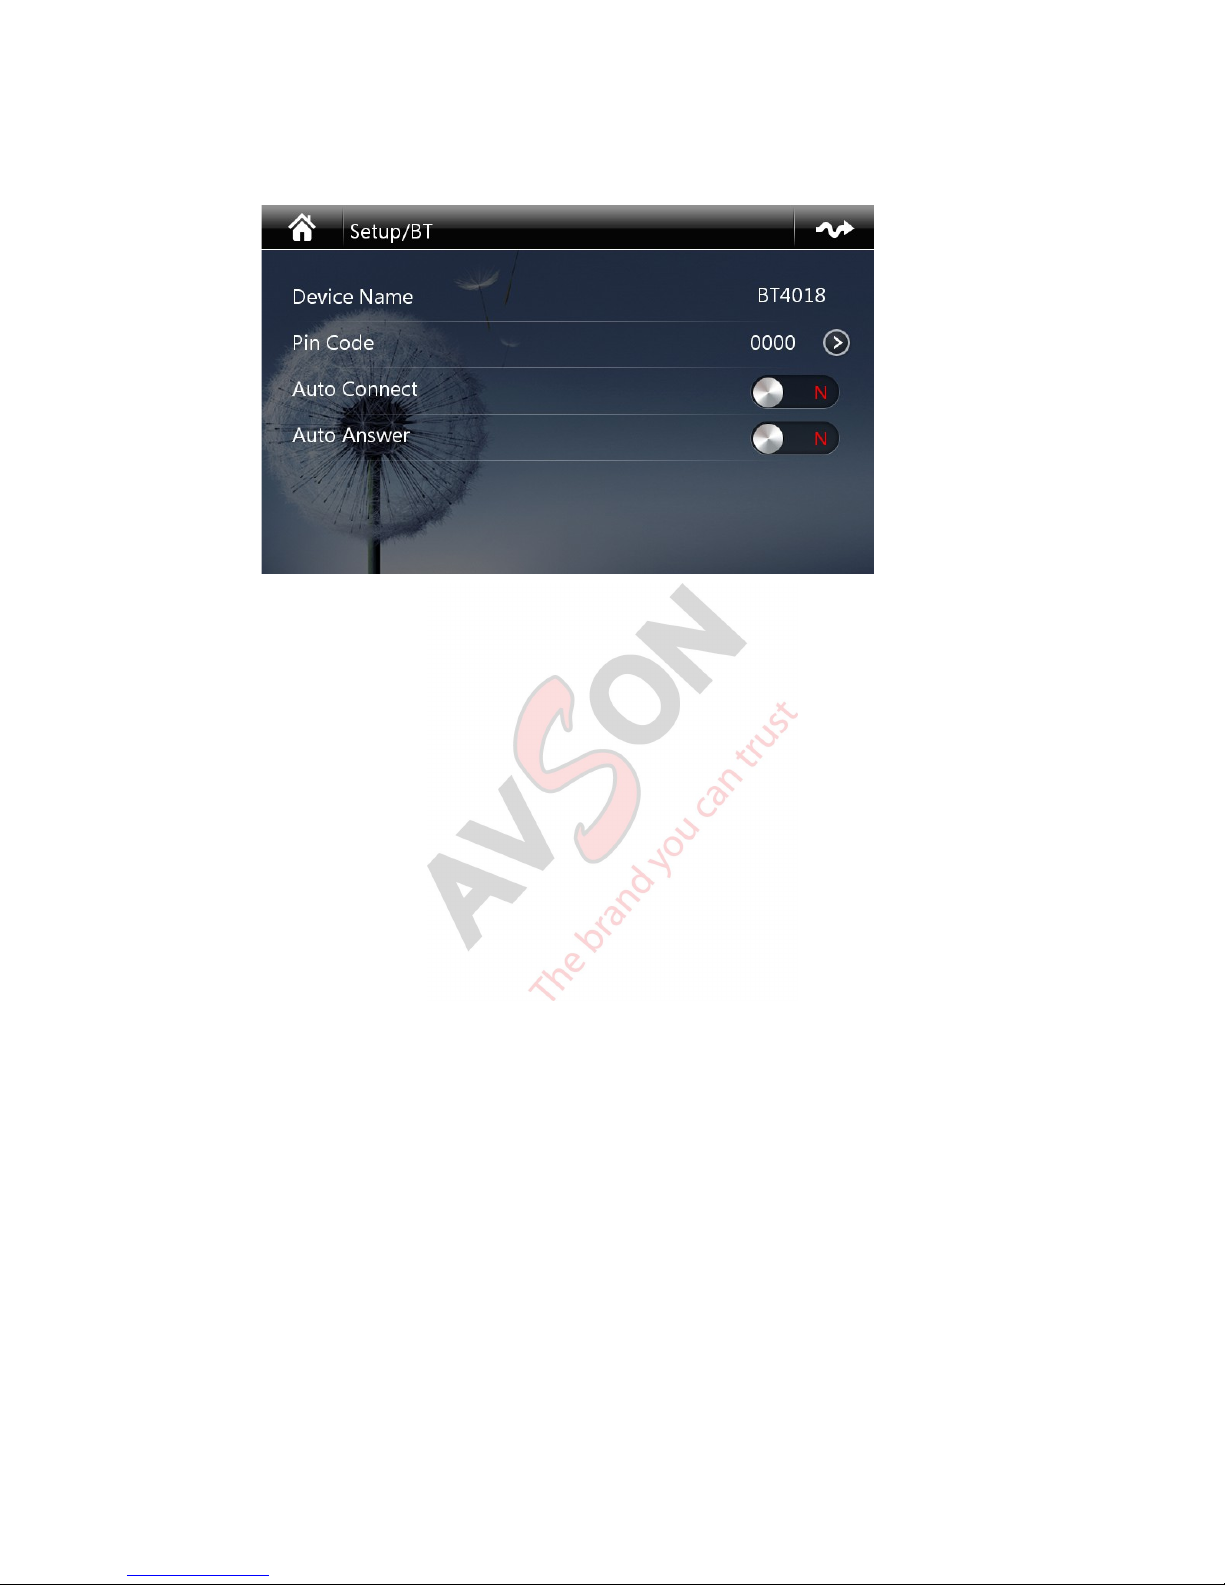
7.1 Device Name
This shows the name of the Blue-tooth device. This name will appear in the mobile phone while searching
for Blue-tooth devices.
7.2 Pin Code
Displays the current pairing code of the Blue-tooth device. User can press the Right Arrow to change the pin
code. Enter any 4 numeric digits to set up new pin code.
7.3 Auto Connect
If enabled, the Blue-tooth hands-free function will automatically search and connect to the last connected
mobile phone at each power up.
7.4 Auto Answer
If enabled, the device will automatically answer any incoming call whenever the Blue-tooth is connected.
AVSON MTK User Manual-en Page 13 / 28
Page 14
8 Navigation Settings
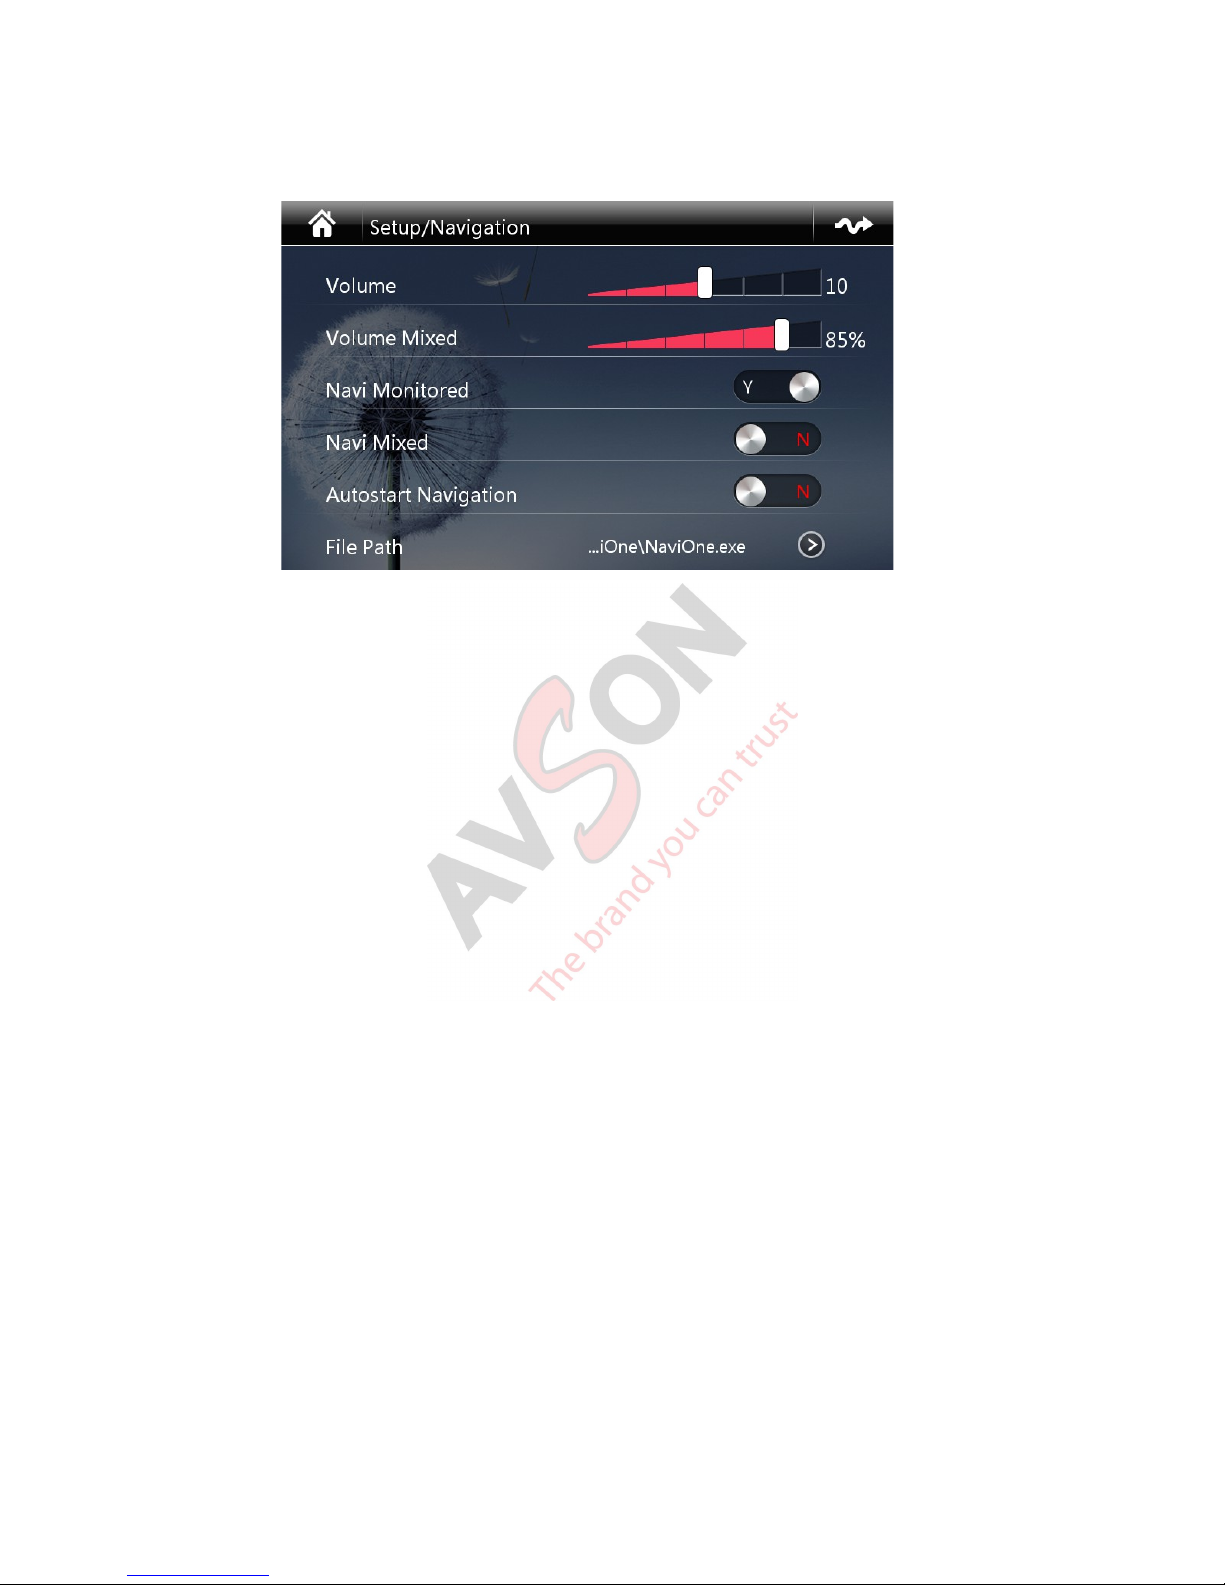
8.1 Volume (Navigation Voice)
Slide the slider to adjust the navigation voice volume. Most navigation software has volume setting within
the main program. Set the volume of the software to maximum and adjust the volume here will achieve the
best result.
8.2 Volume Mixed
If the “Navi Mixed” option is turned on, navigation voice and other sound source (e.g. radio, CD or MP3 etc.)
will come out together. Use this slider to adjust the background music volume ratio.
8.3 Navi Monitored
If this option is turned on, navigation voice will come out regardless the screen is showing navigation or not.
If this option is turned off, navigation voice will only come out when the screen is in navigation mode.
8.4 Navi Mixed
If this option is turned on, navigation voice and other sound source (e.g. radio, CD or MP3 etc.) will come out
together.
8.5 Autostart Navigation
If this option is selected, the navigation map software will automatically start every time the device is turned
on.
8.6 File Path
In order to use the navigation function, a SD card with proper navigation map and software must be inserted
into the GPS card slot. The device will search and list the proper “exe” executable files for user to choose.
The proper “exe” file along with its file path must be set up here before the navigation function works.
AVSON MTK User Manual-en Page 14 / 28
Page 15
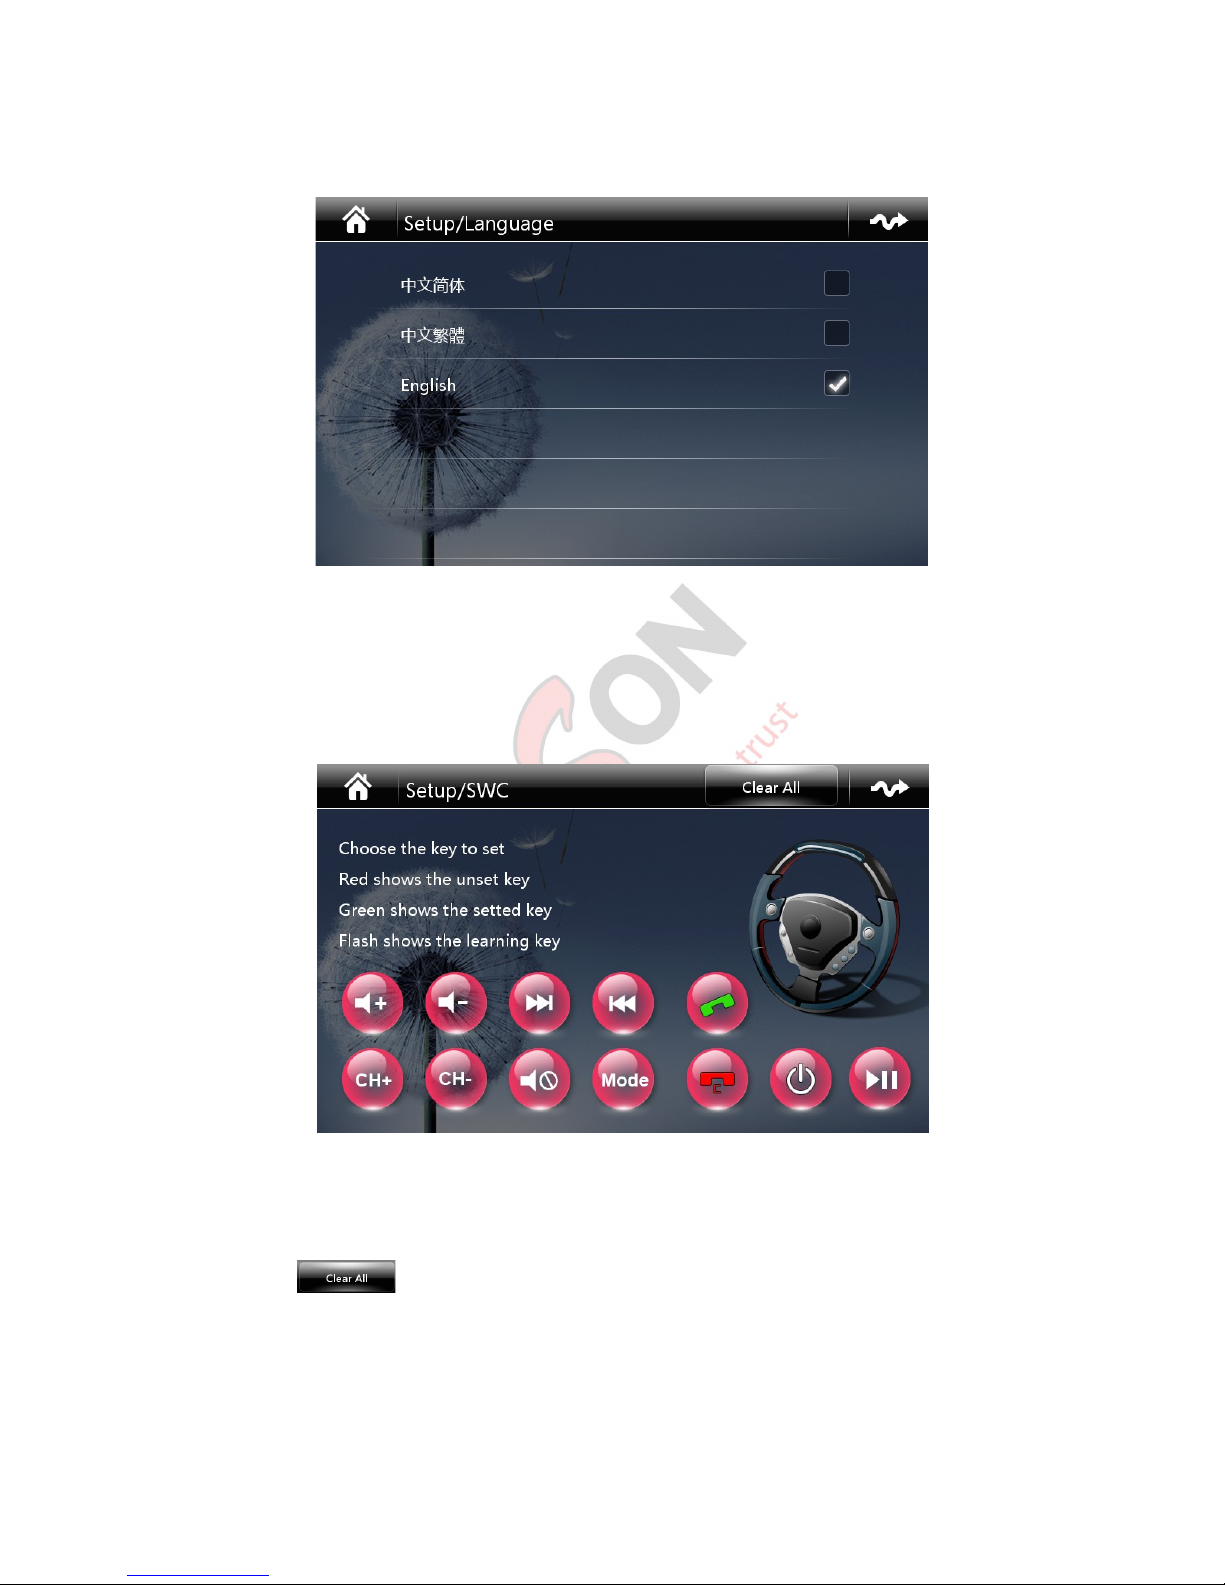
9 Language Setting
Please select the language according to your preference. Consult your dealer for more languages which
can be activited.
10 Steering Wheel Control Programming
Follow the steps below to set up Steering Wheel Buttons (applicable only to those vehicles equipped with the
Steering Wheel buttons):
1. The SWC setup password is “3368”
2. Press to remove any existing settings
3. Press a button to be programmed on the steering wheel
4. Press the corresponding button on the screen. When that button turns from red to green, it signified
that the button has been programmed properly.
5. Repeat the steps to programme the remaining buttons on the steering wheel.
AVSON MTK User Manual-en Page 15 / 28
Page 16
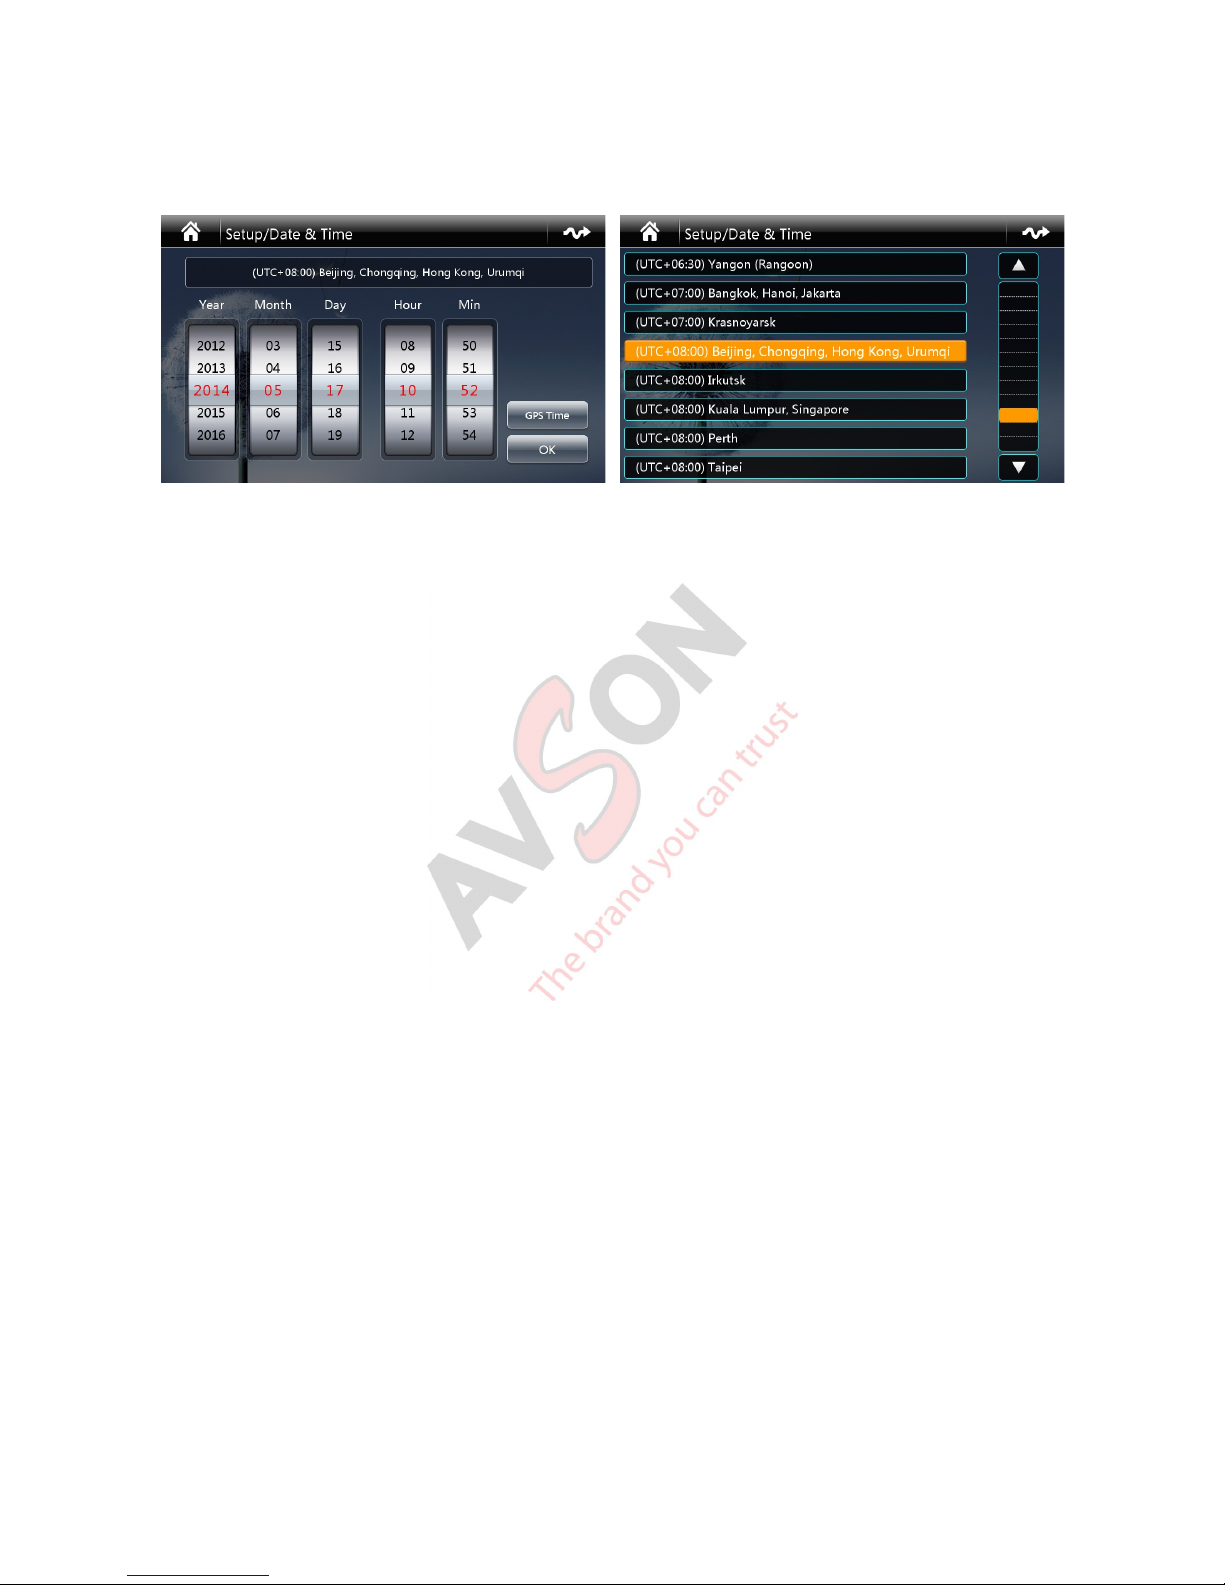
11 Date & Time Settings
Drag the roller up and down to set the year, month, day, hour and minute. Press “OK” to confirm the
selection.
If GPS signal is strong, the “GPS Time” function will be available. Press the “GPS Time” button to
automatically set the system time. Since GPS time is standard GMT, please select the appropriate time
zone to reflect the correct local time.
AVSON MTK User Manual-en Page 16 / 28
Page 17
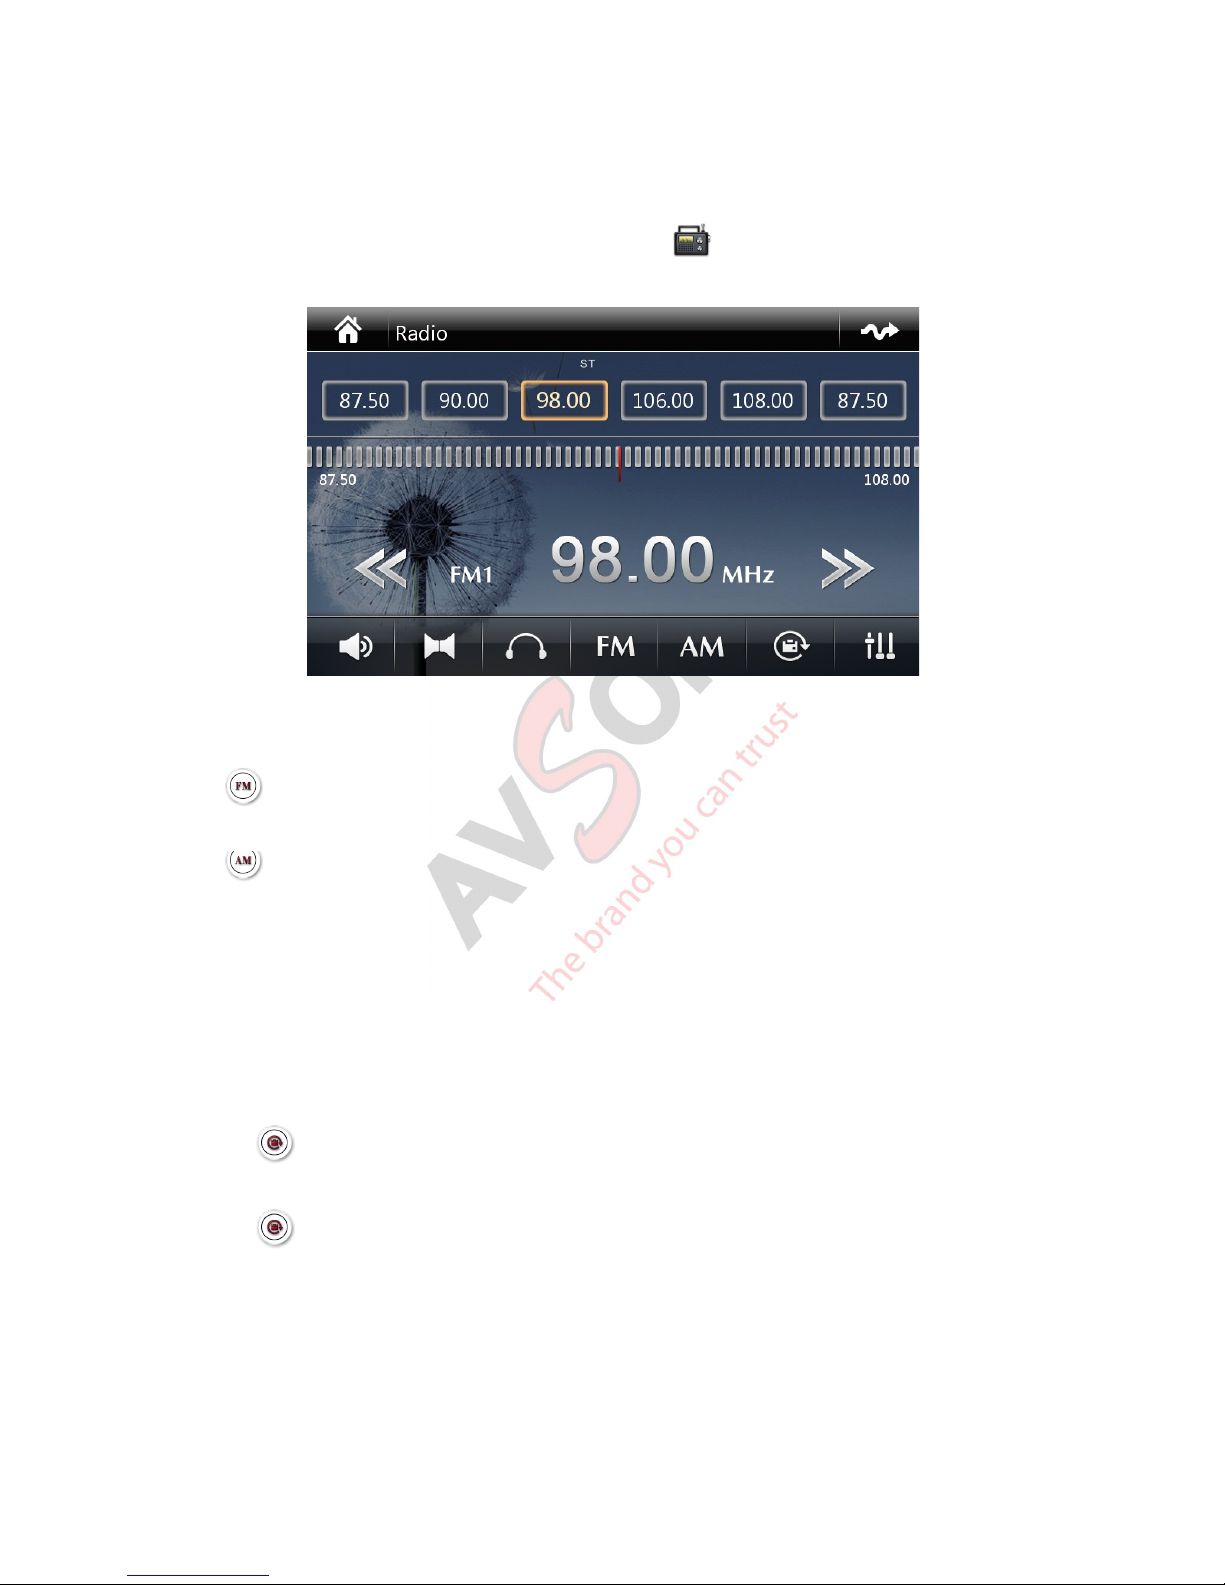
Radio Operation
Enter Radio Mode
Press the "BAND" button on the head unit panel or press the ' radio icon on the Main Menu to enter the
radio mode.
Band Selection
Press to circle through FM1, FM2 and FM3, in total 3 bands. Each band can store up to 6 pre-set
stations.
Press to circle through AM1 and AM2. Each band can store 6 pre-set stations.
Searching Radio Station
Press “>>” or “<<” icon on the Radio menu to search radio frequency in forward or backward position. The
searching will stop automatically once a radio station is found. Slide the horizontal bar in the middle of the
radio screen will quickly jump to a specific frequency.
Automatic Store Radio Stations
Press the icon to let the system automatically search through the radio frequency and store the radio
stations in sequence.
Press the icon again to stop the automatic searching before it is completed.
Manual Store Radio Stations
After a favorite radio station is found and in play, press and hold one of the six pre-set buttons in a radio
band to save the current radio station in that button. The frequency number will appear on the button
indicating the memory action is successful.
AVSON MTK User Manual-en Page 17 / 28
Page 18

Intro
Press the button to listen to 10 seconds introduction of each stored station in turn.
Stereo / Mono mode (FM only)
When the radio signal is weak, press the button to switch to MONO mode to enhance reception. The
“ST” symbol on the screen will disappear.
GPS Navigation Operation
Satellite navigation system provides turn by turn voice guidance and visual routing map to assist driver to
reach the destination. Road and traffic condition may change due to some special occasion or the most
recent changes have not been updated and reflected in the map data. Please ALWAYS follows the road sign
and traffic police instructions. GPS is just an auxiliary tool.
Starting the Navigation Software
1. a SD card with pre-installed navigation software and map data has to be inserted into the GPS Card
Slot
2. set up the GPS software path in Settings > Navigation > File Path (please refer to the Settings
section for more description)
3. press the NAVI / GPS button on the device panel or press the Navi icon in the Main Menu to
engage the navigation software.
Depends on the countries and location, different navigation software and/or map may be used with this
device. For detail instructions in operating the Navigation software, please consult your local distributor.
Note: DO NOT pull out the GPS SD Card while the navigation software is running. Otherwise, it may
damage the software file inside the SD card and lead to the navigation software unusable.
Disc Operation
1. This device only supports 12cm disc. It can play DVD, DVD-9, VCD and Music CD (including MP3).
2. Occasionally, due to incompatibility in disc physically format, editing software and recording
conditions, some disc (especially those copied disc) cannot be played.
Entering Disc Mode
When there is no disc in the device, insert a disc into the disc slot will automatically enter the disc reading
mode.
Where there is a disc in the device, press the “DVD” button on the device panel or the “DVD” icon in the Main
Menu to enter the disc reading mode.
AVSON MTK User Manual-en Page 18 / 28
Page 19
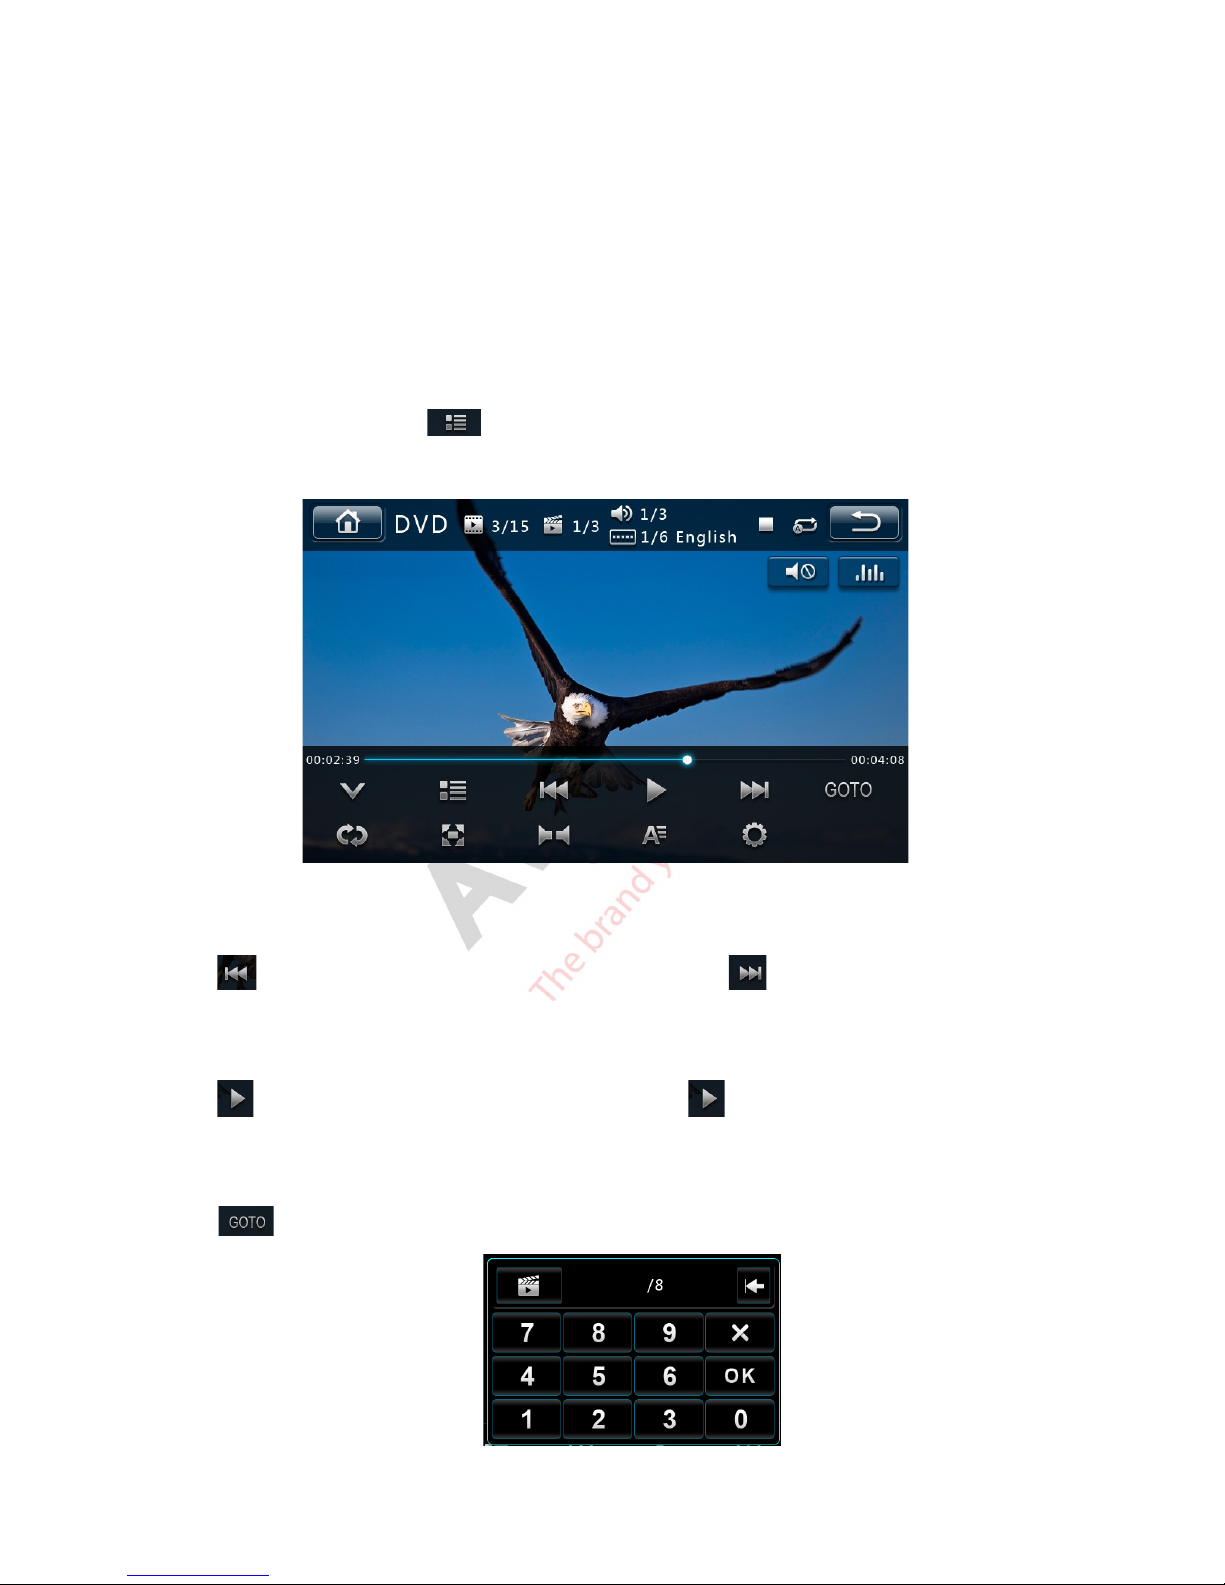
Disc Insert / Eject
This device employs the sophisticated slot-loading mechanism. Gently slide in a 12mm disc into the loading
slot and the disc will be drawn into the device automatically. Please insert the disc with the playing side
facing down. The device will start reading the disc once the loading is completed.
Press the “EJECT” button on the front panel to eject the disc inside the device. If the disc is ejected and has
not been removed completely from the loading slot, the device will draw it in after 5 seconds.
DVD Menu
This Menu will vary slightly depending on the disc type inserted.
For DVD Video disc, press the icon to display the DVD Main Menu. For VCD disc, it will display the
PBC (Player Back Control) menu instead.
Previous / Next
Press to play back the previous song / track / chapter. Press to go to the next one.
Pause / Play
Press one time to temporary pause the playback. Press again to resume the playback.
Select by Number
Press to bring up the numeric pad. Select a number and press “OK” will jump to the specific song /
track / chapter.
AVSON MTK User Manual-en Page 19 / 28
Page 20
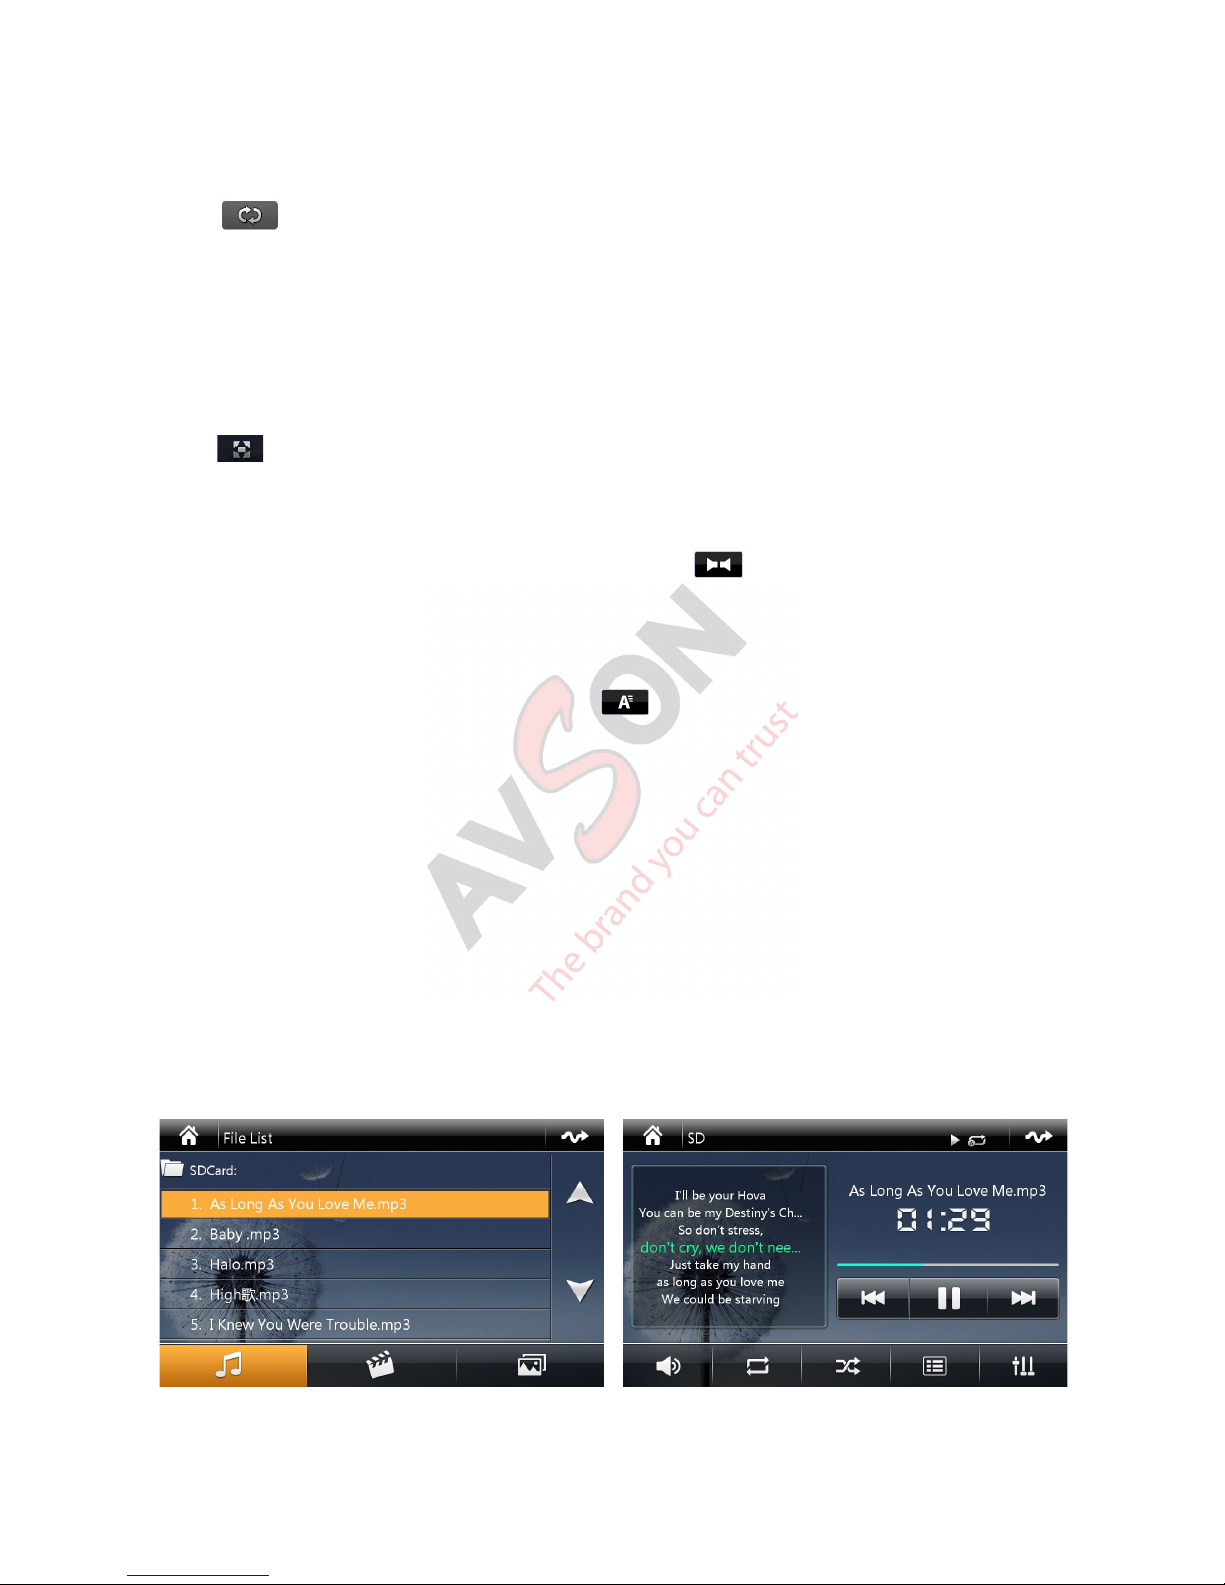
Playback Repeat
Press to switch amongst different playback Repeat mode. Different disc types will have different
repeat patterns as illustrated below:
CD/VCD: Repeat Single Song / Clip → Repeat whole disc
DVD/DVD-9:Repeat Section → Repeat Title → Repeat whole disc
Picture Aspect Ratio
Press to switch between 4:3 and 16:9 picture display aspect ratio.
Audio Channel Selection
Some discs are embedded with multiple sound tracks. Press during playback to circle through the
audio tracks recorded on the disc. This key becomes invalid if the disc contains only one sound track.
Subtitle Selection
DVD disc may contains multilingual subtitles. Press to select a subtitle in the language preferred.
Note:
1. Not all DVD discs can have subtitles changed during playback. Some disc requires the selection of
subtitle within its own menu.
2. There may be a slight delay for the system to prepare and display a selected subtitle.
3. The subtitle of some DVD disc cannot be hidden.
4. The subtitle languages depends on the DVD producer. Some DVD disc may have only one set of
subtitle.
USB / SD Operation
This device can play audio, video and picture files in USB Flash Drive and SD card.
It supports FAT16 / FAT32 / EXFAT / NTFS format file system.
AVSON MTK User Manual-en Page 20 / 28
Page 21

Media Player
Once a USB Flash Drive or SD card is inserted properly into the slot, the Media Player screen will pop up
automatically. The device will categorize the media files into Audio, Video and Picture. If a USB Flash Drive
or SD card has been inserted previously, press the “USB” or “SD” icon on the Main Menu will trigger the
Media Player.
Video Format Support
The device can support a variety of video formats, including: 3GP, 3G2, ASF, AVI, DAT, DIVX, FLV, M2TS,
M2V, M4A, M4V, MFS, MKV, MP4, MPEG, MPG, MOV, OGM, RM, RMV, RMVB, TS, VID and VOB etc. It
supports up to 1080P and most video downloaded from internet.
Audio Format Support
The device can support multiple audio formats as follows: AAC,AC3, APE,FLAC,MP1, MP2,MP3,
OGG, PCM,PCM,RA,RAM,RMM and WAV.
Lyric Display
This device supports song lyrics in LRC format. If a song contains lyric, it will be displayed on the screen
while playing. Press the “LYRIC” or “Spectrum” icon to change lyric or spectrum display.
Album Cover Display
This device supports Album Cover display. If songs come with album cover image, it will be shown in the
Media playback window.
Folder and List
Press on the Media playback screen to bring up the file list. Press to go to specific folder,
then press the favourite song name to start playing that song. Press to return to the previous folder
directory.
Repeat and Random Play
Press to circle through the various repeat modes; repeat current song → repeat current folder →
repeat all music.
Press to switch between Random play and Normal Sequence play.
AVSON MTK User Manual-en Page 21 / 28
Page 22
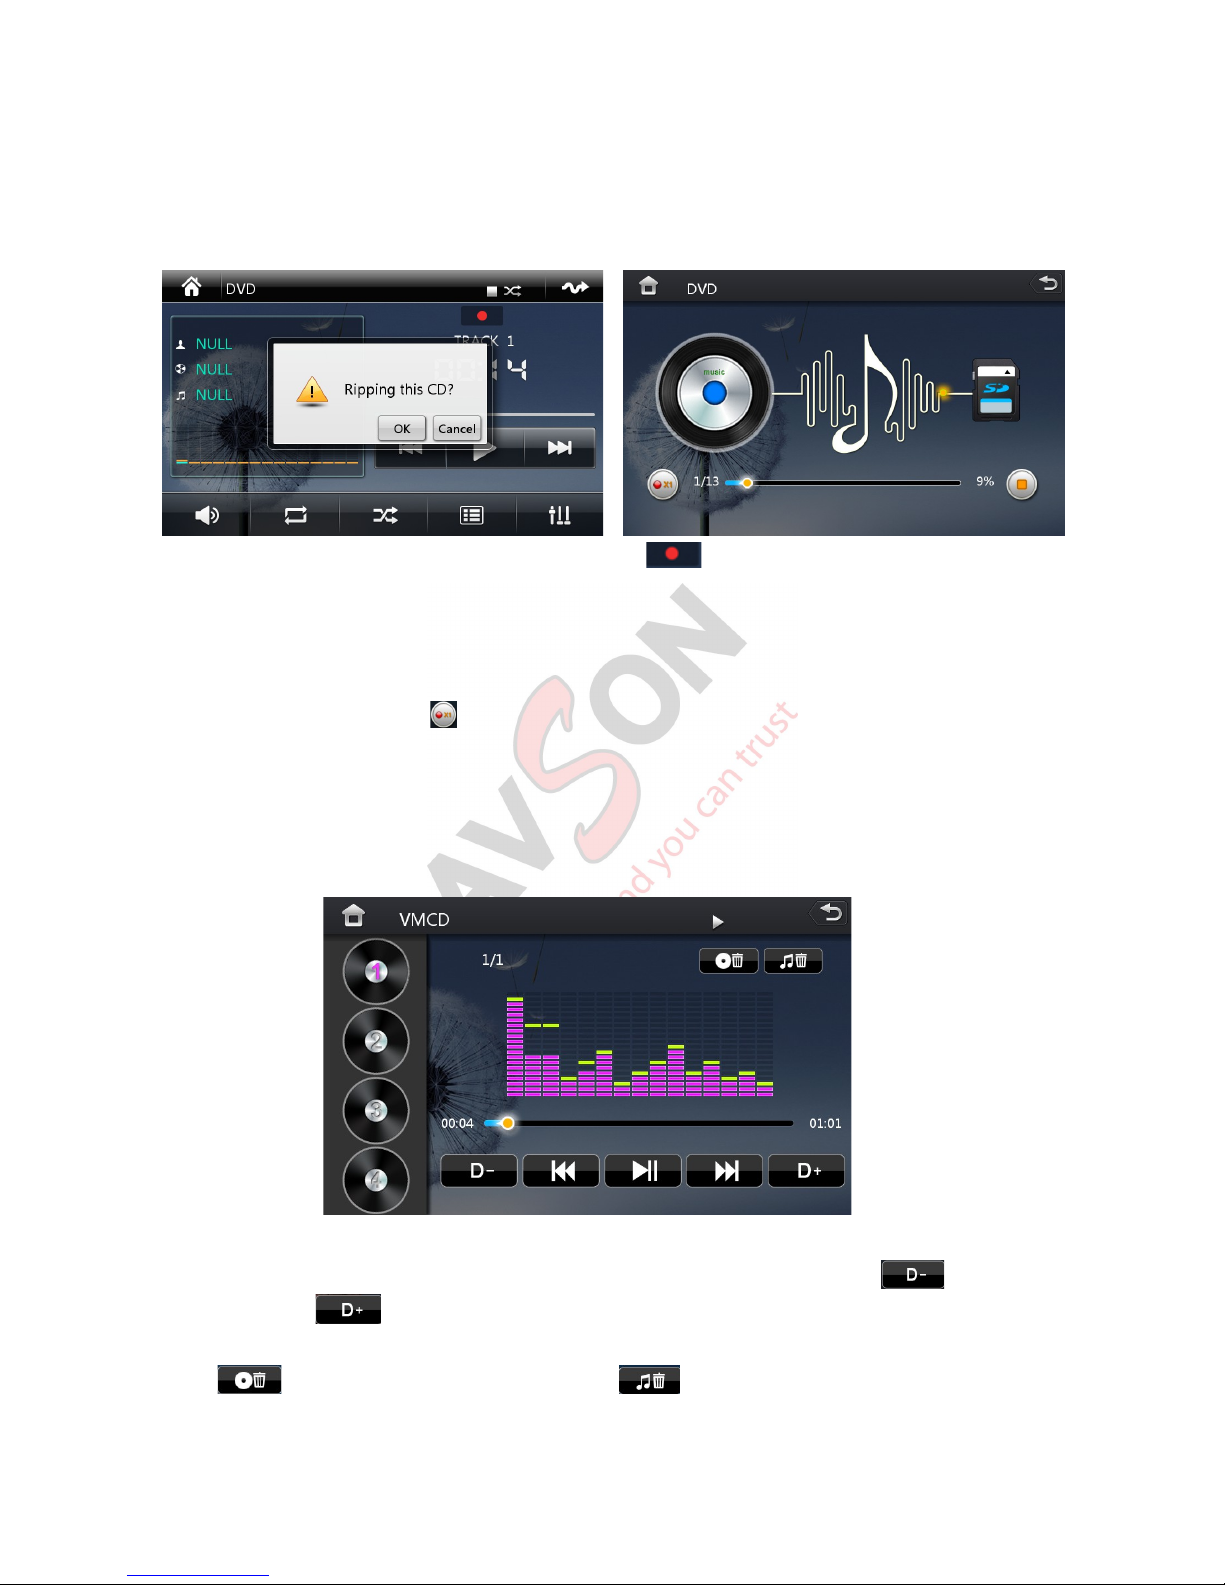
Virtual Multi CD (Option)
The Virtual Multi CD function consists of special hardware and software. It must be pre-installed at factory
level before shipment. It rips the songs in the Audio CD disc and stores them in MP3 format in the USB
Flash Drive or the SD card. A maximum of 9 Audio CD discs can be ripped and stored.
Insert an Audio CD disc in the device and press the icon. A window will pop up requesting
confirmation to rip the CD (as shown in the left image above). Press OK to confirm and the Recording
interface will appear (as shown in the right image above).
Fast Speed Record mode: the recording speed is 4 times faster than the normal play speed and it will take
about 20 minutes to copy one Audio CD disc. There is no sound during recording.
1x Speed Record mode: press to switch to normal speed recording. Under this mode, it will take about
75 minutes to complete the ripping process and the music will play while recording as well.
Virtual Multi CD Play
If any Audio CD has been ripped and stored in either the USB Flash Drive or the SD card in the device, press
the “VMCD” icon on the Menu Main will enter the VMCD player interface.
Disc Selection
Slide up and down and press the disc icon on the left to choose the ripped CD. Press to go to the
previous disc and to go to the next disc.
Delete Function
Press to delete current disc in play and press to delete current song.
AVSON MTK User Manual-en Page 22 / 28
Page 23
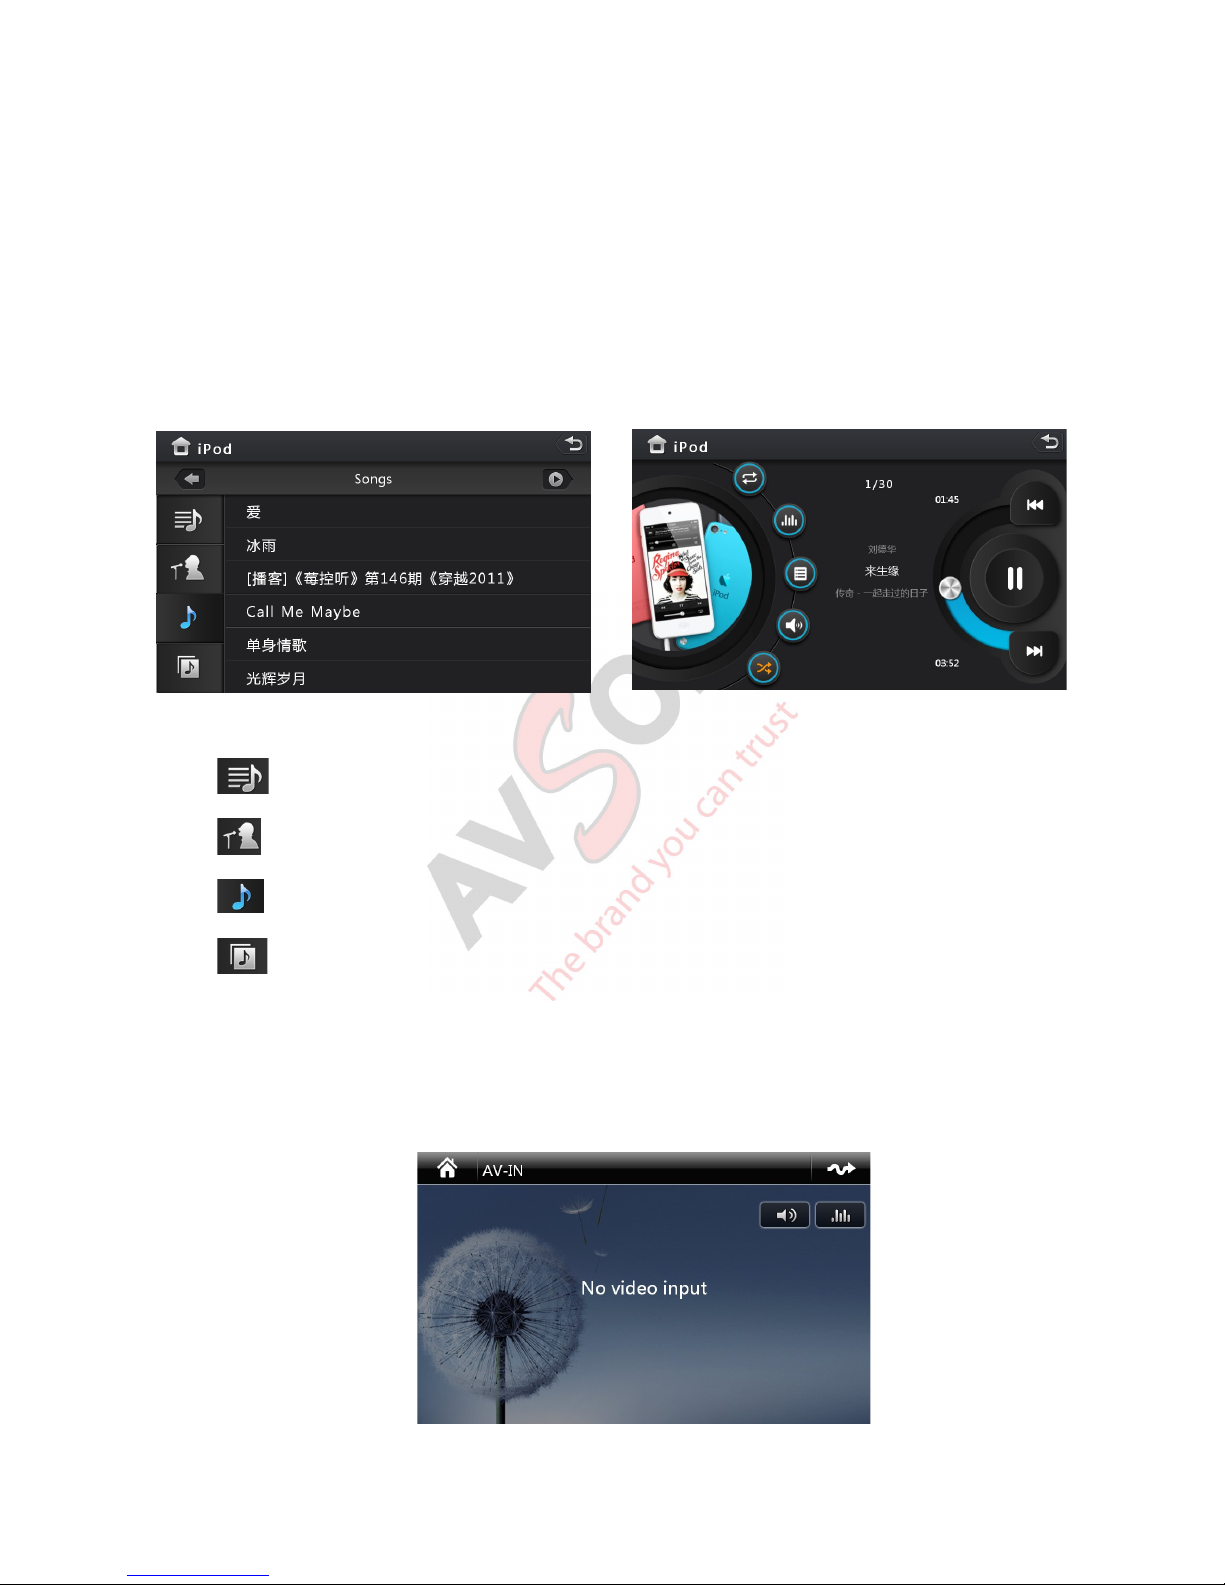
Ipod Music Connection (Option)
Some models, with Apple authentication chip installed inside the device, provide native support for iPhone,
iPod and iPad connection via the USB port through the Apple USB cable. The Apple device will also be
charged during the connection. Once plugged into the USB port, the Apple device will be detected and the
iPod user interface will pop up.
Note:
1. Currently the Apple authentication chip and software supports up to iPhone5, iPod5 and iPad II, with
iOS 7.1 being verified.
2. Depends on the future Apple hardware and software development, newer models and newer iOS
versions may not be supported.
3. Some very old Apple models may not be supported.
Music Selection
Press to bring up the Apple Play List
Press to bring up the Artist List
Press to bring up the Song List
Press to bring up the Album List
AV-IN Operation
This Device supports auxiliary Audio/Video Input through the RCA jacks at the back of the head unit. Press
the “AV-IN” icon on the Main Menu to enter the AV mode.
AVSON MTK User Manual-en Page 23 / 28
Page 24
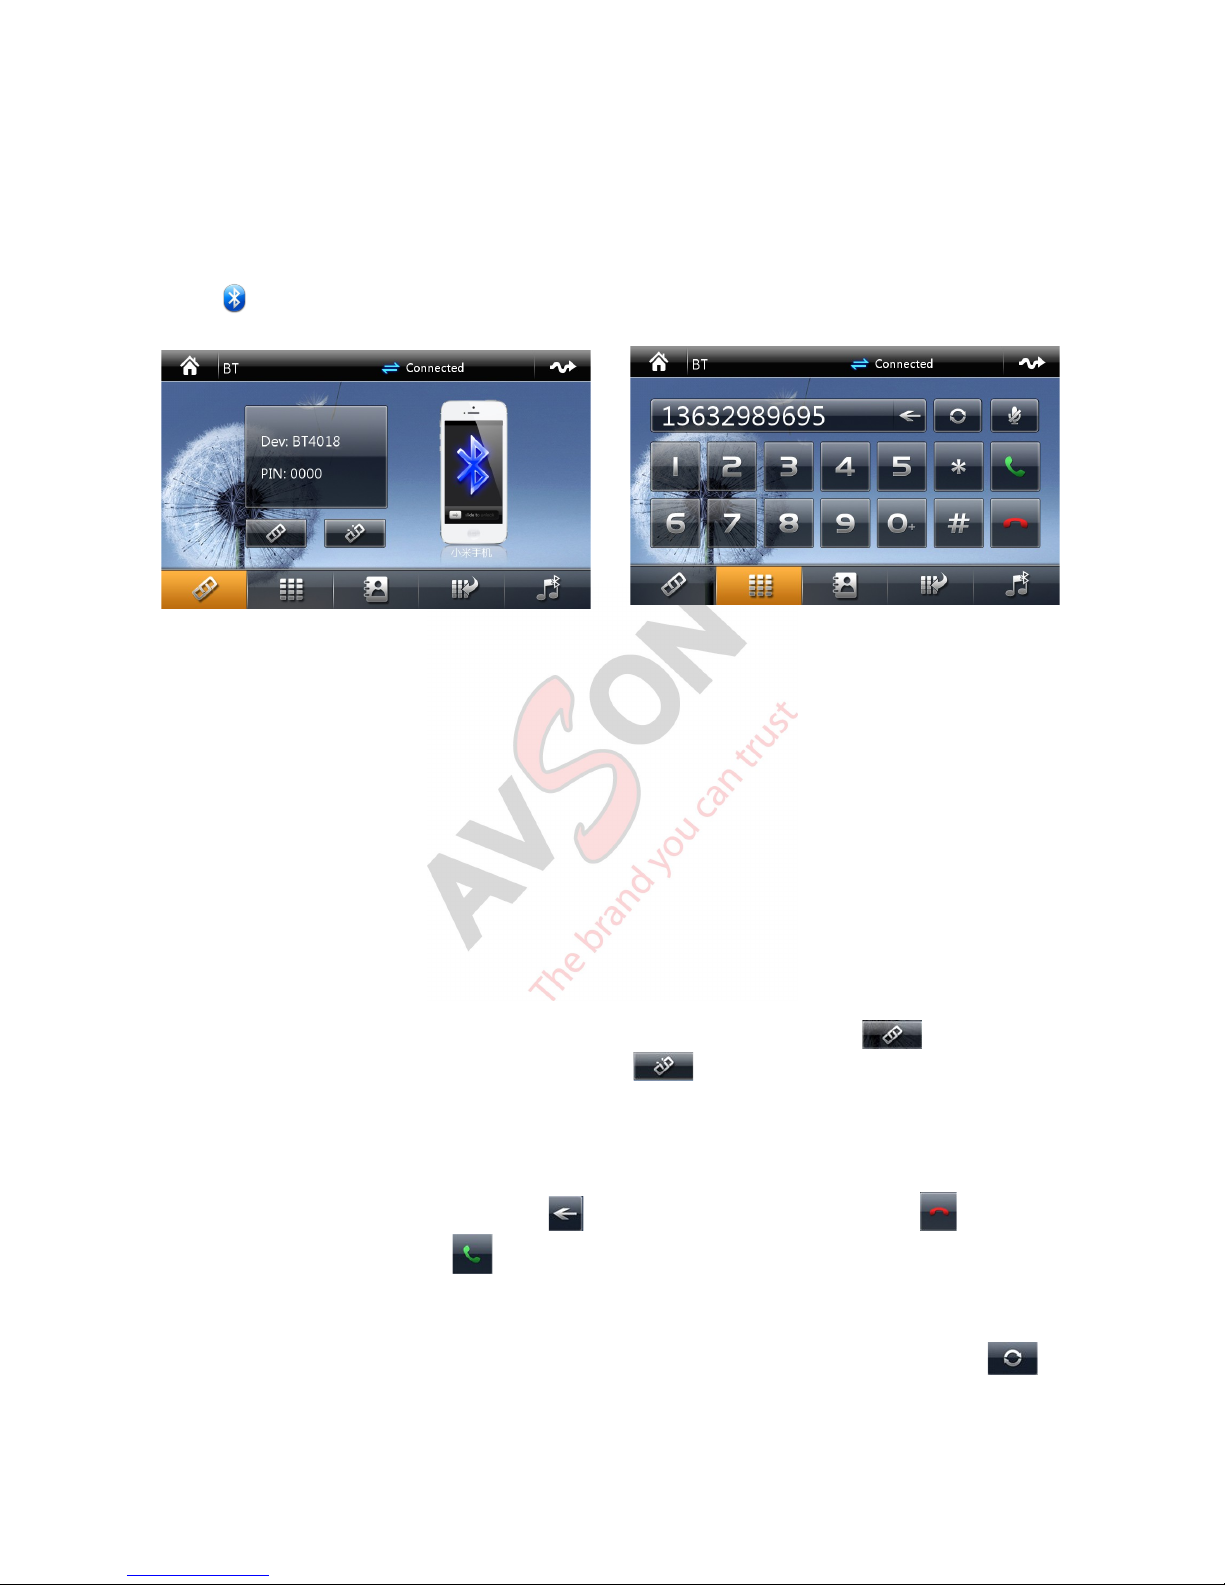
Bluetooth Hands-free Operation
It is very dangerous to drive while talking and holding a mobile phone. In some countries, this also violates
the law. This head unit is equipped with Bluetooth Hands-free function which makes driving safer and more
comfortable. A microphone is attached in the front panel to receive the voice of the user and the voice from
the other end of the the call will be broadcast through the car speakers.
Press in the Main Menu to enter the Bluetooth screen.
Pair and Connect the Device and Mobile Phone
Before using the Bluetooth function, the Device and the Mobile Phone have to be paired and connected first.
The pairing is a one-time process. After paired successfully, the Device and the Mobile Phone will store the
pairing settings in memory and will connect each other automatically when the Bluetooth function on both
equipments are turned on.
Follow the steps below to pair the devices:
1. Turn on the Bluetooth function of the mobile phone and put it into Bluetooth Search mode.
2. Find and select the Bluetooth Hands-free device, e.g. "BT1234".
3. Enter the corresponding PIN code (usually “0000” or “1234”) on the phone when prompted.
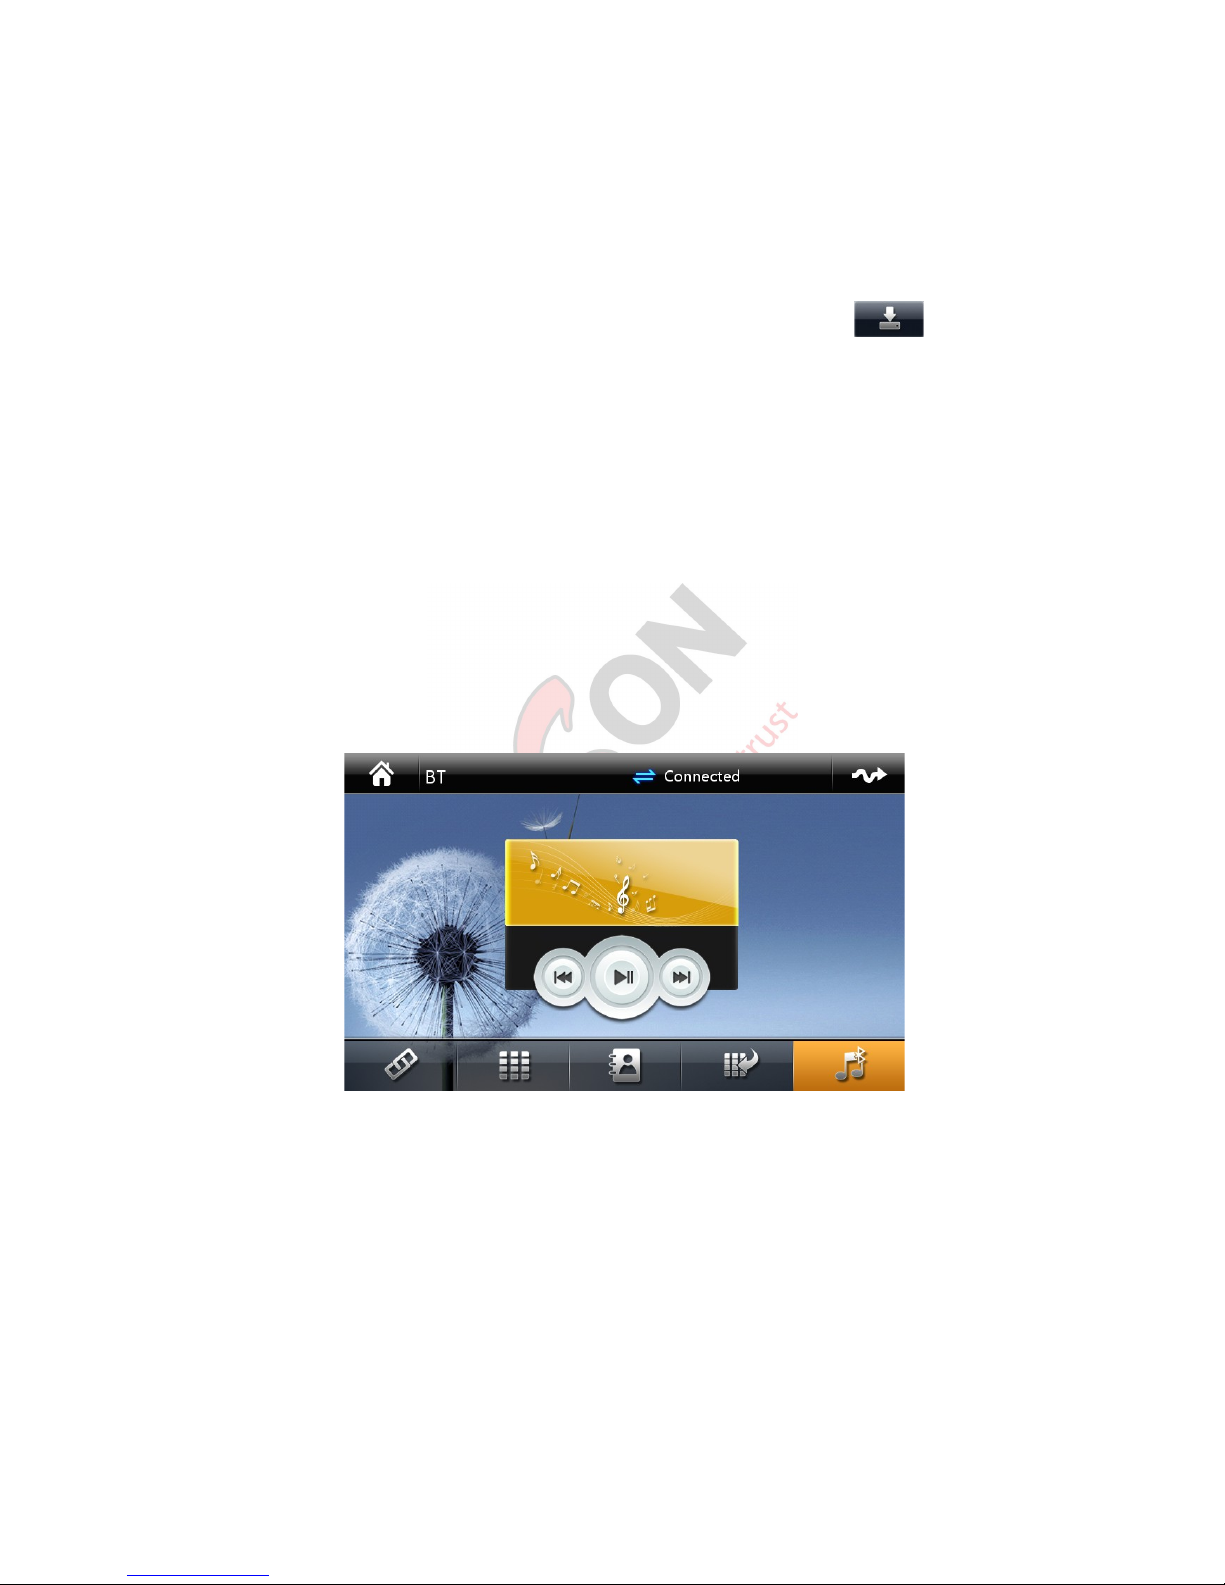
4. If the pairing is successful, the Device and the Phone will connect each other and the top bar of the
screen will show "Connected".
If the Phone had ever been paired and connected with the Device before, press to force the re-
establishment of the Bluetooth connection again. Press will disconnect the Bluetooth connection.
Making a Phone Call
After the Bluetooth Hands-free connection has been established, user can key in the phone number through
the numeric pad on the touch screen. Press to delete the last digit entered. Press to delete all
the numbers just keyed in. Press to make the call.
Switching between Car Speaker and Handset
In some occasions, it is inconvenient to have the call broadcast through the car speakers. Press to
switch between car speaker mode and handset mode.
AVSON MTK User Manual-en Page 24 / 28
Page 25
Call History
This consists of three categories; namely “Dialled Calls”, “Received Calls” and “Missed Calls”. User can
select any number from the list to redial or delete the number.
Synchronize Phone Book
User can download the phone book records from the mobile phone to the Device. Once the Bluetooth
connection has been established, switch to the Phone Book screen and press the icon to start the
download. The number of records downloaded will be shown on the screen during the process. When the
download is completed, user can search the phone list from within the Device. Caller's name will be
displayed on the screen of the Device if the incoming call number matched with the phone book record.
Note:
Because the Bluetooth protocol may be implemented differently by various mobile phone manufacturers, the
Device may not be able to support all mobile phone models in the market. Please try several different mobile
phones for Bluetooth connection before sending the Device for service.
Bluetooth Music
This Device supports standard A2DP (Advanced Audio Distribution Profile) for transmitting stereo audio from
mobile phone to the Device via Bluetooth connection. It also supports music control functions including
"Previous Song", "Next Song" and "Pause / Play" operations.
AVSON MTK User Manual-en Page 25 / 28
Page 26
GPS Antenna Installation
GPS antenna can be mounted inside the vehicle (e.g. on the dashboard). It can also be mounted outside the
vehicle (e.g. on the roof top). For better GPS signal reception, it is recommended to have the antenna face
pointing towards the sky.
If the windshield and windows of the vehicle has metallic film applied, it may weaken or block the GPS signal
from entering the car. In such situation, the GPS antenna has to be mounted outside the vehicle.
Notes
1. Disconnect the power or turn off the Device before connecting the antenna.
2. Avoid shorten or extend the antenna wire. Bad wiring may cause short circuit and antenna
malfunction.
3. GPS antenna should be mounted on a horizontal plane. Bad signal reception may affect navigation
and position accuracy.
4. Never let the GPS antenna wire interfere the steering wheel or the gear lever, which will jeopardize
the safety of driving.
Head Unit Installation Guide and Wiring Diagram
1. This Device requires a 12 volts DC supply with negative grounding. Please ensure the vehicle has
compatible electrical system before installation.
2. The Amplifier or Subwoofer control wire and the Radio Power Antenna wire supply 12 volts
electricity. Please ensure they are properly wrapped, if not used, to avoid short circuit.
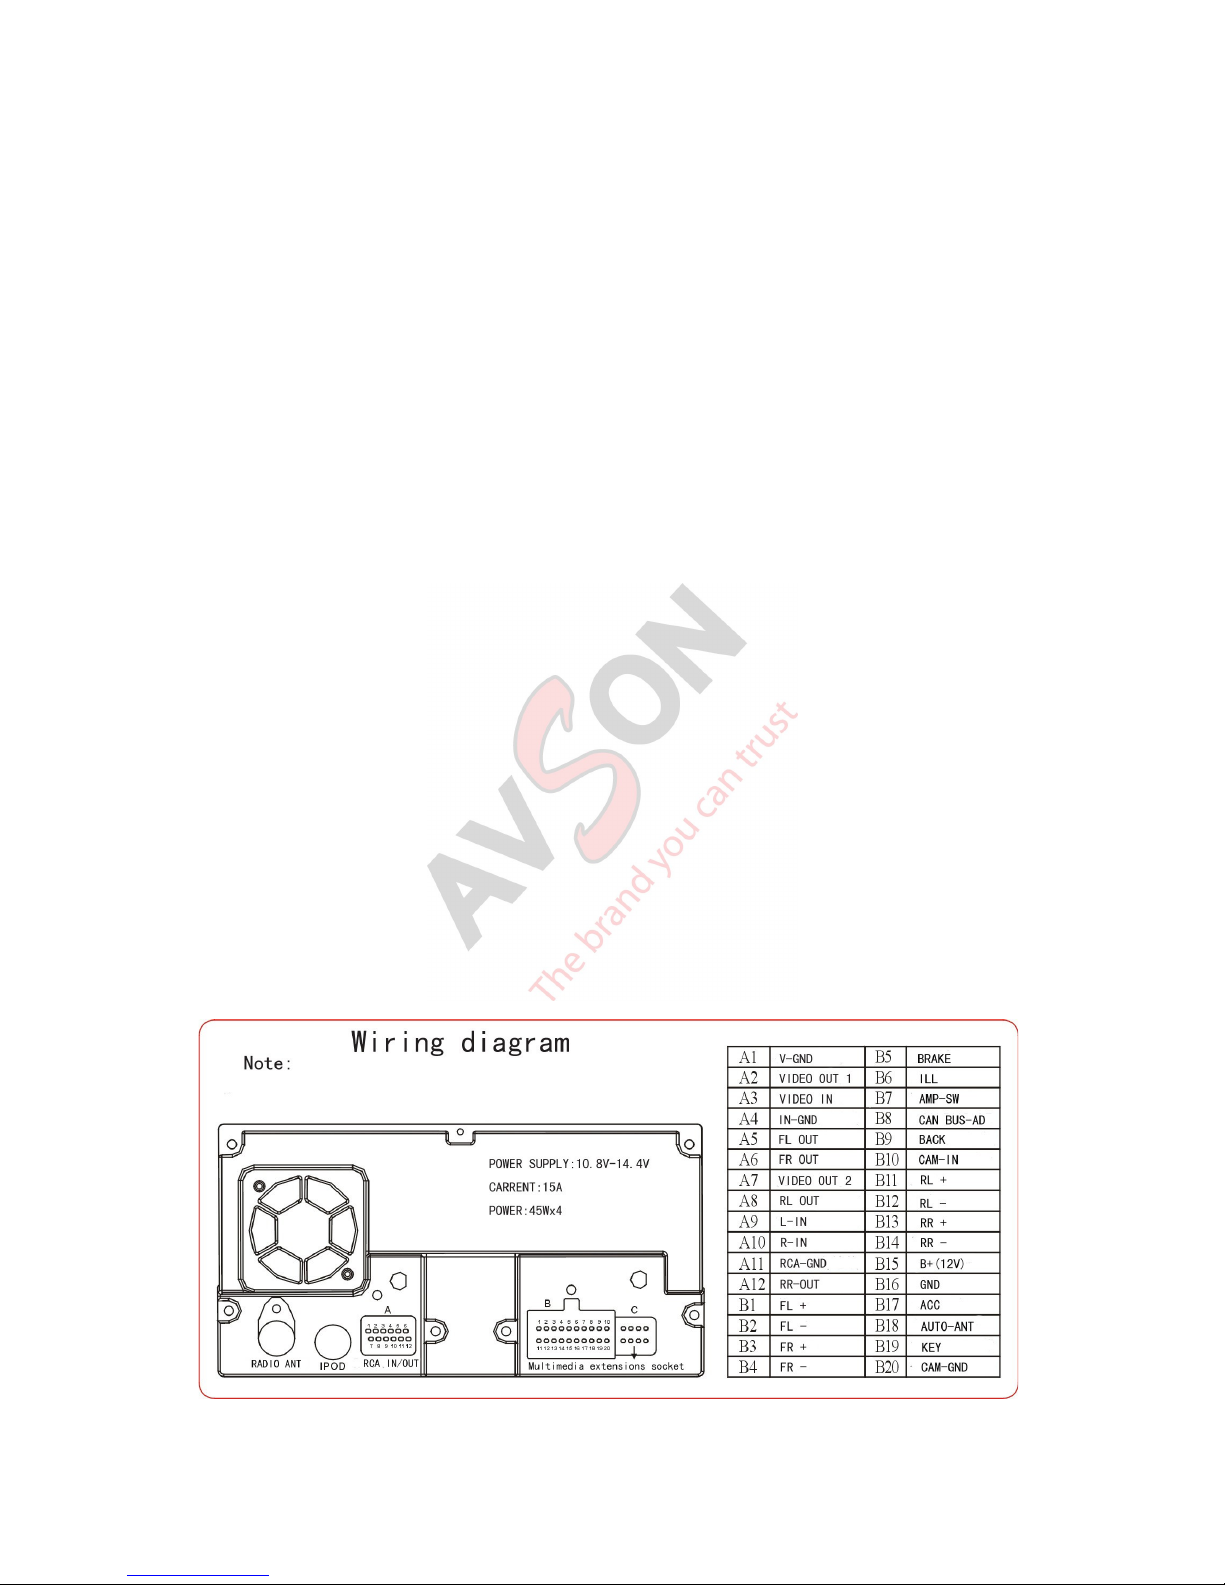
3. Must connect the wires following strictly to the wiring diagram. Failure to do so may damage the
Device or the vehicle electrical system.
4. Speaker Output negative (-) wire must be connected to the speaker negative (-) terminal. Never
connect the this wire to the car body.
5. Do not block the ventilation openings or the heat sink plate of the Device. Overheat will cause
system malfunction.
6. The left and right bracket screws must not exceed 8mm in length. Otherwise, it may damage the
components inside the Device.
Wiring diagram:
AVSON MTK User Manual-en Page 26 / 28
Remove the DVD drive protecting screws before installation.
Always connect the wires according to the schematic wiring diagram.
Page 27
Troubleshooting
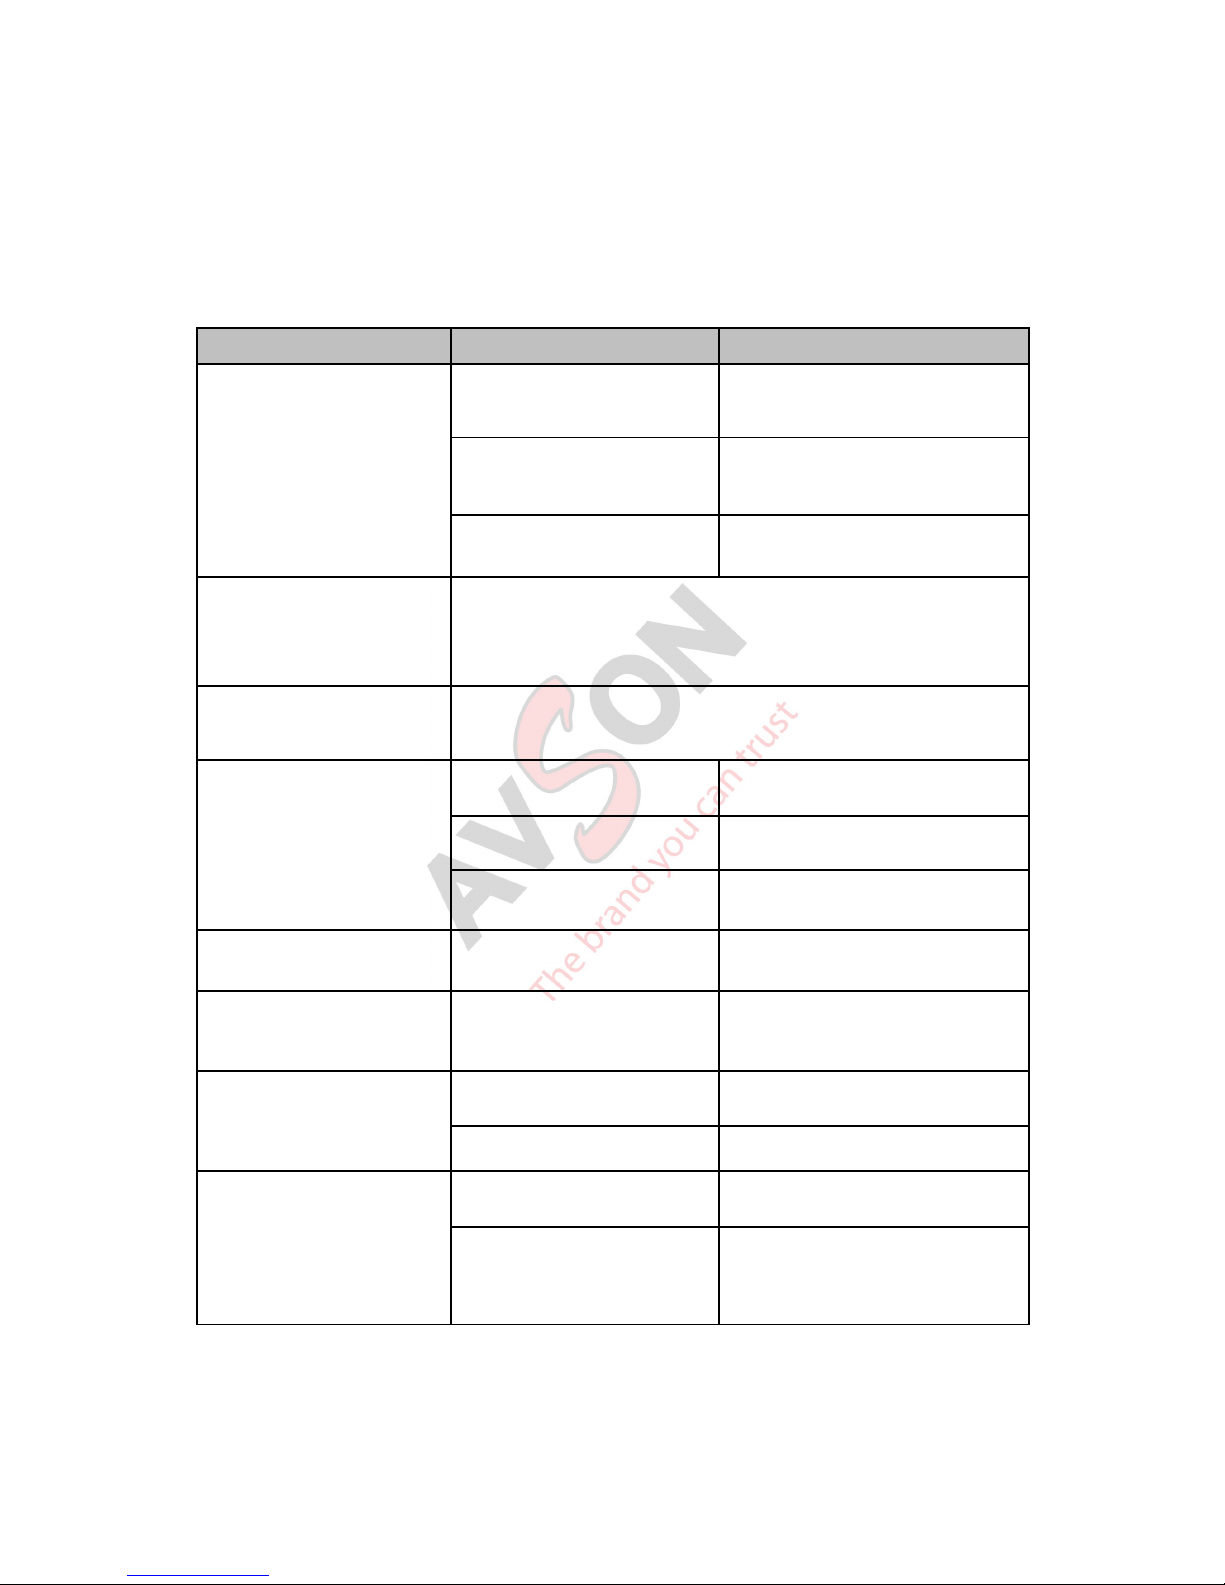
If problem is encountered, please try to resolve the issue following the guide below. Consult the dealer or
qualified professional if the problem persists. Never try to open the Device yourself.
Symptom Possible Reasons Remedy
Unit does not turn on
Car key is not inserted into
the key hole and switch is not
turned on.
Insert the key and turn on the
switch.
The power cable or the CAN
bus box is not plugged into
the Head Unit.
Plug in the power cable or the
CAN bus box.
Fuse is blown.
Replace the blown fuse with same
current rating.
Touch screen does not
response accurately
Recalibrate the touch screen via the Setting Menu or press and
hold the "NAVI / GPS" button on the front panel until the calibration
screen pops up.
Touch screen does not
response
The system may be processing some instructions. Wait for a short
moment. If the problem persists, please contact the Dealer.
DVD /CD disc does not play
The disc is inserted upside
down.
Insert the disc with the recording
surface facing down.
The disc is damaged, heavily
scratched or deformed.
Use good quality disc instead.
The disc format is not
supported.
Use only supported disc.
DVD Main Menu not
function
Copied disc with information
lost in copying process.
Use original copy.
DVD image is poor
Improper settings in
Brightness / Contrast /
Saturation.
Re-adjust the Brightness /
Contrast / Saturation to suitable
level.
No Reverse Camera View
shown on screen while the
car is reversing
Reverse Camera has not
been installed.
Install a Reverse Camera by
qualified professional.
Camera image format does
not match with the Device.
Replace with a matching camera.
GPS cannot acquire the
current position
GPS antenna is not installed
Install the GPS antenna by
qualified professional.
There may be very weak or
no GPS signal in some area.
Drive the car to other locations to
check for GPS reception. If
problem persists, please contact
the Dealer.
AVSON MTK User Manual-en Page 27 / 28
Page 28

Declaration Statements
The best effort has been tried to make this User Manual comprehensive, accurate and precise as much as
possible. If there is any difference between the image shown in this Manual and the physical appearance of
the Device, the physical object prevails.
This manual may change from time to time due to hardware or software upgrades. Please contact your
dealer or search their website for the latest information.
We reserve the right to enhance any hardware or software in manufacturing without any prior notice.
This product has passed the GB/T 19392-2003
General Specification Standard for Car GPS navigation system
AVSON MTK User Manual-en Page 28 / 28
 Loading...