

AVSL MMD-PC1 PC KIT User Manual
Messaging Software
User Manual
FOR
PC & REMOTE OPERATIONS
(REV. 2.0)
Note: Jan 29, 2007
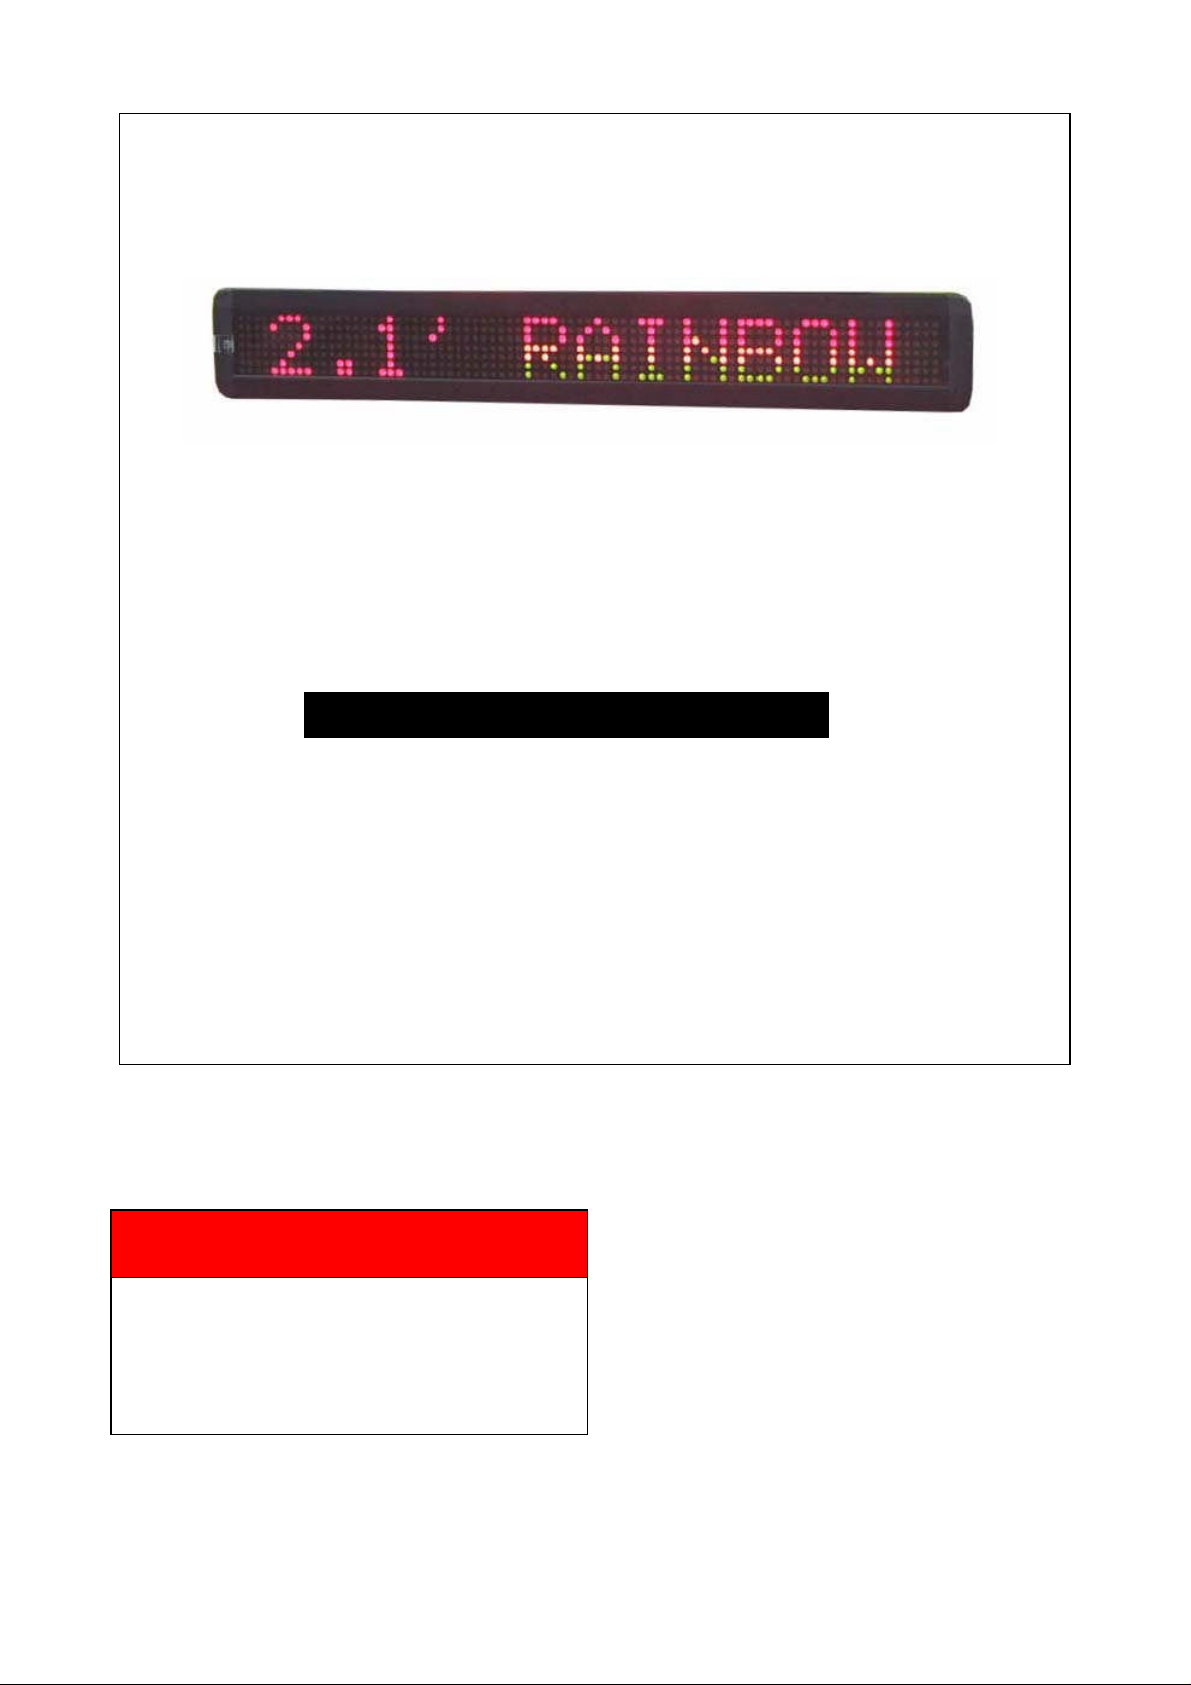
This manual is applied to the model of
M500N-7 series
Note: Specifications are subject to change
without notice

P ramming Manual Programming Manual
Contents
1: General information 3
1.1: Using a remote control to operate your sign 3
1.2: Using a computer to operate your sign 3
1.3: Attaching your sign to a surface 3
2: Basic sign operation 4
2.1: Turning a sign on and off 4
2.2: System requirement 4
2.3: Software operation 4
2.4: Remote control operation 6
3: Beginning messaging 8
3.1: Example 1-A simple message in seven easy steps 8
3.2: Example 2- Insert text, time, date, symbol, graphic, character and carton 8
3.2.1: Software operation 8
3.2.2: Remote control operation 9
3.3: Example 3- Create / Delete messages into different file names 11
3.3.1: Software operation 11
3.3.2: Remote control operation 12
3.4: Example 4- Adjustment of methods, fontsor colors 12
3.4.1: Software operation 12
3.4.2: Remote control operation 13
3.5: Example 5- Insert beep, speed or pause 13
3.5.1: Software operation 13
3.5.2: Remote control operation 13
4: Advanced messaging 14
4.1: Example 6- Setting time or date 14
4.1.1: Software operation 14
4.1.2: Remote control operation 14
4.2: Example 7- Programming filename messages insequence 15
4.2.1: Software operation 15
4.2.2: Remote control operation 16
4.3: Example 8- Creating your own custom graphics & logo 16
4.3.1: Software operation 16
4.3.2: Remote control operation 18
4.4: Example 9- Displaying your own custom graphics & logo 20
4.4.1: Software operation 20
4.4.2: Remote control operation 20
5: Other timeroptions 21
5.1.1: Software operation 21
5.1.2: Remote control operation 22
Appendix A: Additional programming tips 23
Appendix B: Listing of color 25
Appendix C: Listing of international characters 25
Appendix D: Listing of symbol characters 26
Appendix E: Change password 26
Troubleshooting 27
-Page2-

P ramming Manual Programming Manual
1: General Information
You can operate the sign in two ways:
By using a hand-held remote control
By using personal computer
1.1: Using a remote control to operate your sign
A remote control is a hand-held keyboard used to operate the sign. This manual shows you how to
program messages on your sign using a remote control.
1.2: Using a computer to operate your sign
To do this, you’ll need special connectors and computer software as following shown:
LED Display
Signal Cable
Power Adaptor
To Power Source
Note: Do not connect a telephone to the sign’s RS232 jack.
Note: Do not use ordinarytelephone wire to connect the sign to a computer
Note: Use onlythe power supply that came with the sign.
To one of the PC’s
COM (RS232) ports
1.3: Attaching your sign to a surface
Your sign can be mounted to a wall.
Note: This sign is intended for indoor use only.
Note:
Donot mount or attach the power supply to anything.
Donot let the power supply hang loose.
Place the power supply on a flat surface where no chemicals or liquid, such as
water, will contact it.
Plug the power supply into an easily accessible electrical outlet
Wall mount
1. Attach the mounting brackets to the wall orsurface.
2. Attach the sign to mounting brackets using hardware as shown below.
3. Plug the power cord into the sign and into an outlet.
Bracket
Screw Washer
Top View
Front View
Power cord
Washer
Bracket
Screw
-Page3-
P ramming Manual Programming Manual
1
2: Basic Sign Operation
2.1: Turning a sign on and off
When you plug in the sign’s power supply, the sign starts up automatically. On the other hands, in
order to turn the sign off, you can unplug the power supply or use the remote control.
2.2: System requirement
The computer must be Pentium 200 or above, 32M memories, 2Mor above display memory, 100M
empty hard disk. The computer must be installedwindow 95 or above version. The display mode is
designed for 800x600, 16-bit or 24-bit colors.
2.3: Software operation
Messaging Software allows you to send messages to your sign using a computer. Please follow the
steps to activate your software:
Turn on your computer and start Windows 98/2000/XP.
Insert the software CD disk into CD-ROM, or you can copy the software into your PC
for the easy operation.
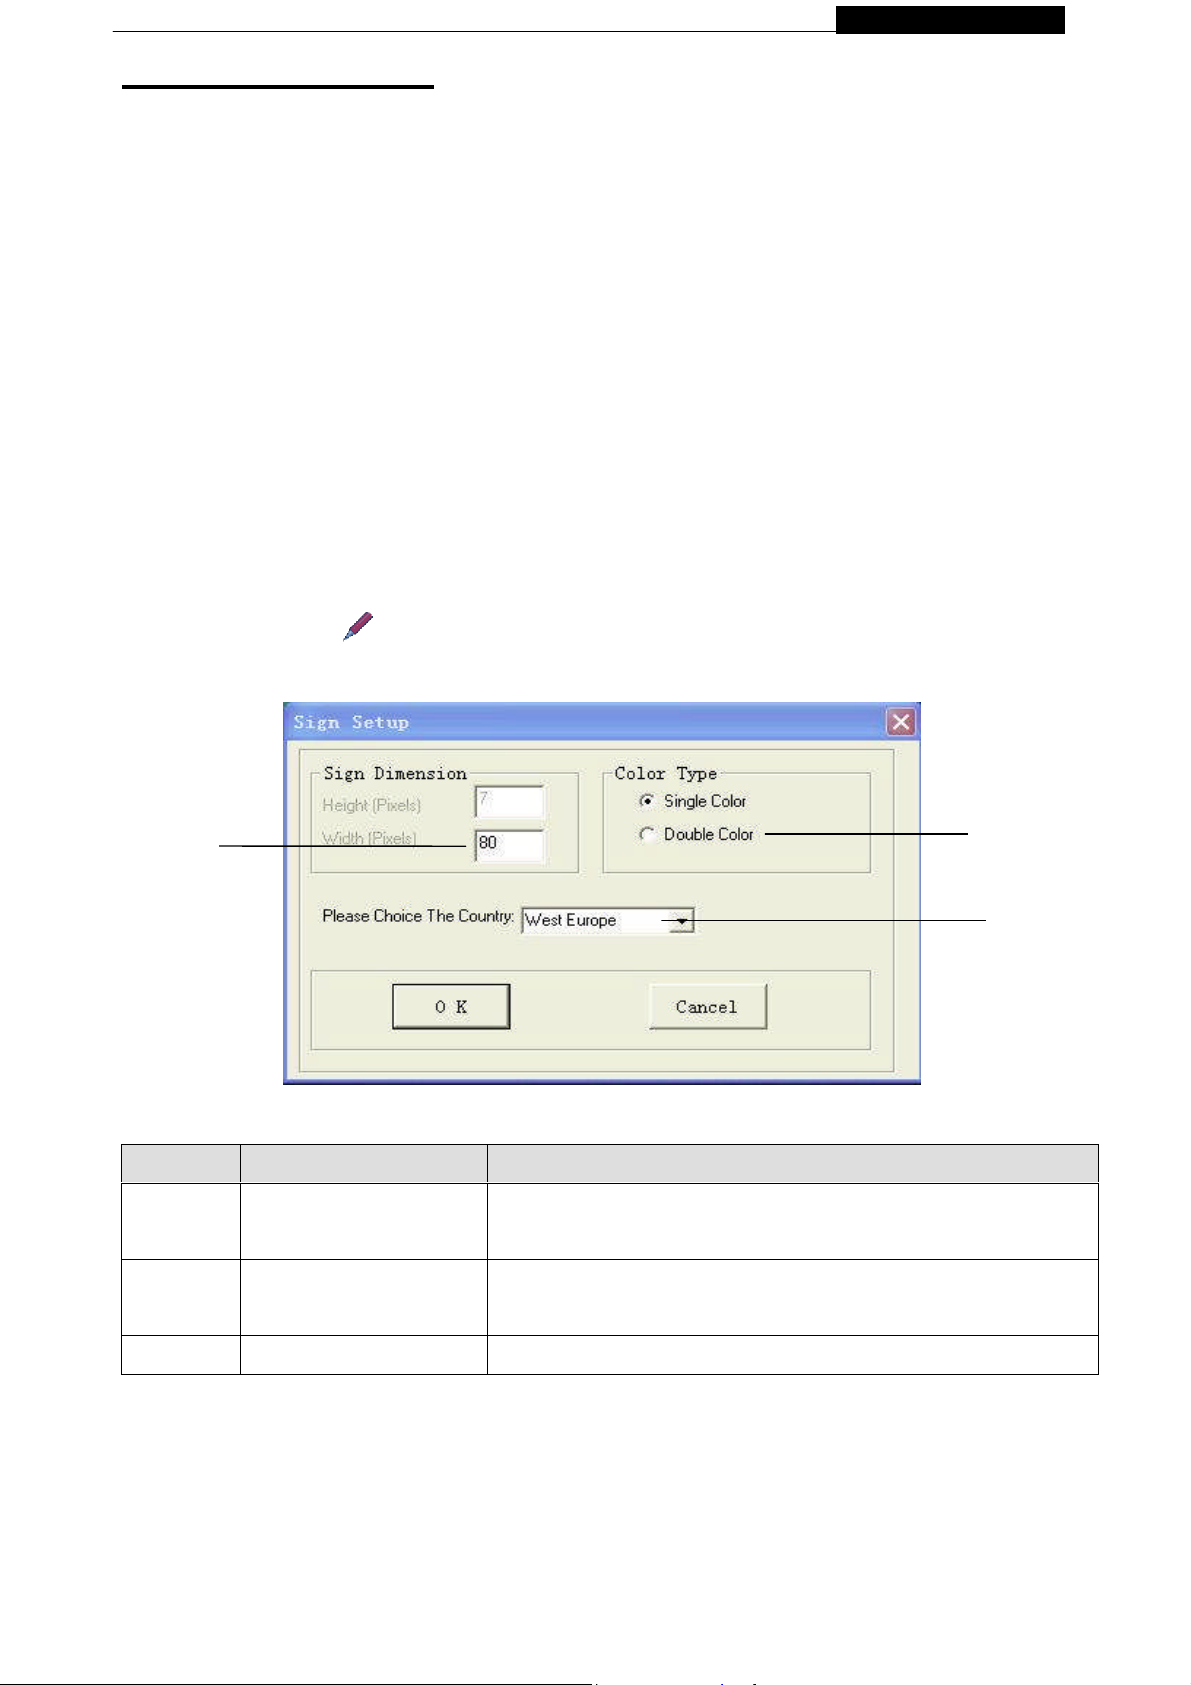
Double click the icon to activate the programming software, this is what should appear
on your computer screen:
Letter Name Description
1 Color
2 Text Size /pixel
If your sign is tricolor (Red, Green & Amber), please
select
Double Color.Otherwise, please select single color.
The length of message sign, unit in pixel.
The default setting is 80
1
3 Country option For new countries, select following choice for the operations
Click
OK
to enter into the main screen as follows;
-Page4-
P ramming Manual Programming Manual
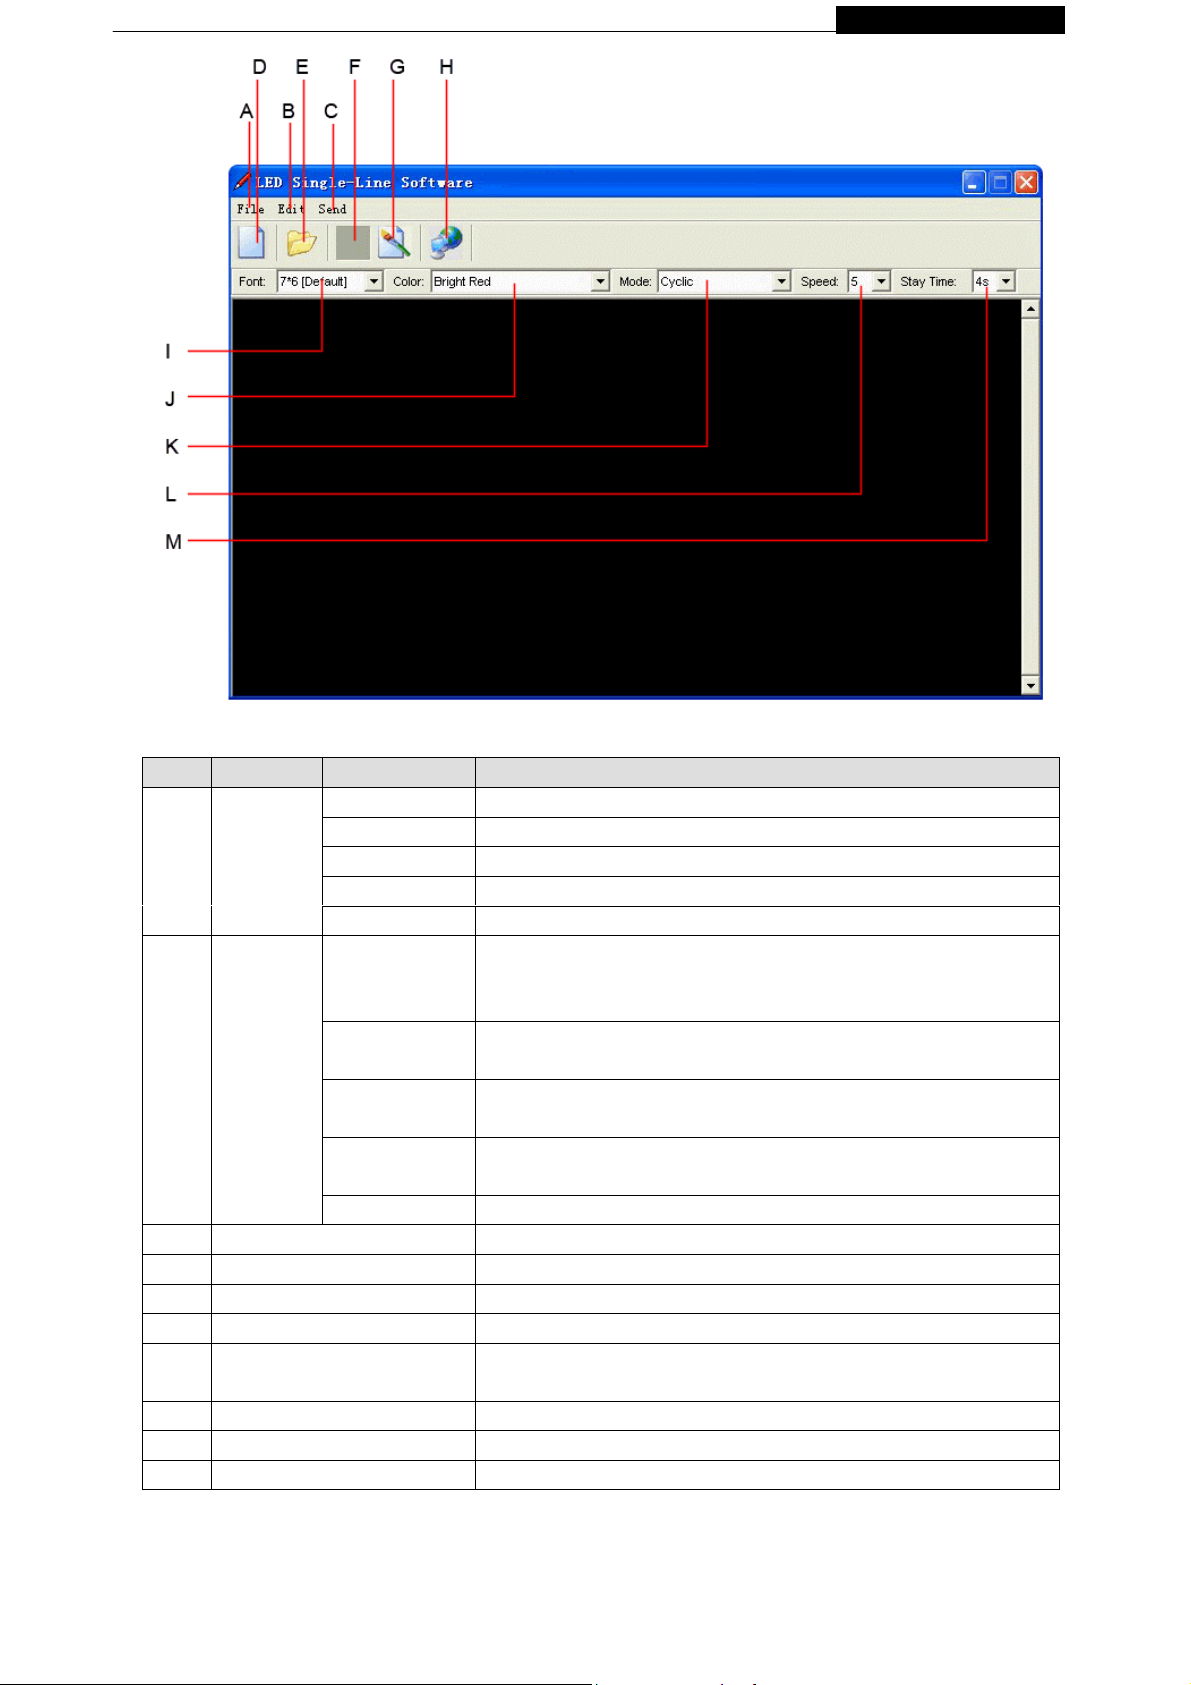
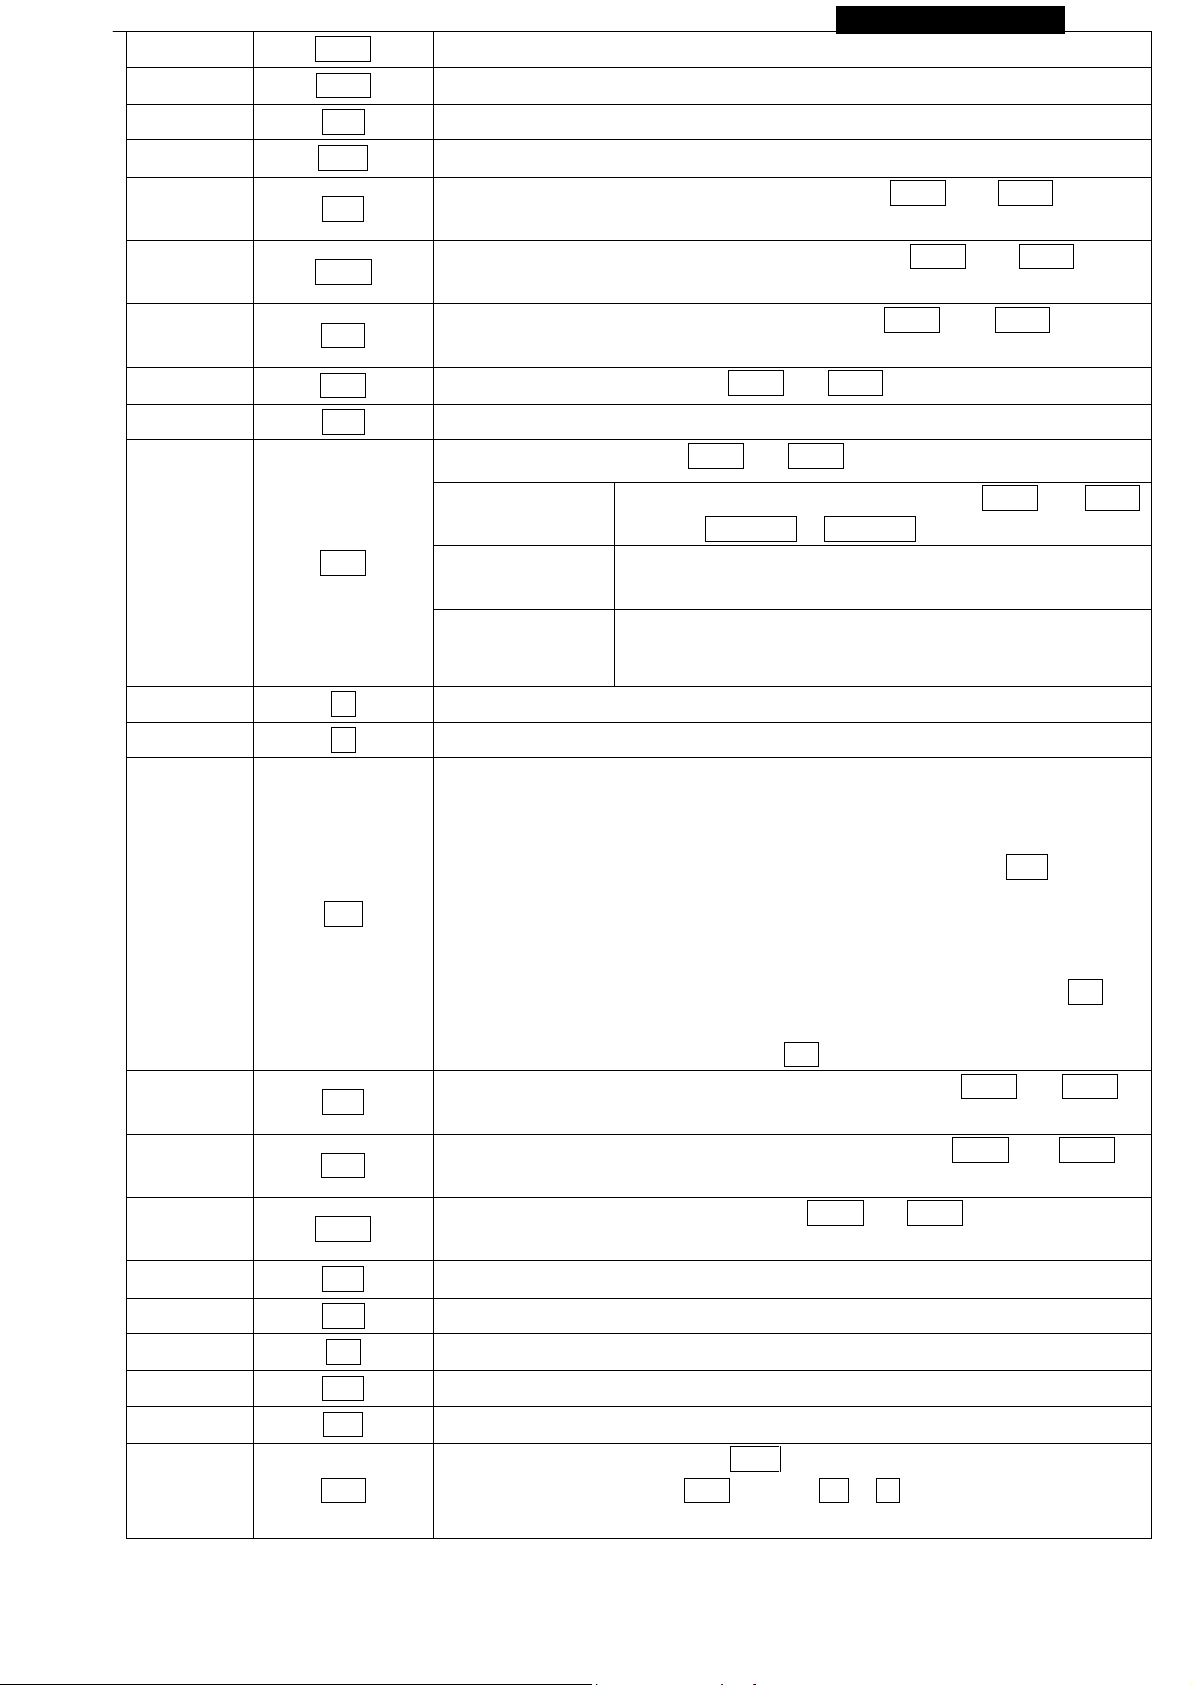
Overview of screen layout
Letter Name Sub-menu Description
Clear Clear all the contents in text edit area
A
B
C Send Update the sign with the new messages in the text edit area
D New Clear all the contents in the text edit area
E Open Openan old file (*.sdv)
F Save Save the file of the current text edit area (*.sdv) for later using
G Graphic edit
File
Moving_
Sign
Open… Open the old files (*.sdv)
Save Save the file of the currenttext edit area for later using
Save as… Save the file of the current text edit area as a new file
Exit Exit the messaging software
- Send Edit Area’s Content: Update the sign with
Send
Execution
lattice
Special
function
Moving Sign
option
Test Send a testing signal to the sign
the new messages in the text edit area
- Send Disk File… :Update the sign with stored *.sdv file
Create custom 7x80 (height x width) pixels graphics
Note: up to 8 custom graphics can be created by users
Allow you to schedule, to on/off, to alarm, to adjust time of your
sign automatically
Models’selection
Create custom 7x80 (height x width) pixels graphics
Note: up to 8 custom graphics can be created
H Font 7 different kind of fonts
I Color 16 different kind of color combinations
J Text edit area Type messages here
-Page5-
P ramming Manual Programming Manual
andNEX
In text editing
mode:
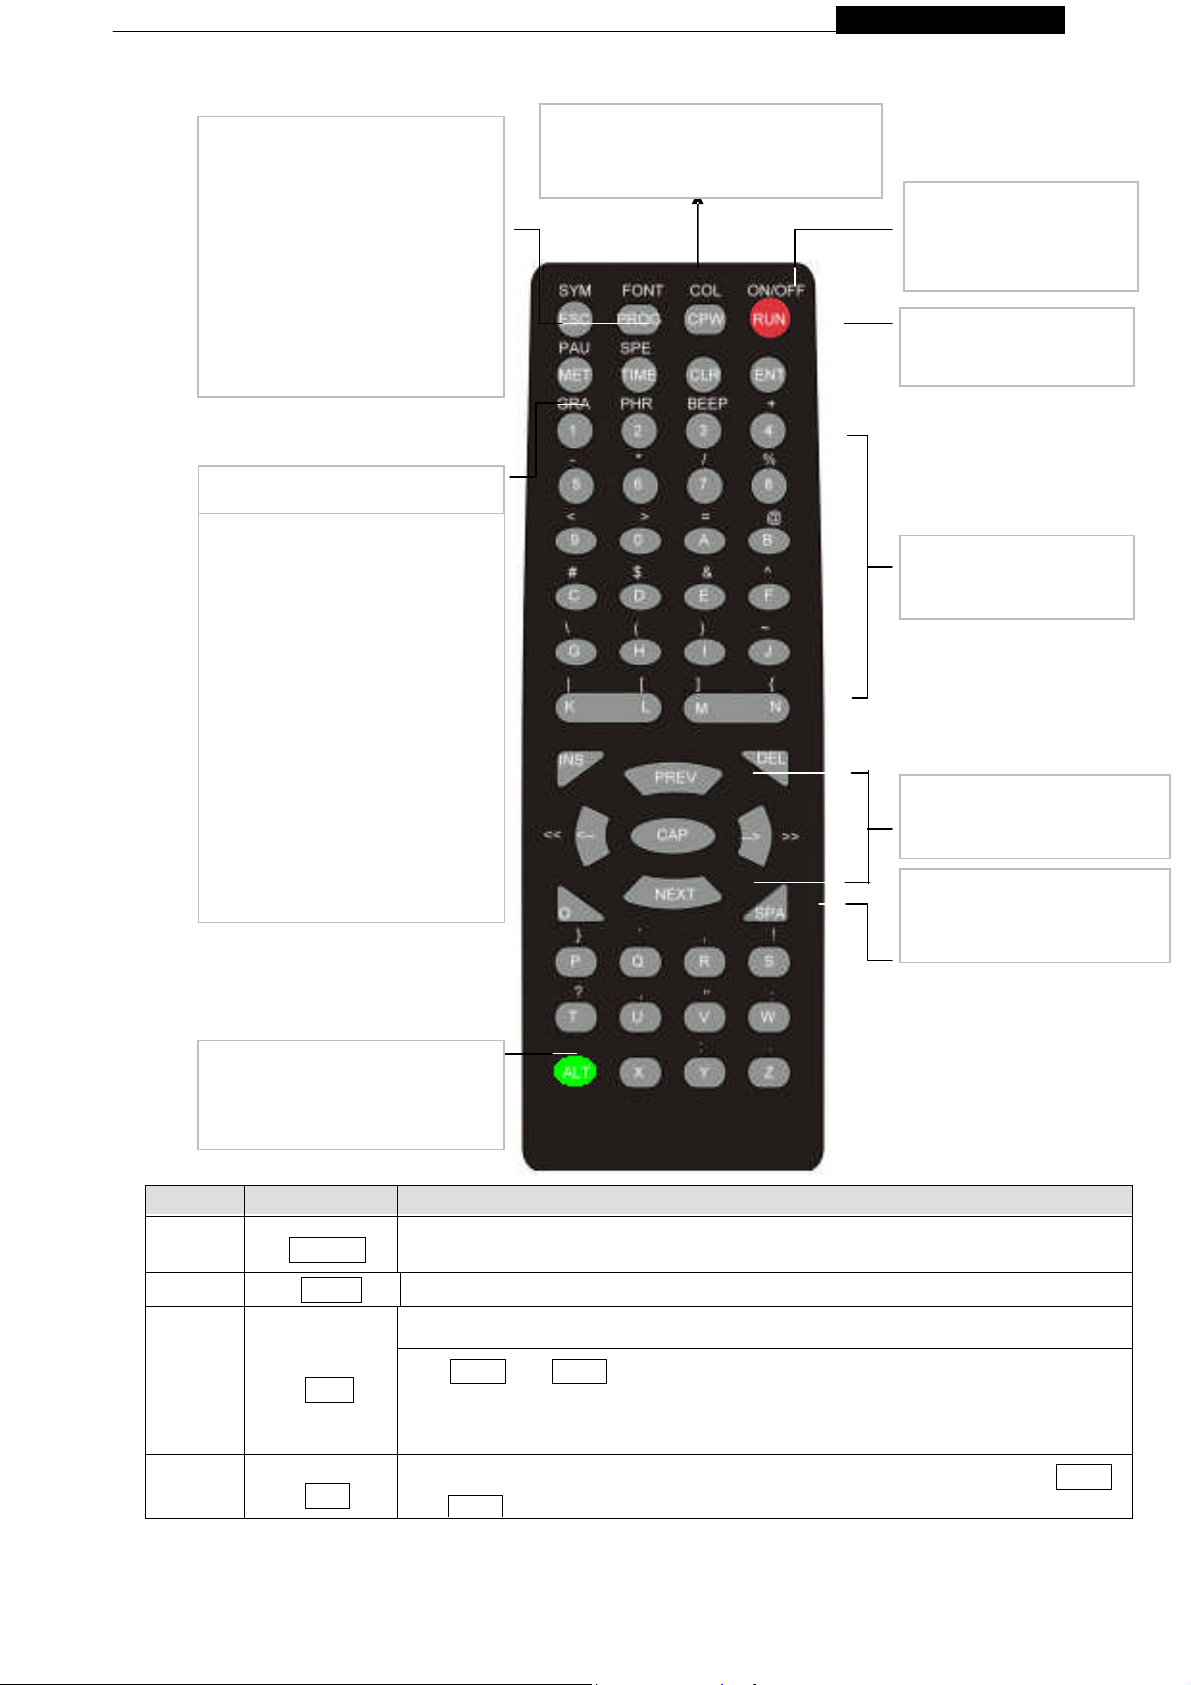
2.4: Remote control operation
-Press PROG to enter into text
editing mode
-Typeinyourpassword
(default=”000”)
then press ENTER
-Type in:”OPEN: 01”.
then press ENTER
-… … start programming
Hold down ALT
then
press GRA to put the sign
one of these modes:
(Use PREV or NEXT
move from mode
mode and ENT
select a mode.)
-GET GRAPH – for getting
GRAPHA - P
-MAKE GRAPH – for
making NUMBERA –H
-EDIT GRAPH –for editing
at the front of your sign
Hold down ALT an
then pres
turn the sign ofand on
Press RUN to exi
programming mode
characters or symbol
move from mode to mode
space between characters
press any key to select
character or symbol above
selected key
Item Key Description
1
2 PROG Enter the Edit Program Mode. Select 01 to 99 to enter message.
3
4
ON/OFF
CPW
MET
Power On / Off. If there is no file in 01 to 99, it will run file 00.If there is file in 01 to
Use for edit or reset password
Use PREV and NEXT to select (a) to (d)(a) UNUSE PASS Turn off password
security.(b) USE PASS Turn on password security(c) RES PASS Reset to
factory default password “000”.(d) CHANGE PASS Change to new password (see
To select the display modes, totallyup to 24 different modes. Note: Press PREV
-Page6-
5 PREV
to select
6 NEXT
7 CAP
8 TIME
g Manual Programming Manual
Select option backward.
Select option forward.
Toggle between Capital letter and lower case character.
To select time option. SeeAppendix B.
9 SPE
10 FONT
11 COL
12 SYM
13 CLR
14 GRA
15 <=
16 >=
Select the display speed of the message. (Use PREV and NEXT to select
different speeds.)
Select the font size of the display message. (Use PREV and NEXT
Select the color of the display message. (Use PREV and NEXT to select
different colors of the display message.)
Select 30 built-in symbols. (Use PREV and NEXT to select different symbols.)
Erase option.
Select graphic option. (Use PREV and NEXT to select the following options:)
(a)GET GRAPH Place the graphic in the message. Use PREV and NEXT
to select GRAPH A to GRAPHP.
(b)MAKE
GRAPH
(c)EDIT GRAPH Edit GRAPH A to GRAPH P and store in one of the
Moving the message and command to the right.
Moving the message and command to the left.
Note:
IF YOU WANT TO DELETE MESSAGE OR COMMAND IN THE EDIT
PROGRAM MODE.PLEASE USE ABOVE KEYS TOMOVE THAT MESSAGE
OR COMMAND TO THE LEFT-MOST POSITION AND PRESS DEL.
Create new graphics in location NUMBER A to NUMBER
H
location of NUMBER A to NUMBER H.
17 ALT
18 PAU
19 PHR
20
21 ENT
22 ESC
23 INS
24 DEL
25 SPA
26 RUN
BEEP
IF YOU WANT TO INSERT MESSAGE OR COMMAND IN THE EDIT
PROGRAM MODE.PLEASE USE ABOVE KEYS TO MOVE THAT MESSAGE
OR COMMAND TO THE LEFT-MOST POSITION AND (1)PRESS INS TO
INSERT.(2)TYPE IN YOUR MESSAGE OR PRESS COMMAND KEY,IT WILL
INSERTAUTOMATICALLY.(3)PRESS INS AGAIN TO OVERWRITE.
Generate a pause within the programmed message. (Use PREV and NEXT to
selectPAUSE 1 to PAUSE 8)
Select a programmed animation in the message. (Use PREV and NEXT to
selectANIM 1 to ANIM 8)
Select beep sound in the message. (Use PREV and NEXT to select BEEP 1 to
BEEP3)
Accept the selected option.
Return to the upper manual in the edit program mode.
Refer to 15 and 16
Refer to 15 and 16
Insert space in message.
(1) In edit program mode, press RUN to save and run the current message.
(2) In display mode, press RUN and enter 01 to 99 to select other messages
for display.
g Manual Programming Manual
pro
27 S
F G H
28
J K L
N O P
Programming a sequence file. Please refer to Section 3.5: Programming a
sequence file.
Cursor direction pointer . K toggles cursor on /off
Note: The direction pointer only works in graphic edit mode
3: Beginning Messaging
3.1: Example 1- Asimple message in seven easy steps
The sign can store up to 100 messages in numbered data files. These files are numbered from
00to99
A Simple Programming Example –
Note:
. File 00 is a default message and for read only.
Underline denotes words or numbers to type, xxxx denotes key names. To correct a mistake,
Press the
User can toggle the capital letter and small letter by pressing the key
to display symbol on keypad. Default Password:”
Step Keys to press Explanation Display
4. 01 ENT
5.
6.
7. Y Save the message as data file number 01 Message begins to be displayed
DEL
WELCOME
VISITORS
RU
key to remove it.
000
The first two digit file
(01-99) are allowed for naming message
files [CYCLIC] is the default method
display code which means to cycle throu
at random
Type the text you wish to display in you
message
End the edit program mode
”
CAP
[CYCLIC]
WELCOME
VISITORS
SAVE? (Y/N)
, and use the
ALT
key
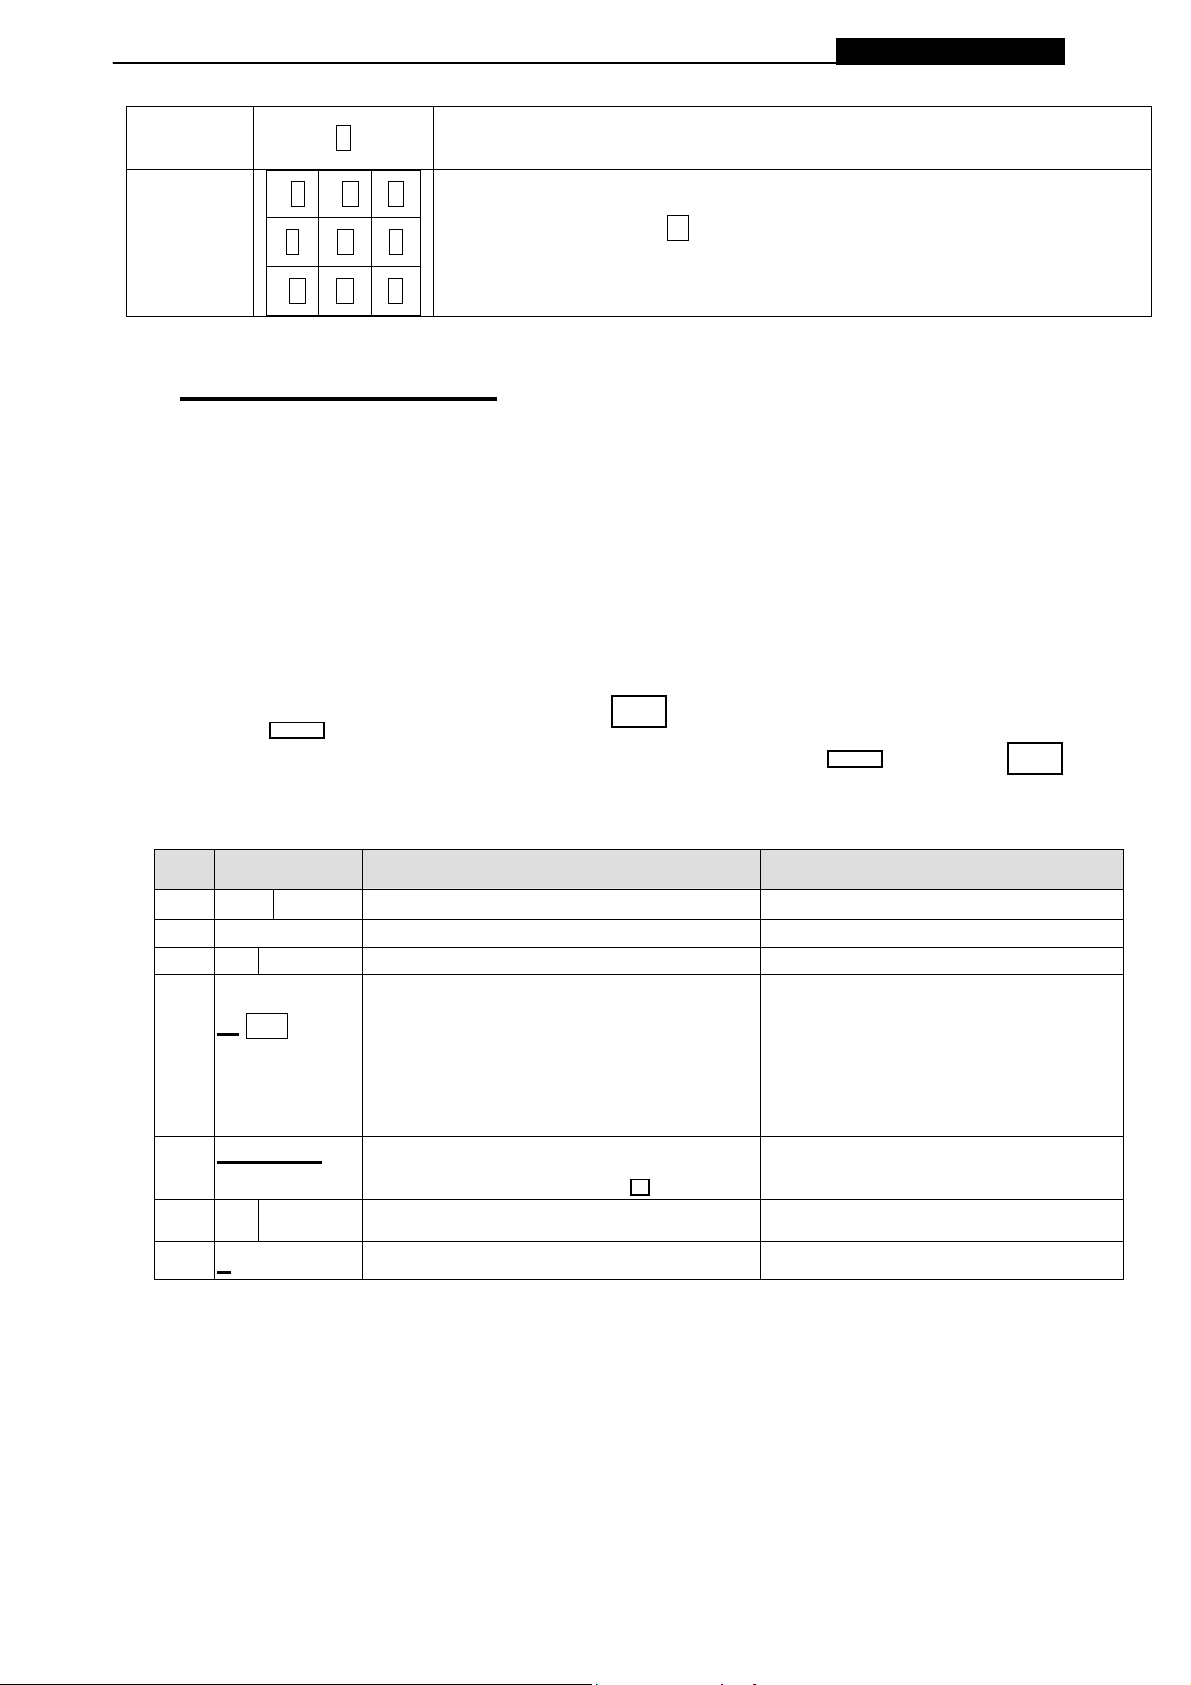
3.2: Example 2- Insert text, time, date, symbol, graphic, character or carton
3.2.1: Software operation
-Page8-
g Manual Programming Manual
(2) Click it to send the messages into the FILE01
(default) of your sign.
(1) Insert text by typing and Right click the mouse to add time, date, symbol,
graphic, character and carton respectively.
Note: The default front and color are 7X 6 and Bright Red, respectively.
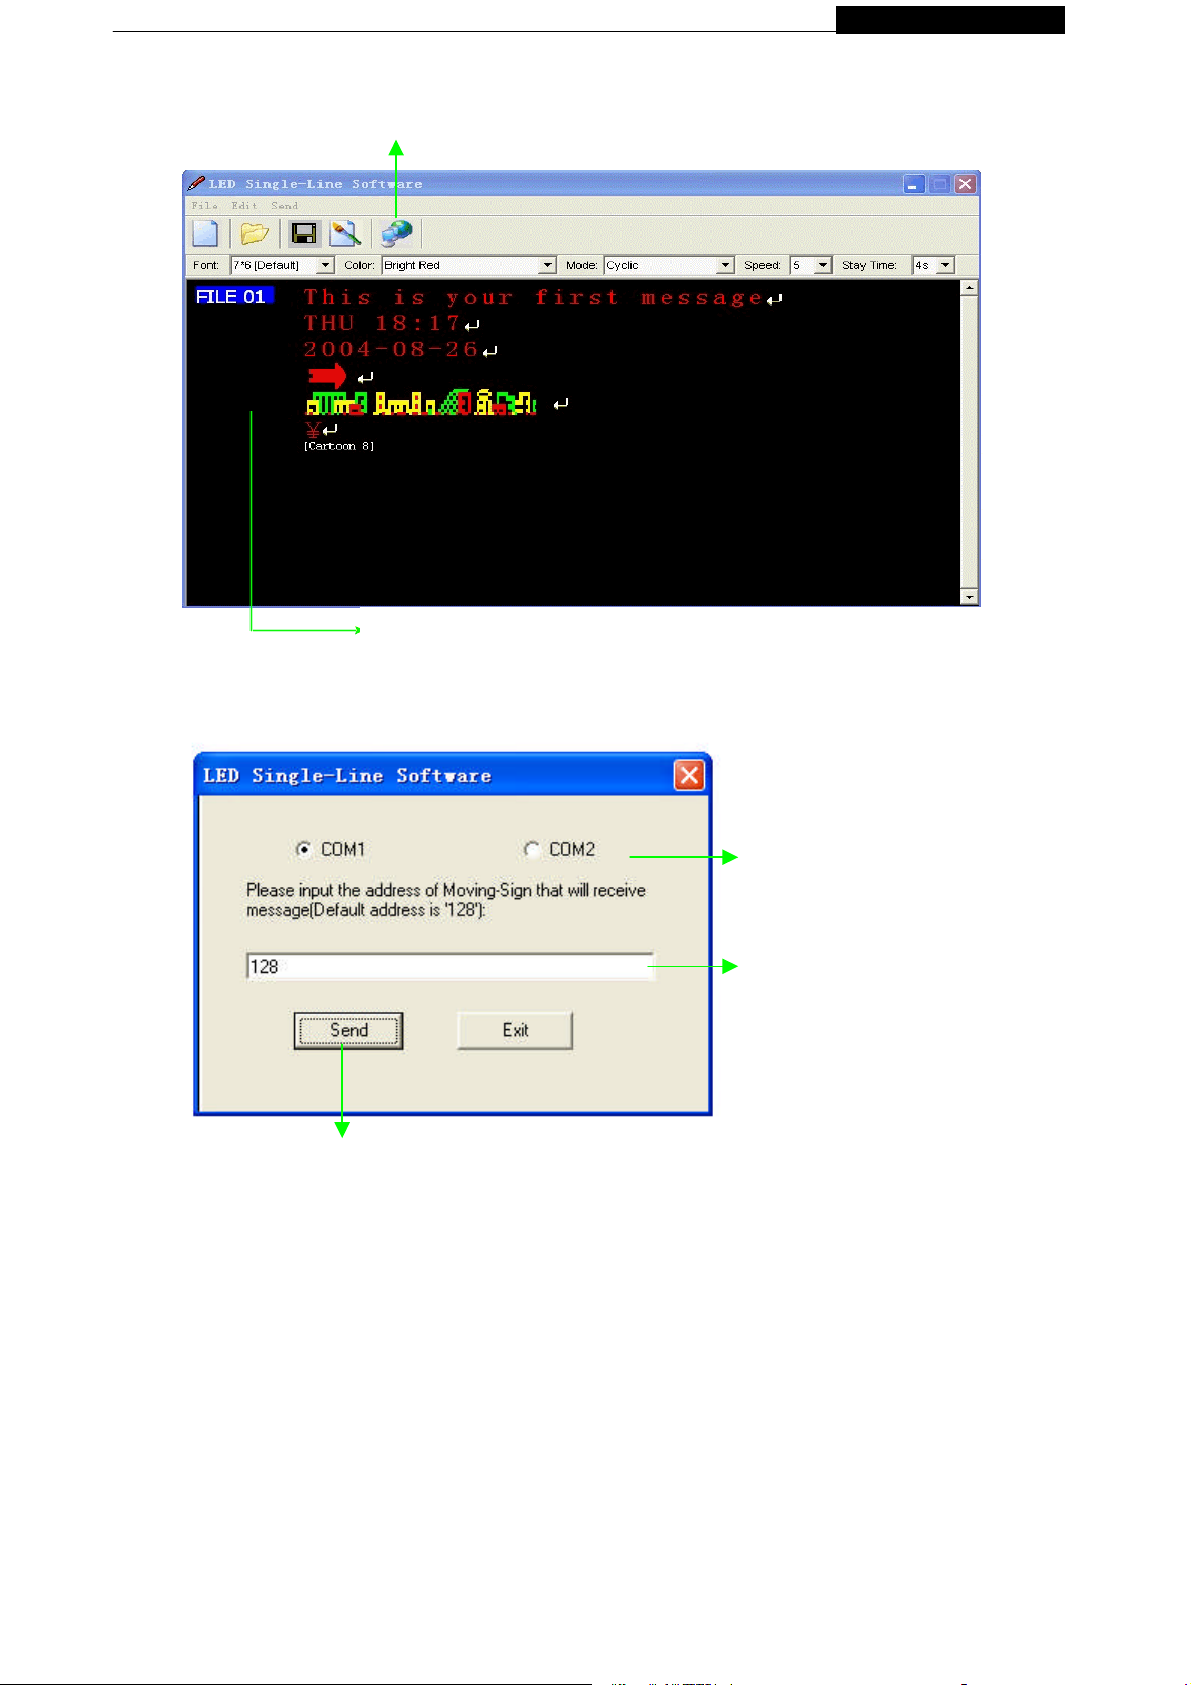
(5) Click OK to start the transmission. The
sign will display the new message
(3) Select a suitable COM port,
i.e. COM1 or COM2
(4) Input the value (default = 128)
Note: The display mode is Cyclic in the example
Note: If the display message is longer than one page of LED screen whatever the
display method used, the display method will be [OPEN←]
3.2.2: Remote Control Operation
-Page9-
 Loading...