

Page 1
KA-2USB
Karaoke Amplifier
Order ref: 103.103UK
User Manual
2 x 50W max power output
Integral USB/SD player
IR remote control for USB/SD
2-band tone EQ controls and MASTER volume control
2 microphone inputs with echo effect
2 stereo LINE inputs via RCA connectors
VERSION 1.0
Page 2

INTRODUCTION:
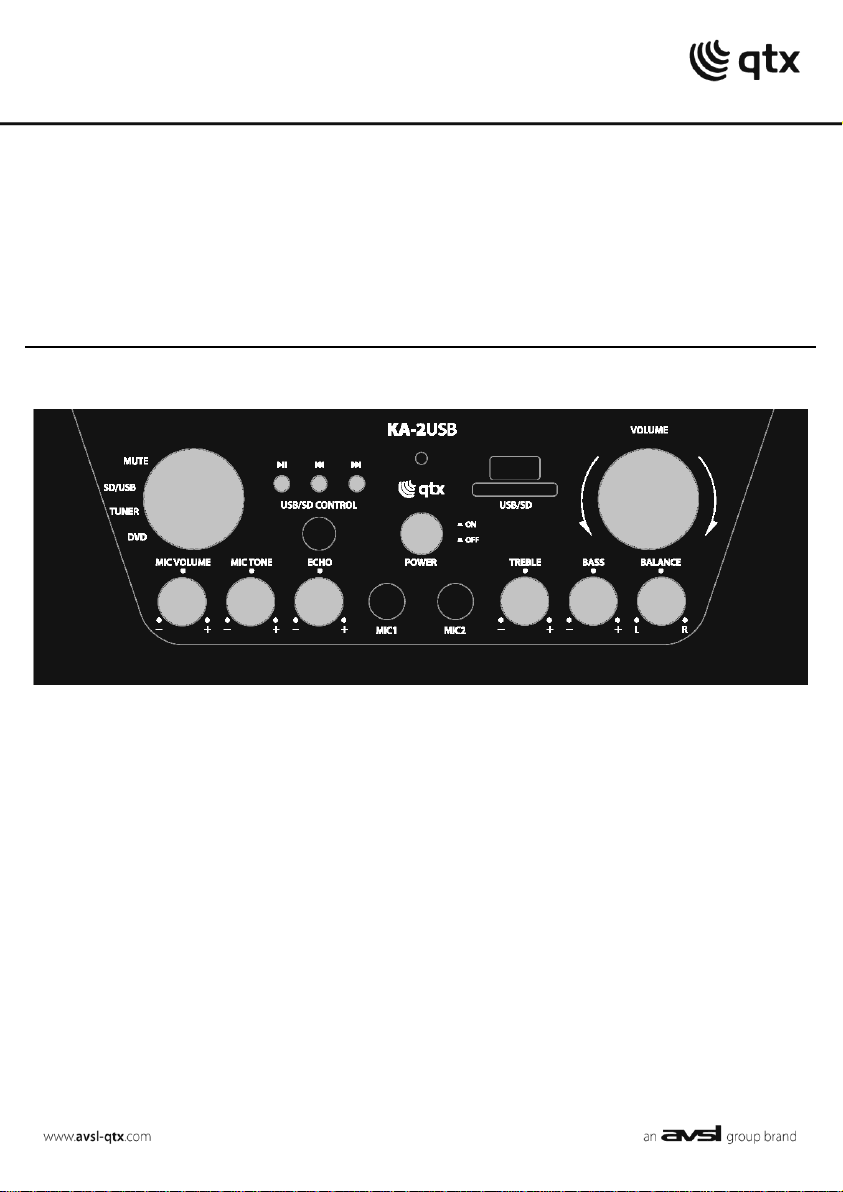
KA-2USB karaoke amplifier
Thank you for choosing the KA-2USB karaoke amplifier with USB/SD player.
This versatile stereo amplifier has three selectable inputs (Tuner, DVD, USB/SD) and two
microphone inputs with individual volume controls and echo control.
The master output has a two-band EQ allowing adjustment of bass and treble frequencies,
there is also a master balance and volume control.
PACKAGE CONTENTS:
Please check the contents to ensure that the product has been received in good condition.
KA-2USB karaoke amplifier
IR remote control
IEC mains lead
User manual
Safety
To prevent the risk of fire or electric shock, do not expose this appliance to rain or moisture.
To prevent electric shock, do not remove the cover. No user serviceable parts inside.
Refer servicing to qualified service personnel.
If any foreign objects or moisture get inside the case, unplug the power cord and have a
qualified service personnel for checking.
Ensure that impedance of attached speakers for each output channel is no lower than 4 Ohms
(Note: 8 Ohms + 8 Ohms wired in parallel = 4 Ohms)
If this product will be unused for a long period of time, unplug the power cord from the outlet.
Placement
To avoid overheating place in a well ventilated area and do not block the ventilation holes.
Do not place the amplifier in direct sunlight or near a heat source and keep free from dust and
Place the unit in a horizontal position. Do not place anything heavy on the set
Cleaning
Use a soft cloth with a neutral detergent to clean the cover, panel and controls.
Never use solvents to clean the unit
152.761UK User Manual
Page 3
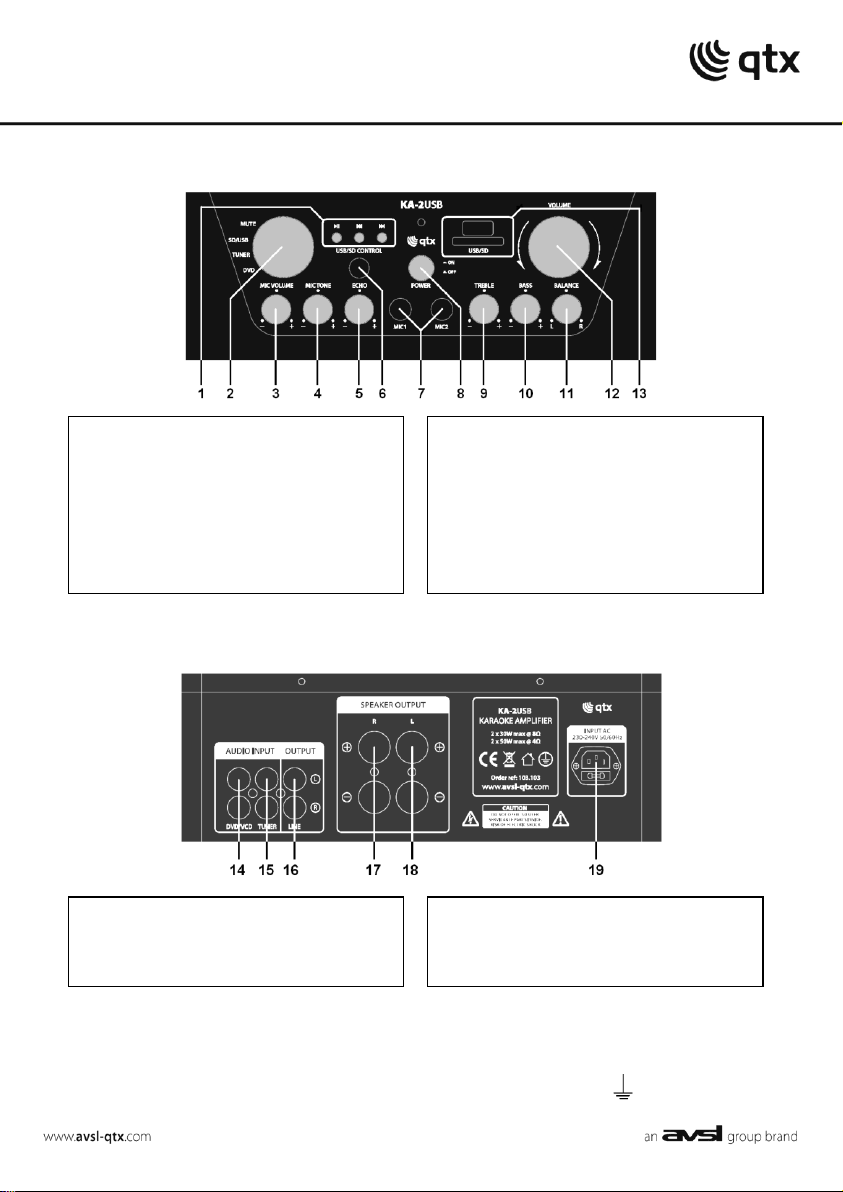
FRONT PANEL
1. USB/SD player transport controls
2. Input selector rotary switch
3. Microphones – volume control
4. Microphones – tone control
5. Microphones – echo control
6. I.R. remote receiver
7. Microphone inputs (6.3mm jack)
8. Power on/off button
9. Treble EQ control
10. Bass EQ control
11. Balance control for Mic1 / Mic2
12. Master volume control
13. USB & SD ports
14. DVD/CD line input (RCA L+R)
15. Tuner line input (RCA L+R)
16. Line output (RCA L+R)
17. Right speaker output
18. Left speaker output
19. IEC mains inlet + fuse
REAR PANEL
CONNECT WITH POWER SUPPLY – EARTH WIRE MUST BE CONNECTED:
Use the supplied IEC lead to connect to the main power supply as follows:
LIVE (L) - brown wire NEUTRAL (N) - blue wire EARTH ( ) - yellow/green wire
Page 4

CONNECTION
Button
Function
►
II
Toggles between PLAY and PAUSE
I
◄◄
Selects previous track
►►
I
Selects next track
Connect microphone(s) via the front 6.3mm jack inputs aand any line inputs to the rear RCA
inputs for DVD/CD or TUNER. If the mixed signal is to be delivered on to further amplifiers or
recording devices, connect to these from the LINE OUTPUT RCA connectors.
Connect speakers to the rear speaker outputs observing correct polarity and impedance.
Connect mains using the supplied IEC lead to a suitable outlet.
Insert USB storage device and/or SD card with compressed digital audio to the relevant port
OPERATION
Ensure that TREBLE, BASS and BALANCE to the 12 o’clock position.
With MASTER and MIC volume controls turned down, switch on the power to the amplifier.
Gradually turn up the master volume control part way
For line inputs, select the relevant source on the input selector (top position is mute)
If “SD/USB” is selected, the internal audio player can be operated from the front panel…
These functions are also available on the infra-red remote control keypad along with some
further functions (see REMOTE CONTROL below)
Adjust MASTER VOLUME up to the required level
Adjust BASS and TREBLE EQ controls for the overall tone of the output.
Check microphone(s) whilst gradually turning up MIC VOLUME to check the input signal
Turn MASTER VOLUME up to the level required
For singers, an ECHO control introduces the amount of echo effect applied to the microphones
The BALANCE control adjusts the volume difference between the 2 microphone inputs
Page 5

REMOTE CONTROL
Power supply
240Vac 50Hz (IEC)
Line inputs
2 x RCA L+R line + internal USB/SD player
Input sensitivity : Line
500mV
Internal audio player
USB/SD player (compressed digital audio)
Microphone inputs (unbalanced)
2 x 6.3mm jack
Input sensitivity : Mic
2mV
Speaker outputs
2 x terminals + and -
Minimum impedance
4 ohms (each output)
Output power @ 4 ohms
2 x 25W rms / 2 x 50W max
Output power @ 8 ohms
2 x 15W rms / 2 x 30W max
Dimensions
95 x 250 x 240mm
Weight
1.45kg
SPECIFICATIONS
Page 6

TROUBLESHOOTING
No power LED on
control panel
Ensure IEC lead is in good condition and connected properly
Ensure mains outlet voltage is correct and power switch is on
Check mains inlet fuse – replace with approved type if necessary
Power LED is on but no
output
Check input signals and condition of input connection leads
Check MASTER, MIC volume controls are not turned fully down
Check input selector is not set to “MUTE”
Check speakers and leads are OK and connected properly
USB player will not play
audio from media
Press PLAY on transport controls
Check USB or SD is connected properly (remove and re-insert)
Check file types – standard compressed digital audio files required
Check memory device works on a PC or Mac for playback
Output is very loud or
distorted
Check level of input signal is not too high
Reduce channel volume and EQ settings
Reduce MASTER level until LIMIT light stops flashing
Ensure Hi-Z line level input(s) not connected via MIC1 or MIC2
Output is working but
at very low level
Check input audio source level is not too low
Increase channel volume and EQ settings if turned down
Increase MASTER level
Check for quiet recording of media files on USB
Feedback (loud
squealing or howling
from mics)
Face microphone away from speakers and monitors
Reduce channel volume and EQ settings
Reduce MASTER level
Amplifier is getting very
hot
Make sure fans are working properly and not obstructed
Ensure cooling vents are clear from debris and dust
Ensure that total load across speaker outputs is not less than 4Ω
DISPOSAL:
Please dispose of the unserviceable device according to the current statutory requirement
Errors and omissions excepted.
Copyright© 2012. AVSL Group Ltd.
 Loading...