

Page 1
!
!
©AVProConnect | 3518 N Casco Ave. Sioux Falls, SD 57104 1.877.886.5112 | +1.605.274.6055
1
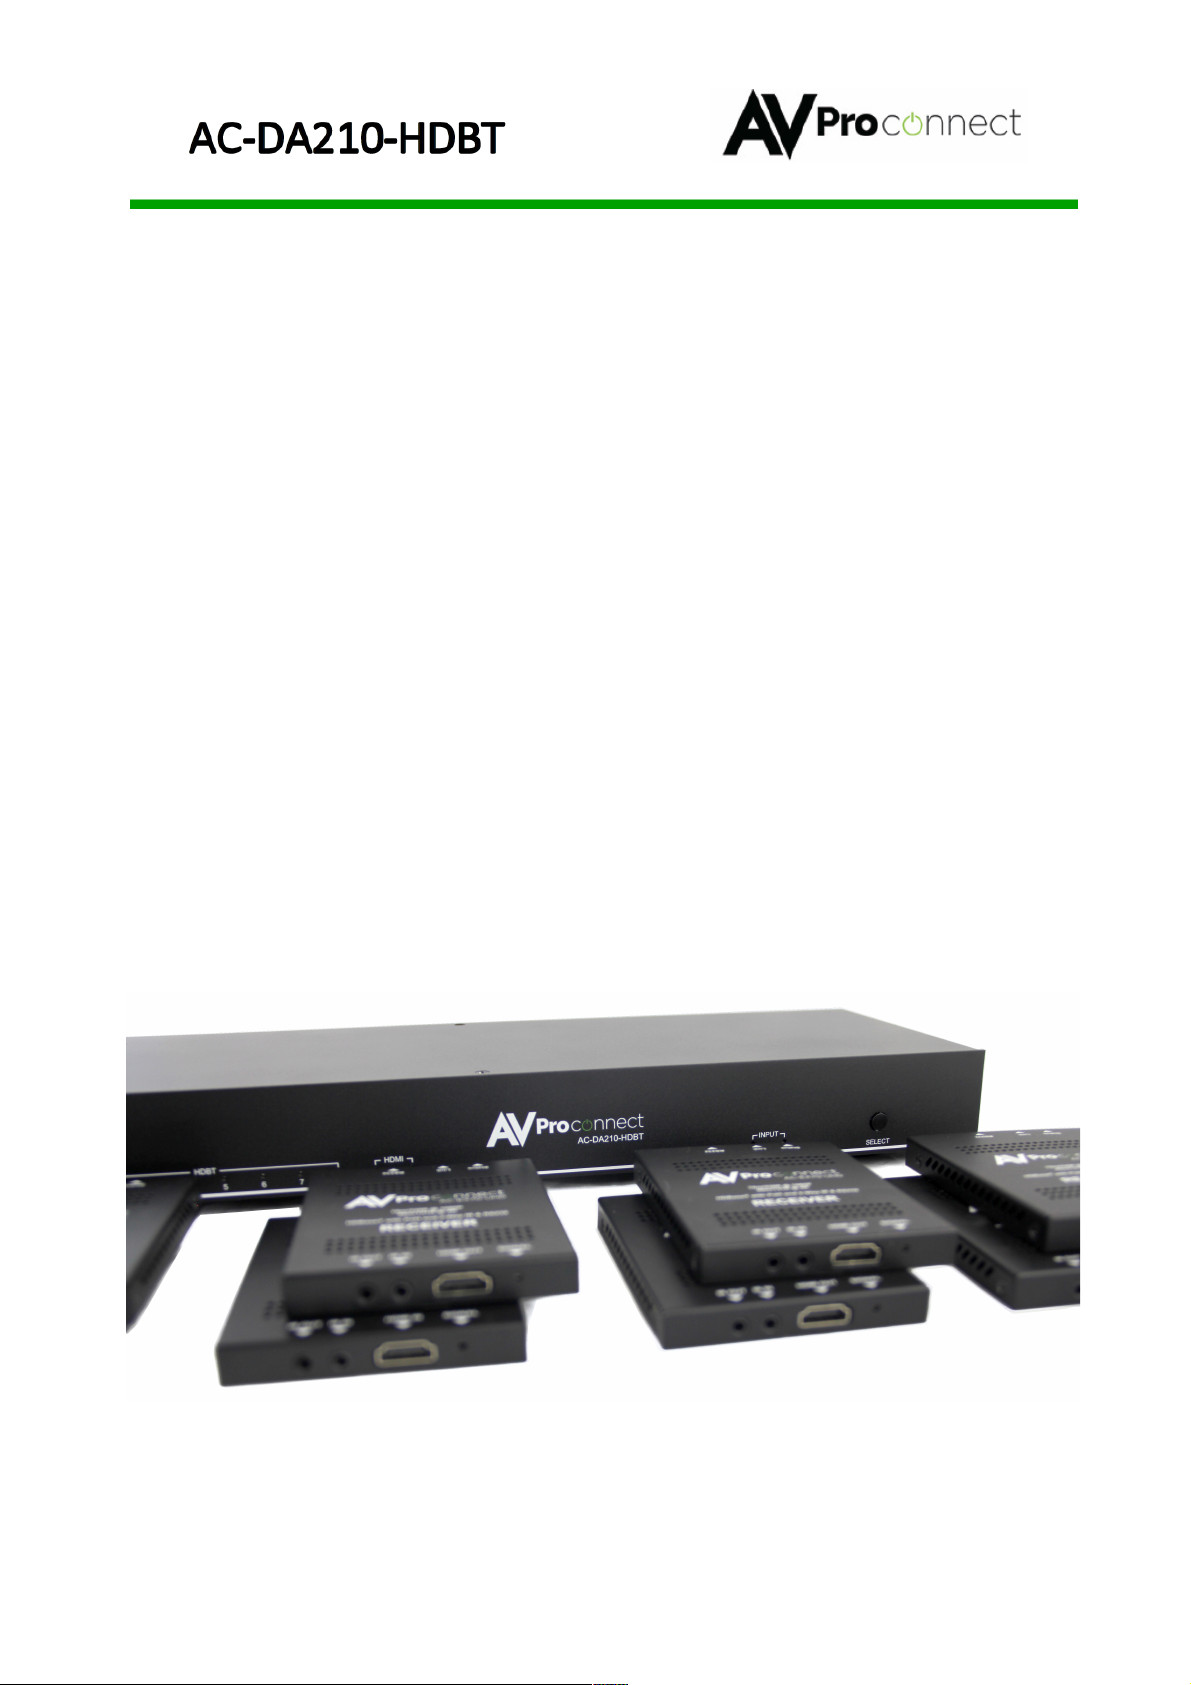
AC-DA210-HDBT
HDBaseT 2-8-2 splitter with Audio De-Embedding, EDID
Management, and switchable inputs.
Operation Manual
Page 2
!
!
©AVProConnect | 3518 N Casco Ave. Sioux Falls, SD 57104 1.877.886.5112 | +1.605.274.6055
2
Revision History
VERSION NO.
DATE DD/MM/YY
SUMMARY OF CHANGES
RDV1
08/10/16
Preliminary Release
RDV2
Prior market Launch
RDV3
Final Version v1.0
Content
1. Introduction-----------------------------------------------------3
2. Product overview---------------------------------------------3
3. Application------------------------------------------------------4
4. Features ----------------------------------------------------------5
5. Specification----------------------------------------------------5
6. Package Contents--------------------------------------------6
7. EDID Management--------------------------------------------6
8. Operation Controls and Functions----------------------6-7
9. Audio---------------------------------------------------------------8
10. IR Routing------------------------------------------------------8
11. RS-232 Control------------------------------------------------9
12. Maintenance, Service, Cleaning and Warranty--11
13. Contact information ---------------------------------------12
Page 3
!
!
©AVProConnect | 3518 N Casco Ave. Sioux Falls, SD 57104 1.877.886.5112 | +1.605.274.6055
3
1. Introduction
The AC-DA210-HDBT is a 2 HDMI in, 8 HDBaseT out + 2 HDMI local output
switch splitter. This switch splitter allows any source (Blu-ray, UHD Blu-ray,
satellite receiver, game consoles, PCs, etc...) to be shown on any of the
connected displays.
IR input is routed to all of the HDBaseT output for controlling remote TV set. IR signal
from HDBaseT can control Switch splitter to switch the source or control the source
device from the IR out. RS232 signal also routed to all HDBaseT device.
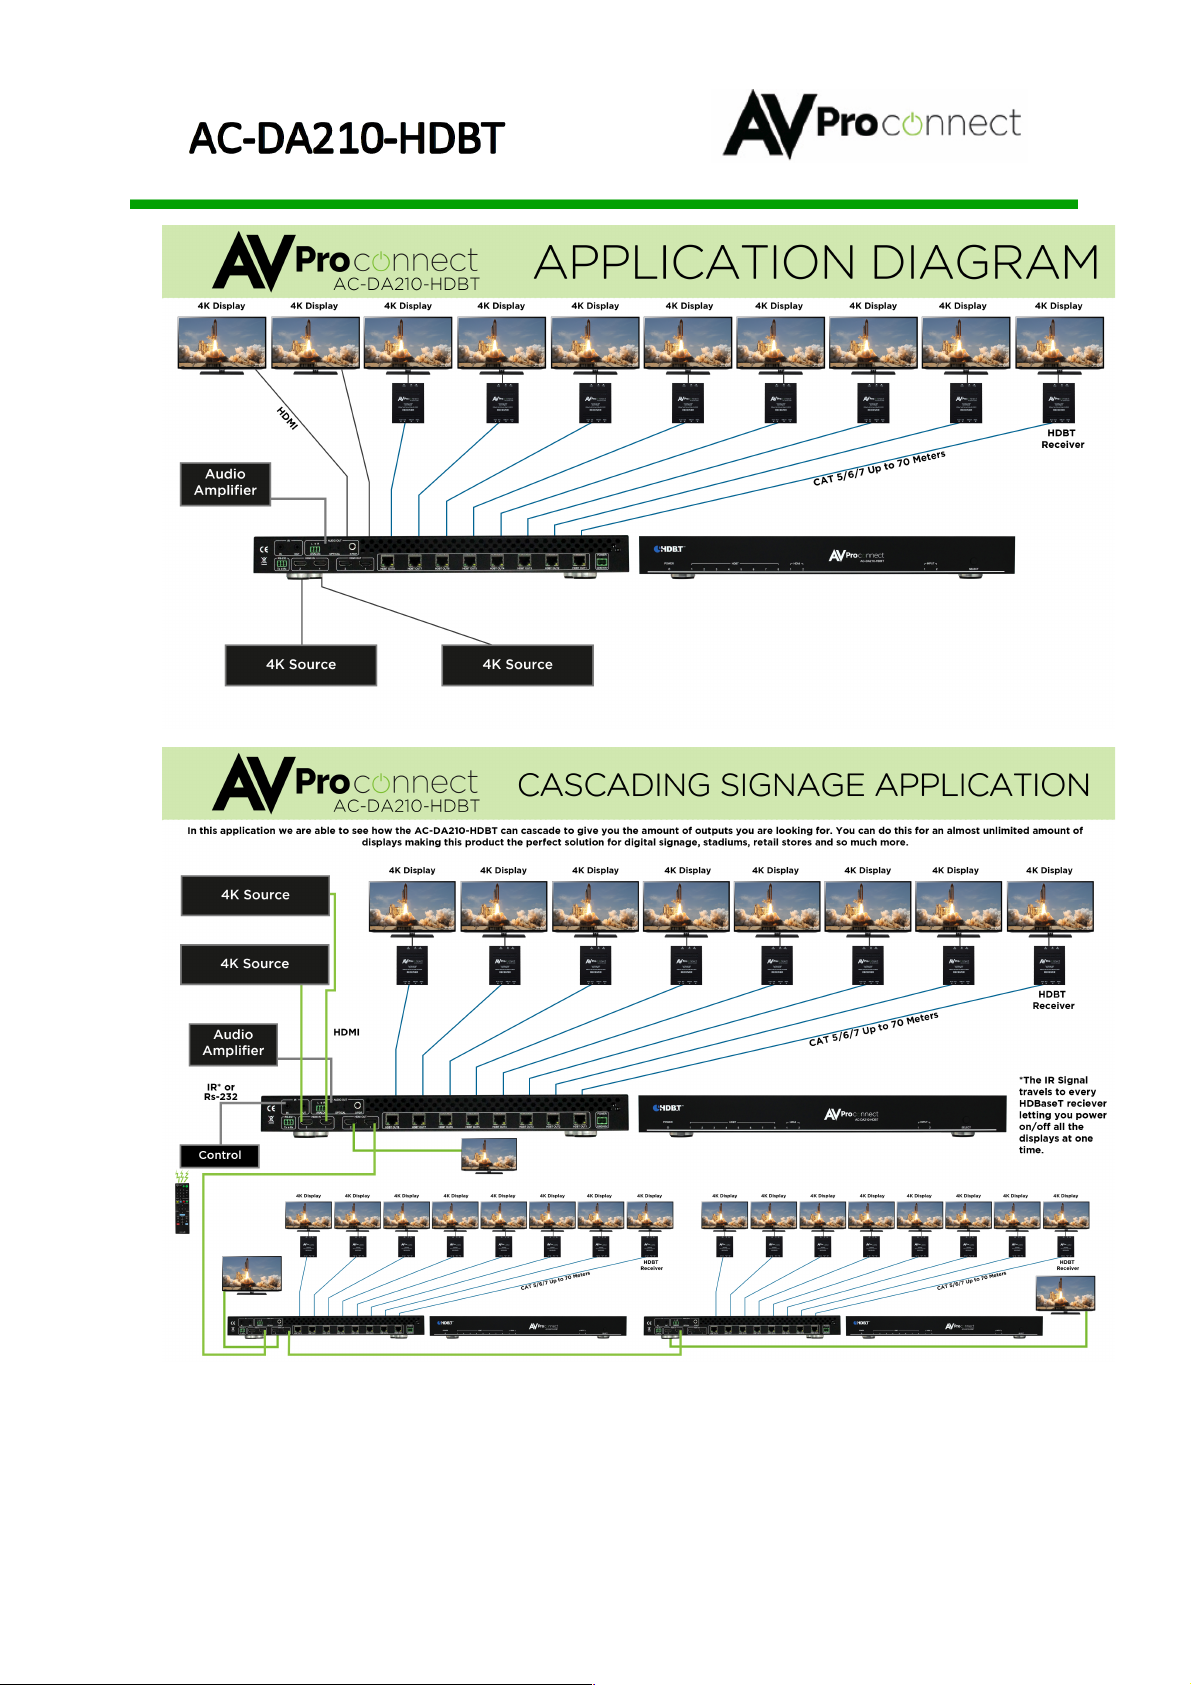
Two local HDMI output can be used to output to local monitor or cascade
more AC-DA210-HDBT to set up big system.
There are 3 audio outputs for different requirements in field of application.
They are analog L/R, Toslink and coaxial S/PDIF.
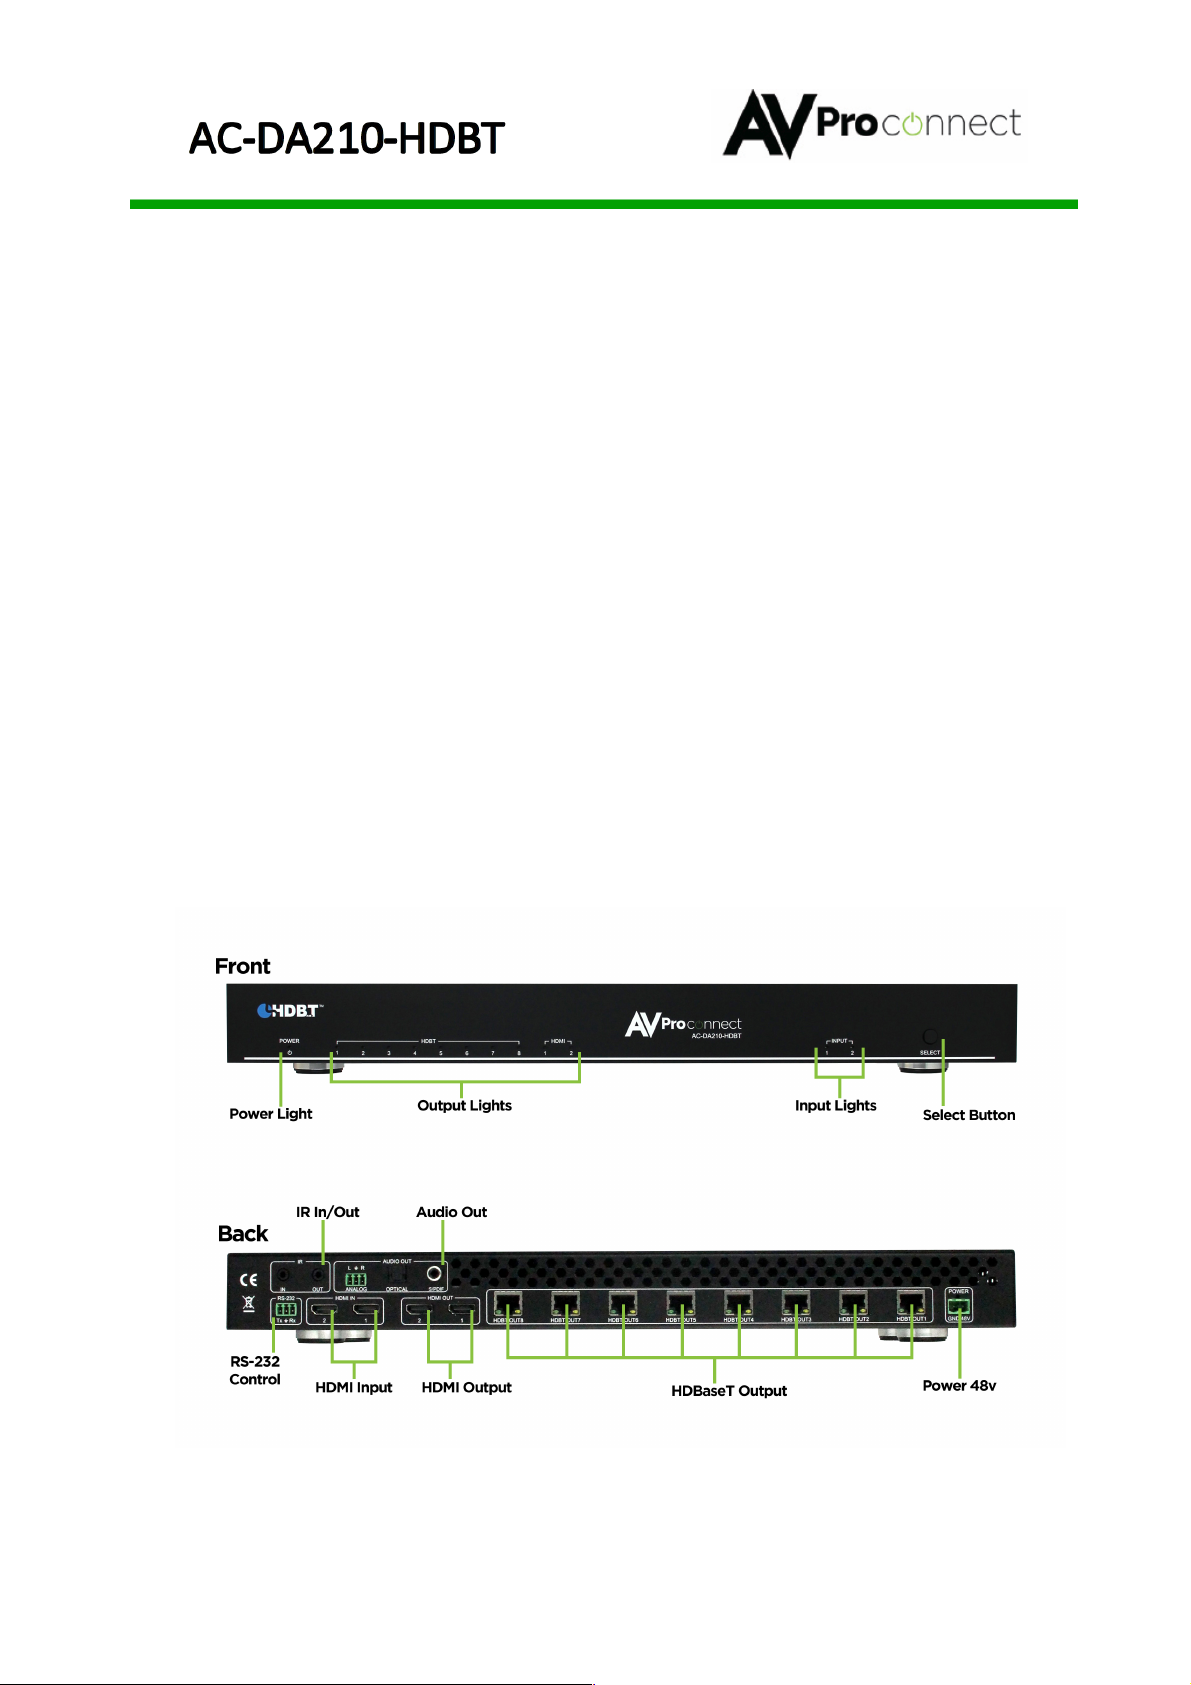
2. Product overview
Page 4
!
!
©AVProConnect | 3518 N Casco Ave. Sioux Falls, SD 57104 1.877.886.5112 | +1.605.274.6055
4
Page 5
©AVProConnect | 3518 N Casco Ave. Sioux Falls, SD 57104 1.877.886.5112 | +1.605.274.6055
5
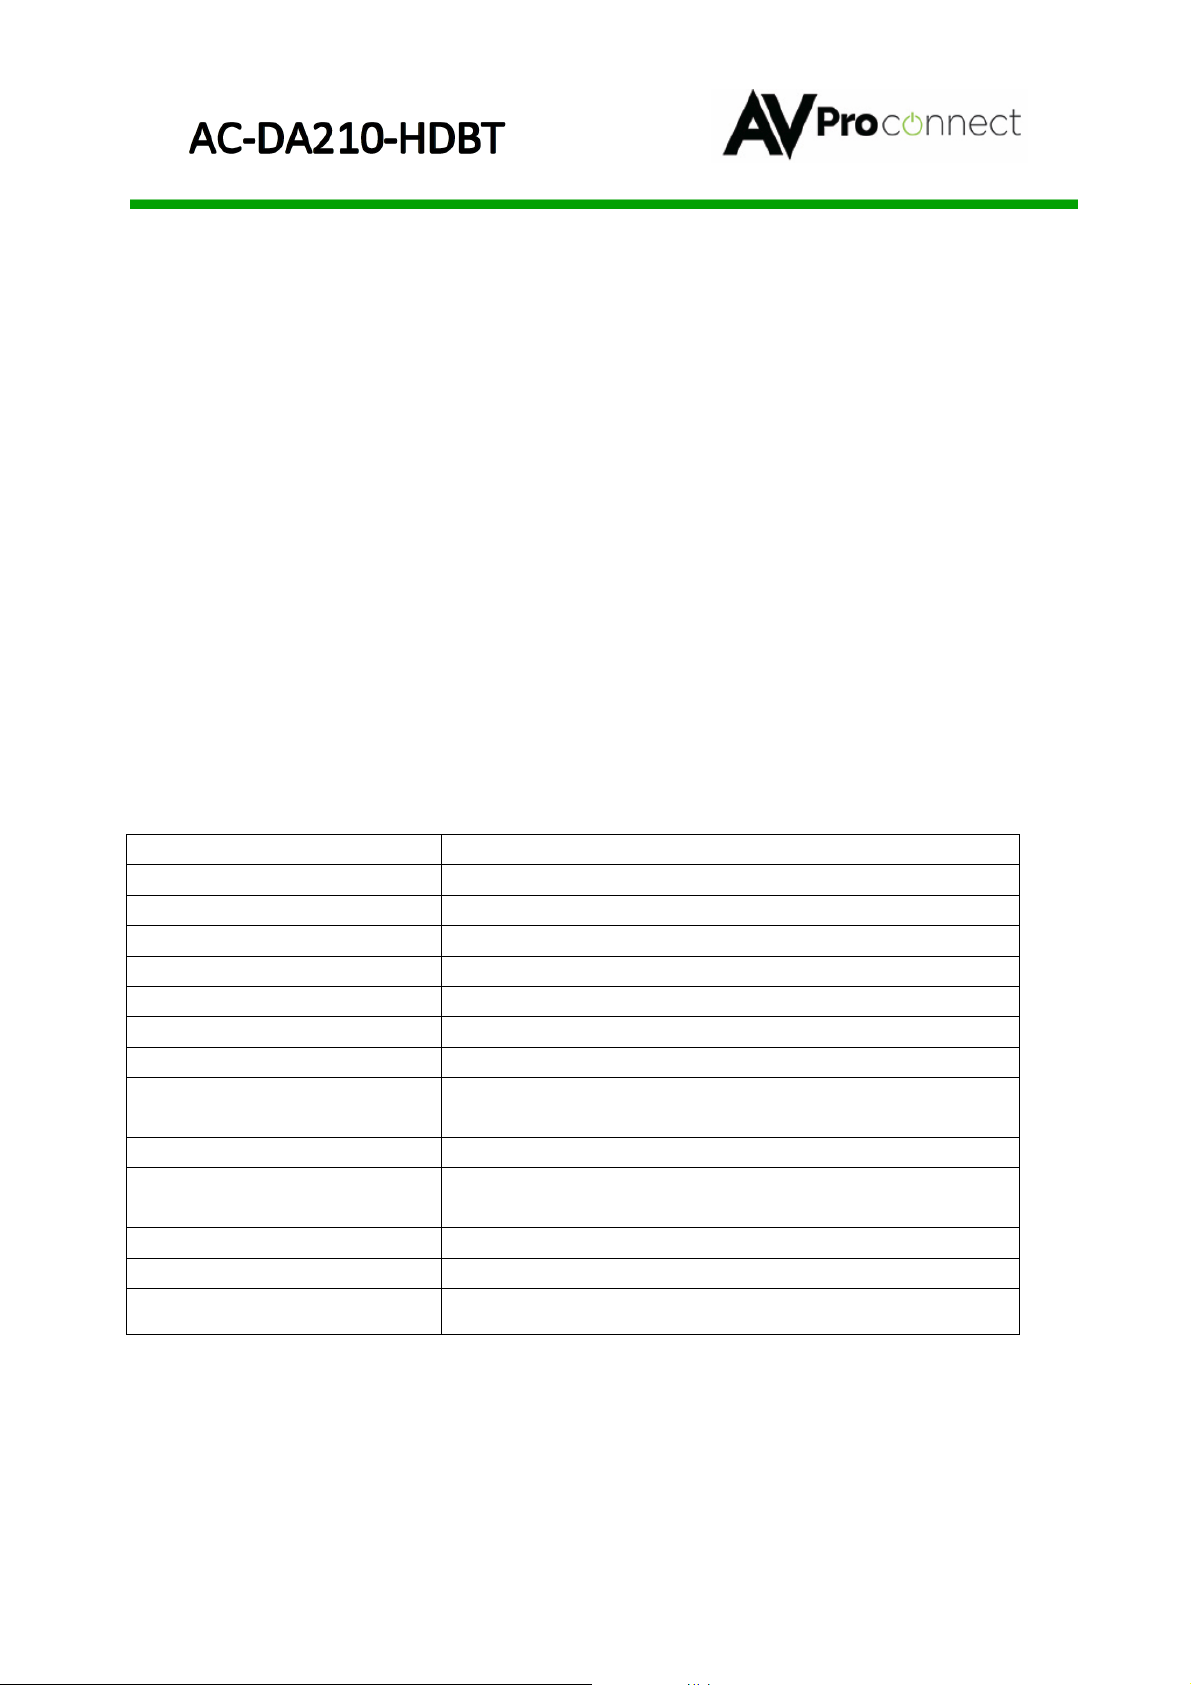
3. Features
Product
AC-DA210-HDBT
Input port
Two HDMI input
Out port
8 HDBaseT output + 2 HDMI output
HDMI Version
HDMI2.0(4K60YUV422)/DVI
HDCP
In1 HDCP1.x, In2 HDCP2.2/1.x
Video Bandwidth
Up to 9.0GHz(3.0GHz per channel)
Color Depth
24bits,30bits,36 bits,48bits
Audio de-embedded
Analog L/R, Toslink optical, Coaxial S/PDIF
EDID
11 embedded EDID,3 user EDID or Copy from
any out port
POH
Controlable 48V POH
Power Consumption
(max.)
26 Watts (not include about 5 Watts for every
HDBT receiver)
Housing
Metal
Dimension (mm)
438mmx138mmx43.6mm
Weight (g)
2.11 Kg
•
Advanced Equalization and amplification of outputs for smooth
switching
•
2 HDMI inputs, In2 supports HDCP2.2.
•
Advanced EDID Management
•
Support HDMI 2.0 4K60 4:2:0
•
IR, RS-232 Control Options
•
IR, RS232 routed to HDBaseT output
•
Digital Toslink Out
•
L/R Analog Out
•
Digital S/PDIF Out
•
Good little clear circuit ensure the cascading capability
4.Specifications
Page 6

!
!
©AVProConnect | 3518 N Casco Ave. Sioux Falls, SD 57104 1.877.886.5112 | +1.605.274.6055
6
5. Package contents:
1. Main unit: AC-DA210-HDBT
2. 48V2A power supply for powering AC-DA210-HDBT
6. Operation controls:
Switching:
The AC-DA210-HDBT can be switched from the front panel by pressing the “Input”
button. This switches back and forth from Input 1 and Input 2
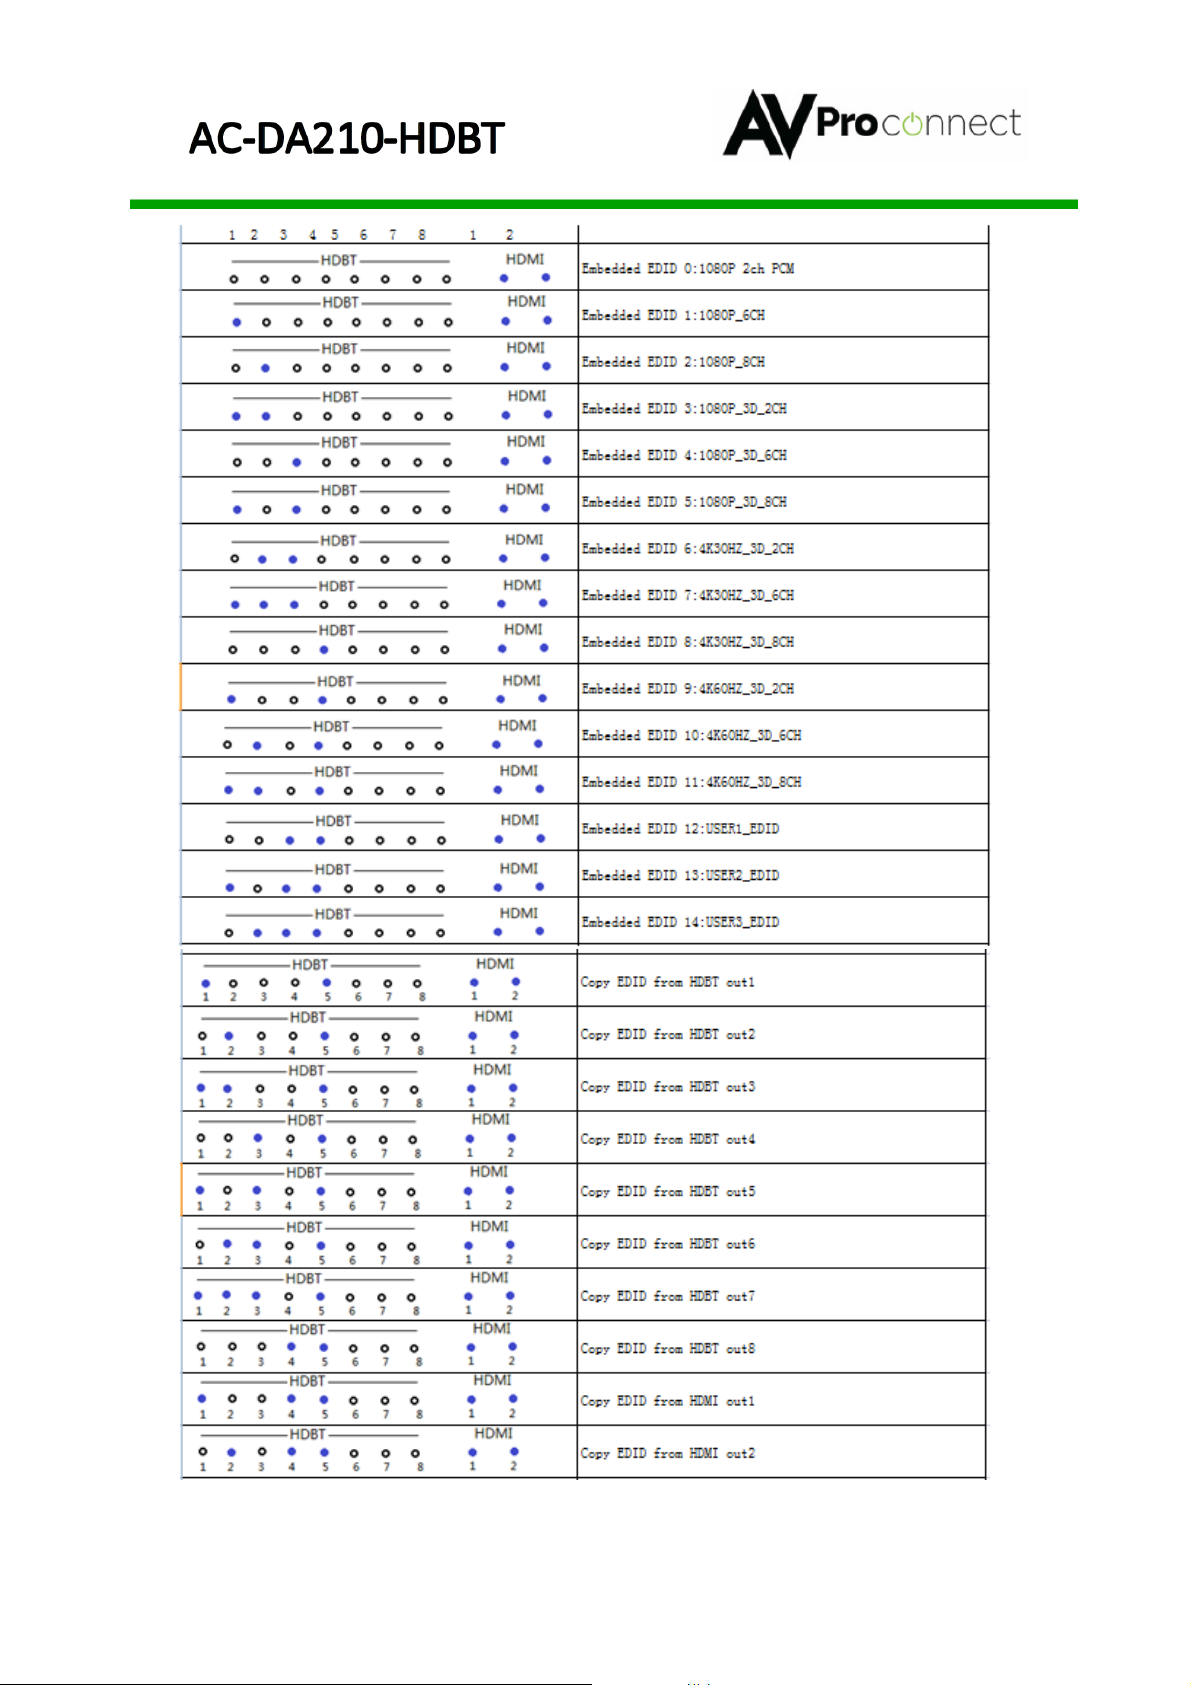
EDID management:
1. Pressing and holding the button for more than 3 seconds will enter an EDID
management mode.
2. When in EDID management mode the HDMI out LED’s 1&2 will be flickering.
3. HDBT out LED’s 1 through 5 are used to identify the EDID setting.
4. Press the button to cycle through the available EDID’s
5. Press and hold for 3 seconds again to set the selected EDID
a) If all LED’s light up it is successful, and press the button once more to return to
normal operating mode.
b) If all LED’s are flickering, the setting failed. Press the button to resume normal
operating mode and try again.
6. The table below (Page 7) shows the different EDID options.
Page 7
!
!
©AVProConnect | 3518 N Casco Ave. Sioux Falls, SD 57104 1.877.886.5112 | +1.605.274.6055
7
Page 8
!
!
©AVProConnect | 3518 N Casco Ave. Sioux Falls, SD 57104 1.877.886.5112 | +1.605.274.6055
8
Audio:
The extracted audio is always active by default, you may simply plug into any/all of
the ports (Toslink, SPDIF, 2CH) and the audio will be output based on the active source.
Additional audio commands can be sent by RS-232.
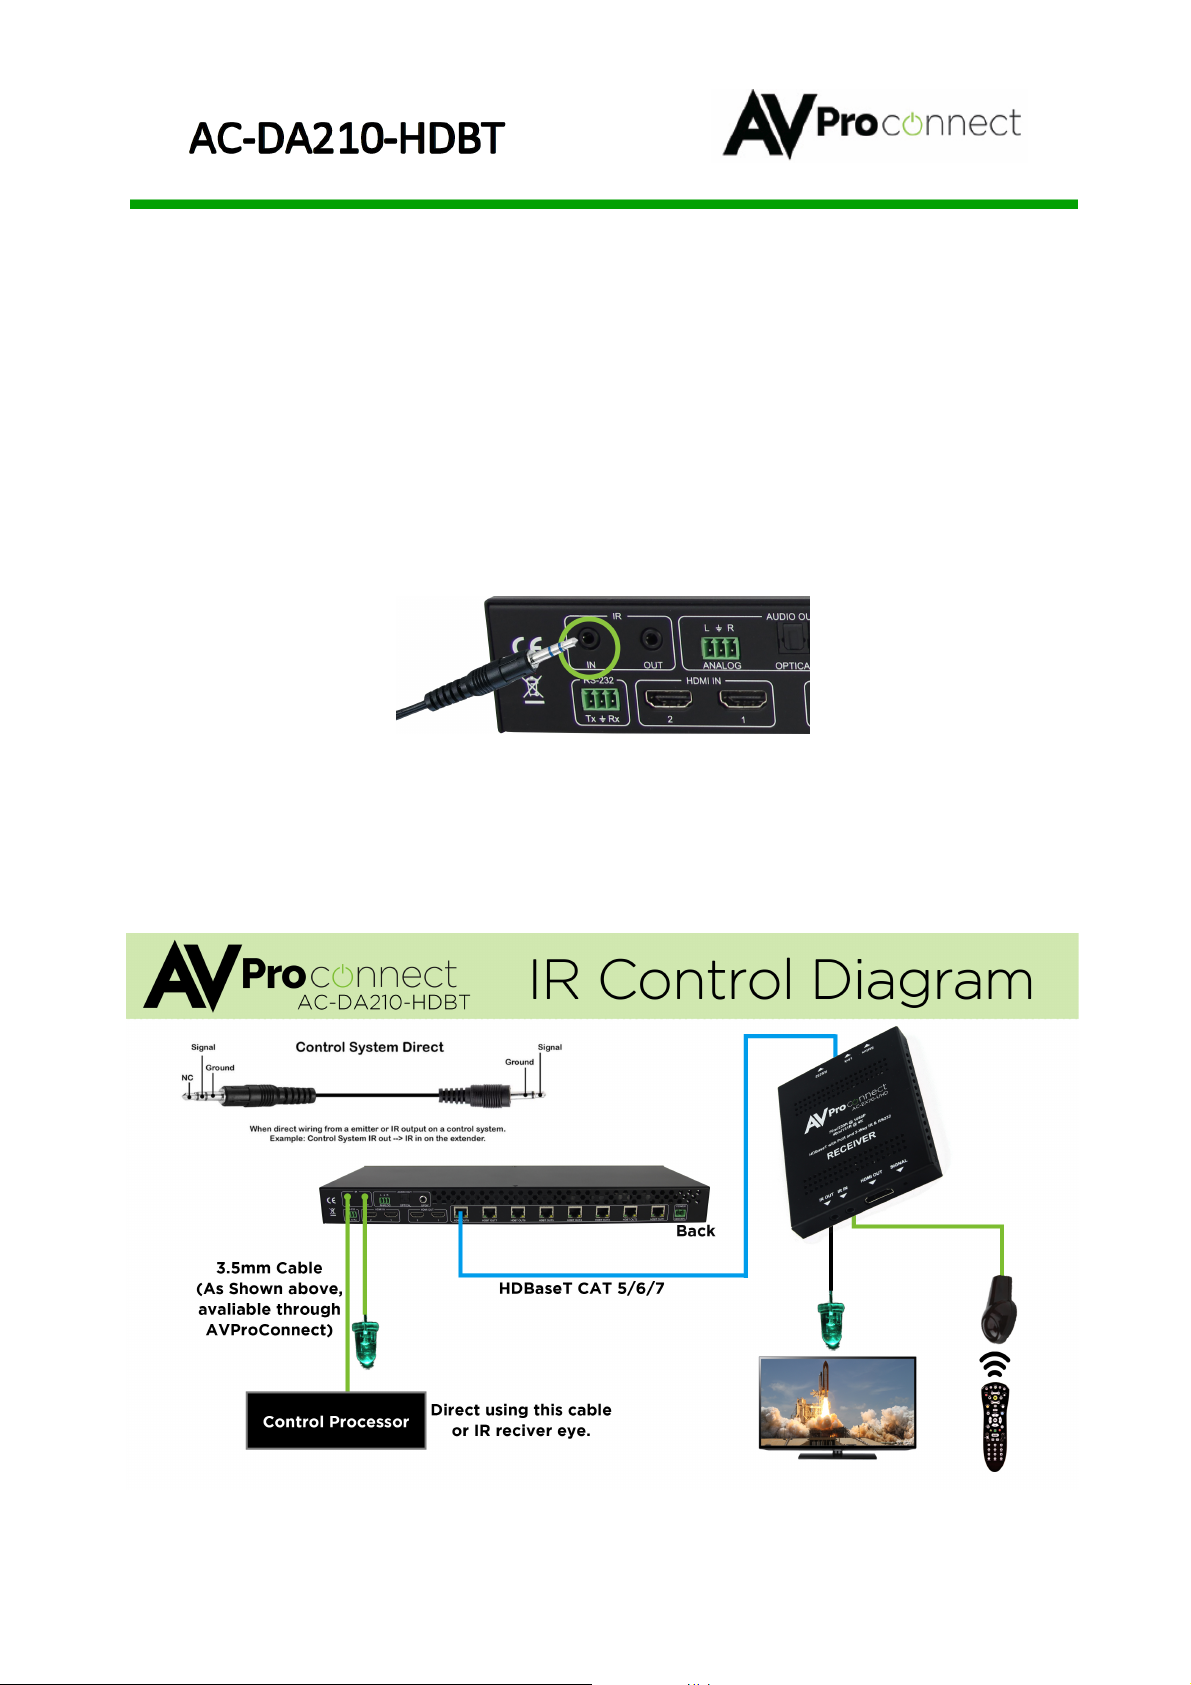
IR Routing:
IR can be routed in three ways
1. To the remote (HDBaseT Receiver) end by inserting an IR Receiving Eye
into the IR In port on the AC-DA210-HDBT.
2. Back out of the IR Out port on the AC-DA210-HDBT by placing an IR
Receiving Eye in the AC-EX70-UHD Receiver’s IR In port
3. Directly from a control system using a cable as designed below.
Page 9
!
!
©AVProConnect | 3518 N Casco Ave. Sioux Falls, SD 57104 1.877.886.5112 | +1.605.274.6055
9
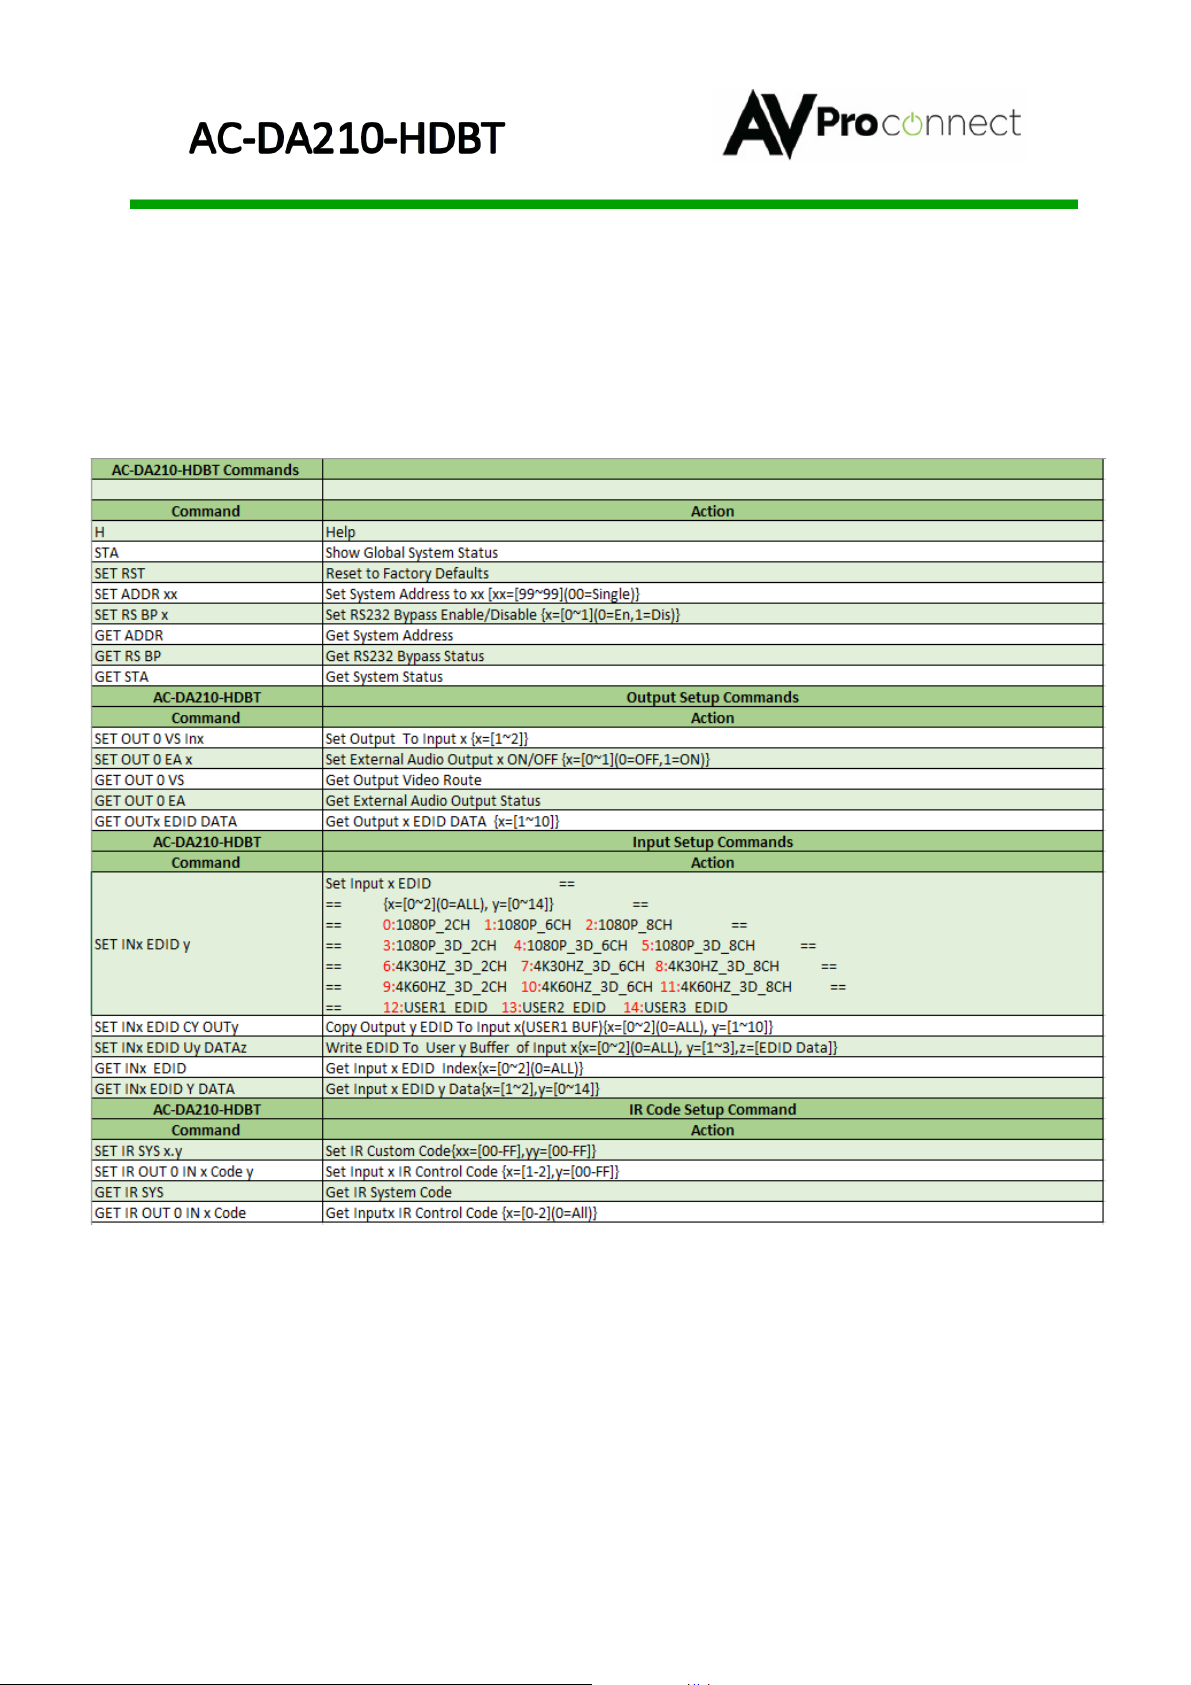
RS-232 Control:
You may also control or configure the AC-DA210-HDBT with RS232.
RS232 setting:
Baudrate: 57600 Parity: None DataBit: 8 StopBit: 1
The available commands are as follows:
Page 10

!
!
©AVProConnect | 3518 N Casco Ave. Sioux Falls, SD 57104 1.877.886.5112 | +1.605.274.6055
10
7. Maintenance, Service, Cleaning and
Warranty
■ Maintenance
Clean this unit with a soft, dry cloth. Never use alcohol, paint thinner or benzine to clean
this unit.
■ Product Service
● Provided Service
1) Damage Requiring service: The unit should be serviced by qualified service
personnel if:
• The DC power supply cord or AC adaptor has been damaged;
• Objects or liquids have gotten into the unit;
• The unit has been exposed to rain;
• The unit does not operate normally or exhibits a marked change in
performance;
• The unit has been dropped or the cabinet damaged.
2) Servicing Personnel: Do not attempt to service the unit beyond that described
in these operating instructions. Refer all other servicing to authorized servicing
personnel.
3) Replacement parts: When parts need replacing ensure the service uses parts
specified by the manufacturer or parts that have the same characteristics as
the original parts. Unauthorized substitutes may result in fire, electric shock, or
other hazards.
4) Safety check: After repairs or service, ask the service to perform safety checks
to confirm that the unit is in proper working condition.
● Mail-In Service
When shipping the unit, carefully pack and send it prepaid, adequately insured and
preferably in the original carton. Include a letter detailing the complaint and provide a
daytime phone and/or email address where you can be reached. If repair is needed
during the limited warranty period, the purchaser will be required
to furnish a sales receipt/proof of purchase indicating date of purchase, amount paid
and place of purchase. Customer will be charged for the repair of any unit received
without such proof of purchase.
Page 11

!
!
©AVProConnect | 3518 N Casco Ave. Sioux Falls, SD 57104 1.877.886.5112 | +1.605.274.6055
11
■ Warranty
If your product does not work properly because of a defect in materials or
workmanship, AVProConnect (referred to as “the warrantor”) will, for the length of
the period indicated as below, (10 Years)which starts with the date of original
purchase (“Limited Warranty period”), at its option either (a) repair your product
with new or refurbished parts, or (b) replace it with a new or a refurbished product. The
decision to repair or replace will be made by the warrantor.
During the “Labor” Limited Warranty period there will be no charge for labor. During the
“Parts” warranty period, there will be no charge for parts. You must mail-in your product
during the warranty period. This Limited Warranty is extended only to the original
purchaser and only covers product purchased as new. A purchase receipt or other proof
of original purchase date is required for Limited Warranty service.
● Warranty Limits and Exclusions
1) This Limited Warranty ONLY COVERS failures due to defects in materials or
workmanship, and DOES NOT COVER normal wear and tear or cosmetic
damage. The Limited Warranty ALSO DOES NOT COVER damages which
occurred in shipment, or failures which are caused by products not supplied by
the warrantor, or failures which result from accidents, misuse, abuse, neglect,
mishandling, misapplication, alteration, faulty installation, set-up adjustments,
misadjustment of consumer controls, improper maintenance, power line surge,
lightning damage, modification, or service by anyone other than a Factory
Service Center or other Authorized Service, or damage that is attributable to
acts of God.
2) There are no express warranties except as listed under “limited warranty
coverage”. The warrantor is not liable for incidental or consequential
damages resulting from the use of this product, or arising out of any breach
of this warranty. (As examples, this excludes damages for lost time, cost of
having someone remove or re-install an installed unit if applicable, travel to
and from the service location, loss of or damage to media or images, data or
other recorded content. The items listed are not exclusive, but are for
illustration only.)
■ Safety Instructions:
After Sale Service
To ensure reliable operation of this product as well as protecting the safety of any person
using or handling this device while powered, please observe the following instructions.
Page 12

!
!
©AVProConnect | 3518 N Casco Ave. Sioux Falls, SD 57104 1.877.886.5112 | +1.605.274.6055
12
1. Use the power supplies provided. If an alternate supply is required, check
voltage, polarity and that it has sufficient power to supply the device it is
connected to.
2. Do not operate these products outside the specified
temperature and humidity range given in the above specifications.
3. Ensure there is adequate ventilation to allow this product to operate efficiently.
4. Repair of the equipment should only be carried out by qualified professionals as
these products contain sensitive devices that may be damaged by any
mistreatment.
5. Only use this product in a dry environment. Do not allow any liquids or harmful
chemicals to come into contact with these products.
■ After Sale Service
1. Should you experience any problems while using this product, firstly
refer to the Troubleshooting section in this manual before contacting Technical Support.
2. When Calling Technical Support, the following information
should be provided:
• Product name and model number
• Product serial number
• Details of the fault and any conditions under which the fault occurs.
3. This Product has a ten-year standard warranty, beginning from
the date of purchase as stated on the sales invoice.
4. Product warranty is automatically void under any of the following
conditions:
The product is already outside of its warranty period
• Damage to the product due to incorrect usage or storage
• Damage caused by unauthorized repairs
• Damage caused by mistreatment of the product
5. Only use this product in a dry environment. Do not allow any liquids or
harmful chemicals to come into contact with these products.
Thanks for Using AVProConnect
If you have any questions just call us at 1-877-886-5112
 Loading...