

Page 1
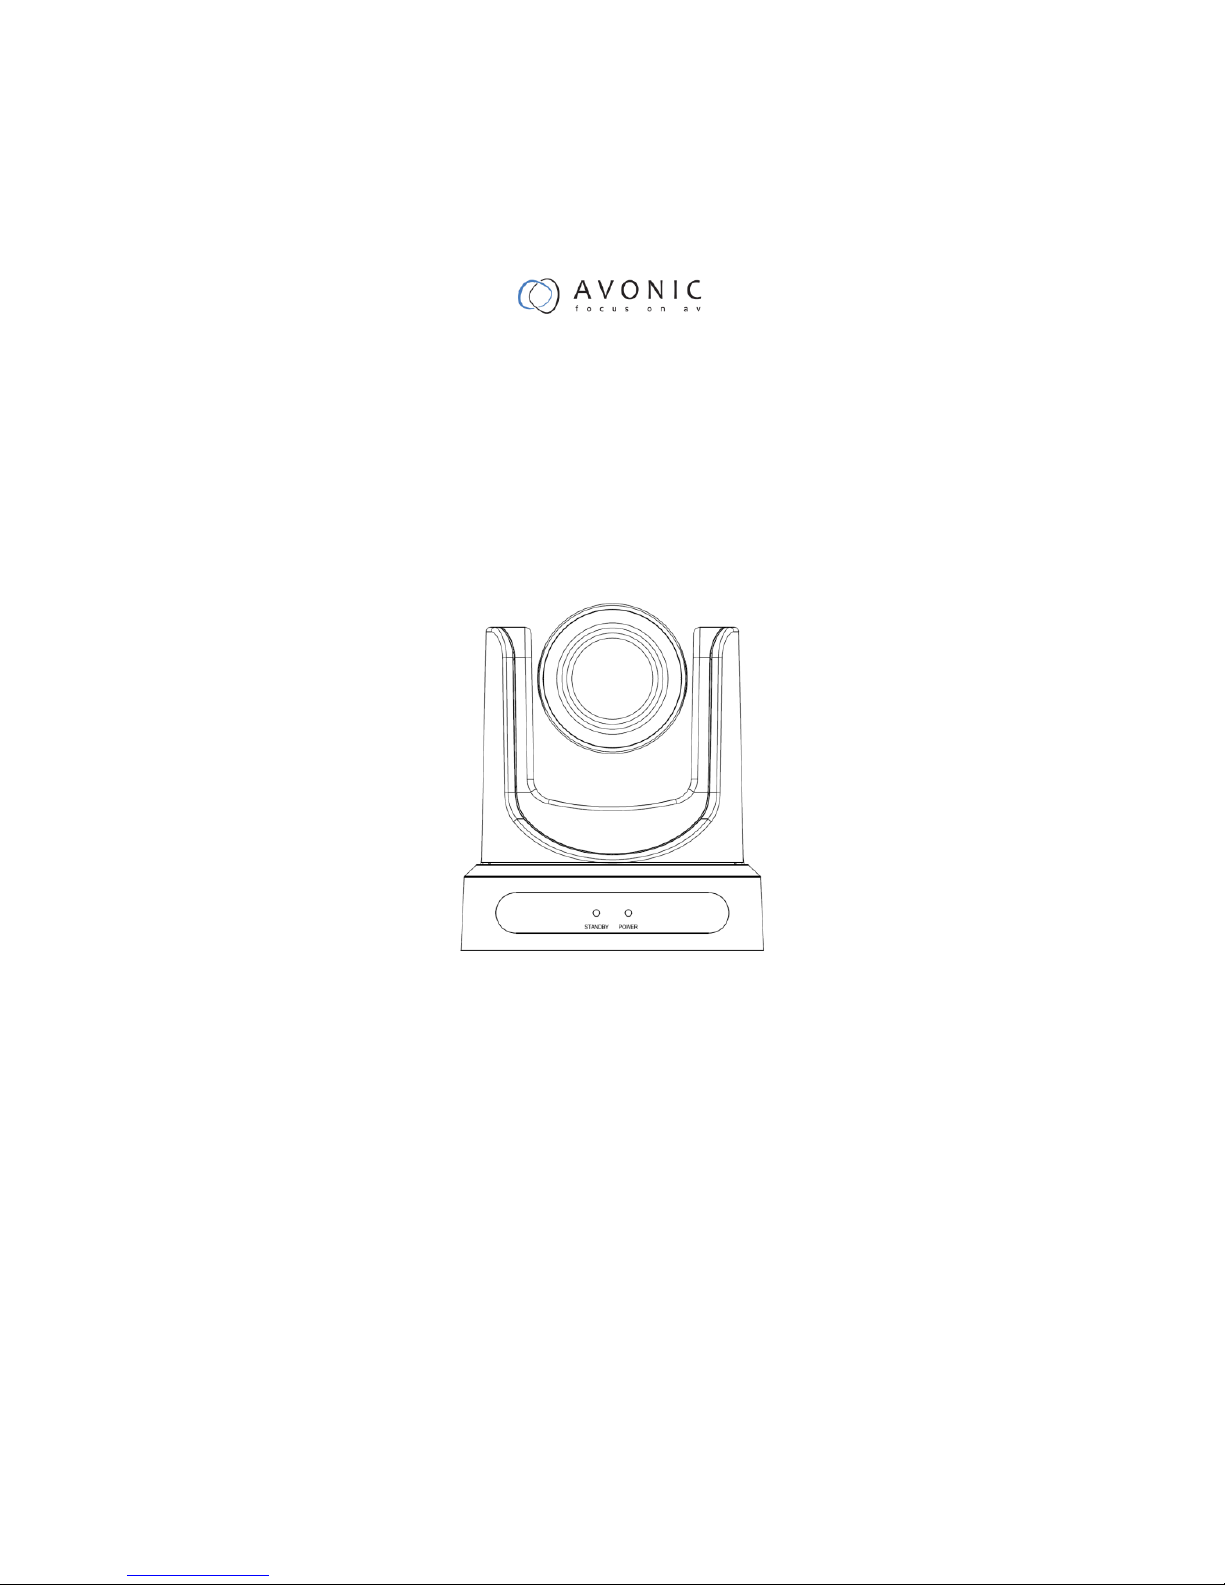
HD Video Conferencing Camera
User Manual
V2.2
(English)
Page 2

1
Preface
Thanks for using this HD Video Conferencing Camera.
This manual introduces the function, installation and operation of the HD camera. Prior to installation and
usage, please read the manual thoroughly.
Precautions
This product can only be used in the specified conditions in order to avoid any damage to the camera:
Don’t subject the camera to rain or moisture.
Don’t remove the cover. Otherwise, you may get an electric shock. In case of abnormal operation,
contact the authorized engineer.
Never operating under unspecified temperature , humidity and power supply.
Please use the soft dry cloth to clean the camera. If the camera is very dirty, clean it with diluted neuter
detergent; do not use any type of solvents, which may damages the surface.
Note:
This is class A production. Electromagnetic radiation at the specific frequency may affect the image quality
of TV in home environment
Page 3

2
Contents
Note ............................................................................................................................................................................ 3
Supplied Accessories ................................................................................................................................................. 5
Quick Start ................................................................................................................................................................. 6
Features ...................................................................................................................................................................... 9
Product Specification ............................................................................................................................................... 10
Main Unit ................................................................................................................................................................. 13
Size........................................................................................................................................................................... 14
IR Remote Controller Explanation .......................................................................................................................... 15
USE IR Remote Controller ...................................................................................................................................... 18
RS-232 Interface ...................................................................................................................................................... 22
VISCA Network Configuration ............................................................................................................................... 23
Serial Communication Control ................................................................................................................................ 24
VISCA Command List ............................................................................................................................................. 25
Menu Setting ............................................................................................................................................................ 26
internet connection(Only the network models) ........................................................................................................ 31
Maintenance and Troubleshooting ........................................................................................................................... 41
Page 4

3
Note
Electric Safety
Installation and operation must accord with electric safety standard.
Caution to transport
Avoid stress, vibration and soakage in transport, storage and installation.
Polarity of power supply
The power supply of the product is +12V, the max electrical current is 2A .Polarity of the power supply plug
drawing as follows.
Careful of installation
Do not grasp the camera head when carrying the camera. Don’t turn camera head by hand. Doing so may
result in mechanical damage.
Don’t apply in corrosive liquid, gas or solid environment to avoid damaging the cover which is made up of
plastic material.
To make sure no obstacle in rotation range.
Never power on before installation is not completed.
Don’t dismantle the camera
We are not responsible for any unauthorized modification or dismantling.
CAUTION!
Page 5

4
The specific frequency of electromagnetic field may affect the image of the camera!
Page 6

5
Supplied Accessories
When you unpack, check that all the supplied accessories are included:
Camera ...................................... 1PCS
AC power adaptor ..................... 1PCS
Power cord .................................. 1PCS
RS232 cable ................................ 1PCS
Remote controller ........................ 1PCS
User manual .............................. 1PCS
Page 7
6
Quick Start
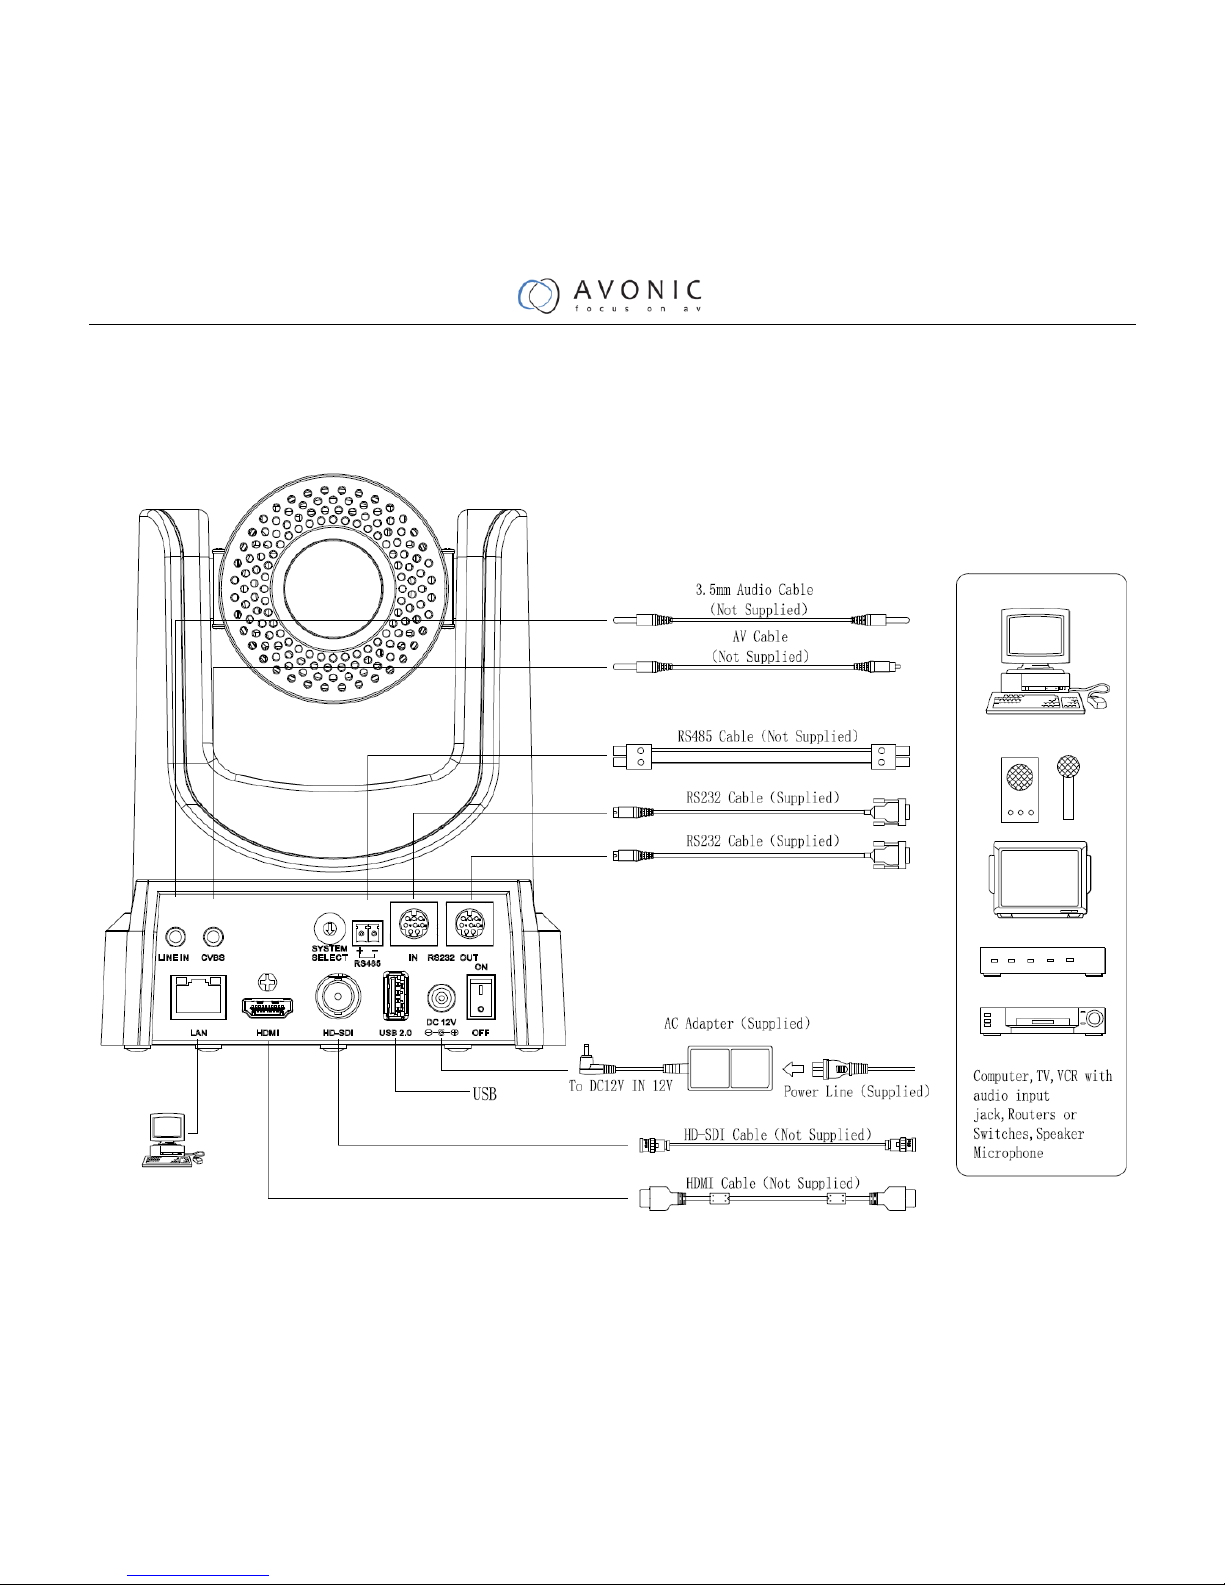
Step1. Please check connections are correct before starting
Page 8

7
Step2. Setting of the system select switch
The option of video format:
VIDEO SYSTEM
0 - 8 - 1 - 9 - 2
1080i60
A
-
3
1080i50
B - 4
720p60
C
-
5
720p50
D
576i
6
1080p30
E
480i
7
1080p25
F
-
CAUTION:
a. After changing the switch, you need to restart the camera to take effect.
Step3. Press the Switch ON/OFF button on the rear of the camera, the power lamp light.
Step4. Pan-Tilt will rotate to the maximum position of top right after the camera started, then it return to the center,
the process of initialization is finished. (Note: If the position preset 0 has been stored, the position preset 0 will be
called up after initialization)
Step5. (Optional) If you want to restore the factory default settings, Press [MENU] button to display the OSD
menu. Select the item [MENU] -> [RESTORE DEFAULT] -> [Restore]. Set the value [Yes], press [HOME]
button to restore the factory default settings.
Page 9

8
RESTORE DEFAULT
Restore Yes
Change Value
[Home] OK
[Menu] Back
Page 10

9
Features
1. The camera provides a high performance in low illumination situations, particularly suitable for which
room's lighting is not very well.
2. With maximum resolution of 1920 x 1080 and output frame rate up to 30 frames / sec, this camera
provides high-definition as well as fluent video.
3. The camera video signal to noise ratio directly affects the image compression coding efficiency for
high-definition video conference terminals. The camera applies 2D and 3D noise reduction at the same time based
on motion estimation algorithm, and effectively reduces the noise.
4. 20x optical zoom.
5. Three type of video output interface: HDMI interface, HD-SDI interface, CVBS interface.
6. Infrared remote control signals pass through function. The camera is capable of receiving signal from the
infrared remote controller, and passes through to the video conferencing terminal via RS232 connector.
7. Support network audio and video streams multiplexed output.
Page 11
10
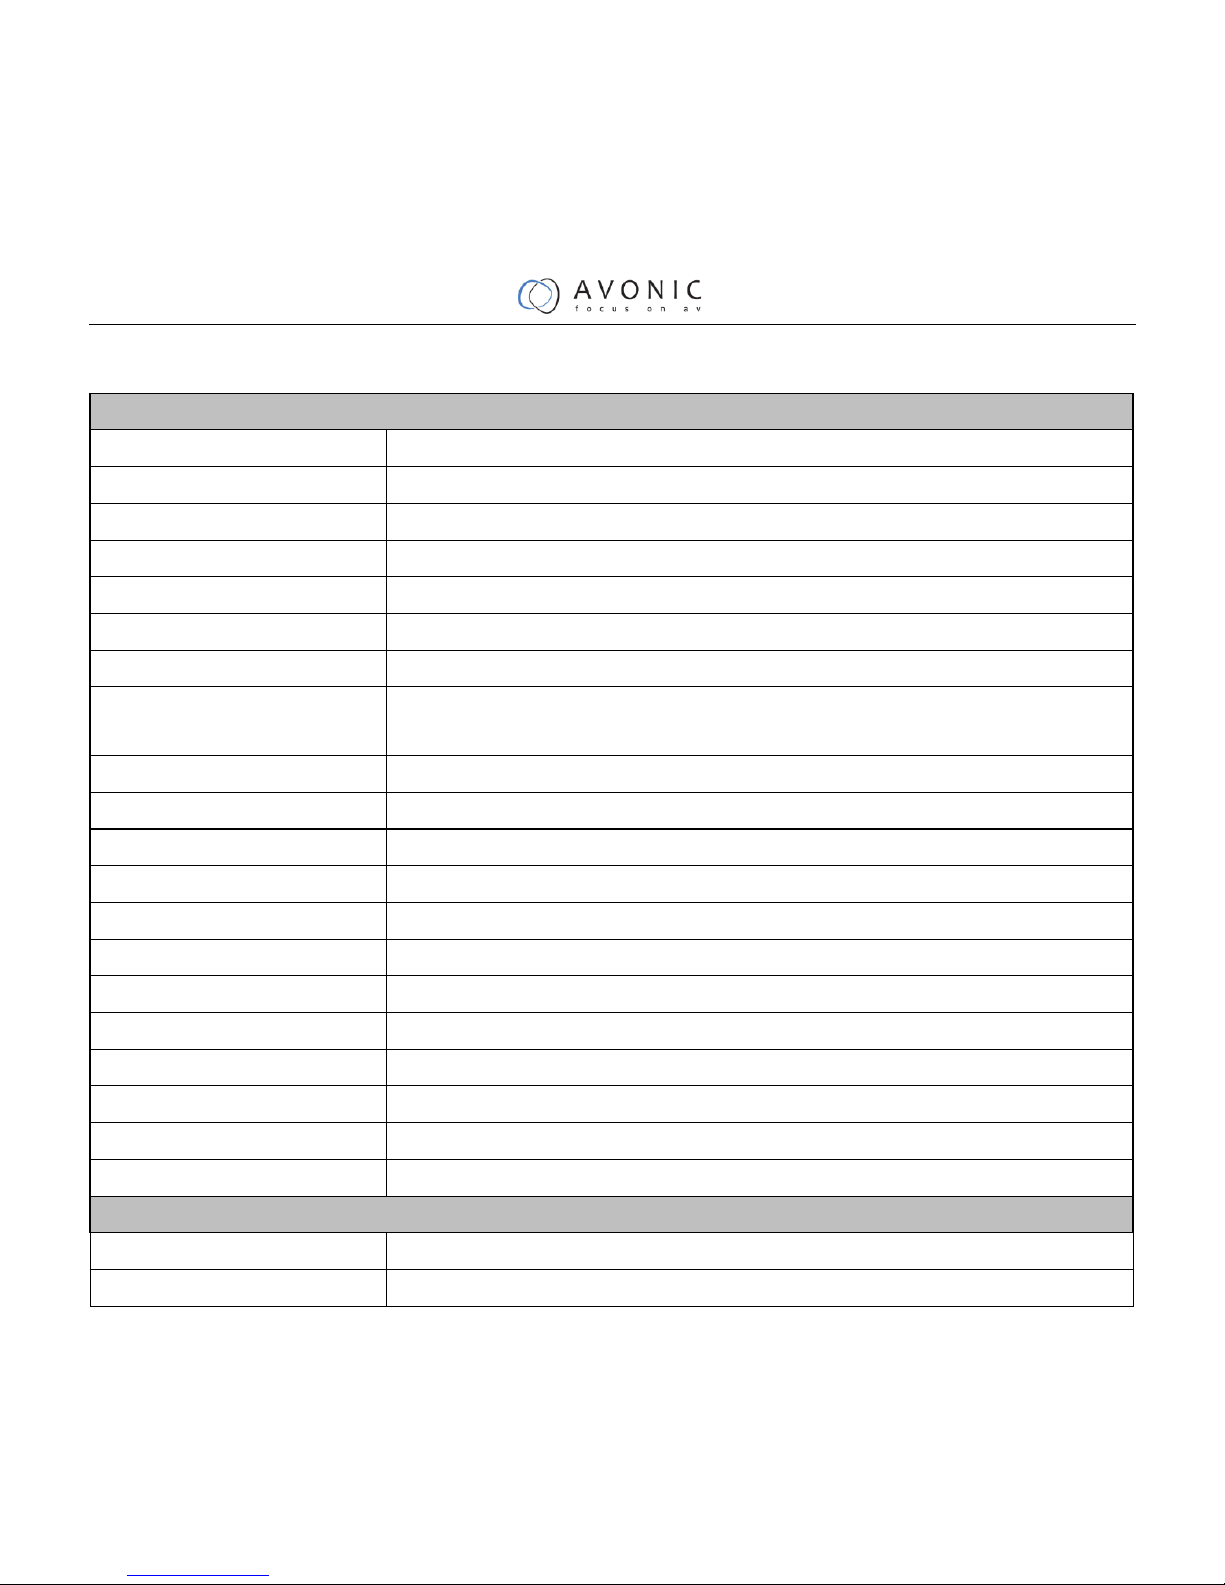
Product Specification
Camera
Video system
1080i/60,1080i/50, 1080p/30, 1080p/25, 720p/60, 720p/50, NTSC, PAL
Sensor
1/2.7", CMOS, Effective Pixel: 2.07M
Scanning Mode
Progressive
Lens
20x, f4.42mm ~ 88.5mm, F1.8 ~ F2.8
Digital Zoom
16x
Minimal Illumination
0.5 Lux @ (F1.8, AGC ON)
Shutter
1/25s ~ 1/10000s
White Balance
Auto, 3000K/Indoor, 4000K,5000K/Outdoor, 6500K_1,6500K_2,6500K_3,One Push,
Manual
Backlight Compensation
Support
Digital Noise Reduction
2D&3D Digital Noise Reduction
S/N
≥55dB
Horizontal Angle
60.7° ~ 3.36°
Vertical Angle
34.1° ~ 1.89°
Horizontal Rotation
±170°
Vertical Rotation
-30° ~ +90°
Pan Speed Range
1.7° ~ 100°/s
Tilt Speed Range
1.7° ~ 69.9°/s
Ceiling Installation
Support
Number of Preset
255
Preset Accuracy
0.1°
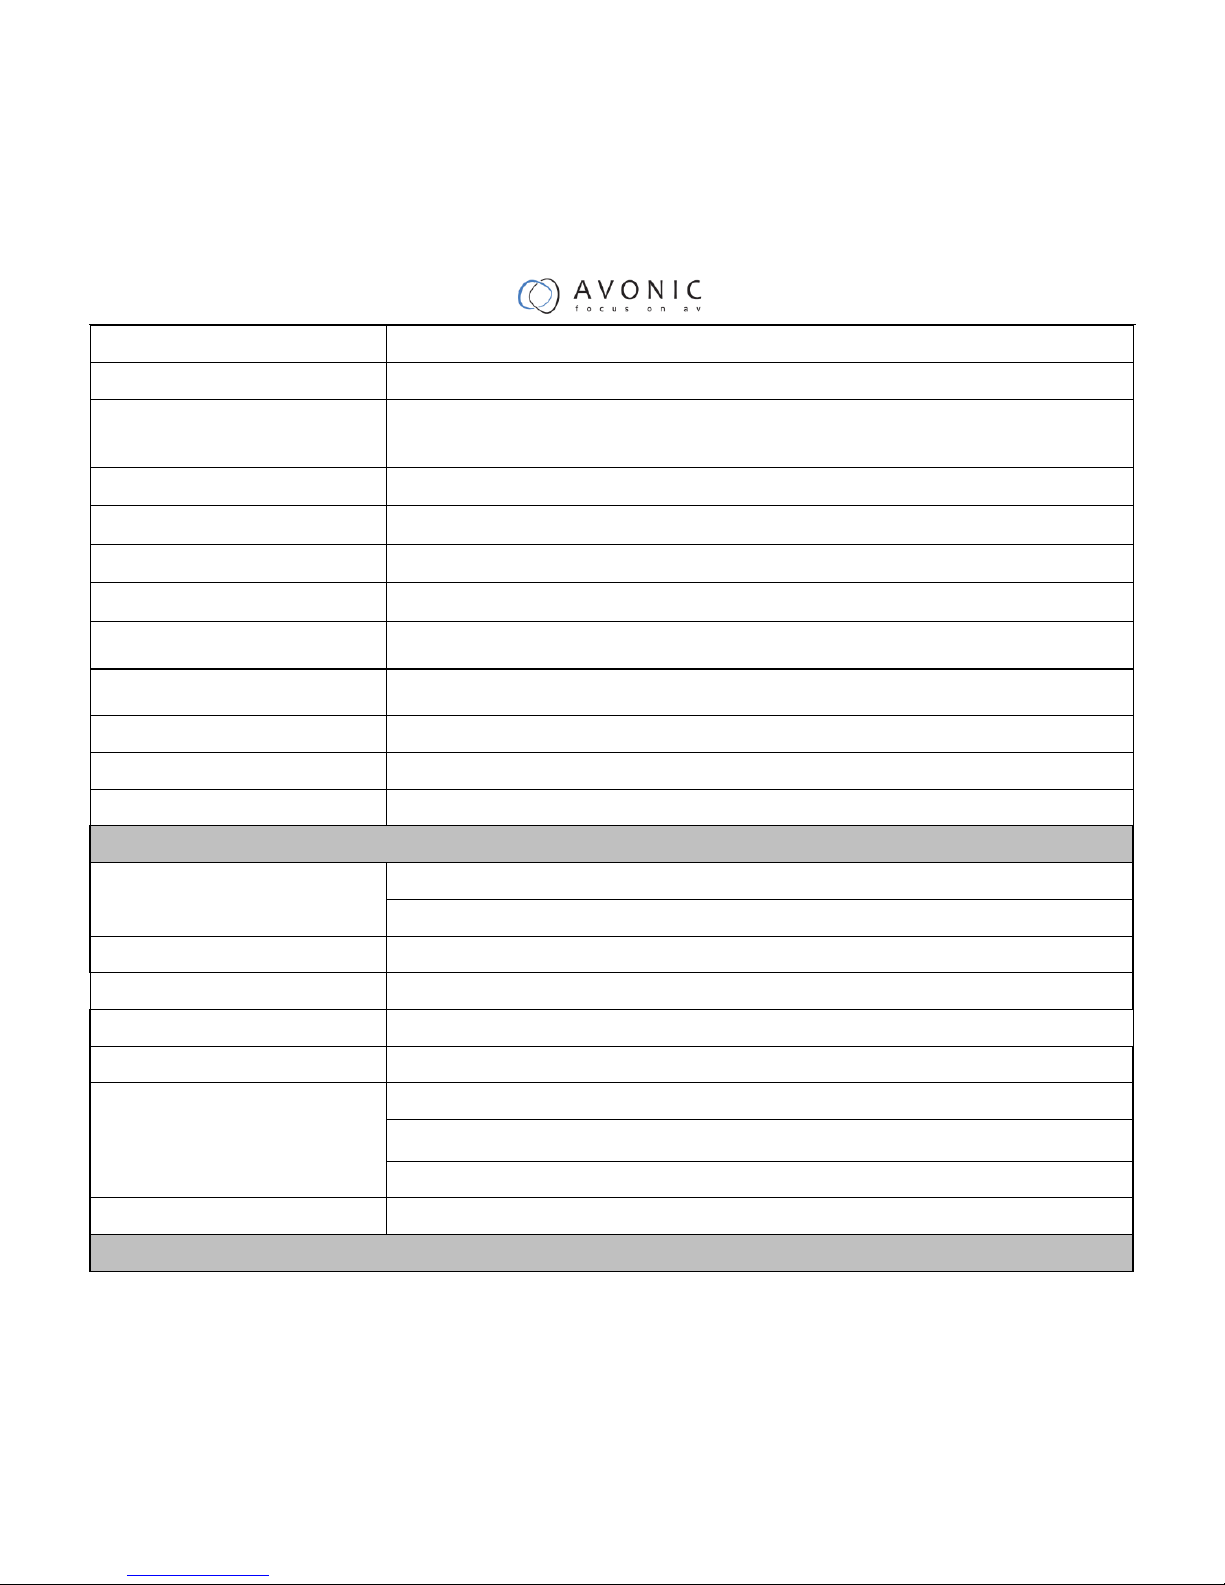
IPC Video Features
Video coding standard
H264
Video Stream
Main stream, Sub stream
Page 12
11
Main stream resolution
1920X1080,1280X720
Sub stream resolution
720X480,320X240
Bit Rate
128K,256K,384K,512K,768K,1024K,1536K,2048K,3072K,4096K,5120K,6144K,8192K
Optional, customize
Bit Rate Type
Variable rate, fixed rate
Audio standard
AAC
Audio rate
96K,128K,256k
Support protocols
TCP/IP,HTTP,DDNS,RTSP,PPPoE,SMTP,UPnP, SNMP,FTP(Optional)
Maximum Frame
Format PAL:1-25, format NTSC:1-30
I Frame Gap
Customizable,(must be greater than or equal to the maximum frame rate)
Video Format
PAL,NTSC
Web Stream
Main stream, sub stream
Web video size
Appropriate size, original size, full-screen
Input/Output Interface
HD Output
1xHDMI: Version 1.3
1xHD-SDI: BNC Type, 800mVp-p, 75Ω, Along to SMPTE 292M standard
SD Output
1xCVBS: 3.5mm jack, 1Vp-p, 75Ω
Network interface
1xRJ45: 10M/100M Adaptive Ethernet ports
Audio interface
1-ch 3.5mm audio interface, LINE IN
USB
1xUSB2.0: A type jack
Communication interface
1xRS-232 IN: 8pin Min DIN, Max Distance: 30m, Protocol: VISCA/Pelco-D/Pelco-P
1xRS-232 OUT: 8pin Min DIN, Max Distance: 30m, Protocol: VISCA only
1xRS-485: 2pin Phoenix port, Max Distance: 1200m, Protocol: VISCA/Pelco-D/Pelco-P
Power jack
JEITA type (DC IN 12V)
Generic Specification
Page 13

12
Input Voltage
DC 12V
Current consumption
1.0A (Max)
Operating Temperature
-5°C ~ 40°C
Storage Temperature
-20°C ~ 60°C
Power
12W(Max)
Dimensions
142mm x 169mm x 176mm
Weight
1.5Kg
Page 14

13
Main Unit
1. Audio LINE IN Interface 7. Network Interface
2. CVBS Interface 8. HDMI Interface
3. System select switch 9. HD-SDI Interface
4. RS485 jack 10. USB2.0
5. RS232 IN jack 11. DC 12V jack
6. RS232 OUT jack 12. Power switch
Page 15

14
Size
Page 16

15
IR Remote Controller Explanation
0. Standby Button
Press this button to enter standby mode. Press it
again to enter normal mode.
(Note: Power consumption in standby mode is
approximately half of the normal mode)
1. Position Buttons
To set preset or call preset
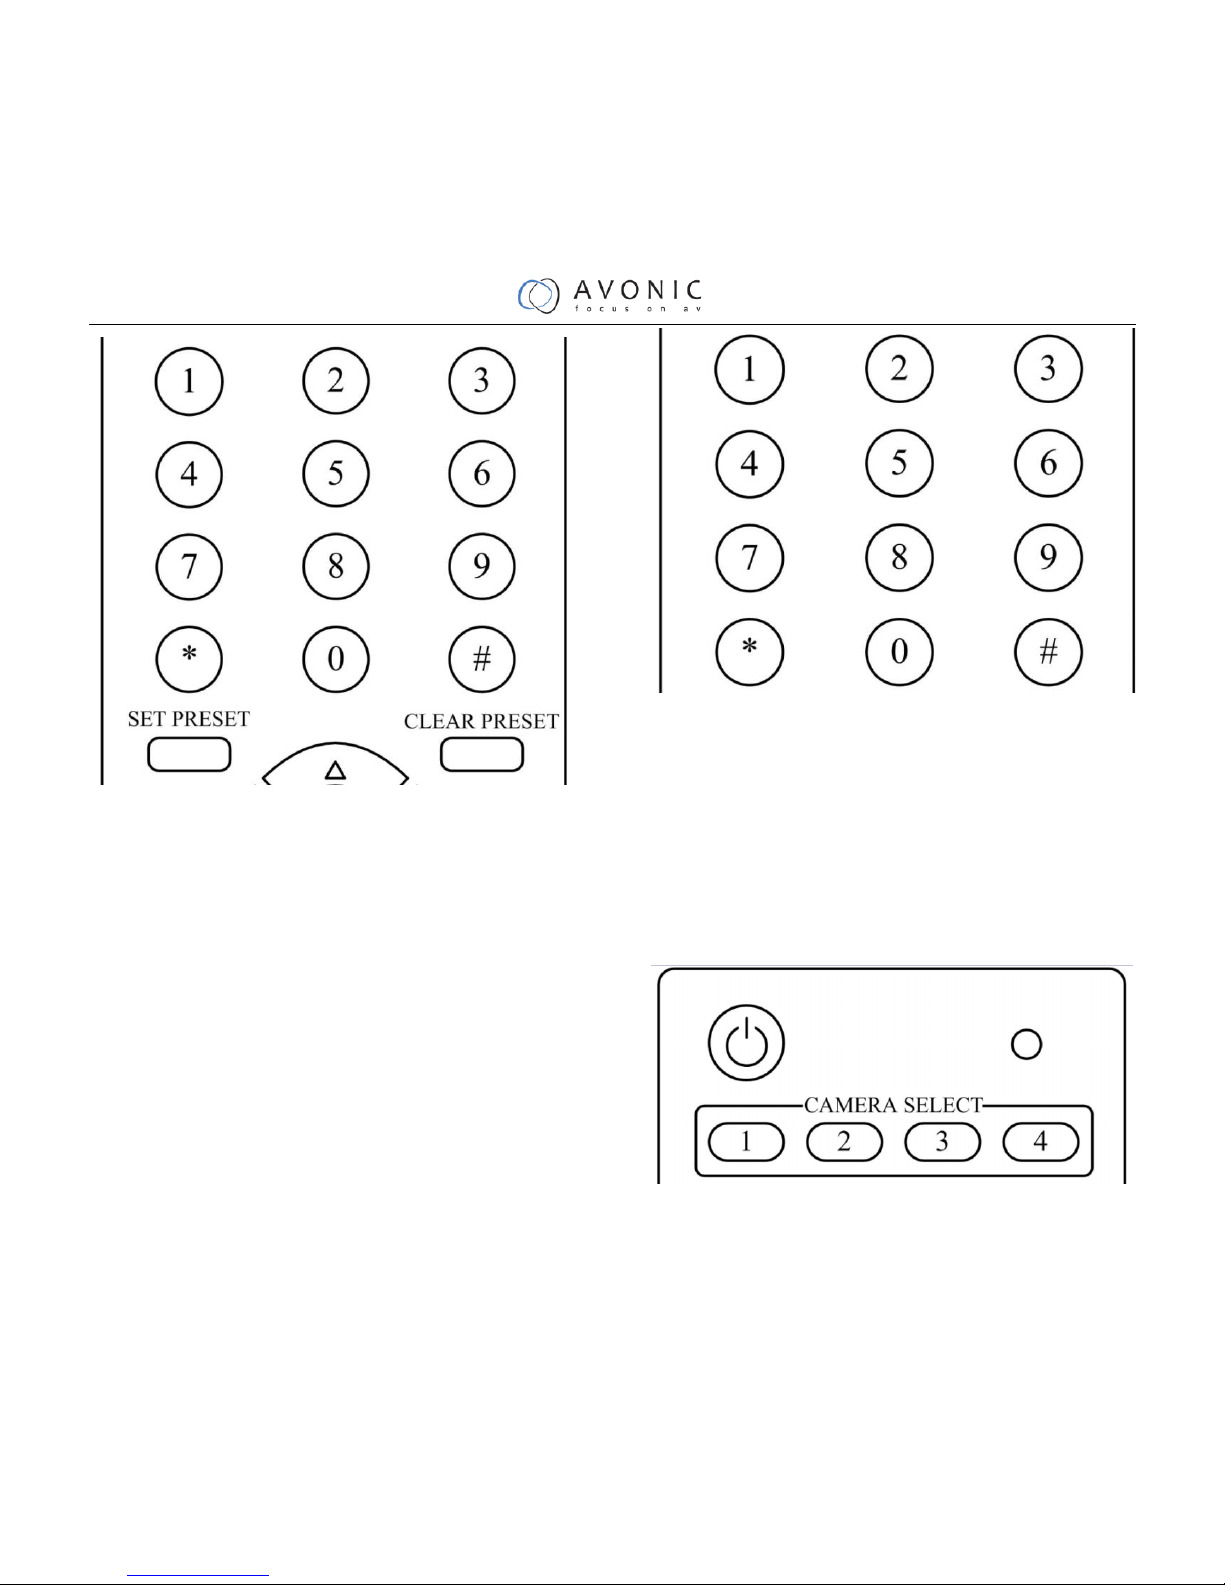
2. * Button
3. Set/Clear Preset Buttons
Set preset: Store a preset position
[SET PRESET] + Numeric button (0-9): Setting a
corresponding numeric key preset position
Clear preset: Erase a preset position
[CLEAR PRESET] + Numeric button (0-9)
Or: [*]+[#]+[CLEAR PRESET]: Erase all the
preset individually
4. BLC (Backlight Compensation) Button
BLC ON/OFF: Press this button to enable the
backlight compensation. Press it again to disable
the backlight compensation.(NOTE: Effective
Page 17

16
only in auto exposure mode)
Note: If a light behind the subject, the subject will
become dark. In this case, press the backlight ON / OFF button. To cancel this function, press the backlight ON /
OFF button.
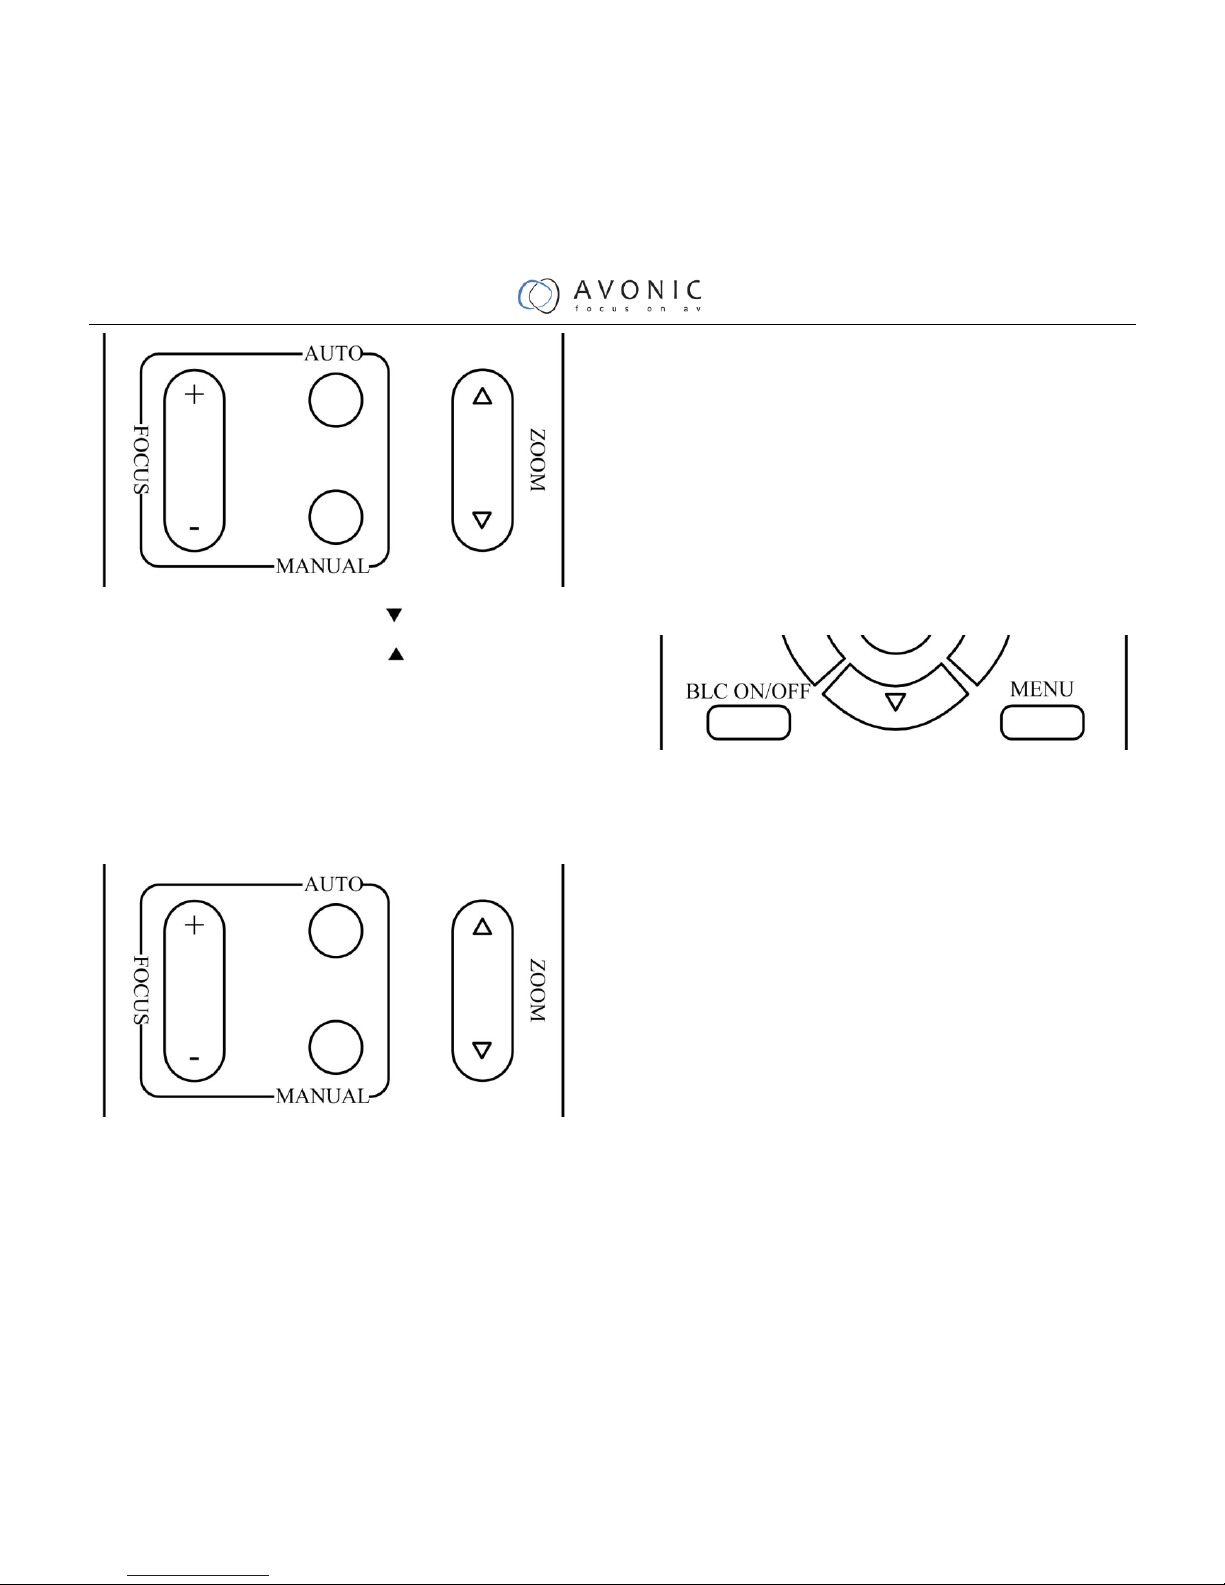
5. Focus Buttons
Used for focus adjustment.
Press [AUTO] adjust the focuses on the center of the object automatically. To adjust the focus manually, press the
[MANUAL] button, and adjust it with [Focus+] (Focus on far object) and [Focus-] (Focus on near object)
6. Camera Select Buttons
Press the button corresponding to the camera you want to operate with the remote controller.
7. # Button
8. Pan/Tilt Control Buttons
Press arrow buttons to perform panning and tilting. Press [HOME] button to face the camera back to front
9. Menu Setting
Menu button: Press this button to enter or exit the OSD menu
10. Zoom Buttons
Zoom : Zoom In
Zoom : Zoom Out
11. Set Camera IR Address Buttons
[*]+[#]+[F1]: Address1
[*]+[#]+[F2]: Address2
[*]+[#]+[F3]: Address3
Page 18

17
[*]+[#]+[F4]: Address4
Page 19

18
USE IR Remote Controller
When the camera is working, you can use
remote controller to perform panning, tilting,
zooming and focusing, store and call back preset
positions.
Button Instruction:
1. In this instruction, ‘press the button’ means
the press and relax the two actions. Such as ‘press
[HOME] button’ means to press the [HOME] key
and then relax action, and a special note will be
given if a hold down for more than one second is
required.
2. When a button-combination is required, do it
in sequence. For example, ‘[*] + [#] + [F1]’means
press [*] first and then press [#] and press [F1] at
last.
1. Pan/Tilt Control
Move up: Press [ ]
Move down: Press [ ]
Move left: Press [ ]
Move right: Press [ ]
Face the camera back to front: Press [HOME]
Press and hold the up/down/left/right button,
the camera will keep rotating from slow to fast, until
it run to the mechanical limit; the camera stops as
soon as the button is released.
2. Zoom
Page 20
19
Zoom Out: press [ZOOM ] button
Zoom In: press [ZOOM ] button
Press and hold the button, the camera will keep
zooming in or zooming out and it stops as soon as
the button is released.
3. Focus Control
Focus Far: Press [FOCUS+] button (NOTE:
Effective only in manual focus mode)
Focus Near: Press [FOCUS-] button (NOTE:
Effective only in manual focus mode)
Press and hold the button, the action of focus
continues and stops as soon as the button is released.
AUTO: Change focus mode to AF, adjusting the
focus automatically.
MANUAL: Change focus mode to MF, adjusting the
focus manually.
4. Backlight Switch
BLC ON/OFF: Press this button to enable the
backlight compensation. Press it again to disable the
backlight compensation. (Note: Backlight is only
effective in full auto exposure mode)
5. Presets Set/Clear
Page 21
20
1. To store a preset position: The users should
press the [SET PRESET] button first and then press
the numeric button 0-9.
10 preset positions in total are available.
2. To erase the memory content of a preset
position: The users should press the [CLEAR
PRESET] button first and then press the numeric
button 0-9.
Note:
Press [*]+[#]+[CLEAR PRESET] will erase all
preset individually positions in the memory.
6. Recalling the Preset
Press any of the numeric buttons 0-9 directly to
recall stored preset positions and settings.
Note:
No action is executed if a relative preset
position is not stored.
7. Camera Selection
Press the button corresponding to the camera
you want to operate.
Page 22

21
8. Camera IR Address Set
[*]+[#]+[F1]: Address1
[*]+[#]+[F2]: Address2
[*]+[#]+[F3]: Address3
[*]+[#]+[F4]: Address4
9. Shortcut Set
[*]+[#]+[1]: OSD menu default English
[*]+[#]+[3]: OSD menu default Chinese
[*]+[#]+[4]: Default IP address
[*]+[#]+[5]:Save OSD
[*]+[#]+[6]:Quickly recover the default
[*]+[#]+[7]:Display the manufacturer
infornation
[*]+[#]+[8]:Look the camera version
[*]+[#]+[9]:Quickly set up inversion
Page 23

22
RS-232 Interface
Camera Windows DB-9
1.DTR 1.CD
2.DSR 2.RXD
3.TXD 3.TXD
4.GND 4.DTR
5.RXD 5.GND
6.GND 6.DSR
7.IR OUT 7.RTS
8.NC 8.CTS
9.RI
Camera Mini DIN
1.DTR 1.DTR
2.DSR 2.DSR
3.TXD 3.TXD
4.GND 4.GND
5.RXD 5.RXD
6.GND 6.GND
7.IR OUT 7.NC
8.NC 8.NC
No.
Function
1
DTR
2
DSR
3
TXD
4
GND
5
RXD
6
GND
7
IR OUT
8
NC
Page 24

23
VISCA Network Configuration
Page 25

24
Serial Communication Control
In default working mode, the camera is able to connect to a VISCA controller with RS232C serial interface.
RS232 Communication Control
The camera can be controlled via RS232 ,the parameters of RS232C are as follows:
Baud rate: 2400/4800/9600 bit/s.
Start bit: 1 bit.
Data bit: 8 bits.
Stop bit: 1bit.
Parity bit: none.
RS485 Communication Control
The camera can be controlled via RS485, Half-duplex mode:
Baud rate: 2400/4800/9600 bit/s.
Start bit: 1 bit.
Data bit: 8 bits.
Stop bit: 1bit.
Parity bit: none.
Pan-Tilt will rotate to the maximum position of top right after the camera started, then it return to the center,
the process of initialization is finished. (Note: If the position preset 0 has been stored, the position preset 0 will be
called up after initialization) Then the users can control the camera with commands in the command list.
Page 26

25
VISCA Command List
(Ignore)
Note:
The camera serial standard VISCA/Pelco-D/Pelco-P, if the need for the secondary development, According to
standard protocol to control the camera. If you need VISCA/Pelco - D/Pelco - P protocol command list in detail,
please contact the manufacturer.
Page 27
26
Menu Setting
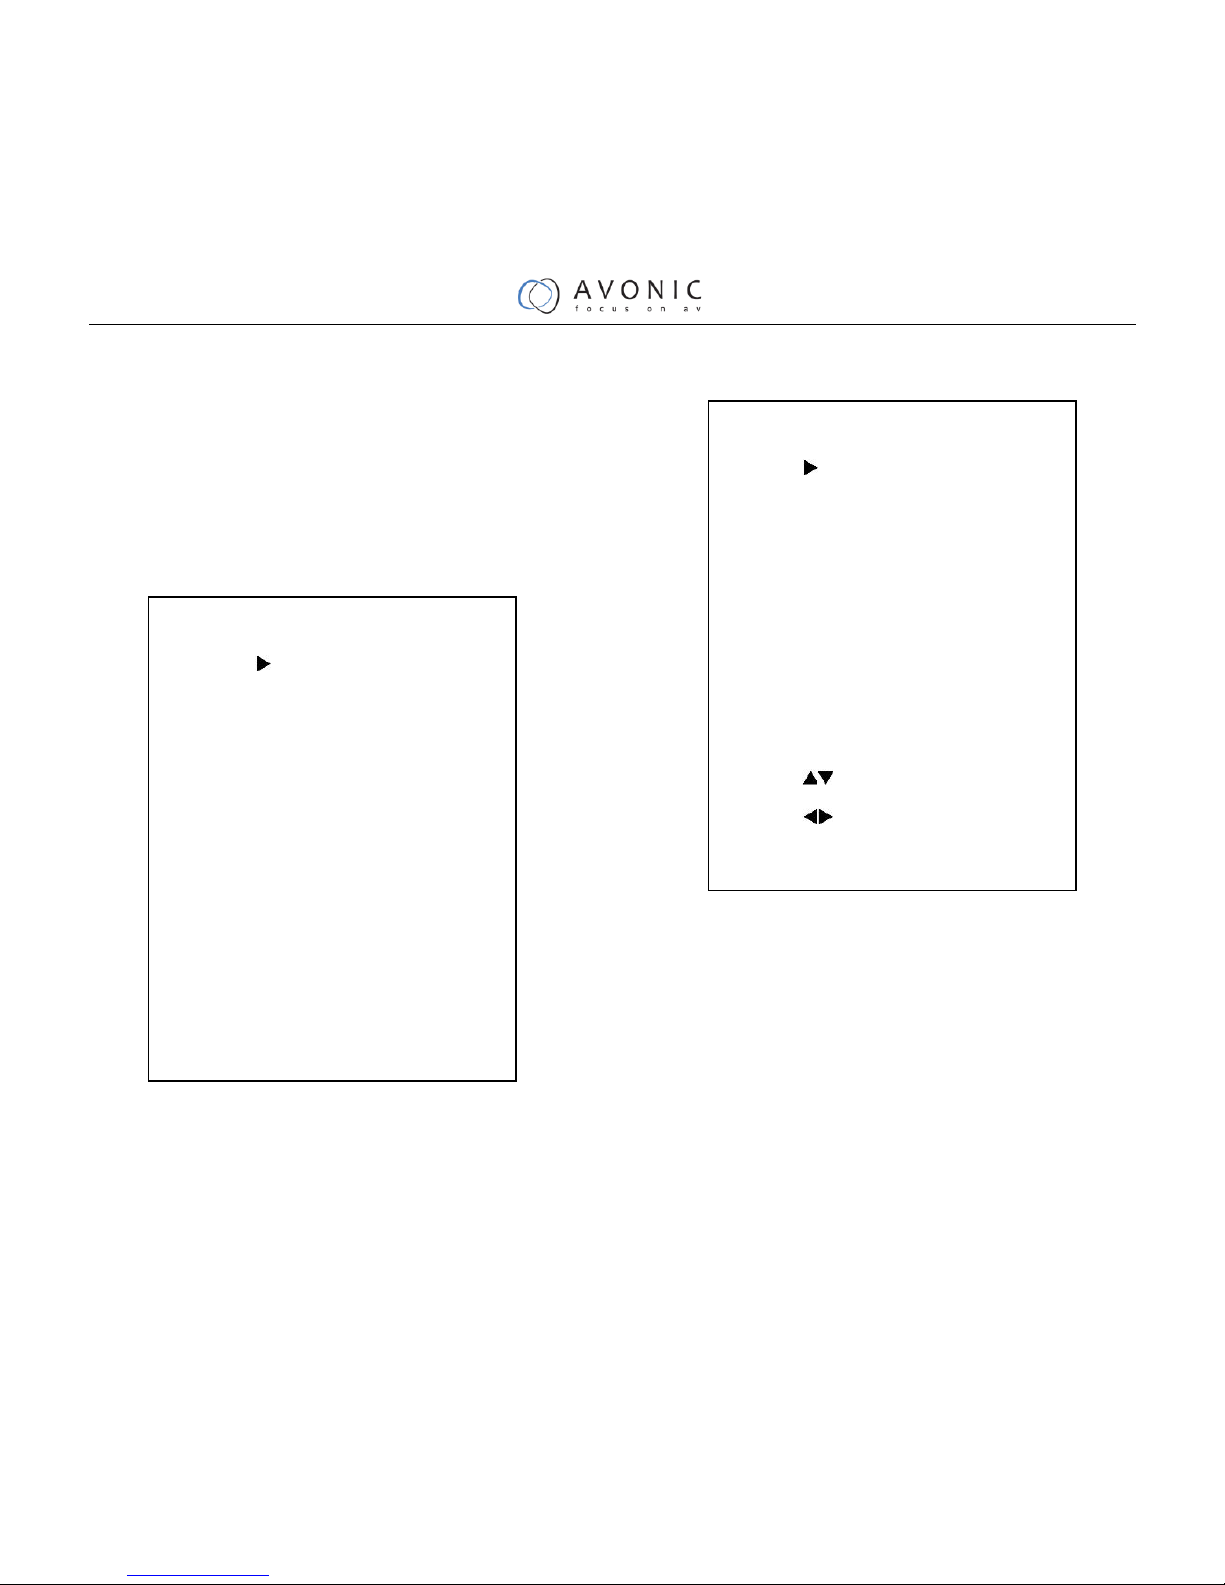
1. MENU
Press [MENU] button to display the main menu
on the normal screen, using arrow button to move
the cursor to the item to be set. Press the [HOME]
button to enter the corresponding sub-menu.
2. EXPOSURE
Move the cursor to the Exposure item in the
main menu and press [home] button, EXPOSURE
menu appears, as shown in the following figure.
Mode: Exposure mode. Optional items: Auto,
Manual, SAE, AAE, Bright
ExpCompMode: Exposure compensation mode,
Optional items: On, Off (Effective only in Auto
mode)
ExpComp: Exposure compensation value,
Optional items:-7 ~ 7(Effective only in
ExpComp Mode item to On)
Gain Limit: Maximum gain limit. Optional
items: 0 ~ 15 (Effective only in Auto, AAE ,Bright
EXPOSURE
Mode Auto
ExpCompMode Off
Backlight Off
Gain Limit 3
Anti-Flicker 50Hz
DRC 4
Select Item
Change Value
[Menu] Back
MENU
Exposure
Color
Image
P/T/Z
Noise Reduction
Setup
Restore Default
[Home] Enter
[Menu] Exit
Page 28

27
mode)
Backlight: Set the backlight compensation,
Optional items: On, Off (Effective only in Auto
mode )
DRC: DRC strength, Optional items: 0 ~ 8.
Bright: Intensity control, Optional items:00~17.
(Effective only in Bright mode)
Anti-Flicker Flicker: Anti-flicker. Optional
items: Off, 50Hz, 60Hz (Effective only in Auto,
Bright mode)
Iris: Aperture value. Optional items: F1.8,
F2.0,F2.4,F2.8,F3.4,F4.0,F4.8,F5.6,F6.8,F8.0,F9.6,F
11.0,Close(Effective only in Manual, AAE mode)
Shutt: Shutter value. Optional items: 1/30,1/60,
1/90,1/100,1/125,1/180,1/250,1/350,1/500,1/725,1/1
000,1/1500,1/2000,1/3000,1/4000,1/6000,1/10000
(Effective only in Manual, SAE mode)
3. COLOR
Move the cursor to the Color item in the main
menu and press [home] button, COLOR menu
appears, as shown in the following figure.
WB-Mode: White balance mode. Optional
items: Auto, 3000K/Indoor, 4000K,5000K/Outdoor,
6500K_1,6500K_2,6500K_3,One Push, Manual
RG: Red gain. Optional items: 0~255(Effective
only in Manual mode)
BG: Blue gain. Optional items:
0~255(Effective only in Manual mode)
Sat.: Saturation. Optional items: 60% ~ 200%.
Hue: Chroma adjustment, Optional items:0 ~
14
AWB sens: The white balance sensitivity,
COLOR
WB Mode Auto
Saturation 90%
Hue 7
AWB sens Low
Select Item
Change Value
[Menu] Back
Page 29

28
Optional items: Normal, High, Low.
4. IMAGE
Move the cursor to the Image item in the main
menu and press [home] button, IMAGE menu
appears, as shown in the following figure.
Luminance: Brightness adjustment. Optional
items: 0 ~ 14
Contrast: Contrast adjustment. Optional items:
0 ~ 14
Sharpness: Sharpness adjustment. Optional
items: Auto, 0 ~ 15
Flip-H: Image flipped horizontally. Optional
items: On, Off.
Flip-V: Image Flip Vertical. Optional items:
On, Off
B&W-Mode: Image color. Optional items: On,
Off
Gamma: Optional items: Default, 0.45, 0.5,
0.56, 0.63
LDC: Optional items: On, Off.
5. P/T/Z
SpeedByZoom: The depth of field scale switch,
P/T/Z
SpeedByZoom On
AF-Zone Center
AF-Sense Low
Fast Zoom Off
Select Item
Change Value
[Menu] Back
IMAGE
Luminance 6
Contrast 6
Sharpness 1
Flip-H Off
Flip-V Off
B&W-Mode Off
Gamma Default
LDC Off
Select Item
Change Value
[Menu] Back
Page 30

29
Optional items: On, Off
AF-Zone: Interested in focusing area, Optional
items: Top, Center, Bottom
AF-Sense: Automatic focusing sensitivity
options, Optional items: Low, Normal, High
Fast Zoom: Optional items: On, Off
6. NOISE REDUCTION
Move the cursor to the Noise Reduction item in
the main menu and press [home] button, NOISE
REDUCTION menu appears, as shown in the
following figure.
NR2D-Level: 2D noise reduction. Optional
items: Off, Auto, 1 ~ 5
NR3D-Level: 3D noise reduction. Optional
items: Off, 1 ~ 8
D-HotPixel: Dynamic bad points, Optional
items: Off, 1 ~ 5
7. SETUP
Move the cursor to the Setup item in the main
menu and press [home] button, SETUP menu
appears, as shown in the following figure.
Language: menu language, Optional items: EN,
SETUP
Language EN
Protocol VISCA
V_Address 1
V_AddrFix Off
Net Mode Serial
Baudrate 9600
Select Item
Change Value
[Menu] Back
NOISE REDUCTION
NR2D-Level 3
NR3D-Level 3
D-HotPixel Off
Select Item
Change Value
[Menu] Back
Page 31
30
Chinese
Protocol: Control protocol type. Optional items:
AUTO, VISCA, PELCO-D, PELCO-P
V_Address: Protocol address, To be decided
according to the agreement, AUTO, VISCA protocol
Optional items: 1 ~ 7
P_D_Address: PELCO-D protocol Optional
items: 0 ~ 254
P_P_Address: PELCO-P protocol Optional
items: 0 ~ 31
V_AddrFix: If I can change through the serial
port of infrared switch, Optional items: On, Off
(When set to On, useless in 88 30 01 FF
Command)
Net Mode: Set the serial port control
networking, Optional items: Serial, Paral
Baudrate: Serial port baud rate. Optional items:
2400, 4800, 9600
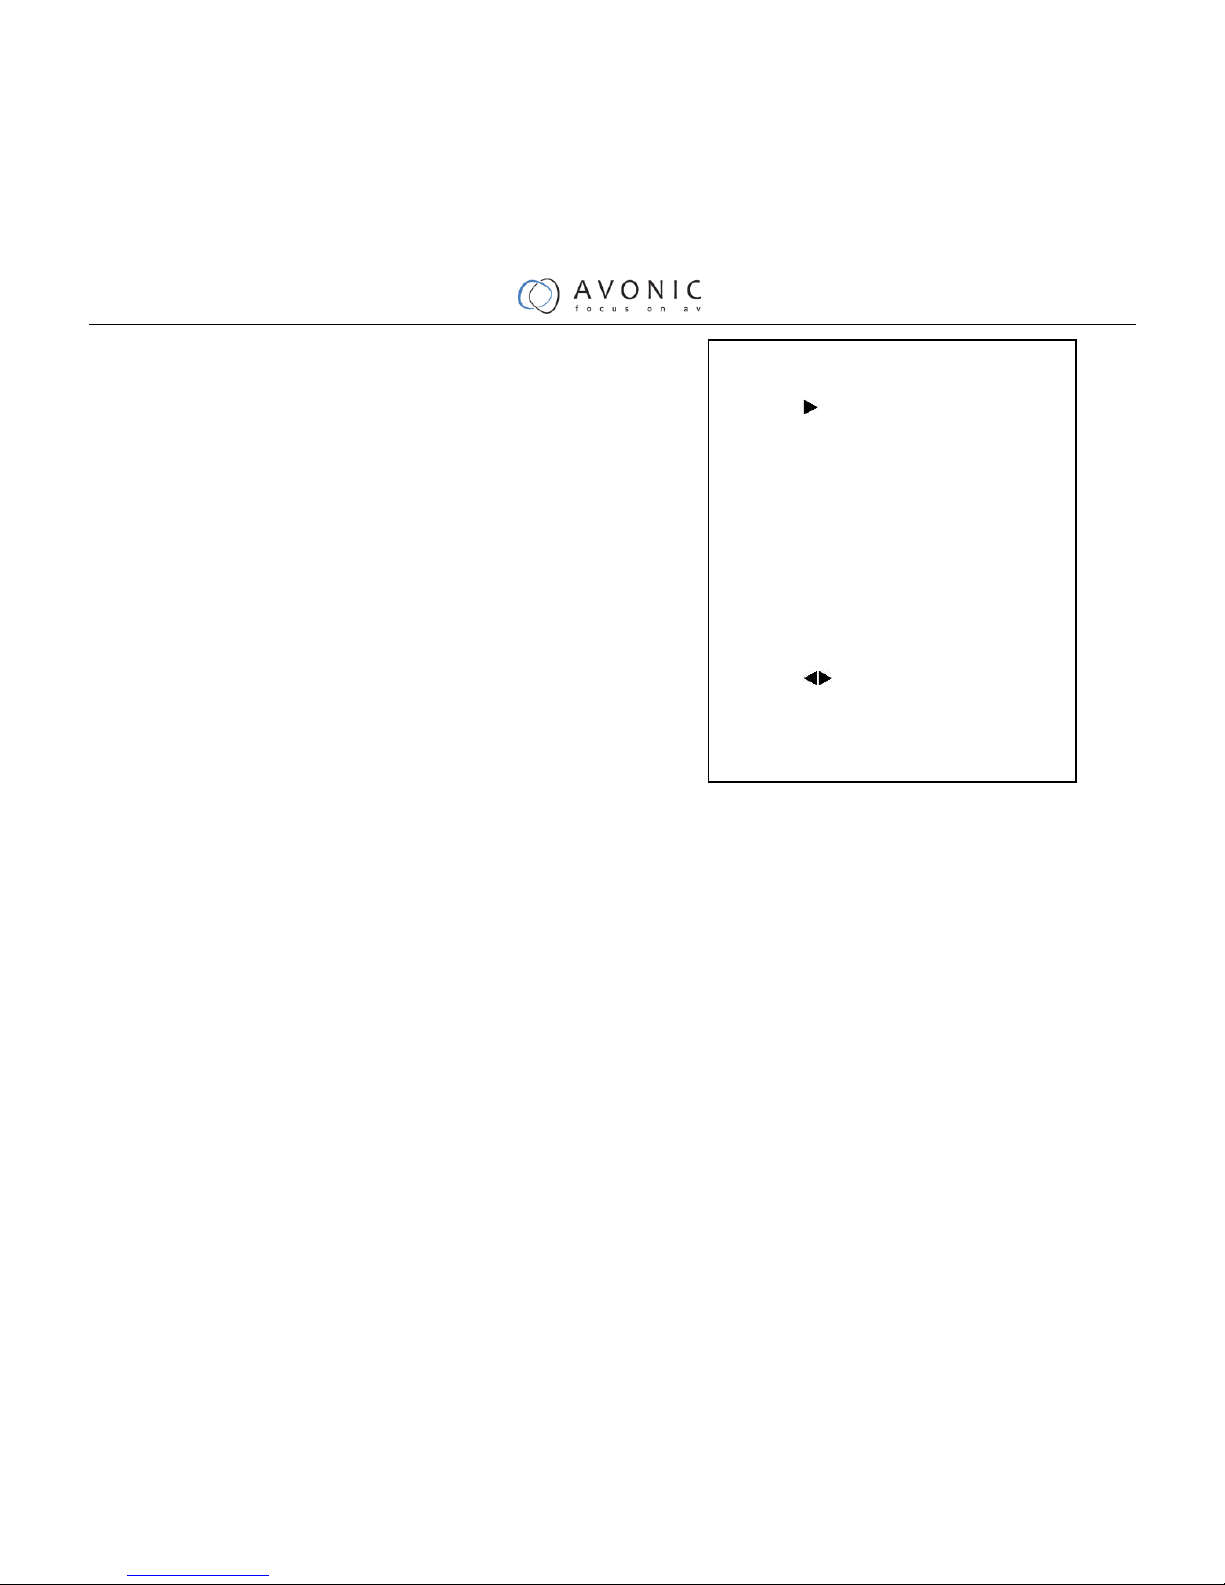
8. RESTORE DEFAULT
Move the cursor to the Restore Default item in
the main menu and press [home] button, RESTORE
DEFAULT menu appears, as shown in the following
figure.
Restore: Confirm restore factory settings.
Optional items: Yes, No
Note: Press [HOME] button to confirm, All
parameter restore default, Include IR Remote
address and VISICA Address
Save: Save Options. Optional items: Yes, No
RESTORE DEFAULT
Restore? No
Change Value
[Home] OK
[Menu] Back
Page 32

31
Internet connection
1. Operating Environment
Operating System: Windows 2000/2003/XP/
vista/7/8
Network Protocol: TCP/IP
Client PC: P4/128MRAM/40GHD/ support
scaled graphics card, support DirectX8.0 or more
advanced version.
2. Equipment Installation
1) Connect internet camera to your internet or to
your PC directly via internet cable.
2) Turn on DC12V power.
3) The orange light of internet port lit on, green light
flashing, and the physical connection finished.
3. Internet Connection
Connection ways between internet camera and
computer, as picture 1.1 and picture 1.2 shown:
Picture 1.1 connect by internet cable
Picture 1.2 Connect by router /interchanger
4. IP camera visited/ controlled by
LAN
1. Setup IP address
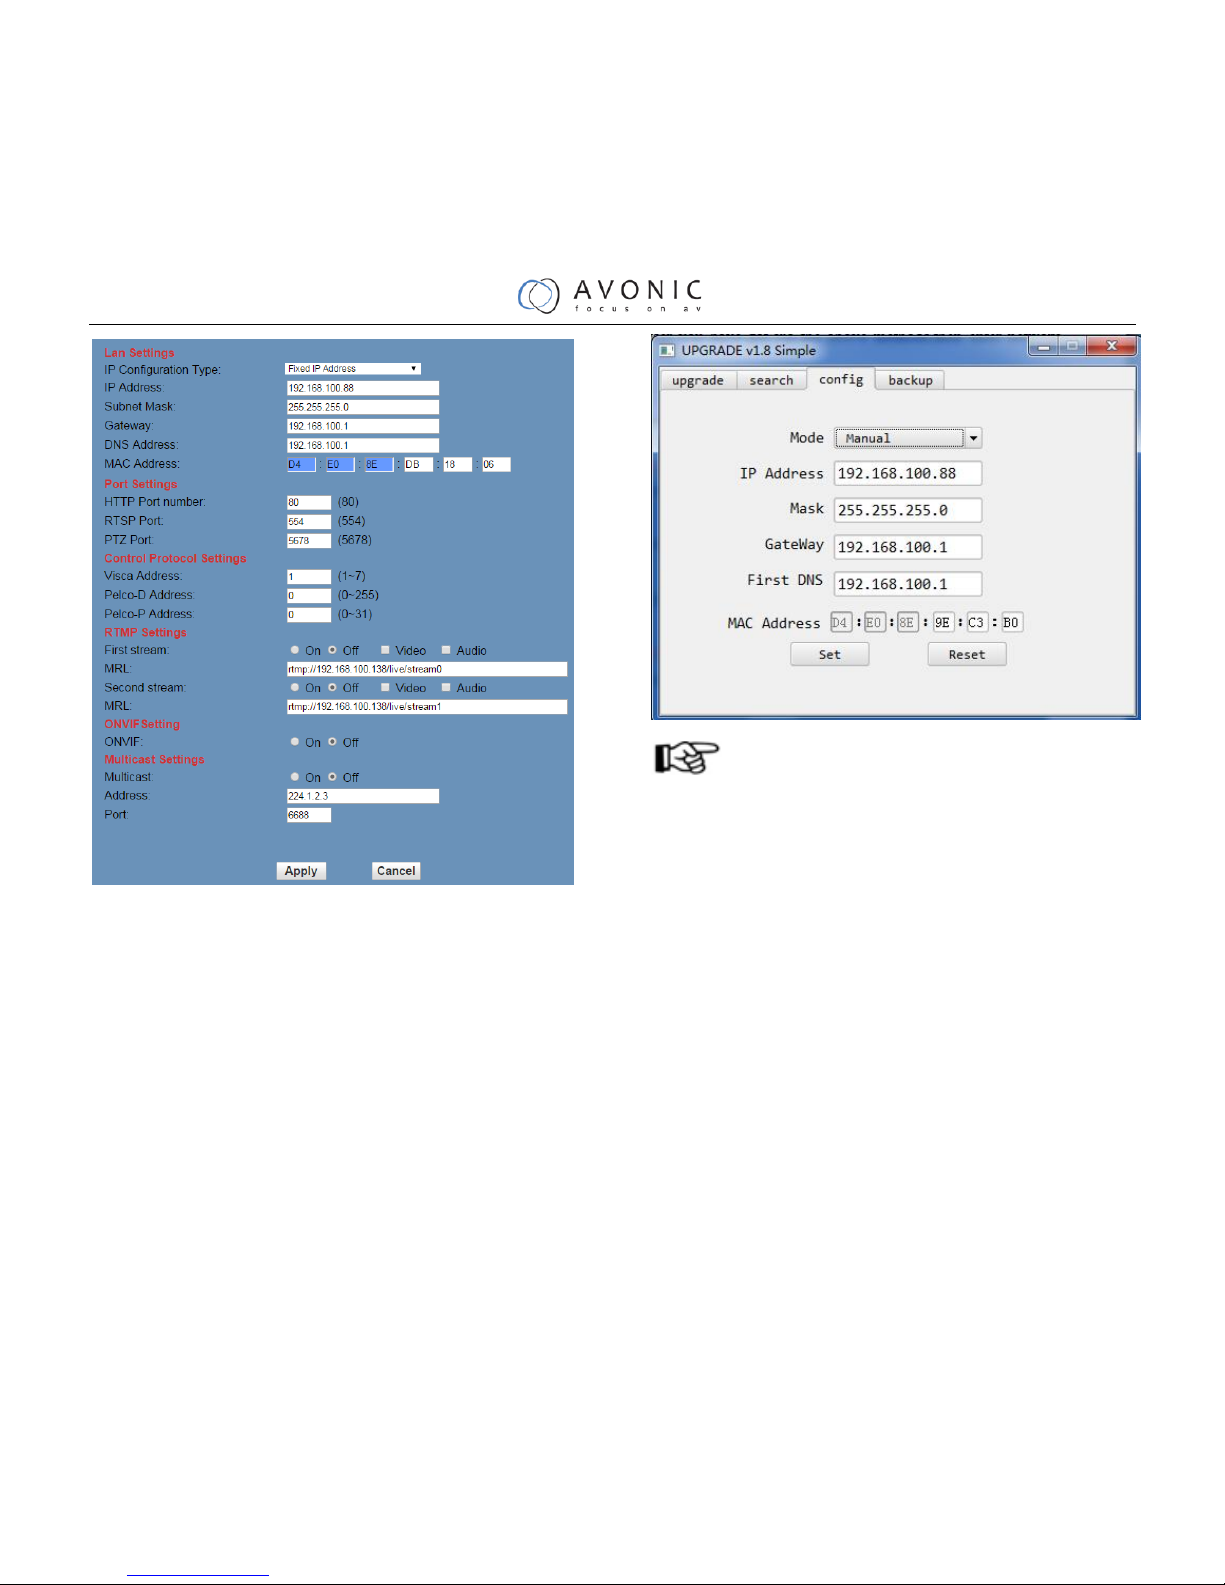
IP camera default IP address"192.168.100.88",
Unknow camera IP, view as below:
Method 1: press * and # and 4 on remote
controller one by one, the camera IP address will be
shown on screen.
Method 2: connect camera to PC with ethernet
cable, use “upgrade_En.exe” to search for IP address
Change IP address,2 methods as below:
Method 1: On web control page, find
“Network”--->Change IP---->Click “Apply”---->
Restart camera
Page 33
32
Method 2: Open “upgrade_En.exe”, change IP
and click “Set”. After modified, IP Camera be
restart.
NOTE!
IP camera default IP address"192.168.100.88",
user "admin", password "admin".
2. Visit/Access IP Camera
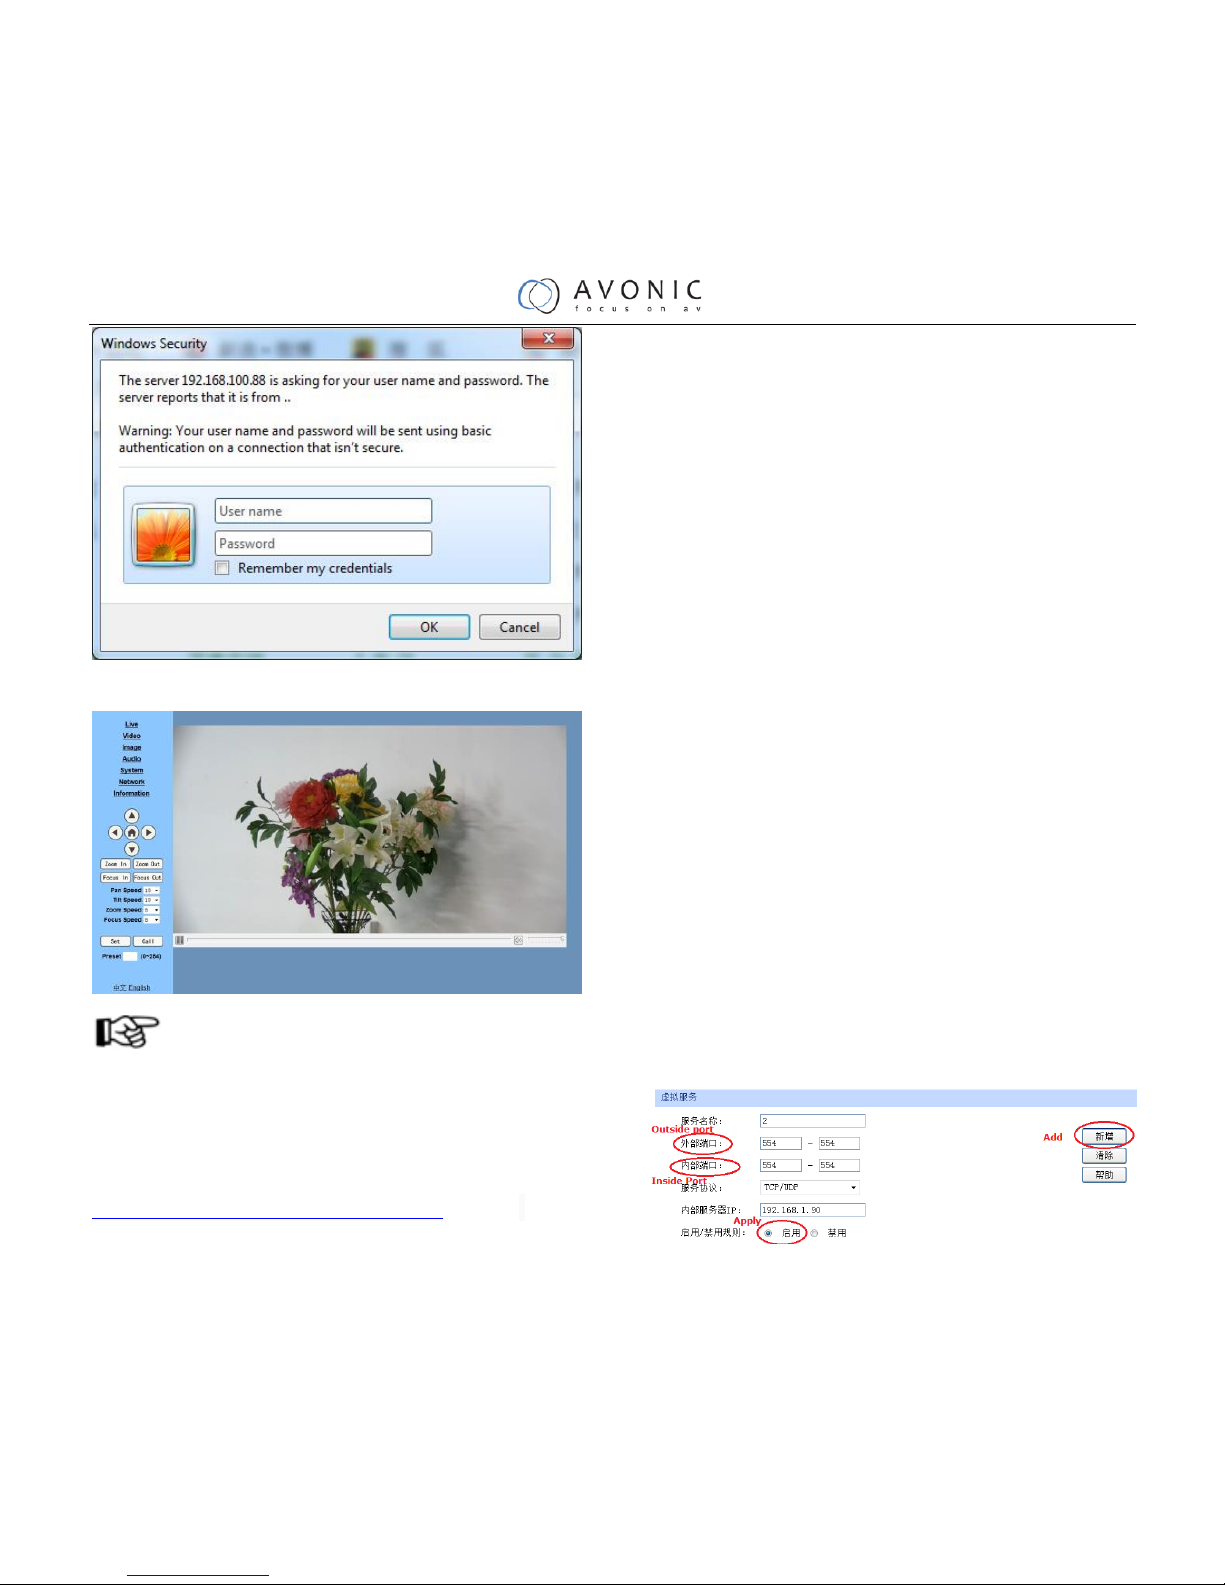
Input http://192.168.100.88 to IE ( better
with IE web browser, others will cause little
latency),a login window pop up, input login name:
admin, password: admin, shown as below:
Page 34
33
After login, shown as below:
NOTE!
If user first time use this camera by internet
(only for new user), must install a player software
(VLC). Please go to VLC webside
http://www.videolan.org/vlc,download and Install
VLC (player software). After installation, login
again,will show as above:
5. IP Camera accessed/controlled by
WAN (internet)
1. Setup IPC accessed/controlled by dynamic
DNS
2 dynamic DNS available:
Dyndns.org,
3322.org
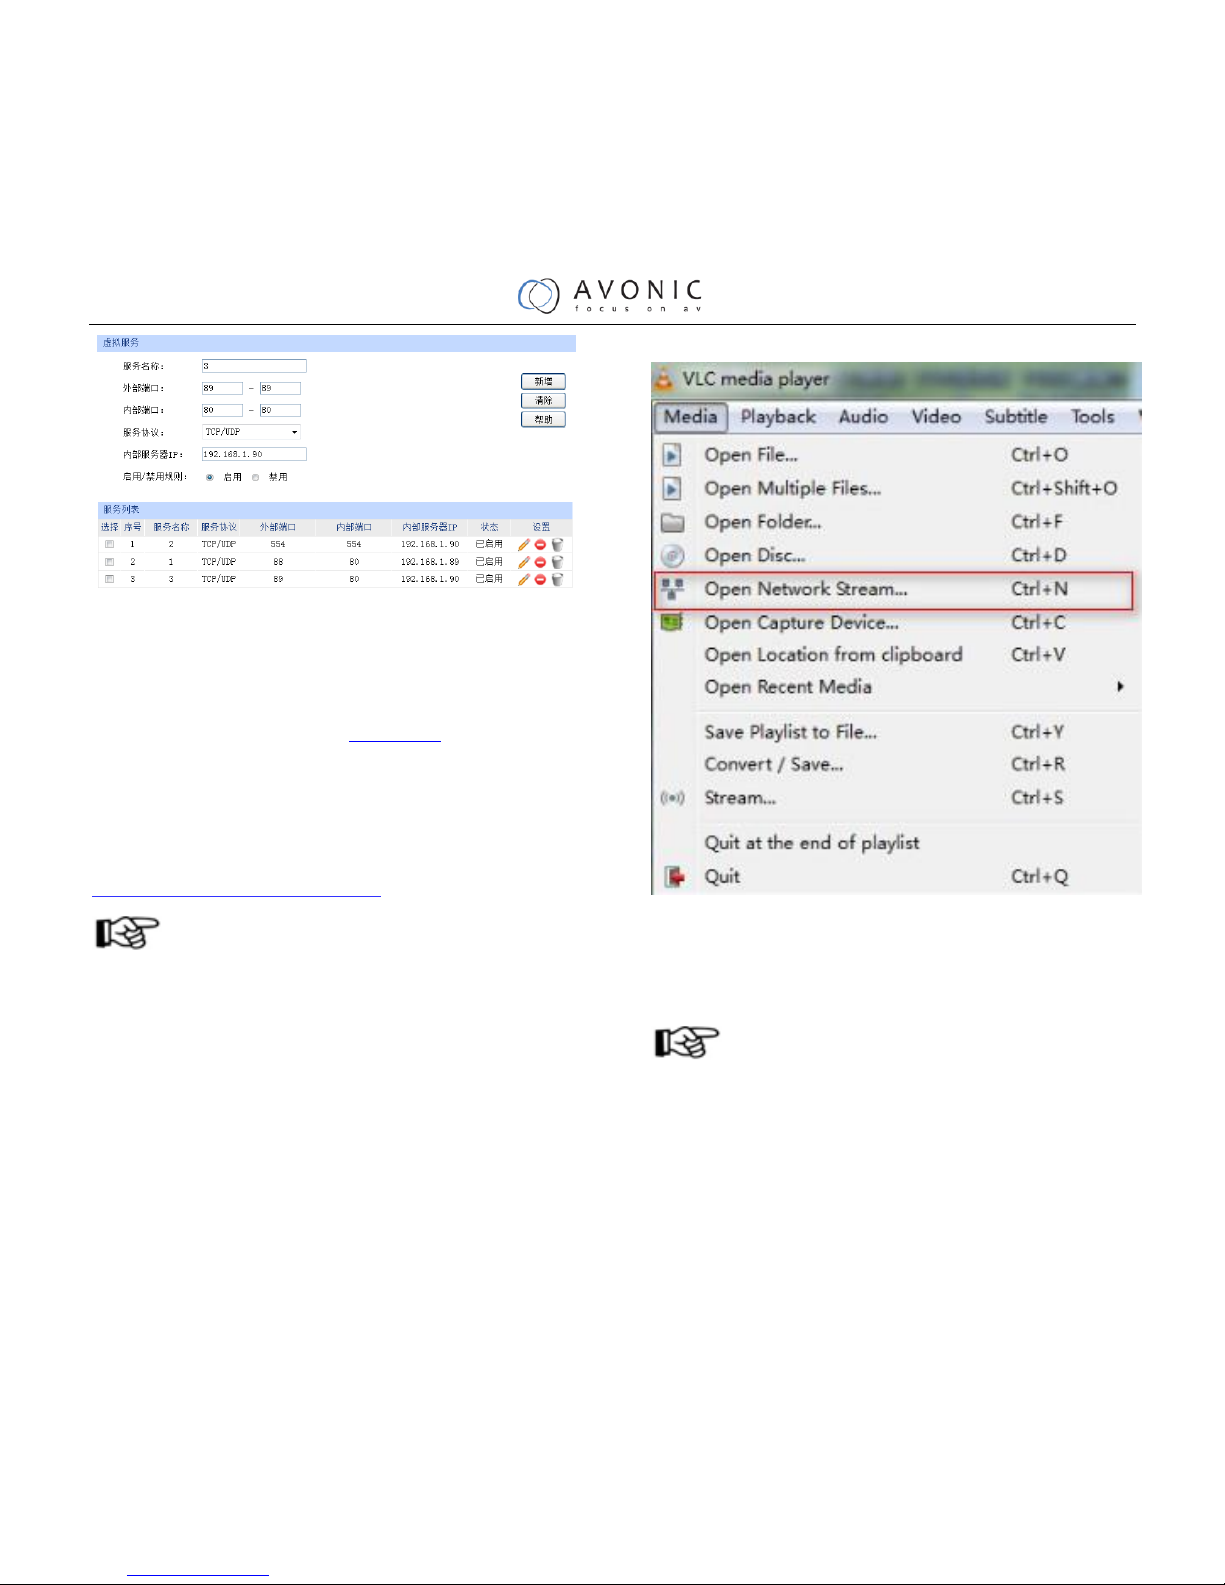
Router Port Mapping:
Take TP-LINK router for example, enter Router
Home Page (interface page),select “Transit control”“ Transit rule"--"Virtual server"-- “Virtual
service” ,add a new port number in “Outside
Port” ,add a new port number in “inside port”, put
camera IP address to “IP address”, then select
“Apply” and “Add”, shown as below: (sorry, we do
not have English Version TP-Link here, so put the
Chinese Version picture for reference, the position is
the same)
Page 35
34
2. Dynamic DNS visit camera
Set domain name to camera, setup the
parameter, then dynamic DNS can access
camera.Access link: http://hostname :port
numberFor example, setup host computer name:
youdomain.f3322.org, camera port number:
554,Access link should be:
http://youdomain.3322.org:554.
NOTE!
If camera port default as 80,then unnecessary to
input port number, use host name can access camera
directly .
3. VLC stream media player monitoring
Visit VLC media server procedure
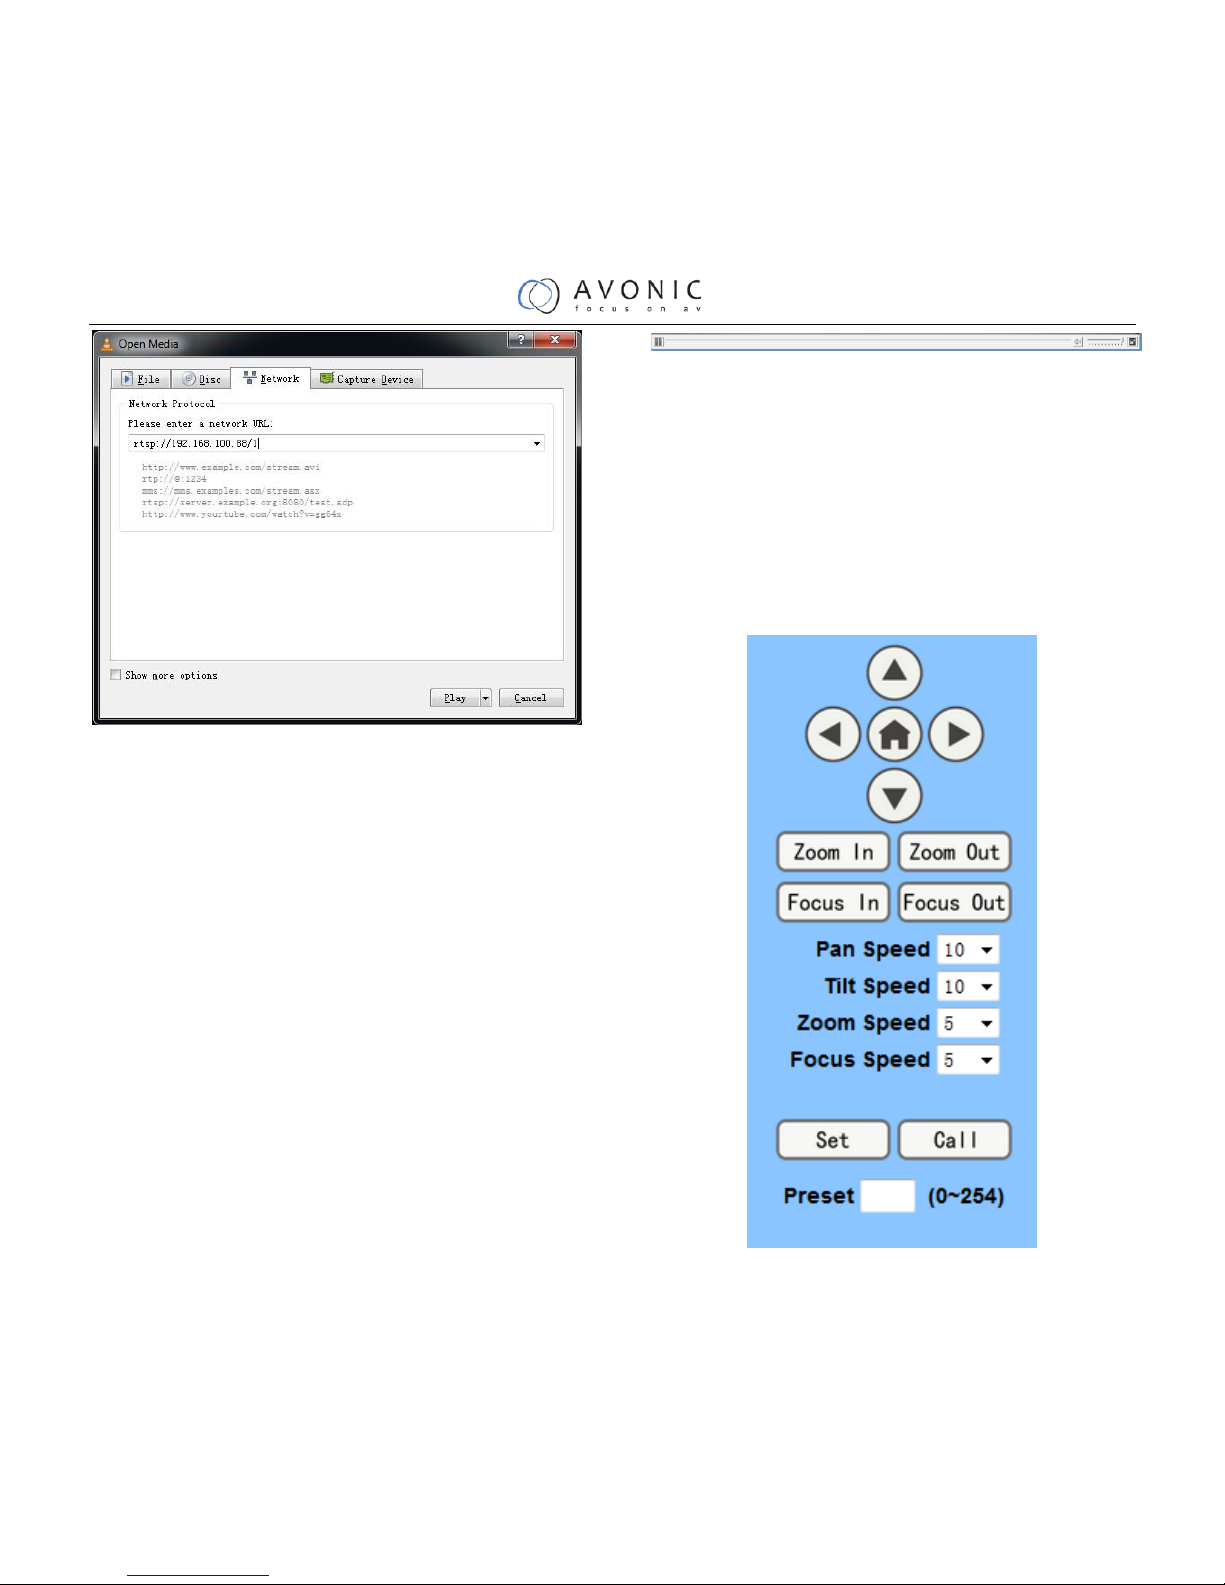
Open VLC media player, click
"Media"->"Open Network Steam", or click "Ctrl+N";
as below:
Input URL address:
rtsp://ip: port number/1 (Main stream);
rtsp://ip: port number/2 (Sub stream).
NOTE!
RTSP port number default 554.
Page 36
35
6. IP Camera parameter setup
1 Homepage introduction
Menu
All pages include 2 menu bars:
Real time monitoring: displaying video image
Parameter setup: with function buttons
1.1 Video viewing window
Video viewing window must be same as video
resolution, the bigger the resolution is, the bigger the
playing area is. Double click viewing window, will
show full-screen, double click again, will return to
initialized size.
Status bar in viewing window shown as
below
1) Video playback pause button: control
real-time video pause, stop the last picture, click
recoverable video again.
2) Audio control buttons: can set slient mode.
3) Full screen switch button.
1.2 PTZ Setup
1) PTZ direction control box: Up, down,
Page 37
36
left, right, home oblique button as above
2) Rate: Vertical speed can be chosen as
1 ~ 24, horizontal direction at the rate of 1 ~ 20.
3) select corresponding speed and click
direction button to realize PTZ speed up or speed
down.
4) Zoom In/Zoom out: for zooming in or zooming
out, Focus In/ Focus Out: Focusing on distant
objects or Focusing on close objects.
5) Set/Call: When PTZ turn to expected position,
can set up a number of preset that user want. click
"Set" button,when PTZ turn to other position, click
"Call" button,PTZ turn back to preset position.
1.3 Language selection
Chinese/English
2 Media
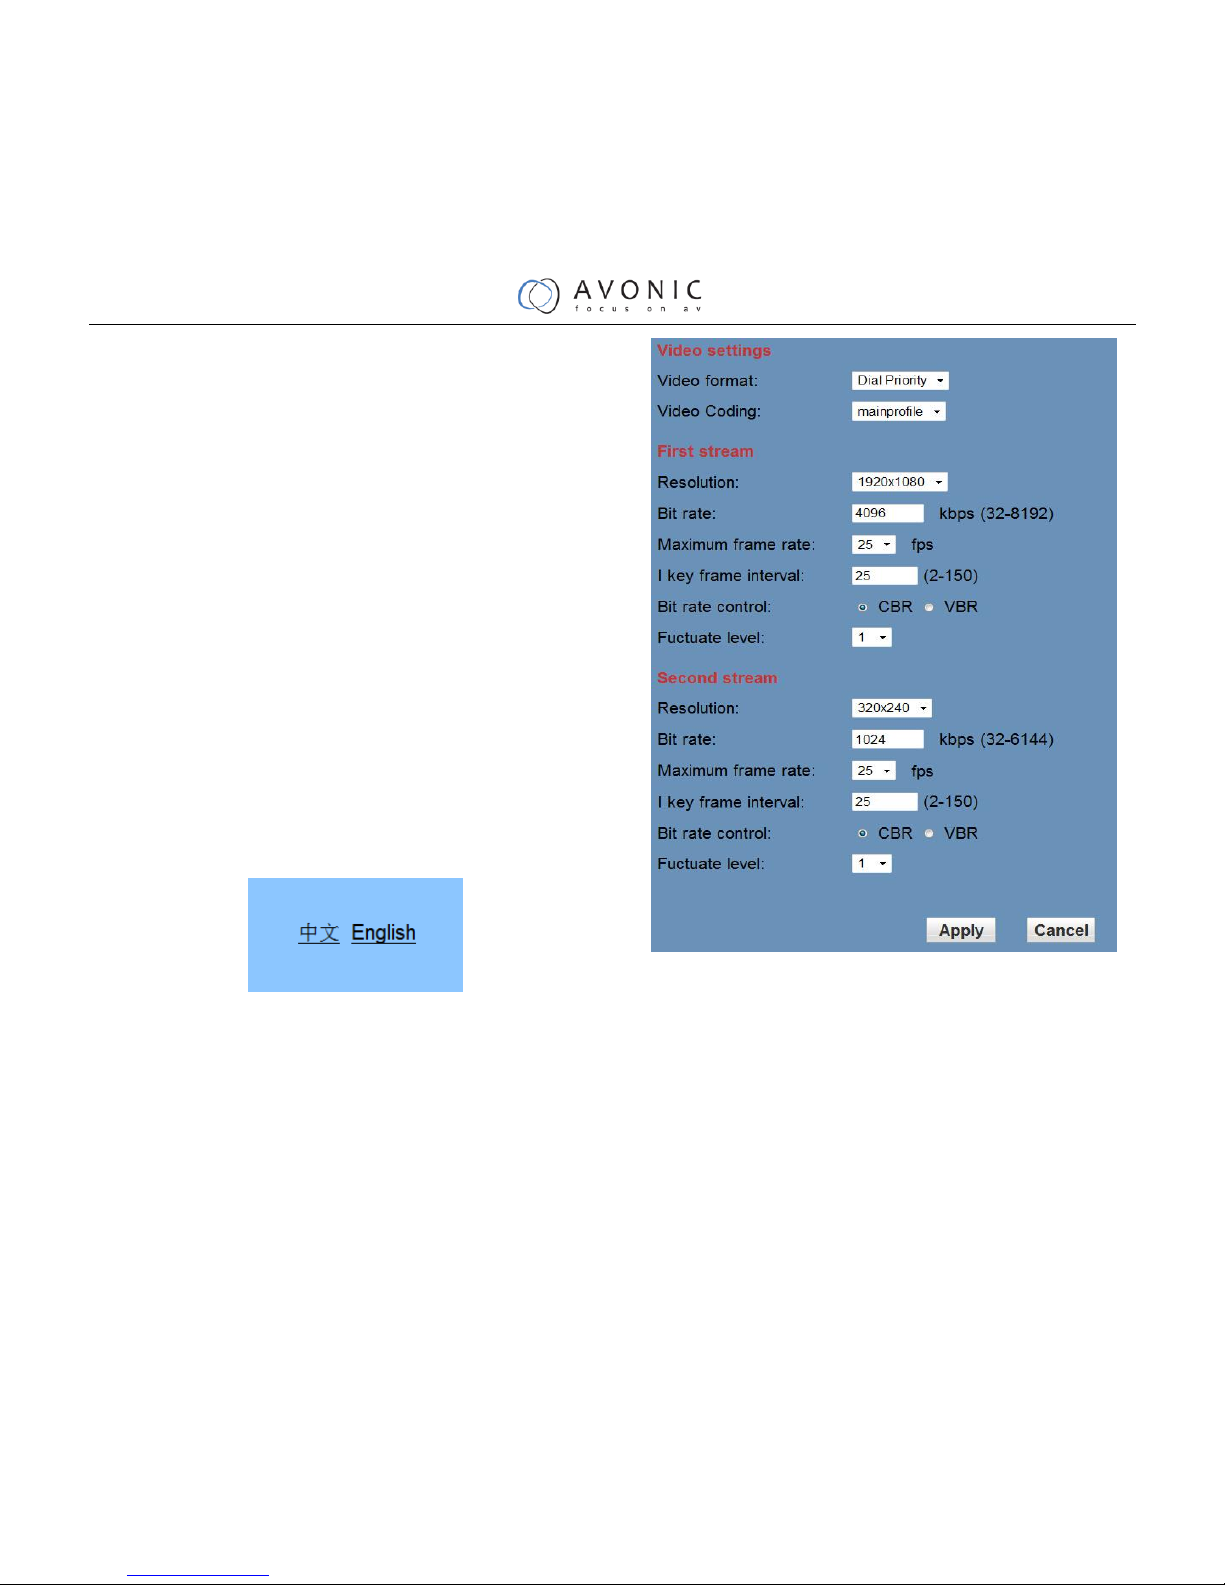
1) Video Setup,please click "Video"
2) Video format
Support 50HZ(PAL)and 60HZ(NTSC),
and Dial priority three formats.
3) Video Coding
Support baseline and mainprofile format
4) Resolution
Main bit flow support 1920x1080,
1280x720,minor bit flow support 640x360,
320x180,the bigger resolution is, the clearer the
Page 38

37
image will be, more network bandwidth will be
taken.
5) Bit Rate
User can assign bit flow/stream, normally
speaking, the bigger bit flow is, the clearer the
image will be. The bit allocation must combine with
network bandwidth, when the network bandwidth is
too narrow and the allocated bit flow is too big, will
cause video signal flow not to be transmitted
normally, the video effect will be worse.
6) Maximum frame rate
User can specify the size of the frame rate,
generally, the frame rate greater, the image more
smooth; Frame rate is smaller, the more sense of
beating.
7) Bit Rate control
Code stream control way:
Constant bit rate: video coder will be coding
according to preset speed
Variable bit rate: video coder will adjust the
speed based on preset speed to gain the best image
quality.
8) I key frame interval:
Set interval between 2 I frame, the bigger
interval is, the response will be lower from viewing
window.
9) dFluctuate level
Restrain the fluctuation magnitude of variable
rate, grade 1 ~ 6
3 Image Setup,please click “Image”
1) Brightness
Image bright 0~100, slider control, on the right
shows the corresponding numerical. Default 43.
2) Saturation
Page 39

38
Saturation 0~100, slider control, on the right
shows the corresponding numerical. Default 50.
3) Contrast
Contrast0~100, slider control, on the right
shows the corresponding numerical. Default 57.
4) Sharpness
Sharpness0~100, slider control, on the right
shows the corresponding numerical. Default 16.
5) Hue
Hue 0~100, slider control, on the right shows the
corresponding numerical. Default 50.
6) Distortion
Adjusted the wide-angle lens image distortion
occurs, controllable range 0 ~ 100, right shows the
corresponding numerical. Default 0.
7) Flip & Mirror
Tick Flip to realize image upside down, tick
mirror to realize image around the mirror. Default
not tick.
8) Button
Adjusting the parameters, press "apply" button to
save, press "cancel" button to cancel the adjustment
of the parameters, press "default" button obtain the
default value.
4 Audio Setup,please click “Audio”
1) Audio Type
Audio type AAC
2) Sample rate
Sample rate 44.1 K and 48 K,selectable.
3) Bit rate
Bit rate 96k,128k,256k,selectable
4) Input Type
line in only
5) Input VolL
The volume of the left channel
6) Input VolR
The volume of the right channel
7) Button
Press "apply" button to save parameters, press
"cancel" button to cancel parameter
Page 40
39
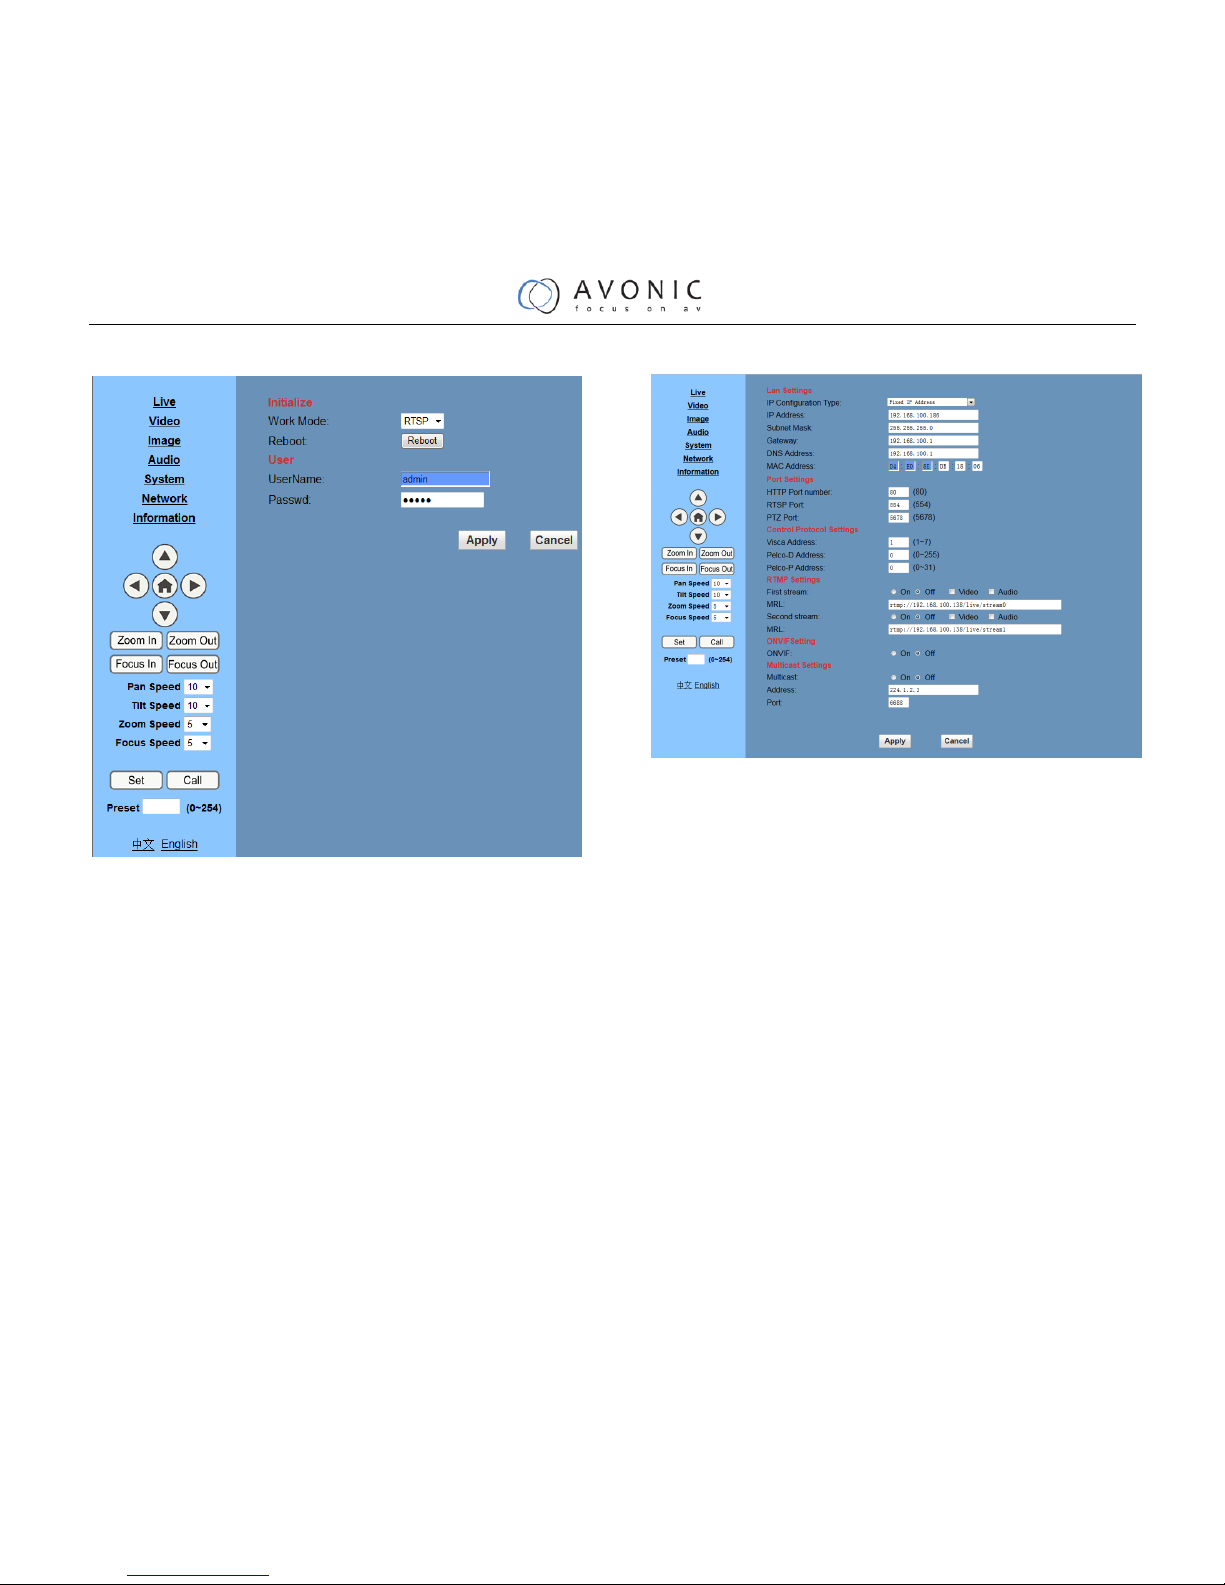
5 System Setting, please click “System”
1) Work Mode
Work Mode RTSP
2) Reboot
Click the "Reboot" button, system restart.
3) User and password
The user can modify the password (letters and
Numbers only)
4) Apply / Cancel
Modify password and click the "apply" button to
the login page, press "cancel" button to cancel
password change.
6 Network Setting,please click “Network”
1) Lan Settings
Default the IP address is 192.168.100.88, The
MAC address can be modified.
2) Port Settings
IP address identifies the network device, the
device can run multiple web applications, each
network program using network port to transmit data,
so data transmission to be carried out between the
port and port. Port setting is to set up WEB
SERVER program using which port to transmit.
When port mapping, need to be consistent with the
port number(default port: 80)
3) RTSP Port
Network camera support RTSP protocol, use the
Page 41
40
VLC tools broadcast.
4) TCP Port
Support TCP protocol, default port: 5678.
5) Apply / Cancel
Modify network parameters then press "Apply"
button to modify network parameters, press
"Cancel" button to cancel network parameters.
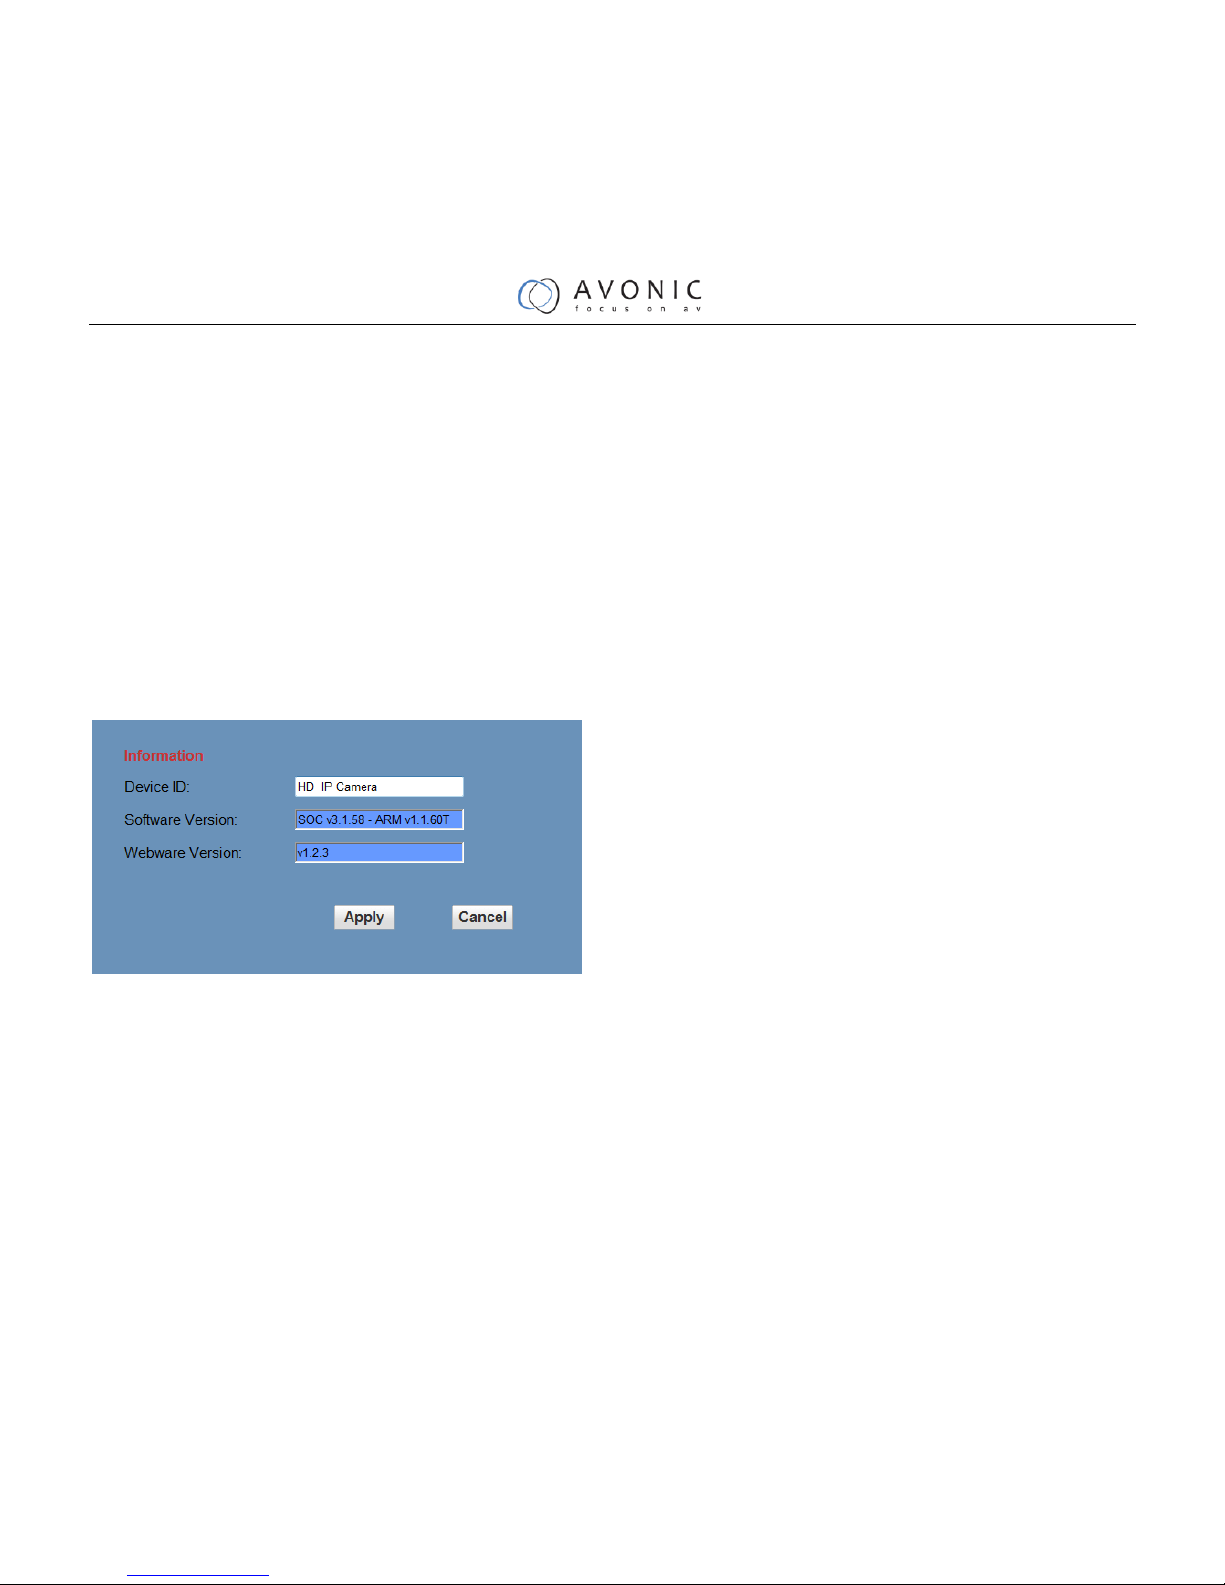
7 Device Information,please click “information”
Show the current device information, as shown
below.
7. Download the Network upgrade
program
IF you need the camera upgrade program, please
contact the manufacturer.
Page 42

41
Maintenance and Troubleshooting
Camera Maintains
If camera will not be used for a long time, please turn off the power switch, disconnect AC power cord
of AC adaptor to the outlet.
Use soft cloth or tissue to clean the camera cover.
Please use the soft dry cloth to clean the lens. If the camera is very dirty, clean it with diluted neuter
detergent. Do not use any type of solvents, which may damages the surface.
Unqualified Application
No shooting extreme bright object for a long period of time, such as sunlight, light sources, etc.
No operating in unstable lighting conditions, otherwise image will be flickering.
No operating close to powerful electromagnetic radiation, such as TV or radio transmitters, etc.
Troubleshooting
Image
No image
1. Check whether the power cord is connected, voltage is OK, POWER lamp is light.
2. Check whether the camera can self-test after startup.
3. Check the BOTTOM switch and make sure the two switches are both set OFF.
4. Check video cable is connected correctly.
Abnormal display of image
Check video cable is connected correctly.
Image dithering even at widest zoom position
1. Check whether camera is fixed correctly.
2. Make sure if there are something like vibration machine or other things nearby.
Page 43

42
IE browser not video image IE
When IPC first time accessed by Internet Explore (IE or other web browser),must install plug-in.
User first time use this camera by internet (only for new user), must install a player software (VLC).
Please go to VLC webside http://www.videolan.org/vlc,download and Install VLC (player software).
After installation,login again, will show image, the video image is displayed.
Unable to access IP Camera by IE browser.
1. Access to the network with PC can test whether network works, in this way to get rid of cable failure,
network failure caused by PC virus until the PC can be Ping.
2. Disconnect IP Camera with network, IP Camera and PC are connected, according to the proper operations
to re-set the IP address.
3. Check the server's IP address and subnet mask and gateway address.
4. MAC addresses conflict.
5. Web port is occupied by other devices.
When modify IP address in an incorrect way cause the wrong IP address or forget web passwords,
press the IR remote controller "[*]+[ # ]+[Manual]" to restore the default value (Default IP:
192.168.100.88 Default username: admin Default password: admin)
Control
IR remote controller cannot control the camera
1. Change the battery
2. Check the camera working mode.
3. Check IR address of the Remote Commander is set correctly.
Serial communication cannot control the camera
1. Check the camera working mode.
2. Check control cable is connected correctly.
Page 44

43
Copyright Notice
All contents of this manual, whose copyright belongs to our Corporation. Cannot be cloned, copied or
translated without the permission of the company. Product specifications and information which were referred to
in this document are for reference only, and the content will be updated at any time without prior notice
2015/4
 Loading...