

Page 1
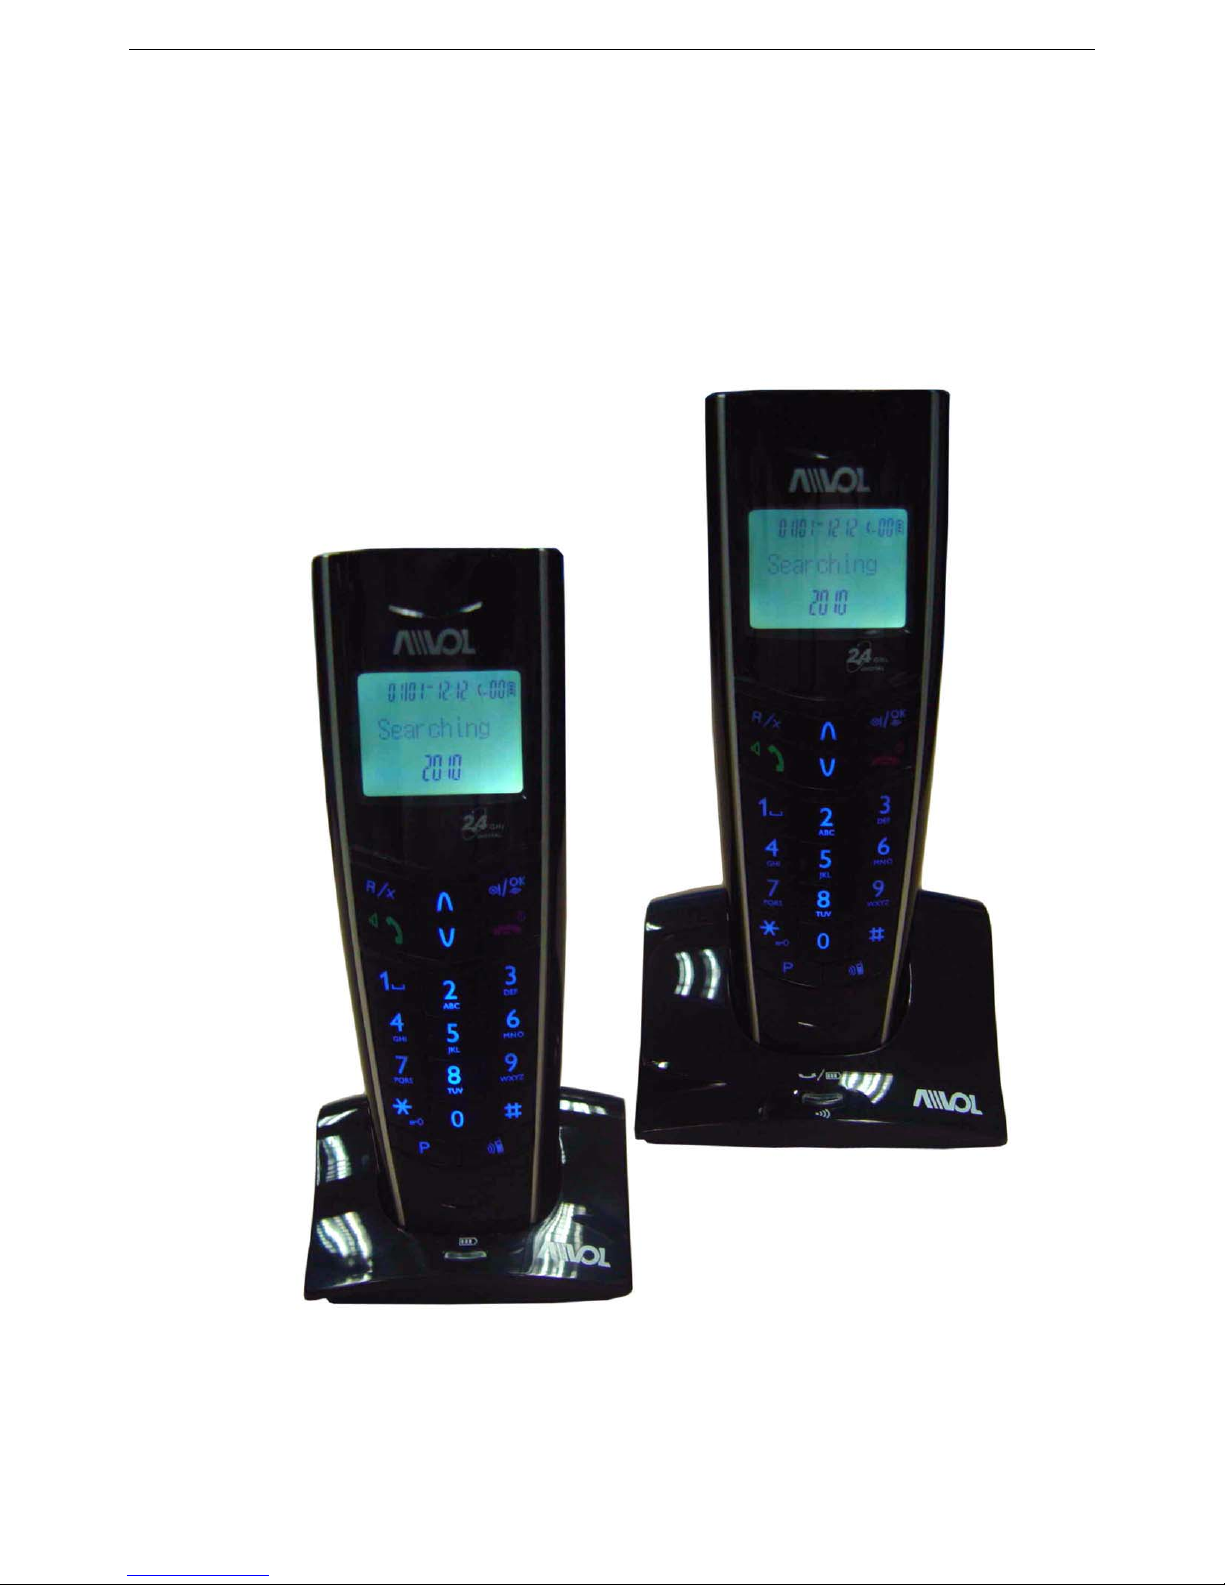
WP800 2.4GHz
Digital Cordless Phone
User’s Manual
Thank you for your purchase. Please read this manual carefully before use.
* Note: Caller ID function is not available in Japan
1
Page 2

CONTENTS
T1. FUNCTION FEATURES .......................................................................................................................................4
2. BASE AND HANDSET KEY FUNCTION .............................................................................................................5
2.1 BASE KEY FUNCTION........................................................................................................................................5
2.2 HANDSET KEY FUNCTION................................................................................................................................5
3. DURING STANDBY MODE , HANDSET DISPLAY ......................................................................................5
3.1 HANDSET DISPLAY STATE................................................................................................................................5
3.2 MENU STRUCTURE.............................................................................................................................................5
4. MENU SETTING.....................................................................................................................................................8
4.1 BASE FUNCTION SETUP....................................................................................................................................8
4.1.1 Dial Mode Setting................................................................................................................................................8
4.1.2 Flash time setting.................................................................................................................................................8
4.1.3 Local code setting................................................................................................................................................9
4.1.4 Area code setting................................................................................................................................................10
4.1.5 Change PIN code setting....................................................................................................................................10
4.1.6 Default operation................................................................................................................................................11
4.2 HS FUNCTION SETUP .......................................................................................................................................12
4.2.1 Internal ring tone and ring volume setting.........................................................................................................12
4.2.2 External ring tone and ring volume setting........................................................................................................13
4.2.3 Key Tone setting ............................................................................................................................... .................14
4.2.4 Time&Alarm setting..........................................................................................................................................14
4.2.4.1 Date Format setting.........................................................................................................................................14
4.2.4.2 Tim e Format setting............................................................................................................................... .........14
4.2.4.3 Tim e setting.....................................................................................................................................................15
4.2.4.4 Alarm clock 1 setting ......................................................................................................................................16
4.2.4.5 Alarm clock 2 setting ......................................................................................................................................17
4.3 LANGUAGE SETTING.......................................................................................................................................17
4.4 LCD CONTRAST SETTING...............................................................................................................................17
4.5 VOICE CALL SETTING......................................................................................................................................18
4.6 AUTO ANSWER SETTING.................................................................................................................................18
4.7 DEFAULT OPERATION......................................................................................................................................19
5. REGISTRATION....................................................................................................................................................20
5.2 REGISTER AND DEREGISTER HANDSET.....................................................................................................20
5.2.1 Register Handset................................................................................................................................................20
5.2.2 Deregister...........................................................................................................................................................21
5.2.3 Deregister all handset on base............................................................................................................................22
6. DIAL/ANSWER CALLS .......................................................................................................................................22
6.1 TO DIAL A CALL................................................................................................................................................22
6.2 TO ANSWER A CALL.........................................................................................................................................22
6.2.1 To answer a call under normal operation...........................................................................................................22
6.2.2 To answer a call under auto-answer activated situation .....................................................................................23
6.3 FLASH FUNCTION.............................................................................................................................................23
6.4 PRE-DIALING FUNCTION ................................................................................................................................23
6.5 REDIAL FUNCTION...........................................................................................................................................23
6.6 T ALK VOLUME ADJUST...................................................................................................................................23
2
Page 3

6.7 CONVERSATION FROM TALK MODE TO SPEAK MODE ...........................................................................23
6.8 INTERCOM FUNCTION.....................................................................................................................................23
6.9 TRANSFER FUNCTION OPERATION ..............................................................................................................24
6.10 CONFERENCE FUNCTION OPERATION ......................................................................................................24
6.11 MUTE FUNCTION............................................................................................................................................24
6.12 OUTGOING CALL REVIEWING/REDIAL/STORE/DELETE.......................................................................24
6.12.1 Outgoing call reviewing............................................................................................................................... ....24
6.12.2 Outgoing call redialing.....................................................................................................................................24
6.12.3 Outgoing call store...........................................................................................................................................25
6.12.4 Outgoing call delete .........................................................................................................................................25
6.13 RECEIVED CALL REVIEWING/CALL-BACK/STORE/DELETE ................................................................25
6.13.1 Received call reviewing...................................................................................................................................25
6.13.2 Call back ..........................................................................................................................................................26
6.13.3 Received call store...........................................................................................................................................26
6.13.4 Received call delete .........................................................................................................................................27
6.14 PHONE BOOK FUNCTION..............................................................................................................................27
6.14.1 To review Phonebook memory ........................................................................................................................27
6.14.2 To add phone book memory.............................................................................................................................27
4.14.3 Character comparison.......................................................................................................................................28
6.14.4 To edit Phonebook memory.............................................................................................................................28
6.14.5 To delete one group Phonebook memory.........................................................................................................29
6.14.6 To delete all Phonebook memory.....................................................................................................................29
6.14.7 Phone book dialing...........................................................................................................................................30
7.OTHER FUNCTION...............................................................................................................................................30
7.1 PAGE FROM BASE TO HANDSET ...................................................................................................................30
7.2 KEYPAD LOCK ON/OFF FUNCTION...............................................................................................................30
7.3 NEW MESSAGE INDICATION..........................................................................................................................30
7.3.1 Delete message...................................................................................................................................................30
7.4 OUT OF RANGE ALARM ..................................................................................................................................31
7.5 HANDSET ON/OFF FUNCTION........................................................................................................................31
3
Page 4

1. FUNCTION FEATURES
2.4GHz frequency band digital enhanced cordless phone.
HANDSET LCD: 66*11 Dots Matrix. 14 digits display
Maximum 3 handsets are linked to the same base unit
Multi Language(English, Spanish, Korean)
CID Voice call function.
2 groups alarm clock function
Time format: 12 hour and 24 hour
Local code and area code function.
Tone and pulse dial select function
Pre-dialing function (32 digits)
40 groups Phonebook memory
40 groups Caller ID memory (number and name)
10 groups Outgoing Call memory
Audio setup that includes 15 melodies each for internal and external ring, 5 steps digital volume adjustment
4 steps digital volume adjustment for earpiece and speaker
Flash time(100ms, 300ms, 600ms, 1000ms)select
Redial function (32 digits)
FSK & DTMF dual Caller ID system
* Note : Caller ID function is not available in Japan
Call Waiting function
One handset transfer to other handset function.
Conference call between external call and two handsets
Intercom between two handsets
Key pad lock function
Mute function
Voice mail function
Battery low alarm and out of range alarm function
Power ON/OFF;
HS Default
4
Page 5
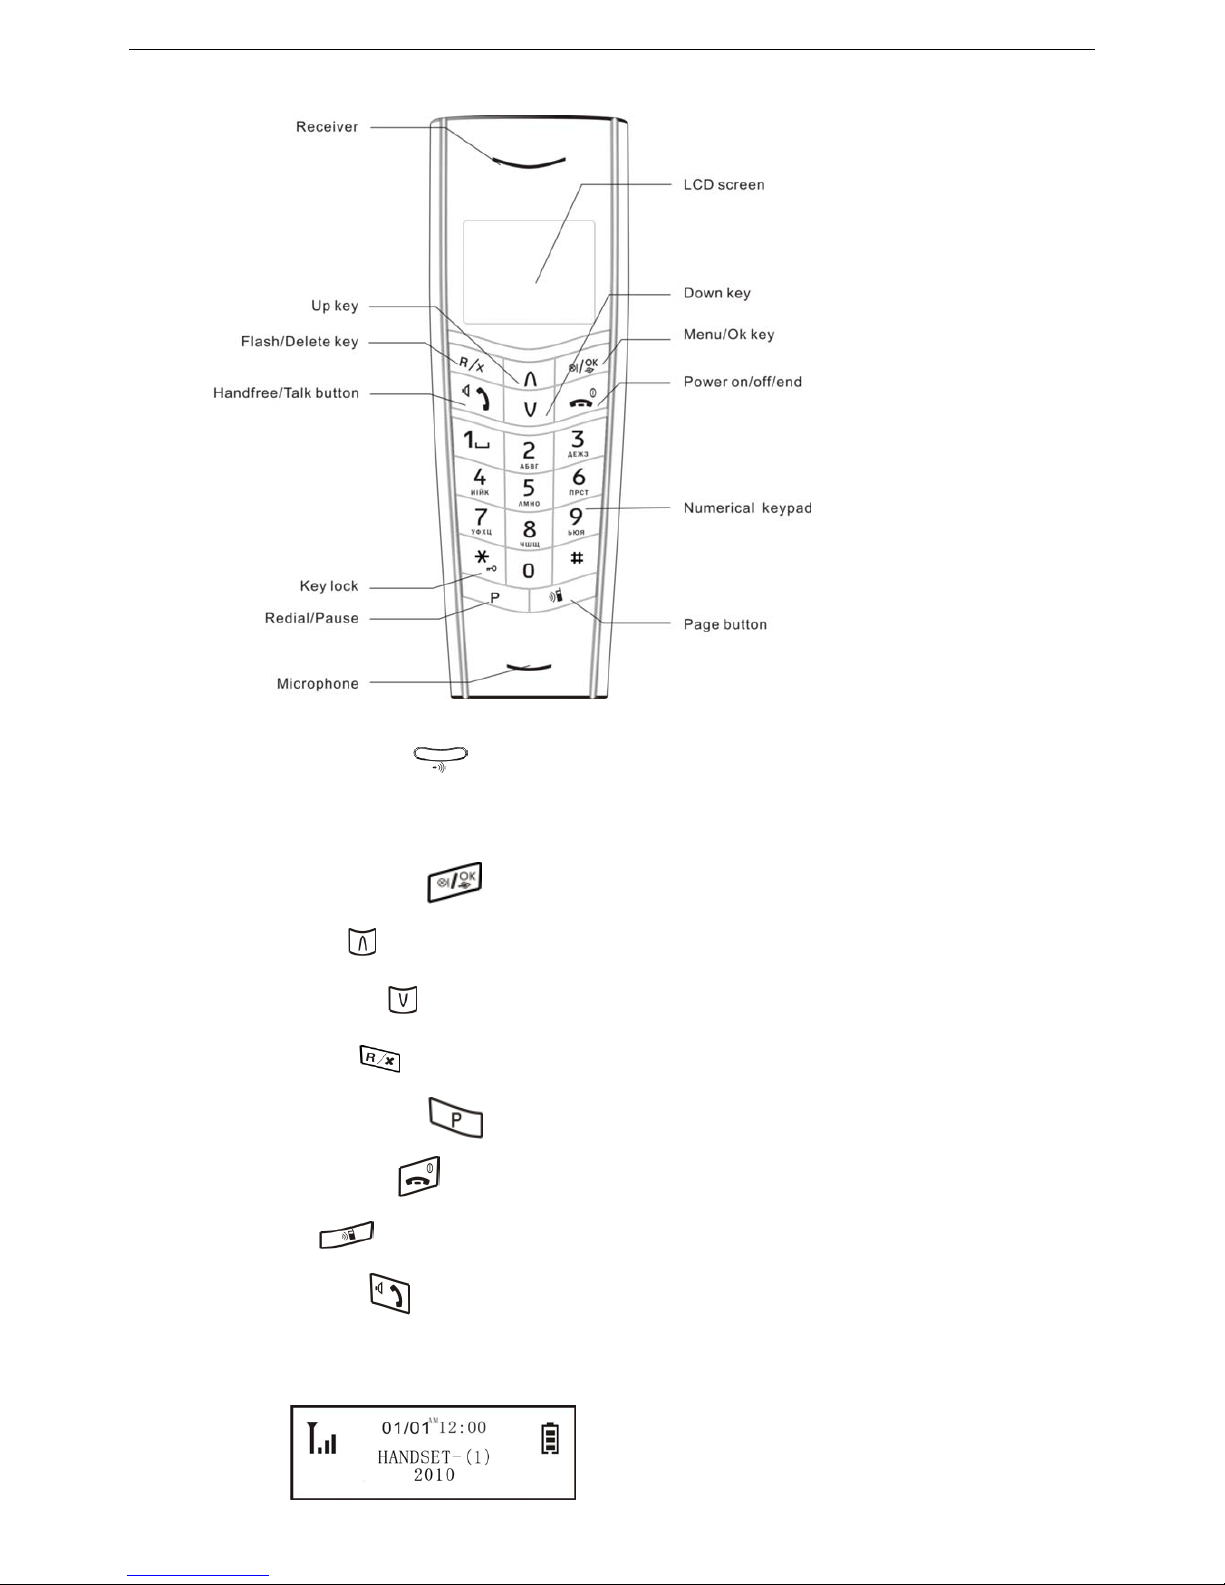
2. BASE AND HANDSET KEY FUNCTION
2.1 BASE KEY FUNCTION
Page / Register key :
2.2 HANDSET KEY FUNCTION
DIAL NUMBER KEY:1,2,3,4,5,6,7,8,9,*,0,#.
MENU/OK/MUTE key :
UP/CID key :
DOWN/OUT key :
FLASH/C key :
REDIAL/PAUSE key :
EXIT/POWER key :
INT key :
TALK/HF key :
3. DURING STANDBY MODE, HANDSET DISPLAY .
3.1 HANDSET DISPLAY STATE
5
Page 6
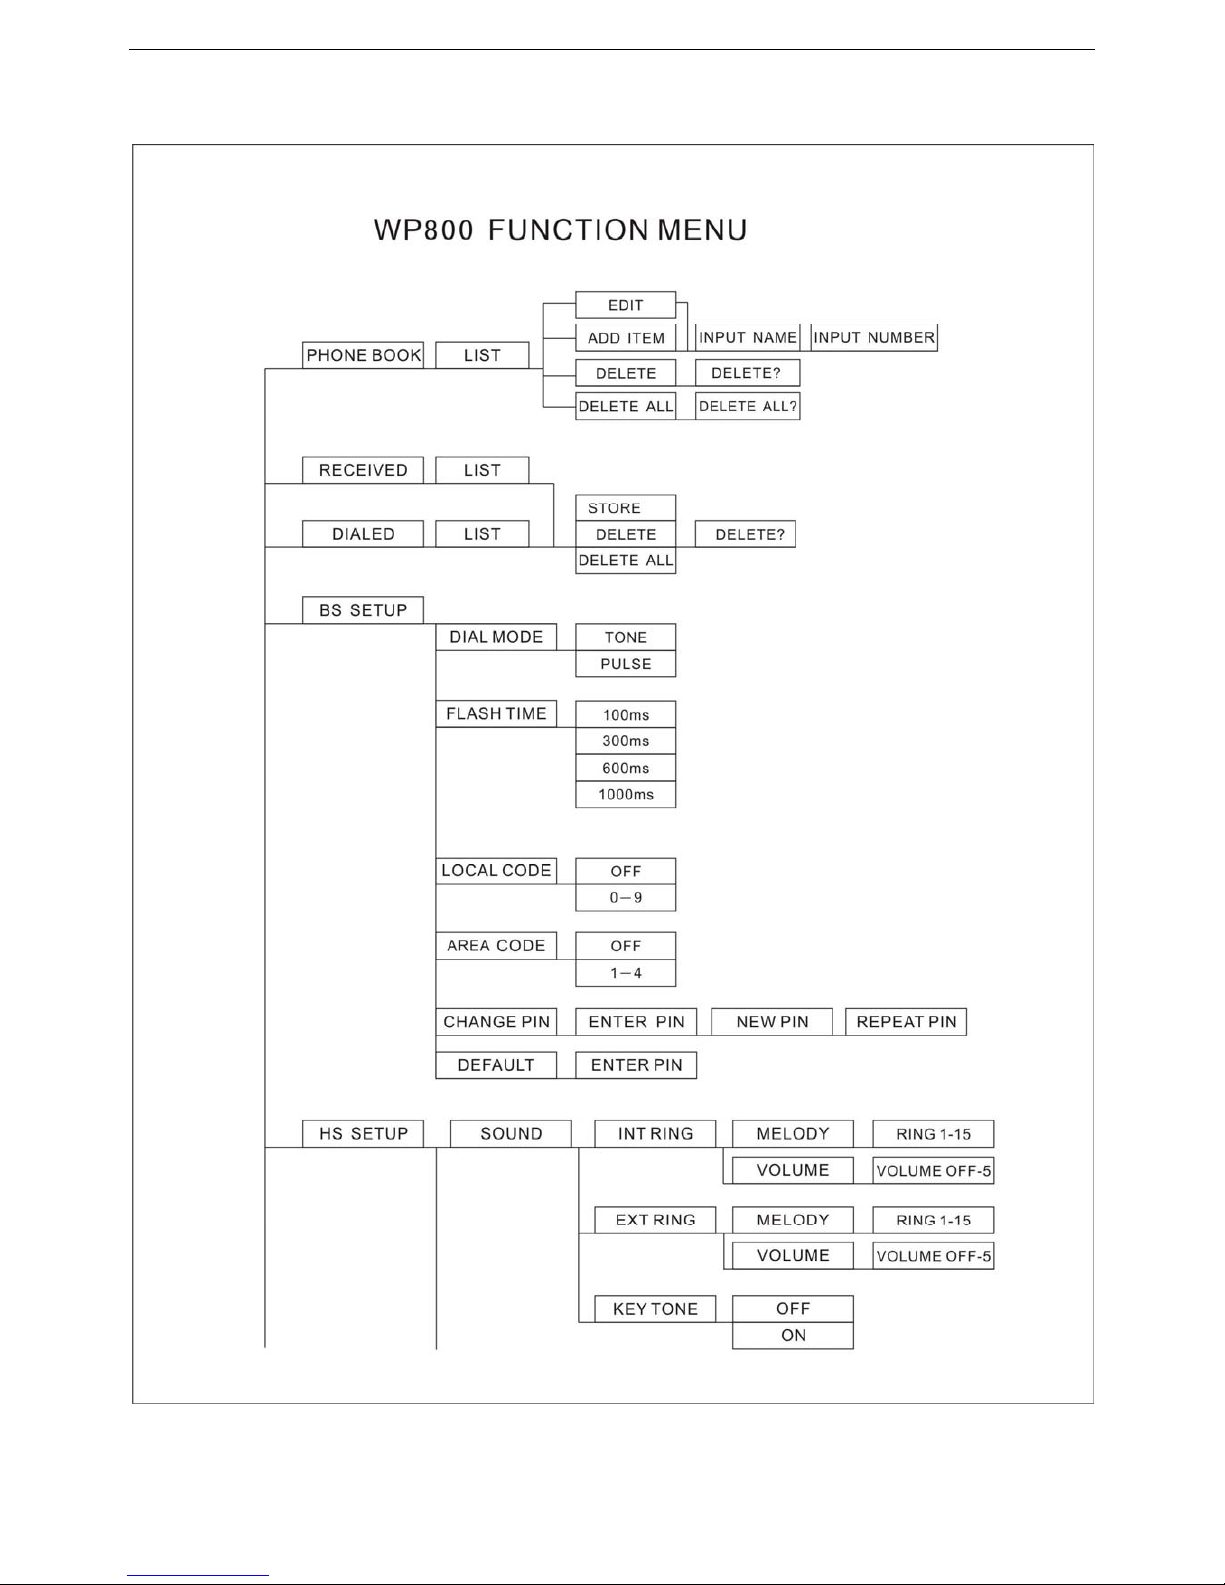
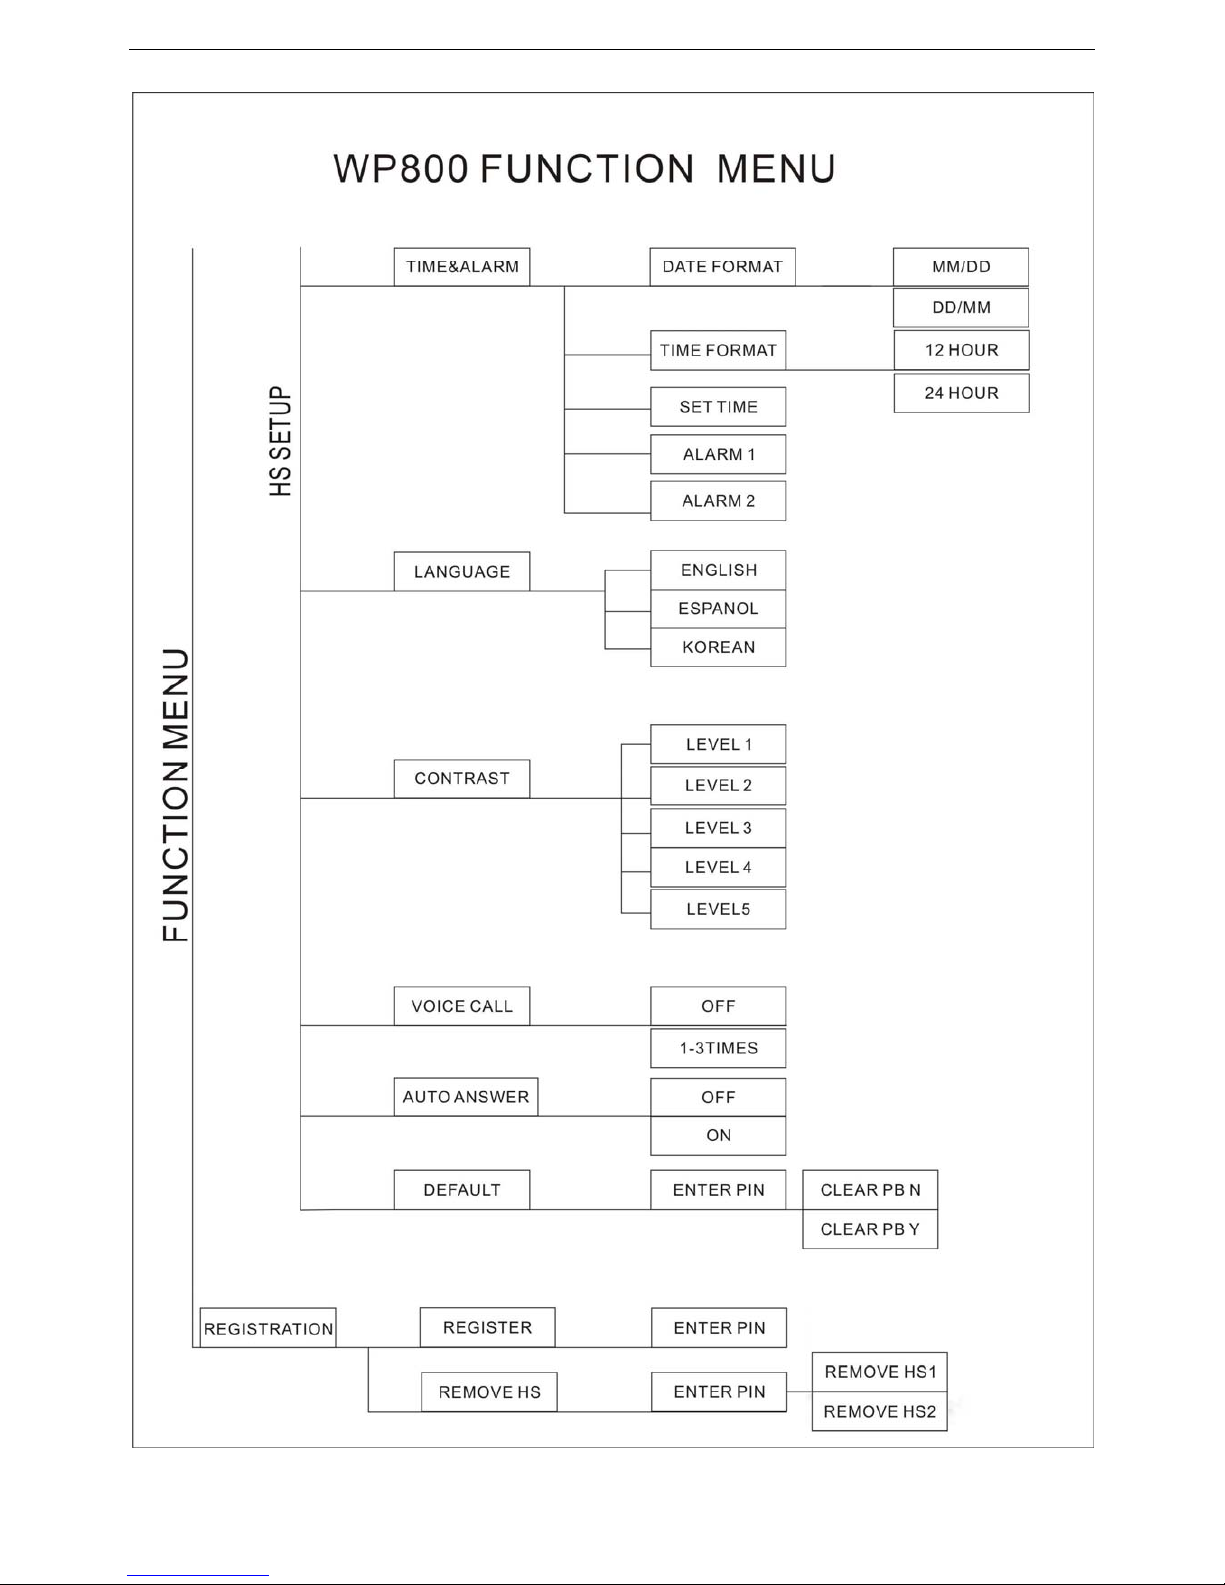
3.2 MENU STRUCTURE
6
Page 7
7
Page 8
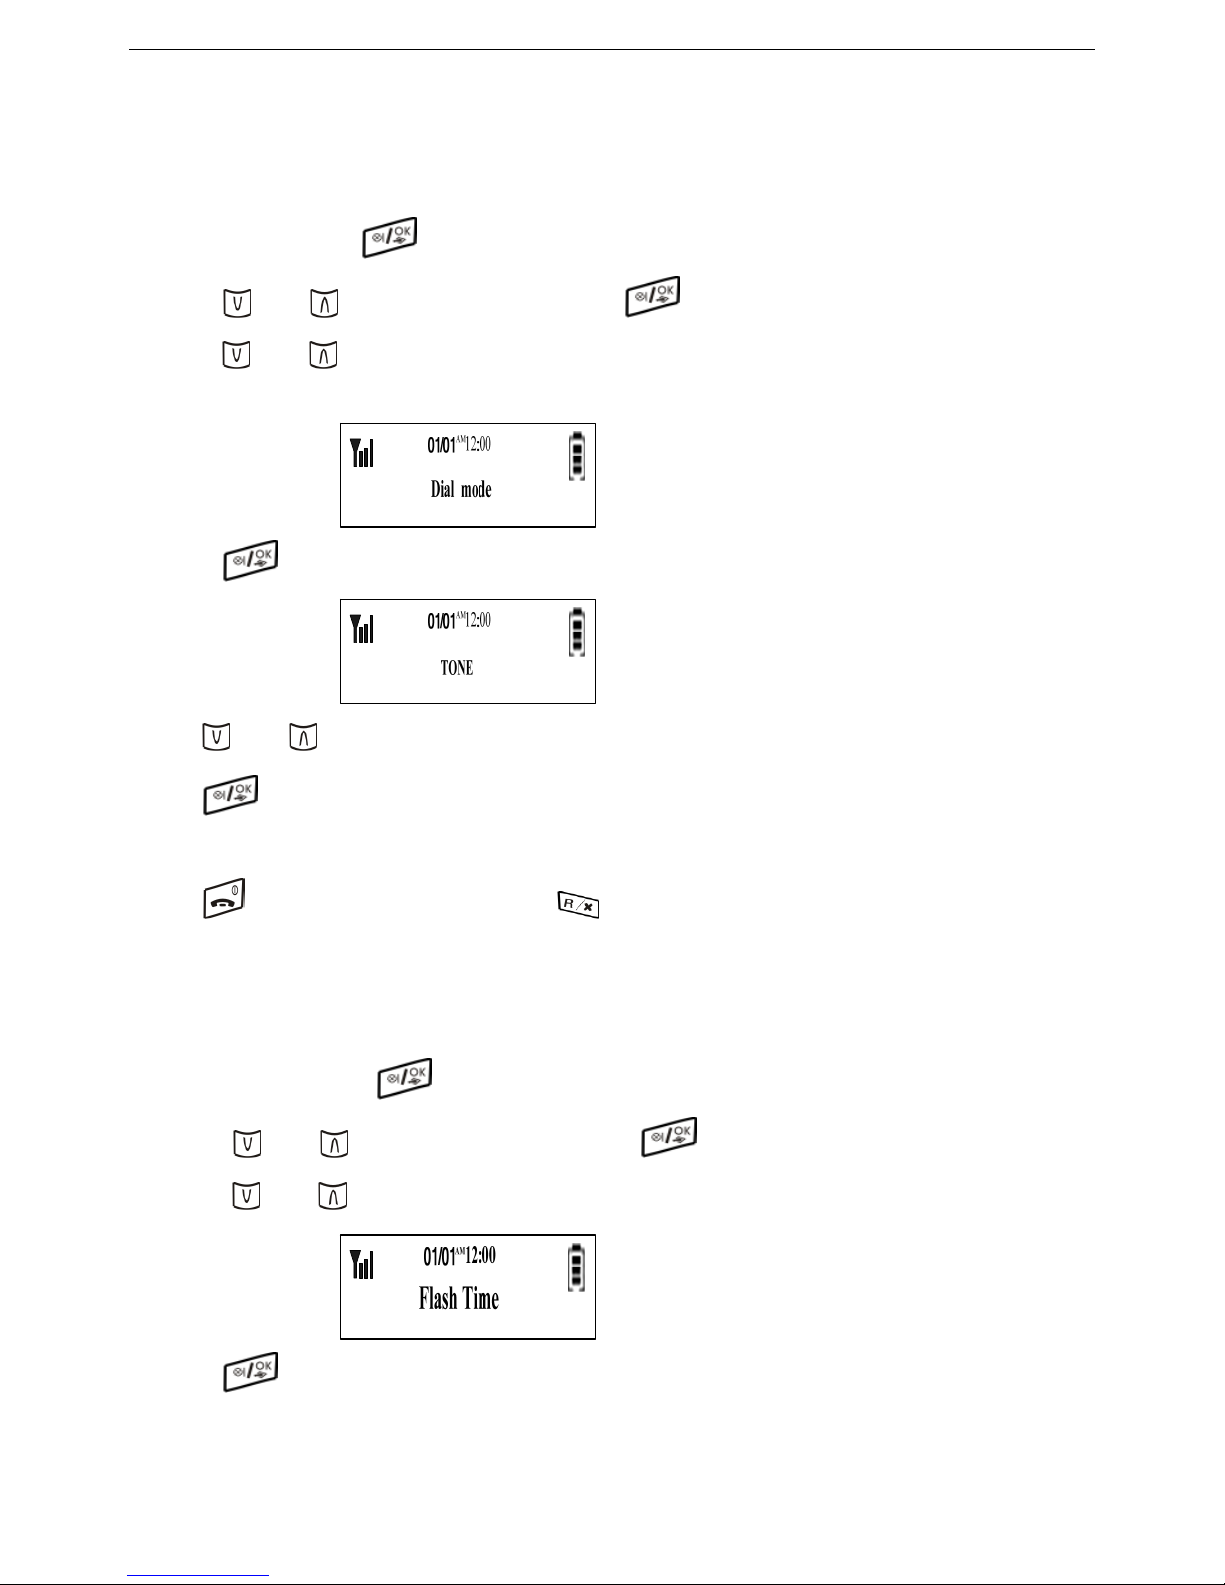
4. MENU SETTING
4.1 BASE FUNCTION SETUP
4.1.1 DIAL MODE SETTING
Factory default for Dial Mode is Tone.
a. In standby mode, press
key to enter setting mode.
b. Press
key or key to select “BS Setup” and press key to confirm.
c. Press
key or key to select “Dial mode”,LCD will show as following:
d. Press
key to confirm. LCD will show as following:
e. Press
key or key to select ‘Tone’ or ‘Pulse’.
Press
key to confirm and return to “Dial Mode”. After the sound of “di du” heard, it indicates that the setting
is done.
Press key to return to standby mode or press key to return to “BS Setup”menu.
4.1.2 FLASH TIME SETTING
User can select Flash time (100ms, 300ms, 600ms, 1000ms).
Factory default for Flash Time is 600ms.
a. In standby mode , press
key to enter setting mode.
b. Press
key or key to select “BS Setup” and press key to confirm.
c. Press
key or key to select “Flash Time”, LCD will show as following:
d. Press
key to confirm, LCD will show as following:
8
Page 9
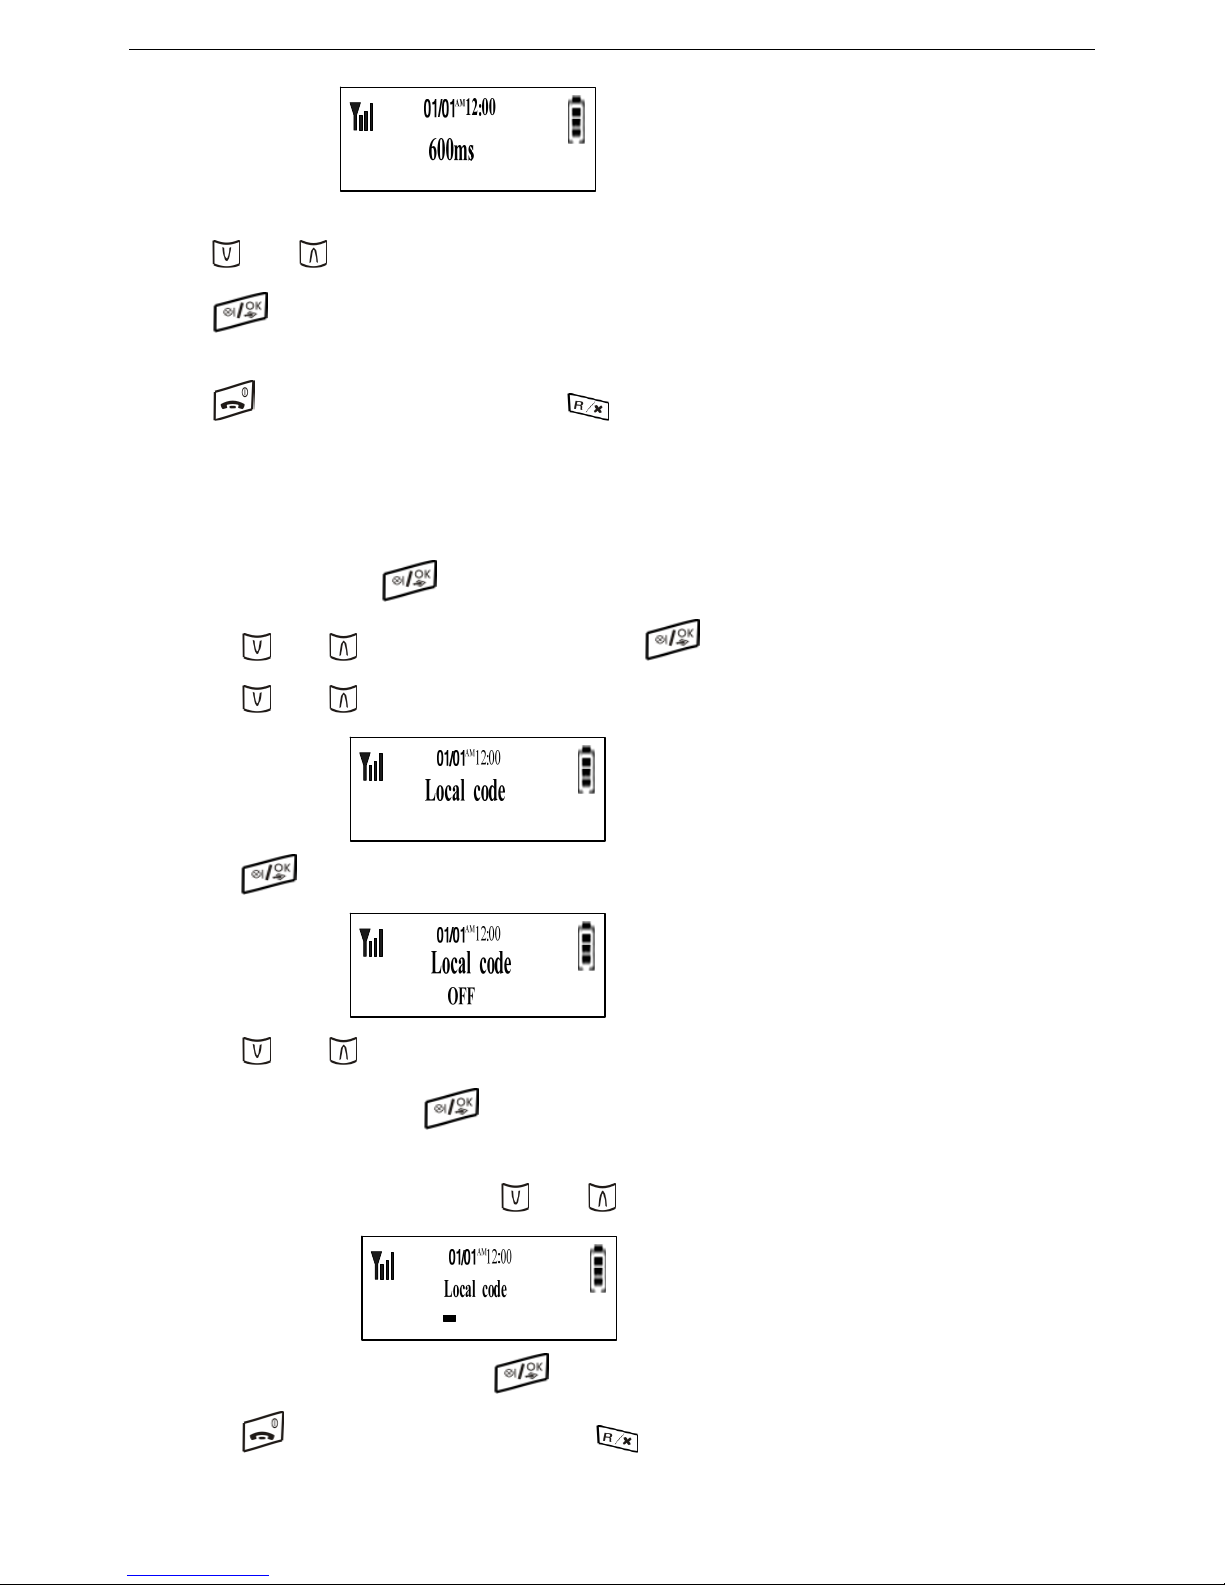
e. Press
key or key to select Flash Time you want.
Press
key to confirm and return to “Flash T ime “. After the sound of “di du” heard, it indicates that the
setting is done.
Press
key to return to standby mode or press key to return to “BS Setup”menu.
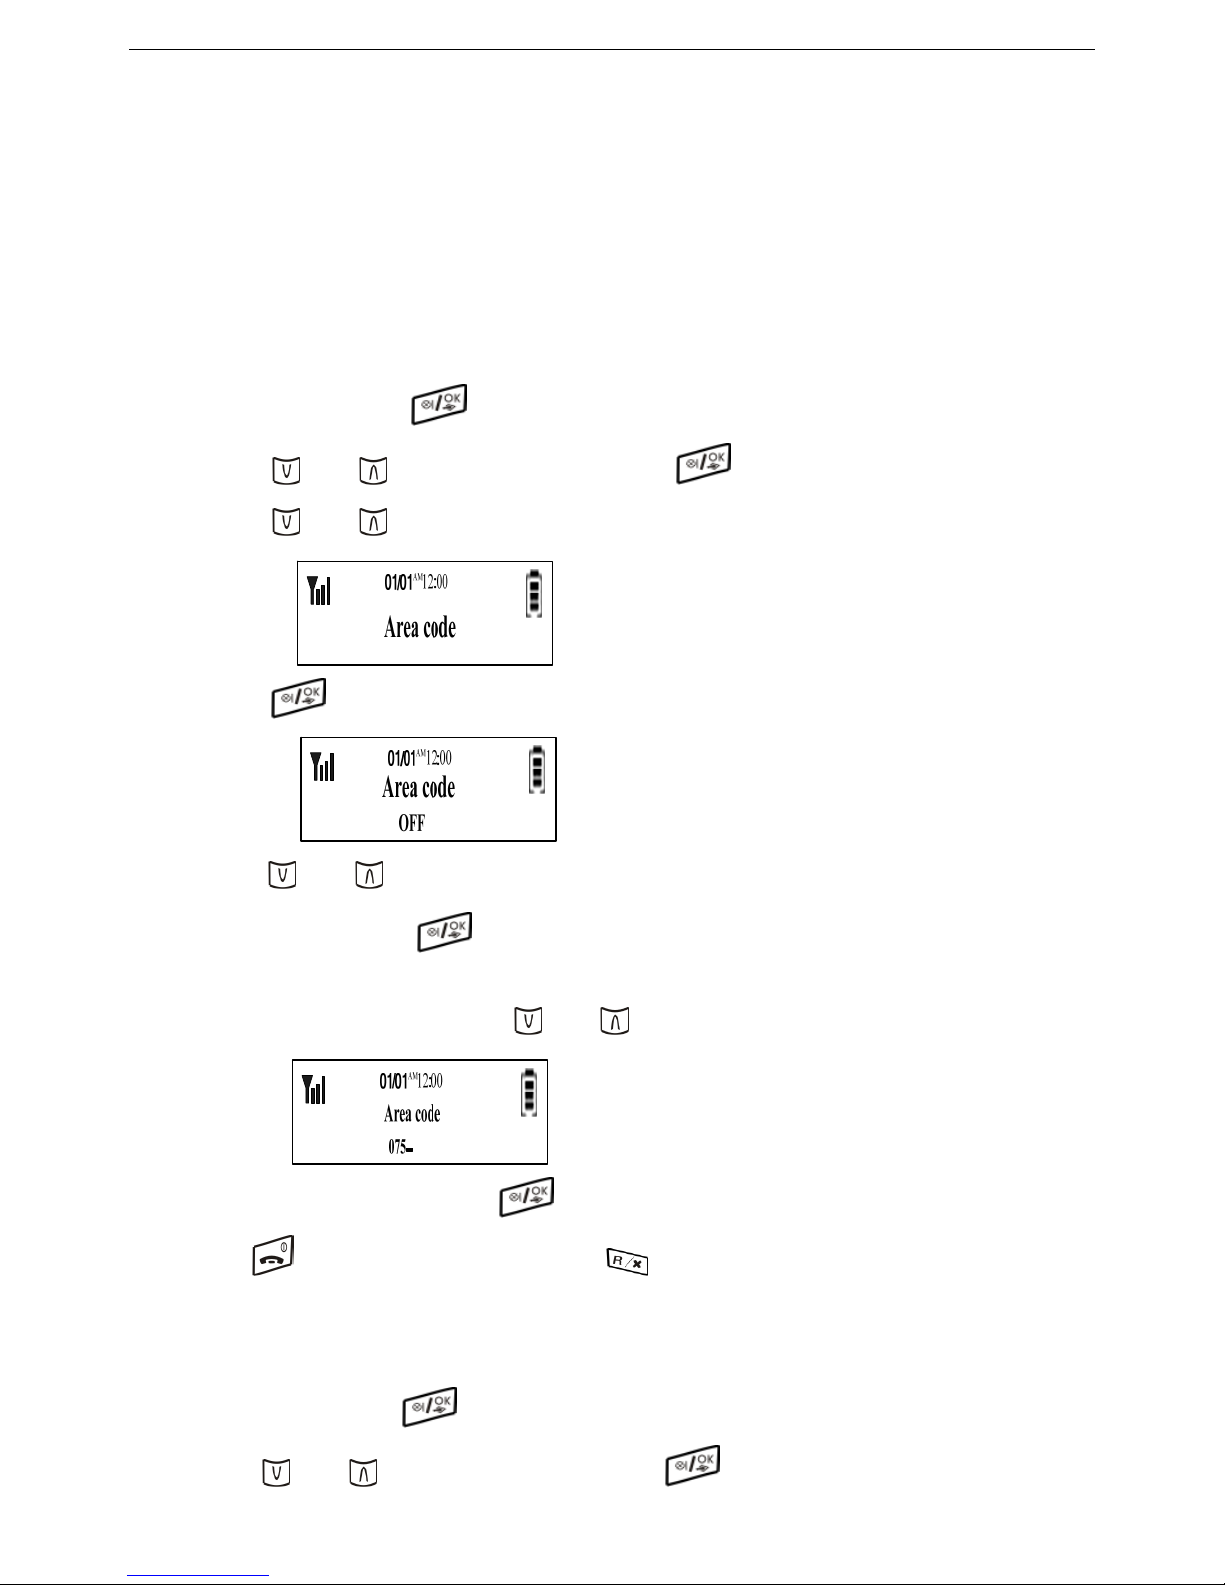
4.1.3 LOCAL CODE SETTING
Setup:
Factory default for Local Code is “OFF”.
a. In standby mode, press
key to enter setting mode.
b. Press
key or key to select “BS Setup” and press key to confirm.
Press
key or key to select “Local Code”, LCD will show as following:
c. Press
key to confirm, LCD will show as following:
d. Press
key or key to select “OFF” or “ON”
If you select “OFF”,press key to confirm and return to “Local Code” menu. After the sound of “di du”
heard, it indicates that the setting is done.
If you want to setup Local Code, press
key or key and LCD will show as following:
After input one of number 0~9, press
key to confirm and return to “Local Code” menu
Press
key to return to standby mode or press key to return “BS Setup” menu.
9
Page 10
*Note: The local code function is particularlly designed for easy use to make calls under the situation when
PABX (Private Automatic Branch Exchange) system connected. This function is invalid when the number
to-be-dial is less than 5 digits.
For example, when this device is used under PABX system, you need to add the controlled number ‘9’ to make
an external call. To ease making an external call, you can set the local code same as PABX controlled code (here
says 9), then you just dial the phone number without adding the controlled number 9 to make an external call.
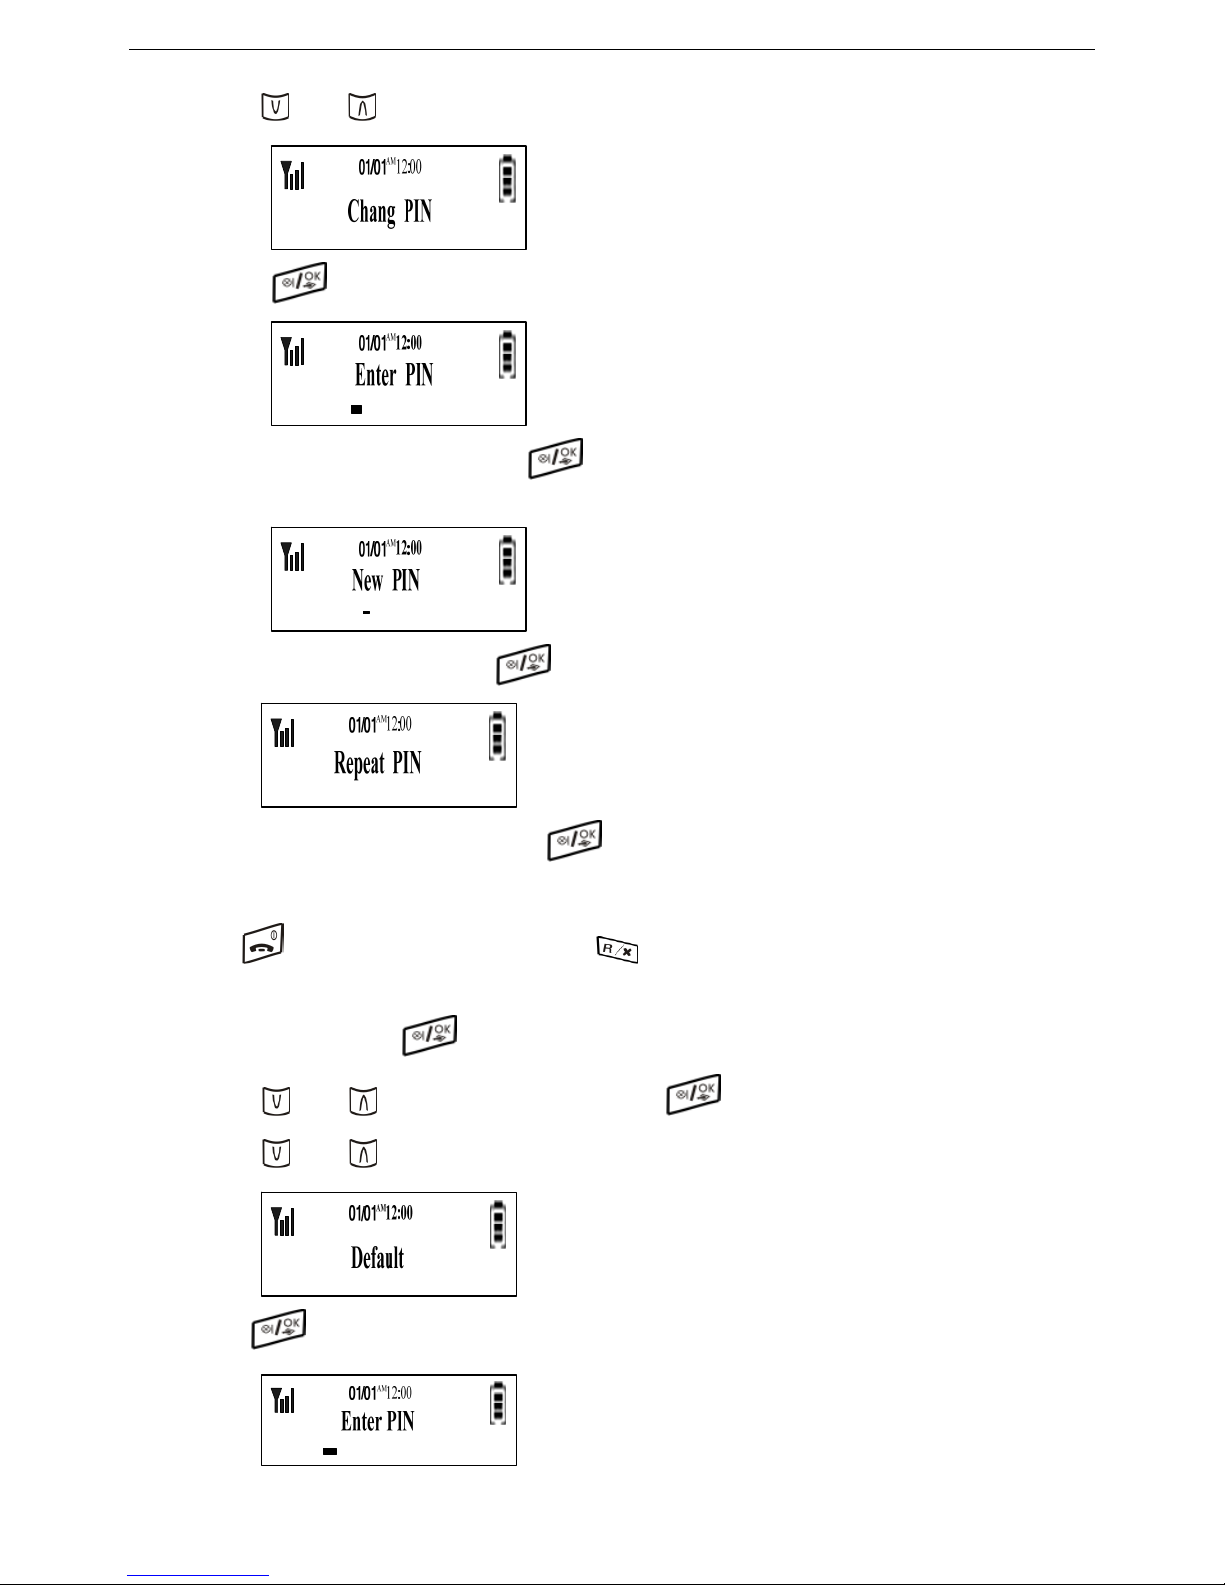
4.1.4 AREA CODE SETTING
a. In standby mode, press
key to enter setting mode.
b. Press
key or key to select “BS Setup” and press key to confirm.
Press
key or key to select “Area Code”,LCD will show as following:
c. Press
key to confirm and LCD will show as following:
d. Press
key or key to select “OFF” or “ON”
If you select Off,Press key to confirm and return to “Area Code” menu, after the sound of “di du”
heard, it indicates that the setting is done.
If you want to setup Area code, press
key or key again, LCD will show as following:
Input up to Maximum 4 digits, press
key to confirm and return to “Area code”.
Press
key to return.to standby mode or press key to return to“BS Setup”menu.
4.1.5 CHANGE PIN CODE SETTING
Factory default for PIN Code is “0000”.
a. In standby mode, press
key to enter setting mode.
b. Press
key or key to select “BS Setup” and press key to confirm.
10
Page 11
c. Press key or key to select “Change PIN” and LCD will show as following:
d. Press
key to confirm and LCD will show as following:
Input the old PIN code and then press
key to confirm, LCD will show as following:
e. Input new PIN code and then press
key to confirm, LCD will show as following
After input the new PIN code again, press
key to confirm and return to “Change PIN”. After the sound
of “di du” heard, it indicates that the setting is done.
Press key to return to standby mode or press key to return to “BS Setup” menu.
4.1.6 DEFAULT OPERATION
a. In standby mode, press key to enter setting mode.
b. Press
key or key to select “BS Setup” and press key to confi rm.
Press
key or key to select “Default”, LCD will show as following:
c. Press
key to confirm and LCD will show as following:
11
Page 12
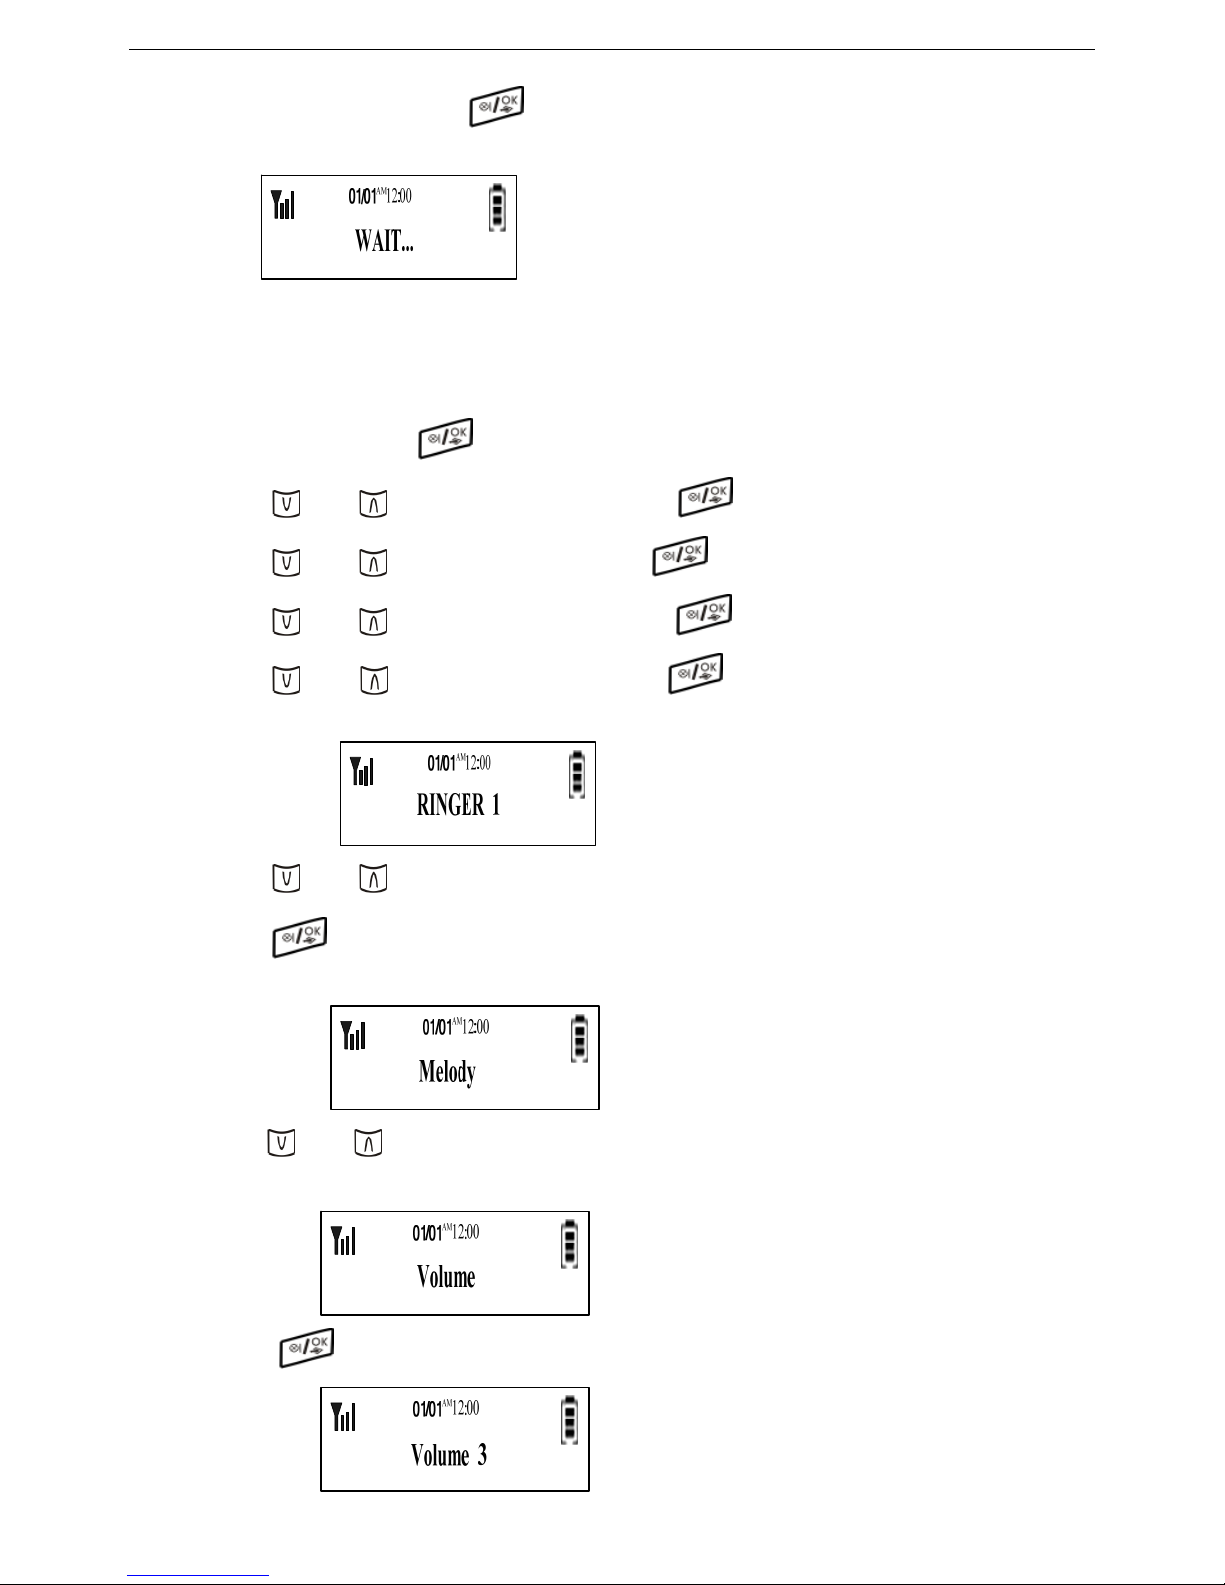
Input PIN code and then press key to confirm, LCD will show as following:
After 2 seconds, it will return to standby mode.
4.2 HS FUNCTION SETUP
4.2.1 INTERNAL RING TONE AND RING VOLUME SETTING
a. In standby mode , press key to enter setting mode.
b. Press
key or key to select “HS Setup” and press key to confirm.
c. Press
key or key to select “Sound” and press key to confirm.
d. Press
key or key to select “INT Ring” and press key to confirm.
e. Press key or key to select “Melody” and press key, the the melody will be played and LCD
will show as below:.
f. Press
key or key to select Melody 1~Melody 15.
g. Press
key to save the melody you want, LCD will show as following:
h. Press
key or key to select “Volume”, LCD will show as following:
I. Press key to check the current volume level and LCD will show as following:
12
Page 13
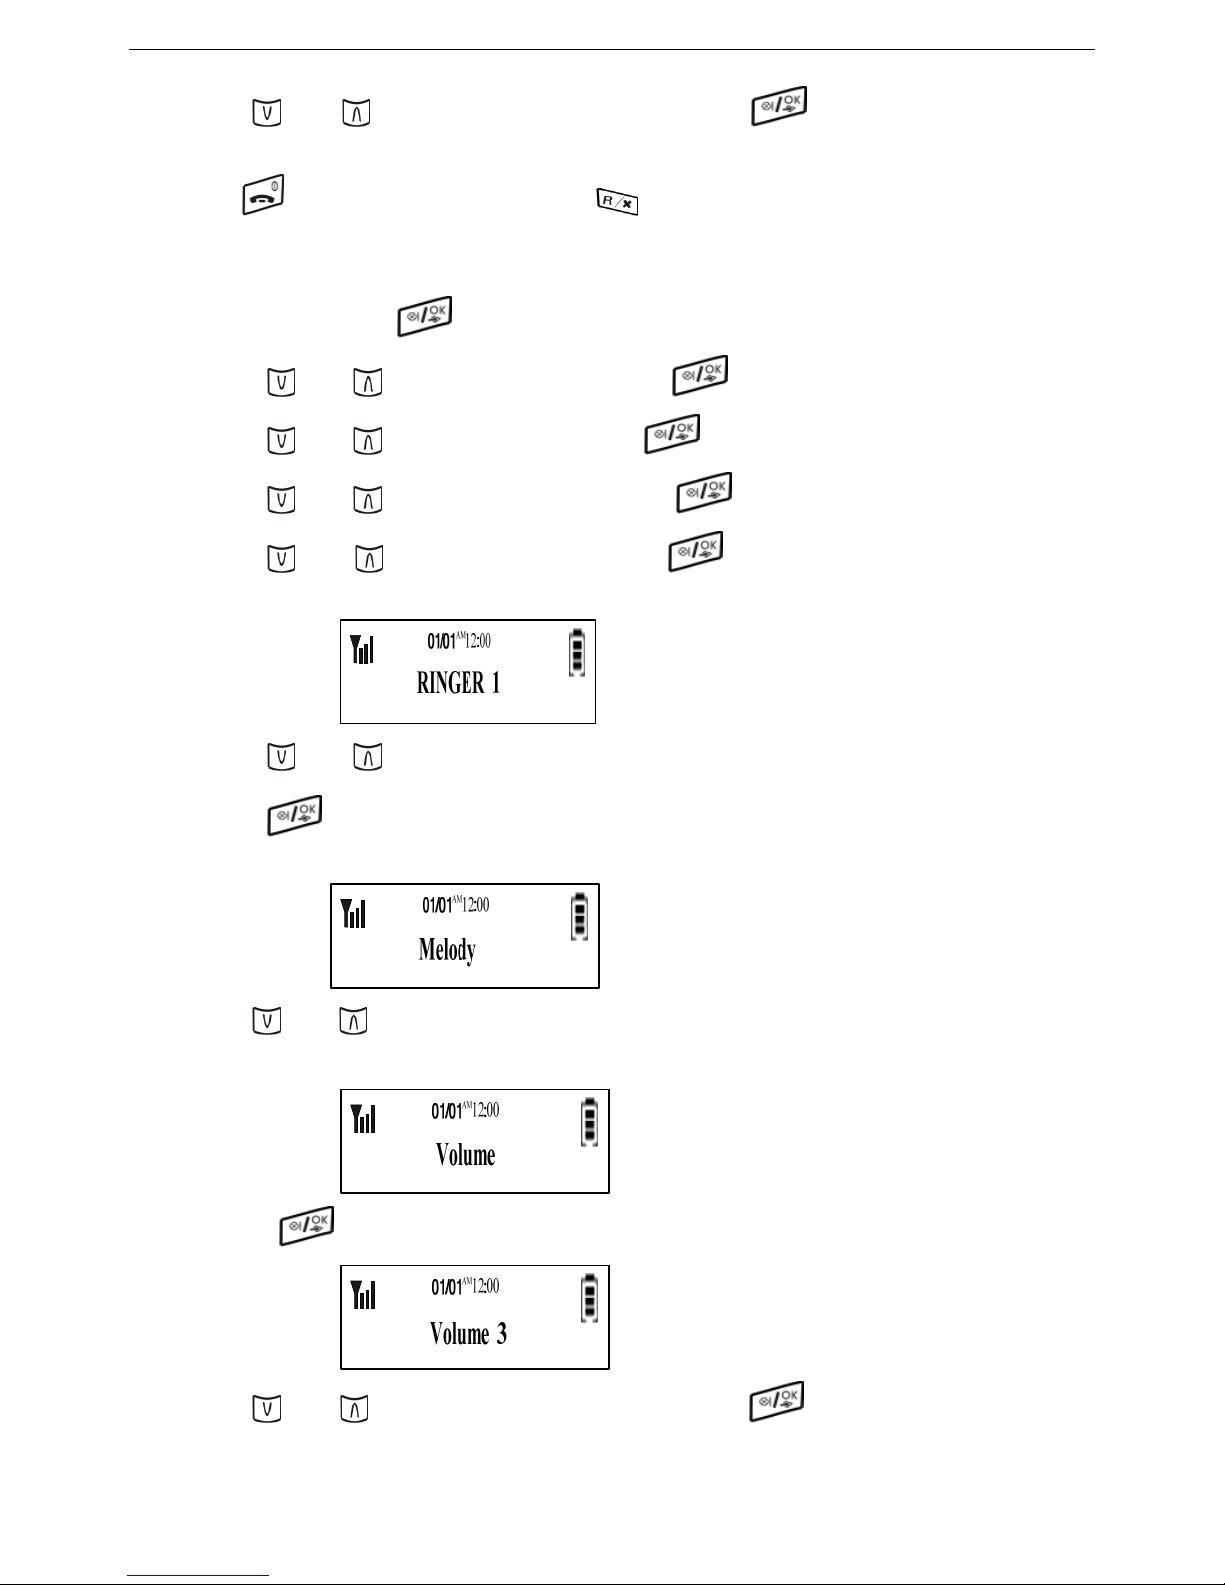
Press key or key to select Volume 1~Volume 5 and press key to confirm. After the sound of
“di du” heard, it indicates that the setting is done.
Press
key to return to standby mode or press key to return t o “INT Ring”menu.
4.2.2 EXTERNAL RING TONE AND RING VOLUME SETTING
a. In standby mode , press key to enter setting mode.
b. Press
key or key to select “HS Setup” and press key to confirm.
c. Press
key or key to select “Sound” and press key to confirm.
d. Press
key or key to select “EXT Ring” and press key to confirm.
e. Press key or key to select “Melody” and press key, the melody will be played and LCD will
show as following.
f. Press
key or key to select Melody 1~Melody 15.
g. Press
key to save the melody you want, LCD will show as following:
h. Press
key or key to select “Volume”, LCD will show as following:
I. Press key to check the current volume level, LCD will show as following:
Press
key or key to select Volume 1~Volume 5 and press key to confirm. After the sound of
“di du” heard, it indicates that the setting is done.
13
Page 14
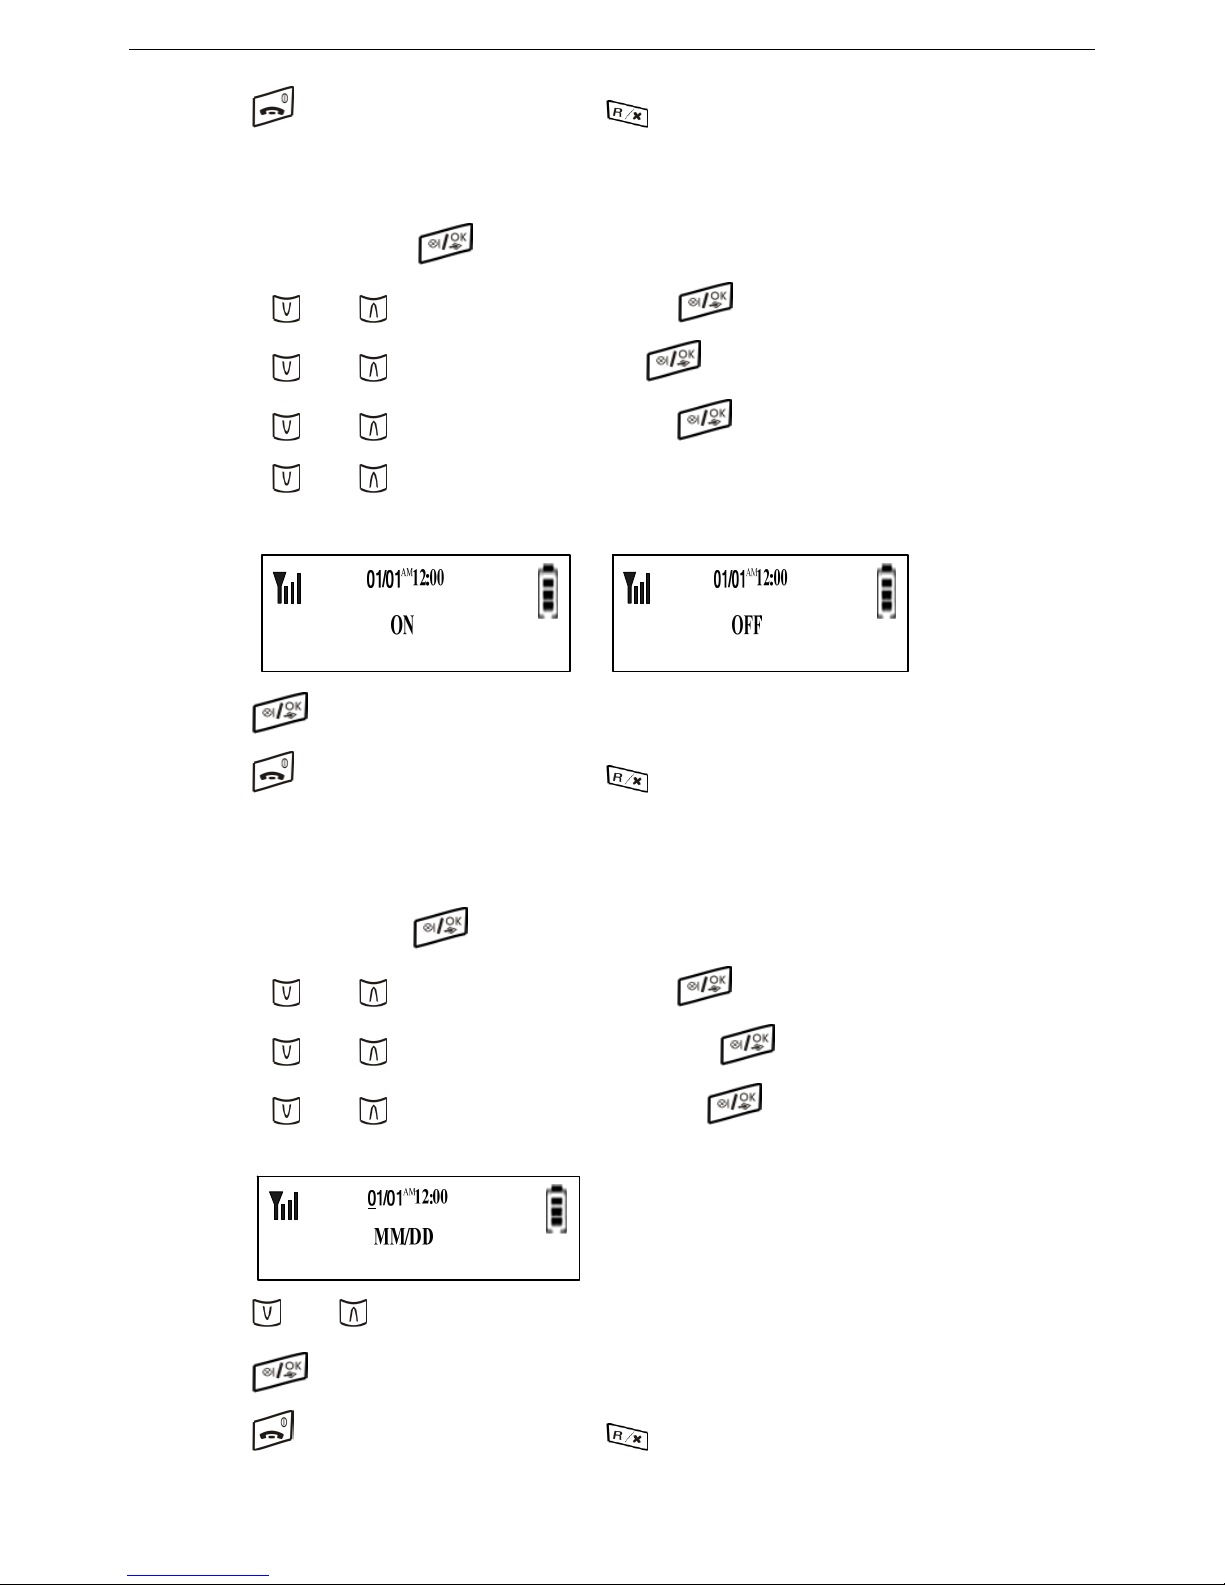
Press key to return to standby mode or press key to return to “EXT R ing”.
4.2.3 KEY TONE SETTING
Factory default for Key Tone is “OFF”.
a. In standby mode , press key to enter setting mode.
b. Press
key or key to select “HS Setup” and press key to confirm.
c. Press
key or key to select “Sound”and press key to confirm.
d. Press
key or key to select “Key Tone” and press key to confirm.
Press
key or key to select “On” or “Off” and LCD will show as following:
Press
key to confirm,. After the sound of “di du” heard, it indicates that the setting is done.
Press
key to return to standby mode or press key to return to “Key Tone” menu.
4.2.4 TIME&ALARM SETTING
4.2.4.1 DATE FORMAT SETTING
a. In standby mode, press key to enter setting mode.
b. Press
key or key to select “HS Setup” and press key to confirm.
c. Press key or key to select “Time & Alarm” and press key to confirm.
d. Press key or key to select “Date Format” and press key to confirm.
Press
key or key to select MM/DD or DD/MM,
Press
key to confirm. After the sound of “di du” heard, it indicates that the setting is done.
Press
key to return to standby mode or press key to return to“Date Format”.
4.2.4.2 TIME FORMAT SETTING
14
Page 15
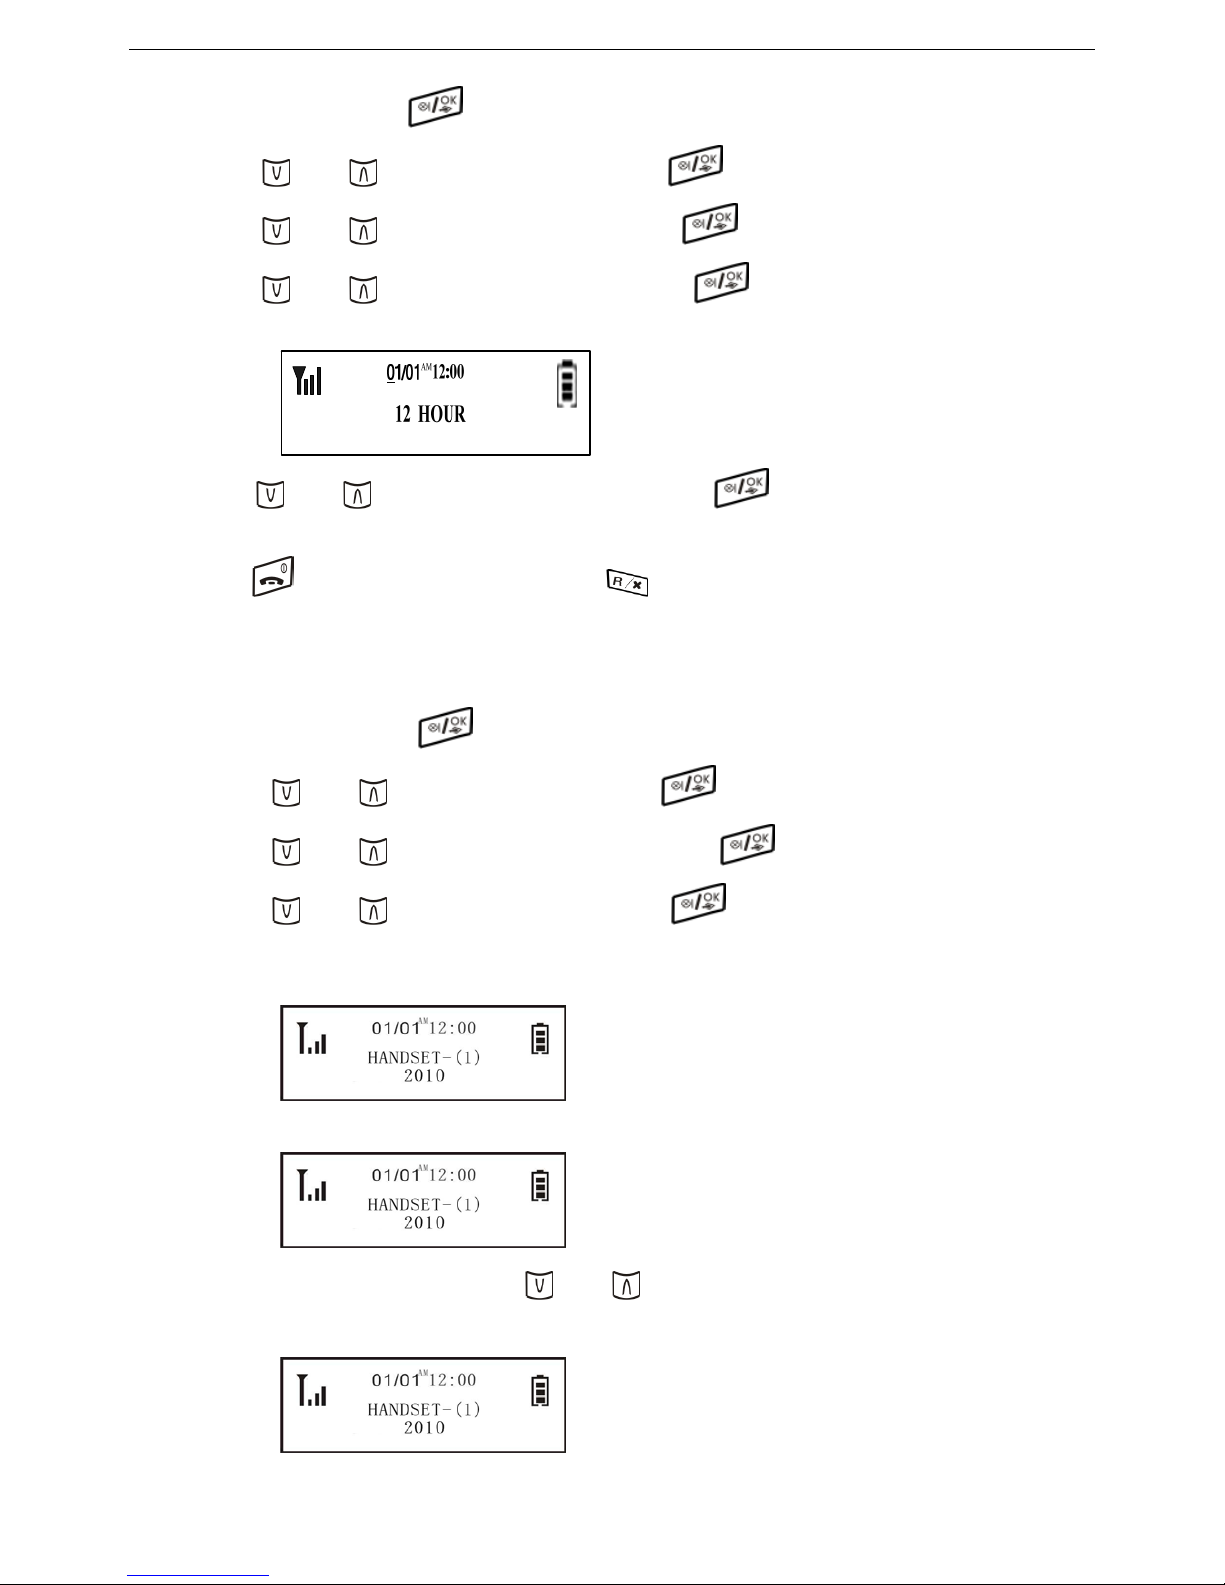
a. In standby mode , press key to enter setting mode.
b. Press
key or key to select “HS Setup” and press key to confirm.
c. Press key or key to select“Time & Alarm” press key to confirm.
d. Press key or key to select “Time format” and press key to confirm.
e. Press
key or key to select 12 hour or 24hour. And press key to confirm. After the sound of
“di du”heard, it indicates that the setting is done.
Press
key to return to standby mode or press key to return to “Time format”.
4.2.4.3 TIME SETTING
Factory default time is 2010.10.01 AM12:00。
a. In standby mode , press
key to enter setting mode.
b. Press
key or key to select “HS Setup”,Press key to confirm.
c. Press
key or key to select “Time & Alarm” and press key to confirm.
d. Press
key or key to select “Set Time” and press key to enter year setting.
LCD will show as following:
After inputing number 0~9 when the third digit flashes,the fourth digit will flash as following.
During modifying year, you can use
key or key to move cursor.
After year setting,you can enter month setting
15
Page 16
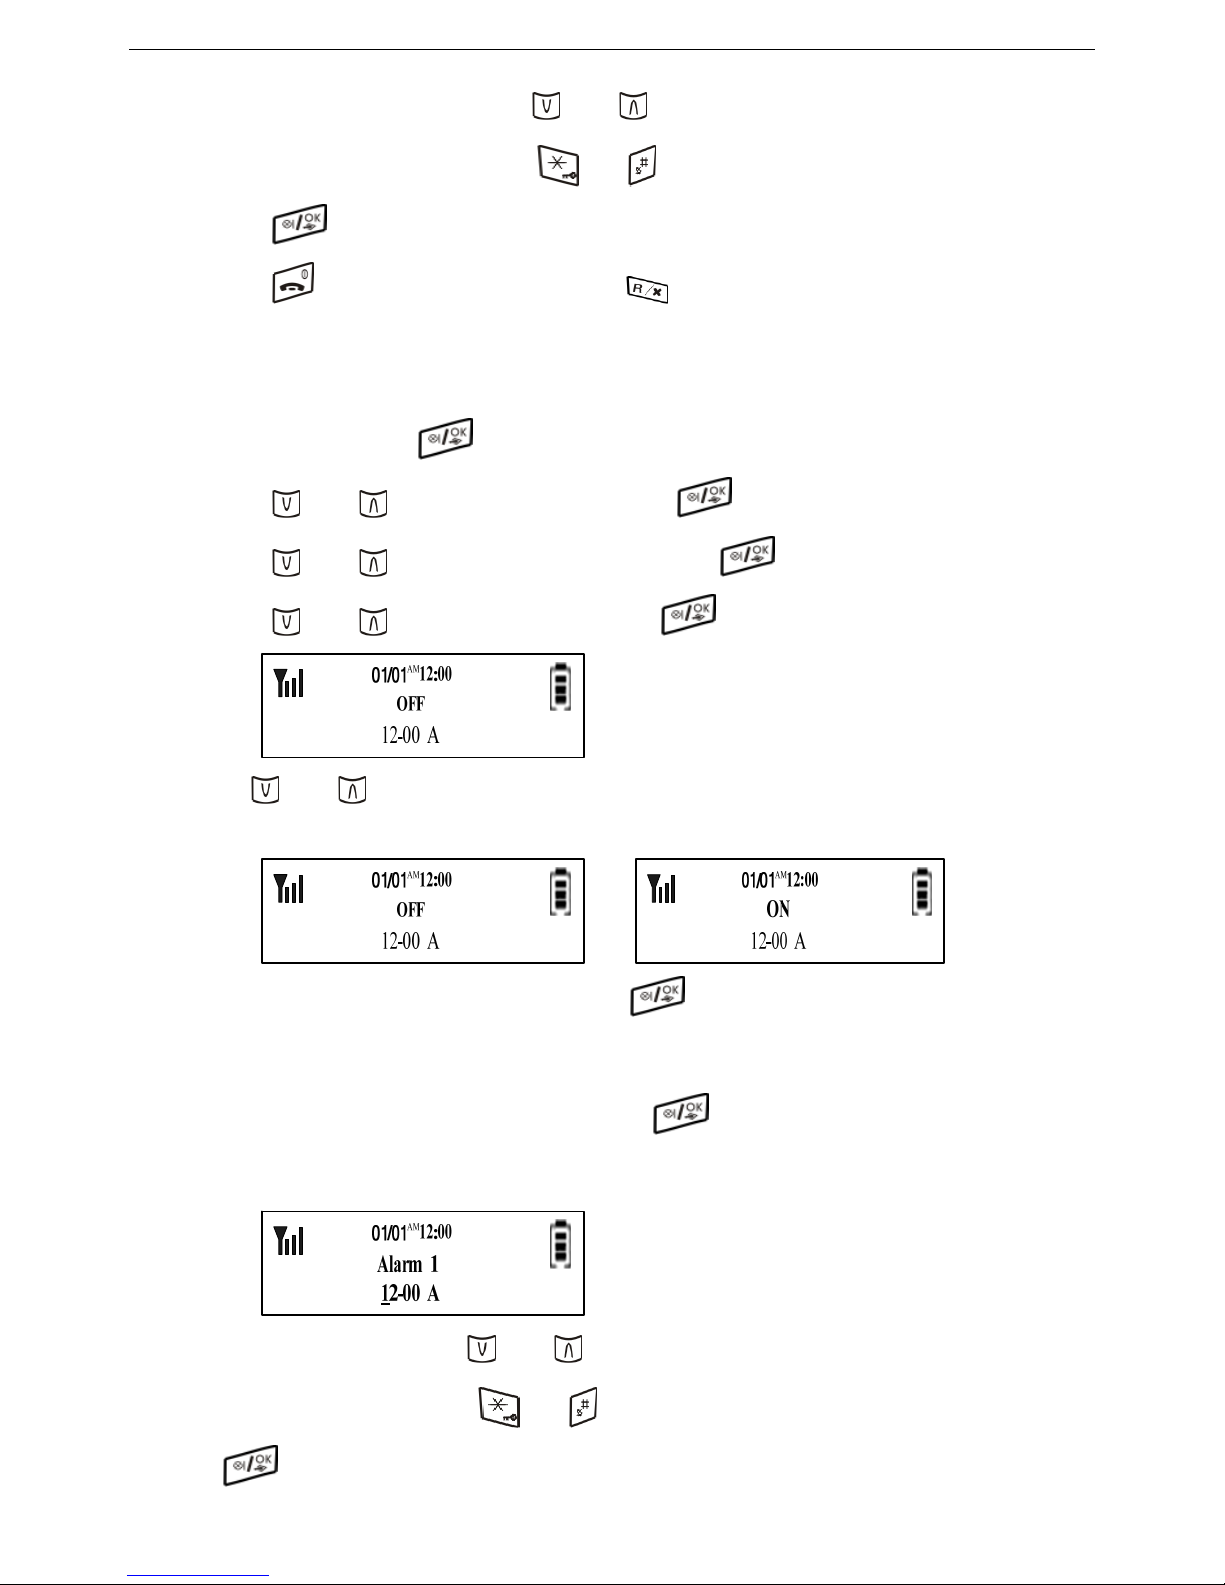
During modifying month, you can use key or key to move cursor。
If time format is 12 hour, you can use
key or key to select AM or PM .
Press
key to confirm. After the sound of “di du” heard, it indicates that the setting is done.
Press
key to return to standby mode or press key to return “Set Time”.
4.2.4.4 ALARM CLOCK 1 SETTING
Factory default for alarm 1 is “Off” and time is AM 12:00。
a. In standby mode , press
key to enter setting mode.
b. Press
key or key to select “HS Setup” and press key to confirm.
c. Press
key or key to select “Time & Alarm” and press key to confirm.
d. Press
key or key to select “Alarm1” and press key to confirm. LCD will show as following:
e. Press
key or key to select Alarm 1 “ON”or “OFF”。
If you want the alarm off, please select “Off” and press
key to confirm. After the sound of “di du” heard, it
indicates that the setting is done.
If you want to set the alarm, please select “On” and press
key to enter Alarm clock time setting. LCD will
show as following:
During modifying time, you can use
key or key to move cursor.
If time format is 12 hour, you can use key or key to select AM or PM .
Press
key to confirm and return to “Alarm 1”. After the sound of “di du” heard, it indicates that the setting
16
Page 17
is done.
Press
key to return to standby mode or press key to return to “Ti me & Alarm” menu.
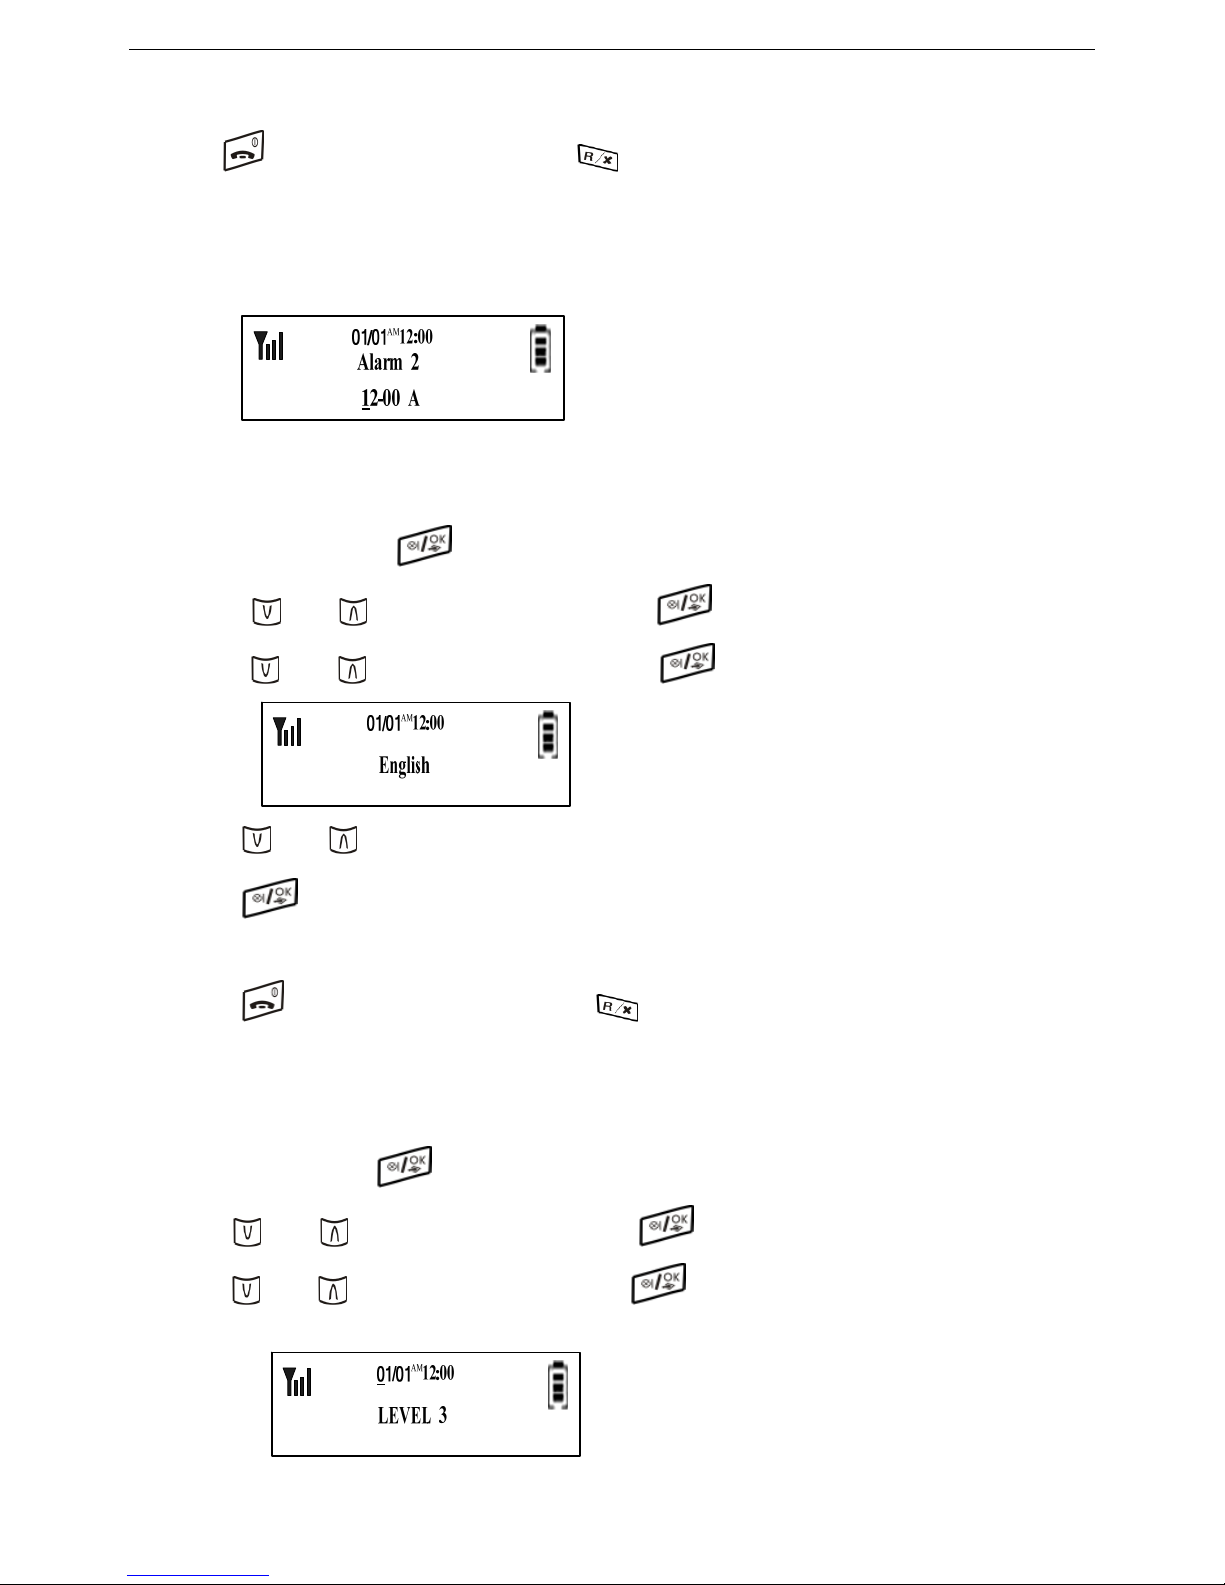
4.2.4.5 ALARM CLOCK 2 SETTING
Factory default for Alarm 2 is “OFF” and time is AM 12:00。
Alarm2 setting is same as Alarm1
4.3 LANGUAGE SETTING
Factory default Language is “English”.
a. In standby mode , press
key to enter setting mode.
b. Press
key or key to select “HS Setup” and press key to confirm.
c. Press
key or key to select “Language” and press key to confirm.
d. Press
key or key to select the Language you want.
Press
key to confirm and return to “Language” menu. After the sound of “di du” heard, it indicates that
the setting is done.
Press
key to return to standby mode or press key to return to “HS Setup” menu.
4.4 LCD CONTRAST SETTING
Factory default contrast level is “level 5”
a. In standby mode , press
key to enter setting mode.
b. Press
key or key to select “HS Setup” and press key to confirm.
c. Press
key or key to select “Contrast” and press key to confirm;
17
Page 18
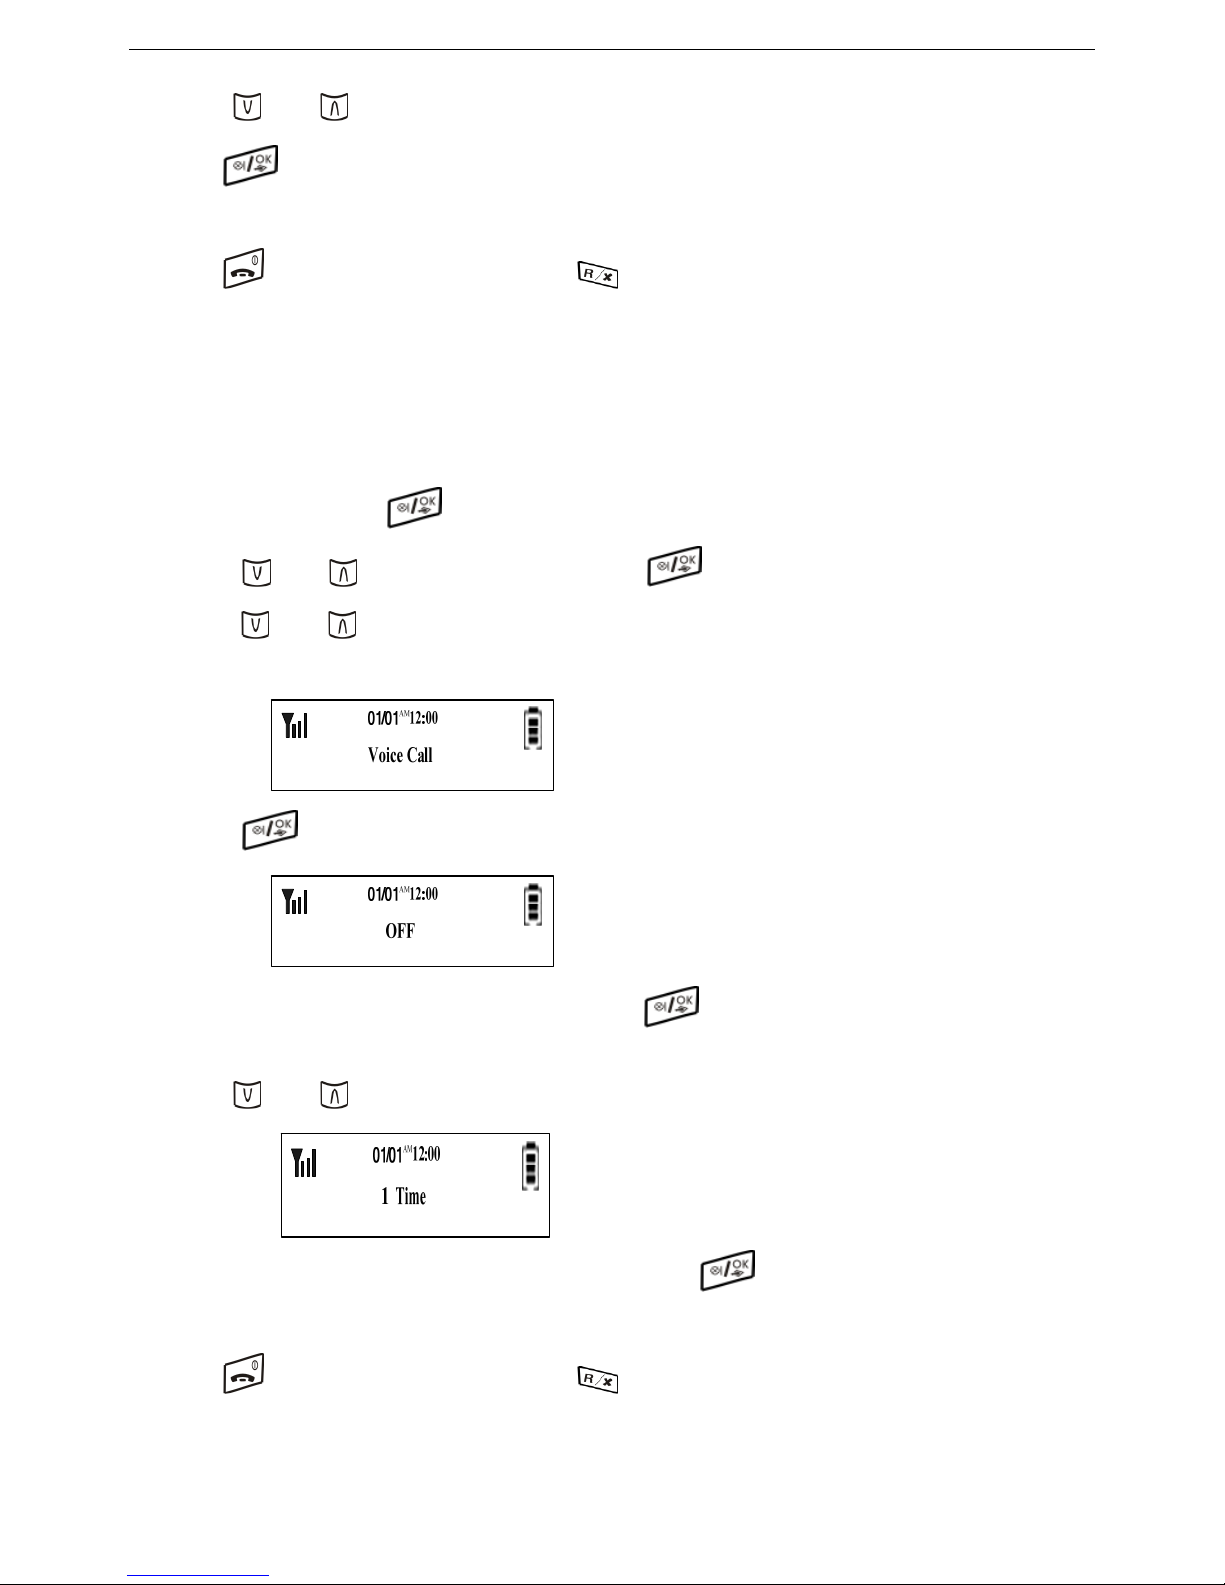
d. Press key or key to select Contrast level 1 ~ 5.
Press key to confirm and return to “Contrast”. After the sound of “di du” heard, it indicates that the setting
is done.
Press key to return to standby mode or press key to return to “HS Setup”menu.
4.5 VOICE CALL SETTING
(This function is that the phone voices the receiving phone No.)
* Note: This function is not available in Japan
Factory default for Voice Calling is “OFF”.
a. In standby mode , press
key to enter setting mode.
b. Press
key or key to select “HS Setup” and press key to confirm.
c. Press
key or key to select “Voice Call” LCD will show as following:
d. Press
key to confirm. LCD shows as following:
If you want Voice Call off, please select “OFF” and press
key to confirm. After the sound of “di du” heard,
it indicates that the setting is done.
Press
key or key to select Voice call times and LCD will show as following:
After you select Voice call times (1 Time ~3 Times), please press
key to confirm and return to “Voice Call”.
After the sound of “di du” heard, it indicates that the setting is done.
Press key to return to standby mode or press key to return to “HS Setup” menu.
4.6 AUTO ANSWER SETTING
18
Page 19
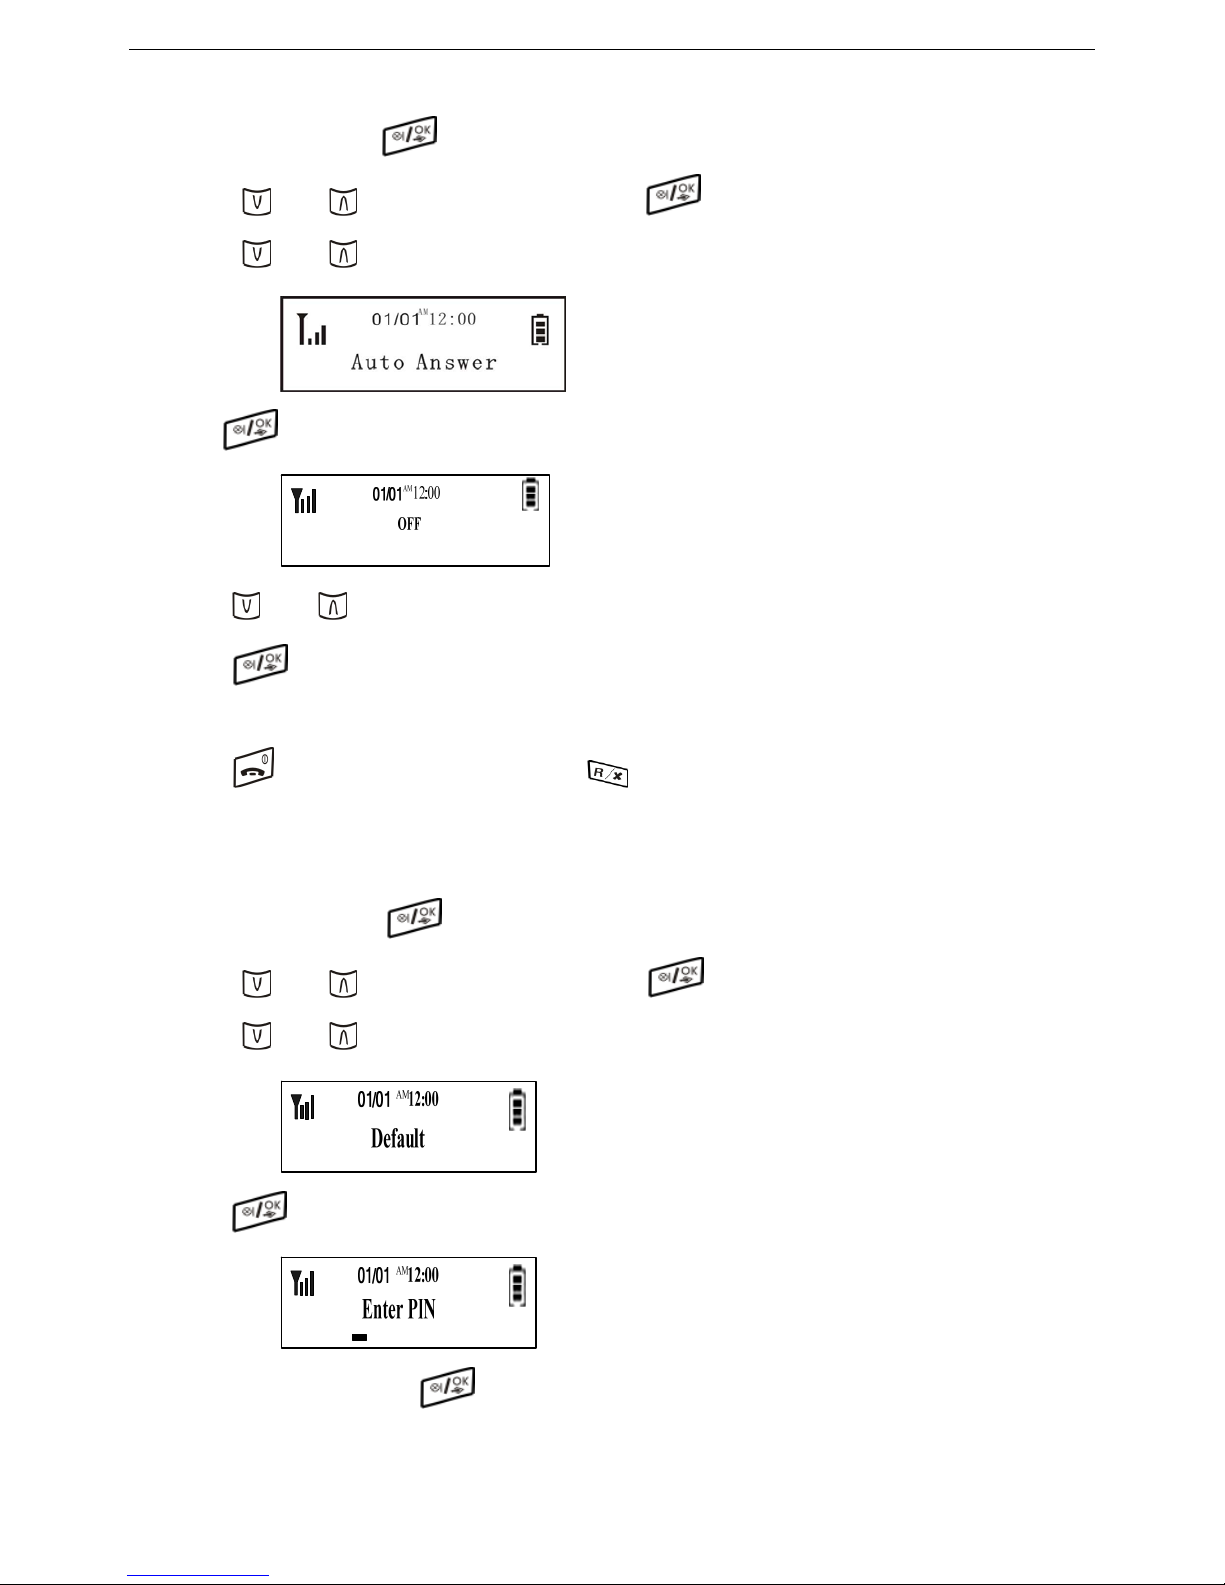
Factory default for Auto Answer setting is “Off”.
a. In standby mode, press
key to enter setting menu.
b. Press
key or key to select “HS Setup” and press key to confirm.
Press
key or key to select “Auto Answer” and LCD will show as following:
Press
key to confirm and LCD will show as following:
e. Press
key or key to select “On” or “Off”.
Press
key to confirm and return to “Auto Answer”. After the sound of “di du” heard,
it indicates that the setting is done.
Press key to return to standby mode or press key to return to “HS Setup” menu.
4.7 DEFAULT OPERATION
Factory default for call ID memory, IP code and Redial memory is empty.
a. In standby mode , press
key to enter setting mode.
b. Press
key or key to select “HS Setup” and press key t o confirm.
Press
key or key to select “Default” and LCD will show as following:
c. Press
key to confirm and LCD will show as following:
Input PIN code and then press
key to confirm, LCD will show as following:
19
Page 20
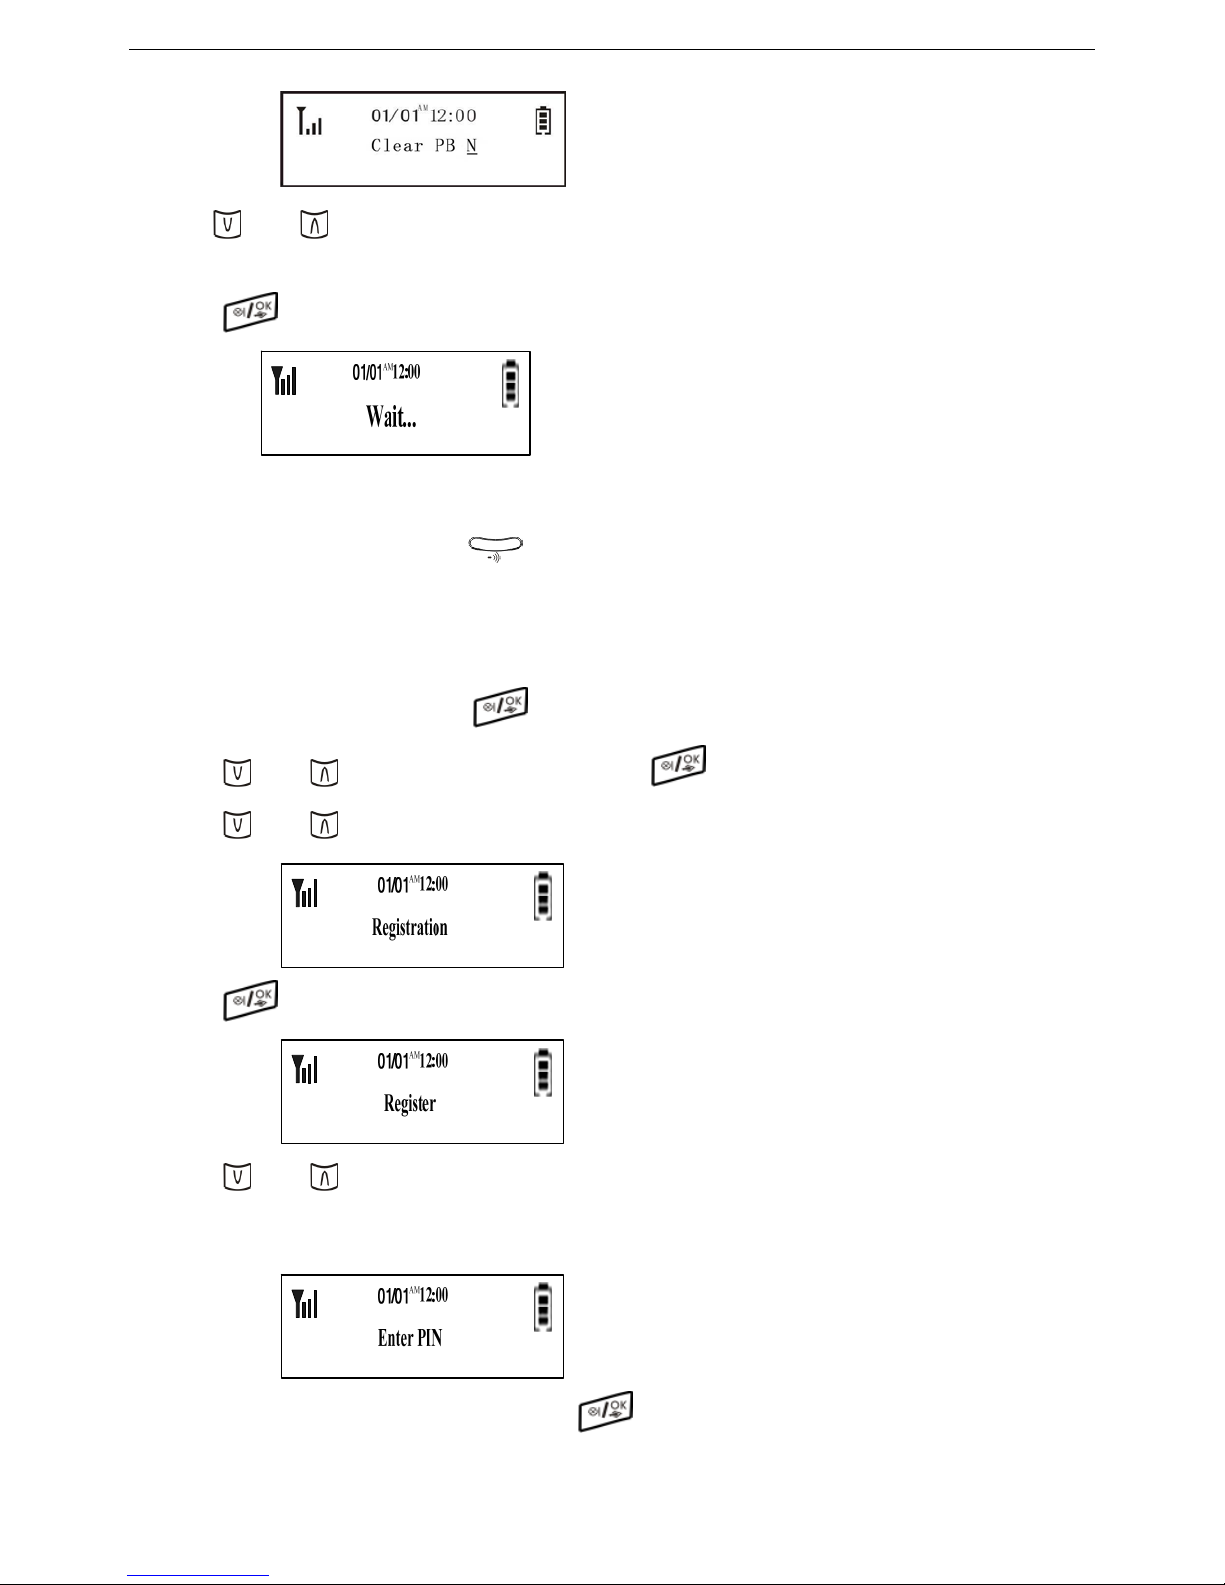
Press
key or key to select “Clear PB N” or “Clear PB Y”
* Note:When user selects “Clear PB Y”, it will clear all phonebook number.
d. Press key to confirm and LCD will show as following:
After 2 seconds, it will return to standby mode.
5. REGISTRATION
BASE in standby mode,press key for 5 seconds to enter Register mode and LED will blink 500ms
on 500ms off.
5.2 REGISTER AND DEREGISTER HANDSET
5.2.1 REGISTER HANDSET
a. HANDSET in standby mode , press key to setting menu.
Press
key or key to select “Registration” and press key to confirm.
Press
key or key to select “Registration”, LCD shows as following:
b. Press
key to confirm and LCD will show as following
Press
key or key to select “Register” or “Remove HS”.
c . If you select “Register”, LCD will show as following:
Please input maximum 4 digits Pin code and press
key to confirm
If the PIN code is wrong, it will not be able to register.
20
Page 21
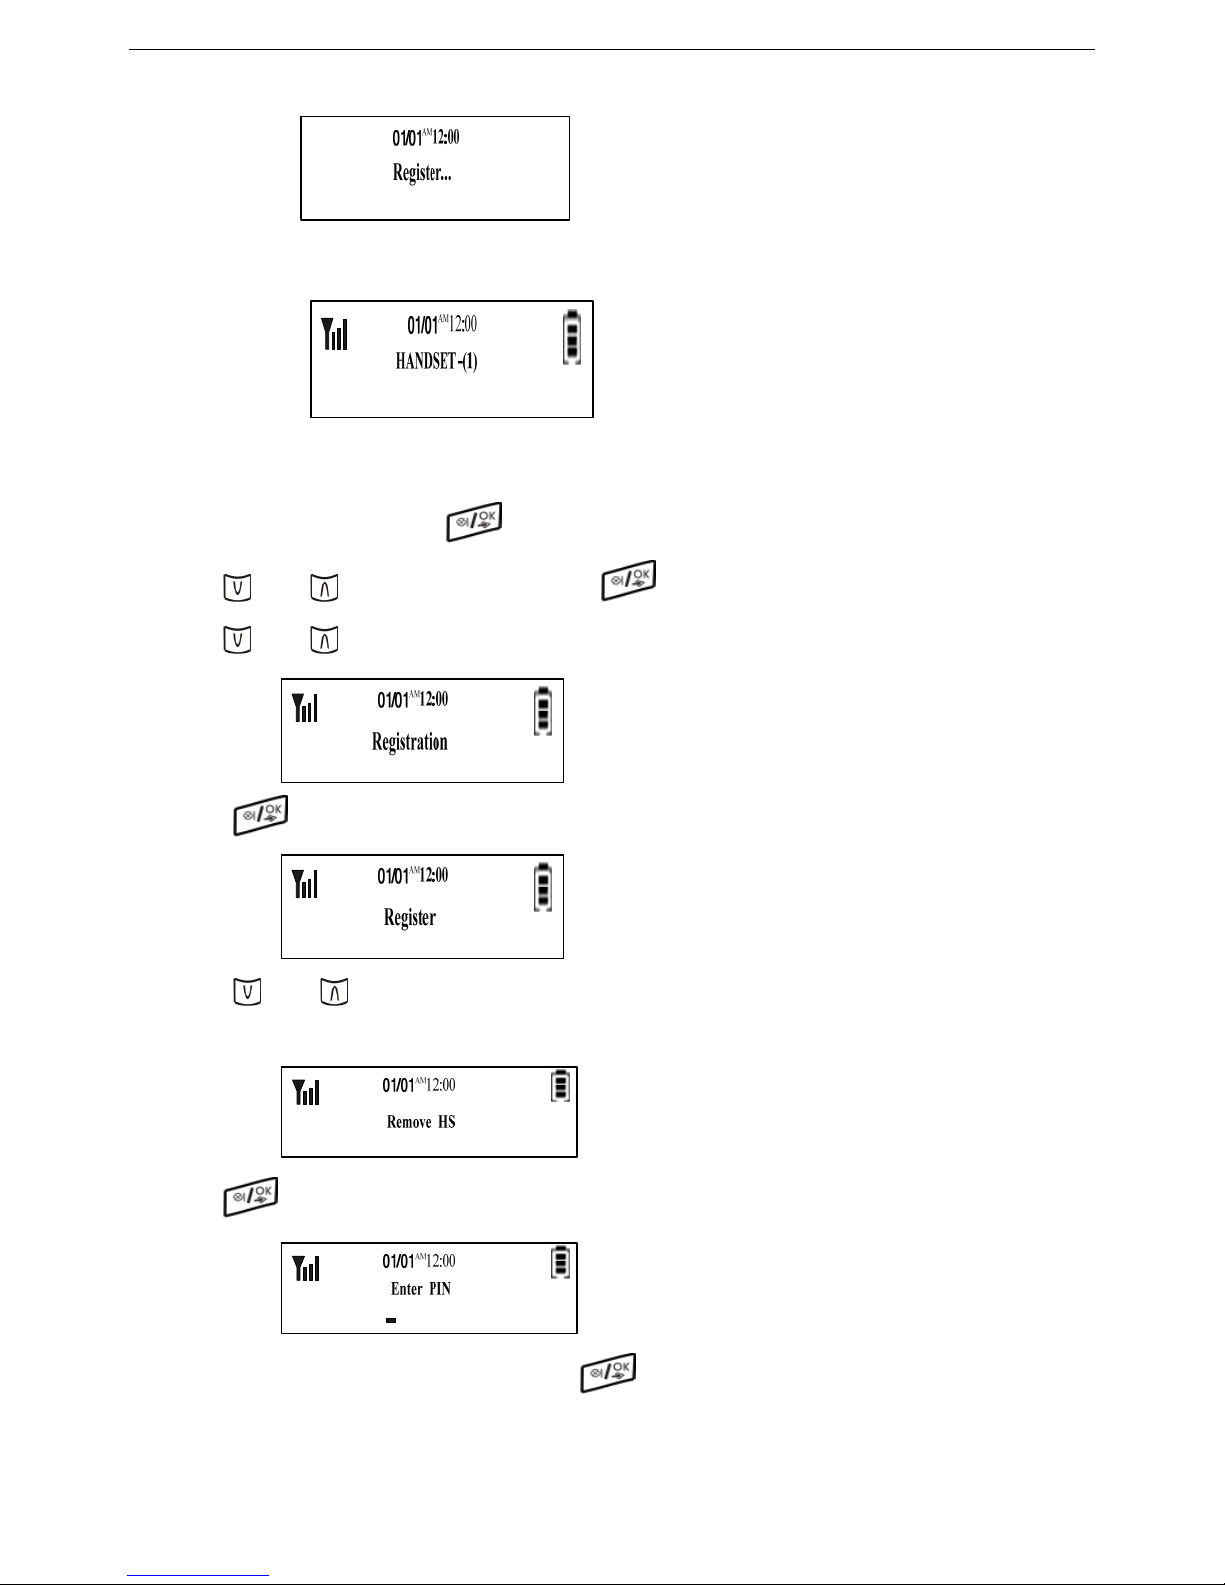
If the PIN code is correct, LCD will show as following
If the registration is successful , LCD will show as following,
5.2.2 DEREGISTER
a. Hanset In standby mode , press key to setting menu.
Press
key or key to “Registration” and press key to confirm.
Press
key or key to select “Registration”, LCD will show as following:
b. Press
key to confirm,and LCD will show as following
Press
key or key to select “Register” or “Remove HS”.
c. If you select “Remove HS”, LCD will show as following:
Press
key to confirm and LCD will show as following:
Please input Maximum 4 digits Pin code and press
key to confirm.
If the PIN code is wrong, LCD will show as following:
21
Page 22
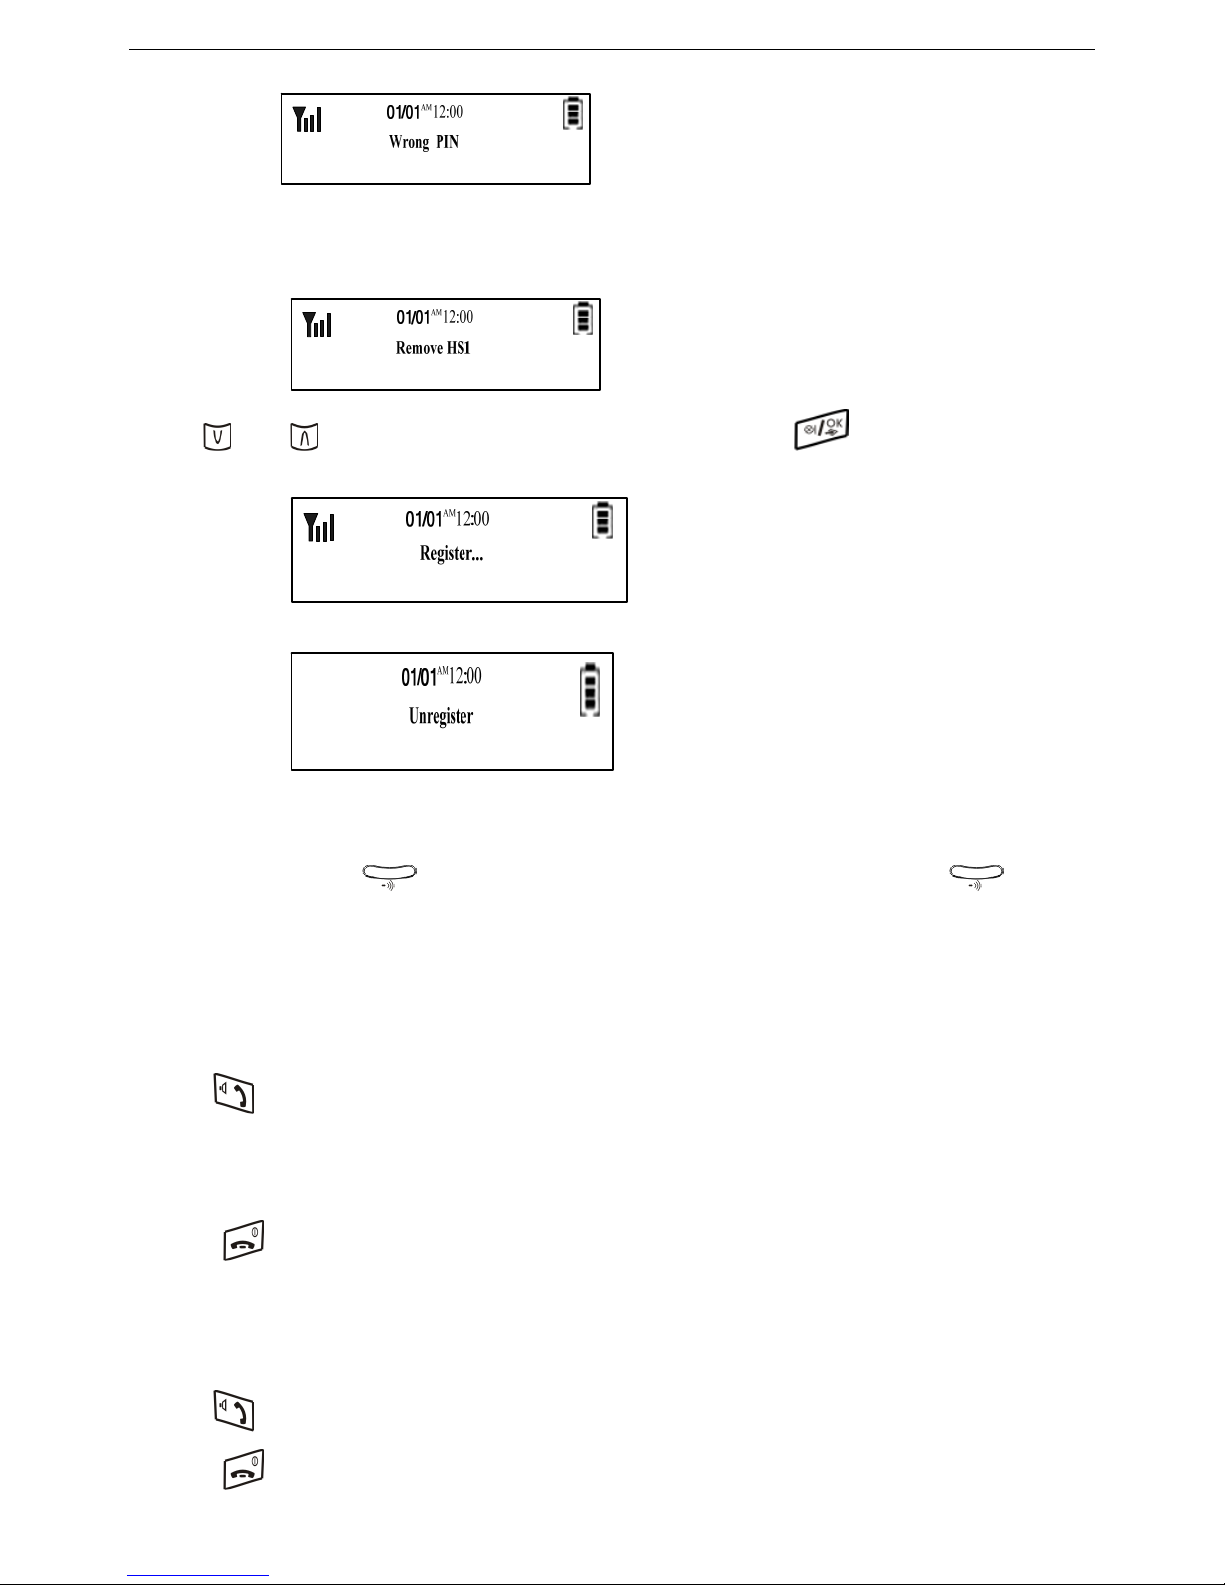
If the PIN code is correct, LCD will show as following:
Press
key or key to select “Remove HS1” or “Remove HS2” and press key to confirm. LCD will
show as following:
After it is completed, LCD will show as following:
5.2.3 DEREGISTER ALL HANDSET ON BASE
In standby mode, press key on the Base for 5 seconds to enter Register mode and press key 7times
continuosly. LED will blink in 200ms on/200ms off and alss Handsets will be unregistered.
6. DIAL/ANSWER CALLS
6.1 TO DIAL A CALL
Ê Press button to dial a number.
Ê Input the number to dial
Ê Start to conversation when the call is answered.
Ê Press
button to end the call.
6.2 TO ANSWER A CALL
6.2.1 TO ANSWER A CALL UNDER NORMAL OPERATION
Ê Handset is ringing
Ê Press button to start the conversation.
Ê Press
button to end the call.
22
Page 23

6.2.2 TO ANSWER A CALL UNDER AUTO-ANSWER ACTIVATED SITUATION
Ê Handset is ringing when it seats on cradle
Ê Pick up the handset to start the conversation directly.
Ê Put handset back to cradle, the conversation will end and automatically turn into standby mode, or press
button to end the conversation.
6.3 FLASH FUNCTION
FLASH function is used when no dialing tone reply or line is busy, to call the line again, you can press
button to generate 1000ms or 600ms or 300ms or 100ms flash time, it enable you to obtain a new dialing tone
directly without the operation to hang off the line.
6.4 PRE-DIALING FUNCTION
Ê In standby mode, input the number to dial
Ê Press
button to delete if any error.
Ê Press button to dial the number directly.
Ê Put handset back to cradle, the conversation will end and automatically turn into standby mode, or press
button to end the conversation.
6.5 REDIAL FUNCTION
The redial function is to facilitate you to dial the repeat number.
In standy mode, please press
button and button in order to redial the last dialed phone number.
When the telephone line is busy, please press
button and button in order to redial the number.
6.6 TALK VOLUME ADJUST
In T alk mode, press key or key to adjust the TALK volume (4 levels for option).
In SPEAKER mode, press
key or key to adjust the SPEAK volume(4 levels for option).
6.7 CHANGING TALK MODE TO SPEAKER MODE
In T A LK mode, press key to change to Speaker mode.
6.8 INTERCOM FUNCTION
Handset 1 is in standby mode, press key and 【2】key to call the Handset 2. Handset will be
ringing with “HS1 calling”displayed on the LCD.
Press key on the Handset2 to answer. Thus it is intercom conversation between the Handset1and
the Handset2. Put handset back to cradle, the conversation will end and automatically turn into
standby mode, or press button to end the conversation.
23
Page 24
6.9 TRANSFER FUNCTION OPERATION
When Handset1 is answering phone call, press key and press 【2】key. “Calli ng HS2”will be displayed on
the LCD of the Handset1 and the Handset 2 will be ringing with “HS1 calling ” displayed on the LCD. Press
key on the Handset1 to transfer the call to Handset2 and “Transf from 1”will be displayed on LCD of the HS2 ,
press key on the Handset 2 to answer the transferred call from Handset1.
6.10 CONFERENCE FUNCTION OPERATION
The Handset1 at talk mode or speaker mode, press key and press【2】key. “Calling HS2” will be displa yed
on the LCD of the Handset1 and the Handset2 will be ringing with “HS1 Calling” displayed on the LCD. Press
key on the Handset2 to answer and press key of the Handset1 to make conference call.
6.11 MUTE FUNCTION
a. In talk mode, press key,“MUTE” is displa yed on the LCD of handset
b. If user wants to end “MUTE”, please press
key again.
6.12 OUTGOING CALL REVIEWING/REDIAL/STORE/DELETE
6.12.1 OUTGOING CALL REVIEWING
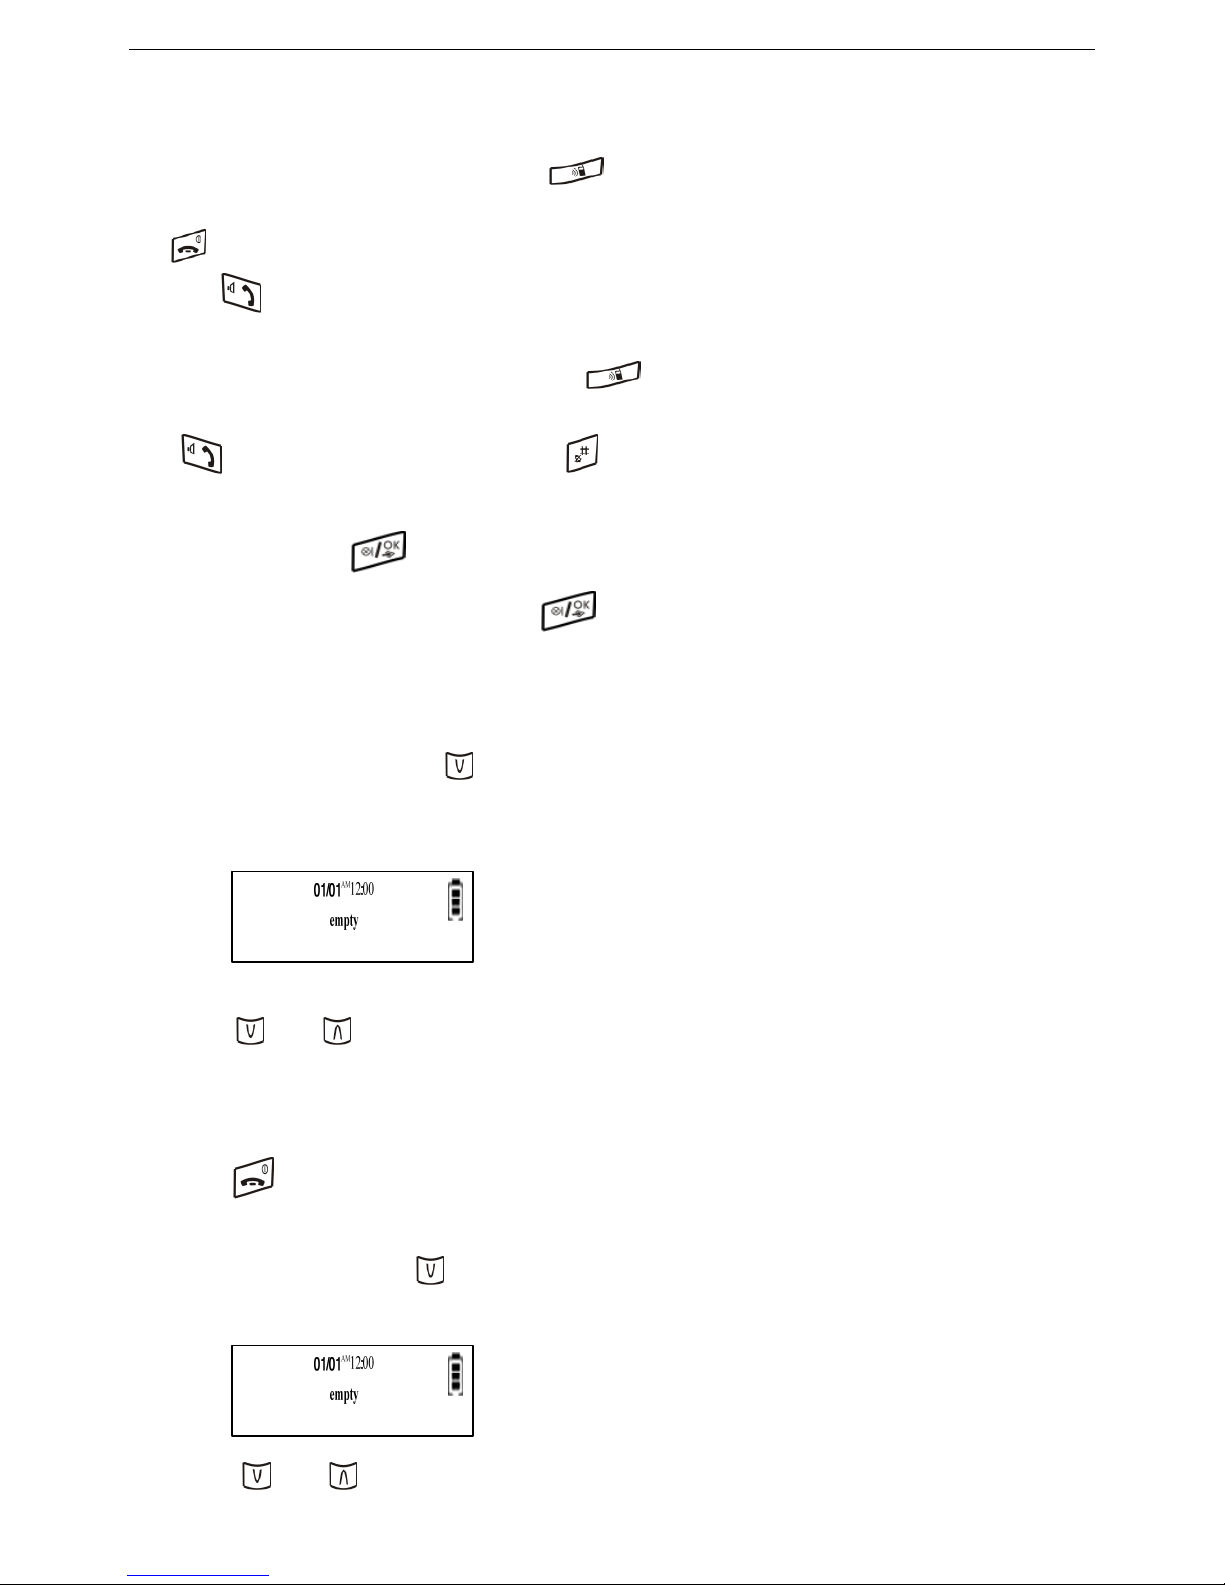
a. In standby mode ,press key to enter Outgoing call reviewing, if Outgoing call memory is
empty, LCD will show as following:
Press key or button to check the latest 10 groups outgoing calls memory.
Press【0】button to check the remaining digits if the number length is over 14digits, and press【0】
button again, Talking time will be displayed on the LCD. ex.18:30.
b. Press key to return to standby mode.
6.12.2 OUTGOING CALL REDIALING
a. In standby mode, press key to enter Out going call reviewing, if Outgoing call memory is
empty, LCD will show as following:
b. Press
key or button to select the phone number to redial.
24
Page 25
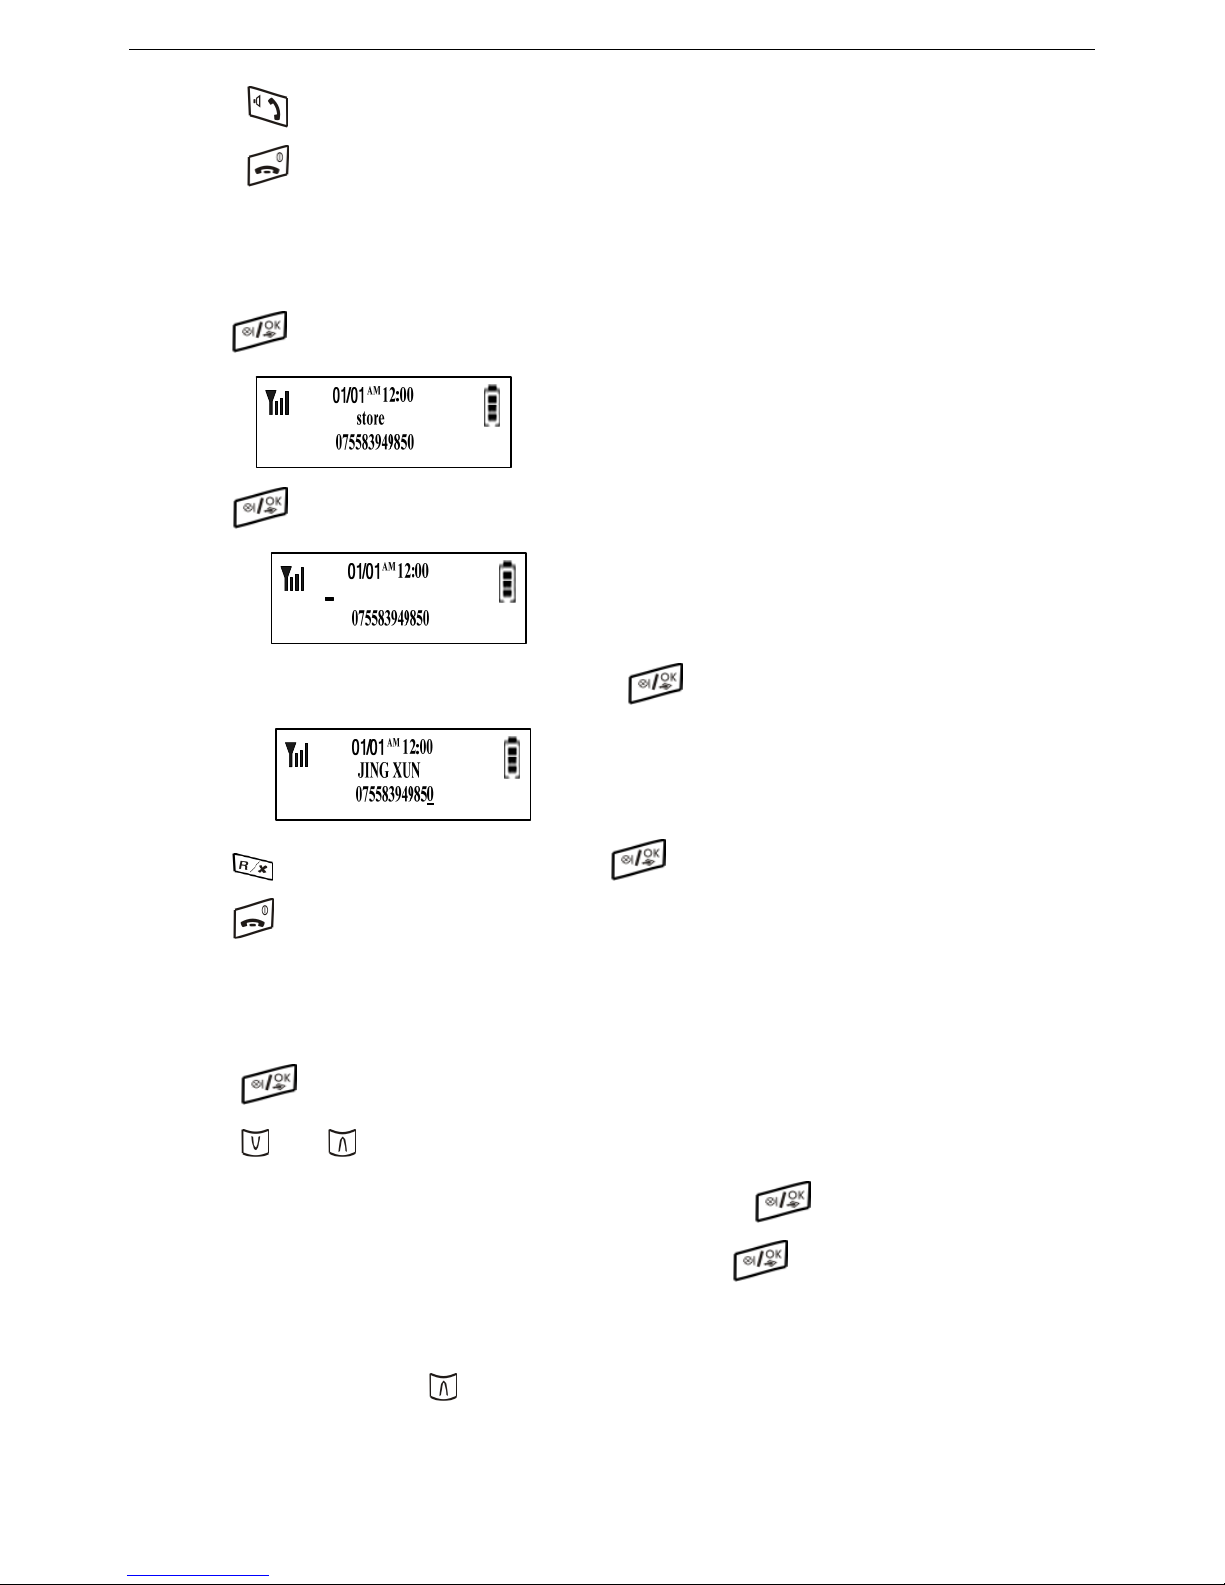
C. Press button to dial it directly
D. Press
key to return into standby mode.
6.12.3 OUTGOING CALL STORE
After reviewing Outgoing call, and select the phone number you want to store.
a. Press
button to store and LCD will show as following:
b. Press
button and LCD will show as following:
Input the name by pressing numerical keypad and press
button to confirm. LCD will show as following:
c. Press
key to modify phone number and press key to save.
d. Press
key to return to standby mode.
6.12.4 OUTGOING CALL DELETE
After reviewing Outgoing call, and select the phone number you want to delete.
a. Press button and LCD will show “Store”
b. press
key or botton to select “Delete\Delete all”.
To delete the single memory number, please select “Delete” and press
button to confirm.
To delete all memory numbers, please select “Delete all” and press
button to confirm.
6.13 RECEIVED CALL REVIEWING/CALL-BACK/STORE/DELETE
6.13.1 RECEIVED CALL REVIEWING
a. In standby mode, press
key to enter Received call reviewing, if received call memory
is empty, LCD will show as following:
25
Page 26
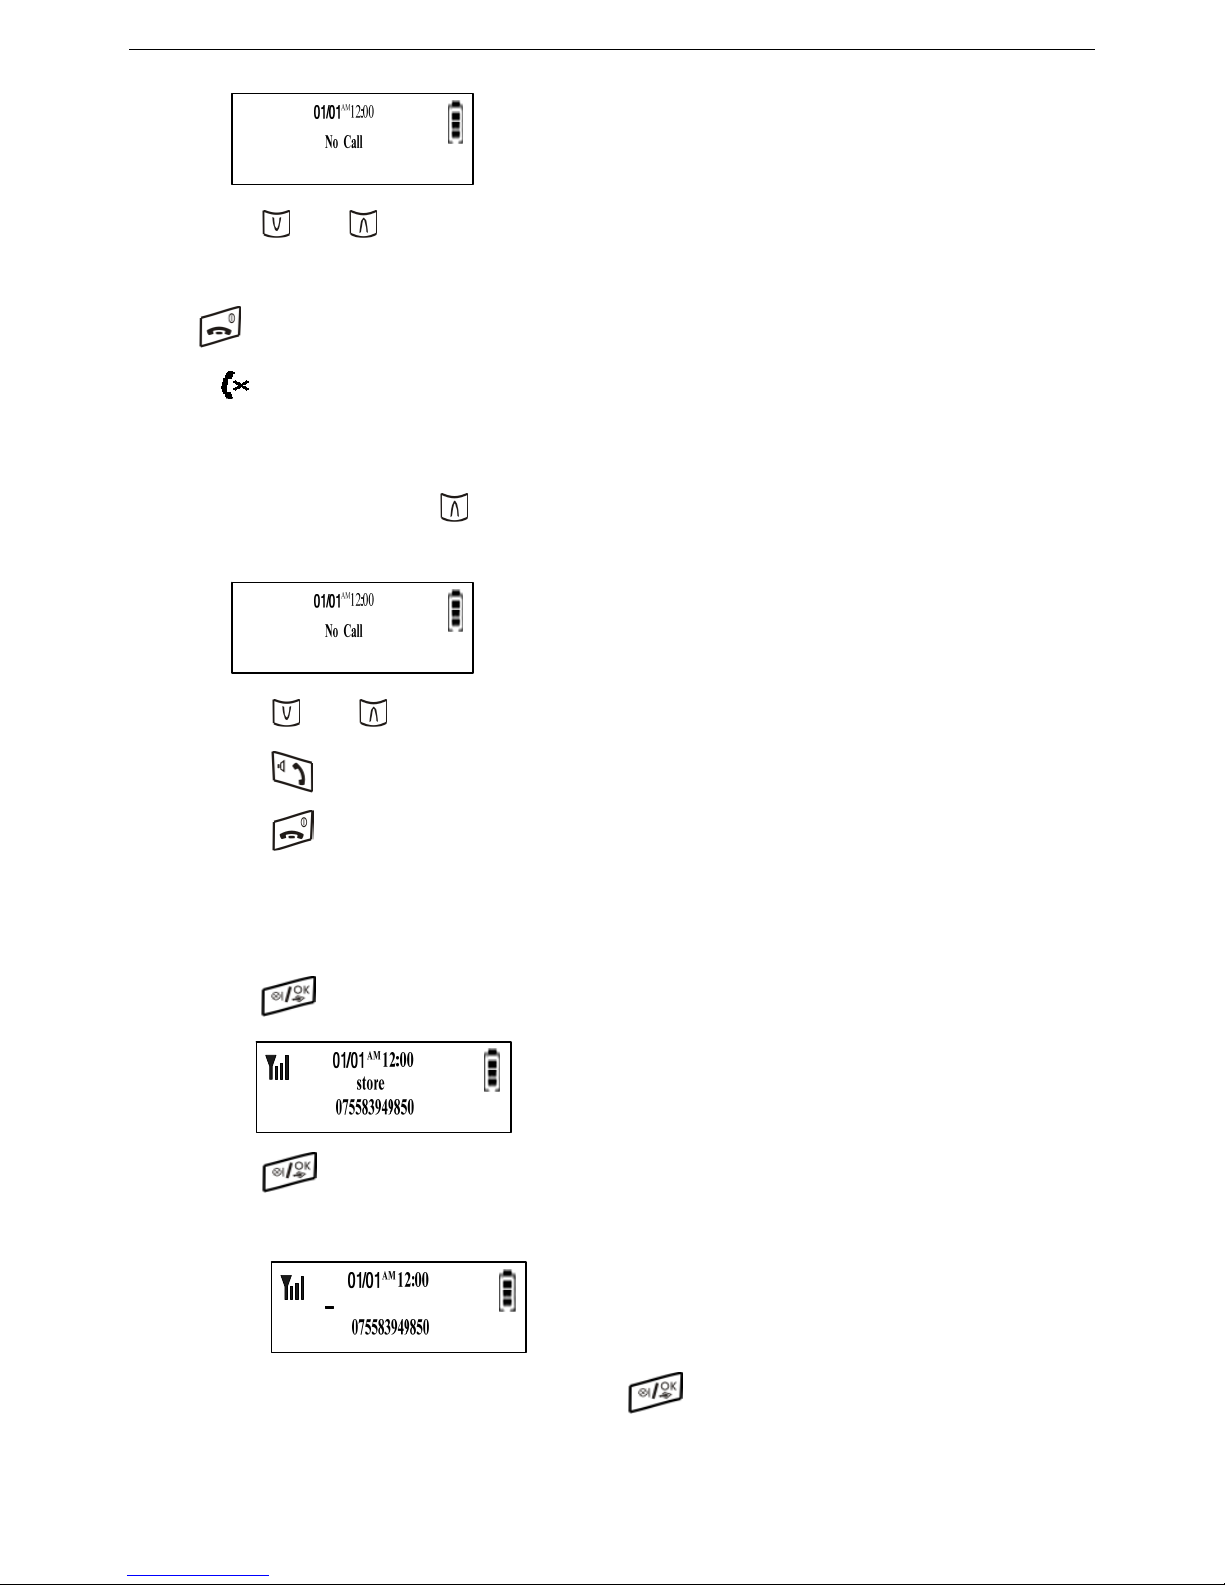
B. Press key or button to check the latest 40 groups received calls memory.
Press【0】button to check the remaining digits if the number length is over 14digits, and press
key to return to standby mode.
※ “
”icon indicates “Missed call”.
6.13.2 CALL BACK
a. In standby mode, press key to enter Received call reviewing, if receive call memory
is empty, LCD will show as following:
b. Press
key or button to select the phone number to redial.
c. Press
button to dial it directly.
d. Press
key to return to standby mode.
6.13.3 RECEIVED CALL STORE
After reviewing the received calls, and select the phone number you want to store.
a. Press button to store and LCD will show as following:
b. Press
button and LCD will show as following:
Input the name by pressing numerical keypad and press
button to confirm. LCD will show as following:
26
Page 27
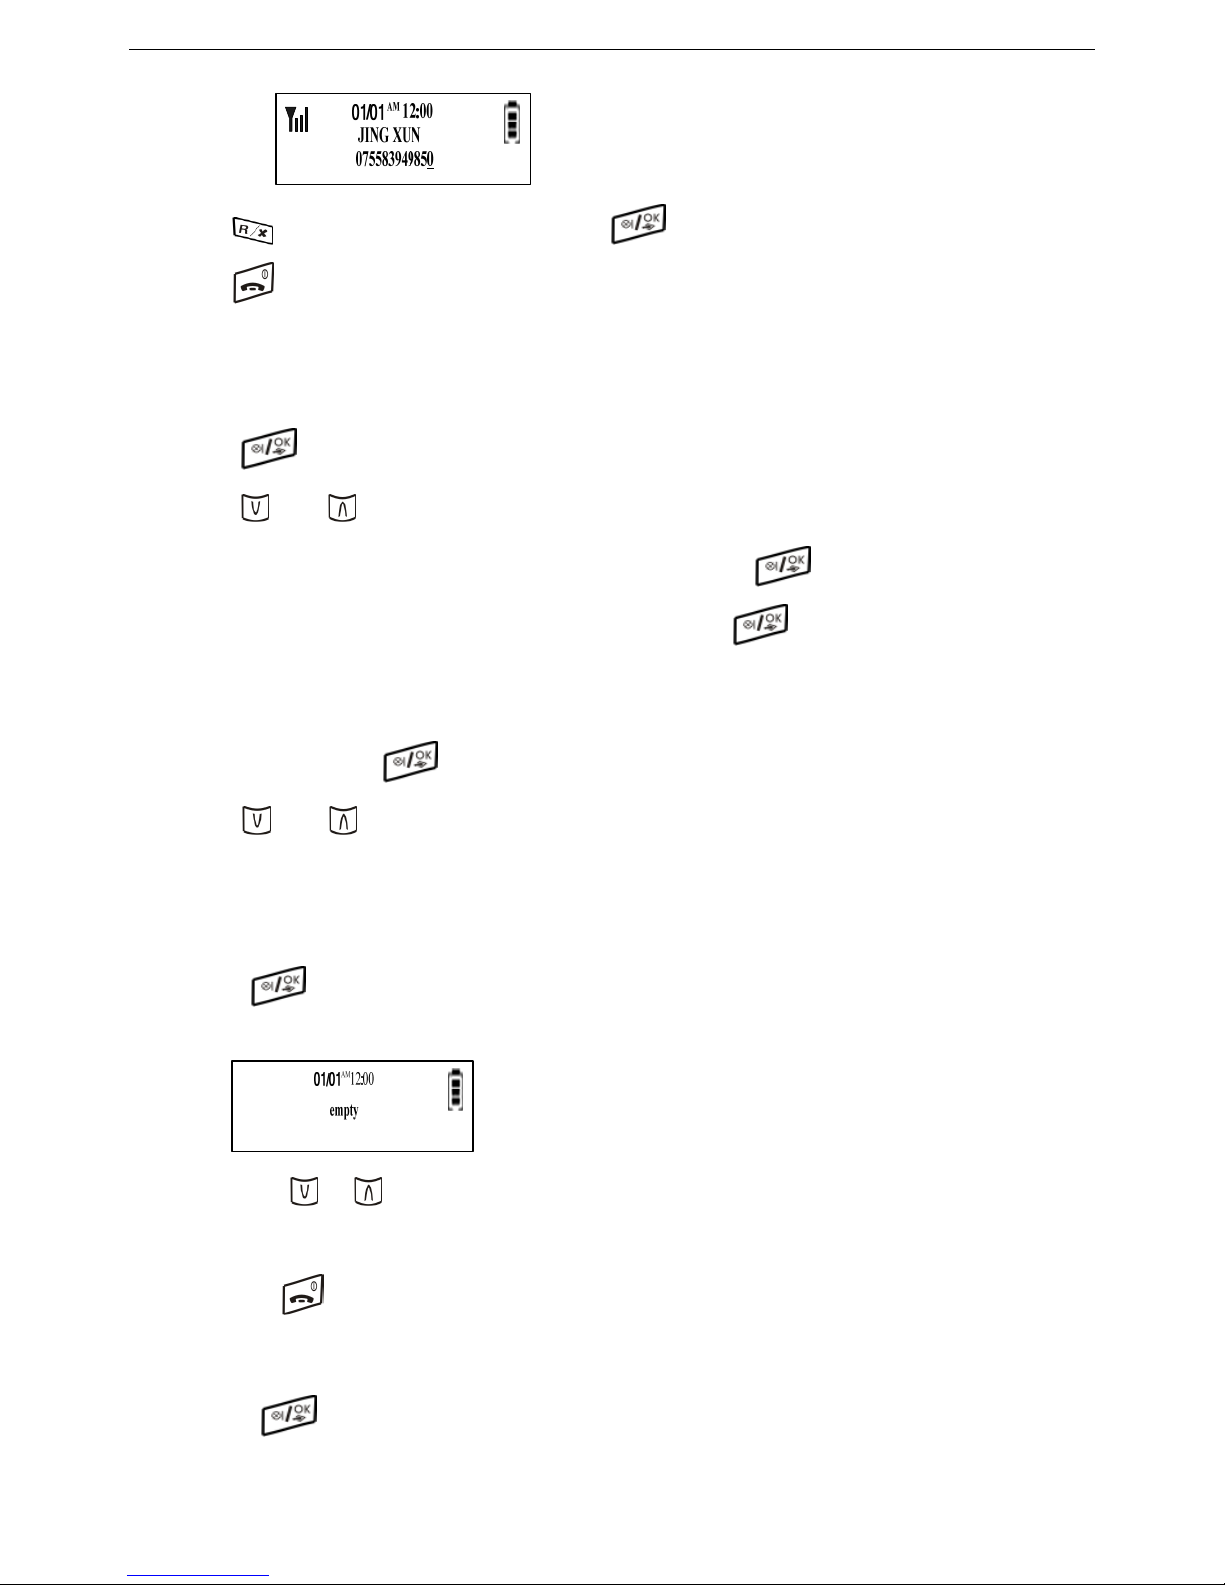
c. Press
key to modify phone number and press key to save.
d. Press
key to return to standby mode.
6.13.4 RECEIVED CALL DELETE
After reviewing Received calls, and select the phone number you want to delete.
a. Press button and LCD will show “Store”
b. press
key or botton to select “Delete\Delete all”.
To delete the single memory number, please select “Delete” and press button to confirm.
To delete all memory numbers, please select “Delete all” and press
button to confirm.
。
6.14 PHONE BOOK FUNCTION
In standby mode, press button to enter setting mode.
Press
key or button to enter phonebook function.
6.14.1 TO REVIEW PHONEBOOK MEMORY
In Phonebook mode
a. Press
button to confirm and it displays “phone book number”. If Phonebook memory
is empty, LCD will show as following:
B. Press or button to check the latest 40 groups phone book memory.
press【0】button to check the remaining digits if the number length is over 14digits
Press key to return to standby mode.
6.14.2 TO ADD PHONE BOOK MEMORY
In phonebook reviewing mode,
a. Press
button to confirm, LCD will show as following:
27
Page 28
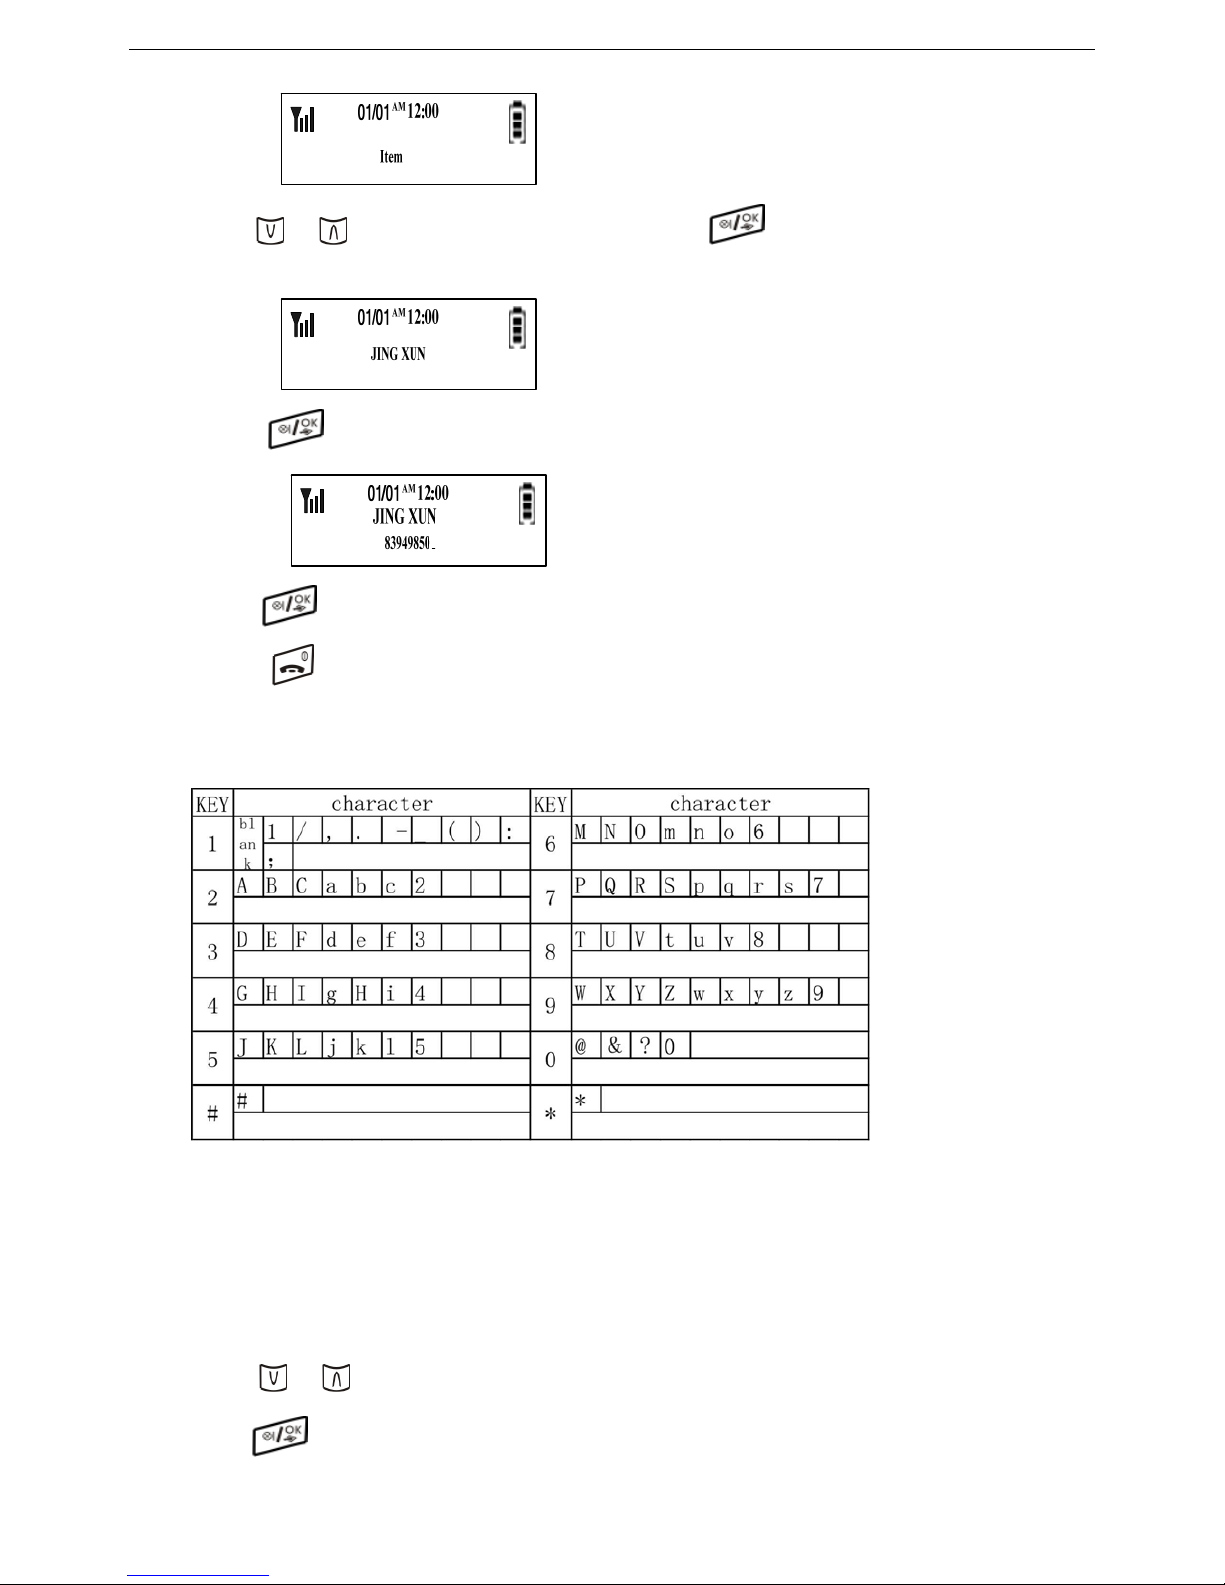
B. Press
or button to select “Add item”option and press key, the blinking cursor will guide you to
input the name.
C. Press key to confirm, the blinking cursor will guide you to input phone number.
Press
key to save the phone number. After the sound of “di du”, it indicates that the setting is done.
d. Press
key to return to standby mode.
4.14.3 CHARACTER COMPARISON
If you want to input the name of “Tom”,
a ter “T”
6.14.4 TO EDIT PHONEBOOK MEMORY
a.
Press
. Press【8】key 1 time to inptut charac
b. press【6】 key 6 times to inptut character “o”
c. press【6】 key 4 times to inptut character “m”
In phonebook reviewing mode,
or button to select the phone number you want to edit.
b. Press button to confirm, LCD will show as following:
28
Page 29
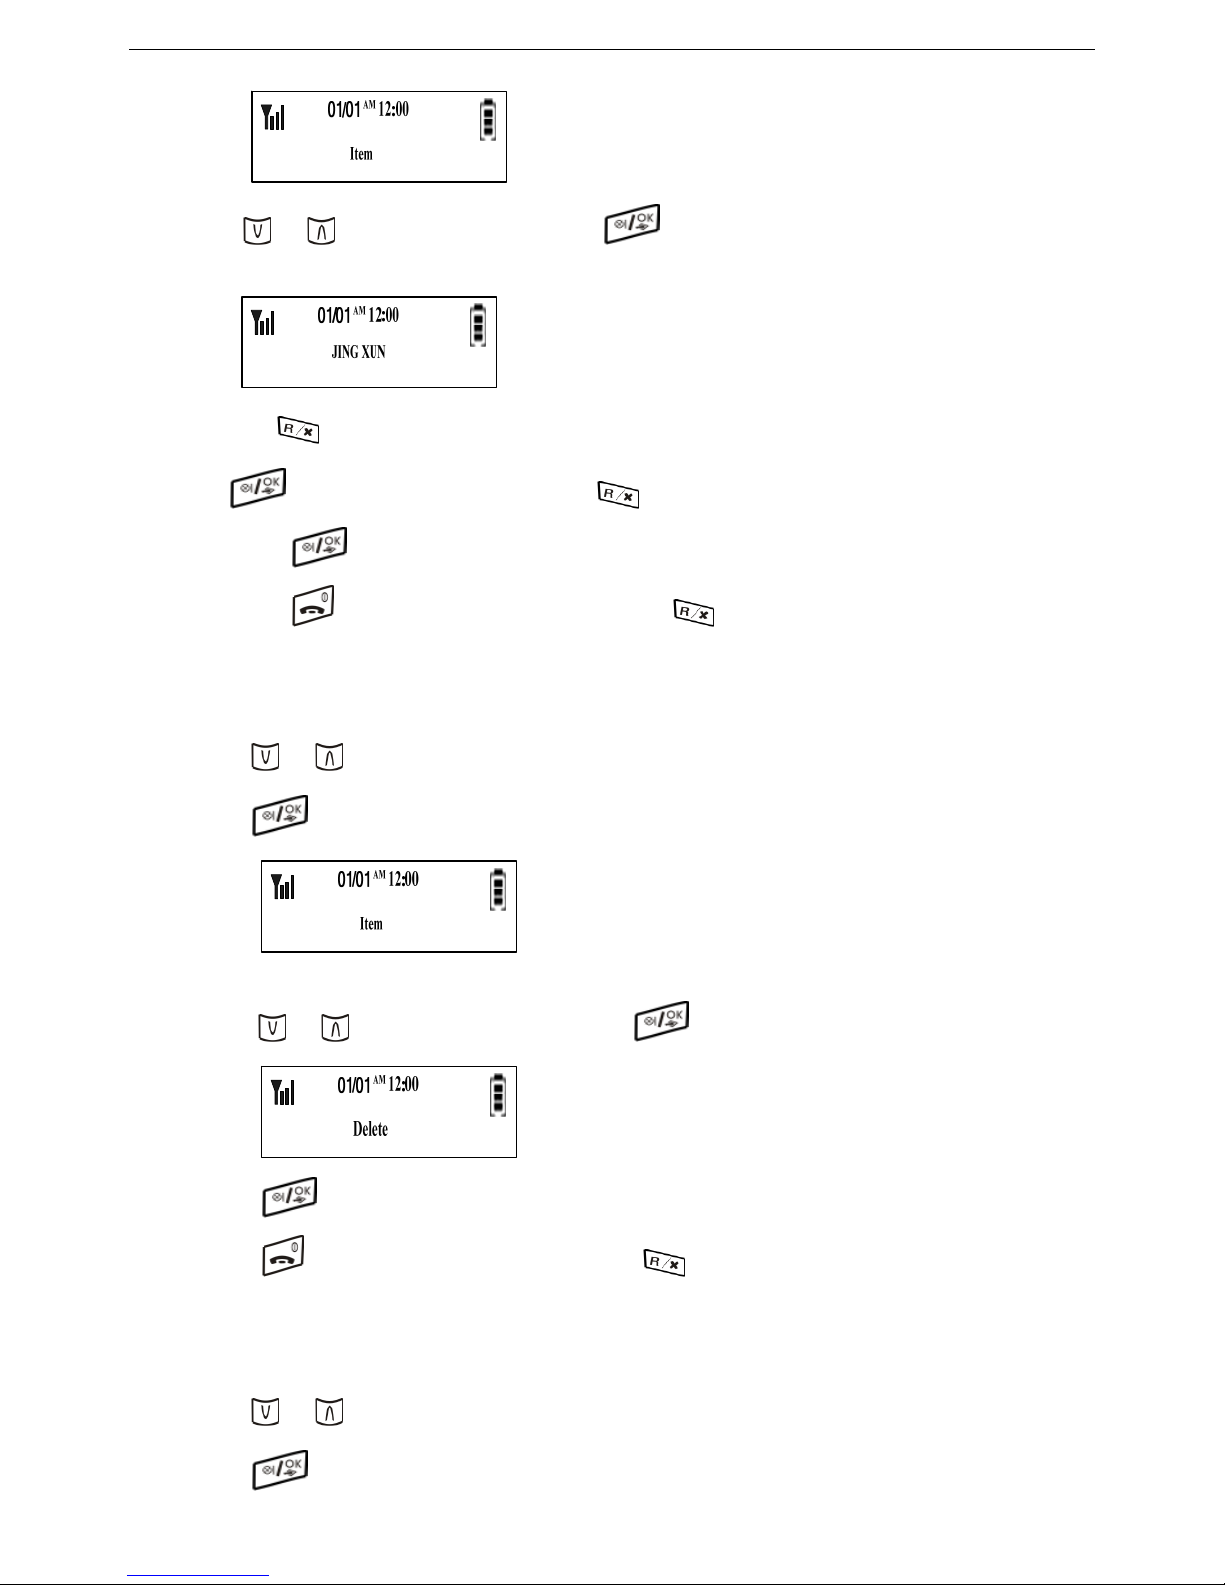
Æ Please change ‘Item’ to ‘Edit’
c. Press
or button to select “Edit” and press button, LCD will show as following:
--> Please add phone number to the picture.
d. Press
button to delete letter or input letters by pressing numerical keypad . After editing name, press
button to edit phone number and press button to delete and input correct number.
Press
button to finish editing. After the sound of “di du”, it indicates that the setting is done.
Press
button to return to standby mode, or press button to return to previous menu.
6.14.5 TO DELETE ONE GROUP PHONEBOOK MEMORY
In phonebook reviewing mode
a. Press
or button to select the phone number you want to delete.
b. Press
button to confirm, LCD will show as following:
c. Press or button to select “Delete” and press button, LCD will show as following
Press
button to delete. After the sound of “di du”, it indicates that the setting is done.
Press
button to return to standby mode, or press button to return to previous menu.
6.14.6 TO DELETE ALL PHONEBOOK MEMORY
In phonebook reviewing mode
a. Press
or button to select the phone number you want to delete.
b. Press
button to confirm, LCD will show as following:
29
Page 30
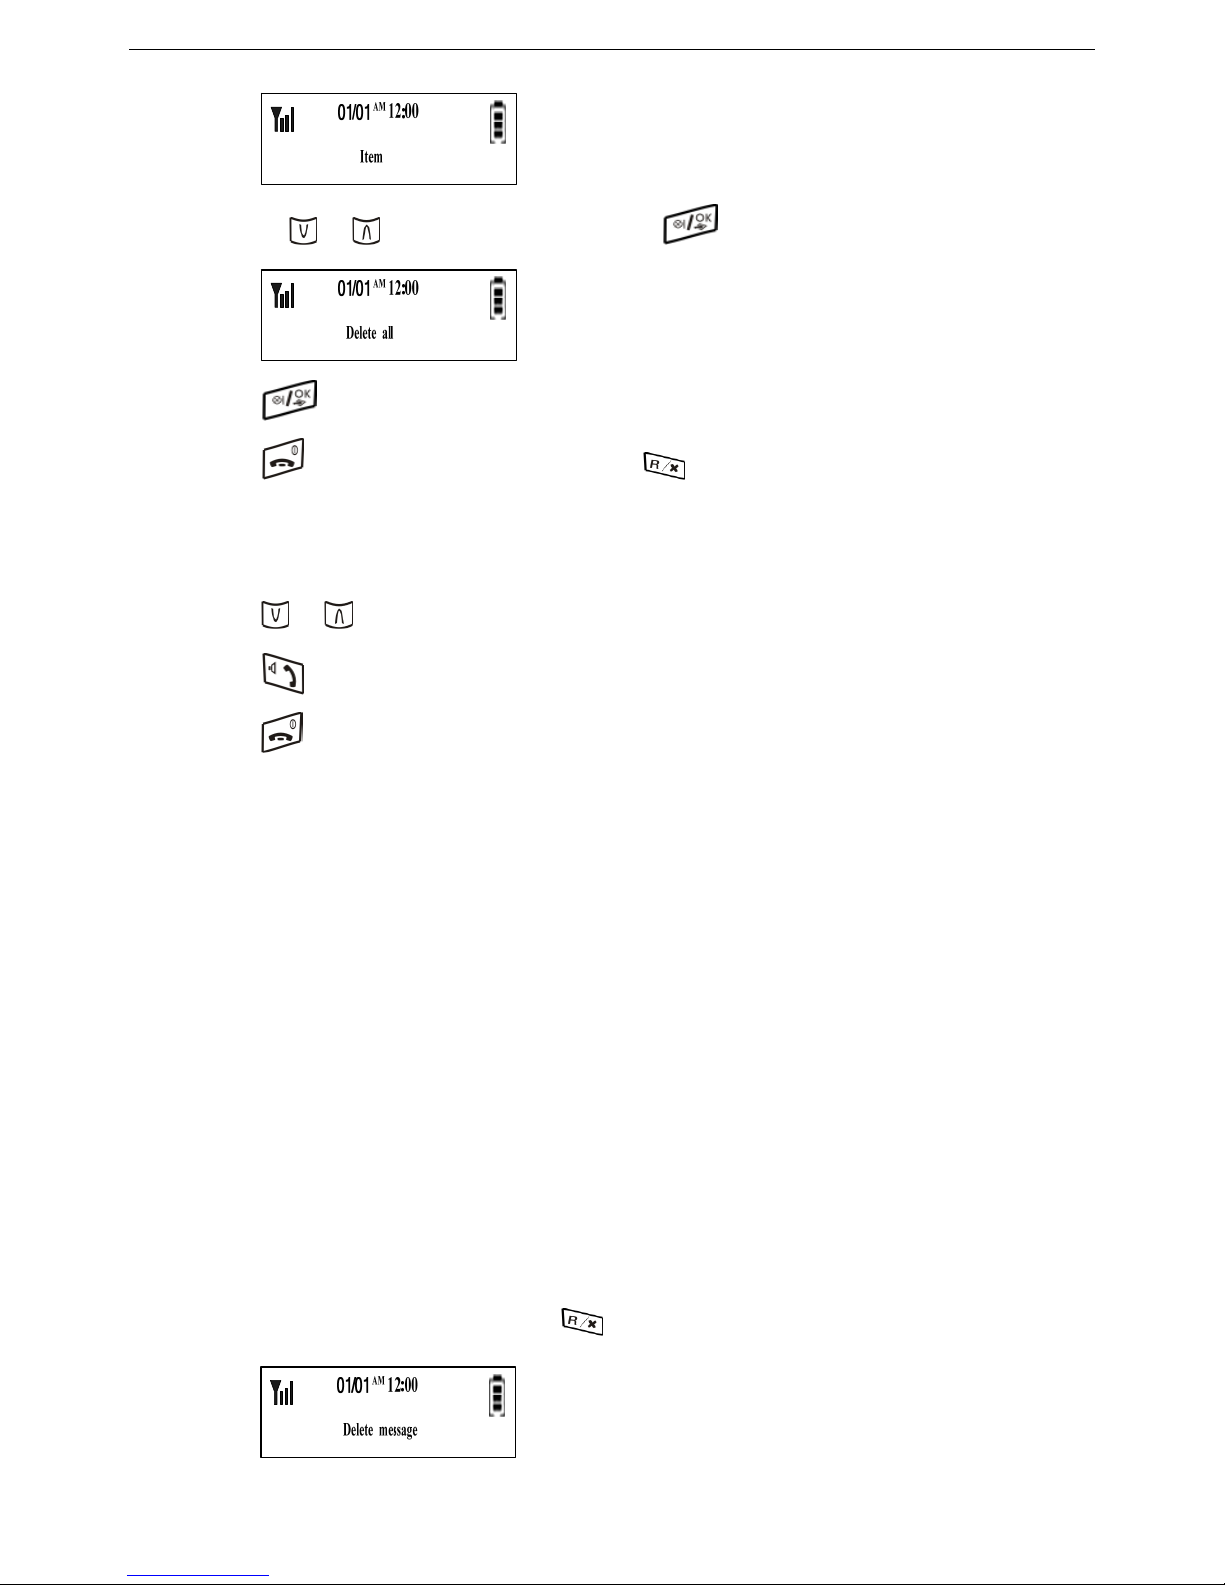
C. Press
or button to select “Delete all”, press button , LCD will show as following
Press
button to delete all. After the sound of “di du”, it indicates that the setting is done.
Press
button to return to standby mode, or press button to return to previous menu.
6.14.7 PHONE BOOK DIALING
In phonebook reviewing mode
a. Press
or button to select the phone number you want to dial.
b. Press
button to dial it directly.
c. Press
key to return to standby mode.
7. OTHER FUNCTION
7.1 PAGE FROM BASE TO HANDSET
In standby mode,
Press page button on the base, then handset will be ringing.
7.2 KEYPAD LOCK ON/OFF FUNCTION
In standby mode, press 【*】 key for 3 seconds, the LCD will display “key locked”. It indicates that the keypad is
locked and no button are activated except 【*】 key. Press【*】key for 3 seconds again to inactivate the keypad
lock .
7.3 NEW MESSAGE INDICATION
When handset receives new message, LCD will display “New mssage”.
7.3.1 DELETE MESSAGE
When “New mssage” displayed on LCD, press key for 3 seconds, then LCD will show as following
30
Page 31

Press key to confirm and return to standby mode .
7.4 OUT OF RANGE ALARM
During talking on the phone, it will beep if the handset goes out of range. User has to return to the range within 20
seconds.
7.5 HANDSET ON/OFF FUNCTION
Press button for 3 seconds, the handset will be turned off. And press button for 3 seconds again, the
handset will be turned on. When the handset is turned off, the handset will be turned on automatically if it is placed
into the base charger.
31
 Loading...