

Page 1
The following instructions will help you
The Power of Being There
Quick Installation Guide
SwitchView USB
operate your SwitchView unit.
Should you require further assistance, please
contact Avocent Technical Support.
To operate a SwitchView unit
Selecting a channel
A channel may be selected in one of the following ways:
• Pressing the button corresponding to the relevant
attached computer
• Using hotkey commands
When you change channels, the mouse will stop moving
for one to two seconds as the signals are synchronized.
Using SwitchView with
USB-connected systems
When USB devices are attached to the SwitchView, they
can be shared with any attached computer. Up to 126
USB devices can be connected by attaching additional
hubs to the unit.
Your SwitchView incorporates a USB 1.1B compliant hub
with two ports. The hub can be switched to any of the
attached computers in conjunction with, or separately
from, the USB mouse/keyboard and the video connections.
NOTE: Firmware updates can be installed using the
UPGRADE port. For instructions and the latest firmware,
visit www.avocent.com.
Using hotkey commands
A hotkey command can be used by pressing a series of
key sequences:
• <CTRL><CTRL> <X*> switches the keyboard,
• <CTRL><CTRL> <LEFT ARROW> toggles scan
• <CTRL><CTRL> <UP ARROW> <X*> switches
• <CTRL><CTRL> <DOWN ARROW> <X*>
* <X> = the port number of the attached computer
NOTE: <SCROLL><SCROLL> can be substituted in
any hotkey sequences that use <CTRL><CTRL>.
mouse, video and all USB devices simultaneously
to another system.
mode on or off.
the keyboard, mouse and video to another system
separately from the USB hub.
switches the USB hub to another system separately
from the PS/2 keyboard/mouse and video.
or USB hub
Check our web site at www.avocent.com/support to search the knowledge base or use the on-line service request. Click on Contact Details for regional support.
590-344-103A
Page 2
The following instructions will help you
The Power of Being There
Quick Installation Guide
SwitchView USB
connect your SwitchView unit.
Should you require further assistance, please
contact Avocent Technical Support.
NOTE:
All drivers necessary for the SwitchView
are built into the unit. If you are installing the unit
with a Windows operating system and are
prompted for drivers, press NEXT until the
configuration is
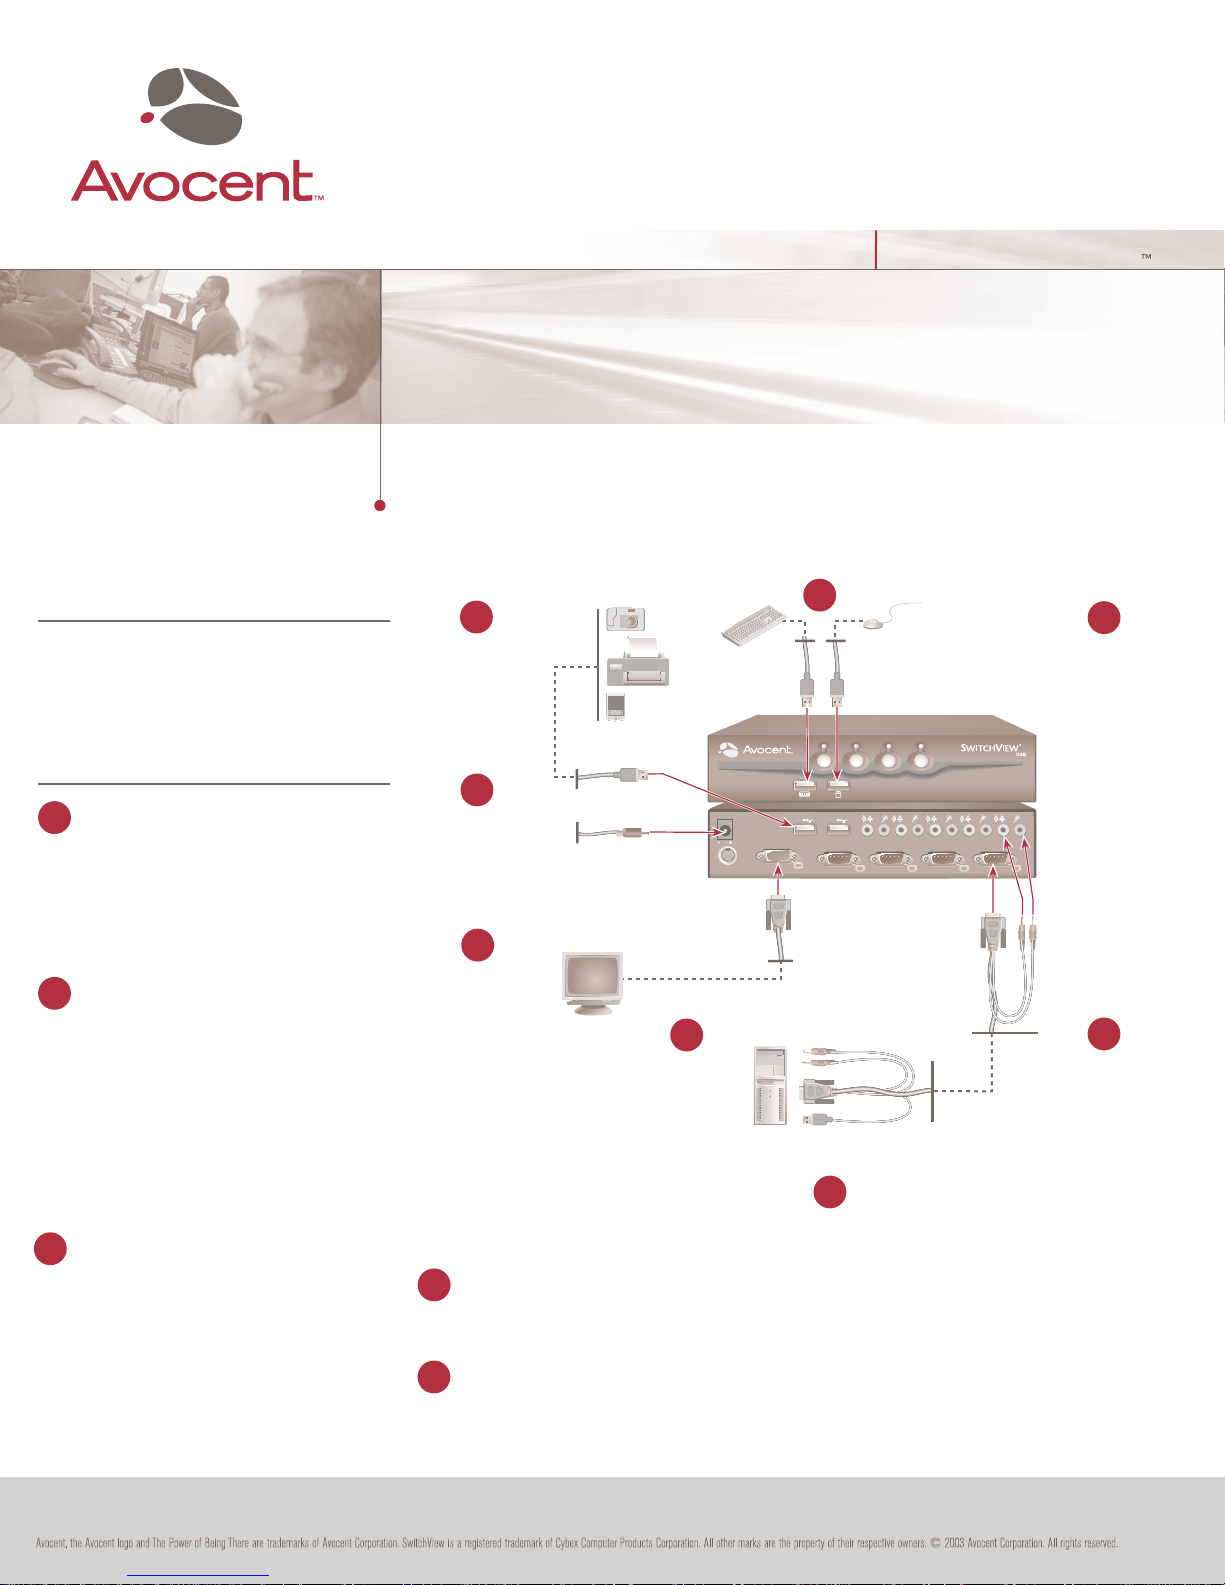
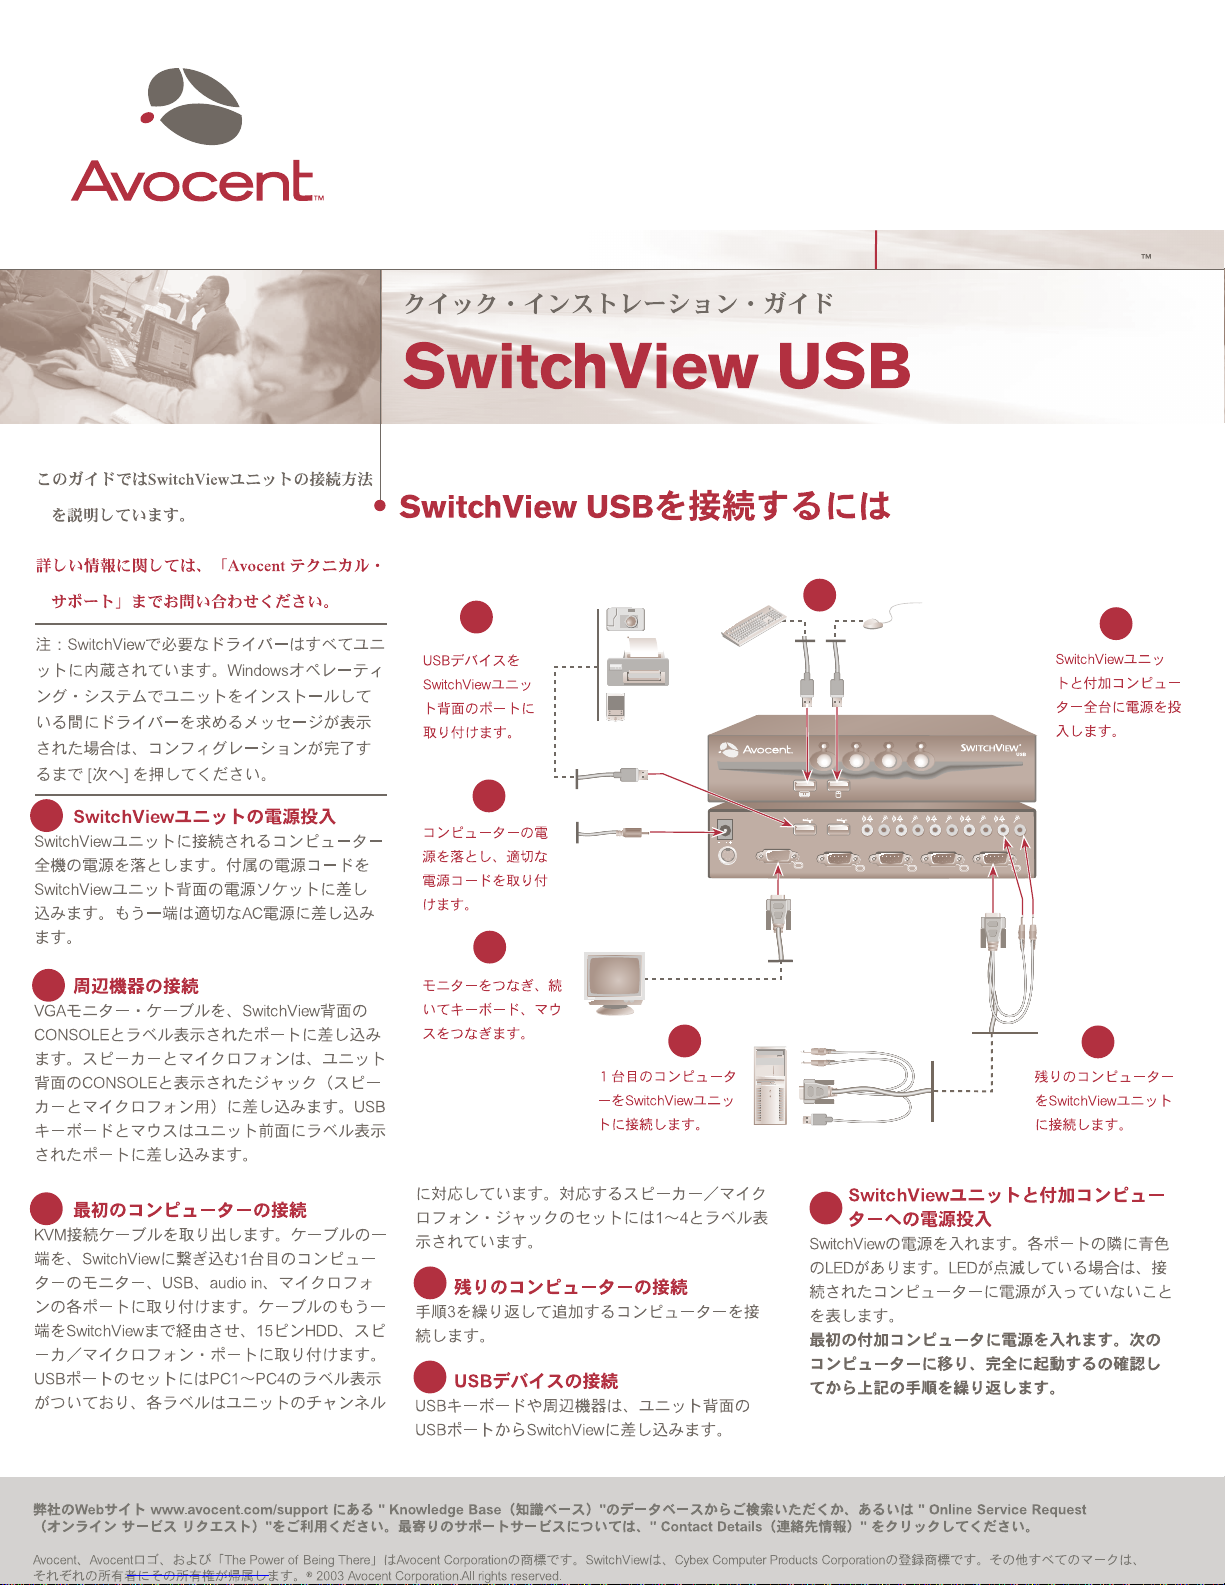
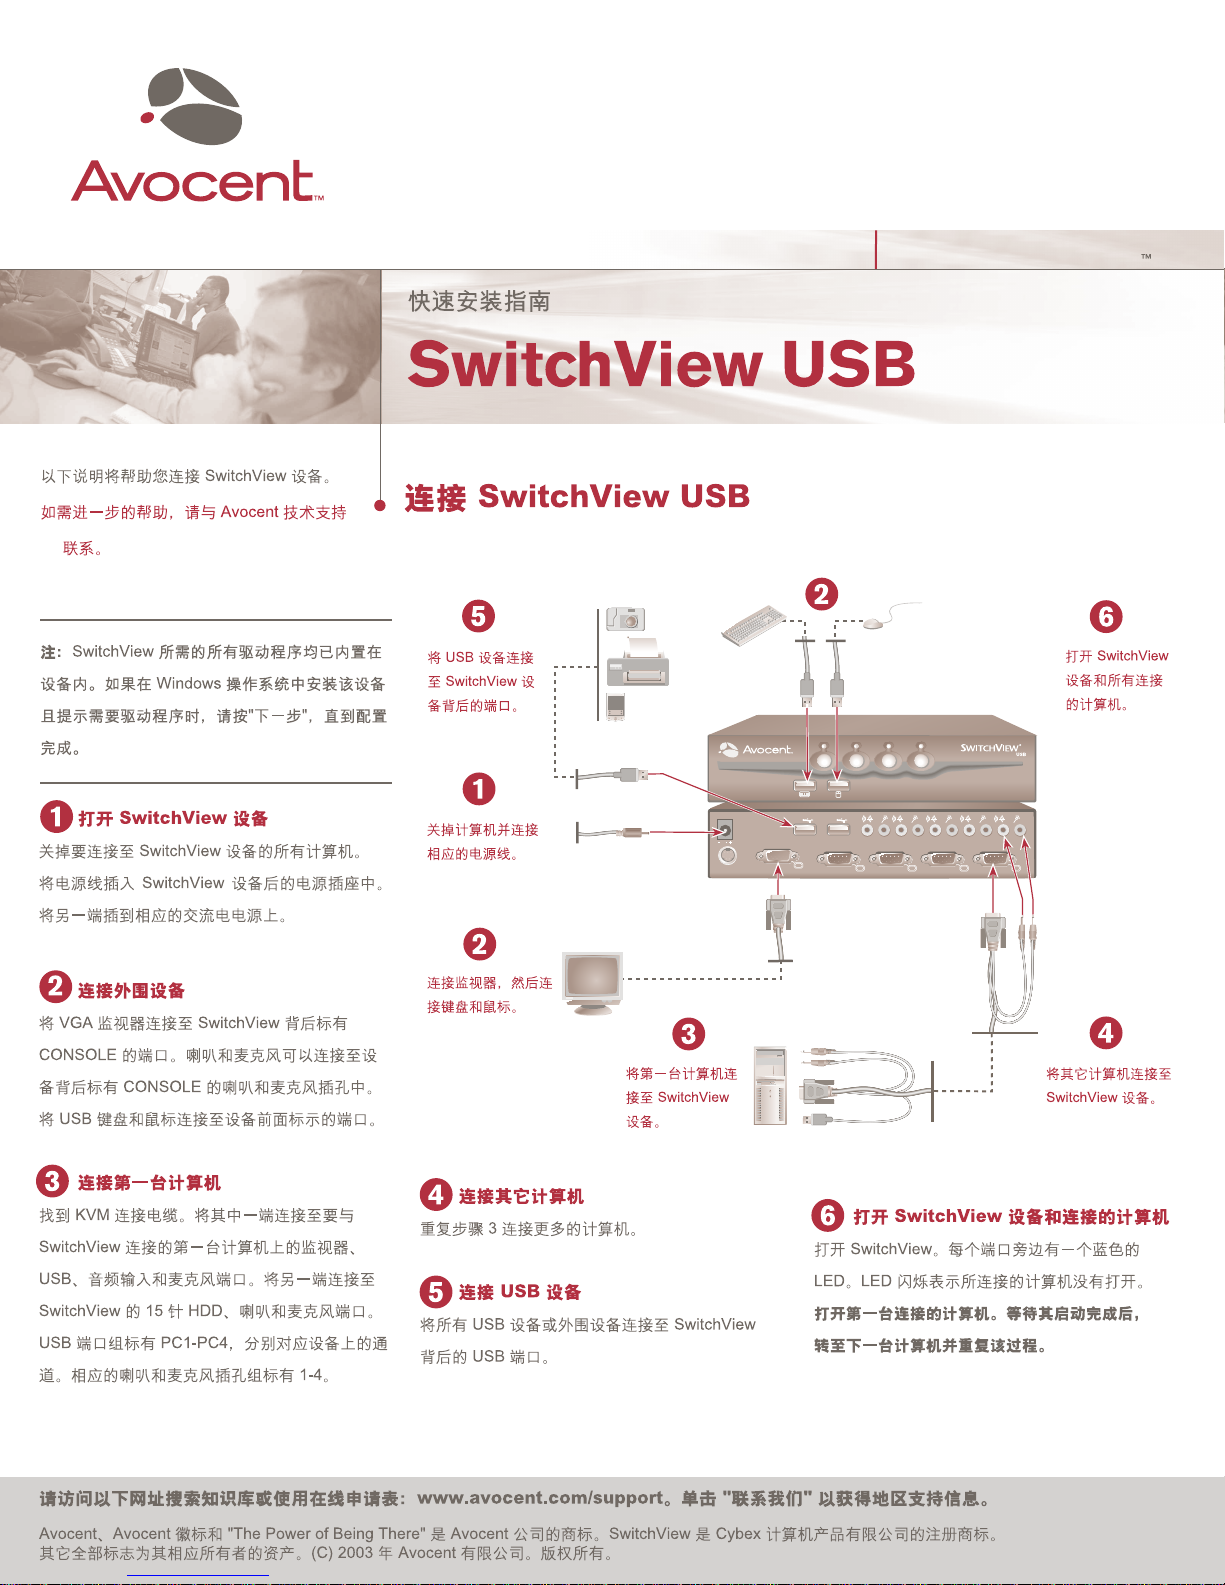
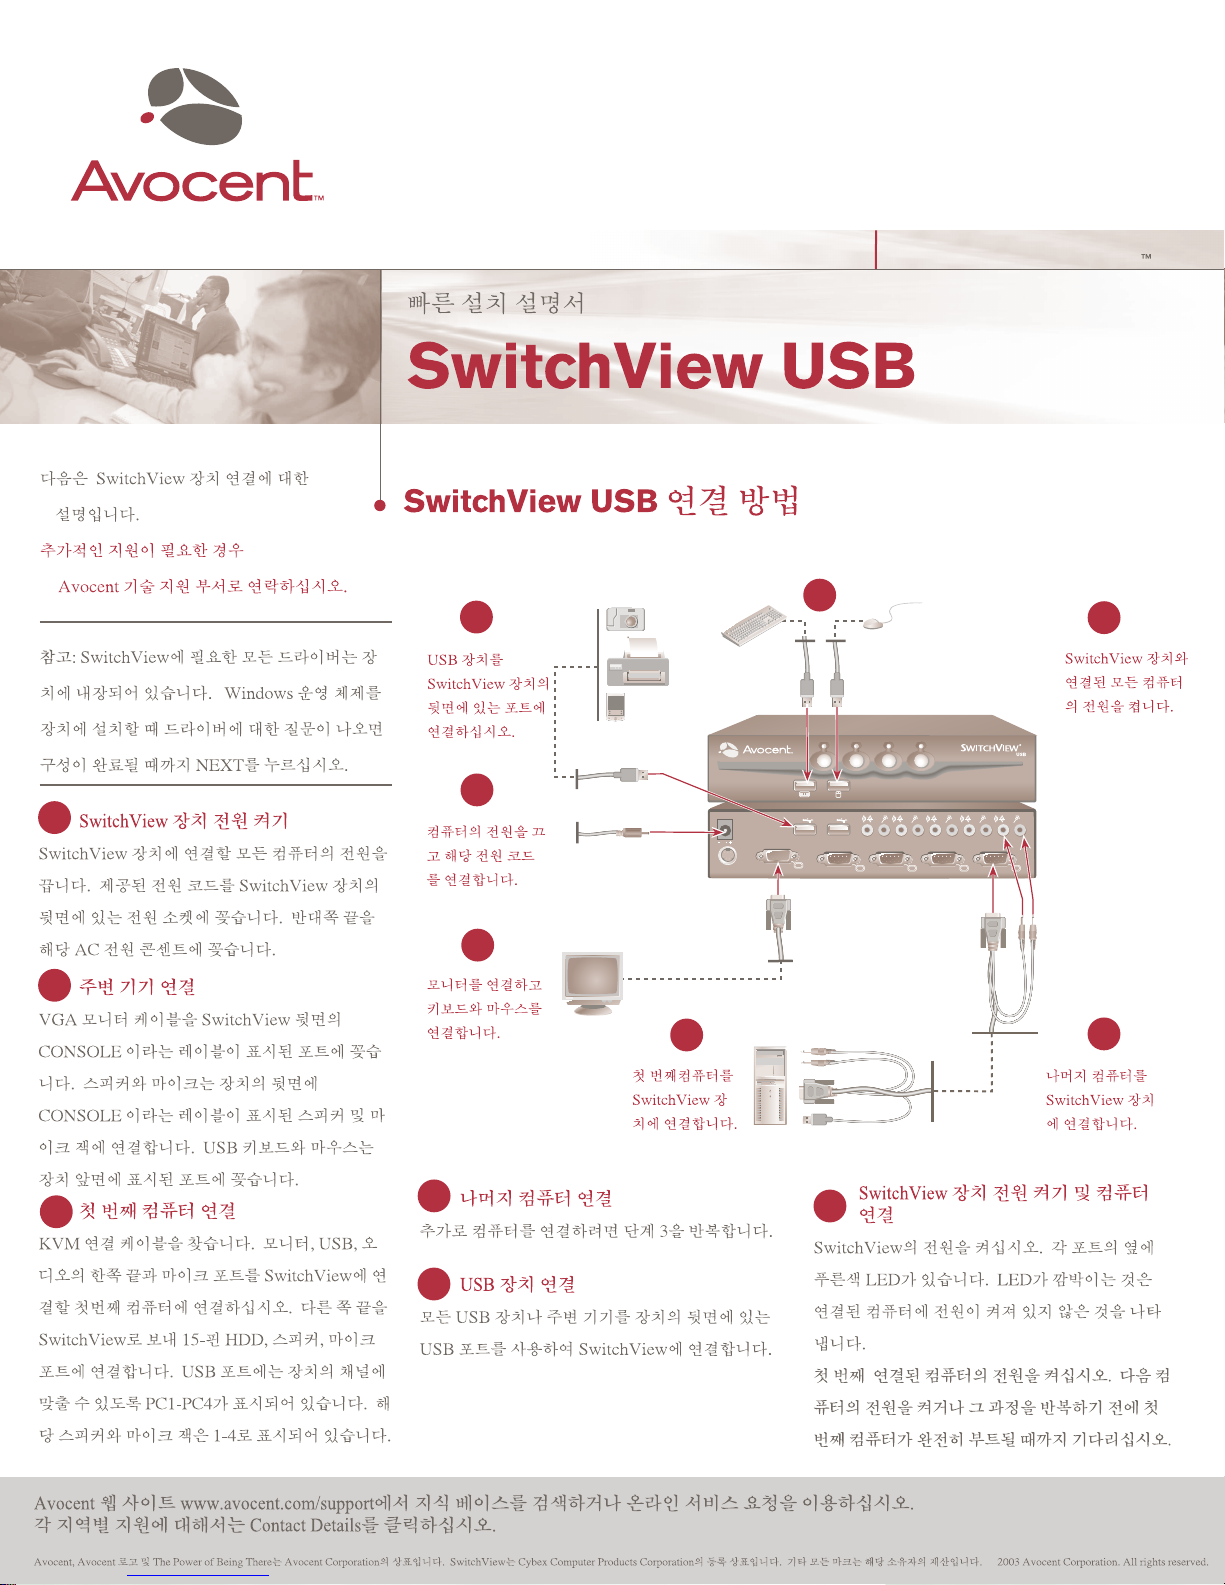
Powering the SwitchView unit
1
Power down all computers that will be attached to your
SwitchView unit. Plug the supplied power cord into the
power socket on the rear of the SwitchView unit. Plug
the other end into an appropriate AC power source.
Connecting the peripheral devices
2
Plug your VGA monitor into the port labeled CONSOLE
on the back of the SwitchView. Speakers and a
microphone can be attached using the speaker and
microphone jacks labeled CONSOLE on the back of
the unit. Plug your USB keyboard and mouse into the
labeled ports on the front of the unit.
Connecting the first computer
3
Locate a KVM connection cable. Attach one end to
the monitor, USB, audio in and microphone ports on
the first computer to be attached to the SwitchView.
Route the other end to the SwitchView and attach it
to the 15-pin HDD, speaker and microphone ports.
The USB port sets are labeled PC1-PC4 to correspond
complete.
To connect a SwitchView USB
2
5
Attach USB devices
to the rear ports of
the SwitchView unit.
1
Power down your
computers and attach
the appropriate
power cord.
2
Plug in the monitor,
followed by the
keyboard and mouse.
Connect the first
computer to the
SwitchView unit.
with the channels on the unit. The corresponding
speaker and microphone jack sets are labeled 1-4.
Connecting the remaining computers
4
Repeat step 3 to connect additional computers.
Connecting USB devices
5
Plug any USB devices or peripherals into the SwitchView
using the USB ports on the rear of the unit.
3
DC 12V, 1A
C
UPGRADE
2 1
PC4
CONSOLE
6
attached computers
Power the SwitchView. Next to each port is a blue
LED. A blinking LED indicates that the attached
computer is not powered.
Power the first attached computer. Wait until it
has completely booted before switching to the
next computer and repeating the process.
6
Power up the
SwitchView unit
and all attached
computers.
4 4 3 3 2 2 1 1
CONSOLE
PC3 PC2 PC1
4
Plug in the remaining
computers to the
SwitchView unit.
Powering the SwitchView unit and
Check our web site at www.avocent.com/support to search the knowledge base or use the on-line service request. Click on Contact Details for regional support.
Page 3
The Power of Being There
Page 4
5
The Power of Being There
2
6
1
3
2
4
1
2
3
DC 12V, 1A
C
UPGRADE
CONSOLE
2 1
6
CONSOLE
PC4
4 4 3 3 2 2 1 1
PC3 PC2 PC1
4
5
Page 5
The Power of Being There
Page 6
The Power of Being There
DC 12V, 1A
C
UPGRADE
CONSOLE
2 1
CONSOLE
PC4
4 4 3 3 2 2 1 1
PC3 PC2 PC1
Page 7
The Power of Being There
Page 8
5
The Power of Being There
2
6
1
2
3
4
5
1
2
3
DC 12V, 1A
C
UPGRADE
CONSOLE
2 1
6
CONSOLE
PC4
4 4 3 3 2 2 1 1
PC3 PC2 PC1
4
 Loading...