

Page 1
Page 1
Ultra96-V2 Hardware User’s Guide
Revision 1
Version 1.0
Copyright © 2019 Avnet, Inc. AVNET, “Reach Further,” and the AV logo are registered
trademarks of Avnet, Inc. All other brands are the property of their respective owners.
LIT# Ultra96-V2-HW-User-Guide-rev-1-0-V1
Page 2

Contents
1 Document Control ................................................................................................. 3
2 Version History ...................................................................................................... 3
3 Introduction ........................................................................................................... 3
3.1 Glossary ................................................................................................................................... 5
3.2 Reference Documents ............................................................................................................. 5
4 Ultra96-V2 Architecture and Features ................................................................... 6
4.1 List of Features ........................................................................................................................ 6
4.2 Ultra96-V2 Block Diagram ....................................................................................................... 7
5 Functional Description ........................................................................................... 8
5.1 Zynq UltraScale+ MPSoC ........................................................................................................ 8
5.1.1 SBVA484 Package ........................................................................................................... 9
5.1.2 PL I/Os (Banks 26, 65, 66) ............................................................................................. 10
5.1.3 PS MIOs (Banks 500, 501, 502) .................................................................................... 13
5.1.4 PS Bank 503 .................................................................................................................. 17
5.1.5 PS Bank 504 .................................................................................................................. 18
5.1.6 PS Bank 505 .................................................................................................................. 20
5.2 LPDDR4 Memory ................................................................................................................... 21
5.3 microSD Card ......................................................................................................................... 21
5.4 USB ........................................................................................................................................ 22
5.4.1 USB5744 Implementation Details .................................................................................. 22
5.5 Wi-Fi / Bluetooth..................................................................................................................... 23
5.5.1 Wi-FI ............................................................................................................................... 23
5.5.2 Bluetooth ........................................................................................................................ 23
5.5.3 Bluetooth Audio .............................................................................................................. 23
5.6 Mini DisplayPort ..................................................................................................................... 23
5.7 UART ..................................................................................................................................... 23
5.8 I2C .......................................................................................................................................... 24
5.9 User LEDs .............................................................................................................................. 24
5.10 MPSoC Thermal Bracket with Fan ......................................................................................... 24
5.11 Expansion Connectors ........................................................................................................... 24
5.11.1 Low Speed Expansion Connector (J7) .......................................................................... 24
5.11.2 High Speed Expansion Connector ................................................................................. 26
6 Configuration and Debug .................................................................................... 27
6.1 Boot Mode .............................................................................................................................. 27
6.2 JTAG Configuration and Debug ............................................................................................. 27
Page 2
Page 3

7 Power .................................................................................................................. 28
Version
Date
Comment
1.0
23 May 2019
Initial Release
7.1 External Power Connection ................................................................................................... 28
7.2 Power Estimation Using XPE ................................................................................................. 28
7.3 Power Regulators .................................................................................................................. 29
7.4 Power Sequence .................................................................................................................... 30
8 Clocks ................................................................................................................. 32
9 Reset ................................................................................................................... 32
10 Specifications and Ratings .................................................................................. 32
11 Getting Help and Support .................................................................................... 32
1 Document Control
Document Version: 1.0
Document Date: 23 May 2019
2 Version History
3 Introduction
The main purposes of the Ultra96-V2 Kit are:
• Provide a Xilinx entry in the 96Boards community
• Combine ARM processing with programmable logic in a convenient and expandable board
• Showcase a wide range of potential peripherals and acceleration engines in the programmable logic
that is not available from other 96Boards offerings
• Be a low-cost starter kit for Zynq UltraScale+ MPSoC developers
• Showcase hardware acceleration for software bottlenecks
• Allow expansion to a variety of sensors and peripherals through the 96Boards mezzanine
connectors
• Target a number of applications for development, including:
o Artificial Intelligence
o Machine Learning
o IoT/Cloud connectivity for add-on sensors
Page 3
Page 4

o Embedded Computing
o Robotics
o Wireless design and demonstrations using Wi-Fi and Bluetooth
Page 4
Page 5
3.1 Glossary
Term
Definition
PS
Zynq UltraScale+ MPSoC Processing System
PL
Zynq UltraScale+ MPSoC Programmable Logic
MIO
PS Multiplexed Input Output Pins
POR
Power On Reset
APU
Application Processing Unit
RPU
Real-time Processing Unit
GPU
Graphics Processing Unit
SYSMON
System Monitor
HD
High Density PL I/O Pins
HP
High Performance PL I/O Pins
PMBus
Power Management Bus
3.2 Reference Documents
[1] Zynq UltraScale+ MPSoC Overview
[2] Zynq UltraScale+ MPSoC DC and AC Switching Characteristics
[3] Zynq UltraScale+ MPSoC Technical Reference Manual
[4] Zynq UltraScale+ MPSoC Packaging and Pinout Product Specification
[5] Zynq UltraScale+ MPSoC PCB Design Guide
[6] UltraScale Architecture SelectIO Resources
[7] SBVA484 Package File
[8] Xilinx Vivado Design Suite
[9] Xilinx Software Development Kit
[10] 96Boards Specification
[11] WiLink8 2.4GHz WiFi + Bluetooth Module
[12] USB3320 Hi-Speed USB 2.0 ULPI Transceiver
[13] USB5744 Smart Hub
[14] Micron MT53B512M32D2NP-062 WT:C LPDDR4 SDRAM datasheet
[15] Delkin Devices Utility Industrial MLC microSD
Page 5
Page 6

4 Ultra96-V2 Architecture and Features
This section summarizes the features of the development board, followed by functional descriptions of each
circuit.
4.1 List of Features
The Ultra96-V2 Developer Kit supports the following features:
• Zynq UltraScale+ MPSoC ZU3EG SBVA484
• Storage
o Micron 2 GB (512M x32) LPDDR4 Memory
o MicroSD Socket
Ships with Delkin Utility MLC Industrial 16GB card
• Wi-Fi / Bluetooth
• DisplayPort
• 1x USB 3.0 Type Micro-B upstream port
• 2x USB 3.0 Type A downstream ports
• 40-pin Low-speed expansion header
• 60-pin High speed expansion header
• Mounted on thermal bracket with fan
Note that there is no on-board, wired Ethernet interface. All communications must be done via USB,
Wi-Fi, JTAG, or expansion interface.
Page 6
Page 7
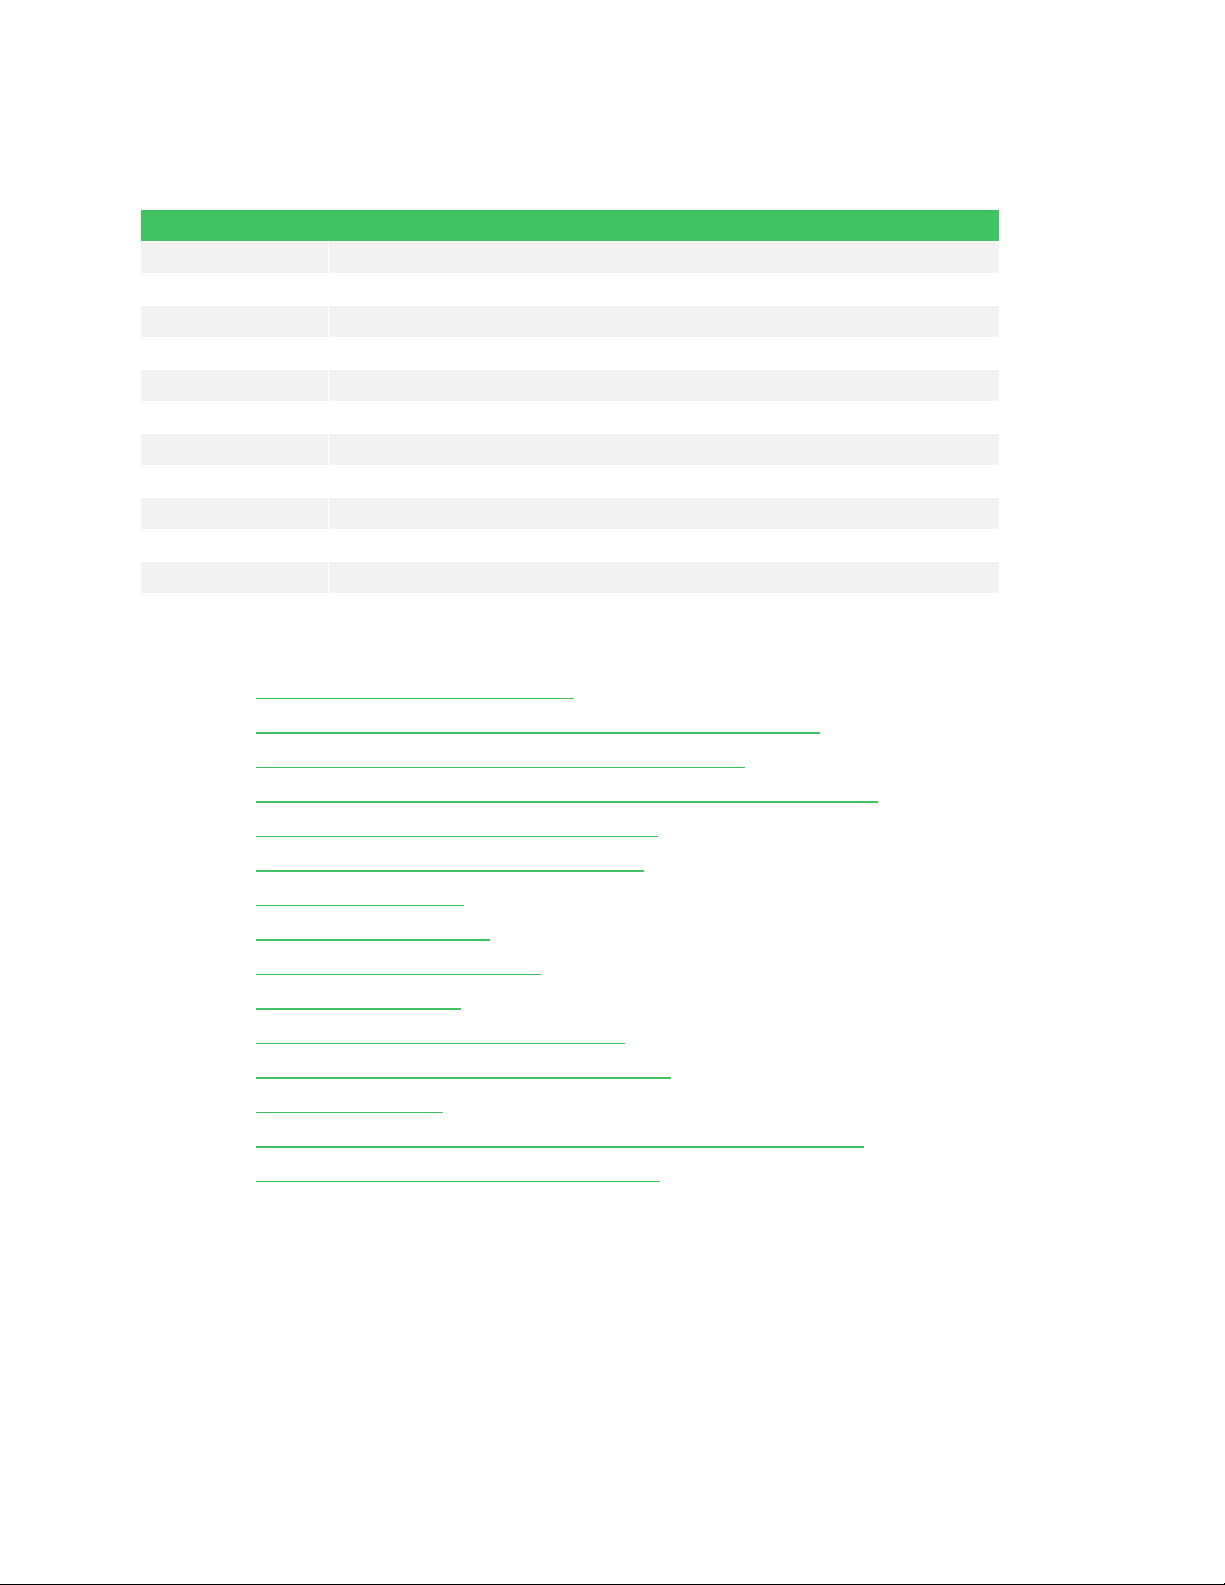
4.2 Ultra96-V2 Block Diagram
Figure 1 – Ultra96-V2 Block Diagram
Page 7
Page 8

Page 8
5 Functional Description
The following sections provide brief descriptions of each feature provided on the Ultra96-V2 board.
5.1 Zynq UltraScale+ MPSoC
The Zynq UltraScale+ MPSoC ZU3EG device (in the SBVA484 package) contains:
• Processor System (PS):
o Application Processing Unit
Quad-core ARM Cortex-A53 MPCore with CoreSight; NEON & Single/Double
Precision Floating Point; 32KB/32KB L1 Cache, 1MB L2 Cache
o Real-Time Processing Unit
Dual-core ARM Cortex-R5 with CoreSight; Single/Double Precision Floating
Point; 32KB/32KB L1 Cache, and TCM
o Embedded and External Memory
256KB On-Chip Memory w/ECC; External DDR4; DDR3; DDR3L; LPDDR4;
LPDDR3; External Quad-SPI; NAND; eMMC
o General Connectivity
214 PS I/O; UART; CAN; USB 2.0; I2C; SPI; 32b GPIO; Real Time Clock;
WatchDog Timers; Triple Timer Counters
o High-Speed Connectivity
4 PS-GTR; PCIe Gen1/2; Serial ATA 3.1; DisplayPort 1.2a; USB 3.0; SGMII
o Graphic Processing Unit
ARM Mali™-400 MP2; 64KB L2 Cache
• Programmable Logic (PL)
o System Logic Cells 154,350
o CLB Flip-Flops 141,120
o CLB LUTs 70,560
o Distributed RAM (Mb) 1.8
o Block RAM Blocks 216
o Block RAM (Mb) 7.6
o UltraRAM Blocks 0
o UltraRAM (Mb) 0
o DSP Slices 360
o CMTs 3
o System Monitor 2
• I/O
o Max PS MIO 78
MIO = multiplexed I/O (up to three banks of 26 I/Os) with support for I/O
voltage of 1.8V or 3.3V
o Max. PS Transceiver I/O 4 transmit and 4 receive pairs
o Max. PL HP I/O 156
HP = High-performance I/O with support for I/O voltage from 1.0V to
1.8V
o Max. PL HD I/O 96
HD = High-density I/O with support for I/O voltage from 1.2V to 3.3V
o Max. PL Transceiver I/O 4 transmit and 4 receive pairs
Page 9
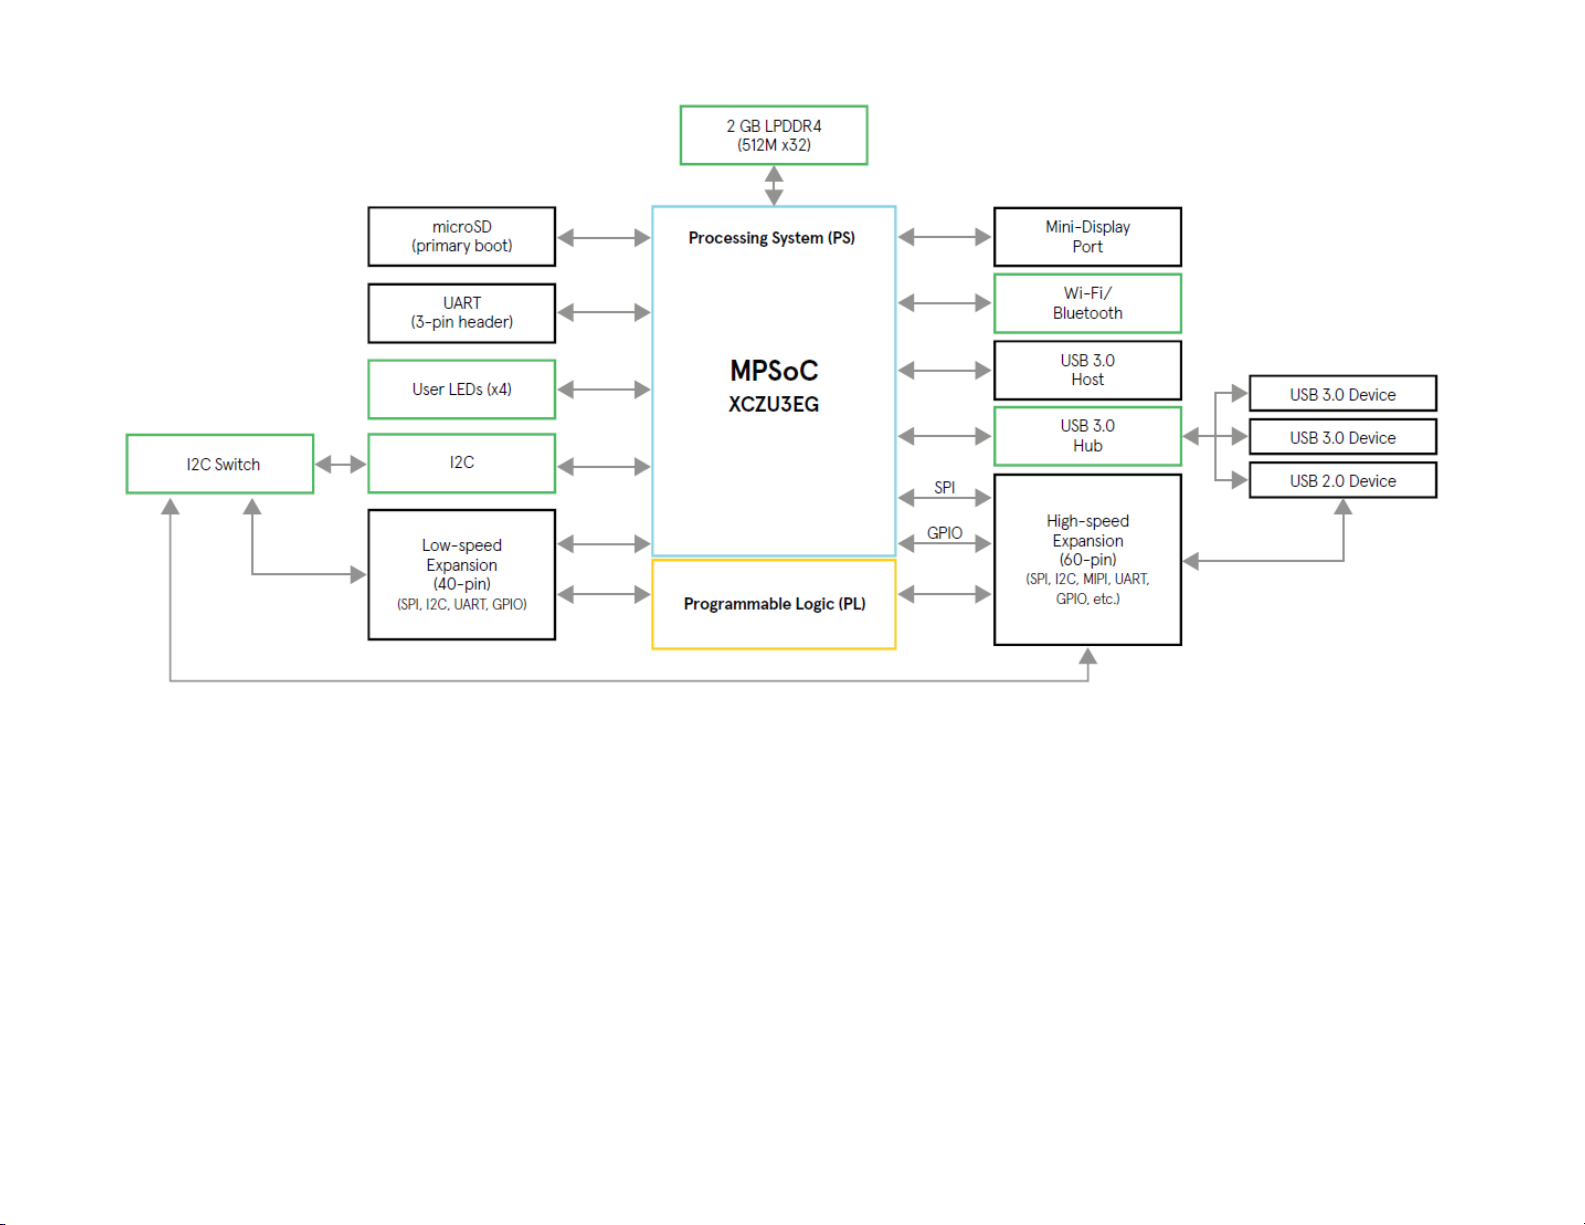
5.1.1 SBVA484 Package
Figure 2 – SBVA484 Package Diagram
Page 9
Page 10
5.1.2 PL I/Os (Banks 26, 65, 66)
MPSoC Pin Number
Bank
MPSoC Site Name
Function
A9
RADIO_LED0
B9
RADIO_LED1
B5
BT_HCI_CTS
B7
BT_HCI_RTS
E8
CSI0_MCLK
D8
CSI1_MCLK
D7
HD_GPIO_0
F8
HD_GPIO_1
E5
HD_GPIO_10
D6
HD_GPIO_11
D5
HD_GPIO_12
C7
HD_GPIO_13
B6
HD_GPIO_14
C5
HD_GPIO_15
F7
HD_GPIO_2
G7
HD_GPIO_3
F6
HD_GPIO_4
G5
HD_GPIO_5
A6
HD_GPIO_6
A7
HD_GPIO_7
G6
HD_GPIO_8
E6
HD_GPIO_9
C8
N/C
A8
N/C
Zynq UltraScale+ MPSoC Promammable Logic (PL) provides two types of I/O banks: Highdensity (HD) banks and high-performance (HP) banks. HD banks support a limited number of
single-ended I/O standards with speeds up to 250Mbps and VCCO voltages up to 3.30V. HP
banks support a large variety of high-speed I/O standards, including differential I/O, and support
VCCO voltages up to 1.80V.
ZU3EG provides one HD bank (Bank 26) with 24 pins, one HP bank (Bank 65) with 52 pins,
and another HP bank (Bank 66) with 6 pins.
The PL I/Os on Ultra96-V2 are tied to the Low-Speed 96Boards Mezzanine, the High-Speed
96Boards Mezzanine, Bluetooth, and the fan.
Table 1 – PL IO Bank 26
26
Bluetooth
HS Expansion
LS Expansion
N/C
Page 10
Page 11

Table 2 – PL IO Bank 65
MPSoC Pin Number
Bank
MPSoC Site Name
Function
F4
FAN_PWM
Fan
P1
CSI0_C_N
N2
CSI0_C_P
N4
CSI0_D0_N
N5
CSI0_D0_P
M1
CSI0_D1_N
M2
CSI0_D1_P
M4
CSI0_D2_N
M5
CSI0_D2_P
L1
CSI0_D3_N
L2
CSI0_D3_P
T2
CSI1_C_N
T3
CSI1_C_P
R3
CSI1_D0_N
P3
CSI1_D0_P
U1
CSI1_D1_N
U2
CSI1_D1_P
H5
DSI_CLK_N
J5
DSI_CLK_P
F1
DSI_D0_N
G1
DSI_D0_P
E3
DSI_D1_N
E4
DSI_D1_P
D1
DSI_D2_N
E1
DSI_D2_P
C3
DSI_D3_N
D3
DSI_D3_P
C2
HSIC_DATA
D2
N/C
F2
N/C
F3
N/C
G2
N/C
G4
N/C
H2
N/C
H3
N/C
H4
N/C
J1
N/C
65
HS
Expansion
NC
Page 11
Page 12

J2
N/C
J3
N/C
K1
N/C
K3
N/C
K4
N/C
K5
N/C
L3
N/C
L4
N/C
N3
N/C
P5
N/C
R1
N/C
R4
N/C
R5
N/C
T1
N/C
T4
N/C
P2
NetR35_1
VRP
Number
A2
HSIC_STR
HS Expansion
A3
MIO7_Radio_RST_N
Radio
A4
N/C
B1
N/C
B2
N/C
B4
N/C
C4
N/C
Table 3 – PL IO Bank 66
MPSoC Pin
Bank MPSoC Site Name Function
66
N/C
Page 12
Page 13

5.1.3 PS MIOs (Banks 500, 501, 502)
0 1 2 3
4 5 6 7 8 9 10 11 12 13 14 15 16 17 18 19 20 21 22 23 24 25
SPI1 WE BE I2C PB SD0 USB
26 27 28 29 30 31 32 33 34 35 36 37 38 39 40 41 42 43 44 45 46 47 48 49 50 51
PI INA PK TP SPI0
52 53 54 55 56 57 58 59 60 61 62 63 64 65 66 67 68 69 70 71 72 73 74 75 76 77
IW
PMI
Bank 500
1.80V
SD0
LED
LSE
Bank 501
1.80V
PMIC
DPAUX
SD0
SPI1
UART1
UART0
I2C1
SD1
SPI0
LSE
Bank 502
1.80V
USB0
USB1
LSE
UART1 - Header
UART0 - Bluetooth (+ PL RTS/CTS)
I2C1 - I2C Hub
SPI1 - HS Expansion Header
WE - (GPIO) WiFi Enable
BE - (GPIO) Bluetooth Enable
I2C - (GPIO) I2C Hub Reset
SD0 - SD Card (3.3V level shifter)
LED - (GPIO) User LEDs
PB - (GPIO) User Pushbutton
USB - (GPIO) USB Hub Vbus detect
PI - (GPIO) Power Pushbutton Controller INT_B (PMU input)
Table 4 – MIO Overview
Page 13
Page 14

Table 5 – MIO Bank 500 (MIOs 0 to 25)
Bank
Pin #
Device
Signal
I/O
Notes
0
MIO0_UART1_TX
O
1
MIO1_UART1_RX
I
2
MIO2_UART0_RX_BT_HCI_TX
I
3
MIO3_UART0_TX_BT_HCI_RX
O
4
MIO4_I2C1_SCL
O
5
MIO5_I2C1_SDA
IO
Header
7
GPIO
MIO7_RRAD_RST_N
O
8
GPIO
MIO8_RADIO_EN
O
ATWILC300 Enable
9
MIO9_SPI1_CS
O
10
MIO10_SPI1_MISO
I
11
MIO11_SPI1_MOSI
O
12
GPIO
MIO12_I2C_MUX_RESET_N
O
I2C Mux reset
13
MIO13_SD0_DAT0
IO
SDIO0 Data 0
14
MIO14_SD0_DAT1
IO
SDIO0 Data 1
15
MIO15_SD0_DAT2
IO
SDIO0 Data 2
16
MIO16_SD0_DAT3
IO
SDIO0 Data 3
17
MIO17_PS_LED3
O
User LED 3
18
MIO18_PS_LED2
O
User LED 2
19
MIO19_PS_LED1
O
User LED 1
20
MIO20_PS_LED0
O
User LED 0
21
MIO21_SD0_CMD
IO
SDIO0 Command
22
MIO22_SD0_CLK
O
SDIO0 Clock
23
GPIO
MIO23_GPIO_PB
I
User Pushbutton
24
SD0
MIO24_SD0_DETECT
I
SDIO Card Detect
25
GPIO
MIO25_VBUS_DET
O
USB Hub VBUS
500
UART1
UART0
I2C1
UART Header J1
ATWILC300
I2C Mux
6 SPI1 MIO6_SPI1_SCLK O Hi-speed Expansion
ATWILC300 Reset
SPI1
Hi-speed Expansion
Header
SD0
GPIO
SD0
Page 14
Page 15

Table 6 – MIO Bank 501 (MIOs 26 to 51)
Bank
Pin #
Device
Signal
I/O
Notes
event detected
27
MIO27_DP_AUX_OUT
O
DPAUX single-ended output
28
MIO28_DP_HPD
I
DPAUX Hot Plug Detect
29
MIO29_DP_OE
O
DPAUX Output Enable
30
MIO30_DP_AUX_IN
I
DPAUX single-ended input
31
GPIO
MIO31_MHTN_ALRT
I
Manhattan Alert
32
GPIO
MIO32
O
Test Point
33
GPIO
MIO33
O
Test Point
off system
35
GPIO
MIO35
IO
Test Point
36
GPIO
MIO36_PS_GPIO1_0
IO
Low-speed Expansion GPIO-C
37
GPIO
MIO37_PS_GPIO1_1
IO
Low-speed Expansion GPIO-D
38
SPI
MIO38_SPI0_SCLK
O
SPI Serial Clock
39
GPIO
MIO39_PS_GPIO1_2
IO
Low-speed Expansion GPIO-E
40
GPIO
MIO40_PS_GPIO1_3
IO
Low-speed Expansion GPIO-F
41
SPI0
MIO41_SPI0_CS
O
SPI Chip Select 0
42
SPI0
MIO42_SPI0_MISO
I
SPI Data In
43
SPI0
MIO43_SPI0_MOSI
O
SPI Data Out
44
GPIO
MIO44_PS_GPIO1_4
IO
Low-speed Expansion GPIO-G
45
GPIO
MIO45_PS_GPIO1_5
IO
Low-speed Expansion GPIO-H
46
SDIO
MIO46_SD1_D0
IO
SDIO1 Data 0
47
SD1
MIO47_SD1_D1
IO
SDIO1 Data 1
48
SD1
MIO48_SD1_D2
IO
SDIO1 Data 2
49
SD1
MIO49_SD1_D3
IO
SDIO1 Data 3
50
SD1
MIO50_SD1_CMD
O
SDIO1 Command
51
SD1
MIO51_SD1_CLK
O
SDIO1 Clock
501
26 GPIO MIO26_PWR_INT I Pushbutton On/Off Controller
Interrupt, Pushbutton turn-off
DPAUX
34 GPIO MIO34_POWER_KILL_N O SLG4G42480V
Pushbutton On/Off Controller
Release enable output, power
Page 15
Page 16

Table 7 – MIO Bank 502 (MIOs 52 to 77)
Bank
Pin #
Device
Signal
I/O
Notes
52
MIO52_USB0_CLK
I
USB0 Clock
53
MIO53_USB0_DIR
I
USB0 Data bus direction
54
MIO54_USB0_DATA2
IO
USB0 Data 2
55
MIO55_USB0_NXT
I
USB0 Data flow
56
MIO56_USB0_DATA0
IO
USB0 Data 0
57
MIO57_USB0_DATA1
IO
USB0 Data 1
58
MIO58_USB0_STP
O
USB0 Stop transfer
59
MIO59_USB0_DATA3
IO
USB0 Data 3
60
MIO60_USB0_DATA4
IO
USB0 Data 4
61
MIO61_USB0_DATA5
IO
USB0 Data 5
62
MIO62_USB0_DATA6
IO
USB0 Data 6
63
MIO63_USB0_DATA7
IO
USB0 Data 7
64
MIO64_USB1_CLK
I
USB1 Clock
65
MIO65_USB1_DIR
I
USB1 Data bus direction
66
MIO66_USB1_DATA2
IO
USB1 Data 2
67
MIO67_USB1_NXT
I
USB1 Data flow
68
MIO68_USB1_DATA0
IO
USB1 Data 0
69
MIO69_USB1_DATA1
IO
USB1 Data 1
70
MIO70_USB1_STP
O
USB1 Stop transfer
71
MIO71_USB1_DATA3
IO
USB1 Data 3
72
MIO72_USB1_DATA4
IO
USB1 Data 4
73
MIO73_USB1_DATA5
IO
USB1 Data 5
74
MIO74_USB1_DATA6
IO
USB1 Data 6
75
MIO75_USB1_DATA7
IO
USB1 Data 7
Interrupt
77
MIO77_PWR_ALERT_N
I
PMIC IRQ
502
USB0
USB1
76 MIO76_WLAN_IRQ I ATWILC3000 WLAN
Page 16
Page 17

5.1.4 PS Bank 503
Number
K16
PS_ERROR_OUT
K18
PS_ERROR_STATUS
K15
PS_INIT_N
J16
PS_MODE0
H15
PS_MODE1
J15
PS_MODE2
H18
PS_MODE3
H17
PS_PAD_IN
J17
PS_PAD_OUT
K12
POWER_GOOD
H14
PS_REF_CLK
K13
PS_SRST_N
Bank 503 contains system-level pins, including Mode, config, PSJTAG, error, SRST, and POR.
Table 8 – PS Bank 503
MPSoC Pin
Bank MPSoC Site Name
503
Page 17
Page 18

5.1.5 PS Bank 504
Number
AA22
PS_DDR_CAA0
AB20
PS_DDR_CAA1
AB17
PS_DDR_CAA2
AB19
PS_DDR_CAA3
AB21
PS_DDR_CAA4
AB16
PS_DDR_CAA5
Y21
PS_DDR_CAB0
AA21
PS_DDR_CAB1
AA18
PS_DDR_CAB2
AA19
PS_DDR_CAB3
AA17
PS_DDR_CAB4
AA16
PS_DDR_CAB5
W20
PS_DDR_CKA_C
V19
PS_DDR_CKB_C
V20
PS_DDR_CKA_T
V18
PS_DDR_CKB_T
U22
PS_DDR_CKE0
U21
PS_DDR_CKE1
V22
PS_DDR_CS0_N
U20
PS_DDR_CS1_N
AB9
PS_DDR_DMA0
AB14
PS_DDR_DMA1
U9
PS_DDR_DMB0
W13
PS_DDR_DMB1
AB11
PS_DDR_DQ0
Y10
PS_DDR_DQ1
AB10
PS_DDR_DQ2
W10
PS_DDR_DQ3
AA8
PS_DDR_DQ4
Y8
PS_DDR_DQ5
AB7
PS_DDR_DQ6
AA7
PS_DDR_DQ7
AA11
PS_DDR_DQ8
Y11
PS_DDR_DQ9
Bank 504 contains the DDR Controller pins which are connected to LPDDR4 on Ultra96-V2.
Table 9 – PS Bank 504
MPSoC Pin
Bank MPSoC Site Name
504
Page 18
Page 19

AA12
PS_DDR_DQ10
AB12
PS_DDR_DQ11
Y14
PS_DDR_DQ12
AA14
PS_DDR_DQ13
Y15
PS_DDR_DQ14
AB15
PS_DDR_DQ15
W8
PS_DDR_DQ16
W7
PS_DDR_DQ17
V7
PS_DDR_DQ18
V10
PS_DDR_DQ19
U7
PS_DDR_DQ20
T9
PS_DDR_DQ21
U10
PS_DDR_DQ22
T10
PS_DDR_DQ23
U11
PS_DDR_DQ24
U12
PS_DDR_DQ25
W12
PS_DDR_DQ26
W11
PS_DDR_DQ27
V14
PS_DDR_DQ28
U14
PS_DDR_DQ29
W15
PS_DDR_DQ30
V15
PS_DDR_DQ31
AA9
PS_DDR_DQSA0_C
AA13
PS_DDR_DQSA1_C
V8
S_DDR_DQSB0_C
V13
PS_DDR_DQSA1_T
Y9
PS_DDR_DQSA0_T
Y13
PS_DDR_DQSA1_T
V9
PS_DDR_DQSB0_T
V12
PS_DDR_DQSB1_T
T18
PS_DDR_RST_N
T19
NetR23_2
Page 19
Page 20

5.1.6 PS Bank 505
Number
L20
U26M_N
L19
U26M_P
J20
U27M_N
J19
U27M_P
K22
GTR_LANE0_TX_N
K21
GTR_LANE0_TX_P
F22
GTR_LANE1_TX_N
F21
GTR_LANE1_TX_P
D22
GTR_LANE2_RX_N
D21
GTR_LANE2_RX_P
C20
GTR_LANE2_TX_N
C19
GTR_LANE2_TX_P
B22
GTR_LANE3_RX_N
B21
GTR_LANE3_RX_P
A20
GTR_LANE3_TX_N
A19
GTR_LANE3_TX_P
M20
NetR22_2
E19
N/C
E20
N/C
G19
N/C
G20
N/C
H21
N/C
H22
N/C
M21
N/C
M22
N/C
Bank 505 contains the transceivers.
Table 10 – PS Bank 505
MPSoC Pin
Bank MPSoC Site Name
505
Page 20
Page 21

5.2 LPDDR4 Memory
Retail TLC
Delkin Utility MLC
CrystalDiskMark Read Performance
80MB/s
95 MB/s
CrystalDiskMark Write Performance
20MB/s
55 MB/s
Lifecycle
<12 months
18-24 months
Endurance (Program/Erase cycles)
300-600
3000
SMART data enabled (card life stats)
No
Yes
with Linux based OS as opposed to FAT only
Ultra96-V2 provides 2GB (512Mbit x 32) of 533MHz (1066Mbps) LPDDR4 memory using Micron
MT53D512M32D 2DS-053 AIT:D.
5.3 microSD Card
Ultra96-V2 provides a microSD card socket as the primary boot device. VCCO for the SDIO lines
going into the Zynq MPSoC is 1.80V thus a level shifter is required to go from the 3.3V native SD
card slot to 1.80V
The Ultra96-V2 kit ships with a Delkin Devices “Utility” 16 GB Industrial MLC microSD card, preprogrammed with Linux boot. The Delkin Part Number is S416APG49-U3000-3, rated at Read
Performance = 95MB/s and Write Performance = 55MB/s (measured using CrystalDiskMark).
There are several advantages to using MLC over the typical retail TLC that is readily available.
Table 11 – Comparison of TLC vs. MLC microSD Cards
Embedded mode – aligned to efficiently work
No Yes
Page 21
Page 22

5.4 USB
USB 3.0
Down st rea m
Port A
USB 3.0
Down st rea m
Port B
USB 2.0
Down st rea m
Expansion Port
USB 3.0 Hub
USB5744
USB 3.0
Up stre am
USB 3.0
Up stre am
ULPI Phy
USB3320
ULPI Phy
USB3320
ZU3EG
UPL I0
ULP I1
GTR0
GTR1
USB 3.0 Connection
USB 2.0 Conn ecttion
Ultra96-V2 provides one upstream (device) and two downstream (host) USB 3.0 connections. A
USB 2.0 downstream (host) interface is provided on the high speed expansion bus.
Two Microchip USB3320 USB 2.0 ULPI Transceivers and one Microchip USB5744 4-Port SS/HS
USB Controller Hub are specified.
Figure 3 below shows the Ultra96-V2 USB Setup.
5.4.1 USB5744 Implementation Details
Refer to the USB5744 datasheet
(http://ww1.microchip.com/downloads/en/DeviceDoc/00001855C.pdf
Evaluation Board schematics (http://ww1.microchip.com/downloads/en/DeviceDoc/EVB-
USB5744_A1-sch.pdf) for implementation details.
NOTE: USB 3.0 Downstream Port A/B VUBS is controlled by a Microchip/Micrel MIC2009YML
USB Power Switch following the Evaluation Board implementation
NOTE: USB2.0 Downstream Port VBUS is provided by the Low Speed Expansion Header 5V
supply (see 5.11.1). A Power switch is not required and the corresponding USB5744
PRT_CTLx pin for that port is left n/c.
Figure 3 – USB Setup
) and the EVB-USB5744
Page 22
Page 23

5.5 Wi-Fi / Bluetooth
Signal
1
MIO1_UART1_RX
U4
2
MIO0_UART1_TX
W1
3
GND
N/C
4 NetJ1_4
N/C
Ultra96-V2 supports Wi-Fi (802.11b/g/n) and Bluetooth 4.0.
A Microchip ATWILC300-MR110CA Single Band Combo Wi-Fi, Bluetooth & Bluetooth low energy
module is specified.
5.5.1 Wi-FI
The ATWILC300-MR110CA WLAN interface connects to the MPSoC through the Secure
Digital SD1 interface. The WLAN interrupt WLAN_IRQ is connected to PS MIO76, the WLAN
enable signal RADIO_EN is connected to PS MIO7. A yellow LED is connected to Bank 26
programmable logic and can be used to indicate that Wi-Fi is enabled when configured
properly.
5.5.2 Bluetooth
The ATWILC300-MR110CA Bluetooth interface connects through a UART interface. Since the
Bluetooth UART interface requires hardware flow-control (RTS/CTS), which is only available
through the PL, the UART RX/TX signals are connected to PS UART0 (MIO2, MIO3) and the
RTS/CTS signals are connected to the PL High-Density (HD) bank. A blue LED is connected
to Bank 26 programmable logic and can be used to indicate that Bluetooth is enabled when
configured properly.
5.5.3 Bluetooth Audio
ATWILC300-MR110CA Bluetooth Audio connects through a PCM/I2S interface. Since MPSoC
does not provide a PCM/I2S interface, this functionality is provided at test points TP11 – TP19.
5.6 Mini DisplayPort
Ultra96-V2 supports one Mini DisplayPort output. A TE Connectivity 2129320-3 provides the Mini
DisplayPort connectivity.
5.7 UART
Ultra96-V2 provides access to one UART on the baseboard. PS UART1 (MIO0, MIO1) is connected
to a 4-pin 2mm header (J1).
Connector Pin
J1
Table 12 – Pinout for the J1 UART Header
PCB
Zynq Pinout
Page 23
Page 24

5.8 I2C
Ultra96-V2 supports one I2C bus. A TI TCA9544A Low-Voltage 8-Channel I2C Switch is specified
to isolate the I2C sub-buses from each other. All I2C buses operate at 1.80V.
Figure 4 – MPSoC I2C to I2C Switch
5.9 User LEDs
Ultra96-V2 provides four user-controllable LEDs connected to PS_MIO[17..20]. All User LEDs are
green.
5.10 MPSoC Thermal Bracket with Fan
The Ultra96-V2 uses a thermal bracket with a fan for the MPSoC device. The bracket is mounted
to the bottom side of the Ultra96-V2 to help dissipate heat. The bracket also has additional mounting
holes to allow for other possible thermal solutions. An example solution Sunon MF30060V1-1000UA99 fan is used with the commercial grade Ultra96-V2, connected to 5V and GND at TP25 and
TP26. Users can control the fan using signal FAN_PWM from PL IO F4 on Bank 65.
5.11 Expansion Connectors
5.11.1 Low Speed Expansion Connector (J7)
Ultra96-V2 provides a 96Boards compatible Low Speed Expansion Connector. A Molex
87381-4063 (or compatible) 40 pin low profile female 2mm receptacle (20x2) 4.5mm height
is specified. Table 13 shows the pinout of the Low Speed Expansion Header (Ultra96-V2
column) and the differences from the 96Boards specification (96Boards column). With the
exception of I2C0 and I2C1, all dedicated interfaces specified by 96Boards are replaced
with GPIO.
Page 24
Page 25

Table 13 – Low Speed Expansion Connector
Ul tra96 96Boards Pin # Pin # 96Boards Ul tra96
GND GND 1 2 GND GND
HD_GPIO0 UART0_CTS 3 4 PWR_BTN_N PWR_BTN_N
HD_GPIO1 UART0_TxD 5 6 RST_BTN_N RST_BTN_N
HD_GPIO2 UART0_RxD 7 8 SPI0_SCLK PS_MIO38
HD_GPIO3 UART0_RTS 9 10 SPI0_DIN PS_MIO42
HD_GPIO4 UART1_TxD 11 12 SPI0_CS PS_MIO41
HD_GPIO5 UART1_RxD 13 14 SPI0_DOUT PS_MIO43
PS_I2C0_SCL I2C0_SCL 15 16 PCM_FS HD_GPIO9
PS_I2C0_SDA I2C0_SDA 17 18 PCM_CLK HD_GPIO10
PS_I2C1_SCL I2C1_SCL 19 20 PCM_DO HD_GPIO11
PS_I2C1_SDA I2C1_SDA 21 22 PCM_DI HD_GPIO12
PS_MIO 36 GPIO- A 23 24 GPIO-B PS_MIO37
PS_MIO 39 GPIO- C 25 26 GPIO-D PS_MIO40
PS_MIO 44 GPIO- E 27 28 GPIO-F PS_MIO 45
HD_GPIO6 GPIO-G 29 30 GPIO-H HD_GPIO13
HD_GPIO7 GPIO-I 31 32 GPIO-J HD_GPIO14
HD_GPIO8 GPIO-K 33 34 GPIO-L HD_GPIO15
+1V8 +1V8 35 36 SYS_DCIN SYS_DCIN
+5V0 +5V0 37 38 SYS_DCIN SYS_DCIN
GND GND 39 40 GND GND
Page 25
Page 26

5.11.2 High Speed Expansion Connector
Xilinx 96Boards Pin # Pin # 96Boards Xilinx
PS_SPI0_MOSI SD_DAT0/SPI1_DOUT 1 2 CSI0_C+ HP_GPIO+
n/c SD_DAT1 3 4 CSI0_C- HP_GPIOn/c SD_DAT2 5 6 GND GND
PS_SPI0_CS SD_DAT3/SPI1_CS 7 8 CSI0_D0+ HP_GPIO+
PS_SPI0_SCLK SD_SCLK/SPI1_SCLK 9 10 CSI0+D0- HP_GPIOPS_SPI0_MISO SD_CMD/SPI1_DIN 11 12 GND GND
GND GND 13 14 CSI 0_D1+ HP_GPIO+
HD_GPIO_CC CLK0/CSI0_MCLK 15 16 CSI0_D1- HP_GPIOHD_GPIO_CC CLK1/CSI1_MCLK 17 18 GND GND
GND GND 19 20 CSI 0_D2+ HP_GPIO+
HP_GPIO_CC+ DSI_CLK+ 21 22 CSI 0_D2- HP_GPIOHP_GPIO_CC- DSI_CLK- 23 24 GND GND
GND GND 25 26 CSI 0_D3+ HP_GPIO+
HP_GPIO+ DSI_D0+ 27 28 CSI0_D3- HP_GPIOHP_GPIO- DSI_D0- 29 30 GND GND
GND GND 31 32 I 2C2_SCL PS_I2C0_SCL
HP_GPIO+ DSI_D1+ 33 34 I2C2_SDA P S_I2C0_SDA
HP_GPIO- DSI_D1- 35 36 I 2C3_SCL PS_I2C1_SCL
GND GND 37 38 I 2C3_SDA PS_I2C1_SDA
HP_GPIO+ DSI_D2+ 39 40 GND GND
HP_GPIO- DSI_D2- 41 42 CSI 1_D0+ HP_GPIO+
GND GND 43 44 CSI 1_D0- HP_GPIOHP_GPIO+ DSI_D3+ 45 46 GND GND
HP_GPIO- DSI_D3- 47 48 CSI 1_D1+ HP_GPIO+
GND GND 49 50 CSI 1_D1- HP_GPIOUSB_D+ USB_D+ 51 52 GND GND
USB_D- USB_D- 53 54 CSI1_C+ HP_GPIO+
GND GND 55 56 CSI1_C- HP_GPIOHP_GPIO HSIC_STR 57 58 GND GND
HP_GPIO HSIC_DATA 59 60 Reserved Reserved
Ultra96-V2 provides a 96Boards compatible High Speed Expansion Connector. An
Amphenol FCI 61082-061409LF (or compatible) 60 pin low profile 0.8mm receptacle is
specified.
Table 14 shows the pinout of the High Speed Expansion Header (Ultra96-V2 column) and
the differences from the 96Boards specification (96Boards column). With the exception of
SD, I2C2 and I2C3, all dedicated interfaces specified by 96Boards are replaced with GPIO.
All HP_GPIO are routed as differential pairs.
Table 14 – High Speed Expansion Connector
Page 26
Page 27

6 Configuration and Debug
6.1 Boot Mode
Ultra96-V2 supports booting from JTAG and microSD Card. A DIP switch (SW3) is installed to allow
selecting the desired boot mode.
Figure 5 – Boot Mode Switch (SD Boot Mode Shown)
6.2 JTAG Configuration and Debug
JTAG access to the MPSoC is available through a 1x8 header (J3). The Avnet JTAG/UART Pod
can directly interface with the 1x8 Ultra96-V2 header. Other JTAG modules can be used with
flyleads.
Figure 6 – Ultra96-V2 JTAG Connection
Page 27
Page 28

7 Power
7.1 External Power Connection
Board power is supplied by an external 12V AC/DC Power Supply based on the 96Boards
specification, located at https://www.96boards.org/product/power/
Here are the requirements from the 96Boards site:
• EIAJ-3 compliant DC plug available up to 2A, which is 4.75 mm outer diameter with 1.7mm
center pin (4.75/1.7), for the power supply
.
• https://en.wikipedia.org/wiki/EIAJ_connector
However, there is a bit of flexibility. Avnet offers a 12V supply as an accessory (part number:
AES-ACC-U96-4APWR) with the following specifications:
• Input: 100-240V, 50/60HZ
• US Plug 12V 4A power adapter
• 1.2m DC cable with ferrite
• 4.7mm * 1.7mm * 10 mm dc plug, Level VI
• International plugs
Figure 7 – Ultra96-V2 12V @ 4A AC/DC Supply
7.2 Power Estimation Using XPE
Xilinx Power Estimator (XPE) should be used to generate worst case power estimations. The Xilinx
Power Estimator (XPE) spreadsheet is available on Xilinx’ website that can help you get started
Page 28
Page 29

with your own power estimation. Avnet has also provided an example of this spreadsheet filled out
for the Ultra96-V2 under Documentation on the Ultra96-V2 website.
7.3 Power Regulators
A configurable multi-rail PMIC provides all power for the Ultra96-V2. The power rail configuration
is shown below:
Figure 8 – Power Regulation
Configuration files for the power devices are available. Please contact your local FAE for details.
Page 29
Page 30

Page 30
7.4 Power Sequence
Here we have the defined power up sequencing for the Ultra96-V2.
Figure 9 – Power up Sequencing
The captures below show the power up sequencing measurements taken on the Ultra96-V2:
Pink – 5V Yellow – VCCPSINT_LP Yellow – VCCPSINT_LP
Page 31

Yellow – VCCPSINT_LP Blue – VCCPSINT_FP Dark Blue – VCCINT
Light Blue – VCCPSAUX Pink – VCCINT Light Blue – VCCPSAUX
Dark Blue – VCCO PSDDR 1.1V Pink – VCCAUX
Yellow – VCCPSINT_LP Yellow – VCCPSINT_LP Light Blue – VCCAUX
Pink – PSPLL Light Blue – VCCPSAUX Dark Blue – VCCO PSDDR 1.1V
Light Blue – VCCPSAUX Dark Blue – VCCO PSDDR 1.1V Pink – VCCO 1.2V
Dark Blue – VCCO PSDDR 1.1V Pink – VCCO 1.2V Yellow – 3.3V
Timing VCCAUX to 3.3V – 53ms Light Blue – VCCAUX 68ms from VCCAUX to POR (65ms required)
Yellow – 3.3V
Pink – POR
Page 31
Page 32

Page 32
8 Clocks
Ultra96-V2 provides the following system clocks to the MPSoC:
- PS_CLK: PS reference clock 100MHz/3 (33. 3MHz), 1.8V LVCMOS
- GTR_CLK0: USB 3.0 26MHz, LVDS
- GTR_CLK1: DisplayPort 27MHz, LVDS
These clocks are generated by the IDT 5P49V6975 programmable clock generator.
9 Reset
Ultra96-V2 Reset is managed by the Infineon PMICs. At power-up, the ZU3EG is held in reset until all
power rails have ramped up and are stable. A pushbutton allows manually resetting the ZU3EG.
10 Specifications and Ratings
***Coming Soon***
11 Getting Help and Support
If additional support is required, Avnet has many avenues to search depending on your needs.
For general question regarding Ultra96-V2, please visit our website at www.ultra96.org
documentation, technical specifications, videos and tutorials, reference designs and other support.
Detailed questions regarding Ultra96-V2 hardware design, software application development, using Xilinx
tools, training and other topics can be posted on the Ultra96-V2 Support Forums at
Zedboard-Community . Avnet’s technical support team monitors the forum during normal business hours.
Those interested in customer-specific options on Ultra96-V2 can send inquiries to customize@avnet.com
. Here you can find
http://avnet.me/E14-
.
 Loading...