

AVM MA 8.3 Cellini Chrome, SA 8.3 Silver, MA 8.3 Black, SA 8.3 Cellini Chrome, SA 8.3 Black MA SA 8.3 Operating Instructions.pdf
...Page 1

OVATION MA 8.3 / SA 8.3
Operating Instructions
Page 2

Declara tio n o f c onformity (for EC only)
We herewith confirm, tha t the unit to whi c h this ma n u al
belongs fulfills the EC rules necessary to obtain the sign
the nec e ssar y m easur ement s w e re tak en w ith pos i tive
results.
AVM Audio Video Manufaktur GmbH
Daimlerstraße 8
76316 Malsch
Germany
www.avm.au dio
Page 3

1 Getti n g s t ar t ed
1.1 What‘s in the box? ... 1
1.2 Control and operating elements ... 1
1.3 Installation and cooling ... 4
1.4 Connection to mains ... 5
1.5 First start-up ... 6
1.6 Connecting trigger inputs ... 7
1.7 AIR Trigger (AVM Intelligent Remote) ... 7
1.8 Firmware update ... 8
1.9 Connecting a preamplifier ... 9
1.10 Connecting loudspeakers ... 9
2 Ba s ic oper a tion
2.1 POWER button ... 13
2.2 DISPLAY button ... 13
2.3 Operation of the menu system ... 14
2.4 Display brightness ... 14
2.5 Display modes ... 15
2.6 Operating modes ... 15
2.7 Define load impedance ... 16
2.8 Set illumination ... 16
3 Ap p end ix
3.1 Cleaning ... 17
3.2 Troubleshooting ... 17
3.3 Conditions of warranty (EC only) ... 21
Page 4

Ge t t in g s ta r ted
1. Getting started
1.1 What‘s i n the box?
• OVATION M A 8.3 ( P air) / S A 8.3
• Power c o r d (in s o m e coun t r i es)
• Tr i gger p l u g(s) 3 , 5 mm
1.2 Control a nd opera ting element s
The n u m b e r s in the fi g u r e s b elow ma r k the contr ol el e ments .
They re fer to the nu m bers in the tex t , where the ope ratio n of
the u n i t is d e s cribe d .
Fig. 1 . Front pa n e l
OVATION MA / SA 8.3 1
Page 5

Ge t t in g s ta r ted
1. Power b u tton on/ o f f
2. Control L ED
3. Disp l ay
4. Menu b u t t ons (s o f t keys) a - e
5. Disp l ay button
Fig. 2 . Rear p a nel MA 8 . 3
Fig. 3 . Rear p a nel SA 8 . 3
2 OVATION MA / SA 8.3
Page 6

Ge t t in g s ta r ted
6. RCA i n p u t (MA) / RCA i n puts ( S A ) unba l a n ced
7. XLR in p u t (MA ) /XLR i n p u t s (S A ) bala n c e d
8. Mains s w itch
9. Mains o u tlet
10. Speaker t e r m inals
11. Co nfigu ra t i o n por t (fi r m w a re upd a t e s)
12. Tri g g er inp u t
13. Serial po r t ( R S 232)
1. 2.1 Pi n a ss i gn men t
Fig. 4 . Pin as s i gnmen t o f XLR i n p ut(s )
1) Ground (GND)
2) Non inverting input POS (+)
3) Inverting input NEG (-)
OVATION MA / SA 8.3 3
Page 7
Ge t t in g s ta r ted
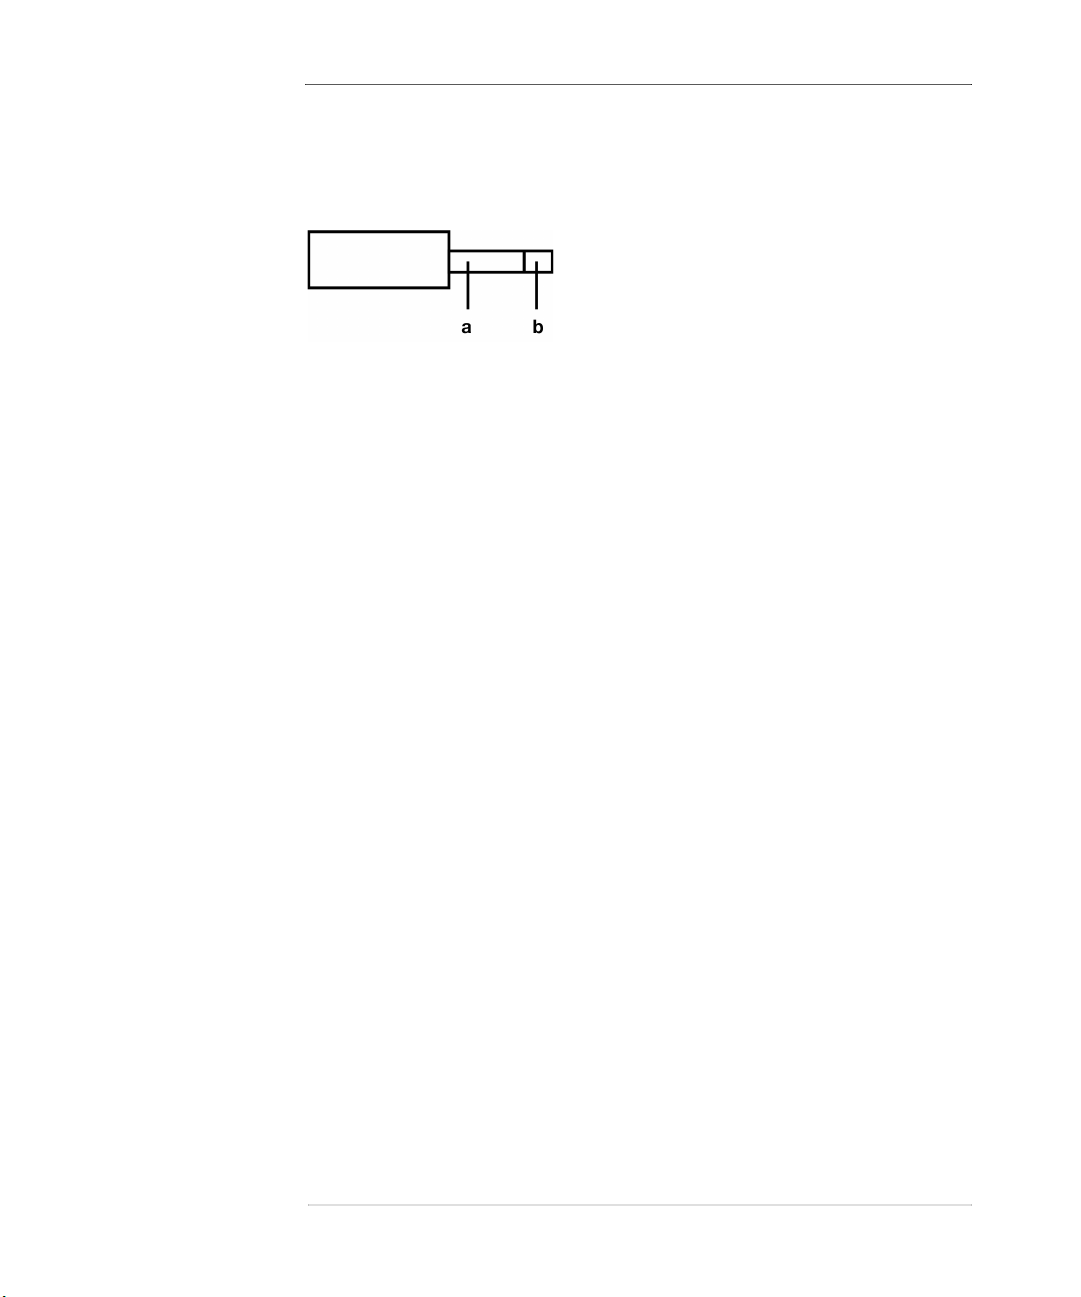
Fig. 5 . Pin as s i gnmen t o f 3,5 m m trigge r inpu t ( 1 2 )
a) Ground (GND)
b) Triggervsignal (+5V to +20V)
1.3 In stallation and coo ling
The un it can be com e hot dep e n d ing on t he de m a n ded ou tput
power or en v i r onment a l t e mperature. The re f o r e , it is impor t ant, t h a t the cool i ng air can fl o w unhin de r e d into the air i n lets
in the bo t t o m a nd flow ou t t h r o ugh the ho l e s i n t he rear pan e l .
Set u p the pow e r ampli f i ers so t h at th e r e i s at l e a s t 10 cm
dist a n ce aroun d th e device to ad jacen t componen t s or w alls .
Whe n p l a cin g t he a m p l ifie r o n a c a rpet, m a ke su re t hat t h e
feet of th e uni t do not si n k in (if necess a r y, underl a y puck s )
and tha t t h e c a r pet pile d o e s n ot seal the a i r s l o t s in the floor.
Direc t ex p o s ure t o su nlight is not r e comme n d e d b e c a use this
will h e a t u p t h e un i t a nd may c ause un w a nted m a l functi o n s.
ℹ NOT E
The insta l l e d tr a n s forme r s emit m agne t i c stray fields . To
prevent inte r ference , it i s rec o m m e nded to n o t pl a c e the
unit ( s ) eithe r d i r e ctly on or n e a r a p r e amplif i er or a record
playe r.
4 OVATION MA / SA 8.3
Page 8

Ge t t in g s ta r ted
ℹ CAUTIO N
Heat sensi t i v e ob jects such as ca n dles , plas t i c s , re c o rds or
CD’ s m a y al s o be d a maged b y the g e nerated h eat o f the M A /
SA 8 . 3. G r e a t care s houl d a lso b e taken to ens u r e small childre n do not burn thems e l ves by ac cide n t a lly to uchi n g t h e
amp l i f i er(s ) . T h e housi n g d o e s n ot feel e x t r e m e ly hot to
adu l t s but s m a ll chi l d r e n gen e r a l ly rea c t more se n s i tively.
1.4 Connect ion to ma ins
Con n e c t the s uppli e d m ains c a ble t o th e po w e r so c k e t (1 5 )
and p l u g it i n t o a Sch u k o soc k e t .
ℹ NOT E
Keep th e u n it(s) sw i tched of f u n t il all au d io c onne c t i ons are
mad e . A l s o, keep your lo u d s p eakers d i s connec t e d when switchi n g th e u n it o n f o r the f i rst tim e . If th e d e v i c e i s still cold
afte r unpa c k i ng f r o m transp o r t, p lace i t in y o u r li s t e ning
room fo r ab out on e h o ur wi t h out a mai n s connecti o n s o t hat
it c a n adap t t o t he room t e mperat u r e .
ℹ CAUTIO N : Imp or tant i n f o rmati o n on e l e c trica l s a f ety
Dep e n d ing on t h e c onnec t e d l oudsp e a k e r a nd th e r e qui r e d
out p u t p ower, t he powe r a mplifie r s can ta k e u p to 3500 w a t t s
from th e ma i n s. T he powe r c o n s umpti o n ca n be up to 16
amp s . T h erefo r e , standar d ma i ns c abl es (maximu m cu r r e nt
OVATION MA / SA 8.3 5
Page 9

Ge t t in g s ta r ted
10 Ampère ) can n o t b e u s e d. The su p p l i e d p ower co r d is
desi g n ed f o r u p to 16 a m p eres. I f yo u wish to re p lace t he
main s ca b le w ith anot he r ca b le, pleas e n o t e t h a t i t i s a p proved for at leas t 1 6 a m p e r e s and has a suitabl e co u p l ing on
the d e v i ce si d e (IEC - 6 0 3 20 C1 9 ) .
Con n e c t each output st age to a separat e socket. Do not us e
powe r di s t r ibutio n s t r i p s, as th o se are not de signe d fo r the
hig h c urrents r e quired i n total .
If the po wer a mpli f i e rs ar e in standby mo de, they ar e not
comp l e tely d i s conne c t e d f r o m the mai n s . To prote ct your
dev i c e fr om d a m a ge, u nplu g th e d e v i ce d u ring a t h u nde r s torm o r wh e n you are away f or a l o nger pe riod of time or
swi t c h off t h e devic e w ith th e m a ins s w i tch ( 8 ) .
1.5 First st art- up
ℹ NOT E
If yo u r p o w er ampli f i ers are s t i l l cold a ft e r unpack i ng due to a
previo u s transpo r t, pla c e them i n y our li s t e ning ro o m for a t
lea st one ho u r w i t hout mains co n n e ctio n so tha t t h e y c a n
ada p t to th e ro o m temp e r a t ure. Ot herwi s e , co n d ensa ti o n
coul d damage o r dest r oy the un i t .
Do n o t c onne ct a n y loud s p eakers du r ing the i n itial s t art- u p .
Tu rn on the po wer sw i t c h ( 8 ). Wh i l e the AVM logo appe a r s i n
the dis p lay ( 3 ) , th e amp l i f ier p e rfo r m s a se l f -te st a nd s witche s t o s t andby m o de after a few secon d s . The pow e r L ED (2)
light s up.
6 OVATION MA / SA 8.3
Page 10

Ge t t in g s ta r ted
As so o n a s the se l f - test i s complet e d , switch o f f the a mp l i f ier
at t h e m ains sw i t ch (8 ). Th e devic e i s now r e ady fo r w i ring
wit h o t her c o m ponen ts of your s ystem.
ℹ CAUTIO N
Never co n n ect cabl e s t o sw i t c hed-o n d ev i ces or disco n nect
cable s fro m s wi t c hed-on devic e s . T h is co uld damage your
powe r amp l i f ier o r any o t her c onnec t e d d e v i c e. B efore doin g
so , t u r n off t h e pow e r switch o r unpl u g the p o w er co r d.
1.6 Connect ing trigger i nputs
If yo u us e a p r e - a mplif i e r that i s equi p p ed w i t h trig g e r output s, c onn e c t them t o the t r i gger i n put(s) o f you r MA / S A 8.3
(11 ) wh i ch will au t omatica l l y s witch on and off toget h e r with
your pr e-amp l i f i er. Th e pinning of the t r igger o utputs i s
des c r i b ed i n s ection 1 . 6 Conne c t ing tri g g er inp u t s.
1. 6.1 AI R Tri gge r (AVM Int el lig en t R emo te)
If you have conne c t ed a compatibl e AVM mode l su c h as the
OVATIO N PA 8. 2 as a p r eampl i f ier, n o s e p arate t r igge r c onnec ti o n i s n eede d, s i nce thos e AVM pre a m p lifi e r s s e n d
swi tc h -on/of f si g n a l s to yo u r po wer ampli f i er inaudibly v i a
the c o nnected a udio c a b le (6 , 7 ) .
OVATION MA / SA 8.3 7
Page 11

Ge t t in g s ta r ted
1.7 Firmware update
The fi r mware of t he MA / S A 8.3 ca n b e updat e d v ia t h e c o nfigurati o n p ort (1 1 ) using a spe c i a l AV M update do n g le. To
upd at e y our amp l i f ier, s witch i t o ff at th e m ains swi t c h (8).
Now plug in the dongle as sh o w n in the followi n g fig u r e and
swi tc h on the d evice a g a in.
Fig. 6 . Firmwa r e update with a s p e cial AVM d o n gle a t the
confi g u ra tion p ort ( 1 1 )
The display (3) now s hows the ve r s ion number of th e c urrentl y in s talled fi r mware in the lef t section under cu rrent. On
the ri g h t side the v e r sion num b er of the a v a i lable up d a t e is
shown under ne w . With th e menu bu t t ons 4a an d 4e you ma y
sele c t whet h e r yo u would like to star t th e process (UPDATE)
or c a n c el it (E X IT ) . After t h e u p date h a s been co m p l eted ,
swi tc h o f f t he device at t h e m ains sw i t c h (8) and remov e th e
dong l e . Af t e r res t art i n g , th e devic e star t s wi t h th e ne w fir m ware .
8 OVATION MA / SA 8.3
Page 12

Ge t t in g s ta r ted
1.8 Connect ing a p reampli fier
The M A 8 . 3 p r ov ides o n e R C A (6) and one X L R i n put socke t
(7) each, whic h can only be us e d al t ernati v e l y. Here th e preampl i f i er is c o nnec te d with a s uitabl e c able.
The SA 8.3 is equi p p e d with two RCA (6) and two XLR input
soc k e t s ( 7 ), whi c h c a n also o n l y be used al t e rnative l y. He r e
the p r e amplif i e r is co n n ected w i th a s u i t able c able.
For l o nger d istance s , we r e c ommend t he u s e of a ba l a n c ed
XLR co n nection , a s t his ma y sh ield in t erferenc e s m ore effective l y t han a R CA co n n e c tion.
ℹ CAUTIO N
Pl ea s e make s ure t h at ei t her th e RCA o r t h e X LR c able is
conn e ct ed t o th e anal o g inp u t s. O t h erwi s e , d ep e n d ing o n t h e
out p u t imped a n c e of th e conne c t e d so u r c e d evice, s imult a neou s a s s i g nme n t o f t h e R CA (6) and X LR ( 7 ) c o n nectors m a y
res ul t i n unf av o r a b le so u n d effec t s or eve n a shor t circ ui t .
1.9 Connect ing lou dspeake rs
ℹ IMPORTA NT NOT ES on e l e ctri ca l safety
The M A 8.3 i s a bri dg e o utpu t s t a ge. Th i s m e ans n o t only t h e
red (+ ) loud s p e aker te r m inal carries th e sig n a l , bu t also t he
bla ck (-) ter m i n a l. Never connec t on e of the speaker termi nals to the ca b i n e t or the sign a l g r o u n d - this may damag e
your p o w er am p l i fier o r other d evices o f your H i F i syste m .
OVATION MA / SA 8.3 9
Page 13

Ge t t in g s ta r ted
Sin c e t h e MA 8.3 deli v e r s o ver 10 0 0 w a t ts of power, h i gh voltag e s can occ u r a t th e louds p e a k e r term i n a ls. Theref o r e , do
not touch the te r minals of either the po wer ampli f i e r or the
lou d s p e aker duri n g o peration . I f y o u w ant to chang e or
reco n n ect t h e s peake r c a b les, firs t s w i t c h off the po w e r
amp l i f i er us i n g the m a i ns sw i t c h (8) .
We recomm e n d o wners of S A 8 .3 also fo l l ow the ab o v e in struct i o n s.
Make sure small child r e n or pet s do not touch the termina l s
or s p e aker ca b l es whi l e t he sy s tem is i n operat i o n . To c o nnec t sp eakers to th e o utput ja c ks (10 ), use only go o d q uality
spe a ke r c a b les of s uffi c i e n t cr o s s -sec ti o n . If in do u bt, as k
your d e a ler to r e c ommen d t he be s t c able f o r you r s p eaker.
Make sure the pol ar i t y is co rrect when con n e c t ing the speakers. The red o utpu t te r m inals (10 ) mu s t be co nnected to th e
red sp e a k e r t ermi n a l s o r to t he spea k e r t e rminals m a r k ed with
a plus sig n . On t h e S A 8. 3 , t h e right and left c h an nels must
have t he s a m e po l arity o f th e lo u d s p eakers f or o p t imum
soun d r e product i o n .
If you ar e us ing banana plugs , tur n the oute r par t s of th e
spe a ke r t e r minal s ti g h t (to t h e r i ght) bef or e pl u gging them in
so that th e y do not cause annoying rattli n g nois e s at a la te r
time . I f y ou w ant t o c onta c t bare c a ble e n d s o r cab l e l ugs,
turn t he ou t e r pa r ts of the sp e a ker t e r m inals t o the l e ft a s f ar
as the y wi l l go , inser t t h e strippe d c a b l e ends or cab l e l u g s
from bel o w in t o t h e o p e n i ngs provid e d in th e s p e a ker terminal s a nd th e n tighte n t he o u t e r par ts o f t he sp e a k e r term i n a ls
by t u r n i ng t h e m to th e r ight.
To take full ad v a ntage of th e monobl o ck co n c ept, we rec o m mend y o u p lace the M A 8 .3 as c l o s e a s possi b l e t o the
resp e c t ive lou ds p e aker. Th i s result s in s hor t e s t p ossib l e dis-
10 OVATION MA / SA 8.3
Page 14

Ge t t in g s ta r ted
tanc e s f o r t h e t ra n s p o rt of the el e c t rical powe r f r o m th e
ampl i f i er to y o u r loud s p eaker. This i n s t a llatio n me t h o d als o
saves yo u l o n g a n d e x pensi v e lo udspea k e r cables an d , l ast
but n o t leas t , makes p l ayback l e ss sen s i t i ve to i n terfere n c e .
If you r l oudsp e a k e rs react t o c a b les tha t a r e to o sh o r t wit h
tigh t but too t h in b ass, t h is m a y be due to t h e f a c t t h a t th o s e
lou d s p e akers we re de s igned to op e r a t e w i th l o ng cable s . Th e
cab l e is t herefo r e a 'componen t of the cros s o v e r ' an d has an
effect o n the bas s re p r o d uctio n . A s a resul t , we re commend
you u s e longe r c a b les to o p erate s u c h spe a ke r s. In c ase of
doubt , pleas e g et i n t o uch wi t h y our de a l er.
OVATION MA / SA 8.3 11
Page 15

Ge t t in g s ta r ted
12 OVATION MA / SA 8.3
Page 16

B a s i c o pe ra t io n
2. Basic operation
2.1 PO WER button
In pe rmame n t mod e the unit is sw i tche d on and of f by pressing the POWER bu t ton (1 ). In o th e r o perating modes (see
sect i o n 2.6 Op e ra t i ng mo d e s ), th e p o wer s t a ge is s w i tched o n
and of f fro m a n e x ternal so u r c e. T he POWER b u t t o n i s ineffective in thes e operati n g modes , which is in d i c ated on the display w h en pres s e d.
Afte r swit c h i ng o n, t h e po w e r am p lifier needs a s h ort amoun t
of tim e t o w a rm up th e t u b e secti o n . The me s s age tube
wa r m u p appears i n t h e d i s play. Please w a it u n til t h e e ntire
wa i t i n g for tub e w armup dis p l a y chang e s complet e l y from
lowe r c a se to upper ca s e c haracter s . T h e two anal og t r a n sformers f or t h e p o w er a m p l ifiers are t h e n s witche d on a nd, a f ter
che c k i n g that t h e r e are no erro r s , the prote c t ive relay is r e l e a sed (a s equen c e o f cl i cks can b e h e a rd from t he d evice). T he
MA 8 . 3 / SA 8 .3 is n o w ready f o r opera t i o n.
2.2 DI SPLAY button
If you wish to sw i t ch off the dis p l a y w h ile listen i ng t o music,
you m a y deac ti v a t e it b y pressin g the D I S P LAY button ( 5 ).
OVATION MA / SA 8.3 13
Page 17

B a s i c o pe ra t io n
2.3 Menu syt em
The M A 8.3 a n d SA 8 . 3 provid e a vari e t y of i n d i vidua l settin g s
via a key-co n t r olled me nu s yste m. Th e c orrespo n d i n g f unction o f a key i s shown i n the d i s play ab o v e the r e s pective k e y.
If no di splay ap p ears ab o ve a key, no f unct i o n is a ssign e d to
this me n u i tem. The me n u s ystem wo r k s both in operat i on and
in s t a n dby m o d e by pres s ing th e Menu key ( 4 c ).
2. 3.1 Op e ra tio n o f t he me nu sy ste m
To en t er t h e m enu , p ress t h e mid d l e me n u bu t t o n (4 c ) . The
displ a y (3) n o w shows t he fi r s t menu i t e m.
The c u r r ent set ti n g is hi gh l ighte d b y a f ra me. You may c h a nge
the set t i n g b y pr e s s ing t h e r i ght m e n u b u t tons ( 4d, 4 e ). To
acce s s oth e r men u item s , pre s s the left buttons (4a, 4b). To
exi t th e menu an d s a ve y our se t t ings, pr e s s the mi d d l e menu
but to n (4c).
If no button is pres se d fo r mo r e t h a n 10 se conds, the me n u
swi tc h es o ff a utomat i c a lly. Pr eviou sl y mad e settin g s a r e st ill
saved.
2.4 Di splay brightness
Adjus t s the displ ay b r i g htness: 10 0 % / 7 5% / 50% / 2 5% / from
remot e s ignal . See al s o secti o n 2 .6 O p e ra ting m o d e s.
14 OVATION MA / SA 8.3
Page 18

B a s i c o pe ra t io n
2.5 Di splay modes
bargra p h & value: Du r i n g operatio n , a bar indi ca t e s the cu r -
rent ou tp u t l evel. A nume r i c d i splay ind i c a tes the cur r e n t peak
power.
bargra p h only: Du r ing oper at i o n , a b a r i n d icat e s t h e cu r r e n t
outp u t level.
value only: A numeric dis p l a y sh ow s the cu rrent peak power
outp u t .
2.6 O perating modes
per m a n e nt (ke y P OWER) : T he M A 8.3 / S A 8.3 i s alway s r e a dy
for operation a s so o n a s it is sw i t ched on wi t h th e m ains
swi tc h (8) ( s t a ndby m o d e).
auto : The M A 8.3 / S A 8 . 3 s w itches on aut o m a t ically as so o n
as an au d i o sign a l i s d etect e d from th e pr e a m plif i e r. If no si g nal is dete c t e d for more than ab o u t 6 mi n u tes, th e po w e r
ampl i f i er sw i t c hes b a c k to st an dby mode .
trig g e r: T he swi t c h-on s i g n a l of a p r e a mplifie r w i th sw i t c hing
outp u t activ a t es the M A 8. 3 / SA 8 . 3 as so o n as t h e pream p l ifier i s a c tivate d. I f t h e preampl i fier is swit c h e d off, t h e o u tput
sta g e also g o es in to s tandb y m ode. S e e al s o sect i o n 1.6 C o n nec ti n g trig g e r input s .
remo t e : If you a r e u s ing an AVM m o d e l of t h e PA or S D s eries ,
set th e operatin g mode to remo t e . Th e MA / SA 8.3 switc h e s
on a u t o m atic a l l y as s oo n a s t he co r r e s pondi n g PA o r SD c ompone n t wit h prea m p f u n c t ion is s w i t che d on. T h e sam e
appli e s to the s witch- o f f proces s . T h e digit a l swit c h i ng sig n a l
OVATION MA / SA 8.3 15
Page 19

B a s i c o pe ra t io n
is t ransmit t e d i n a u dibly and with o u t a n y i n f l uence on the
soun d v i a the a u d io lin e ( R CA or X L R ). The c o n n e cti o n of a
sep a ra t e trig g e r cabl e is not ne c essar y in th is ca se. In addition, th e di s play bri g h t ness of the displ a y (4) i s a l s o a d apted
to t h e setti n g of th e connec t e d PA o r SD c o mpone n t (see s e c tion 2 . 4 Disp l a y bright n e ss).
ℹ NOT E
If y ou p r e s s t h e PO W E R b u t ton i n one of the o p erating mod e s
auto m a t ic, tr i g ger o r remo t e , the d i s play s hows t h is bu t t o n is
wit h o u t func t i o n. If yo u wa n t t o chan g e this s etting, p ress th e
menu b u tton 4 c .
2.7 De fine l oad impedanc e
Here y o u c a n a d j u st t h e impedan c e of t h e con nect e d sp e akers: 2 / 4 / 8 Ohm . Th i s se t t i ng is used ex c lusivel y f or ca l i bratin g t h e po w e r display and has no effect on the power
ampl i f i er it s e lf.
2.8 S et ill umination
Thi s m enu i t em a l l o ws y o u to a c t ivate a n d d e a ctivate additi o nal b l ue LED s in th e d e vice a s a spec i a l optic a l effect .
16 OVATION MA / SA 8.3
Page 20

Ap p e n di x
3. Appendix
3.1 Cleaning
The surface of t h e h ousing is l a rgely scra tch-re s i stant an d
may be cle an e d w i th m ild soapy wa t e r o r a g l a ss cleaner a n d
a so f t dust c l o th.
ℹ CAUTIO N
Never allo w liq u i d to ente r th e in s i de of th e ho using durin g
clea n i n g. Fo r safety re asons , the po w er co rd shou l d also be
dis c o n necte d bef o r e d a m p w i ping. Do not use solven t s or
abra si v e s as they m a y d amage t h e surfa c e o r prin t i n g . The
ple x i g l as p a n e l of t h e c over i s very s e n s itive .
3.2 Trouble shooting
Ofte n , s uppose d d e f e c t s can be traced b a c k t o o p erating
error s . B efore you con t a ct us abou t a de fe c t , please ch e c k t h e
func t i o ns o f you r pow e r am plifi e r ( s) a c c ording t o t h e fo llowing c h ecklis t :
OVATION MA / SA 8.3 17
Page 21

Ap p e n di x
3. 2.1 Dev ic e is swi tc h ed on, bu t t h e d is pla y i s da rk
The di s p l a y bright n e s s is set too dark . S e t t h e d i splay to a different s e t ting (s e e also 2.2 DI S PLAY button and 2 .4 Dis p l a y
brig h t ness).
3. 2.2 De v ic e i s t ur ne d on , but d oes no t play m u si c
Firs t c h e c k w h e t her the preampl i f i e r and th e selected sig n a l
sour c e a re wor k i n g (e. g . conne c t headph o n e s).
You have plug g e d headp h o nes in to t h e p reampli f i e r, wh i ch
mut e s t he o u t p u t s.
Chec k t h e c onne c t ion cables b e t ween sour c e a nd preamp l i f ier
and b e t ween p r e a mplifi e r and p o w er amp l i f ier.
Chec k your s p e a k e r cabl e s for a n open o r shor t circuit .
3. 2.3 De v ic e d oes n ot sw itc h o n o r swi tch es to st and by mo d e w hi le lis te nin g t o m usi c
Thi s c a n happen i f t h e power am p l ifier i s i n a u t o mode and
you hea r a t a ver y l ow v o l u me level. In this ca s e , t h e signa l
volta g e is not sufficie nt to tr i gger th e a u t o m atic. Se l e c t th e
perm a n ent op e ra t i n g mode i n s tead ( s ee sect i o n 2.6 Op e ra t i n g
mode s ) .
If t he p o wer a m p lifie r is in t r i g ger m o de, c heck t h e t r igger
cab l e s be tween the preamp l i f ier and powe r amp l i fier for a
shor t cir c u i t or in t e r rupti o n .
18 OVATION A 6.3 / 8.3
Page 22

Ap p e n di x
The remo t e op e r ating mode i s s e l ected but no co m p a tibl e
AVM pr eampl i f ier model is conn e cted. Sel e c t an o ther op e ra tin g mode (s e e sectio n 2 .6 O p e r a t i ng mod e s ).
3. 2.4 Af t er s wit ch i ng of f t he pr eam pli fie r, th e po wer am pl ifi er doe s n ot a utom at i ca lly go in to st and by mo d e ( af ter a b ou t 6 mi nu t es ), al t ho ugh th e o per ati n g mo d e "auto" is s e le c te d
Chec k to see if yo u can hear any humming or chirping nois e
from the speak e r s even af ter th e p ream pl i fier ha s been switche d off. If this is th e cas e , i nterfe re n ce in th e c able will
int e r f e re wi th t h e autom a t i c sw i t c h-on/o f f f unctio n . I t int e r pret s t h e inter f e r e n ce as a m usic sig n a l and t h e r e f ore does
not s w itch of f the de v i ce.
Sol ut i on: Positio n yo u r ca bles in a differe n t way, so that n o
int e r f e rence i s inter s p ersed . Che c k t h e p i n a s s i g nment of
your b a l anced X L R c a bles ( s e e sectio n 1 .2.1 P i n a s s ignm e n t ) .
3. 2.5 Hu mmi ng du ri n g musi c pl ayba ck
The cau se is usu al l y a gro u n d lo op cause d by an antenna
ampl i f i er or cable. Check whet h e r t h e hu m ming decreas e s if
you disc o n n ect the ante n n a c a b l e f ro m y our t uner (if co n n e cted, al s o f r o m a T V). If thi s sho u l d help, a she at h c urrent fil t e r
mus t b e i n s t alled in ea c h a n t e nna cab l e o f t h e connect e d
rece i v e r.
Cabl e f ault: The s h ield o f a n audi o c a b le i s i n terrup t ed, th e
RCA plu g do es n o t h a ve a go od groun d co n t a ct ( bend it ca r e full y ) . Ch e ck t h e p i n as s i gnment of your balanc e d XL R cab l e s
(se e s e ction 1 . 2 .1 Pi n assig n me nt).
OVATION MA / SA 8.3 19
Page 23

Ap p e n di x
3. 2.6 Th e d isp lay s h o w s " OVE RHE AT " and t h e u ni t sw itc hes of f
Swit c h of f the mains s u p ply via the ma i n s sw itch (8 ) a n d
all o w th e a m p l i fier to c ool dow n fo r ap p r o x . 1 5 mi n utes.
Chec k th at the a mpli fi e r i s c o rrectly in s talled (s e e 1 . 3 I n stallatio n and c o o l ing).
Chec k your s p e a k e r cabl e s for s h o rt c i rcuits.
3. 2.7 Th e d isp lay s h o w s " OVE RLOA D" an d th e un i t sw itc hes of f
Swit c h off t h e m ains s u p ply v i a the m a i n s sw i t c h (8).
Chec k your s p e a k e r cabl e s for s h o rt c i rcuits.
3. 2.8 T he di s pl ay sh ow s "I NTE RNA L FAI LUR E o r DC on in put " and th e d evi ce sw it c he s o ff
Chec k to see if your preamp l i f ier is outpu tt i n g DC vo l t age
(som e tu b e p r eampli f i e rs d o t h is for a s hort ti m e a f ter p owering o n).
The MA 8.3 / SA 8.3 was ov e r modula t e d due to he avy ou t p ut
level s . In t h i s c a s e i t s w itches o ff a utomat i c a lly t o pr o tect
itse l f and t he l o u d speaker s . Sw i t ch o f f the p ower a mplifi e r,
reduc e the vol u m e and s w i tch o n the po w e r ampli f i er ag a i n .
20 OVATION A 6.3 / 8.3
Page 24

Ap p e n di x
3. 2.9 Pa cka gin g
The bottom of the flig h t ca s e in w h i c h t h e un it i s d e l ivered is
not symm e t r i cal. If y o u w a n t t o pa c k th e un i t i n to t h e ca s e at
a l a t er p o int i n t i m e , p l e a se m a k e su r e t o po s i t ion t he u n it
correc t l y.
Abb . 4. B ottom of t h e AVM figh t c ase: M a k e sure t h e feet o f
the a m p l i fier a r e corre c t l y posi t i o ned .
3.1 Conditio ns of warranty (EC only)
If de s p ite ex p e ctat i o n s a defect oc c urs th a t cannot be r e paired b y y ourself or you r dealer, we u n d erta k e the rep a i r of y o u r
uni t fr e e of c h arge f or u p t o three y ears f rom d ate of purchas e . T he w a r r a n ty c o v e r s t h e costs o f ma t e r ial a n d wor k i n g
time , t ranspor t cost s a re to b e borne b y the o w n e r.
OVATION MA / SA 8.3 21
Page 25

Ap p e n di x
Provi si o ns for t his wa r ra n t y are:
1. The un i t must have be en purchas e d f ro m a n aut h o r ised
deale r. Eq u i p ment fro m o t h er sourc e s will n o t b e repair e d , n ot
even a t charg e .
2. The warranty re g i stration ca rd, t ogether wi t h a c o py of the
bill of sa le, must be re c e i v e d by us within four weeks of th e
dat e o f purc h a s e .
3. Th e de f ect must not have be en caused by improper han d ling o r misus e .
4. Return th e unit to us on l y in it s or i g i nal pa cking. If this is
not p o s sible w e are e n t i t led to re fuse a ccepta n c e . We w i l l not
assu m e respons i b ility f o r transpo r t dam ag e under a n y circums t a n c es.
5. A sh o r t desc r i p tion o f t h e def e c t i s to be i nclude d wit h th e
retur n e d uni t.
6. In c a ses o f do u b t w e reser v e th e ri g ht t o reques t a copy o f
the b i ll of s a l e.
7. We al s o res e r ve the ri g ht to le v y a ha n d ling charge for
ite m s r e t urned w i t hout go o d o r valid re a s o n, or i f t h e unit pro ves to be not d e fective .
PLE A S E NOT E : I f y o u a r e r e t urning th e u n i t f rom a c o untr y
other t h a n Germany you shou l d ensure tha t co r r e c t expor t
doc u m e nts a re o b t aine d . W e ca n not a c c e pt any c harges f o r
cos t s arisin g from i m proper o r i n c o mplete e xpor t docu m e n tation. If yo u ha v e p urcha se d yo u r un i t f rom a d ealer o u tsid e
Germ a n y p l ease re fer to him o r t h e r e l ev ant i mpor t ing firm to
proce s s the w a r ra nty.
22 OVATION A 6.3 / 8.3
 Loading...