

Page 1

Installation,
Configuration
and Operation
FRITZ!Box
6360 Cable
Page 2

Legal Notice
FRITZ!Box 6360 Cable
This documentation and the software it describes are protected by copyright. AVM grants the
non-exclusive right to use the software, which is supplied exclusively in object code format. The
licensee may create only one copy of the software, which may be used exclusively for backup use.
AVM reserves all rights that are not expressly granted to the licensee. Without previous approval
in writing, and except for in cases permitted by law, it is particularly prohibited to
• copy, propagate or in any other manner make this documentation or this software publicly ac-
cessible, or
• process, disassemble, reverse engineer, translate, decompile or in any other manner open
the software and subsequently copy, propagate or make the software publicly accessible in
any other manner.
The licensing conditions are specified in the FRITZ!Box 6360 Cable user interface: Open the user
interface as described on page 26, click the question mark icon at the upper right, and open the
“Legal Notice”.
This documentation and software have been produced with all due care and checked for correctness in accordance with the best available technology. AVM GmbH disclaims all liability and warranties, whether express or implied, relating to the AVM product’s quality, performance or suitability for any given purpose which deviates from the performance specifications contained in the
product description. The licensee bears all risk in regard to hazards and impairments of quality
which may arise in connection with the use of this product.
AVM will not be liable for damages arising directly or indirectly from the use of the manual or the
software, nor for incidental or consequential damages, except in case of intent or gross negligence. AVM expressly disclaims all liability for the loss of or damage to hardware or software or
data as a result of direct or indirect errors or destruction and for any costs (including connection
charges) related to the documentation and the software and due to incorrect installations not performed by AVM itself.
The information in this documentation and the software are subject to change without notice for
the purpose of technical improvement.
We offer a manufacturer’s warranty for this original product. The warranty conditions are presented from page 105 of this manual.
© AVM GmbH 2011. All rights reserved. Documentation release 05/2011
AVM Audiovisuelles Marketing
und Computersysteme GmbH
Alt-Moabit 95
D 10559 Berlin
Germany
AVM in the Internet: www.avm.de/en
Unless otherwise indicated, all trademarks mentioned are legally protected trademarks owned by
AVM. This includes product names and logos in particular. Microsoft, Windows and the Windows
logo are trademarks owned by Microsoft Corporation in the USA and/or other countries. Bluetooth
is a trademark of Bluetooth SIG Inc. licensed to AVM GmbH. All other products and company
names are trademarks of their respective owners.
AVM Computersysteme
Vertriebs GmbH
Alt-Moabit 95
D 10559 Berlin
Germany
2
Page 3

Table of Contents
Symbols and Highlighting . . . . . . . . . . . . . . . . . . . . . . . . 7
I CONNECTING AND OPERATION . . . . . . . . . . . . . . . . . . . . . 8
1 Security and Handling . . . . . . . . . . . . . . . . . . . . . . . . . . . 8
2 FRITZ!Box 6360 Cable. . . . . . . . . . . . . . . . . . . . . . . . . . . 10
2.1 Package Contents . . . . . . . . . . . . . . . . . . . . . . . . . . . . . . . . . . . . . . . 13
2.2 Requirements for Operation . . . . . . . . . . . . . . . . . . . . . . . . . . . . . . . 13
3 Connecting . . . . . . . . . . . . . . . . . . . . . . . . . . . . . . . . . . . 14
3.1 Installing at the Cable Connection . . . . . . . . . . . . . . . . . . . . . . . . . . 14
3.2 Connecting to Electrical Power . . . . . . . . . . . . . . . . . . . . . . . . . . . . . 15
3.3 Connecting to the Computer . . . . . . . . . . . . . . . . . . . . . . . . . . . . . . . 15
3.4 Connecting a Computer to the LAN Port . . . . . . . . . . . . . . . . . . . . . . 16
3.5 Connecting Computer(s) Wirelessly via WLAN. . . . . . . . . . . . . . . . . 18
3.6 Connecting Telephone, Fax, or Answering Machine . . . . . . . . . . . . 21
3.7 Connecting an ISDN Telephone. . . . . . . . . . . . . . . . . . . . . . . . . . . . . 22
3.8 Connecting an ISDN PBX . . . . . . . . . . . . . . . . . . . . . . . . . . . . . . . . . . 23
3.9 Connecting an IP Telephone . . . . . . . . . . . . . . . . . . . . . . . . . . . . . . . 23
4 Opening the User Interface . . . . . . . . . . . . . . . . . . . . . . 26
4.1 Password Protection . . . . . . . . . . . . . . . . . . . . . . . . . . . . . . . . . . . . . 26
4.2 Saving Settings . . . . . . . . . . . . . . . . . . . . . . . . . . . . . . . . . . . . . . . . . 28
5 Surf the Net . . . . . . . . . . . . . . . . . . . . . . . . . . . . . . . . . . . 29
6 Telephone Connections . . . . . . . . . . . . . . . . . . . . . . . . . 30
6.1 Entering Your Phone Numbers . . . . . . . . . . . . . . . . . . . . . . . . . . . . . 30
6.2 Configuring Up Telephony Devices . . . . . . . . . . . . . . . . . . . . . . . . . . 31
6.3 Telephony Functions . . . . . . . . . . . . . . . . . . . . . . . . . . . . . . . . . . . . . 34
6.4 Operating the Answering Machine on the Telephone Keypad . . . . 38
3
Page 4

7 DECT Function . . . . . . . . . . . . . . . . . . . . . . . . . . . . . . . . . 39
7.1 Registering the FRITZ!Fon MT-F Cordless Telephone . . . . . . . . . . . . 39
7.2 Registering Cordless Telephones . . . . . . . . . . . . . . . . . . . . . . . . . . . 40
7.3 Placing an Internal Call to a Cordless Telephone. . . . . . . . . . . . . . . 40
7.4 Paging Cordless Telephones . . . . . . . . . . . . . . . . . . . . . . . . . . . . . . . 41
7.5 Logging a Cordless Telephone off of the FRITZ!Box . . . . . . . . . . . . . 41
7.6 Enabling and Disabling DECT . . . . . . . . . . . . . . . . . . . . . . . . . . . . . . 41
8 USB Devices . . . . . . . . . . . . . . . . . . . . . . . . . . . . . . . . . . 42
8.1 Connecting USB Devices . . . . . . . . . . . . . . . . . . . . . . . . . . . . . . . . . . 42
8.2 Accessing USB Devices . . . . . . . . . . . . . . . . . . . . . . . . . . . . . . . . . . . 43
8.3 USB Storage . . . . . . . . . . . . . . . . . . . . . . . . . . . . . . . . . . . . . . . . . . . . 43
8.4 USB Printers . . . . . . . . . . . . . . . . . . . . . . . . . . . . . . . . . . . . . . . . . . . . 45
8.5 FRITZ!Box USB Remote Connection. . . . . . . . . . . . . . . . . . . . . . . . . . 53
8.6 FRITZ!WLAN USB Stick. . . . . . . . . . . . . . . . . . . . . . . . . . . . . . . . . . . . 56
8.7 USB Hub . . . . . . . . . . . . . . . . . . . . . . . . . . . . . . . . . . . . . . . . . . . . . . . 56
8.8 Tips for Using USB Devices . . . . . . . . . . . . . . . . . . . . . . . . . . . . . . . . 56
9 Configuration and Operation on the Telephone . . . . . . 58
9.1 Instructions for Operation at the Telephone . . . . . . . . . . . . . . . . . . 58
9.2 Audio Signals. . . . . . . . . . . . . . . . . . . . . . . . . . . . . . . . . . . . . . . . . . . 59
9.3 Configuring by Telephone . . . . . . . . . . . . . . . . . . . . . . . . . . . . . . . . . 60
9.4 Operation at the Telephone . . . . . . . . . . . . . . . . . . . . . . . . . . . . . . . 70
10 Troubleshooting . . . . . . . . . . . . . . . . . . . . . . . . . . . . . . . 80
10.1 Errors Opening the User Interface. . . . . . . . . . . . . . . . . . . . . . . . . . . 80
10.2 The WLAN Adapter Cannot Find FRITZ!Box . . . . . . . . . . . . . . . . . . . . 86
10.3 WLAN Connection Is Not Established . . . . . . . . . . . . . . . . . . . . . . . . 87
10.4 Obtaining an IP Address Automatically . . . . . . . . . . . . . . . . . . . . . . 91
11 Uninstallation . . . . . . . . . . . . . . . . . . . . . . . . . . . . . . . . . 96
11.1 Removing FRITZ!Box from the Computer. . . . . . . . . . . . . . . . . . . . . . 96
11.2 Removing the Printer Port . . . . . . . . . . . . . . . . . . . . . . . . . . . . . . . . . 96
11.3 Removing the Program Group . . . . . . . . . . . . . . . . . . . . . . . . . . . . . . 97
4
Page 5

II PRODUCT DETAILS AND USEFUL INFORMATION. . . . . . . 99
1 Product Details . . . . . . . . . . . . . . . . . . . . . . . . . . . . . . . . 99
1.1 Network Cable . . . . . . . . . . . . . . . . . . . . . . . . . . . . . . . . . . . . . . . . . . 99
1.2 LEDs . . . . . . . . . . . . . . . . . . . . . . . . . . . . . . . . . . . . . . . . . . . . . . . . . 100
1.3 WLAN Button . . . . . . . . . . . . . . . . . . . . . . . . . . . . . . . . . . . . . . . . . . 101
1.4 DECT Button . . . . . . . . . . . . . . . . . . . . . . . . . . . . . . . . . . . . . . . . . . . 101
1.5 Technical Specifications . . . . . . . . . . . . . . . . . . . . . . . . . . . . . . . . . 102
1.6 Declaration of CE Conformity . . . . . . . . . . . . . . . . . . . . . . . . . . . . . 104
1.7 Manufacturer’s Warranty. . . . . . . . . . . . . . . . . . . . . . . . . . . . . . . . . 105
1.8 Disposal . . . . . . . . . . . . . . . . . . . . . . . . . . . . . . . . . . . . . . . . . . . . . . 106
2 More about WLAN . . . . . . . . . . . . . . . . . . . . . . . . . . . . . 107
2.1 Standards. . . . . . . . . . . . . . . . . . . . . . . . . . . . . . . . . . . . . . . . . . . . . 107
2.2 Security. . . . . . . . . . . . . . . . . . . . . . . . . . . . . . . . . . . . . . . . . . . . . . . 112
2.3 Frequency Ranges . . . . . . . . . . . . . . . . . . . . . . . . . . . . . . . . . . . . . . 115
2.4 Using the FRITZ!WLAN Repeater N/G . . . . . . . . . . . . . . . . . . . . . . . 118
2.5 WPS (Wi-Fi Protected Setup) . . . . . . . . . . . . . . . . . . . . . . . . . . . . . . 119
3 More About Network Settings . . . . . . . . . . . . . . . . . . . 122
3.1 Network Overview . . . . . . . . . . . . . . . . . . . . . . . . . . . . . . . . . . . . . . 122
3.2 UPnP Settings. . . . . . . . . . . . . . . . . . . . . . . . . . . . . . . . . . . . . . . . . . 124
3.3 IP Settings . . . . . . . . . . . . . . . . . . . . . . . . . . . . . . . . . . . . . . . . . . . . 124
3.4 IP Address . . . . . . . . . . . . . . . . . . . . . . . . . . . . . . . . . . . . . . . . . . . . 125
3.5 DHCP Server . . . . . . . . . . . . . . . . . . . . . . . . . . . . . . . . . . . . . . . . . . . 126
3.6 IP Network . . . . . . . . . . . . . . . . . . . . . . . . . . . . . . . . . . . . . . . . . . . . 127
3.7 Changing Network Settings. . . . . . . . . . . . . . . . . . . . . . . . . . . . . . . 127
4 More About: Internet Telephony . . . . . . . . . . . . . . . . . 129
5 More about: Virtual Private Network (VPN) . . . . . . . . . 130
5.1 What Is VPN? . . . . . . . . . . . . . . . . . . . . . . . . . . . . . . . . . . . . . . . . . . 130
5.2 Security through a VPN . . . . . . . . . . . . . . . . . . . . . . . . . . . . . . . . . . 131
5.3 Tunnel Technology . . . . . . . . . . . . . . . . . . . . . . . . . . . . . . . . . . . . . . 132
5.4 Supplementary Software for VPN . . . . . . . . . . . . . . . . . . . . . . . . . . 133
5
Page 6

6 More about: Band Width Management and Prioritization
134
6.1 Band Width Management . . . . . . . . . . . . . . . . . . . . . . . . . . . . . . . . 134
6.2 The Prioritization of Network Applications and Network Devices. 134
7 More Functions . . . . . . . . . . . . . . . . . . . . . . . . . . . . . . . 138
7.1 Child Protection . . . . . . . . . . . . . . . . . . . . . . . . . . . . . . . . . . . . . . . . 138
7.2 Energy Monitor. . . . . . . . . . . . . . . . . . . . . . . . . . . . . . . . . . . . . . . . . 138
7.3 Push-Service Mail . . . . . . . . . . . . . . . . . . . . . . . . . . . . . . . . . . . . . . 140
7.4 Night Service . . . . . . . . . . . . . . . . . . . . . . . . . . . . . . . . . . . . . . . . . . 140
8 Customer Service Guide . . . . . . . . . . . . . . . . . . . . . . . . 142
8.1 Documentation . . . . . . . . . . . . . . . . . . . . . . . . . . . . . . . . . . . . . . . . 142
8.2 Frequently Asked Questions (FAQs) . . . . . . . . . . . . . . . . . . . . . . . . 143
8.3 Support from the Service Team. . . . . . . . . . . . . . . . . . . . . . . . . . . . 143
Glossary. . . . . . . . . . . . . . . . . . . . . . . . . . . . . . . . . . . . . 145
Index . . . . . . . . . . . . . . . . . . . . . . . . . . . . . . . . . . . . . . . 159
6
Page 7
Symbols and Highlighting
This symbol indicates useful hints to assist you in working
with the FRITZ!Box.
This symbol indicates important instructions that must be
observed to avoid malfunctions.
The table below explains the highlighting used in this manual.
Highlighting Function Examples
Quotation marks Keys
Pointed brackets Joker <Ext.>
Underlined text Address to be en-
Bold Emphasis Do not click the button
Buttons
Settings pages
Menus
Commands
File paths
Directory and file
names
tered in the web
browser
“F1” key
“Help”
“Advanced”
“Edit / Paste”
“Copy”
“C:\My Documents”
“Documentation”
fritz.box
7
Page 8

I CONNECTING AND OPERATION
1 Security and Handling
What to Watch Out For
Safety Instructions
When working with the FRITZ!Box 6360 Cable, observe the
following security instructions in order to protect yourself and
the FRITZ!Box from harm.
• Do not install the FRITZ!Box during an electrical storm.
• Disconnect FRITZ!Box from the power supply during elec-
trical storms.
• Never let liquids get inside the FRITZ!Box. Otherwise,
electric shocks or short circuits may result.
• The FRITZ!Box is intended for indoor use only.
• Do not open the FRITZ!Box housing. The device contains
hazardous components and should only be opened by
authorized repair technicians.
Handling the FRITZ!Box
You can either place FRITZ!Box on a horizontal surface or
mount it on a wall. Please note the following:
• Place or hang the FRITZ!Box in a dry location that is free
of dust and protected from direct sunlight.
For ideal operating conditions, mount the FRITZ!Box on a
wall with the cables connected on the bottom.
• Do not place FRITZ!Box on excessively heat-sensitive sur-
faces, as the base of the device can heat up during normal operation.
• Make sure that the ventilation slits are unobstructed. For
this reason the FRITZ!Box should not be placed on a carpet or on upholstered furniture. The ventilation slits provide for air cooling of the FRITZ!Box.
8
Page 9

• When connecting FRITZ!Box to your computer using the
network, remember to take the length of the cable into
account.
• If you would like to establish wireless connections be-
tween FRITZ!Box and the computer, position the device
at a central location.
• Make sure to keep sufficient distance from potential
sources of interference like microwave devices or electric devices with large metal housings.
9
Page 10
2 FRITZ!Box 6360 Cable
Analog telephone,
fax
Printer,
storage media
Computers, game
console, network
Internet at the
TV cable connection
USB 4 x LAN (GBit)
Cable
Notebook, smartphone,
video/TV streaming
FRITZ!Fon or other
cordless (DECT) telephones
DECT
Telephone,
PBX
Fon ISDN
WLAN
2.4 GHz/5 Ghz
2 x Fon analog
Po
Pow
Powe
r/DS
r/DS
L
Power/DSL
Fon
Fon
DECT
DECT
WLAN
WLAN
INFO
INFO
Cable
Cable
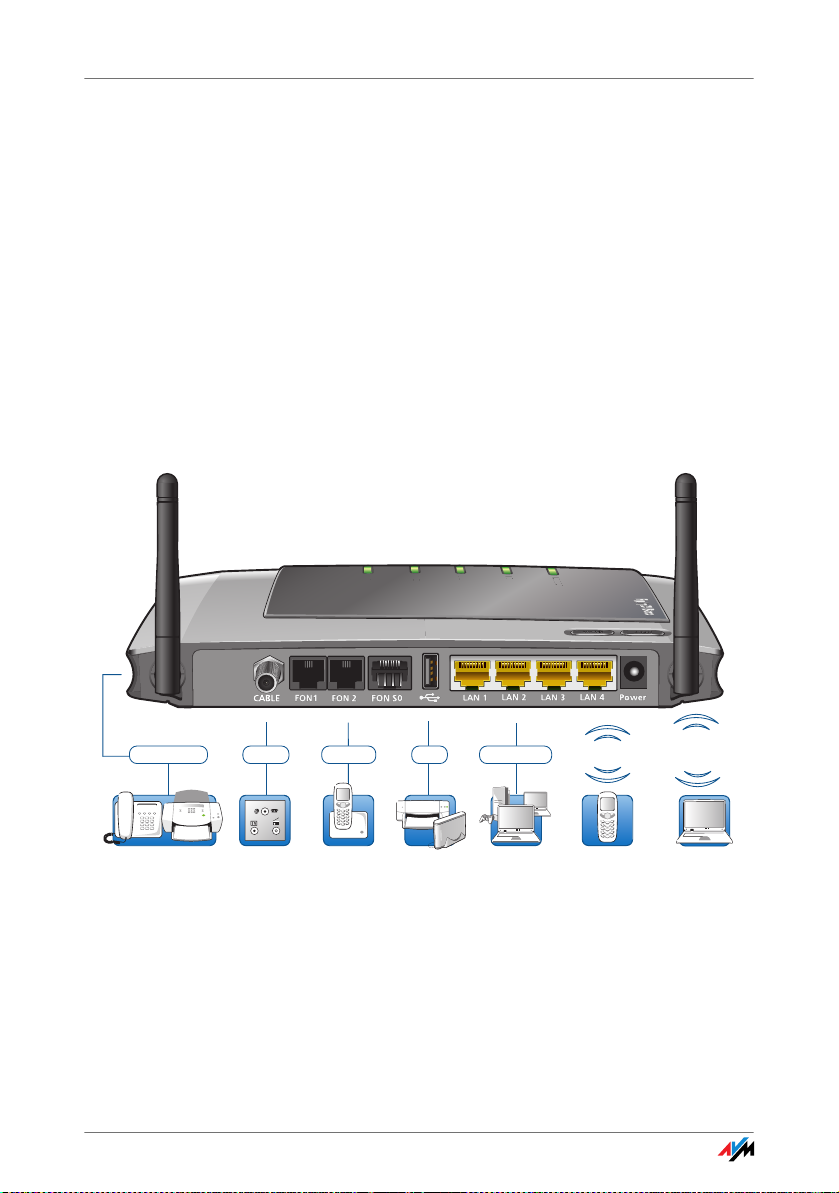
An Overview
The FRITZ!Box 6360 Cable is equipped with an integrated cable model
and designed for operation at a cable connection. The FRITZ!Box thus
connects your computers with the cable connection.
Each connected computer can establish an Internet connection over the
FRITZ!Box.
As a WLAN access point, FRITZ!Box offers you the possibility of connecting your computer to the cable connection wirelessly.
The FRITZ!Box is a Private Branch Exchange (PBX) for making telephone
calls via the Internet.
Possibilities for connecting the FRITZ!Box
Cable Modem
The FRITZ!Box is equipped with an integrated cable modem
compliant with the EuroDOCSIS 3.0 standard. Up to four
channels are available in both the receiving and the sending
10
Page 11

FRITZ!Box 6360 Cable
directions. Channel bundling is possible in both directions.
This allows for transmission rates of up to 220 Mbit/s in the
receiving direction and sending at a rate of up to 120 Mbit/s.
PBX
You can connect two analog telephones, fax machines or answering machines to the FRITZ!Box.
Up to eight ISDN telephony devices can be connected to the
integrated ISDN S
Using Cordless Telephones
Thanks to the DECT function, the FRITZ!Box can be used as a
base station for cordless telephones. Every cordless telephone that supports the DECT standard can be registered at
the FRITZ!Box.
Connecting Computers
Four computers can be connected directly to the FRITZ!Box
using the four LAN ports.
You can also connect a network hub or switch to the LAN
ports so that even more computers can be connected to the
FRITZ!Box.
port.
0
WLAN Access Point
The FRITZ!Box is a WLAN access point. All computers that support WLAN can be wirelessly connected to the FRITZ!Box.
Local Network
All of the computers connected with the FRITZ!Box constitute
a network and can share access to any files released for file
sharing.
Internet
All of the computers connected to the FRITZ!Box can access
the Internet.
The FRITZ!Box works as a router, making the Internet connection available to all connected computers. All connected computers can then use the Internet connection at the same time.
11
Page 12

FRITZ!Box 6360 Cable
IPv6
The FRITZ!Box 6360 Cable can be configured for IPv6. Thanks
to the dual-stack concept, IPv4 can be used at the same time,
parallel to IPv6.
The FRITZ!Box 6360 Cable supports native IPv6 in case your Internet Provider offers a direct IPv6 link. IPv6 with tunnel protocols can be used over IPv4 links. The FRITZ!Box 6360 Cable supports various tunnel protocols.
Firewall
The FRITZ!Box is equipped with an integrated firewall. The integrated firewall protects your network from attacks from the
Internet as long as the FRITZ!Box is operated as a router.
USB Port
The FRITZ!Box is equipped with a port for USB devices, to which
you can connect USB storage devices (hard drive, stick), a printer, one of the FRITZ!WLAN USB Sticks by AVM, a USB hub or other devices (see page 53).
The USB port supports the USB 2.0 and USB 1.1 standards.
If you use one of the FRITZ!WLAN USB Sticks by AVM, the AVM
Stick & Surf technology is at your disposal. Use Stick & Surf
to adopt the WLAN security settings from the FRITZ!Box quickly and conveniently.
For connecting a printer, FRITZ!Box has a printer server. Alternatively, the USB remote connection is available for the use of
printers.
Media Server
An integrated media server makes music, image and video files
available in the local network. A USB storage with a media collection is simply connected to the FRITZ!Box. A suitable playback device linked to the local network can then play back
these media contents. Suitable devices include FRITZ!Media
and other devices compatible with the UPnP AV standard.
Network Devices
Other network devices can also be connected to the network
ports of the FRITZ!Box, for instance game consoles.
12
Page 13

Package Contents
2.1 Package Contents
The following is included in the FRITZ!Box 6360 Cable package:
• FRITZ!Box 6360 Cable
• one power supply unit with a cable for connection to the
power mains
• one network cable for connection to a computer or a net-
work
• printed product information
depending on the product variant, your FRITZ!Box is accompanied by either an installation manual or a page
presenting service information.
2.2 Requirements for Operation
In order to operate the FRITZ!Box, you must have the following:
• a Web browser that supports Java script (for instance, In-
ternet Explorer version 7.0 or higher, or Firefox
version 2.0 or higher)
• an Internet-ready cable connection compliant with the
EuroDOCSIS 1.0, 1.1, 2.0 or 3.0 standard
• for connection via WLAN:
computer with a WLAN adapter compliant with
IEEE 802.11n, IEEE 802.11g, IEEE 802.11a or
IEEE 802.11b, for example a FRITZ!WLAN USB Stick N
• for connection via network cable:
computer with a network port (network adapter standard
Ethernet 10/100/1000 Base-T)
13
Page 14
Connecting
CABLE
Power/Cable
Fon
DECT
WLAN
Info
Radio
Data
TV
C
able
3Connecting
Connecting FRITZ!Box
This chapter presents comprehensive descriptions of all of the possibilities for connecting the FRITZ!Box.
Please see the instructions about setting up the FRITZ!Box in
section Security and Handling on page 8.
The service technician of your cable network provider generally connects your FRITZ!Box 6360 Cable to the cable network
and the power grid when operation of the box is launched for
the first time.
3.1 Installing at the Cable Connection
Installing at the cable connection
Connecting
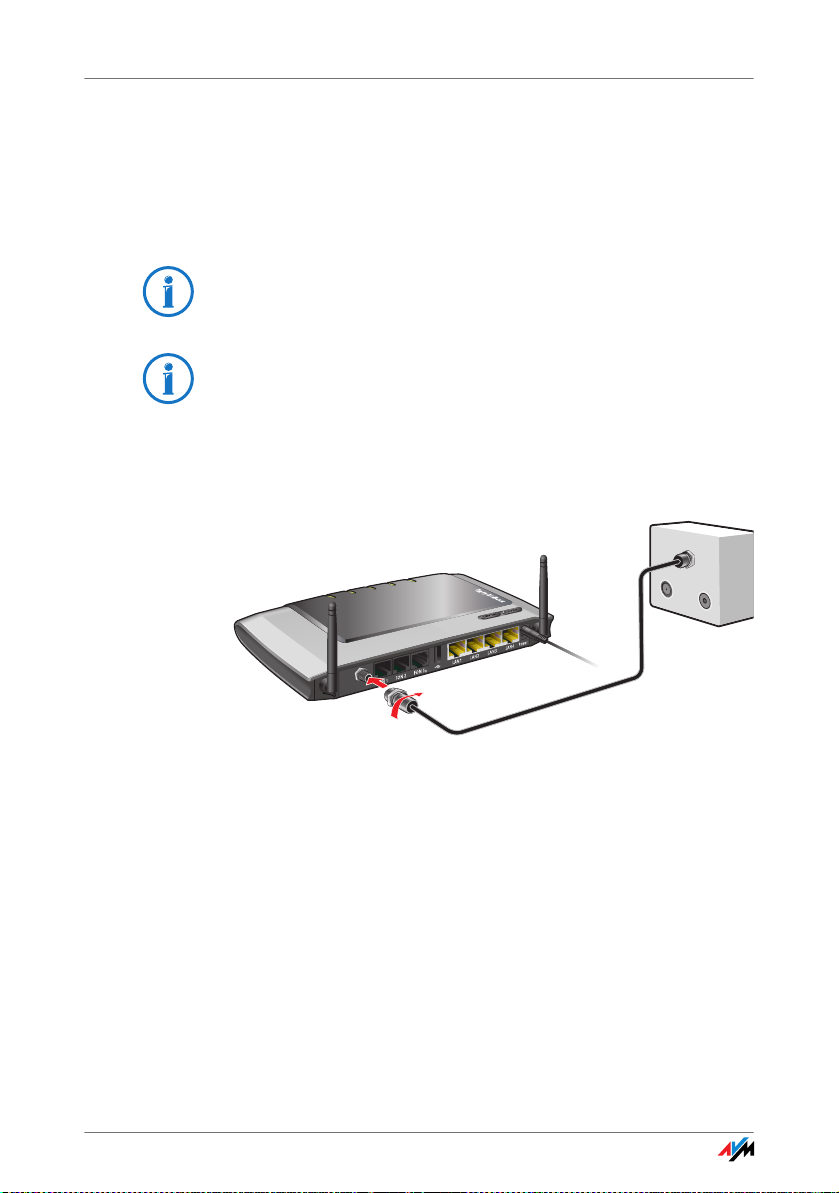
The coaxial cable for installing the FRITZ!Box 6360 Cable at
the cable connection is not included with delivery of the
FRITZ!Box. You receive it from your cable network operator.
During the first installation, connect the coaxial cable to the
“Cable” port of the FRITZ!Box and to your multimedia socket.
14
Page 15
Connecting to Electrical Power
CABLE
Power/Cable
Fon
DECT
WLAN
Info
C
able
3.2 Connecting to Electrical Power
Connecting to the power supply
Connecting
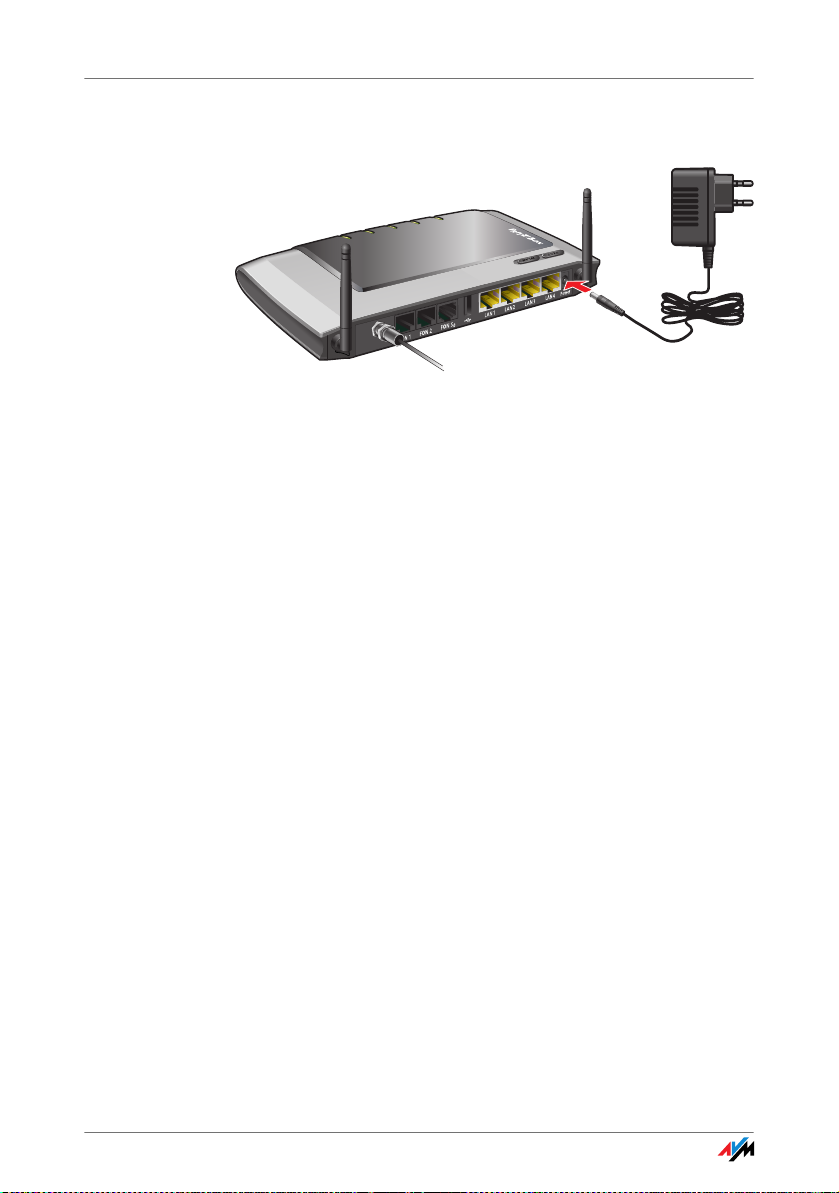
To connect to the power mains, use the power supply unit included in the FRITZ!Box package.
1. Connect the FRITZ!Box to the power supply unit. Insert
the small plug into the power socket at the right edge of
the socket strip on the FRITZ!Box.
2. Plug the other end into an AC power outlet.
3.3 Connecting to the Computer
If you would like to surf the web using the FRITZ!Box or to
open the FRITZ!Box user interface, then you must connect a
computer with the FRITZ!Box.
A computer can be connected with the FRITZ!Box in two different ways:
• via a LAN port
• wirelessly via WLAN
Connection Scenarios
Note the following when connecting computers to the FRITZ!Box:
• One computer can be connected to the FRITZ!Box by only
one of these means.
• At each of the network ports of the FRITZ!Box, a comput-
er can be connected directly or via a hub/switch.
15
Page 16
Connecting a Computer to the LAN Port
CABLE
Power/Cable
Fon
DECT
WLAN
Info
C
able
• Using WLAN you can connect multiple computers with
the FRITZ!Box at the same time.
• The way a computer is connected to the FRITZ!Box is the
same regardless of the operating system on the computer.
• All of the computers connected with the FRITZ!Box con-
stitute a network.
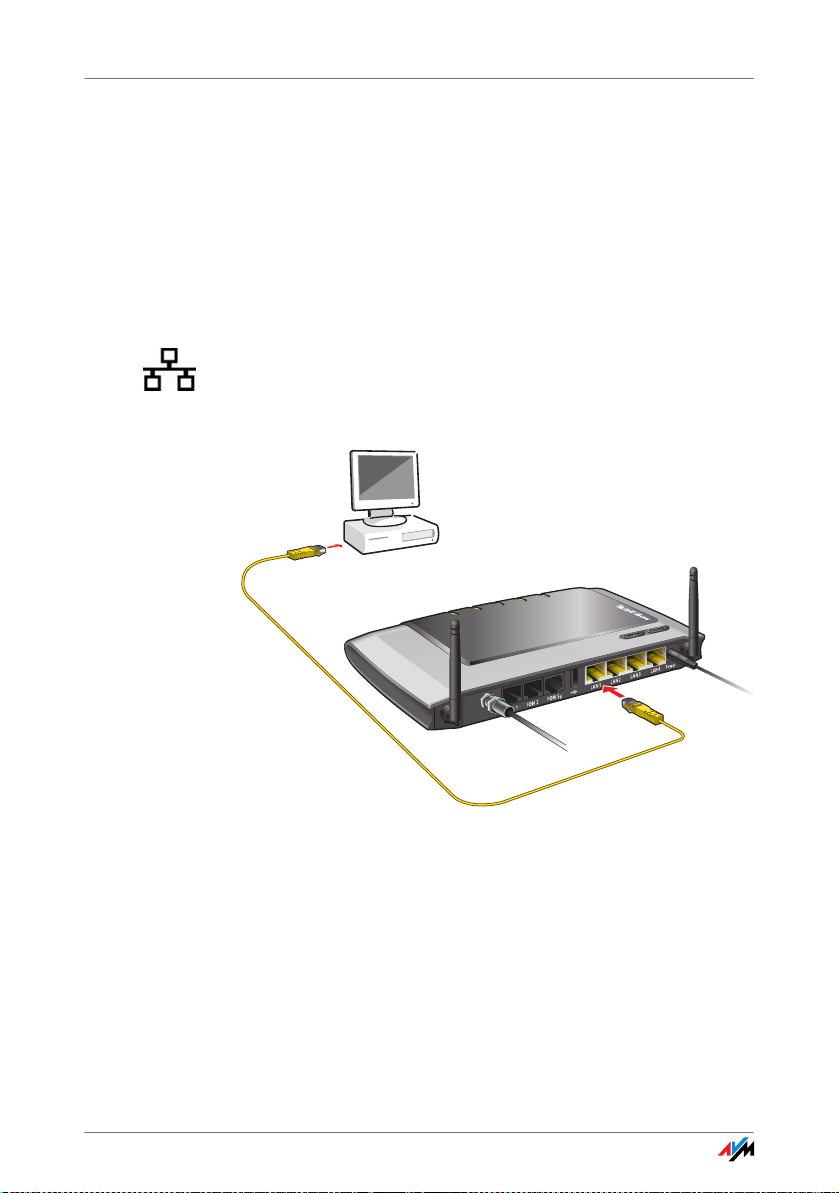
3.4 Connecting a Computer to the LAN Port
If you would like to connect a computer to the LAN port of the
FRITZ!Box, make sure the computer is equipped with a LAN
port (network adapter). A LAN port is usually designated by
the icon at left or labeled “LAN”.
Connecting a computer to a LAN port on the FRITZ!Box
Connecting
Set aside the network cable (yellow) from the FRITZ!Box
package.
1. Switch on your computer.
2. If you work with a Linux operating system, configure your
network adapter with the setting “DHCP”, if this setting
is not already configured.
16
Page 17
Connecting a Computer to the LAN Port
CABLE
Power/Cable
Fon
DECT
WLAN
Info
C
able
3. Insert one end of the LAN cable into the computer’s net-
work adapter.
4. Connect the other end of the LAN cable to a socket on
the FRITZ!Box labeled “LAN 1”, “LAN 2”, “LAN 3” or
“LAN 4”.
Now the FRITZ!Box and computer are connected to each other.
Connecting More Computers to the LAN Ports
Additional cables are required to connect further computers.
In purchasing a LAN cable, note the instructions in the section Network Cable on page 99.
You can connect a computer to any of the four LAN ports of
the FRITZ!Box at any time.
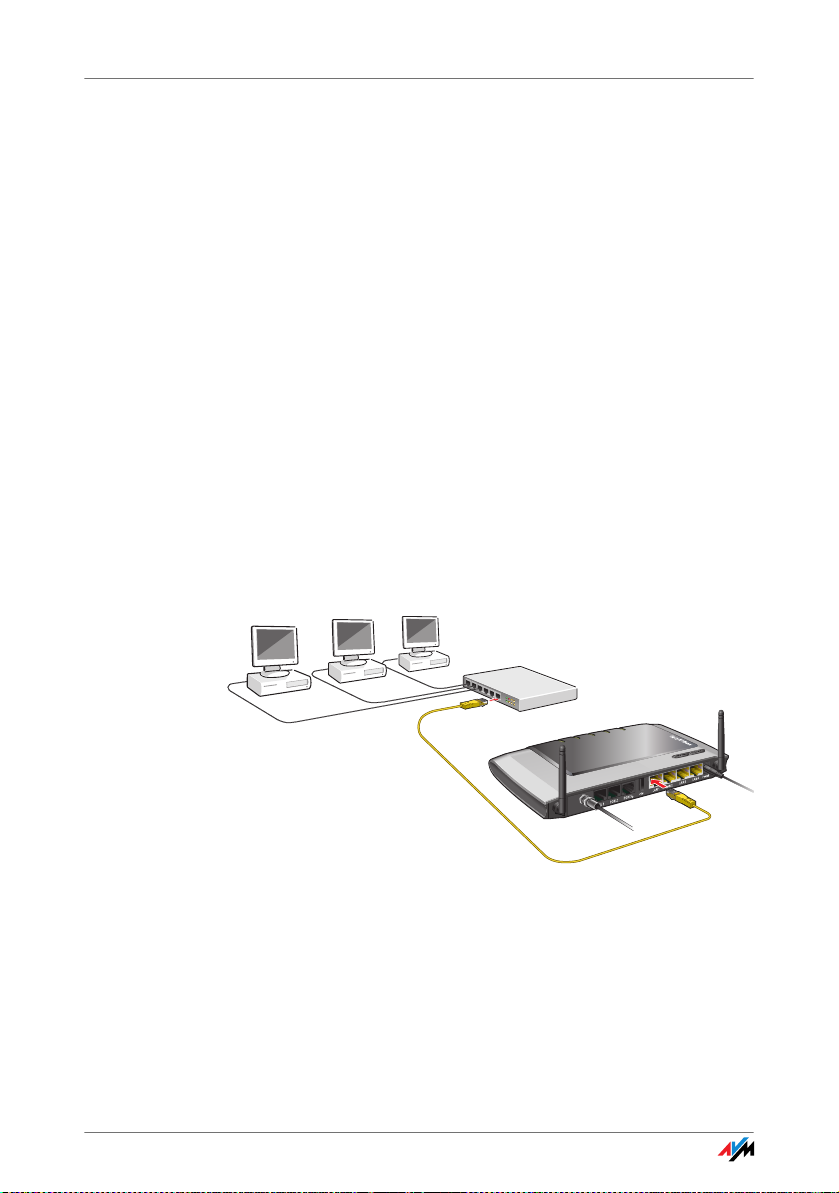
Connecting a Network Hub or Switch
You can connect a network hub or switch to one of the LAN
ports on the FRITZ!Box if you would like to connect multiple
computers via LAN.
Connecting FRITZ!Box to a network hub
Connecting
Set aside the network cable (yellow) from the FRITZ!Box
package.
1. Connect one end of the LAN cable into the uplink port of
the network hub or switch.
2. Connect the other end of the cable to one of the LAN
sockets on the FRITZ!Box.
17
Page 18
Connecting Computer(s) Wirelessly via WLAN
The FRITZ!Box and network hub are now connected with each
other.
3.5 Connecting Computer(s) Wirelessly via WLAN
Using WLAN you can connect one or multiple computers with
the FRITZ!Box wirelessly.
The wireless WLAN connection is independent of the operating system used. Each computer to be connected to the
FRITZ!Box via WLAN must be equipped with a compatible
WLAN adapter, for instance the FRITZ!WLAN USB Stick N.
Many modern computers and notebooks have an integrated
WLAN adapter.
For more information on WLAN, see the section More about
WLAN from page 107.
Connecting the FRITZ!WLAN USB Stick
AVM Stick & Surf
If you are using a FRITZ!WLAN USB Stick model by AVM, you
can establish a secure WLAN connection quickly and conveniently using AVM Stick & Surf technology.
1. Switch on your computer.
2. Insert the your FRITZ!WLAN USB Stick into the USB port
on the FRITZ!Box.
The WLAN security settings are being transmitted to the
FRITZ!WLAN USB Stick. The “Info” LED on the FRITZ!Box
begins flashing rapidly.
As soon as the “Info” LED stops flashing, transmission
of the settings has been concluded.
3. Remove the FRITZ!WLAN USB Stick.
4. Now insert the FRITZ!WLAN USB Stick into the USB port
of the computer.
18
Page 19

Connecting Computer(s) Wirelessly via WLAN
The security settings saved on the FRITZ!WLAN USB Stick are
applied to the computer. Now the FRITZ!Box and
FRITZ!WLAN USB Stick are connected with each other wirelessly.
For more information, see the manual on your AVM
FRITZ!WLAN USB Stick model.
Establishing a WLAN Connection Using WPS
If you are using a WLAN adapter from another manufacturer
and your WLAN adapter supports WPS (Wi-Fi Protected Setup), you can also use this mechanism to establish the WLAN
connection between your computer and the FRITZ!Box. For detailed instructions about how to do so, see the section WPS
(Wi-Fi Protected Setup) from page 119.
Establishing a WLAN Connection Manually
Installing a WLAN Adapter
If you are using a WLAN adapter from another manufacturer,
you can also establish the WLAN connection manually. To do
so, proceed as follows:
1. Switch on your computer.
2. Install the WLAN adapter in your computer along with
the appropriate software. Please take note of the instructions in the documentation of the adapter.
3. In order to establish a WLAN connection to the
FRITZ!Box, you can use the WLAN software for the WLAN
adapter, or the WLAN software supplied with the operating system.
Establishing a Connection
The FRITZ!Box is delivered with preset values for WLAN security. You must enter these values during the configuration of
the WLAN adapter.
If you would like to establish a WLAN connection using these
preset values, then your WLAN adapter must support the WPA
encryption procedure.
19
Page 20

Connecting Computer(s) Wirelessly via WLAN
1. Start the WLAN software.
2. Enter the following values for the connection between
the FRITZ!Box and the WLAN adapter:
SSID (name of the
WLAN radio network)
Encryption methods WPA (TKIP) or WPA2 (AES-CCMP)
Encryption WPA PSK or WPA2 PSK (AES)
WLAN key The key is printed on the sticker on
Network mode Infrastructure
FRITZ!Box 6360 Cable
the bottom of housing.
3. Confirm your entries using the relevant button in the us-
er interface (for instance, “OK” or “Connect”).
Now your WLAN adapter and the FRITZ!Box are connected
with each other wirelessly.
Please see the instructions in the section Opening the User
Interface on page 26. See also the information on WLAN secu-
rity in the Security from page 112 section.
WPA Not Supported
If your WLAN adapter does not support WPA encryption, you
must convert the encryption set in the FRITZ!Box to WEP. For
this you must change the WLAN settings in the FRITZ!Box. To
do so, proceed as follows:
1. Connect the FRITZ!Box and the computer using the net-
work cable (yellow) (see the section Connecting a Com-
puter to the LAN Port on page 16).
2. Start a web browser on your computer.
3. Enter fritz.box
in the address line of the browser.
4. Select the “WLAN / Security” menu.
5. Then select WEP encryption and enter a network key.
6. Click the “Apply” button.
A window is displayed with the WLAN security settings.
20
Page 21
Connecting Telephone, Fax, or Answering Machine
CABLE
Power/Cable
Fon
DECT
WLAN
Info
C
able
7. Make a note of the settings or print out the page by click-
ing the printer icon in the toolbar.
8. Close the user interface and clear the connection be-
tween the FRITZ!Box and the computer. Remove the network cable (yellow).
9. Configure your WLAN adapter with the security settings
entered in the FRITZ!Box.
The WLAN connection between your WLAN adapter and the
FRITZ!Box will be established.
We strongly recommend the use of a WLAN adapter that supports WPA or WPA2 (for instance, an FRITZ!WLAN USB Stick
AVM, see also page 18). WEP is out of date and data encrypted with WEP can be deciphered within minutes.
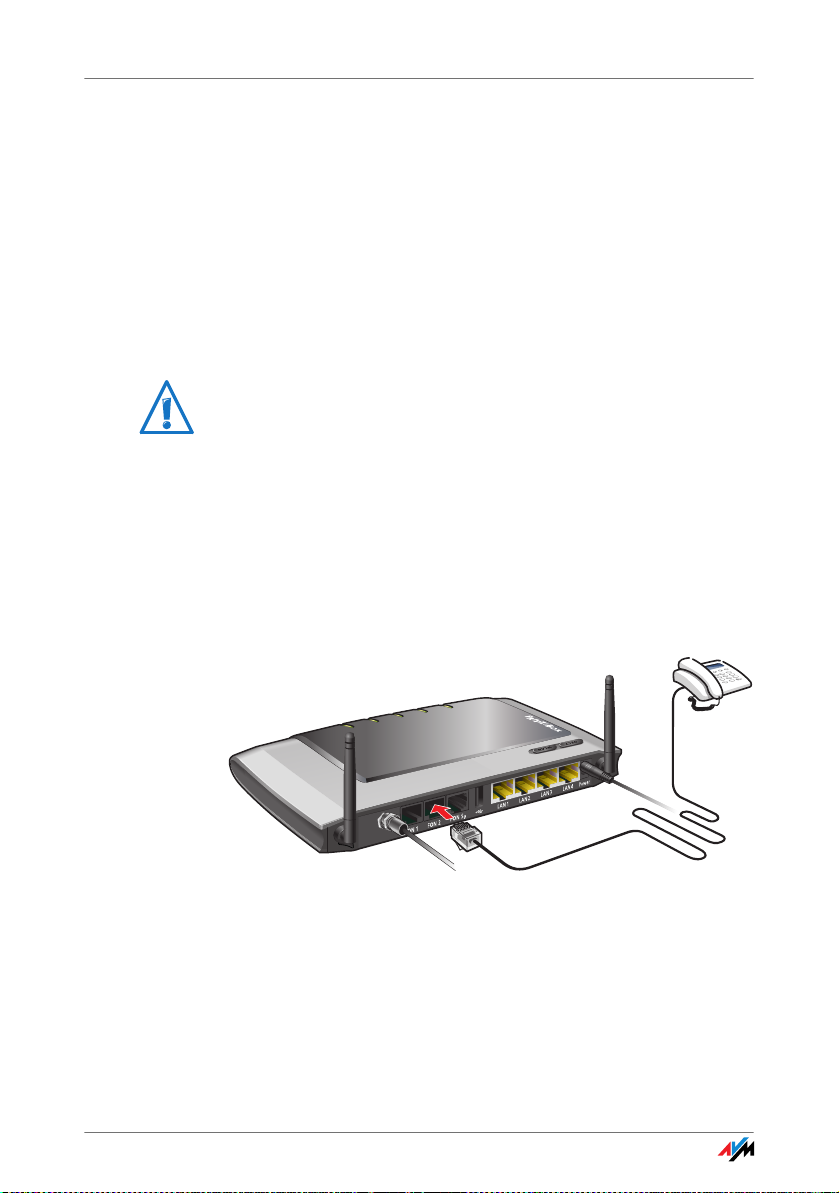
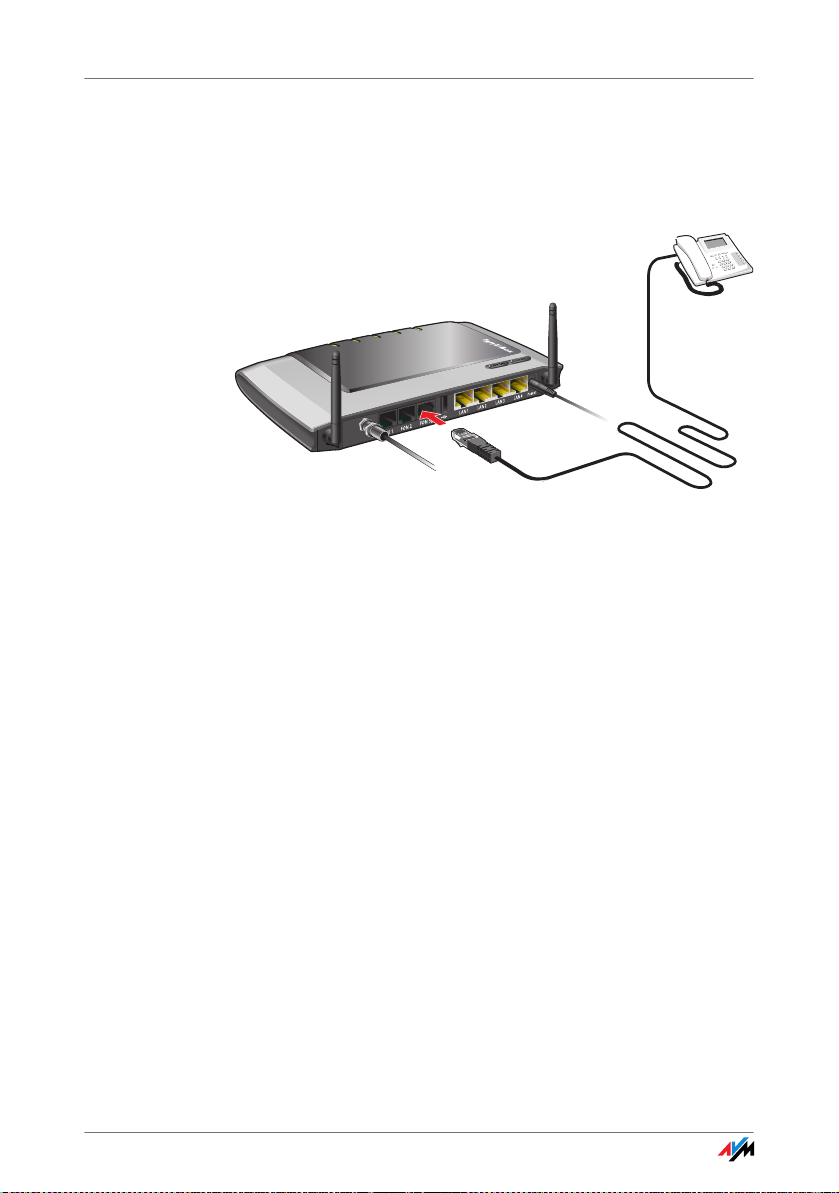
3.6 Connecting Telephone, Fax, or Answering Machine
The FRITZ!Box 6360 Cable provides Internet telephony for analog terminal devices.
You can connect two analog terminal devices like telephones,
fax machine or answering machine to the FRITZ!Box.
Connecting an analog telephone to an RJ11 socket
Analog telephones that have an RJ11 plug are connected to
the RJ11 sockets “FON 1” and “FON 2”. These two sockets are
located on the back panel of the FRITZ!Box.
21
Page 22
Connecting an ISDN Telephone
CABLE
Power/Cable
Fon
DECT
WLAN
Info
C
able
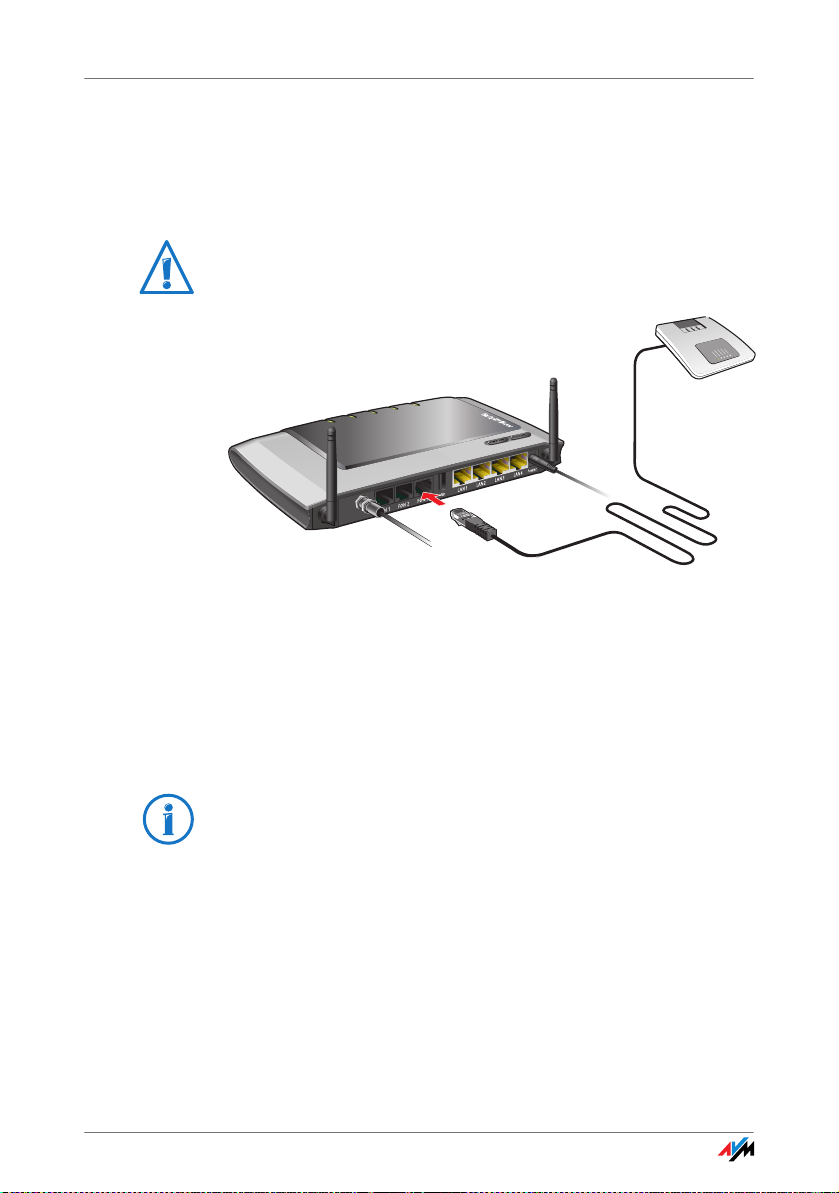
3.7 Connecting an ISDN Telephone
ISDN telephones can be connected to the FRITZ!Box. With appropriate cabling, up to eight ISDN telephones can be connected.
Connecting an ISDN telephone to the FRITZ!Box
Connecting
Use an ISDN cable to connect an ISDN telephone.
1. Connect one end of the ISDN cable with the ISDN tele-
phone.
2. Connect the other end of the ISDN cable with the
“FON S
” port of the FRITZ!Box.
0
22
Page 23
Connecting an ISDN PBX
3.8 Connecting an ISDN PBX
If you have an ISDN PBX, you can connect this PBX to the
FRITZ!Box. With the telephones connected to the PBX you can
make calls in the usual fashion.
The ISDN PBX must support a point-to-multipoint line.
WLAN
Info
CABLE
Connecting an ISDN PBX to the FRITZ!Box
Connecting
Use an ISDN cable to connect an ISDN PBX.
Power/Cable
Fon
DECT
C
able
1. Connect one end of the ISDN cable with the ISDN PBX.
2. Connect the other end of the ISDN cable with the
“FON S
” port of the FRITZ!Box.
0
If you have no more than two analog devices connected
to the PBX, you can connect them directly to the
FRITZ!Box and do without the PBX.
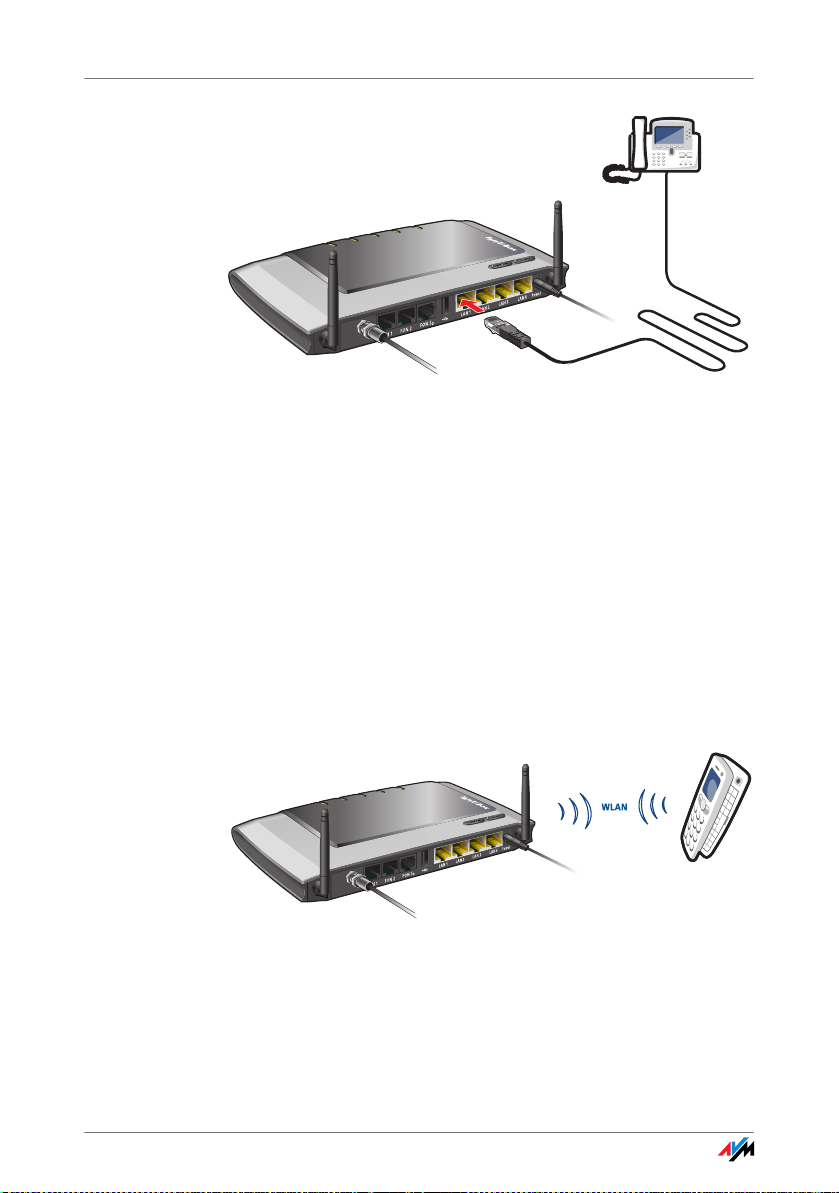
3.9 Connecting an IP Telephone
With your FRITZ!Box 6360 Cable you can even use IP telephones to make calls over the Internet. IP telephones are connected to the FRITZ!Box via LAN or WLAN.
Connecting to a LAN Port
At the LAN ports of the FRITZ!Box you can connect IP telephones using a LAN cable.
23
Page 24
Connecting an IP Telephone
CABLE
Power/Cable
Fon
DECT
WLAN
Info
C
able
CABLE
Power/Cable
Fon
DECT
WLAN
Info
C
able
Connecting an IP telephone to the FRITZ!Box
1. Connect one end of the LAN cable with the IP telephone.
2. Connect the other end of the LAN cable to one of the LAN
ports on the FRITZ!Box.
Now the IP telephone is connected to the FRITZ!Box. This
phone must be configured before you can use it for telephone
calls. Follow the instructions in the documentation of the device and in the section Configuring an IP Telephone in
FRITZ!Box on page 33.
Connecting via WLAN
IP telephones that support WLAN, known as “smart phones”,
can be connected wirelessly to the FRITZ!Box via WLAN.
Connecting a smart phone to the FRITZ!Box
1. Use your smart phone to search for WLAN devices at your
location.
2. Select the FRITZ!Box 6360 Cable from the list of WLAN
devices found.
24
Page 25

Connecting an IP Telephone
3. To establish a connection, enter the WLAN key of the
FRITZ!Box.
The smart phone is now connected to the FRITZ!Box. Before
you can make telephone calls that take advantage of the features of an IP telephone, this phone must be configured once.
Follow the instructions in the documentation of the device
and in the section Configuring an IP Telephone in FRITZ!Box
on page 33.
25
Page 26
Opening the User Interface
4 Opening the User Interface
fritz.box
The FRITZ!Box has a user interface that can be used in a web
browser.
The user interface presents information about the FRITZ!Box
product, your access and connections. This is where you configure all of the settings for operating the FRITZ!Box.
The user interface can be opened from any computer connected with the FRITZ!Box. The settings you configure are saved in
the FRITZ!Box.
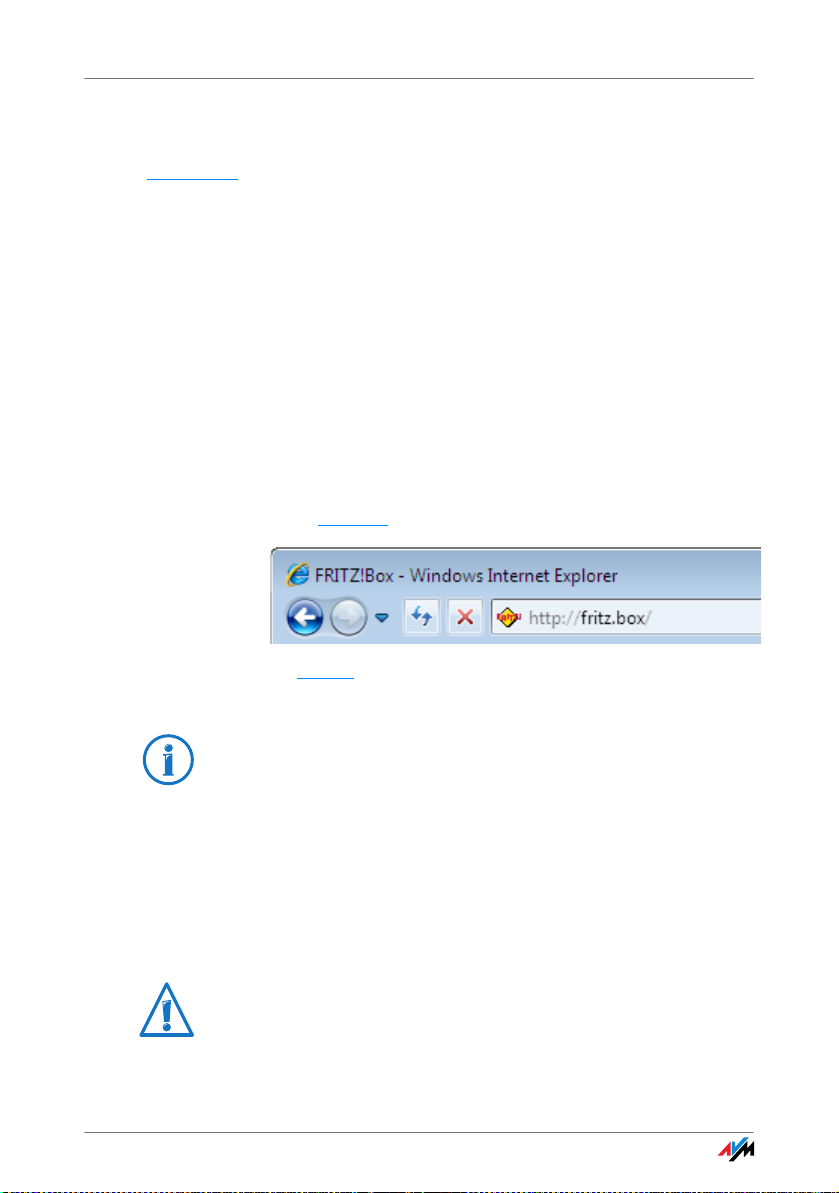
Starting
1. Start a web browser on your computer.
2. Enter fritz.box
The fritz.box address entry in the address field of an Internet browser
The FRITZ!Box user interface opens.
If the user interface does not open, please see the instructions in the section Errors Opening the User Interface on
page 80.
4.1 Password Protection
You can protect the FRITZ!Box user interface from unauthorized and unwelcome access by setting up a password. Only
users who know the password can access the user interface.
This protects all settings and all information in the FRITZ!Box.
We strongly recommend setting up and using password protection for the user interface.
Please note the following once you have enabled password
protection:
in the address line of the browser.
26
Page 27

Password Protection
• When the user interface is opened, the login screen will
• If you do not click on the user interface for a period of
• There are some pages in the user interface from which
• You can log yourself off the user interface by clicking the
• Be sure to use a password you can remember easily. If
be displayed first. Enter the password here to log in to
the user interface.
longer than ten minutes, you will be logged off the user
interface automatically.
The next time you click on the user interface you must
log back in.
the user is not logged off automatically. These are pages
that show constantly changing information, which are
refreshed automatically at regular intervals. The “Overview” page is one example.
icon with the padlock at the top right.
you forget the password, the only way to access the
FRITZ!Box is to restore the factory settings. All settings
made during operation will be overwritten. Then you can
open the user interface again in order to reconfigure your
settings or restore the settings you saved during previous operation.
Setting Up Password Protection
There are several ways to set up password protection in the
FRITZ!Box:
• On the login screen:
As long as password protection is not enabled and you
have not switched off the prompt to use password protection, you will be prompted to set up password protection every time you open the user interface.
• In the “System / FRITZ!Box Password” menu:
In this menu you can set up password protection, or
change a password that has already been set up.
27
Page 28

Saving Settings
4.2 Saving Settings
The settings you made in the FRITZ!Box can be saved as a file
on your computer. This file contains all user-defined settings,
including the account information for the telephony connections. This settings file can be loaded back to your FRITZ!Box
at any time.
The FRITZ!Box features a Wizard to accompany you step by
step through the process of saving and restoring your settings.
28
Page 29

Surf the Net
5Surf the Net
Once the FRITZ!Box has been installed on the cable connection, the FRITZ!Box connects with the cable network and thus
with the Internet. The Internet connection can be used by any
computer connected to the FRITZ!Box.
1. Start a web browser on your computer.
2. Enter in the address field the URL of the web page you
would like to visit, for instance http://www.avm.de/en
.
29
Page 30
Telephone Connections
6 Telephone Connections
Configuring FRITZ!Box for Telephony
With your FRITZ!Box you can make telephone calls via the Internet.
Once you have connected the FRITZ!Box as described in the chapter
Connecting from page 14, you can configure the FRITZ!Box for making
telephone calls.
The configuration is performed in two consecutive steps:
• entering your phone numbers
• configuring the connected telephony devices
In the FRITZ!Box user interface are various Wizards for the
configuration of your FRITZ!Box. We recommend using these
step-by-step instructions.
6.1 Entering Your Phone Numbers
The “Manage Your Own Phone Numbers” Wizard supports you
in performing the following tasks:
• entering Internet telephone numbers
• changing numbers already entered
• deleting entered numbers
If you used the Basic Configuration Wizard after connecting
your FRITZ!Box and entered numbers then, these numbers
are already entered in your FRITZ!Box. In this case you can
start right away with the configuration of the connected telephony devices.
Entering Internet Telephone Numbers
In order to be able to make calls via the Internet with the
FRITZ!Box, you will need an Internet telephone number from
an Internet telephony provider. Enter the Internet telephone
number in the FRITZ!Box.
You can enter multiple Internet numbers in the FRITZ!Box. The
Internet numbers can be from one or from multiple different
Internet telephony providers.
30
Page 31

Configuring Up Telephony Devices
6.2 Configuring Up Telephony Devices
For the configuration of telephony devices, the “Manage Telephony Devices” Wizard is available in the FRITZ!Box.
Telephony Devices Supported
The following telephony devices are supported by the
FRITZ!Box:
• an internal fax for fax reception
• five internal answering machines
The following telephony devices can be connected to the
FRITZ!Box:
• telephones
– analog telephones
– ISDN telephones
– telephones with an integrated answering machine
– cordless (DECT) telephones
– IP telephones
• answering machine
• ISDN telephone systems (PBXs)
– ISDN PBXs for analog telephones
– ISDN PBXs for ISDN telephones
• fax machines
– analog fax machines
– ISDN fax machines
– ISDN fax-telephone combinations
31
Page 32

Configuring Up Telephony Devices
Settings for Telephony Devices
Telephony devices like telephones, faxes and answering machines can be connected to the FRITZ!Box. The FRITZ!Box is also equipped with integrated answering machines and a fax
machine for fax reception.
The “Manage Telephony Devices” Wizard can assist you in
configuring the necessary settings for all telephony devices:
Devices Connected to the FRITZ!Box
• Tele phone
– kind of connection used to connect the telephone
with the FRITZ!Box
– internal name for the telephone
– Call acceptance: Specify here whether the telephone
should react to all calls or only to calls for certain
telephone numbers.
• Fax machine
– kind of connection used to connect the fax machine
with the FRITZ!Box
– internal name for the fax machine
– Call acceptance: Here you define the numbers to
which the fax machine should react.
• Answering Machine
– kind of connection used to connect the answering
machine with the FRITZ!Box
– internal name for the answering machine
– Call acceptance: Enter here whether the answering
machine should react to all calls or only to calls for
certain numbers.
• ISDN PBX
The Wizard explains step by step how to prepare the
ISDN telephone system for operation at the FRITZ!Box
and what settings you can configure.
32
Page 33

Configuring Up Telephony Devices
Devices Integrated in the FRITZ!Box
• Fax reception
– fax ID to be transmitted to the sender of the fax
– e-mail address to which the received faxes are for-
warded
– USB memory on which the received faxes are stored.
For this option a USB memory device must be connected to the USB port of the FRITZ!Box.
• Answering Machine
– Specifications about how calls should be accepted,
and whether the message should also be sent by email.
– internal name for the answering machine
– Call acceptance: Enter here whether the answering
machine should react to all calls or only to calls for
certain numbers.
– Remote inquiry, which can be used to pick up mes-
sages from the answering machine from another telephone line.
Configuring an IP Telephone in FRITZ!Box
If you connected an IP telephone to the FRITZ!Box, you still
have to set up the telephone in the FRITZ!Box user interface.
Then you can use the IP telephone to make calls.
1. Open the FRITZ!Box user interface (see the section
Opening the User Interface on page 26).
2. Select “System / Expert Mode”. Enable the expert
settings and click “Apply”.
3. Select “Wizards / Manage Telephony Devices” and then
click “Next”.
4. Select the option “Telephone” and then click “Next”.
5. Select the “LAN/WLAN (IP telephone)” port and then
click “Next”.
33
Page 34
Telephony Functions
6. Assign a password.
7. Enter the password, the user name and the registrar in
your IP telephone. Consult the documentation of your IP
telephone for instructions.
8. In the user interface of the FRITZ!Box click “Next” and
follow the instructions.
This concludes the configuration of the IP telephone in the
FRITZ!Box.
6.3 Telephony Functions
More functions and settings options for telephony are available using in the “Advanced Settings” tab in the “Telephony /
Internet Telephony” menu.
Call List
The “Call List” displays outgoing calls and sent faxes, incoming calls and faxes, as well as incoming calls during absence.
If the number of a caller or someone called is entered in the
telephone book, the “Call List” will display the name from the
telephone book.
The “Call List” can be saved as a file.
Menu
The call list is found in the “Telephony / Calls” menu.
Telephone Book
A telephone book is at your disposal in the FRITZ!Box.
If a DECT cordless phone from AVM (for instance
FRITZ!Fon MT-F) is registered on the FRITZ!Box, you can use
the telephone book on this DECT telephone. If multiple AVM
DECT telephones are registered, you can set up an individual
telephone book for each DECT telephone in the FRITZ!Box.
Menu
The “Telephone Book” is found in the “Telephony” menu.
34
Page 35

Telephony Functions
Call Diversion
With this function you can divert incoming calls to another
number. The following kinds of call diversion are available:
• diversion of all incoming calls to a certain telephone
• diversion of calls to other telephones or answering ma-
• diversion of calls for certain numbers
• diversion of calls that come from a certain telephone
• diversion of calls without a telephone number (anony-
Menu
The “Call Diversion” menu is located in the “Telephony”
menu.
Blocking Calls
The blocking of telephone numbers using the FRITZ!Box offers
you the following options:
number
chines connected with the FRITZ!Box
number
mous calls)
• Numbers and number ranges can be blocked for outgo-
ing calls
From the FRITZ!Box no outgoing calls to a blocked number range are possible. In this manner you can block
connections to certain mobile networks, for instance.
• blocking telephone numbers for incoming calls
For incoming calls you can block certain numbers to
avoid receiving calls from unwanted callers.
Menu
The command for blocking calls is located in the “Telephony”
menu.
35
Page 36

Telephony Functions
Alarm
With the alarm function you can use the telephones connected to the FRITZ!Box as alarm clocks:
• You can specify several different times for the alarm to
• An individual telephone can be selected for the alarm
Menu
The “Alarm” function is located in the “Telephony” menu.
Dialing Rules
Dialing rules specify which calls are conducted over a certain
Internet telephone number.
All connections to number ranges for which a dialing rule has
been defined are established using the specified Internet
telephone number.
Menu
The “Dialing Rules” menu is located in the “Telephony
menu”.
go off.
function.
Integrated Fax
The FRITZ!Box is equipped with an integrated fax function so
that you can receive faxes without having to connect a fax machine. The integrated fax machine forwards received faxes to
an e-mail address, or stores them on a USB memory device
connected to the FRITZ!Box.
For operation the integrated fax machine must be set up using the Wizard for telephony devices in the FRITZ!Box user interface. Enter an e-mail address to which received faxes
should be forwarded.
36
Page 37

Telephony Functions
The integrated fax machine of the FRITZ!Box supports only fax
reception. To send faxes you can install the “FRITZ!fax for
FRITZ!Box” software. This program can be downloaded from
the AVM web site for the operating systems Windows 7,
Windows Vista and Windows XP.
Integrated Answering Machine
The FRITZ!Box is equipped with several integrated answering
machines, each of which can be enabled and configured individually.
By enabling the setting “Send messages by e-mail” you can
have recorded messages sent to you by e-mail. The messages
are sent as audio files.
To check an answering machine internally, enter the following
keypad sequences:
Answering machine 1 ss600
Answering machine 2 ss601
Answering machine 3 ss602
Answering machine 4 ss603
Answering machine 5 ss604
An overview of the answering machine menu is presented on
page 38.
Menu
The integrated answering machines can be enabled and configured in the “Telephony / Telephony Devices” menu.
37
Page 38

Operating the Answering Machine on the Telephone Keypad
6.4 Operating the Answering Machine on the Telephone Keypad
Main menu
1 Play back messages
If no messages have been recorded, you hear two short audio signals and return
to the main menu.
1 Play back messages
3 Call back the caller of the message
5 Delete message
7 To previous message
9 To next message
0 Listen to “Play back messages” menu again
r Back to main menu
2 Delete all messages
3 Switch the answering machine on / off
4 Record greetings
1 Record greeting message
2 Record announcement
3 Record closing announcement
Record and select
1 Listen to all greetings/announcements of the selected type > Se-
lect the desired recording by pressing 2
5 Delete greeting/announcement
8 Record greeting/announcement > End recording by pressing 1
0 Listen to “Record and Select” menu again
r Back to main menu
0 Listen to “Record greetings” menu again
r Back to main menu
5 Switch recording and directions mode on / off
0 Listen to main menu again
38
Page 39

DECT Function
7DECT Function
Cordless Telephony with FRITZ!Box
Thanks to the integrated DECT function, the FRITZ!Box 6360 Cable can
be used as a DECT base station for cordless telephones that support
the DECT standard. Up to six cordless telephones can be registered on
the FRITZ!Box.
7.1 Registering the FRITZ!Fon MT-F Cordless Telephone
The AVM FRITZ!Fon MT-F supports the DECT radio standard,
making it an ideal handset for your FRITZ!Box 6360 Cable.
Proceed as follows to register FRITZ!Fon MT-F at the FRITZ!Box:
1. Switch FRITZ!Fon MT-F on by pressing and holding down
the hang-up button.
2. Press the DECT button on your FRITZ!Box until
FRITZ!Fon MT-F indicates that registration has been successful.
The FRITZ!Fon MT-F is now connected with your FRITZ!Box and
can be used to make telephone calls.
If registration is not successful, see the instructions for manual registration in the manual of your FRITZ!Fon MT-F.
FRITZ!Fon MT-F Scope of Service
FRITZ!Fon MT-F is optimized for connections with your
FRITZ!Box to provide not only telephone connections, but a
whole range of additional features.
• With FRITZ!Fon MT-F you can read the e-mail sent to your
e-mail account with an e-mail provider. For this the POP3
protocol is used to retrieve your e-mail from your mailbox
at the e-mail provider so that it can be displayed on the
handset.
• You can set up multiple e-mail accounts on your
FRITZ!Box, and, if you have more than one FRITZ!Fon MT-F,
assign the display of each account to a certain
FRITZ!Fon MT-F.
39
Page 40
Registering Cordless Telephones
• With FRITZ!Fon MT-F you can use your FRITZ!Box tele-
phone book. New numbers recorded in a call list on
FRITZ!Fon MT-F can be transferred directly from the call
list to the FRITZ!Box telephone book.
For detailed descriptions of this and other features, see the
documentation for your FRITZ!Fon MT-F.
7.2 Registering Cordless Telephones
With the FRITZ!Box 6360 Cable you can use all cordless telephones that support the DECT radio standard. See the documentation of your cordless telephone to find out whether it
supports either of these standards.
To register a cordless telephone from any manufacturer on
the FRITZ!Box, follow the corresponding instructions in your
telephone manual.
Press and hold down the “DECT” button on the FRITZ!Box
during registration until the cordless telephone indicates
that registration was successful.
7.3 Placing an Internal Call to a Cordless Telephone
You can conduct free, internal calls between telephones connected to the FRITZ!Box.
For internal calls each cordless telephone is assigned an internal number between 610 and 615 upon registration.
1. To place an internal call to a cordless telephone, dial
ss <internal phone number>.
Example: ss610
2. To end the call, simply hang up.
40
Page 41
Paging Cordless Telephones
7.4 Paging Cordless Telephones
If you have misplaced a cordless telephone, you can find it by
using a paging call:
1. Press once briefly on the DECT button of the FRITZ!Box.
All cordless telephones registered on the FRITZ!Box will
ring at the same time.
2. To end the paging call press the DECT button again or the
call button on the cordless telephone.
7.5 Logging a Cordless Telephone off of the FRITZ!Box
1. Start a web browser.
2. Open the FRITZ!Box user interface by entering fritz.box
3. Select the “Telephony / Telephony Devices” menu entry.
4. On the “Overview” page, select the cordless telephone
you want to log off and click the “Delete” button.
Now the cordless telephone will be logged off.
7.6 Enabling and Disabling DECT
The DECT function is disabled upon delivery of the FRITZ!Box.
• Enabling the DECT function
The DECT function is switched on when the first cordless
telephone is registered.
• Disabling the DECT function
When the last cordless telephone is logged off in the
FRITZ!Box user interface, the DECT function is switched
off automatically.
If you use a FRITZ!Fon MT-F from AVM, you can also disable or enable the DECT function on the handset. The
corresponding function is found in the FRITZ!Fon menu
under “DECT / Base Station”.
.
41
Page 42
USB Devices
CABLE
Power/Cable
Fon
DECT
WLAN
Info
C
able
8USB Devices
USB Devices at the FRITZ!Box
The FRITZ!Box is equipped with a USB port (also known as a USB host
controller).
The USB port of the FRITZ!Box supports the USB 1.1 and USB 2.0 standards.
Various USB devices can be connected to the host controller:
• a FRITZ!WLAN USB Stick model from AVM
• a USB mass storage device (hard drive, memory stick, card reader)
• a USB printer
• a USB hub
A maximum of four USB devices may be connected to the USB hub.
8.1 Connecting USB Devices
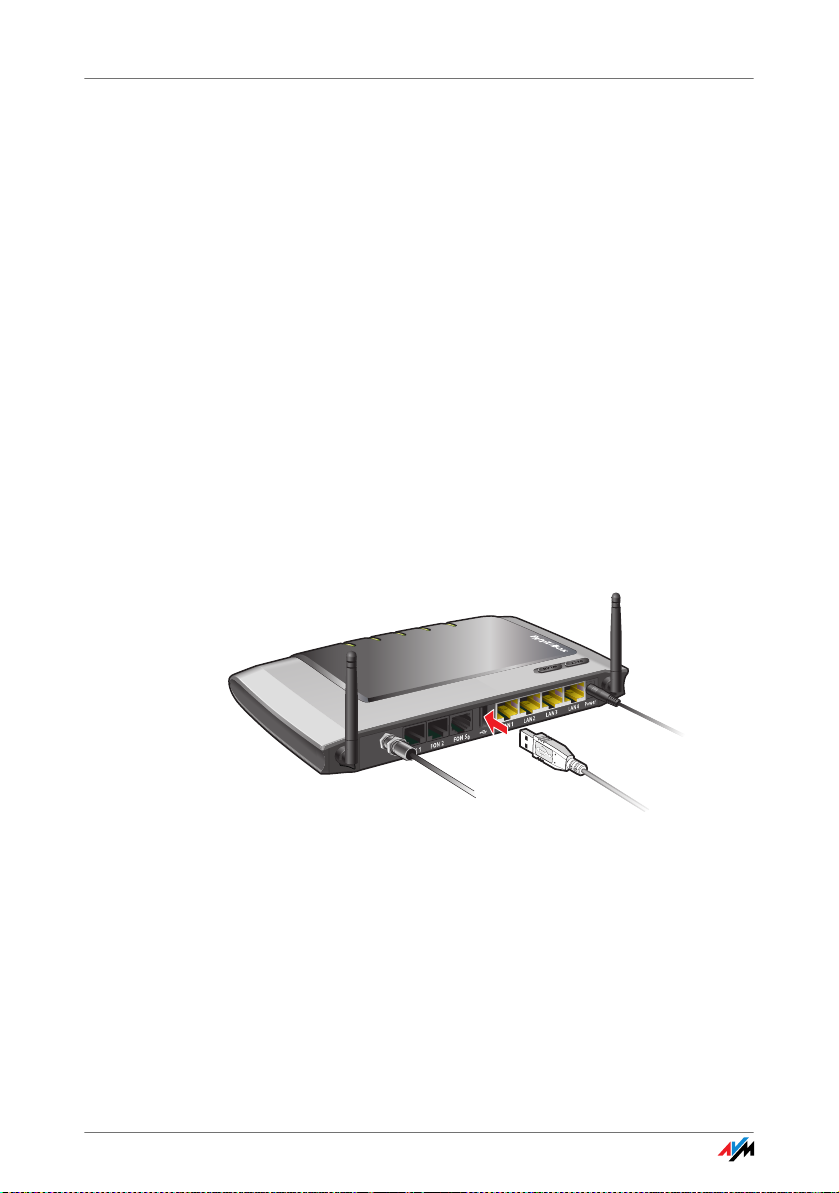
Connecting a USB cable to the USB port
Connection
Some USB devices, such as memory sticks or a
FRITZ!WLAN USB Stick, are inserted directly into the USB port
of the USB host controller on the FRITZ!Box. Other devices like
USB printers are connected to the USB port by means of a
USB cable.
42
Page 43

Accessing USB Devices
If you would like to use multiple devices at the USB port, you
can also use a USB hub (see the section USB Hub on
page 56). Please read the Tips for Using USB Devices on
page 56 first.
8.2 Accessing USB Devices
Network Sharing
As soon as a USB device is connected to the FRITZ!Box, all of
its functions are available in the entire network:
• The files in the USB mass storage can be accessed from
the network via FTP (File Transfer Protocol), or you can
make the USB mass storage device available as a network storage device. The two kinds of access are explained in greater detail in the section Accessing the Da-
ta on the USB Mass Storage on page 44.
• USB printers are available as network printers.
8.3 USB Storage
USB storage devices include hard drives, memory sticks, and
card readers.
File Systems
Access to USB memory devices connected to the FRITZ!Box is
possible via the File Transfer Protocol (FTP), network storage
and USB remote connection functions. USB storage devices
using the file systems FAT, FAT32 and NTFS are supported.
Files in the FAT and FAT32 file systems are supported up to a
size of 4 GB. This limit does not apply in the NTFS file system,
where even larger files can be accessed.
Access Rights and Password Protection
You can define access rights and password protection for the
USB storage devices. These settings are valid for all USB storage devices connected to the FRITZ!Box. It is not possible to
assign specific read or write access or an individual password
to each storage device.
43
Page 44

USB Storage
Configuring
Proceed as follows to define access rights and password protection for the USB storage devices:
1. Start a web browser.
2. Enter fritz.box
in the address field.
3. Select the “Home Network / Storage (NAS)” menu.
4. Select the “Security” page.
5. Configure the access rights and password protection for
the USB mass storage devices.
The access rights and password are are not enabled if the USB
remote connection is enabled for all USB storage devices.
Accessing the Data on the USB Mass Storage
USB storage devices connected to the FRITZ!Box directly or
via a USB hub are displayed with their device name in the
“USB Devices / Overview of Devices” menu on the user interface.
FTP (File Transfer Protocol)
All of the computers in the network can access the data in the
USB mass storage simultaneously via FTP.
Click the name of the USB storage device in the “USB Devices /
Overview of Devices” menu or open a web browser and enter
ftp://fritz.box
USB storage device is displayed in the web browser.
in the address field. The folder structure of the
The data in the USB storage device can be accessed via FTP
using any FTP client.
Files from the USB storage device cannot be executed or
opened in a suitable program until they have been copied to
your computer or your local network.
44
Page 45

USB Printers
USB Network Storage
The FRITZ!Box offers you the possibility of making USB storage devices available in the Windows network as network
drives. Files in the USB memory then can be opened and processed directly on the USB mass storage device.
Media Server
With this option music, image and video files on the USB storage device can be played back by compatible devices
(streaming). The USB storage device with the media collection is simply connected to the USB port on the FRITZ!Box and
a suitable playback device is linked to the local network.
The devices automatically communicate via Universal Plug &
Play (UPnP). This technology allows the devices connected to
each other by cable or radio network to perform automatic detection, recognize events, and exchange data with each other
accordingly. With UPnP AV this technology has been expanded to audio and video contents.
With the media server, media files of all kinds of formats can
be made available from the connected USB storage device via
UPnP.
8.4 USB Printers
To connect a USB printer to the USB port of the FRITZ!Box, you
can either enable the USB remote connection, or use it as a
network printer.
USB Printer at the USB Remote Connection
If you enable the USB remote connection for USB printers,
then you can use the printer on another computer just as if it
were connected directly to your computer (virtual cable replacement).
• If you want to use the printer with the USB remote con-
nection enabled, then the program for the USB remote
connection (see page 54) and the suitable printer drivers must be installed on any computer that is supposed
to use the printer.
45
Page 46

USB Printers
• When the USB remote connection is enabled, all-in-one
printers (printers with supplementary fax or scanner
functions) can also be used for faxing and scanning.
• If your printer is equipped with a status monitor, you can
use this feature when the USB remote connection is enabled.
• Host-based printers, like those that expect printer status
message responses from the system (bidirectional communication as in the GDI system, for instance), can only
be used via the USB remote connection. These printers
usually can be used only with an operating system for
which the printer manufacturer has provided driver software. Such printers connected to the FRITZ!Box are not
supported as network printers.
USB Printer as a Network Printer
When you connect a USB printer to the FRITZ!Box and set it up
without using the “USB Remote Connection” software, the
FRITZ!Box manages the printer itself and makes it available as
a network printer to all computers connected to the
FRITZ!Box. Please note the following for the printer setup:
• If you want to use the printer as a network printer, the
printer connection must be configured, and the suitable
printer drivers installed, on every computer. Print jobs
are forwarded to the IP address of the printer server in
the local network via the printer port.
• Only printers that can be addressed with the device
class “Printer” are supported as network printers. This is
generally not the case for multi-function devices, for instance combined fax-scanner-printers.
• If your printer is equipped with a status monitor, it may
not be possible to use the status monitor if the printer is
operated as a network printer.
• For multi-function devices (printers with additional func-
tions like fax or scanning), only the printing function is
supported for network printers.
46
Page 47

USB Printers
Setting Up the Windows Printer Port for Network Printers
If the “FRITZ!Box” entry is already listed in the “Programs”
group of the start menu of the computer, this means that the
printer port is already configured on this computer.
Otherwise, work through the following steps to configure the
printer port:
1. Start a web browser.
2. Enter fritz.box
in the address field.
The FRITZ!Box user interface opens.
3. Click the “Programs” link.
4. On the “Programs” page, click the link to the “Printer
Port” . The program will be loaded to your computer.
5. Follow the instructions to unpack and install the pro-
gram.
The printer port designated “AVM: (FRITZ!Box USB Printer
Port)” will be configured.
Now you can install the printer drivers of the printer connected to FRITZ!Box for this printer port.
Installing Printer Drivers in Windows 7
1. Click the “Start” button in the task bar and select “De-
vices and Printers”.
2. Click “Add a printer”.
3. Select “Add a local printer”.
You must make this selection because the printer port
on the computer functions as a local port.
4. Select the setting “Use an existing port” and then
choose the entry “AVM: (FRITZ!Box USB Printer Port)”
from the list. Click “Next”.
47
Page 48

USB Printers
5. Select the manufacturer for the USB printer connected to
the FRITZ!Box from the “Manufacturers” list and then select the exact model from the “Printers” list.
If the manufacturer or the model is not included in the
lists, use an installation disk or CD with the required
files and click “Have Disk...”. Click “Next”.
6. You can enter a name for the printer in the “Printer
name” field. The operating system will use this name to
administer the printer.
7. Click “Next”. Installation will be concluded.
Installing Printer Drivers in Windows Vista
1. Click the “Start” button in the task bar and select the
“Control Panel”.
2. Select “Printers”.
3. Click “Add a printer”.
4. Select “Add a local printer”.
You must make this selection because the printer port
on the computer functions as a local port.
5. Select the setting “Use an existing port” and then
choose the entry “AVM: (FRITZ!Box USB Printer Port)”
from the list. Click “Next”.
6. Select the manufacturer for the USB printer connected to
the FRITZ!Box from the “Manufacturers” list and then select the exact model from the “Printers” list.
If the manufacturer or the model is not included in the
lists, use an installation disk or CD with the required
files and click “Have Disk...”.
7. You can enter a name for the printer in the “Printer
name” field. The operating system will use this name to
administer the printer.
8. Conclude the installation by clicking “Finish”.
48
Page 49

USB Printers
Installing Printer Drivers in Windows XP
1. Open the start menu of the computer and click the
“Printers and Faxes”.
2. In the “Printers and Faxes ” window, click “Add Printer” in
the area“Printers Tasks” on the left hand side.
The “Add Printer” Wizard will be started.
3. Click “Next”.
4. Select the option “Local printer attached to this comput-
er” and make sure that the setting “Automatically detect
and install my Plug and Play printer” is disabled.
You must make this selection because the printer port
on the computer functions as a local port.
5. Click “Next”.
6. In the “Select a Printer Port” window, select the option
“Use the following port” and select “AVM: (FRITZ!Box
USB Printer Port)” from the list field. Click “Next”.
7. Select the manufacturer for the USB printer connected to
the FRITZ!Box from the “Manufacturers” list and then select the exact model from the “Printers” list.
If the manufacturer or the model is not included in the
lists, use an installation disk or CD with the required
files and click “Have Disk...”.
8. In the “Name Your Printer” window, answer the question
“Do you want to use this printer as the default printer?”
with “No”.
49
Page 50

USB Printers
Setting Up Printers in SUSE Linux Systems
A USB printer can be connected to the FRITZ!Box for use as a
network printer. The printer is then available to all computers
connected with the FRITZ!Box.
You install the printer as “root” or “superuser”.
1. Open a console and enter the following command:
lpadmin -p <printer_name> -E -v socket://<IP_address_
of_FRITZ!Box>:<port> -m <printer_description_file.ppd>
2. For more information and instructions, go to the follow-
ing web site:
http://www.cups.org/documentation.php/manlpadmin.html
The printer must be supported by CUPS (Common UNIX Printing System) software and be detected correctly at the USB
port of the FRITZ!Box.
Example
For a laser jet printer with the example name of Laserjet4 and
the PPD file laserjet.ppd at a FRITZ!Box with the default address 192.168.178.1, on the console you must enter:
lpadmin -p LaserJet4 -E -v socket://192.168.178.1:9100 -m
laserjet.ppd
You can view the PPD files installed in the system with the following command:
lpinfo -m
For More Information
Please direct any questions about PPD files to the manufacturer of the printer or system used. More detailed information
on the CUPS printing software is included in the following
documentation:
http://www.cups.org/documentation.php
50
Page 51
USB Printers
More detailed questions on the setup should also be directed
to the manufacturer of the distribution or to an Internet-based
or usenet forum that deals with CUPS or the distribution
used.
Setting Up a USB Printer on Apple Computers
A USB printer can be connected to the FRITZ!Box for use as a
network printer. The printer is then available to all computers
connected with the FRITZ!Box.
The only printers that can be used are the ones whose drivers
can be selected in the printer utility or for which a compatible
driver is available there.
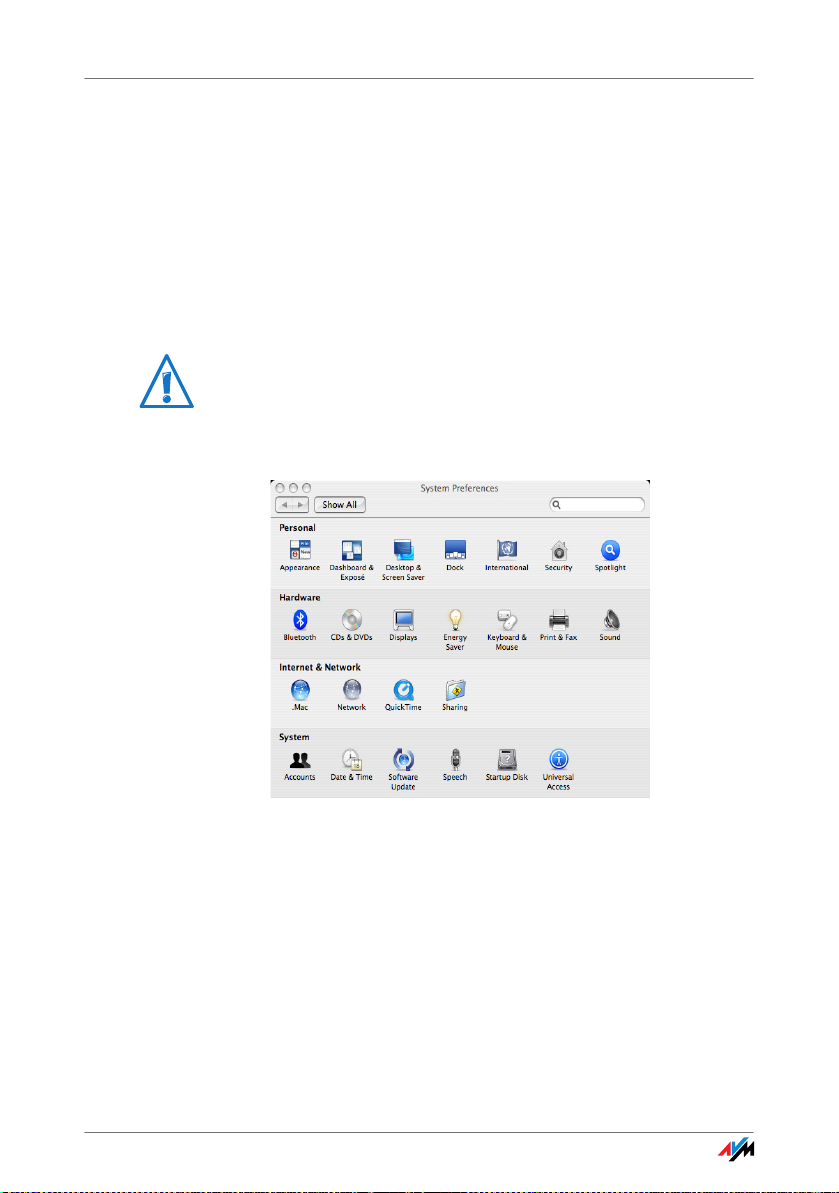
1. Open “Programs / System Preferences / Print & Fax”.
2. Click the “+” symbol at the left of the bottom half of the
screen.
51
Page 52
USB Printers
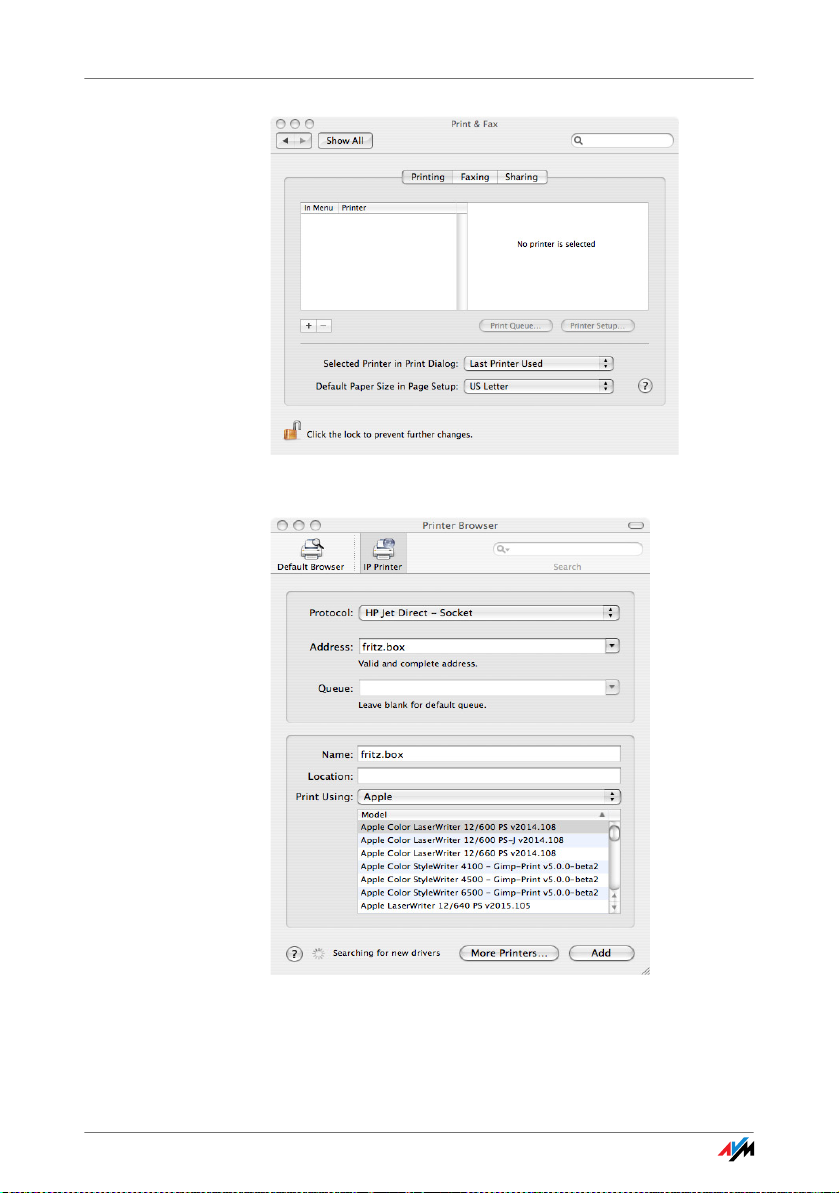
3. Click “IP Printer”.
4. In the “Protocol:” field, select the entry “HP Jet Direct –
Socket”.
52
Page 53
FRITZ!Box USB Remote Connection
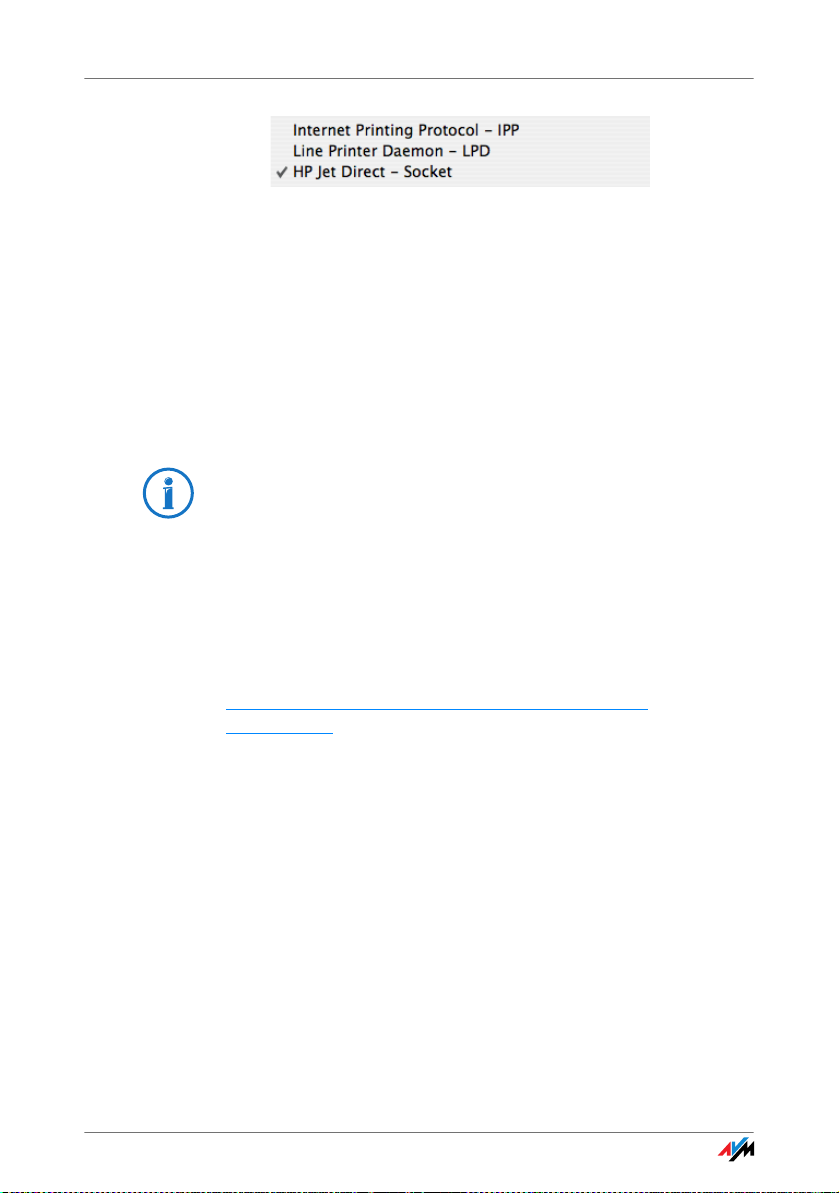
5. Enter in the “Address” field the IP address of the
FRITZ!Box:
192.168.178.1
6. Leave the “Queue:” field empty.
7. Enter the desired values in the “Name:” and “Location:”
fields.
8. Enter a driver compatible with your printer in the “Print
Using:” field.
If the printer cannot be selected, it may be possible to
select a compatible printer or printer driver.
9. Click the “Add” button to save your settings.
The printer is then available to all computers connected with
the FRITZ!Box.
Information about compatible printers or printer drivers is
available in the Internet, for instance on the following page:
http://gimp-print.sourceforge.net/p_Supported_
Printers.php
8.5 FRITZ!Box USB Remote Connection
With the FRITZ!Box USB remote connection you can control
connections between your computer and USB devices. The
computer and the USB devices are all connected with the
FRITZ!Box.
A USB device connected to the FRITZ!Box is handed over to a
computer via the USB remote connection function (virtual cable replacement). The USB device is detected as new hardware by the operating system on this computer, so that device software can be installed as if it were connected directly
to the computer.
53
Page 54

FRITZ!Box USB Remote Connection
The USB Remote Connection can be utilized in Windows 7,
Windows Vista, and 32-bit Windows XP with Service Pack 2
or higher.
Use
Enable the FRITZ!Box USB remote connection whenever you
would like to use one of the following devices on the
FRITZ!Box:
• USB storage device with the NTFS file format
• printer with the Graphics Device Interface (GDI printer)
that requires the driver software for the given operating
system
• multi-function printer whose scanner, fax or card reader
features are to be used
• printer with ink level monitor (requiring bidirectional
communication)
• USB scanner
Note that isochronous USB devices with time-critical transmission (isochronous USB devices like sound cards, web
cams, video converters or TV adapters) are not supported.
Do not use the FRITZ!Box USB remote connection if multiple
computers are to be able to access a single USB device connected to the FRITZ!Box at the same time (network printing
function).
Functions like FTP, USB network storage and the media server, which are provided by the FRITZ!Box, are not available as
long as the USB remote connection is active for USB storage
devices.
Enabling the USB Remote Connection
Work through the following steps in order to enable the USB
remote connection on your computer:
1. Start a web browser on your computer.
2. Enter fritz.box
in the address line of the browser.
54
Page 55

FRITZ!Box USB Remote Connection
3. Enable the expert settings of the FRITZ!Box in the “Sys-
tem / Expert Mode” menu. Confirm by clicking “Apply”.
4. Open the “USB Remote Connection”page in the “Home
Network / USB Devices”menu.
5. Select the setting “USB remote connection enabled”
and click “Apply”.
6. Now install the program for the USB remote connection
on the computer from which you want to use the USB devices.
7. The next step is to specify for which kind of USB devices
the USB remote connection should be enabled. Enable
the desired options.
8. As a final step, click “Apply”. All USB devices connected
to the FRITZ!Box will be detected again.
The result of the changed USB settings can be viewed in the
“Overview of Devices”.
Disabling the USB Remote Connection
Perform the following steps to disable the USB remote connection:
1. Open a web browser on the computer for which the USB
remote connection is to be disabled.
2. Enter fritz.box
in the address line of the browser.
3. Enable the expert settings of the FRITZ!Box in the “Sys-
tem / Expert Mode” menu. Confirm by clicking “Apply”.
4. Open the “Home Network / USB Devices” menu.
5. Select the “USB Remote Connection” page.
6. Disable all types of USB devices.
7. As a final step, click “Apply”.
The result of the changed USB settings can be viewed in the
“Overview of Devices”.
55
Page 56
FRITZ!WLAN USB Stick
8.6 FRITZ!WLAN USB Stick
The FRITZ!WLAN USB Stick models are WLAN adapters manufactured by AVM for connection to a computer. Using a WLAN
adapter you can connect the computer wirelessly with the
FRITZ!Box.
All FRITZ!WLAN USB Sticks from AVM master the Stick & Surf
method, making it easy to establish a secure WLAN connection: The FRITZ!WLAN USB Stick is inserted briefly into the
USB port on the FRITZ!Box, where it receives all of the security
settings required for the WLAN connection to this FRITZ!Box.
For instructions on establishing a WLAN connection using
Stick & Surf, see the section Connecting the FRITZ!WLAN USB
Stick from page 18. For more information on the various
FRITZ!WLAN USB Sticks by AVM and the WLAN standards each
of them supports, see the respective manual.
8.7 USB Hub
A USB hub can be connected to the USB host controller. A
USB hub is a device to extend existing USB ports.
You can connect two USB mass storage devices and one USB
printer, or three USB mass storage devices (like a hard drive
or memory stick) to the USB hub.
It is advisable to use a USB hub with its own power supply.
8.8 Tips for Using USB Devices
When using USB devices at the USB port of the FRITZ!Box,
please keep in mind the following;
• If more than one USB device without its own power sup-
ply is connected to the FRITZ!Box, please note that, in
accordance with the USB specification, the total current
consumption may not exceed a value of 500 mA. Otherwise unspecified malfunctions with the USB devices or
even damage to the FRITZ!Box may occur.
56
Page 57

Tips for Using USB Devices
• Before removing a USB storage device, select the “Safely
Remove” button in the FRITZ!Box user interface to prevent losses of data.
• To avoid damage to the FRITZ!Box or the USB storage de-
vice, only operate USB storage devices that require more
than one USB port for operation (for instance hard drives
with a Y cable) if they have their own power supply, or
use them at a USB hub with its own power supply.
• The FRITZ!Box can not defend the USB memory from ex-
ternal influences. Thus such phenomena as voltage
spikes during storms may occur, and writing to older
USB memory devices may corrupt the data structure due
to a high number of defective structures. In such cases a
complete loss of data may occur.
Therefore we recommend always backing up the USB
memory content just in case data are lost on the USB
storage device.
57
Page 58

Configuration and Operation on the Telephone
9 Configuration and Operation on the Telephone
FRITZ!Box Keypad Sequences
Many of the FRITZ!Box functions and features can be configured and used over a telephone connected to a FRITZ!Box extension. Only tone-dialing (dual-tone multifrequency = DTMF)
telephones can be used in configuration and operation. Pulse
dialing telephones are not suitable.
Acknowledgment Tone
Entries input on the telephone are confirmed with acknowledgement tones (see also Audio Signals on page 59):
• Correct entries are confirmed with a positive acknowl-
edgement tone (a single tone of one second in length).
• If the entry was not successful, because of an incorrect
key sequence, for instance, you hear a negative acknowledgment tone (an intermittent tone broken into intervals of about 0.25 seconds).
9.1 Instructions for Operation at the Telephone
This manual uses the following symbols:
Symbol Action
M Dial a number.
N Pick up the handset.
O Hang up the handset.
P Tal k.
D Three-Party conference call
Q Wait for the acknowledgement tone.
K You hear the ring tone.
58
Page 59
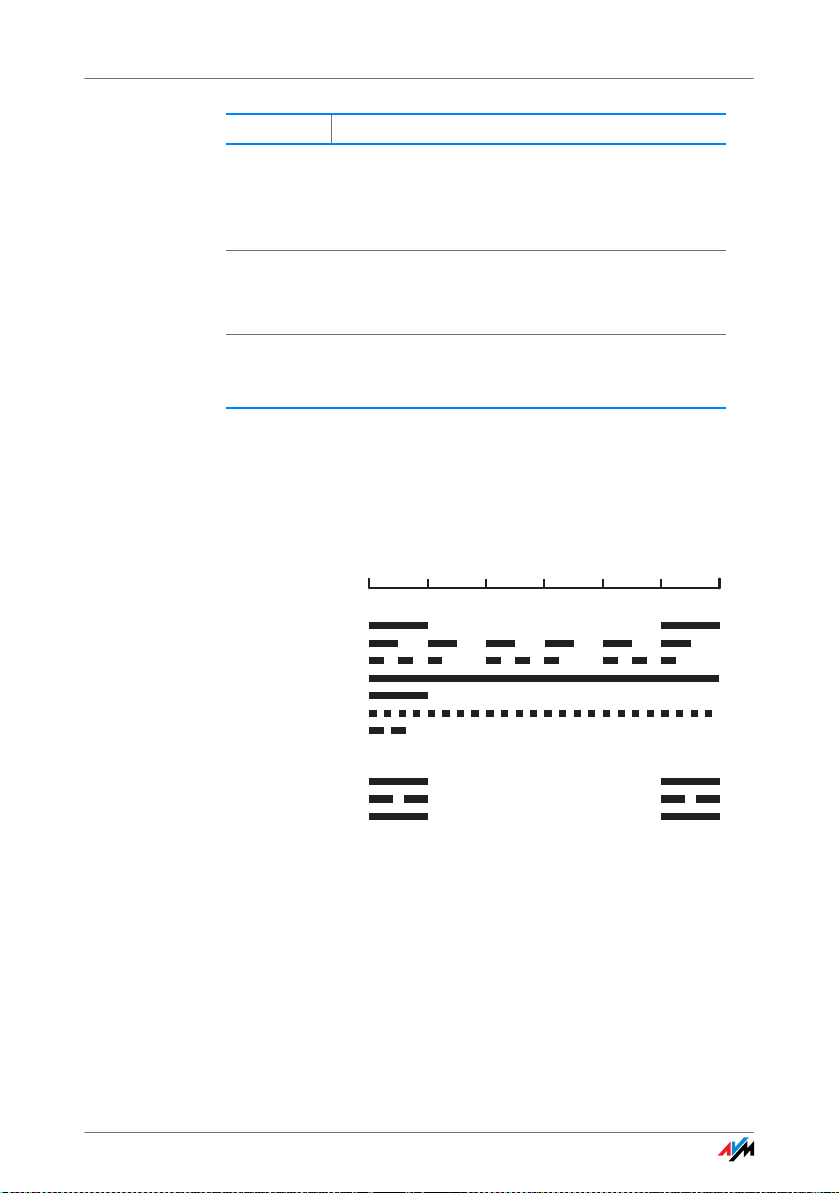
Audio Signals
Time in seconds
Audible Signals
Ring
Busy signal
Internal dial tone
External dial tone
Positive confirmation
Neg. acknowledgment
Call waiting
Calls
External call
Internal call
Call back
0123456
Symbol Action
<Ext.> In the place of <Ext>, enter the number of an ana-
<DNo.> In place of <DNo>, enter the destination number.
<DNo./Ext.> Enter either an external telephone number (the
9.2 Audio Signals
The following diagram illustrates the duration and intervals of
the various audio signals and ring tones of the telephones
connected to the FRITZ!Box 6360 Cable.
log extension of the FRITZ!Box.
Enter, for instance, 1 for the extension “FON 1” or
2 for the extension “FON 2”.
The destination number is the complete telephone number of an external telephone line.
destination number) or the number of an analog
extension of the FRITZ!Box (Ext).
Audio signals and ring tones of the connected telephones
59
Page 60
Configuring by Telephone
9.3 Configuring by Telephone
Restoring Factory Settings
All of the settings in the FRITZ!Box can be reset to their condition upon delivery by restoring the factory settings.
All settings you made in the FRITZ!Box—including the configured Internet connection—are deleted when the factory settings are restored.
Restoring Factory Settings
r991s159
01590s
After factory settings are restored, the FRITZ!Box is restarted.
Enabling and Disabling WLAN
The WLAN function can be switched on and off using the telephone keypad. This is especially convenient when the WLAN
function has been switched off. Simply use your telephone to
turn it back on. This means that the WLAN function can be enabled without having use a wired connection to open the user
interface.
Restores all settings in the FRITZ!Box to
their original condition on delivery.
Enabling and Disabling WLAN
r96s1s Enables the WLAN function.
r96s0s Disables the WLAN function.
Do Not Disturb
For every analog extension of the FRITZ!Box, the Do Not Disturb
option can be enabled by telephone. When Do Not Disturb is
set, the telephone connected to the extension will not ring.
Enabling
You can choose between two different Do Not Disturb options.
If you enable Do Not Disturb immediately, it will remain enabled until you disable it:
60
Page 61
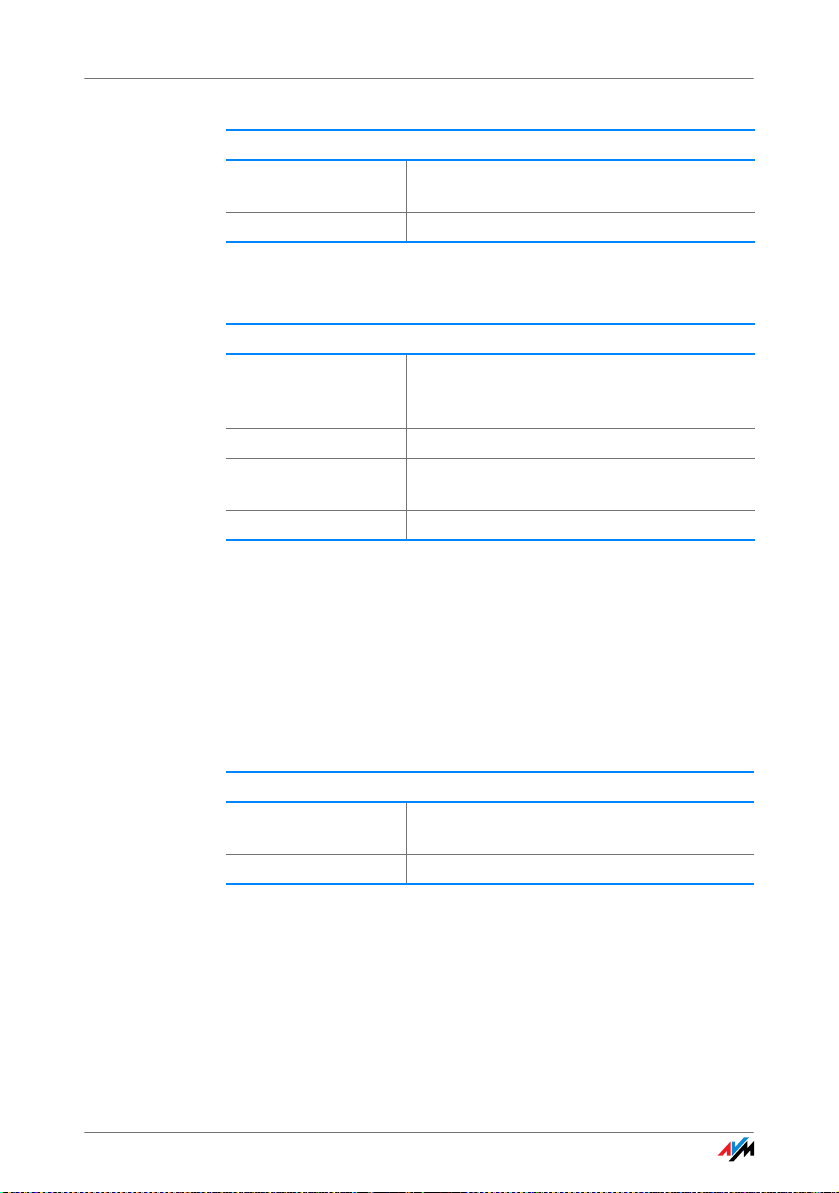
Configuring by Telephone
Enabling Do Not Disturb Immediately
r81<Ext.>s0s Immediately enables Do Not Disturb for ex-
r91ss Saves the settings.
Alternatively, you can enter a Do Not Disturb period during
which the telephone will not ring.
Enablling Do Not Disturb for Specific Period
r80<Ext.>s
<Start>s<End>s
r91ss Saves the settings.
r81<Ext.>s6s Enables Do Not Disturb on the extension
r91ss Saves the settings.
Example: Do Not Disturb should be enabled from 8:00 p.m.
until 7:00 a.m. daily. Enter “2000” for <Start> and “0700” for
<End>. Do Not Disturb then automatically will be switched on
daily at 8:00 p.m. and switched off again at 7:00 a.m.
tension <Ext.>.
Defines the start and end of the period during which Do Not Disturb is enabled on the
extension <Ext.>.
<Ext.>.
Disabling
Both of these Do Not Disturb settings can be switched off on
the telephone:
Disabling Do Not Disturb
r81<Ext.>s1s Disables Do Not Disturb on the extension
<Ext.>.
r91ss Saves the settings.
61
Page 62

Configuring by Telephone
Alarm
You can use the telephones connected to the FRITZ!Box as
alarms. The alarm can be set individually and enabled or disabled at any time.
Configuring the Alarm for a Telephone
N Pick up the handset.
r881s<time>s
<Ext.>s
r881s<time>s
<internal telephone
number>s
r91ss Saves the settings.
O Hang up the handset.
Defines the time at which the telephone
connected to the analog extension <Ext.>
will ring.
For instance, enter
r881s0700s1s, if the telephone at extension “FON 1” should
ring at 07:00 a.m.
Defines the time at which the DECT,
ISDN or IP telephone with the specified
internal telephone number will ring.
For instance, enter
r881s0700s610s, if
the first cordless DECT telephone
should ring at 07:00 a.m.
Cordless DECT telephones have the internal telephone numbers 610 – 615,
ISDN telephones 51 - 58, and IP telephones 620 – 629.
Enabling/Disabling the Alarm
N Pick up the handset.
r881ss Enables the alarm.
r881r Disables the alarm.
r91ss Saves the settings.
O Hang up the handset.
62
Page 63

Configuring by Telephone
Call Diversion
With call diversion you can divert incoming calls. The calls are
diverted to an external telephone line or to a telephone connected with your FRITZ!Box. The following diversions can be
set up on your telephone:
• Call diversion for a telephone number: Only incoming
• Call diversion for all telephone numbers: All incoming
• Call diversion for an analog extension: All calls for the
If your telephony provider supports direct diversion of incoming calls, calls will be diverted by your provider. Otherwise the
FRITZ!Box performs call diversion by establishing a second
call for the diversion whenever a call arrives. In either case,
call diversion to an external line will be charged at your contracted telephone rates.
For call diversion only numerical Internet telephone numbers
can be entered. This means you can use only numerals, no
letters or other characters.
calls for the specified telephone number are diverted.
calls (for all telephone numbers) are diverted.
specified analog extension on the are diverted.
Call Diversion for One or All Telephone Numbers
You can set up call diversion for the local outgoing call number (Caller ID) of the telephone or for any other telephone
number. The telephone uses the local outgoing call number
to establish outgoing calls.
If you set up call diversion for all telephone numbers, all incoming calls will be diverted.
For each call diversion you can select whether an incoming
call is diverted immediately, delayed (after 20 seconds), or
only when the line is busy. All call diversion settings can be
disabled at any time.
63
Page 64

Configuring by Telephone
Call Diversion Immediately
Incoming calls are immediately diverted to the given destination telephone number.
Call Diversion Immediately for the Outgoing Call Number (Caller ID)
N Pick up the handset.
s21s<DNo>r Dial the sequence shown at left.
Q Wait for the acknowledgement tone.
O Hang up the handset.
Call Diversion Immediately for Any Telephone Number
N Pick up the handset.
s21s<DNo>
s<telephone number>r
Q Wait for the acknowledgement tone.
O Hang up the handset.
Call Diversion Immediately for All Telephone Numbers
N Pick up the handset.
s21s<DNo>sr Dial the sequence shown at left.
Q Wait for the acknowledgement tone.
O Hang up the handset.
Dial the sequence shown at left.
Disabling Call Diversion Immediately
N Pick up the handset.
s21sr Disables call diversion immediately for
the outgoing call number (Caller ID).
s21ss<telephone
number>r
s21ssr Disables call diversion immediately for
Q Wait for the acknowledgement tone.
O Hang up the handset.
Disables call diversion immediately for
any telephone number.
all telephone numbers.
64
Page 65

Configuring by Telephone
Call Diversion Delayed
Incoming calls are forwarded to the specified destination
number if not answered at the number originally dialed within
20 seconds (about five rings).
Call Diversion Delayed for the Outgoing Call Number (Caller ID)
N Pick up the handset.
s61s<DNo>r Dial the sequence shown at left.
Q Wait for the acknowledgement
O Hang up the handset.
Call Diversion Delayed for Any Telephone Number
N Pick up the handset.
s61s<DNo>
s<telephone number>r
Q Wait for the acknowledgement
O Hang up the handset.
tone.
Dial the sequence shown at left.
tone.
Call Diversion Delayed for All Telephone Numbers
N Pick up the handset.
s61s<DNo>sr Dial the sequence shown at left.
Q Wait for the acknowledgement
tone.
O Hang up the handset.
Disabling Call Diversion Delayed
N Pick up the handset.
s61sr Disables call diversion delayed for the
outgoing call number (Caller ID).
s61ss<telephone
number>r
Disables call diversion delayed for any
telephone number.
65
Page 66
Configuring by Telephone
Disabling Call Diversion Delayed
s61ssr Disables call diversion delayed for all
Q Wait for the acknowledgement tone.
O Hang up the handset.
Call Diversion When Busy
Incoming calls are forwarded to the specified destination
telephone number only if a call is already being conducted
using the number dialed.
Call Diversion When Busy for the Outgoing Call Number (Caller ID)
N Pick up the handset.
s67s<DNo>r Dial the sequence shown at left.
Q Wait for the acknowledgement tone.
O Hang up the handset.
Call Diversion When Busy for Any Telephone Number
N Pick up the handset.
s67s<DNo>
s<telephone number>r
Q Wait for the acknowledgement tone.
O Hang up the handset.
telephone numbers.
Dial the sequence shown at left.
Call Diversion When Busy for All Telephone Numbers
N Pick up the handset.
s67s<DNo>sr Dial the sequence shown at left.
Q Wait for the acknowledgement tone.
O Hang up the handset.
66
Page 67
Configuring by Telephone
Disabling Call Diversion When Busy
N Pick up the handset.
s67sr Disables a call diversion setting on busy
s67ss<telephone
number>r
s67ssr Disables a call diversion setting on busy
Q Wait for the acknowledgement tone.
O Hang up the handset.
Setting Up Call Diversion for an Analog Extension
To set up call diversion for an analog extension of the
FRITZ!Box (for instance “FON 1”), you can choose among five
different variations. You can enable or disable a configured
call diversion setting at any time.
Call Diversion Immediately (without Ringing) for an Extension
N Pick up the handset.
r41<Ext>s
<DNo>/<Ext>s
r91ss Save your settings by dialing the se-
O Hang up the handset.
for the outgoing call number (Caller ID).
Disables a call diversion setting on busy
for any telephone number.
for all telephone numbers.
Dial the sequence shown at left.
quence shown at left.
Call Diversion Immediately with Ringing for an Extension
N Pick up the handset.
r45<Ext>s
<DNo>/<Ext>s
r91ss Save your settings by dialing the se-
O Hang up the handset.
67
Dial the sequence shown at left.
quence shown at left.
Page 68

Configuring by Telephone
Call Diversion with Delay for an Extension
N Pick up the handset.
r42<Ext>s
<DNo>/<Ext>s
r91ss Save your settings by dialing the se-
O Hang up the handset.
Call Diversion When Busy for an Extension
N Pick up the handset.
r43<Ext>s
<DNo>/<Ext>s
r91ss Save your settings by dialing the se-
O Hang up the handset.
Call Diversion With Delay or When Busy for an Extension
N Pick up the handset.
r44<Ext>s
<DNo>/<Ext>s
r91ss Save your settings by dialing the se-
O Hang up the handset.
Dial the sequence shown at left.
quence shown at left.
Dial the sequence shown at left.
quence shown at left.
Dial the sequence shown at left.
quence shown at left.
Disabling Call Diversion for an Extension
N Pick up the handset.
r40<NSt>ss Dial the sequence shown at left.
r91ss Save your settings by dialing the se-
quence shown at left.
O Hang up the handset.
68
Page 69
Configuring by Telephone
Suppressing Caller ID for Outgoing Calls (CLIR) on a
Case-by Case Basis
The CLIR (Calling Line Identification Restriction) function prevents your telephone number being displayed on the other
party’s telephone during outgoing calls.
If you would like to conduct only certain calls with the Caller
ID suppressed, prefix the number dialed with a keypad sequence. This enables CLIR only for the current connection.
CLIR on a Case-by-Case Basis
N Pick up the handset.
s31r Dial the sequence shown at left. Now
M Dial the number you want to call.
Disabling Automatic Outside Dialing
The FRITZ!Box offers the possibility of disabling automatic
outside dialing. This means that you will receive an internal
dialing tone when you lift the handset at the corresponding
extension. This makes sense at any extension which is used
to make many internal calls, for instance, between the extensions of the FRITZ!Box. When automatic outside dialing is disabled, for an external call the 0 must be dialed before the
telephone number.
you hear the external dial tone.
Disabling Automatic Outside Dialing
N Pick up the handset.
r1<Ext.>s0s Dial the sequence shown at left.
r91ss Save your settings if desired by dialing the
sequence shown at left.
O Hang up the handset.
69
Page 70
Operation at the Telephone
Enabling Automatic Outside Dialing
N Pick up the handset.
r1<Ext.>s1s Dial the sequence shown at left.
r91ss Save your settings if desired by dialing the
O Hang up the handset.
9.4 Operation at the Telephone
This section describes how you can use the FRITZ!Box features via your telephone keypad.
Shortening the Dialing Procedure
The FRITZ!Box automatically recognizes when a number has
been entered, but not until a few seconds after the final digits
are entered.
You have the possibility of shortening the dialing procedure
by closing your entry with the r key.
sequence shown at left.
Shortening the Dialing Procedure
<Number> r Indicates that a number has been dialed
to shorten the dialing procedure.
70
Page 71

Operation at the Telephone
Making internal Calls
All calls conducted between telephones connected to the
FRITZ!Box are internal telephone calls. These calls are free of
charge.
Dialing Internal Calls
N Pick up the handset.
ss<Ext.> If you would like to call an analog extension of
ss <internal te-
lephone number>
ss50 If you would like to call all ISDN telephones for
the FRITZ!Box, dial ss and the number of the
extension.
For instance, enter ss1, to call the telephone at the analog extension “FON 1”.
If you would like to call a cordless DECT, ISDN or
IP telephone that is connected with the
FRITZ!Box, dial ss and the internal number of
the telephone.
For instance, enter ss610 to call the first
cordless telephone.
Cordless DECT telephones have the internal telephone numbers 610 – 615, ISDN telephones
51 - 58, and IP telephones 620 – 629.
which no number has been configured, then dial ss50.
ISDN telephones connected at the “FON S
port, for which no telephone number has been
configured, do not react to calls to any internal
telephone numbers.
”
0
Group Call
Place a group call to call all other extensions at the same
time. Your call is connected with whichever extension answers first.
Group Call
N Pick up the handset.
ss9 Dial the keypad sequence shown at left to call all
free extensions.
71
Page 72
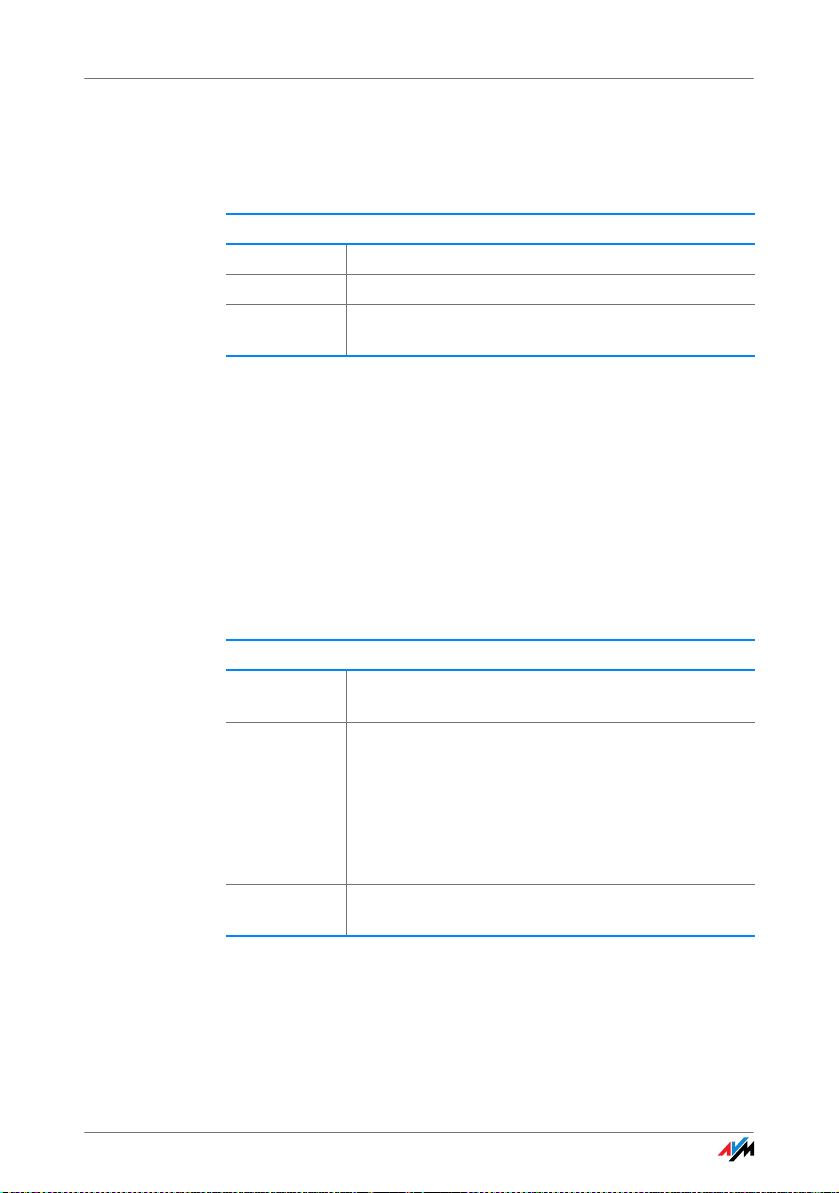
Operation at the Telephone
Picking up a Call from the Answering Machine
Use this function to pick up incoming calls on your telephone
that already have been taken by the answering machine.
Picking up a Call
N Pick up the handset.
s09 Dial the sequence shown at left.
P The call is now connected to your extension. You are
Waiting Calls
When the “Call Waiting” feature is enabled and you are conducting a call, you will be notified as soon as an external call
arrives on your your line. This call will be signaled by an
acoustic signal in the handset. You can accept the connection
with the new caller within 30 seconds. If you ignore the signal, the waiting call is rejected after 30 seconds.
For instructions on how to enable and disable the function,
see the section on page 68.
now connected to the caller.
Accepting or Rejecting Waiting Calls
R2 To accept a waiting call, dial the sequence shown at
left. Your original call is now on hold.
R1 To return to your original connection, dial the se-
quence shown at left.
You can also accept the waiting call by hanging up
your existing connection, i.e., by hanging up the
handset. In this case the telephone rings as soon as
you have hung up. Pick up the handset again to accept the waiting call.
R0 To reject a waiting call, dial the sequence shown at
left.
72
Page 73

Operation at the Telephone
Alternating Between Calls
Whenever you have one active connection and one caller on
hold, you can switch from one call to the other as often as you
want using the Hold button.
Alternating Between Calls
Call 1
P
R Press the Hold button. Caller 1 is now on hold.
M To establish a second call, simply dial ss plus the
Call 2
P
R2 To switch back from caller 2 to caller 1, dial the se-
Call 1
P
R2 To switch back again from caller 2 to caller 1, dial
You are talking to caller 1.
desired extension number for an internal call, or the
desired external number.
If the partner you dialed picks up, you can conduct
a second telephone conversation. The original
caller is still on hold.
quence shown at left.
Caller 1 is now active again and caller 2 is on hold.
the same sequence. In this way you can alternate
between the two connections.
Ending Hold
O The caller on hold hangs up. You can continue talk-
ing on the active connection.
R1 You end the active connection by dialing the se-
quence shown at left. The call that was on hold is
now active again, and there is no call left at hold.
O
K
Call
P
You can also return to the call on hold by hanging
up the handset: this ends the currently active connection. In this case the telephone rings as soon as
you hang up. Pick up the handset again to return to
the last call that was on hold.
73
Page 74

Operation at the Telephone
Three-Party Conference Call
FRITZ!Box allows you to hold telephone conferences with two
other people at once. Two external and one internal party, or
two internal and one external party can conduct a conference
call with each other.
Conducting a Three-Party Conference Call
N Pick up the handset.
M Dial the external number of the first party. Talk.
R Press the Hold button.
M To establish a second call, simply dial ss plus the
R3 Dial the sequence shown at left to begin a three-
D Now all three participants can confer together. If ei-
O You can end the three-party call by hanging up the
R2 You can also switch from the three-party call back to
desired extension number for an internal call, or the
desired external number.
You can now conduct a second conversation while
your first call is on hold.
party conference call.
ther of the other two parties hangs up, your connection with the remaining participant remains active.
handset.
the original two-party connection. Dial the sequence shown at left. This ends the three-party conference. The connection that was active last before
you initiated the three-party conference is now active again. The other call is on hold. You can alternate between the two connections by dialing the
same sequence again.
74
Page 75
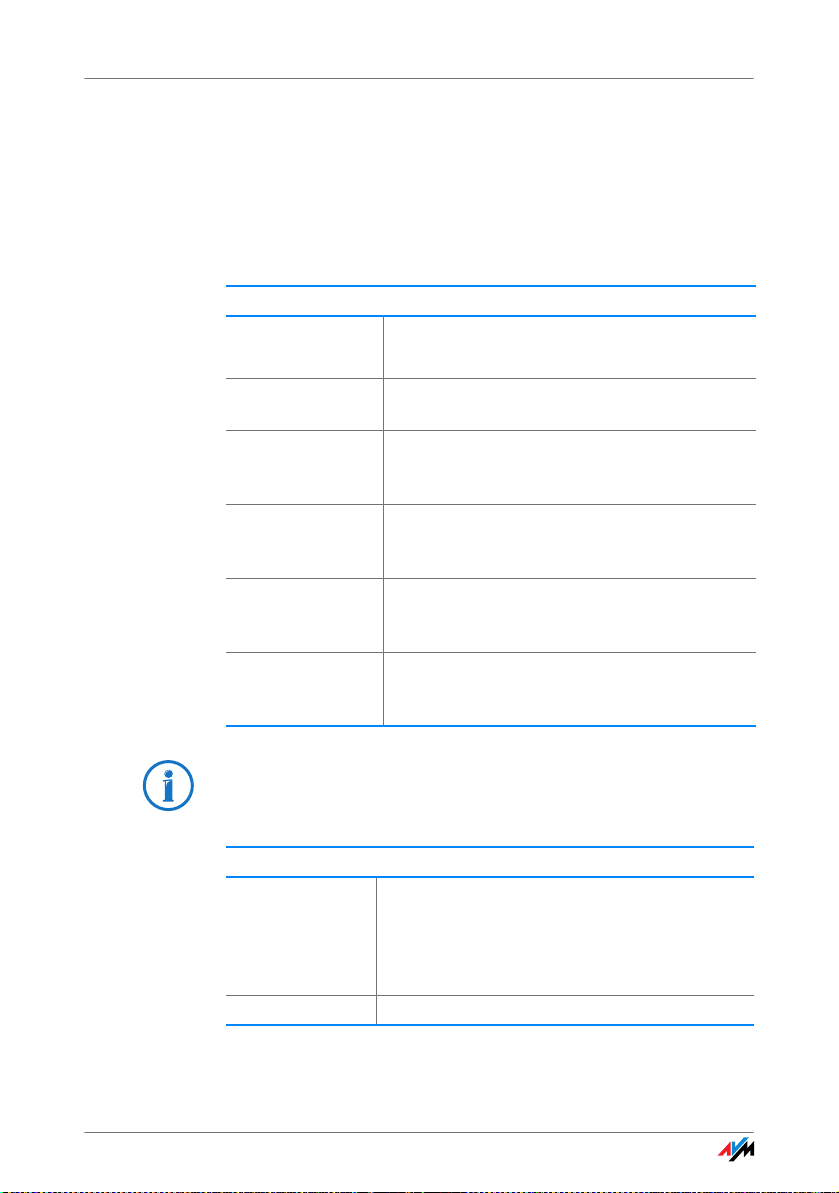
Operation at the Telephone
Consultation / Hold
The “consultation/hold” feature allows you to place an existing call on hold. You then may consult with someone else at
your workplace or dial a second call. The party on hold does
not hear the second conversation. Once you have finished the
consultation, you can return to the original connection.
Consultation / Hold
Call 1
P
R Press the Hold button. Caller 1 is now on hold
M To establish a second call, simply dial ss
Call 2
P
R If the number you dialed is busy or the call is
R1 To switch back to caller 1 after talking on the
You are talking to caller 1.
and you can consult someone else.
plus the desired extension number for an internal call, or the desired external number.
If the partner you dialed picks up, you can conduct a second telephone conversation. The
original caller is still on hold
not answered, press the Hold button again to
return to caller 1.
second connection, dial the sequence shown
at left. Call 1 is now active again.
If you return to caller 1 by pressing the Hold button, the connection to caller 2 is not cleared down until caller 2 hangs up.
Ending Consultation
Call 1
P
O Hang up the handset to end the connection.
You can also return to caller 1 by hanging up the
handset: this ends the connection to caller 2. In
this case, your phone rings as soon as you hang
up. Pick up the handset to return to caller 1
again.
75
Page 76
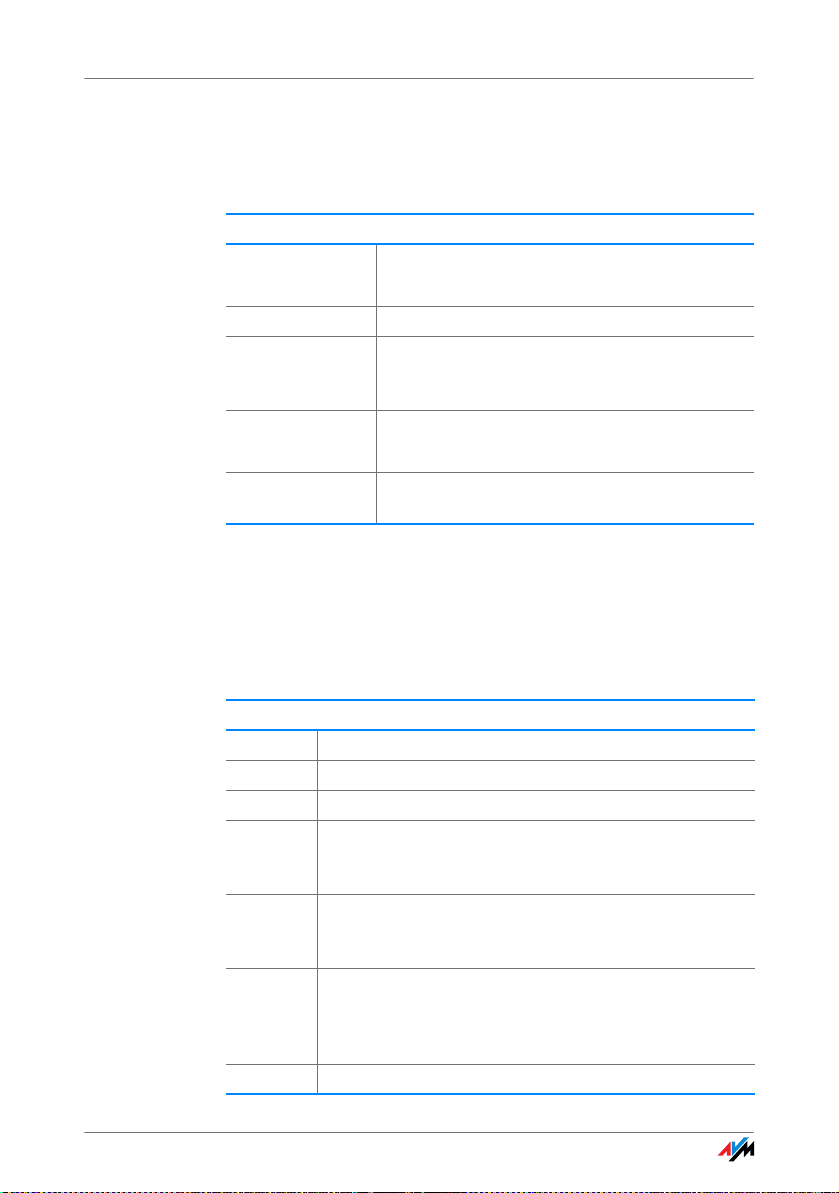
Operation at the Telephone
Transferring Calls
The “call transfer” function allows you to transfer a connection from one of FRITZ!Box’s extension to another.
Transferring Calls
Call 1
P
R Press the Hold button. Caller 1 is now on hold.
ss<Ext.> To establish a connection to caller 2, dial the
Call 2
P
O To transfer the caller 1 to caller 2, simply hang
Explicit Call Transfer (ECT)
Use the “explicit call transfer” function to connect two external parties with each other while one connection is active and
the other is on hold. Then you can end your own connection
while the other two parties continue their conversation.
You are talking to caller 1.
star key twice and then her or his extension
number.
You can now talk with caller 2.
up the handset.
Explicit Transfer of One Active and One Held Connection
N Pick up the handset.
M Dial the external number of the first party. Talk.
R Press the Hold button.
M Dial the number for your second external call. You can
now conduct a second conversation while your first call
is on hold.
To clear your connection while allowing the external
parties to continue the call, connect the parties with
each other.
R4 Dial the sequence shown at left. The connection on
hold and the active connection are connected with each
other. The external parties continue the call while you
clear the connection.
O Hang up the handset.
76
Page 77

Operation at the Telephone
Explicit Call Transfer from a Three-Party Conference Call
N Pick up the handset.
M Dial the external number of the first party. Talk.
R Press the Hold button.
M Dial the number for your second external call. You can
R3 Dial the sequence shown at left to begin a three-party
D Now all three participants can confer together. If either
R2 You can also switch from the three-party call back to the
R4 Dial the sequence shown at left. The connection on
O Hang up the handset.
now conduct a second conversation while your first call
is on hold.
conference call.
of the other two parties hangs up, your connection with
the remaining participant remains active.
To clear your connections while allowing the external
parties to continue the call, connect the parties with
each other.
original two-party connection. Dial the sequence shown
at left. This ends the three-party conference. The connection that was active last before you initiated the
three-party conference is now active again. The second
external call is on hold. You can alternate between the
two connections by dialing the same sequence again.
hold and the active connection are connected with each
other. The external parties continue the call while you
clear the connection.
77
Page 78
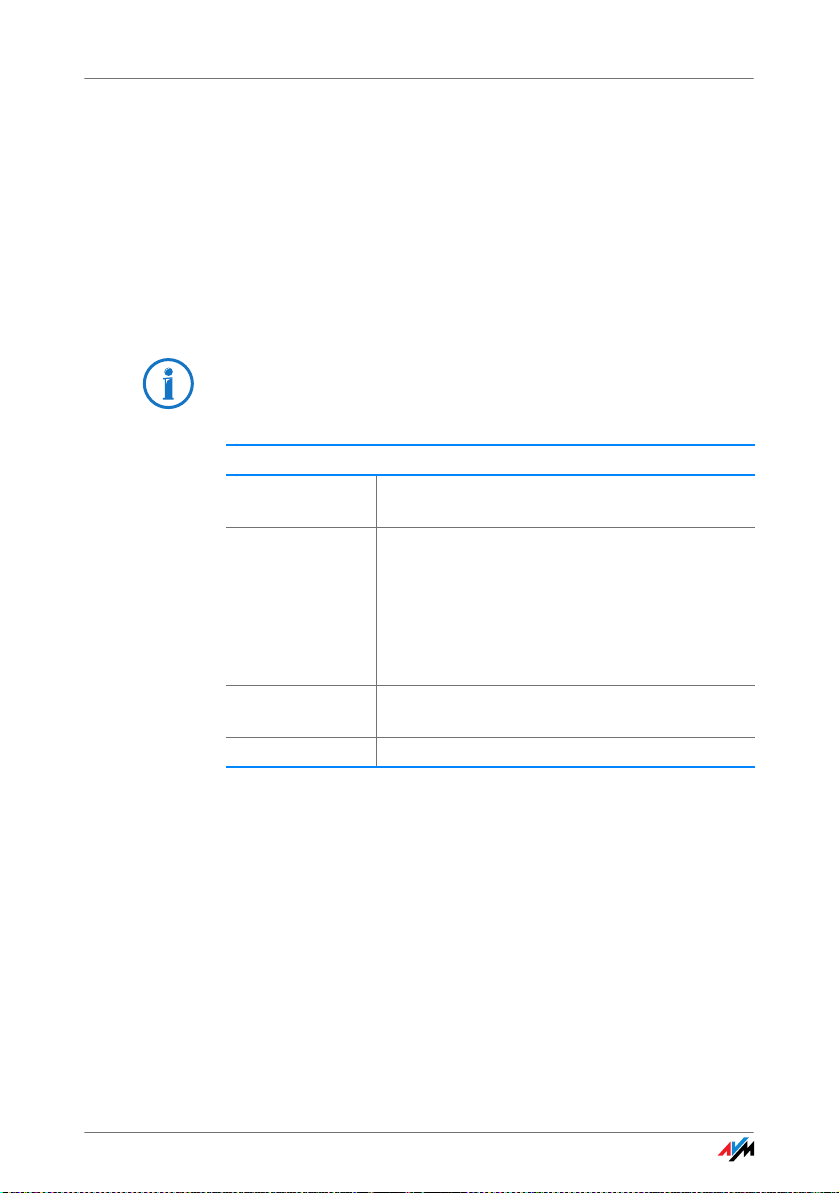
Operation at the Telephone
Room Monitoring (Baby Monitor)
The following keypad sequence enables the function for monitoring the sound level in a room. First enter the volume level
(a value between 1 and 8). Enter a telephone number. Do not
hang up the handset! When the volume in the room reaches
the specified level, the number you entered will be dialed.
When the telephone rings and you pick up the handset, you
will be connected with the telephone on which you enabled
the room monitoring function.
When using this feature, it is advisable to activate the speaker phone function.
Enabling Room Monitoring
N Pick up the handset or activate the speaker
s4
<level>
s
<number>
r
Q Wait for the acknowledgement tone. The baby
phone function of your telephone.
Dial the sequence shown at left. For <level>, enter a number between 1 the most sensitive
sound level) and 8. For <number>, enter the
number to be called. This may be the number of
another internal extension, a 9 for an internal
group call, or any external number desired.
monitoring phone function is now enabled.
Do not hang up the handset!
Dial the number of the extension to listen in at an extension
with room monitoring activated.
After initiating a room monitoring phone call, the PBX cannot
generate a new call until at least one minute has lapsed.
You can disable the function by simply hanging up the handset of the telephone at which you enabled it.
78
Page 79
Operation at the Telephone
Using Keypad Sequences
The “Keypad” function allows you to control services and features for your Internet telephone numbers by entering characters and strings on the telephone keypad.
These keyboard entries are called keypad sequences. Ask
your telephone carrier for the specific keypad sequences to
access ISDN features.
Entering Keypad Sequences on an Extension with Automatic
Outside Dialing
N Pick up the handset.
sr<Seq> Dial the sequence shown at left. <Seq> stands for
Entering Keypad Sequences on an Extension without Automatic
Outside Dialing
N Pick up the handset.
0sr<Seq> Dial the sequence shown at left. <Seq> stands for
the keypad sequence you received from your telephone carrier.
the keypad sequence you received from your telephone carrier.
79
Page 80

Troubleshooting
10 Troubleshooting
Help in Case of Errors
This chapter provides assistance if you are not able to open the user interface of your FRITZ!Box, if you are having problems with the WLAN
connection, or if you want to change the IP settings on your computer.
10.1 Errors Opening the User Interface
If an error message is returned when you open the user interface, this can have various causes. Check the possible causes
and attempt to resolve the error.
Restart the FRITZ!Box
The user interface cannot be opened or does not react.
Cause
Inconsistencies within the FRITZ!Box.
Remedy
1. Restart the FRITZ!Box.
Remove the power cable from the socket.
2. Wait about five seconds before reconnecting to the pow-
er supply.
3. To make sure that the FRITZ!Box has finished restarting,
wait until the “Power/Cable” LED lights up and stop
flashing and, if you have switched on WLAN, the “WLAN”
LED remains lit up as well. This ensures that the
FRITZ!Box restart has been completed.
4. Try again to open the FRITZ!Box user interface by enter-
ing fritz.box
in the address field.
80
Page 81

Errors Opening the User Interface
Checking the Cable Connections
The user interface of the FRITZ!Box does not appear in the
window of your web browser.
Cause
The cable connections are not secure.
Remedy
Make sure that all cable connections are plugged in securely.
Checking teh Name Resolution
The user interface of the FRITZ!Box cannot be opened by entering fritz.box.
Cause
The name resolution of the FRITZ!Box does not work.
Remedy
1. In the web browser, enter the following IP address in
place of fritz.box
192.168.178.1
:
2. If the user interface cannot be reached via this address,
check the settings configured for your network adapter
as described in the section Obtaining an IP Address Au-
tomatically from page 91.
81
Page 82

Errors Opening the User Interface
Checking the IP Address
The user interface of the FRITZ!Box can be reached neither at
the address fritz.box
Cause
The IP address set on the connected computer is inapplicable.
Remedy
Set the network adapter to DHCP so that the IP address can
be obtained via the DHCP server of the FRITZ!Box. Adjust the
settings to those described in the section Obtaining an IP
Address Automatically from page 91.
If it is still not possible to open the FRITZ!Box user interface
by entering fritz.box
dress of the FRITZ!Box as described on page 85.
Disabling Dial-Up Connections
The user interface is not opened; a window for a dial-up connection appears instead.
Cause
nor at 192.168.178.1.
or 192.168.178.1, use the fixed IP ad-
The browser must use the network connection between the
computer and FRITZ!Box when the user interface is opened.
For this the automatic establishment of a Dial-Up Networking
connection must be disabled.
Remedy
You can disable the automatic attempt to establish a Dial-Up
Networking connection. The following example explains how
to check the settings of Internet Explorer 8:
1. Select the “Connections” settings page under “Tools /
Internet Options...”.
2. In the “Dial-up and Virtual Private Network settings” sec-
tion, enable the option “Never dial a connection”.
3. As a final step, click “OK”.
82
Page 83

Errors Opening the User Interface
Disabling Online Operation
The user interface does not appear in the window of your web
browser.
Cause
The web browser is set for offline operation.
Remedy
Configure the web browser for online operation. Using the example of Internet Explorer 8:
1. Open the “Tools” menu.
2. If a checkmark is displayed in front of “Work Offline”,
click this line.
The checkmark will be removed and Internet Explorer will
switch to online operation.
Checking theProxy Settings
The user interface does not appear in the window of your web
browser.
Cause
The proxy settings of the web browser prevent the user interface from being opened.
Remedy
Enter the DNS name and the IP address of the FRITZ!Box as an
exception in the proxy settings of the web browser, as described here for the example of the Internet Explorer 8.
1. Select the “Connections” settings page under “Tools /
Internet Options...”.
2. Click the “LAN Settings...” button in the “Local Area Net-
work (LAN)” settings area.
3. In the “Proxy server” area of the next window, check the
“Use proxy Server for LAN” option and then click “Advanced”.
83
Page 84

Errors Opening the User Interface
4. Enter as “Exceptions”:
fritz.box
; 192.168.178.1; 169.254.1.1
and click “OK”.
Checking the CGI Settings
The user interface does not appear in the window of your web
browser.
Cause
The execution of CGI scripts is disabled in the web browser.
Remedy
Configure the web browser so that the execution of scripts is
allowed in the user interface. Using the example of the Internet Explorer 8:
1. Select the “Security” settings page under “Tools / Inter-
net Options...”.
2. If the “Default Level” button is not available for selec-
tion, the "Medium" security level is already configured,
which means that CGI scripts can be executed in the Internet browser.
3. Proceed as follows if the “Default Level” button is avail-
able for selection:
4. Select the “Local Intranet” icon and click the “Sites...”
button.
5. In the next window, click the “Advanced...” button and
enter in the “Add this Web site to the zone:” field:
fritz.box
Click “Add”.
6. Disable the “Require server verification (https:) for all
sites in this zone” option and click “Close”.
84
Page 85

Errors Opening the User Interface
Checking theSecurity Software
The user interface cannot be displayed in the web browser.
Cause
Security software is blocking access to the user interface.
Remedy
Security software like firewalls can prevent access to the user
interface of the FRITZ!Box. Configure exceptions for the
FRITZ!Box in all of the enabled security software.
If you would like to exit security software to test access to the
FRITZ!Box, remove the coaxial cable from the “CABLE” socket
first! After testing, first start the security software before reinserting the coaxial cable and connecting to the Internet!
Opening the User Interface of the FRITZ!Box
The FRITZ!Box is equipped with a fixed IP address that cannot
be changed. FRITZ!Box always can be reached at this IP address. This fixed IP address is:
Fixed IP address 169.254.1.1
Proceed as follows to open the FRITZ!Box user interface using
this IP address:
1. Connect the FRITZ!Box to the computer using the net-
work cable (yellow). For more information, see the section Connecting a Computer to the LAN Port from
page 16.
2. Make sure that the computer obtains its IP address auto-
matically. You can check this setting in the computer’s IP
settings (see section Obtaining an IP Address Automati-
cally from page 91).
3. Restart your computer.
4. Start your Internet browser and enter FRITZ!Box’s fixed IP
address:
169.254.1.1
85
Page 86
The WLAN Adapter Cannot Find FRITZ!Box
The FRITZ!Box user interface opens
Once you have reached the FRITZ!Box user interface again,
you should check the FRITZ!Box settings and correct them if
necessary.
10.2 The WLAN Adapter Cannot Find FRITZ!Box
If the “FRITZ!Box 6360 Cable” radio network is not found by
the WLAN adapter of a computer, work through the following
steps to find the source of the error and resolve it.
Enabling the WLAN Adapter
The WLAN adapter cannot find a wireless network.
Cause
The WLAN adapter is not ready for operation.
Remedy
Make sure that the WLAN adapter is ready for operation.
Some of the WLAN adapters installed in notebooks must be
activated by flipping a switch on the notebook.
For questions on the WLAN adapter of your computer, please
contact the manufacturer.
Enabling WLAN
The wireless network of the FRITZ!Box is not found by the
WLAN adapter.
Cause
WLAN is not enabled in the FRITZ!Box. If the “WLAN” LED on
the FRITZ!Box is not lit up or is flashing, this means that WLAN
is not enabled.
Remedy
Press the WLAN button on the FRITZ!Box. The “WLAN” LED begins flashing and then lights constantly. This means that the
WLAN function is enabled.
86
Page 87

WLAN Connection Is Not Established
Announcing the Name of the Radio Network
The WLAN Adapter cannot find the wireless network of the
FRITZ!Box.
Cause
The name of the wireless network of the FRITZ!Box is concealed.
Remedy
Enable the setting “Name of the WLAN radio network visible”
in the WLAN settings of the FRITZ!Box.
1. Connect the FRITZ!Box to a computer using a network ca-
ble, as described in the section Connecting a Computer
to the LAN Port on page 16.
2. Start a web browser.
3. Enter fritz.box
in the address field.
4. Select the “ WLAN / Radio Network” menu and select the
“Name of the WLAN radio network visible” option.
5. Click the “Apply” button.
6. Remove the network cable and try again to establish a
connection via WLAN.
10.3 WLAN Connection Is Not Established
Comparing the Security Settings for WLAN
Make sure that the WLAN security settings registered in the
FRITZ!Box agree with the security settings of the WLAN adapter.
Here is how to view the WLAN security settings of the
FRITZ!Box and print them out.
1. Connect the FRITZ!Box to a computer using a network ca-
ble. Proceed as described in the section Connecting a
Computer to the LAN Port from page 16.
2. Start a web browser.
3. Enter fritz.box
in the address field.
87
Page 88

WLAN Connection Is Not Established
4. Select the “WLAN / Security” menu.
5. Select the desired encryption and enter the encryption
data.
6. Click the “Apply” button.
A window is displayed with the WLAN security settings.
Print out the page by clicking the “Print Page” button.
7. Remove the network cable and check the configuration
of the WLAN adapter in the printout. Try again to establish a connection.
Testing the WLAN Connection Without Security Settings
Disable the WLAN security settings to test whether a WLAN
connection between the FRITZ!Box and the WLAN adapter is
possible at all.
1. Connect the FRITZ!Box to a computer using a network ca-
ble. Proceed as described in the section Connecting a
Computer to the LAN Port from page 16.
2. Open the user interface in a web browser. Proceed as de-
scribed in the section Opening the User Interface on
page 26.
3. Go to the “WLAN / Security” menu and select “non-enc-
typted”. As a final step, click “Apply”.
4. Remove the network cable and try again to establish a
connection.
This non-secured condition should be used only for testing, to find out whether a WLAN connection is possible
at all.
If the attempt to connect to the WLAN using the non-encrypted connection is not successful either, check the installation
of the WLAN adapter and contact the manufacturer of the
WLAN adapter if necessary.
Enable WLAN encryption again after completing the tests. Follow the steps listed above and then enable the kind of encryption that was previously configured.
88
Page 89

WLAN Connection Is Not Established
Installing the Current Service Pack
The WLAN connection to the FRITZ!Box cannot be established
using the Microsoft WLAN Service (WZC) in Windows XP with
Service Pack 2.
Cause
The required Microsoft patch for WPA2 (IEEE 802.11i) may not
be installed.
Help
Install Service Pack 3 (SP3) for Windows XP, available as a
free download from Microsoft. Then Microsoft WLAN Service
will support WPA2, so that a WLAN connection can be established to the FRITZ!Box.
Ruling Out Interference Caused by Other Wireless
Networks
If there are other devices in the immediate vicinity of your
FRITZ!Box that use the same frequency band, simultaneous
use of frequencies can result in mutual interference (for example, fluctuations or interrupted connections). Disruptions
can be caused by other WLAN access points, but also by devices like baby monitors, game consoles, garage door openers, Bluetooth devices, or wireless AV bridges, which also use
the 2.4-GHz frequency band. In this case, please test a different radio channel for your FRITZ!Box.
Alternatively, you can set the radio channel to “Auto”. This
enables the Autochannel function, so that the
FRITZ!Box searches for the best WLAN channel itself.
For applications that rely on a steady, high throughput rate
(“streaming”), you should use the 5-GHz frequency band.
This radio band provides more channels and is subject to significantly less external interference.
To set the radio channel in the user interface, your computer
must be connected with the FRITZ!Box by network cable or
wirelessly. If your computer is connected via WLAN, continue
with Step 2 of the instructions below. In this case, note that
89
Page 90

WLAN Connection Is Not Established
the existing WLAN connections is interrupted as soon as you
apply the changed settings. Afterward you have to reconnect
your computer with the FRITZ!Box.
1. Connect the FRITZ!Box to a computer using a network ca-
ble. Proceed as described in the section Connecting a
Computer to the LAN Port from page 16.
2. Start a web browser.
3. Enter fritz.box
in the address field.
4. Open the “WLAN / Radio Channel” menu.
5. Select the option “Adjust radio channel settings”.
6. Select a different radio channel from the “Radio channel”
list.
7. Click the “Apply” button.
8. Remove the network cable and check whether interfer-
ence continues to occur.
Avoid WLAN Channels with DFS
The FRITZ!Box loses the WLAN connection in the 5-GHz frequency band for no apparent reason.
Cause
In the 5-GHz frequency area the access point is programmed
to change the channel whenever a radar source transmits on
the same channel (Dynamic Frequency Selection, DFS).
Help
A forced channel change can be avoided by selecting in the
FRITZ!Box a channel for the 5-GHz frequency band that does
not use DFS (channels 36, 40, 44, 48).
90
Page 91

Obtaining an IP Address Automatically
10.4 Obtaining an IP Address Automatically
The FRITZ!Box has its own DHCP server, which assigns IP addresses to the connected computers. The connected computers must be configured such that they can receive their IP addresses automatically. The steps for checking and adjusting
this option differ among the operating systems. See the relevant section for your operating system.
If FRITZ!Box is operated in a network, no other DHCP server
may be activated in this network.
Obtaining an IP Address Automatically in Windows 7
1. Click the “Start” button in the task bar and select the
“Control Panel / Network and Internet”.
2. Under “Network and Sharing Center”, click “View net-
work status and tasks”.
3. From the left column, select the “Change adapter
settings” command.
4. Select the LAN connection between your computer and
the FRITZ!Box. Click the right mouse button and select
“Properties”.
5. Under “This connection uses the following items”, select
the “Internet Protocol Version 4 (TCP/IPv4)” entry and
click “Properties”.
6. On the “General” tab, enable the options “Obtain an IP
address automatically” and “Obtain DNS server address
automatically”.
91
Page 92
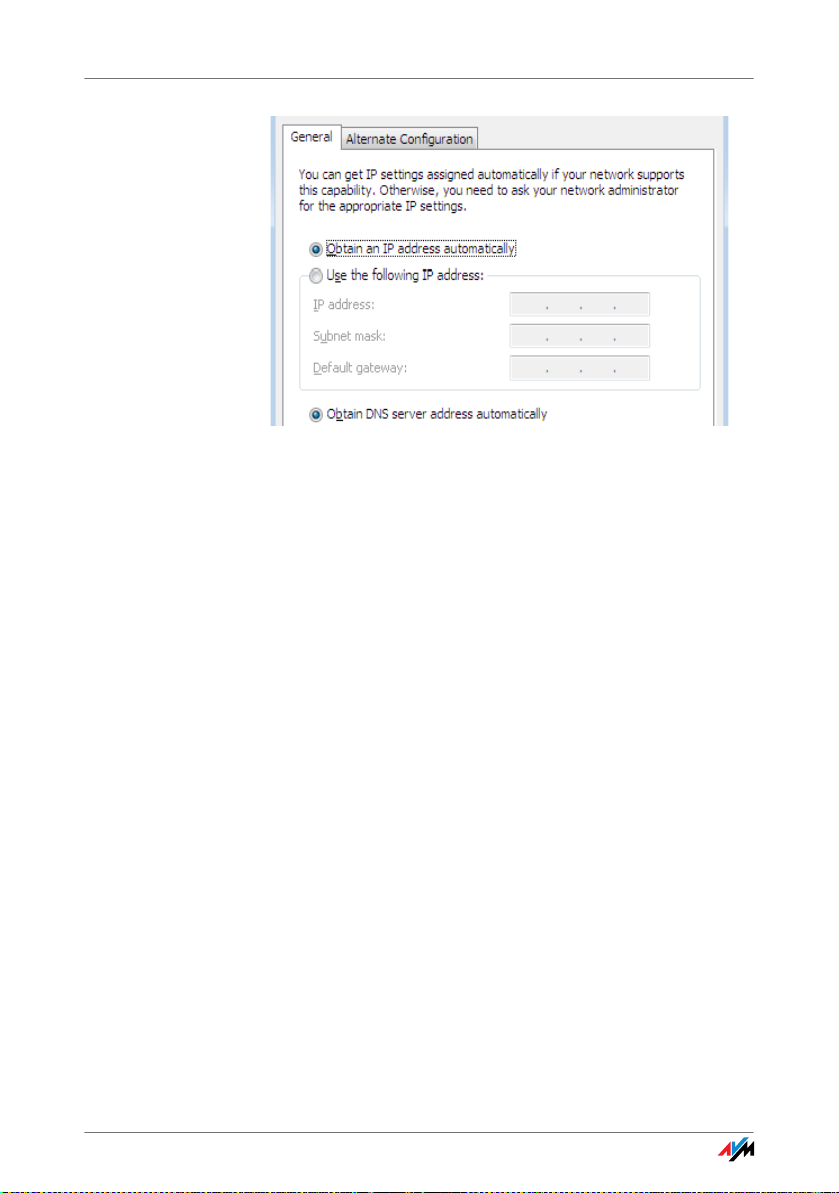
Obtaining an IP Address Automatically
Properties of the Internet protocol (TCP/IP)
7. Confirm your selection by clicking “OK”.
Repeat steps 5 through 7 for the “Internet Protocol
Version 6 (TCP/IPv6)” as well.
The computer now receives an IP address from the FRITZ!Box.
Obtaining an IP Address Automatically in Windows Vista
1. Click the “Start” button in the task bar and select the
“Control Panel / Network and Sharing Center”.
2. From the “Tasks”, select “Manage network connec-
tions”.
3. In the “LAN or High-Speed Internet” area, select the LAN
connection between your computer and the FRITZ!Box.
Click the right mouse button and select “Properties”.
4. If the “User Account Control” window is displayed, click
“Continue” in this window.
5. Under “This connection uses the following items”, select
the “Internet Protocol Version 4 (TCP/IPv4)” entry and
click “Properties”.
6. On the “General” tab, enable the options “Obtain an IP
address automatically” and “Obtain DNS server address
automatically”.
92
Page 93
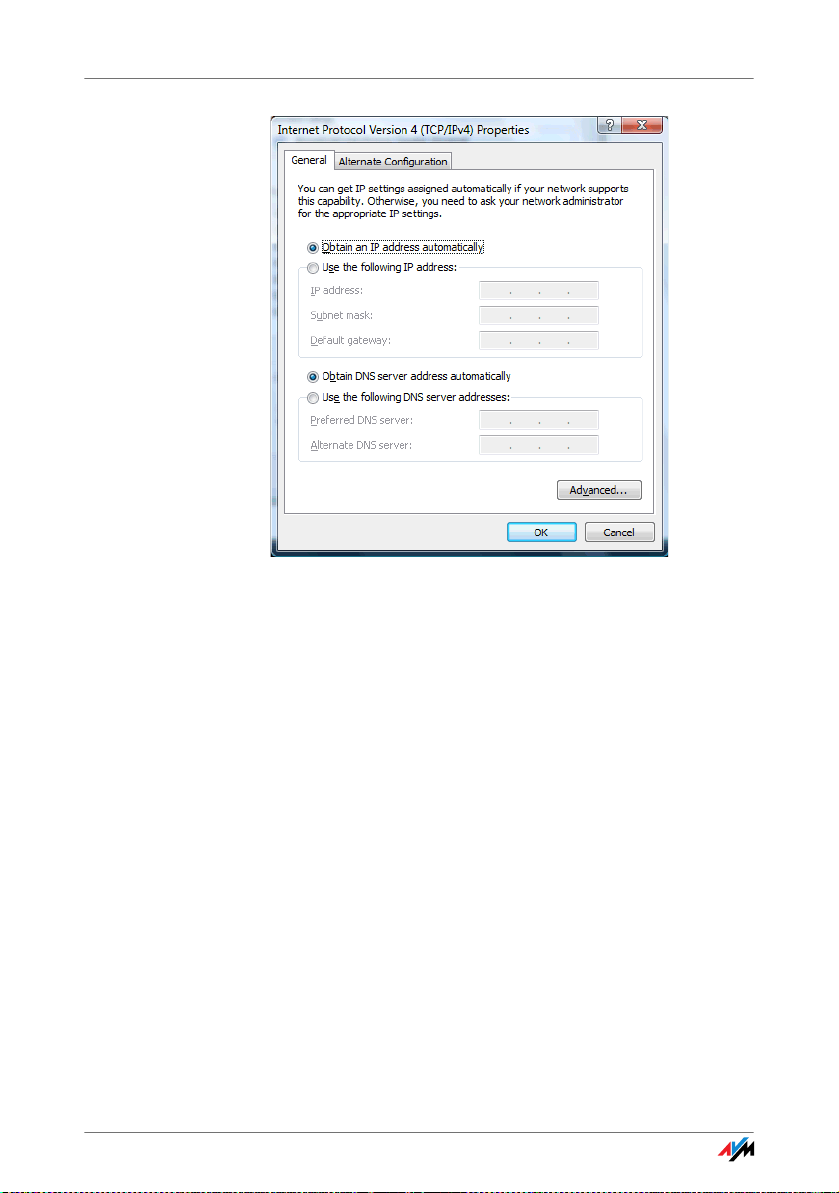
Obtaining an IP Address Automatically
Properties of the Internet protocol (TCP/IP)
7. Confirm your selection by clicking “OK”.
If necessary, repeat steps 5 through 7 for the “Internet
Protocol Version 6 (TCP/IPv6)” as well.
The computer now receives an IP address from the FRITZ!Box.
Obtaining an IP Address Automatically in Windows XP
1. Go to “start / Control Panel / Network and Internet Con-
nections / Network Connections” and double-click the
LAN connection icon of the network adapter connected
to the FRITZ!Box.
2. Click the “Properties” button.
3. Select “Internet Protocol (TCP/IP)” in the list of items
used in this network connection and click “Properties”.
4. On the “General” tab, enable the options “Obtain an IP
address automatically” and “Obtain DNS server address
automatically”.
93
Page 94
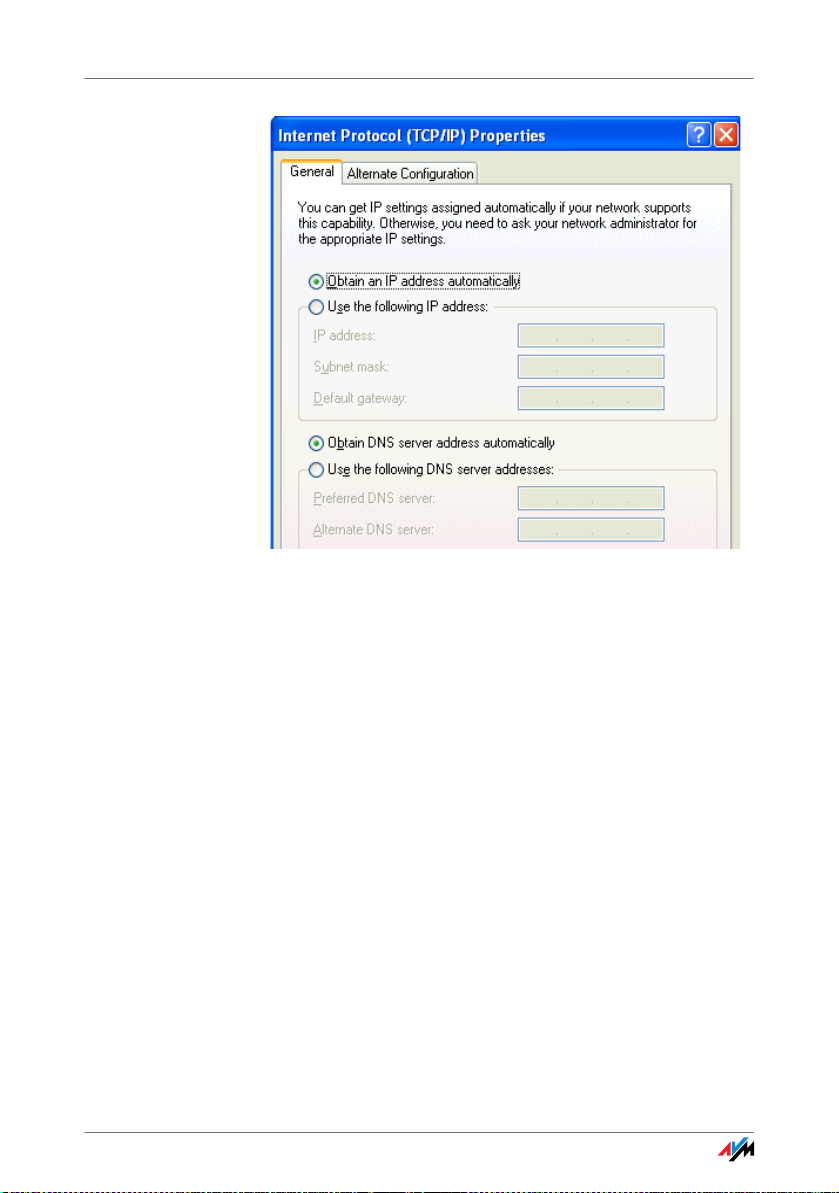
Obtaining an IP Address Automatically
Properties of the Internet protocol (TCP/IP)
5. Confirm your selection by clicking “OK”.
The computer now receives an IP address from the FRITZ!Box.
Obtaining an IP Address Automatically in Mac OS X
1. Select the “System Preferences” in the Apple menu.
2. In the “System Preferences” window, click the “Net-
work” icon.
3. In the “Network” window, select the “Built-in Ethernet”
entry from the “Show:” drop-down menu.
4. Switch to the “TCP/IP” settings page and select the “Us-
ing DHCP:” option from the “Configure IPv4” drop-down
menu.
5. Click “Apply Now”.
The computer now receives an IP address from the FRITZ!Box.
94
Page 95

Obtaining an IP Address Automatically
Obtaining an IP Address Automatically in Linux
For comprehensive information and tips on the topic of network settings in Linux, see, for example:
http://www.tldp.org/HOWTO/NET3-4-HOWTO-5.html
95
Page 96

Uninstallation
11 Uninstallation
Removing Software and Program Entries
This chapter describes how to remove the FRITZ!Box from the
computer and uninstall the corresponding software.
11.1 Removing FRITZ!Box from the Computer
LAN Port
If the computer is connected to one of the LAN ports on the
FRITZ!Box, simply remove the network cable.
If the computer is connected to the FRITZ!Box via a network
hub or switch, remove the network cable between the
FRITZ!Box and the network hub or switch.
WLAN
If the computer is connected to the FRITZ!Box wirelessly via
WLAN, deactivate the WLAN connection to the FRITZ!Box in
the software of the WLAN adapter or the WLAN module.
11.2 Removing the Printer Port
The AVM FRITZ!Box USB printer port is removed using the
Control Panel of the Windows operating system.
Removing the Printer Port in Windows 7
1. Open “Start / Control Panel / Programs”.
2. Under “Programs and Features”, click “Uninstall a pro-
gram”.
3. Select the “AVM FRITZ!Box Printer Port” entry from the
list.
4. Click the “Uninstall/Change” button above the list.
The printer port is uninstalled.
96
Page 97

Removing the Program Group
Removing the Printer Port in Windows Vista
1. Open “Start / Settings / Control Panel / Programs and
Functions”.
2. Select the “AVM FRITZ!Box USB Printer Port” entry from
the list.
3. Click the “Uninstall/Change” button.
4. Confirm the next query by clicking “Continue”.
This concludes the uninstallation of the printer port.
Removing the Printer Port in Windows XP
1. Open “start / Control Panel / Add or Remove Programs”.
Make sure that the “Change or Remove Programs” button is selected in the column at left.
2. Select the “AVM FRITZ!Box USB Printer Port” entry from
the list of “Currently installed programs”.
3. Click the “Change/Remove” button.
This concludes the uninstallation of the printer port.
11.3 Removing the Program Group
Remove the FRITZ!Box program group using the Control Panel
of the Windows operating system.
Removing the Program Group in Windows 7
1. Open “Start / Control Panel / Programs”.
2. Under “Programs and Features”, click “Uninstall a pro-
gram”.
3. Select the “AVM FRITZ!Box Documentation” entry from
the list.
4. Click the “Uninstall/Change” button above the list.
This concludes the uninstallation of the program group.
97
Page 98

Removing the Program Group
Removing the Program Group in Windows Vista
1. Open “Start / Settings / Control Panel / Programs and
Functions”.
2. Select the “AVM FRITZ!Box Documentation” entry from
the list.
3. Click the “Uninstall/Change” button.
4. Confirm the next query by clicking “Continue”.
This concludes the uninstallation of the program group.
Removing the Program Group in Windows XP
1. Open “start / Control Panel / Add or Remove Programs”.
Make sure that the “Change or Remove Programs” button is selected in the column at left.
2. Select the “AVM FRITZ!Box” entry from the list of “Cur-
rently installed programs”.
3. Click the “Change/Remove” button.
This concludes the uninstallation of the program group.
98
Page 99
Product Details
II PRODUCT DETAILS AND USEFUL INFORMATION
1Product Details
FRITZ!Box 6360 Cable
This chapter provides you with product details on FRITZ!Box 6360 Cable. You receive information on cables, technical data and further details.
1.1 Network Cable
Additional network cable is required if you would like to use
all of the FRITZ!Box 6360 Cable network ports.
The network cable (yellow) of the FRITZ!Box 6360 Cable is a
standard category 5 (Cat5) Ethernet cable. If you need a replacement cable, a longer cable or an extension, please use a
standard STP-type (Shielded Twisted Pair) Ethernet cable of
category 5 or 5e (Cat5 or Cat5e). To extend the cable you will
need a shielded RJ45 double coupling (Cat5 or Cat5e) with a
1:1 pin assignment. You can use both straight cables and
crosslink cables. All components are available from specialized vendors.
When components of a smaller category are used, reduced
transmission rates may result.
AVM recommends using a network cable no more than 100
meters long.
99
Page 100

LEDs
1.2 LEDs
Five LEDs are built into the top of the FRITZ!Box 6360 Cable,
which flash or light up to display various connection statuses.
LED Condition Meaning
Power/Cable on
flashing
Fon on telephone connection is active
DECT on DECT function enabled
flashing registration procedure for a DECT handset in progress
WLAN on WLAN function enabled
flashing
Info on
flashing
flashes red An error occurred. Open the FRITZ!Box user interface and
• FRITZ!Box on standby
• power supply is connected and the cable connection
is ready for operation
• the device has electrical power
• connection to the cable line is being established or
has been interrupted
• adopting the WLAN settings
• Switching the radio network on or off.
• performing WPS
• WPS procedure aborted: More than two WLAN devices
are performing WPS at the same time. Repeat the connection routine.
• signals an event specified by the user
• Stick & Surf procedure concluded
• updating the firmware
• You have received a new message on the integrated
answering machine, a call in absence, or a new fax.
• signals an event specified by the user
• Stick & Surf procedure in progress
follow the instructions in the “Overview” page
100
 Loading...