

Page 1

Installation,
Configuration
and Operation
FRITZ!Box
6320 Cable
Page 2

Table of Contents
Symbols and Highlighting . . . . . . . . . . . . . . . . . . . . . . . . 6
1 FRITZ!Box 6320 Cable. . . . . . . . . . . . . . . . . . . . . . . . . . . . 7
1.1 An Overview . . . . . . . . . . . . . . . . . . . . . . . . . . . . . . . . . . . . . . . . . . . . . 7
1.2 Buttons. . . . . . . . . . . . . . . . . . . . . . . . . . . . . . . . . . . . . . . . . . . . . . . . . 9
1.3 LEDs . . . . . . . . . . . . . . . . . . . . . . . . . . . . . . . . . . . . . . . . . . . . . . . . . . 10
2 Before You Connect the FRITZ!Box . . . . . . . . . . . . . . . . . 11
2.1 Contents of the FRITZ!Box Package. . . . . . . . . . . . . . . . . . . . . . . . . . 11
2.2 Requirements for Operation . . . . . . . . . . . . . . . . . . . . . . . . . . . . . . . 11
2.3 Security and Handling . . . . . . . . . . . . . . . . . . . . . . . . . . . . . . . . . . . . 12
3 Connecting FRITZ!Box . . . . . . . . . . . . . . . . . . . . . . . . . . . 14
3.1 Installing at the Cable Connection . . . . . . . . . . . . . . . . . . . . . . . . . . 14
3.2 Connecting to Electrical Power . . . . . . . . . . . . . . . . . . . . . . . . . . . . . 14
4 Connecting Telephony Equipment to the FRITZ!Box . . . 16
4.1 Connecting an Analog Telephony Device . . . . . . . . . . . . . . . . . . . . . 16
4.2 Registering Cordless (DECT) Telephones . . . . . . . . . . . . . . . . . . . . . 17
4.3 Connecting an IP Telephone . . . . . . . . . . . . . . . . . . . . . . . . . . . . . . . 18
5 Connecting the Computer to the FRITZ!Box. . . . . . . . . . 20
5.1 Connecting Computers to the LAN Port . . . . . . . . . . . . . . . . . . . . . . 20
5.2 Connecting Computers Wirelessly over WLAN . . . . . . . . . . . . . . . . . 21
6 The FRITZ!Box User Interface . . . . . . . . . . . . . . . . . . . . . 26
6.1 Opening the User Interface . . . . . . . . . . . . . . . . . . . . . . . . . . . . . . . . 26
6.2 Protecting the User Interface with a Password. . . . . . . . . . . . . . . . . 27
6.3 Saving the FRITZ!Box Settings. . . . . . . . . . . . . . . . . . . . . . . . . . . . . . 28
2
Page 3

7 Surf the Net . . . . . . . . . . . . . . . . . . . . . . . . . . . . . . . . . . . 29
8 Setting up the FRITZ!Box for Telephone Calls . . . . . . . . 30
8.1 Entering Internet Telephone Numbers . . . . . . . . . . . . . . . . . . . . . . . 30
8.2 Setting Up Connected Telephony Devices . . . . . . . . . . . . . . . . . . . . 31
8.3 Making and Answering Calls. . . . . . . . . . . . . . . . . . . . . . . . . . . . . . . 32
9 FRITZ!Box as Internet Access Point . . . . . . . . . . . . . . . . 33
9.1 Internet Filter: Restricting Access to the Internet. . . . . . . . . . . . . . . 33
9.2 Port Forwarding: Making Computers Accessible from the Internet. 34
9.3 Dynamic DNS: Name Instead of IP Address . . . . . . . . . . . . . . . . . . . 35
9.4 Remote Access over HTTP . . . . . . . . . . . . . . . . . . . . . . . . . . . . . . . . . 36
9.5 Prioritization: Right of Way for Internet Access . . . . . . . . . . . . . . . . 36
9.6 VPN: Remote Access to the Home Network . . . . . . . . . . . . . . . . . . . 39
9.7 IPv6: The New Internet Protocol . . . . . . . . . . . . . . . . . . . . . . . . . . . . 43
10 FRITZ!Box as a Telephone System . . . . . . . . . . . . . . . . . 50
10.1 Using the Telephone Book and Call List . . . . . . . . . . . . . . . . . . . . . . 50
10.2 Setting up the FRITZ!Box Answering Machine . . . . . . . . . . . . . . . . . 51
10.3 Setting up FRITZ!Box Fax Reception . . . . . . . . . . . . . . . . . . . . . . . . . 54
10.4 Making Calls and Forwarding Calls to Other Connected Telephones54
10.5 Paging or Deregistering Cordless Telephones . . . . . . . . . . . . . . . . . 55
10.6 Setting Up Call Diversion. . . . . . . . . . . . . . . . . . . . . . . . . . . . . . . . . . 56
10.7 Saving Costs with Dialing Rules . . . . . . . . . . . . . . . . . . . . . . . . . . . . 57
10.8 Blocking Telephone Numbers and Callers . . . . . . . . . . . . . . . . . . . . 57
10.9 Setting Up Do Not Disturb . . . . . . . . . . . . . . . . . . . . . . . . . . . . . . . . . 58
10.10 Setting Up the Alarm . . . . . . . . . . . . . . . . . . . . . . . . . . . . . . . . . . . . . 59
10.11 Baby Monitor . . . . . . . . . . . . . . . . . . . . . . . . . . . . . . . . . . . . . . . . . . . 60
11 Network Devices in the FRITZ!Box Home Network . . . . 61
11.1 Network Settings in the FRITZ!Box . . . . . . . . . . . . . . . . . . . . . . . . . . 61
11.2 Obtaining an IP Address Automatically . . . . . . . . . . . . . . . . . . . . . . 67
3
Page 4

12 FRITZ!Box as a WLAN Base Station. . . . . . . . . . . . . . . . . 72
12.1 WLAN Standards . . . . . . . . . . . . . . . . . . . . . . . . . . . . . . . . . . . . . . . . 72
12.2 Security. . . . . . . . . . . . . . . . . . . . . . . . . . . . . . . . . . . . . . . . . . . . . . . . 75
12.3 Frequency Ranges . . . . . . . . . . . . . . . . . . . . . . . . . . . . . . . . . . . . . . . 77
12.4 Increasing the Range of the WLAN Connection . . . . . . . . . . . . . . . . 79
12.5 Setting Up Night Service for WLAN . . . . . . . . . . . . . . . . . . . . . . . . . . 80
13 Help in Case of Errors . . . . . . . . . . . . . . . . . . . . . . . . . . . 81
13.1 The User Interface Does Not Open . . . . . . . . . . . . . . . . . . . . . . . . . . 81
13.2 Cannot Establish a WLAN Connection . . . . . . . . . . . . . . . . . . . . . . . 87
14 Configuration and Operation on the Telephone . . . . . . 92
14.1 Symbols and Acknowledgement Tones . . . . . . . . . . . . . . . . . . . . . . 92
14.2 Configuring by Telephone . . . . . . . . . . . . . . . . . . . . . . . . . . . . . . . . . 93
14.3 Operation at the Telephone . . . . . . . . . . . . . . . . . . . . . . . . . . . . . . 101
15 Taking FRITZ!Box out of Operation . . . . . . . . . . . . . . . . 111
15.1 Restoring the FRITZ!Box Factory Settings . . . . . . . . . . . . . . . . . . . . 111
15.2 Clearing Cable Connections . . . . . . . . . . . . . . . . . . . . . . . . . . . . . . 112
15.3 Uninstalling Software . . . . . . . . . . . . . . . . . . . . . . . . . . . . . . . . . . . 112
15.4 Disposal Instructions. . . . . . . . . . . . . . . . . . . . . . . . . . . . . . . . . . . . 112
16 Technical Specifications. . . . . . . . . . . . . . . . . . . . . . . . 113
16.1 Ports and Interfaces. . . . . . . . . . . . . . . . . . . . . . . . . . . . . . . . . . . . . 113
16.2 Router Functions . . . . . . . . . . . . . . . . . . . . . . . . . . . . . . . . . . . . . . . 113
16.3 User Interface and Display . . . . . . . . . . . . . . . . . . . . . . . . . . . . . . . 114
16.4 Physical Specifications . . . . . . . . . . . . . . . . . . . . . . . . . . . . . . . . . . 114
16.5 Cable. . . . . . . . . . . . . . . . . . . . . . . . . . . . . . . . . . . . . . . . . . . . . . . . . 114
17 Customer Service . . . . . . . . . . . . . . . . . . . . . . . . . . . . . 115
17.1 Documentation on the FRITZ!Box . . . . . . . . . . . . . . . . . . . . . . . . . . 115
17.2 Information in the Internet . . . . . . . . . . . . . . . . . . . . . . . . . . . . . . . 115
17.3 Support from the Support Team . . . . . . . . . . . . . . . . . . . . . . . . . . . 116
4
Page 5

Legal Documentation . . . . . . . . . . . . . . . . . . . . . . . . . . 118
Legal Notice . . . . . . . . . . . . . . . . . . . . . . . . . . . . . . . . . . . . . . . . . . . 118
Declaration of CE Conformity . . . . . . . . . . . . . . . . . . . . . . . . . . . . . 119
Disposal Information . . . . . . . . . . . . . . . . . . . . . . . . . . . . . . . . . . . . 120
Glossary. . . . . . . . . . . . . . . . . . . . . . . . . . . . . . . . . . . . . 121
Index . . . . . . . . . . . . . . . . . . . . . . . . . . . . . . . . . . . . . . . 136
5
Page 6
Symbols and Highlighting
Symbols and emphasized texts are used to mark certain information
in this manual. To improve your understanding of the manual, please
take a moment to become familiar with these symbols and emphasized texts.
Symbols
This symbol designates information and tips that are useful
in operating the FRITZ!Box.
This symbol indicates important instructions that must be
observed to avoid malfunctions.
Highlighting
Highlighting Function Examples
Quotation marks Keys
Pointed brackets Joker <Number>
Blue and underlined
Blue links and references
Bold Emphasis Do not click the button
Buttons
Menus
File paths
Directory and file
names
Address to be entered in the web
browser
within this manual
“F1” key
“Help”
“Home Network”
“C:\My Documents”
“Documentation”
fritz.box
For more information on
customer service, see
the section from
page 115.
...
6
Page 7
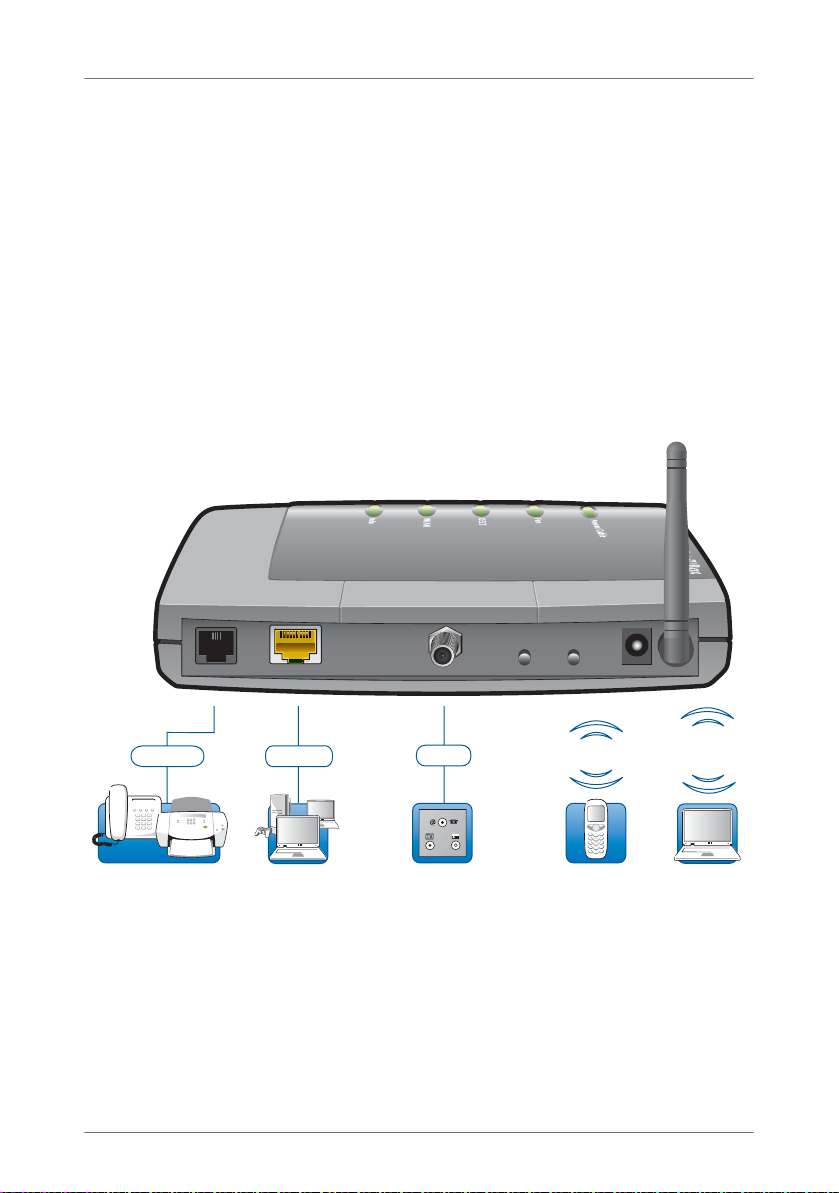
FRITZ!Box 6320 Cable
LAN DECTWLANCABLE
Power
FON
analog telephone,
fax
computers, game
console, network
Internet at the
TV cable connection
LAN (GBit)
Cable
notebook, smartphone,
video/TV streaming
FRITZ!Fon or other cordless
(DECT) telephones
DECT
WLAN
2.4 GHz
Fon analog
1 FRITZ!Box 6320 Cable
The FRITZ!Box is designed for operation at a cable connection. Thanks
to the integrated cable modem, you can connect the FRITZ!Box directly to your cable socket.
The FRITZ!Box thus connects your computers with the cable connection; when used as a WLAN access point, it does so wirelessly. All connected computers connect to the Internet over the FRITZ!Box.
The FRITZ!Box used as a telephone system allows you to make calls
over the Internet.
1.1 An Overview
Possibilities for connecting the FRITZ!Box
Cable Modem
The FRITZ!Box is equipped with an integrated cable modem
compliant with the EuroDOCSIS 3.0 standard. Up to four
channels are available in both the receiving and the sending
7
Page 8

An Overview
directions. Channel bundling is possible in both directions.
This allows for transmission rates of up to 220 Mbit/s in the
receiving direction and sending at a rate of up to 120 Mbit/s.
Telephone System and DECT Base Station
You can connect an analog telephone, fax machine, or an analog answering machine to the “FON” port of the FRITZ!Box.
Up to six cordless telephones can be registered at the integrated DECT base station. The cordless telephones must support the DECT standard.
You can make telephone calls over the Internet using all of
the connected telephones.
Connect to the Computer
A computer can be connected with a network cable directly to
the FRITZ!Box.
You can also connect a network hub or switch to the LAN port
so that even more computers can be connected to the
FRITZ!Box.
WLAN Access Point
The FRITZ!Box is a WLAN access point. Computers that support WLAN can be connected to the FRITZ!Box wirelessly.
Local Network
All of the computers connected with the FRITZ!Box constitute
a network and can share access to any files released for file
sharing.
Internet
All of the computers connected to the FRITZ!Box can access
the Internet.
The FRITZ!Box works as a router, making the Internet connection available to all connected computers. All connected computers can then use the Internet connection at the same time.
8
Page 9
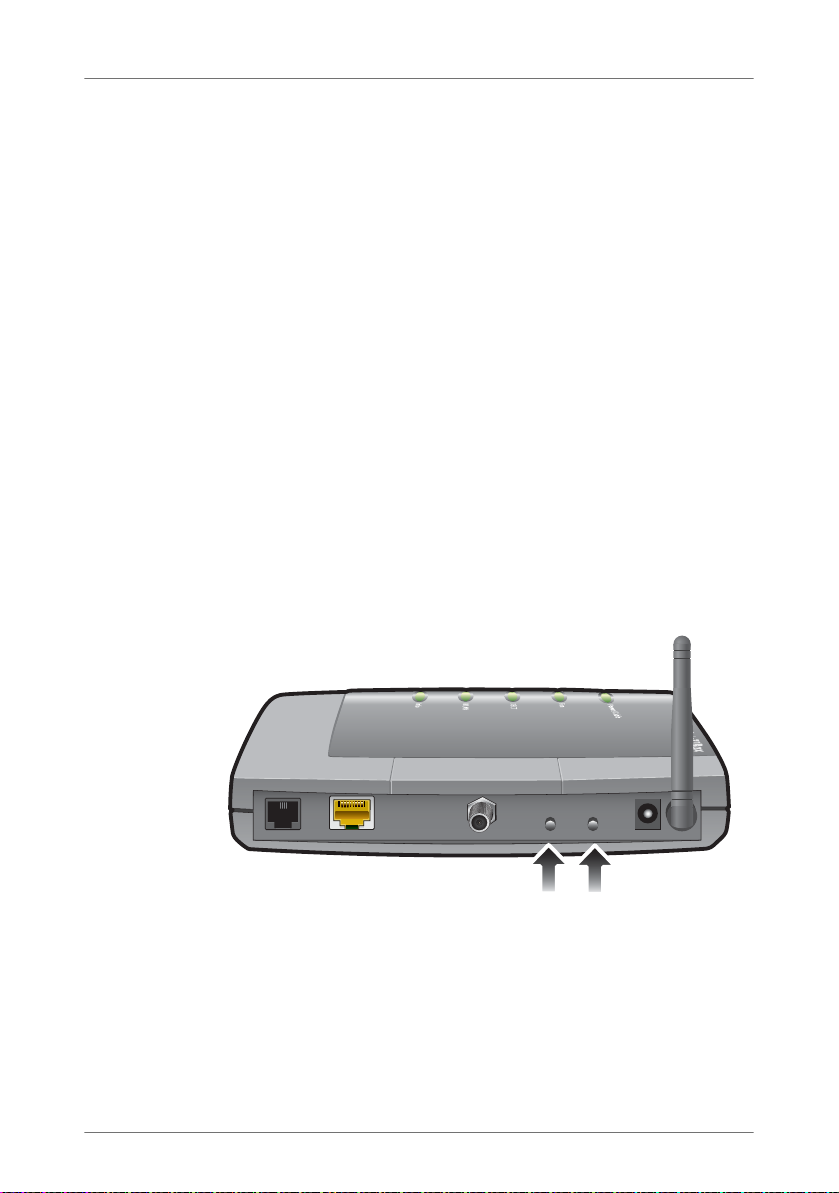
Buttons
LAN DECTWLANCABLE
Power
FON
1.2 Buttons
IPv6
The FRITZ!Box 6320 Cable can be configured for IPv6. Thanks
to the dual stack concept you can use IPv6 and IPv4 simultaneously.
The FRITZ!Box 6320 Cable supports native IPv6 in case your
Internet Service Provider offers a direct IPv6 link. IPv6 with
various tunnel protocols can be used over IPv4 links.
Firewall
The FRITZ!Box is equipped with an integrated firewall. The integrated firewall protects your network from attacks from the
Internet as long as the FRITZ!Box is operated as a router.
Network Devices
Other network devices can also be connected to the network
ports of the FRITZ!Box, for instance game consoles.
The FRITZ!Box has two buttons on the back of the device.
FRITZ!Box buttons
WLAN Button
With the WLAN button you can turn the WLAN function on and
off and connect wireless devices with the FRITZ!Box using
WPS. WPS is an easy way to establish secure wireless connections (see page 22).
9
Page 10

LEDs
DECT Button
With the DECT button you can register cordless telephones on
the FRITZ!Box (see page 17) and page misplaced cordless
handsets (see page 55).
1.3 LEDs
Five LEDs are built into the top of the FRITZ!Box 6320 Cable,
which flash or light up to display various connection statuses
and events.
LED Condition Meaning
Power /
on
Cable
flashing
Fon on A telephone connection is active.
DECT on The DECT function is enabled.
flashing Log-on procedure for a DECT handset in progress.
WLAN on The WLAN function is enabled.
flashing
Info on
flashing
flashing red An error occurred. Open the FRITZ!Box user interface and
• FRITZ!Box on standby
• Power supply is connected and the cable connection is
ready for operation.
• The device has electrical power.
• The connection to the cable line is being established or
has been interrupted.
• Adopting the WLAN settings.
• Switching the radio network on or off.
• Performing WPS.
• WPS procedure aborted: More than two WLAN devices
are performing WPS at the same time. Repeat the connection routine.
• Signals an event specified in the user interface under
“System / Info Display”.
• Updating the firmware.
• Signals missed calls, new messages on the FRITZ!Box
answering machine or another event specified in the
user interface under “System / Info Display”.
follow the instructions on the “Overview” page.
10
Page 11

Before You Connect the FRITZ!Box
2 Before You Connect the FRITZ!Box
• Check the contents of your FRITZ!Box package. See the section
Contents of the FRITZ!Box Package on page 11 for more informa-
tion.
• Make sure that the requirements for connecting and operating
the FRITZ!Box have been met. See the section Requirements for
Operation on page 11 for more information.
• Please see the security and handling instructions in the section
Security and Handling on page 12.
2.1 Contents of the FRITZ!Box Package
• FRITZ!Box 6320 Cable
• one power supply unit for connection to the power mains
• one network cable (yellow) for connection to a computer
or a network
• quick installation guide
2.2 Requirements for Operation
In order to operate the FRITZ!Box, you must have the following:
• a web browser that supports Java script (for instance, In-
ternet Explorer version 7.0 or higher, or Firefox
version 2.0 or higher)
• an Internet-ready cable connection compliant with the
DOCSIS or EuroDOCSIS 1.0, 1.1, 2.0 or 3.0 standard
• for connecting computers via WLAN:
computer with WLAN support (compliant with
IEEE 802.11n, IEEE 802.11g, or IEEE 802.11b). Computers that do not have integrated WLAN can be equipped
with WLAN support by installing a WLAN device like a
FRITZ!WLAN USB Stick, for instance.
• for connecting computers using network cable:
computer with a network port (network adapter standard
Ethernet 10/100/1000 Base-T)
11
Page 12

Security and Handling
2.3 Security and Handling
Before installing and using the FRITZ!Box, please read the following
security and handling instructions.
Security and Handling
When working with the FRITZ!Box 6320 Cable, be sure to observe the following security instructions in order to protect
yourself and the FRITZ!Box from harm.
• Do not install the FRITZ!Box during an electrical storm.
• Disconnect the FRITZ!Box from the power supply during
electrical storms.
• Never let liquids get inside the FRITZ!Box. Otherwise,
electric shocks or short circuits may result.
• The FRITZ!Box is intended for indoor use only.
• Do not open the FRITZ!Box housing. The device contains
hazardous components and should only be opened by
authorized repair technicians.
Handling the FRITZ!Box
• You can either place FRITZ!Box on a horizontal surface or
mount it on a wall.
• Place or hang the FRITZ!Box in a dry location that is free
of dust and protected from direct sunlight.
For ideal operating conditions, mount the FRITZ!Box on a
wall with the cables connected on the bottom.
• Do not place FRITZ!Box on excessively heat-sensitive sur-
faces, as the base of the device can heat up during normal operation.
• Make sure that the ventilation slits are unobstructed. For
this reason the FRITZ!Box should not be placed on a carpet or on upholstered furniture. The ventilation slits provide for air cooling of the FRITZ!Box.
12
Page 13

Security and Handling
• When connecting FRITZ!Box to your computer using a
• If you would like to establish wireless connections be-
• Make sure to keep sufficient distance from potential
network cable, keep in mind that the cable can be no
longer than 100m.
tween the FRITZ!Box and the computer, position the
FRITZ!Box at a central location.
sources of interference like microwave devices or electric devices with large metal housings.
13
Page 14
Connecting FRITZ!Box
Radio
Data
TV
3 Connecting FRITZ!Box
This chapter describes how you connect the FRITZ!Box in two steps.
• Installing at the Cable Connection from page 14
• Connecting to Electrical Power from page 14
Note the additional instructions on connecting the FRITZ!Box
in the section Security and Handling on page 12.
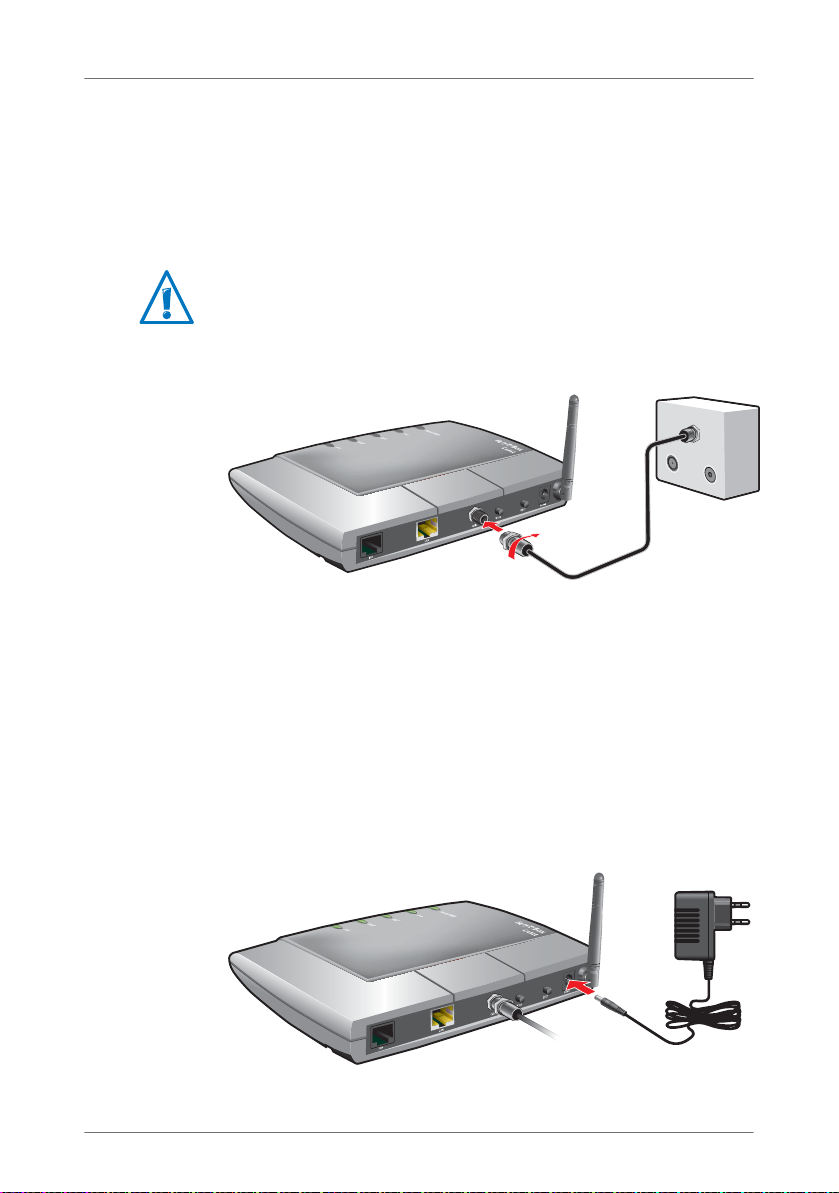
3.1 Installing at the Cable Connection
Installing at the cable connection
Connecting
The FRITZ!Box is connected to the cable line with a coaxial cable. You receive the cable from your cable network operator.
The FRITZ!Box package does not contain a coaxial cable.
Connect the coaxial cable to the “CABLE” port of the
FRITZ!Box and to your multimedia line.
3.2 Connecting to Electrical Power
Connecting to the power supply
14
Page 15

Connecting to Electrical Power
1. Pick up the power supply unit included in the FRITZ!Box
package.
Use only this power supply unit for connecting to electrical power.
2. Connect the FRITZ!Box to the power supply unit. Insert
the small plug into the power socket at the right edge of
the socket strip on the FRITZ!Box.
3. Plug the other end into an AC power outlet.
The “Power / Cable” LED lights up after a few minutes to signal that the FRITZ!Box is ready for operation on the cable connection.
15
Page 16
Connecting Telephony Equipment to the FRITZ!Box
4 Connecting Telephony Equipment to the FRITZ!Box
This chapter explains how to connect your telephony devices to the
FRITZ!Box:
• Connecting an Analog Telephony Device from page 16
• Registering Cordless (DECT) Telephones on page 17
• Connecting an IP Telephone from page 18
4.1 Connecting an Analog Telephony Device
You can connect an analog telephone, an analog fax machine
or an analog answering machine to the FRITZ!Box.
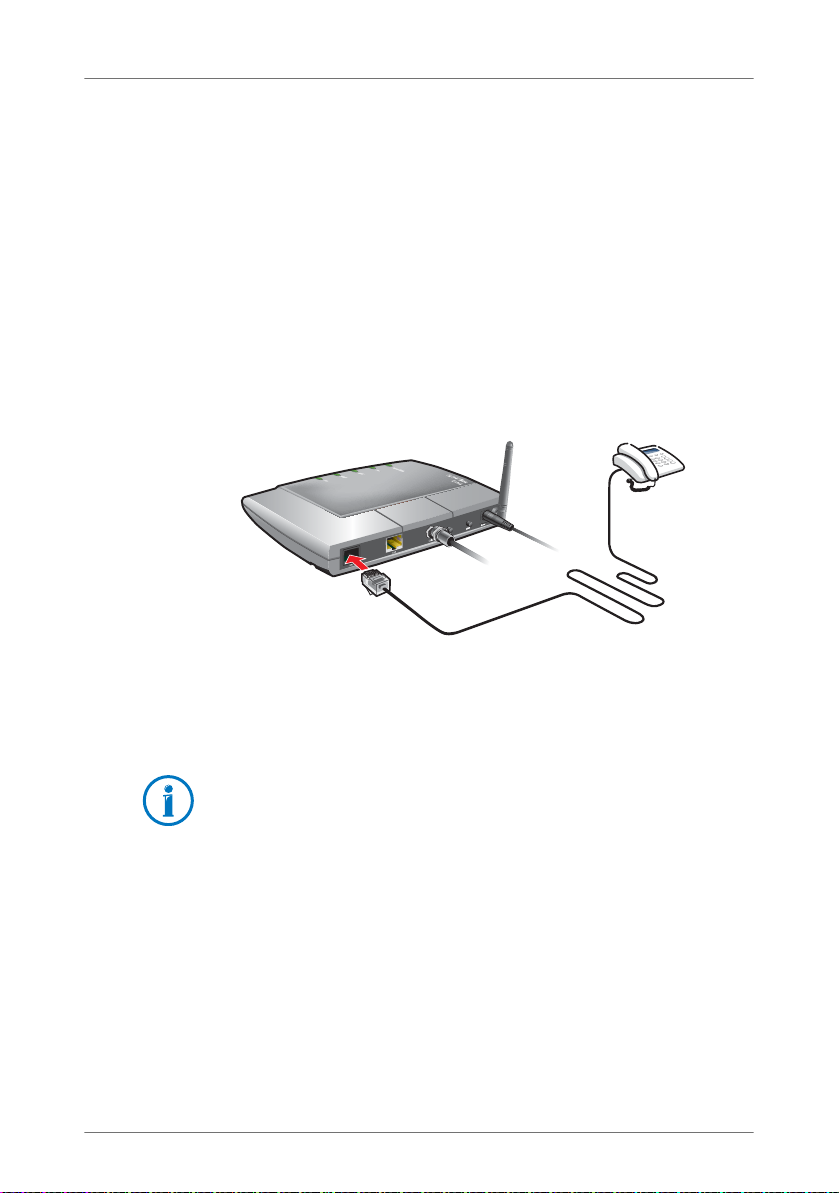
Connecting an analog telephone with an RJ11 plug
Connect the telephone device to the “FON” port of the
FRITZ!Box.
For instructions on how to set up the FRITZ!Box for making
phone calls, start reading from page 30.
16
Page 17
Registering Cordless (DECT) Telephones
4.2 Registering Cordless (DECT) Telephones
Up to six cordless telephones can be registered on the
FRITZ!Box. The cordless telephones must support the DECT
standard.
The DECT function of the FRITZ!Box is switched on automatically when the first cordless telephone is registered.
Registering Cordless Telephones from AVM
The cordless telephones FRITZ!Fon MT-F, FRITZ!Fon C3, and
FRITZ!Fon MT-D from AVM are the ideal complement to your
FRITZ!Box 6320 Cable.
Here is how to register your FRITZ!Fon on the FRITZ!Box:
1. If the FRITZ!Fon is switched off, switch it on by pressing
and holding down the hang up/end call button.
2. Press the “DECT” button on your FRITZ!Box. Hold the but-
ton down until the DECT LED on the FRITZ!Box flashes.
This takes about 10 seconds.
Your FRITZ!Fon is now connected with the FRITZ!Box.
If registration fails, register the FRITZ!Fon manually. See the
manual of your FRITZ!Fon for instructions.
Registering Cordless (DECT) Telephones from Other
Manufacturers
1. Start the process of manually registering your cordless
telephone at a base station. See the manual of your
cordless telephone for instructions.
2. Follow the directions on the display of the cordless tele-
phone.
Upon delivery the system PIN of the FRITZ!Box is set to
“0000”.
As soon as you are prompted to press the registration
button (also the paging button) on the base station,
press the “DECT” button on the FRITZ!Box and hold it
down until the DECT LED on the FRITZ!Box begins flashing. This takes about 10 seconds.
17
Page 18
Connecting an IP Telephone
4.3 Connecting an IP Telephone
Connect an IP telephone to the FRITZ!Box wirelessly over
WLAN or by plugging it into a network port on the FRITZ!Box.
Connecting an IP Telephone to the LAN Port of the FRITZ!Box
IP telephones with a LAN port can be connected to the
FRITZ!Box with a network cable.
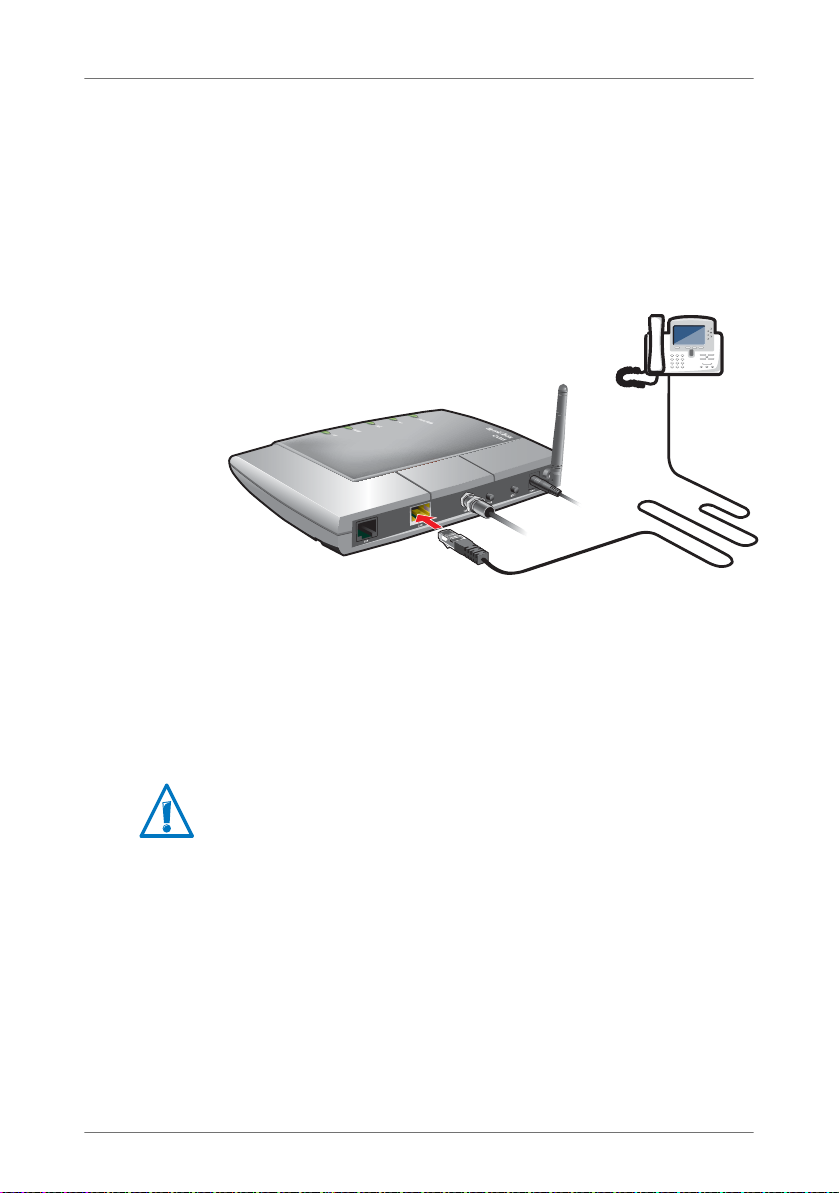
Connecting an IP telephone to the network port of the FRITZ!Box
1. Connect a network cable to the IP telephone.
2. Connect the free end of the network cable to the LAN
port on the FRITZ!Box.
The IP telephone is now connected with the FRITZ!Box.
You cannot make calls with the IP telephone yet. The IP telephone still has to be configured in the FRITZ!Box (see
page 31).
18
Page 19
Connecting an IP Telephone
Connecting an IP Telephone with the FRITZ!Box over WLAN
IP telephones that support WLAN can be connected wirelessly
to the FRITZ!Box via WLAN.
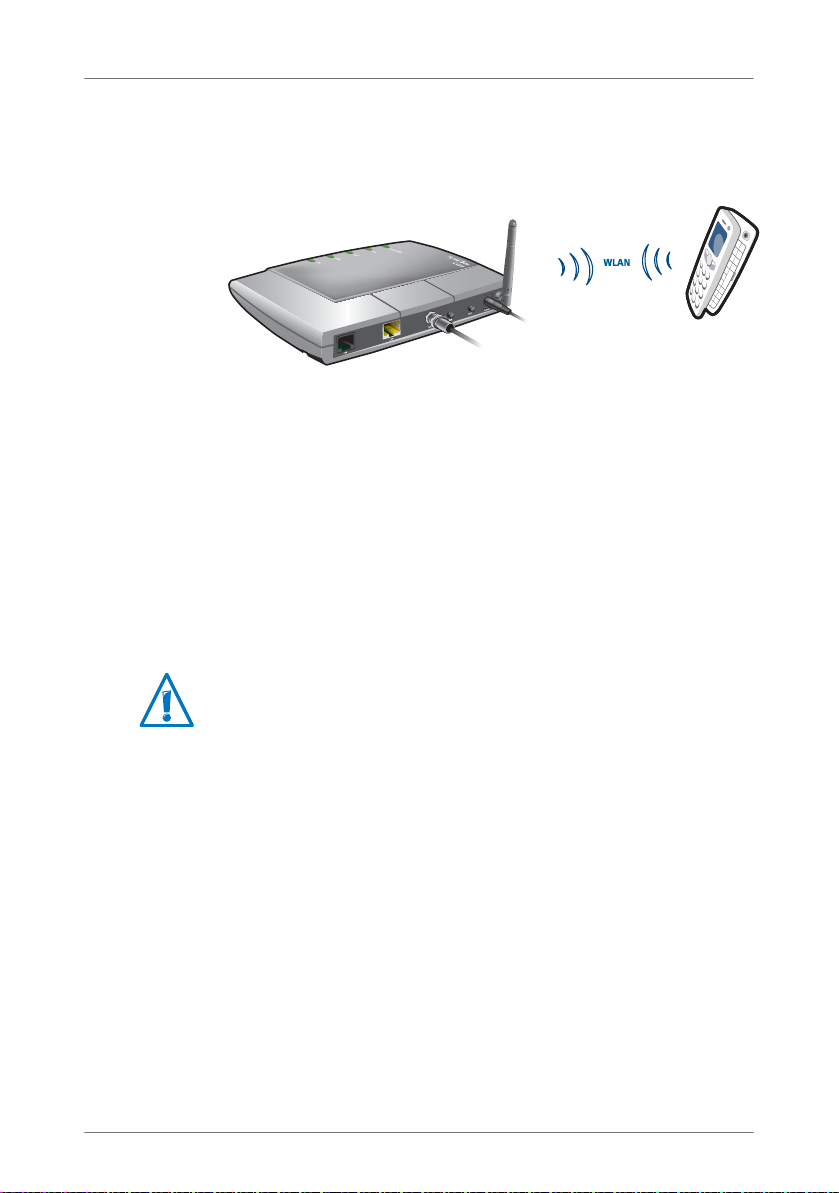
Connecting an IP telephone with the FRITZ!Box over WLAN
1. Use your IP telephone to search for WLAN devices at your
location.
2. Select the FRITZ!Box 6320 Cable from the list of WLAN
devices found.
3. To establish a connection, enter the WLAN key of the
FRITZ!Box. The network key valid upon delivery of the
FRITZ!Box is found on the bottom of the device housing.
Now the IP telephone will be connected with the FRITZ!Box.
You cannot make calls with the IP telephone yet. The IP telephone still has to be configured in the FRITZ!Box (see
page 31).
19
Page 20
Connecting the Computer to the FRITZ!Box
5 Connecting the Computer to the FRITZ!Box
This chapter explains how to connect one or more computers with the
FRITZ!Box.
• Connecting Computers to the LAN Port from page 20
• Connecting Computers Wirelessly over WLAN from page 21
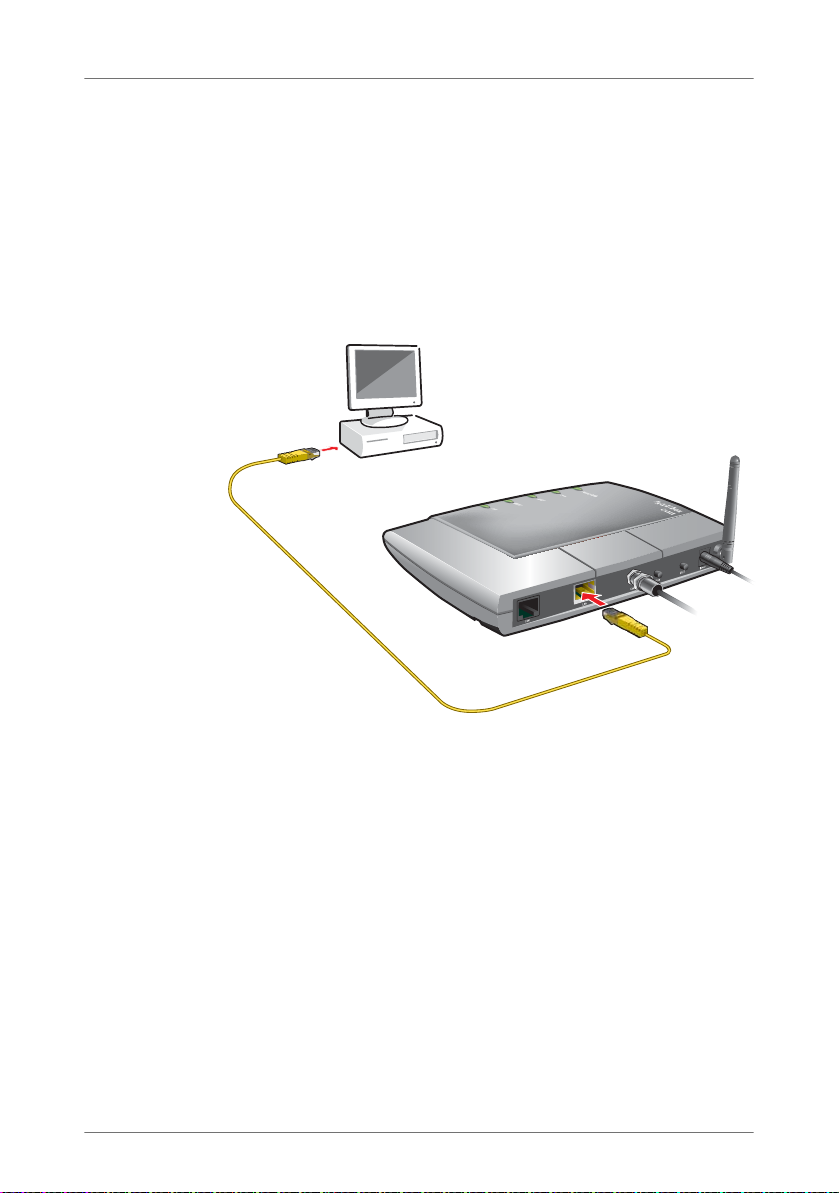
5.1 Connecting Computers to the LAN Port
Connecting a computer to a LAN port on the FRITZ!Box
1. Set aside the network cable (yellow) from the FRITZ!Box
package.
2. Switch on your computer.
3. If you work with a Linux operating system, configure your
network adapter with the setting “DHCP”, if this setting
is not already configured.
4. Connect one end of the network cable to the network
port (network card) of the computer.
5. Connect the other end of the network cable to the socket
on the FRITZ!Box labeled “LAN”.
Now the FRITZ!Box and computer are connected to each other.
20
Page 21
Connecting Computers Wirelessly over WLAN
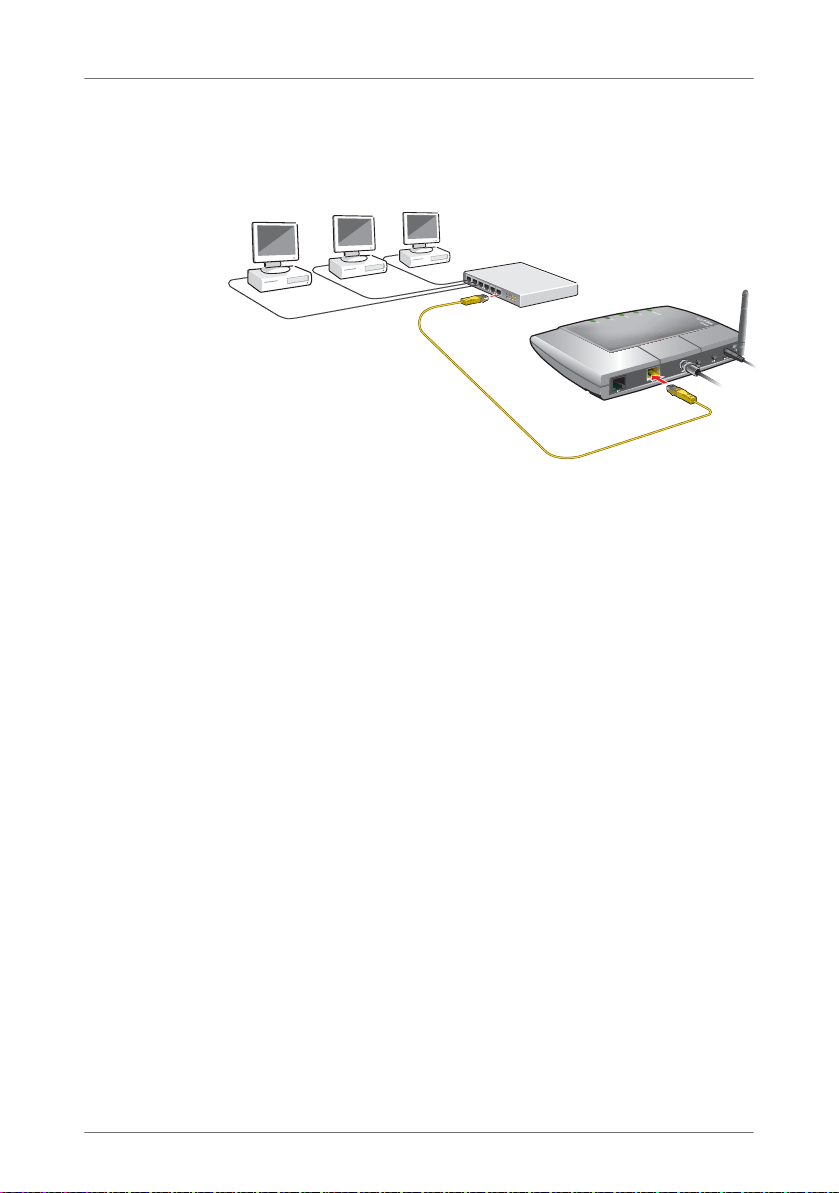
Connecting a Network Hub or Switch
You can also connect a network hub or switch to the LAN port
on the FRITZ!Box.
Connecting FRITZ!Box to a network hub
1. Set aside the network cable (yellow) from the FRITZ!Box
package.
2. Connect one end of the LAN cable to the uplink port (see
glossary) of the network hub or network switch.
3. Connect the other end of the cable to the socket on the
FRITZ!Box labeled “LAN”.
The FRITZ!Box and network hub are now connected with each
other. Now multiple computers can be connected to the hub
or switch.
5.2 Connecting Computers Wirelessly over WLAN
Using WLAN radio technology you can connect multiple computers with the FRITZ!Box wirelessly.
• WLAN device
A computer to be connected to the FRITZ!Box via WLAN
must be equipped with a WLAN device for it to support
WLAN. Many modern computers and notebooks come
with a WLAN device integrated.
21
Page 22
Connecting Computers Wirelessly over WLAN
• WLAN security settings
In the FRITZ!Box WLAN security settings are enabled ex
works. Before a computer can establish a wireless connection to the FRITZ!Box, the WLAN security settings of
the FRITZ!Box must be transferred to the WLAN device.
For more information on WLAN, see the section FRITZ!Box as
a WLAN Base Station from page 72.
Establishing a WLAN Connection Using WPS
The FRITZ!Box supports WPS (Wi-Fi Protected Setup). WLAN
devices that also support WPS can be connected with your
FRITZ!Box securely using this method. All of the necessary
WLAN security settings are transferred in the process. There
are two kinds of WPS: the push-button method and the PIN
method.
WPS with the Push-Button Method
The push-button method (WPS PBC) can be used if your WLAN
device is also equipped with a WPS button, or if WPS can be
enabled via the control software of the WLAN device.
1. Press the “WLAN” button on the FRITZ!Box and hold it
down for at least six seconds.
2. As soon as the “WLAN” LED begins flashing, enable the
WPS function on the other WLAN device, either by pressing a button or in the device’s user interface (depending
on the device). Activation must be started within two
minutes.
The FRITZ!Box and the WLAN device now connect with each
other automatically. The WLAN device adopts the security settings of the FRITZ!Box.
As soon as the WLAN connection has been established the
computer is connected to the FRITZ!Box.
22
Page 23

Connecting Computers Wirelessly over WLAN
WPS with the PIN Method
If your WLAN device supports WPS, but does not have a button to start the push method nor any possibility to enable it in
its control software, use the PIN method to establish the
WLAN connection.
You can choose between two methods:
• the FRITZ!Box specifies the PIN or
• the WLAN device specifies the PIN.
The FRITZ!Box Specifies the PIN
1. Open the FRITZ!Box user interface.
2. Select the “WLAN / Security” menu.
3. Go to the “WPS - Quick Connection”page.
4. Enable the setting “WPS enabled”.
5. Select the option “PIN method (WPS-PIN), the FRITZ!Box
specifies the PIN”.
6. The PIN will be displayed. Enter this PIN in the control
software of the WLAN device.
7. Click “Start WPS”.
The WLAN LED on the FRITZ!Box flashes slowly, indicating that
the WPS procedure has begun. Now a secure WLAN connection is being established between the FRITZ!Box and the
WLAN device.
The WLAN Device Specifies the PIN
1. Open the FRITZ!Box user interface.
2. Select the “WLAN / Security” menu.
3. Go to the “WPS - Quick Connection”page.
4. Enable the setting “WPS enabled”.
5. Select the option “PIN method (WPS-PIN), the WLAN de-
vice specifies the PIN”.
23
Page 24

Connecting Computers Wirelessly over WLAN
6. Now start the control software of the WLAN device. The
program outputs a PIN for establishing a connection.
7. Enter this PIN in the FRITZ!Box user interface.
8. Click “Start WPS”.
The WLAN LED on the FRITZ!Box flashes slowly, indicating that
the WPS procedure has begun. Now a secure WLAN connection is being established between the FRITZ!Box and the
WLAN device.
Transferring the WLAN Security Settings Manually
The WLAN security settings for WLAN devices can also be
transferred manually. Manual transfer is unavoidable if a
WLAN device does not support any methods for transferring
the security settings automatically.
For manual transfer the WLAN security settings have to be entered in the WLAN software.
WLAN devices are generally delivered with their own WLAN
software, which is installed in the computer along with the
WLAN device. By now many operating systems have WLAN
software included. Integrated WLAN devices sometimes use
the operating system’s WLAN software.
Installing a WLAN Device
If you need to use a separate WLAN device because you do
not have one integrated, then install the WLAN device in the
computer along with the corresponding WLAN software.
Please take note of the instructions in the relevant documentation.
Transferring WLAN Security Settings
The values for WLAN security preconfigured in the FRITZ!Box
have to be transferred to the WLAN device by entering the values in the WLAN software.
24
Page 25

Connecting Computers Wirelessly over WLAN
If you would like to establish a WLAN connection using the
preset values, then your WLAN device must support the WPA
encryption procedure.
1. Start the WLAN software.
2. Enter the following values for the connection between
the FRITZ!Box and the WLAN device:
SSID (name of the
WLAN radio network)
Encryption methods WPA (TKIP) or WPA2 (AES-CCMP)
Encryption WPA PSK or WPA2 PSK (AES)
WLAN key The key is printed on the sticker on the
Network mode Infrastructure
FRITZ!Box 6320 Cable
bottom of housing.
3. Confirm your entries using the relevant button in the us-
er interface (for instance, “OK” or “Connect”).
Now your WLAN device and the FRITZ!Box are connected with
each other wirelessly.
25
Page 26
The FRITZ!Box User Interface
6The FRITZ!Box User Interface
The FRITZ!Box has a user interface you can open in a web browser on
your computer.
In the user interface you can set up the FRITZ!Box, switch functions
enable or disable and receive information on the FRITZ!Box and on
your connections.
This chapter describes how to:
• open the user interface on the computer (page 26).
• protect the user interface with a password (page 27).
• save all of the settings of your FRITZ!Box in a file (page 28).
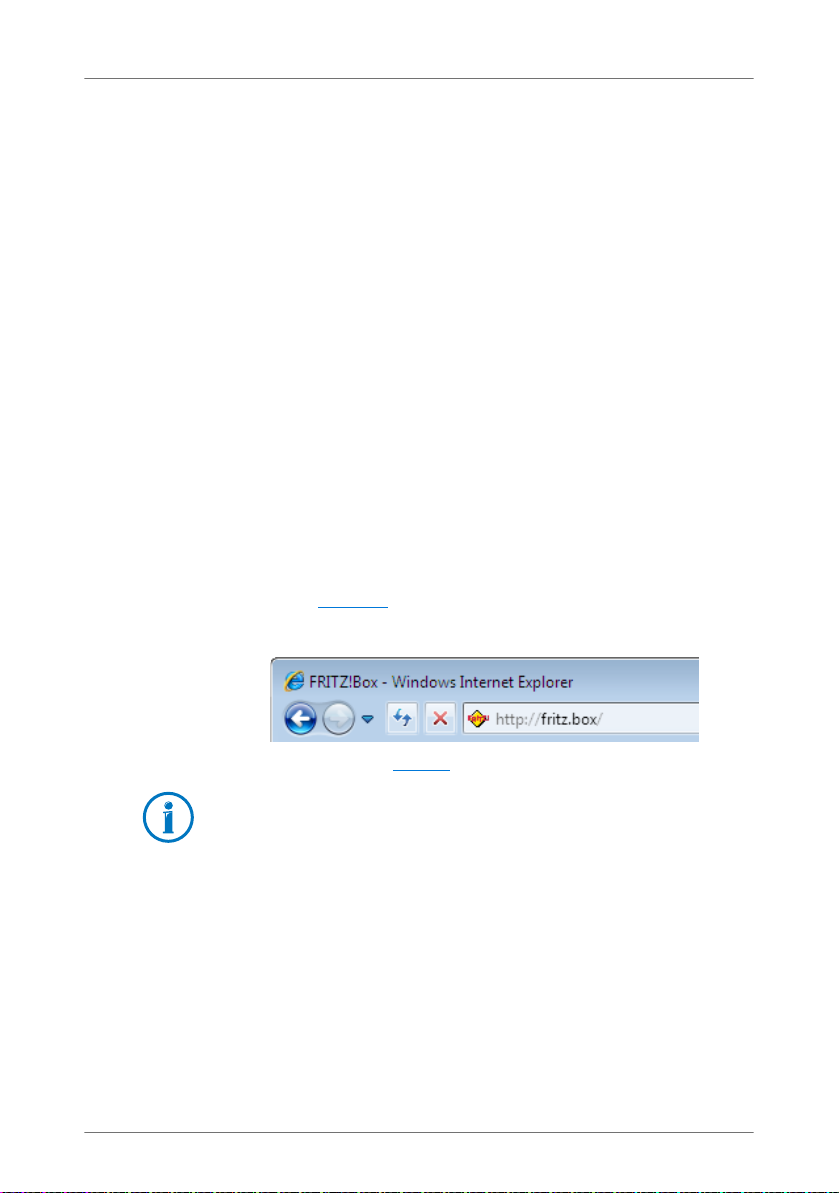
6.1 Opening the User Interface
The FRITZ!Box user interface can be opened on every computer connected with the FRITZ!Box.
1. Start a web browser on your computer.
2. Enter fritz.box
The FRITZ!Box user interface opens.
Enter the address fritz.box in the browser.
If the user interface does not open, see the instructions
on resolving errors in the section page 81.
The Wizard: Opening the User Interface for the First Time
When you open the user interface for the first time, a wizard
starts to assist you in configuring the FRITZ!Box.
If you cancel the wizard, you can configure your FRITZ!Box
without this wizard. You can change the settings configured
with this wizard at any time. For comprehensive information
on configuring the many diverse functions of you FRITZ!Box,
see the following chapters in this manual.
in the address line of the browser.
26
Page 27
Protecting the User Interface with a Password
6.2 Protecting the User Interface with a Password
You can protect the user interface of the FRITZ!Box with a
password. The password will be requested every time the user interface is opened. This protects the settings of your
FRITZ!Box from unauthorized access.
We strongly recommend setting up and using password protection for the user interface.
Setting Up Password Protection
As long as no password protection has been set up, every
time you open the user interface you will be prompted to enter a passwrod. If you disabled this message, here is how to
set password protection:
1. Open the FRITZ!Box user interface.
2. Go to the “System / FRITZ!Box Password”menu.
3. Enter a password and save the password by clicking “Ap-
ply”.
Password protection is now enabled.
Be sure to use a password you can remember easily. If
you forget the password, the factory settings will have to
be restored to your FRITZ!Box (see page 111). All of the
settings you configured will be discarded.
Log off the user interface
When password protection is enabled, you can log off the user interface at any time. To do so, click .
If you do not click on the user interface for a period of longer
than ten minutes, you will be logged off automatically. The
only pages excepted from this are those which are constantly
updated, like the “Overview” page. No automatic logout will
take place on these pages.
27
Page 28
Saving the FRITZ!Box Settings
6.3 Saving the FRITZ!Box Settings
All of the settings you configure in your FRITZ!Box can be
saved in a file on your computer. With this file you can restore
the settings in your FRITZ!Box at any time.
You can also load the saved settings to another FRITZ!Box as
long as it is the same FRITZ!Box model.
Saving and Restoring Settings
1. Open the FRITZ!Box user interface (see the section
page 26).
2. Click on the “Wizard”and then run the “Save Settings”
wizard.
With this wiard you can save your settings and restore
any settings you have already saved.
You can enter a password when saving your settings. A
password must be entered if you would like to load the
saved settings into another FRITZ!Box (same model).
28
Page 29

Surf the Net
7Surf the Net
Once the FRITZ!Box has been installed on the cable connection, the FRITZ!Box connects with the cable network and thus
with the Internet. The Internet connection can be used by any
computer connected to the FRITZ!Box.
1. Start a web browser on your computer.
2. Enter in the address field the URL of the web page you
would like to visit, for instance www.avm.de/en
.
29
Page 30
Setting up the FRITZ!Box for Telephone Calls
8 Setting up the FRITZ!Box for Telephone Calls
Set up your FRITZ!Box for telephone calls by working through the following steps:
• Enter your Internet numbers in the FRITZ!Box (page 30).
• Once you have entered your telephone numbers, configure all of
the connected telephony devices in the FRITZ!Box user interface
(page 31).
8.1 Entering Internet Telephone Numbers
If you would like to be able to make calls via the Internet with
the FRITZ!Box, you will need an Internet telephone number.
Enter the Internet telephone number in the FRITZ!Box. You can
even enter multiple Internet numbers from different Internet
telephony providers.
A number of Internet and Internet telephony provider support
remote configuration with TR-069 (see glossary). If your provider supports remote configuration with TR-069, your Internet telephone numbers may already have been entered in
the FRITZ!Box automatically.
1. Open the FRITZ!Box user interface (see page 26).
2. Click “Wizards”.
3. Click “Manage Your Own Phone Numbers”.
The next page presents an overview of all telephone
numbers that have already been entered.
4. Click “Add Telephone Number” to enter a new Internet
telephone number. Follow the wizard’s instructions.
The Internet telephone number is entered in the FRITZ!Box. An
overview of your Internet telephone numbers is presented in
the FRITZ!Box user interface in the “Telephony / Internet Telephony” menu. Here you can edit or delete Internet telephone
numbers as needed.
30
Page 31
Setting Up Connected Telephony Devices
8.2 Setting Up Connected Telephony Devices
Set up telephones and other telephony devices you connected to the FRITZ!Box in the FRITZ!Box user interface.
For instructions on how to connect telephony devices to the
FRITZ!Box, read from the page 16.
During configuration you must define the following settings,
depending on the type of device:
• The telephone number the device uses to place external
calls. These are calls to the public telephone network.
• Telephone numbers for accepting calls. A telephone can
be set to calling for all incoming calls or only for calls to
certain telephone numbers.
• Internal name for the telephony device. This name will
be displayed, for instance, in the call list of the
FRITZ!Box.
The “Configure Telephony Devices” Wizard can assist you in
setting up the telephony devices:
1. Open the FRITZ!Box user interface (see page 26).
2. Click “Wizards”.
3. Click “Configure Telephony Devices”.
The next page presents an overview of all telephony devices that have already been entered.
4. To set up a new telephony device, click “Configure New
Device”. Follow the wizard’s instructions.
The telephony device is set up in the FRITZ!Box. All configured
telephony devices are displayed in an overview in the
FRITZ!Box user interface. This overview is found in the “Telephony / Telephony Devices” menu. Here you can edit the settings of the telephony devices and delete telephony devices.
31
Page 32

Making and Answering Calls
8.3 Making and Answering Calls
Once you have set up your telephones, you can establish external telephone calls and accept incoming calls.
A telephone places external calls using the telephone number
you defined for outgoing calls.
For incoming calls a telephone reacts only to calls to those
telephone numbers you assigned to the telephone.
32
Page 33

FRITZ!Box as Internet Access Point
9 FRITZ!Box as Internet Access Point
The FRITZ!Box connects computers in your home network with the Internet. This chapter explains the possibilities offered by using the
FRITZ!Box as an Internet access point and how to take advantage of
them.
• Internet Filter: Restricting Access to the Internet from page 33
• Port Forwarding: Making Computers Accessible from the Internet
from page 34
• Dynamic DNS: Name Instead of IP Address from page 35
• Remote Access over HTTP from page 36
• Prioritization: Right of Way for Internet Access from page 36
• VPN: Remote Access to the Home Network from page 39
• IPv6: The New Internet Protocol from page 43
9.1 Internet Filter: Restricting Access to the Internet
The Internet filter feature in the FRITZ!Box allows you to restrict access to the Internet for individual computers or Windows users.
• You can define on which days of the week, at what times
of day, and for how long a computer or Windows user is
allowed to use the Internet connection.
• You can permit Internet access to only certain Internet
pages or block certain Internet pages. For instance, you
can block all Internet pages institutions or organizations
has defined as offensive or harmful to minors.
• You can block ports (see glossary) that certain programs
use for Internet access, for instance file-sharing software.
The Internet filter can be enabled for each computer individually, regardles of the computer’s operating system.
You can also enable the Internet filter individually for all Windows users (Windows 7, Windows Vista and Windows XP).
33
Page 34

Port Forwarding: Making Computers Accessible from the Internet
Setting Up the Internet Filter in the FRITZ!Box
The Internet filter is available only when the FRITZ!Box is connected with the cable connection.
1. Open the FRITZ!Box user interface (page 26).
2. Select the “Internet / Filter” menu.
3. Set up the Internet filter. Consult the Online Help avail-
able in the FRITZ!Box user interface for more information.
9.2 Port Forwarding: Making Computers Accessible from the Internet
With default settings in the FRITZ!Box, programs on your computer and LAN cannot be accessed from the Internet. For a
number of applications like online games and file sharing
software, you have to make your computer accessible for other Internet users. In order to grant controlled access to your
computer to other Internet users, you release certain ports for
incoming connections. The ports serve to distinguish between running applications on a computer that has only one
IP address.
Setting Up Port Forwarding in the FRITZ!Box
• Port Forwarding is set up in the “Internet / Permit Ac-
cess”menu.
• Port Forwarding for IPv6 is also set up in the “Internet /
Permit Access” menu, on the “IPv6” page. To see this
page, make sure you enabled the expert mode in the
“System / Expert Mode” menu.
34
Page 35
Dynamic DNS: Name Instead of IP Address
Access Address of the FRITZ!Box
If you have enabled the ports in the FRITZ!Box, other users
can access your server at the IP address assigned to
FRITZ!Box by the Internet Service Provider. This is a public IP
address.
Here is how to determine the public IP address of the
FRITZ!Box:
1. Open the FRITZ!Box user interface (page 26).
2. Enable the expert settings in the “System / Expert
Mode” menu.
3. Open any Internet page in order to establish an Internet
connection.
4. The FRITZ!Box’s public IP address is displayed in the
“Overview” menu in the “Connections” area.
Every time the Internet connection is interrupted the Internet
Service Provider re-assigns the IP address. The IP address
may change in the process. Therefore it is a good idea to use
Dynamic DNS so that the IP address can always be reached
under the same name. For more information, see the section
Dynamic DNS: Name Instead of IP Address on page 35.
9.3 Dynamic DNS: Name Instead of IP Address
Dynamic DNS is an Internet service that makes it possible for
the FRITZ!Box to remain accessible from the Internet at all
times under a fixed name, even though the public IP address
changes.
You must register with a dynamic DNS provider to use this
service. When you register, you agree on the fixed name (domain name) at which your FRITZ!Box should be accessible
from the Internet. You also define a user name and password.
Every time the IP address changes, the FRITZ!Box transmits
the new IP address to the Dynamic DNS provider in the form
of an update request. Then the domain name is assigned to
the current IP address by the dynamic DNS provider.
35
Page 36

Remote Access over HTTP
Setting up Dynamic DNS in the FRITZ!Box
1. Open the FRITZ!Box user interface (page 26).
2. Make sure that the expert mode is enabled in the “Sys-
tem / Expert Mode” menu.
3. Select the “Internet / Permit Access” menu.
4. Select the “Dynamic DNS” page and set up Dynamic
DNS. Consult the Online Help available in the FRITZ!Box
user interface for more information.
9.4 Remote Access over HTTP
With this function it is possible to access the user interface of
the FRITZ!Box from another location. With this feature you can
configure settings in the FRITZ!Box or perform a firmware update using a computer that is not in your own network (LAN or
WLAN).
Setting Up Remote Access over HTTP in the FRITZ!Box
1. Open the FRITZ!Box user interface (page 26).
2. Make sure that the expert mode is enabled in the “Sys-
tem / Expert Mode” menu.
3. Select the “Internet / Permit Access” menu.
4. Select the “Remote Access” page and set up Dynamic
DNS. For more information, see the Online Help.
9.5 Prioritization: Right of Way for Internet Access
Prioritization is a function you can use to specify that network
applications and network devices be treated with higher or
lower priority when they access the Internet connection. For
example, you may wish to ensure that applications like Internet telephony, IPTV and video on demand are always treated
with higher priority than other applications. You can also
specify that file-sharing applications like eMule and BitTorrent always have to wait behind online games.
36
Page 37

Prioritization: Right of Way for Internet Access
Categories for Prioritization
There are three categories for prioritization: “Real-time applications”, “Prioritized applications” and “Background applications”. The categories are explained below.
Real-time Applications
This category is suitable for applications with high demands
on transmission speed and reaction times (for example, Internet telephony, IPTV, video on demand).
Network applications and network devices are assigned to
the categories using rules.
• Network applications of this category always have priori-
ty over other applications accessing the Internet at the
same time.
• When the Internet connection is working at full capacity,
the network packets of the applications of this category
will always be sent first. In this case data from network
applications assigned to other categories, like “Prioritized applications”, will be transmitted later.
• If multiple network applications are assigned to this cat-
egory, then they must share the available capacity.
• Whenever Internet telephony is included in this catego-
ry, this application always has the highest priority, even
over other real-time applications.
Prioritized Applications
This category is suitable for applications that require a fast reaction time (for example, company access, terminal applications, games).
• For network applications prioritized in this category,
90% of the FRITZ!Box’s upload bandwidth is available,
as long as no application from the “Real-time applications” category requires bandwidth. The remaining 10%
of the upload bandwidth is available for applications
that are prioritized in lower categories or not prioritized
at all.
37
Page 38

Prioritization: Right of Way for Internet Access
• If multiple network applications are assigned to the “Pri-
oritized applications” category, then they must share
the available capacity.
Background Applications
This category is suitable for applications that do not require
any high transmission speed and which are not time-critical
(for example, peer-to-peer services or automatic updates).
• Network applications assigned to this category are al-
ways treated with the lowest priority when the Internet
connection is working at full capacity. So whenever an
application from a different category or a non-prioritized
application requires the entire bandwidth, all background applications must wait until bandwidth capacity
becomes available again.
• If no other network applications are active, then the
background applications receive the entire bandwidth.
Prioritization Method in the FRITZ!Box
The following algorithm is used in the FRITZ!Box to send data
packets according to their prioritization:
• Change in the order in which packets are sent to the In-
ternet (upstream direction)
The order of the packets the FRITZ!Box receives from the
Internet (downstream direction) cannot be changed.
• Discard low-priority packets in order to ensure the trans-
mission of higher-priority packets. This algorithm is
used whenever more packets are supposed to be sent to
the Internet than the upstream transmission rate of the
Internet connection alllows.
• As long as no packets are being sent from higher-priority
applications, the full transmission rate of the Internet
connection is available for low-priority packets.
38
Page 39

VPN: Remote Access to the Home Network
Setting up Prioritization in the FRITZ!Box
In order to use prioritization, the Expert Mode must be enabled in the user interface of the FRITZ!Box
1. Make sure that the expert mode is enabled in the “Sys-
tem / Expert Mode” menu.
2. Prioritization is set up in the “Internet / Prioritiza-
tion”menu.
9.6 VPN: Remote Access to the Home Network
Via VPN a secure remote access to the network of the
FRITZ!Box can be established. The VPN solution for the
FRITZ!Box features the following:
• The VPN solution for the FRITZ!Box is based on the IPSec
standard.
• Computer-LAN coupling and LAN-LAN coupling: VPN con-
nections can be set up for individual remote computers
or even for remote networks.
• Eight simultaneous active VPN connections are supported.
• The configuration files for the VPN connections are creat-
ed using a separate program. The program is provided
free of charge and can be downloaded from the AVM web
site.
• A free VPN client for individual computers can also be
downloaded from the AVM web site.
This chapter is a short introduction to the subject of VPN. The
AVM web site offers a Service Portal which presents comprehensive information on VPN in general and in connection with
the FRITZ!Box. Visit this portal to obtain more detailed information.
www.avm.de/en/vpn
39
Page 40
VPN: Remote Access to the Home Network
TunnelTunnel
Local network A
Local network B
Setting up VPN in the FRITZ!Box
1. Open the FRITZ!Box user interface.
2. Make sure that the expert mode is enabled in the “Sys-
tem / Expert Mode” menu.
3. Select the “Internet / Permit Access” menu.
4. Select the “VPN” page.
5. See the Online Help of the FRITZ!Box to set up VPN.
What Is VPN?
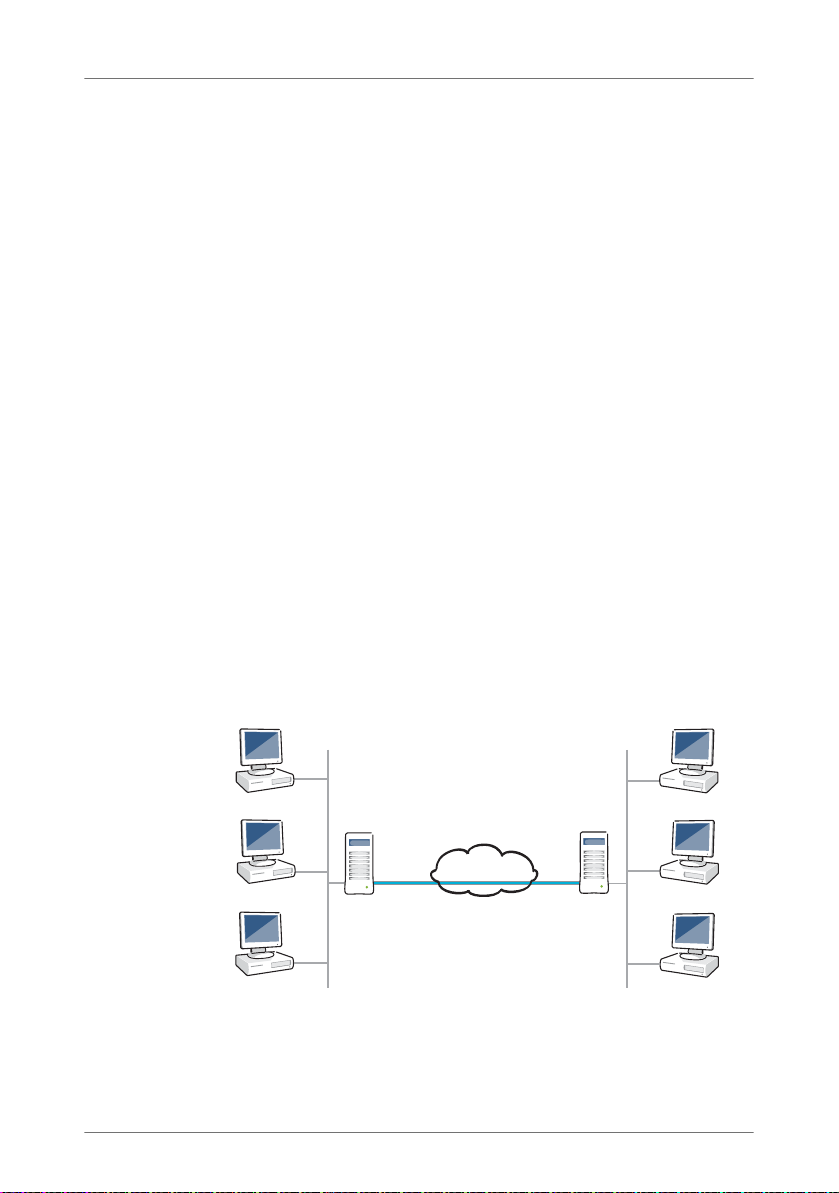
VPN stands for Virtual Private Network. A VPN is a virtual, private network that uses the Internet as its physical base. The
VPN provides for secure data transmission.
All computers registered in the network are connected with
each other over the Internet so that they can exchange data.
Data transmission takes place over IP, as in the local network.
In a pure transmission over IP the data are not protected and
thus exposed to unauthorized access by third parties.
Security in a VPN is ensured by transmitting the data encrypted via what is known as a tunnel. This excludes the possibility of unauthorized access to the data. The tunnel is the logical, virtual connection.
Internet
The terminals of the tunnels can be individual computers or
entire networks. For instance, telecommuters or field staff can
connect to the company network via VPN. The local network
at a branch office can also be connected to the local network
40
Page 41

VPN: Remote Access to the Home Network
of company headquarters via VPN. Both of the locations securely connected over VPN must have an Internet connection
at their disposal.
Security through a VPN
A VPN fulfills the following security requirements for data
transmission:
• Authenticity
• Confidentiality
• Integrity
Authenticity
Authenticity ensures that no unauthorized users can access
the local network via VPN.
It also makes sure that incoming data actually come from the
registered party and not from another source.
Confidentiality
Confidentiality requires the nondisclosure of data. Confidentiality can be guaranteed by encrypting the data. Encryption
means that unauthorized third parties cannot obtain any
knowledge about the transmitted data.
Integrity
Integrity ensures that the data are not changed, recorded or
diverted during transmission.
The VPN tunnel fulfills these security requirements. The VPN
tunnel is implemented using a tunnel protocol.
Tunnel Technology
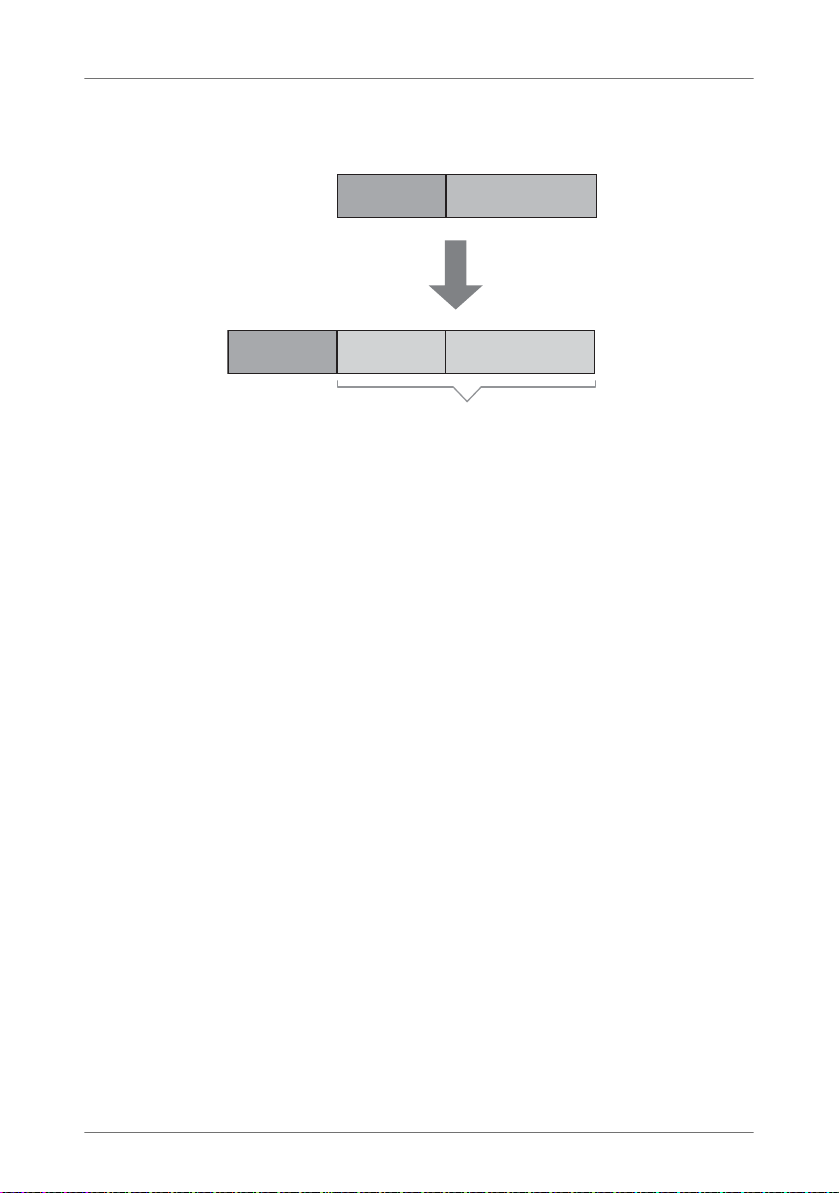
A tunnel is created by placing an IP packet to be transmitted
inside of an additional, new IP packet.
An IP packet is composed of the IP header and the user data.
The IP header contains the IP address of the destination and
the IP address of the sender.
41
Page 42
VPN: Remote Access to the Home Network
IP header
Data
IP header
Data
New
IP header
Original packet
Tunnel packet
encrypted
The original packet is encrypted and authenticated before repacking.
• The IP addresses of the destination and the sender in
the new IP header are the public IP addresses of the two
VPN parties in the Internet. Only the new IP header can
be read in the Internet in clear text.
• Thanks to the encryption and authentication, the origi-
nal packet remains concealed in the inside of the tunnel.
The IP addresses of the destination and sender in the IP
header of the original packet are private IP addresses in
the local network.
The tunnel is what makes it possible to connect networks
with private IP addresses via the Internet. Moreover, the tunnel secures the connection.
The VPN solution used with the FRITZ!Box uses the IPSec tunnel protocol.
IPSec is a tunnel protocol that offers state-of-the-art encryption procedures and can be integrated seamlessly into existing IP networks. The AES encryption algorithm is used in the
FRITZ!Box VPN solution. AES is currently the most modern encryption algorithm.
42
Page 43

IPv6: The New Internet Protocol
Supplementary Software for VPN
All of the information required for a VPN is saved in a configuration file. The terminals involved in any VPN must receive
this file.
If an individual computer is integrated into a network via a
VPN, the computer must have a VPN client installed.
• “Configure FRITZ!Box VPN Connection” Wizard
AVM provides the “Configure FRITZ!Box VPN” software
for creating configuration files. This program is a Wizard
that takes you step by step through the VPN configuration. All of the necessary VPN settings, like the encryption method and access rules, are set automatically. The
resulting configuration files must be imported to the respective terminals of the VPN tunnel. At the terminal
with the FRITZ!Box the configuration file is then imported
to the FRITZ!Box. The VPN parameters in these files can
be adjusted manually to connect to products by other
manufacturers.
• The “FRITZ!VPN” VPN Client
AVM offers the “FRITZ!VPN” software as a VPN client.
Both the Wizard and the client can be downloaded free of
charge from the VPN Service Portal on the AVM web site:
www.avm.de/en/vpn
9.7 IPv6: The New Internet Protocol
The FRITZ!Box supports IPv6, meaning that it can be used for
IPv6 connections. IPv6 stands for Internet protocol version 6
and is the successor to IPv4.
This chapter addresses FRITZ!Box users who have an Internet
connection that supports IPv6 directly or, or who would like
to establish connections to IPv6 web sites.
• Enable IPv6 in the FRITZ!Box user interface if you would
like to use IPv6 connections.
43
Page 44

IPv6: The New Internet Protocol
• IPv6 and IPv4 can be used at the same time. For simulta-
neous use the FRITZ!Box uses dual stack and dual stack
lite.
• The FRITZ!Box supports two kinds of IPv6 connections:
native IPv6 and IPv6 with a tunnel protocol. Native IPv6
means that IPv6 is supported directly at the connection.
• For IPv6 the FRITZ!Box offers a completely closed firewall
to protect against unwanted data from the Internet.
• Port forwarding is also possible for IPv6 connections.
Using IPv6 with the FRITZ!Box
If you would like to use IPv6, set up IPv6 for your home network as described here.
Setting up IPv6 in the FRITZ!Box
1. Open the FRITZ!Box user interface.
2. Make sure that “Show expert settings” is enabled in the
“System / Expert Mode” menu.
3. Then select the “Internet / Account Information” menu.
4. Select the “IPv6” page and set up IPv6 in the FRITZ!Box.
Consult the Online Help of the FRITZ!Box user interface
for more information.
Setting up IPv6 on the Computer
You can establish connections in the IPv6 range of the Internet only if IPv6 is also installed and enabled on the computers in your home network.
• IPv6 is already installed and enabled in the Windows 7
and Windows Vista operating systems.
• IPv6 is not installed and enabled in standard Windows
XP. You must install and enable IPv6 in order to use it in
this operating system. The IPv6 installation requires Service Pack 2 for Windows XP.
• IPv6 has been available in the MAC OS X operating sys-
tems since MAC OS 10.
44
Page 45

IPv6: The New Internet Protocol
Testing the IPv6 Connection
Once you have set up the FRITZ!Box and your computer for
IPv6, in the Windows operating systems you can test whether
configuration was successful using the “ping”command.
Test the IPv6 connection between the computer and the
FRITZ!Box:
1. Press the Windows key and the R key on the keyboard at
the same time.
The “Run” window opens.
2. In the “Open” field, enter the command “cmd” and click
“OK”.
The “Prompt” window opens.
3. Enter the following in this window: “ping -6 fritz.box”.
If there is an IPv6 connection between the computer and the
FRITZ!Box, you receive an output with the responses of the
FRITZ!Box. The FRITZ!Box is given along with its IPv6 address
in the responses.
You can test the connection to IPv6 remote sites in the Internet in the same way.
More about IPv6
IPv6 stands for Internet protocol version 6, the successor protocol to IPv4. The introduction of IPv6 marks a division of the
Internet into two ranges: the previous IPv4 range of the Internet, and the new IPv6 range.
Some Reasons for Introducing IPv6:
• The supply of IPv4 addresses is dwindling. Not many
IPv4 addresses remain available for assignment to Internet users. According to estimates these will be gone in
just a few years.
• The scarcity of addresses in the IPv4 space necessitates
the deployment of NAT (Network Address Translator).
NAT became necessary with IPv4 since the Internet Service Provider generally assigns only one public IPv4 ad-
45
Page 46

IPv6: The New Internet Protocol
dress, even though multiple devices are operated in the
home network. This restriction is no longer required with
IPv6. In the IPv6 range the provider assigns not just a
single address, but an entire subnet containing at least
64
addresses. This means that every station in the
2
home network can also receive a globally valid IP address. It also simplifies many of the configuration issues
raised with NAT. The address of the subnetwork assigned by the provider is called a prefix. The provider assigns the prefix via DHCPv6 prefix delegation.
• IPv4 addresses generally have to be configured manual-
ly or via DHCP (Dynamic Host Configuration Protocol).
IPv6 provides for a simpler and more automated configuration of network devices.
IPv6 Addresses
This means that IPv6 makes approximately 340 sextillion
(around 3.4 x 10
son, the IPv4 address space has just over four billion IP addresses.
The Structure and Notation of IPv6 Addresses
38
) IPv6 addresses available. By compari-
• Length of an IPv6 address: 128 bits
• Structure of IPv6 addresses: division into eight blocks of
16 bits each
• Notation of IPv6 addresses: hexadecimal format, with
the individual blocks separated from each other by colons
• Example of an IPv6 address:
fedc:ba98:7654:3210:fedc:ba98:7654:3210
• Leading zeros within a block can be left out.
46
Page 47

IPv6: The New Internet Protocol
• One or more consecutive blocks with a value of 0 are ab-
breviated by ::. This abbreviation can be used only once
within a single IPv6 address.
Example 1:
0202:d42a:ee78:0000:0000:0000:0000:0000
abbreviated: 202:d42a:ee78::
Example 2:
fd00:0000:0000:0000:021c:4aff:fe12:bd6f
abbreviated: fd00::21c:4aff:fe12:bd6f
Notation for IPv6 Networks
When IPv6 networks are rendered, the prefix is given along
with its bit length. The prefix is the network address.
Example:
2001:ba98:7654::/48 stands for the IPv6 network with the
following properties:
• prefix: 2001:ba98:7654
• length of the prefix: 48 bits
• Usable IP addresses:
2001:ba98:7654:0000:0000:0000:0000:0000 through
2001:ba98:7654:ffff:ffff:ffff:ffff:ffff
IPv6 Addresses in the Address Bar
In the address bars of programs, for instance in web browsers, IPv6 names are always set in pointed brackets.
Example:
[2001:ba98:7654::1]
Assigning IPv6 Addresses
The Internet Service Provider assigns an entire subnetwork to
the FRITZ!Box. The IPv6 addresses from the subnetwork are
available for distribution in the local network.
47
Page 48

IPv6: The New Internet Protocol
IPv6 Addresses from the Internet Service Provider
When an Internet Service Provider assigns IPv6 addresses, it
assigns an entire subnetwork to the end customer. The network address of the subnetwork is called the prefix. The subnetwork must allow for at least 2
means that the assigned prefix can be no longer than 64 bits.
For a prefix length of 64 bits, the remaining 64 bits remain
available for what is known as the interface identifier. The
prefix and the interface identifier combine to form the IPv6
address.
The assignment of the prefix is called prefix delegation and is
part of DHCPv6.
The prefix assigned by the Internet Service Provider can be
shorter than 64 bits, thereby increasing the size of the subnetwork. For a prefix length of 56 bits, for example, the interface identifier would increase to 72 bits. This means that 2
IPv6 addresses are available. In this case the FRITZ!Box in the
local network distributes the first or second subnetwork, with
a prefix length of 64 bits, so that the interface identifier of the
distributed IPv6 addresses is also 64 bits long.
64
IPv6 addresses. This
72
Assigning IPv6 Addresses in the Local Network
The assignment of IPv6 addresses at a network interface using the SLAAC (Stateless Address Autoconfiguration) method
is completely automated and independent. Neither a manual
IP assignment nor configuration and maintenance of a central
service is required for IP assignments. The only requirement
is that the terminal device must be connected to the network
and started, so that it can automatically integrate itself into
the IPv6 network structure.
IPv6 Addresses without an Internet Connection
If there is no Internet connection, the globally valid prefix assigned by the Internet Service Provider does not exist. In this
case the FRITZ!Box can generate what are known as ULAs
(Unique Local Addresses) and distribute them in the local
network.
48
Page 49

IPv6: The New Internet Protocol
The first 16 bits of a ULA are always fd00. ULAs are designed
exclusively for communication in the local network. User data
can also be transmitted using ULAs.
IPv6 Addresses with Special Properties
When IPv6 is used, each network interface generally receives
several IPv6 addresses. Each address has its own properties,
which can be identified from the first bits (the “prefix”).
A number of important IPv6 address ranges and their properties are described here in simplified form:
• 2001:... designates global IPv6 addresses that are as-
signed by the Internet Service Provider. IPv6 addresses
can only be assigned by the Internet Service Provider if
that provider supports IPv6 on your line. The FRITZ!Box
and every other connected computer receives an IPv6
address of its own with this prefix for Internet communication.
• 2002:... designates global IPv6 addresses when a 6to4
tunnel is used. If your FRITZ!Box uses IPv6 by means of a
6to4 tunnel, the FRITZ!Box and each and every connected computer uses an IPv6 address of its own with this
prefix for Internet communication.
• fd00:... designates locally generated IPv6 addresses
(Unique Local Addresses - ULA). IPv6 addresses with this
prefix cannot be used for Internet communication, but
only within a local network. If no globally valid prefix is
available, for instance because no Internet connection
is currently active, the FRITZ!Box can assign ULAs in the
local network.
• fe80:... designates what “link-local IPv6 addresses (Link
Local Addresses)”, which can only be used within a network segment. IPv6 addresses with this prefix are generated by the network interface itself in order to communicate with network interfaces in the immediate vicinity.
For the most part these addresses are used to exchange
status messages. These addresses are not designed for
the exchange of user data.
49
Page 50

FRITZ!Box as a Telephone System
10 FRITZ!Box as a Telephone System
The FRITZ!Box is a telephone system for Internet telephony. This chapter describes various convenience functions of the telephone system:
• Telephone book and call list (page 50)
• The answering machines of the FRITZ!Box (page 51)
• Receiving faxes with the FRITZ!Box (page 54)
• Making internal calls and transferring calls within the system
(page 54)
• Paging or deregistering cordless telephones (page 55)
• Call diversion ( page 56)
• Saving costs with dialing rules (page 57)
• Blocking numbers and callers (page 57)
• Do Not Disturb (page 58)
• Alarm (page 59)
• Baby monitor (page 60)
10.1 Using the Telephone Book and Call List
Telephone Book
A telephone book is at your disposal in the FRITZ!Box.
In the user interface the FRITZ!Box telephone book is found in
the “Telephony” menu.
If a cordless phone from AVM (for instance FRITZ!Fon MT-F) is
registered on the FRITZ!Box, you can use the telephone book
directly on the cordless telephone. If multiple AVM cordless
telephones are registered, you can set up an individual telephone book for each cordless telephone in the FRITZ!Box.
Call List
In the call list the FRITZ!Box saves outgoing and incoming
calls, missed calls, and sent and received faxes.
In the user interface the FRITZ!Box call list is found in the “Telephony” menu.
50
Page 51

Setting up the FRITZ!Box Answering Machine
If the number of a caller or someone called is entered in the
FRITZ!Box telephone book, the call list will display the name
from the telephone book.
Numbers that are not saved in the telephone book can be
added to the telephone book from the call list.
The call list can be stored as a CSV file. CSV files can be
opened in programs like spreadsheet software.
10.2 Setting up the FRITZ!Box Answering Machine
You can configure up to five different answering machines in
the FRITZ!Box.
Configuring the Answering Machine
1. Open the FRITZ!Box user interface (see page 26).
2. Select “Telephony / Telephony Devices”.
3. Click “Configure New Device”. Under “Integrated in the
FRITZ!Box”, select the “Answering machine”option and
confirm by clicking “Next”.
4. Specify the mode, greeting delay and greeting length.
In the “Greeting only” mode, callers will hear a recording, but cannot leave any message for you.
5. Enter a name for the answering machine and confirm by
clicking “Next”.
6. Specify which calls the answering machine should ac-
cept. Select one or multiple telephone numbers and
confirm by clicking “Next”.
7. Check the settings of the answering machine and then
click “Finish”.
Now the answering machine is enabled.
51
Page 52
Setting up the FRITZ!Box Answering Machine
Enabling Additional Functions and Switching Off the Answering Machine
All configured answering machines are displayed in the
FRITZ!Box user interface under “Telephony / Telephony Devices”. Here you can disable or delete answering machines and
enable additional functions.
For instance, you can enable the “Send messages via e-mail”
setting for each answering machine. Messages callers leave
on the answering machine then will be sent to you by e-mail.
You can select any e-mail address you want. The messages
are sent as audio files.
Operating via Voice Menu
The answering machine can be operated using a voice menu.
You can listen to new messages, for instance, or switch the
answering machine on and off.
Operating the Answering Machine via Voice Menu
N Pick up the handset.
Select:
ss600
ss601
ss602
ss603
ss604
Answering machine 1
Answering machine 2
Answering machine 3
Answering machine 4
Answering machine 5
You will enter the voice menu of the answering machine.
Follow the voice menu.
If you do not want to wait for the voice menu instructions, you can press a telephone key right away (see
The Answering Machine Menu on page 53).
You can also pick up calls that have already been answered
by an answering machine. For more information, see
page 103.
52
Page 53

Setting up the FRITZ!Box Answering Machine
The Answering Machine Menu
Main menu
1 Play back messages
If no messages are available, you will hear two short audio signals and return to the main menu.
1 Play back messages
3 Call back the caller of the message
5 Delete message
7 To previous message
9 To next message
0 Listen to “Play back messages” menu again
r Back to main menu
2 Delete all messages
3 Switch answering machine on / off
4 Record greetings
1 Record greeting message
2 Record announcement
3 Record closing announcement
Record and select
1 Listen to all greetings/announcements of the se-
lected type. Select the desired recording by pressing 2
5 Delete greeting/announcement
8 Record greeting/announcement > End recording by
pressing 1
0 Listen to “Record and Select” menu again
r Back to main menu
0 Listen to “Record greetings” menu again
r Back to main menu
5 Switch recording and directions mode on / off
0 Listen to main menu again
53
Page 54

Setting up FRITZ!Box Fax Reception
10.3 Setting up FRITZ!Box Fax Reception
With the FRITZ!Box you can receive faxes without having to
connect a fax machine. The fax machine automatically forwards faxes received to one or multiple e-mail addresses,
which you can define in the FRITZ!Box.
1. Open the FRITZ!Box user interface (see page 26).
2. Click “Settings” and select “Advanced Settings / Tele-
phony / Telephony Devices”.
3. Click “Configure New Device”. Under “Integrated in the
FRITZ!Box”, select the “Fax reception”option and confirm by clicking “Next”.
4. Enter a fax ID for fax reception. This could be your fax
number or name, for instance.
5. Enter the e-mail address to which received faxes should
be forwarded.
You can also enter multiple e-mail addresses. Use a
comma to separate the individual addresses.
6. Confirm with “Continue”.
7. Select one or multiple telephone numbers you would
like to use exclusively for fax reception.
8. Confirm by clicking “Next”and “Apply”.
10.4 Making Calls and Forwarding Calls to Other Connected Telephones
You can conduct free, internal calls between telephones connected to the FRITZ!Box. You can also forward calls to other
connected telephones.
For instructions on making internal calls, see page 102.
For instructions on how to forward a call to another telephone, see page 103.
54
Page 55
Paging or Deregistering Cordless Telephones
10.5 Paging or Deregistering Cordless Telephones
You can use this function if you have at least one DECT cordless telephone registered on the FRITZ!Box.
For instructions on how to register a cordless telephone on
the FRITZ!Box, see page 17.
Paging Cordless Telephones
If you have misplaced a cordless telephone, you can find it by
using a paging call:
1. Briefly press the DECT button of the FRITZ!Box. All cord-
less telephones registered on the FRITZ!Box will ring.
2. To end the paging call press the DECT button on the
FRITZ!Box again or the call button on the cordless telephone.
Deregistering a Cordless Telephone from the FRITZ!Box
1. Open the FRITZ!Box user interface (see page 26).
2. Click “DECT”.
The “Cordless Telephones” page presents an overview of
the registered cordless telephones.
3. Click the “Delete” button next to the cordless tele-
phone to be deregistered.
The cordless telephone will be deregistered from the
FRITZ!Box.
If you deregister all of the cordless telephones from the
FRITZ!Box, the DECT function of the FRITZ!Box is switched off
automatically.
55
Page 56

Setting Up Call Diversion
10.6 Setting Up Call Diversion
You can configure call diversion settings in the FRITZ!Box. Call
diversion forwards incoming telephone calls, for instance, to
an external telephone number.
Call Diversion Settings
You can configure multiple call diversion modes with different
settings.
Depending on the setting, a call diversion forwards all calls or
only certain calls. For instance, you may want to divert calls
for a certain telephone number, or calls from a certain person
in the FRITZ!Box telephone book.
As the destination of a call diversion you can specify an external telephone number, a connected telephone, the integrated
answering machine of the FRITZ!Box or a connected answering machine.
Examples of call diversion settings:
• All incoming calls will be diverted to another telephone
line.
• Calls that come from a certain telephone number will be
diverted to your mobile telephone number.
• Anonymous calls in which the caller does not transmit a
telephone number will be diverted to an answering machine.
Setting Up a New Call Diversion Setting
1. Open the FRITZ!Box user interface (see page 26).
2. Select the “Telephony / Call Diversion”menu.
3. Click “New Call Diversion”.
4. Define which calls should be diverted.
5. Define the destination and the kind of call diversion.
6. Save the settings by clicking “OK”.
This concludes the configuration of call diversion.
56
Page 57

Saving Costs with Dialing Rules
All configured call diversion settings can be viewed in the user interface of the FRITZ!Boxin the “Telephony / Call Diversion” menu. All call diversion settings can be disabled or deleted here.
10.7 Saving Costs with Dialing Rules
In the FRITZ!Box you can set up dialing rules. A dialing rule
determines which telephone number the FRITZ!Box uses for
outgoing calls in a certain number range. A number range may
cover, for instance, all mobile telephone numbers or international numbers.
If you have multiple telephone numbers you can have each
outgoing call automatically placed using the most economical telephone rate.
Setting up New Dialing Rules
1. Open the FRITZ!Box user interface (see page 26).
2. Select the “Telephony / Dialing Rules”menu.
3. Click the “New Dialing Rule” button.
4. Define the range of telephon numbers or the telephone
number to which the dialing rule should apply.
5. Select a telephone number from the “connect using”
drop-down list.
6. Save the settings by clicking “OK”.
This concludes the configuration of the dialing rule.
10.8 Blocking Telephone Numbers and Callers
The FRITZ!Box offers you the following possibilities for blocking calls:
• Block numbers and ranges of numbers for outgoing
calls:
Blocked numbers and number ranges can no longer be
called from the FRITZ!Box. In this manner you can block
calls to certain mobile networks, for instance.
57
Page 58

Setting Up Do Not Disturb
• Block telephone numbers for incoming calls:
Setting Up a New Call Block
1. Open the FRITZ!Box user interface (see page 26).
2. Select the “Telephony / Calls” menu.
3. Go to the “Block Calls” settings page and click the “New
4. Select whether the call block is to apply to incoming or
5. Enter a range of numbers or a number.
6. Save the settings by clicking “OK”.
If you block a number for incoming calls, the FRITZ!Box
will no longer accept any calls from this telephone number – provided that the caller did not suppress her or his
number. In this way you can block connections from unwanted callers.
You can also set up a call block for all callers who do not
transmit their telephone numbers (anonymous callers).
Call Block” button.
outgoing calls.
This concludes the configuration of the call block.
10.9 Setting Up Do Not Disturb
In the FRITZ!Box night service you can set up a do not disturb
function so that none of the connected telephony devices
ring. At a time freely defined by the user (for instance
11:00 pm – 6:00 am) the telephony devices then will be set
as follows:
• Connected telephones will not ring.
This is not the case for IP telephones. It is not possible to
set up do not disturb for IP telephones in the FRITZ!Box.
• Connected fax and answering machines are disabled.
The do not disturb setting has no effect on fax reception
or the answering machine integrated in the FRITZ!Box.
58
Page 59

Setting Up the Alarm
Turning Do Not Disturb On/Off
1. Open the FRITZ!Box user interface (see page 26).
2. Select the “System / Night Service / Do Not Disturb”
3. Enable the “Do Not Disturb active” option and define the
4. Save your settings by clicking “Apply”.
Do Not Disturb is now enabled.
To have the telephones ring again, disable the “Do Not Disturb enabled” option and then click “Apply”.
Instead of setting the do not disturb setting for all telephones, in the FRITZ!Box you can also set the do not disturb
feature for individual telephones. The do not disturb function
for an individual telephone is set up in the telephone settings. In the user interface of the FRITZ!Box, these settings
can be opened for editing in the “Telephony / Telephony Devices” menu.
menu.
time period during which the telephones should not be
able to ring every day.
10.10 Setting Up the Alarm
In the FRITZ!Box you can set an alarm. When an alarm is set
and enabled, a telephone connected to the FRITZ!Box will ring
at the specified time.
Setting the Alarm in FRITZ!Box
1. Open the FRITZ!Box user interface (see page 26).
2. Select the “Telephony / Alarm” menu.
3. Enable the alarm and enter a time.
4. Select which telephone should ring at the specified
time.
5. Define here whether the alarm should be repeated.
6. Save the settings by clicking “OK”.
Now the alarm is set up and enabled.
59
Page 60

Baby Monitor
10.11 Baby Monitor
The “Baby Monitor” function can be used with any telephones connected to the FRITZ!Box. When the baby monitor
is enabled, your telephone automatically calls a previously
specified telephone number whenever the volume in the
room reaches a defined level. If the telephone is in the same
room as your child, you can use this function to monitor its
sleep.
For instructions on how to enable the baby monitor, see
page 108.
60
Page 61
Network Devices in the FRITZ!Box Home Network
11 Network Devices in the FRITZ!Box Home Network
All network devices connected with the FRITZ!Box comprise a network.
Network devices include, for instance, computers, game consoles and
smartphones. The devices can be connected with the FRITZ!Box by cable or wirelessly. This chapter describes the network settings in the
FRITZ!Box and how you can change them. You will also learn how you
can change the IP settings for the computer in the most common operating systems.
• Network Settings in the FRITZ!Box from page 61
• Obtaining an IP Address Automatically from page 67
11.1 Network Settings in the FRITZ!Box
The FRITZ!Box is delivered with preconfigured network settings. According to these settings, all network devices connected with the FRITZ!Box are located in a single network.
The network settings can be changed and adapted to your
conditions and needs. But you should do so only if you are
well versed in networking technology.
The Glossary (page 121) explains concepts and terminology
having to do with IP networks.
Network Overview
The FRITZ!Box user interface shows an overview with all of the
devices and users connected with the FRITZ!Box.
The network overview “Devices and Users” is found in the
menu “Home Network / Network”.
61
Page 62
Network Settings in the FRITZ!Box
There is an entry in the network overview for each user and
each network device. The columns have the following meanings:
Icon Each name is preceded by a green LED if the de-
Name This column displays the name under which the
IP Address For network devices, also displayed is the IP ad-
Connection The WLAN icon is displayed for wireless connec-
Properties This column indicates whether port forwarding or
vice is actively connected with the FRITZ!Box, but
currently not using the Internet connection. Any
device using the Internet connection appears with
a green-blue globe icon in front of its name.
user or the network device is known to the
FRITZ!Box. The names of network devices can be
changed by clicking the button to edit the entry.
dress with which the device is integrated into the
FRITZ!Box network.
tions.
child protection is enabled for the respective user
or network device.
Button for editing an entry
The button opens the entry in editing mode. This
view displays information about the network device, for instance on child protection or port forwarding settings. The name of the device in the
FRITZ!Box can be changed here.
Button for deleting the entry
Users or network devices that do not have an active connection to the FRITZ!Box can be deleted
from the network overview by clicking this button.
Always Assigning the Same IP Address
The editing mode for network devices includes the setting
“Always assign this network device the same IP address”.
When this setting is enabled for a network device, the DHCP
server of the FRITZ!Box will always assign the same IP address
to this device each time the connection is established.
62
Page 63
Network Settings in the FRITZ!Box
Starting the Computer – Wake On LAN
The editing mode for network devices that are connected with
the FRITZ!Box via a network (LAN) port includes the “Start
Computer” button. Use this button to start computers that
support Wake On LAN.
With the Wake on LAN function you can start computers in
your FRITZ!Box via the Internet. For instance, you can access a
computer at any time using remote maintenance software,
without wasting electricity by keeping the computer switched
on permanently.
IP Settings in the FRITZ!Box
The IP settings of the FRITZ!Box are preset upon delivery with
the following values:
FRITZ!Box Factory Settings
IP address 192.168.178.1
Subnet mask 255.255.255.0
DHCP server enabled
The IP address and the corresponding subnet mask yield the
following values:
Network address of the subnet 192.168.178.0
Entire IP address range for the computers
192.168.178.2 -
192.168.178.254
The following addresses cannot be assigned because they
are reserved for certain purposes:
This IP address is used by the
FRITZ!Box itself
This IP address is the broadcast
address used to send messages into
the network
63
192.168.178.1
192.168.178.255
Page 64

Network Settings in the FRITZ!Box
IP Address in the FRITZ!Box
Upon delivery the FRITZ!Box is assigned the following IP address:
192.168.178.1
If you would like to change the IP address, please read
through the following sections.
When Does It Make Sense to Change the IP Address?
You should change the IP address of the FRITZ!Box if the following apply to your network:
• You have an existing local IP network, one subnet with
several computers.
• Fixed IP addresses are registered in the network settings
of the computer, and you do not want to or are not permitted to change these addresses.
• You want to connect the FRITZ!Box to the local IP network
in order to make the FRITZ!Box features available to all of
the computers in the IP network.
Reserved IP Addresses
The entire IP network 192.168.180.0 in the FRITZ!Box is reserved for internal purposes.
IP addresses from this network may not be assigned to the
FRITZ!Box.
DHCP Server of the FRITZ!Box
The FRITZ!Box is equipped with its own DHCP server. The
DHCP server is enabled by default in the factory settings. The
following range of IP addresses is reserved for the DHCP server in the factory settings:
192.168.178.20 - 192.168.178.200
This IP address can be changed as needed.
Every time the operating system on a computer connected
with FRITZ!Box is started, the DHCP server assigns it an IP address from the IP address range of the DHCP server.
64
Page 65

Network Settings in the FRITZ!Box
Only one DHCP server may be active within any network.
Assigning the IP addresses via the DHCP server ensures that
all of the computers connected with the FRITZ!Box are located
in the same IP network.
The computers can receive their IP addresses from the DHCP
server only if the setting “Obtain an IP address automatically” is enabled in the their IP settings. For more information,
see the section Obtaining an IP Address Automatically from
page 67.
Fixed IP Addresses when the DHCP Server Is Enabled
If you would like to configure fixed IP addresses on individual
computers connected with the FRITZ!Box despite the enabled
DHCP server, please note the following:
• The IP addresses must be from the IP network of the
FRITZ!Box.
• The IP addresses may not come from the address range
of the DHCP server.
• Each IP address can be assigned only once.
Disabling the DHCP Server
You can disable the DHCP server.
To make sure that all computers remain in the same IP network when the DHCP server is disabled, you must enter the IP
addresses manually in the computers’ network settings. First
disable the option “Obtain an IP address automatically” and
then enter the IP address manually in the appropriate field.
In the case of the preset IP address of the FRITZ!Box, the following IP addresses are available for assignment to the computers:
192.168.178.2 - 192.168.178.254
Each IP address can be assigned only once.
65
Page 66
Network Settings in the FRITZ!Box
Changing Network Settings
In order to change the network settings of the FRITZ!Box, the
Expert Mode must be enabled in the user interface:
1. Select the “System / Expert Mode” menu and enable
“Show expert settings”.
2. Select the “Home Network / Network” menu.
3. Select the “Network Settings” page.
4. Click the “IP Addresses” button.
The “IP Settings” page is opened.
5. Make the desired changes and then confirm with “OK”
so that all changes will be applied.
Please note that changes to the network settings in the
FRITZ!Box may make it necessary to adjust the network settings of your computers so that you can continue to access
the FRITZ!Box user interface.
UPnP Settings
The Universal Plug-and-Play (UPnP) service included in your
FRITZ!Box provides status information about the FRITZ!Box to
all connected computers. Programs with UPnP support on
these computers can receive this information and use them
to display the status of the FRITZ!Box (e.g., DSL synchronization, connection status, data transmission). UPnP service
thus allows you to monitor your FRITZ!Box from a connected
computer.
Here is how to change the UPnP settings:
1. Open the FRITZ!Box user interface (see page 26).
2. Make sure that the expert mode is enabled in the “Sys-
tem / Expert Mode” menu.
3. Configure the UPnP settings in the “Home Network / Net-
work” menu on the “Programs” page.
66
Page 67
Obtaining an IP Address Automatically
11.2 Obtaining an IP Address Automatically
The FRITZ!Box has its own DHCP server, which assigns IP addresses to the connected computers. The connected computers must be configured such that they can receive their IP addresses automatically. The steps for checking and adjusting
this option differ among the operating systems. See the relevant section for your operating system.
If FRITZ!Box is operated in a network, no other DHCP server
may be activated in this network.
Obtaining an IP Address Automatically in Windows 7
1. Click the “Start” button in the task bar and select the
“Control Panel / Network and Internet”.
2. Under “Network and Sharing Center”, click “View net-
work status and tasks”.
3. From the left column, select the “Change adapter
settings” command.
4. Select the LAN connection between your computer and
the FRITZ!Box. Click the right mouse button and select
“Properties”.
5. Under “This connection uses the following items”, select
the “Internet Protocol Version 4 (TCP/IPv4)” entry and
click “Properties”.
6. On the “General” tab, enable the options “Obtain an IP
address automatically” and “Obtain DNS server address
automatically”.
67
Page 68
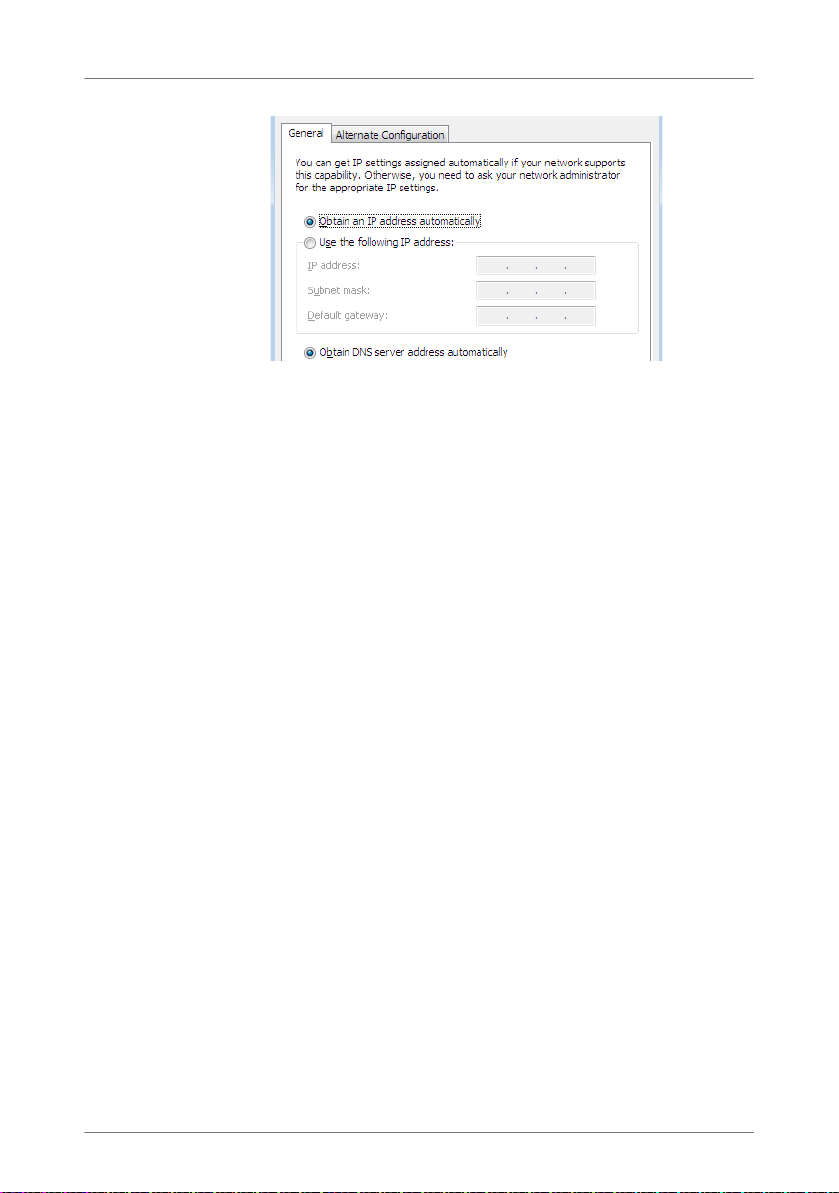
Obtaining an IP Address Automatically
Properties of the Internet protocol (TCP/IP)
7. Confirm your selection by clicking “OK”.
Repeat steps 5 through 7 for the “Internet Protocol
Version 6 (TCP/IPv6)” as well.
The computer now receives an IP address from the FRITZ!Box.
Obtaining an IP Address Automatically in Windows Vista
1. Click the “Start” button in the task bar and select the
“Control Panel / Network and Sharing Center”.
2. From the “Tasks”, select “Manage network connec-
tions”.
3. In the “LAN or High-Speed Internet” area, select the LAN
connection between your computer and the FRITZ!Box.
Click the right mouse button and select “Properties”.
4. If the “User Account Control” window is displayed, click
“Continue” in this window.
5. Under “This connection uses the following items”, select
the “Internet Protocol Version 4 (TCP/IPv4)” entry and
click “Properties”.
6. On the “General” tab, enable the options “Obtain an IP
address automatically” and “Obtain DNS server address
automatically”.
68
Page 69
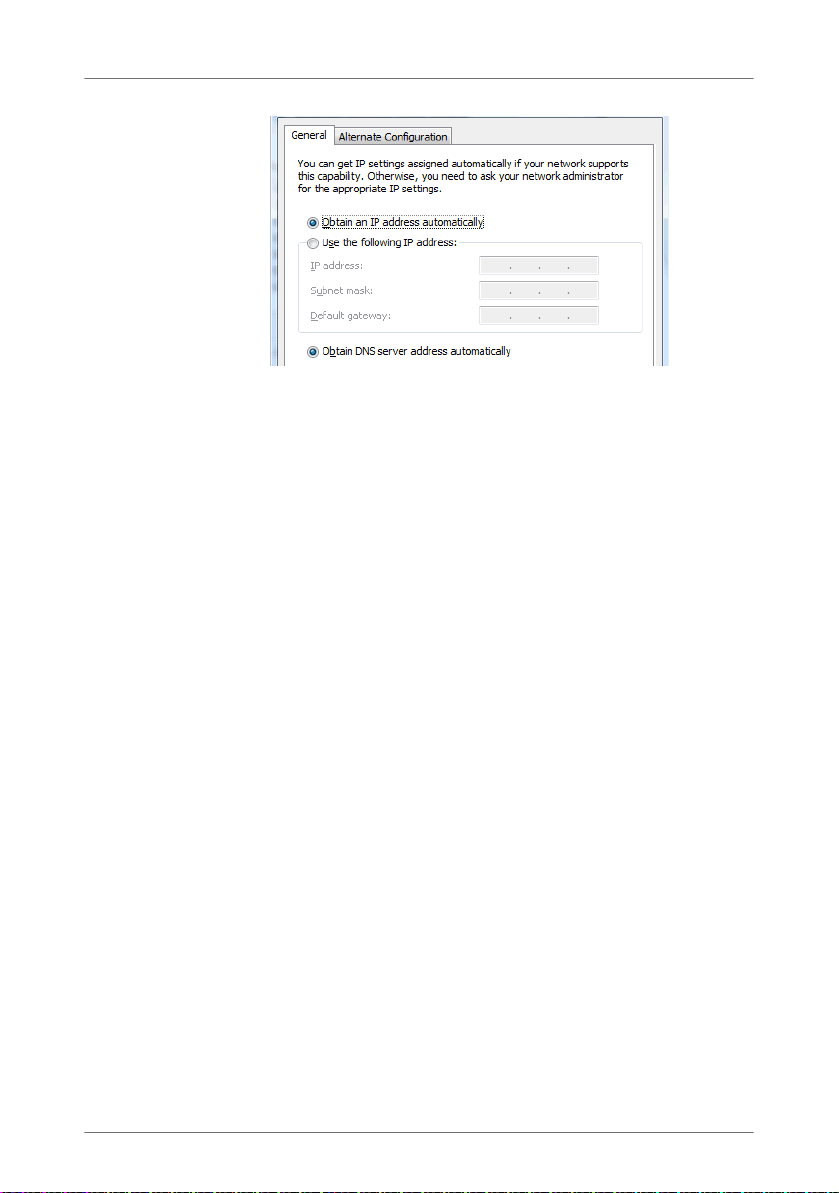
Obtaining an IP Address Automatically
Properties of the Internet protocol (TCP/IP)
7. Confirm your selection by clicking “OK”.
If necessary, repeat steps 5 through 7 for the “Internet
Protocol Version 6 (TCP/IPv6)” as well.
The computer now receives an IP address from the FRITZ!Box.
Obtaining an IP Address Automatically in Windows XP
1. Go to “start / Control Panel / Network and Internet Con-
nections / Network Connections” and double-click the
LAN connection icon of the network adapter connected
to the FRITZ!Box.
2. Click the “Properties” button.
3. Select “Internet Protocol (TCP/IP)” in the list of items
used in this network connection and click “Properties”.
4. On the “General” tab, enable the options “Obtain an IP
address automatically” and “Obtain DNS server address
automatically”.
69
Page 70
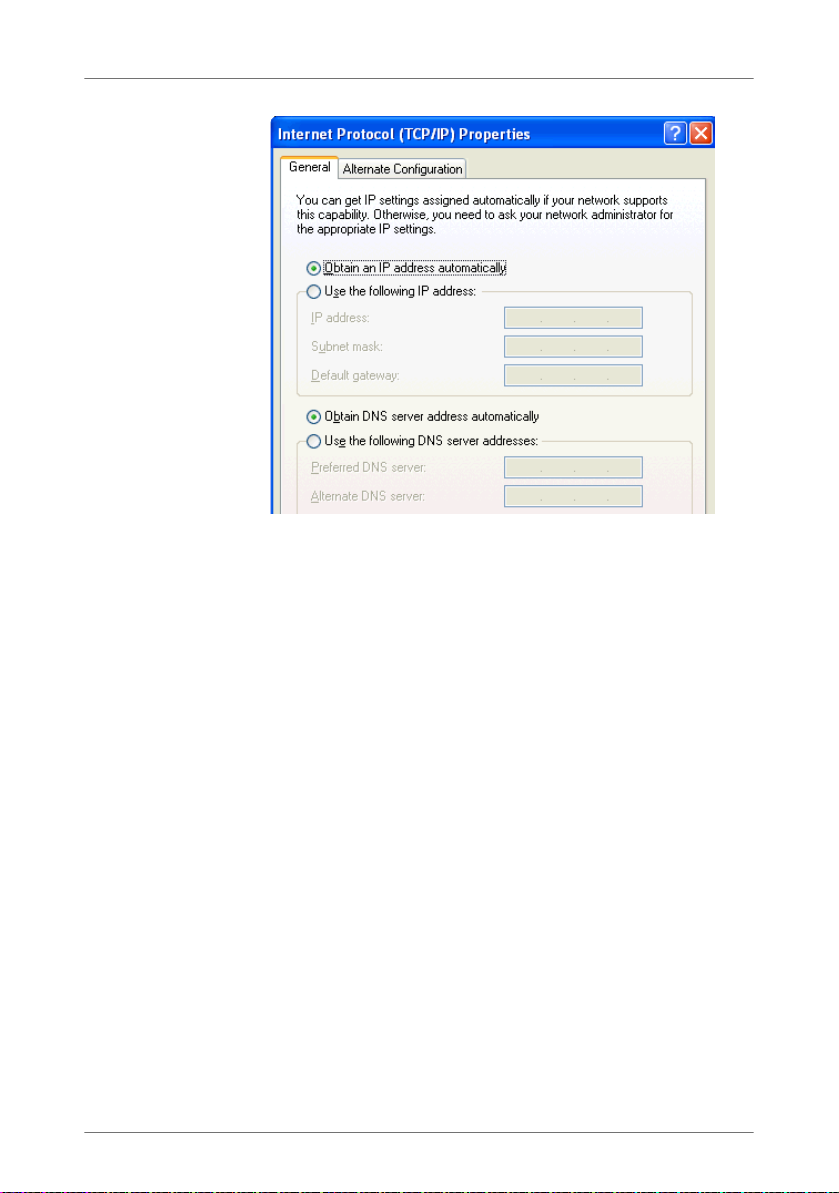
Obtaining an IP Address Automatically
Properties of the Internet protocol (TCP/IP)
5. Confirm your selection by clicking “OK”.
The computer now receives an IP address from the FRITZ!Box.
Obtaining an IP Address Automatically in Mac OS X
1. Select the “System Preferences” in the Apple menu.
2. In the “System Preferences” window, click the “Net-
work” icon.
3. In the “Network” window, select the “Built-in Ethernet”
entry from the “Show:” drop-down list.
4. Switch to the “TCP/IP” settings page and select the “Us-
ing DHCP:” option from the “Configure IPv4” drop-down
menu.
5. Click “Apply Now”.
The computer now receives an IP address from the FRITZ!Box.
70
Page 71

Obtaining an IP Address Automatically
Obtaining an IP Address Automatically in Linux
For comprehensive information and tips on the topic of network settings in Linux, see, for example:
http://www.linux.org/docs/ldp/NET3-4-HOWTO-5.html
71
Page 72

FRITZ!Box as a WLAN Base Station
12 FRITZ!Box as a WLAN Base Station
The FRITZ!Box supports WLAN (Wireless Local Area Network) technology. In this chapter you will learn how you can use WLAN with the
FRITZ!Box.
• WLAN Standards from page 72
• Security from page 75
• Frequency Ranges from page 77
• Increasing the Range of the WLAN Connection from page 79
• Setting Up Night Service for WLAN from page 80
12.1 WLAN Standards
The Institute of Electrical and Electronic Engineers (IEEE) defined the WLAN standards IEEE 802.11b, IEEE 802.11g,
IEEE 802.11n and IEEE 802.11i.
The IEEE 802.11b, IEEE 802.11g and IEEE 802.11n standards
define the transmission rate within a wireless radio network.
IEEE 802.11i is a security standard.
Standards for the Throughput Rate
Data Throughput
The throughputs listed differentiate between gross and net
transmission rates. The net speed describes the transmission
rate of the user data.
The FRITZ!Box supports your choice of the standards
IEEE 802.11b, IEEE 802.11g and IEEE 802.11n. WLAN devices
based on one or more of the standards listed can be used for
WLAN connections with the FRITZ!Box.
Standard Frequency Band Gross Data Throughput
up to
802.11b 2.4 GHz 11 Mbit/s 5 Mbit/s
802.11g 2.4 GHz 54 Mbit/s 25 Mbit/s
802.11n 2.4 GHz 150 Mbit/s 80 Mbit/s
72
Net Data Throughput
up to
Page 73
WLAN Standards
IEEE 802.11b
With a maximum throughput rate of 11 Mbit/s, this is the oldest WLAN standard. Older WLAN devices of the first generation can communicate with the FRITZ!Box using 802.11b.
However, if the WLAN device supports newer standards such
as 802.11g, the latest standard should be used.
IEEE 802.11g
This is currently the most common WLAN standard. It communicates with a maximum of 54 Mbit/s gross in the 2.4-GHz
frequency range (ISM) and guarantees broad compatibility
with many WLAN devices.
IEEE 802.11n
This standard allows for high throughput rates and ranges.
The FRITZ!Box supports 802.11n in the 2.4-GHz frequency
band. Modulation processes and antenna techniques like
MIMO (Multiple Input, Multiple Output) use the frequency
band more effectively than the older standards.
The use of the 802.11n standard—and thus the availability
of higher throughput rates—is possible only if the WLAN connection is secured using the WPA2 security mechanism (AESCCMP).
Thanks to compatibility with the 802.11g standard, you can
also continue to use older WLAN devices.
Setting the Right Standard in the FRITZ!Box
The throughput rate that can be achieved in your WLAN radio
network depends on the WLAN standards used by the integrated WLAN devices. These WLAN standards must also be
set in the FRITZ!Box. Proceed as follows to check which WLAN
standards are set and change them if needed:
1. Open the FRITZ!Box user interface.
2. Make sure that the expert mode is enabled in the “Sys-
tem / Expert Mode” menu.
73
Page 74

WLAN Standards
3. Open the “WLAN / Radio Channel” menu and select “Ad-
just radio channel settings” to make the desired changes.
Make a note of which standards the WLAN devices in your
network are compatible with and then adjust the FRITZ!Box
settings according to the following information:
• Your radio network integrates only WLAN devices that
are compatible with one or both of the following standards:
802.11n
802.11g
Set the following mode in the FRITZ!Box:
Mode: 802.11n+g
The 2.4-GHz frequency band will be used.
• Your radio network integrates only WLAN devices that
are compatible with one or both of the following standards:
802.11b
802.11g
Set the following mode in the FRITZ!Box:
Mode: 802.11b+g
The 2.4-GHz frequency band will be used.
• Your radio network integrates only WLAN devices that
are compatible with one or several of the following standards:
802.11n
802.11g
802.11b
Set the following mode in the FRITZ!Box:
Mode: 802.11n+g+b
The 2.4-GHz frequency band will be used.
74
Page 75
Security
The Standard for Security
IEEE 802.11i
The WPA2 security mechanism is defined in the IEEE 802.11i
standard. WPA2 is an extension of the familiar security mechanism WPA (Wi-Fi Protected Access).
The main feature of the extension of WPA to WPA2 is the AESCCMP encryption process.
Mechanism Encryption
WPA TKIP (Temporary Key Integrity Protocol)
WPA2 TKIP
AES-CCMP
based on the extremely secure AES (Advanced
Encryption Standard) procedure. CCM (Counter with CBC-MAC) defines how the AES procedure is applied to WLAN packets.
FRITZ!Box supports the AES encryption procedure as part of
the WPA2 mechanism, and the TKIP encryption procedure as
part of the WPA mechanism. This means that the FRITZ!Box
can be used in combination with any WLAN devices that also
support WPA2 with AES or WPA with TKIP.
12.2 Security
Security is of utmost importance within radio networks.
Radio signals can also be received outside of office or residential spaces and abused for criminal purposes.
Therefore it is important that no unauthorized users can register in a WLAN to use its Internet access or shared network
resources.
FRITZ!Box includes settings on various levels that contribute
to the security of your WLAN and thus to the security of your
computers.
75
Page 76
Security
Encryption
The most important security setting is encryption. The
FRITZ!Box supports the security mechanisms WPA (Wi-Fi Protected Access) and WPA2.
WPA and WPA2 provide for authentication while the connection is being established. For this a WPA password must be
defined in your FRITZ!Box.
The WPA password must be between 8 and 63 characters. We
recommend a length of at least 20 characters. In addition to
numerals and letters the password should also include other
characters. Mix upper-case and lower-case letters.
WPA uses the TKIP encryption method to encrypt the user data. The security mechanism WPA2 uses the AES-CCMP encryption method.
The encryption method you configure in your FRITZ!Box must
also be supported by your WLAN device.
Default Setting of the FRITZ!Box
In the FRITZ!Box a method combining WPA + WPA2 encryption
with the TKIP/AES-CCMP encryption method is preconfigured.
This setting allows you to use WLAN devices that support WPA
(TKIP) or WPA2 (AES-CCMP) or both methods.
Change this preset WLAN network key as soon as possible.
Enter a new WLAN key in the FRITZ!Box user interface.
Recommendation
Set the most secure encryption method supported by your
WLAN device in the FRITZ!Box.
If your WLAN device supports WPA2:
• Enable WPA encryption.
• Select the WPA mode “WPA2 (CCMP)” or “WPA+WPA2”.
• Replace the WPA network key with a new, unique value.
If your WLAN device supports WPA, but not WPA2:
• Enable WPA encryption.
76
Page 77
Frequency Ranges
• Select the WPA mode “WPA (TKIP)” or “WPA+WPA2”.
• Replace the WPA network key with a new, unique value.
Wireless Network Name (SSID)
In the factory settings of the FRITZ!Box, the name of the wireless network (SSID) is set to “FRITZ!Box 6320 Cable”.
It may occur that an additional device with the same network
name is located in the vicinity of your FRITZ!Box. Therefore
we recommend changing the preset radio network name.
12.3 Frequency Ranges
WLAN uses the frequency ranges at 2.4 GHz and 5 GHz as its
transmission range.
With the FRITZ!Box you can establish WLAN connections in
the 2.4-GHz range.
2.4-GHz Frequency Band
In the 2.4-GHz frequency band WLAN works in the same range
as Bluetooth, microwave devices and various other devices
like radio-controlled toys, garage-door openers and video
bridges. This means that interference may occur within
WLANs operated in the vicinity of such devices. Generally this
has adverse effects on the transmission rate, including aborted connections.
In the 2.4-GHz frequency range the European regulation authorities have designated 13 channels for WLAN. A channel
can have a bandwidth of 20 MHz (throughput up to
130 Mbit/s) or 40 MHz (throughput of up to 300 Mbit/s).
Channels located directly next to each other in the 2.4-GHz
band may overlap and result in mutual interference. For instance, if several WLANs are operated close to each other in
the 2.4-GHz frequency range with a bandwidth of 20 MHz, a
distance of at least five channels should be left empty between each two channels used. This means that if channel 1
is selected for one WLAN, the channels 6 through 13 can be
selected for a second WLAN. This maintains the minimum distance between channels.
77
Page 78

Frequency Ranges
Should interference in a WLAN persist, the first step should
be to select a different channel.
WLAN Autochannel
With the WLAN Autochannel function, the FRITZ!Box automatically searches for the channel subject to the least interference. This process takes into consideration interference from
radio networks in the vicinity (WLAN base stations) and potential sources of interference (for instance video bridges, baby monitors, microwave ovens). Should problems with interference persist despite this function, try to identify the source
of interference and switch it off manually.
Additional tips on interference in the WLAN radio network are
presented in the section Ruling Out Interference Caused by
Other Wireless Networks from page 90.
Allocation of the WLAN Channels in the 2.4-GHz Range
Channel Frequency (GHz) Channel Frequency (GHz)
12.412 82.447
22.417 92.452
3 2.422 10 2.457
4 2.427 11 2.462
5 2.432 12 2.467
6 2.437 13 2.472
72.442
78
Page 79

Increasing the Range of the WLAN Connection
12.4 Increasing the Range of the WLAN Connection
The range of a WLAN radio network is influenced by various
external circumstances. The following factors have an especially strong influence on the distance over which your
FRITZ!Box can establish a stable, high-throughput wireless
connection:
• the WLAN device used
• structural conditions
• the number of devices operating near the access point in
the same frequency range.
If needed, you can extend the range of your WLAN radio network with a WLAN repeater, for instance with the FRITZ!WLAN
Repeater N/G or FRITZ!WLAN Repeater 300E from AVM. A
WLAN repeater is a supplementary device that is not included
in the FRITZ!Box package.
Using the FRITZ!WLAN Repeater
With the FRITZ!WLAN Repeater N/G from AVM you can extend
the range of your WLAN radio network quickly and easily, for
instance to overcome structural conditions that are characterized by thick materials and heavy shielding. The FRITZ!WLAN
Repeater N/G supports all common WLAN standards, is especially easy to install and can be operated at any 230-V power
outlet. For more information on the FRITZ!WLAN Repeater
N/G, see the web site at:
www.avm.de/en/Produkte/FRITZ_WLAN/FRITZ_WLAN_
Repeater_N_G
79
Page 80

Setting Up Night Service for WLAN
12.5 Setting Up Night Service for WLAN
In the FRITZ!Box you can set up night service for the WLAN radio network. Then the FRITZ!Box switches to hibernation at
specified times and turns off the radio network. This has the
following advantages:
• reduced power consumption when idle
• Time-controlled Internet access: With night service you
can ensure that your children are only allowed to surf the
web until a certain time of day.
Switching Night Service for WLAN On and Off
1. Open the FRITZ!Box user interface (see page 26).
2. Select the “System / Night Service” menu.
3. Enable the “Use schedule for WLAN radio network” op-
tion.
4. Enable or disable the option “The radio network cannot
be switched off until no more WLAN devices are active. ”.
Option enabled: The radio network remains switched on
until all wireless connections between the FRITZ!Box and
other WLAN devices have been ended.
Option is disabled: The radio network is switched off immediately at the start of the specified period.
5. Define the days and times at which the FRITZ!Box WLAN
radio network should be switched off.
6. Save your settings by clicking “Apply”.
Night service for WLAN is now enabled. To disable night service, remove the checkmark in front of “Use schedule for
WLAN radio network” and click “Apply”.
Switching on WLAN during Night Service
The WLAN radio network of the FRITZ!Box can be switched
back on at any time during night service:
Press the WLAN button on the FRITZ!Box or switch on the
WLAN radio network using a connected telephone (see
page 93).
80
Page 81

Help in Case of Errors
13 Help in Case of Errors
This chapter provides assistance if you are not able to open
the user interface of your FRITZ!Boxor are having problems
with the WLAN connection.
For more comprehensive help, see the AVM knowledge database in the Internet, which can be accessed at the following
address:
www.avm.de/en/service/FAQs
13.1 The User Interface Does Not Open
If an error message is returned when you open the FRITZ!Box
user interface, this can have various causes. Check the
causes listed below and attempt to resolve the error.
Restarting the FRITZ!Box
The user interface cannot be opened or does not react.
Possible cause
Inconsistencies within the FRITZ!Box.
Remedy
1. Restart the FRITZ!Box.
Remove the power cable from the outlet.
2. Wait about five seconds before reconnecting to the pow-
er supply.
3. To make sure that the FRITZ!Box has finished restarting,
wait until the “Power/Cable” LED lights up and stops
flashing and, if you have switched on WLAN, the “WLAN”
LED remains lit up as well. This ensures that the
FRITZ!Box restart has been completed.
4. Try again to open the FRITZ!Box user interface by enter-
ing fritz.box
in the address field.
81
Page 82

The User Interface Does Not Open
Checking the Cable Connections
The user interface of the FRITZ!Box does not appear in the
window of your web browser.
Possible cause
The cable connections are not secure.
Remedy
Make sure that all cable connections are plugged in securely.
Checking Name Resolution
The user interface of the FRITZ!Box cannot be opened by entering fritz.box.
Possible cause
The name resolution of the FRITZ!Box is not working.
Remedy
1. In the web browser, enter the following IP address in
place of fritz.box
192.168.178.1
:
2. If the user interface cannot be reached via this address,
check the settings configured for your network device as
described in the section Obtaining an IP Address Auto-
matically from page 67.
Checking the IP Address
The user interface of the FRITZ!Box cannot be opened by a
fritz.box
Possible cause
incorrect IP address on the connected computer
Remedy
Set the network adapter to DHCP so that the network address
can obtain its IP address from the DHCP server of the
FRITZ!Box. See the section Obtaining an IP Address Automati-
cally from page 67 for instructions.
nor by entering 192.168.178.1.
82
Page 83

The User Interface Does Not Open
If you still cannot open the user interface by entering fritz.box
or 192.168.178.1
as described on page 86.
Disabling Dial-Up Connections
The user interface is not opened; a window for a dial-up connection appears instead.
Possible cause
The browser must use the network connection between the
computer and FRITZ!Box when the user interface is opened.
For this the automatic establishment of a Dial-Up Networking
connection must be disabled.
Remedy
You can disable the automatic attempt to establish a Dial-Up
Networking connection. The following example explains how
to check the settings of Internet Explorer 8:
1. Select the “Connections” settings page under “Tools /
Internet Options... ”.
, use the fixed IP address of the FRITZ!Box
2. In the “Dial-up and Virtual Private Network settings” sec-
tion, enable the option “Never dial a connection”.
3. As a final step, click “OK”.
Disabling Online Operation
The user interface does not appear in the window of your web
browser.
Possible cause
The web browser is set for offline operation.
Remedy
Configure the web browser for online operation. Using the example of Internet Explorer 8:
1. Open the “Tools” menu.
2. If a checkmark is displayed in front of “Work Offline”,
click this line.
83
Page 84

The User Interface Does Not Open
The checkmark will be removed and Internet Explorer will
switch to online operation.
Checking Proxy Settings
The user interface does not appear in the window of your web
browser.
Possible cause
The proxy settings of the web browser prevent the user interface from being opened.
Remedy
Enter the DNS name and the IP address of the FRITZ!Box as an
exception in the proxy settings of the web browser, as described here for the example of the Internet Explorer 8.
1. Select the “Connections” settings page under “Tools /
Internet Options... ”.
2. Click the “LAN Settings...” button in the “Local Area Net-
work (LAN)” settings area.
3. In the “Proxy server” area of the next window, check the
“Use proxy Server for LAN” option and then click “Advanced”.
4. Enter as “Exceptions”:
fritz.box
; 192.168.178.1; 169.254.1.1
and click “OK”.
84
Page 85

The User Interface Does Not Open
Checking the CGI Settings
The user interface does not appear in the window of your web
browser.
Possible cause
The execution of CGI scripts is disabled in the web browser.
Remedy
Configure the web browser so that the execution of scripts is
allowed in the user interface. Using the example of the Internet Explorer 8:
1. Select the “Security” settings page under “Tools / Inter-
net Options... ”.
2. If the “Default Level” button is not available for selec-
tion, the “Medium” security level is already configured,
which means that CGI scripts can be executed in the Internet browser.
3. Proceed as follows if the “Default Level” button is avail-
able for selection:
Select the “Local Intranet” icon and click the “Sites...”
button.
4. In the next window, click the “Advanced...” button and
enter in the “Add this Web site to the zone:” field:
fritz.box
Click “Add”.
5. Disable the “Require server verification (https:) for all
sites in this zone” option and click “Close”.
85
Page 86

The User Interface Does Not Open
Checking the Security Software
The user interface cannot be displayed in the web browser.
Possible cause
Security software is blocking access to the user interface.
Remedy
Security software like firewalls can prevent access to the user
interface of the FRITZ!Box. Configure exceptions for the
FRITZ!Box in all of the enabled security software.
If you would like to exit security software to test access to the
FRITZ!Box, remove the coaxial cable from the “CABLE” socket
first! After testing, first start the security software before reinserting the coaxial cable and connecting to the Internet!
Opening the User Interface of the FRITZ!Box
The FRITZ!Box is equipped with a fixed IP address that cannot
be changed. FRITZ!Box always can be reached at this IP address. This fixed IP address is:
Fixed IP address 169.254.1.1
Proceed as follows to open the FRITZ!Box user interface using
this IP address:
1. Connect the FRITZ!Box to the computer using the net-
work cable (yellow). For more information, see the section Connecting Computers to the LAN Port from
page 20.
2. Make sure that the computer obtains its IP address auto-
matically. You can check this setting in the computer’s IP
settings (see section Obtaining an IP Address Automati-
cally from page 67).
3. Restart your computer.
4. Start your Internet browser and enter FRITZ!Box’s fixed IP
address:
169.254.1.1
86
Page 87
Cannot Establish a WLAN Connection
The FRITZ!Box user interface opens.
Once you have reached the FRITZ!Box user interface again,
you should check the FRITZ!Box settings and correct them if
necessary.
13.2 Cannot Establish a WLAN Connection
If you are not able to establish a WLAN connection between
your computer and the FRITZ!Box, then please undertake the
following measures to seek the source of the error and resolve it.
Enabling the WLAN Device
The WLAN device cannot find a wireless network.
Possible cause
The WLAN device is not ready for operation.
Remedy
Make sure that the WLAN device is ready for operation. Some
of the WLAN devices installed in notebooks must be activated
by flipping a switch on the notebook.
For questions on the WLAN device of your computer, please
contact the manufacturer.
Enabling WLAN
The wireless network of the FRITZ!Box is not found by the
WLAN device.
Possible cause
WLAN is not enabled in the FRITZ!Box. If the WLAN LED on the
FRITZ!Box is not lit up or is flashing, this means that WLAN is
not enabled.
Remedy
Press the WLAN button on the FRITZ!Box. The “WLAN” LED begins flashing and then lights constantly. This means that the
WLAN function is enabled.
87
Page 88

Cannot Establish a WLAN Connection
Announcing the Name of the Radio Network
The WLAN device cannot find the wireless network of the
FRITZ!Box.
Possible cause
The name of the wireless network of the FRITZ!Box is concealed.
Remedy
In the WLAN settings of the FRITZ!Box, enable the “Announce
name of the radio network ” option.
1. Connect the FRITZ!Box to a computer using a network ca-
ble, as described in the section Connecting Computers
to the LAN Port on page 20.
2. Start a web browser.
3. Enter fritz.box
in the address field.
4. Click the “Ports” area on the overview page and select
“WLAN”, or open the “WLAN” menu in the navigation bar
on the left.
5. In the “Radio Network” page, enable the option “Name
of the radio network visible”.
6. Click the “Apply” button at the bottom of the page.
7. Remove the network cable and try again to establish a
connection via WLAN.
Compare the Security Settings for WLAN
Make sure that the WLAN security settings registered in the
FRITZ!Box agree with the security settings of the WLAN device.
Here is how to view the WLAN security settings of the
FRITZ!Box and print them out:
1. Connect the FRITZ!Box to a computer using a network ca-
ble. Proceed as described in the section Connecting
Computers to the LAN Port from page 20.
2. Start a web browser.
88
Page 89

Cannot Establish a WLAN Connection
3. Enter fritz.box in the address field.
4. Click on the “Ports” area on the overview page and se-
lect “WLAN” or select the “WLAN” menu in the navigation bar on the left.
5. Open the “WLAN / Security” menu .
6. Click the “Apply” button.
A window with the WLAN security settings will be displayed. Print out the page by clicking the “Print Page”
button.
7. Remove the network cable and check the configuration
of the WLAN device in the printout. Try again to establish
a connection.
Testing the WLAN Connection Without Security Settings
Disable the WLAN security settings to test whether a WLAN
connection between the FRITZ!Box and the WLAN device is
possible at all.
1. Connect the FRITZ!Box to a computer using a network ca-
ble. Proceed as described in the section Connecting
Computers to the LAN Port from page 20.
2. Open the user interface of the FRITZ!Box in a web brows-
er. Proceed as described in the section Opening the User
Interface on page 26.
3. Click the “Ports” area on the overview page and select
“WLAN”, or open the “WLAN” menu in the navigation bar
on the left.
4. Click the “Security” menu and enable the option “unen-
crypted”.
5. Then click the “Apply” button.
6. Remove the network cable and try again to establish a
connection.
This non-secured condition should be used only for testing, to find out whether a WLAN connection is possible
at all.
89
Page 90

Cannot Establish a WLAN Connection
If the attempt to connect to the WLAN using the non-encrypted connection is not successful either, check the installation
of the WLAN device and contact the manufacturer of the
WLAN device if necessary.
Enable WLAN encryption again after completing the tests. Follow the steps listed above and then enable the kind of encryption that was previously configured.
Installing the Current Service Pack
The WLAN connection to the FRITZ!Box cannot be established
using the Microsoft WLAN Service (WZC) in Windows XP with
Service Pack 2.
Possible cause
The required Microsoft patch for WPA2 (IEEE 802.11i) may not
be not installed.
Remedy
Install Service Pack 3 (SP3) for Windows XP, available as a
free download from Microsoft. Then Microsoft WLAN Service
will support WPA2, so that a WLAN connection can be established to the FRITZ!Box.
Ruling Out Interference Caused by Other Wireless Networks
If there are other devices in the immediate vicinity of your
FRITZ!Box that use the same frequency band, simultaneous
use of frequencies can result in mutual interference (for example, fluctuations or interrupted connections). Disruptions
can be caused by other WLAN base stations, but also by devices like baby monitors, game consoles, garage door openers, Bluetooth devices, or wireless AV bridges, which also use
the 2.4-GHz frequency band. In this case, please test a different radio channel for your FRITZ!Box.
Alternatively, you can set the radio channel to “Auto channel”. This enables the Autochannel function, so that the
FRITZ!Box searches for the best WLAN channel itself.
90
Page 91

Cannot Establish a WLAN Connection
To set the radio channel in the user interface, your computer
must be connected with the FRITZ!Box by network cable or
wirelessly. If your computer is connected via WLAN, continue
with Step 2 of the instructions below. In this case, note that
the existing WLAN connection is interrupted as soon as you
apply the changed settings. Afterward you have to reconnect
your computer with the FRITZ!Box.
1. Connect the FRITZ!Box to a computer using a network ca-
ble. Proceed as described in the section Connecting
Computers to the LAN Port from page 20.
2. Start a web browser.
3. Enter fritz.box
in the address field.
4. Open the “WLAN / Radio Channel” menu in the naviga-
tion bar on the left.
5. You may have to enable the “Adjust radio channel set-
tings” option.
Select a different radio channel from the “Select radio
channel” list.
6. Click the “Apply” button.
7. Remove the network cable and check whether interfer-
ence continues to occur.
91
Page 92
Configuration and Operation on the Telephone
14 Configuration and Operation on the Telephone
Many of the FRITZ!Box functions and features can be configured and
used over telephones connected to the FRITZ!Box. Only tone-dialing
(dual-tone multifrequency = DTMF) telephones can be used in configuration and operation.
14.1 Symbols and Acknowledgement Tones
Symbols for Actions on the Telephone
Icon Action
M Dial a number.
N Pick up the handset.
O Hang up the handset.
P Tal k.
D Three-party conference call
Q Wait for the acknowledgement tone.
K You hear the ring tone.
<DNo.> In place of <DNo>, enter the destination number.
The destination number is the complete telephone
number of an external telephone line.
Acknowledgement Tones
• A correct entry will be signaled by the positive acknowl-
edgement tone. The tone is 1 second in length and
sounds once.
• If the entry is incorrect, you will hear the negative ac-
knowledgement tone. This is a repeated tone 0.25 seconds in length.
92
Page 93
Configuring by Telephone
14.2 Configuring by Telephone
Restoring Factory Settings
All of the settings in the FRITZ!Box can be reset to their condition upon delivery by restoring the factory settings.
All settings you made in the FRITZ!Box are deleted when the
factory settings are restored. This is also true for the configured Internet connection.
Restoring Factory Settings
r991s159
01590s
After factory settings are restored, the FRITZ!Box is restarted.
Switching WLAN On and Off
The WLAN function of your FRITZ!Box can be switched on and
off using a connected telephone.
Switching WLAN On and Off
r96s1s Switches the WLAN function on.
r96s0s Switches the WLAN function off.
Restores all settings in the FRITZ!Box to
their original condition.
Turning Do Not Disturb On/Off
For the analog extension “FON” on the FRITZ!Box, the do not
disturb option can be enabled by telephone. When Do Not
Disturb is set, the telephone connected to the extension will
no longer ring.
Enabling Do Not Disturb Immediately
r811s0s Immediately enables Do Not Disturb for
the extension “FON”.
Do not disturb remains switched on until
it is disabled.
r91ss Save your settings.
93
Page 94
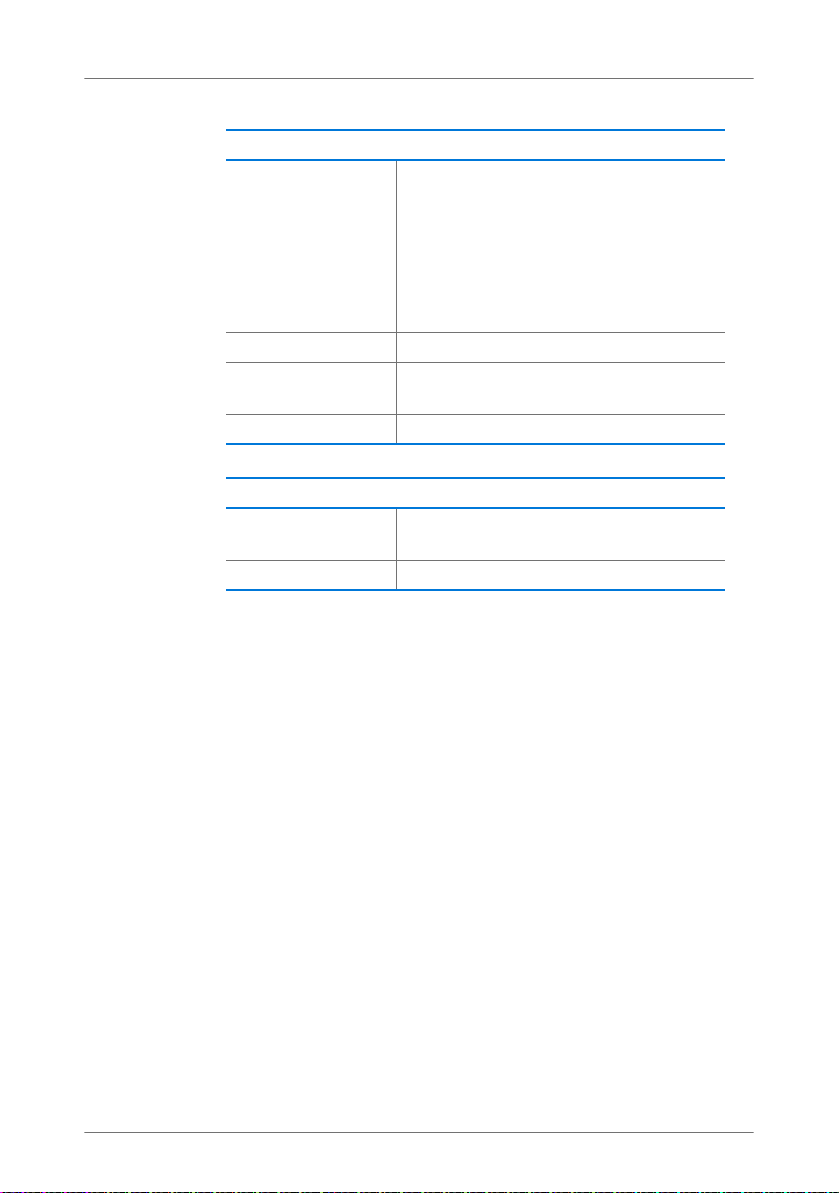
Configuring by Telephone
Enabling Do Not Disturb for a Specific Period
r801s
<Start>s<End>s
r91ss Saves the settings.
r811s6s Enables do not disturb on the extension
r91ss Save your settings.
Disabling Do Not Disturb
r811s1s Disables Do Not Disturb on the extension
r91ss Save your settings.
Defines the start and end of the period
during which do not disturb is enabled on
the extension “FON”.
Example: Do Not Disturb should be enabled from 8:00 p.m. until 7:00 a.m. daily. Enter “2000” for <start> and “0700” for
<end>.
“FON”.
“FON”.
94
Page 95

Configuring by Telephone
Switching the Alarm On and Off
You can use the telephones connected to the FRITZ!Box as
alarms. The alarm can be set individually and enabled or disabled at any time.
Configuring the Alarm for a Telephone
N Pick up the handset.
r881s<time>s
<internal telephone
number>s
r91ss Save your settings.
O Hang up the handset.
Defines the time at which the telephone with the specified internal telephone number will ring.
For instance, enter
r881s0700s1s if the
telephone on the “FON” socket
should ring at 07:00 a.m.
Internal numbers:
Socket “FON” of the FRITZ!Box:1
Cordless DECT telephones: 610 – 615
IP telephones: 620 – 629
Enabling the Alarm
N Pick up the handset.
r881ss Enable the alarm function.
r91ss Save your settings.
O Hang up the handset.
Disabling the Alarm
N Pick up the handset.
r881r Disable the alarm.
r91ss Save your settings.
O Hang up the handset.
95
Page 96
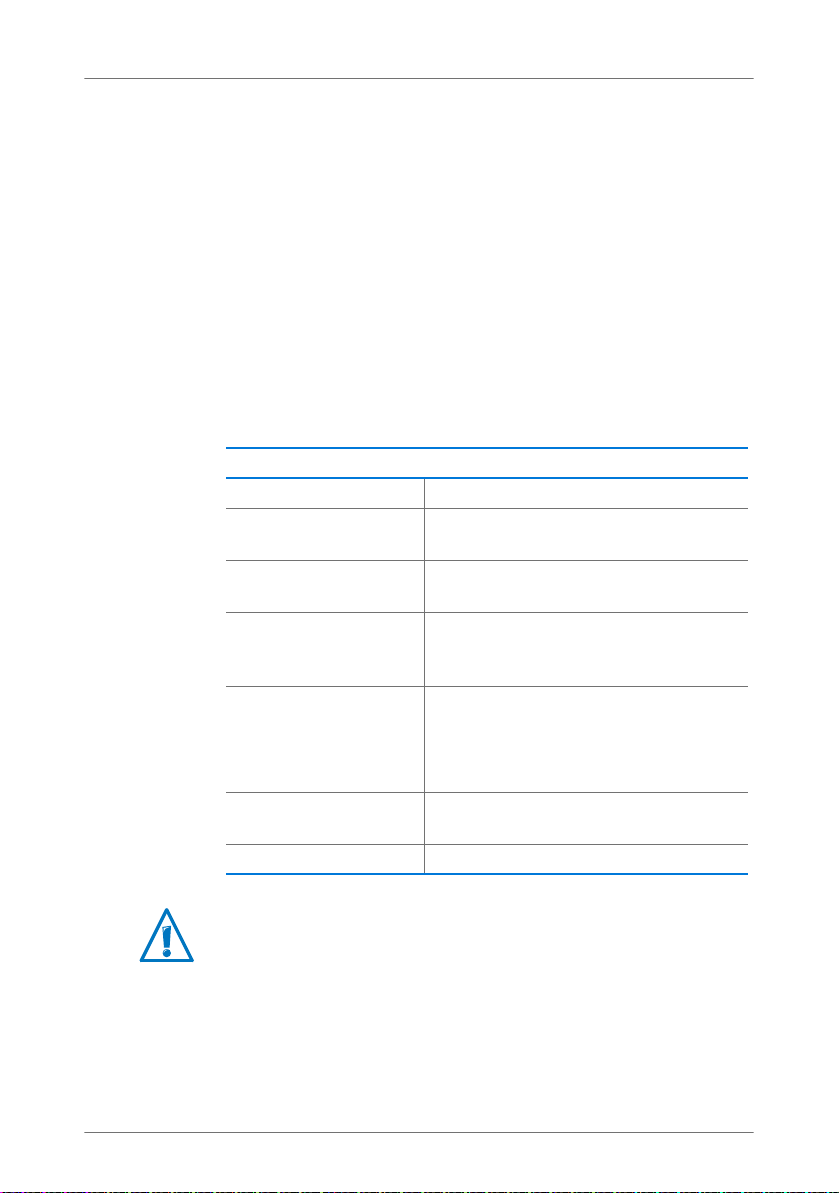
Configuring by Telephone
Setting Up Call Diversion
With call diversion you can divert incoming calls. The calls are
diverted to an external telephone line or to a certain telephone connected with your FRITZ!Box.
If your telephony provider supports direct diversion of incoming calls, calls will be diverted by your provider. Otherwise the
FRITZ!Box establishes a second connection to divert the call.
In either case, call diversion to an external line will be
charged at your contracted telephone rates.
Configuring Call Diversion for All Calls
You can set up call diversion for all incoming calls:
Configuring Call Diversion for all Incoming Calls
N Pick up the handset.
s21s<DNo>sr Configures immediate call diversion to
s61s<DNo>sr Configures delayed call diversion (after
s67s<DNo>sr Configures call diversion on busy to the
Q Wait for the positive acknowledgement
O Hang up the handset.
Enter one of the following three key sequences:
the destination number <DNo>.
20 seconds) to the destination number
<DNo>.
destination number <DNo>.
Calls will be diverted when the telephone number called is busy.
tone.
Internet telephone numbers that contain letters or special
characters cannot be entered.
96
Page 97
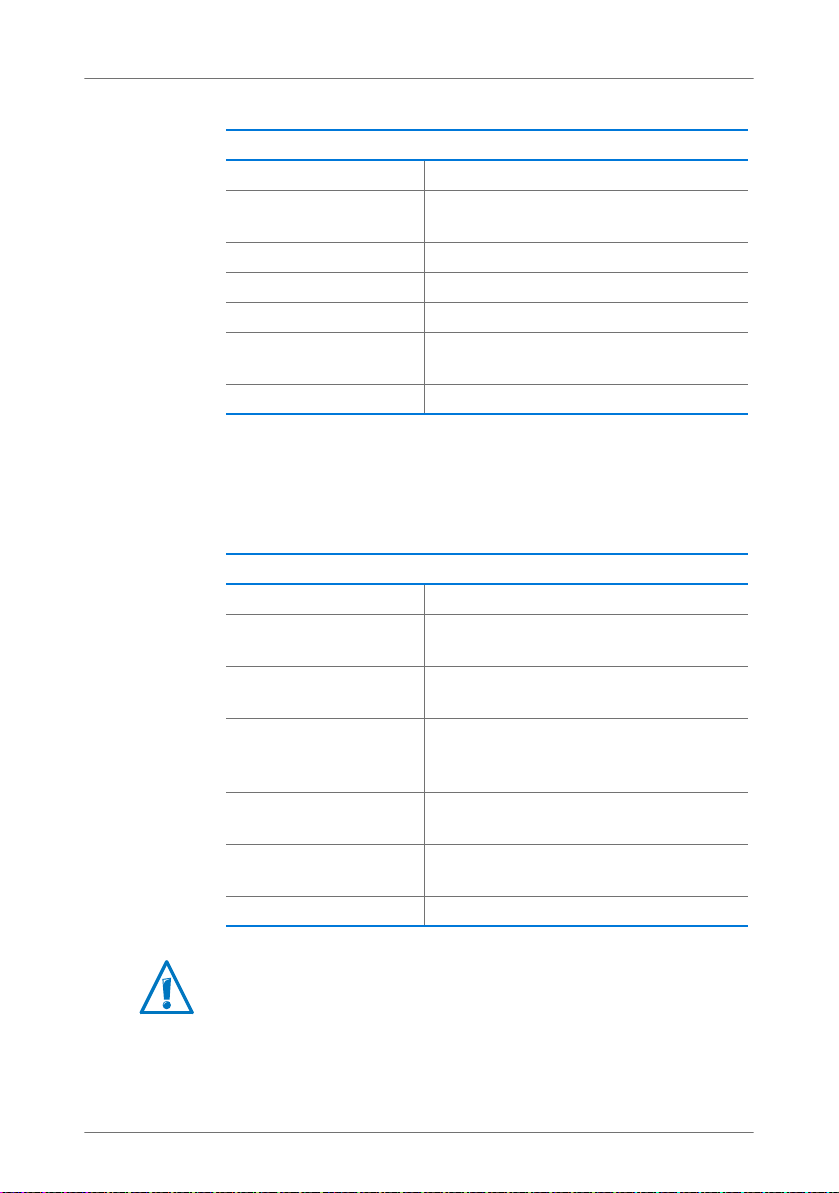
Configuring by Telephone
Disabling Call Diversion for All Incoming Calls
N Pick up the handset.
s21ssr Disables call diversion immediately.
s61ssr Disables delayed call diversion.
s67ssr Disables a call diversion on busy setting.
Q Wait for the positive acknowledgement
O Hang up the handset.
Configuring Call Diversion for the Outgoing Telephone
Number
You can set up call diversion for all calls that arrive for the
outgoing number of the telephone:
Configuring Call Diversion for the Outgoing Telephone Number
N Pick up the handset.
s21s<DNo>r Configures immediate call diversion to
s61s<DNo>r Configures delayed call diversion (after
s67s<DNo>r Configures call diversion on busy to the
Q Wait for the positive acknowledgement
O Hang up the handset.
Enter one of the following three key sequences:
tone.
Enter one of the following three key sequences:
the destination number <DNo>.
20 seconds) to the destination number
<DNo>.
destination number <DNo>.
tone.
Internet telephone numbers that contain letters or special
characters cannot be entered.
97
Page 98
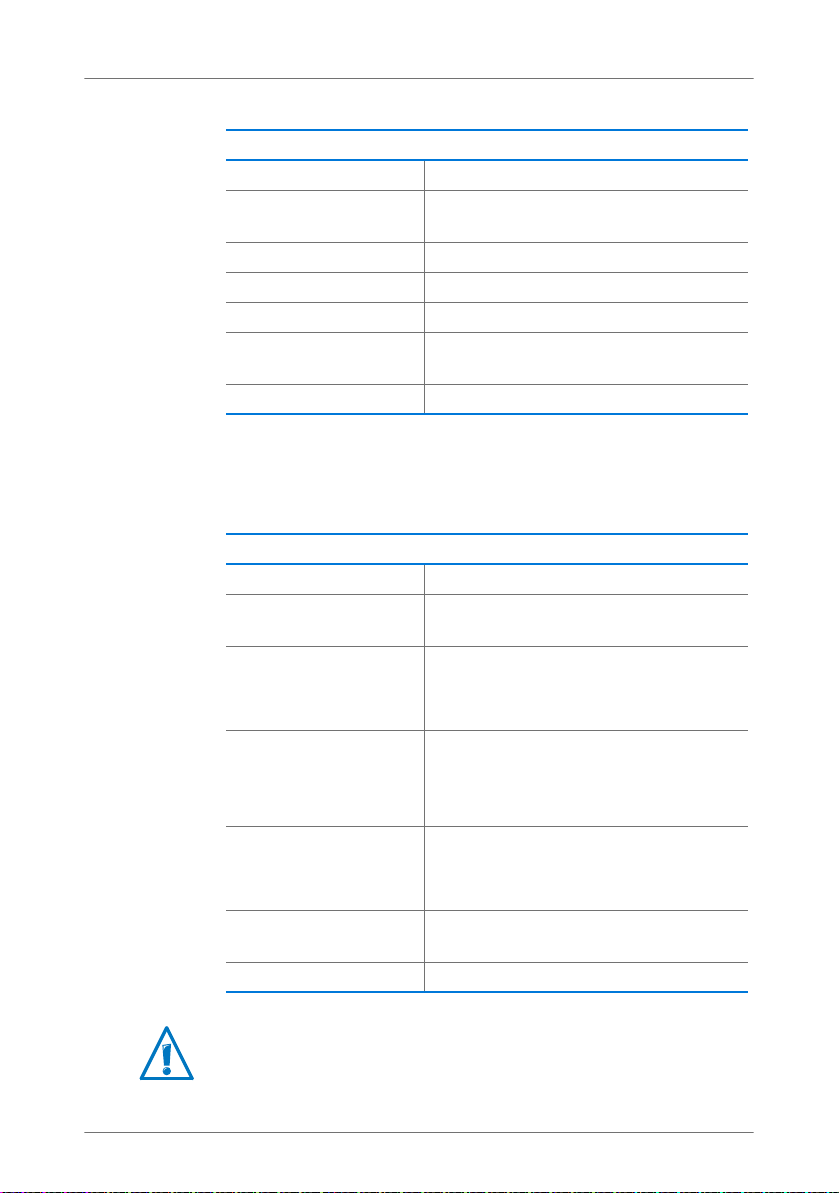
Configuring by Telephone
Disabling Call Diversion for the Outgoing Telephone Number
N Pick up the handset.
s21sr Disables a call diversion immediate.
s61sr Disables delayed call diversion.
s67sr Disables a call diversion on busy setting.
Q Wait for the positive acknowledgement
O Hang up the handset.
Configure Call Diversion for a Certain Telephone Number
You can set up call diversion for all calls that arrive for a certain telephone number:
Configuring Call Diversion for a Certain Telephone Number
N Pick up the handset.
s21s<DNo>
s<telephone num-
ber>r
s61s<DNo>
s<telephone num-
ber>r
s67s<DNo>
s<telephone num-
ber>r
Q Wait for the positive acknowledgement
O Hang up the handset.
Enter one of the following three key sequences:
tone.
Enter one of the following three key sequences:
Configures immediate call diversion for
the telephone number entered to the
destination number <DNo>.
Configures delayed call diversion (after
20 seconds) for the telephone number
entered to the destination number
<DNo>.
Configures call diversion on busy for the
telephone number entered to the destination number <DNo>.
tone.
Internet telephone numbers that contain letters or special
characters cannot be entered.
98
Page 99

Configuring by Telephone
Disabling Call Diversion for a Certain Telephone Number
N Pick up the handset.
s21ss<telephone
number>r
s61ss<telephone
number>r
s67ss<telephone
number>r
Q Wait for the positive acknowledgement
O Hang up the handset.
Setting Up Call Diversion for the Analog Extension FON
Setting up Call Diversion for an Analog Extension
N Pick up the handset.
r41 Call diversion without ringing
r45 Call diversion immediately with ringing
r42 Call diversion delayed (after 20 seconds)
r43 Call diversion on busy
r44 Call diversion delayed (after 20 seconds)
1s<DNo>s Configures call diversion to the destina-
r91ss Save your settings.
O Hang up the handset.
Enter one of the following three key sequences:
Disables a call diversion immediate.
Disables delayed call diversion.
Disables a call diversion on busy setting.
tone.
Define the kind of call diversion:
or on busy
Enter the destination to which the call
will be diverted:
tion number <DNo>.
Internet telephone numbers that contain letters or special
characters cannot be entered.
99
Page 100
Configuring by Telephone
Disabling Call Diversion for the Analog Extension
N Pick up the handset.
r401ss Disables call diversion.
r91ss Save your settings.
O Hang up the handset.
CLIR for One Call (Case by Case)
On the analog extension of the “FON”, when you make a call
you can define that during this call your telephone number
will not be transmitted to the other caller. This function is called "CLIR (case by case)". Transmission of your number will be
suppressed for one call only.
This function can only be used on the analog extension
“FON” of the FRITZ!Box.
Enable CLIR (case by case)
N Pick up the handset.
s31r Dial the sequence shown at left. You
M Dial an external telephone number.
hear the external dial tone.
For this outgoing call your telephone
number will not be transmitted to the
other caller.
Disabling Automatic Outside Dialing
You can disable automatic outside dialing on the analog extension “FON” of the FRITZ!Box. When automatic dialing is
disabled, you will hear an internal dialing tone when you pick
up the telephone receiver. This is a good idea if you make a
lot of internal calls.
When automatic outside dialing is disabled, for an external
call the 0 must be dialed before the telephone number.
100
 Loading...