

Page 1
Operating instructions
EVOLUTION C 5.2
Page 2
2
Dear customer
thank you for purchasing this AVM product. You now own a versatile, excellent sounding hifi
component. Before enjoying music, please read this manual carefully. After that you will know how
to use your new AVM component in the optimal way.
Please note that the range of functions of your AVM hifi component can be easily expanded by
means of a software update at any time. Hence, the present operating instructions will require
continued updates going forward. You you can always download the most current version from our
website at www.avm.audio.
Sincererly yours,
The AVM Team
CAUTION : This unit contains a class 1 laser diode. Do not open. Invisible laser radiation can damage
your eyes.
Laser diode Type : Ga-Al-As
Wavelength : 755 - 815 nm (@ 25 °C)
Output power : 0,7 mW max.
NOTE: Use only high quality cables for connection between the unit and the other components of
your hifi set. We recommend cable lengths under 50 cm to avoid interference which can affect the
reception of radio and TV tuners.
Declaration of conformity (for EC only)
We herewith confirm, that the unit to which this manual belongs fulfills the EC rules necessary to
obtain the sign
the necessary measurements were taken with positive results.
AVM Audio Video Manufaktur GmbH, Daimlerstraße 8, D-76316 Malsch
www.avm-audio.com, info@avm-audio.com
Page 3

Table of contents
Dear Customer 2
Table of Contents 3
1 Getting started 4
1.1 What’s in the box? 4
1.2 Control and operating elements 4
1.3 Installation and cooling 5
1.4 Connection to mains 5
1.5 Connecting analogue signal sources 5
1.6 Connecting digital signal sources 5
1.7 RC 3 remote control 6
1.7.1 Battery charge 6
1.8 Connecting a recorder 6
1.9 Connecting subwoofers 6
1.10 Connecting loudspeakers 6
1.11 Tuner antenna 6
1.12 Pin configuration of external infrared
sensor 7
2 Basic operation 7
2.1 First operation / self test 7
2.2 Switching on / stand-by 7
2.3 Selecting the signal source 7
2.4 Volume setting 7
2.4.1 Setting of input sensitivity 7
2.5 Tuner 8
2.5.1 Tuning 8
2.5.2 Station and memory 8
2.5.3 Selecting a station out of the
memory 8
2.6 CD-Player 8
2.6.1 Insert / eject 9
2.6.2 PLAY, PAUSE, STOP 9
2.6.3 SEARCH / SKIP 9
2.6.4 Repeat 9
2.6.5 Random 9
2.6.6 Programming an individual playlist 9
3 Advanced Settings 10
3.1 Global settings 10
3.1.1 Tone control 10
3.1.2 Bass 10
3.1.3 Treble 11
3.1.4 Loudness (Contour) 11
3.1.5 Balance 11
3.1.6 Poweramp 11
3.2 Tuner settings 11
3.2.1 RDS display 11
3.2.2 Scan mode 11
3.2.3 2 channel mode 11
3.2.4 Deemphasis 11
3.3 Personal setup 12
3.3.1 Display brightness 12
3.3.2 Bass & treble control 12
3.3.3 Skip unused inputs 12
3.3.4 Define input names 12
3.3.5 Gain fix / variable 12
3.3.6 FM auto store 13
3.3.7 Autoplay 13
3.4 Reset 13
4 Cleaning 13
5 If something doesn’t work... 14
6 Conditions of warranty (EC only) 14
7 Technical Data 15
7.1 Amplifier 15
7.2 Tuner 15
7.3 CD-Player / D/A Converter 15
7.4 Other 15
Page 4

4
1 Getting started
1.1 What’s in the box?
• EVOLUTION C 5.2 CD-Receiver
• RC 3 remote control
• Power cable
CAUTION: After unpacking, please check the scope of delivery to ensure that all the parts have been
supplied and are undamaged. In case the original packing has already been opened, please contact
your local dealer. Often, your dealer prepares your new device prior to delivery to adapt and change the
configuration to your personal needs.
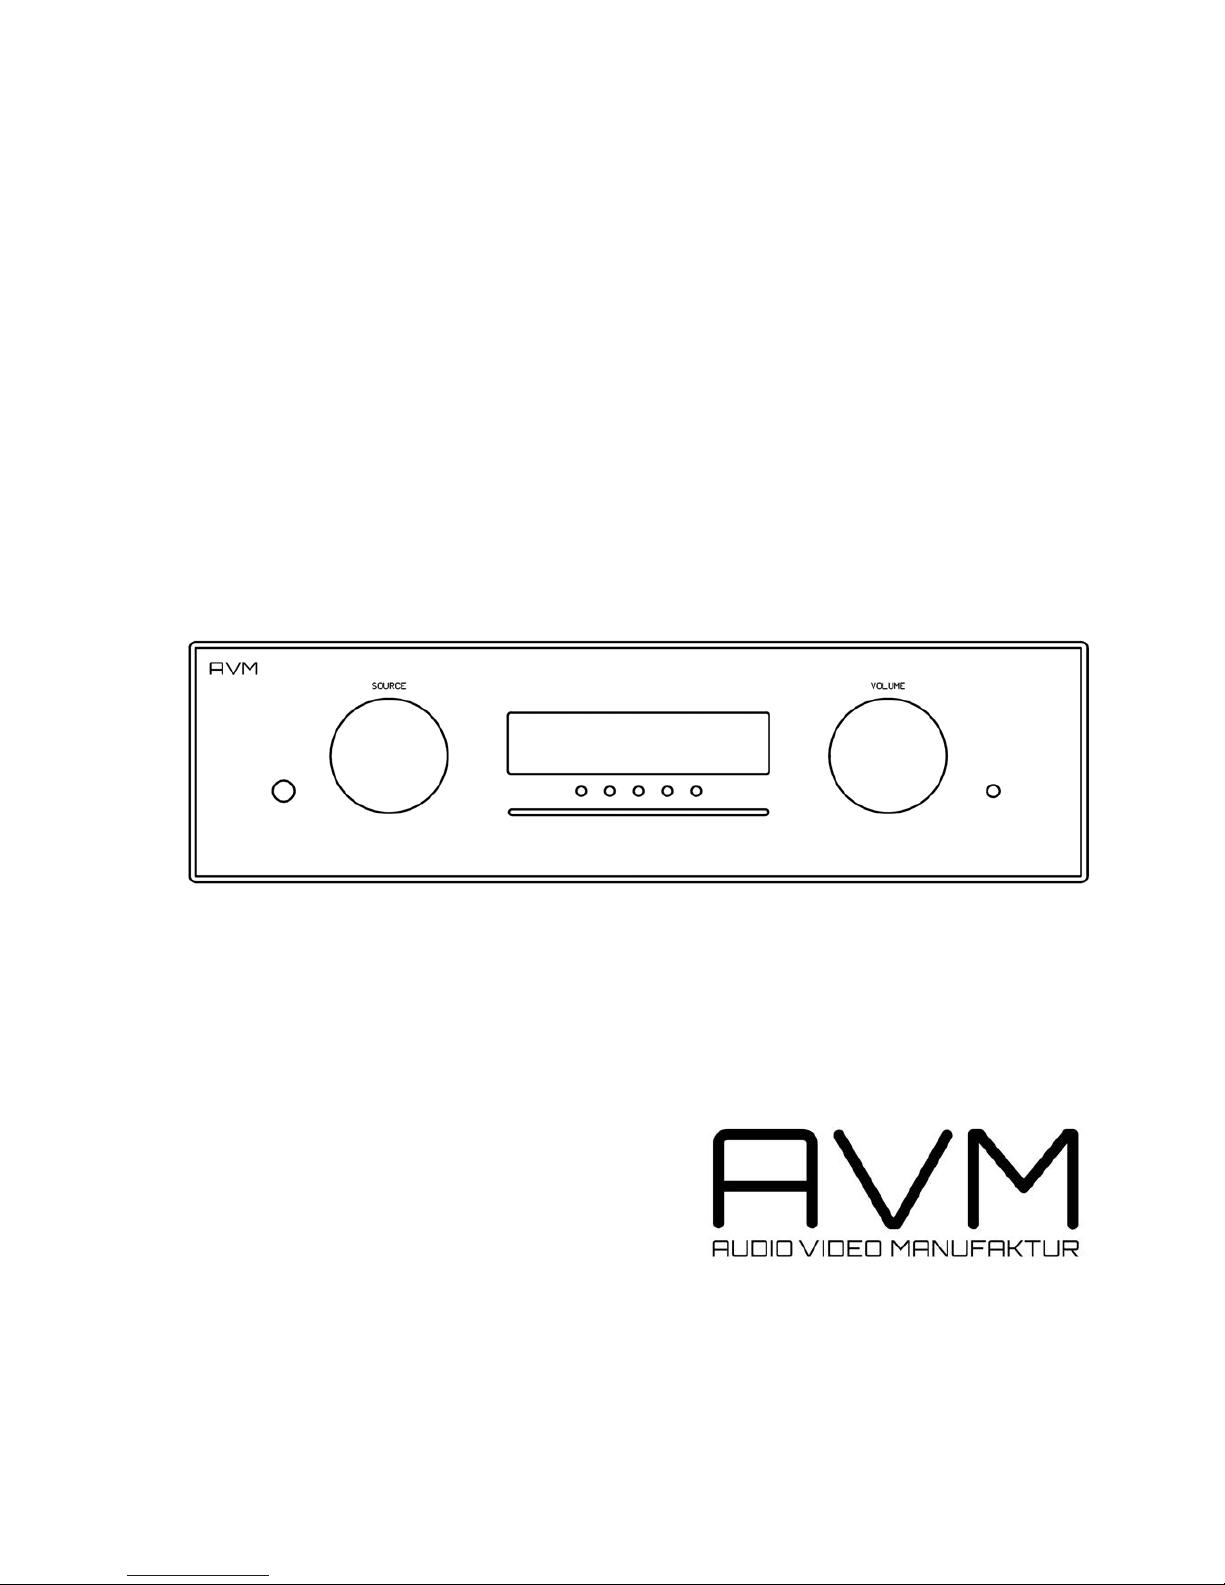
1.2 Control and operating elements
The numbers in the drawings below mark the control elements. They refer to the numbers in the text,
where the operation of the unit is described.
1. Power button (on / off)
2. Source selector
3. Control LED
4. CD-Slot
5. Multifunctional button (soft key)
6. Multifunctional button (soft key)
7. Multifunctional button (soft key)
8. Multifunctional button (soft key)
9. Multifunctional button (soft key)
10. Display
11. Volume knob
12. Headphone output
Page 5
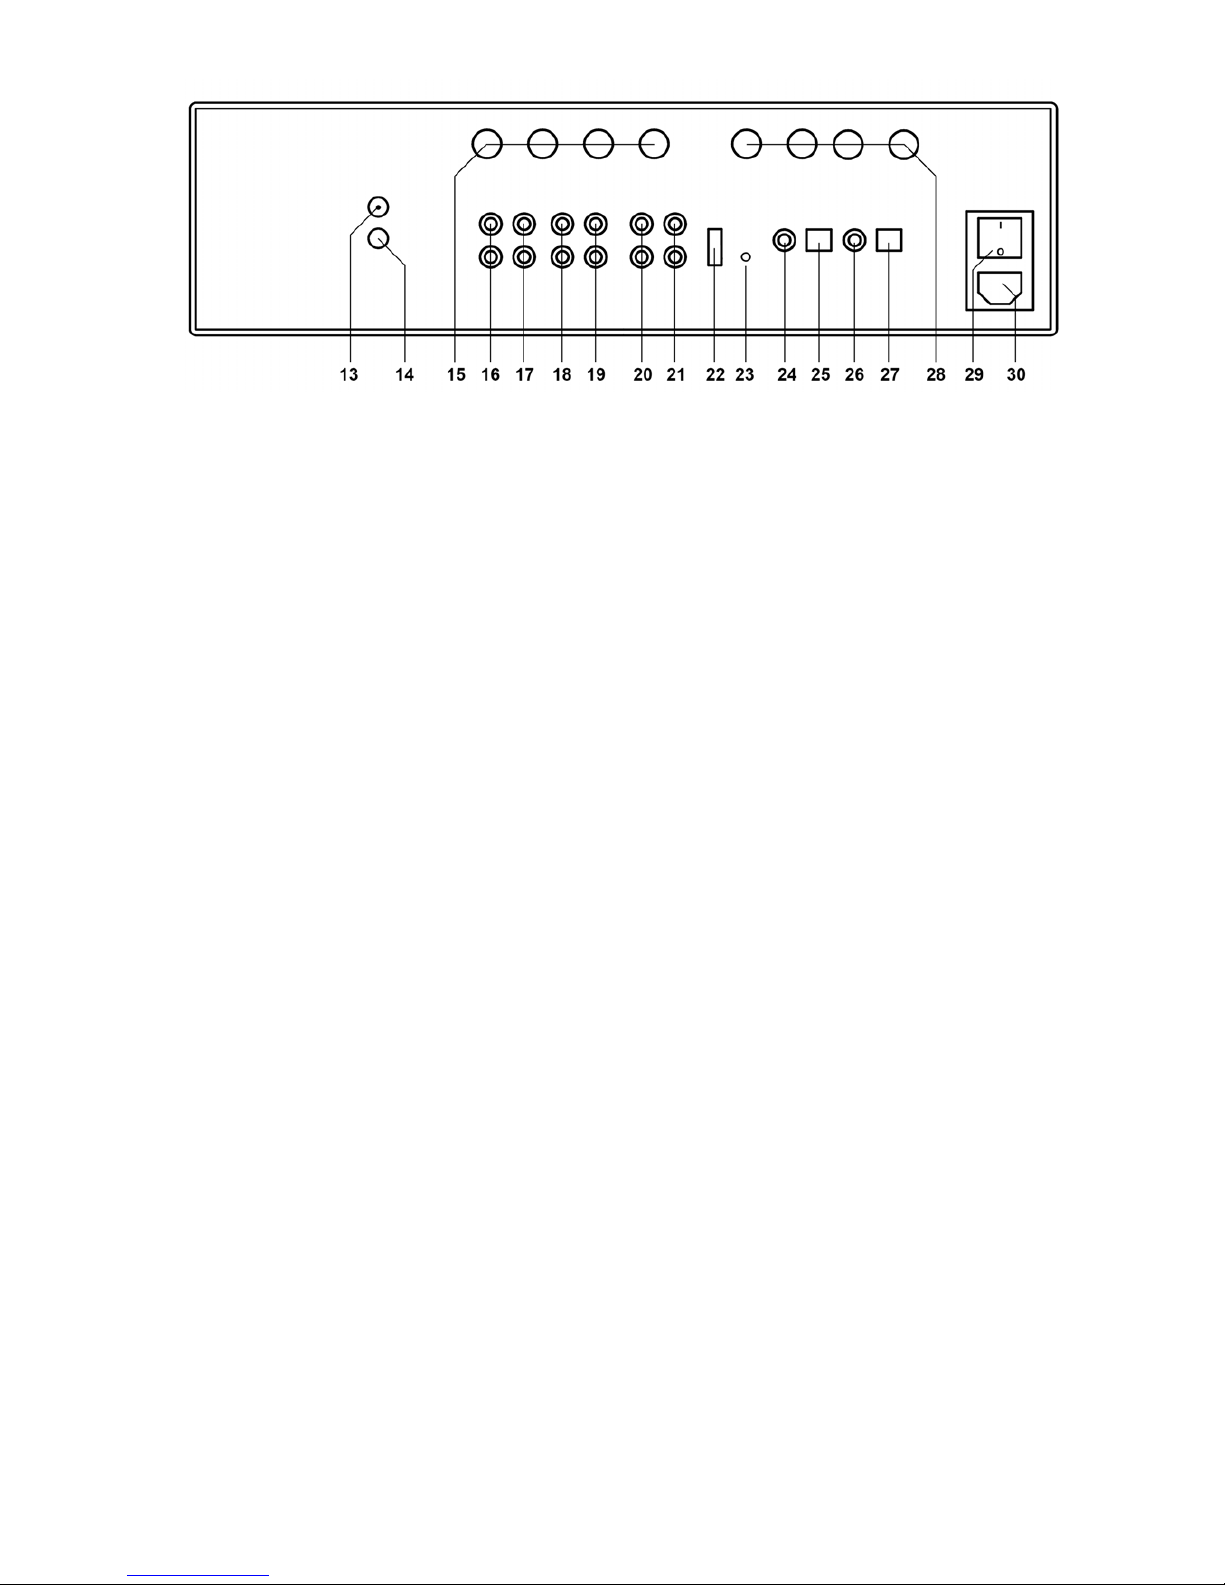
5
13 Antenna socket
14 Ground socket for turntable chassis
15 Speaker terminal B
16 Phono input
17 High-level analogue input 1
18 High-level analogue input 2
19 High-level analogue input 3
20 Output for recorder (fixed level)
21 Preamplifier output
22 Configuration port
23 Connector for external infrared sensor
24 Digital input coaxial
25 Digital input optical
26 Digital output coaxial
27 Digital output optical
28 Speaker terminal A
29 Mains switch
30 Mains connector
1.3 Installation and cooling
The unit can become hot depending on demanded output power / environmental temperature.
Therefore it is important, that the cooling air can flow unhindered into the air inlet in the bottom and
flow out through the holes in the rear panel. Direct exposure to sunlight is not recommended because
this will heat up the unit.
1.4 Connection to mains
Connect the unit to the mains connector (30) by using the power cord which is (in some countries)
delivered together with the unit. Make sure that mains voltage is according to the value printed on the
rear panel of the amp (near mains connector).
CAUTION: Keep the unit switched off until all audio connections are made.
1.5 Connecting analogue signal sources
High-level sources
Connect the outputs of your signal sources to the inputs (17-19). The upper row is for left channel, the
lower row is for right channel.
Turntable
Connect the output of your turntable with phono inputs (16) and connect the chassis ground wire to
the ground connector (14). The C 5.2 phono input is suitable for MM cartridges as well as for high and
medium level MC cartridges. Sensitivity can be adjusted (see 2.4.1)
1.6 Connecting digital signal sources
Inputs SPDIF/ (RCA cinch, optical)
Connect the outputs of your digital sources to the corresponding inputs of the C 5.2 (24, 25).
Page 6

6
Digital out
The input of a digital recorder must be connected to the digital outputs (26, 27). The signal on the
digital outputs depends on the selected source (build in CD, dig in etc.).
1.7 RC 3 remote control
The included RC 3 remote control allows for easy and comprehensive control of the C 5.2. All main
functions of the C 5.2 can be controlled by the RC 3: on/off, source selection, station selection, SKIP,
PLAY/PAUSE, and STOP.
By pressing the PLAY button briefly a second time, the PAUSE function is activated while in CD mode.
By pressing the STOP button briefly a second time, an inserted CD is ejected. By holding down one of
the SKIP buttons a little longer, the device switches into seek mode (fast forward/reverse).
1.7.1 Battery charge
Bottom view
Unscrew the 6 marked screws (CAUTION: Do NOT unscrew the 2 unmarked screws in the middle).
Take the bottom plate with the mounted pcb out. Remove the worn batteries and replace them with
two new batteries (type CR2032, 3V Lithium cells). Make sure that polarity is correct (the "+" sign must
be on top). Insert the bottom plate and screw it tight.
1.8 Connecting a recorder
Connect the recorder’s output to one of the inputs (17-19). The inputs of the recorder must be
connected to the fixed level output (20).
1.9 Connecting subwoofers
Aktiver Subwoofer ohne Frequenzweiche
If you use an active subwoofer (with built in power amplifier), simply connect it's inputs to the unit's pre
out (21) and adjust the bass level at the subwoofer.
1.10 Connecting loudspeakers
The C 5.2 is equipped with two switchable speaker terminals (15 and 28) and thus allows either parallel
operation with two loudspeaker pairs or operation with respectively one of the connected loudspeaker
pairs. Both outputs can be activated or deactivated via the menu (see 3.1.6).
Connect your loudspeakers to the speaker terminals A (28) and B (15). Use only good speaker cables
with sufficient diameter. Make sure, that the red terminals are connected to the red or "+“ terminals of
the speakers and the black terminals to the black or “-“ terminals of the speakers.
1.11 Tuner antenna
Connect the antenna cable to the antenna socket (13).
Page 7

7
1.12 Pin configuration of external infrared sensor
Connector for external IR-sensor (23)
2 Basic operation
2.1 First operation / self test
In case the C 5.2 was not connected to mains a self test will be performed when it is switched on by
the mains switch (29) for the first time. The unit will check its configuration and that all the installed
components work properly. The procedure is shown in the display. Afterwards the unit will switch to
stand-by.
2.2 Switching on / stand-by
Using the button power (1) you can switch between on (operate) and stand-by. In the on state the
display (10) lights up and the LED (3) is off. In stand-by mode the display is off and the LED is on to
indicate that the unit is still connected to mains.
CAUTION: When switched to stand-by the unit is still connected to the mains. In case of a
thunderstorm or if you leave the house for a longer time we recommend that you switch the amplifier
off by using the mains switch (29) or pull the mains plug.
2.3 Selecting the signal source
The signal source can be selected by turning the source selector (2) until the desired source appears
on the display.
CAUTION: If you switch to another source while playing a CD, the drive will stop first. This may take a
few seconds. If you activate a digital input that has no valid signal, "NO DIG SIGNAL" is indicated in
the display (10). In this case the source can not be changed.
2.4 Volume setting
Use the rotary encoder (11) to set the desired volume. Depending on rotating speed the volume
increases / decreases in 0.5 dB steps (slow) or 2 dB steps (fast). The actual setting is shown in the
display (10). If the volume is changed using the RC 3 remote control, the level always increases /
decreases in 0.5 dB steps.
2.4.1 Setting of input sensitivity
The level of signal sources differs often by several dBs. You recognize a step in volume, when
switching between two different inputs. With the sensitivity setting menu you can avoid this. The
sensitivity of each input can be adjusted between – 9.5 dB and + 10.0 dB.
Select any input (except for tuner or CD) and chose a convenient volume level. Now press the MENU
button (7) under the display for more than 2 seconds. The button is now marked "EXIT LVL". Pressing
this button again will exit the level setting mode and bring the unit back to normal operating mode.
3,5mm stereo
+5V supplyIR-SignalGND
infrared input
Page 8

8
While level setting is active the display shows the actual level instead of the volume. Level can be set
using the volume knob (11). Now you can switch between the sources (also CD and tuner) and adjust
the levels. When this is done press the "EXIT LVL" knob and bring the unit back to normal operating
mode. All level settings are now stored.
NOTE: While the level setting mode is active the unit will not respond to any RC 3 remote control
command.
2.5 Tuner
The basic functions of the tuner can be accessed by the buttons right under the display (5 – 9). More
sophisticated functions and all web radio features are available via the menu and the included RC 3
remote control.
2.5.1 Tuning
Depending on the selected mode (manual / auto) the far right buttons (8, 9) under the display (10) are
named < AUT > or < MAN >. In AUT mode a tip on one of the buttons lets the tuner automatically seek
the next upper or lower station. In MAN mode the frequency changes in 50 kHz-steps as long as the
button is pressed. In this case the tuning indicator shown in the display (10) helps you to tune correctly
to the desired station. If tuning is correct it will show "locked“.
NOTE: To optimize the sound quality you can use the functions mode, sensitivity and bandwidth,
which are described later on in chapter 3.
2.5.2 Station and memory
Storing a new station
If you want to store a certain station in the memory, press the button MENU (7) under the display (10)
for more than 2 seconds. The display will propose the next free memory position for storage (for
example: if 5 stations are already stored, position 6 will be proposed). Using the "MOVE" buttons (5, 6)
you can change the position.
Modifying, moving or deleting an existing station
If the tuner is set to an already stored station you can change its settings, move it to a different position
or delete it. If you, want first change settings (mono/stereo, bandwidth or other). Then press the button
MENU (7) under the display (10) for more than 2 seconds. If you then press "STORE" the station will be
stored a new at the old position with the changed settings. Using the buttons "MOVE" allows you to
change the position of this station before storing. "DELETE" will erase the station out of the memory.
"EXIT" will bring the unit back to normal operating mode without changing the memory.
NOTE: The station memory allows you to store up to 63 stations. It stores not only their frequency, but
also the individual setting (mono/stereo, bandwidth or other).
2.5.3 Selecting a station out of the memory
The buttons < STAT > (5, 6) select the stations stored in the memory. A short tip switches to the next /
previous station. Holding the button down scans automatically up / down. The number of the actual
station is shown in the display ("STAT xx“).
2.6 CD-Player
The basic functions of the CD player can be accessed by the buttons right under the display (5 – 9).
For more sophisticated functions see chapter 3.
Page 9

9
2.6.1 Insert / eject
Insert a CD
The C 5.2 has a slot-in CD drive. Insert the CD (cover side up) and push slightly. The drive will now
automatically draw the disc inside. After that the player reads the TOC and shows it on the display.
Furthest left is the number of the actual track followed by the total number of tracks on the CD (for
example "1/17"). The middle of the display shows the total playing time of the CD.
NOTE: If there is still a CD inside or the unit is in stand by, the slot will be blocked. If the inserted disc
is not readable (DVD, data-CD) the display will show "no playable disc".
Eject CD
Press the button (8) under the display (10). Then the disc will be ejected.
Auto-CD function
If CD is not selected as source the unit will automatically change to CD from any other input after you
have inserted a CD.
2.6.2 PLAY, PAUSE, STOP
While the player is stopped the button |<< or >>| (5, 6) select the title. A short tip switches to the next /
previous title. Holding the button down scans automatically up / down. The number of the actual title is
shown in the display.
Pressing PLAY (9) starts the CD player. While playing, the button changes its function to PAUSE.
While the player is playing, the button (8) under the display shows the STOP symbol. When the player
is stopped this button changes its function to the EJECT symbol.
2.6.3 SEARCH / SKIP
While the player is stopped, the buttons |<< oder >>| (5, 6) select the title. A short tap switches to the
next / previous title. Holding the button down scans automatically up / down. The number of the actual
title is shown in the display.
While the player is playing a short tap on the buttons 5 and 6 selects the previous / next title. Holding
down the buttons starts the rewind / fast forward function. Rewind / fast forward stops automatically
when the begin / end of the actual title is reached.
2.6.4 Repeat
Choose a repeat mode by pressing the MENU button (7): "ONE" repeats the actual title). "ALL" repeats
the whole CD or a programmed sequence.
2.6.5 Random
To activate the random mode, press and hold the MENU button (7) and choose the random mode by
pressing the RANDOM button (8).
2.6.6 Programming an individual playlist
If a disc is inside the player you can program your individual playing sequence as follows: Hold the
button MENU (7) down for more than 2 seconds to enter the playlist menu.
The display shows on the left side the actual title (TRCK), below the playing time of this title (TIME).
Pressing the buttons 6 and 6 allows you to select a title.
Page 10

10
Pressing ADD (7) adds the selected title to the playlist. The display shows on the right side the number
of programmed titles (PGM-QT"), below the playing time of the programmed list (P-TIME).
NOTE: The program function is only available while the player is stopped. The maximum number of
programmed tracks is 99, the maximum program duration is 99 minutes. In case the level setting is
active, you must exit first.
Example
The CD inside the player contains 15 titles. You want to play only titles 7, 3 and 8.
Press MENU (7) for more than 2 seconds.
• Select title 7 using the SELECT buttons 5 and 6. Display shows “TRCK 7/15”.
• Now add this track (pressing ADD (7)) to the playlist.
• Select title 3 using the SELECT buttons 5 and 6. Display shows “TRCK 3/15”.
• Now add this track (pressing ADD (7)) to the playlist.
• Select title 8 using the SELECT buttons 5 and 6. Display shows “TRCK 8/15”.
• Now add this track (pressing ADD (7)) to the playlist.
• Now press STORE (8) to finish the programming and store the playlist
Deleting an existing playlist
Press MENU (7) for more than 2 seconds. Then press DEL PGM (9) and the playlist is deleted. The
playlist will also be deleted automatically as soon as a CD is ejected or the unit is switched off (standby).
3 Advanced Settings
The C 5.2 offers a lot of custom specific settings in its menu system. To enter the menu just tap on the
button MENU (7). The button now changes to EXIT. A second tip on this button leads you to the normal
operating mode. When the menu system is active you can select the desired function using the
buttons < ITEM > (5, 6). The setting is done using the buttons < VALUE > (8, 9).
Depending on the actual source the menu system offers a range of settings described in the following.
3.1 Global settings
3.1.1 Tone control
Set tone control to "bypass" (= linear) or "active". In case the tone control is activated "TONE ON" is
shown in the display (10), otherwise "LINEAR".
You can choose if you want to change bass and treble settings simultaneously for all inputs ("global")
or especially for the actual input ("individual").
The loudness function depends on speakers and properties of the listening room and is therefore
always "global".
NOTE: In case tone control is set to "bypass" the menu will skip the bass, treble, and loudness
settings.
3.1.2 Bass
Set a global or individual bass level between – 5 dB and + 9 dB.
Page 11

11
3.1.3 Treble
Set a global or individual treble level between – 7 dB and + 7 dB.
3.1.4 Loudness (Contour)
If you listen to music at low levels, you often recognize that bass and treble reproduction are weak.
This is because the human ear is not sensitive to bass and treble at low sound levels. To compensate
this you can use the parametric loudness function of the C 5.2. This function will increase bass and
treble levels when you decrease the volume. When the volume is increased the frequency response will
be more and more flat and remain linear at high volume levels. In order to obtain best results you have
to proceed in the following way:
Set the amplifier to a moderate volume level. Using the VALUE buttons (8, 9) choose in the loudness
menu a curve ("of" and 1 to 9) which gives best sound impression and exit the menu (button EXIT (7)).
NOTE: The loudness function selects automatically the correct curve depending on actual volume
setting. So if you change volume a different curve than previously selected may be shown in the
loudness menu. This is not a malfunction.
3.1.5 Balance
Set the balance between right and left channel for optimal stereo image.
3.1.6 Poweramp
In order to enable or disable both switchable speaker terminals (15, 28), you can set the poweramp ON
or OFF. This can useful if you have connected a headphone amp or a separate power amplifier to the
pre out (21). The chosen setting is saved permanently and can be changed again by new call of the
menu.
3.2 Tuner settings
3.2.1 RDS display
Choose if station NAME, RDS-TEXT or FREQUENCY is displayed.
3.2.2 Scan mode
Set tuning mode between "auto" or "manual" (see also 2.5.1).
3.2.3 2 channel mode
Set tuner to mono or stereo to obtain best sound.
NOTE: Depending on actual setting the threshold for auto tuning will change (sensitive in MONO, less
sensitive in STEREO).
3.2.4 Deemphasis
Depending on the country in which you will be using your device, setting a corresponding deemphasis
value helps to improve the sound quality by optimizing the signal-to-noise ratio and transmission
behavior of your FM tuner. Please choose the option"EUR, AUS, JPN", unless the unit is being used
the United States of America (USA).
Page 12

12
3.3 Personal setup
The personal setup offers you a range of settings to individualize the device according to your personal
needs. To enter the personal setup menu, please switch off your device on the rear of the unit at the
mains switch (29). Keep the most right key under the display pressed (9) while you switch on the unit
again (29). As soon as the display shows the personal setup menu you can release the multifunctional
button (9).
When the personal setup is active you can select the desired function using the buttons < ITEM >. The
button SELECT activates the function. The setting is done using the buttons < VALUE4 >. BACK leads
you back to other settings. EXIT exits the personal setup and stores the settings.
3.3.1 Display brightness
Sets display brightness 25% to 100%.
NOTE: The setting 100% can lead to "burn in" effects on the display if the unit is operated in this
setting for a very long time. So please switch the unit to stand by, if not in use.
3.3.2 Bass & treble control
Choose if you want to change bass and treble settings simultaneously for all inputs ("global") or
especially for the actual input ("individual").
3.3.3 Skip unused inputs
Deactivate unused inputs ("SKIP"). The unit will then skip these inputs when the source selector (2) is
pressed or if you select the inputs via the RC 3 remote control.
3.3.4 Define input names
You can individually set the names (max. 8 characters) of the different sources shown in the display
(10). Proceed as follows:
Press SELECT. The display shows now on the left side the old name, on the right side the new name.
The character to change is marked by an underscore. The keys < ITEM > (5, 6) select the input, the
keys < POS > (8, 9) select the position of the character to change. The marked character can be set
using the volume knob (11). When you are ready, simply press BACK (7). and the new names will be
stored.
3.3.5 Gain fix / variable
In a surround system the channel balance, tone setting and bass management are done by the
decoder. This setting must not be altered by another component because the channel balance the
would be incorrect. For this application the C 5.2 offers the fixed gain function (only for inputs 1-3).
Set the input where the main channels of the surround system are connected to fixed gain. When this
input is selected, tone controls are bypassed, balance is set to neutral position and the gain is on a
fixed level independently of the volume setting on the other inputs.
Page 13

13
3.3.6 FM auto store
This function is useful when storing a large quantity of stations from cable. Please note that the
stations are stored including the actual tuner setting. For cable we recommend: RDS-display = name,
scanmode = auto, 2-ch mode = stereo, bandwidth = narrow, sensitivity = local.
Once the tuner parameters are set in the desired way enter the personal setup and select "FM auto
store". Then press the button START (5). While the auto store function is in progress all stations are
played audibly for half a second. When the function is terminated the display shows for 2 seconds the
number if stations found. Then the unit comes back to normal tuner operating mode.
If desired you can now shift certain stations to different positions, change the settings and store back
or delete unwanted stations.
3.3.7 Autoplay
When AUTOPLAY is ON, the CD player will start playing automatically every time a new CD is inserted.
If AUTOPLAY is OFF, the player will read the TOC of the inserted disc and then go to STOP mode.
3.4 Reset
This function cancels certain or all settings and makes the unit return to default settings.
To enter the reset menu, please switch off your device on the rear of the unit at the mains switch (29).
Keep the middle key under the display pressed (7) while you switch on the unit again (29). As soon as
the display shows the reset menu you can release the multifunctional button (7).
Select if you want to clear the station memory (STAT), the input names (NAME) or reset the unit
completely (ALL).
CANCEL will bring the unit back to normal operating mode without resetting any item.
4 Cleaning
Use a soft cloth and normal glass cleansing fluid.
CAUTION: Make sure that no fluid comes into the unit. Do not use scouring cleaners. They may
damage the surface.
Page 14

14
5 If something doesn’t work...
Some putative defects are often caused by mistakes in operation. Sometimes other units connected to
the amplifier can cause problems. Therefore please read the following tips before you consult your
dealer or us.
1. Amplifier is muted
a) Mute function is active, press button MUTE on remote control or increase volume using the rotary
encoder (11).
b) Inadvertent switching to standby by remote control. Press power button (1). If the LED indicator
and display do not light up a fuse can be blown due to overvoltage (thunderstorm). Please contact
your dealer.
2. Amplifier switches off during normal operation
This can happen if the temperature inside the unit becomes too high. In this case the amplifier
switches off and the display shows ’overheat’. Switch the unit off and let it cool down for five minutes.
3. Hum
a) Hum while playing records: Make sure that the chassis of your record player is properly grounded.
4. Remote control doesn’t work
a) Charge the included lithium-ion battery of your RC 3 or RC 8 remote control (see 1.7.1).
b) Point with the remote control transmitter directly to the unit.
5. The display shows „now disc“ althoug A CD is inserted
a) Please make sure the CD has not been damaged and is inserted with the correct side facing
up
b) Please clean your CD with a soft cleaning clot
6. No RDS display
a) The receive signal is too weak, hence data can’t be decoded and aren’t displayed.
b) Certain radio stations do not support and broadcast RDS.
6 Conditions of warranty (EC only)
If despite expectations a defect occurs that cannot be repaired by yourself or your dealer, we
undertake the repair of your unit free of charge for up to three years from date of purchase. The
warranty covers the costs of material and working time, transport costs are to be borne by the owner.
Provisions for this warranty are:
• The unit must have been purchased from an authorised dealer. Equipment from other sources
will not be repaired, not even at charge.
• The warranty registration card, together with a copy of the bill of sale, must be received by us
within four weeks of the date of purchase.
• The defect must not have been caused by improper handling or misuse.
• Return the unit to us only in its original packing. If this is not possible we are entitled to refuse
acceptance. We will not assume responsibility for transport damage under any circumstances.
• A short description of the defect is to be included with the returned unit.
• In cases of doubt we reserve the right to request a copy of the bill of sale.
• We also reserve the right to levy a handling charge for items returned without good or valid
reason, or if the unit proves to be not defective.
Page 15

15
NOTE: If you are returning the unit from a country other than Germany you should ensure that correct
export documents are obtained. We cannot accept any charges for costs arising from improper or
incomplete export documentation.
If you have purchased your unit from a dealer outside Germany please refer to him or the relevant
importing firm to process the warrant
7 Technical Data
7.1 Amplifier
Sensitivity (25 W/4 Ohm) 12.5 mV to 125 mV (adjustable)
Sensitivity Phono (25 W/4 Ohm) 40 µV to 400 µV (adjustable)
Input impedance 6.8 kOhms
Input impedance PHONO 47 kOhms / 100 pF
S/N 96 dB(A)
S/N PHONO 83 dB(A)
THD (25 W/4 Ohm) < 0,1 %
Frequency response (4 Ohm) < 5 Hz - > 50 kHz
Damping factor (8 Ohm) >400
Output power > 2 x 220 Watt (8 Ω) / 2 x 330 Watt (4 Ω)
7.2 Tuner
Frequency range 87,5 MHz – 108,0 MHz
Tuning step 50 kHz
Sensitivity mono / stereo) 50 Ω
Empfindlichkeit mono / stereo 1,5 µV / 50 µV
S/N ratio mono / stereo 73 dB(A) / 68 dB(A)
THD+N mono / stereo 0,1% / 0,3%
7.3 CD-Player / D/A Converter
Formats CD Audio, CDR (according to red book standard)
Upsampling 192 kHz / 24 Bit
Frequency response CD <20 Hz – 20 kHz
Frequency response USB <20 Hz – 24 kHz
Frequency response SPDIF <20 Hz – 90 kHz
Deemphasis automatically
Input Dig in opt SPDIF, linear PCM 33 kHz – 96 kHz / 16 Bit – 24 Bit
Input Dig in coax SPDIF, linear PCM 33 kHz – 192 kHz / 16 Bit – 24 Bit
USB Input up to 48 kHz / 16 bits
Dig out opt/coax (S/PDIF/TOSLINK) SPDIF 44,1 kHz / 16 Bit (CD-Player)
SPDIF, or input format (Dig in opt / coax/USB)
Input impedance dig in coax 75 Ω
Input level dig in coax according to IEC 908
Output impedance dig out coax 75 Ω
Output level dig out coax according to IEC 908
7.4 Other
Supply voltage 230 Volt / 50 Hz / 450 VA (stand-by <1 VA)
Dimensions (W x H x D) 430 mm x 130 mm x 370 mm
Weight 12 kg
Changes reserved without notice.
 Loading...