


AvL TECHNOLOGIES
Operation and Maintenance Manual
MODEL 1200K/1210K - RCI SNG Antenna System
Operation and Maintenance Manual
Contents Subject to Change
Rev. 9, April 2006
900-009-001-A
© Copyright 2006
No part of this document may be photocopied or
otherwise reproduced without the prior permission
in writing of AvL Technologies, Inc.. Such
written permission must also be obtained before
any part of this document is stored in an electronic
system of whatever nature.
AvL Technologies P 130 Roberts Street P Asheville, NC 28801
828-250-9950
P 828-250-9938 Fax P www.avltech.com

Model 1200K/1210K - RCI SNG ANTENNA SYSTEM 2 Operation and Maintenance Manual
TABLE OF CONTENTS
SECTION 1 - Overview Page
1.1 Technical Description 2
1.2 Specifications 4
SECTION 2 -Installation and Set-Up
2.1 General 6
2.2 Installation to Vehicle 6
2.3 Controller Installation 7
2.4 Controller/Positioner Verification Tests 7
2.5 Elevation Stow Switch Setting 8
2.6 Final Calibration of System 8
SECTION 3 - Azimuth Positioning System
3.1 Azimuth Bearing 9
3.2 Azimuth Gear Box 9
3.3 Azimuth Motor 9
3.4 Azimuth Roto-Lok® Cable Drive 10
3.5 Azimuth Position Feedback 10
3.6 Azimuth Stow and Limit Switches 11
SECTION 4 - Elevation Positioning System
4.1 Elevation Pivot Assembly 12
4.2 Elevation Gear Box 12
4.3 Elevation Motor 12
4.4 Elevation Roto-Lok® Cable Drive 13
4.5 Elevation Position Feedback 13
4.6 Elevation Stow and Limit Switches 14
4.7 Elevation Stow Ignition Cut-Out Switch 14
SECTION 5 - Feed and Polarization System
5.1 General 15
5.2 Feed 15
5.3 Polarization Drive 15
5.4 Polarization Position Potentiometer 16
5.5 Polarization Limits 16
5.6 Feed Assembly 16
SECTION 6 - Annual Inspection and Maintenance
6.1 General Maintenance 17
6.2 Annual Inspection List 17
6.3 Replacement Parts List 18
SECTION 7 - Interface Drawing 19

Model 1200K/1210K - RCI SNG ANTENNA SYSTEM 3 Operation and Maintenance Manual
SECTION 1 - OVERVIEW
TECHNICAL DESCRIPTION
The 1.2M SNG Antenna System is an elevation over azimuth positioner featuring the simple,
rugged Roto-Lok® drive system which produces very low backlash, high-stiffness and highreliability and driven by a low backlash, gear box with DC motors. All drive components are highstrength steel, housed in lubricated-for-life housings which results in the most reliable, no
maintenance system with the minimum of weight. The reflector is an offset, prime focus, carbon
fiber reflector illuminated by a corrugated feed horn. The RF power amplifier may be installed on
the feed boom, positioner backing structure or inside the truck. Handcranks across az and el axis
are included allowing easy antenna positioning if the controller malfunctions. The basic 2-port
antenna system weighs only 117 pounds.
RF SYSTEM
The offset reflector/feed system produces co-polarization patterns that easily meet the 29-25 log
theta requirement. The .8 f/d optics reduces off-axis cross-pol in the asymmetrical plane. The RF
power amplifier may be installed on the feed boom, positioner backing structure or inside the truck.
Waveguide run to power amp across each axis can be via twist-flex or rotary joints. The system
can be configured for either 2-port or 4-port.
ROTO-LOK® DRIVE SYSTEM
The patented Roto-Lok® drive system utilizes highly-reliable aircraft control cables in a redundant
configuration to achieve a zero-backlash, light-weight, very stiff drive system. It achieves this hightech performance using low-tech components by simply wrapping the cable around the driver
capstan several times before wrapping the larger drive drum. The method used to wrap the
capstan results a minimum free-length of cable. The load in the cable on the main drum is
exponentially reduced as it is wrapped around the drum. Therefore the total elongation of the
cable when under load is minimized. The Roto-Lok® system results in stiffness of up to 10 times
that of comparable gear or harmonic drive systems. The cables are pre-tensioned and springloaded at the main drum attachment point, which eliminates backlash at installation and from any
unexpected cable stretch in the future.

Model 1200K/1210K - RCI SNG ANTENNA SYSTEM 4 Operation and Maintenance Manual
SECONDARY DRIVE SYSTEM
The Az and El Roto-Lok® drive systems are driven by a low backlash worm gear set with a 40:1
ratio. The factory low backlash of the worm-gear set is reduced further by the Roto-Lok® drive ratio
resulting in a lash equivalent to only .06 dB as seen by the RF system. The gear sets are housed
in a sealed housing which allows the gear set to be continuously lubricated in synthetic oil which
maximizes gear efficiency and minimizes wear.
MOTOR DRIVES
Lightweight, reliable, servo-quality DC motors with integral gear box are used for az, el and pol
drives. These motors were selected because they provide the best torque-to-weight ratio as well
as allowing dual speed operation for slewing and peaking. These motors produce constant torque
over the speed range with no cogging at low speeds which ensures smooth operation when
peaking antenna. The 24V DC design provides current limiting torque control and will allow vehicle
battery operation if necessary.
CONTROLS
The system will interface with a jog controller which allows remote control of the system. Each
axis position is displayed as well as limit indications. The unit will also interface with a full function
controller with features such as automatic stow, GPS/flux-gate input and automatic satellite
pointing and tracking.
CONSTRUCTION
Except for the drive components and bearings, the trunion and backing structure and covers will be
all aluminum. The fabrications on parts and assembly will be of world wide quality standards AvL
is noted.

Model 1200K/1210K - RCI SNG ANTENNA SYSTEM 5 Operation and Maintenance Manual
1200/1210K SPECIFICATIONS
MECHANICAL
Reflector 1.2M Prime Focus Offset
Mount Geometry Elevation over Azimuth
Polarization Rotation of Feed
Travel
Azimuth 270° or 400°
Elevation
Operational 0° - 70° of reflector boresight (Standard)
0° - 90° (Optional)
Total 0° - 160°
Polarization ±/-95° for 2-Port
±/-50° for Electronic H/V Switching or 4-Port
Speed
Slewing/Deploying 2°/second
Peaking 0.2°/second
Motors 24V DC Variable Speed, Constant Torque
RF Interface
HPA Storage Feed Boom, Rear of Reflector or Inside Truck
Axis Transition Twist-Flex or Rotary Joints
Waveguide WR 75 Cover Flange at Interface Point
Coax RG59 run from feed to base plus 8 ft.
Electrical Interface 25 ft. Cable with Connectors for Controller
Optional Manual Drive ½" Hex Socket Wrench
Weight 110 to 150 lbs. depending on options selected
ENVIRONMENTAL
(Wind) Survival
Deployed 75 mph
Stowed 100 mph
Operational
Tracking 45 mph (at 60° F Min. Temperature)
Temperature
Operational -20°F to 125°F
Survival -40°F to 140°F

Model 1200K/1210K - RCI SNG ANTENNA SYSTEM 6 Operation and Maintenance Manual
ELECTRICAL Receive Transmit
Frequency 11.7 - 12.2 GHz 14.0 - 14.5 GHz
Gain (Midband)
R/T 42.0 dBi 43.5 dBi
VSWR 1.30:1 1.30:1
Beamwidth (degrees)
-3 dB 1.5 1.2
-10 dB 2.6 2.1
First Sidelobe Level (+/-2 dB) -20 dB -20 dB
Radiation Pattern Meets Current FCC requirements for 2° Spacing
Antenna Noise Temperature
30° Elevation Angle 30°K
Polarization Linear
Power Handling Capability 0.5KW per port
Cross-Pol Isolation
On-Axis 35 dB 35 dB
Off-Axis (within .5 dB BW) 32 dB 32 dB
Off-Axis (within 1 dB BW) 30 dB 30 dB
Feed Port Isolation
RX/RX 30 dB
TX/RX 60 dB
CONTROLLER
Type Jog or Full Function Controller
Manual Mode Input Front Panel Keypad for Jog/Run/Run To/Stow
Automatic Mode Input GPS, Flux-Gate Compass and Antenna LNB
Size Two or Three rack units high
Input Power 110V AC 1 ph 60 Hz 15 amp or
220V AC 1 ph 60 Hz 7.5 amp

Model 1200K/1210K - RCI SNG ANTENNA SYSTEM 7 Operation and Maintenance Manual
SECTION 2 - INSTALLATION AND SET-UP 1.2M - SNG
2.1 GENERAL
The AvL 1.2M positioner has been fully tested with the RCI 3000/3050 controller prior to shipment.
All position feedback, limit sensing, limit switches (except elevation stow) and motor speeds have been
calibrated or set. The positioner should be secured to the vehicle, connecting wave quide or boom
mounted HPA cables, connecting coax, connecting control cables to controller and connecting auxiliary
control cable to wave quide switch if applicable.
The vehicle roof should be reinforced with a substructure capable of carrying the wind loads as specified
on the interface drawing to the vehicle frame. The structure should be stiff enough to prevent no more
than a 0.5 dB of TX gain loss in a 30 mph gusting to 45 mph wind. (850 IN/LB moment @ .25°)
A 11-inch diameter hole should be in the mounting surface. The mounting surface must
be flat within .005
inch to prevent binding the azimuth bearing after torquing the mounting bolts. No obstruction should be
above the interface surface in a 17-inch diameter envelope. Any other roof-mounted equipment such as
air conditioners should be more than 64 inches from center of interface bolt pattern. A hard flat surface is
required for the feed bumpers as shown on the interface drawing.
The 12-inch diameter, 12-bolt pattern must
be oriented properly with two bolts 15° on either side of the
centerline of the vehicle.
2.2 INSTALLATION TO VEHICLE
Remove the top of the shipping crate. Remove the narrow end at the azimuth platform end of the crate.
Hand crank using RH access and raise the antenna in elevation until the backing structure is vertical. (Fig.
2.1)
Figure 2.1

Model 1200K/1210K - RCI SNG ANTENNA SYSTEM 8 Operation and Maintenance Manual
Remove the bolts attaching the positioner to the shipping base. Adjust the forks on a forklift to just
straddle the azimuth ring and under the elevation pivot assemblies. Place cardboard pieces between
the positioner and the forks.
Carefully raise positioner out of crate watching control cables. Safety strap positioner to forklift
truck. Maneuver over to rear of truck. Raise positioner to clear vehicle roof by about two feet.
Lower control cables into center of mounting hole and install ¼ - 20 x 1" long screws (provided)
into holes in azimuth ring diametrically opposed. Use these as guides to position azimuth ring
directly over bolt circle. Note: Positioner must be installed with azimuth cable termination housing
aligned on centerline of vehicle. (Fig. 2.2)
Remove and replace set screws with mounting bolts provided.
APPLY LOCKTITE 242 OR EQUIVALENT TO BOLTS.
IF INTERFACE SURFACE IS NOT
FLAT WITHIN .005 INCH, apply a thin layer of structural epoxy grout
between azimuth ring and vehicle surface. Snug bolts finger tight and allow epoxy to cure before final
torquing .IF INTERFACE SURFACE IS FLAT WITHIN .005 INCH
, apply a thin coat of silicone between
azimuth ring and surface.
TORQUE ALL 12 BOLTS TO 9 - 10 FT. LBS.
2.3 CONTROLLER INSTALLATION
Install controller into electronics rack. Connect cables to rear making sure P1 and P2 are connected
to correct sockets. (P1 to J1 and P2 to J2) Confirm
convert to correct voltage by following instructions in the RCI 3000/3050 Controller manual Section 2.2.1.
Connect AC power cable to controller.
2.4 CONTROLLER / POSITIONER VERIFICATION TEST
Turn power on. Wait for self-check to complete. Hit mode button once to reach display/function
mode. Press deploy button to Deploy. Antenna will drive until:
ELEVATION 20.0° (approx)
AZIMUTH 0.0°
POLARIZATION 0.0°
controller voltage and fuse are correct, if not
Press speed button to change speed to FAST
HAVE SOMEONE OUTSIDE AND ELEVATED SO ANTENNA MOVEMENT CAN BE OBSERVED
DURING TEST!
Push El UP button. Antenna elevation reading should increase. Move until elevation reads 20°.
Place inclinometer on feed boom tubes. Inclinometer should indicate that feed boom tubes are 20° above
horizontal. (Note: The feed boom tubes are indicated on the interface drawing and are
parallel to the antenna boresight.) If not, refer to RCI 3000/3050 Controller manual for elevation
zero voltage setting.

Model 1200K/1210K - RCI SNG ANTENNA SYSTEM 9 Operation and Maintenance Manual
Press az CW and az display should increase, and az should rotate CW as viewed from above the
antenna.
Press az CCW and az display should decrease.
Press pol CW and pol display should increase.
Press pol CCW and pol display should decrease, and the feed az should rotate CW as viewed from
behind the reflector.
2.5 ELEVATION STOW POSITION SETTING
HAVE SOMEONE OUTSIDE AND ELEVATED SO ANTENNA MOVEMENT MAY BE OBSERVED
DURING TEST!
Press mode key to change screens and Select STOW.
Watch reflector surface approach feed horn.
Press STOP when reflector is within 2" of feed horn.
Jog down until reflector presses on rubber padding on feed housing.
Adjust stow limit switch if necessary by bending lever. Stow switch is on east side with long lever. (East
is the left side as viewed from behind the reflector.)
2.6 FINAL CALIBRATION OF SYSTEM
Check az ZERO position on roof. If azimuth controller will stow at az = 0.0 degrees you may adjust as
zero voltage +/-2° to bias stow position. Adjust zero voltage per Section 4.1.1 of controller manual.

Model 1200K/1210K - RCI SNG ANTENNA SYSTEM 10 Operation and Maintenance Manual
SECTION 3 - AZIMUTH POSITIONING SYSTEM
3.1 AZIMUTH BEARING
The azimuth bearing is a precision ground, sealed Kaydon Slim Line ball bearing with a dynamic
and static moment capacity of over four times the worst-case wind load specification. It is press fit into a
special aluminum-bearing ring consisting of main internal and external rings with clamping
rings. The bearing is packed with synthetic grease at assembly and no further greasing is required.
Because of the excess capacity, low rpm, and low number of cycles, no maintenance is required.
3.2 AZIMUTH GEAR BOX
The azimuth gearbox is a low backlash worm gear box. The worm gear drive
isolates any backlash in the motor drive from the system. In addition, since it is
a 40:1 ratio it will not back drive, eliminating any need for a brake on the drive
train. (Fig 3.1)
The motor drives the input worm via a quill/female hole and square key. The
worm shaft is extended with a hex shape installed for the hand crank. The
azimuth capstan is secured to the output shaft with a square key knurl plus
permanent locktite to eliminate any backlash between the capstan and
gearbox.
The low backlash is achieved by selective fit of the worm and worm gear. The
nominal backlash for the gearbox is 30' which is reduced by the
Roto-Lok® drive to less than 4' of the beam of the antenna. The gearbox
contains synthetic oil filled half way to the level plugs. Because of the design
capacity of the gearbox, low rpm and limited cycles experienced by an SNG
system, no maintenance is required.
3.3 AZIMUTH MOTOR
The azimuth drive motor is a 24 DC motor with integral 30:1 spur
gear train. (Fig 3.2.) The motor armature rotates at up to 3000 rpm
causing a high frequency noise that will vary depending of the loading
condition of the motor.
The maximum output speed is 100 rpm. The output shaft is “D”
shaped with a special adapter with a slot for a square key.
Since the low backlash worm gear drive isolates the backlash from
the motor, any backlash between the shaft adapter, square key or
motor gear train will not be seen by the reflector boresight. The motor
is mounted to an adapter plate that is bolted to gearbox with (4)
screws.
Figure 3.1
Figure 3.2
No maintenance of the azimuth motor is required.
Model 1200K/1210K - RCI SNG ANTENNA SYSTEM 11 Operation and Maintenance Manual
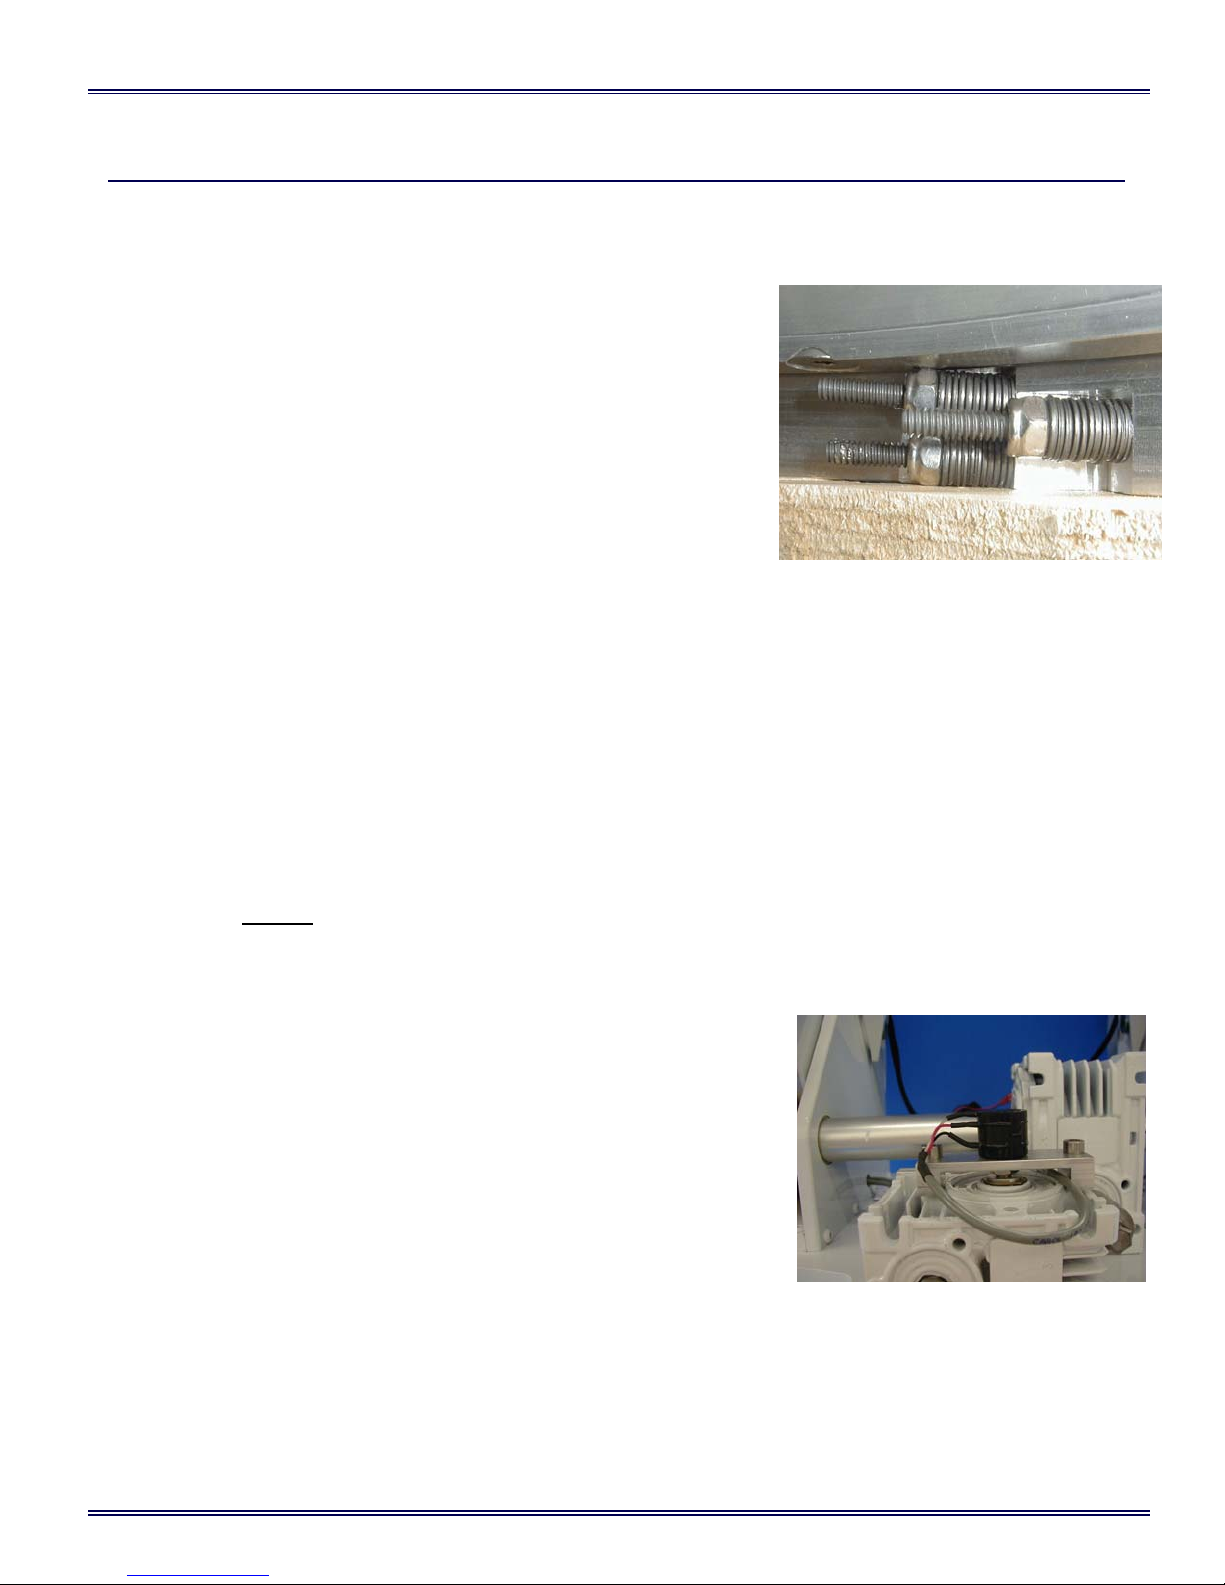
3.4 AZIMUTH ROTO-LOK® CABLE DRIVE
The patented azimuth Roto-Lok® drive produces a drive system
with zero backlash, high stiffness, no wear, no lubrication, and
maximum reliability. The system consists of three or four 1/16, 7 x
19 stainless steel aircraft control cables reverse wrapped twice
around the grooved capstan and once around the drum, with solid
connections on one end and high force, Belleville springs on the
other end (Fig 3.3.) One cable has the capacity to withstand a 75
mph wind load. The additional cables are used to provided
increased stiffness and drive redundancy. If a cable becomes
damaged during usage, cut off cable and continue to use
positioner. Replace cable when time permits at your
maintenance facility.
The cables are sized to last the life of the positioner. The springs
will automatically compensate for
any elongation of the cable.
Figure 3.3
Cable position should be checked as per the periodic maintenance schedule in Section 7. If cables
have drifted, manually move cables using blunt instrument on azimuth drum until correct position is
obtained.
At installation the Belleville springs are collapsed until no “air” is seen between the springs. You
should check this condition yearly to account for the slow settling of the cable strands. Use pliers
to hold stud and ¼ box end wrench to tighten nut. Be sure not to over tighten. Tighten until
springs are almost
fully collapsed. (Fig 3.3)
3.5 AZIMUTH POSITION FEEDBACK
The azimuth position feedback is produced by a 10 turn, 1K-ohm
potentiometer driven by the output shaft of the worm gear box. (Fig
3.4) Since the Roto-Lok drive has no backlash, the position feedback
is as accurate (1%) as the resolution (.3°) and accuracy of the
potentiometer and the backlash between the potentiometer and the
azimuth capstan. The potentiometer is sealed and rated for IP 65
environment - wind, rain, dust, etc.
The potentiometer is mounted on a bracket that straddles the az gear
box. The azimuth potentiometer is slotted and driven with a cross pin
in the az capstan. The potentiometer is mechanically centered at the
travel position ( 5 turns from either end ) when az platform is in the az
stow position. This is accomplished by loosening the ½” nut, which
secures the potentiometer to the bracket. The potentiometer may
also be electrically zeroed by the controller. See Section 2.3
in the RCI 3000/3050 Controller manual.
Figure 3.4

Model 1200K/1210K - RCI SNG ANTENNA SYSTEM 12 Operation and Maintenance Manual
3.6 AZIMUTH STOW AND LIMIT SWITCHES
The RCI 3000/3050 Controller uses the az potentiometer
voltage to determine limits. Therefore, the AvL positioner is
equipped with only an azimuth stow position switch. Limit
switch mounting holes are provided if needed for other brand
controllers.
The azimuth stow and limit switches are mounted under the
azimuth platform accessible through the access hole on the
base. (Fig 3.5) The switches are fixed to relative to the
mounting surface and are actuated by a cam located on the
azimuth bearing clamp ring. The stow switch actuation occurs
at slightly different positions depending if you approach the
stow position from CW or CCW.
Therefore, the azimuth stow position will vary approximately 1° from stowing from CW or CCW.
Since the controller drives to 0° az after sensing the stow switch, the az stow position can be varied
by either changing the zero position of the az potentiometer or zero voltage of the controller.
Figure 3.5
Rotation Direction Convention: + is clockwise (CW) viewed from above mount
- is counter clockwise (CCW) viewed from above mount
NOMINAL AZIMUTH LIMITS
Model Limits
1200 (With 300° az
and no az RJ or +145° / -155°
with single az RJ)
1200 (With 270° az and
With dual az RJ) +120° / -120°
1200 (With 400° az and
No az RJ or +210° / -190°
with single az RJ)
Notes:
1) The Limits should be set after the potentiometer has been centered as described above. If the
potentiometer is moved from this position, the limits should be reset.
2) The az angle displayed by the controller is affected by several parameters in the controller.
(These include az Scale Factor, az Reference Position).
3) While setting the limits, watch the az capstan to make sure it does not run into the spring block
at the end of the cables.
4) The angles at the limits in the chart shown above are for nominal values of these parameters,
and the values actually displayed by the controller at the limits may vary.

Model 1200K/1210K - RCI SNG ANTENNA SYSTEM 13 Operation and Maintenance Manual
SECTION 4 - ELEVATION POSITIONING SYSTEM
4.1 ELEVATION PIVOT ASSEMBLY
The elevation pivot assembly consists of two elevation drum assemblies
pivoting between two clevis blades assemblies. The drum shafts pivot in
hi-tech plastic bushings. (Fig 4.1) No maintenance is required. If
squeaking noise is heard, simply spray silicone lubricant with “straw”
nozzle down between the drum side and clevis plate on to the pivot shaft.
4.2 ELEVATION GEARBOX
The elevation gearbox is a low backlash (30') worm gear box. The worm
gear drive isolates any backlash in the motor drive from the system. In
addition, since it is a 40:1 ratio it will not back drive, eliminating any need
for a brake on the drive train.
The motor drives the input worm via a quill/female hole and square
key. The worm shaft is extended with a hex shape adapter for the
hand crank. The dual elevation capstans are driven with a square
key and clamped to the gearbox shaft to eliminate backlash. (Fig 4.2)
Figure 4.1
The gearbox contains synthetic oil filled half-way to the level plugs.
Because of the design capacity of the gearbox, low rpm and limited
cycles experienced by an SNG system, no maintenance is required.
4.3 ELEVATION MOTOR
The elevation drive motor is a 24V DC motor with integral 32:1 spur
gear train. The motor armature
rotates at up to 3300 rpm causing a high frequency noise that will vary depending of the loading condition
of the motor. (Fig 4.2)
The maximum output speed is 104 rpm. The output shaft is a standard keyed shaft. The output
torque capacity of the motor is rated for the operational wind load.
Since the low backlash worm gear drive, isolates the backlash from the motor, any backlash between
the square key and motor gear train will not be seen by the reflector boresight. No maintenance of
elevation motor is required.
Figure 4.2

Model 1200K/1210K - RCI SNG ANTENNA SYSTEM 14 Operation and Maintenance Manual
4.4 ELEVATION ROTO-LOK® CABLE DRIVE
The patented elevation Roto-Lok® drive produces a zero backlash; high stiffness, no wear, no lubrication,
and maximum reliability drive system. The system consists of 12 1/16, 7 x 19 stainless
steel aircraft control cables reverse wrapped three times around the capstan with solid connections
on one end and high force, Belleville springs on the other end. Eight cables have the capacity to
withstand a 75 mph wind load. The additional cables are used to provided increased stiffness and drive
redundancy. If a cable becomes damaged during usage, cut off cable and continue to use
positioner. Replace cable when time permits at your maintenance facility.
The cables are sized to last the life of the positioner. The springs will automatically compensate for any
elongation of the cable.
The position should be checked per the periodic maintenance
schedule in Section 6. If the cables have drifted, manually move
cables using blunt instrument on elevation drums until correct position
is obtained.
At installation the Belleville springs are collapsed until no “air” is seen
between the springs. You should check this condition yearly to
account for the slow settling of the cable strands. Use pliers to
hold stud and ¼ box end wrench to tighten nut. Be sure not to over
tighten. Just almost fully, collapse springs. (Fig. 4.3)
4.5 ELEVATION POSITION FEEDBACK
Figure 4.3
The elevation position feedback is produced by an electronic
inclinometer located in the feed housing. (Fig 4.4) No adjustment or maintenance is required. The
inclinometer is electronically zeroed in the controller. See Section 2.3 in the RCI 3000/3050 Controller
Manual.
Figure 4.4

Model 1200K/1210K - RCI SNG ANTENNA SYSTEM 15 Operation and Maintenance Manual
4.6 ELEVATION STOW AND LIMIT SWITCHES
The elevation stow, down and up limit switches are mounted on the east elevation pivot assembly under
the drum. (Fig 4.5) the switches are fixed to pivot wall and are actuated by a cam profile machined into
the drum side plates.
The elevation up and down switches do not require adjustment. The Elevation Stow switch is adjusted by
using needle nose pliers and bending the limit switch lever as needed. See section 2.6 above.
Figure 4.5
4.7 ELEVATION STOW IGNITION CUT-OUT SWITCH
A second elevation stow switch is mounted on the west elevation pivot and used as an ignition cutout
switch. It should be adjusted to actuate before the elevation stow switch, as the antenna is stowed. See
Fig 4.6 for reference, see Fig. 4.1 for east and west side orientation.
Figure 4.6

Model 1200K/1210K - RCI SNG ANTENNA SYSTEM 16 Operation and Maintenance Manual
SECTION 5 - FEED AND POLARIZATION POSITIONING SYSTEM
5.1 GENERAL
The Feed assembly consists of feed boom, feed housing, RF components and polarization drive.
The feed boom is pivoted about the elevation axis to eliminate additional flex-guide required if
pivoted at edge of reflector. The pivot connection at the end of the feed arms is with delrin
bushings and shoulder bolts. The elevation wavequide runs along the outside of the feed boom tubes. A
piece of 18" flex waveguide is used at the end of the waveguide tube to the OMT. The feed/OMT is
rotated by worm gear drive and 12V DC motor. Position feedback is from a 10 turn potentiometer.
5.2 FEED
The feed assembly consists of an inclinometer, feed horn and OMT with male pivot bushings. The
male bushings pivot in delrin female bushings at each end of the OMT. These bushings are mounted to
mounting plate. The worm gear attaches to OMT and waveguide attaches to other end with M6
screws at the rear flange of the OMT. The feed/polarization drive is mounted underneath pol mounting
plate with worm mating to worm gear, which extends through slot.
5.3 POLARIZATION DRIVE
The feed/polarization drive is mounted underneath pol
mounting plate with a worm mating to the worm gear,
which extends through a slot. The polarization drive
motor (Fig. 5.1) is a 12V DC gear motor. It is attached to
a coupling, which attaches to the worm. The worm gear
shaft is extended to drive the position potentiometer. This
plugs into standard cigarette lighter and has a toggle
switch to rotate
pol in desired direction. The controller travel limits are +/92° for a 2-port and +/-47° for a 4-port.
(See RCI 3000/3050 Controller Manual section 3.3). An
emergency pol drive is available to drive pol motor in case
of controller error or failure. This plugs into standard
cigarette lighter and has a toggle
switch to rotate pol in desired direction.
Since the low backlash worm gear drive isolates the feed from the motor no brake is required. No
maintenance of the Polarization motor/assembly is required.
The polarization drive is replaced a complete unit including the motor, motor bracket, worm, bushings and
worm shaft.
Figure 5.1

Model 1200K/1210K - RCI SNG ANTENNA SYSTEM 17 Operation and Maintenance Manual
5.4 POLARIZATION POSITION POTENIOMETER
The polarization feedback is produced by a 10 turn, 1K-ohm potentiometer driven by the worm shaft, and
mounted on the polarization motor bracket. The resolution and accuracy is 0.3 degrees. The
potentiometer is rated for IP 65 environment, Wind, Rain, and dust etc... The potentiometer is
mechanically set at the one-half travel position. (5 turns from either end) and will read approximately 500
ohms at 0° pol (stow). The potentiometer may be set using the controller the voltage reading at pol stow
will read 2.5V at 0°. See RCI controller manual Sec. 3.3
5.5 POLARIZATION LIMITS
The RCI 3000 Controller uses the polarization potentiometer voltage to determine limits. The controller
drives to 0° pol when it stows. The AvL positioner has the mechanical capability of +/-92° per section 3.3
of the RCI 3000/3050 Controller Manual. If the controller fails to terminate power to the motor and the
system is driven to a hard limit stop, the DC motor will stall. To correct, reset pol jam error in the
controller.
5.6 FEED ASSEMBLY
The feed assembly consists of the feed, the polarization drive and the polarization potentiometer.
The feed assembly is installed as a complete unit and secured to each side of feed box. The feed horn is
mechanically positioned with a template within 1/8" of the theoretical focal point of the reflector. This
positioning assures the RF System provides the gain and FCC compliance as stated
in the specifications. Minor RF improvement can be realized by optimizing the feed positioning
using transmit or receive patterns. Inclinometer is mounted on the inside of feed box.

Model 1200K/1210K - RCI SNG ANTENNA SYSTEM 18 Operation and Maintenance Manual
SECTION 6 - MAINTENANCE
6.1 GENERAL
The AvL Model 1200K/1210K-RCI is designed such that any wear should never degrade performance
below specifications and essentially no maintenance will ever be required. However, since it is
impossible to ascertain or test for all possible environments, the following check up is recommended
each year. If any problems are observed, refer to the appropriate section.
6.2 ANNUAL INSPECTION
AZIMUTH
• Hand crank in azimuth the unit should hand crank easily.
• Check for unusual noise in azimuth bearing and azimuth gearbox.
• Run in azimuth and check for unusual noise in azimuth motor.
• Check position of azimuth drive cables on capstan at 0°az.
• Check drive cables for damage.
• Have someone run to both az limits and observe cable tracking.
• Check oil level in gearbox.
• Remove cable termination block covers and inspect cable terminations.
Tighten springs if more than .010 gap exists between spring sets. Tighten
With an open-end ¼” wrench and using Visegrip pliers holding stud.
• Inspect az stow switch.
• Inspect and confirm az potentiometer is seated properly and not damaged.
• Check az bearing screws, az gearbox bolts, az pot bracket, etc are tight.
ELEVATION
• Hand cranking in elevation the unit should hand crank easily.
• Unit should hand crank with approximately 50-75 in-lbs. torque.
• Check for unusual noise in elevation pivot bearings and elevation gearbox.
• Run in elevation and check for unusual noise in elevation motor. (Run to limits)
• Check position and tracking of elevation drive cables.
• Check drive cables for damage.
• Check oil level in gearbox.
• Remove backing structure covers and inspect cable terminations. Tighten
springs if more than .010 gap exists between spring sets. Tighten with an
open-end 7/16" wrench and using Visegrip pliers holding stud.
• Inspect elevation limit switches.
POLARIZATION
• Remove rear feed cover.
• Run in polarization and check for unusual noise in polarization gearing or motor.
• Inspect polarization potentiometer.
• Inspect wave-guide for any damage, dents, or cracks.

Model 1200K/1210K - RCI SNG ANTENNA SYSTEM 19 Operation and Maintenance Manual
6.3 SPARE / REPLACEMENT PARTS
Since no maintenance is required, only electrical parts are recommended as spares. These parts
will not fail from activity, but may fail from environmental exposure.
Description
Manufacture Manufacture Part No.
Limit Switch (Short Arm) Omron D2VW-5L2A-1HS
Limit Switch (Long Arm) Omron D2VW-5L2-1HS
Potentiometer, 1k, 10T ETI MW20B-2982-1K
Clinometers Lucas 02111-002-000
Optional
AZ/EL Rotary Joint Advanced Microwave AMC-206-CG/CG-RJ-U-B
WR75 Super flex 18" Microtech MTES75-502-N-18B
Elevation Motor Colman CYMA-82700-721
Azimuth Motor Colman CYMA-82700-731
Polarization Motor Globe 415A160-2

Model 1200K/1210K - RCI SNG ANTENNA SYSTEM 20 Operation and Maintenance Manual
SECTION 7 - INTERFACE DRAWING

Model 1200K/1210K - RCI SNG ANTENNA SYSTEM 21 Operation and Maintenance Manual
 Loading...