


Compu-Dobby V
User’s Manual
AVL Looms
2360 Park Avenue
Chico, CA 95928-6785
U.S.A.
530 893-4915
530 893-1372 fax
sales@avlusa.com
www.avlusa.com
Version 0.2
January 9, 2019


Compu-Dobby V User’s Manual Introductory Information
Introductory Information ................................................................................................................ 1
Safety .......................................................................................................................................... 2
Introduction ................................................................................................................................. 3
Loom Features ............................................................................................................................ 3
Connecting to the Loom.................................................................................................................. 5
Getting Started ............................................................................................................................ 6
Setting up communication .......................................................................................................... 8
Naming Your Loom .................................................................................................................. 12
Using the RESET Function ....................................................................................................... 14
Shutdown the loom ................................................................................................................... 14
Loom Software.............................................................................................................................. 17
File Tab ..................................................................................................................................... 18
Weaving Tab ............................................................................................................................. 20
Controlling the Auto Advance .................................................................................................. 24
Setting the tension ..................................................................................................................... 25
Other Tabs ................................................................................................................................. 27
The Fine Print ............................................................................................................................... 35
AVL Customer Service ............................................................................................................. 36
AVL Warranties ........................................................................................................................ 36
ABLE OF CONTENTS
T
Table of Contents Page | i


Compu-Dobby V User’s Manual Introductory Information
INTRODUCTORY
INFORMATION
NTRODUCTORY INFORMATION
I
Introductory Information Page | 1

Introductory Information Compu-Dobby V User’s Manual
AFETY
S
Before Getting Started:
Please read the entire manual before using the software.
WARNING:
Never pull or cut power to the loom without first shutting down the loom
through the software.
Page | 2 Safety

Compu-Dobby V User’s Manual Introductory Information
NTRODUCTION
I
About AVL
AVL Looms has been in the business of designing and building some of the
world’s finest handweaving looms since 1977.
Jim Ahrens had been building and designing looms for a number of years
before Jon Violette, the “V” in AVL, approached Ahrens about a partnership
in 1977.Violette, an industrial management professional, had discovered
Ahrens’ work through his sister who ran the Pacific Basin School of Textiles
in Berkeley, where Ahrens was a volunteer advisor.
The two men worked together in the Bay Area for three years untilViolette
moved Ahrens and Violette Looms to Chico, where it officially became known
as AVL Looms Inc., and has operated ever since.
In 1982, Violette was instrumental in the development of the first
computerized dobby, then called the “Apple Dobby”.He retired from active
life in the company in 1987.
Once known for our production looms, AVL has broadened its line
considerably and we now offer customers a full spectrum of fine weaving
equipment, ranging from our small Home Looms, to our Industrial Dobby
Looms, Rug Looms, and Jacquards.
The Compu-Dobby V Design Concept
The guiding concept behind the Compu-Dobby V is ease of use with precise,
repeatable control. The loom is designed to be easy to thread, easy to setup
and easy to weave on.
OOMFEATURES
L
Compu-Dobby®
A first for handweaving looms, the Compu-Dobby 5 enables computer
control of pattern and key loom functions, including warp tension and pick
spacing.
Pattern control is a state of the art system that eliminates the multi-treadle
dance of traditional looms and the tedious pegging of mechanical
Introduction Page | 3

Introductory Information Compu-Dobby V User’s Manual
dobbylooms. Much like the legacy cartridge systems from the Compu-Dobby
I and II, the Compu-Dobby 5 stores entire weaving files (WIFs) onboard with
three significant advantages over all other systems:
Ultra-fast pick writing. The system can achieve weaving speeds
in excess of 100 picks per minute.
Hundreds of weaving files may be stored for later use.
Eliminates latency timing issues inherent in computer
communications systems. Latencies can cause slower weaving
and even missed picks.
As a web enabled device, this loom connects to your computer or tablet via
WiFi or USB and controls the loom from your favorite browser. AVLDrive
version 5 is an easy to use, intuitive interface run from within the CompuDobby 5. As a direct result, there is no software to install for the loom, nor
limitation on the controlling device, except fora minimum screen resolution
1024 x 768 pixels)
(
. AVLDrive is compatible with all major browsers, including
Safari, Chrome, Edge, Firefox and Opera.
Warp Beams andAutomatic Warp Tension System
Another first in our industry, some looms offer digital control of warp tension
using a small electrical motor and drive system connectedvia spring and
brake cable tothe warp beam. The motor is controlled by the Compu-Dobby
&AVLDrive. Easily change the warp tension at any time during weaving by a
click of the mouse or a touch of the finger on the touchscreen. This
systemallows very fine, repeatable control with a range from locked beam to
free turning for winding on the warp.
Automatic cloth advance is an AVL-only feature on hand weaving looms.
Earlier mechanical versions of these systems are well known for providing
fine control over pick advance spacing. This featureutilizes digital controls
via an electric motor driven worm and gear attached directly to the cloth
beam. Much like the digital warp tension controls, set the picks per inch in
AVLDrive and start weaving.Easily change the advance setting or manually
advance the cloth at any time during weaving by a click of the mouse or a
touch of the finger on the touchscreen. This systemallows very fine,
repeatable control with a range from hundreds of picks per inch (or
centimeter) to gross movements needed when starting a new warp.
Page | 4 LoomFeatures

Compu-Dobby V User’s Manual Connecting to the Loom
CONNECTING TO
THE LOOM
ONNECTING TO THE LOOM
C
ATTENTION:
Please read through this entire section before powering on your loom.
Connecting to the Loom Page | 5

Connecting to the Loom Compu-Dobby V User’s Manual
ETTING STARTED
G
New Features:
The loom uses a lighted interface for communication with the weaver.
Light Name Description
POWER Orange light means “power” to the loom in standby mode.
Red light means “power” to the loom in weaving mode.
NETWORK Different colors indicate the network status.
Blinking Red: searching for LAN (Local Area Network).
Red: connected to LAN
Green: LoomDirect is available (not searching for LAN).
COM Green light shows the loom is connected to a device. No light
means there is no connection.
ERROR Red light will shine when an error has occurred.
SHED Red light will shine when shed is open.
In order to connect to the loom, your device must either have a USB port or
the ability to connect to the internet. There are threeways to connect a
device to the loom:
Connection Type Description
USB USB cable from your device to the loom. Only
devices with USB ports can connect this way.
LAN (Local Area
Network)
LoomDirect Connection to loom’s WiFi network (not through
Through a router. Only devices with WiFi can
connect this way.
a router). Only devices with WiFi can connect
this way.
Page | 6 Getting Started

Compu-Dobby V User’s Manual Connecting to the Loom
The software interface (AVL Drive) is web browser based so you do not need
to download anything. Simply open your standard web browser (Chrome,
Safari, Firefox, etc.) and type in the loom’s address.
Loom Modes
The loom is designed to be controlled through the AVL Drive software, so
there is no “power” button anywhere on the loom.
STANDBY MODE:
When you plug the loom in it enters Standby Mode. It is alright to leave the
loom plugged inand in Standby Mode at all times. Minimal power is going to
the loom, and some lights will be on, but the full power has not been turned
on yet. In Standby Mode you’ll be able to connect to the loom via AVL Drive
and power on the loom.
WARNING:
Never pull or cut power to the loom in STANDBY MODE.
WEAVING MODE:
Weaving mode is when the loom and all its digital controls have been
powered on through AVL Drive. You will hear the warp tension motors set
into place and other digital features come to life.
WARNING:
Never pull or cut power to the loom in WEAVING MODE.
SHUTDOWN MODE:
Can be initiated from Weaving Mode or Standby Mode through AVL Drive.
Shutting down the loom through AVL Drive is the proper way to stop all
power to the loom.
Once the loom has been shutdown the power cord can be unplugged.
If the loom has been Shutdown through the software, but is still plugged in,
simply unplugging it and plugging it back in will initiate Standby Mode.
We’ll go into greater detail on all the modes in the following sections.
Powering on the loom:
When powering on the loom for the first time,you will need to use either a
USB connection or connect via LoomDirect. In order to connect via LAN, you
will have to setup the Network information on the loom using one of the
other connection types first. Once setup you can then connect via LAN each
Getting Started Page | 7

Connecting to the Loom Compu-Dobby V User’s Manual
time you come to the loom. However, if Wifi connections are ever lost you
can always revert to USB or LoomDirect.
1)
2)
Connect the loom to power via the provided power cable. You can
connect to a surge protector or multiple outlet adapter. All lights
but the “Error” light will light up as shown in the images below.
Wait for the loom to bootup. This can takeup to several minutes.
Once ready the loom will show just the “Power” and
“Network”lights. The network light may be Green or Red.
ETTING UP COMMUNICATION
S
Connecting via USB
1)
2)
Plug the normal USB plug into your computer and plug the other
end into the Compu-Dobby.
Open an Internet browser program on your computer (Chrome,
Internet Explorer, Microsoft Edge, Firefox, Opera, etc.).
Page | 8 Setting up communication

Compu-Dobby V User’s Ma
nual
In the Address Bar, type in
to open AVL Drive.
when connecting via USB.
Any time you’re connected via USB you can use
to open AVL Drive.
connection is established,
LoomDirect
LoomDirect means the loom is generating its own WiFi network and will
show up as an available network on your device. The great part about this
feature is that you don’t need internet access to wirelessly connect to the
ol is to first search for a LAN connection. If it does not find
one, it will automatically switch to LoomDirect and create its own network.
If no LAN connection is established your loom will automatically switch to
It can take up to sev
Connecting to the Loom
or the Loom Name
is the IP address for the loom
the IP address or the loom
COM Light will turn
switch to
3)
press Enter
Note:
192.168.7.2
This
URL and
name
4)
When the
be green.
the
on and
Connecting via
loom.
The loom’s protoc
Note:
LoomDirect.
1)
LoomDirect.
Setting up communication
eral minutes for the loom to
Page | 9
Connecting to the Loom
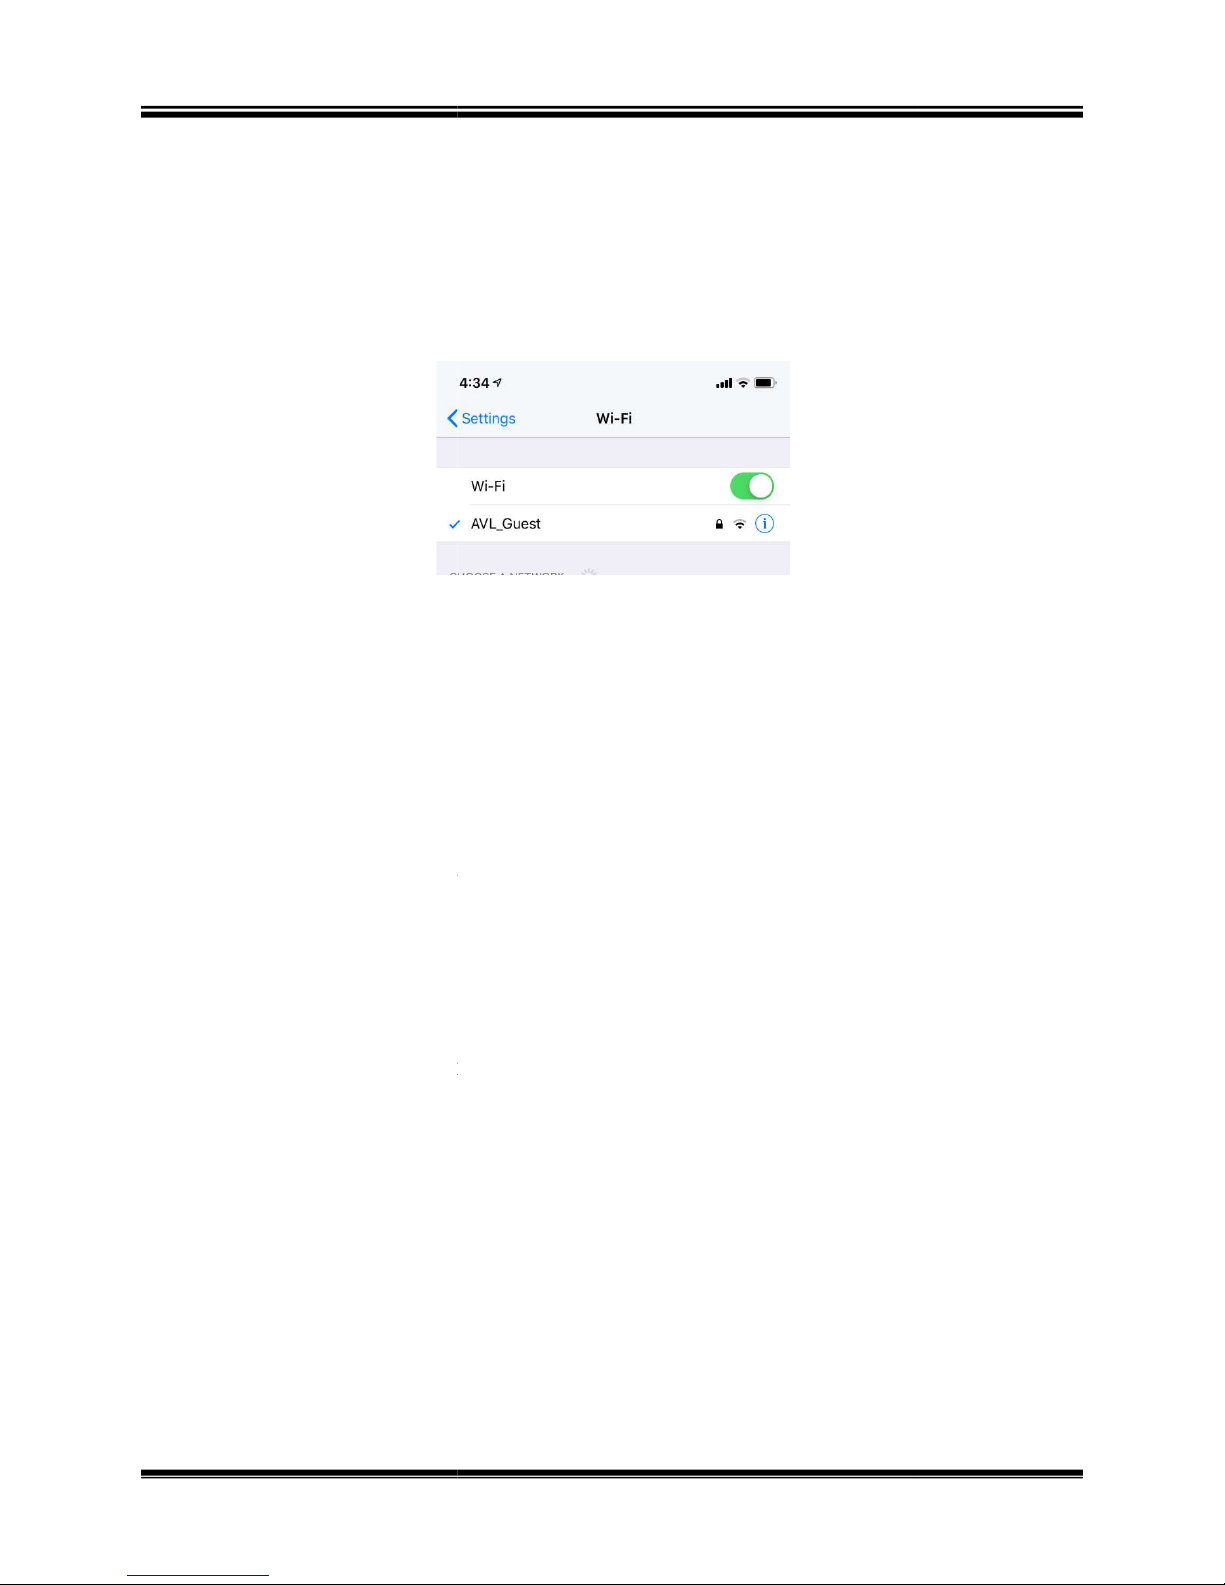
the Network light shines
own network that can be found from your device.
The network will be AVL_[loom_serial_number] where
loom_serial_number is the serial num
Connect your device (laptop, tablet, phone) to this WiFi network.
Looms Network ID = AVL_[loom’s serial number]
Network Password = CompuDobby5
The password for the network will be CompuDobby5.
The COM light will turn off while the
COM light turns green, you’ll know connection has been
Open your browser and type in
loom if you’ve named it
Once you establish the LoomDirect connection you won’t have to go
ough this process again. You can shut down your loom and you’ll
be able to turn the loom on and connect to AVL Drive automatically.
Setting up Network settings to connect
For this connection, you will
router allows you to access the internet wirelessly on your device.
computer and the loom will be connected to the same network.
use this connection type, you must have access to the internet.
nternet, you can still connect via WiFi with LoomDirect
its own
Connect your device to the loom via USB or LoomDirect.
Go to Network tab in AVL Drive
Dobby V User’s Manual
Setting up communication
loom is now putting off its
ber for your loom.
loom is connecting. When the
, or the name of the
via LAN (Local Area Network)
location
2)
3)
4)
When
green, the
Compu-
5)
6)
reestablished.
7)
8)
thr
If you don’t have i
connection covered in
192.168.7.2
.
connect using your router at your
section.
.The
Both your
In order to
1)
2)
Page | 10
.

Compu-
Dobby V User’s Manual
network from the dropdown list and enter the password
The network light should remain RED during these steps. If your network light
GREEN, you’ve entered the incorrect password for your router.
the password for your router and reenter the correct password
Click theRestart Netwo
or disconnect from LoomDirect.
for the WiFi connection to the loom. It can take
for the loom to connect to the router.
The COM light will turn off during this period. When the COM light
you’ll know connection has been reestablished.
Connect your device (laptop, tablet, phone) to the WiFi network you
connected the loom to.
ou can refresh your browser.
Connecting to the Loom
.
up to several
.
3)
Note:
Select your
for your router.
turns
4)
5)
6)
7)
8)
Unplug the USB
Wait
minutes
turns green,
Check
rk button.
9)
Y
Setting up communication
Page | 11

Connecting to the Loom Compu-Dobby V User’s Manual
10) Once you establish LAN WiFI connection you won’t have to go
through this process again. You can shutdown your loom and you’ll
be able to turn the loom on and connect to AVL Drive without these
steps.
Note:
If your router name or password changes, you will have to setup the network
using the USB or LoomDirect.
AMING YOUR LOOM
N
Install Bonjour Print Services for Windows
Bonjour Print Services for Windows lets you access AVL Drive via your web
browser using your "loom name" as the URL. Example: http://[loom
name].local.
1)
2)
3)
Go to
Click the Download button.
Open the downloaded file to initiate the install wizard.
https://support.apple.com/kb/DL999?locale=en_US
.
Add Loom Name
Naming your loom is an important step that will make it easy to access your
loom via WiFi from any device.
This creates a URL that you type in to the address bar on a web browser. It
will be easy to remember, unlike the IP address. Your loom name can be
changed at any time.
The LOOM URL will be http:// + [loom name] + .local
Example:
Loom name = myloom
Loom URL = http://myloom.local
Note:
The name must be a solid piece of text with no spaces. If a space is added to
the name, the URL will only be the letters before the space even though the
“Loom Name” shows the complete name with the space.
GOOD EXAMPLES: myloom, my_loom, my-loom
Page | 12 Naming Your Loom

Compu-
Dobby V User’s Manual
BAD EXAMPLES: my loom (loom would only show up as “my”)
If you ever forget the name of your loom you can always connect with the IP
Once you have AVL Drive open, select the “Options” tab.
Loom Name, enter the name you’d like to use for
your loom. If the box is not blank, delete the existing name and
enter the new text of your choice.
Clicking the enter button on your keyboard, or simply clicking
anywhere on the page,
Refresh or exit your
then back on pretty quickly.
loom name has been changed. You will also see the Connected To:
field under Please select file has changed.
Type the new URL into your browser with your
shown in the beginning of this section. http:// + [loom name] +
Click Enter on the keyboard
AVL Drive will refresh and the COM Light will light up once
communication is established with the loom. You can now use this
URL to access AVL Drive via USB, LAN, and LoomDirect.
Connecting to the Loom
The COM light will turn off and
In the Options Tab you’ll see the
new Loom Name as
Note:
address.
1)
2)
In the box for
3)
4)
browser.
5)
.local.
6)
7)
Naming Your Loom
Page | 13

Connecting to the Loom
If at any time you see the below alert, you’ll need
reestablish connection to the loom. This could occur if you accidentally
unplug your USB cable, or if you’re trying to connect a new device to the
loom when another device is already connected.
When connecting to the loom, you re
Enter “/reset” after the URL or IP address in your web browser.
Refresh your page.
Once you receive the notification that the “current use
logged out”, simply reenter your normal URL or IP address.
HUTDOWN THE LOO
If you will be removing the loom from a power source, you will need to
shutdown the loom using the commands in the software first. This is similar
to shutting down a computer so that it restarts correctly.
In the software, go to the
Dobby V User’s Manual
Using the RESET Function
to reset the web URL to
ceive the message below.
r
Compu-
SING THE
U
1)
2)
RESET
UNCTION
F
S
3)
4)
1)
M
has been
Utilities tab.
Page | 14

Compu-Dobby V User’s Manual Connecting to the Loom
2)
3)
Click Shutdown.
Once the loom has completed the shutdown sequence, you can
remove power from the loom.
Shutdown the loom Page | 15


Compu-Dobby V User’s Manual Loom Software
LOOM SOFTWARE
OOM SOFTWARE
L
Loom Software Page | 17

Loom Software
No matter how you are connecting to the loom, the loom software will
appear in your browser. Depending on the
software may appear subtly different from the pictures in this manual,
however all functionality will be the same.
Files are stored on the loom. The files must be in the WIF format. The file
tab allows you to open your w
loom. It is the default tab that appears when you open the software.
Transfer to Loom and Open
Dobby V User’s Manual
browser you are using, the
eaving files or to transfer weaving files to the
Transfer a file from local storage to the loom
. Complete instructions follow.
Opens the selected file for weaving. You can
click a file to open it for
Transfer a file to the loom without opening
Complete instructions follow.
ILE TAB
F
Compu-
Button
Open for Weaving
Rename
Delete
Upload to Loom
Download from Loom
Backup to Local Machine
What it does
and open it
also doubleweaving.
Rename a file
Delete a file from the loom
it.
For future use.
For future use.
Page | 18
File Tab

Compu-
Dobby V User’s Manual
Transfer to Loom and Open
Transfer to Loom and Open
Navigate to the desired folder.
Choose the desired WIF file from the folder.
The WIF file will open in the Weaving Tab.
Upload to Loom
1)
Click
Loom Software
.
2)
3)
4)
5)
Click Open.
Upload to Loom
1)
Click
.
File Tab
Page | 19

Loom Software
Navigate to the desired folder.
Choose the desired WIF file from the folder.
The WIF file will appear in the list of files in the Files tab.
you open a file it will open in the Weaving tab. This tab allows you
access to control the loom.
Dobby V User’s Manual
Compu-
2)
3)
4)
5)
EAVING TAB
W
When
Click Open.
Page | 20
Weaving Tab

Compu-Dobby V
User’s Manual
Click Power On to boot up the loom.
the loom is ready.
Once the loom is ready, begin to weave.
Tabby to switch to the pre
Click Reverse to reverse the weaving pattern. This allows you to
automatically reverse the weaving order of the WIF.
Click Unweave if you want to unweave some of your work.
It will switch to Power Off once
Loom Software
Power On
1)
2)
Tabby
1)
Click
Reverse
1)
-defined tabby.
Unweave
1)
Weaving Tab
Page | 21

Loom Software
are done weaving, click Power Off to return the loom to
its normal standby state. If you are going to turn off power to the
loom, shutdown the loom through the software.
You can zoom in on the WIF in order to see it in more detail. You
out on the WIF in order to see more of it.
zoom buttons until you have adjusted the view of
the WIF file to what you want.
If you do not want to weave the whole pattern, enter the range of picks you
In the Set Range Area, click Set Range.
Dobby V User’s Manual
Power Off
1)
When you
Zoom in on the WIF
1)
Click the + or –
Compu-
can zoom
Set the Range
want to use.
1)
Page | 22
Weaving Tab

Compu-
Dobby V User’s Manual
The Set Range window appears.
Enter the Start and End Picks. Click Apply.
project and are midway through your pattern
the pick you want to start
In the Pick area, click Set Pick.
The Set Pick window appears.
Enter the pick you want to start with and click Apply.
2)
3)
Set the Pick
Loom Software
If you are resuming a
1)
2)
, enter
this weaving session with.
3)
Weaving Tab
Page | 23

Loom Software
ONTROLLING THE
The auto advance controls allow you to advance the warp without weaving,
can also set the picks per inch
In the software go to the Cloth Advance area.
Use the down arrow to advance the warp. Click the arrow until the
warp has advanced as far as you want it.
Take the pin out of the cloth advance beam so that the cloth will
In the software go to the Cloth Advance area.
Use the up arrow to reverse the warp. Click the arrow until the
warp has advanced as far as you want it.
Reset the tension. D
may need to rewind the warp onto the warp beam.
If you will only be reversing a few picks, you do not have to remove the pin
from the cloth advance beam. However,
oth between the cloth beam and the cloth storage beam.
too tight, you will need to remove the pin.
Dobby V User’s Manual
Controlling the Auto Advance
. The default
epending on how far you have unwoven, you
keep an eye on the tension of the
Compu-
C
or reverse the warp. You
PPI is 15.
Advance the Warp
1)
2)
Reverse the Warp
UTO ADVANCE
A
(PPI)
1)
2)
3)
4)
Note:
finished cl
unwind easily.
If it gets
Page | 24

Compu-
Dobby V User’s Manual
The default for the cloth advance is picks per inch, but you can change
inches to centimeters in the options tab.
In the software go to
arrow keys to change the value, or click in the field
and type in the value you want.
If you want to advance the warp quickly, for example when warping the lo
ETTING THE TENSION
Set tension for winding on
There is a button to allow you to set the tension to the lowest setting. This
will allow you to wind the warp on the beam without removing the tension
Open the software.
the warp tension button.
Click the button again to turn it off.
the Cloth Advance area and click in
Set the PPI
1)
field.
2)
Note:
set the PPI to one.
Use the small
Loom Software
the PPI
om,
S
cable.
1)
2)
3)
Click
Setting the tension
Page | 25

Loom Software
There is a button that allows you to lock the warp beam in place.
warp beam is locked, the warp advance is automatically disabled.
Open the software.
the Lock wrap beam button.
Click the button again to turn it off.
You can set the tension by entering a number in the field or by using the up
and down arrows on the field. The default tension is set at 55.
loom is powered on for weaving, the warp tension motor will
search for its reference home, then return to the tension setting left by the
weaver in the previous weaving session.
In the software go to the
the value, or click in the field and type in the value you
Dobby V User’s Manual
Setting the tension
. Use the arrow keys to
Lock the warp beam
1)
2)
Click
Compu-
When the
3)
Set Warp Tension
When the
1)
change
want.
Warp Tension field
Page | 26

Compu-
Dobby V User’s Manual
you to access a variety of settings for your loom.
This tab allows you to set several options for your loom.
To activate an option, check the
To turn off an option, uncheck the box.
Changing the name will
change the address you need to type to access
for complete instructions.
how much of
the screen should be devoted to history.
Shows the repeat number in the softwa
The color bar to the right of the draft will appear.
When you are zoomed in far enough on the WIF,
you will be able to see the harness numbers
THER TABS
O
Loom Software
The othertabs allow
Options Tab
1)
2)
box.
Option
Loom Name
History Percent
Show repeat counter
Show color bar
Show drawdown in color
Show numbers in
liftplan
Other Tabs
What it does
The name of your loom.
your loom. See page 12
Move the percentage bar to indicate
Allows you to view the WIF in color.
re.
Page | 27

Loom Software
This tab allows you to set up or use a tabby.
With the Options window open, click Tabby.
Dobby V User’s Manual
on the screen
, if not, the fabric will scroll up.
Allows you to use the metric system. The default
beam
Compu-
Fabric scrolls down
Use metric (cm) for
advance
Enable Cloth Beam
Advance
Tabby Tab
1)
If selected the fabric will scroll down
as you weave
is imperial (inches).
Allows you to turn on or off the cloth
advance.
Page | 28
Other Tabs

Compu-
Dobby V User’s Manual
Enter the name of the Tabby
Add a Tabby
1)
Click Add.
Loom Software
2)
3)
Click OK.
.
Other Tabs
Page | 29

Loom Software
Choose the Tabby from the
Click Edit. The background color of the tabby will change.
Click the harnesses that should rise on each lift.
When you are done, click Edit again.
Dobby V User’s Manual
Edit a Tabby
1)
2)
drop-down list.
Compu-
3)
4)
Page | 30
Other Tabs
Compu-
Dobby V User’s Manual
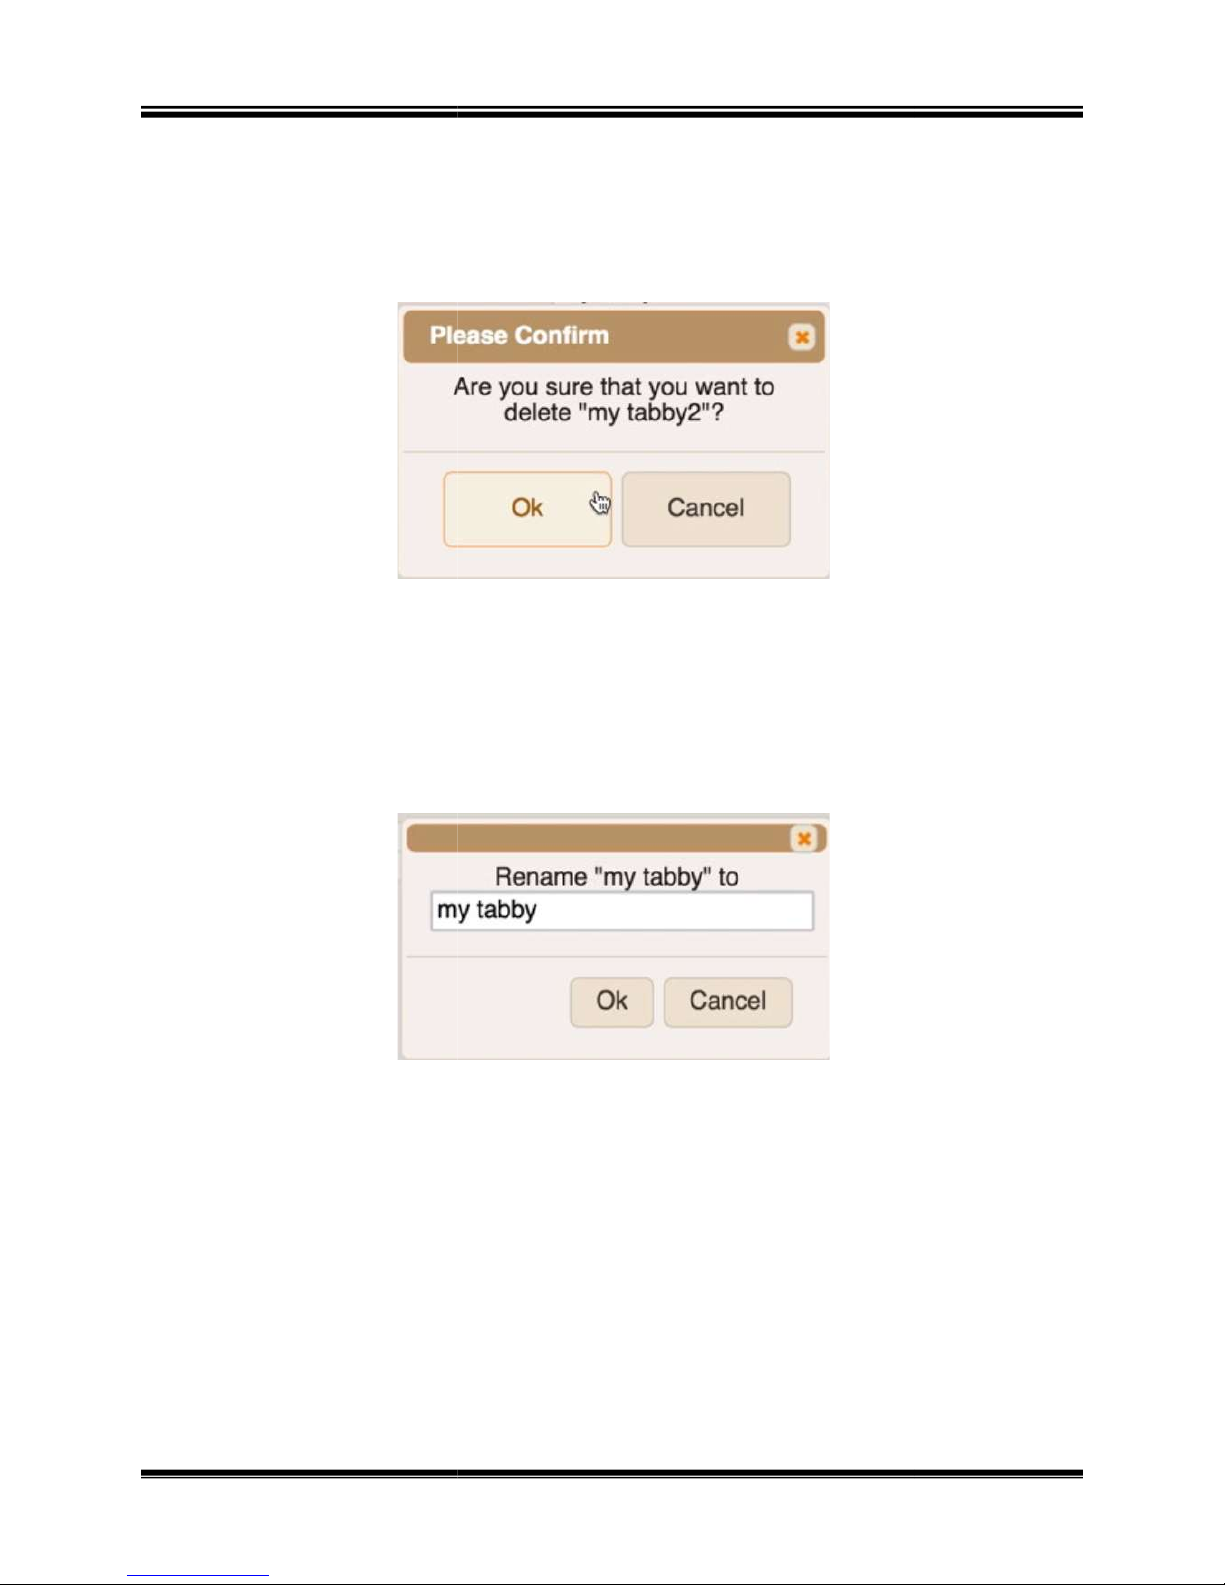
Choose the Tabby from the drop
confirmation window.
Choose a Tabby from the drop
Enter the new name in the window and click OK.
Choose a Tabby from the drop
Close the Options window.
In the loom software,
the bottom of the screen.
Delete a Tabby
1)
2)
3)
Click Delete.
Click OK at the
Loom Software
-down list.
Rename a Tabby
1)
2)
3)
Click Rename.
Use a Tabby
1)
-down list.
-down list.
2)
3)
click Tabby at
Other Tabs
Page | 31

Loom Software
This tab allows you to perform several operations for your loom.
What it does
Checks to see if there are updates for the loom
software. The loom must be connected to the
internet.
Gets configuration information for your software.
The loom must be connected to the internet.
Displays a log of software events. This can be sent
to AVL for diagnostics if something is wrong with
your loom.
Shuts down the
removed from power.
Dobby V User’s Manual
loom safely so that it can be
Utilities
Compu-
Button
Check for update
Fetch configuration
Show Log
Shutdown
Page | 32
Other Tabs
Compu-
Dobby V User’s Manual
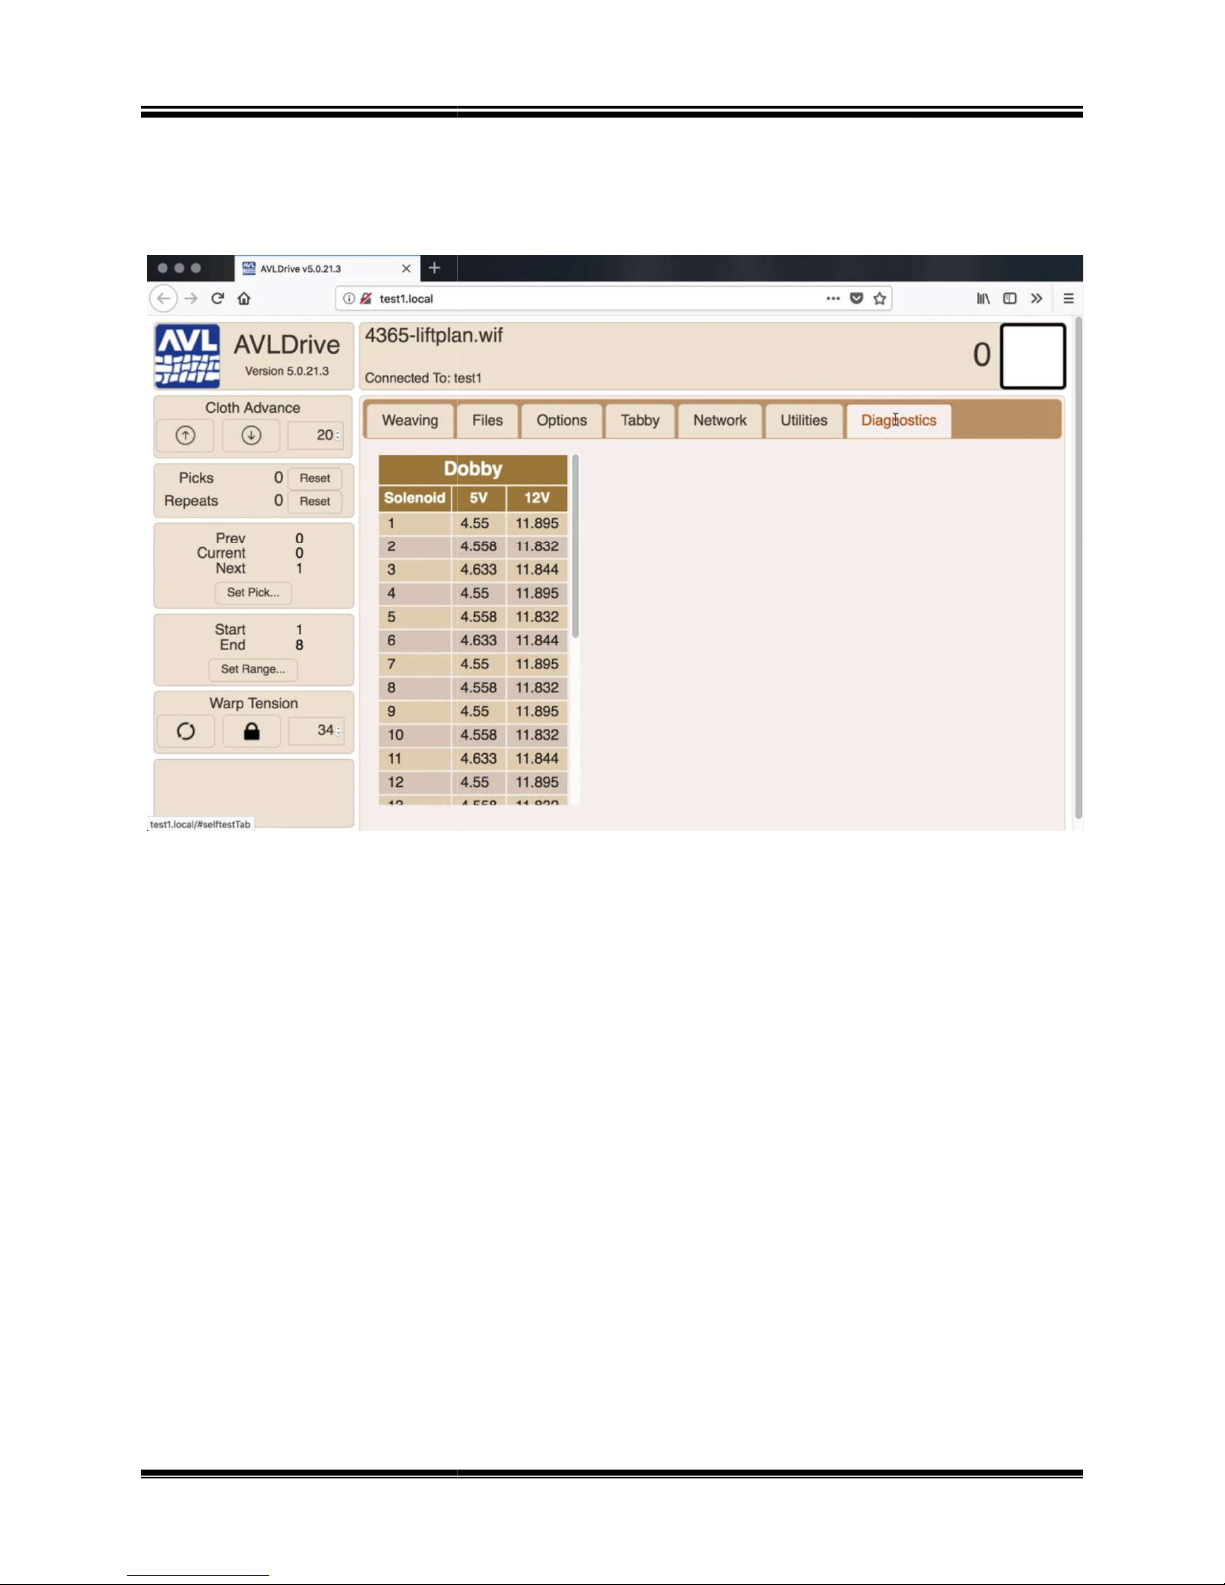
This tab allows you to view information about your solenoids.
Diagnostics
Loom Software
Other Tabs
Page | 33


Compu-Dobby V User’s Manual The Fine Print
THE FINE PRINT
HE FINE PRINT
T
The Fine Print Page | 35

The Fine Print Compu-Dobby V User’s Manual
AVL C
USTOMER SERVICE
AVL offers free technical support to the original owner of all our looms.This
means if you ever have a problem, you can call, fax, or e-mail us and we’ll
help you find a solution.Please take advantage of this service; your
satisfaction is extremely important to us.
Customer Service Phone: (530) 893-4915
Fax:(530) 893-1372
E-Mail:sales@avlusa.com
AVL W
Limited Warranty:The benefits of this warranty accrue solely to the original purchaser of AVL Looms,
Inc. products, as defined below.
Your warranty covers:
New Looms: AVL Looms, Inc., a California corporation (“AVL”) warrants to the original purchaser of any
AVL loom (each, a "Product") that the Product will be free from defects in materials and workmanship
during the limited warranty period described herein. The limited warranty coverage begins (a) the day
the Product is installed if installed by a professional from AVL, or (b) on the date of shipment from AVL
to the original purchaser if the Product is not installed by AVL (the “Effective Date”). Except as set forth
under the section entitled “What is Excluded?” below, AVL will, for a period of two (2) years from the
Effective Date (the “Original Warranty Period”), repair or replace the defective part(s) of the Product with
a repaired, renewed, or comparable part (whichever is deemed necessary or proper by AVL) if it
becomes defective or inoperative or fails to perform according to AVL’s specifications. Any repair during
the Original Warranty Period will be carried out without charge to you for parts (except applicable taxes,
if any). You will be responsible for all labor in connection with installation of the parts and service upon
the Product, as well as the cost of shipping involved.
New Accessories, Loom Upgrade Parts, and Replacement Parts:Subject to the limitation contained in
subsection (i) under the section entitled “What is Excluded?” below, AVL warrants to the original
purchaser of any accessory, loom upgrade parts, or loom replacement parts (the “Additional Part”) that
are sold by AVL that such Additional Part will be free from defects in materials and workmanship for
ninety (90) days from the date of purchase. In the event that any Additional Part is physically damaged or
physically defective and if such defective Additional Part is returned to AVL within ninety (90) days of the
date of purchase, AVL will provide a replacement Additional Part at no charge. The sole remedy for this
warranty shall be limited to the replacement of the defective Additional Part. You are responsible for all
shipping charges (including applicable taxes) incurred with returning the defective Additional Part.
All New Products and their components (including replacement Product and its components) are covered
only for the Original Warranty Period. When the warranty on the original Product expires, the warranty on
any replacement Product, or components also expires. After two (2) years from the Effective Date, you
pay for any replacement or repair, including all parts, all labor and shipping charges (including applicable
taxes).
ARRANTIES
Page | 36 AVL Customer Service

Compu-Dobby V User’s Manual The Fine Print
Your warranty does not cover:
1.Labor charges for installation or set-up of the Product, as well as any labor charges required to
install, disassemble, troubleshoot, or reassemble the Product.
2.Any taxes imposed on AVL for Product replacement or repair under this warranty.
3.Installation, performance of, or repair of: cabling, electrical, or accessory attachments used with the
Product.
4.Product replacement or repair because of misuse, accident, repair by any party other than AVL, or
other cause not within the control of AVL. Please note that removing any parts from the Product for any
reason voids the warranty.
5.Incidental or consequential damages resulting from the Product.
6.A Product that has been modified or adapted to enable it to operate in any country other than the
United States or any repair of Products damaged by these modifications.
7.Electrical and pneumatic components, each of which carries a one (1) year warranty from the
Effective Date.
8.Jacquard components function beyond 98%. A Jacquard module is considered to be operating within
specification if 98% of all hooks are operating as commanded.
9.Computing equipment, such as a Personal Digital Assistant or a Personal Computer, which are
manufactured by a third party(ies) and which may be under warranty through the original manufacturer.
AVL is not responsible for any warranty coverage that may be offered concerning these products and
you must contact those manufacturers directly regarding any available warranty coverage.
The performance or functionality of any software that is sold either together or separate from the Product.
The AVL warranty covers only defects in the Software Media, namely the CD-ROM media such as a
broken CD-ROM or a defect in the CD-ROM that would prevent the CD-ROM from being read by your
personal computer's CD-ROM drive.
.
AVL Returns Policy
Any order that has left AVL in transit to the customer is considered fulfilled.
Parts and accessories not covered under warranty must be returned to AVL
within 60 days from the date of shipment from AVL. The purchase price of
the item(s) is refundable less a 15% re-stocking fee based on the total
purchase price. No refunds will be given on shipping or handling. The buyer
is responsible to return the merchandise in "as new" condition at their
expense. Any item received showing wear or damage is not eligible for
return and will be promptly returned to the customer COD unless some other
arrangement is made. Looms and custom-made items, special order items,
parts made for pre-1998 looms, used and reconditioned items are not
eligible for return.
AVL Warranties Page | 37
 Loading...