

Page 1

3G-SDI AUDIO
p
DELAY Conversion
Box
Introduction
The ADD-01HDW connects to the SDI signal from your
source equipment to your SDI receiver.
With the simple interface of ADD-01HDW, the audio delay
time can be adjusted so that sound and picture are
perfectly synchronized. Up to 2700ms (2.7 second) error
can be corrected. The digital audio signal is reproduced
bit-perfect so no loss of audio quality is incurred.
Also the ADD-01HDW can convert the SDI audio sound to
analog or digital.
Features
Max Audio Delay time 2.7 seconds.
Audio delay adjustment scale is 10ms.
Support high-resolution display up to 1080P@60Hz.
Supports 2-channel PCM analog audio.
Supports Coaxial digital audio(PCM only).
TOP VIEW
c
d
ADD-01HDW
USER MANUAL V1.0
ADD-01HDW
Package Contents-
1 ADD-01HDW Unit
1 User manual
1 Power adapter DC 12V
2 Screws
4 foot pads
Any thing missed, please contact with your vendor.
Specifications
Input connector 1 x BNC
Output Connector
SDI Video support
Audio support
sample rate
Power Adapter (Min.) DC 12V with lock
Housing Metal
Weight 378g
Dimensions (LxWxH) 150x111x25mm
1 x BNC for video
2 x BNC for audio
1 x RCA
525i@59.94, 625i@50,
720p@50/59.94/60,
1080i@50/59.94/60,
1080
@23.98/24/25/29.97/30,
1080p@50/59.94/60
-1-
48K
e
f
1. Select audio output channel to “Coaxial” and “Analog” audio
output.
2. Display current audio delay time
3. - : decrease time delay value
4. + : increase time delay value
5. CHG: change time unit to adjust the audio delay time.
(second/ 100ms / 10ms)
-2-
g
Page 2
FRONT VIEW
c
d
e
f
1. SDI Input
2. SDI LOOP Output
3. RS232 port
4. Input Power Jack
REAR VIEW
c
1. Coaxial Output
2. Analog Audio Output
3. SDI Output
d
e
Installation
1. Connect input equipment source to ADD-01HDW.
2. Connect ADD-01HDW to output device. (e.g. speaker).
3. Connect the power cord and turn on the ADD-01HDW.
4. Turn on the source device.
-3-
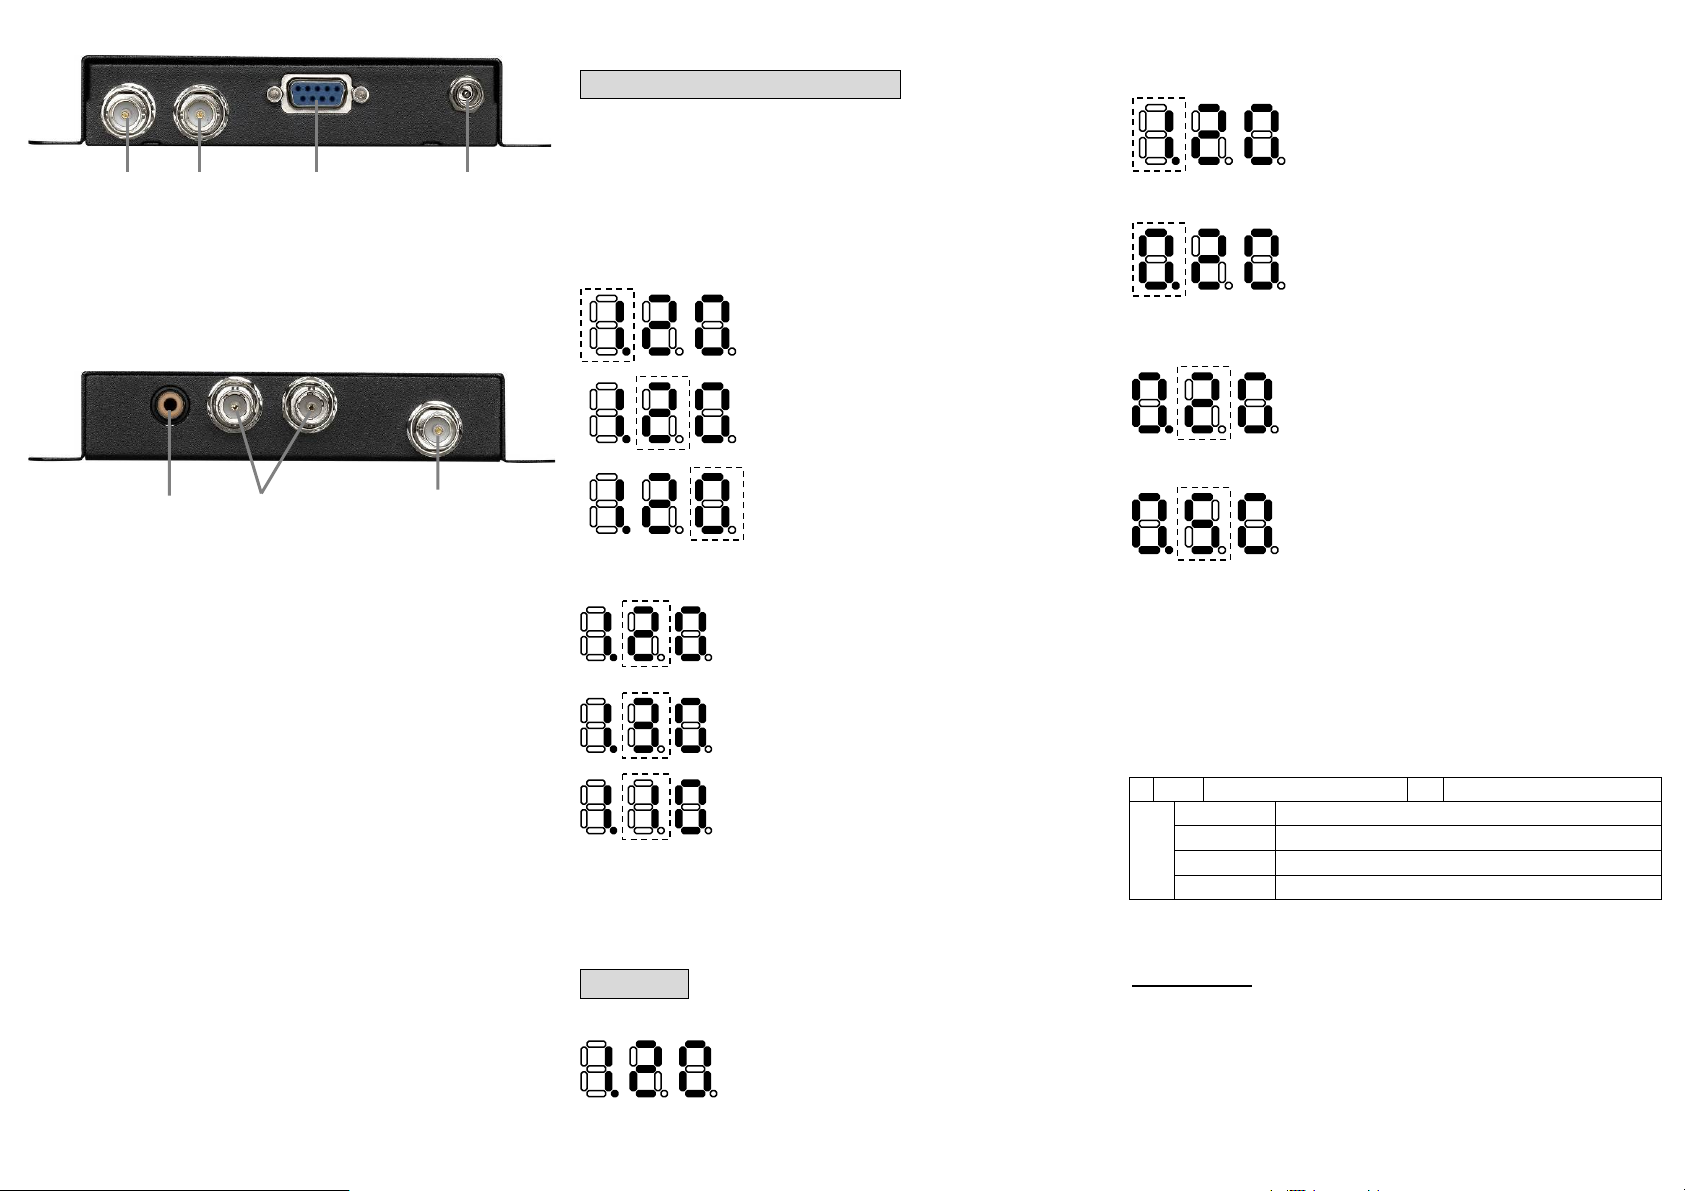
Operation
Setting the audio delay time
1. Select the time unit to adjust by pressing the button
“CHG”.
2. Then the selected time unit LED will keep flash. The
user can change to the next time unit by pressing “CHG”.
Second => 100ms => 10ms => Second…
Adjust “second”
Adjust “100 ms”
Adjust “10 ms”
3. Pressing the “+” or “-“ to increase /decrease the value
Old delay value 1.20 sec
Time unit to change: 100ms
“+” increase value from 2 to 3
“-” decrease value from 2 to 1
5. Stop operation and wait several second the LED stop
flashing, then the new audio delay time will take effect.
6. “+” and “-“ can reset LED at the same time
Example:
Audio delay “1.20” second change to “0.50” second
Old audio delay time “1.20” second
-4-
1. Pressing button “CHG” to select time unit “second” to
change.
“Second” LED flash.
2. Pressing button “-” once to decrease 1 to 0.
3. Pressing button “CHG” to select time unit “100ms” to
change.
4. Pressing button “+” three times to increase 2 to 5.
5. Stop operation and wait the LED stop flashing, then the
new audio delay time “0.50” second take effect.
DIP Switch Settings
Select audio output channel from 16-channel of SDI-input to
“Coaxial” and “Analog” audio output.
1 OFF GROUP 1-2,1-8CH ON GROUP 3-4,9-16CH
OFF,OFF Group1, 1-2 CH_Group3, 9-10 CH
OFF,ON Group1, 3-4 CH_Group3, 11-12 CH
2,3
ON ,OFF Group2, 5-6 CH_Group4, 13-14 CH
ON ,ON Group2, 7-8 CH_Group4, 15-16 CH
© C&C TECHNIC TAIWAN CO., LTD. All rights reserved.
Trademarks:
All the companies, brand names, and product names
referred to this manual are the trademarks or
registered trademarks belonging to their respective
companies.
-5-
 Loading...