

AVL Industrial Dobby Loom User Manual
Industrial Dobby Loom
User's Manual
AVL Looms
2360 Park Ave.
Chico, CA
95928-8305 U.S.A.
530 893-4915
530 893-1372 (fax #)
info@avlusa.com www.avlusa.com
Copyright © 2018
All Rights Reserved Worldwide


Industrial Dobby Loom User's Manual Introductory Information
Introductory Information ................................................................................................................ 1
Safety .......................................................................................................................................... 2
Warnings: ................................................................................................................................ 2
Safety Features: ....................................................................................................................... 3
IDL Setup ........................................................................................................................................ 5
Introduction ................................................................................................................................. 6
About This Manual ..................................................................................................................... 6
Preparations................................................................................................................................. 6
Safety .......................................................................................................................................... 6
Stopping your loom safely ...................................................................................................... 8
Restarting After an "Emergency Stop" ................................................................................... 9
Additional Loom Setup ............................................................................................................. 10
Square and Level the Loom .................................................................................................. 10
Flexible Air Link ................................................................................................................... 11
Floor Brackets ....................................................................................................................... 11
Power Supply ........................................................................................................................ 11
Setup Your Computer ............................................................................................................... 11
Setup the Air System ................................................................................................................ 12
Compressor ........................................................................................................................... 12
Filter-Regulator (FR) ............................................................................................................ 12
Regulators ............................................................................................................................. 13
Cylinder Flow Controls (Speed Controls) ............................................................................ 14
Testing The Loom ..................................................................................................................... 14
Pre-Operation Checklist ............................................................................................................ 15
Normal Loom Firing Sequence ................................................................................................. 15
Using the IDL ............................................................................................................................... 17
Operating the Loom .................................................................................................................. 18
Manual Loom Control ........................................................................................................... 18
Automatic Loom Control ...................................................................................................... 19
Reversing Cloth Direction ........................................................................................................ 19
Adjustments .............................................................................................................................. 22
Synchronized Loom Motion ................................................................................................. 22
Automatic Cloth Advance Speed Adjustment ...................................................................... 22
Automatic Advance and Cloth Beam Gear Adjustment ....................................................... 23
Introductory Information Page | 3

Introductory Information Industrial Dobby Loom User's Manual
Dobby Cylinder Speed Adjustment (controls harness lifting) .............................................. 25
Shuttle Box Adjustment ........................................................................................................ 26
Cloth Storage Power Control ................................................................................................ 33
Establish Picks Per Inch (P.P.I.) ............................................................................................... 34
Pressure Roller .......................................................................................................................... 36
Temple System (To Prevent Draw-In) ...................................................................................... 37
Setting the Temple Rollers .................................................................................................... 37
Temple Rings ........................................................................................................................ 38
Warp Tension ............................................................................................................................ 38
Set Tension ............................................................................................................................ 39
Troubleshooting Tip.............................................................................................................. 39
Shuttle Box System ................................................................................................................... 40
Normal Mode ........................................................................................................................ 41
Special Mode ........................................................................................................................ 43
Extra Mode............................................................................................................................ 44
Maintenance .................................................................................................................................. 47
Maintenance .............................................................................................................................. 48
General .................................................................................................................................. 48
Square and Level the Loom .................................................................................................. 48
Maintenance .......................................................................................................................... 49
Trouble-shooting ........................................................................................................................... 51
Basic Troubleshooting Tips ...................................................................................................... 52
Shuttle Doesn't Fire ............................................................................................................... 52
Shuttle Won't Stay On Race .................................................................................................. 52
Shuttle Doesn't Box Completely ........................................................................................... 52
Loom Fires on Empty Box .................................................................................................... 52
Loom Stops -- Red Light Is On ............................................................................................. 52
Loom Stops -- Green Light Is On ......................................................................................... 52
Harnesses Drop or Don't Lift ................................................................................................ 53
Automatic Cloth Advance Inoperable ................................................................................... 53
Inconsistent Pick Count ........................................................................................................ 53
Loose Shed ............................................................................................................................ 53
Adjusting the Compu-Dobby .................................................................................................... 53
Adjusting the Shuttle Sensors ................................................................................................... 55
Page | 4 Introductory Information

Industrial Dobby Loom User's Manual Introductory Information
To make the adjustment ........................................................................................................ 55
Troubleshooting the Picker Cylinders ...................................................................................... 56
Diagram of the PLC .................................................................................................................. 57
The Fine Print ............................................................................................................................... 59
AVL Customer Service ............................................................................................................. 60
AVL Warranty .......................................................................................................................... 60
AVL Returns Policy .................................................................................................................. 61
Introductory Information Page | 5


Industrial Dobby Loom User's Manual Introductory Information
INTRODUCTORY
INFORMATION
NTRODUCTORY INFORMATION
I
Introductory Information Page | 1

Introductory Information Industrial Dobby Loom User's Manual
AFETY
S
Before Getting Started:
Please read the entire manual before using the loom.
Warnings:
WARNING:
EQUIPMENT SHOULD ONLY BE USED FOR TEXTILE MANUFACTURING. IF
THE EQUIPMENT IS USED IN A MANNER NOT SPECIFIED BY THE
MANUFACTURER, THE PROTECTION PROVIDED BY THE EQUIPMENT MAY
BE IMPAIRED.
WARNING:
ELECTRICAL SHOCK HAZARD. DO NOT TAMPER WITH ELECTRICAL WIRES
OR OPERATE THE LOOM WITH SAFETY PANELS OPENED OR REMOVED.
WARNING:
PINCH, CRUSH, AND FINGER CUT-OFF HAZARDS. DO NOT OPERATE THE
LOOM WITH SAFETY PANELS OPENED OR REMOVED. DO NOT PLACE
HANDS IN MOVING MECHANISMS OR SCISSORS.
Page | 2 Safety

Industrial Dobby Loom User's Manual Introductory Information
WARNING:
EQUIPMENT PANELS ARE AWKWARD AND HEAVY. TO AVOID MUSCLE
STRAIN OR INJURY, USE PROPER LIFTING TECHNIQUES AND A HELPER.
WARNING:
DO NOT POSITION EQUIPMENT IN A WAY TO BLOCK OR IMPEDE ACCESS
TO DISCONNECTING DEVICES, EMERGENCY STOPS, OR ON/OFF BREAKER
SWITCHES
WARNING:
USE OF CONDUCTIVE FIBER OR YARN ON OR AROUND THIS EQUIPMENT
WILL VOID WARRANTY AND MAY DAMAGE EQUIPMENT.
WARNING:
THIS EQUIPMENT IS CLASSIFIED FOR LIGHT INDUSTRIAL ENVIRONMENT
ONLY. OPERATION OF HIGH-CURRENT DRAW EQUIPMENT (EX. MIG
WELDER) ON THE SAME ELECTRICAL CIRCUITS MAY CAUSE EQUIPMENT
FAILURE.
Safety Features:
Covers and shielding separate weaver from moving components where pinch
hazards exist. Do not reach under covers and shielding while the loom is
operating.
Safety Page | 3


Industrial Dobby Loom User's Manual IDL Setup
IDL SETUP
IDL S
ETUP
IDL Setup Page | 5

IDL Setup Industrial Dobby Loom User's Manual
NTRODUCTION
I
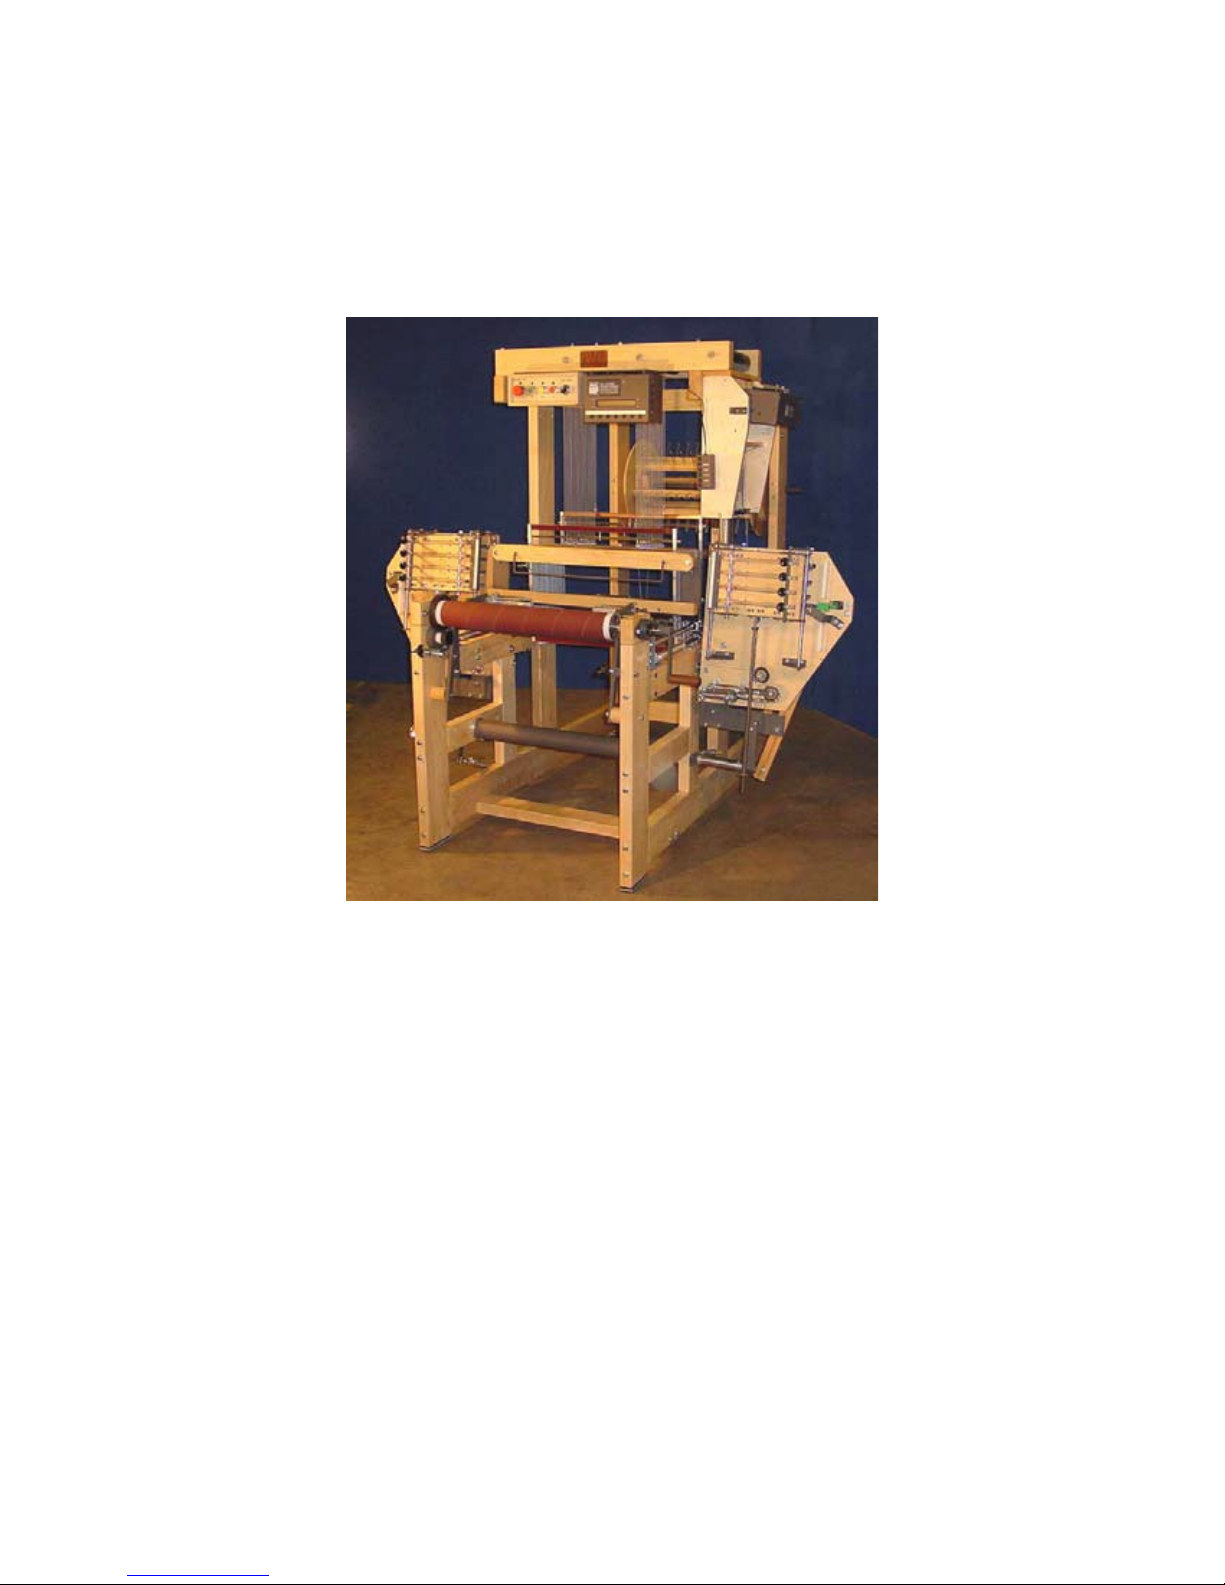
Your Industrial Dobby Loom (IDL) is designed to be low-maintenance and
easy to use. If you are an experienced power loom weaver, you may initially
think this loom is a little quaint. If you’re more familiar with handlooms, it
may seem impossibly busy and complicated. With a little hands-on
experience, however, you’ll find that the IDL is just right. Considerable
attention has been paid to the needs of the weaver. In addition to those
things we know you’ll need, we’ve provided features that we think you’ll
want. For example, the cloth beam can be removed so that you’ll have more
working room when sleying the reed and we’ve placed the main operating
controls conveniently front-and-center. Feature for feature, you’ll soon
discover that the IDL is the best loom in its class.
BOUT THIS MANUAL
A
While the IDL is simple to use, there is some information you need to know,
like how to start the IDL, how to make adjustments, and what you’ll need to
do to keep your loom in top working condition.
We have provided detailed steps to follow and illustrations to guide you.
You will also find a Maintenance and Troubleshooting section in the back of
the manual.
REPARATIONS
P
Your IDL will have been assembled and tested before it left the factory. An
AVL technician will, in most cases, have uncrated and installed the loom at
your facility, run it, and made any necessary adjustments. It is also likely
that someone on your staff will have been oriented to the loom.
AFETY
S
The first part of this manual shows the safety warnings and features that
apply to the IDL. Anyone who has access to the IDL must be aware of these
warnings.
Let’s talk about some safety rules that you need to follow to safely use the
loom. Remember that any piece of equipment, from a hammer to a buzz
saw, can be hazardous if it’s misused or misunderstood. The IDL is fitted
with a variety of safety devices, but the critical element in using this
machine safely is your ATTENTION TO THE RULES. The rules are:
Page | 6 Introduction

Industrial Dobby Loom User's Manual IDL Setup
.
1.
Never, under any circumstances, remove or disable one of your
loom’s safety devices.
2.
Err on the side of caution: if something seems wrong, assume it
is. Stop the loom until you’ve figured it out.
3.
4.
Don’t take chances — be particularly careful about your hands.
Disconnect both electrical power and air before you do any
maintenance on your loom.
5.
Don’t guess. If you’re unsure about anything, and this manual
doesn’t help, call our technical support number at 800 626-9615.
6.
Never stand at the end of the shuttle boxes when the loom is in
motion.
BE SAFE!!! You’ll come across other safety tips as you read more about your
IDL. PLEASE, if you read nothing else in this manual, read this safety
information!
Safety Page | 7

IDL Setup Industrial Dobby Loom User's Manual
Stopping your loom safely
It is important to understand how to stop your loom safely, especially if an
emergency occurs. Always pay attention to where you are in relation to the
moving parts of the loom. Normally, you will use Stop or Pause to stop the
loom when weaving.
In an emergency where the loom needs to be stopped immediately, you
should use the Emergency Stop. However, anything that has already been
placed in motion will complete that motion. For instance, if the shuttle has
been thrown, it will not stop until it hits something.
1)
There are three ways to stop your loom:
a.
b.
Press
Press PAUSE
STOP
c. Press EMERGENCY STOP
Each of these actions will bring the loom to a standstill; but, different
situations call for different methods.
Page | 8 Safety
Figure 1 - Control Panel

Industrial Dobby Loom User's Manual IDL Setup
end of the present cycle.
if it is
Control Application What Happens
STOP To stop the loom at the
Loom works to the end
of the cycle and stops.
Can be used for any
reason.
To resume, press RUN. The new cycle will begin
properly.
PAUSE To pause the loom mid-
cycle for any reason.
Interrupts the loom,
mid-cycle.
Press PAUSE to resume. The cycle should resume
with the next action.
Check to make sure the
next expected action
occurs.
EMERGENCY
STOP
To stop the loom
immediately.
Stops the loom at the
current action. The cycle
will not complete.
Turn the loom on, and
press RUN.
The loom resets to the
beginning of the next
cycle. This may result in
a flaw in the fabric
not accounted for.
Restarting After an "Emergency Stop"
If you’ve used this mode, your loom will have stopped somewhere midcycle; that is, anywhere between a cloth advance and a beater return.
However, when you re-start the loom, it will re- set automatically to the
beginning of the next cycle. Whatever weaving operations were yet to go
when it was shut down will not be completed. If you continue weaving in the
AUTO mode, you’ll develop a flaw in the fabric.
Note:
Before re-starting the loom, make sure the shuttles are firmly in their boxes
and the warp yarns are correctly in place.
1)
2)
Switch the loom to Manual at the Control Panel.
Determine where you are in the weaving sequence.
Safety Page | 9

IDL Setup Industrial Dobby Loom User's Manual
3)
4)
DDITIONAL LOOM SETUP
A
Normally, the IDL is setup by an AVL technician. Depending on the
circumstances of your particular installation, you may need to provide some
additional setup.
Use the hand control to advance through the remaining steps of the
cycle. As a reminder, each cycle consists of the following sequence
of steps:
ADVANCE —> DOBBY —> SHUTTLE —> DOBBY —> BEATER —>
BEATER
Return the loom to
Auto
, press
Run
, and continue.
Square and Level the Loom
Please make a note of this process, as it is an important part of the
maintenance of your loom. Your loom will perform better and give more
years of service if this process becomes a part of your regular loom
maintenance.
1)
2)
3)
4)
5)
6)
Using a tape measure, note these measurements:
a. The distance from the inside corner of the rear left vertical to
the inside corner of the front right vertical.
b. The distance from the inside corner of the rear right vertical
to the inside corner of the front left vertical.
These two measurements should match. If they do not, you will
need to adjust the frame slightly.
Now, using a level, check to see if the frame is level front-to-back,
place a carpenter’s level along the top of each Top horizontal.
Check side-to-side by placing the level along the length of the Cloth
beam and, again, along the Lower back framing member.
Depending on the flooring, you may need to use shims under the
four corner verticals in order to achieve level.
Once the loom is square and level, check and tighten all bolts and
nuts that connect the frame pieces.
Page | 10 Additional Loom Setup

Industrial Dobby Loom User's Manual IDL Setup
Over time, due to the shaking and movement the loom experiences during
use, these connections will shake loose, requiring periodic checking and
tightening. Make a check of these components a regular part of your loom
maintenance.
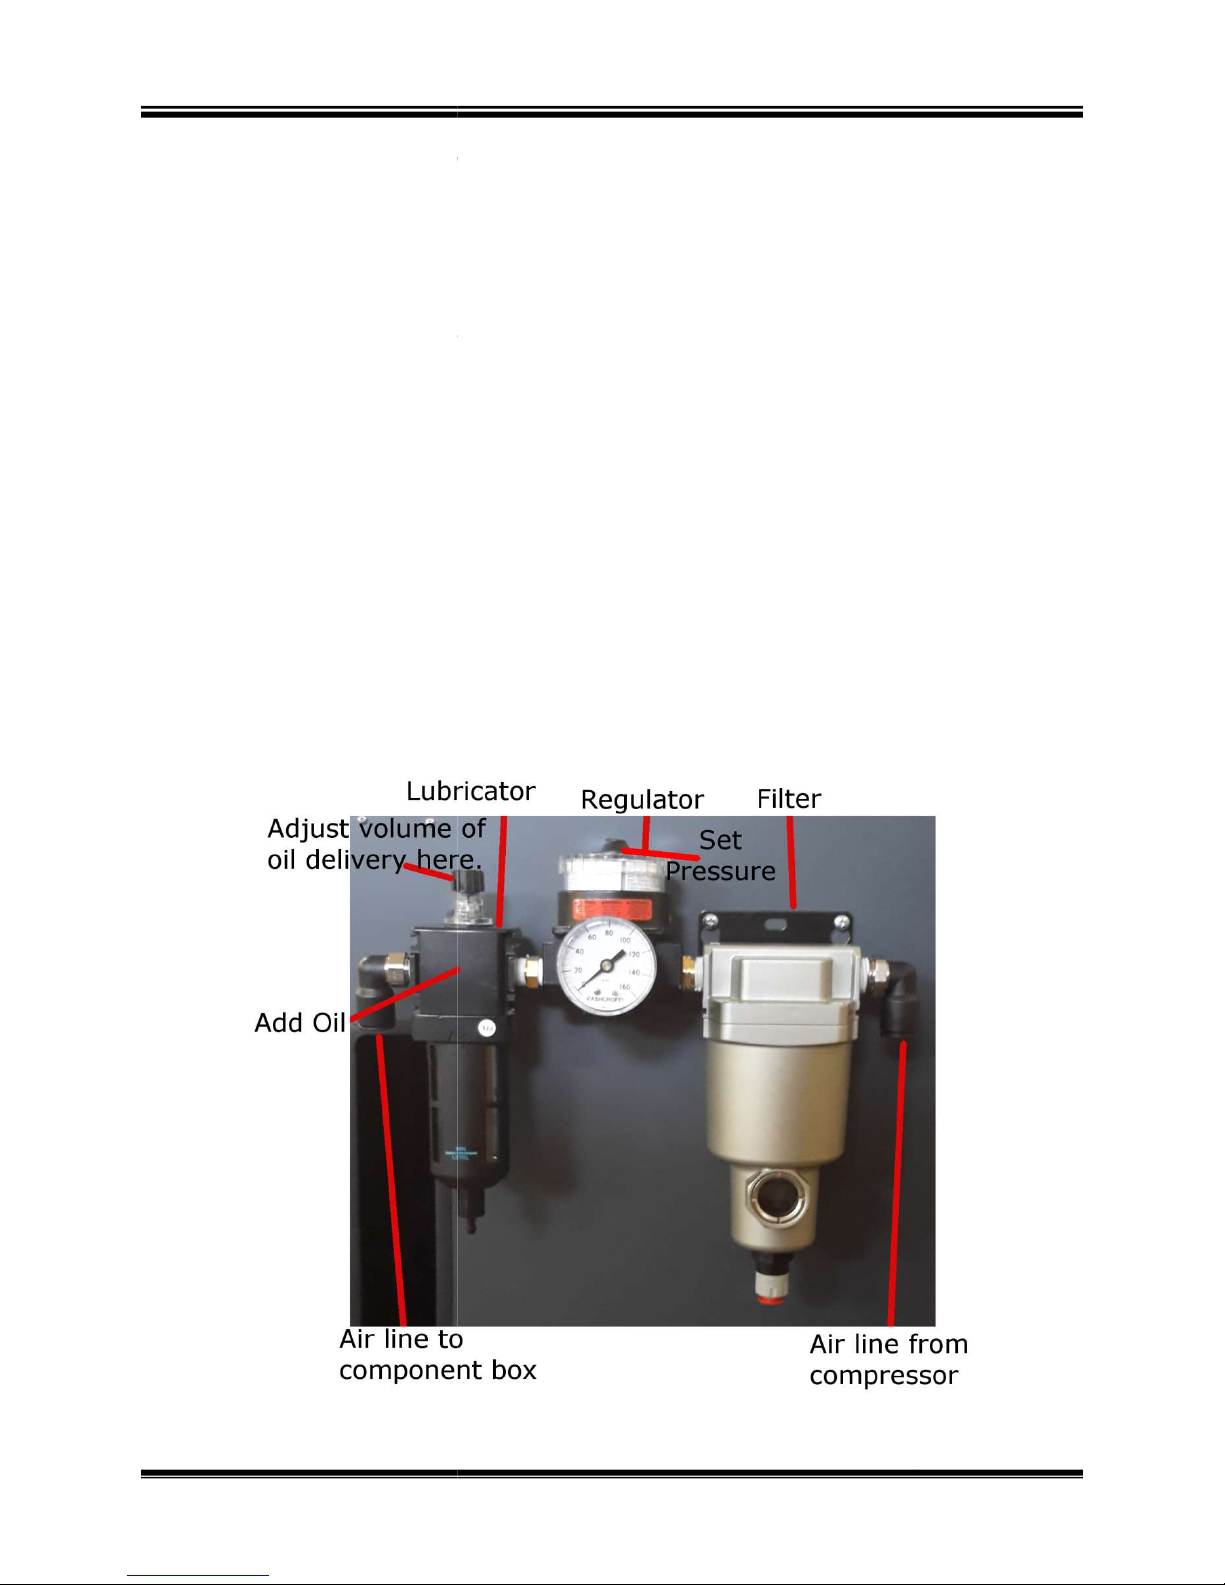
Flexible Air Link
If the air line from your compressor is made of a rigid material (steel pipe,
PVC, copper), we suggest that you provide a flexible link between it and the
loom. Simply connect a foot or more of ½” air hose between the FR and the
end of the compressor line. This link will dampen vibration between your
loom and the incoming air line, lessening the possibility of loosened fittings.
Floor Brackets
Your loom is equipped with special shock absorbing pads which will retard its
tendency to “walk”. In some situations, the loom may need to be anchored
to the floor. Brackets made for this purpose are available from AVL.
If you opt to bolt your loom to the floor, be sure to first check that it is
square. Bolting the loom to the floor will, over time, reduce the need to
adjust the loom for square. It will also reduce the need to make adjustments
to the flyshuttle boxes.
Power Supply
AVL strongly recommends that you use a surge protector and an
Uninterruptable Power Supply (UPS) with your loom. These will protect the
electronics in your loom from power outages and fluctuations.
Note:
If the IDL stops unexpectedly due to a power outage, check the loom
carefully for any damage before restarting. Also check the warp and the
woven cloth to make sure nothing was damaged.
ETUP YOUR COMPUTER
S
Your AVL technician should have installed the software for the IDL on your
computer and connected it to the Compu-Dobby.
There are several ways to connect the Compu-Dobby to the computer. The
most common is with a USB cable.
For complete information on using the software, please see the software
manual.
Setup Your Computer Page | 11
IDL Setup
YSTEM
compressor must be able to deliver a minimum of 2
pounds per square
Regulator) is mounted on the back of the
This is where the air line coming from the compressor
The primary function of this device is to
Air pressure is measured in pounds
r with pneumatic systems, just think of air as
power.
see a gauge on the FR and an adjustment knob
this knob clockwise to increase pressure.
the FR at 105+ p.s.i. The operating pressure
FRL (may vary)
Industrial Dobby Loom User's Manual
Setup the Air System
cubic
Computer
connects to the loom.
the air pressure coming into
you’re not
you think of gas in your
immediately above it.
should start pressure
generally
ETUP THE AIR
S
Compressor
S
Your
per minute at 115
Filter-Regulator (FR)
The FR (Filter,
the system.
familia
car. More air equals more
You’ll
Turn
from
around 120 p.s.i.
inch.
control
-per-square-inch (P.S.I.). If
You
should
5
feet of air
Cabinet.
be
Figure 2 -
Page | 12
Industrial Dobby Loom User's Manual
Regulators
In addition to the FR, there are other regulators that control the
air that is delivered to the di
component board in the computer cabinet in
of the FR. Each regulator has a
ntrol power. FLOW CONTROLS, discussed below, control the
speed at which your systems operate.
Each regulator controls one system and is labeled on the air board
computer cabinet. Consult the chart below to determine
You
are located on the
Component box, to the left
operating
settings need to be
fferent loom systems. These
the
gauge labeled with the name.
IDL Setup
amount of
REMEMBER:
Regulators co
Figure 3 - Regulators
values for each system.
may find that these
Setup the Air System
in the
initial
Page | 13
IDL Setup Industrial Dobby Loom User's Manual
modified, depending on the weight of your yarns, operating speed, and other
factors.
System P.S.I. Setting
Beater 60
Cloth Storage 10-20
Dobby 60
Right picker (shuttle) 50
Left picker (shuttle) 50
Cylinder Flow Controls (Speed Controls)
The speed at which each of the loom systems operates is regulated by “flow
controls” located at various points on the loom:
Loom System Flow Control
Cloth Advance Automatic Advance Cylinder
Harness Lifting Dobby Cylinder
Box Changing Box Changing Cylinders
Cloth Storage Cloth Storage Cylinder
These different systems will operate according to the choreography which
you establish. You’ll want the loom to lift, beat, and pick according to your
weaving needs at a particular moment. This means you’ll need to set the
controls for each of the systems. It sounds much more complicated than it
really is and, once you’ve made your initial setting, you won’t need to
change them for the balance of your warp. Your installer will make the initial
settings. We describe how to adjust these and what they control in more
depth later in the manual.
ESTING THE LOOM
T
You will want to test the loom before beginning to weave the first time, and
anytime it has been sitting idle for a long time. Generally when your loom is
Page | 14 Testing The Loom

Industrial Dobby Loom User's Manual IDL Setup
installed by an AVL technician, they will help you test and run the loom the first
time.
To test the loom, open or create a file for plain weave in the software program.
Set the software to Loom Control.
We advise that you first operate your loom with empty shuttles. This will
give you an opportunity to study the action of the loom and will point out
any operating deficiencies. When testing the loom, always start with Manual
Loom Control.
RE
P
Anytime you use the loom, you should run through this short checklist
before you put the loom in motion:
ORMAL LOOM FIRING SEQUENCE
N
There is a specific order of events that should successfully complete for the
IDL to operate correctly.
1)
PERATION CHECKLIST
-O
Check that the shuttle boxes align with the shuttle race.
Check that the shuttle boxes traverse their support rods without
rubbing or binding (move up and down by hand).
Check that the air line is connected.
Check that the power cord is connected.
Check that the Compu-Dobby is connected.
Check that the FR and system regulators are at the expected settings.
Auto Advance. The warp advances incrementally.
2)
3)
4)
5)
Pre-Operation Checklist Page | 15
Dobby Down and Beater Back. The harnesses are opened and the
beater is in the back position.
Shuttle Fires.
Dobby Up and Beater Forward. The harnesses close and the beater
moves forward, beating the new weft yarn in.
This sequence, 1-4, is repeated.
 Loading...