

Page 1

User Manual
Revision 1.0.0, (December, 2014)
Sequoia Dual
One of a kind multiviewier
Page 2

User Manual
ABOUT THIS MANUAL
This manual contains information on how to use the Avitech Sequoia Dual mouse keyboard controller. There are 3
chapters in this manual.
Getting Started introduces features and specifications as well as external components of the Avitech Sequoia
Dual.
System Configuration discusses the process of setting up your Sequoia Dual.
Basic Operations introduces the two types of operating modes and demonstrates the mouse and keyboard
hot-keys to perform basic operations, as well as using the on-screen user interface to configure your Sequoia
Dual on regular and touch-screen monitors.
The following conventions are used to distinguish elements of text throughout the manual.
provides additional hints or information that require special attention.
identifies warnings which must be strictly followed.
Any name of a menu, command, icon or button displayed on the screen is shown in a bold typeset.
For example: On the Start menu select Settings.
Any name that refers to a mode is underlined.
For example: Windows can be adjusted by the Host cursor when the Sequoia Dual is in Host mode.
To assist us in making improvements to this user manual, we welcome any comments and constructive criticism.
Please email us at: sales@avitechvideo.com.
WARNING
Do not attempt to disassemble the Sequoia Dual. Doing so may void the warranty. There are no serviceable parts
inside. Please refer all servicing to qualified personnel.
TRADEMARKS
All brand and product names are trademarks or registered trademarks of their respective companies.
COPYRIGHT
The information in this manual is subject to change without prior notice. No part of this document may be
reproduced or transmitted in any form or by any means, electronic or mechanical for any purpose, without the
express written permission of Avitech International Corporation. Avitech International Corporation may have
patents, patent applications, trademarks, copyrights or other intellectual property rights covering the subject matter
in this document. Except as expressly written by Avitech International Corporation, the furnishing of this document
does not provide any license to patents, trademarks, copyrights or other intellectual property of Avitech International
Corporation or any of its affiliates.
TECHNICAL SUPPORT
For any questions regarding the information provided in this guide, call our technical support help line at
425-885-3863, or our toll free help line at 1-877-AVI-TECH, or email us at: support@avitechvideo.com.
ii
Page 3

Contents
About This Manual............................................................................................................... ii
Warranty.............................................................................................................................. iv
Limitation of Liability.......................................................................................................... iv
Extended Warranty Options ............................................................................................... iv
Services and Repairs Outside the Warranty Period.......................................................... iv
Regulatory Information....................................................................................................... iv
Federal Communications Commission (FCC) Statement ................................................. iv
European Union CE Marking and Compliance Notices..................................................... iv
Australia and New Zealand C-Tick Marking and Compliance Notice................................ iv
1. Getting Started......................................................................................................................... 1
1.1 Package Contents......................................................................................................... 1
1.2 Product Features .......................................................................................................... 3
1.3 Specifications ............................................................................................................... 4
1.4 Connections to the Sequoia Dual................................................................................. 6
2. System Configuration.............................................................................................................. 8
2.1 Getting the Sequoia Dual Ready .................................................................................. 8
2.1.1 Basic Setup When Connecting a Regular Display or Touch-screen Display
................................................................................................................................ 8
2.1.2 Basic Setup When Cascading the Sequoia Dual ........................................... 10
3. Basic Operations................................................................................................................... 12
3.1 Host Mode ................................................................................................................... 13
3.1.1 Pop-up Selections........................................................................................... 13
3.1.2 Functions ........................................................................................................ 13
3.2 Remote Mode .............................................................................................................. 14
Appendix A Using the Mouse Right-click Menu .................................................................... 15
Appendix B Using the GO! Bridge Utility.............................................................................. 26
Appendix C Using the “Surfer”Feature.................................................................................. 32
Appendix D Using the Top Menu .......................................................................................... 36
Appendix E Using the Touch-screen .................................................................................... 37
Appendix F Using the Touch-to-Mouse Utility (for Windows XP only) ................................ 40
Appendix G Resetting to the Factory-Default State............................................................... 41
iii
Page 4

Warranty
Avitech International Corporation (herein after referred to as “Avitech”)
warrants to the original purchaser of the products manufactured in its
facility (the “Product”), that these products will be free from defects in
material and workmanship for a period of 1 year or 15 months from the
date of shipment of the Product to the purchaser. There is a 3 month
grace period between shipping and installation.
If the Product proves to be defective during the 1 year warranty period,
the purchaser’s exclusive remedy and Avitech’s sole obligation under
this warranty is expressly limited, at Avitech’s sole option, to:
(a) repairing the defective Product without charge for parts and labor;
or (b) providing a replacement in exchange for the defective Product;
or (c) if after a reasonable time is unable to correct the defect or
provide a replacement Product in good working order, then the
purchaser shall be entitled to recover damages subject to the limitation
of liability set forth below.
Limitation of Liability
Avitech’s liability under this warranty shall not exceed the purchase
price paid for the defective product. In no event shall Avitech be liable
for any incidental, special, or consequential damages, including
without limitation, loss of profits for any breach of this warranty.
If Avitech replaces the defecti ve Product with a replacement Product
as provided under the terms of this Warranty, in no event will the term
of the warranty on the replacement Product exceed the number of
months remaining on the warranty covering the defective Product.
Equipment manufactured by other suppliers and supplied by Avitech
carries the respective manufacturer’s warranty. Avitech assumes no
warranty responsibility either expressed or implied for equipment
manufactured by others and supplied by Avitech.
This Warranty is in lieu of all other warranties expressed or implied,
including without limitation, any implied warranty of merchantability or
fitness for a particular purpose, all of which are expressly disclaimed.
This Hardware Warranty shall not apply to any defect, failure, or
damage: (a) caused by improper use of the Product or inadequate
maintenance and care of the Product; (b) resulting from attempts by
other than Avitech representati ves to install, repair, or service the
Product; (c) caused by installation of the Product in a hostile operating
environment or connection of the Product to incompatible equipment;
or (d) caused by the modification of the Product or integration with
other products when the effect of such modification or integration
increases the time or difficulties of servicing the Product.
Any Product which fails under conditions other than those specifically
covered by the Hardware Warranty, will be repaired at the price of
parts and labor in effect at the time of repair. Such repairs are
warranted for a period of 90 days from date of reshipment to customer.
Extended Warranty Options
Avitech offers OPTIONAL Extended Warranty plans that provide
continuous coverage for the Product after the expiration of the
Warranty Period. Contact an Avitech sales representative for details
on the options that are available for the Avitech equipment.
Services and Repairs Outside the Warranty Period
Avitech makes its best offer to repair a product that is outside the
warranty period, provided the product has not reached its end of life
(EOL). The minimum charge for such repair excluding shipping and
handling is $200 (US dollars).
AVITECH INTERNATIONAL CORPORATION
● 15377 NE 90th Street Redmond, W A 98052 USA
● TOLL FREE 1 877 AVITECH
● PHONE 1 425 885 3863
● FAX 1 425 885 4726
● info@avitechvideo.com
● http://avitechvideo.com
Regulatory Information
Marking labels located on the exterior of the device indicate the
regulations that the model complies with. Please check the marking
labels on the device and refer to the corresponding statements in this
chapter. Some notices apply to specific models only.
Federal Communications Commission (FCC) Statement
This equipment has been tested and found to comply with the limits for
a Class B digital device, pursuant to Part 15 of the FCC Rules. These
limits are designed to provide reasonable protection against harmful
interference when the equipment is operated in a commercial
environment. This equipment generates, uses, and can radiate radio
frequency energy and, if not installed and used in accordance with the
instruction manual, may cause harmful interference to radio
communications. Operation of this equipment in a residential area is
likely to cause harmful interference, in which case the user will be
required to correct the interference at his own expense. Properly
shielded and grounded cables and connectors must be used in order
to meet FCC emission limits. Avitech is not responsible for any radio or
television interference caused by using other than recommended
cables and connectors or by unauthorized changes or modifications to
this equipment. Unauthorized changes or modifications could void the
user's authority to operate the equipment. Operation is subject to the
following two conditions: (1) this device may not cause harmful
interference, and (2) this device must accept any interference
received, including interference that may cause undesired operation.
European Union CE Marking and Compliance Notices
Statements of Compliance
English
This product follows the provisions of the European Directive
1999/5/EC.
Dansk (Danish)
Dette produkt er i overensstemmelse med det europæiske direkti v
1999/5/EC.
Nederlands (Dutch)
Dit product is in navolging van de bepalingen van Europees Directief
1999/5/EC.
Suomi (Finnish)
Tämä tuote noudattaa EU-direktii vin 1999/5/EC määräyksiä.
Français (French)
Ce produit est conforme aux exigences de la Directive Européenne
1999/5/EC.
Deutsch (German)
Dieses Produkt entspricht den Bestimmungen der Europäischen
Richtlinie 1999/5/EC.
Ελληνικά (Greek)
To προϊόν αυτό πληροί τις προβλέψεις της Ευρωπαϊκής Οδηγίας
1999/5/EC.
Íslenska (Icelandic)
Þessi vara stenst reglugerð Evrópska Efnahags Bandalagsins númer
1999/5/EC.
Italiano (Italian)
Questo prodotto è conforme alla Direttiva Europea 1999/5/EC.
Norsk (Norwegian)
Dette produktet er i henhold til bestemmelsene i det europeiske
direktivet 1999/5/EC.
Português (Portuguese)
Este produto cumpre com as normas da Diretiva Européia 1999/5/EC.
Español (Spanish)
Este producto cumple con las normas del Directivo Europeo
1999/5/EC.
Svenska (Swedish)
Denna produkt har tillverkats i enlighet med EG-direktiv 1999/5/EC.
Australia and New Zealand C-Tick Marking and
Compliance Notice
Statement of Compliance
This product complies with Australia and New Zealand's standards for
radio interference.
iv
Page 5

1. Getting Started
The Avitech Sequoia Dual is a highly innovative device that comes with its own embedded operating
system and graphic engines. The Sequoia Dual integrates functions of a KVM (keyboard video mouse)
switch and a robust multi-viewer into one enclosure, providing a simple multi-viewing solution for any
user who works in an environment with multiple computer and video systems. With a single Sequoia
Dual being able to connect up to four computers and instantly switch inputs among them, users can
monitor and remotely control any two computers at the same time on a single display with just one set of
keyboard and mouse. The Sequoia Dual also supports a variety of video formats from HDMI, DVI-I to
VGA and YPbPr. Additionally, its scalability through cascading with other Sequoia devices makes the
Sequoia Dual an ideal solution to both individual users and corporate applications.
The Sequoia Dual features an on-screen user interface which allows handy operation and control of the
device. By giving relevant mouse commands through the interface, users can easily convert monitoring
styles to various layouts, and adjust windows to any size and position on the display. The mouse
right-click menu available through the on-screen interface allows users to freely set up or configure
numerous features for different applications. In addition, the top menu allows users to lock their windows
in size and position, and load previously saved layouts.
In addition to its freely adjustable interface and features, the Sequoia Dual can enter Remote mode to
transfer mouse and keyboard control from the Sequoia to the connected computer systems. Users can
then remotely control any of the connected computers with the set of keyboard and mouse on the
Sequoia. The “Surfer” feature, along with other user-friendly commands supported by the Sequoia Dual
allows users to freely switch control between the computers and the host Sequoia in an intuitive manner.
Furthermore, for more hands-on user experiences, the Sequoia Dual can be used with a touch-screen
display. The touch-screen controls are receptive and intuitive, allowing source switching, window
resizing and repositioning, and control of remote computers with just a tap of your finger.
This chapter will continue to introduce more features and specifications as well as external components
of your Sequoia Dual.
1.1 Package Contents
The following standard items are included in the shipping package:
Avitech Sequoia Dual
Utility Disc (software and user manual)
1
Page 6

D
D
D
12 V DC/5A Power Adapter
Rubber Foot (4 pcs)
Standard Power Cord (USA customer only)
USB A/B Cable (Optional)
HDMI to DVI Adapter (optional)
VGA to DVI Adapter (optional)
Table 1-1 Package Contents
Male to Dual Female Y Splitter Audio Cable
(length 1.8 m – optional)
HDMI® Cable (length 1.8 m – 1 piece)
2
Page 7

1.2 Product Features
The Sequoia Dual is HDCP-compliant and capable of handling HDMI®, DVI-I, VGA and YPbPr inputs.
Featuring two DVI-I and two HDMI input ports, and one HDMI output port, a single Sequoia Dual can
connect up to four computers, four videos, or any combination of four inputs. It can simultaneously
display any two of the four inputs on a single display, and allows instant switching of inputs through its
on-screen user interface.
The Sequoia Dual features in automatic sensing of input signals, automatic detection and selection of
optimum display resolution; it also supports hot-swapping which allows addition and removal of any
input/output signals without powering down the device.
For audio monitoring, the Sequoia Dual features a 1/8 inch headphone jack. It also accepts embedded
HDMI® audio (8ch-stereo) and analog audio (2ch-stereo).
For operation, the Sequoia Dual provides a friendly on-screen user interface that can be controlled by a
set of keyboard and mouse, allowing free switching of operating modes and adjustments for numerous
behavior that suits different applications. In addition, with Avitech Hook Utility (patent pending), a
computer with its own keyboard and mouse can also be used to control the Sequoia Dual through the
USB type B port on its front panel .The Sequoia Dual also features in multi-touch support and is
compatible with touch-screen displays, offering more flexibility for operation and control.
In addition to monitoring, the Sequoia Dual can remotely control the connected computers through the
USB keyboard and mouse connected to its front panel. Utilizing the “Surfer” feature – which allows users
to transfer keyboard and mouse control from one computer to another by simply moving the mouse
cursor to the window border of the targeted computer, the Sequoia Dual is able to seamlessly switch
between and control any of the four computers connected to it with just one set of keyboard and mouse.
Integrated file and folder transfer across computers provides convenient file management. By selecting
an origin and a destination through the on-screen user interface, the Sequoia Dual allows simple
copy/cut and paste of files/folders across connected computers using its embedded file managing utility,
Go! Bridge.
The Sequoia Dual also supports streaming its display through Ethernet connection, allowing computers
at far ends to perform remote monitoring and control of the Sequoia. Its video over IP operates on
standard 100/1000Mb Ethernet networks for remote monitors.
The Sequoia’s front panel features LED indicators for monitoring the followings:
Connected Computers (Active or Standby), Operating Mode (Host or Remote), and Power.
The temperature monitor with automatic PWM fan speed controls to protect against system failure. The
low noise and speed-varying fan along with the stand-alone and rack mountable module designs make
the Sequoia Dual suitable for various work environments. The size of the Sequoia Dual is also greatly
reduced to save working spaces and enhance mobility.
For larger applications, the Sequoia Dual can be cascaded with other Sequoia devices, enabling users
to control up to five Sequoia Dual and 20 computers with just one set of keyboard and mouse.
1. Non-standard keyboards (e.g., keyboards with a USB hub, keyboards that need driver installation and
programmable keyboard, etc.) are not supported.
2. Compatibility between the computer and the Sequoia Dual may depend on the computer’s BIOS Setup.
If an incompatibility occurs, refer to the computer’s BIOS Setup and make sure USB port is enabled if
this item exists in the computer’s BIOS Setup (typically found in the "Advanced" or "Onboard Device
Configuration" menu).
3. The Hook Utility currently supports the Sequoia solo series (non-cascaded) and the Pacific X-HDU.
Connect a laptop (or desktop) computer to the Sequoia solo series or Pacific X-HDU and simulate
keyboard/mouse function for remote control processing (KVM feature).
4. Refer to the Hook Utility user manual for more details.
3
Page 8

1.3 Specifications
Input
HDMI or DVI
or YPbPr
(through DVI to YPbPr
adapter)
or VGA
(through DVI to VGA adapter)
Automatic sensing
HDMI/DVI-D mode:
1920×1200, 50Hz/60Hz
1920×1080, 50Hz/60Hz
1680×1050, 50Hz/60Hz
1600×1200, 50Hz/60Hz
1400×1080, 50Hz/60Hz
1360×765, 50Hz/60Hz
1280×1024, 50Hz/60Hz/75Hz
1280×960, 50Hz/60Hz
1024×768, 50Hz/60Hz/75Hz
800×600, 50Hz/60Hz/75Hz
720×400, 70Hz
640×480, 60Hz/75Hz
Automatic sensing/Manual adjustment
YPbPr:
1920×1035i, 59.94Hz/60Hz
1920×1080PsF, 23.98Hz/24Hz
1920x1080p, 24Hz/25Hz/29.97Hz/30Hz/50Hz/60Hz
1920x1080i, 50Hz/59.94Hz/60Hz
1280x720p, 50Hz/59.94Hz/60Hz
576i, 50Hz
576p, 50Hz
480i, 59.94Hz
480p, 59.94Hz
VGA mode:
1920×1200, 50Hz/60Hz
1920×1080, 50Hz/60Hz/30Hz
1920×1035, 60Hz/30Hz
1760×1100, 60Hz
1680×1050, 50Hz/60Hz/75Hz
1600×1200, 50Hz/60Hz/75Hz
1600×1024, 60Hz
1440×900, 50Hz/60Hz/75Hz
1400×1050, 50Hz/60Hz/75Hz
1366×768, 60Hz
1365×1024, 60Hz
1365×768, 60Hz
1360×1024, 75.1Hz
1360×768, 50Hz/60Hz/75Hz
1360×765, 60Hz
1280×1024, 50Hz/60Hz/72Hz/75Hz/76Hz/85Hz
1280×960, 60Hz/70Hz/75Hz
1280×768, 50Hz/56Hz/60Hz/75Hz
1280×720, 50Hz/59.94Hz/60Hz/75Hz
1200×900, 72Hz
1152×900, 66Hz/76Hz
1152×864, 75Hz
1024×768, 50Hz/60Hz/70Hz/75Hz/85Hz
1024×576, 60Hz/72Hz
960×680, 60Hz
960×620, 60Hz
960×540, 60Hz
852×480, 60Hz
848×480, 60Hz
800×600, 50Hz/56Hz/60Hz/72Hz/75Hz
640×512, 60Hz
640×480, 60Hz/72Hz
4
Page 9

Input
Transmission of embedded audio signal is supported when passing a
HDMI input signal to the DVI-I port using a HDMI to DVI adapter, but not
supported when passing a DVI, VGA or YPbPr signal.
Output
Automatic sensing or user selectable
1920×1200 (WUXGA) at 50Hz/60Hz
1920×1080 (HD1080) at 50Hz/60Hz
1680×1050 (WSXGA+) at 50Hz/60Hz/75Hz
1600×1200 (UXGA) at 50Hz/60Hz/75Hz
1440×900 (WSXGA, WXGA) at 50Hz/60Hz/75Hz
1400×1050 (SXGA+) at 50Hz/60Hz/75Hz
HDMI or DVI
(through DVI to HDMI adapter)
1360×768 (WXGA) at 50Hz/60Hz/75Hz
1280×1024 (SXGA) at 50Hz/60Hz/75Hz
1280×768 (WSGA) at 50Hz/60Hz/75Hz
1280×720 (HD 720) at 50Hz/59.94Hz/60Hz/75Hz
1024×768 (XGA) at 50Hz/60Hz/75Hz
800×600 (SVGA) at 50Hz/60Hz/75Hz
640×480 (VGA) at 60Hz
Transmission of embedded audio signal is not supported when passing
an output signal through a HDMI to DVI adapter.
Others
Peripheral/File
Sharing
Computer
Connection
Port Switching
Power
Dimensions/Weight
Environment/Safety
1. The Sequoia Dual supports VGA/YPbPr input(s) through the optional VGA/YPbPr to DVI adapter(s).
2. Upon inputting a 480i/576i/1080i signal, a judder on the Source 2 image may be observed. This is due to
the fact that Source 2's de-interlace process is not as efficient as that of Source 1.
3. The Sequoia Dual's HDMI input/output ports support HDMI revision 1.3 and HDCP revision 1.2.
4. For monitors whose display mode can be set between “Graphic” and “Video”, select “Graphic”; for those
whose display color format can be set between “RGB” and “YPbPr”, select “RGB” (selecting the other ones
may lead to corrupted displays).
5. It is suggested to always reboot the Sequoia Dual after switching to a different monitor (especially one that
supports different optimal resolution); this will ensure the Sequoia Dual to select the correct output
resolution and frame rate.
Method:
USB type A port (for USB 2.0 hub)
GO! Bridge Utility software
Up to 4 units (maximum)
Method:
“Surfer” feature
OSD (pop-up menu)
Power consumption is 25W
Power Supply (adapter):
Input (AC): 100 to 240V 50Hz/60Hz
Output (DC): 12V DC/5A
Dimensions: 152×174×44 mm (6.0×6.9×1.7 inch)
Weight: 0.70 kg (1.54 lb)
Temperature:
Operating: 0 C (32 F) to 40 C (104 F)
Storage: –10 C (14 F) to 50 C (122 F)
Humidity: 0% to 80% relative, non-condensing
Safety: FCC/CE/C-Tick/Class B
Table 1-2 Specifications
5
Page 10

1.4 Connections to the Sequoia Dual
Figure 1-1 Sequoia Dual Components
6
Page 11

Front Panel
PWR
Glows green when the Sequoia Dual is turned ON
MODE
Glows green when the Sequoia Dual is in Host mode
Glows amber when the Sequoia Dual is in Remote mode
Indicators
Audio In/Out
USB Type A
(keyboard/mouse)
USB Type B
USB Type A
(peripheral sharing)
1 to 4
Glows green when a particular computer is operating under
Remote mode (full control through keyboard and mouse)
Glows amber when a particular computer is operating under Host
mode (monitoring only)
Blinks amber on a particular rebooting or powered-off computer
connected to the Sequoia Dual
Connects to the green connector for headphone function (mono)
Connects to the red connector for microphone function
Connects to a USB mouse and keyboard (or connects to a touch-screen
display). Use these ports for operation and control in Host and Remote
mode.
Connects to a computer with its own keyboard and mouse to control the
Sequoia Dual (The Hook Utility needs to be installed on that computer to
perform such control)
Connects to a USB 2.0 hub, USB flash disk, etc.
Rear Panel
Microphone/
Headphone/
USB Input
DVI Input
HDMI Input
Serial
Ethernet (IP)
HDMI OUT
Power Switch
Dip Switches
Power
(DC 12V)
Kensington
Security Slot
®
Connect the remote computer’s USB (through the USB A/B cable) and
audio connectors (through the male to dual female Y splitter audio cable)
Connects HDMI/DVI-I/VGA/YPbPr inputs (an adapter may be required)
Note: Transmission of embedded audio signal is supported when passing
a HDMI input signal to the DVI-I port using a HDMI to DVI adapter, but not
supported when passing a DVI, VGA or YPbPr signal.
Connects HDMI/DVI inputs through HDMI or DVI signal cable
(a DVI to HDMI adapter may be required)
Updates firmware
Supports Avitech ASCII Protocol
For setup through a network connection
For video streaming to remote PC monitoring over Ethernet
Supports Avitech Http and ASCII command Protocol
Connects a monitor/display through HDMI or DVI signal cable
(a HDMI to DVI adapter may be required)
Turns the Sequoia Dual power ON and OFF
Resets the Sequoia Dual to factory-default settings; or updates firmware
Connects to the 12V DC/5A power adapter
Attach a lock-and-cable apparatus for anti-theft purpose
Note: Available on both sides of Sequoia Dual
Table 1-3 Sequoia Dual Component Description
7
Page 12

2. System Configuration
This chapter discusses the process of setting up your Sequoia Dual.
2.1 Getting the Sequoia Dual Ready
To control your Sequoia Dual directly, connect a keyboard and mouse to the USB type A ports on
its front panel. Alternatively, to control your Sequoia Dual on a computer, use a laptop (or desktop)
computer with its own keyboard and mouse and connect to your Sequoia Dual’s USB type B port on
its front panel (use a USB A/B cable), and then run the Hook Utility on this controlling computer to
simulate mouse and keyboard operation.
When using a touch-screen display, connect the display to one of the USB type A port with a USB
cable to simulate mouse-click action. The Sequoia Dual can then be controlled by tapping your finger on
the display.
1. The Hook Utility currently supports the Sequoia solo series (non-cascaded) and the Pacific X-HDU. With
Hook Utility, use the connected computer to simulate keyboard and mouse function for remote control
processing (KVM feature).
2. Refer to the Hook Utility user manual for more details.
2.1.1 Basic Setup When Connecting a Regular Display or Touch-screen Display
The following figures show a typical setup with a single Sequoia Dual connected to four computers and
a regular/touch-screen display.
DO NOT place any object on the top or side panels of the Sequoia Dual.
Doing so could affect its internal components and/or its heat dissipation.
Figure 2-1 Sequoia Dual with Regular Display Setup
8
Page 13

Figure 2-2 Sequoia Dual with Touch-screen Display Setup
Step 1. Connect a USB A/B cable to the first computer’s USB type A port, and then connect the other
end to your Sequoia Dual’s source 1 port (USB type B port on its rear panel). Repeat this
process for all succeeding computers.
(For Windows 2000 users) Upon connecting your Sequoia Dual to a computer through USB interface for the
first time, perform the Windows' on-screen steps to initialize the USB connection.
Step 2. Connect the male end of a male to dual female Y splitter audio cable to your Sequoia Dual’s
source 1 audio port on its rear panel. Connect the two dual female ends of the male to dual
female Y splitter audio cable to the first computer’s audio ports (mic in and audio out).
Repeat this process for all succeeding computers.
Step 3. Connect a HDMI or DVI (through a HDMI to DVI adapter) display to the HDMI OUT port on your
Sequoia Dual’s rear panel.
Step 4. Connect the first computer’s DVI or VGA/YPbPr (through an adapter) output to your Sequoia
Dual’s DVI-L port through a DVI cable. Repeat this procedure for the second computer to
DVI-R.
Connect the third computer’s HDMI output to your Sequoia Dual’s HDMI-L port through a HDMI
cable. Repeat this procedure for the fourth computer to HDMI-R.
Step 5. Connect a set of mouse and keyboard to the mouse/keyboard USB ports located on your
Sequoia Dual's front panel. When connecting to a touch-screen display, you can choose to
connect the display to one of the USB port of the Sequoia Dual with a USB cable instead.
When more than three devices (such as connecting a touch-screen display, a mouse and a
keyboard) need to be connected to the Sequoia Dual at the same time, you can use a USB hub
to increase the number of USB connections (Refer to figure 2-2).
Non-standard keyboards (e.g., keyboards with a USB hub, keyboards that need driver installation and
programmable keyboard, etc.) are not supported.
Step 6. Connect the provided 12V DC power adapter to your Sequoia Dual and power it on.
9
Page 14

Step 7. After the boot logo finishes loading, the Sequoia Dual's on-screen user interface with two
windows each contains image from one of the connected computers will appear, along with the
Host cursor that can be controlled directly through the mouse connected to your Sequoia Dual's
front panel.
The pop-up selections will appear upon moving the Host
cursor to a window’s top-right position:
Click the icon on a selected window to enter the Sequoia Dual's Remote mode.
Remote mode allows direct connection to the selected computer through USB interface.
Your Sequoia Dual’s (Host) keyboard and mouse will now control the selected computer; the
Host cursor will disappear when your Sequoia Dual is in Remote mode.
The “Surfer” feature (default setting is ON) is enabled. Moving your cursor out of your
current window's border toward the other window, or to the edges that are shared with the
other window will automatically switch over your Sequoia Dual’s (Host) keyboard and mouse
control to that computer.
Press the Pause/Break hot-key on the keyboard connected to your Sequoia Dual's front
panel to return keyboard and mouse control to the Sequoia Dual. The Host cursor will
reappear. Right-click anywhere and select OptionsSurfer to toggle off this feature if
desired.
2.1.2 Basic Setup When Cascading the Sequoia Dual
Cascade is the technique of “daisy-chaining” multiple Sequoia Dual (up to five) through a USB A/B
cable(s). It can be used when larger applications that involve having multiple computer systems
controlled by a master device. It should be noted that only the keyboard and mouse are cascaded; in
other words, when cascading, one set of keyboard and mouse can be used to control five Sequoia Dual
(or other Sequoia series) by “surfing” the Host cursor across five displays and switch over control to any
of the connected computers. Other functions (e.g., audio, video, and USB hub) are still confined to the
associated Sequoia Dual to which they are connected (see Figure 2-3).
The following figure shows three Sequoia Dual cascaded together, with each Sequoia Dual connected
to four computers.
Cascading is available on the Sequoia Dual, 4H, and 2H2U. A combination of any of these Sequoia devices
can be cascaded to meet custom applications.
Figure 2-3 Setup of Cascading Three Sequoia Dual
10
Page 15

Step 1. Perform step 1 – 4 for your first Sequoia Dual as outlined in the previous section (2.1.1)
“Basic Setup When Connecting to a Regular or Touch-screen Display.”
Step 2. Repeat the above-mentioned steps for your second and third Sequoia Dual to be cascaded.
Step 3. Connect a mouse and keyboard to the USB type A ports located on your first Sequoia
Dual’s front panel.
Step 4. Connect your first Sequoia Dual’s USB type B port to one of the second Sequoia’s USB
type A port using a standard USB A/B cable. Repeat this procedure to connect the second
Sequoia Dual to the third one.
Step 5. Move your Host cursor across all three displays to allow the system to complete the USB device
initialization.
If the Host cursor is unable to move over all three displays, perform step 5 and 6 again.
Step 6. The pop-up selections will appear upon moving the Host
cursor to a window’s top-right position:
Click the icon on a selected window to enter the Sequoia Dual's Remote mode.
Remote mode allows direct connection to the selected computer through USB interface.
Your Sequoia Dual’s (Host) keyboard and mouse will now control the selected computer; the
Host cursor will disappear when your Sequoia Dual is in Remote mode.
The “Surfer” feature (default setting is ON) is enabled. Moving your cursor out of your
current window's border toward the other window, or to the edges that are shared with the
other window will automatically switch over your Sequoia Dual’s (Host) keyboard and mouse
control to that computer.
Press the Pause/Break hot-key on the keyboard connected to your Sequoia Dual's front
panel to return keyboard and mouse control to the Sequoia Dual. The Host cursor will
reappear. Right-click anywhere and select OptionsSurfer to toggle off this feature if
desired.
Move the Host cursor across three displays to access computers confined to each Sequoia
Dual.
11
Page 16

3. Basic Operations
The Sequoia Dual always operates in one of its two operating modes: Host and Remote mode. Users
are allowed to freely switch between these two modes anytime during the operation for different uses.
This chapter discusses these operating modes, their functions, and hot-keys in details.
Host Mode
When your Sequoia Dual is in Host mode, the Host cursor appears on the display upon connecting a
mouse device to the front panel of your Sequoia Dual. The cursor will be controlled by this locally
connected mouse (In the case of a cascaded setup the cursor will be controlled by the mouse device
connected to the Master Sequoia Dual; in the case of using a touch-screen display, the Host cursor can
be controlled by a tap of a finger). Host mode provides a monitoring solution for the incoming
computer/video signals. Users can use the Host cursor to select and adjust window size, position, and
display layout directly through the on-screen interface. Other features such as the mouse right-click
menu and the top menu are features of this mode to enhance ease of control and operation and are
discussed in details in Appendix A and D.
Upon re-connecting a keyboard or mouse, the Host cursor may disappear.
Press the Pause/Break key to solve this problem.
Remote Mode
When your Sequoia Dual enters Remote mode, the Host cursor disappears, and your Sequoia Dual
transfers the connected mouse and keyboard control to a selected computer system. You can then
control this computer as you regularly would through the corresponding window on the display. Your
Sequoia Dual can only enter Remote mode to take control of a computer when the correct USB type B
port on your Sequoia Dual's rear panel is properly connected to the USB type A port of that computer
(using a standard USB A/B cable). In addition, only windows corresponding to computer systems (as
opposed to pure video systems) can be accessed through Remote mode.
Tips on Navigating the Sequoia Dual:
A maximum of four computers can be connected to a single Sequoia Dual. The Sequoia Dual
puts the images of two selected computers onto two windows and simultaneously displays them
on the monitor. Instant switching of inputs through the user interface is supported; thus, any two
of the four computers can be monitored and controlled on the display.
When Host mode is active, use the mouse connected to your Sequoia Dual to resize and
reposition windows on the display.
To switch from Host mode to Remote mode, move the Host cursor to the top-right corner of the
targeted window and then click the Login icon (or double-click your mouse's left button any
area within that window).
When entering Remote mode, your Sequoia Dual automatically transfers its mouse and
keyboard control to the selected computer. Use the mouse and keyboard to control that
computer as you regularly would.
To switch back to Host mode, use the keyboard hot-key Pause/Break, or double-click the
mouse scroll button. The Sequoia Dual will return to Host mode and the Host cursor will
reappear.
12
Page 17

3.1 Host Mode
In Host mode, users can monitor images of the connected computers and adjust two windows at a time
using the provided selections and menu. Basic operations allowed in Host mode are addressed below.
3.1.1 Pop-up Selections
Upon moving the Host cursor to the top-right corner of a window, the following pop-up selections will
appear:
Swap: enable a window to switch its position with the other window
Full screen: set a window to full screen
(right): select DVI-R port input signal
(left): select HDMI-L port input signal
(right): select HDMI-R port input signal
Login: enter Remote mode and control the computer corresponding to the window
Restore: return from a full-screen view to previous layout
(left): select DVI-L port input signal
When your Sequoia Dual detects that a particular computer’s USB port is not connected, the Login
pop-up icon on the corresponding window will be grayed-out.
3.1.2 Functions
The Sequoia Dual allows free window resize/reposition and selection of any video and audio inputs
directly through its on-screen user interface. The following is a list of summarized functions available in
Host mode; additional functions can be referred in Appendix A in details.
Function
Window resizing Drag any of the four corners or edges of a window to a desired size
Window
repositioning
Window position
swapping
Full screen
window
Drag a window to a desired position
Move the Host cursor to the top-right corner of a window; click the
icon to swap two windows' positions.
Move the Host cursor to the top-right corner of a window; click the
icon and then the window will maximize to full screen. Click the icon
to return from full screen.
Access a remote
computer
Select video
source
Move the Host cursor to the top-right corner of a window; click icon
to enter Remote mode to the corresponding computer. The icon will
be grayed-out if a window does not correspond to a computer system, or
if the USB connection between the Sequoia Dual and the computer fails.
Method 1:
Move the Host cursor to the top-right corner of a window;
click the icon (left) to select DVI-L as the input signal source;
click the icon (right) to select DVI-R as the input signal source;
click the icon (left) to select HDMI-L as the input signal source;
click the icon (right) to select HDMI-R as the input signal source.
Repeat the above procedure for the second window.
13
Page 18

Function
Method 2:
Right-click anywhere on the display to call the mouse right-click menu. On
the right-click menu, select Source 1 and choose DVI (L/R) or HDMI (L/R)
from the sub-menu as the input signal source.
Repeat the above procedure for Source 2.
Select audio
source
Right-click anywhere on the display to call the mouse right-click menu,
and then on the right-click menu, select Audio port to choose the source
for audio output.
Table 3-1 Host Mode Functions
The minimum window size for the Sequoia Dual to process and display: width = 348 pixel, height = 162 pixel.
3.2 Remote Mode
The following hot-keys are available when utilizing your Sequoia Dual under Remote mode.
Keys
Pause
Break
Ctrl + Shift + Alt + V
Exits from Remote mode and returns to Host mode.
This command is used to read the Sequoia Dual’s USB device firmware
version (USB type B port (source 1 to 4 port) located on the Sequoia
Dual’s rear panel that connects to the computer’s USB type A port through
a USB A/B cable). Open Microsoft® Notepad and then press Ctrl + Shift +
Alt + V to paste the firmware text to Notepad.
Table 3-2 Hot-keys of Remote Mode
When using an Apple’s MacBook computer, use control + option (Alt) + shift + k to perform Host/Remote
mode switch since there is no Pause/Break key.
14
Page 19
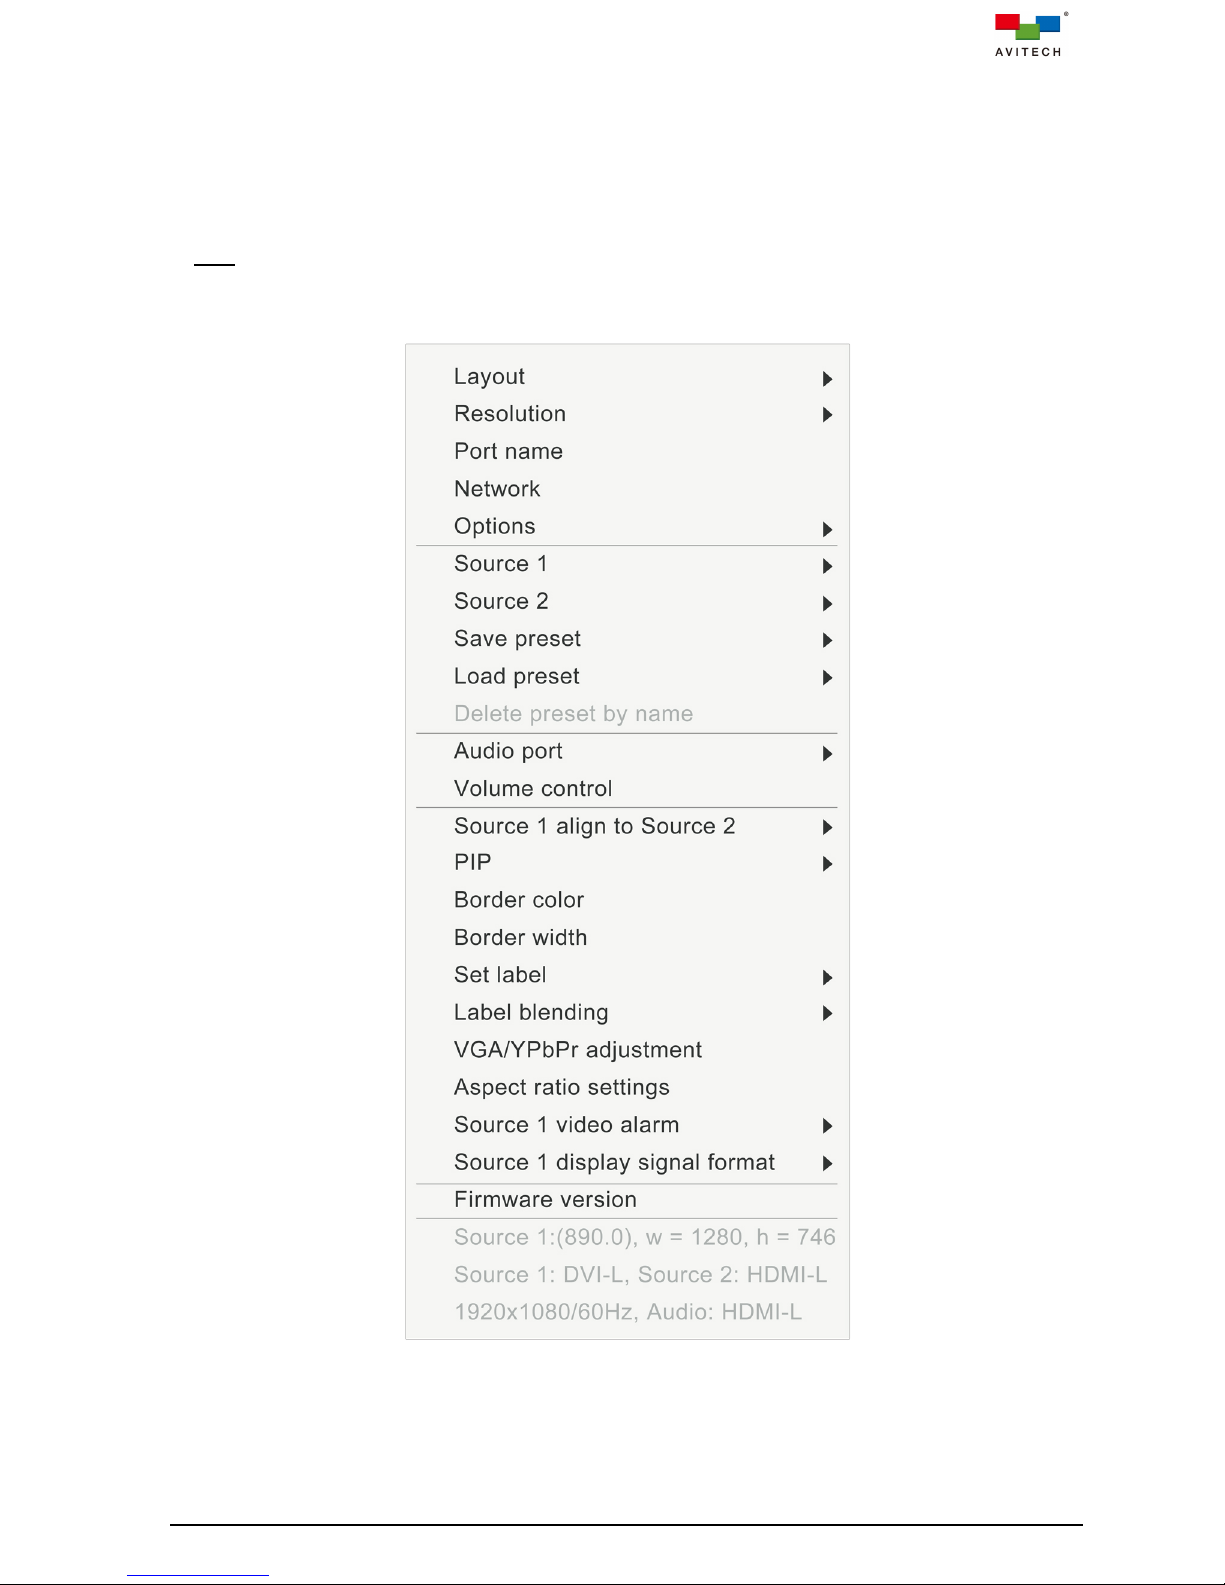
Appendix A: Using the Mouse Right-click Menu
The mouse right-click menu contains a collective of display and feature settings for the Sequoia Dual
such as customization of the user interface, video/audio source selections, remote monitoring, presets
save/load, and port selections for file/folder transfer across computers. The menu, as shown in the figure
below, can be called upon right-clicking anywhere on the on-screen interface when the Sequoia Dual is
in Host mode.
This appendix discusses each item listed on the mouse right-click menu.
Figure A-1 Mouse Right-click Menu
15
Page 20

Right-click Menu
Layout
Resolution
Arrange the two windows on the display into Picture Over Picture,
Picture In Picture, or Picture By Picture layout, or Full Screen for
Source 1 window.
Set the frame rate and display resolution of your Sequoia Dual's display.
The supported frame rates and display resolutions can be referred in 1.3,
Specifications.
EDID Check (default setting is ON) allows the Sequoia Dual to output
the optimum frame rate and resolution supported by the connected
display (if no resolution is specified).
Note: If EDID Check is disabled, the Sequoia Dual will automatically
output 1024×768 instead (if no resolution is specified).
Port name
Network
Set the name(s) of the video input port(s).
Default: DVI-L/DVI-R/HDMI-L/ HDMI-R.
16
Page 21

Right-click Menu
Enable remote monitoring of the Sequoia Dual's display on another
computer (multiple computers can perform remote monitoring
simultaneously). To perform remote monitoring on one computer, follow
the procedures below:
Step 1. Toggle ON the Streaming check box on the Network window.
Step 2. Connect your Sequoia Dual to a computer intended for remote
monitoring through Ethernet cable(s) (direct connection or
through a Ethernet hub). Streaming video can only be run with
VLC Media Player, so make sure your remote computer has the
player properly installed before proceeding.
Step 3. Check whether your Sequoia Dual and the remote computer
are under the same network by pinging the IP address of the
Sequoia Dual on that computer’s command prompt.
Step 4. Once the connection is established, type in the IP address of
your Sequoia Dual (set on the Network window) on a web
browser (Chrome/Firefox) on the remote computer. Then log in
with the user account set up on the Network window. Once
logged in you will see the streaming video of your Sequoia
Dual's display.
Step 5. When your Sequoia Dual is in Host mode, you can control it
through that remote computer's keyboard and mouse. It should
be noted that this control is only limited to Host mode control; you
will not be able to control other computers through the Sequoia
Dual's Remote mode with that remote computer.
Note: Referring to the Network window, the MAC Address is a fixed
address corresponding to the network interface card inserted in your
Sequoia Dual. The DHCP check box (if toggled on) enables automatic
assignment of an IP address to your Sequoia Dual; instead you can
choose to manually input an address or use the factory-default one
(192.168.0.5) for the IP Address. The Sub mask sets the number of IP
addresses available in your local area network; in other words, the
17
Page 22
Right-click Menu
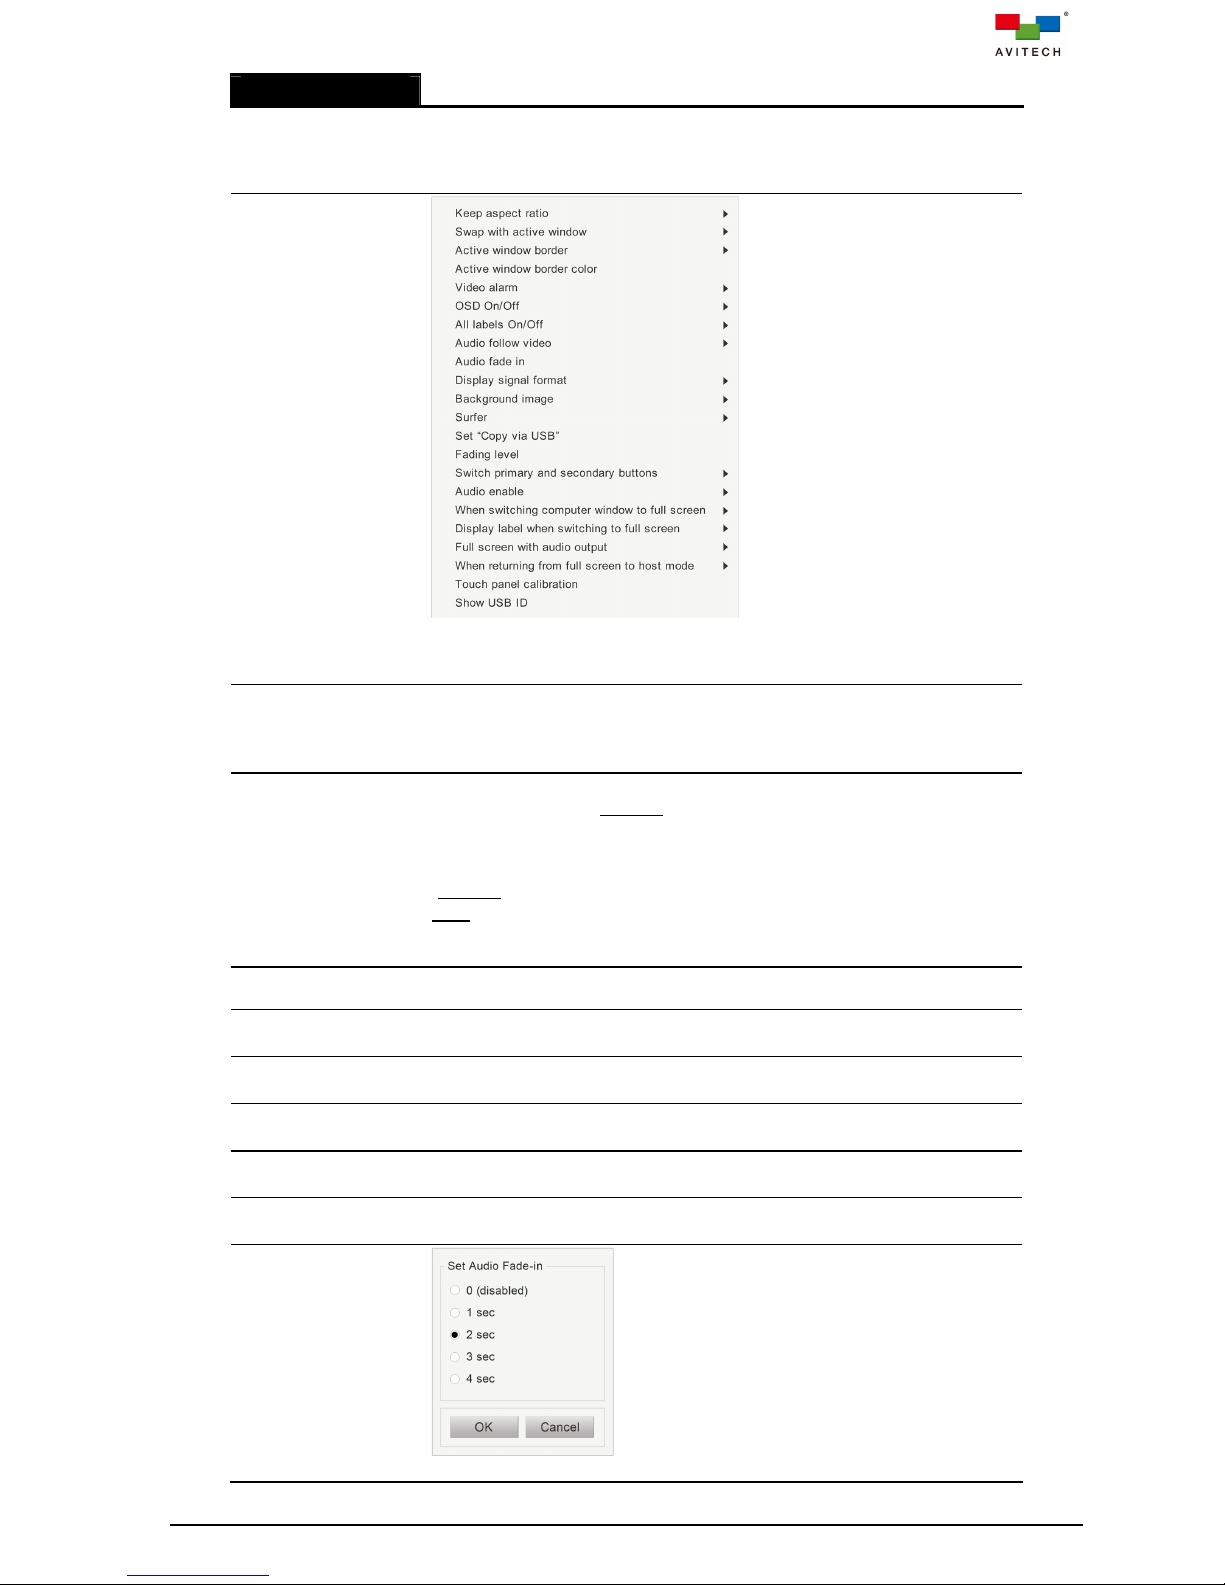
Options
Keep aspect
ratio
Swap with
active window
Active window
border
Active window
border color
Video alarm
OSD On/Off
All labels
On/Off
Audio follow
video
number of remote computers supported for remote monitoring. The
Remote login account and the Remote login password (default:
123456) are used to access streaming video on a web browser(s). Make
sure to press OK when done setting them.
The Options sub-menu includes a list of settings to customize the
Sequoia Dual's user interface, in addition to touch-screen related setups.
Select or toggle on/off a particular feature to modify its behavior.
Confine each window to a fixed width-to-height ratio; a resized window will
also follow this aspect ratio. By default, the aspect ratio of a window is set
to match that of its corresponding video source, but can be customized as
well (refer to Aspect ratio settings).
An active window corresponds to the remote computer where your
Sequoia Dual enters Remote mode. Swap with active window enables
the window of the computer targeted for remote control to automatically
swap its position and size with the previous active window. This swapping
feature allows the image of the computer controlled by the Sequoia Dual
(Remote mode) to always be displayed on a particular window.
Note: When Keep aspect ratio is turned on, your windows will not
interchange their sizes upon swapping, but will be resized based on the
aspect ratio of each of their video source.
Enable the active window to have a different border color.
Set the border color of the active window. Refer to Border color for color
setting methods.
Enable video loss detection by displaying an alert message(s) on any
window that fails to receive video signal(s).
Display/Hide labels, signal formats, and window borders on the two
windows.
Display/Hide labels on the two windows (only effective when OSD On/Off
is turned on).
Enable automatic switching of the audio port when its corresponding
video input port is selected on a window.
Audio fade in
Set the level of audio fade-in effect upon switching between audio ports.
18
Page 23
Right-click Menu
Display signal
format
Background
image
Surfer
Set “Copy via
USB”
Display/Hide resolutions and frame rates of the video inputs currently
selected on the two windows. This switch, if turned off, disables Source
1/2 display signal format
Display/Hide the background image on the display. Images that are not
provided by default can be saved to the Sequoia Dual through the USB
type A port (for mouse and keyboard) on its front panel (supported image
formats are jpg, bmp, and png).
Enable automatic switching of the Sequoia Dual's keyboard and mouse
control from a computer to another by moving the mouse cursor from the
former window to the latter one. This feature allows your Sequoia Dual’s
keyboard and mouse control to transfer to different remote computers
without the need to return to Host mode. Please refer to Appendix C for
details.
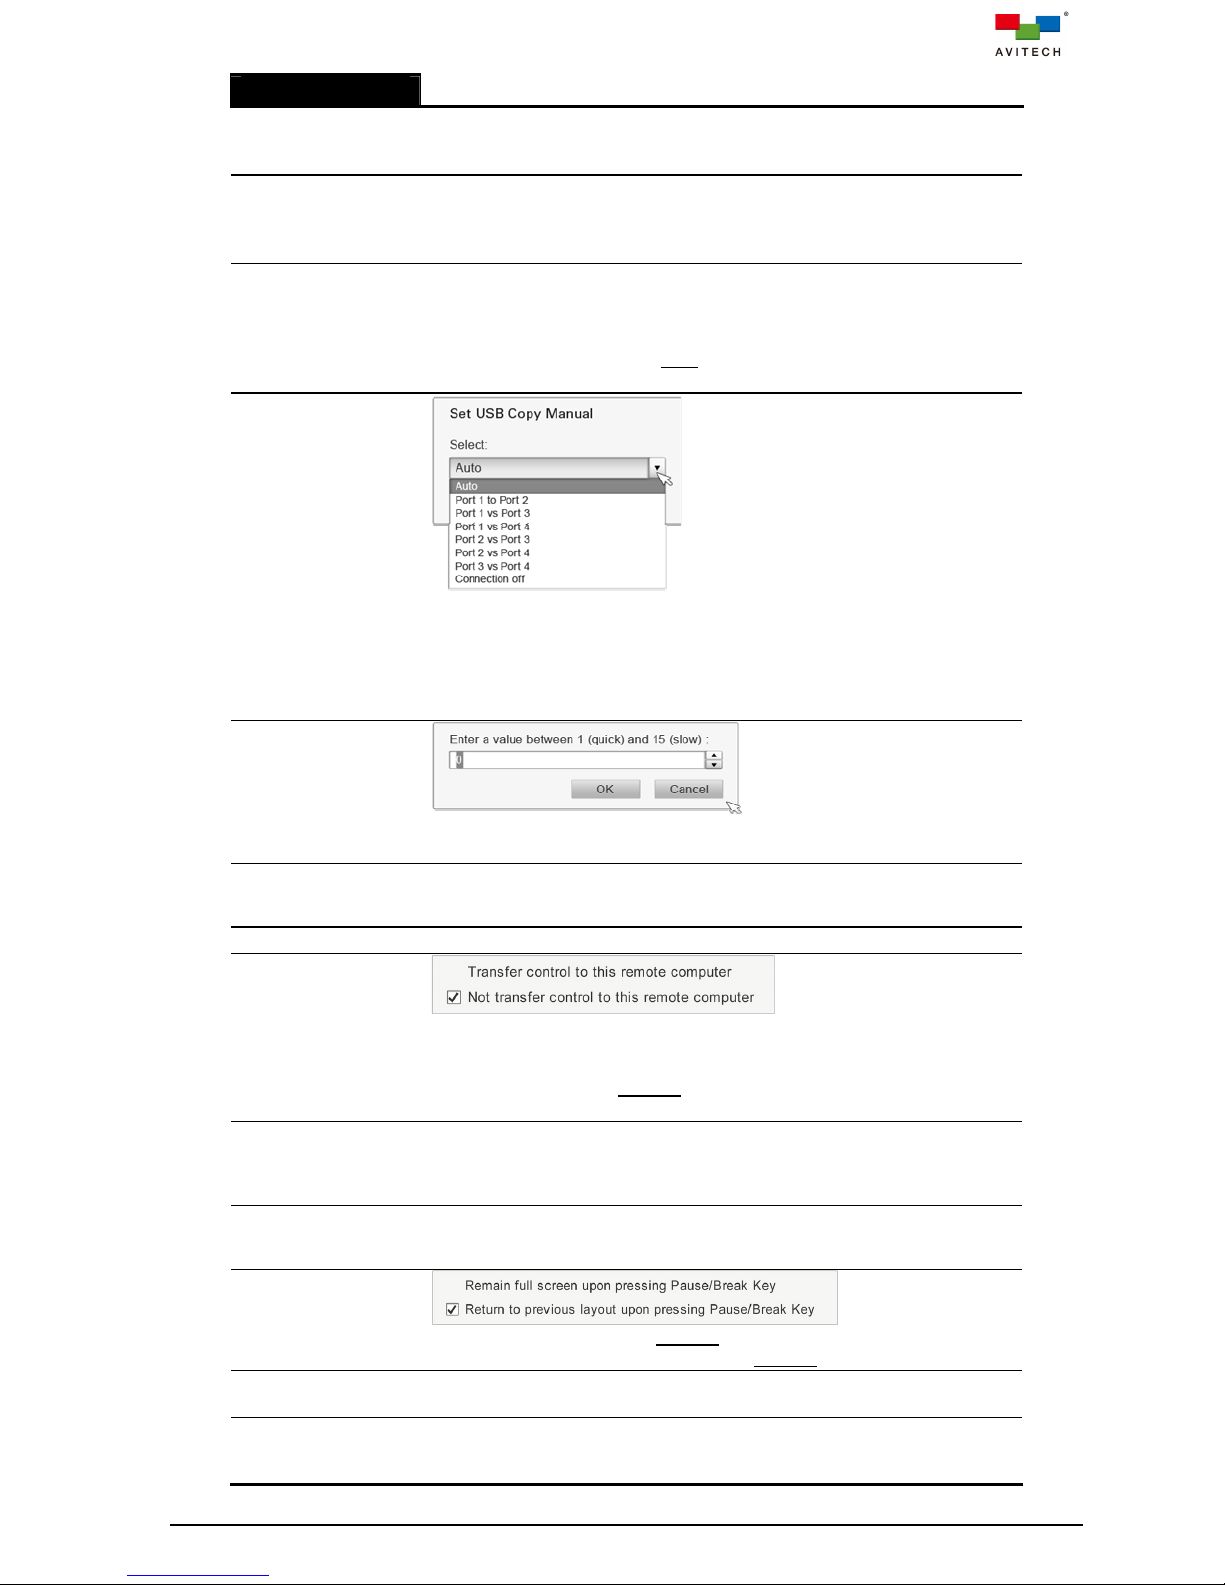
Select two USB ports corresponding to two connected computers as
endpoints for file and folder transfer. The Go! Bridge Utility will only initiate
when both of the selected ports are currently displayed on the two
windows. Select Auto if your Sequoia Dual is connected to exactly two
computers, and select Connection off to terminate file/folder transfer.
Please refer to Appendix B for details
Fading level
Set the speed of an overlaying window that fades into the background
when the other window is selected.
Switch primary
and secondary
buttons
Audio enable Turn on the audio output of your Sequoia Dual.
When
switching
computer
window to full
screen
Display label
when
switching to
full screen
Full screen
with audio
output
When returning
from full
screen to host
mode
Touch panel
calibration
Show USB ID
Interchange the functions of the connected mouse's primary and
secondary button (default: left button is set as the primary button).
Enable/Disable automatic transfer of keyboard and mouse control from
the Sequoia Dual to a computer when its corresponding window is set to
full screen (in other words, if this feature is turned on, your Sequoia Dual
will automatically enter Remote mode to a computer when its
corresponding window is set to full screen).
Enable the two windows to display their labels when set to full screen
(only effective when OSD On/Off and All labels On/Off are both turned
on).
Enable automatic switching of the audio port to follow the video input port
selected on a window when that window is set to full screen.
Enable/Disable a full screen Remote mode window to automatically return
to its non-full-screen layout upon exiting Remote mode.
Calibrate tapping-actions when connecting a touch-screen display to the
Sequoia Dual for the first time
For any touch-screen display that does not recognize the Sequoia Dual
after performing Touch panel calibration, click Show USB ID. After its
pop-window appears, unplug the USB cable connected to the
19
Page 24
Right-click Menu
Source 1
Source 2
touch-screen display, and then the ID number corresponding to that
display will appear on the pop-up window. Please send this string of ID
number to Avitech. An updated firmware that supports the corresponding
touch-screen display will be delivered.
Select the input signal source for Source 1 window. Select from DVI-L/R
or HDMI-L/R ports. The icon of the selected port will be marked with a red
check.
Select the input signal source for Source 2 window. Select from DVI-L/R
or HDMI-L/R ports. The icon of the selected port will be marked with a red
check.
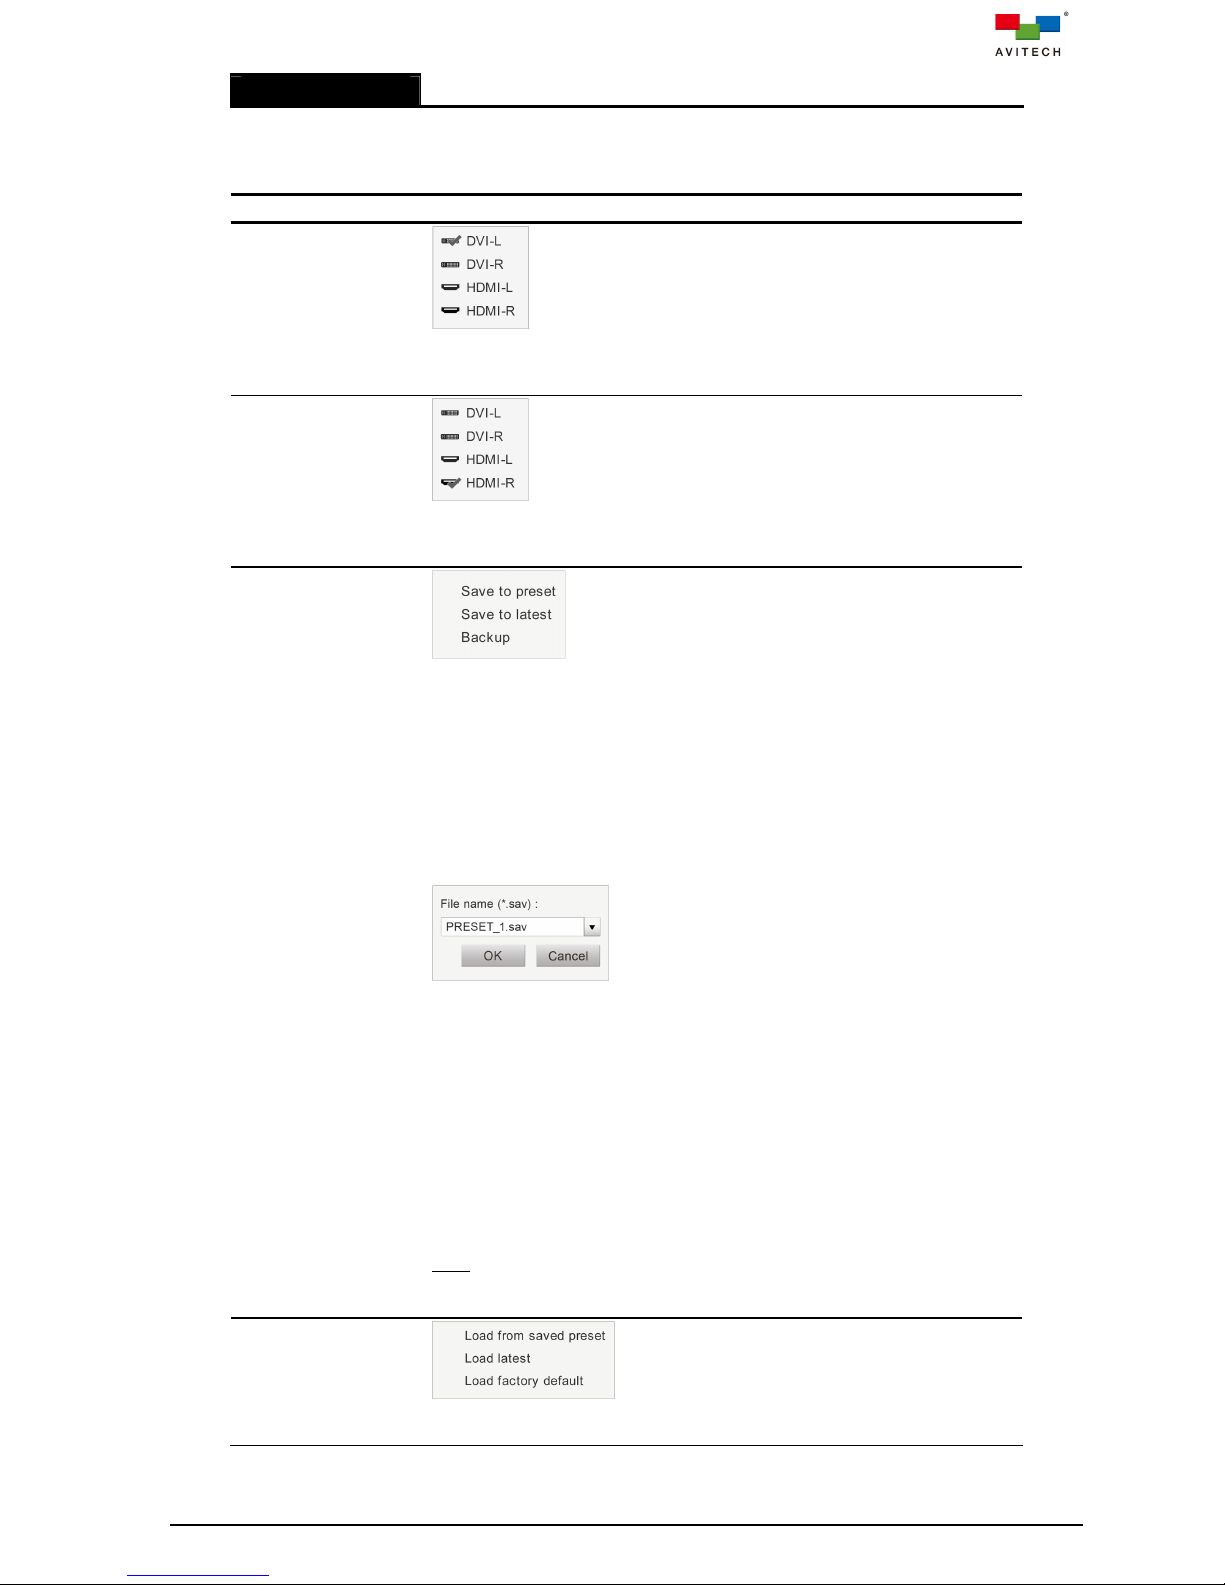
Presets are files that contain user-configured display layouts with
already-adjusted settings. They allow users to keep their desired
layouts for later uses without the need to repeatedly perform the same
configuration. Saved presets are stored to the Sequoia Dual's flash
memory and can be loaded anytime during the operation.
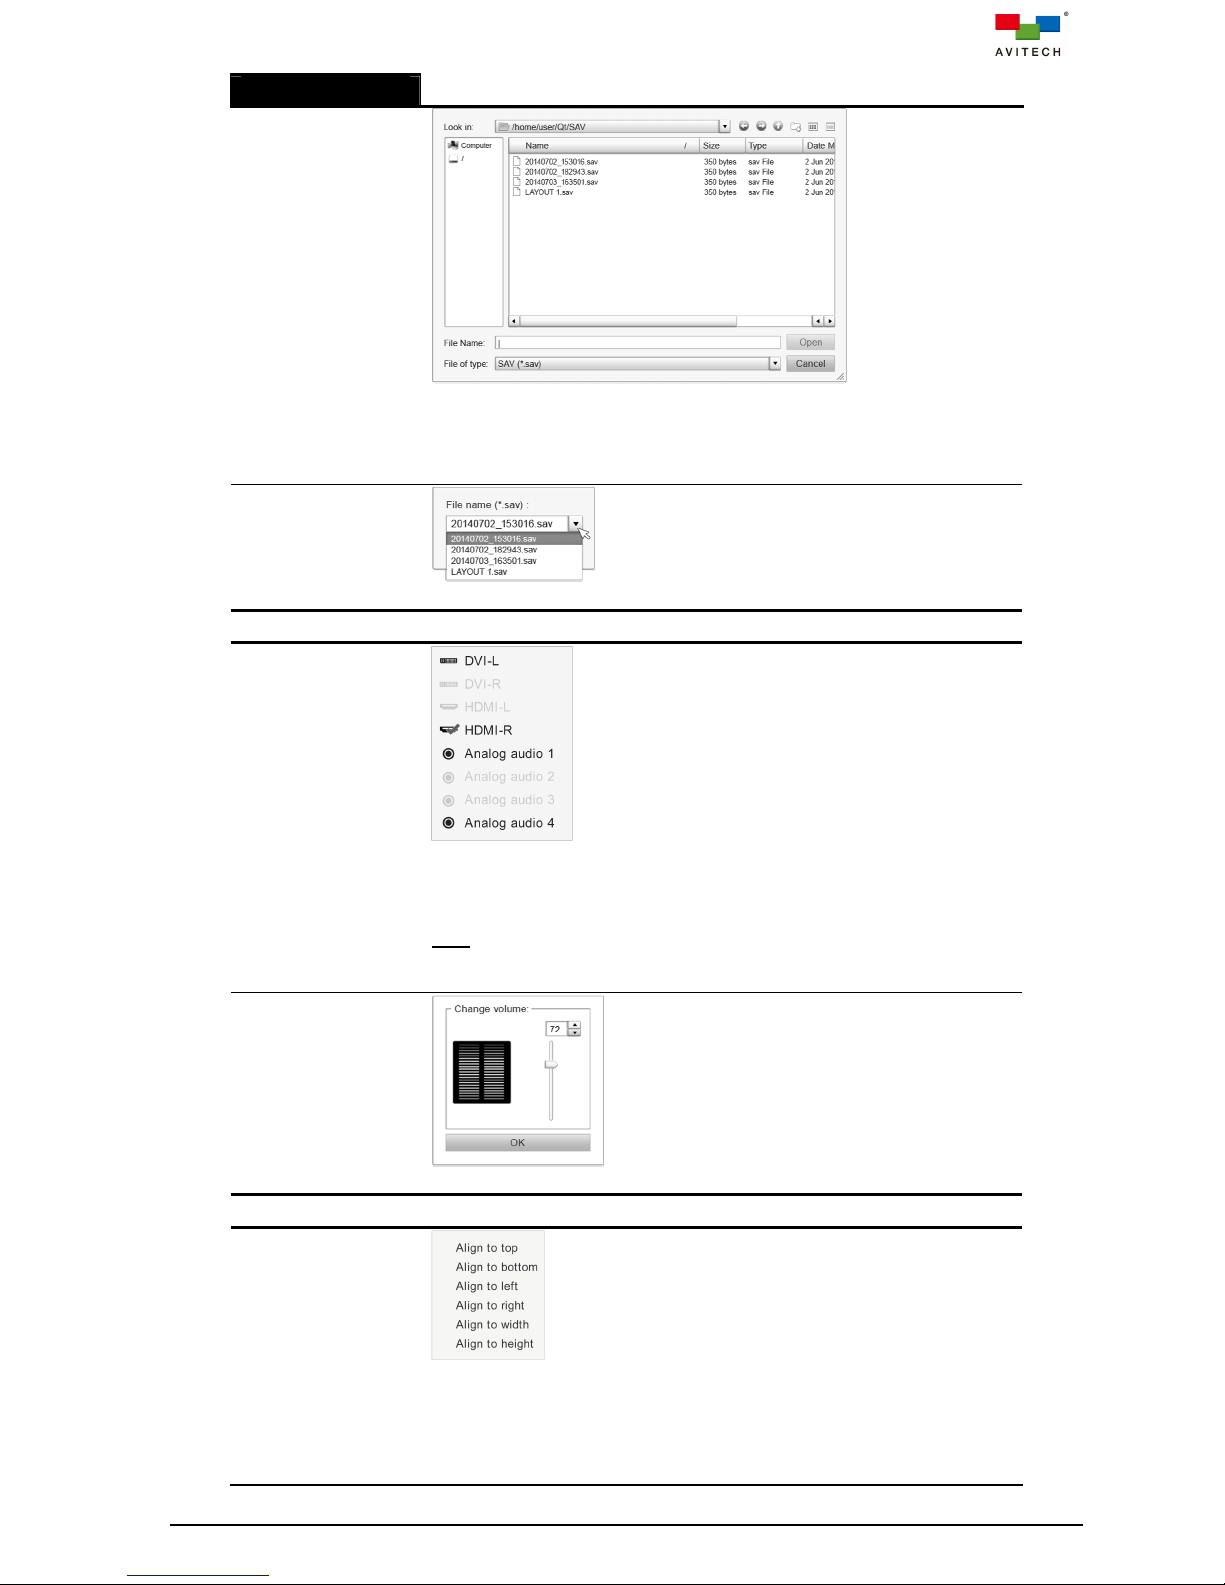
To save a preset, perform the following steps:
Step 1. Configure a new display layout and change settings if desired.
Step 2. Click Save to preset. A pop-up window with a default filename
will appear on the display.
Save preset
Load preset
Step 3. Edit the filename if desired (the file extension sav will be
automatically added to the filename), and then click OK to save
the file. Repeat step 1-3 for each additional preset.
Alternatively, click Save to latest, and then click Load latest (refer to
Load preset). Your Sequoia Dual will immediately recall the display
layout that was last Save to latest.
Or, click Backup to save presets to a USB device. A pop-up window will
appear upon clicking Backup only when a USB device is connected to
your Sequoia Dual's USB type A port (for mouse and keyboard) on the
front panel. This enables presets to be stored externally, allowing them
to be transferred to other Sequoia Dual as well.
Note: Files will not be saved when Save to preset is executed by
pressing Enter on the keyboard. It is suggested to always click the OK
button to save the preset files.
Load a preset previously created by clicking Load from saved preset,
and then select the desired file from the pop-up window.
20
Page 25
Right-click Menu
Delete preset by
name
Alternatively, click Load latest to load the window layout that was last
saved using Save to latest. This layout will also be the master layout
which gets loaded when your Sequoia Dual is powered on.
Or, click Load factory default for the default layout if desired.
Delete a saved preset file appearing on the list of the drop-down menu.
Audio port
Volume control
Source align
Select the audio source to be played. Select from DVI-L/R, HDMI-L/R or
Analog 1/2/3/4 (from the remote computer’s audio ports through the male
to dual female Y splitter audio cable) ports. The icon of the selected port
will be marked with a red check.
Note: Transmission of embedded audio signal is supported when passing
a HDMI input signal to the DVI-I port using a HDMI to DVI adapter, but not
supported when passing a DVI, VGA or YPbPr signal.
Adjust volume for audio output by using the slider on the pop-up window.
Align a selected window with the other one by specifying the reference
edge/size.
Align to top/bottom/left/right: move the selected window to where its
top/bottom/left/right edge aligns with that of the other window. Window
size does not alter in this case. If a window exceeds the border of the
21
Page 26

Right-click Menu
PIP
Border color
display, that window jumps back to align with the display instead.
Align to width/height: set the selected window to have the same
width/height as the other one. Window position does not alter in this
case.
Note: Align to width/height will not be effective when Keep aspect ratio
is turned on.
This switch appears on the menu when the two windows are in Picture In
Picture layout, or when a window is set to Full Screen. Select on/off to
switch between these two layouts.
Change the border color of a selected window by performing the
followings:
Step 1. In Basic colors on the top-left corner of the pop-up window, click
to select a desired color.
Step 2. Adjust the Hue, Saturation, and Brightness Values.
Step 3. Adjust the Red, Green, and Blue values.
Step 4. Add the adjusted color to Custom colors by clicking the Add to
Custom Colors button (or directly drag a color from Basic
colors to Custom colors if no adjustment is needed).
Step 5. Repeat step 1-4 for any additional color. Click to select a desired
color from Custom colors to be the border color.
Border width
Set label
Set the border width of a selected window.
Define label: input a text string that will appear as the label of the
selected window (up to 32 characters).
Note: This entire user manual refers to the two windows based on their
default labels: Source 1 window and Source 2 window.
Font size: set the font size for a label’s text.
22
Page 27

Right-click Menu
Font fg & bg color: change a label’s foreground/background color by
performing the followings:
Step 1. In Basic colors on the top-left corner of the pop-up window,
click to select a desired color.
Step 2. Adjust the Hue, Saturation, and Brightness Values.
Step 3. Adjust the Red, Green, and Blue values.
Step 4. Add the adjusted color to Custom colors by clicking the Add to
Custom Colors button (or directly drag a color from Basic
colors to Custom colors if no adjustment is needed).
Step 5. Repeat step 1-4 for any additional color. Click to select a desired
color from Custom colors to be the label color.
Label On/Off: display/hide the label of a selected window (only effective
when OSD On/Off and All labels On/Off are both turned on).
Label blending
VGA/YPbPr
adjustment
Enable a window’s label to become transparent and blend into the image
displayed on the window. Transparency level can be set by adjusting the
arrow buttons on the Blending level pop-up window.
Manual adjustment for VGA/YPbPr input(s) when an image(s) appears
off-centered or off-colored; this item only appears for window(s) with
VGA/YPbPr input(s):
Use the slider to change the H_Start value. The image on the
selected window will move towards the left/right upon
increasing/decreasing the value on the slider. Continue the
adjustment until the image is aligned horizontally.
Use the slider to change the V_Start value. The image on the
selected window will move upwards/downwards upon
increasing/decreasing the value on the slider. Continue the
23
Page 28

Right-click Menu
adjustment until the image is aligned vertically.
Use the slider to change the Width/Height value if the image(s) is
deformed.
Use the slider to change the Red/Green/Blue Gain value if the
image(s) is off-colored.
Note:
1. The values of H_Start plus Width must not exceed that of H_Total.
2. The value of V_Total based on the values of V_Start plus Height
must not exceed the value automatically computed (by the software)
based on the input signal’s pre-determined value for V_Total.
3. If a VGA/YPbPr source is selected to be displayed on both windows,
adjusting one of the images on a window will change the VGA/YPbPr
adjustment parameters for both images. Each window can however,
save its own parameters to EEPROM and load the parameters without
affecting the other window.
Click Save to EEPROM to save the adjusted parameters to
EEPROM (changed VGA/YPbPr parameters will not be saved
using Save preset).
Click Load from EEPROM to use the saved parameters.
Click Clear EEPROM to delete saved parameters.
Click Default to return to the factory-default parameters.
Aspect ratio
settings
Source 1/2 video
alarm
Source 1/2 display
signal format
Toggling on the Enable check box on the pop-up window enables users
to confine a selected window to an aspect ratio (only effective when
Keep aspect ratio is turned on).
Under Sync Type, the default Auto detect sets the aspect ratio of the
selected window to be identical to that of its video source; selecting
Custom default instead enables users to alter the aspect ratio to the
followings:
4:3
5:4
16:9
16:10
custom
Select custom and adjust the width-to-height ratio if the desired aspect
ratio is not listed above.
Click Update to view changes without closing the pop-up window.
Enable an alert message to be displayed on Source 1/2 window upon
detecting no video input.
Enable the resolution and frame rate of Source 1/2 window’s
corresponding image to be displayed on its window's top-left corner (only
effective when Display signal format under Options sub-menu is turned
on).
24
Page 29

Right-click Menu
Firmware version
Others
Display information of the firmware version and associated chips
embedded in your Sequoia Dual.
The last three items on the mouse right-click menu contain the following
information (this portion is grayed-out and not selectable):
Coordinate of the selected window's starting point/pixel (a
window's top-left corner is defined as its starting point; the top-left
corner of the display is defined as (0,0))
Width and height of the selected window
Video input ports selected for the two windows
Resolution and frame rate of the Sequoia Dual's display
Audio port selected for the Sequoia Dual's audio output
Table A-1 Mouse Right-click Menu Description
25
Page 30

Appendix B Using the GO! Bridge Utility
A single Sequoia Dual can connect up to four computer systems. The Sequoia Dual puts the images of
two selected computer systems onto two windows and simultaneously displays them. Instant switching
of inputs through your Sequoia Dual's user interface is supported in Host mode; thus, any two of the four
connected computers can be displayed and controlled on a single monitor.
In addition to monitoring solutions, the Sequoia Dual also features in file and folder transfer across the
connected computers. This appendix introduces the GO! Bridge Utility - a handy feature not only to
browse the files and folders contained in the hard drives of the connected computers, but also use the
copy-and-paste or drag-and-drop methods to manage and transfer these files and folders across
computers.
The following steps show how to start up GO! Suite to use the GO! Bridge Utility:
Step 1. Connect a USB A/B cable to the first computer’s USB type A port and then connect the other
end to the Sequoia Dual’s source 1 port (USB type B port on its rear panel). The computer will
start recognizing the USB connection. When initialization is complete, the following will be
displayed on Source 1 window.
Figure B-1 GO! Bridge Initialization
Go! Bridge will not be executed automatically under Win7/Win8 operating systems; therefore manual
installation will be required.
Step 2. Connect another USB A/B cable to the second computer’s USB type A port and then connect
the other end to the Sequoia Dual’s source 2 port (USB type B port on its rear panel). The
computer will start recognizing the USB connection. When initialization is complete, the next
sample screen will appear showing the Desktop content of the first computer on Source 2
window. A similar window as figure B-2 below will also be displayed on Source 1 window,
showing the Desktop content of the second computer. A “bridge” between the two computers is
now established allowing transfer (copy/paste) as well as deletion of files and folders through
the Sequoia Dual.
Figure B-2 GO! Bridge Initialization
26
Page 31

Step 3. Click this icon on the top-right corner of the Go! Bridge's interface, and
then select Open Dock to open up the Dock panel as shown below. Multiple files/folders can be placed
onto the Dock panel so that those destined for the same destination can be transferred at the same time.
Figure B-3 Dock Panel
27
Page 32

Step 4. To manage files or folders on Go! Bridge's Main panel, or add them to the Dock panel,
right-click the desired file or folder on the Main panel, and then on the pop-up menu, select any
of the followings:
Open
–
open the selected file/folder (can also double-click it). Note: Some executable
files (“.exe”) that require other supporting files such as graphic resources, library, etc.
may not run on the remote computer.
Add to Dock
Dock panel)
–
add the selected file/folder to the Dock panel (can also drag-and drop to the
Rename
–
change the name of a selected file/folder.
Copy
–
copy the selected file/folder to paste to another destination. After copying the file/folder,
select
Paste
–
complete the file/folder transfer by pasting the file/folder to the desired destination.
Note: Pasting to the same destination as the source location or pasting to the same
computer is not allowed.
Delete
–
remove the file/folder from the list. Click OK to confirm.
Figure B-4 Right-click File/Folder Menu on Main Panel
28
Page 33

Step 5. To manage files or folders added to the Dock panel, right-click the desired file or folder on the
Dock panel, and then in the pop-up menu, select any of the followings:
Copy
–
copy the selected file/folder to paste to another destination. After copying the file/folder,
select
Paste
–
complete the file/folder transfer by pasting the file/folder to the desired destination.
Remove from Dock
–
remove the selected file/folder from the Dock panel.
Select All
easier if all the files/ folders are to be moved to the same destination; perform
copy-and-paste to the selected files/folders or simply drag-and-drop them to
the desired destination.
–
select all the files/folders on the Dock panel. This will make the transfer much
Figure B-5 Right-click File/Folder Menu on Dock Panel
29
Page 34

Click the view icon as shown below to bring up the list of the default directory, the devices of the other
computer, and recent path(s) previously browsed.
Figure B-6 View Button
30
Page 35

Click the add folder icon as shown below to add a new folder to the present directory of the other computer.
You can also designate the name of the new folder.
Figure B-7 Add New Folder and Designate the Name
Click the monitor icon to switch from the main panel display (window
mode) to icon mode. In icon mode, dragging the file/folder(s) from the host computer onto the Go! Bridge icon
transfers them only to the root directory of the other computer.
Click the monitor icon again to switch back to the main panel display
(window mode).
31
Page 36

Appendix C Using the “Surfer” Feature
The ”Surfer” feature is designed for ease of switching the Sequoia Dual's keyboard and mouse control
from one remote computer to another. When under non-full-screen Remote mode, simply move the
cursor from the current window toward the nearest edge(s) of the other window. The Sequoia Dual’s
keyboard and mouse control will automatically be transferred to the computer corresponding to that
window when the mouse cursor leaves the former window to the later one. This appendix discusses
different “Surfer” scenarios for single and cascaded Sequoia Dual. It should be noted that “Surfer” is a
Remote mode feature, and the following scenarios presume that your Sequoia Dual is in Remote mode.
By default, the “Surfer” feature is enabled upon starting up the Sequoia Dual.
Select OptionsSurfer under the mouse right-click menu to toggle off this feature desired.
C.1 “Surfer” Feature on Uniform Dual Layout That Fills Entire Screen
The figure below shows an allowed control switching action upon moving the mouse cursor
toward the window border of Source 1, as indicated by the arrow and shaded line. Moving the
cursor from Source 1 window to Source 2 window transfers keyboard and mouse control from
the former window to the latter one (transfer occurs upon the cursor touches the edge shared by
both windows). Moving the cursor from Source 2 window to Source 1 window also transfers
control from Source 2 to Source 1 (not shown). It should be noted that the arrow and shaded line
shown in the figure only indicate the direction the cursor moves; they will not appear on the
actual display.
32
Page 37

Figure C-1 “Surfer” Feature on Uniform Dual Layout
C.2 “Surfer” Feature on Non-adjoining Dual Layout
The figure below shows an allowed control switching action upon moving the mouse cursor
toward the border of a non-adjoining window (indicated by the arrow and line indicator). Moving
the cursor from Source 1 window to Source 2 window transfers keyboard and mouse control
from the former window to the later one (transfer occurs upon the cursor leaves the right edge of
Source 1 window). The arrow and shaded line shown in the figure only indicate the direction the
cursor moves; they will not appear on the actual display.
33
Page 38
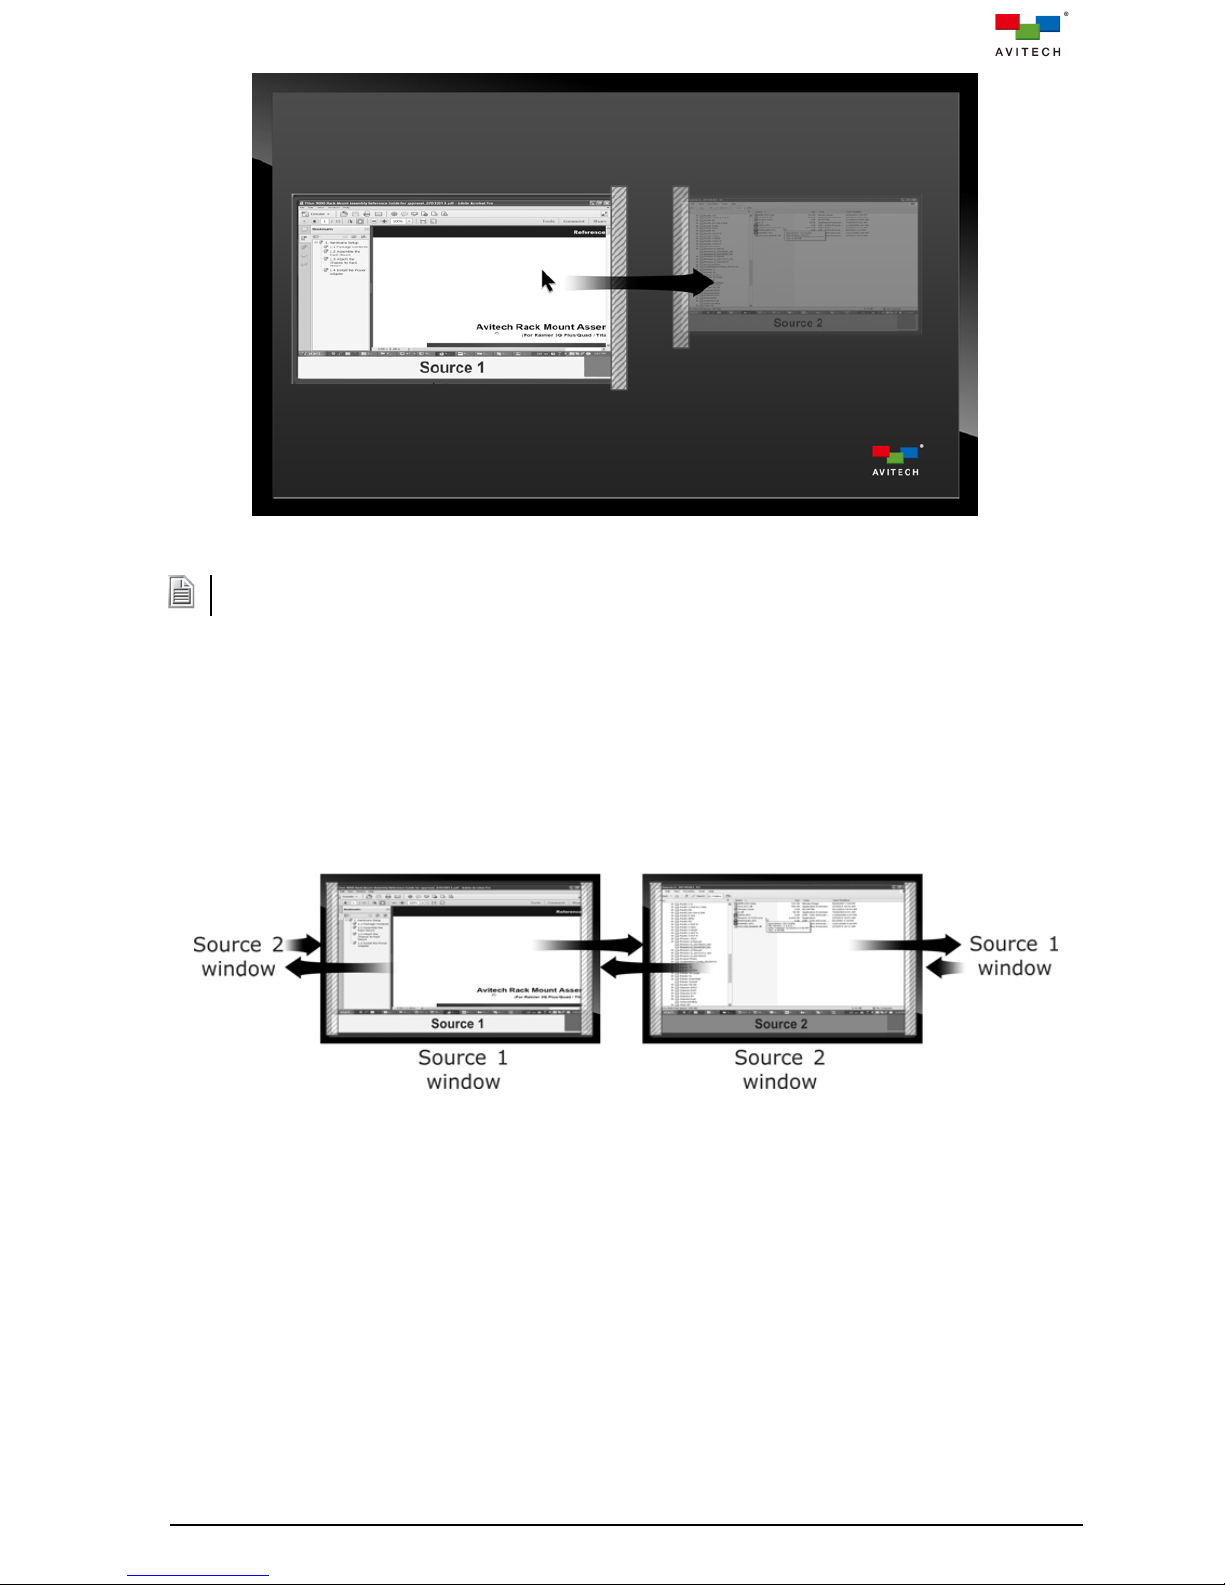
Figure C-2 “Surfer” Feature on Non-uniform, Non-adjoining Dual Layout
In the case of a source window overlaid with the other one, switching of control will occur when the mouse
cursor has left the area where the two windows overlay (toward the targeted window).
C.3 “Surfer” Feature on Full Screen “Source” Window
The figure below shows allowed control switching actions upon moving the mouse cursor to the
left or right edge of a full-screen window (indicated by arrows and line indicators). Moving the
cursor in such ways switches the full-screen window to the other window, and transfers
keyboard and mouse control from the former window to the latter one.
Figure C-3 “Surfer” Feature on Full Screen Source Window
34
Page 39

C.4 “Surfer” Feature on Cascaded System
The figure below shows a sample of 3-Sequoia Dual cascaded system.
The “Surfer” feature is confined within each Sequoia Dual only (refer to the above-mentioned
illustrations on using the “Surfer” feature within each Sequoia Dual).
For example, if a user is currently in control of Source 1 window on Sequoia 2 (Remote mode),
and wishes to switch control to Source 2 window on Sequoia 3 (Remote mode), perform the
followings:
Step 1: Press Pause/Break key (or double-click the mouse scroll button) to exit Remote mode
and re-enter Host mode. Control of Source 1 window on Sequoia 2 has now
been disengaged.
Step 2: Move the Host cursor to the right edge of the display of Sequoia 2 to allow the cursor to
jump to the left edge of the display of Sequoia 3 (still in Host mode, but this time the
location of the Host cursor is now in Sequoia 3).
Step 3: Move the Host cursor over to the top-right corner of Source 2 window on Sequoia 3 and
click the Login icon of the pop-up selections
the mouse left button anywhere within the window) to switch control to Source 2 (enter Remote
mode).
The “Surfer” feature can now be used within Sequoia 3.
(or double-click
Legend:
Host mode action (moving between multiple Sequoia Dual): dotted lines and gray arrows
Remote mode action (moving within a particular Sequoia Dual): black arrows
Figure C-4 “Surfer” Feature on Cascaded System
Up to five Sequoia Dual can be cascaded together.
35
Page 40

Appendix D Using the Top Menu
The top menu is a Host mode feature designed for ease of shifting between multiple display layouts. It
also has the “lock” function to suit applications that prefer fixed windows on the display. This menu
locates at the bottom of the display and pops up when the Host cursor is near by. Simply click a
particular icon to execute its function.
Figure D-1 Top menu with its functional icons
The top menu contains eight functional icons as indicated in the figure above (the Menu icon is
not functional).
The lock icon locks the current layout of the Sequoia Dual's display, and disables any
adjustment of window size and position made by the Host cursor. In the case when two windows
overlay, the selected window will come to the top-most layer of the display and the other one will
fade into background. Other functions such as those on the pop-up selections and the mouse
right-click menu are still available even when the “lock” function is enabled. To disable the “lock”
function, click the unlock icon (the unlock icon replaces the lock icon when “lock” is
enabled).
The next four icons provide the same functions that are also available in Layout under the
mouse right-click menu: Picture Over Picture , Picture By Picture , Picture In Picture
, and Full Screen respectively. These icons on the top menu serve as shortcuts for the
mouse right-click menu, and can be used to alter your display layout even when the “lock”
function is enabled.
The three icons on the right of the top menu (also shown below) each represent a saved preset.
A preset is a file that contains user-configured layout with already-adjusted settings. Users can
have multiple presets stored to the Sequoia Dual for future references, but only the latest three
presets saved can be loaded from the top menu as shortcuts (only presets saved by Save to
preset are linked to the top menu). When the number of presets reaches or exceeds three, any
new preset saved will replace the old one (in the order of preset 1, 2, and 3). Presets that are
replaced are still stored in the Sequoia Dual and can be accessed by the mouse right-click menu.
Switching between presets under the top menu can also be achieved when the “lock” function is
enabled.
: Load user-defined preset 1
: Load user-defined preset 2
: Load user-defined preset 3
36
Page 41

Appendix E Using the Touch-screen
The Sequoia Dual features in multi-touch support for touch-screen displays. To operate the Sequoia
Dual on a touch-screen display for the first time, perform setups instructed in 2.1.1. Once the setup is
complete, select Touch panel calibration under the mouse right click menu - Options sub-menu.
Finish the calibrating process by tapping the red dots shown on four corners of the display. When done
with the calibration, you will be able to operate your Sequoia Dual as you regularly would with a mouse
by performing tapping actions on the display.
This appendix discusses different tapping actions that simulate mouse-clicking actions.
E.1 Move/Resize Window
To move a window, tap anywhere within the window and then drag it to a new position.
To resize a window, tap anywhere near the edge or corner of the window. When the directional
arrow appears, drag the window’s border to the desired size.
Figure E-1 Touch-screen: Move/Resize Window
E.2 Pop-up Selection
Use a stylus (or finger) to tap area near the top-right corner of a window, and then the following
pop-up selections will appear: . To execute the function a
particular icon, tap the icon once more (for more information regarding the pop-up selections,
refer to p.13).
E.3 Top menu
Use a stylus (or finger) to tap area near the bottom of the display and then the following menu
will appear: .To execute the function of a
particular icon, tap the icon once more (for more information regarding the top menu, refer to
Appendix D).
37
Page 42

E.4 Mouse right-click menu
Use a stylus (or finger) to long-tap anywhere on the display for approximately 1 second, and
then the mouse right-click menu will appear (Refer to Figure A-1). To extend a sub-menu from
an item that has an arrow on its right side, tap the item once more; to execute the function of an
item, double-tap the item instead (for more information regarding the mouse right-click menu,
refer to Appendix A).
E.5 Enter/Exit Remote Mode and Host Mode
To have the Sequoia Dual enter Remote mode to a connected computer, tap the Login
icon from the pop-up selections of the corresponding window; alternatively, double-tap
anywhere within the corresponding window.
To exit Remote mode from a non-full-screen window, double-tap anywhere outside that window.
When working with a touch-screen display, sometimes it takes 2-4 trials of double-tapping (simulating a
mouse double-click action) on the display to have the Sequoia Dual enter Remote mode. This may occur
when the precise location of the second tap is slightly away from that of the first tap; or the time interval
between the two taps is too long.
To exit Remote mode from a full screen window, press the upper or lower inch of the
touch-screen display for approximately 1.5 seconds (Refer to Figure E-2).
Figure E-2 Touch-screen: Exit Remote Mode while in Full Screen
When the Sequoia Dual returns from Remote mode to Host mode, the Host cursor will reappear where it last
located before that Remote mode; it will not reappear where the double-tapping action outside the active
window took place.
38
Page 43

E.6 Switch Control Between Windows
To switch windows while in full screen Remote mode, press within an inch of the left or right
edge of the touch-screen display and hold for approximately 1.5 seconds (Refer to Figure E-3).
To switch windows while in non-full-screen Remote mode, simply long press within the area of
the targeted window for approximately 1 second.
Figure E-3 Touch-screen: Switch Sources while in Full Screen
39
Page 44

Appendix F Using the Touch-to-Mouse Utility (for
Windows XP only)
The Touch-to-Mouse Utility is designed for using a touch-screen display to control a remote computer
that runs on Windows XP. To start the Touch-to-Mouse Utility, perform the following steps:
Step 1. Copy the file “Sequoia USB Touch Tool.exe” to the designated computer.
Step 2. Run the file: “Sequoia USB Touch Tool.exe”.
Step 3. Right-click the Touch-to-Mouse icon appearing on Windows task bar and then select Settings.
Step 4. Set the Double-click Speed with the slider or enter the time in the box next to ms. Note: two
successive taps on a touch-screen mimic double-clicking the left-mouse button.
Figure F-1 Touch-to-Mouse Utility Setup
Step 5. Set the Right Key Trigger with the slider or enter the time in the box next to ms. To mimic a
right-click action, hold your finger on the touch-screen display until the specified time has elapsed.
Step 6. Click Hide when finished.
To have your Windows XP automatically start running the Touch-to-Mouse Utility upon the next boot-up,
right-click the Touch-to-Mouse icon and select Auto-start when Windows starts-up (a check mark will
appear signifying it is enabled).
40
Page 45

Appendix G Resetting to the Factory-Default State
To reset your Sequoia Dual to its factory-default state, perform the following steps:
Step 1. Power-off the Sequoia Dual.
Step 2. Push number 2 (middle) dip switch located on Sequoia Dual’s rear panel downwards to the ON
position.
Figure G-1 Push down the Number 2 (Middle) Dip Switch
Step 3. Power-on the Sequoia Dual.
Step 4. Push number 2 (middle) dip switch located on Sequoia Dual’s rear panel upwards to the OFF
position (the Sequoia Dual will not proceed after loading the boot logo if leaving this dip switch ON).
Upon resetting your Sequoia Dual to its factory-default state, your previously saved presets stored in the
Sequoia Dual's flash memory will be automatically removed; make sure to have your files saved externally
before resetting the Sequoia Dual to the factory-default state.
41
 Loading...