

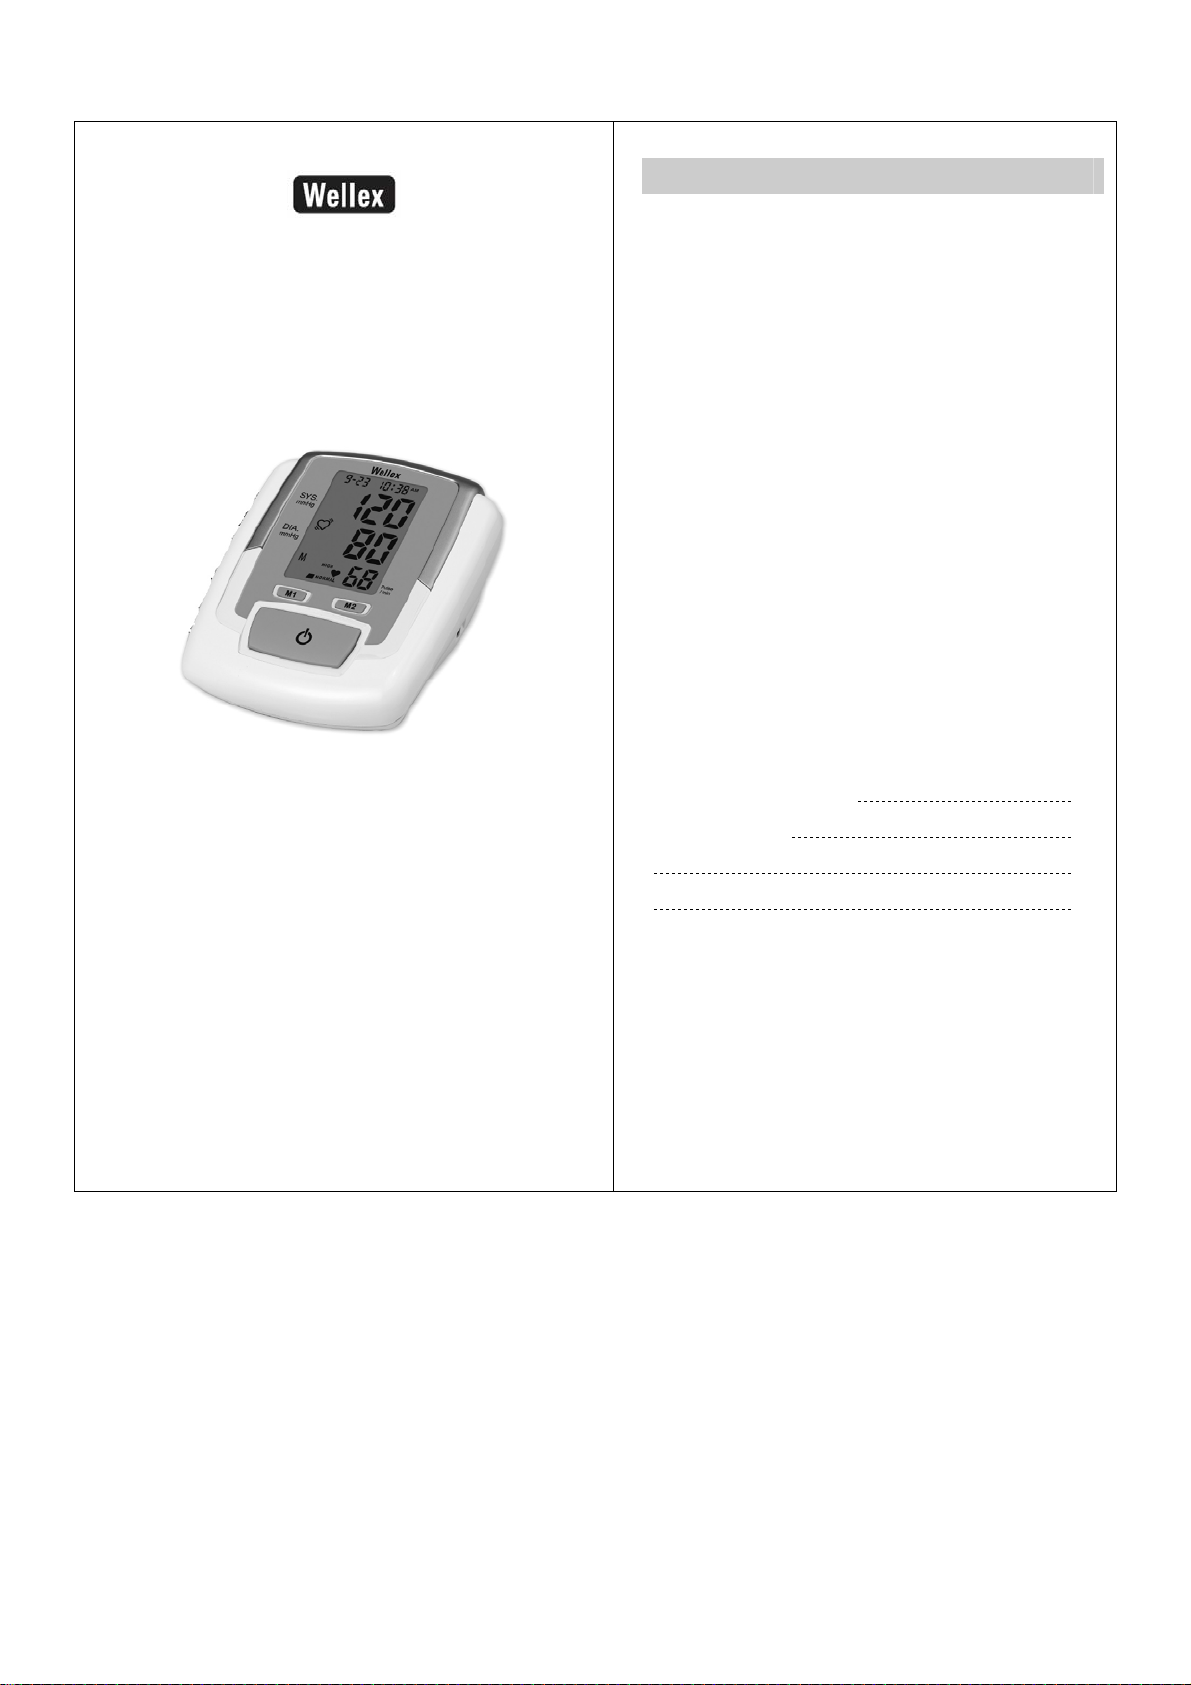
Arm Type Blood Pressure Monitor
Model: BPM64R
Contents
Introduction ...................................................... 1
Important Information Before Use ................... 2
Blood Pressure Monitor Features....................3
Description of LCD Display.............................. 4
Battery Installation ........................................... 5
Setting the Date and Time ............................... 6
Applying Your Cuff........................................... 7
Taking a blood pressure measurement ...........8
Irregular Heartbeat Detector............................ 9
World Health Organization (WHO) ................10
Memory Function ...........................................11
Troubleshooting .............................................12
Error Codes.................................................... 12
Operating the Bluetooth function ...................13
Care and Maintenance ..................................14
INSTRUCTION MANUAL
Please read this instruction manual carefully
before operating this unit.
Technical Specification ..................................14
FCC Statement ..............................................15
EMC Tables ................................................... 16
Explanation of Symbols ................................. 17

Introduction
BPM64R Series Blood Pressure Monitor applies the
Oscillometric method to measure human systolic / diastolic
blood pressure and heart rate. All values are shown on the
LCD monitor and using the Bluetooth technology (BLE4.0)
or USB to transfer the related information of your blood
pressure measurement. This device is designed only for
adults.
CAUTION:
No modification of this equipment is allowed.
Keep your equipment out of the reach of children, pets
and pest.
The Patient is an intended operator.
Risk of explosion if battery is replaced by an incorrect
type.
Dispose of used batteries according to the instructions.
1
Important Information Before Use
When using this product, please be sure to follow all the
notes listed below. Any action against these notices may
cause injury or affect the accuracy.
1. WARNING – Do not modify this equipment without
authorization of the manufacturer.
2. Blood pressure measurements should only be interpreted
by a physician or a trained health care professional who
is familiar with your medical history.
Through regular use of this device and recording of your
measurements, you can keep your physician informed of
the changes in your blood pressure.
3. Perform your measurement in a quiet place. You should
be seated in a relaxed position.
4. Avoid smoking, eating, taking medication, alcohol
consumption or physical activity 30 minutes prior to
taking a reading. If you are exhibiting signs of stress,
avoid taking your measurement until the feeling subsides.
5. Rest 15 minutes prior to taking a reading.
6. Remove any constrictive clothing or jewelry that may
interfere with the cuff placement.
7. Keep the monitor stable during measurement to achieve
an accurate reading. Remain still; do not talk during the
measurement.
8. Record your daily blood pressure and pulse readings on a
chart.
9. Take your readings at the same time, each day or as
recommended by your physician to get an accurate
indication of change in your true blood pressure.
10.Wait a minimum of 2~3 minutes between readings to
allow for the blood vessels to return to normal. The wait
time may vary depending on your individual
physiological characteristics.
11.Although such cases are rare, for those with an
extremely weak pulse or irregular pulse, errors may
result which prevent proper measurement. If abnormal
variations are noticed, consult with your physician or
trained healthcare professional.
12.This device is intended for adult use. While taking a
measurement, you can stop the inflation or deflation
process of the cuff at any time by pressing the POWER
button.
13.It is recommended that the accuracy should be checked
by the manufacturer every two years.
14.If you would require any assistance during setting up,
using or maintaining, please contact the manufacturer.
Under any circumstances, the measurement taking
result is ONLY for reference.
Any further medical action should follow the advice of
doctors.
2
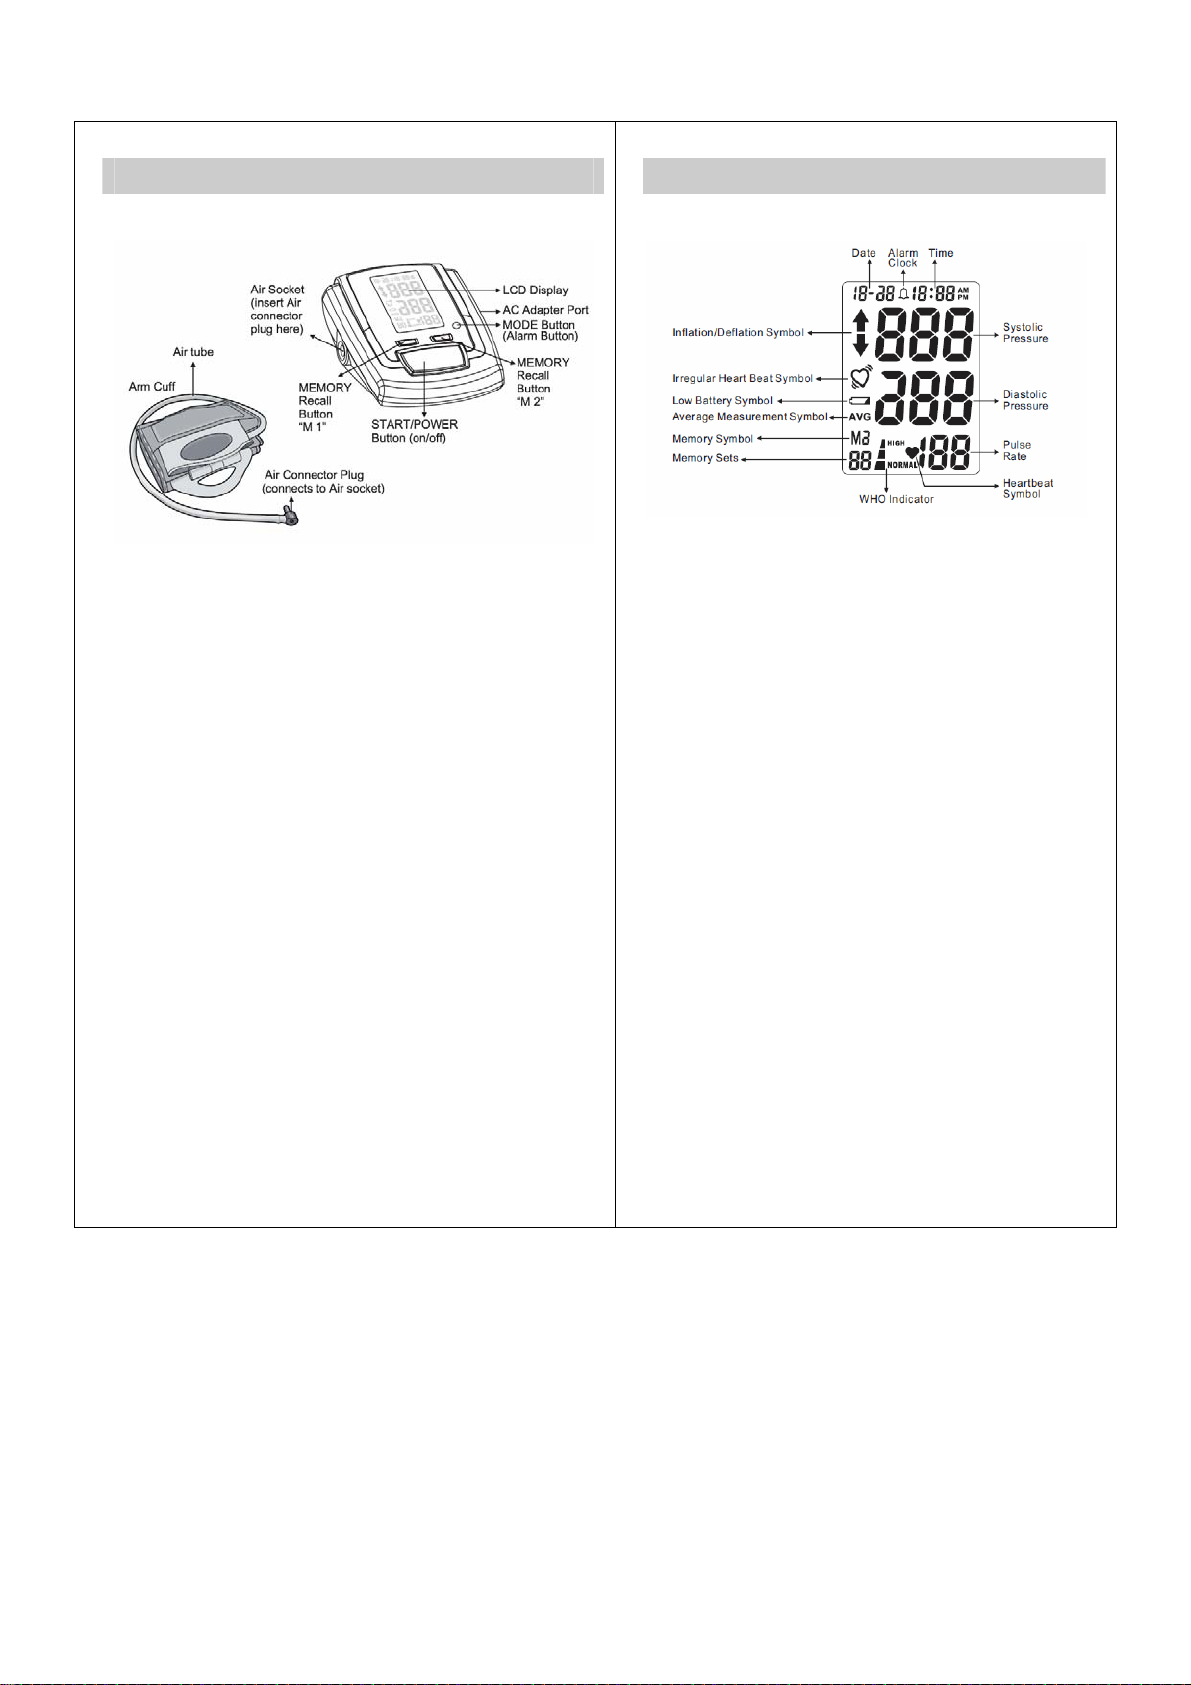
Blood Pressure Monitor Features
Description of LCD Display
3
4

Battery Installation
Low battery warning:
It is necessary to replace the batteries
when the Low Battery symbol “
appears on the display, or when the
display does not turn on after the
POWER button is pressed.
Replacing the Battery:
1. Press down on latch and lift the cover on the bottom of
the monitor.
2. Insert or replace 4 x 1.5 V AA batteries into the battery
compartment, ensuring to match the indicated polarity
symbols.
Always use new batteries.
3. Replace the battery cover.
”
Setting the Date and Time
It is necessary to set the date and time for the unit every
time batteries are initially installed or replaced.
1. Loading 4 AA alkaline batteries; the Year value will
begin to flash on the display.
2. Press the “M1” button to advance the display to the
desired year, press “M2” button to confirm the year.
3. Next, the month will blink. Repeat steps 2 to set the
month and date, then hours, then minutes.
4. After setting the minutes, the unit will automatically exit
out or press power button of the date/time setting mode
and briefly show the word OFF before shutting down.
Battery-operated
1. Always use NEW batteries; never mix old and new
batteries.
2. Do not use rechargeable batteries; rechargeable batteries
can vary greatly in quality and strength.
Use of rechargeable batteries may affect the performance of
this device.
3. Please properly dispose of the batteries away from small
children and heat.
4. It is recommended to remove the batteries if the unit will
not be used for an extended period of time.
5. Batteries must be disposed of in accordance with local
environmental and institutional policies.
6. Remove the battery during extended storage.
5
6

Applying Your Cuff
It is important to avoid smoking, eating, taking medication,
alcohol consumption or physical activity 30 minutes prior to
taking a reading. If for any reason you are unable to or
should not use your left arm, please modify the instructions
for cuff application to your right arm. Your physician can
help you identify which arm is best for you to take
measurements from.
1. Remove any constrictive
clothing or jewelry that
may interfere with cuff
placement.
2. Be seated at a table or desk with your feet flat on
the floor.
3. The cuff should not be plugged into the monitor until after
the cuff is applied to your arm.
Note:
Blood pressure naturally varies from one arm to the other;
therefore, measure your blood pressure on the same arm to
ensure comparability of the two readings.
4. Unfold the Easy Cuff and
apply to your left arm. Position
the air tube over the main
artery on the inside of your
arm.
5. The bottom edge of the cuff
should be positioned
approximately one inch above
the elbow joint.
6. Reaching underneath your
left arm with your right hand,
pull the end of the cuff
towards your body to tighten
the cuff. Incorrectly applied cuffs may result in inaccurate
readings or showing error message.
7
Taking a blood pressure measurement
Please read the preceding portions of this manual prior to
taking your first reading.
1. Position the monitor on a flat,
stable surface with the
digital display in view.
2. Insert the cuff tubing connector into
the port on the
left side of your monitor.
3. Rest your elbow on a solid surface with your
palm facing upward. Elevate your arm so that the cuff is at
the same level as your heart.
Relax your left hand.
4. Press the POWER button. This will turn
the power on.
5. After the self-test, the values for the last
reading will appear on the display.
6. The blood pressure monitor start to
measure.
7. The cuff will automatically begin to inflate,
with the display showing the increasing
pressure in the cuff. As the pressure
increases, an arrow pointing up will appear
on the display.
8. As the cuff inflates, the monitor automatically determines
your ideal inflation level. This monitor detects your blood
pressure.
9. To detect the heartbeat, the heartbeat
symbol will appear and continuous flashes on
the LCD display.
10.Your blood pressure measurement and
pulse will display simultaneously on the
screen.
11.The Hypertension Indicator will indicate
your reading range on the display separately.
12. Your reading will be automatically stored in "MEMORY
Recall" Button.
13. Select POWER to turn the unit off and conserve energy
and battery life. The unit will automatically shut-off
approximately 2 minutes.
8

Irregular Heartbeat Detector
Your digital blood pressure monitor features
an Irregular Heartbeat Detector. This
feature allows users to accurately monitor
blood pressure even if an irregular
heartbeat should occur. When an irregular
heartbeat is detected, the “
display.
Note:
Please consult with your physician or trained healthcare
professional for further information regarding an irregular
heartbeat and if this symbol appears frequently.
” icon will appear on the
World Health Organization (WHO)
This unit features our unique Hypertension Indicator. The
World Health Organization has established globally accepted
standards for the assessment of high or low blood pressure
readings. The below chart should be considered only as
a guideline, always consult with your physician or health care
professional to interpret your individual results.
9
10

Memory Function
Recalling Measurements in Memory:
You can recall up to 90 measurements per memory
bank, 180 total, plus an average of last 3 currently
stored measurements in memory to share with your
physician or trained healthcare professional.
1. 1. Press and release the
M1 or M2 button. The unit
will first display the average
of last 3 currently stored
measurements.
2. Continue to press the M1
or M2 button to successively
view the next previously
stored measurements.
Measurements will appear on the display from most
current to oldest; the memory number will appear on the
Troubleshooting
Error Codes
lower left corner.
3. All results for a given measurement will display,
including measurement results, pulse rate,
Hypertension Indicator, Irregular Heartbeat alert, and
date/time stamp.
4. Each memory bank stores up to 90 readings; when
the number of readings exceeds 90, the oldest data will
be replaced with the new record.
5. Press the Power button to turn the monitor OFF at
any time during review of the stored measurements.
Clearing Measurements from Memory
From power display off, press and hold down
the M1 button or the M2 button until the
display
shows CLr. This indicates that all
measurements have been erased.
11
:
12

Data Transferring
Bluetooth function:
What You Need
An Android device with Android version 4.3 or above and
hardware support for Bluetooth 4.0.
An iOS device with iOS version 5 or above and hardware
support for Bluetooth 4.0. All devices Apple released
since the iPhone 4S (including the 4S) do, the older ones
don’t.
Note:
Please refer to the instruction manual of your smart
phone for how to activate the Bluetooth function.
Set Up Process
1. Download an app which supports Bluetooth 4.0 from
the iTune App Store or Google Play.
2. Enable Bluetooth on your mobile device.
3. Open the app and activate the function.
4. Turn on the BPM64R.
5. The app should automatically detect your BPM64R.
Tap the BPM64R that is showed in the device list.
6. Your BPM64R is now successfully connected to
your mobile device. Every measure reading will be
transfer to your mobile device automatically.
You can send results in memory zone as following step
1.Press Memory recall button of blood pressure monitor
to enter memory mode. The symbol AVG and M will
appear on the display and the number of memory index is
“00”.
2.Turn on the bluetooth function of device to search the
blood pressure monitor. Then the blood pressure monitor
will be searched and connected the bluetooth device.
3.After the connection is completed, you can press
memory recall button to display the memory result on
LCD. Each result showed on LCD, the result will be
transmitted by bluetooth immediately.
USB function:
Connect the blood pressure monitor to your PC using the
USB Cable. appears on the display. Begin the data
transfer in the PC software. During the data transfer, an
animation is shown on the display.
• A successful data transfer is displayed
as in figure 1.
If the data transfer is unsuccessful, an error
message appears as in figure 2.
In this case, interrupt the PC connection and
start the data transfer again.
After 30 seconds of not being in use or if communication
with the PC is interrupted, the blood pressure monitor
switches itself off automatically.
13
Care and Maintenance
1. Clean the device and arm cuff carefully only with a
slightly moistened cloth.
2. Do not immerse the device in water. It may cause
damage if water enters.
3. Do not use any gas, strong detergent, or solvents to
clean the device, including the arm cuff.
4. Disconnect the cuff and tubing from the monitor prior
to storing.
5. Do not use any liquids on the monitor or cuff.
6. Use a soft, dry cloth to clean your monitor.
7. Do not store in direct sunlight, dust or excessive
humidity.
8. Avoid extreme temperatures.
9. Do not disassemble the monitor or cuff.
10.Remove batteries if the monitor will not be used for
an extensive period of time.
Technical Specification
• Measuring range :
Blood Pressure : 30~280 mmHg
Pulse Rate : 40~199 beats/min
• Calibration Accuracy:
Blood Pressure : ± 3 mmHg
Pulse rate : ± 4% of reading
• Operating environment :
10oC~40oC (50oF~104oF)
with relative humidity up to 85%
(non condensing)
• Storage/ Transportation
environment :
-20oC~+50oC (-4oF~+122oF)
with relative humidity up to 85% (non
condensing)
• Power Source : 4 x 1.5 V AA batteries
• Weight : approx. 250g (exclude batteries)
• Dimensions : approx. 113mm x 140mm x
57mm(W x H x D)
• Cuff circumference: approx. 22 ~ 42 cm (9” ~
17”)
14

FCC Statement
Note: This equipment has been tested and found to comply
with the limits for a Class B digital device, pursuant to Part
15 of the FCC Rules.
These limits are designed to provide reasonable protection
against harmful interference in a residential installation.
This equipment generates, uses, and can radiate radio
frequency energy and, if not installed and used in
accordance with the instructions, may cause harmful
interference to radio communications.
However, there is no guarantee that interference will not
occur in a particular installation. If this equipment does
cause harmful interference to radio or television reception,
which can be determined by turning the equipment off and
on, the user is encouraged to try to correct the interference
by one of the following measures:
1. Reorient or relocate the receiving antenna.
2. Increase the separation between the equipment and
receiver.
3. Connect the equipment into an outlet on a circuit different
from that to which the receiver is connected.
4. Consult the dealer or an experienced adio/TV technician
for help.
5. FCC Caution: To assure continued compliance,
(example – use only shielded interface cables when
connecting to computer or peripheral devices). Any
changes or modifications not expressly approved by the
party responsible for compliance could void the user’s
authority to operate this equipment.
6. This device complies with Part 15 of the FCC Rules.
Operation is subject to the following two conditions: (1)
this device may not cause harmful interference, and (2)
this device must accept any interference received,
including interference that may cause undesired
operation.
7. This device complies with FCC radiation exposure limits
set forth for an uncontrolled environment. End users must
follow the specific operating instructions for satisfying RF
exposure compliance. This transmitter must not be
colocated or operating in conjunction with any other
antenna or transmitter.
15
EMC Tables
AViTA BPM64R is intended for use in the electromagnetic environment
specified below.
make sure that it is used in such an environment.
Guidance and manufacturer’s declaration - Electromagnetic emissions
Phenomenon
Conducted and
radiated RF
EMISSIONS
Harmonic
distortion
Voltage
fluctuations and
flickering
a) The equipment is suitable for use in Home Health Environments and
Professional Health Care Environments limited to patient rooms and
respiratory treatment facilities in hospital or clinics. The more restrictive
acceptance limits of Group 1 Class B (CISPR 11) have been considered and
applied. The equipment is suitable for use in the mentioned environments
when directly connected to the Public Mains Network.
b) The test is not applicable in this environment unless the ME EQUIPMENT
and ME SYSTEM used will be connected to the PUBLIC MAINS NETWORK
and the power input is otherwise within the scope of the Basic EMC
standard.
Guidance and manufacturer’s declaration - Electromagnetic immunity Enclosure port
ELECTROSTATIC
DISCHARGE
Radiated RF EM
fields
Proximity fields
from RF wireless
communications
equipment
RATED power
frequency
magnetic fields.
a) The equipment is suitable for use in Home Health Environments and
Professional Health Care Environments limited to patient rooms and
respiratory treatment facilities in hospital or clinics. The more restrictive
IMMUNITY acceptance limits have been considered and applied.
b) Before modulation is applied.
c) This test level assumes a minimum distance of at least 15 cm between
the ME EQUIPMENT or ME SYSTEM and sources of power frequency
magnetic fields.
The customer or the user of AViTA BPM64R must
Professional healthcare
facility environment a)
a) CISPR 11
Not applicable
Not applicable
standard or test
method
IEC 61000-4-2 ± 8kV contact
IEC 61000-4-3 a) 10 V/m b) 80MHz - 2.7
IEC 61000-4-3 COMPLIANT
IEC 61000-4-8 30 A/m c)
Immunity test levels Phenomenon Basic EMC
Professional
healthcare
facility
environment
± 2 kV, ±4kV ±, ±8 kV, ±15 kV air
NOTE: Further information about
distances to be maintained between
portable and mobile RF
communications equipment
(transmitters) and the AViTA BPM64R
can be requested from AViTA using the
contact information provided in this
manual. However, it is advisable to
keep the electromechanical aerosol
equipment at an adequate distance of,
at least, 0.5 m from mobile phones or
other RF communications transmitters
to minimise possible interference.
50 Hz or 60 Hz
HOME HEALTHCARE
ENVIRONMENT a)
Group 1 Class B
HOME HEALTHCARE
ENVIRONMENT
GHz 80% AM at 1kHz
16

Explanation of Symbols
Follow instructions for use
Disposal information: Should you wish to
dispose of the article, do so in accordance
with current regulations. Details are available
from your local authority
“ON/OFF” (push-push)
Type of protection of applied part against
electric shock, body floating
This product meets the basic safety and
essential performance requirements
indicated in the IP22 conditioning test
(protection against solid foreign objects of
12.5mm ∅ and greater and against
vertically falling water drops when enclosure
tiled up to 15°)
Temperature limits
Manufacturer’s name and address
SN YYMWWWXXXXX
SN: Product Serial Number
YY: year, M:month, WWW: working sheet,
XXXXX: serial no.
17
18
72-B64RMN-AV1
 Loading...